
:max_bytes(150000):strip_icc():format(webp)/snork-fa65ca350e2243e1a2deaf6bb7b209b1.jpg)
Step by Step to Crop Videos with CyberLink PowerDirector for 2024
Step by Step to Crop Videos with CyberLink PowerDirector
Video Editing is an art form dependent on various elements and factors that are part of your video; this means people, items, or objects in the background can often make or break the viewing experience.
Can you imagine having shot a scene with impeccable attention to detail, but a small uncontrollable action leaves a portion of an unwanted cable or equipment in the frame? Bummer, right? But luckily, due to the power of video editing software, it is not hard to deal with such problems.
A way to work with such clips is to use the crop function while editing, as it can help emphasize or detract attention from a particular part of any video project.
Author’s Note: While filming, try to capture footage in the highest resolution allowed by the available camera hardware; this will give you more room to play with while using the crop function.
To preface, CyberLink PowerDirector is a free video editing tool capable of accomplishing this and providing a professional touch to your video projects. And like other competing software, the program not only allows you to crop into clips but also uses keyframes to modify aspects like panning and zoom. So to help you perform this action, in this article, we list the steps you will need for cropping into video clips with PowerDirector. As an added bonus, we have also included the method to perform the same actions in WonderShare Filmora.
Note: We documented the steps in this guide with PowerDirector 365 and WonderShare Filmora X.
How to Crop Videos with CyberLink PowerDirector?
The idea of cropping into clips has always been an easy action to perform; once you have PowerDirector 365 open, follow the steps listed below.
If you do not already have CyberLink PowerDirector 365, download the software by visiting Cyberlink’s official website.
Step 1: Create a new video project in Cyberlink PowerDirector 365 by choosing Full Mode.

Note: Full Mode in Cyberlink PowerDirector 365 provides access to a full-featured video editing tool, similar to Wondershare Filmora. The other available options cater to distinct video types.
Step 2: Import media onto the Timeline from the Media Library; in this guide, we have gone ahead and used the pre-existing stock footage.

Step 3: Now, click on the video file on the Timeline; this will activate the video toolbar giving you access to the various controls built into PowerDirector 365. Hover over the tools open, following which you need to click on the Crop, Zoom, and Pan option.

Step 4: Pick either corner of the frame visible around the video and set the area you want the clip to focus upon; following this, click Save.

This action will crop the video clip according to your desired size.
Tip:
The activation of Keyframes while cropping will allow you to create an effect that slowly zooms into the footage. To do this, set Keyframe Point 1 at a specific time (say the fifth second) and at one zoom level (say zero) and create Keyframe Point 2 at another time (fifteenth second) and a different zoom level (say fifty). So, between the fifth second and fifteenth second, the zoom will steadily increase and raise emphasis on an object. You can also add an element of position to this action if you want the focus to be on something not in the center of the screen.
Definition: Keyframes while Video Editing is a software-based feature that allows you to set In and Out Points, giving clips between the two positions different properties that change as the playhead continues to move. These properties can be increased zoom, rotation, different colors, or even a gradual pan.
We recommend experimenting with this feature if you want to bring a more dynamic feeling to your video project.
An Easier Way to Crop Video with Wondershare Filmora
While Cyberlink PowerDirector 365 is a powerful video editing tool, in our experience, its menus are not as simple to navigate as some of the other competing video editing tools available, Wondershare Filmora Video Editor included.
An emphasis on quick accessibility is present with Filmora, and we believe this is a huge plus for beginning creators. The use of iconography resemblant to mobile software is another aspect that helps increase familiarity.
If you do not already have Wondershare Filmora, you can download the software by visiting the official website.
Now, to help you learn how to use the Crop Tool and to show you an example of what we mean, here is how you can use the feature Wondershare Filmora to get the desired output.
For Win 7 or later (64-bit)
For macOS 10.14 or later
Once you have the software open, follow the steps listed below.
Step 1: Import the Media File into your Video Project.

Step 2: Drag the clip onto the Timeline and then select it to activate further interactions.

Step 3: Choose the Crop Options (marked in Red) to open the Crop window.

Step 4: Pick any edge within the visible box and resize them to select the portion you want to keep in the clip.

Having read this bit of the guide, we believe you may have noticed how Filmora is more convenient due to the easier access it provides to the crop function.
The Bottom Line
So, at the end of the day, both software listed in this article are fully functional and highly-capable video editing tools, but saving time spent in front of the computer is a huge factor for any video editor.
And Wondershare Filmora does just that with its modern iconography and increased accessibility. With its thoughtful, less-frills approach, Filmora is the one to pick if you do not want to be bogged down by needless menus and have to hunt for actions that will help you create a video that you would want to watch yourself.
Note: Full Mode in Cyberlink PowerDirector 365 provides access to a full-featured video editing tool, similar to Wondershare Filmora. The other available options cater to distinct video types.
Step 2: Import media onto the Timeline from the Media Library; in this guide, we have gone ahead and used the pre-existing stock footage.
Step 3: Now, click on the video file on the Timeline; this will activate the video toolbar giving you access to the various controls built into PowerDirector 365. Hover over the tools open, following which you need to click on the Crop, Zoom, and Pan option.
Step 4: Pick either corner of the frame visible around the video and set the area you want the clip to focus upon; following this, click Save.
This action will crop the video clip according to your desired size.
Tip:
The activation of Keyframes while cropping will allow you to create an effect that slowly zooms into the footage. To do this, set Keyframe Point 1 at a specific time (say the fifth second) and at one zoom level (say zero) and create Keyframe Point 2 at another time (fifteenth second) and a different zoom level (say fifty). So, between the fifth second and fifteenth second, the zoom will steadily increase and raise emphasis on an object. You can also add an element of position to this action if you want the focus to be on something not in the center of the screen.
Definition: Keyframes while Video Editing is a software-based feature that allows you to set In and Out Points, giving clips between the two positions different properties that change as the playhead continues to move. These properties can be increased zoom, rotation, different colors, or even a gradual pan.
We recommend experimenting with this feature if you want to bring a more dynamic feeling to your video project.
An Easier Way to Crop Video with Wondershare Filmora
While Cyberlink PowerDirector 365 is a powerful video editing tool, in our experience, its menus are not as simple to navigate as some of the other competing video editing tools available, Wondershare Filmora Video Editor included.
An emphasis on quick accessibility is present with Filmora, and we believe this is a huge plus for beginning creators. The use of iconography resemblant to mobile software is another aspect that helps increase familiarity.
If you do not already have Wondershare Filmora, you can download the software by visiting the official website.
Now, to help you learn how to use the Crop Tool and to show you an example of what we mean, here is how you can use the feature Wondershare Filmora to get the desired output.
For Win 7 or later (64-bit)
For macOS 10.14 or later
Once you have the software open, follow the steps listed below.
Step 1: Import the Media File into your Video Project.
Step 2: Drag the clip onto the Timeline and then select it to activate further interactions.
Step 3: Choose the Crop Options (marked in Red) to open the Crop window.
Step 4: Pick any edge within the visible box and resize them to select the portion you want to keep in the clip.
Having read this bit of the guide, we believe you may have noticed how Filmora is more convenient due to the easier access it provides to the crop function.
The Bottom Line
So, at the end of the day, both software listed in this article are fully functional and highly-capable video editing tools, but saving time spent in front of the computer is a huge factor for any video editor.
And Wondershare Filmora does just that with its modern iconography and increased accessibility. With its thoughtful, less-frills approach, Filmora is the one to pick if you do not want to be bogged down by needless menus and have to hunt for actions that will help you create a video that you would want to watch yourself.
Best Ever Ways Make Tiktok Slideshow [Solved]
Best Ever Ways Make Tiktok Slideshow [Solved] 2022
An easy yet powerful editor
Numerous effects to choose from
Detailed tutorials provided by the official channel
Tiktok is the most amazing and popular social media platform because it has stunning features. It is used by many people like social media influencer to common man. Tiktok helps the content creator in making them and their content viral. It is used for gaining followers and becoming popular.
In this article
01 [How to Make Tiktok Photo Slideshow Faster](#Part 1)
02 [Five Recommended Tiktok Slideshow Effects](#Part 2)
03 [How to Adjust Sound on Tiktok Slideshow](#Part 3)
04 [FAQ of Making Tiktok Slideshow](#Part 4)
Part 1 How To Make Tiktok Photo Slideshow Faster?
01How can you make fast slideshow of pictures on Tiktok 2022?
Do you want to create fast slideshow of pictures on Tiktok? Here is the step by step process to make a fast slideshow of pictures:
Step 1: Open the Tiktok app
Click on the Tiktok logo in your device to open Tiktok app.

Step 2: Click on plus icon.
Now, you will start seeing the videos from “Following” or “For you” on your Home Screen.
Click on the “+” Plus icon in the bottom of the screen.

Step 3: Click on templates
On the right side of “Red Shoot Button” you will see template option, click on templates.

Step 4: Select Template
After clicking on the “Template” option, you will see photo and videos from the gallery on your device. Tap on images to select images.

Step 5: Select Images from your gallery
Tap on the “Radio Button” to select images, you can also choose videos if you want.
To explore all the images on your gallery, you can click on the swipe up or drop down menu.

Step 6: Click on OK Button
When you are done selecting all images from the gallery, at the bottom right you see the OK button. To proceed, click on the OK button.

Step 7: Edit the Slideshow Video
Now you can see a slideshow photo video of the images which you have selected. Now, you can edit the video: you can change the sound, add different effects and add text or any stickers to your slideshow video.

Step 8: Click on Next Button
After completing your photo video slideshow, click on the Next button.
Step 9: Click on the Post button
After clicking on the Next button now you will see two options, Drafts and Post button.
● Drafts: If you don’t want to post the video then add #hashtags, mention your friend name and click on the drafts button.
● Posts: If you want to post the video then add #hashtags, mention your friends and click on post button to publish.

Step 10: Done
You have successfully completed making a fast photo video slideshow.
02How can you make tiktok slideshow faster in 2022?
To faster tiktok photo slideshow follow the given steps:
● Go to Play Store or App Store.
● Search for “Video Speed” Application on your device.
● Download any app, from the search list.
● Open the app and select your Tiktok video for editing.
● Edit the video from the instructions which are given on-screen.
● Download it for free on your device.
● Add it on Tiktok to share.
So, these were the given steps from which you can make your photo slideshow faster.
Part 2 Five Recommended Tiktok Slideshow Effects
01Bling Effect on Tiktok
If you use Tiktok actively then you must have seen the Bling Effect as they look glittery and conspicuous. If you are not aware about the Bling effect on Tiktok, it is an effect which gives sparkly look. Bling Effect works better on videos which emit light. Things that emit light are jewellery, LED lights, glasses etc.

Make sure that your Tiktok is updated with the latest version to get the Bling Effect. Then follow the given steps:
● Open Tiktok on your device and click on the “+” icon to add a new video.
● Click on the “Effects” button at the bottom left side and then open the “Trending” tab of Tiktok effect.
● Keep scrolling until you do not get the Bling effect icon.
● When you get the Bling effect tap to download it, and after that it’s ready to use.
● To add an effect in your favourites, click on the white Bookmark which is given while the Bling effect is alive.
Now, you can use the Bling effect while recording your videos.
02Face Zoom Effect on Tiktok
The Face Zoom Effect is what it sounds like; it’s an effect on Tiktok which is used to automatically zoom the camera on your face. Face Zoom effect can make your videos stand out from other people videos. If you use the Face Zoom effect and hold on to the camera up to your face and pull your phone back slowly, your face will look totally different.

Here are the steps to get the Face Zoom Effect on Tiktok:
● Open the Tiktok on your device.
● Tap on the “+” button on the home screen.
● Then you will see the “Effects” section, click on it.
● In the Effects section you will see various other filters also.
● Keep searching for it and when you get it, select it.
● Now, you can make videos and publish them**.**
03Face Morph Effect on Tiktok
Face Morph Filter is which morphs 2 pictures and make transitions to the pictures at that time. When you use this filter, you can see that it make changes but still you have the same face. Your face remains the same but the transitions look very even and amazing.

Follow the given steps to use the Face Morph Effect:
● Open the Tiktok app on your device.
● Click on the “+” icon at the bottom of the screen.
● Scroll on the right side on the Templates.
● Keep scrolling until you get the Morph Effect.
● Click to select photos.
● Select at least 5 photos from your camera roll.
● Click OK at the bottom right corner
● Now edit and publish your Tiktok.
04 Beauty Effects
Beauty effects are used to beautify your face and changes you into completely different person. If you don’t want to wear makeup just to record one video, in that case you can use this effect. Basically it completely changes your overall appearance.

Steps to follow to use beauty effects:
● Open Tiktok app on your device.
● Click on the “+” button at the bottom- center of the screen.
● Click on the “Effects” section.
● Keep searching for “Beauty Effect” and after that select it.
● Now, you can record your video and publish them.
05Green Effect
Green effects allow you to change the background of any image or you can also add any video to your background of your choice. With the help of Green Screen, users have been able to film their videos wherever they want.

● Open Tiktok application.
● On the bottom center, click on the “+” icon.
● On the bottom left corner, click on “effects”.
● Click on the “Green Screen” from the Effects menu.
● Select Green Screen effect.
● Now you can film videos using Green Screen.
Part 3 How To Adjust Sound On Tiktok Slideshow
Once you have selected the sound, you may need to do some adjustments.
To edit which part of the song you are using:
● Click on the “Trim” button given at the right side of the screen.
● Drag the cursor to adjust which part of the song you want your video to begin at.
● Click on the checkmark to confirm.
To edit the volume of the sound:
● Once you have completed filming your video, in the bottom left corner click on the sounds button.
● Click the “volume” tab and use the cursor to adjust how much loud the sound is compared to the original audio.
● Click on the screen again to confirm.
These were the steps for adjusting sound, the way you want to customize it.
Part 4 FAQ’S of making Tiktok Slideshow
Q1. How can you trim the audio on a Tiktok Sideshow?
A. To trim sound on a Tiktok slideshow, first add a sound to a Tiktok slideshow, click on the ‘Trim” button at the right side of the screen. Then drag the cursor to select which part of the audio you want for your video. Listen to the sound after trimming. If you liked the trimmed song, tap to the next button to add it in your Tiktok slideshow.
Q2. How can you add text to the Tiktok slideshow?
A. Steps to add text to your Tiktok slideshow:
● Open Tiktok app.
● Click on the “+” icon.
● Click on upload.
● Select an image from your gallery.
● Click on the “Next” button.
● Now click on the “Text” to add text.
● After that type the text.
● Choose any font or color of your choice.
● Tap on the “Done “button”.
● Now your video is ready to publish.
Q3. How can we add music to slideshow videos on Tiktok?
A. Yes you can add music to your slideshow video. Before posting it you will find the edit option.
When you select images from your gallery > click next > click on the sound option > choose music from sounds and add it to your slideshow video.
Q4. How many images can you add to a Tiktok slideshow?
A. Select the images to add to the slideshow. You can also add videos to your slideshow from the videos section. Keep in mind that the images you are selecting are in perfect order as you want to see them appear in a slideshow. You can add up to 35 images and videos.
Q5. What are the best recommended slideshow effects on Tiktok?
A. There are a lot of effects on Tiktok but here are some best slideshow effects of Tiktok like Green Screen, Spilt Screen, Face Zoom effect, Bling effect, Trio effect, Beauty effect, Long Face effect, Trisection effect and Face Morph effect.
Tiktok is a great choice for making photo video slideshow but if you want to try something new you can consider using Wondershare Filmora Video Editor . As it have amazing transitions and its own music gallery, it allows you to record your own voiceover. Filmora allows you to make engaging slideshow using different features automatically or manually. It has voice removal, audio mixer, and video stabilization features that add to the output. The 4K editing feature allows you to export the video of resolution of up to 4K.
For Win 7 or later (64-bit)
For macOS 10.12 or later
● Ending Thoughts →
● Tiktok is an amazing and popular social media platform which allows you to create your own content and with the help of this platform your content can reach a wide range of people.
● You can make an attractive photo slideshow with the help of Tiktok because it has amazing features like different effects, and you can also add text and sound to it.
● Tiktok is a great choice but you can also consider an alternate option like, Filmora as you can create your slideshow with its amazing features.
Tiktok is the most amazing and popular social media platform because it has stunning features. It is used by many people like social media influencer to common man. Tiktok helps the content creator in making them and their content viral. It is used for gaining followers and becoming popular.
In this article
01 [How to Make Tiktok Photo Slideshow Faster](#Part 1)
02 [Five Recommended Tiktok Slideshow Effects](#Part 2)
03 [How to Adjust Sound on Tiktok Slideshow](#Part 3)
04 [FAQ of Making Tiktok Slideshow](#Part 4)
Part 1 How To Make Tiktok Photo Slideshow Faster?
01How can you make fast slideshow of pictures on Tiktok 2022?
Do you want to create fast slideshow of pictures on Tiktok? Here is the step by step process to make a fast slideshow of pictures:
Step 1: Open the Tiktok app
Click on the Tiktok logo in your device to open Tiktok app.
Step 2: Click on plus icon.
Now, you will start seeing the videos from “Following” or “For you” on your Home Screen.
Click on the “+” Plus icon in the bottom of the screen.
Step 3: Click on templates
On the right side of “Red Shoot Button” you will see template option, click on templates.
Step 4: Select Template
After clicking on the “Template” option, you will see photo and videos from the gallery on your device. Tap on images to select images.
Step 5: Select Images from your gallery
Tap on the “Radio Button” to select images, you can also choose videos if you want.
To explore all the images on your gallery, you can click on the swipe up or drop down menu.
Step 6: Click on OK Button
When you are done selecting all images from the gallery, at the bottom right you see the OK button. To proceed, click on the OK button.
Step 7: Edit the Slideshow Video
Now you can see a slideshow photo video of the images which you have selected. Now, you can edit the video: you can change the sound, add different effects and add text or any stickers to your slideshow video.
Step 8: Click on Next Button
After completing your photo video slideshow, click on the Next button.
Step 9: Click on the Post button
After clicking on the Next button now you will see two options, Drafts and Post button.
● Drafts: If you don’t want to post the video then add #hashtags, mention your friend name and click on the drafts button.
● Posts: If you want to post the video then add #hashtags, mention your friends and click on post button to publish.
Step 10: Done
You have successfully completed making a fast photo video slideshow.
02How can you make tiktok slideshow faster in 2022?
To faster tiktok photo slideshow follow the given steps:
● Go to Play Store or App Store.
● Search for “Video Speed” Application on your device.
● Download any app, from the search list.
● Open the app and select your Tiktok video for editing.
● Edit the video from the instructions which are given on-screen.
● Download it for free on your device.
● Add it on Tiktok to share.
So, these were the given steps from which you can make your photo slideshow faster.
Part 2 Five Recommended Tiktok Slideshow Effects
01Bling Effect on Tiktok
If you use Tiktok actively then you must have seen the Bling Effect as they look glittery and conspicuous. If you are not aware about the Bling effect on Tiktok, it is an effect which gives sparkly look. Bling Effect works better on videos which emit light. Things that emit light are jewellery, LED lights, glasses etc.
Make sure that your Tiktok is updated with the latest version to get the Bling Effect. Then follow the given steps:
● Open Tiktok on your device and click on the “+” icon to add a new video.
● Click on the “Effects” button at the bottom left side and then open the “Trending” tab of Tiktok effect.
● Keep scrolling until you do not get the Bling effect icon.
● When you get the Bling effect tap to download it, and after that it’s ready to use.
● To add an effect in your favourites, click on the white Bookmark which is given while the Bling effect is alive.
Now, you can use the Bling effect while recording your videos.
02Face Zoom Effect on Tiktok
The Face Zoom Effect is what it sounds like; it’s an effect on Tiktok which is used to automatically zoom the camera on your face. Face Zoom effect can make your videos stand out from other people videos. If you use the Face Zoom effect and hold on to the camera up to your face and pull your phone back slowly, your face will look totally different.
Here are the steps to get the Face Zoom Effect on Tiktok:
● Open the Tiktok on your device.
● Tap on the “+” button on the home screen.
● Then you will see the “Effects” section, click on it.
● In the Effects section you will see various other filters also.
● Keep searching for it and when you get it, select it.
● Now, you can make videos and publish them**.**
03Face Morph Effect on Tiktok
Face Morph Filter is which morphs 2 pictures and make transitions to the pictures at that time. When you use this filter, you can see that it make changes but still you have the same face. Your face remains the same but the transitions look very even and amazing.
Follow the given steps to use the Face Morph Effect:
● Open the Tiktok app on your device.
● Click on the “+” icon at the bottom of the screen.
● Scroll on the right side on the Templates.
● Keep scrolling until you get the Morph Effect.
● Click to select photos.
● Select at least 5 photos from your camera roll.
● Click OK at the bottom right corner
● Now edit and publish your Tiktok.
04 Beauty Effects
Beauty effects are used to beautify your face and changes you into completely different person. If you don’t want to wear makeup just to record one video, in that case you can use this effect. Basically it completely changes your overall appearance.
Steps to follow to use beauty effects:
● Open Tiktok app on your device.
● Click on the “+” button at the bottom- center of the screen.
● Click on the “Effects” section.
● Keep searching for “Beauty Effect” and after that select it.
● Now, you can record your video and publish them.
05Green Effect
Green effects allow you to change the background of any image or you can also add any video to your background of your choice. With the help of Green Screen, users have been able to film their videos wherever they want.
● Open Tiktok application.
● On the bottom center, click on the “+” icon.
● On the bottom left corner, click on “effects”.
● Click on the “Green Screen” from the Effects menu.
● Select Green Screen effect.
● Now you can film videos using Green Screen.
Part 3 How To Adjust Sound On Tiktok Slideshow
Once you have selected the sound, you may need to do some adjustments.
To edit which part of the song you are using:
● Click on the “Trim” button given at the right side of the screen.
● Drag the cursor to adjust which part of the song you want your video to begin at.
● Click on the checkmark to confirm.
To edit the volume of the sound:
● Once you have completed filming your video, in the bottom left corner click on the sounds button.
● Click the “volume” tab and use the cursor to adjust how much loud the sound is compared to the original audio.
● Click on the screen again to confirm.
These were the steps for adjusting sound, the way you want to customize it.
Part 4 FAQ’S of making Tiktok Slideshow
Q1. How can you trim the audio on a Tiktok Sideshow?
A. To trim sound on a Tiktok slideshow, first add a sound to a Tiktok slideshow, click on the ‘Trim” button at the right side of the screen. Then drag the cursor to select which part of the audio you want for your video. Listen to the sound after trimming. If you liked the trimmed song, tap to the next button to add it in your Tiktok slideshow.
Q2. How can you add text to the Tiktok slideshow?
A. Steps to add text to your Tiktok slideshow:
● Open Tiktok app.
● Click on the “+” icon.
● Click on upload.
● Select an image from your gallery.
● Click on the “Next” button.
● Now click on the “Text” to add text.
● After that type the text.
● Choose any font or color of your choice.
● Tap on the “Done “button”.
● Now your video is ready to publish.
Q3. How can we add music to slideshow videos on Tiktok?
A. Yes you can add music to your slideshow video. Before posting it you will find the edit option.
When you select images from your gallery > click next > click on the sound option > choose music from sounds and add it to your slideshow video.
Q4. How many images can you add to a Tiktok slideshow?
A. Select the images to add to the slideshow. You can also add videos to your slideshow from the videos section. Keep in mind that the images you are selecting are in perfect order as you want to see them appear in a slideshow. You can add up to 35 images and videos.
Q5. What are the best recommended slideshow effects on Tiktok?
A. There are a lot of effects on Tiktok but here are some best slideshow effects of Tiktok like Green Screen, Spilt Screen, Face Zoom effect, Bling effect, Trio effect, Beauty effect, Long Face effect, Trisection effect and Face Morph effect.
Tiktok is a great choice for making photo video slideshow but if you want to try something new you can consider using Wondershare Filmora Video Editor . As it have amazing transitions and its own music gallery, it allows you to record your own voiceover. Filmora allows you to make engaging slideshow using different features automatically or manually. It has voice removal, audio mixer, and video stabilization features that add to the output. The 4K editing feature allows you to export the video of resolution of up to 4K.
For Win 7 or later (64-bit)
For macOS 10.12 or later
● Ending Thoughts →
● Tiktok is an amazing and popular social media platform which allows you to create your own content and with the help of this platform your content can reach a wide range of people.
● You can make an attractive photo slideshow with the help of Tiktok because it has amazing features like different effects, and you can also add text and sound to it.
● Tiktok is a great choice but you can also consider an alternate option like, Filmora as you can create your slideshow with its amazing features.
Trailer Guide for Creators and Developers
Trailers are a popular means to showcase a product you are about to release to the market. Teasers and trailers are traditionally created for movies, but have eventually evolved to include book trailers, game trailers, and app trailers. In this article, we will explain the key details of a trailer, highlight some examples, and show you how to create an effective trailer.
Part 1. What is a Trailer?
A trailer is a type of video commercial advertisement made to advertise and inform audiences about a specific program or item. To persuade customers to view or use the product, it includes a brief series of previews of the entire material. It also serves as a means of creating anticipation for a show or product that is about to hit the market.

Trailers were originally made for cinema movies. Nowadays, trailers are created for different forms of media like shows, apps, programs, video games, and book videos. A typical traditional trailer lasts between 1 to 3 minutes.
Part 2. What Are the Similarities and Differences Between a Teaser and Trailer?
Teasers and trailers can often be confused with each other. After all, they pretty much have the same objective.
Both are created for the purpose of advertising an upcoming show, product, or service. Teasers and trailers are similarly shown to audiences prior to the release of the thing they are advertising. They are meant to show a small portion of the full experience to create curiosity and excitement towards a targeted market. Both videos are typically short in length - taking up only a maximum of 3 minutes in duration.

The differences between them lie in their content, timeline, and duration. A teaser is much shorter than a trailer - the former runs for only 20-30 seconds while the latter can go between 1-3 minutes in length. This is because teasers are typically made before or during the production process of a movie or feature, whilst trailers are commonly made at the end.
For films, movies, and shows, teasers generally capture only a single part of that media. It focuses on the most intense or impactful scene. Trailers are formed from a series of clips depicting striking scenes derived from the beginning, middle, and end of the show. These scenes are normally arranged in a nonlinear structure, allowing viewers to have a general understanding of the story without revealing the entirety of the plot.
Part 3. Examples of good trailers
An excellent trailer is one who can effectively attract and maintain the audience’s attention. It satisfies its objective of showcasing striking and captivating pieces of the main product and entices viewers to experience its entirety. Here are some examples of trailers who have well fulfilled the criteria of a good trailer.
1. The Suicide Squad
The Suicide Squad is a fresh take featuring DC’s anti-heroes assemble in a single chaotic and unconventional team. James Gunn’s iteration on these characters is brought to life in the trailer with a majestic cast including John Cena, Idris Elba, Margot Robbie, and David Dastmalchian. Several key scenes are shown, highlighting its standout characters in the process while portraying the movie’s setting.
2. Raya and the Last Dragon
The trailer starts out innocently and comes with an adorable and surprising twist. The brief 2-minute trailer is packed with relevant scenes that depict the character’s quest without revealing too much. Many action-packed scenes and emotional interactions are satisfactorily squeezed into the trailer. Excitement builds further with Tamara Bubble’s “I’m That Good” playing in the background on the last minute of the video.
3. Men (2022)
Ingenious combination of sound effects and background music play a distinct role in this 2022 trailer. The female lead’s voice echoing from a tunnel, the haunting piano keys gradually building up the suspense, and the common but cleverly used horror audio effects create a chilling ensemble of haunting scenes in the movie. The sounds gradually rise up as more aggressive and energized scenes flash on the screen, and eventually end back into the sombre intro that leaves the audience with questions.
4. The Farewell
Lulu Wang’s dramatic comedy The Farewell is all about a family hiding the truth of a family member’s terminal illness from the person herself. What makes the trailer special is that it steers away from the sad, melancholic direction and veers toward a feel-good movie vibe. The conflict, struggle, and the beliefs featured in the movie are depicted in the trailer. However, the clever placement of interactions and the uplifting music tug at the audience’s heartstrings and urge them to want to see more.
5. Pokémon Go
Pokémon has become a culture to several generations. Becoming a Pokémon trainer is a secret dream that almost all of us have, even as adults. Niantic’s collaboration with the Pokémon franchise brings people closer to that reality by introducing its AR and location-powered app Pokémon Go. The trailer shows people of all ages living out their trainer dreams in the real world and interacting with Pokémon. The different features of the game are dramatized in a real-life setting, inciting more excitement, and pulling out the nostalgia from its market. The trailer keeps the actual app showcase to a minimum, instead focusing on once again selling that dream to audiences and bringing out the inner child in everyone.
Part 4. How to bring your trailer to the next level?
While it may seem intimidating to create a trailer for your upcoming product, there is no need to worry. It is now easier than ever to create a well-crafted trailer by taking advantage of a program’s tools and templates.
- Stock media
Filmora makes it easy to craft a trailer with only a few clicks. Make use of the program’s media library to gain access to a wealth of resources like stock photos, videos, music, and audio files.
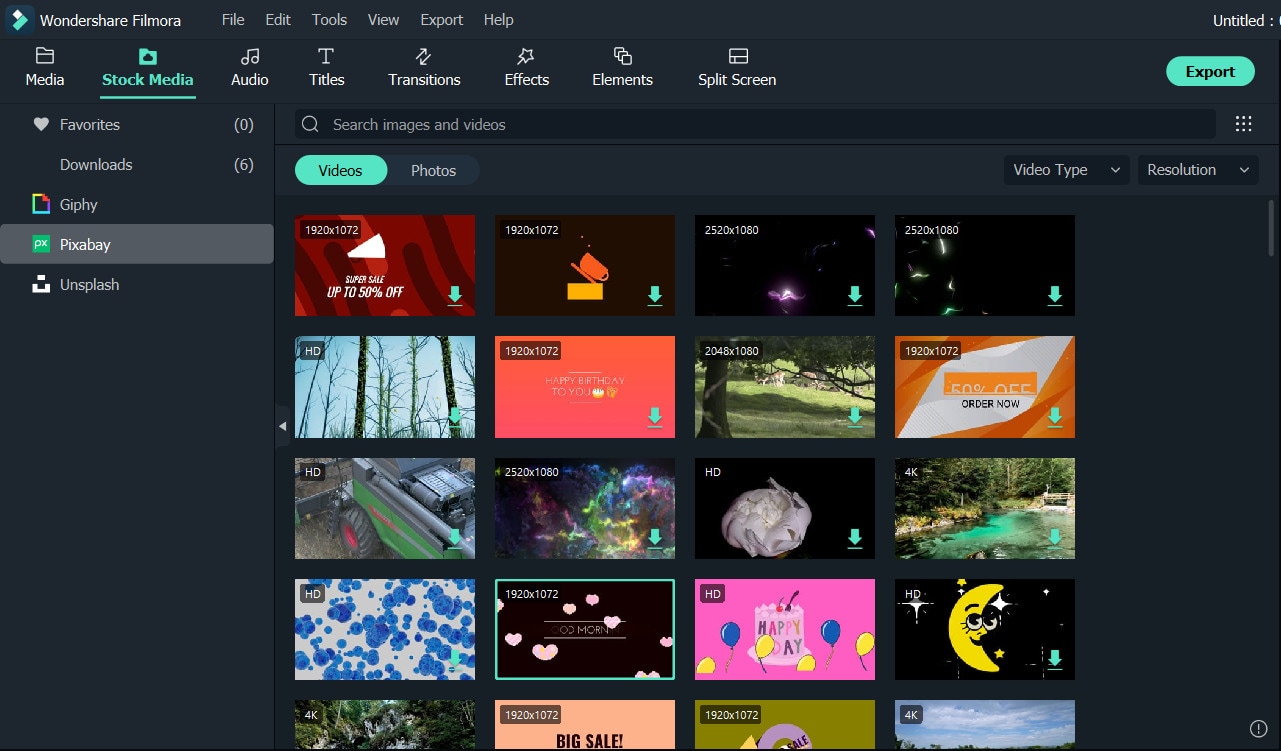
- Keyframing
Keyframing lets you smoothly transition from one scene to another, making it an effective tool for trailers. It is particularly appealing for shows that highlight motion like sports, dancing, and action. Experiment with more than 80 preset templates and create smooth scene transitions with ease.
- Speed Ramping
Speed Ramping is a feature that works perfectly with keyframing. Increase the energy and dynamics in your trailer with 6 preset speed types. You can also customize these templates. There is also no need for concern about the audio - Filmora lets you maintain the audio pitch even when using these features.
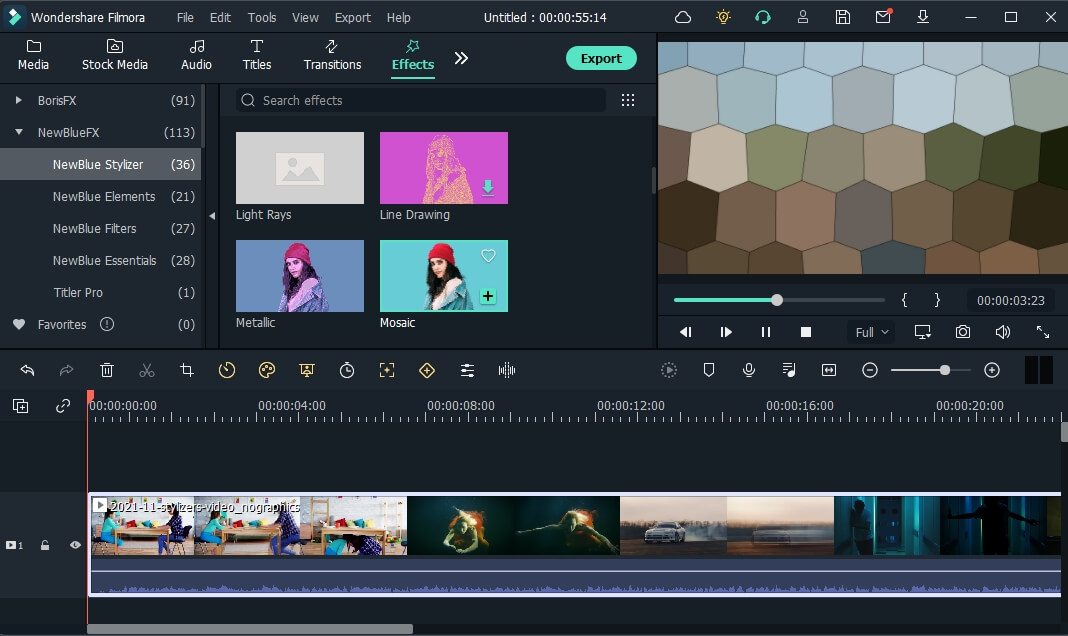
- FX Effects
The program also offers many effects and filters for an extra element in your trailer. The Borix FX is an example of that. Designed in collaboration with the award-winning developer of the same name, Boris FX and its extension Continuum features a wide array of tasteful effects for your convenience. There are over 91 customizable and adjustable presets including types like blurs, stylization, and lights. NewBlue is another option that carries choices of filters, titlers, and stylizers.
Filmora offers different features, tools, and effects to explore that can help make your trailer editing objectives easier and more convenient. Save time and resources by taking advantage of its powerful yet easy-to-use tools.
Free Download For Win 7 or later(64-bit)
Free Download For macOS 10.14 or later
2. Raya and the Last Dragon
The trailer starts out innocently and comes with an adorable and surprising twist. The brief 2-minute trailer is packed with relevant scenes that depict the character’s quest without revealing too much. Many action-packed scenes and emotional interactions are satisfactorily squeezed into the trailer. Excitement builds further with Tamara Bubble’s “I’m That Good” playing in the background on the last minute of the video.
3. Men (2022)
Ingenious combination of sound effects and background music play a distinct role in this 2022 trailer. The female lead’s voice echoing from a tunnel, the haunting piano keys gradually building up the suspense, and the common but cleverly used horror audio effects create a chilling ensemble of haunting scenes in the movie. The sounds gradually rise up as more aggressive and energized scenes flash on the screen, and eventually end back into the sombre intro that leaves the audience with questions.
4. The Farewell
Lulu Wang’s dramatic comedy The Farewell is all about a family hiding the truth of a family member’s terminal illness from the person herself. What makes the trailer special is that it steers away from the sad, melancholic direction and veers toward a feel-good movie vibe. The conflict, struggle, and the beliefs featured in the movie are depicted in the trailer. However, the clever placement of interactions and the uplifting music tug at the audience’s heartstrings and urge them to want to see more.
5. Pokémon Go
Pokémon has become a culture to several generations. Becoming a Pokémon trainer is a secret dream that almost all of us have, even as adults. Niantic’s collaboration with the Pokémon franchise brings people closer to that reality by introducing its AR and location-powered app Pokémon Go. The trailer shows people of all ages living out their trainer dreams in the real world and interacting with Pokémon. The different features of the game are dramatized in a real-life setting, inciting more excitement, and pulling out the nostalgia from its market. The trailer keeps the actual app showcase to a minimum, instead focusing on once again selling that dream to audiences and bringing out the inner child in everyone.
Part 4. How to bring your trailer to the next level?
While it may seem intimidating to create a trailer for your upcoming product, there is no need to worry. It is now easier than ever to create a well-crafted trailer by taking advantage of a program’s tools and templates.
- Stock media
Filmora makes it easy to craft a trailer with only a few clicks. Make use of the program’s media library to gain access to a wealth of resources like stock photos, videos, music, and audio files.
- Keyframing
Keyframing lets you smoothly transition from one scene to another, making it an effective tool for trailers. It is particularly appealing for shows that highlight motion like sports, dancing, and action. Experiment with more than 80 preset templates and create smooth scene transitions with ease.
- Speed Ramping
Speed Ramping is a feature that works perfectly with keyframing. Increase the energy and dynamics in your trailer with 6 preset speed types. You can also customize these templates. There is also no need for concern about the audio - Filmora lets you maintain the audio pitch even when using these features.
- FX Effects
The program also offers many effects and filters for an extra element in your trailer. The Borix FX is an example of that. Designed in collaboration with the award-winning developer of the same name, Boris FX and its extension Continuum features a wide array of tasteful effects for your convenience. There are over 91 customizable and adjustable presets including types like blurs, stylization, and lights. NewBlue is another option that carries choices of filters, titlers, and stylizers.
Filmora offers different features, tools, and effects to explore that can help make your trailer editing objectives easier and more convenient. Save time and resources by taking advantage of its powerful yet easy-to-use tools.
Free Download For Win 7 or later(64-bit)
Free Download For macOS 10.14 or later
How to Make an Instant Slideshow on Mac
How to Create an Instant Slideshow on Mac
An easy yet powerful editor
Numerous effects to choose from
Detailed tutorials provided by the official channel
Instant slideshows on Mac devices are elusive graphic elements to creatively convey your information to the target audience. Stay here to have a complete knowhow of the design process!
In this article
01 [How to Create a Slideshow in Photos on Mac](#Part 1)
02 [How to Create a Slideshow in Video on Mac](#Part 2)
03 [How to Make a Slideshow on Mac in Preview](#Part 3)
04 [How to Create Slideshows Online](#Part 4)
05 [FAQs About Slideshows on Mac](#Part 5)
Part 1 How to Create a Slideshow in Photos on Mac
Creating a slideshow is an intuitive exploration of your graphic design skills, either just for a fun-filled entertainment, or catering to some specific information delivery on the professional front. When aiming to create Mac photos slideshow presentations, you can affordably pick any of your preferred devices and a suitable slideshow creator tool.
Speaking in the light of the fact, it is an equally amazing experience to design exemplary movies and presentations for a slide show MacBook, thanks to the high end technical abilities of such devices that work together to facilitate a remarkable and classic slideshow output. Having said that, let us proceed with discussing about the process of creating slideshow Mac presentations in the ‘Photos’ app of a Mac supported device in the following section:
User’s Guide to Create a Slideshow in the Photos App of a Mac Device
Step 1: Launch the App
Open the apps gallery of your Mac device and navigate to the ‘Photos’ app. Launch the same to be greeted by the latter’s welcome screen. Next, head to the sidebar in the left and hit the ‘Library’ option under the ‘Photos’ tab.

Step 2: Select Your Images
Within the ‘Library’ tab, hit the ‘Days’ or ‘All Photos’ subcategory to choose the desired images and videos that you wish to include in your presentation to create slideshow on Mac.

Step 3: View the Presentation
The ‘Photos’ app has a feature to automatically transform your selections in the previous step into an impressive slideshow. You can take a look at the created Mac photo slideshow by navigating to the ‘Menu Bar’ at the top of the app screen and hitting the ‘File’ tab, followed by selecting the ‘Play Slideshow’ option from the dropdown menu that appears next.

Step 4: Customize Your Slideshow
Completion of Step 3 causes a customization window to pop up, where you can select a vibrant theme and background music for your presentation. Once you have made your choices, you can visualize their appearance in the ‘Preview’ window at the right side of the screen.
About the selection of background music, you can either choose an audio track from the in-built music app of your iPad, or go with the inline complementary music of the presentation theme that you have already selected.

Step 5: It’s Time to Play!
When everything seems fine and you are satisfied with your efforts, head to the ‘File’ tab again and select the ‘Play Slideshow’ from the list of options that drops down to start your MacBook Photos slideshow. Once the slideshow begins to run, you can use the ‘Arrow Keys’ on your device to navigate forward and backward within the presentation, or press the ‘Spacebar’ to pause/resume the slideshow. If you want to stop playing the slideshow, press either of the ‘Escape’ or ‘X’ keys on your system’s keyboard.

Part 2 How to Create a Slideshow in Video on Mac
While image centered slideshows add life to still photos, video editions of the same are highly effective in integrating motion with visual excellence. Creating a slideshow on Mac is easy enough. However, if you wish to design elusive video presentations on the device, it is no difficult either. Having understood the credibility and design process of still presentations, let us move ahead with getting an insight into crafting classic masterpieces of video slideshows on a Mac device in what follows next:
User’s Guide to Create a Video Slideshow in a Mac Device
Step 1: Download and Install a Suitable Video Editor Application
Browsing the IT market, you can easily pick your preferred Mac compatible video editing software to address the concern of how to make a slideshow on Mac. As of now, let us try hands at understanding the creation process through the Movavi Slideshow Maker application.
Start with navigating to and downloading the Movavi Slideshow Maker software from the latter’s official website. Having done that, proceed to install the program in your Mac device by following the on screen instructions to run the installation files.
Step 2: Select a Working Mode
After a successful installation of the program, proceed to launch it in your Mac device and wait for the app’s welcome screen to appear. Choosing the Movavi Slideshow Maker program for creating Mac slideshow presentations, you are allowed to work in 2 different creation modes.
If you wish to explicitly convert still images into stunning slideshows, select the ‘Slideshow Wizard’ mode. On the contrary, if you have a task of designing a high end, professional presentation with a series of elements, prefer choosing the ‘Create a Movie in Manual Mode’ option.
Having talked enough about how to create slideshow presentations with images on a Mac device in the previous section, let us now dive into making a classic video presentation on the same, in what follows next. As already stated; select ‘Create a Movie in Manual Mode’ from the software’s main interface to begin with the creation process.

Step 3: Import Media Files
Browse through the local media gallery on your Mac device to select the required image and video files that you wish to create the slideshow presentation from. To do this, navigate to the ‘Elements Panel’ at the left and hit the ‘Import’ tab, followed by clicking on the ‘Add Files’ option in the software’s editor timeline and navigate through your locally saved media files.
When you have selected everything, your choices will automatically appear in the app’s editing workspace. You can alternatively, prefer dragging and dropping the associated files directly to the software timeline.

Step 4: Include Transitions
Adding a suitable transition effect gives the perfect flow to your presentation, while eliminating distortions in between successive slides. To supplement your slideshow with the same, navigate to the ‘Elements Panel’ at the left of the editor timeline and hit the ‘Transitions’ tab. You can choose any preferred transition style from the variety of available options in line with the theme of your presentation.
When you have made your choice, drag the same in between the desired pair of consecutive slides within the editor workspace. If you require supplementing all the presentation slides with a particular transition effect, click on the icon beside the ‘Transitions’ tab to automatically add a selected transition effect to all the slides together.

Step 5: Add an Upbeat Background Music
To add a preferred background audio, head to the ‘Import’ tab in the left side ‘Elements Panel’ and click on the same to see the ‘Add Files’ option. Here, you can traverse through your device’s media gallery and select a desired soundtrack. Click on the track’s thumbnail to automatically include it within the ‘Audio Track’ of the software timeline.

Step 6: Include Titles and Captions
To add text customizations within your presentations, head to the ‘Elements Panel’ at the left and hit the ‘Titles’ tab to open the program’s preset title options. You can select any suitable annotation for your slideshow, followed by dragging and dropping the same to the editor workspace to include it in the presentation.

You can customize the added title by double clicking on the same, either in the ‘Preview’ window above the editor timeline, or within the timeline itself. Next, double click within the text box in the ‘Preview’ window to type the desired text for including it into the slideshow.
To adjust text parameters like, size, font, color of the added title, double click on the same within the program’s timeline to open the title customization interface in the ‘Preview’ window, where you get the liberty to make desired modifications in the preset parameter values. When you have made the required changes, hit ‘Apply’ to confirm them.

Step 7: Export Your Slideshow
When you are satisfied with your efforts till here, proceed to save the presentation by navigating to and hitting the ‘Export’ tab at the right side of the editor workspace. This will direct you to the slideshow export interface, where you can choose from a variety of file saving options according to your specific needs.

Click on ‘Save Video File’ to add the presentation to your device’s local media gallery, or hit the ‘Save for Devices’ option to preserve your creation for an external device export. For a direct export of the slideshow to your ‘YouTube’ channel, click on ‘Upload to YouTube’, or choose to save the presentation in any of the MP4, OGV and WebM media file formats for an online sharing purpose. Once you are done with making all the selections and adjustments, head to and tap the ‘Start’ button.

Part 3 How to Make a Slideshow on Mac in Preview
When the question is how to create a slideshow on Mac devices, the answer can have a diverse range of aspects. You can work with the ‘Photos’ app, create a video slideshow, and much more. Exploring the domain, let us proceed with learning to create a Mac slideshow in the Preview feature of the device in the following section:
User’s Guide to Create a Slideshow in the Preview App of a Mac Device
Step 1: Launch the Application
In the launchpad of your Mac device, head to and tap the ‘Preview’ app icon frame to open the same.
Step 2: Choose Your Photos
Browse through the local media gallery of your device and select the desired images that you wish to include within the presentation. Click the ‘Open’ button, once you have made your choices.
Step 3: Play the Presentation
Navigate to the ‘Functions Toolbar’ at the top of the app’s main interface and hit the ‘View’ tab, followed by clicking on the ‘Slideshow’ option from the dropdown list that appears next.
Step 4: That’s It!
You can now watch and control the automatically created slideshow through the respective buttons that appear on the screen.

Part 4 How to Create Slideshows Online
As is evident by now that MacBook slideshow presentations have a diversity of creation processes and platforms, you can conveniently pick the one that suits your specific design concerns and portability requirements. After discussing about the ways to make Mac compatible slideshow presentations on external software platforms, as well as on the device itself, let us now have an insight into the process of creating slideshows on online utilities in the following section:
User’s Guide to Create Online Slideshow Presentations
Step 1: Launch a Preferred Online Tool
In any of your favorite web browsers, navigate to and launch any desired online slideshow creator tool from its official website. As of now, let us proceed with using the Kapwing video slideshow maker.
Step 2: Upload Media Files
Browse through the media gallery of your device to select and upload the desired set of images, GIFs and videos to the Kapwing video slideshow maker online tool. You can also ‘Drag and Drop’ the media directly to the tool’s editor workspace.

In addition to choosing media files from your device, you can directly import the same from online sources, like, YouTube, Twitter, etc., by copying the media link and pasting it within the tool’s media URL box. The Kapwing slideshow maker allows you to work with a series of media file formats, such as, MOV, JPG, GIF, MP4, PNG, among others.
Step 3: Sort and Edit Your Presentation
Once all the media files are imported to the workspace, you can use the ‘Slideshow Preview’ to sort the Images and videos within the presentation in a desired sequence of appearance. As far as editing the slideshow is concerned, you can set the orientation of the slides to landscape, square or a 9:16 aspect ratio.
There are options to crop the images and videos to include specific sections, while simultaneously adjusting their screen time. You can further, complement the presentation with a cohesive soundtrack in the background and include different graphic elements, like, stickers, titles and text annotations to craft the perfect slideshow.

Step 4: Time to Share!
When you are happy with your work, proceed to the top right corner of the editor workspace and click on the ‘Export’ tab. The Kapwing video maker will now transform your media into an MP4 slideshow presentation, which you are free to either save locally in your device, or share with your social media peers.
Part 5 FAQs About Slideshows on Mac
● How to delete a slideshow?
To delete a saved slideshow for MacBook, navigate to the latter’s destination folder in your device and browse for the particular presentation you wish to remove. Once found, right click on the same, followed by selecting the ‘Delete’ option from the dropdown menu that appears next. A ‘Delete Slideshow’ conformation box pops up, where you need to click on the ‘Yes’ button to move the presentation to your device’s ‘Trash Can’.
● How to include animations within a slideshow presentation?
If you are working on the concern of how to create a slideshow on Mac in the Photo apps of a Mac device, there is no provision for including animations within the slideshow. If at all you choose to add live images and animation files, they will appear as still images when you run the presentation.
● How to export a slideshow in the video format?
For exporting a created slideshow in the video format, all you need to do is, open the slideshow and navigate to the ‘Export’ button at the top right corner. As you hit the tab, the slideshow export interface pops up, where you can select the desired video format and destination of your slideshow. When you have made your choice, click ‘Save’ at the bottom right corner.
● How to create slideshows for Facebook?
To create a slideshow on Facebook, launch the app to login to your Facebook account in your device and head to the ‘Status Update’ tab. From the list of options that follows next, choose ‘Photo/Video’, succeeded by ‘Create a Slideshow’. You can now add the desired media files and adjust the different slideshow parameters to create a presentation.
● How to upload slideshow presentations on Instagram?
To create and upload a slideshow on Instagram, launch the app in your device and click on the ‘+’ icon in the latter’s welcome screen. You now need to hit the ‘Select Multiple’ button and choose the desired images and videos up to a maximum of 10 files from your device to add to the presentation. You can sort the order and add filter customizations before posting your creation. When you are done, click ‘Upload’ and follow the upcoming instructions.
Creating Slideshow Presentations on a Mac Device With Wondershare Filmora Video Editor
For Win 7 or later (64-bit)
For macOS 10.12 or later
The credibility of the Filmora video editor package does not need an introduction in the graphic design world. When the talk is about how to do a slideshow on Mac, the franchise presents its exclusive, Mac compatible slideshow creator program for designing professional quality slideshow movies. The software is handy enough to be easily worked upon by amateurs, casual creators and experienced professionals.
When it comes to the editing flexibility, the program’s inbuilt library is there to deliver a hoard of upgraded and high tech audio-visual and design effects, filters, elements at your disposal. Whether create a presentation from scratch or customize a premade slideshow template, Filmora lets you do everything to generate a slideshow output that is no less than a visual masterpiece. Talking of the output quality, you can safely leave everything to this high resolution program.
● Ending Thoughts →
● Mac devices have a diversity of utilities and in-built apps to automatically create beautiful and stunning slideshow presentations within just a few clicks.
● When addressing the concern of how to make slides on MacBook, you can choose from working with a range of media files to design and customize a classic piece o0f graphic artwork.
● If the talk is about choosing the most reliable Mac slideshow creator alternative, you can pick the Wondershare Filmora slideshow maker application without a second thought.
Instant slideshows on Mac devices are elusive graphic elements to creatively convey your information to the target audience. Stay here to have a complete knowhow of the design process!
In this article
01 [How to Create a Slideshow in Photos on Mac](#Part 1)
02 [How to Create a Slideshow in Video on Mac](#Part 2)
03 [How to Make a Slideshow on Mac in Preview](#Part 3)
04 [How to Create Slideshows Online](#Part 4)
05 [FAQs About Slideshows on Mac](#Part 5)
Part 1 How to Create a Slideshow in Photos on Mac
Creating a slideshow is an intuitive exploration of your graphic design skills, either just for a fun-filled entertainment, or catering to some specific information delivery on the professional front. When aiming to create Mac photos slideshow presentations, you can affordably pick any of your preferred devices and a suitable slideshow creator tool.
Speaking in the light of the fact, it is an equally amazing experience to design exemplary movies and presentations for a slide show MacBook, thanks to the high end technical abilities of such devices that work together to facilitate a remarkable and classic slideshow output. Having said that, let us proceed with discussing about the process of creating slideshow Mac presentations in the ‘Photos’ app of a Mac supported device in the following section:
User’s Guide to Create a Slideshow in the Photos App of a Mac Device
Step 1: Launch the App
Open the apps gallery of your Mac device and navigate to the ‘Photos’ app. Launch the same to be greeted by the latter’s welcome screen. Next, head to the sidebar in the left and hit the ‘Library’ option under the ‘Photos’ tab.
Step 2: Select Your Images
Within the ‘Library’ tab, hit the ‘Days’ or ‘All Photos’ subcategory to choose the desired images and videos that you wish to include in your presentation to create slideshow on Mac.
Step 3: View the Presentation
The ‘Photos’ app has a feature to automatically transform your selections in the previous step into an impressive slideshow. You can take a look at the created Mac photo slideshow by navigating to the ‘Menu Bar’ at the top of the app screen and hitting the ‘File’ tab, followed by selecting the ‘Play Slideshow’ option from the dropdown menu that appears next.
Step 4: Customize Your Slideshow
Completion of Step 3 causes a customization window to pop up, where you can select a vibrant theme and background music for your presentation. Once you have made your choices, you can visualize their appearance in the ‘Preview’ window at the right side of the screen.
About the selection of background music, you can either choose an audio track from the in-built music app of your iPad, or go with the inline complementary music of the presentation theme that you have already selected.
Step 5: It’s Time to Play!
When everything seems fine and you are satisfied with your efforts, head to the ‘File’ tab again and select the ‘Play Slideshow’ from the list of options that drops down to start your MacBook Photos slideshow. Once the slideshow begins to run, you can use the ‘Arrow Keys’ on your device to navigate forward and backward within the presentation, or press the ‘Spacebar’ to pause/resume the slideshow. If you want to stop playing the slideshow, press either of the ‘Escape’ or ‘X’ keys on your system’s keyboard.
Part 2 How to Create a Slideshow in Video on Mac
While image centered slideshows add life to still photos, video editions of the same are highly effective in integrating motion with visual excellence. Creating a slideshow on Mac is easy enough. However, if you wish to design elusive video presentations on the device, it is no difficult either. Having understood the credibility and design process of still presentations, let us move ahead with getting an insight into crafting classic masterpieces of video slideshows on a Mac device in what follows next:
User’s Guide to Create a Video Slideshow in a Mac Device
Step 1: Download and Install a Suitable Video Editor Application
Browsing the IT market, you can easily pick your preferred Mac compatible video editing software to address the concern of how to make a slideshow on Mac. As of now, let us try hands at understanding the creation process through the Movavi Slideshow Maker application.
Start with navigating to and downloading the Movavi Slideshow Maker software from the latter’s official website. Having done that, proceed to install the program in your Mac device by following the on screen instructions to run the installation files.
Step 2: Select a Working Mode
After a successful installation of the program, proceed to launch it in your Mac device and wait for the app’s welcome screen to appear. Choosing the Movavi Slideshow Maker program for creating Mac slideshow presentations, you are allowed to work in 2 different creation modes.
If you wish to explicitly convert still images into stunning slideshows, select the ‘Slideshow Wizard’ mode. On the contrary, if you have a task of designing a high end, professional presentation with a series of elements, prefer choosing the ‘Create a Movie in Manual Mode’ option.
Having talked enough about how to create slideshow presentations with images on a Mac device in the previous section, let us now dive into making a classic video presentation on the same, in what follows next. As already stated; select ‘Create a Movie in Manual Mode’ from the software’s main interface to begin with the creation process.
Step 3: Import Media Files
Browse through the local media gallery on your Mac device to select the required image and video files that you wish to create the slideshow presentation from. To do this, navigate to the ‘Elements Panel’ at the left and hit the ‘Import’ tab, followed by clicking on the ‘Add Files’ option in the software’s editor timeline and navigate through your locally saved media files.
When you have selected everything, your choices will automatically appear in the app’s editing workspace. You can alternatively, prefer dragging and dropping the associated files directly to the software timeline.
Step 4: Include Transitions
Adding a suitable transition effect gives the perfect flow to your presentation, while eliminating distortions in between successive slides. To supplement your slideshow with the same, navigate to the ‘Elements Panel’ at the left of the editor timeline and hit the ‘Transitions’ tab. You can choose any preferred transition style from the variety of available options in line with the theme of your presentation.
When you have made your choice, drag the same in between the desired pair of consecutive slides within the editor workspace. If you require supplementing all the presentation slides with a particular transition effect, click on the icon beside the ‘Transitions’ tab to automatically add a selected transition effect to all the slides together.
Step 5: Add an Upbeat Background Music
To add a preferred background audio, head to the ‘Import’ tab in the left side ‘Elements Panel’ and click on the same to see the ‘Add Files’ option. Here, you can traverse through your device’s media gallery and select a desired soundtrack. Click on the track’s thumbnail to automatically include it within the ‘Audio Track’ of the software timeline.
Step 6: Include Titles and Captions
To add text customizations within your presentations, head to the ‘Elements Panel’ at the left and hit the ‘Titles’ tab to open the program’s preset title options. You can select any suitable annotation for your slideshow, followed by dragging and dropping the same to the editor workspace to include it in the presentation.
You can customize the added title by double clicking on the same, either in the ‘Preview’ window above the editor timeline, or within the timeline itself. Next, double click within the text box in the ‘Preview’ window to type the desired text for including it into the slideshow.
To adjust text parameters like, size, font, color of the added title, double click on the same within the program’s timeline to open the title customization interface in the ‘Preview’ window, where you get the liberty to make desired modifications in the preset parameter values. When you have made the required changes, hit ‘Apply’ to confirm them.
Step 7: Export Your Slideshow
When you are satisfied with your efforts till here, proceed to save the presentation by navigating to and hitting the ‘Export’ tab at the right side of the editor workspace. This will direct you to the slideshow export interface, where you can choose from a variety of file saving options according to your specific needs.
Click on ‘Save Video File’ to add the presentation to your device’s local media gallery, or hit the ‘Save for Devices’ option to preserve your creation for an external device export. For a direct export of the slideshow to your ‘YouTube’ channel, click on ‘Upload to YouTube’, or choose to save the presentation in any of the MP4, OGV and WebM media file formats for an online sharing purpose. Once you are done with making all the selections and adjustments, head to and tap the ‘Start’ button.
Part 3 How to Make a Slideshow on Mac in Preview
When the question is how to create a slideshow on Mac devices, the answer can have a diverse range of aspects. You can work with the ‘Photos’ app, create a video slideshow, and much more. Exploring the domain, let us proceed with learning to create a Mac slideshow in the Preview feature of the device in the following section:
User’s Guide to Create a Slideshow in the Preview App of a Mac Device
Step 1: Launch the Application
In the launchpad of your Mac device, head to and tap the ‘Preview’ app icon frame to open the same.
Step 2: Choose Your Photos
Browse through the local media gallery of your device and select the desired images that you wish to include within the presentation. Click the ‘Open’ button, once you have made your choices.
Step 3: Play the Presentation
Navigate to the ‘Functions Toolbar’ at the top of the app’s main interface and hit the ‘View’ tab, followed by clicking on the ‘Slideshow’ option from the dropdown list that appears next.
Step 4: That’s It!
You can now watch and control the automatically created slideshow through the respective buttons that appear on the screen.
Part 4 How to Create Slideshows Online
As is evident by now that MacBook slideshow presentations have a diversity of creation processes and platforms, you can conveniently pick the one that suits your specific design concerns and portability requirements. After discussing about the ways to make Mac compatible slideshow presentations on external software platforms, as well as on the device itself, let us now have an insight into the process of creating slideshows on online utilities in the following section:
User’s Guide to Create Online Slideshow Presentations
Step 1: Launch a Preferred Online Tool
In any of your favorite web browsers, navigate to and launch any desired online slideshow creator tool from its official website. As of now, let us proceed with using the Kapwing video slideshow maker.
Step 2: Upload Media Files
Browse through the media gallery of your device to select and upload the desired set of images, GIFs and videos to the Kapwing video slideshow maker online tool. You can also ‘Drag and Drop’ the media directly to the tool’s editor workspace.
In addition to choosing media files from your device, you can directly import the same from online sources, like, YouTube, Twitter, etc., by copying the media link and pasting it within the tool’s media URL box. The Kapwing slideshow maker allows you to work with a series of media file formats, such as, MOV, JPG, GIF, MP4, PNG, among others.
Step 3: Sort and Edit Your Presentation
Once all the media files are imported to the workspace, you can use the ‘Slideshow Preview’ to sort the Images and videos within the presentation in a desired sequence of appearance. As far as editing the slideshow is concerned, you can set the orientation of the slides to landscape, square or a 9:16 aspect ratio.
There are options to crop the images and videos to include specific sections, while simultaneously adjusting their screen time. You can further, complement the presentation with a cohesive soundtrack in the background and include different graphic elements, like, stickers, titles and text annotations to craft the perfect slideshow.
Step 4: Time to Share!
When you are happy with your work, proceed to the top right corner of the editor workspace and click on the ‘Export’ tab. The Kapwing video maker will now transform your media into an MP4 slideshow presentation, which you are free to either save locally in your device, or share with your social media peers.
Part 5 FAQs About Slideshows on Mac
● How to delete a slideshow?
To delete a saved slideshow for MacBook, navigate to the latter’s destination folder in your device and browse for the particular presentation you wish to remove. Once found, right click on the same, followed by selecting the ‘Delete’ option from the dropdown menu that appears next. A ‘Delete Slideshow’ conformation box pops up, where you need to click on the ‘Yes’ button to move the presentation to your device’s ‘Trash Can’.
● How to include animations within a slideshow presentation?
If you are working on the concern of how to create a slideshow on Mac in the Photo apps of a Mac device, there is no provision for including animations within the slideshow. If at all you choose to add live images and animation files, they will appear as still images when you run the presentation.
● How to export a slideshow in the video format?
For exporting a created slideshow in the video format, all you need to do is, open the slideshow and navigate to the ‘Export’ button at the top right corner. As you hit the tab, the slideshow export interface pops up, where you can select the desired video format and destination of your slideshow. When you have made your choice, click ‘Save’ at the bottom right corner.
● How to create slideshows for Facebook?
To create a slideshow on Facebook, launch the app to login to your Facebook account in your device and head to the ‘Status Update’ tab. From the list of options that follows next, choose ‘Photo/Video’, succeeded by ‘Create a Slideshow’. You can now add the desired media files and adjust the different slideshow parameters to create a presentation.
● How to upload slideshow presentations on Instagram?
To create and upload a slideshow on Instagram, launch the app in your device and click on the ‘+’ icon in the latter’s welcome screen. You now need to hit the ‘Select Multiple’ button and choose the desired images and videos up to a maximum of 10 files from your device to add to the presentation. You can sort the order and add filter customizations before posting your creation. When you are done, click ‘Upload’ and follow the upcoming instructions.
Creating Slideshow Presentations on a Mac Device With Wondershare Filmora Video Editor
For Win 7 or later (64-bit)
For macOS 10.12 or later
The credibility of the Filmora video editor package does not need an introduction in the graphic design world. When the talk is about how to do a slideshow on Mac, the franchise presents its exclusive, Mac compatible slideshow creator program for designing professional quality slideshow movies. The software is handy enough to be easily worked upon by amateurs, casual creators and experienced professionals.
When it comes to the editing flexibility, the program’s inbuilt library is there to deliver a hoard of upgraded and high tech audio-visual and design effects, filters, elements at your disposal. Whether create a presentation from scratch or customize a premade slideshow template, Filmora lets you do everything to generate a slideshow output that is no less than a visual masterpiece. Talking of the output quality, you can safely leave everything to this high resolution program.
● Ending Thoughts →
● Mac devices have a diversity of utilities and in-built apps to automatically create beautiful and stunning slideshow presentations within just a few clicks.
● When addressing the concern of how to make slides on MacBook, you can choose from working with a range of media files to design and customize a classic piece o0f graphic artwork.
● If the talk is about choosing the most reliable Mac slideshow creator alternative, you can pick the Wondershare Filmora slideshow maker application without a second thought.
Also read:
- New Step by Step Guide of Make Gimp Transparent Background PNG
- New In 2024, Replacing the Sky in Adobe After Effects An Extensive Guide
- How to Make Discord GIF PFP? Solved for 2024
- Updated In 2024, How to Livestream Zoom on Facebook?
- New VLC Media Player How to Merge Audio and Video Like a Pro
- Updated 2024 Approved How to Create Cooking Video Intro and End Screen for YouTube Channel?
- In 2024, Are You Looking to Find Out How to Loop YouTube Videos on iPhone? Learn How to Loop Your Favorite YouTube Video on Your iPhone, so You Can Play that Part over and Over
- How to Easily Add VHS Green Screen to Your Video
- What Slideshow Templates Teach You About Aesthetic
- 2024 Approved Looking for the Steps to Add Transitions Effects in Premiere Pro? Here Are the Steps to Add and Edit Transitions in Premiere Pro and an Alternative Way to Video Transitions
- New Would You Like to Know How to Change the Ratio of the Video or Which Is the Correct Aspect Ratio for Uploading to the Online Platform? Then, Go Through the Article to Get Complete Details About the Video Aspect Ratio
- New How to Create After Effects Gifs
- New Are You Also Facing a Problem with the Snapchat Camera Zoomed In? Find Out the Easiest Methods to Fix This Error without Installing a Third-Party Tool
- How to Add Subtitles in VLC Media Play for 2024
- 2024 Approved Editing Videos Was Never so Easy as It Is Now. With Video Enhancer Ai, This Task Is Very Simple to Do and No Trouble Will Be There in Getting the Things Done as Needed. Choose the Right AI Video Enhancer for Task Completion
- Learn How to Slow Down Time-Lapse Videos on iPhone to Make Detailed and Captivating Slow-Motion Effects in Your Time-Lapse Captures for 2024
- In 2024, Guide to Making Cinematography for Music Video
- In 2024, TikTok Velocity Dance Tutorial| Filmora
- How to Google Meet Green Screen
- Updated In 2024, Perfecting the Art of Slowing Down Video on Instagram
- In 2024, 2 Effective Ways to Easily Convert VTT to SRT
- Adobe Premiere Pro Download and Use Guide
- Updated 2024 Approved How to Be a YouTube Vlogger
- Progressive Solutions to Add VHS Effects to Video with Ease
- 2024 Approved Do You Know You Can Use Mobile Apps to Apply Camera Effects to Your Videos? Many Smartphone Applications Allow You to Apply Camcorder Effects
- How to Convert a GIF to a Video for Instagram
- How to Make Censor Effects with Filmora
- Updated Convert Your Videos to 60 FPS Using These Excellent Tools
- In 2024, Hard to Remove Black Background in After Effects? Heres the Best Way to Deal With It
- Designed for You! Best Image (JPG/PNG) to GIF Converters for 2024
- Top Tips on How to Design Travel Slideshow for 2024
- In 2024, Top 10 Sound Extractors to Extract Sound From Video 2023
- Updated How to Make Flying Objects in Wondershare Filmora for 2024
- New Do You Find Choosing a Good LUT to Color-Correct Your Media Files Difficult? Discover some of the Best Professional LUTs From 3D LUT Creator to Download
- New Exploring the Top Professional Tools to Perform Mask Tracking
- In 2024, Are You Stuck with How to Use Discord GIF Ideally? Check that Out in This Article, as We Will Guide You on All You Need to Know About GIFs for Discord
- Updated 2024 Approved 4 Ways to Merge MP4 and MP3
- In 2024, TikTok Slow Zoom | Create Your Slow Zoom TikTok in Minutes
- New In 2024, How to Denoise in Final Cut Pro – Reduce Video and Audio Noise
- New 2024 Approved Top 12 Sony Vegas Slideshow Templates for Free Download
- Your Search for the Best GIF Creator Tools Ends Here for 2024
- New 2024 Approved Guide to Create Intro Video with KineMaster
- New Best Audio Waveform Generator
- Updated 2024 Approved 6 Instant Mp4 to GIF Online Tools for You
- In 2024, Best Online MPEG to GIF Converters
- 5 Solutions For Xiaomi 14 Unlock Without Password
- In 2024, A Complete Guide To OEM Unlocking on Vivo T2 5G
- 7 Ways to Unlock a Locked Vivo Y100t Phone
- In 2024, How to Cast Lenovo ThinkPhone Screen to PC Using WiFi | Dr.fone
- In 2024, Where Is the Best Place to Catch Dratini On Honor Play 40C | Dr.fone
- Unlock Your Samsung Galaxy A34 5Gs Potential The Top 20 Lock Screen Apps You Need to Try
- How to Downgrade iPhone 12 without Data Loss? | Dr.fone
- Fixes for Apps Keep Crashing on Itel P55 5G | Dr.fone
- Troubleshooting Guide How to Fix an Unresponsive Motorola Moto G14 Screen | Dr.fone
- Updated 2024 Approved New Essential Details of Making Perfect Talking Face
- A Quick Guide to Lava Blaze Curve 5G FRP Bypass Instantly
- How to Unlock iPhone 11 Pro Max Passcode without Computer?
- Honor Play 40C Bootloop Problem, How to Fix it Without Data Loss | Dr.fone
- Disabled Apple iPhone 6s Plus How to Unlock a Disabled Apple iPhone 6s Plus?
- Updated In 2024, 12 Animated Slideshow PowerPoint Templates and Tools to Make Them
- How To Change Country on App Store for Apple iPhone XS Max With 7 Methods | Dr.fone
- In 2024, How can I get more stardust in pokemon go On Samsung Galaxy A34 5G? | Dr.fone
- How to Bypass Google FRP Lock on Samsung Galaxy A25 5G Devices
- Here are Some of the Best Pokemon Discord Servers to Join On Sony Xperia 10 V | Dr.fone
- How to Get and Use Pokemon Go Promo Codes On Apple iPhone SE (2020) | Dr.fone
- In 2024, Why does the pokemon go battle league not available On Vivo X Flip | Dr.fone
- How to Bypass FRP from Xiaomi Redmi Note 13 Pro 5G?
- Android Call History Recovery - recover deleted call logs from Realme GT 5 (240W)
- In 2024, Top 4 Ways to Trace Oppo Reno 11F 5G Location | Dr.fone
- Can Life360 Track Or See Text Messages? What Can You Do with Life360 On Vivo T2x 5G? | Dr.fone
- In 2024, How I Transferred Messages from Motorola Moto E13 to iPhone 12/XS (Max) in Seconds | Dr.fone
- How to Lock Apps on Itel P55T to Protect Your Individual Information
- In 2024, Trouble with iPhone 6s Plus Swipe-Up? Try These 11 Solutions | Dr.fone
- Top 12 Prominent Xiaomi Redmi Note 12T Pro Fingerprint Not Working Solutions
- Title: Step by Step to Crop Videos with CyberLink PowerDirector for 2024
- Author: Chloe
- Created at : 2024-05-20 03:38:17
- Updated at : 2024-05-21 03:38:17
- Link: https://ai-editing-video.techidaily.com/step-by-step-to-crop-videos-with-cyberlink-powerdirector-for-2024/
- License: This work is licensed under CC BY-NC-SA 4.0.
