
:max_bytes(150000):strip_icc():format(webp)/family-hanging-out-watching-videos-online-1166432791-309c6f7ac8cb4cc99875db5a77fd6f35.jpg)
Step by Step to Cut Videos in Adobe Premiere Pro for 2024
Step by Step to Cut Videos in Adobe Premiere Pro
Video editing is an essential skill in a world that has a growing focus on creative fields. And if you work with videos, knowing which clips to use and where to cut is essential in conveying your story and increasing its impact. So, if you are a beginner and want to familiarise yourself with steps and terms used in video editing, in this article, we will go through the steps you will need to cut your video file in Adobe Premiere Pro and Wondershare Filmora.
This guide uses Adobe Premiere Pro 2022 and Wondershare Filmora X.
How to cut video in Adobe Premiere Pro?
Once you have Adobe Premiere Pro open on your computer, follow the steps listed below.
Step 1: Create a new project in Premiere Pro.

During project creation, we recommend keeping an eye on the file name set and the storage location; this can help reduce the time spent in locating the Premiere Project.

Step 2: Import a video file into Premiere Pro with a double click in the marked area and choose the file from its stored location.

Step 3: Double click on any imported media to activate it and send it to the Source Window.

You can continue to import more media by double-clicking within the marked area. For better organization, users can also create Bins, which are folders within a Premiere Pro File that are often in use to sort out imported media.
Users can create Bins with a right-click in the red box marked area (refer to image above).
Step 4: Select either the whole clip or a part of it from the Source Window and drag it onto the Timeline.

Step 5: Select the Razor Tool from the Tools Window. Now, pick the point where you want to introduce a cut and confirm with your left mouse button; this will split your video track into two parts.
Make a second cut where desired, following which you can move around the newly generated clip or delete it.

**Tip:**You can also select the Razor Tool by pressing C on the keyboard_._
We also recommend using the Snap in Timeline feature (activated with (S) on your keyboard or by choosing the magnet option), which will match your mouse pointer with the Playhead to ensure your cut will match the exact frame shown on your screen.
-—————————————————————————————————————————————-
Some more tips for Adobe Premiere Pro:
- Using the I and O keys on your keyboard while playing a video in the Source Window will allow you to set an In Pointand an Out Point. These markers will allow you to move a specific part of your video file into the Timeline, thus, reducing the amount of time spent making the right cut.
We have tagged the Mark In and Mark Out buttons with a Green Box in the image below.
- Clicking on the Step Frame Buttons [marked in Yellow] will also help increase the accuracy of your cut by allowing you to select the exact moment you desire.
- You can also mark a Point of Interest in your video file with the help of Markers in Premiere Pro. These afford you the ability to come back to the moment at a later time and see why it interested you in the first place, as editing sessions can often take hours at an end.

An alternative way to cut video with Wondershare Filmora
In Wondershare Filmora Video Editor , the steps to cut a video are simplified and don’t require as many steps as seen earlier. Opening the application throws you straight into a project, and following this, you can import a video file and begin editing. From the process you will learn below, it is easy to assume that Wondershare Filmora is more convenient for beginners and provides software features that match paid professional software.
For Win 7 or later (64-bit)
For macOS 10.14 or later
Note: If you don’t have Wondershare Filmora installed, you can get the video editor by visiting its official website . Once the setup program download completes, execute it and begin the installation process.
Once you have the editing software open, follow the steps listed below.
Step 1: Import a video file by clicking on the import window.
The default project setting for Filmora X is 1920x1080 at 25 frames per second. Users can change this to match their video file by going into Project Settings under the File tab or by accepting the automatic prompt that appears when dragging the video file onto the Timeline.

Note: If you have a PC with weak hardware, Wondershare Filmora gives you the option to create Video Proxies that will reduce the load on your computer by creating smaller clips that are lower in size, resulting in a smoother and faster experience. You can also do this in Premiere Pro, but Filmora does it for you automatically once given permission.
Step 2: Drag the video file onto the Timeline to begin previewing it in the Playback Window and commence editing operations.

Step 3: Locate where you want to cut in the video file and click on the orange scissors option to split the video file.

Tip: You can also use the keyboard shortcut (CTRL+B) to cut without using a mouse click, in case you make use of a trackpad while editing.
The Bottom Line
As said earlier, knowing where to cut is essential in improving the feel of your video, and we hope this guide showed you exactly how to perform the actions to create your best project. If you are a beginner, the simplistic approach of Wondershare Filmora will be more welcoming and easier to navigate. In addition, the software is also free to download, with added features that you can activate by paying a monthly, yearly, or one-time fee. Adobe Premiere Pro is an option worth considering if you plan on using third-party plugins and other applications from the Creative Cloud Suite.
During project creation, we recommend keeping an eye on the file name set and the storage location; this can help reduce the time spent in locating the Premiere Project.
Step 2: Import a video file into Premiere Pro with a double click in the marked area and choose the file from its stored location.
Step 3: Double click on any imported media to activate it and send it to the Source Window.
You can continue to import more media by double-clicking within the marked area. For better organization, users can also create Bins, which are folders within a Premiere Pro File that are often in use to sort out imported media.
Users can create Bins with a right-click in the red box marked area (refer to image above).
Step 4: Select either the whole clip or a part of it from the Source Window and drag it onto the Timeline.
Step 5: Select the Razor Tool from the Tools Window. Now, pick the point where you want to introduce a cut and confirm with your left mouse button; this will split your video track into two parts.
Make a second cut where desired, following which you can move around the newly generated clip or delete it.
**Tip:**You can also select the Razor Tool by pressing C on the keyboard_._
We also recommend using the Snap in Timeline feature (activated with (S) on your keyboard or by choosing the magnet option), which will match your mouse pointer with the Playhead to ensure your cut will match the exact frame shown on your screen.
-—————————————————————————————————————————————-
Some more tips for Adobe Premiere Pro:
- Using the I and O keys on your keyboard while playing a video in the Source Window will allow you to set an In Pointand an Out Point. These markers will allow you to move a specific part of your video file into the Timeline, thus, reducing the amount of time spent making the right cut.
We have tagged the Mark In and Mark Out buttons with a Green Box in the image below.
- Clicking on the Step Frame Buttons [marked in Yellow] will also help increase the accuracy of your cut by allowing you to select the exact moment you desire.
- You can also mark a Point of Interest in your video file with the help of Markers in Premiere Pro. These afford you the ability to come back to the moment at a later time and see why it interested you in the first place, as editing sessions can often take hours at an end.
An alternative way to cut video with Wondershare Filmora
In Wondershare Filmora Video Editor , the steps to cut a video are simplified and don’t require as many steps as seen earlier. Opening the application throws you straight into a project, and following this, you can import a video file and begin editing. From the process you will learn below, it is easy to assume that Wondershare Filmora is more convenient for beginners and provides software features that match paid professional software.
For Win 7 or later (64-bit)
For macOS 10.14 or later
Note: If you don’t have Wondershare Filmora installed, you can get the video editor by visiting its official website . Once the setup program download completes, execute it and begin the installation process.
Once you have the editing software open, follow the steps listed below.
Step 1: Import a video file by clicking on the import window.
The default project setting for Filmora X is 1920x1080 at 25 frames per second. Users can change this to match their video file by going into Project Settings under the File tab or by accepting the automatic prompt that appears when dragging the video file onto the Timeline.
Note: If you have a PC with weak hardware, Wondershare Filmora gives you the option to create Video Proxies that will reduce the load on your computer by creating smaller clips that are lower in size, resulting in a smoother and faster experience. You can also do this in Premiere Pro, but Filmora does it for you automatically once given permission.
Step 2: Drag the video file onto the Timeline to begin previewing it in the Playback Window and commence editing operations.
Step 3: Locate where you want to cut in the video file and click on the orange scissors option to split the video file.
Tip: You can also use the keyboard shortcut (CTRL+B) to cut without using a mouse click, in case you make use of a trackpad while editing.
The Bottom Line
As said earlier, knowing where to cut is essential in improving the feel of your video, and we hope this guide showed you exactly how to perform the actions to create your best project. If you are a beginner, the simplistic approach of Wondershare Filmora will be more welcoming and easier to navigate. In addition, the software is also free to download, with added features that you can activate by paying a monthly, yearly, or one-time fee. Adobe Premiere Pro is an option worth considering if you plan on using third-party plugins and other applications from the Creative Cloud Suite.
ReVisionFX ReelSmart Motion Blur Plugin For Premiere Pro
Premiere Pro is an exceptional tool for editing videos flawlessly by using various advanced features. For instance, you can use Adobe Premiere Pro to add extraordinary effects to your videos, such as motion blur. However, if you want a more smooth and flawless effect, you can use a plugin known as ReelSmart Motion Blur. By reading this article, you can learn about the ReelSmart Motion Blur Plugin Premiere Pro and its related instructions for usage.
Part 1: What is ReVisionFX ReelSmart Motion Blur?
You must be wondering why it’s essential to use the motion blur plugin for Premiere Pro. The reason is that using a plugin like ReelSmart Motion Blur can offer more advanced capabilities and options to create professional results. The ReelSmart Motion Blur plugin uses advanced algorithms to track each pixel automatically. As a result, it provides a more compelling and natural outlook to the video. Hence, you can easily apply the motion blur effect to your videos using RSMB without hard work.
Key Features
- Offers Automatic Tracking: To provide accurate and precise results, RSMB uses automatic tracking. This function allows the plugin to track every pixel automatically from one frame to another efficiently.
- Ability to Adjust Blur: You can add refinements by adjusting the amount of blur according to your preference. By doing so, you can generate the desired final output easily.
- Removing Motion Blur: Apart from adding and adjusting the motion blur effect, you can also remove the blur effect using RSMB effortlessly.
- Add Motion Blur to 360 Videos: RSMB is also capable of adding a motion blur to 360 videos properly. It can recognize the edges of sides along with the top and bottom to create a motion blur effect appropriately.
Part 2: Is It Worth Trying ReelSmart Motion Blur Pro?
As we have discussed the regular version of ReelSmart Motion Blur, now we will also shed light on its Pro version. To help you in choosing the best version, we will draw a comparison between the regular and pro versions of RSMB in this section.
Pricing Price
| Regular Version | Pro Version |
|---|---|
| $104.95 | $164.95 |
Supported Hosts
| ReelSmart Motion Blur | Regular Version | Pro Version |
|---|---|---|
| Adobe: After Effects, Premiere Pro | Adobe: After Effects, Premiere Pro | |
| Apple: Final Cut Pro, Motion | Apple: Final Cut Pro, Motion | |
| / | Avid: Media Composer | |
| OFX: Catalyst Edit, DaVinci Resolve, Final Cut Pro, HitFilm, Movie Studio, Natron, and Vegas Pro | Supports all Regular version Hosts Plus the Following:OFX: Baselight, Flame, Fusion Studio, Smoke, Nucoda, Scratch, Nuke, and Silhouette |
New Features
- Separates the Object: RSMB Pro has the additional capability to isolate the background and foreground effectively. It utilizes a specified matte that can help in object separation to create motion blur with great precision. (Not available with Movie Studio, Vegas Pro, Catalyst Edit, Smoke, Media Composer, Flame, or Nucoda)
- Blur with Motion Vectors: If you have imported a 3D animation video, the pro version can blur the motion vectors provided by you. Thus, it can work on a 3D animation system perfectly. (Not available with Vegas Pro, DaVinci Resolve, Movie Studio, Media Composer, Catalyst Edit, or Nucoda)
- RGB+A Tracking: This option is used to recognize and track dark images with mattes by using the alpha channel. You can use this option for masked or CG stuff. (Not available with Media Composer)
- Use of Tracking Points: To help the RSMB’s calculation of motion vectors, you can provide tracking points. By defining the tracking points, you can tell RSMB about the movement of one pixel from one frame to another efficiently. (Not available with Vegas Pro, Media Composer, Catalyst Edit, DaVinci Resolve, Smoke, Flame, Movie Studio, or Nucoda)
- Spline Guidance: If RSMB encounters problems related to tracking, you can draw and animate shapes to tell about the object’s movement. Thus, it can help the RSMB find the object movement easily. (Not available with Premiere Pro, Nucoda, Vegas Pro, HitFilm, Movie Studio, Smoke, Sihouette, Flame, Scratch, Nuke, Motion, Media Composer, DaVinci Resolve, Catalyst Edit, FCPX)
Rating
- 7 out of 5
Our Verdict
The new features in the pro version of RSMB are really compelling and beneficial. However, there are various restrictions when it comes to the supported hosts of the pro version. So, if you are using any common software for video editing that is not recognized by the pro version, we will recommend you use the regular version of RSMB. The regular version of RSMB is cost-effective and works proficiently.
Part 3: How to Use ReelSmart Motion Blur Plugin in Premiere Pro?
Are you eager to know how to use the Premiere Pro motion blur plugin? Read and follow the steps provided below to craft flawless results.
Step1 Import Video Clip
Open Adobe Premiere Pro in your system and start with a new project. On the newly displayed window, import the video clip by browsing through your computer. After importing the desired video file, make sure to drag and drop it into the timeline to begin editing.

Step2 Search for RSMB Effect
Once you have dropped the video into the timeline, navigate to the “Effects” tab given on the right side. On the search box, type “RSMB.” From the fetched results, select RSMB and apply it to the above layer of your video clip in the timeline.

Step3 Adjust the Plugin Settings
Now head to the settings on the left side and enable the GPU settings. Moreover, you can increase the blur amount to 1 or 1.5. By doing so, you can create a smoother look in your video. Once done with the settings, make sure to render your video to produce a smooth finish. Once done with rendering, you can preview and save the video easily.

Conclusion
Motion blur effect can drastically transform your video clip. If you are using Premiere Pro to add motion blur, we will recommend you use the plugin called ReVisionFX ReelSmart Motion Blur. If you are unaware of the motion blur plugin Premiere Pro, this article has fetched all the related details. This article has provided all the significance and instructions to use the RSMB plugin.
Supported Hosts
| ReelSmart Motion Blur | Regular Version | Pro Version |
|---|---|---|
| Adobe: After Effects, Premiere Pro | Adobe: After Effects, Premiere Pro | |
| Apple: Final Cut Pro, Motion | Apple: Final Cut Pro, Motion | |
| / | Avid: Media Composer | |
| OFX: Catalyst Edit, DaVinci Resolve, Final Cut Pro, HitFilm, Movie Studio, Natron, and Vegas Pro | Supports all Regular version Hosts Plus the Following:OFX: Baselight, Flame, Fusion Studio, Smoke, Nucoda, Scratch, Nuke, and Silhouette |
New Features
- Separates the Object: RSMB Pro has the additional capability to isolate the background and foreground effectively. It utilizes a specified matte that can help in object separation to create motion blur with great precision. (Not available with Movie Studio, Vegas Pro, Catalyst Edit, Smoke, Media Composer, Flame, or Nucoda)
- Blur with Motion Vectors: If you have imported a 3D animation video, the pro version can blur the motion vectors provided by you. Thus, it can work on a 3D animation system perfectly. (Not available with Vegas Pro, DaVinci Resolve, Movie Studio, Media Composer, Catalyst Edit, or Nucoda)
- RGB+A Tracking: This option is used to recognize and track dark images with mattes by using the alpha channel. You can use this option for masked or CG stuff. (Not available with Media Composer)
- Use of Tracking Points: To help the RSMB’s calculation of motion vectors, you can provide tracking points. By defining the tracking points, you can tell RSMB about the movement of one pixel from one frame to another efficiently. (Not available with Vegas Pro, Media Composer, Catalyst Edit, DaVinci Resolve, Smoke, Flame, Movie Studio, or Nucoda)
- Spline Guidance: If RSMB encounters problems related to tracking, you can draw and animate shapes to tell about the object’s movement. Thus, it can help the RSMB find the object movement easily. (Not available with Premiere Pro, Nucoda, Vegas Pro, HitFilm, Movie Studio, Smoke, Sihouette, Flame, Scratch, Nuke, Motion, Media Composer, DaVinci Resolve, Catalyst Edit, FCPX)
Rating
- 7 out of 5
Our Verdict
The new features in the pro version of RSMB are really compelling and beneficial. However, there are various restrictions when it comes to the supported hosts of the pro version. So, if you are using any common software for video editing that is not recognized by the pro version, we will recommend you use the regular version of RSMB. The regular version of RSMB is cost-effective and works proficiently.
Part 3: How to Use ReelSmart Motion Blur Plugin in Premiere Pro?
Are you eager to know how to use the Premiere Pro motion blur plugin? Read and follow the steps provided below to craft flawless results.
Step1 Import Video Clip
Open Adobe Premiere Pro in your system and start with a new project. On the newly displayed window, import the video clip by browsing through your computer. After importing the desired video file, make sure to drag and drop it into the timeline to begin editing.
Step2 Search for RSMB Effect
Once you have dropped the video into the timeline, navigate to the “Effects” tab given on the right side. On the search box, type “RSMB.” From the fetched results, select RSMB and apply it to the above layer of your video clip in the timeline.
Step3 Adjust the Plugin Settings
Now head to the settings on the left side and enable the GPU settings. Moreover, you can increase the blur amount to 1 or 1.5. By doing so, you can create a smoother look in your video. Once done with the settings, make sure to render your video to produce a smooth finish. Once done with rendering, you can preview and save the video easily.
Conclusion
Motion blur effect can drastically transform your video clip. If you are using Premiere Pro to add motion blur, we will recommend you use the plugin called ReVisionFX ReelSmart Motion Blur. If you are unaware of the motion blur plugin Premiere Pro, this article has fetched all the related details. This article has provided all the significance and instructions to use the RSMB plugin.
How To Fade Audio With Movavi Editor
Movavi Video Editor Plus is the best option if you want to use its user-friendly Movavi fade audio feature set with plenty of functionality. There are versions of the app on Mac and Windows. For all intents and purposes, Movavi fade out music functionality is an excellent piece of this video editing software. The Movavi Video Editor Plus package comes with standard advanced features and functionality. You may also store your work and share your Movavi fade out audio exports across devices that have the software installed.
Looking for how to fade out music in Movavi? We’ve got you solutions to it. The ability to quickly and simply check that the beginning and conclusion of any audio is one of the best Movavi fade audio features. Prior to the audio, there must be a distinct period of quiet. Finding the program, like Movavi Audio fade out, that best suits your requirements is essential whether you want to fade-in, fad-out, trim, crop, clip, or combine audio files or segments of a music. Find out the details in the upcoming sections.
Part 1. How to Fade Audio with Movavi Editor
When the song’s ending is not featured in the video, fade-out is used to provide an added level of professionalism. Even if you’ve never altered a video before, using Movavi Video Editor Plus is simple. A step-by-step tutorial that walks you through all the tools you’ll need is shown to you when the software initially launches. Additionally, you may always search the Movavi official website for advice.
Steps to use Movavi Fade Audio:
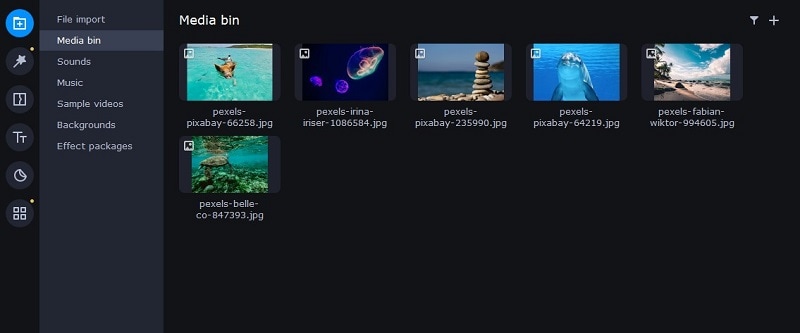
Step1The first step is to import the audio and video files you want to utilize. Drag and drop the files into the software or choose “Add Files” from the Media Bin area to do this. Drag and drop the clip into the timeline after that.
Step2Select the disconnect audio option from the edit menu. Additionally, you can see that the audio and video will no longer be connected by a little connection. Your titles’ location, color, and font may all be changed.
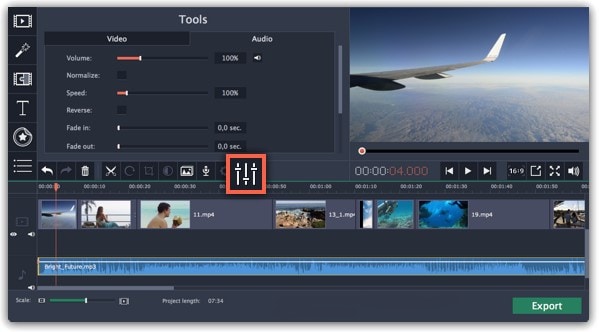
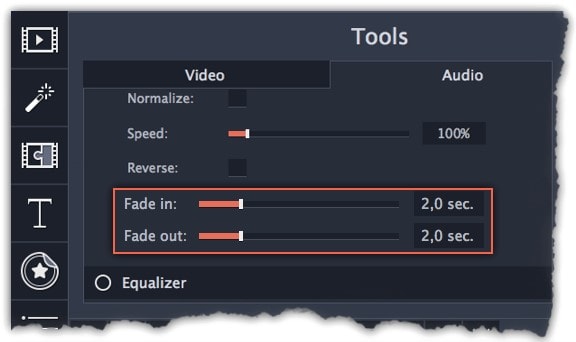
Step3Use the sliders on the Audio tab to set the fade duration by referring to the Audio Properties. Additional options may be used to increase the audio’s loudness, eliminate ambient noise, or even create an echo effect.
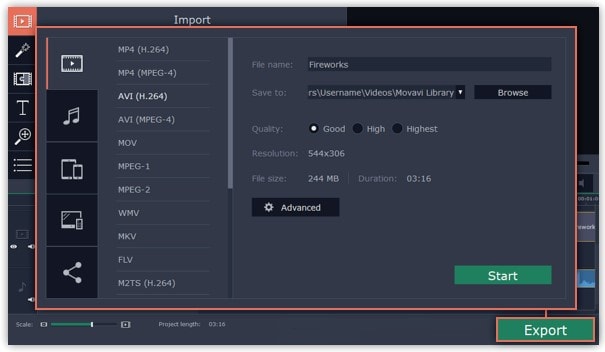
Step4Click on the export option to save this audio as an MP3. Select Audio Export. The MP3 choice is used by default. Select the Save Audio File tab after clicking the Export button. Choose the preferred format and press Start.
Part 2. Movavi Alternative to Fade Audio
Look no further than Filmora by Wondershare if you’re seeking for an effective and user-friendly Movavi audio fade out substitute. This program has all the tools you need to edit, apply special effects, and make titles for videos of a professional caliber. In contrast to Movavi, Filmora gives you the ability to create fade out music without requiring you to install a separate extension. In order to help you understand how to use this function using the Filmora video editing interface, we have enlisted the step-by-step guide for you as well.
Although there are several video editors on the market, Filmora has successfully carved out a position for itself with a variety of intriguing features. The application is appropriate for both new and more experienced users and was designed with novice users in mind. Its user interface (UI), which is rather simple when compared to professional applications. Among all the free video editing programs for beginners, Filmora also offers a far larger selection of effects, customizability, and correction tools, and its screen-splitting capability is much handier than Movavi fade audio feature.
Steps to Fade Out Audio in Filmora:
Step1Install Wondershare Filmora
The straightforward platform to start editing your audio and music files is Filmora, which is available for free. You must first download and install this application on your windows computer in order to utilize it without difficulty. Download the most current edition of this application first. It’s now time to install it on your computer when you’ve completed that. Simply install this program on your computer by following the standard setup instructions if you want to do it fast.
Step2Open Filmora Editor and Import Audio Files
In the step that follows, we’ll show you how to use this platform to fade in and out audio. Filmora may be immediately launched from your desktop or the search bar, then opened as seen below to begin going. By choosing the Video Editor option from the software’s home screen, you may now investigate the basic principles of editing. This will bring up the main interface for Filmora. To import your music and video files, just choose the Import button from the software’s main screen, as seen below:

Step3Load Built-in Audio Editor
You must drag the media files into the program’s timeline after importing them into Filmora. You may modify your media files using every tool in the timeline. To utilize the audio editor in Filmora, just right-click on the specific audio file and choose “Edit Audio” from the list, as seen below.

Step4Use Audio Fade-in/Fade-out
The initial step is to learn how to use Filmora to start fading in and, afterwards, fading out your audio recordings. The best aspect of Filmora is how simple it is to employ these techniques from the timeline. To achieve this, focus on the audio file that you want to change in the timeline; after you’ve picked it, the two icons will show up above the audio file. Drag the first one to the desired duration for the audio fade-in option, as demonstrated:

Step5Edit and Share Video/Sound
In addition to an audio editor, Filmora has a built-in toolset for video editing. You may utilize basic to sophisticated editing techniques inside the program. To choose the basic editor, just click on the video file within the timeline as seen below. There is support for all widely used video and audio formats, including MP3. Click “Export” and choose “File Format” to do this.
By pressing the Format button, choose the required configuration from the list. On a computer, the particular document will be saved to the designated directory.
The Bottom Line
Have you learned how to fade out music in Movavi? If so, then you would also find out that the Movavi fade audio alternative, Filmora , provides a selection of audio editing options in addition to video editing features. The Movavi editor is capable of spicing up your videos and audios, however; Filmora’s workflow is a little more established and well-defined than Movavi’s, which is what propels it to the top of the audio editing field. As a result, Filmora would be the better option if you intend to work as a video editor for a long time.
Free Download For Win 7 or later(64-bit)
Free Download For macOS 10.14 or later
Things You Need to Know About Transparent PNG Remove and Convert
Things You Need to Know About Transparent PNG Remove and Convert
An easy yet powerful editor
Numerous effects to choose from
Detailed tutorials provided by the official channel
Are you thinking of merging two photos together with an identical background and no loss of quality? Or, do you have to remove the background color in a design? In such cases, PNG images work best for all.
PNG images are used at a broad level by web designers, graphic designers, and many other professionals around the world. It enables them to have a transparent background along with the finest image quality. It’s even possible to convert a JPG image to PNG transparent using any image editor. However, the process can seem a bit tedious and become complex if you are not using the right tool.
So, to help you out, we will reveal here the best way to remove the background of a photo and convert JPG image to PNG transparent.
In this article
01 [How to Remove the Background of a Photo in PowerPoint](#Part 1)
02 [How to Convert JPG to Transparent PNG](#Part 2)
Part 1 How to Remove the Background of a Photo in PowerPoint
If there is anything that a designer hates in his precious photo, then it’s the background. It hides and distracts from the main subject at hand. You can use various photo editing tools to remove the background from PNG images or JPG. However, they may not do the job as easily as you are thinking.
Yes, we know that you may be wondering about Adobe Photoshop now. It can be used for removing the background too but are you ready to pay for it? No, right? This is when you can depend on PowerPoint to erase the background of a photo without any hassle. Make sure you have PowerPoint 2010 or a later version installed before beginning. Because the earlier Microsoft PowerPoint versions don’t have a background removal feature.
Step 1: Open the image in a new tab
Launch PowerPoint on your desktop or Mac and change the layout of the slide to “Blank”. Next, insert your image, which has a solid or high-contrast background. Such pictures are easier to transform and edit.

Step 2: Select the “Remove Background” option
Click on your image to get the “Picture Format” in the menu toolbar. On the left top side, choose the “Remove Background” option. Now, PowerPoint will try to remove the background automatically. If the final picture that you are getting is not satisfactory, move to the next step.

Step 3: Select the Area
From the given options in the toolbar, mark the areas that you want to keep or remove in the final result. As you can view, how some parts of the pictures have been cut. So, spread the box to cover the entire area of the image, which you want to keep. Remember, purple-highlighted areas are removed automatically.

If you want to ensure a better result, use the cursor. Start hovering over the background and the main subject to get the plus and minus sign. These signs are useful for getting a precise image at the end. The Minus sign allows you to mark the areas to be removed. The plus sign can be used to keep the marked areas in the final picture.
Step 4: Finishing Touches
Check your image carefully and see whether any area is left to be removed or not. You can zoom in to find the tiniest spot. When you are satisfied with every detail, click anywhere outside of the image to stop further edits. Congratulations! Your transparent PNG is ready to save. Go to “File”>”Save As” and find the option to save your picture in PNG transparent format.
Part 2 How to Convert JPG to Transparent PNG
Ever wondered how logos in a graphic match with the background image color? It’s possible with transparent PNG images only. The transparent PNG images format contains superior quality and no background. Hence, it is pretty helpful for the designers to add them to graphics and videos.
In case you have some JPG images but you want it in PNG images format, don’t worry. You can use Kapwing as it’s a trusted content creation and video editing platform. It can bring your idea to life. It can convert JPG to PNG transparent easily. With the AI-powered facility, you can enjoy a seamless editing and conversion experience. Kapwing makes it really simple and fast, but the best part is that you can get it done for free.
Step 1: Add Your JPG
Launch Kapwing in any browser of your choice. Log in using your account or sign up with a new one. Now, you will be redirected to the Kapwing studio, where you can do all the editing and conversion. Upload your image to the “Kapwing Studio” and use the “Remove Image from Background” tool.

If the image is already saved on your device, simply hit “Click to Upload” or, if you wish, drag and drop the JPG image to initiate the conversion. On the other hand, in case the image is not available, you can copy and paste from a URL in the “Paste an image or video URL” box.
Step 2: Pick a Tool
After the image upload finishes, the next thing is to start removing its background. Go to the right side of the “Image” tab and click on the “Erase” button. Otherwise, you can use the “Remove Background from Image” tool to start.

You have two options to choose from – Erase and Magic Wand. The first tool gives you full control over what you want to remove or keep. Adjust the “eraser size” by sliding right on the dial. This way, you can remove the background precisely.
Apart from that, the Magic Wand tool is amazing for removing a particular area at once. You can remove the picture background in less time and effort. If you want to remove a certain area of the same color, then the Magic Wand is the best tool to use. It eliminates similar groups of pixels together. To modify the sensitivity, move the same dial to the right as you did while selecting the “Erase” tool.
For some impressive results, adjust the zoom and choose “Move” to select the pixels you want to remove.
Step 3: Make the PNG and Download
After everything has been set, it’s time to download your PNG transparent file. Click “Done” and then move back to the Kapwing Studio for additional features. You can add watermarks, text, and a lot more. Finally, hit the “Publish” button placed at the top right and “Download” to save the PNG file to your desktop.
You can do more with Wondershare Filmora Video Editor !
For Win 7 or later (64-bit)
For macOS 10.12 or later
Have you ever tried to extract images from a video file? Well, many of us wish to do so but lack the right tools or don’t have any idea of how to do it. Some people just take a screenshot of the video and crop it for use in memes, images, etc. However, doing this will reduce its overall resolution and quality.
If you want to preserve quality during the extraction of images from a video, use Wondershare Filmora. It lets you take images out of a video file frame by frame without any compromise on quality. It features many other tools to show your creativity.
It’s the latest update. Filmora V11 is here! Find out what’s new in this latest video editing software release and how it can help you create incredible videos and images. You can remove any unwanted object from an image, add filters and overlays, all on the go.
● Ending Thoughts →
● So there you have it: the full story on transparent PNGs, removing background, and conversion from JPG to PNG file format. As you can see, it’s not too hard to combine one image in your design. However, we don’t want you to forget anything. Hence, remember these things when you try to convert JPG to PNG transparent.
● Whichever method you choose to turn a PNG image into a JPG, make sure you are familiar with the tool. If not, first spend time figuring out the features. Seek out what suits you and then start. We would recommend following the above tips carefully instead of using any other tool.
● Beware of using third-party websites for background removal from a PNG. Many will store your pictures, which can be accessed by other users. They are not safe for you by any means.
● It’s not an easy job to convert JPG to transparent PNG using PowerPoint, especially when an image contains multiple images and colors. For such pictures, you can use Kapwing. It has plenty of additional features that you can use for creative work.
● If you have any questions or have different ways of accomplishing this, feel free to comment below. Thanks for reading.
Are you thinking of merging two photos together with an identical background and no loss of quality? Or, do you have to remove the background color in a design? In such cases, PNG images work best for all.
PNG images are used at a broad level by web designers, graphic designers, and many other professionals around the world. It enables them to have a transparent background along with the finest image quality. It’s even possible to convert a JPG image to PNG transparent using any image editor. However, the process can seem a bit tedious and become complex if you are not using the right tool.
So, to help you out, we will reveal here the best way to remove the background of a photo and convert JPG image to PNG transparent.
In this article
01 [How to Remove the Background of a Photo in PowerPoint](#Part 1)
02 [How to Convert JPG to Transparent PNG](#Part 2)
Part 1 How to Remove the Background of a Photo in PowerPoint
If there is anything that a designer hates in his precious photo, then it’s the background. It hides and distracts from the main subject at hand. You can use various photo editing tools to remove the background from PNG images or JPG. However, they may not do the job as easily as you are thinking.
Yes, we know that you may be wondering about Adobe Photoshop now. It can be used for removing the background too but are you ready to pay for it? No, right? This is when you can depend on PowerPoint to erase the background of a photo without any hassle. Make sure you have PowerPoint 2010 or a later version installed before beginning. Because the earlier Microsoft PowerPoint versions don’t have a background removal feature.
Step 1: Open the image in a new tab
Launch PowerPoint on your desktop or Mac and change the layout of the slide to “Blank”. Next, insert your image, which has a solid or high-contrast background. Such pictures are easier to transform and edit.
Step 2: Select the “Remove Background” option
Click on your image to get the “Picture Format” in the menu toolbar. On the left top side, choose the “Remove Background” option. Now, PowerPoint will try to remove the background automatically. If the final picture that you are getting is not satisfactory, move to the next step.
Step 3: Select the Area
From the given options in the toolbar, mark the areas that you want to keep or remove in the final result. As you can view, how some parts of the pictures have been cut. So, spread the box to cover the entire area of the image, which you want to keep. Remember, purple-highlighted areas are removed automatically.
If you want to ensure a better result, use the cursor. Start hovering over the background and the main subject to get the plus and minus sign. These signs are useful for getting a precise image at the end. The Minus sign allows you to mark the areas to be removed. The plus sign can be used to keep the marked areas in the final picture.
Step 4: Finishing Touches
Check your image carefully and see whether any area is left to be removed or not. You can zoom in to find the tiniest spot. When you are satisfied with every detail, click anywhere outside of the image to stop further edits. Congratulations! Your transparent PNG is ready to save. Go to “File”>”Save As” and find the option to save your picture in PNG transparent format.
Part 2 How to Convert JPG to Transparent PNG
Ever wondered how logos in a graphic match with the background image color? It’s possible with transparent PNG images only. The transparent PNG images format contains superior quality and no background. Hence, it is pretty helpful for the designers to add them to graphics and videos.
In case you have some JPG images but you want it in PNG images format, don’t worry. You can use Kapwing as it’s a trusted content creation and video editing platform. It can bring your idea to life. It can convert JPG to PNG transparent easily. With the AI-powered facility, you can enjoy a seamless editing and conversion experience. Kapwing makes it really simple and fast, but the best part is that you can get it done for free.
Step 1: Add Your JPG
Launch Kapwing in any browser of your choice. Log in using your account or sign up with a new one. Now, you will be redirected to the Kapwing studio, where you can do all the editing and conversion. Upload your image to the “Kapwing Studio” and use the “Remove Image from Background” tool.
If the image is already saved on your device, simply hit “Click to Upload” or, if you wish, drag and drop the JPG image to initiate the conversion. On the other hand, in case the image is not available, you can copy and paste from a URL in the “Paste an image or video URL” box.
Step 2: Pick a Tool
After the image upload finishes, the next thing is to start removing its background. Go to the right side of the “Image” tab and click on the “Erase” button. Otherwise, you can use the “Remove Background from Image” tool to start.
You have two options to choose from – Erase and Magic Wand. The first tool gives you full control over what you want to remove or keep. Adjust the “eraser size” by sliding right on the dial. This way, you can remove the background precisely.
Apart from that, the Magic Wand tool is amazing for removing a particular area at once. You can remove the picture background in less time and effort. If you want to remove a certain area of the same color, then the Magic Wand is the best tool to use. It eliminates similar groups of pixels together. To modify the sensitivity, move the same dial to the right as you did while selecting the “Erase” tool.
For some impressive results, adjust the zoom and choose “Move” to select the pixels you want to remove.
Step 3: Make the PNG and Download
After everything has been set, it’s time to download your PNG transparent file. Click “Done” and then move back to the Kapwing Studio for additional features. You can add watermarks, text, and a lot more. Finally, hit the “Publish” button placed at the top right and “Download” to save the PNG file to your desktop.
You can do more with Wondershare Filmora Video Editor !
For Win 7 or later (64-bit)
For macOS 10.12 or later
Have you ever tried to extract images from a video file? Well, many of us wish to do so but lack the right tools or don’t have any idea of how to do it. Some people just take a screenshot of the video and crop it for use in memes, images, etc. However, doing this will reduce its overall resolution and quality.
If you want to preserve quality during the extraction of images from a video, use Wondershare Filmora. It lets you take images out of a video file frame by frame without any compromise on quality. It features many other tools to show your creativity.
It’s the latest update. Filmora V11 is here! Find out what’s new in this latest video editing software release and how it can help you create incredible videos and images. You can remove any unwanted object from an image, add filters and overlays, all on the go.
● Ending Thoughts →
● So there you have it: the full story on transparent PNGs, removing background, and conversion from JPG to PNG file format. As you can see, it’s not too hard to combine one image in your design. However, we don’t want you to forget anything. Hence, remember these things when you try to convert JPG to PNG transparent.
● Whichever method you choose to turn a PNG image into a JPG, make sure you are familiar with the tool. If not, first spend time figuring out the features. Seek out what suits you and then start. We would recommend following the above tips carefully instead of using any other tool.
● Beware of using third-party websites for background removal from a PNG. Many will store your pictures, which can be accessed by other users. They are not safe for you by any means.
● It’s not an easy job to convert JPG to transparent PNG using PowerPoint, especially when an image contains multiple images and colors. For such pictures, you can use Kapwing. It has plenty of additional features that you can use for creative work.
● If you have any questions or have different ways of accomplishing this, feel free to comment below. Thanks for reading.
Also read:
- Guide To Creating The Perfect VHS Effect Look in Premiere Pro for 2024
- 2024 Approved Video Editing Tips to Know Before Editing First Draft
- 7 Best GoPro Video Editors for Mac for 2024
- Updated Are You Looking to Vlog Across Your Next Stop at the Café? Get Aware of the Significant Elements that Make up the Café Vlog
- 2024 Approved Techniques You Never Heard of for Learning YouTube AI Marketing
- Updated Can You Get Free After Effects Templates Slideshow? Yes, You Definitely Can! Follow the Given Discussion to Learn About a Simple Trick and More About Getting Free Effects Template for Slideshows
- In 2024, Slideshow Makers Are On-Demand as They Come with Multiple Possibilities for Both Professional and Personal Uses. Gradually, the Best Software to Make Slideshows Is Always Welcomed to Save Time and Effort without Compromising the Quality
- 2024 Approved How To Make a Photo Collage in Microsoft Word
- New Create Amazing Slow-Motion Videos 8 Affordable Slow-Motion Cameras
- 2024 Approved Basic Introduction for LumaFusion Color Grading
- In 2024, 6 Instant Mp4 to GIF Online Tools
- Discover the Top 5 Free Online Video Filter Editors to Transform Your Videos with Captivating Color Grading and Correction Presets. Elevate Your Digital Storytelling Effortlessly
- 2024 Approved How to Color-Correct an S-Log Footage
- Learn How to Make Modern TikTok Velocity Dance Videos in Filmora Just Like the Ones You See on TikTok and Instagram Reels for 2024
- New Best Ways to Merge FLV Files Windows, Mac,Android, iPhone & Online for 2024
- Updated In 2024, Some Facts About GIF Background You Didnt Know
- New How to Resize FLV Videos Efficiently Windows, Mac,Android, iPhone & Online
- In 2024, A Roster of 8 Top Color Match Generators
- Updated The Top 10 AI Video Analytics Companies at a Glance
- In 2024, Getting Into The Details A Review of Kodak LUTs
- 2024 Approved How to Make Custom Lower Thirds with Filmora
- 2024 Approved 6 Tips for Your First Facebook Ads
- Updated In 2024, How to Add Background to Video With/Without a Green Screen
- In 2024, 3 Different Methods to Correct Color Distortion in Videos
- Updated End This Problem! Make Transparent Background Video Today for 2024
- In 2024, Making Slow Motion Videos in Premiere Pro A Review on The Best Methods
- New Ultimate Guide on Magic Effects Video Making for 2024
- 2024 Approved 4 Solutions to Resize a WebM File
- New How to Create a Slideshow with Movavi Slideshow Maker
- New 10 Top Free GIF Background Remover for PC and Online
- New 10 Best Sony LUT for Different Purposes for 2024
- 2024 Approved Do You Know You Can Trim and Cut Your Video Into the Desired Portions Using a Reliable Video Splitter? Get an Easy Video Splitter Now to Simplify Your Work. Here Are 33 Carefully Chosen Apps to Help You in This
- Updated 2024 Approved How To Edit Youtube Videos In Simple Steps
- Updated How To Be A Successful YouTuber for 2024
- A Comprehensive Guide on VHS Technology and Its Influence on Video Editing for 2024
- The Magnificent Art of Pokemon Go Streaming On Vivo V29 Pro? | Dr.fone
- In 2024, Ultimate guide to get the meltan box pokemon go For Lenovo ThinkPhone | Dr.fone
- Latest Guide on iPad 2/3 and iPhone 14 Plus iCloud Activation Lock Bypass
- How to Change GPS Location on Samsung Galaxy A05 Easily & Safely | Dr.fone
- Complete guide for recovering music files on S17t
- Wondering the Best Alternative to Hola On Realme GT Neo 5 SE? Here Is the Answer | Dr.fone
- In 2024, 3 Effective Methods to Fake GPS location on Android For your Honor X50i+ | Dr.fone
- Undelete lost pictures from Tecno Spark 20 Pro.
- How to solve MKV lagging problem in Moto G Stylus 5G (2023)?
- In 2024, How can I get more stardust in pokemon go On HTC U23? | Dr.fone
- How to get the dragon scale and evolution-enabled pokemon On Oppo Find X6? | Dr.fone
- How to Repair Corrupt Excel 2016 Files | Stellar
- How to Remove Forgotten PIN Of Your Realme C33 2023
- In 2024, How to get the dragon scale and evolution-enabled pokemon On HTC U23? | Dr.fone
- Full Tutorial to Bypass Your Realme C67 4G Face Lock?
- In 2024, How to Mirror Xiaomi Redmi 12 to Mac? | Dr.fone
- How to Transfer Data from Honor 90 GT to BlackBerry | Dr.fone
- Overview of the Best Motorola Moto G73 5G Screen Mirroring App | Dr.fone
- In 2024, How to Unlock Apple ID Activation Lock From iPhone 14?
- Reset iTunes Backup Password Of Apple iPhone 6s Plus Prevention & Solution
- How to Remove a Previously Synced Google Account from Your Itel S23+
- Resolve Your Apple iPhone 7 Keeps Asking for Outlook Password | Dr.fone
- 10 Best Fake GPS Location Spoofers for Motorola Razr 40 | Dr.fone
- Where Is the Best Place to Catch Dratini On Tecno Camon 30 Pro 5G | Dr.fone
- Possible solutions to restore deleted photos from V29 Pro.
- How to Unlock Samsung Galaxy M34 5G Bootloader Easily
- Simple ways to get lost messages back from Nokia C12 Pro
- In 2024, What You Want To Know About Two-Factor Authentication for iCloud From your iPhone 8
- In 2024, 5 Easy Ways to Copy Contacts from Vivo V30 Lite 5G to iPhone 14 and 15 | Dr.fone
- How to Unlock Apple iPhone 15 Passcode Screen? | Dr.fone
- Play Store Stuck on Downloading Of Infinix Note 30 Pro? 7 Ways to Resolve | Dr.fone
- How To Bypass iCloud By Checkra1n Even From iPhone 11 If Youve Tried Everything
- In 2024, 7 Ways to Lock Apps on iPhone 15 Plus and iPad Securely | Dr.fone
- Title: Step by Step to Cut Videos in Adobe Premiere Pro for 2024
- Author: Chloe
- Created at : 2024-04-24 07:08:14
- Updated at : 2024-04-25 07:08:14
- Link: https://ai-editing-video.techidaily.com/step-by-step-to-cut-videos-in-adobe-premiere-pro-for-2024/
- License: This work is licensed under CC BY-NC-SA 4.0.
