Steps to Add Subtitles in Canva

Steps to Add Subtitles in Canva
Have you ever used Canva before? It is a famous online tool that is also available on Windows, Mac, Android, and iOS platforms. It contains various basic editing features that you can use to crop, trim, resize, and rotate your video clips and images. Apart from these basic tools, you can also navigate to the built-in library of Canva to explore its vibrant templates.
As more than 100 million individuals use Canva every month, it’s a well-trusted tool. If you are a frequent user of Canva, this article can help you how to add subtitles in Canva. Keep reading this article to find out the quickest way to add subtitles to videos using Canva.

Part 1: What is Canva?
To create and edit videos flawlessly, Canva offers great options. It contains pre-sized video formats for YouTube, Facebook, and other social media platforms. If you are a beginner and struggling with ideas, Canva offers various templates of different categories, such as fitness, education, fashion, and real estate. Apart from using the built-in media library, you have complete freedom to upload your media files to add further modifications.
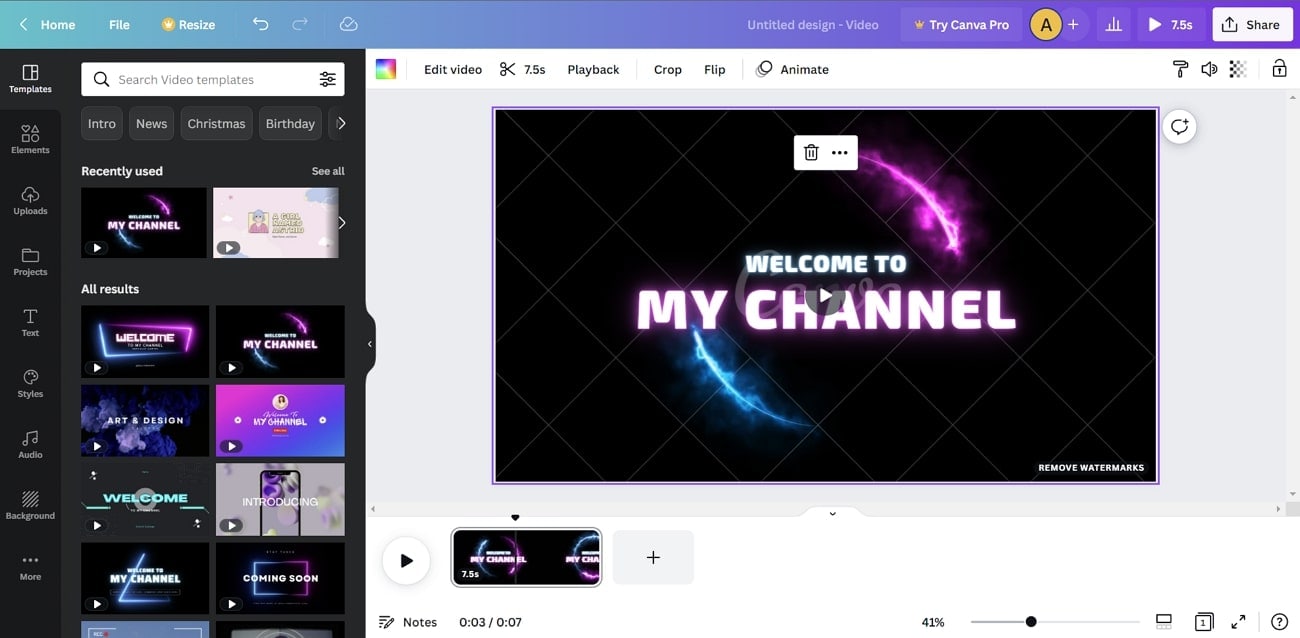
Furthermore, using Canva, you can also add exciting animations and transitions to your videos to generate a smooth look. You can also add multiple overlays to add more dimensions to your video clips. Also, you can use the Canvas captions feature to generate customized subtitles for your video files. To learn more about Canva, let’s shed light on its key features, advantages, and pricing plans:
Key Features of Canva
- Multiple Export Options: Canva offers various export formats such as MP3, PNG, GIF, MP4, PPTX, etc. You can also check the video quality before exporting it to your device.
- Add Audio Tracks: To make your videos more engaging, you can add audio tracks and sound effects using this professional tool.
- Background Remover: To remove a dull background from your video without a green screen or professional software, you can use the background remover of Canva. Through this advanced feature, you can remove the background from your videos with a single click.
- Magic Resize: It offers a Magic Resize option that enables you to resize videos in different formats for multiple platforms.
- Brand Tools: Canva’s branding tools allow users to create and save branded templates, colors, and fonts. This makes it easy to maintain consistency across all design materials and ensures that all designs align with the brand’s visual identity.
- Collaboration Features: Canva’s collaboration features make it easy for teams to work together on a design project. Users can share designs with team members and assign roles and permissions, allowing for seamless collaboration and feedback.
Advantages of Using Canva
- If you want to share your videos on social media platforms instantly, Canva is the best option. Using this software, you can share your videos on Instagram or other social media platforms with a single tap.
- Canva can also add voice-overs and narrations to your videos in high audio quality.
- This tool provides various elements such as lines, shapes, stickers, and frames that you can add to your videos.
Pricing Plans
If you want to learn more about Canva’s detailed plan, you can visit its official website .
| Plan Name | Price |
|---|---|
| Canva Pro | $54.99/Year for 1 Person |
| Canva for Teams | $84.90/Year for 5 Person |
Part 2: How to Add Captions to Videos in Canva?
Do you want to know how to add subtitles in Canva? Adding subtitles in Canva is extremely simple and quick. In this section, we have jotted down accurate and simple instructions to add subtitles using the Canva tool:
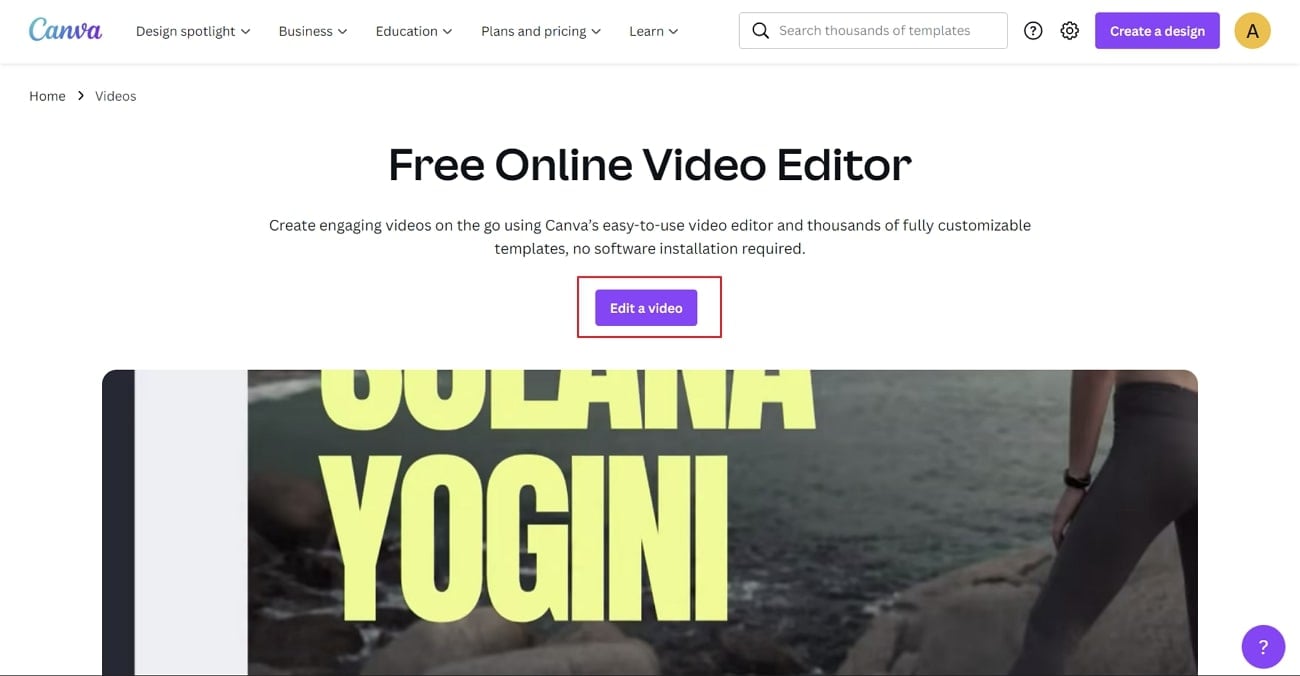
Step1 Begin by visiting the video editor tool page of Canva through any web browser. After accessing the tool page, click on “Edit a Video.” This will open a new window on your screen.
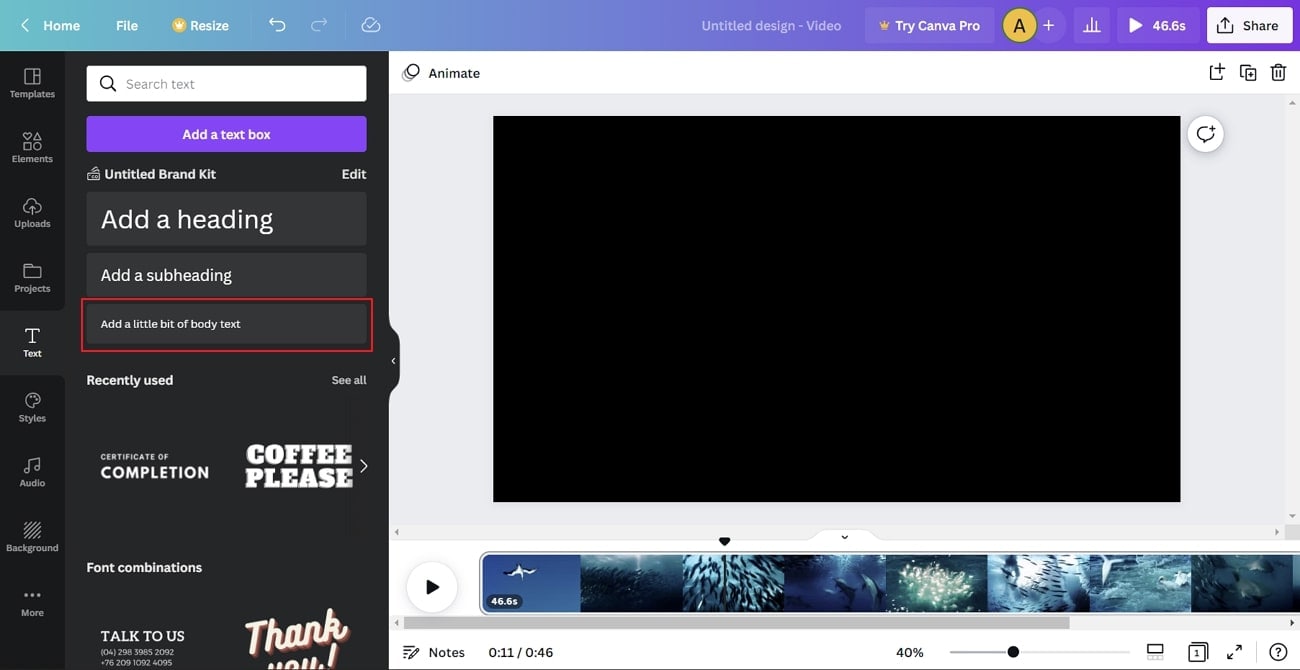
Step2 Now, hit the “Upload Files” button from the left panel and import the video file on this tool. Once done, navigate to the “Text” tab and tap “Add a little bit of body text.” Now adjust the position of the text box according to your desire. You can write your Canva captions by choosing your preferred font, color, size, and style.
Step3 You can also add effects and animation to your added subtitles for more enhancements. Once done with customizations, click on the “Share” button. Here select MP4 as the video file format and save the video on your system.

Part 3: Is There a Good Alternative to Add Subtitles to Videos?
Canva provides a very basic user interface to create subtitles. If you want to enhance your added subtitles with more possibilities, Wondershare Filmora is the best alternative. You can add subtitles through this tool in multiple ways. You can either add subtitles manually or use its “Speech-to-Text” feature. Through this feature, you can transcribe your voice to generate subtitles automatically.
Free Download For Win 7 or later(64-bit)
Free Download For macOS 10.14 or later
Filmora also offers great styles and font options to customize the subtitles. You can easily check the results from the preview window of this efficient video editor. Hence, Filmora acts as a complete and well-trusted platform to generate subtitles in different ways.
Instructions to Create Subtitles Using Filmora
Are you tired of writing subtitles manually in Canva? Read the precise instructions guided below to create the subtitles automatically in more than 16 languages:
Step1 Upload the Video File
Download and launch Filmora on your desktop to initiate the process. On its main interface, tap “Create New Project,” which will open a new window. Afterward, upload your desired video on the Project Media to proceed.

Step2 Select Speech-to-Text Feature
Once done with uploading the file, drag the video file to the timeline. Click on the “Speech-to-Text” icon displayed on the timeline and hit the “OK” button after selecting the required language and file. After some seconds, subtitles would be automatically added to the timeline.

Step3 Add Modifications to Subtitles
On your timeline, double-click on the auto-generated subtitles to open the edit settings. By going to the Presets section, you can select the subtitle styles. To add more modifications, you can head to the Custom tab as displayed on your screen. From here, you can change the font, style, color, and size of the subtitles. To confirm the subtitles edits, press the “OK” button.

Step4 Export the Video File
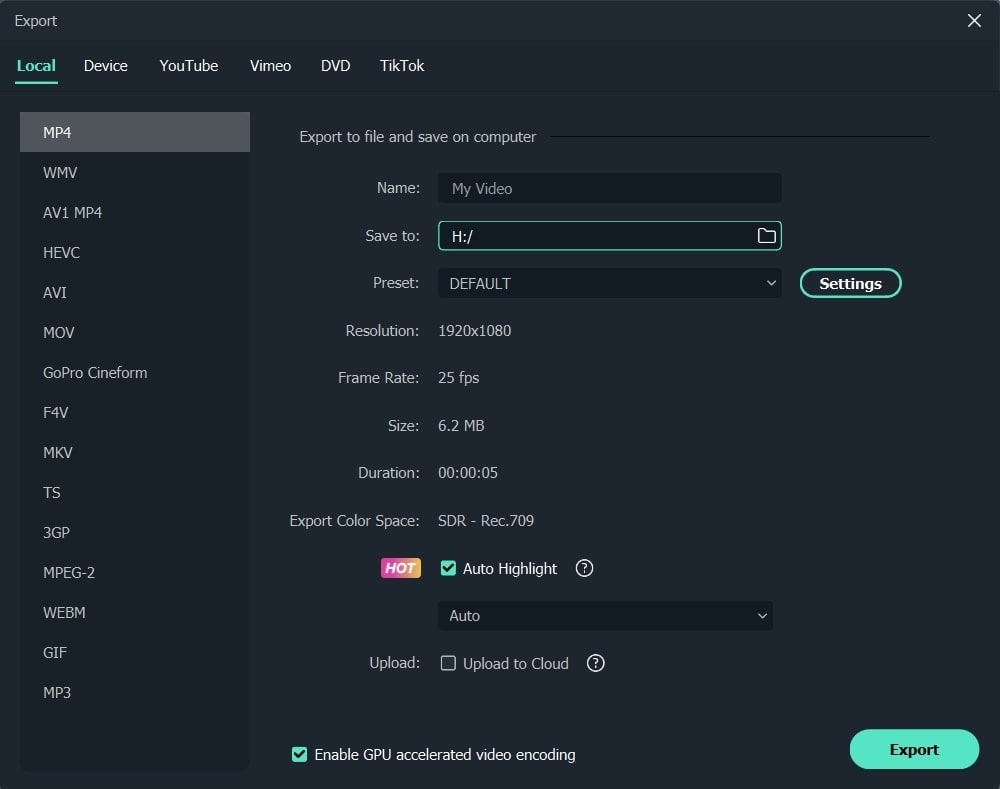
Once you are done with all the subtitle edits, click on the “Export” button. Filmora provides you with various export resolution options and file formats that you can choose. Moreover, you can also share the video file to your desired social media platform, such as YouTube, Vimeo, or TikTok.
Conclusion
Being a non-technical individual, adding subtitles may sound tricky. To provide you with complete assistance, this article has shed light on how to add subtitles in Canva. But, Canva has some limitations in generating subtitles. Hence, we recommend you try and explore Wondershare Filmora to craft subtitles. This tool comprises a Speech-to-Text feature through which you can produce subtitles automatically without hassle.
Part 2: How to Add Captions to Videos in Canva?
Do you want to know how to add subtitles in Canva? Adding subtitles in Canva is extremely simple and quick. In this section, we have jotted down accurate and simple instructions to add subtitles using the Canva tool:
Step1 Begin by visiting the video editor tool page of Canva through any web browser. After accessing the tool page, click on “Edit a Video.” This will open a new window on your screen.

Step2 Now, hit the “Upload Files” button from the left panel and import the video file on this tool. Once done, navigate to the “Text” tab and tap “Add a little bit of body text.” Now adjust the position of the text box according to your desire. You can write your Canva captions by choosing your preferred font, color, size, and style.

Step3 You can also add effects and animation to your added subtitles for more enhancements. Once done with customizations, click on the “Share” button. Here select MP4 as the video file format and save the video on your system.

Part 3: Is There a Good Alternative to Add Subtitles to Videos?
Canva provides a very basic user interface to create subtitles. If you want to enhance your added subtitles with more possibilities, Wondershare Filmora is the best alternative. You can add subtitles through this tool in multiple ways. You can either add subtitles manually or use its “Speech-to-Text” feature. Through this feature, you can transcribe your voice to generate subtitles automatically.
Free Download For Win 7 or later(64-bit)
Free Download For macOS 10.14 or later
Filmora also offers great styles and font options to customize the subtitles. You can easily check the results from the preview window of this efficient video editor. Hence, Filmora acts as a complete and well-trusted platform to generate subtitles in different ways.
Instructions to Create Subtitles Using Filmora
Are you tired of writing subtitles manually in Canva? Read the precise instructions guided below to create the subtitles automatically in more than 16 languages:
Step1 Upload the Video File
Download and launch Filmora on your desktop to initiate the process. On its main interface, tap “Create New Project,” which will open a new window. Afterward, upload your desired video on the Project Media to proceed.

Step2 Select Speech-to-Text Feature
Once done with uploading the file, drag the video file to the timeline. Click on the “Speech-to-Text” icon displayed on the timeline and hit the “OK” button after selecting the required language and file. After some seconds, subtitles would be automatically added to the timeline.

Step3 Add Modifications to Subtitles
On your timeline, double-click on the auto-generated subtitles to open the edit settings. By going to the Presets section, you can select the subtitle styles. To add more modifications, you can head to the Custom tab as displayed on your screen. From here, you can change the font, style, color, and size of the subtitles. To confirm the subtitles edits, press the “OK” button.

Step4 Export the Video File
Once you are done with all the subtitle edits, click on the “Export” button. Filmora provides you with various export resolution options and file formats that you can choose. Moreover, you can also share the video file to your desired social media platform, such as YouTube, Vimeo, or TikTok.

Conclusion
Being a non-technical individual, adding subtitles may sound tricky. To provide you with complete assistance, this article has shed light on how to add subtitles in Canva. But, Canva has some limitations in generating subtitles. Hence, we recommend you try and explore Wondershare Filmora to craft subtitles. This tool comprises a Speech-to-Text feature through which you can produce subtitles automatically without hassle.
How to to Mimic Professional Filming Gears
The professional and expensive gears are primarily out of budget for starters. But there is no need to stop filming because household things will give good output.
In this article, you will learn 6 pro tips to make professional filming gear using cardboard, container, and tape. It will turn out into POV and barrel roll shots. Scroll more to learn the top ways, and then enjoy the rest with your audience.
Part 1. Things to Remember Before Making Gears
Before using tools for professional videos, you should remember some side effects and cautions to make everything reliable and simple. Read the below outlines!
Not Professional Results
You should remember that homemade tools will give you different results than professional gear because they are expensive for a purpose. But you can experiment and get fun during filming with these products.
Safety Measures
If you use any heavy or temperature-sensitive equipment, you should take safety before operating them.
Handle Carefully
Before experimenting, make sure that you are holding everything tightly. Ensure that no accident occurs during filming!
After taking precautions and understanding the output, it’s time to make tools and film!
Part 2. Smooth Camera Movement with A Door
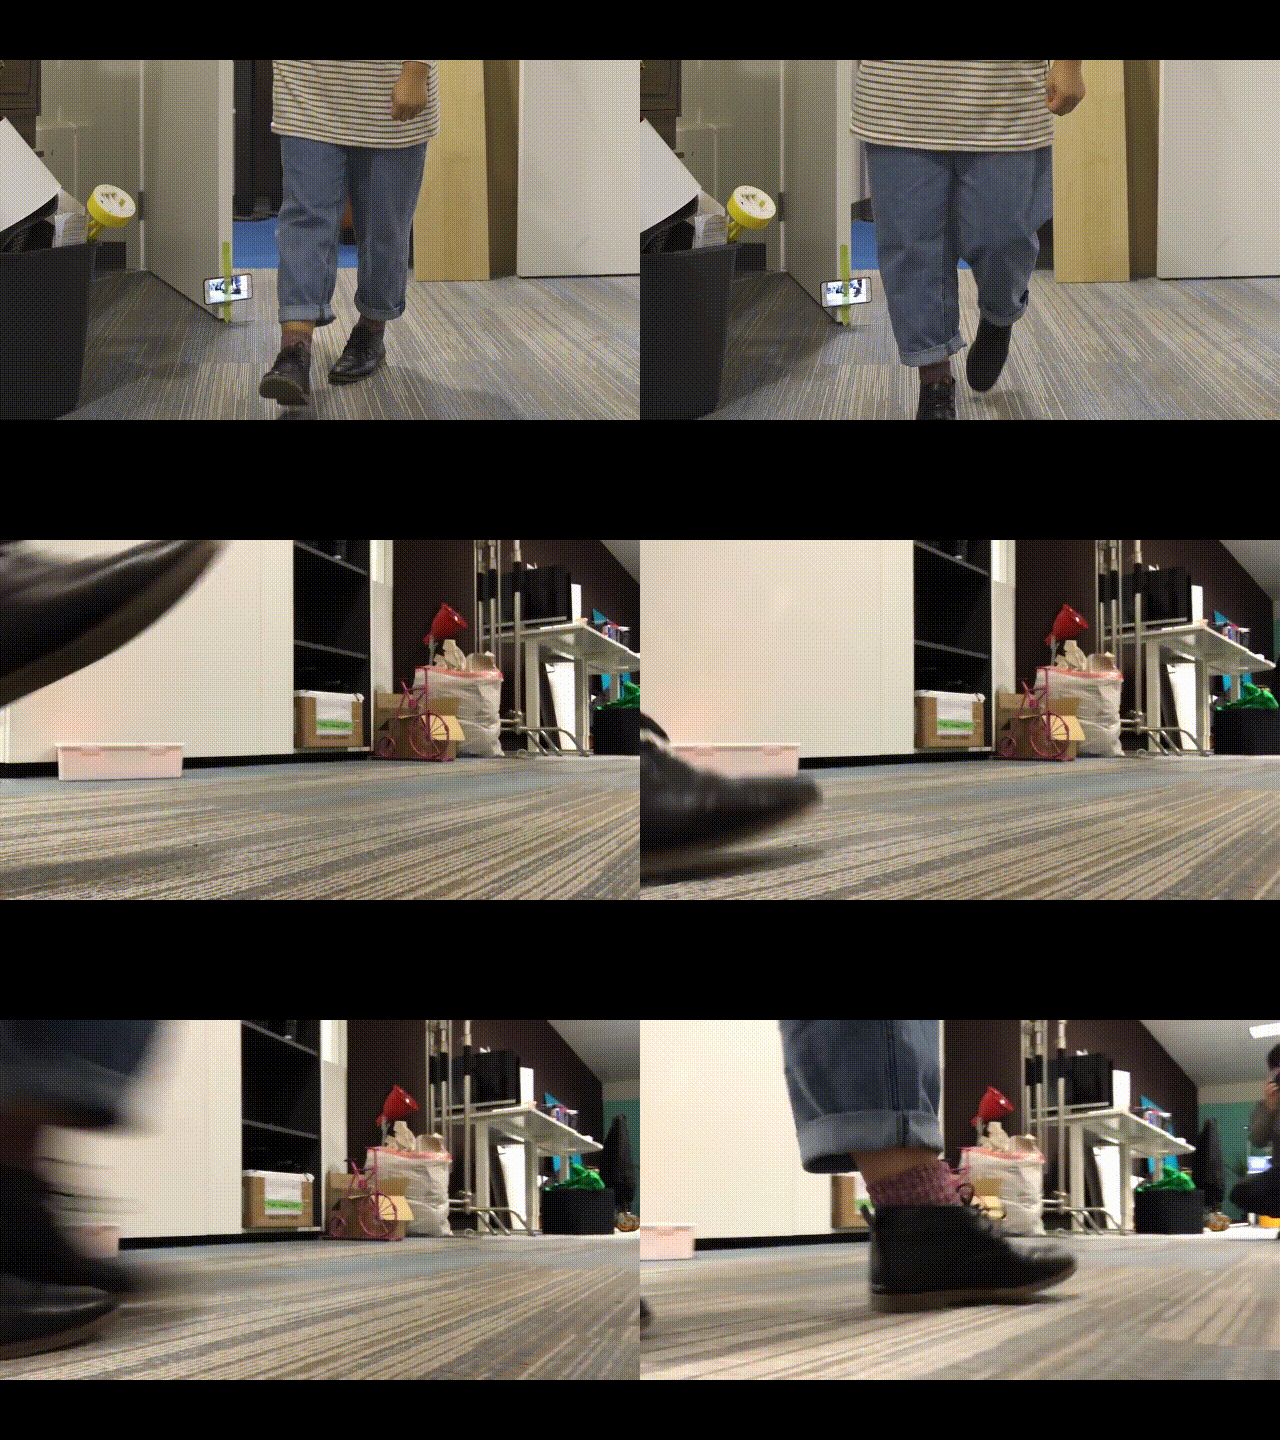
With a simple mobile camera, you can make smooth shots of any action, like walking, running, and playing. There is no need to get any professional gear.
It easy to achieve by attaching a camera to the door. You can use duct or any other tape which is easily available in the home. Fasten the mobile phone to the side of the door with tape, as shown below!

Moving the door while performing any action will result in smooth shots. Check out the final results below.
Part 3. Film Shots of Underwater
Filming underwater is always a dream of any videographer, but we were limited to get shots from the water’s surface. So now it’s time to add more creativity to your video.
First, you need to take a transparent container or any glass container. Pour water according to your need in it.
![]()
Note: Ensure the container is light enough to put on the phone.
Then, place the container on the lens of the phone to make a video. Then, take care of the phone from the water.
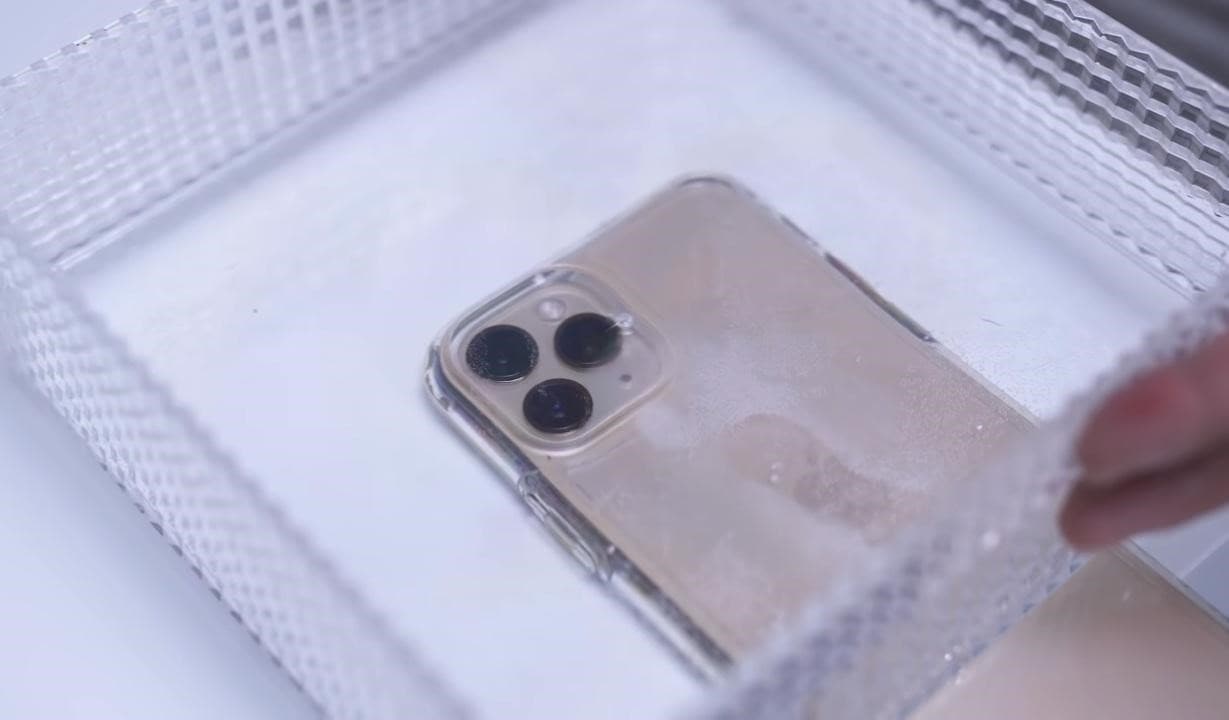
Pro Tip: You can also shine light source in water and add glitter or colors to get more astonishing shots.
Part 4. Make Colourful Shots Without Coloured Lights
All filmmakers love party lights and want to add colors like that in the video. Different colored lights in videos usually represent different mood swings and enhance the creativity of storytellers.
Professional videographers use expensive lights to give these effects. But you don’t need to purchase any expensive gear. Because you can make colorful shots easily with colored plastic binder dividers, or you can also use cellophane wraps.
First, wrap the colored divider around the LED light or any light you use to shoot video.
![]()
Note: Check the light temperature after short intervals because it melts or burns the dividers when the light source gets hot.
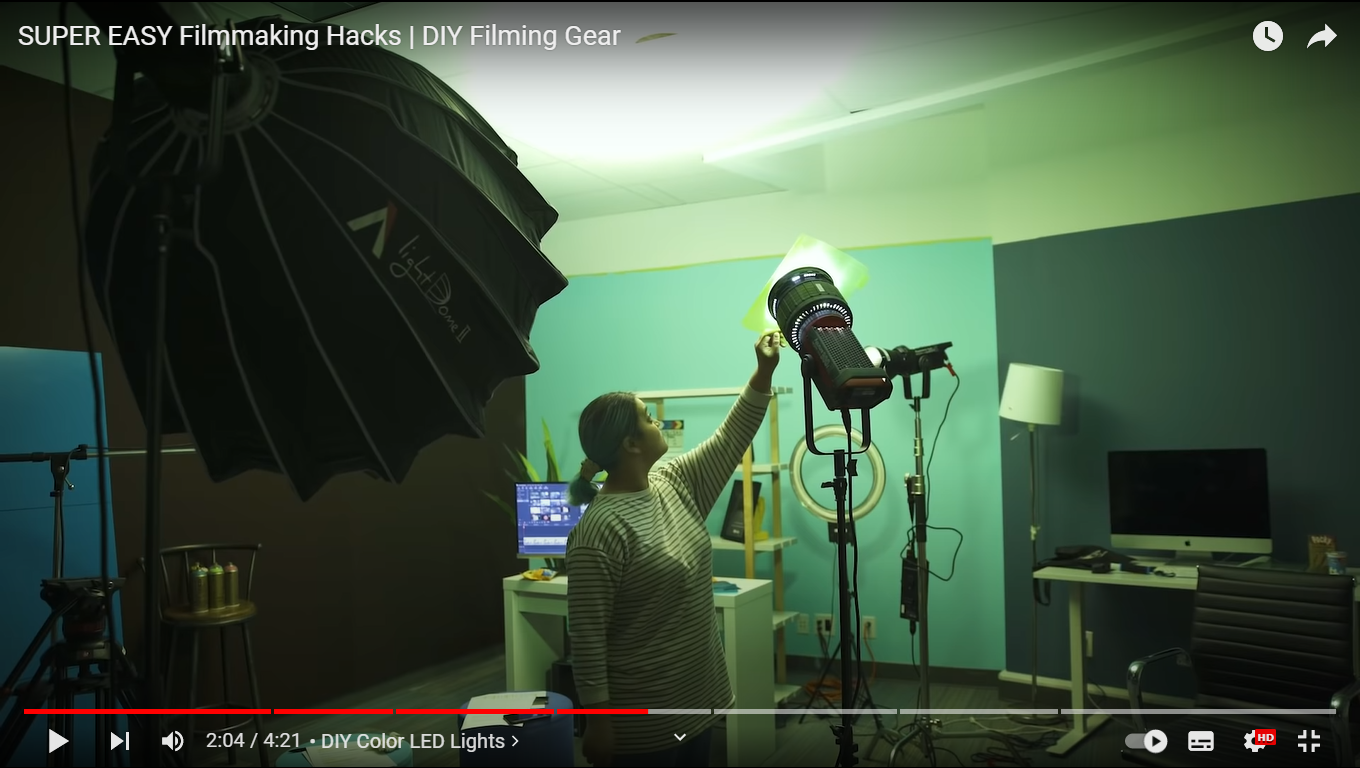
Now make the video and try with different colors to add suspense, horror, and happy effects to the video.
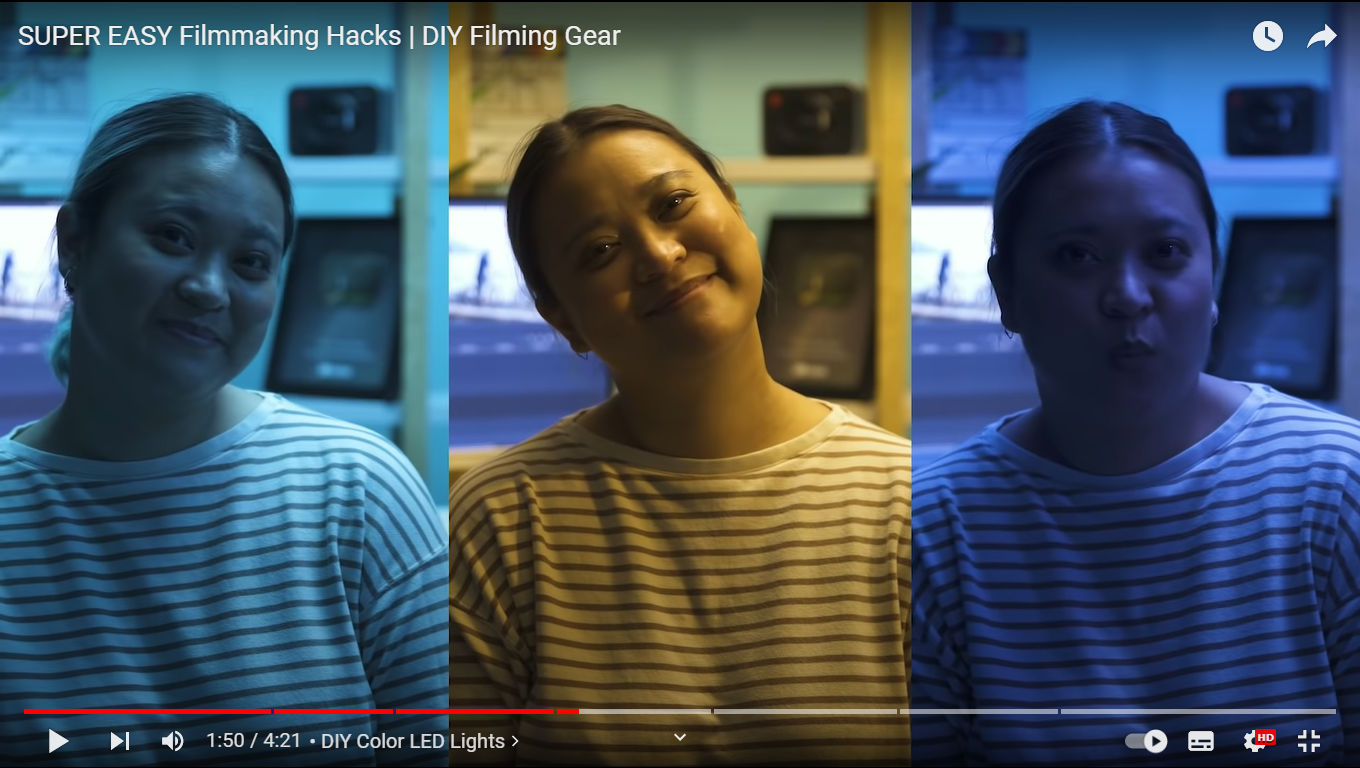
The video still needs more creative effects and designs; scroll more to read exciting tips.
Part 5. Different Shapes of Light with Cardboard
To add a fantasy location in the video and make light effects in the form of shapes, try out easily available cardboard. Most of the time, aesthetic videos are made by these hacks, giving viewers different vibes.
Only a professional photographer and videographer know how to attract the audience to the shots by doing these simple hacks.
The interesting thing is that if light has more shape, it will precisely describe more about the scene’s backstory, location, and context. Give it a try!
Step1 Cutting of cardboards
Cut the cardboard in any shape, whatever you want. We will experiment by cutting cardboard in window blinds shape.
![]()
Note: There is no specific recommendation for the cardboard, you can use any size or shape which suits you the best.

Step2 Make shots in different shapes of light
After giving shape, now move the cardboard around the light source and make a video. It seems like the subject is sitting near the window and has aesthetic vibes.
![]()
Note: The more precise the cutting of cardboard, the more professional it looks.

Become more creative and make more shapes with cardboard because the audience always prefers new content in the market.
Part 6. Create Point of View Shots
After adding colors and shapes, now it’s time to get some Point of View (POV) shots. Most of the time, viewers become bored by watching framing and filming coverages.
POV shots are mostly captured from a specific angle to show an object’s characters. They are mostly seen in food commercials, and videographers of snacks just love to make these shots.
To make POV shots, there is nothing specific required. You just have to make a suitable position for the lens. Follow the below guidelines and capture it!
Step1 Cut ends of packet
To create POV shots of your favorite snack, first of all, cut down both ends of the packets.
Step2 Attach packet on a camera
After cutting, attach the packet of snacks to the camera lens or phone with the help of old-fashioned tape.
Ensure the camera is turned on, and then make a POV shot. Now, it’s time to enjoy the rest part with the audience. Check out the final results, as shown below!

Due to this, the food seems good, and you can notice the number of spices too. This one actually looks amazing!
What if we add the rotatory shots, too, in the video? For this, check out the last tip and try that!
Part 7. Create a Barrel Roll Shot
Barrel roll shots are the full axial shot by spinning the camera lens. Epic shots that formerly required costly gimbals and sophisticated techniques are now as simple as strolling.
It’s pretty easy to make a rotatory shot at 360° by using equipment easily available at home. Rolling may feel anxiety and disorientation. Filmmakers utilize it to confuse or unnerve audiences in movies.
There is no need to purchase expensive gambles to make barrel roll clips. Instead, try this hack by utilizing a power drill present at your home. Then, follow the below steps to give it a professional look!
Step1 Take equipment
First, take a camera lens or smartphone, whatever you are using to make a video, and a power drill as a gimbal.
Step2 Camera with drill
Attach the camera to the power drill with the help of old-fashioned tape.
![]()
Note: You should have a piece of square foam or soft block placed between the camera and drill to assist.

Now, it’s time to turn on the drill and ensure that the video option is “Turn On” in the camera. Then, enjoy the shots of 360° with your audience!

Conclusion
Finally, you get a filmy video after performing above mentioned 6 DIY hacks without expensive gear. More creativity in a video attracts more audience, which makes you more prior in the videography industry.
You can also try more tools at home and share your ideas with others to get reviews on them and make better changes. Make sure that you are taking all safety measures and precautions.
Then, place the container on the lens of the phone to make a video. Then, take care of the phone from the water.

Pro Tip: You can also shine light source in water and add glitter or colors to get more astonishing shots.
Part 4. Make Colourful Shots Without Coloured Lights
All filmmakers love party lights and want to add colors like that in the video. Different colored lights in videos usually represent different mood swings and enhance the creativity of storytellers.
Professional videographers use expensive lights to give these effects. But you don’t need to purchase any expensive gear. Because you can make colorful shots easily with colored plastic binder dividers, or you can also use cellophane wraps.
First, wrap the colored divider around the LED light or any light you use to shoot video.
![]()
Note: Check the light temperature after short intervals because it melts or burns the dividers when the light source gets hot.

Now make the video and try with different colors to add suspense, horror, and happy effects to the video.

The video still needs more creative effects and designs; scroll more to read exciting tips.
Part 5. Different Shapes of Light with Cardboard
To add a fantasy location in the video and make light effects in the form of shapes, try out easily available cardboard. Most of the time, aesthetic videos are made by these hacks, giving viewers different vibes.
Only a professional photographer and videographer know how to attract the audience to the shots by doing these simple hacks.
The interesting thing is that if light has more shape, it will precisely describe more about the scene’s backstory, location, and context. Give it a try!
Step1 Cutting of cardboards
Cut the cardboard in any shape, whatever you want. We will experiment by cutting cardboard in window blinds shape.
![]()
Note: There is no specific recommendation for the cardboard, you can use any size or shape which suits you the best.

Step2 Make shots in different shapes of light
After giving shape, now move the cardboard around the light source and make a video. It seems like the subject is sitting near the window and has aesthetic vibes.
![]()
Note: The more precise the cutting of cardboard, the more professional it looks.

Become more creative and make more shapes with cardboard because the audience always prefers new content in the market.
Part 6. Create Point of View Shots
After adding colors and shapes, now it’s time to get some Point of View (POV) shots. Most of the time, viewers become bored by watching framing and filming coverages.
POV shots are mostly captured from a specific angle to show an object’s characters. They are mostly seen in food commercials, and videographers of snacks just love to make these shots.
To make POV shots, there is nothing specific required. You just have to make a suitable position for the lens. Follow the below guidelines and capture it!
Step1 Cut ends of packet
To create POV shots of your favorite snack, first of all, cut down both ends of the packets.
Step2 Attach packet on a camera
After cutting, attach the packet of snacks to the camera lens or phone with the help of old-fashioned tape.
Ensure the camera is turned on, and then make a POV shot. Now, it’s time to enjoy the rest part with the audience. Check out the final results, as shown below!

Due to this, the food seems good, and you can notice the number of spices too. This one actually looks amazing!
What if we add the rotatory shots, too, in the video? For this, check out the last tip and try that!
Part 7. Create a Barrel Roll Shot
Barrel roll shots are the full axial shot by spinning the camera lens. Epic shots that formerly required costly gimbals and sophisticated techniques are now as simple as strolling.
It’s pretty easy to make a rotatory shot at 360° by using equipment easily available at home. Rolling may feel anxiety and disorientation. Filmmakers utilize it to confuse or unnerve audiences in movies.
There is no need to purchase expensive gambles to make barrel roll clips. Instead, try this hack by utilizing a power drill present at your home. Then, follow the below steps to give it a professional look!
Step1 Take equipment
First, take a camera lens or smartphone, whatever you are using to make a video, and a power drill as a gimbal.
Step2 Camera with drill
Attach the camera to the power drill with the help of old-fashioned tape.
![]()
Note: You should have a piece of square foam or soft block placed between the camera and drill to assist.

Now, it’s time to turn on the drill and ensure that the video option is “Turn On” in the camera. Then, enjoy the shots of 360° with your audience!

Conclusion
Finally, you get a filmy video after performing above mentioned 6 DIY hacks without expensive gear. More creativity in a video attracts more audience, which makes you more prior in the videography industry.
You can also try more tools at home and share your ideas with others to get reviews on them and make better changes. Make sure that you are taking all safety measures and precautions.
Easy Guide to Zoom Video in VLC
Even though VLC Media Player is not the default video player in any operating system, most users install VLC Player separately on their computers. This is because VLC Media Player offers several useful and advanced features that the default media player like Windows Media Player lacks. There are situations when users need to zoom into certain parts of a video, and that is where VLC zoom in video feature comes in handy.
You may need to zoom into videos to pay attention to details and focus on parts around the subject that others are missing out. For example, you have recorded a video, and you have played it on VLC to zoom in and ensure that there is nothing distracting before you publish the video. Now, we will illustrate all the different ways on how to zoom in VLC Media Player. We will also suggest a better alternative to zoom into videos easily.
Part 1: Zoom VLC Video Using Interactive Zoom
VLC Media Player comes with Interactive Zoom feature that lets you zoom into a section of a video irrespective of its resolution. You can use Interactive Zoom feature to zoom nearly eight times the original size of the video. While you zoom your video with Interactive Zoom option, VLC Media Player zooms the video digitally, and if the video resolution is not high, you can see some deterioration in video quality as you zoom in. Here are the steps on how to VLC zoom with Interactive Zoom.
Step1First, you have to enable Interactive Zoom feature. Launch VLC Player and go to Tools menu option.
Step2Select Effects and Filters and you will see Adjustments and Effects window open.
Step3Go to Video Effects tab and then go to Geometry tab.
Step4Turn on Interactive Zoom option. Click on Save and Close buttons.
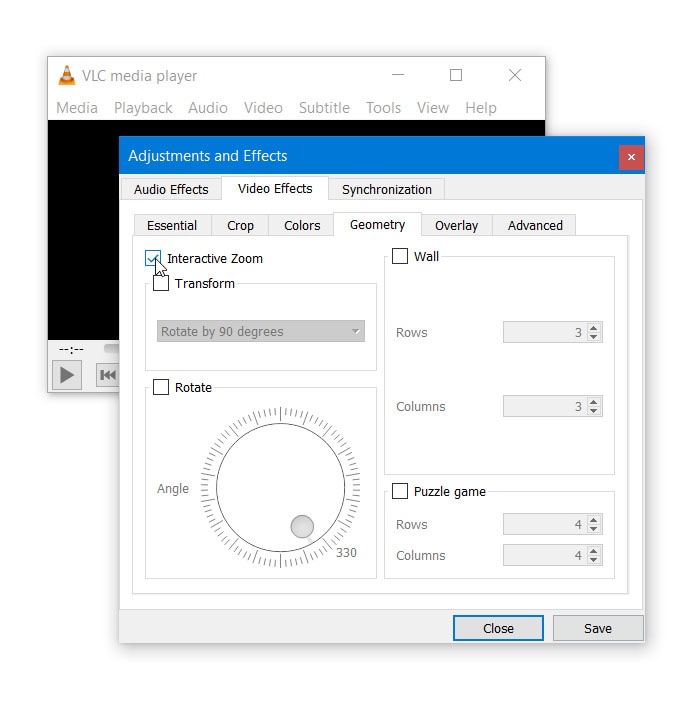
Step5Play a video and you will see a Picture in Picture window in the top-left corner where you can see live preview of the video. You will notice a rectangular box that you can drag around the PiP window to zoom that section of the video.
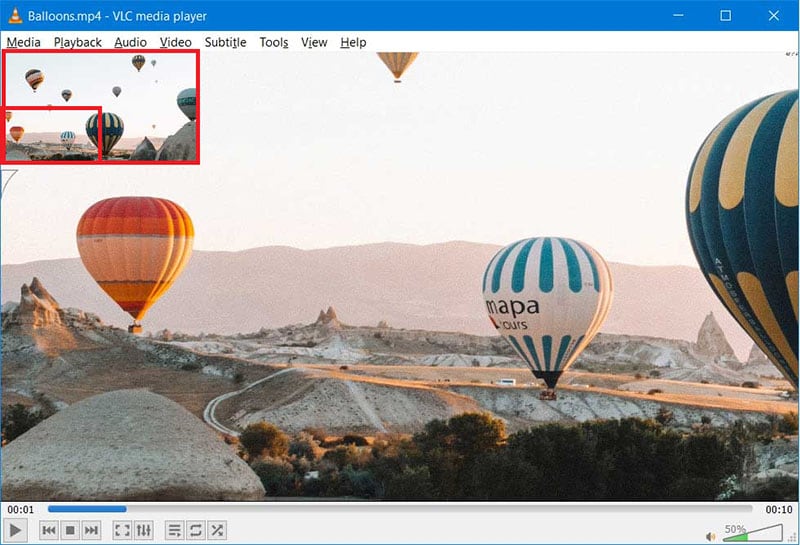
Step6Wherever you place the rectangular box in PiP window, that part will be zoomed and shown outside the PiP window. You can increase or decrease the level of magnification from the vertical slider present below PiP window.
Part 2: Zoom Video Using VLC Video Menu
Apart from Interactive Zoom, there is also an inbuilt Zoom option available under Video Menu. While Interactive Zoom is for detailed zooming, Zoom through Video menu on VLC is for instant zooming. Moreover, Zoom through Video menu is effective only when you view the video on VLC Player. If you are watching the video on full screen, the zooming effect will not be easily noticeable. Here are the steps on how to zoom in VLC player using VLC Video menu.
Step1Open VLC Media player in windowed mode and play the desired video.
Step2Go to Video menu and select Zoom option.
Step3You will come across several options such as 1:4 quarter, 1:2 half, 1:1 original, and 2:1 double. You can select from one of them as per your requirements.
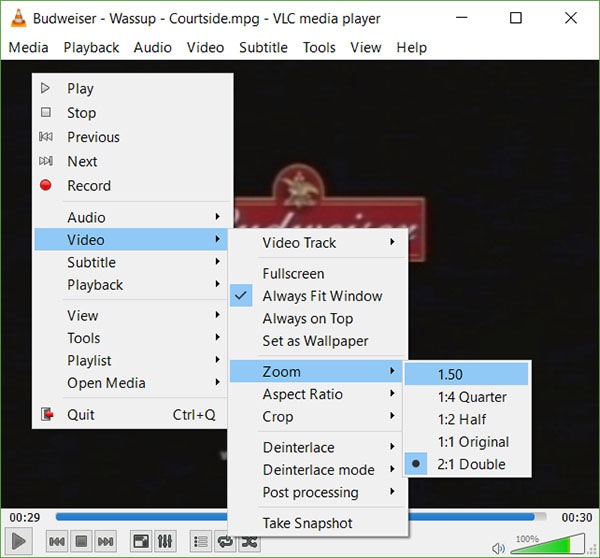
Otherwise, you can press Shift + Z keys together to try out different zoom options.
Part 3: Zoom VLC Video Using Magnifier
If you are using VLC Media Player on your Windows desktop computer, you can use the inbuilt Magnifier tool to zoom into a video that you are playing on VLC. You can zoom into videos to read any text in the background but this leads to low resolution and distortion. You can zoom in by 16 times which is the highest among all the three methods. Here are the steps on how to VLC zoom video using Magnifier tool.
Step1Open VLC Player and play the desired video.
Step2Go to Start menu on Windows and search for “Magnifier”.
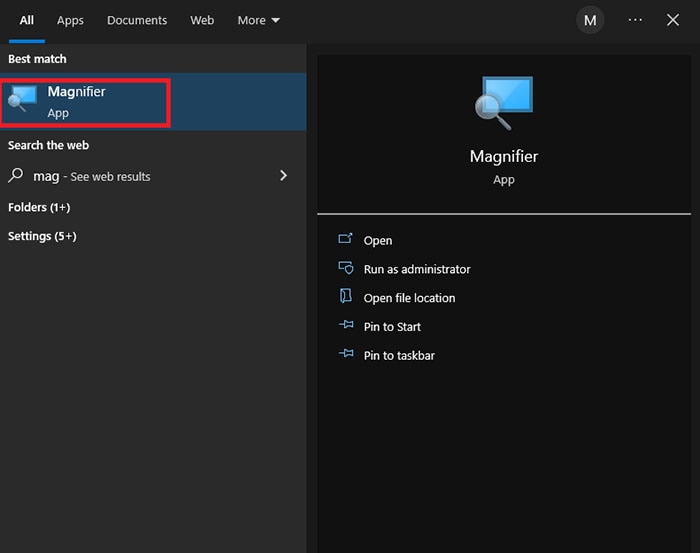
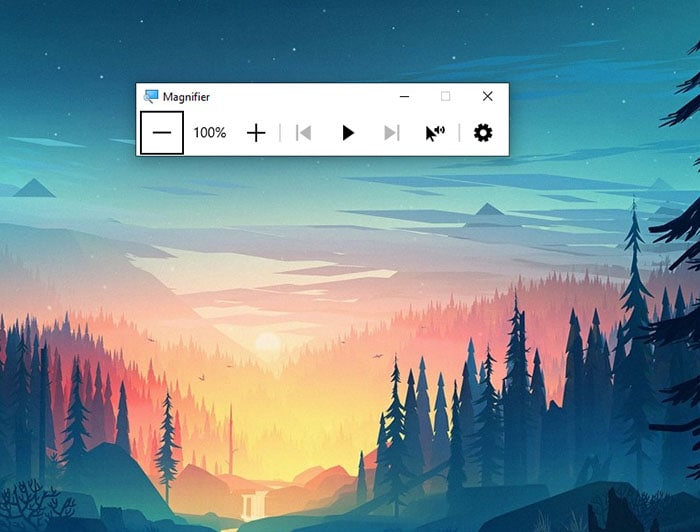
Step3Click on Magnifier App. Once it opens, place the mouse pointer on the video and you will see its magnified version.
Step4Press Windows and “+” keys to zoom in while press Windows and “-“ keys to zoom out.
Part 4: VLC Alternative to Zoom in Videos
If you are not satisfied with VLC Player zoom feature, you can use a video editor to zoom into your video conveniently so that you can check any focused section on your video. You can also read any text on the video comfortably. We recommend Wondershare Filmora as an alternative to VLC Media Player for zooming into videos. Filmora is a professional video editor and here is the list of the steps on how to zoom into videos with Filmora.
Step 1: Download and install Wondershare Filmora and it is available for Windows and Mac users.
Free Download For Win 7 or later(64-bit)
Free Download For macOS 10.14 or later
Step 2: Launch Wondershare and click on New Project option.
Step 3: Import your video on Filmora into Project Media folder by drag and drop option.

Step 4: Drag and drop the video file into Timeline. Click on Crop icon on the top bar of Timeline.
Step 5: Go to Pan & Zoom tab and move the rectangular box and play the video to watch its magnified video. You can also export the video after cropping in your desired file format.

Conclusion
There are several scenarios when you need to zoom into a video to focus on the details. VLC Media Player comes with instant zoom as well as detailed zoom options to satisfy your requirements. You can even use Magnifier App on Windows to zoom into videos. But for the best result, we recommend Wondershare Filmora as the best VLC Player alternative for zooming videos.
Free Download For macOS 10.14 or later
Step 2: Launch Wondershare and click on New Project option.
Step 3: Import your video on Filmora into Project Media folder by drag and drop option.

Step 4: Drag and drop the video file into Timeline. Click on Crop icon on the top bar of Timeline.
Step 5: Go to Pan & Zoom tab and move the rectangular box and play the video to watch its magnified video. You can also export the video after cropping in your desired file format.

Conclusion
There are several scenarios when you need to zoom into a video to focus on the details. VLC Media Player comes with instant zoom as well as detailed zoom options to satisfy your requirements. You can even use Magnifier App on Windows to zoom into videos. But for the best result, we recommend Wondershare Filmora as the best VLC Player alternative for zooming videos.
How To Make a Timelapse in After Effects
Time-Lapse movies are great for a variety of projects; you can use them as establishing shots in sitcoms, corporate marketing videos, and they can make lovely backgrounds for animated slideshows. A time-lapse video is essentially a series of photographs taken at regular intervals to depict how the environment changes gradually over a shorter period of time. In this article, we’ll demonstrate how you may quickly and easily build an After Effects time-lapse effect.
With that said, let’s start!
Step 1. Create a new composition
Calculating your composition length to accommodate the frame rate and number of images is the first step in generating a time-lapse video.
- Verify the number of images you have for your Sequence.
- New Composition Creation. Selecting a frame rate: A time lapse film produced at 30 frames per second will flow smoothly, but you can select any frame rate you like.
- To determine the duration of your composition, divide the number of photographs you have by the frame rate you’ve chosen. For instance, if you use 600 photos at 30 frames per second, your composition will last 20 seconds.
Step 2. Import your images
You are prepared to make a time-lapse sequence if all of your photographs are saved to the same folder and are in the same order. If you are working directly from your Camera, you will likely have Camera Raw files, although this procedure works with PNG and JPEG sequences.
- Press Command/Control I on your keyboard or select File > Import. Find the folder holding your image sequence.
- To begin, select the first picture in the sequence. If all of your images have accurate names, After Effects will be able to identify a sequence of images.
- Make sure the Force Alphabetical Order and Camera Raw Sequence checkboxes are selected. Your Time-Lapse Sequence will display in the Project Browser Panel after you click Import.
- Once you’ve watched how it plays, you can adjust the Frame Rate by right-clicking the Sequence in the Project Browser and selecting Interpret Footage > Main.
- To update your time-lapse, modify the Frame Rate setting and click OK.

Step 3. Create movements
- After Effects’ Time-Lapse Sequence can be used just like any other standalone clip. This implies that you may give your time-lapse clip movement by adding Keyframes and Effects.
- Place your Playhead at the beginning of the clip after choosing the Image Sequence. Make a keyframe for the scale or position.
- To generate a second Keyframe for the value of your choice, move to the end of the clip. Make any necessary Clip modifications.
- Right-click on the timeline, choose New > Adjustment Layer, then add your effects to the Adjustment Layer to add effects like noise and grain.
Step 4. Create slow motion from a video
You can import your video after you’ve shot it to prepare it for editing. The same steps, including naming your photos in order, must be taken for the Time Lapse sequence. It may be advantageous to entirely rename both your Image Sequence and Performer clip.
- Drag the finished Time Lapse sequence to your Timeline after completing it as previously explained.
- Over the Time Lapse, add the Performer Clip to the Timeline.
- Choose Time>Time Stretch by performing a right-click on the performer clip.
- You can alter the Stretch Factor or Duration in the dialogue box. When you alter one parameter, the other will reflect the new Stretch Factor or Duration for you.
Step 5. Make an overlay
You can alter the Stretch Factor or Duration in the dialogue box. When you alter one parameter, the other will reflect the new Stretch Factor or Duration for you.
- Find Luma Key in the Effect Control Panel and drag it to your clip.
- Change the Key Type setting in the Effect Control Panel to Key Out Brighter.
- The Threshold, Tolerance, and Edge settings should be adjusted until only the silhouette is visible.
- Use the Pen or Mask Tool to create a circle around the parts you want to delete if you discover any corners of your clip that are still visible.
- Add any Effects, such as Light Leaks, to your Adjustment Layer by choosing “Right-click > New > Adjustment layer.”
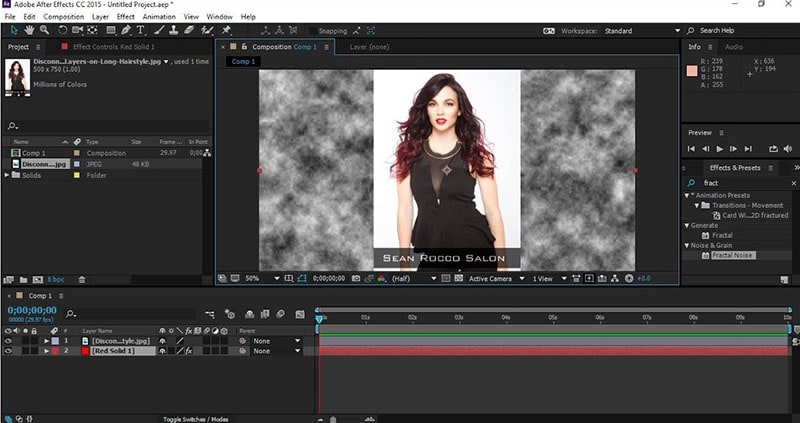
After Effects CC must be opened, a new project must be created, the Import File menu option must be selected, and the appropriate folder containing the altered still images must be located and selected before the time-lapse photos can be turned into a film. You need to make sure that the JPEG Series box is checked, as well as the Force Alphabetical Order box.
Once you have clicked on the first image in the sequence. The time-lapse video that you uploaded appears in the project library. After performing a right-click on the filename, select “New Comp from Selection” from the context menu.
Step 6. Exporting your video
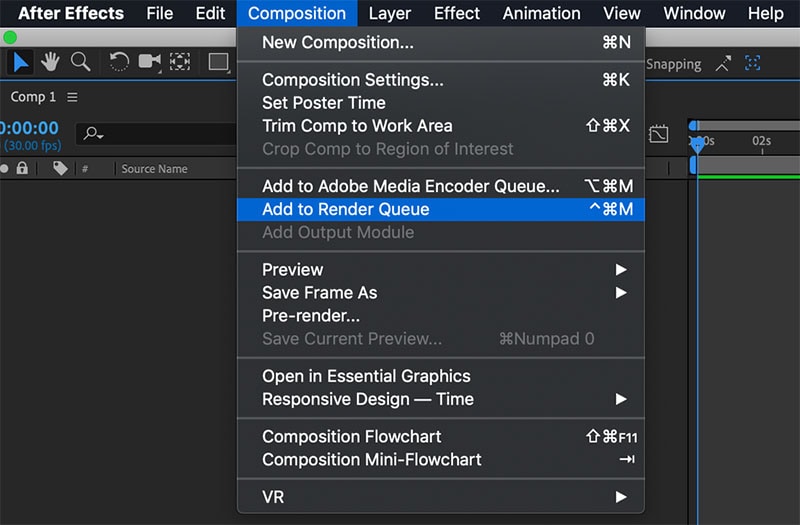
After getting our sequence to perform some kind of slow, understated animation so that it appears as though the camera is moving dramatically, we will need to export a video file. Go to File > Export > Add to Render Queue, then open the Render Queue dialog box by going to Window > Render Queue. From there, you can choose the Output Module and change the settings in the options dialog box. Finally, choose the Output To option and select the location on your computer where you would like to save the video clip that we are currently rendering and exporting.
Conclusion
No matter how you make your time lapse videos, After Effects has a ton of features you can use to modify and enhance the way they look. Now that you are familiar with the fundamentals, you can play with the Frame Rates and Composition options. Check out this helpful manual for more information on Time Stretching and Remapping in After Effects.
Free Download For Win 7 or later(64-bit)
Free Download For macOS 10.14 or later
Free Download For macOS 10.14 or later
Also read:
- [New] 2024 Approved Unveiling Best Video Software VLC Against MX
- [New] In 2024, Capture Clearness Without a Tripod Tool
- [New] In 2024, Funny Flicks Compilation of Chuckle-Inducing Short YouTube Videos
- [Updated] 2024 Approved Customize Your YouTube Watch Experience (Speed Settings)
- [Updated] 2024 Approved Enhancing Instagram Video Visibility
- Can I play MKV movies on Redmi 13C?
- Easily Sync Audio With Video With Filmora
- How to Unlock Nubia Red Magic 8S Pro Phone Password Without Factory Reset?
- In 2024, 5 Ways to Move Contacts From Infinix Smart 8 Plus to iPhone (13/14/15) | Dr.fone
- In 2024, Everything You Need To Know About Unlocked Apple iPhone 13 | Dr.fone
- New Best Cloud Storage Service for Videos
- New Best Ideas for Time Lapse Video
- New Top 5 Free Online Video Filter Editors
- Title: Steps to Add Subtitles in Canva
- Author: Chloe
- Created at : 2024-10-01 04:52:57
- Updated at : 2024-10-02 18:50:21
- Link: https://ai-editing-video.techidaily.com/steps-to-add-subtitles-in-canva/
- License: This work is licensed under CC BY-NC-SA 4.0.