:max_bytes(150000):strip_icc():format(webp)/GettyImages-14050070541-0fc96b82fdc54287bf3bbce3ba323342.jpg)
Steps to Create Gold Text Effects After Effects for 2024

Steps to Create Gold Text Effects After Effects
Have you always wanted to create the gold text effect in After effects but you don’t know how? This polished effect can make your video’s title stand out and is one of the best ways to create a stunning title for YouTube and Instagram clips. In this article, we will be looking at how to create the gold text using After Effects.
Steps to Create Gold Text Effects After Effects
Follow these steps to create a gold text effect in your After Effects video project;
Step1Start by creating an environment. To do that just right-click and choose “New Comp” and click “OK” to create one.
Step2Then we need to add fractal noise. To do that, click on “Effects and Presets” and type in “fractal” to choose “Fractal Noise.” You can double-click on it or drag it to the comp.
Step3Once this is done, you will need to do a little bit of housekeeping on the contrast and brightness. Increase the “Contrast” and reduce the “Brightness.”
Then go to the “Sub Settings” and reduce the “Sub Influence” down to zero.
Go to “Transform Option” and decrease the scale just a little bit. Then increase the “Scale Height” just a little.
Step4The next step is to add color to the scene. To do that, right-click on the layer and choose “New > Solid.” Select the gold color and click “OK.” Do the same with the second layer.
Step5Now you want to blend both colors by choosing a blending mode. Hold the “Shift” key and “hyphen” or “=” sign on the keyboard and choose “Overlay.”
Step6To make the color stronger, go to “Layer > Solid Settings” and choose a color.
Step7Go back to “Comp 3.” Right-click on it and select “New > Light” to add a new point of light.
Step8Go back to the project panel to click on “Comp 4” to add the environment. Right-click on the Comp 4 layer and make it an environment layer.
Step9In the options that appear, set “Appears in Reflections” to “Only” and you can then increase and decrease the color saturation until you have the desired result.
Free Gold Text Effects Template to Use
As you can see from the steps above, creating your gold text effects can be quite difficult. The good news is that you can download pre-made titles that you can simply edit. The following are some of the best to choose from;
- Christmas Title Template
Link: https://mixkit.co/free-after-effects-templates/christmas-title-template-819/
Despite the name, this is an ideal title for elegant projects or when you want your title to stand out. The typography is beautiful and elegant making it the most ideal template for fashion-themed videos. The template is easily customizable in After Effects and you can even change the color you want.

- Fashion Instagram Story
Link: https://mixkit.co/free-after-effects-templates/fashion-instagram-story-551/
This is the most ideal template to choose if you want a gold text effect that is accompanied by an image. Again, this is a very elegant theme that is ideal for YouTube and Instagram videos in the fashion and entertainment genres. It is also fully customizable in After Effects, allowing you to change the color, text, and image.

- Wedding Invitation Opener
Link: https://mixkit.co/free-after-effects-templates/wedding-invitation-opener-803/
This free gold text template is also completely customizable and comes with various text effects that you can include in the text. It is elegant and includes shadow effects that make the text stands out more. But you can remove the shadow effects if they don’t suit your project.

- Golden Luxury Titles
Link: https://motionarray.com/after-effects-templates/golden-luxury-titles-116934/
If you are looking for a gold text title that stands out in terms of design, animation, and color, consider Golden Luxury Titles. It comes with 9 editable layers that you can use to modify the title in any way. It is the most ideal title for movies, teasers, TV shows, and more.

- Emotional Awards Opener
Link: https://motionarray.com/after-effects-templates/emotional-awards-opener-356434/
This is a sparkling and glistering stylish design that can be very useful for movies and TV shows. This attention-grabbing title template has over 18 editable text layers to allow you to customize the title in various ways.

Alternative Way to Create Video Gold
Adobe After Effects is a very good video editor, but one of the things that can make it inaccessible to many users is that it can be very difficult to use. Thankfully, there is another very effective video editor that you can use to create gold text that is much easier to use.
This is the Wondershare Filmora , one of the best video editors in the market. Before we look at how you can use Filmora to create the perfect gold metal texture on your text, let’s first look at some of its main features;
- You can use Filmora to edit videos at a very high resolution including 4K videos
- It can be used to remove the background and noise from the video very easily
- You can edit both video and audio in the same project
- Up to 5 text tracks and 10 music tracks can be added to the same timeline and the same project
- It is very easy to use with a simple and intuitive user interface
Here’s how to use Filmora to create a gold metal texture for your text;
Step1Install Wondershare Filmora on your Computer
Download the Filmora setup file to your computer and double-click on it to start installing the program to your computer.
Open the program once the installation is complete.
Step2Create a New Project
If you are starting from the beginning, you may need to create a new project.
To do that, click on “File > New Project” in the menu bar to start a new project.
If there was a project that you were already working on, click on “Open Project” on the main window and then click “File > Open Project” or “File > Open Recent” in the menu bar.
Step3Add A Title to the Timeline
To add a gold texture effect to a title on your video, we will first of all need to add a title to the project.
To do that, go click on the “Titles” tab at the top and drag one of the default titles to the timeline.
Once it is in the timeline, double-click on the title and edit it. Type in anything you want to appear in the title.

Select the font that you want to use and choose a specific font size to use. These are all your preferences and will depend on your project.
Move the title to the second track in the timeline as you get ready to begin adding the colors.
Step4Start Adding Colors
Go to “Media” at the top and click on “Sample Colors.” Drag the black color image to the track directly below the title timeline.

Then take a snapshot of this newly created image by clicking on the “camera” icon next to the playhead.
Change the Font of the Title to something else more elegant like “Montez” and take another snapshot by clicking on the same camera icon.

Step5Add the Gold Effect
Delete everything from the timeline. Don’t worry you took a photo of all the text layers and the effects added to each.
You will then need to find an image of a gold background. You can find these on any good background image site. Download a good clear image and upload it into Filmora.
Now drag and drop the gold background image to the second track in the timeline. Double click on the background image.
Select “Compositing” and then in the “Blending Mode” drop-down menu, choose “Darken.” Click OK.”

Hide the first layer in the timeline and select the gold background image layer. Click on “Animation” and then select “Customize.”
To create the customized effect that we need, click on the image and drag it from the right to the left side.

Move the playhead to the end of the image to insert another keyframe and then click on the restore icon to restore the size of the image.

Click “OK” and show the track above the timeline. You will now see that the gold texture effect has been applied to your title. You can also add the second snapshot with the varying font for further effect.
Step6Save the Project
Once you are done, you can go ahead and save the project or continue working on other aspects of the video as desired.
Free Download For Win 7 or later(64-bit)
Free Download For macOS 10.14 or later
YouTube Being One of the Most Used Video Platforms Uses Artificial Intelligence to Recommend Videos. Click Here to Know About YouTube AI in Detail
Techniques You Never Heard of for Learning AI Marketing YouTube
An easy yet powerful editor
Numerous effects to choose from
Detailed tutorials provided by the official channel
YouTube is one of the largest entertainment websites, where you can watch, share, and create videos. Millions of active users on YouTube have taken premium subscriptions on YouTube to enjoy hassle-free entertainment. YouTube was launched back in 2005. With the passage of time and advancements in technology, YouTube has also evolved.

Artificial intelligence is one of the recent and most famous advancements in technology. The introduction of artificial intelligence in the industry has proved to be a boon. The introduction of artificial intelligence has made things easy to manage in every industry. AI can easily be applied in any industry be it manufacturing or the IT sector. Artificial intelligence has made work easier and increased the efficiency of people working in different areas. Even YouTube has started using AI techniques for many tasks. In this article, we have listed some of the applications of AI on YouTube.
In this article
01 [How Is YouTube Using Artificial Intelligence?](#Part 1)
02 [How Is YouTube Using AI to Recommend Videos?](#Part 2)
Part 1 How Is YouTube Using Artificial Intelligence?
Tools like artificial intelligence and machine learning have made things easier to manage. Even the introduction of Artificial Intelligence on YouTube has helped a lot to smoothen its procedure. YouTube being one of the most engaging websites has applied YouTube Intelligence to manage all its activities smoothly. Read further to know how YouTube is using artificial intelligence currently!
01Automatic Removal of Inappropriate Content
One of the main applications of AI on YouTube is to remove inappropriate content automatically. YouTube uses artificial intelligence and machine learning to remove the violative and inappropriate content from the platform. As this content was one of the main reasons for the rise in racism and terrorism. To avoid all these harmful after effects, YouTube introduced the “Trashy Video Classifier” to scan and examine the feedback.
Although these algorithms might not be 100% accurate, they can perform the task more easily and efficiently than the manual examination of the content. Due to these algorithms, it has become easier to automatically remove the controversial content from the platform immediately. AI aided feature helps in determining the inappropriate content faster. However, it doesn’t provide 100% accurate results. This is the reason why YouTube has a large team of human specialists to check the accuracy of determining violative content.
02Add New Video Effects
The introduction of artificial intelligence and machine learning in the market has made it easier to add new video effects without the use of any external equipment. You can now swap out backgrounds from videos with just one click due to the in-built AI features on YouTube. This AI neural feature is prepared by Google’s AI YouTube researchers to make it easier for the AI algorithms to understand video patterns. This feature makes it easier for the system to maintain the correct pace with the video.
03Maintain Age Restrictions
Being an online platform, YouTube is open to everyone. There are many creators and viewers on the platform with different interests. Moreover, it is accessible to all age groups, which makes it necessary to optimize the content according to the age groups. YouTube has always been very particular about the age-restricted content. A lot of content is published on the platform that can be harmful to the children’s minds and growth. YouTube uses different AI tools and algorithms to maintain the age restrictions of adult content.
YouTube has guaranteed that the mature content will not be accessible to the kids and youngsters aged below 13 years. It has also created a separate application for the kids to maintain the age restrictions from the matured content.
Earlier, the YouTubers used to flag their content as mature themselves, but now the platform is planning to flag the content using machine learning technology. YouTube had also used machine learning technology to thwart the age-restricted content automatically in 2017.
04”Up Next” Feature
The “Up Next” feature of YouTube is also a result of artificial intelligence. With many creators uploading a large number of videos every minute, it was becoming difficult for the platform to manage the suggestion engine properly. So, YouTube has introduced the AI technique to streamline the recommendation process to maintain the real-time and latest suggestion.
This feature is a mix of two algorithms, one is used to optimize the suggestion engine according to the search history and watch history of the user, and the other is to determine according to the ranking. As the main aim is to provide the content so that the user can spend his/her maximum time watching YouTube videos. This helps in creating a better sidebar full of user-specific recommendations. YouTube’s special recommendation feature ensures to recommend different videos to the different viewers as per their interests.
05Training on Depth Prediction
YouTube has a lot of data stored that provides easy knowledge of AI algorithms. According to the recent data and announcement, it is now clear that Google’s AI YouTube researchers used the “mannequin challenge” to understand depth predictions.
In this challenge, they researched around 2000 groups, with 1 group in each video. Video had many people standing still like they have been frozen and one person was going through the scene to shoot the video. A better understanding of depth prediction can further help in generating the development of Augmented Reality (AR).
06Tackle Fake News
Among the different features of the most engaging online platform comes the ability to detect and tackle fake news and misleading content. YouTube can understand and detect fake news. With so many users on different social media platforms, it has now become common to spread fake and false news. Unlike other platforms, YouTube is using artificial intelligence to detect and remove misleading content that is against YouTube’s privacy policy.
YouTube understands that this type of content can be harmful to the audience and can be the reason for disputes among different communities. Hence, giving rise to racism and terrorism. To reduce its wrong impact on society, YouTube is using AI technology and removing this type of fake and misleading content. Around 11 million videos were removed from the platform within a single quarter. The introduction of AI has also proved that the technology works more effectively and efficiently rather than the manual removal of such content.
Part 2 How Is YouTube Using AI to Recommend Videos?

YouTube aims at finding the perfect video for each user separately and anticipating the users to spend more time on the platform. Keeping both these things in mind, it decided to use AI technology to recommend videos and optimize the suggestion panel. Just like Netflix, AI technology makes it easier for the platform to determine the best suggestions for different viewers. It recommends the videos after researching the user’s age, interests, watch time, etc.
YouTube generally focuses on increasing the watch time of the viewer, that’s why it recommends the videos keeping the user’s interests on priority. The goal is to watch more rather than watch the best.
YouTube uses different AI algorithms to understand things and recommend optimized videos to stand out from the crowd. First of all, it uses AI algorithms to understand the user’s interest by scanning his/her search history and watching history. It creates a list based on the findings and then ranks the videos as per the google rankings. Each video on YouTube has a different ranking.
YouTube has been changing its algorithms over time. Earlier, it used to rank videos according to view counts. But soon people understood the technique and started using the eye-catchy title and thumbnail to gain a large number of views. Due to this, viewers even started complaining about the content and YouTube changed its algorithms to resolve this issue.
YouTube introduced AI and ML technology to customize the recommendations in 2016. This introduction has made things easier for YouTube as well as its viewers. It has now announced to ban the “borderline content”.
For Win 7 or later (64-bit)
For macOS 10.12 or later
● Ending Thoughts →
● Applying AI on YouTube has made it easier for the platform to manage activities more effectively and efficiently. As a result, many new features are added to enhance the convenience and maintain the quality of the user experience.
● Moreover, YouTube is now experimenting with AI and ML for automatically adding video chapters. This feature will be beneficial for the content creators.
● It will assist them in creating and uploading, resulting in the elimination of the time used in adding timestamps manually. Even the creators are uploading AI-generated YouTube videos that are created with the help of an AI YouTube video maker.
● You can even learn about the different applications of AI and ML from different YouTube channels. Many accessible YouTube channels for machine learning are available on the platform.
● YouTube intelligence can also be seen on the homepage, recommendations, notifications, and subscriptions. The latest trending videos are also ranked with the help of artificial intelligence and machine learning.
YouTube is one of the largest entertainment websites, where you can watch, share, and create videos. Millions of active users on YouTube have taken premium subscriptions on YouTube to enjoy hassle-free entertainment. YouTube was launched back in 2005. With the passage of time and advancements in technology, YouTube has also evolved.

Artificial intelligence is one of the recent and most famous advancements in technology. The introduction of artificial intelligence in the industry has proved to be a boon. The introduction of artificial intelligence has made things easy to manage in every industry. AI can easily be applied in any industry be it manufacturing or the IT sector. Artificial intelligence has made work easier and increased the efficiency of people working in different areas. Even YouTube has started using AI techniques for many tasks. In this article, we have listed some of the applications of AI on YouTube.
In this article
01 [How Is YouTube Using Artificial Intelligence?](#Part 1)
02 [How Is YouTube Using AI to Recommend Videos?](#Part 2)
Part 1 How Is YouTube Using Artificial Intelligence?
Tools like artificial intelligence and machine learning have made things easier to manage. Even the introduction of Artificial Intelligence on YouTube has helped a lot to smoothen its procedure. YouTube being one of the most engaging websites has applied YouTube Intelligence to manage all its activities smoothly. Read further to know how YouTube is using artificial intelligence currently!

01Automatic Removal of Inappropriate Content
One of the main applications of AI on YouTube is to remove inappropriate content automatically. YouTube uses artificial intelligence and machine learning to remove the violative and inappropriate content from the platform. As this content was one of the main reasons for the rise in racism and terrorism. To avoid all these harmful after effects, YouTube introduced the “Trashy Video Classifier” to scan and examine the feedback.
Although these algorithms might not be 100% accurate, they can perform the task more easily and efficiently than the manual examination of the content. Due to these algorithms, it has become easier to automatically remove the controversial content from the platform immediately. AI aided feature helps in determining the inappropriate content faster. However, it doesn’t provide 100% accurate results. This is the reason why YouTube has a large team of human specialists to check the accuracy of determining violative content.
02Add New Video Effects
The introduction of artificial intelligence and machine learning in the market has made it easier to add new video effects without the use of any external equipment. You can now swap out backgrounds from videos with just one click due to the in-built AI features on YouTube. This AI neural feature is prepared by Google’s AI YouTube researchers to make it easier for the AI algorithms to understand video patterns. This feature makes it easier for the system to maintain the correct pace with the video.
03Maintain Age Restrictions
Being an online platform, YouTube is open to everyone. There are many creators and viewers on the platform with different interests. Moreover, it is accessible to all age groups, which makes it necessary to optimize the content according to the age groups. YouTube has always been very particular about the age-restricted content. A lot of content is published on the platform that can be harmful to the children’s minds and growth. YouTube uses different AI tools and algorithms to maintain the age restrictions of adult content.
YouTube has guaranteed that the mature content will not be accessible to the kids and youngsters aged below 13 years. It has also created a separate application for the kids to maintain the age restrictions from the matured content.
Earlier, the YouTubers used to flag their content as mature themselves, but now the platform is planning to flag the content using machine learning technology. YouTube had also used machine learning technology to thwart the age-restricted content automatically in 2017.
04”Up Next” Feature
The “Up Next” feature of YouTube is also a result of artificial intelligence. With many creators uploading a large number of videos every minute, it was becoming difficult for the platform to manage the suggestion engine properly. So, YouTube has introduced the AI technique to streamline the recommendation process to maintain the real-time and latest suggestion.
This feature is a mix of two algorithms, one is used to optimize the suggestion engine according to the search history and watch history of the user, and the other is to determine according to the ranking. As the main aim is to provide the content so that the user can spend his/her maximum time watching YouTube videos. This helps in creating a better sidebar full of user-specific recommendations. YouTube’s special recommendation feature ensures to recommend different videos to the different viewers as per their interests.
05Training on Depth Prediction
YouTube has a lot of data stored that provides easy knowledge of AI algorithms. According to the recent data and announcement, it is now clear that Google’s AI YouTube researchers used the “mannequin challenge” to understand depth predictions.
In this challenge, they researched around 2000 groups, with 1 group in each video. Video had many people standing still like they have been frozen and one person was going through the scene to shoot the video. A better understanding of depth prediction can further help in generating the development of Augmented Reality (AR).
06Tackle Fake News
Among the different features of the most engaging online platform comes the ability to detect and tackle fake news and misleading content. YouTube can understand and detect fake news. With so many users on different social media platforms, it has now become common to spread fake and false news. Unlike other platforms, YouTube is using artificial intelligence to detect and remove misleading content that is against YouTube’s privacy policy.
YouTube understands that this type of content can be harmful to the audience and can be the reason for disputes among different communities. Hence, giving rise to racism and terrorism. To reduce its wrong impact on society, YouTube is using AI technology and removing this type of fake and misleading content. Around 11 million videos were removed from the platform within a single quarter. The introduction of AI has also proved that the technology works more effectively and efficiently rather than the manual removal of such content.
Part 2 How Is YouTube Using AI to Recommend Videos?

YouTube aims at finding the perfect video for each user separately and anticipating the users to spend more time on the platform. Keeping both these things in mind, it decided to use AI technology to recommend videos and optimize the suggestion panel. Just like Netflix, AI technology makes it easier for the platform to determine the best suggestions for different viewers. It recommends the videos after researching the user’s age, interests, watch time, etc.
YouTube generally focuses on increasing the watch time of the viewer, that’s why it recommends the videos keeping the user’s interests on priority. The goal is to watch more rather than watch the best.
YouTube uses different AI algorithms to understand things and recommend optimized videos to stand out from the crowd. First of all, it uses AI algorithms to understand the user’s interest by scanning his/her search history and watching history. It creates a list based on the findings and then ranks the videos as per the google rankings. Each video on YouTube has a different ranking.
YouTube has been changing its algorithms over time. Earlier, it used to rank videos according to view counts. But soon people understood the technique and started using the eye-catchy title and thumbnail to gain a large number of views. Due to this, viewers even started complaining about the content and YouTube changed its algorithms to resolve this issue.
YouTube introduced AI and ML technology to customize the recommendations in 2016. This introduction has made things easier for YouTube as well as its viewers. It has now announced to ban the “borderline content”.
For Win 7 or later (64-bit)
For macOS 10.12 or later
● Ending Thoughts →
● Applying AI on YouTube has made it easier for the platform to manage activities more effectively and efficiently. As a result, many new features are added to enhance the convenience and maintain the quality of the user experience.
● Moreover, YouTube is now experimenting with AI and ML for automatically adding video chapters. This feature will be beneficial for the content creators.
● It will assist them in creating and uploading, resulting in the elimination of the time used in adding timestamps manually. Even the creators are uploading AI-generated YouTube videos that are created with the help of an AI YouTube video maker.
● You can even learn about the different applications of AI and ML from different YouTube channels. Many accessible YouTube channels for machine learning are available on the platform.
● YouTube intelligence can also be seen on the homepage, recommendations, notifications, and subscriptions. The latest trending videos are also ranked with the help of artificial intelligence and machine learning.
YouTube is one of the largest entertainment websites, where you can watch, share, and create videos. Millions of active users on YouTube have taken premium subscriptions on YouTube to enjoy hassle-free entertainment. YouTube was launched back in 2005. With the passage of time and advancements in technology, YouTube has also evolved.

Artificial intelligence is one of the recent and most famous advancements in technology. The introduction of artificial intelligence in the industry has proved to be a boon. The introduction of artificial intelligence has made things easy to manage in every industry. AI can easily be applied in any industry be it manufacturing or the IT sector. Artificial intelligence has made work easier and increased the efficiency of people working in different areas. Even YouTube has started using AI techniques for many tasks. In this article, we have listed some of the applications of AI on YouTube.
In this article
01 [How Is YouTube Using Artificial Intelligence?](#Part 1)
02 [How Is YouTube Using AI to Recommend Videos?](#Part 2)
Part 1 How Is YouTube Using Artificial Intelligence?
Tools like artificial intelligence and machine learning have made things easier to manage. Even the introduction of Artificial Intelligence on YouTube has helped a lot to smoothen its procedure. YouTube being one of the most engaging websites has applied YouTube Intelligence to manage all its activities smoothly. Read further to know how YouTube is using artificial intelligence currently!

01Automatic Removal of Inappropriate Content
One of the main applications of AI on YouTube is to remove inappropriate content automatically. YouTube uses artificial intelligence and machine learning to remove the violative and inappropriate content from the platform. As this content was one of the main reasons for the rise in racism and terrorism. To avoid all these harmful after effects, YouTube introduced the “Trashy Video Classifier” to scan and examine the feedback.
Although these algorithms might not be 100% accurate, they can perform the task more easily and efficiently than the manual examination of the content. Due to these algorithms, it has become easier to automatically remove the controversial content from the platform immediately. AI aided feature helps in determining the inappropriate content faster. However, it doesn’t provide 100% accurate results. This is the reason why YouTube has a large team of human specialists to check the accuracy of determining violative content.
02Add New Video Effects
The introduction of artificial intelligence and machine learning in the market has made it easier to add new video effects without the use of any external equipment. You can now swap out backgrounds from videos with just one click due to the in-built AI features on YouTube. This AI neural feature is prepared by Google’s AI YouTube researchers to make it easier for the AI algorithms to understand video patterns. This feature makes it easier for the system to maintain the correct pace with the video.
03Maintain Age Restrictions
Being an online platform, YouTube is open to everyone. There are many creators and viewers on the platform with different interests. Moreover, it is accessible to all age groups, which makes it necessary to optimize the content according to the age groups. YouTube has always been very particular about the age-restricted content. A lot of content is published on the platform that can be harmful to the children’s minds and growth. YouTube uses different AI tools and algorithms to maintain the age restrictions of adult content.
YouTube has guaranteed that the mature content will not be accessible to the kids and youngsters aged below 13 years. It has also created a separate application for the kids to maintain the age restrictions from the matured content.
Earlier, the YouTubers used to flag their content as mature themselves, but now the platform is planning to flag the content using machine learning technology. YouTube had also used machine learning technology to thwart the age-restricted content automatically in 2017.
04”Up Next” Feature
The “Up Next” feature of YouTube is also a result of artificial intelligence. With many creators uploading a large number of videos every minute, it was becoming difficult for the platform to manage the suggestion engine properly. So, YouTube has introduced the AI technique to streamline the recommendation process to maintain the real-time and latest suggestion.
This feature is a mix of two algorithms, one is used to optimize the suggestion engine according to the search history and watch history of the user, and the other is to determine according to the ranking. As the main aim is to provide the content so that the user can spend his/her maximum time watching YouTube videos. This helps in creating a better sidebar full of user-specific recommendations. YouTube’s special recommendation feature ensures to recommend different videos to the different viewers as per their interests.
05Training on Depth Prediction
YouTube has a lot of data stored that provides easy knowledge of AI algorithms. According to the recent data and announcement, it is now clear that Google’s AI YouTube researchers used the “mannequin challenge” to understand depth predictions.
In this challenge, they researched around 2000 groups, with 1 group in each video. Video had many people standing still like they have been frozen and one person was going through the scene to shoot the video. A better understanding of depth prediction can further help in generating the development of Augmented Reality (AR).
06Tackle Fake News
Among the different features of the most engaging online platform comes the ability to detect and tackle fake news and misleading content. YouTube can understand and detect fake news. With so many users on different social media platforms, it has now become common to spread fake and false news. Unlike other platforms, YouTube is using artificial intelligence to detect and remove misleading content that is against YouTube’s privacy policy.
YouTube understands that this type of content can be harmful to the audience and can be the reason for disputes among different communities. Hence, giving rise to racism and terrorism. To reduce its wrong impact on society, YouTube is using AI technology and removing this type of fake and misleading content. Around 11 million videos were removed from the platform within a single quarter. The introduction of AI has also proved that the technology works more effectively and efficiently rather than the manual removal of such content.
Part 2 How Is YouTube Using AI to Recommend Videos?

YouTube aims at finding the perfect video for each user separately and anticipating the users to spend more time on the platform. Keeping both these things in mind, it decided to use AI technology to recommend videos and optimize the suggestion panel. Just like Netflix, AI technology makes it easier for the platform to determine the best suggestions for different viewers. It recommends the videos after researching the user’s age, interests, watch time, etc.
YouTube generally focuses on increasing the watch time of the viewer, that’s why it recommends the videos keeping the user’s interests on priority. The goal is to watch more rather than watch the best.
YouTube uses different AI algorithms to understand things and recommend optimized videos to stand out from the crowd. First of all, it uses AI algorithms to understand the user’s interest by scanning his/her search history and watching history. It creates a list based on the findings and then ranks the videos as per the google rankings. Each video on YouTube has a different ranking.
YouTube has been changing its algorithms over time. Earlier, it used to rank videos according to view counts. But soon people understood the technique and started using the eye-catchy title and thumbnail to gain a large number of views. Due to this, viewers even started complaining about the content and YouTube changed its algorithms to resolve this issue.
YouTube introduced AI and ML technology to customize the recommendations in 2016. This introduction has made things easier for YouTube as well as its viewers. It has now announced to ban the “borderline content”.
For Win 7 or later (64-bit)
For macOS 10.12 or later
● Ending Thoughts →
● Applying AI on YouTube has made it easier for the platform to manage activities more effectively and efficiently. As a result, many new features are added to enhance the convenience and maintain the quality of the user experience.
● Moreover, YouTube is now experimenting with AI and ML for automatically adding video chapters. This feature will be beneficial for the content creators.
● It will assist them in creating and uploading, resulting in the elimination of the time used in adding timestamps manually. Even the creators are uploading AI-generated YouTube videos that are created with the help of an AI YouTube video maker.
● You can even learn about the different applications of AI and ML from different YouTube channels. Many accessible YouTube channels for machine learning are available on the platform.
● YouTube intelligence can also be seen on the homepage, recommendations, notifications, and subscriptions. The latest trending videos are also ranked with the help of artificial intelligence and machine learning.
YouTube is one of the largest entertainment websites, where you can watch, share, and create videos. Millions of active users on YouTube have taken premium subscriptions on YouTube to enjoy hassle-free entertainment. YouTube was launched back in 2005. With the passage of time and advancements in technology, YouTube has also evolved.

Artificial intelligence is one of the recent and most famous advancements in technology. The introduction of artificial intelligence in the industry has proved to be a boon. The introduction of artificial intelligence has made things easy to manage in every industry. AI can easily be applied in any industry be it manufacturing or the IT sector. Artificial intelligence has made work easier and increased the efficiency of people working in different areas. Even YouTube has started using AI techniques for many tasks. In this article, we have listed some of the applications of AI on YouTube.
In this article
01 [How Is YouTube Using Artificial Intelligence?](#Part 1)
02 [How Is YouTube Using AI to Recommend Videos?](#Part 2)
Part 1 How Is YouTube Using Artificial Intelligence?
Tools like artificial intelligence and machine learning have made things easier to manage. Even the introduction of Artificial Intelligence on YouTube has helped a lot to smoothen its procedure. YouTube being one of the most engaging websites has applied YouTube Intelligence to manage all its activities smoothly. Read further to know how YouTube is using artificial intelligence currently!

01Automatic Removal of Inappropriate Content
One of the main applications of AI on YouTube is to remove inappropriate content automatically. YouTube uses artificial intelligence and machine learning to remove the violative and inappropriate content from the platform. As this content was one of the main reasons for the rise in racism and terrorism. To avoid all these harmful after effects, YouTube introduced the “Trashy Video Classifier” to scan and examine the feedback.
Although these algorithms might not be 100% accurate, they can perform the task more easily and efficiently than the manual examination of the content. Due to these algorithms, it has become easier to automatically remove the controversial content from the platform immediately. AI aided feature helps in determining the inappropriate content faster. However, it doesn’t provide 100% accurate results. This is the reason why YouTube has a large team of human specialists to check the accuracy of determining violative content.
02Add New Video Effects
The introduction of artificial intelligence and machine learning in the market has made it easier to add new video effects without the use of any external equipment. You can now swap out backgrounds from videos with just one click due to the in-built AI features on YouTube. This AI neural feature is prepared by Google’s AI YouTube researchers to make it easier for the AI algorithms to understand video patterns. This feature makes it easier for the system to maintain the correct pace with the video.
03Maintain Age Restrictions
Being an online platform, YouTube is open to everyone. There are many creators and viewers on the platform with different interests. Moreover, it is accessible to all age groups, which makes it necessary to optimize the content according to the age groups. YouTube has always been very particular about the age-restricted content. A lot of content is published on the platform that can be harmful to the children’s minds and growth. YouTube uses different AI tools and algorithms to maintain the age restrictions of adult content.
YouTube has guaranteed that the mature content will not be accessible to the kids and youngsters aged below 13 years. It has also created a separate application for the kids to maintain the age restrictions from the matured content.
Earlier, the YouTubers used to flag their content as mature themselves, but now the platform is planning to flag the content using machine learning technology. YouTube had also used machine learning technology to thwart the age-restricted content automatically in 2017.
04”Up Next” Feature
The “Up Next” feature of YouTube is also a result of artificial intelligence. With many creators uploading a large number of videos every minute, it was becoming difficult for the platform to manage the suggestion engine properly. So, YouTube has introduced the AI technique to streamline the recommendation process to maintain the real-time and latest suggestion.
This feature is a mix of two algorithms, one is used to optimize the suggestion engine according to the search history and watch history of the user, and the other is to determine according to the ranking. As the main aim is to provide the content so that the user can spend his/her maximum time watching YouTube videos. This helps in creating a better sidebar full of user-specific recommendations. YouTube’s special recommendation feature ensures to recommend different videos to the different viewers as per their interests.
05Training on Depth Prediction
YouTube has a lot of data stored that provides easy knowledge of AI algorithms. According to the recent data and announcement, it is now clear that Google’s AI YouTube researchers used the “mannequin challenge” to understand depth predictions.
In this challenge, they researched around 2000 groups, with 1 group in each video. Video had many people standing still like they have been frozen and one person was going through the scene to shoot the video. A better understanding of depth prediction can further help in generating the development of Augmented Reality (AR).
06Tackle Fake News
Among the different features of the most engaging online platform comes the ability to detect and tackle fake news and misleading content. YouTube can understand and detect fake news. With so many users on different social media platforms, it has now become common to spread fake and false news. Unlike other platforms, YouTube is using artificial intelligence to detect and remove misleading content that is against YouTube’s privacy policy.
YouTube understands that this type of content can be harmful to the audience and can be the reason for disputes among different communities. Hence, giving rise to racism and terrorism. To reduce its wrong impact on society, YouTube is using AI technology and removing this type of fake and misleading content. Around 11 million videos were removed from the platform within a single quarter. The introduction of AI has also proved that the technology works more effectively and efficiently rather than the manual removal of such content.
Part 2 How Is YouTube Using AI to Recommend Videos?

YouTube aims at finding the perfect video for each user separately and anticipating the users to spend more time on the platform. Keeping both these things in mind, it decided to use AI technology to recommend videos and optimize the suggestion panel. Just like Netflix, AI technology makes it easier for the platform to determine the best suggestions for different viewers. It recommends the videos after researching the user’s age, interests, watch time, etc.
YouTube generally focuses on increasing the watch time of the viewer, that’s why it recommends the videos keeping the user’s interests on priority. The goal is to watch more rather than watch the best.
YouTube uses different AI algorithms to understand things and recommend optimized videos to stand out from the crowd. First of all, it uses AI algorithms to understand the user’s interest by scanning his/her search history and watching history. It creates a list based on the findings and then ranks the videos as per the google rankings. Each video on YouTube has a different ranking.
YouTube has been changing its algorithms over time. Earlier, it used to rank videos according to view counts. But soon people understood the technique and started using the eye-catchy title and thumbnail to gain a large number of views. Due to this, viewers even started complaining about the content and YouTube changed its algorithms to resolve this issue.
YouTube introduced AI and ML technology to customize the recommendations in 2016. This introduction has made things easier for YouTube as well as its viewers. It has now announced to ban the “borderline content”.
For Win 7 or later (64-bit)
For macOS 10.12 or later
● Ending Thoughts →
● Applying AI on YouTube has made it easier for the platform to manage activities more effectively and efficiently. As a result, many new features are added to enhance the convenience and maintain the quality of the user experience.
● Moreover, YouTube is now experimenting with AI and ML for automatically adding video chapters. This feature will be beneficial for the content creators.
● It will assist them in creating and uploading, resulting in the elimination of the time used in adding timestamps manually. Even the creators are uploading AI-generated YouTube videos that are created with the help of an AI YouTube video maker.
● You can even learn about the different applications of AI and ML from different YouTube channels. Many accessible YouTube channels for machine learning are available on the platform.
● YouTube intelligence can also be seen on the homepage, recommendations, notifications, and subscriptions. The latest trending videos are also ranked with the help of artificial intelligence and machine learning.
Best Ever Ways Make Tiktok Slideshow [Solved]
Best Ever Ways Make Tiktok Slideshow [Solved] 2022
An easy yet powerful editor
Numerous effects to choose from
Detailed tutorials provided by the official channel
Tiktok is the most amazing and popular social media platform because it has stunning features. It is used by many people like social media influencer to common man. Tiktok helps the content creator in making them and their content viral. It is used for gaining followers and becoming popular.
In this article
01 [How to Make Tiktok Photo Slideshow Faster](#Part 1)
02 [Five Recommended Tiktok Slideshow Effects](#Part 2)
03 [How to Adjust Sound on Tiktok Slideshow](#Part 3)
04 [FAQ of Making Tiktok Slideshow](#Part 4)
Part 1 How To Make Tiktok Photo Slideshow Faster?
01How can you make fast slideshow of pictures on Tiktok 2022?
Do you want to create fast slideshow of pictures on Tiktok? Here is the step by step process to make a fast slideshow of pictures:
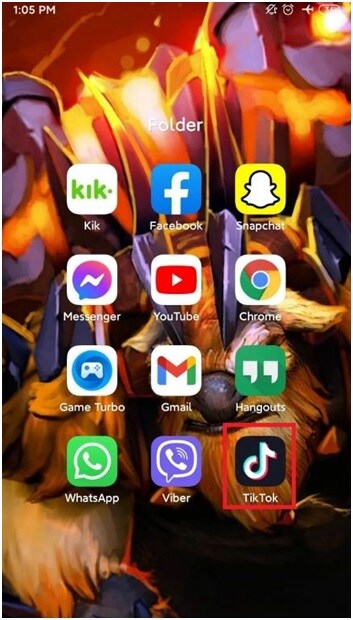
Step 1: Open the Tiktok app
Click on the Tiktok logo in your device to open Tiktok app.
Step 2: Click on plus icon.
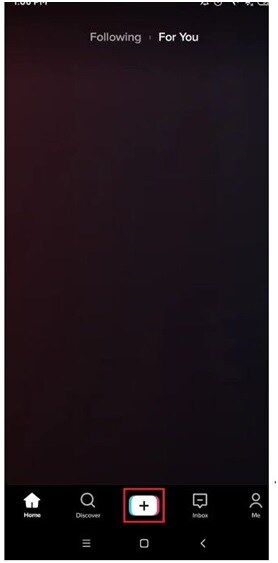
Now, you will start seeing the videos from “Following” or “For you” on your Home Screen.
Click on the “+” Plus icon in the bottom of the screen.
Step 3: Click on templates
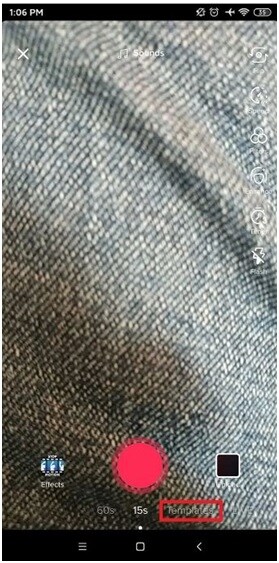
On the right side of “Red Shoot Button” you will see template option, click on templates.
Step 4: Select Template
After clicking on the “Template” option, you will see photo and videos from the gallery on your device. Tap on images to select images.
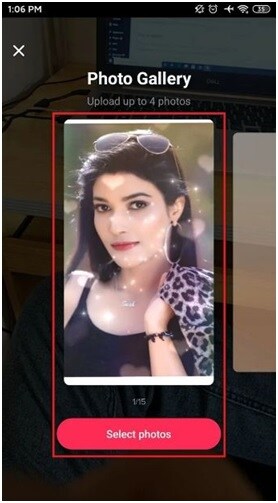
Step 5: Select Images from your gallery
Tap on the “Radio Button” to select images, you can also choose videos if you want.
To explore all the images on your gallery, you can click on the swipe up or drop down menu.
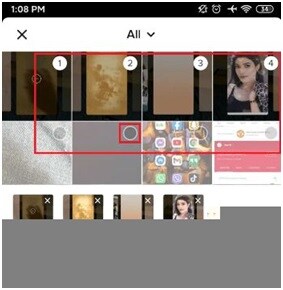
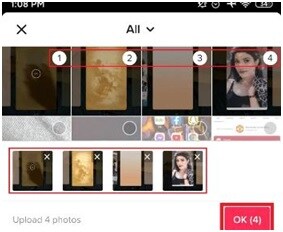
Step 6: Click on OK Button
When you are done selecting all images from the gallery, at the bottom right you see the OK button. To proceed, click on the OK button.
Step 7: Edit the Slideshow Video
Now you can see a slideshow photo video of the images which you have selected. Now, you can edit the video: you can change the sound, add different effects and add text or any stickers to your slideshow video.
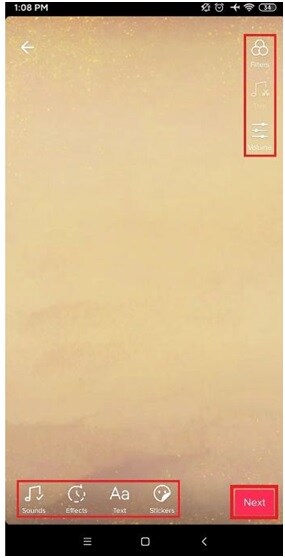
Step 8: Click on Next Button
After completing your photo video slideshow, click on the Next button.
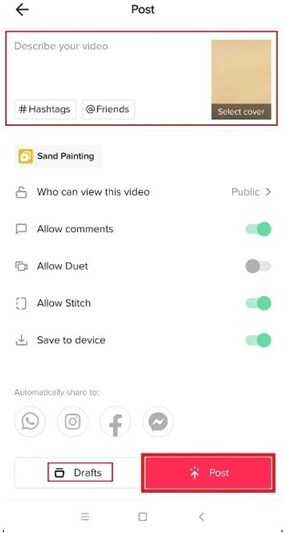
Step 9: Click on the Post button
After clicking on the Next button now you will see two options, Drafts and Post button.
● Drafts: If you don’t want to post the video then add #hashtags, mention your friend name and click on the drafts button.
● Posts: If you want to post the video then add #hashtags, mention your friends and click on post button to publish.
Step 10: Done
You have successfully completed making a fast photo video slideshow.
02How can you make tiktok slideshow faster in 2022?
To faster tiktok photo slideshow follow the given steps:
● Go to Play Store or App Store.
● Search for “Video Speed” Application on your device.
● Download any app, from the search list.
● Open the app and select your Tiktok video for editing.
● Edit the video from the instructions which are given on-screen.
● Download it for free on your device.
● Add it on Tiktok to share.
So, these were the given steps from which you can make your photo slideshow faster.
Part 2 Five Recommended Tiktok Slideshow Effects
01Bling Effect on Tiktok
If you use Tiktok actively then you must have seen the Bling Effect as they look glittery and conspicuous. If you are not aware about the Bling effect on Tiktok, it is an effect which gives sparkly look. Bling Effect works better on videos which emit light. Things that emit light are jewellery, LED lights, glasses etc.
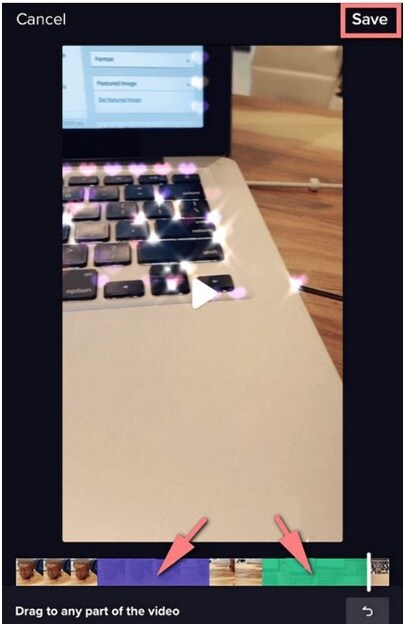
Make sure that your Tiktok is updated with the latest version to get the Bling Effect. Then follow the given steps:
● Open Tiktok on your device and click on the “+” icon to add a new video.
● Click on the “Effects” button at the bottom left side and then open the “Trending” tab of Tiktok effect.
● Keep scrolling until you do not get the Bling effect icon.
● When you get the Bling effect tap to download it, and after that it’s ready to use.
● To add an effect in your favourites, click on the white Bookmark which is given while the Bling effect is alive.
Now, you can use the Bling effect while recording your videos.
02Face Zoom Effect on Tiktok
The Face Zoom Effect is what it sounds like; it’s an effect on Tiktok which is used to automatically zoom the camera on your face. Face Zoom effect can make your videos stand out from other people videos. If you use the Face Zoom effect and hold on to the camera up to your face and pull your phone back slowly, your face will look totally different.
Here are the steps to get the Face Zoom Effect on Tiktok:
● Open the Tiktok on your device.
● Tap on the “+” button on the home screen.
● Then you will see the “Effects” section, click on it.
● In the Effects section you will see various other filters also.
● Keep searching for it and when you get it, select it.
● Now, you can make videos and publish them**.**
03Face Morph Effect on Tiktok
Face Morph Filter is which morphs 2 pictures and make transitions to the pictures at that time. When you use this filter, you can see that it make changes but still you have the same face. Your face remains the same but the transitions look very even and amazing.
Follow the given steps to use the Face Morph Effect:
● Open the Tiktok app on your device.
● Click on the “+” icon at the bottom of the screen.
● Scroll on the right side on the Templates.
● Keep scrolling until you get the Morph Effect.
● Click to select photos.
● Select at least 5 photos from your camera roll.
● Click OK at the bottom right corner
● Now edit and publish your Tiktok.
04 Beauty Effects
Beauty effects are used to beautify your face and changes you into completely different person. If you don’t want to wear makeup just to record one video, in that case you can use this effect. Basically it completely changes your overall appearance.
Steps to follow to use beauty effects:
● Open Tiktok app on your device.
● Click on the “+” button at the bottom- center of the screen.
● Click on the “Effects” section.
● Keep searching for “Beauty Effect” and after that select it.
● Now, you can record your video and publish them.
05Green Effect
Green effects allow you to change the background of any image or you can also add any video to your background of your choice. With the help of Green Screen, users have been able to film their videos wherever they want.
● Open Tiktok application.
● On the bottom center, click on the “+” icon.
● On the bottom left corner, click on “effects”.
● Click on the “Green Screen” from the Effects menu.
● Select Green Screen effect.
● Now you can film videos using Green Screen.
Part 3 How To Adjust Sound On Tiktok Slideshow
Once you have selected the sound, you may need to do some adjustments.
To edit which part of the song you are using:
● Click on the “Trim” button given at the right side of the screen.
● Drag the cursor to adjust which part of the song you want your video to begin at.
● Click on the checkmark to confirm.
To edit the volume of the sound:
● Once you have completed filming your video, in the bottom left corner click on the sounds button.
● Click the “volume” tab and use the cursor to adjust how much loud the sound is compared to the original audio.
● Click on the screen again to confirm.
These were the steps for adjusting sound, the way you want to customize it.
Part 4 FAQ’S of making Tiktok Slideshow
Q1. How can you trim the audio on a Tiktok Sideshow?
A. To trim sound on a Tiktok slideshow, first add a sound to a Tiktok slideshow, click on the ‘Trim” button at the right side of the screen. Then drag the cursor to select which part of the audio you want for your video. Listen to the sound after trimming. If you liked the trimmed song, tap to the next button to add it in your Tiktok slideshow.
Q2. How can you add text to the Tiktok slideshow?
A. Steps to add text to your Tiktok slideshow:
● Open Tiktok app.
● Click on the “+” icon.
● Click on upload.
● Select an image from your gallery.
● Click on the “Next” button.
● Now click on the “Text” to add text.
● After that type the text.
● Choose any font or color of your choice.
● Tap on the “Done “button”.
● Now your video is ready to publish.
Q3. How can we add music to slideshow videos on Tiktok?
A. Yes you can add music to your slideshow video. Before posting it you will find the edit option.
When you select images from your gallery > click next > click on the sound option > choose music from sounds and add it to your slideshow video.
Q4. How many images can you add to a Tiktok slideshow?
A. Select the images to add to the slideshow. You can also add videos to your slideshow from the videos section. Keep in mind that the images you are selecting are in perfect order as you want to see them appear in a slideshow. You can add up to 35 images and videos.
Q5. What are the best recommended slideshow effects on Tiktok?
A. There are a lot of effects on Tiktok but here are some best slideshow effects of Tiktok like Green Screen, Spilt Screen, Face Zoom effect, Bling effect, Trio effect, Beauty effect, Long Face effect, Trisection effect and Face Morph effect.
Tiktok is a great choice for making photo video slideshow but if you want to try something new you can consider using Wondershare Filmora Video Editor . As it have amazing transitions and its own music gallery, it allows you to record your own voiceover. Filmora allows you to make engaging slideshow using different features automatically or manually. It has voice removal, audio mixer, and video stabilization features that add to the output. The 4K editing feature allows you to export the video of resolution of up to 4K.
For Win 7 or later (64-bit)
For macOS 10.12 or later
● Ending Thoughts →
● Tiktok is an amazing and popular social media platform which allows you to create your own content and with the help of this platform your content can reach a wide range of people.
● You can make an attractive photo slideshow with the help of Tiktok because it has amazing features like different effects, and you can also add text and sound to it.
● Tiktok is a great choice but you can also consider an alternate option like, Filmora as you can create your slideshow with its amazing features.
Tiktok is the most amazing and popular social media platform because it has stunning features. It is used by many people like social media influencer to common man. Tiktok helps the content creator in making them and their content viral. It is used for gaining followers and becoming popular.
In this article
01 [How to Make Tiktok Photo Slideshow Faster](#Part 1)
02 [Five Recommended Tiktok Slideshow Effects](#Part 2)
03 [How to Adjust Sound on Tiktok Slideshow](#Part 3)
04 [FAQ of Making Tiktok Slideshow](#Part 4)
Part 1 How To Make Tiktok Photo Slideshow Faster?
01How can you make fast slideshow of pictures on Tiktok 2022?
Do you want to create fast slideshow of pictures on Tiktok? Here is the step by step process to make a fast slideshow of pictures:
Step 1: Open the Tiktok app
Click on the Tiktok logo in your device to open Tiktok app.

Step 2: Click on plus icon.
Now, you will start seeing the videos from “Following” or “For you” on your Home Screen.
Click on the “+” Plus icon in the bottom of the screen.

Step 3: Click on templates
On the right side of “Red Shoot Button” you will see template option, click on templates.

Step 4: Select Template
After clicking on the “Template” option, you will see photo and videos from the gallery on your device. Tap on images to select images.

Step 5: Select Images from your gallery
Tap on the “Radio Button” to select images, you can also choose videos if you want.
To explore all the images on your gallery, you can click on the swipe up or drop down menu.

Step 6: Click on OK Button
When you are done selecting all images from the gallery, at the bottom right you see the OK button. To proceed, click on the OK button.

Step 7: Edit the Slideshow Video
Now you can see a slideshow photo video of the images which you have selected. Now, you can edit the video: you can change the sound, add different effects and add text or any stickers to your slideshow video.

Step 8: Click on Next Button
After completing your photo video slideshow, click on the Next button.
Step 9: Click on the Post button
After clicking on the Next button now you will see two options, Drafts and Post button.
● Drafts: If you don’t want to post the video then add #hashtags, mention your friend name and click on the drafts button.
● Posts: If you want to post the video then add #hashtags, mention your friends and click on post button to publish.

Step 10: Done
You have successfully completed making a fast photo video slideshow.
02How can you make tiktok slideshow faster in 2022?
To faster tiktok photo slideshow follow the given steps:
● Go to Play Store or App Store.
● Search for “Video Speed” Application on your device.
● Download any app, from the search list.
● Open the app and select your Tiktok video for editing.
● Edit the video from the instructions which are given on-screen.
● Download it for free on your device.
● Add it on Tiktok to share.
So, these were the given steps from which you can make your photo slideshow faster.
Part 2 Five Recommended Tiktok Slideshow Effects
01Bling Effect on Tiktok
If you use Tiktok actively then you must have seen the Bling Effect as they look glittery and conspicuous. If you are not aware about the Bling effect on Tiktok, it is an effect which gives sparkly look. Bling Effect works better on videos which emit light. Things that emit light are jewellery, LED lights, glasses etc.

Make sure that your Tiktok is updated with the latest version to get the Bling Effect. Then follow the given steps:
● Open Tiktok on your device and click on the “+” icon to add a new video.
● Click on the “Effects” button at the bottom left side and then open the “Trending” tab of Tiktok effect.
● Keep scrolling until you do not get the Bling effect icon.
● When you get the Bling effect tap to download it, and after that it’s ready to use.
● To add an effect in your favourites, click on the white Bookmark which is given while the Bling effect is alive.
Now, you can use the Bling effect while recording your videos.
02Face Zoom Effect on Tiktok
The Face Zoom Effect is what it sounds like; it’s an effect on Tiktok which is used to automatically zoom the camera on your face. Face Zoom effect can make your videos stand out from other people videos. If you use the Face Zoom effect and hold on to the camera up to your face and pull your phone back slowly, your face will look totally different.
Here are the steps to get the Face Zoom Effect on Tiktok:
● Open the Tiktok on your device.
● Tap on the “+” button on the home screen.
● Then you will see the “Effects” section, click on it.
● In the Effects section you will see various other filters also.
● Keep searching for it and when you get it, select it.
● Now, you can make videos and publish them**.**
03Face Morph Effect on Tiktok
Face Morph Filter is which morphs 2 pictures and make transitions to the pictures at that time. When you use this filter, you can see that it make changes but still you have the same face. Your face remains the same but the transitions look very even and amazing.
Follow the given steps to use the Face Morph Effect:
● Open the Tiktok app on your device.
● Click on the “+” icon at the bottom of the screen.
● Scroll on the right side on the Templates.
● Keep scrolling until you get the Morph Effect.
● Click to select photos.
● Select at least 5 photos from your camera roll.
● Click OK at the bottom right corner
● Now edit and publish your Tiktok.
04 Beauty Effects
Beauty effects are used to beautify your face and changes you into completely different person. If you don’t want to wear makeup just to record one video, in that case you can use this effect. Basically it completely changes your overall appearance.
Steps to follow to use beauty effects:
● Open Tiktok app on your device.
● Click on the “+” button at the bottom- center of the screen.
● Click on the “Effects” section.
● Keep searching for “Beauty Effect” and after that select it.
● Now, you can record your video and publish them.
05Green Effect
Green effects allow you to change the background of any image or you can also add any video to your background of your choice. With the help of Green Screen, users have been able to film their videos wherever they want.
● Open Tiktok application.
● On the bottom center, click on the “+” icon.
● On the bottom left corner, click on “effects”.
● Click on the “Green Screen” from the Effects menu.
● Select Green Screen effect.
● Now you can film videos using Green Screen.
Part 3 How To Adjust Sound On Tiktok Slideshow
Once you have selected the sound, you may need to do some adjustments.
To edit which part of the song you are using:
● Click on the “Trim” button given at the right side of the screen.
● Drag the cursor to adjust which part of the song you want your video to begin at.
● Click on the checkmark to confirm.
To edit the volume of the sound:
● Once you have completed filming your video, in the bottom left corner click on the sounds button.
● Click the “volume” tab and use the cursor to adjust how much loud the sound is compared to the original audio.
● Click on the screen again to confirm.
These were the steps for adjusting sound, the way you want to customize it.
Part 4 FAQ’S of making Tiktok Slideshow
Q1. How can you trim the audio on a Tiktok Sideshow?
A. To trim sound on a Tiktok slideshow, first add a sound to a Tiktok slideshow, click on the ‘Trim” button at the right side of the screen. Then drag the cursor to select which part of the audio you want for your video. Listen to the sound after trimming. If you liked the trimmed song, tap to the next button to add it in your Tiktok slideshow.
Q2. How can you add text to the Tiktok slideshow?
A. Steps to add text to your Tiktok slideshow:
● Open Tiktok app.
● Click on the “+” icon.
● Click on upload.
● Select an image from your gallery.
● Click on the “Next” button.
● Now click on the “Text” to add text.
● After that type the text.
● Choose any font or color of your choice.
● Tap on the “Done “button”.
● Now your video is ready to publish.
Q3. How can we add music to slideshow videos on Tiktok?
A. Yes you can add music to your slideshow video. Before posting it you will find the edit option.
When you select images from your gallery > click next > click on the sound option > choose music from sounds and add it to your slideshow video.
Q4. How many images can you add to a Tiktok slideshow?
A. Select the images to add to the slideshow. You can also add videos to your slideshow from the videos section. Keep in mind that the images you are selecting are in perfect order as you want to see them appear in a slideshow. You can add up to 35 images and videos.
Q5. What are the best recommended slideshow effects on Tiktok?
A. There are a lot of effects on Tiktok but here are some best slideshow effects of Tiktok like Green Screen, Spilt Screen, Face Zoom effect, Bling effect, Trio effect, Beauty effect, Long Face effect, Trisection effect and Face Morph effect.
Tiktok is a great choice for making photo video slideshow but if you want to try something new you can consider using Wondershare Filmora Video Editor . As it have amazing transitions and its own music gallery, it allows you to record your own voiceover. Filmora allows you to make engaging slideshow using different features automatically or manually. It has voice removal, audio mixer, and video stabilization features that add to the output. The 4K editing feature allows you to export the video of resolution of up to 4K.
For Win 7 or later (64-bit)
For macOS 10.12 or later
● Ending Thoughts →
● Tiktok is an amazing and popular social media platform which allows you to create your own content and with the help of this platform your content can reach a wide range of people.
● You can make an attractive photo slideshow with the help of Tiktok because it has amazing features like different effects, and you can also add text and sound to it.
● Tiktok is a great choice but you can also consider an alternate option like, Filmora as you can create your slideshow with its amazing features.
Tiktok is the most amazing and popular social media platform because it has stunning features. It is used by many people like social media influencer to common man. Tiktok helps the content creator in making them and their content viral. It is used for gaining followers and becoming popular.
In this article
01 [How to Make Tiktok Photo Slideshow Faster](#Part 1)
02 [Five Recommended Tiktok Slideshow Effects](#Part 2)
03 [How to Adjust Sound on Tiktok Slideshow](#Part 3)
04 [FAQ of Making Tiktok Slideshow](#Part 4)
Part 1 How To Make Tiktok Photo Slideshow Faster?
01How can you make fast slideshow of pictures on Tiktok 2022?
Do you want to create fast slideshow of pictures on Tiktok? Here is the step by step process to make a fast slideshow of pictures:
Step 1: Open the Tiktok app
Click on the Tiktok logo in your device to open Tiktok app.

Step 2: Click on plus icon.
Now, you will start seeing the videos from “Following” or “For you” on your Home Screen.
Click on the “+” Plus icon in the bottom of the screen.

Step 3: Click on templates
On the right side of “Red Shoot Button” you will see template option, click on templates.

Step 4: Select Template
After clicking on the “Template” option, you will see photo and videos from the gallery on your device. Tap on images to select images.

Step 5: Select Images from your gallery
Tap on the “Radio Button” to select images, you can also choose videos if you want.
To explore all the images on your gallery, you can click on the swipe up or drop down menu.

Step 6: Click on OK Button
When you are done selecting all images from the gallery, at the bottom right you see the OK button. To proceed, click on the OK button.

Step 7: Edit the Slideshow Video
Now you can see a slideshow photo video of the images which you have selected. Now, you can edit the video: you can change the sound, add different effects and add text or any stickers to your slideshow video.

Step 8: Click on Next Button
After completing your photo video slideshow, click on the Next button.
Step 9: Click on the Post button
After clicking on the Next button now you will see two options, Drafts and Post button.
● Drafts: If you don’t want to post the video then add #hashtags, mention your friend name and click on the drafts button.
● Posts: If you want to post the video then add #hashtags, mention your friends and click on post button to publish.

Step 10: Done
You have successfully completed making a fast photo video slideshow.
02How can you make tiktok slideshow faster in 2022?
To faster tiktok photo slideshow follow the given steps:
● Go to Play Store or App Store.
● Search for “Video Speed” Application on your device.
● Download any app, from the search list.
● Open the app and select your Tiktok video for editing.
● Edit the video from the instructions which are given on-screen.
● Download it for free on your device.
● Add it on Tiktok to share.
So, these were the given steps from which you can make your photo slideshow faster.
Part 2 Five Recommended Tiktok Slideshow Effects
01Bling Effect on Tiktok
If you use Tiktok actively then you must have seen the Bling Effect as they look glittery and conspicuous. If you are not aware about the Bling effect on Tiktok, it is an effect which gives sparkly look. Bling Effect works better on videos which emit light. Things that emit light are jewellery, LED lights, glasses etc.

Make sure that your Tiktok is updated with the latest version to get the Bling Effect. Then follow the given steps:
● Open Tiktok on your device and click on the “+” icon to add a new video.
● Click on the “Effects” button at the bottom left side and then open the “Trending” tab of Tiktok effect.
● Keep scrolling until you do not get the Bling effect icon.
● When you get the Bling effect tap to download it, and after that it’s ready to use.
● To add an effect in your favourites, click on the white Bookmark which is given while the Bling effect is alive.
Now, you can use the Bling effect while recording your videos.
02Face Zoom Effect on Tiktok
The Face Zoom Effect is what it sounds like; it’s an effect on Tiktok which is used to automatically zoom the camera on your face. Face Zoom effect can make your videos stand out from other people videos. If you use the Face Zoom effect and hold on to the camera up to your face and pull your phone back slowly, your face will look totally different.
Here are the steps to get the Face Zoom Effect on Tiktok:
● Open the Tiktok on your device.
● Tap on the “+” button on the home screen.
● Then you will see the “Effects” section, click on it.
● In the Effects section you will see various other filters also.
● Keep searching for it and when you get it, select it.
● Now, you can make videos and publish them**.**
03Face Morph Effect on Tiktok
Face Morph Filter is which morphs 2 pictures and make transitions to the pictures at that time. When you use this filter, you can see that it make changes but still you have the same face. Your face remains the same but the transitions look very even and amazing.
Follow the given steps to use the Face Morph Effect:
● Open the Tiktok app on your device.
● Click on the “+” icon at the bottom of the screen.
● Scroll on the right side on the Templates.
● Keep scrolling until you get the Morph Effect.
● Click to select photos.
● Select at least 5 photos from your camera roll.
● Click OK at the bottom right corner
● Now edit and publish your Tiktok.
04 Beauty Effects
Beauty effects are used to beautify your face and changes you into completely different person. If you don’t want to wear makeup just to record one video, in that case you can use this effect. Basically it completely changes your overall appearance.
Steps to follow to use beauty effects:
● Open Tiktok app on your device.
● Click on the “+” button at the bottom- center of the screen.
● Click on the “Effects” section.
● Keep searching for “Beauty Effect” and after that select it.
● Now, you can record your video and publish them.
05Green Effect
Green effects allow you to change the background of any image or you can also add any video to your background of your choice. With the help of Green Screen, users have been able to film their videos wherever they want.
● Open Tiktok application.
● On the bottom center, click on the “+” icon.
● On the bottom left corner, click on “effects”.
● Click on the “Green Screen” from the Effects menu.
● Select Green Screen effect.
● Now you can film videos using Green Screen.
Part 3 How To Adjust Sound On Tiktok Slideshow
Once you have selected the sound, you may need to do some adjustments.
To edit which part of the song you are using:
● Click on the “Trim” button given at the right side of the screen.
● Drag the cursor to adjust which part of the song you want your video to begin at.
● Click on the checkmark to confirm.
To edit the volume of the sound:
● Once you have completed filming your video, in the bottom left corner click on the sounds button.
● Click the “volume” tab and use the cursor to adjust how much loud the sound is compared to the original audio.
● Click on the screen again to confirm.
These were the steps for adjusting sound, the way you want to customize it.
Part 4 FAQ’S of making Tiktok Slideshow
Q1. How can you trim the audio on a Tiktok Sideshow?
A. To trim sound on a Tiktok slideshow, first add a sound to a Tiktok slideshow, click on the ‘Trim” button at the right side of the screen. Then drag the cursor to select which part of the audio you want for your video. Listen to the sound after trimming. If you liked the trimmed song, tap to the next button to add it in your Tiktok slideshow.
Q2. How can you add text to the Tiktok slideshow?
A. Steps to add text to your Tiktok slideshow:
● Open Tiktok app.
● Click on the “+” icon.
● Click on upload.
● Select an image from your gallery.
● Click on the “Next” button.
● Now click on the “Text” to add text.
● After that type the text.
● Choose any font or color of your choice.
● Tap on the “Done “button”.
● Now your video is ready to publish.
Q3. How can we add music to slideshow videos on Tiktok?
A. Yes you can add music to your slideshow video. Before posting it you will find the edit option.
When you select images from your gallery > click next > click on the sound option > choose music from sounds and add it to your slideshow video.
Q4. How many images can you add to a Tiktok slideshow?
A. Select the images to add to the slideshow. You can also add videos to your slideshow from the videos section. Keep in mind that the images you are selecting are in perfect order as you want to see them appear in a slideshow. You can add up to 35 images and videos.
Q5. What are the best recommended slideshow effects on Tiktok?
A. There are a lot of effects on Tiktok but here are some best slideshow effects of Tiktok like Green Screen, Spilt Screen, Face Zoom effect, Bling effect, Trio effect, Beauty effect, Long Face effect, Trisection effect and Face Morph effect.
Tiktok is a great choice for making photo video slideshow but if you want to try something new you can consider using Wondershare Filmora Video Editor . As it have amazing transitions and its own music gallery, it allows you to record your own voiceover. Filmora allows you to make engaging slideshow using different features automatically or manually. It has voice removal, audio mixer, and video stabilization features that add to the output. The 4K editing feature allows you to export the video of resolution of up to 4K.
For Win 7 or later (64-bit)
For macOS 10.12 or later
● Ending Thoughts →
● Tiktok is an amazing and popular social media platform which allows you to create your own content and with the help of this platform your content can reach a wide range of people.
● You can make an attractive photo slideshow with the help of Tiktok because it has amazing features like different effects, and you can also add text and sound to it.
● Tiktok is a great choice but you can also consider an alternate option like, Filmora as you can create your slideshow with its amazing features.
Tiktok is the most amazing and popular social media platform because it has stunning features. It is used by many people like social media influencer to common man. Tiktok helps the content creator in making them and their content viral. It is used for gaining followers and becoming popular.
In this article
01 [How to Make Tiktok Photo Slideshow Faster](#Part 1)
02 [Five Recommended Tiktok Slideshow Effects](#Part 2)
03 [How to Adjust Sound on Tiktok Slideshow](#Part 3)
04 [FAQ of Making Tiktok Slideshow](#Part 4)
Part 1 How To Make Tiktok Photo Slideshow Faster?
01How can you make fast slideshow of pictures on Tiktok 2022?
Do you want to create fast slideshow of pictures on Tiktok? Here is the step by step process to make a fast slideshow of pictures:
Step 1: Open the Tiktok app
Click on the Tiktok logo in your device to open Tiktok app.

Step 2: Click on plus icon.
Now, you will start seeing the videos from “Following” or “For you” on your Home Screen.
Click on the “+” Plus icon in the bottom of the screen.

Step 3: Click on templates
On the right side of “Red Shoot Button” you will see template option, click on templates.

Step 4: Select Template
After clicking on the “Template” option, you will see photo and videos from the gallery on your device. Tap on images to select images.

Step 5: Select Images from your gallery
Tap on the “Radio Button” to select images, you can also choose videos if you want.
To explore all the images on your gallery, you can click on the swipe up or drop down menu.

Step 6: Click on OK Button
When you are done selecting all images from the gallery, at the bottom right you see the OK button. To proceed, click on the OK button.

Step 7: Edit the Slideshow Video
Now you can see a slideshow photo video of the images which you have selected. Now, you can edit the video: you can change the sound, add different effects and add text or any stickers to your slideshow video.

Step 8: Click on Next Button
After completing your photo video slideshow, click on the Next button.
Step 9: Click on the Post button
After clicking on the Next button now you will see two options, Drafts and Post button.
● Drafts: If you don’t want to post the video then add #hashtags, mention your friend name and click on the drafts button.
● Posts: If you want to post the video then add #hashtags, mention your friends and click on post button to publish.

Step 10: Done
You have successfully completed making a fast photo video slideshow.
02How can you make tiktok slideshow faster in 2022?
To faster tiktok photo slideshow follow the given steps:
● Go to Play Store or App Store.
● Search for “Video Speed” Application on your device.
● Download any app, from the search list.
● Open the app and select your Tiktok video for editing.
● Edit the video from the instructions which are given on-screen.
● Download it for free on your device.
● Add it on Tiktok to share.
So, these were the given steps from which you can make your photo slideshow faster.
Part 2 Five Recommended Tiktok Slideshow Effects
01Bling Effect on Tiktok
If you use Tiktok actively then you must have seen the Bling Effect as they look glittery and conspicuous. If you are not aware about the Bling effect on Tiktok, it is an effect which gives sparkly look. Bling Effect works better on videos which emit light. Things that emit light are jewellery, LED lights, glasses etc.

Make sure that your Tiktok is updated with the latest version to get the Bling Effect. Then follow the given steps:
● Open Tiktok on your device and click on the “+” icon to add a new video.
● Click on the “Effects” button at the bottom left side and then open the “Trending” tab of Tiktok effect.
● Keep scrolling until you do not get the Bling effect icon.
● When you get the Bling effect tap to download it, and after that it’s ready to use.
● To add an effect in your favourites, click on the white Bookmark which is given while the Bling effect is alive.
Now, you can use the Bling effect while recording your videos.
02Face Zoom Effect on Tiktok
The Face Zoom Effect is what it sounds like; it’s an effect on Tiktok which is used to automatically zoom the camera on your face. Face Zoom effect can make your videos stand out from other people videos. If you use the Face Zoom effect and hold on to the camera up to your face and pull your phone back slowly, your face will look totally different.
Here are the steps to get the Face Zoom Effect on Tiktok:
● Open the Tiktok on your device.
● Tap on the “+” button on the home screen.
● Then you will see the “Effects” section, click on it.
● In the Effects section you will see various other filters also.
● Keep searching for it and when you get it, select it.
● Now, you can make videos and publish them**.**
03Face Morph Effect on Tiktok
Face Morph Filter is which morphs 2 pictures and make transitions to the pictures at that time. When you use this filter, you can see that it make changes but still you have the same face. Your face remains the same but the transitions look very even and amazing.
Follow the given steps to use the Face Morph Effect:
● Open the Tiktok app on your device.
● Click on the “+” icon at the bottom of the screen.
● Scroll on the right side on the Templates.
● Keep scrolling until you get the Morph Effect.
● Click to select photos.
● Select at least 5 photos from your camera roll.
● Click OK at the bottom right corner
● Now edit and publish your Tiktok.
04 Beauty Effects
Beauty effects are used to beautify your face and changes you into completely different person. If you don’t want to wear makeup just to record one video, in that case you can use this effect. Basically it completely changes your overall appearance.
Steps to follow to use beauty effects:
● Open Tiktok app on your device.
● Click on the “+” button at the bottom- center of the screen.
● Click on the “Effects” section.
● Keep searching for “Beauty Effect” and after that select it.
● Now, you can record your video and publish them.
05Green Effect
Green effects allow you to change the background of any image or you can also add any video to your background of your choice. With the help of Green Screen, users have been able to film their videos wherever they want.
● Open Tiktok application.
● On the bottom center, click on the “+” icon.
● On the bottom left corner, click on “effects”.
● Click on the “Green Screen” from the Effects menu.
● Select Green Screen effect.
● Now you can film videos using Green Screen.
Part 3 How To Adjust Sound On Tiktok Slideshow
Once you have selected the sound, you may need to do some adjustments.
To edit which part of the song you are using:
● Click on the “Trim” button given at the right side of the screen.
● Drag the cursor to adjust which part of the song you want your video to begin at.
● Click on the checkmark to confirm.
To edit the volume of the sound:
● Once you have completed filming your video, in the bottom left corner click on the sounds button.
● Click the “volume” tab and use the cursor to adjust how much loud the sound is compared to the original audio.
● Click on the screen again to confirm.
These were the steps for adjusting sound, the way you want to customize it.
Part 4 FAQ’S of making Tiktok Slideshow
Q1. How can you trim the audio on a Tiktok Sideshow?
A. To trim sound on a Tiktok slideshow, first add a sound to a Tiktok slideshow, click on the ‘Trim” button at the right side of the screen. Then drag the cursor to select which part of the audio you want for your video. Listen to the sound after trimming. If you liked the trimmed song, tap to the next button to add it in your Tiktok slideshow.
Q2. How can you add text to the Tiktok slideshow?
A. Steps to add text to your Tiktok slideshow:
● Open Tiktok app.
● Click on the “+” icon.
● Click on upload.
● Select an image from your gallery.
● Click on the “Next” button.
● Now click on the “Text” to add text.
● After that type the text.
● Choose any font or color of your choice.
● Tap on the “Done “button”.
● Now your video is ready to publish.
Q3. How can we add music to slideshow videos on Tiktok?
A. Yes you can add music to your slideshow video. Before posting it you will find the edit option.
When you select images from your gallery > click next > click on the sound option > choose music from sounds and add it to your slideshow video.
Q4. How many images can you add to a Tiktok slideshow?
A. Select the images to add to the slideshow. You can also add videos to your slideshow from the videos section. Keep in mind that the images you are selecting are in perfect order as you want to see them appear in a slideshow. You can add up to 35 images and videos.
Q5. What are the best recommended slideshow effects on Tiktok?
A. There are a lot of effects on Tiktok but here are some best slideshow effects of Tiktok like Green Screen, Spilt Screen, Face Zoom effect, Bling effect, Trio effect, Beauty effect, Long Face effect, Trisection effect and Face Morph effect.
Tiktok is a great choice for making photo video slideshow but if you want to try something new you can consider using Wondershare Filmora Video Editor . As it have amazing transitions and its own music gallery, it allows you to record your own voiceover. Filmora allows you to make engaging slideshow using different features automatically or manually. It has voice removal, audio mixer, and video stabilization features that add to the output. The 4K editing feature allows you to export the video of resolution of up to 4K.
For Win 7 or later (64-bit)
For macOS 10.12 or later
● Ending Thoughts →
● Tiktok is an amazing and popular social media platform which allows you to create your own content and with the help of this platform your content can reach a wide range of people.
● You can make an attractive photo slideshow with the help of Tiktok because it has amazing features like different effects, and you can also add text and sound to it.
● Tiktok is a great choice but you can also consider an alternate option like, Filmora as you can create your slideshow with its amazing features.
How to Create Datamoshing Effect to Your Footage in After Effects?
Experimenting with new effects and filters has become part and parcel of life, especially for creative professionals. Datamoshing is a similar effect that displays errors and flaws in the video clips to leave an impression on the audience. In most terms, the datamoshing effect shares similarities with the glitch effect.
Henceforth, the write-up shall focus on the introduction of this effect along with its workability. The procedure to create datamosh After Effects would also be covered. So, let us begin!
In this article
01 What is the Datamoshing Effect?
02 How Does Datamoshing Effect Work?
03 Step by Step to Create Datamoshing Effect in After Effects (Without Plugin)
04 How to Do Datamoshing Effect with Datamosh Plugin in After Effects
Part 1: What is the Datamoshing Effect?
Before going into the depths of workability and operation of the datamoshing effect in After Effects, let us understand the effect in detail. The datamoshing effect plays with the video compression to corrupt the pixels of the footage.
In this effect, the pixels glitch and appear to melt, duplicate, and create a projection organically. Also known as databending, it is a complicated technique in which movement of one layer is introduced to another layer of the video clip.
Lossy compression and removed frames help develop a psychedelic result effortlessly. Presently, datamosh After Effects has gained popularity as it helps bring change to the video and engages the audience.
Part 2: How Does Datamoshing Effect Work?
The sub-section informs the content creators and creative professionals regarding the workability of the datamoshing effect in video clips. Hence, let us commence this.
Datamoshing eliminates the new picture frame and keeps those frames that control the movement of the pixels. It leads to the picture pixels going into different directions instead of the usual one, thus, creating a glitch effect. These glitch effects are used in unique mediums to create a classy yet ancient vibe.
The datamoshing effect can be noticed between the cuts and motion. It is the process of corrupting the imagery in which the I-frames are replaced and P-frames are applied in the wrong picture. Let us dive right into two types of datamoshing.
The first type of datamoshing is created when the I-frame of the video is removed. In this scenario, the pixels from the previous scene are projected into the next scene smoothly. It gives the impression that the pixels have been tracked into the next shot.
The second kind of datamoshing, known to humankind, is when the d-frame of the video is duplicated. It leads the footage to show images and colors being bloomed together as the pixels are equivalent, coming through the same motion path.
Part 3: Step by Step to Create Datamoshing Effect in After Effects (Without Plugin)
Understanding the datamosh After Effects is one thing, and incorporating it in your footage is another. The section shall walk you through the step-by-step guide to create the After Effects’ datamoshing effect without a plugin. So, let’s go, shall we?
Step 1: Preliminary Process
The first step is easy. Open After Effects from your system. Import the targeted video that needs the datamosh effect. After that, head to the “Content-Aware Fill” to begin the process.

Step 2: Creating the Reference Frame
Use the playhead where you wish to create the effect, and then click on “Create Reference Frame.” The picture frame opens in Photoshop, and the user is expected to save it. Now, go back to the After Effects.

Step 3: Smearing Process
Now, hide the top layer so that the smearing can occur. Turn the Masks to “None” so that you can perform the masking. Split the second layer to duplicate the layer as we make changes to it. Set the “Masks” to “Subtract and then add a refine soft matte.

Step 4: Pre-composing the Clip
It is important to pre-compose the clip, so right-click on the timeline and hit “Pre-compose” to the menu list that appears. Tick mark “Move all attributes into the new composition” and rename the clip afterward. Hit “OK.”

Step 5: Rendering Queue
Double-click on the timeline, hold shift and drag it until the clip snaps. Press “B” on your keyboard and “N” on the other side to snap the work area. Navigate to “File” and “Export” and then click on “Render Queue.”

Step 6: Generating Fill Layer
Import the file when it is done rendering and drag it to the timeline. Trim the work area again using B and N buttons from the keyboard. Ensure that the fill method is “Surface,” and the range is “Work Area.” Click on “Generate Fill Layer” to start the analyzing process.

Step 7: Creating the Transition
The user is expected to create a transition between the two shots. Use the track matte to make solid and fractal noise. In the “Noise and Grain” section, click on “Fractal noise” and then switch the fractal type to “Basic.” Now, keyframe the “Brightness” and simultaneously turn its level to black and white to create a transition.

Step 8: Achieving a Glitchy Effect
To give the glitchy effect, head to the “Effects and Presets” and hit “Posterize,” and reduce its level to a couple of integers. Pull the transition down to the fill layer and set it to “Luma Matte.” It will showcase the halo sign that we masked around the image.

Step 9: Have a Finer Imprint
To eliminate it, use the “Set Matte” channel and alter its layer to the one we pre-composed. Now, invert the matte. Moving on, navigate to the “Simple Choker” and reduce it to one pixel. For perfection, duplicate it and get a finer imprint.

Step 10: Final Process
Duplicate the grey solid and then extend the second clip to our fill. In the last step, change the layer of the second clip to “Luma Matte” and save the video. You are done with the process.

Part 4: How to Do Datamoshing Effect with Datamosh Plugin in After Effects
With its plugin, this sub-section revolves around creating the datamosh effect in After Effects. So, let us begin!
Step 1: Rendering the Work Area
Open After Effects and click on the (+) sign to set the in and out points. Click on the “Datamosh” to render the work area. The timeline will showcase the clip. Click on “Remove Frames” from the left panel and add a new mosh marker by pressing the (+) button beside “Remove Frames.”

Step 2: I-Frame Removal
The new remove frame marker will be on the timeline. Drag it to the new scene and then hit “Datamosh.” The I-frame removal effect can be shown on the screen. Again, click on (+) to add a new mosh module. Press “Multiply” and then “Average” from the menus that appear. Hit “Average previous 3” afterward.

Step 3: Using the Hold Frames Function
Set the in and out points of this mosh marker and again hit “Datamosh.” The work area will be rendered. Now, open the mosh module and toggle on the “Hold Frames” feature. Also, toggle on the previous render. Press the “Datamosh” again.

Step 4: Injecting the Frames
Toggle the “Inject Frames” on and press use previous render. Hit “Datamosh” afterward. In this way, the clip will hold the frames and inject them into the transition. Enhance the intensity of the moshing algorithm and eliminate “Remove Frames” and “Inject Frames.” Use the previous render and again hit “Datamosh.”

Step 5: Playing with the Acceleration
Increase the acceleration and bring the intensity back to what it was. Again, use the previous render and click “Datamosh.” Now, improve the intensity and set the acceleration back to 0. Alter the “Blend” as much you need to mix the original and present motion of the transition. Press the “Datamosh.”

Step 6: Changing the Threshold
Moving on to the threshold feature, this function is a gatekeeper and decides if a pixel will be moshed. Inverse the intensity of the clip, change the blend to be 0, and set the threshold to be a small integer to find out the impact first. It can be enhanced later on. Uncheck the previous render if you are using the new clip for threshold. Hit “Datamosh” again. Now, export the video, and you are done with the datamoshing.

Conclusion
YouTubers and content creators use the Datamoshing effect to offer magic to the workplace. The article offered an extensive guide to effortlessly adding this effect in After Effects. The foundation and workability of the datamosh effect were also the cruces of the article. It is recommended that the user properly know the software before getting into the process.
02 How Does Datamoshing Effect Work?
03 Step by Step to Create Datamoshing Effect in After Effects (Without Plugin)
04 How to Do Datamoshing Effect with Datamosh Plugin in After Effects
Part 1: What is the Datamoshing Effect?
Before going into the depths of workability and operation of the datamoshing effect in After Effects, let us understand the effect in detail. The datamoshing effect plays with the video compression to corrupt the pixels of the footage.
In this effect, the pixels glitch and appear to melt, duplicate, and create a projection organically. Also known as databending, it is a complicated technique in which movement of one layer is introduced to another layer of the video clip.
Lossy compression and removed frames help develop a psychedelic result effortlessly. Presently, datamosh After Effects has gained popularity as it helps bring change to the video and engages the audience.
Part 2: How Does Datamoshing Effect Work?
The sub-section informs the content creators and creative professionals regarding the workability of the datamoshing effect in video clips. Hence, let us commence this.
Datamoshing eliminates the new picture frame and keeps those frames that control the movement of the pixels. It leads to the picture pixels going into different directions instead of the usual one, thus, creating a glitch effect. These glitch effects are used in unique mediums to create a classy yet ancient vibe.
The datamoshing effect can be noticed between the cuts and motion. It is the process of corrupting the imagery in which the I-frames are replaced and P-frames are applied in the wrong picture. Let us dive right into two types of datamoshing.
The first type of datamoshing is created when the I-frame of the video is removed. In this scenario, the pixels from the previous scene are projected into the next scene smoothly. It gives the impression that the pixels have been tracked into the next shot.
The second kind of datamoshing, known to humankind, is when the d-frame of the video is duplicated. It leads the footage to show images and colors being bloomed together as the pixels are equivalent, coming through the same motion path.
Part 3: Step by Step to Create Datamoshing Effect in After Effects (Without Plugin)
Understanding the datamosh After Effects is one thing, and incorporating it in your footage is another. The section shall walk you through the step-by-step guide to create the After Effects’ datamoshing effect without a plugin. So, let’s go, shall we?
Step 1: Preliminary Process
The first step is easy. Open After Effects from your system. Import the targeted video that needs the datamosh effect. After that, head to the “Content-Aware Fill” to begin the process.

Step 2: Creating the Reference Frame
Use the playhead where you wish to create the effect, and then click on “Create Reference Frame.” The picture frame opens in Photoshop, and the user is expected to save it. Now, go back to the After Effects.

Step 3: Smearing Process
Now, hide the top layer so that the smearing can occur. Turn the Masks to “None” so that you can perform the masking. Split the second layer to duplicate the layer as we make changes to it. Set the “Masks” to “Subtract and then add a refine soft matte.

Step 4: Pre-composing the Clip
It is important to pre-compose the clip, so right-click on the timeline and hit “Pre-compose” to the menu list that appears. Tick mark “Move all attributes into the new composition” and rename the clip afterward. Hit “OK.”

Step 5: Rendering Queue
Double-click on the timeline, hold shift and drag it until the clip snaps. Press “B” on your keyboard and “N” on the other side to snap the work area. Navigate to “File” and “Export” and then click on “Render Queue.”

Step 6: Generating Fill Layer
Import the file when it is done rendering and drag it to the timeline. Trim the work area again using B and N buttons from the keyboard. Ensure that the fill method is “Surface,” and the range is “Work Area.” Click on “Generate Fill Layer” to start the analyzing process.

Step 7: Creating the Transition
The user is expected to create a transition between the two shots. Use the track matte to make solid and fractal noise. In the “Noise and Grain” section, click on “Fractal noise” and then switch the fractal type to “Basic.” Now, keyframe the “Brightness” and simultaneously turn its level to black and white to create a transition.

Step 8: Achieving a Glitchy Effect
To give the glitchy effect, head to the “Effects and Presets” and hit “Posterize,” and reduce its level to a couple of integers. Pull the transition down to the fill layer and set it to “Luma Matte.” It will showcase the halo sign that we masked around the image.

Step 9: Have a Finer Imprint
To eliminate it, use the “Set Matte” channel and alter its layer to the one we pre-composed. Now, invert the matte. Moving on, navigate to the “Simple Choker” and reduce it to one pixel. For perfection, duplicate it and get a finer imprint.

Step 10: Final Process
Duplicate the grey solid and then extend the second clip to our fill. In the last step, change the layer of the second clip to “Luma Matte” and save the video. You are done with the process.

Part 4: How to Do Datamoshing Effect with Datamosh Plugin in After Effects
With its plugin, this sub-section revolves around creating the datamosh effect in After Effects. So, let us begin!
Step 1: Rendering the Work Area
Open After Effects and click on the (+) sign to set the in and out points. Click on the “Datamosh” to render the work area. The timeline will showcase the clip. Click on “Remove Frames” from the left panel and add a new mosh marker by pressing the (+) button beside “Remove Frames.”

Step 2: I-Frame Removal
The new remove frame marker will be on the timeline. Drag it to the new scene and then hit “Datamosh.” The I-frame removal effect can be shown on the screen. Again, click on (+) to add a new mosh module. Press “Multiply” and then “Average” from the menus that appear. Hit “Average previous 3” afterward.

Step 3: Using the Hold Frames Function
Set the in and out points of this mosh marker and again hit “Datamosh.” The work area will be rendered. Now, open the mosh module and toggle on the “Hold Frames” feature. Also, toggle on the previous render. Press the “Datamosh” again.

Step 4: Injecting the Frames
Toggle the “Inject Frames” on and press use previous render. Hit “Datamosh” afterward. In this way, the clip will hold the frames and inject them into the transition. Enhance the intensity of the moshing algorithm and eliminate “Remove Frames” and “Inject Frames.” Use the previous render and again hit “Datamosh.”

Step 5: Playing with the Acceleration
Increase the acceleration and bring the intensity back to what it was. Again, use the previous render and click “Datamosh.” Now, improve the intensity and set the acceleration back to 0. Alter the “Blend” as much you need to mix the original and present motion of the transition. Press the “Datamosh.”

Step 6: Changing the Threshold
Moving on to the threshold feature, this function is a gatekeeper and decides if a pixel will be moshed. Inverse the intensity of the clip, change the blend to be 0, and set the threshold to be a small integer to find out the impact first. It can be enhanced later on. Uncheck the previous render if you are using the new clip for threshold. Hit “Datamosh” again. Now, export the video, and you are done with the datamoshing.

Conclusion
YouTubers and content creators use the Datamoshing effect to offer magic to the workplace. The article offered an extensive guide to effortlessly adding this effect in After Effects. The foundation and workability of the datamosh effect were also the cruces of the article. It is recommended that the user properly know the software before getting into the process.
02 How Does Datamoshing Effect Work?
03 Step by Step to Create Datamoshing Effect in After Effects (Without Plugin)
04 How to Do Datamoshing Effect with Datamosh Plugin in After Effects
Part 1: What is the Datamoshing Effect?
Before going into the depths of workability and operation of the datamoshing effect in After Effects, let us understand the effect in detail. The datamoshing effect plays with the video compression to corrupt the pixels of the footage.
In this effect, the pixels glitch and appear to melt, duplicate, and create a projection organically. Also known as databending, it is a complicated technique in which movement of one layer is introduced to another layer of the video clip.
Lossy compression and removed frames help develop a psychedelic result effortlessly. Presently, datamosh After Effects has gained popularity as it helps bring change to the video and engages the audience.
Part 2: How Does Datamoshing Effect Work?
The sub-section informs the content creators and creative professionals regarding the workability of the datamoshing effect in video clips. Hence, let us commence this.
Datamoshing eliminates the new picture frame and keeps those frames that control the movement of the pixels. It leads to the picture pixels going into different directions instead of the usual one, thus, creating a glitch effect. These glitch effects are used in unique mediums to create a classy yet ancient vibe.
The datamoshing effect can be noticed between the cuts and motion. It is the process of corrupting the imagery in which the I-frames are replaced and P-frames are applied in the wrong picture. Let us dive right into two types of datamoshing.
The first type of datamoshing is created when the I-frame of the video is removed. In this scenario, the pixels from the previous scene are projected into the next scene smoothly. It gives the impression that the pixels have been tracked into the next shot.
The second kind of datamoshing, known to humankind, is when the d-frame of the video is duplicated. It leads the footage to show images and colors being bloomed together as the pixels are equivalent, coming through the same motion path.
Part 3: Step by Step to Create Datamoshing Effect in After Effects (Without Plugin)
Understanding the datamosh After Effects is one thing, and incorporating it in your footage is another. The section shall walk you through the step-by-step guide to create the After Effects’ datamoshing effect without a plugin. So, let’s go, shall we?
Step 1: Preliminary Process
The first step is easy. Open After Effects from your system. Import the targeted video that needs the datamosh effect. After that, head to the “Content-Aware Fill” to begin the process.

Step 2: Creating the Reference Frame
Use the playhead where you wish to create the effect, and then click on “Create Reference Frame.” The picture frame opens in Photoshop, and the user is expected to save it. Now, go back to the After Effects.

Step 3: Smearing Process
Now, hide the top layer so that the smearing can occur. Turn the Masks to “None” so that you can perform the masking. Split the second layer to duplicate the layer as we make changes to it. Set the “Masks” to “Subtract and then add a refine soft matte.

Step 4: Pre-composing the Clip
It is important to pre-compose the clip, so right-click on the timeline and hit “Pre-compose” to the menu list that appears. Tick mark “Move all attributes into the new composition” and rename the clip afterward. Hit “OK.”

Step 5: Rendering Queue
Double-click on the timeline, hold shift and drag it until the clip snaps. Press “B” on your keyboard and “N” on the other side to snap the work area. Navigate to “File” and “Export” and then click on “Render Queue.”

Step 6: Generating Fill Layer
Import the file when it is done rendering and drag it to the timeline. Trim the work area again using B and N buttons from the keyboard. Ensure that the fill method is “Surface,” and the range is “Work Area.” Click on “Generate Fill Layer” to start the analyzing process.

Step 7: Creating the Transition
The user is expected to create a transition between the two shots. Use the track matte to make solid and fractal noise. In the “Noise and Grain” section, click on “Fractal noise” and then switch the fractal type to “Basic.” Now, keyframe the “Brightness” and simultaneously turn its level to black and white to create a transition.

Step 8: Achieving a Glitchy Effect
To give the glitchy effect, head to the “Effects and Presets” and hit “Posterize,” and reduce its level to a couple of integers. Pull the transition down to the fill layer and set it to “Luma Matte.” It will showcase the halo sign that we masked around the image.

Step 9: Have a Finer Imprint
To eliminate it, use the “Set Matte” channel and alter its layer to the one we pre-composed. Now, invert the matte. Moving on, navigate to the “Simple Choker” and reduce it to one pixel. For perfection, duplicate it and get a finer imprint.

Step 10: Final Process
Duplicate the grey solid and then extend the second clip to our fill. In the last step, change the layer of the second clip to “Luma Matte” and save the video. You are done with the process.

Part 4: How to Do Datamoshing Effect with Datamosh Plugin in After Effects
With its plugin, this sub-section revolves around creating the datamosh effect in After Effects. So, let us begin!
Step 1: Rendering the Work Area
Open After Effects and click on the (+) sign to set the in and out points. Click on the “Datamosh” to render the work area. The timeline will showcase the clip. Click on “Remove Frames” from the left panel and add a new mosh marker by pressing the (+) button beside “Remove Frames.”

Step 2: I-Frame Removal
The new remove frame marker will be on the timeline. Drag it to the new scene and then hit “Datamosh.” The I-frame removal effect can be shown on the screen. Again, click on (+) to add a new mosh module. Press “Multiply” and then “Average” from the menus that appear. Hit “Average previous 3” afterward.

Step 3: Using the Hold Frames Function
Set the in and out points of this mosh marker and again hit “Datamosh.” The work area will be rendered. Now, open the mosh module and toggle on the “Hold Frames” feature. Also, toggle on the previous render. Press the “Datamosh” again.

Step 4: Injecting the Frames
Toggle the “Inject Frames” on and press use previous render. Hit “Datamosh” afterward. In this way, the clip will hold the frames and inject them into the transition. Enhance the intensity of the moshing algorithm and eliminate “Remove Frames” and “Inject Frames.” Use the previous render and again hit “Datamosh.”

Step 5: Playing with the Acceleration
Increase the acceleration and bring the intensity back to what it was. Again, use the previous render and click “Datamosh.” Now, improve the intensity and set the acceleration back to 0. Alter the “Blend” as much you need to mix the original and present motion of the transition. Press the “Datamosh.”

Step 6: Changing the Threshold
Moving on to the threshold feature, this function is a gatekeeper and decides if a pixel will be moshed. Inverse the intensity of the clip, change the blend to be 0, and set the threshold to be a small integer to find out the impact first. It can be enhanced later on. Uncheck the previous render if you are using the new clip for threshold. Hit “Datamosh” again. Now, export the video, and you are done with the datamoshing.

Conclusion
YouTubers and content creators use the Datamoshing effect to offer magic to the workplace. The article offered an extensive guide to effortlessly adding this effect in After Effects. The foundation and workability of the datamosh effect were also the cruces of the article. It is recommended that the user properly know the software before getting into the process.
02 How Does Datamoshing Effect Work?
03 Step by Step to Create Datamoshing Effect in After Effects (Without Plugin)
04 How to Do Datamoshing Effect with Datamosh Plugin in After Effects
Part 1: What is the Datamoshing Effect?
Before going into the depths of workability and operation of the datamoshing effect in After Effects, let us understand the effect in detail. The datamoshing effect plays with the video compression to corrupt the pixels of the footage.
In this effect, the pixels glitch and appear to melt, duplicate, and create a projection organically. Also known as databending, it is a complicated technique in which movement of one layer is introduced to another layer of the video clip.
Lossy compression and removed frames help develop a psychedelic result effortlessly. Presently, datamosh After Effects has gained popularity as it helps bring change to the video and engages the audience.
Part 2: How Does Datamoshing Effect Work?
The sub-section informs the content creators and creative professionals regarding the workability of the datamoshing effect in video clips. Hence, let us commence this.
Datamoshing eliminates the new picture frame and keeps those frames that control the movement of the pixels. It leads to the picture pixels going into different directions instead of the usual one, thus, creating a glitch effect. These glitch effects are used in unique mediums to create a classy yet ancient vibe.
The datamoshing effect can be noticed between the cuts and motion. It is the process of corrupting the imagery in which the I-frames are replaced and P-frames are applied in the wrong picture. Let us dive right into two types of datamoshing.
The first type of datamoshing is created when the I-frame of the video is removed. In this scenario, the pixels from the previous scene are projected into the next scene smoothly. It gives the impression that the pixels have been tracked into the next shot.
The second kind of datamoshing, known to humankind, is when the d-frame of the video is duplicated. It leads the footage to show images and colors being bloomed together as the pixels are equivalent, coming through the same motion path.
Part 3: Step by Step to Create Datamoshing Effect in After Effects (Without Plugin)
Understanding the datamosh After Effects is one thing, and incorporating it in your footage is another. The section shall walk you through the step-by-step guide to create the After Effects’ datamoshing effect without a plugin. So, let’s go, shall we?
Step 1: Preliminary Process
The first step is easy. Open After Effects from your system. Import the targeted video that needs the datamosh effect. After that, head to the “Content-Aware Fill” to begin the process.

Step 2: Creating the Reference Frame
Use the playhead where you wish to create the effect, and then click on “Create Reference Frame.” The picture frame opens in Photoshop, and the user is expected to save it. Now, go back to the After Effects.

Step 3: Smearing Process
Now, hide the top layer so that the smearing can occur. Turn the Masks to “None” so that you can perform the masking. Split the second layer to duplicate the layer as we make changes to it. Set the “Masks” to “Subtract and then add a refine soft matte.

Step 4: Pre-composing the Clip
It is important to pre-compose the clip, so right-click on the timeline and hit “Pre-compose” to the menu list that appears. Tick mark “Move all attributes into the new composition” and rename the clip afterward. Hit “OK.”

Step 5: Rendering Queue
Double-click on the timeline, hold shift and drag it until the clip snaps. Press “B” on your keyboard and “N” on the other side to snap the work area. Navigate to “File” and “Export” and then click on “Render Queue.”

Step 6: Generating Fill Layer
Import the file when it is done rendering and drag it to the timeline. Trim the work area again using B and N buttons from the keyboard. Ensure that the fill method is “Surface,” and the range is “Work Area.” Click on “Generate Fill Layer” to start the analyzing process.

Step 7: Creating the Transition
The user is expected to create a transition between the two shots. Use the track matte to make solid and fractal noise. In the “Noise and Grain” section, click on “Fractal noise” and then switch the fractal type to “Basic.” Now, keyframe the “Brightness” and simultaneously turn its level to black and white to create a transition.

Step 8: Achieving a Glitchy Effect
To give the glitchy effect, head to the “Effects and Presets” and hit “Posterize,” and reduce its level to a couple of integers. Pull the transition down to the fill layer and set it to “Luma Matte.” It will showcase the halo sign that we masked around the image.

Step 9: Have a Finer Imprint
To eliminate it, use the “Set Matte” channel and alter its layer to the one we pre-composed. Now, invert the matte. Moving on, navigate to the “Simple Choker” and reduce it to one pixel. For perfection, duplicate it and get a finer imprint.

Step 10: Final Process
Duplicate the grey solid and then extend the second clip to our fill. In the last step, change the layer of the second clip to “Luma Matte” and save the video. You are done with the process.

Part 4: How to Do Datamoshing Effect with Datamosh Plugin in After Effects
With its plugin, this sub-section revolves around creating the datamosh effect in After Effects. So, let us begin!
Step 1: Rendering the Work Area
Open After Effects and click on the (+) sign to set the in and out points. Click on the “Datamosh” to render the work area. The timeline will showcase the clip. Click on “Remove Frames” from the left panel and add a new mosh marker by pressing the (+) button beside “Remove Frames.”

Step 2: I-Frame Removal
The new remove frame marker will be on the timeline. Drag it to the new scene and then hit “Datamosh.” The I-frame removal effect can be shown on the screen. Again, click on (+) to add a new mosh module. Press “Multiply” and then “Average” from the menus that appear. Hit “Average previous 3” afterward.

Step 3: Using the Hold Frames Function
Set the in and out points of this mosh marker and again hit “Datamosh.” The work area will be rendered. Now, open the mosh module and toggle on the “Hold Frames” feature. Also, toggle on the previous render. Press the “Datamosh” again.

Step 4: Injecting the Frames
Toggle the “Inject Frames” on and press use previous render. Hit “Datamosh” afterward. In this way, the clip will hold the frames and inject them into the transition. Enhance the intensity of the moshing algorithm and eliminate “Remove Frames” and “Inject Frames.” Use the previous render and again hit “Datamosh.”

Step 5: Playing with the Acceleration
Increase the acceleration and bring the intensity back to what it was. Again, use the previous render and click “Datamosh.” Now, improve the intensity and set the acceleration back to 0. Alter the “Blend” as much you need to mix the original and present motion of the transition. Press the “Datamosh.”

Step 6: Changing the Threshold
Moving on to the threshold feature, this function is a gatekeeper and decides if a pixel will be moshed. Inverse the intensity of the clip, change the blend to be 0, and set the threshold to be a small integer to find out the impact first. It can be enhanced later on. Uncheck the previous render if you are using the new clip for threshold. Hit “Datamosh” again. Now, export the video, and you are done with the datamoshing.

Conclusion
YouTubers and content creators use the Datamoshing effect to offer magic to the workplace. The article offered an extensive guide to effortlessly adding this effect in After Effects. The foundation and workability of the datamosh effect were also the cruces of the article. It is recommended that the user properly know the software before getting into the process.
Also read:
- 2024 Approved What Are AR Emoji Stickers & How to Add Them to Your Video
- New In 2024, Top Online Video Background Changers Transform Your Videos with Ease
- Boost the Pace of Your Instagram Reels Videos with These Simple Tricks
- New The Background in Your Footage Might Be Bland or Unpleasant. This Article Will Discuss Video Background Templates You Can Use to Spice Things up and Make Your Videos Go Viral
- Updated 2024 Approved Easy Guide to Overlay Videos in Premiere Pro
- This Article Covers a Lot of Information About the Freeze-Frame Effect. It Includes Its Power, Its Usage in Films, and How to Create It in Your Videos Using Filmora. It Will Get You a Super Exciting Cinematic Effect
- New How to Create Freeze Frame Clone Effect for 2024
- New Top List 20 Best LUTs for Music Videos for 2024
- New 2024 Approved 6 Best MP4 Mergers to Join Videos Easily
- Finding Best GIF Websites Is Easy as Pie — Heres What You Should Know
- Updated 4 Ways to Add White Borders on Mobile and Desktop
- How D AI Video Games Act More Human Than Human, In 2024
- 2024 Approved How to Make Falling Text Effect in Filmora?
- Updated How to Remove Audio From Video Without Watermark?
- 2024 Approved Magic Effects Video Making How To
- 2024 Approved Learn How to Merge Audio and Video Like a Pro with This Step-by-Step Guide to Using FFmpeg. Create Seamless Videos and Improve Your Video Production Skills
- Updated In 2024, How to Create Video in Text Intro?
- New This Article Has a Detailed Description of How You Can Split the Videos in Lightworks Including the the Discussion of Splitting the Wondershare Filmora as an Alternative. It Is Also a Suitable Choice
- In 2024, How to Merge Audio and Video in VLC Media Player
- Updated 2024 Approved How to Create OBS Slideshow
- Updated 2024 Approved How Long Does It Take To Edit Videos
- Final Cut Pro - How to Download and Install It, In 2024
- Do You Know You Can Use Mobile Apps to Apply Camera Effects to Your Videos? Many Smartphone Applications Allow You to Apply Camcorder Effects for 2024
- New 2024 Approved Detailed Tutorial to Resize Your Video in VLC
- Updated Different Ways To Trim Video In Premiere Pro for 2024
- Updated In 2024, How to Make GIFs From Videos on Mac
- What Are the 10 Best GIF Creator?
- Updated How to Perform Mask Tracking Discovering the Best Methods
- In 2024, 6 Instant Ways to Make Windows 10 Slideshow
- New 2024 Approved Top 7 MP4 Video Editors on Mac Edit MP4 Videos Easily
- 6 Tips for Your First Facebook Ads
- New Is Augmented Reality Conferencing the Future of Workplace Collaboration, In 2024
- New In 2024, Deleting White Background in Photoshop Is Hard? No
- 2024 Approved Easy Guide to Use a Stabilization Tool in Filmora
- New In 2024, Stunning Glitch Effect and Its Creation Steps for Premiere Pro
- Updated Looking for a Legitimate Tutorial to Create and Add Text Effects in Adobe Premiere Pro? Here Are the Simple Steps for Premiere Pro Text Effects and Find an Alternative Way
- Updated 2024 Approved 7 Ways Add Subtitles to MKV Videos on All Platforms
- In 2024, What If YouTube Zoom to Fill Not Working?
- New In 2024, 2 Methods to Crop Video in VLC
- New | How to Share YouTube Video on Zoom for 2024
- Updated Montage Makes It Easy to Create and Share Videos. This Article Will Explain What It Can Do and Show You Examples of Movies that Use Montage
- What Is HDRI? Everything You Need to Know About HDRI for 2024
- New How to Create Emoji on Mac That Take Less Than 10 Mins for 2024
- Ideas That Will Help You Out in Making Transparent Image
- New What Is MKV Format and How To Play MKV Video?
- Updated Do You Want to Learn How to Film a TikTok with Multiple Clips? Worry No More because You Can Do This by Following the Methods Instructed in This Article
- In 2024, Is pgsharp legal when you are playing pokemon On Google Pixel 8? | Dr.fone
- In 2024, 5 Ways to Move Contacts From Vivo Y200 to iPhone (13/14/15) | Dr.fone
- How to recover lost data from Honor Play 40C?
- How to Easily Hard reset my Meizu 21 Pro | Dr.fone
- Authentication Error Occurred on Vivo Y100i? Here Are 10 Proven Fixes | Dr.fone
- New 12+ Stunning Instagram GIF Stickers and How to Make & Find
- How to Make a Video a Live Photo
- Best Anti Tracker Software For Apple iPhone 7 | Dr.fone
- A Detailed Guide on Faking Your Location in Mozilla Firefox On Samsung Galaxy XCover 6 Pro Tactical Edition | Dr.fone
- Motorola G54 5G ADB Format Tool for PC vs. Other Unlocking Tools Which One is the Best?
- Title: Steps to Create Gold Text Effects After Effects for 2024
- Author: Chloe
- Created at : 2024-05-20 03:38:18
- Updated at : 2024-05-21 03:38:18
- Link: https://ai-editing-video.techidaily.com/steps-to-create-gold-text-effects-after-effects-for-2024/
- License: This work is licensed under CC BY-NC-SA 4.0.


