
Steps To Fade Audio In Premier Pro
Steps To Fade Audio In Premier Pro
Audio is a very big part of any video project and it can make or break the video project. This is why it is very important to not just choose a video editor that also offers audio editing, but one that is easy to use and offers a lot of editing options. This way, you can edit the audio in your project to suit your video’s production and end up with a great professional final product.
One of the video editing tools that offer features that can accomplish all that is Adobe Premier Pro. In this article, we will look at how you can use Premier Pro to fade audio in or out.
Steps to Fade Audio in Premier Pro
Premier Pro gives you two different options to fade audio in or out. Let’s look at both options and then you can choose the one that suits you best;
Fade Audio using Crossfade Audio Transition
Step1To begin, open Premier Pro on your computer and then open the audio that you want to edit.
Step2Once it is open, select the audio clip in the timeline and then click on “Sequence” at the top menu and select “Apply Audio Transition.”
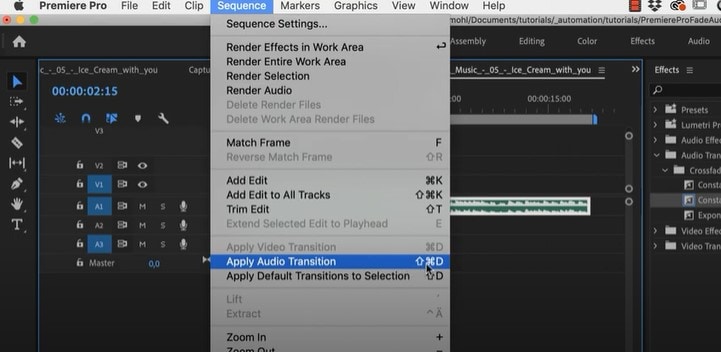
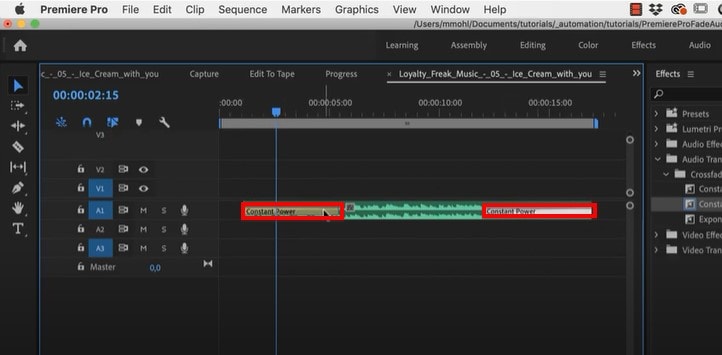
You can also use the keyboard shortcut Shift + Command + D (macOS) or Shift+ Ctrl + D (PC). This will add the “Constant Power Cross Fade” effect at the beginning and the end of the clip.
Step3You can then just change the duration of the effect by simply dragging the end of the transition.

Fade Audio using Clip Keyframes
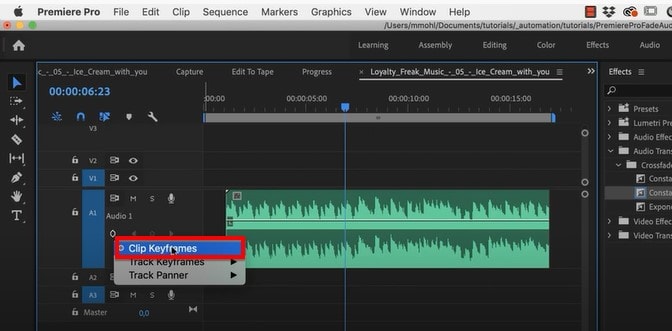
Step1Adobe Premier Pro has two volume keyframes; Track and Clip. Make the audio larger so you can see the volume line and then under the audio name, click on the volume keyframes option to make sure “Clip Keyframes” is enabled.
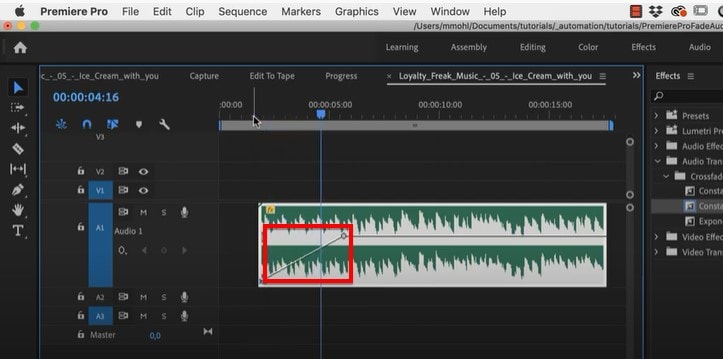
Step2You can then press down on the Command Key (macOS) or the Control Key (PC) and drag the volume line down to add a fade-in or fade-out effect.
Adobe Premiere Alternative Way to Fade Audio
If you are like most people and you find Adobe Premier Pro to be very difficult you use, we have a tool that is just as effective but also simplifies the process. This is the very simple to use Wondershare Filmora .
Just like Premier Pro, Filmora gives you two options to fade audio in and out. Let’s look at both options;
Adding Fade in and Out in Audio Pane
Step1Download and install Wondershare Filmora onto your computer, open the program and then import the audio clip that you want to edit.
Step2Once the video has been added to the timeline, double-click on it to access the “Audio” editing panel.
Step3Here, you can very simply add the fade-in and fade-out effects by simply dragging the sliders to the desired duration or by manually entering the duration in seconds.

Using the Audio Waveform
You can also use the fade icons on the left and right edges of the audio waveform to quickly add a fade in and out.
To add a fade-in effect, drag the fade-in maker to the right. Then go to the end of the clip to drag the fade-out maker to the left to add a fade-out effect.

Related FAQs about Audio Fade
1. How Do I Fade to Black in Adobe Premiere Pro?
You can easily add the Fade to Black transition in Adobe Premiere Pro using the “Effects” tab. Just open the two clips in Premiere Pro and go to “Effects.” Type in “dip to black” in the search box and when you find the effect, drag it between the two clips in the timeline. The effect will appear on the right side of the project.
You also have several customization options that you can apply to the effect to get it just right. To see these options, go to Effect Controls and you should be able to change the alignment of the effect to “Center at Cut” so that the first video fades out to black before the second video appears.
2. Premiere Pro Audio Fade Not Working?
Sometimes you can complete all the editing steps we have described above but you are unable to tell if the fade-in and fade-out effects are working because you can’t play the audio in Premiere. This is a very common problem that can easily be fixed using the following troubleshooting steps;
Check the master volume on your computer to see if this is the problem
Then check the volume in Premiere to see if the audio meter is moving as you play the clip. It is the green bar usually in the lower right corner.
If your volume is fine but you still can’t hear the audio, you may need to adjust several settings. Go to Edit > Preferences (on PC) or Preferences menu under the main Premiere Pro CC menu (macOS) and select “Audio Hardware” in the options that appear. You can then change the “Default Output” device to something else.
3. How Do You do Audio Transitions in Premiere Pro
Adding audio transitions in Premiere Pro is very easy; just open the audio that you want to edit and then Right-click (PC) or Control- Click (macOS) on either the “Constant Gain” or “Constant Power” effect from the Effects panel. Then choose “Set Selected as Default Transition” from the options in the menu.
To add a duration for the audio transitions, go to Edit > Preferences > Timeline (PC) or Premiere Pro Menu > Preferences (macOS) and enter the duration value under “Audio Transition Default Duration.”
Free Download For Win 7 or later(64-bit)
Free Download For macOS 10.14 or later
How to Film Better in Public - 2024 Guide
Filming in public and different locations can add a new dimension to any video. The possibilities are limitless, from the hustle and bustle of a busy city street to the tranquil beauty of a remote beach.
Suppose you’re a new vlogger and want to capture the perfect scene in public. Then this blog is for you. It will explain various tips and tricks to help you create the best videos, regardless of location. So let’s start and learn more about how to film better in public!
Part 1. What Gear Will You Need to Record a Better Video in Public?
While recording in public, you want to avoid setting and holding unnecessary camera gear. That’s why you should keep your gear as low-key as possible. The essential shooting gears that you are going to need are as follows:
A Good Camera
A good camera is essential to record a video in public because it will provide quality footage. It will also allow you to capture more detail and create more engaging videos. But if you use a phone instead, make sure it is the latest iPhone or other with high pixels camera.

A Tripod
A tripod is essential when recording video in public to ensure that your shots are stable and steady. Without a tripod, your camera can shake and create a distorted, blurry image that can ruin a shot. So having a secure tripod will help you capture professional-looking footage.

A Microphone
A microphone is essential for recording a video in public because it captures the sound in the environment, allowing the video to be recorded with better-quality audio. Without a microphone, the video would be recorded with distorted sound and would likely be challenging to understand.

Apart from the gear mentioned above, you can also bring an ND filter, extra batteries, and SD cards. Because If the battery runs out or the SD card becomes full, the video recording could be lost. The spare batteries and SD cards help to ensure that the video can be captured uninterrupted. Let’s see what we need further.
Part 2. What Do You Need to Accomplish With Your Video?
While recording a video in a busy location, you need to accomplish three things with your video to record it better. Which are as follows:
1. Clean Shots
When recording in a busy location, it is essential to try and capture clean shots. It can be done by using a wide-angle lens to get the full shot or zooming in to focus on a particular element.
2. Clean Audio
Getting a clean and clear sound when recording audio in a busy location is essential. A good quality microphone, an audio recorder, or external noise reduction can help minimize background noise and capture the desired audio.
3. Decent Lighting
In a busy location, decent lighting is as important as the other two factors. Look for natural light sources that can provide good light, even illumination. If these are unavailable, consider using portable lighting equipment or lamps to create a more flattering environment.
Now that we know what we need let’s see how to make a video.
Part 3. How to Get the Best Shot While Filming Outdoor?
Whether you are a vlogger, a YouTuber, or a student filmmaker, shooting a video in a busy area is always a challenge. You must be able to plan and execute your production in a way that minimizes disruption and produces quality footage. By following these instructions, we hope you can make a difference in a shot you record:
Step1 Scout the Location
Before recording, visit the location in advance to plan your shots. Take note of potential distractions or noise sources and plan your angles accordingly.

Step2 Choose the correct shooting time
The best time to record a video in a busy location is when the area is less crowded, such as early in the morning or late at night. Avoiding peak times and holidays is also a good idea.
Step3 Choose the right angle
Once you get to the location, you must find the right angle.
Select Background
Try to find a background that will best capture the atmosphere of the area and minimize any background noise.

Set the frame
If your frame is too broad, you will face potential distractions that could interfere with your video, such as people walking in and out of the frame.

Set your position
Instead of getting closer to your talent, get further away and zoom in this way, you leave space for other people in the location, and you can still get your shot!

Try to get your shot and then get out quickly so you don’t bother other people trying to get their photos.
Part 4. Best Way to Record Audio While Filming Outdoor
Audio is essential to any video production, and recording audio while filming outdoor scenes can be challenging.
Outdoor environments come with more variables to consider, such as wind, traffic noise, and other background noise, that can make capturing clear audio more difficult. Even if you use a high-quality mic, you still have chances of interruption.
If you get any such variable in the video you recorded, you can re-record the audio with the help of Wondershare Filmora . Let’s see how you can do it:
Free Download For Win 7 or later(64-bit)
Free Download For macOS 10.14 or later
Step1 First, select the clip you want to re-record and then drag it onto the timeline.
Step2 Right-click on the video you dragged and then click on the Detach Audio. After doing that, mute the lousy audio from the audio timeline.

Step3 Place the playhead at the clip’s start, click Record just above the import media section, and then click Record Voiceover.

Step4 Now select a recording device and then select the time for the countdown. For example, a 3-minute timer would be perfect.

Step5 Click record and try to re-record your line and match it up the best you can. To get the sound and sync right, you might need to attempt a few times, but in the end, it will improve the quality of your video.

This technique is used in almost every film you see, especially action sequences that also have dialogue. You can also use this technique with the help of Filmora and enhance your video with better audio quality.
Conclusion
We hope this blog has given you some tips for how to film better in public. Filming in public can be intimidating, but you can shoot professional footage with the proper techniques.
From understanding the legalities of filming in public to learning to be discreet and respectful of your environment, you can ensure your filming experience is positive and successful.
With these tips and some practice, you’ll be on your way to shooting great videos in public!
Let us know your favorite film location in the comments below.
Free Download For macOS 10.14 or later
Step1 First, select the clip you want to re-record and then drag it onto the timeline.
Step2 Right-click on the video you dragged and then click on the Detach Audio. After doing that, mute the lousy audio from the audio timeline.
Step3 Place the playhead at the clip’s start, click Record just above the import media section, and then click Record Voiceover.
Step4 Now select a recording device and then select the time for the countdown. For example, a 3-minute timer would be perfect.
Step5 Click record and try to re-record your line and match it up the best you can. To get the sound and sync right, you might need to attempt a few times, but in the end, it will improve the quality of your video.
This technique is used in almost every film you see, especially action sequences that also have dialogue. You can also use this technique with the help of Filmora and enhance your video with better audio quality.
Conclusion
We hope this blog has given you some tips for how to film better in public. Filming in public can be intimidating, but you can shoot professional footage with the proper techniques.
From understanding the legalities of filming in public to learning to be discreet and respectful of your environment, you can ensure your filming experience is positive and successful.
With these tips and some practice, you’ll be on your way to shooting great videos in public!
Let us know your favorite film location in the comments below.
How to Denoise in After Effects – Audio and Video Noise Removal
I was filming with my mobile phone, and the light was low, and it happened so that I had to shake the phone a little because I was in movement. I return home, thinking that the shots were not so bad, look at the new footage on the bigger screen than my phone would have provided, and – no! I am totally wrong! This footage has some kind of little dots all over it, the whole shot looks sort of pixelated. I understand that the circumstances were not so good for shooting, but how come the video is actually this bad? How to get rid of this annoying dot-like overlay, that hinders me from seeing some details and makes my eyes exhausted? Is there a way to make this better at all?
Yeah, this is something called noise, and something called grain can also be in play. And is there a way to solve the problem? –Yes! Technology is getting so good from day to day that editing programs offer the ways to not be bothered because of this problem.
But noise is a word that not necessarily evoke the image of the visual side, rather, for the broader society, it is connected to the audio. A room, filled with some people hanging out and chatting, air conditioner that creates some sound, an opened window from where the chirping of the birds are coming… Anyway, I am still trying to concentrate, to make my voice recording, and then edit the video. Even in this case, I think everything is going pretty well, and the scenario is so alike: I record the whole text I have to follow, then try to listen to it in the speakers or in the headphones, and – SOS again! These noises I mentioned, are filling up my recording, where only my words should be played. Now, I don’t like to cut the parts of my whole recording one by one, and relentlessly, like a butcher, because I am just trying to create a good listener, or viewer experience, and slicing my piece will only make things work. There should be another way!
And yes, there also is. I can solve this problem using some editing software as well. It might even take me only a while and I will have a great voice recording to include in my content. So, my choice, in this case, would be Adobe After Effects – you will say, wow, why so serious? (because this is a very powerful and sophisticated program!) but the answer is – because we can, and because it gives us many opportunity.
So, as you may have noticed already, in this article we will be touching upon audio and video denoising in Adobe After Effects! Let’s get started and solve those little problems we have in our everyday life and work!
How to denoise a video in Adobe After Effects
So, denoising in image and video production is used as a technique to take footage from grainy to crystal-clear, and this is exactly our target. But when can we say that the video noise reduction went well? This method achieves its goal If it suppresses noise effectively in uniform regions; preserves edges and other characteristics, such as fine details and textures; and provides a visually natural experience.
Primarily, Adobe After Effects is a digital visual effects, motion graphics, and compositing application. If you are skilled, you are almost invincible in this software, meaning that you can do almost everything that sparks your imagination. So, if that is the sophistication of the program, why can it not be so that it can help us get rid of the unwanted noise and grain on the scene? There is no answer, because of course, it can.
Even though sometimes this kind of software requires you to download and install and then finally use some external resources, such as plugins, there is a way to do what we are going to, without any help from outside of the program.
First of all, I suppose you have some video you want to edit and make better. Bringing that clip into the program would be the first step of our little adventure. And see the menu where it says Effect? – you need to click on it. Then it gets pretty, meaning very… meaning extremely straightforward – you will find it written – Noise and Grain. Of course, you will need to choose it, and then see the Remove Grain option, to which you are going to stick.

Then, you will need to move your attention to the left side of the screen, where Effects Control will open. By default, you are able to see viewing mode, where Preview can be changed to Final Output, which is exactly what you are going to do.

This will be the video with Preview checked:

And this is the look of the same frame from the video whenever Final Output is turned on:

Yes, it’s true – we have done it already! This is actually this fast and easy in Adobe After Effects – no more noise, no more grain! Anyway, if you want to see the whole process on the video, you can check it here !
How to denoise an audio in Adobe After Effects
When it comes to audio noise, as we have mentioned already, it is possible to master the recording in After Effects in terms of the voice as well, but in reality, After Effects requires another Adobe program called Audition. Let us say that you have a video with audio attached, and you are working in AE, but in order to remove the background noise, you will need to open Audition. Here’s how it’s done:
First, in the sequence, you will need to click twice on the video clip, which will open audio graphics below.

Then, go to Edit in the Navbar, and choose Edit in Adobe Audition.

This program will open and show you more detailed graphic image of the voice recording. Now, you will find the space of time in your recording when you have a somewhat damaged audio and you will select the beginning and the end of it with the mouse. Keep in mind that in case you need to take a look at the video when your audio is played, you can see a little window showing the scene on the left and bottom of your screen.

Once you have the selection and are determined with it, you right click on the selection and find Capture Noise Print. Then, you will click on the selection again and find Select all, which will cover the whole audio. That’s when you go to the Navbar again and find Effects -> Noise Reduction / Restoration -> Noise Reduction (process). This will open the graphics again, where you can reduce the noise – you will see the percentage scale where you can modify the noise.

After changing it a little, you will click on the Apply and be able to visually see how the flow has changed and lowered.

So, when you deselect the selection and play the recording, you will notice that from now on the words are hearable, but some background noise is not there anymore! In order to export, please go to the File and Export, choose your preferred settings and you are ready to go!
Bonus tip: how to remove audio noise in video with Wondershare Filmora
When it comes to audio noise removal, it’s also good to have some alternatives, and you might not even have Adobe After Effects installed on your computer, because there exist a lot of programs easier to use. One of them is Wondershare Filmora, which can play a major role in background noise removal, in a simple way. For this to play out, you will need to pursue the following steps:
To bring your video clip in the program, drag and drop it into the timeline. Right-clicking on the video and hitting Detach Audio will enable you to separate audio and video from each other and work on them individually.

Click twice on the audio track, which will make sure you can see the editing panel and find Remove background noise option there – it can remove the noise right away.

And, that’s it – hard to believe it’s so simple!
So, in this article, you followed us through the steps of how to denoise in Adobe After Effects – first, we touched upon video noise reduction, and then, background noise removal, for which we had to open the audio in Adobe Audition from After Effects. Last but not least, we took a look at how another magnificent software, Wondershare Filmora can help us in doing the same task! Armed with different tools and knowledge, now you can go for it and make your videos and audios more appealing for everyone!
Then, you will need to move your attention to the left side of the screen, where Effects Control will open. By default, you are able to see viewing mode, where Preview can be changed to Final Output, which is exactly what you are going to do.
This will be the video with Preview checked:
And this is the look of the same frame from the video whenever Final Output is turned on:
Yes, it’s true – we have done it already! This is actually this fast and easy in Adobe After Effects – no more noise, no more grain! Anyway, if you want to see the whole process on the video, you can check it here !
How to denoise an audio in Adobe After Effects
When it comes to audio noise, as we have mentioned already, it is possible to master the recording in After Effects in terms of the voice as well, but in reality, After Effects requires another Adobe program called Audition. Let us say that you have a video with audio attached, and you are working in AE, but in order to remove the background noise, you will need to open Audition. Here’s how it’s done:
First, in the sequence, you will need to click twice on the video clip, which will open audio graphics below.
Then, go to Edit in the Navbar, and choose Edit in Adobe Audition.
This program will open and show you more detailed graphic image of the voice recording. Now, you will find the space of time in your recording when you have a somewhat damaged audio and you will select the beginning and the end of it with the mouse. Keep in mind that in case you need to take a look at the video when your audio is played, you can see a little window showing the scene on the left and bottom of your screen.
Once you have the selection and are determined with it, you right click on the selection and find Capture Noise Print. Then, you will click on the selection again and find Select all, which will cover the whole audio. That’s when you go to the Navbar again and find Effects -> Noise Reduction / Restoration -> Noise Reduction (process). This will open the graphics again, where you can reduce the noise – you will see the percentage scale where you can modify the noise.
After changing it a little, you will click on the Apply and be able to visually see how the flow has changed and lowered.
So, when you deselect the selection and play the recording, you will notice that from now on the words are hearable, but some background noise is not there anymore! In order to export, please go to the File and Export, choose your preferred settings and you are ready to go!
Bonus tip: how to remove audio noise in video with Wondershare Filmora
When it comes to audio noise removal, it’s also good to have some alternatives, and you might not even have Adobe After Effects installed on your computer, because there exist a lot of programs easier to use. One of them is Wondershare Filmora, which can play a major role in background noise removal, in a simple way. For this to play out, you will need to pursue the following steps:
To bring your video clip in the program, drag and drop it into the timeline. Right-clicking on the video and hitting Detach Audio will enable you to separate audio and video from each other and work on them individually.
Click twice on the audio track, which will make sure you can see the editing panel and find Remove background noise option there – it can remove the noise right away.
And, that’s it – hard to believe it’s so simple!
So, in this article, you followed us through the steps of how to denoise in Adobe After Effects – first, we touched upon video noise reduction, and then, background noise removal, for which we had to open the audio in Adobe Audition from After Effects. Last but not least, we took a look at how another magnificent software, Wondershare Filmora can help us in doing the same task! Armed with different tools and knowledge, now you can go for it and make your videos and audios more appealing for everyone!
Create the Night-to-Day Effect Videos
Do you wish you could control when it’s nighttime to daytime? It would make getting ready in the morning much faster! This tutorial will show you how to use the keyframe and mask feature in Filmora to make a remarkable night-to-day transition.
How-to Guide
1) Preparation
For this effect, you will need to shoot two footage shots with the same frame. The first is for the daytime clip, and the second is for nighttime.
But before that, you need to prepare some things, such as:
- Tripod to ensure your camera stays at the same point, so the frame doesn’t change.
- Mark the place where you want to shoot the scene. You can put a marker on the floor to ensure that you perform at the same spot in different shots.
Once done, let’s start shooting to get the footage.
2) Steps
Shooting footages
First, get the daytime shot. For this tutorial, we will pretend that you are walking and transitioning into nighttime at the spot you have marked.

Now, let’s film the nighttime clip. You will walk through the living room and do the same movement again at the same spot. You can dim the light and change the camera’s white balance settings to bluer to create a night feeling.

After you have both clips that you need, let’s go to Filmora and start editing.
Night-to-day transition
Step1 Launch Filmora and import the footage into the program. If you haven’t installed it, you can download Filmora on their website here: https://filmora.wondershare.com
Step2 Place the nighttime video clip on the first video track of the timeline and place the daytime clip on the top.

Step3 Find the spot where you want to create a transition between the day and nighttime. Then, you can delete the unwanted part.

Step4 Since the transition for this tutorial is where the subject started waving, make sure to place the daytime clip at the same time the subject started waving in the nighttime clip. Hence, the timing in both clips syncs.
Masking transition
For the next step, we will make a masking transition with the Filmora mask feature.
Step1 Double-click the daytime clip on the timeline. In the Filmora setting, find the Mask section > Circle. You can see the mask is applied in the preview screen.

Step2 Scroll down the setting and click add a keyframe at the beginning of the clip.

Step3 Change the scale of the mask to the smallest number and adjust the Width and Height down to 0. You can set the blur strength to 15 to make the transition edge smoother.

Step4 Move the play head to find the spot where you want the mask fully opens up, then add another keyframe. Change the scale of the mask to 2 and the Width and Height to 50. Make sure the mask occupies the whole frame.

Now, if you play back, you can see the nighttime becomes daytime through the mask.

If the movement in the two clips is a bit off, you can fix it by adding more keyframes on the mask.
3) Pro tips
You can add one more effect in Filmora to make it more magical. To do this, open the Effects window on the top left and find “Heartbeat” under the Basic section.

Drag and drop it onto the third video track and start the effect when the mask opens up. Then, trim the effect length to match the movement. Adjust the speed of this effect if needed.

The final result will look like this:

Summary
That is how to do this night-to-day transition night-to-day time shift effect in Filmora. By the end of this tutorial, you should be able to use the masking transition technique. You can apply and adjust it based on your needs.
Free Download For Win 7 or later(64-bit)
Free Download For macOS 10.14 or later
Free Download For macOS 10.14 or later
Also read:
- [New] 2024 Approved Basic Routines Preserving Google Voice Conversations
- [New] 2024 Approved Foundations in Creating Animated Imagery
- [New] Unveiling the Magic of Film's Mood with Colors
- Avoiding Pitfalls: Solutions to 6 Recurrent ChatGPT Mistakes
- Choosing the Right iPhone for Gamers: A Comprehensive Review
- Efficient Techniques Unveiled Mastering Screen Recordings with ShowMore for 2024
- How to Use Frame Blending in Premiere Pro
- In 2024, How to Loop a Video in Canva Editor
- In 2024, How to Make Fortnite Thumbnail with Motion Blur?
- In 2024, Palette Wisdom Essential Color Theory Explained
- In 2024, The Best Methods to Unlock the iPhone Locked to Owner for Apple iPhone 8 Plus
- Is Windows Movie Maker Still Available, In 2024
- New Are You in Search for a Step-by-Step Guide to How to Add Effects in TikTok? Here It Is. To Add some Flavor to Your TikTok Videos. Use These How to Add Effect to TikTok Recommendations
- New Best 10 Tools To Make Quiz Videos for 2024
- New How to Convert Images Into Video - Kapwing Tutorial for 2024
- Repair damaged, unplayable video files of Infinix Smart 7 HD on Windows
- The Ultimate Guide to Understanding Apple Watch Series 4 – The Pinnacle of Smartwatch Innovation
- Updated 2024 Approved Easy Guide to Overlay Videos in Premiere Pro
- Updated How to Add Adjustment Layer (Clip) in DaVinci Resolve?
- Title: Steps To Fade Audio In Premier Pro
- Author: Chloe
- Created at : 2024-09-26 07:06:45
- Updated at : 2024-10-03 04:48:56
- Link: https://ai-editing-video.techidaily.com/steps-to-fade-audio-in-premier-pro/
- License: This work is licensed under CC BY-NC-SA 4.0.