:max_bytes(150000):strip_icc():format(webp)/001_2654847-5b99b903c9e77c005077d0d8.jpg)
Steps to Make a Neon Dance Effect With Filmora for 2024

Steps to Make a Neon Dance Effect With Filmora
Neon colors in videos are constantly attracting and compelling the scenes. So how it looks if dancing videos have this feature? For sure, it’ll be dreamier and more classy.
After moving toward, the following steps of processing neon effects, you will find different effects to make your video filmier. Wondershare Filmora provides all types of products on one platform. Then try it out and enjoy the rest. Scroll more to learn about the neon effect before editing your video!
Neon Dance Effects in Wondershare Filmora
You often watch viral dance videos or commercials in which a neon highlight of a person dances aside from them in the video. Yes! You can also make that just in a few minutes.
In this case, Wondershare Filmora is considered to be your partner. Filmora is a fantastic tool that you can have at your disposal to edit a range of videos. There are tons of neon effects in Filmora, including neon frames, neon swings, or even multiple neon overlays.
Free Download For Win 7 or later(64-bit)
Free Download For macOS 10.14 or later

Steps to Make a Neon Dance Effect With Filmora
The public is tired now of seeing old video graphics in dancing videos. It’s time to add neon colors to give a fascinating look. Follow the step-by-step guide mentioned below, and let’s get going!
Step1 Import Clips into the Timeline
Before we begin to edit our video, make sure you download Wondershare Filmora. First, you need to create a timeline to edit our dancing clips. For this, take a look at the below steps!
- Click on the Import icon in the main window when you open Wondershare Filmora.
- Then, import the video clips you want to edit.
- Now, drag the Video and drop it in the editing timeline below.

Step2 Add the Same Video again
We aim to create a black background for the original video we imported above. To do so, follow the steps mentioned below.
- Drag and drop the same video on the timeline.
- Make sure to drag and drop it above the original video.

Step3 Go into the Compositing Mode
After adding the same video, now convert BG into a black screen. For this, follow the given steps:
- Double-Click on the video we added later.
- A video editing panel will open up in the Import
- Scroll down till you see the compositing tab.
- Here will have to change the Blending mode.
- Click on the tab ahead that is labeled “Norma“
- A drop-down option will open up.
- In this drop-down option, scroll below to “Difference“.

- As soon as you click on the Difference option, you will notice a change in the main play window; it will all turn to a black screen.
Step4 Add the Pixelated Edges effect
Our target is to outline the individual in the video, so we can move on to create the Neon Highlight effect. To do so, follow these steps!
- First, go into the effects option that you can select from the tab above the import window.
- In the effects panel, search for the Pixelated edges
- You will notice a search bar in the top right corner. Type “Pixelated edges,“ and you will see some effects pop up in the import window.

- Select the Pixelated edges effect. Then, click and drag it below the video that we turned to black using the Difference
- The edges of the individual dancing in the video will be outlined.

Step5 Change the outline color
You may not like the default color with the Pixelated edges effect. But no worries, you can change that to whatever color you desire by following these steps:
- Double-Click on the video in which you added the effect.
- An editing panel will pop up.
- Click on the Effect option below the Video
- Here, you can see the color option.
- Click on the color and select whatever suits you the best.

Step6 Create Multiple Outlines
It would help if you created multiple outlines to achieve the Neon Dance effect. These multiple outlines will be produced by exporting them multiple times with the color you want. Follow the below points to get it instantly!
- When you have selected the color for your outline, export the video by clicking on the Export icon in the top right corner.

- When you have exported the video, move back to the timeline to edit again.
- As we had selected the Blue color for reference, now choose another color you wish.
- After changing the video, export it again.
![]()
Note: Export as many times as you want with the color of your choice. E.g., 5 colors = 5 exports.
Step7 Import the exported videos
- Now you have to import the videos that you exported.
- Before doing that, first, delete the video in track 2. (The video on which we applied the Difference)
- Now select all the exports from your library and import them onto the import window.
- Please select all of them and drag them on the timeline.
![]()
Note: You don’t want all the outlines to play simultaneously. Otherwise, the outlines will not appear to be separate.
- To do so, stack the videos on each other on different tracks.
Tip: The trick here will be to offset the video by a few seconds so that each video plays a little later than the other.

To efficiently blend the outlines with the green screen, you can change the blending mode of each of the exported videos to “Lighten.”
- Double-click on each video.
- In the editing panel, choose compositing.
- From there, select the “Lighten“ option.

Step8 Add the Glow effect
To make the outlines glow like Neon lights, we will need to add another effect from the effects library.
- Go to the effects tab and search for “Glow.”
- Click and drag the glow effect to each of the exported videos.

You can make it more fun by going one step further!
- Double-click on each of the glow effects that you added.
- In effect, the editing panel goes to the video effects.
- Here, you can change the radius of the Glow effect you added.
- Similarly, you can do it in all the other videos.
Step9 Apply the Green screen effect
We will change our green screen for the final part. Follow the last steps, and then enjoy!
- Move the green screen footage below them all to the top track.
- Double-click the video to enter the editing panel.
- Go to the chroma key (Green Screen) in the editing panel**.**
- Click on the arrow aside from the tab.
You will immediately see changes to your video in the main play window. Play the video from the start and notice the changes.

Congratulations! You have successfully created Neon Dance effects by using the user-friendly Wondershare Filmora.
Conclusion
Wondershare Filmora offers a variety of editing features that you can use to create very innovative videos. You can quickly create Neon effects in your dance videos next time by following the above steps! Add more creativity to attract more audience. Have fun and explore more effects to get unique results!
Free Download For macOS 10.14 or later

Steps to Make a Neon Dance Effect With Filmora
The public is tired now of seeing old video graphics in dancing videos. It’s time to add neon colors to give a fascinating look. Follow the step-by-step guide mentioned below, and let’s get going!
Step1 Import Clips into the Timeline
Before we begin to edit our video, make sure you download Wondershare Filmora. First, you need to create a timeline to edit our dancing clips. For this, take a look at the below steps!
- Click on the Import icon in the main window when you open Wondershare Filmora.
- Then, import the video clips you want to edit.
- Now, drag the Video and drop it in the editing timeline below.

Step2 Add the Same Video again
We aim to create a black background for the original video we imported above. To do so, follow the steps mentioned below.
- Drag and drop the same video on the timeline.
- Make sure to drag and drop it above the original video.

Step3 Go into the Compositing Mode
After adding the same video, now convert BG into a black screen. For this, follow the given steps:
- Double-Click on the video we added later.
- A video editing panel will open up in the Import
- Scroll down till you see the compositing tab.
- Here will have to change the Blending mode.
- Click on the tab ahead that is labeled “Norma“
- A drop-down option will open up.
- In this drop-down option, scroll below to “Difference“.

- As soon as you click on the Difference option, you will notice a change in the main play window; it will all turn to a black screen.
Step4 Add the Pixelated Edges effect
Our target is to outline the individual in the video, so we can move on to create the Neon Highlight effect. To do so, follow these steps!
- First, go into the effects option that you can select from the tab above the import window.
- In the effects panel, search for the Pixelated edges
- You will notice a search bar in the top right corner. Type “Pixelated edges,“ and you will see some effects pop up in the import window.

- Select the Pixelated edges effect. Then, click and drag it below the video that we turned to black using the Difference
- The edges of the individual dancing in the video will be outlined.

Step5 Change the outline color
You may not like the default color with the Pixelated edges effect. But no worries, you can change that to whatever color you desire by following these steps:
- Double-Click on the video in which you added the effect.
- An editing panel will pop up.
- Click on the Effect option below the Video
- Here, you can see the color option.
- Click on the color and select whatever suits you the best.

Step6 Create Multiple Outlines
It would help if you created multiple outlines to achieve the Neon Dance effect. These multiple outlines will be produced by exporting them multiple times with the color you want. Follow the below points to get it instantly!
- When you have selected the color for your outline, export the video by clicking on the Export icon in the top right corner.

- When you have exported the video, move back to the timeline to edit again.
- As we had selected the Blue color for reference, now choose another color you wish.
- After changing the video, export it again.
![]()
Note: Export as many times as you want with the color of your choice. E.g., 5 colors = 5 exports.
Step7 Import the exported videos
- Now you have to import the videos that you exported.
- Before doing that, first, delete the video in track 2. (The video on which we applied the Difference)
- Now select all the exports from your library and import them onto the import window.
- Please select all of them and drag them on the timeline.
![]()
Note: You don’t want all the outlines to play simultaneously. Otherwise, the outlines will not appear to be separate.
- To do so, stack the videos on each other on different tracks.
Tip: The trick here will be to offset the video by a few seconds so that each video plays a little later than the other.

To efficiently blend the outlines with the green screen, you can change the blending mode of each of the exported videos to “Lighten.”
- Double-click on each video.
- In the editing panel, choose compositing.
- From there, select the “Lighten“ option.

Step8 Add the Glow effect
To make the outlines glow like Neon lights, we will need to add another effect from the effects library.
- Go to the effects tab and search for “Glow.”
- Click and drag the glow effect to each of the exported videos.

You can make it more fun by going one step further!
- Double-click on each of the glow effects that you added.
- In effect, the editing panel goes to the video effects.
- Here, you can change the radius of the Glow effect you added.
- Similarly, you can do it in all the other videos.
Step9 Apply the Green screen effect
We will change our green screen for the final part. Follow the last steps, and then enjoy!
- Move the green screen footage below them all to the top track.
- Double-click the video to enter the editing panel.
- Go to the chroma key (Green Screen) in the editing panel**.**
- Click on the arrow aside from the tab.
You will immediately see changes to your video in the main play window. Play the video from the start and notice the changes.

Congratulations! You have successfully created Neon Dance effects by using the user-friendly Wondershare Filmora.
Conclusion
Wondershare Filmora offers a variety of editing features that you can use to create very innovative videos. You can quickly create Neon effects in your dance videos next time by following the above steps! Add more creativity to attract more audience. Have fun and explore more effects to get unique results!
How to Edit Recorded Video
The most critical component of post-production for a video marketer is editing. Your video will seem unfinished and repel your viewers if you cannot effortlessly weave your images together or get your cut to reach the proper frame. Learning to edit a video may soon become a never-ending task. While each project you work on will have somewhat different editing needs, the principles of video editing remain basically the same. You don’t need to spend a lot on costly equipment to have a professional appearance; if you pay attention to a few important things, you can produce excellent movies with whatever you have right now.
Content producers, entrepreneurs, and influencers can have much too much material to include into a single YouTube video. You may not be able to buy video editing software if you’re on a tight budget. So, what does a video marketer do if they don’t have editing software? To assist you with the process of video editing, we’ve put up this thorough tutorial that covers everything you’ll need to know to make stunning films, even if you’ve never done it before. We’ll also demonstrate how to utilize the super-intuitive and user-friendly editor to create a video.
Part 1. Edit Recorded Video in OBS
OBS is a video streaming and recording application. It’s open source, free, and works on Macs, Windows, and Linux. It is a strong and adaptable screencast video creation tool when paired with competent audio and video editing tools. Unfortunately, OBS doesn’t support editing feature and hence, we’re enlisting the recording steps so you can edit them by using a third-party toolkit mentioned in the guide.
Step 1. Download and Install OBS
Install OBS according to the instructions for your operating system by downloading it from the link below.
Step 2. Setup Screen Recording
The window is divided into separate parts called “docks” when you initially launch the app. Every dock has a distinct function. Scenes, Sources, Mixer, and Controls are the areas to pay attention to. OBS employs a Scenes and Sources system, which will be discussed in more depth in a later lesson. These two tools operate in tandem to help you keep track of your video, audio, and other production materials. When you first start OBS, you’ll see that a scene is already loaded, which you can locate in the bottom left corner of the interface.
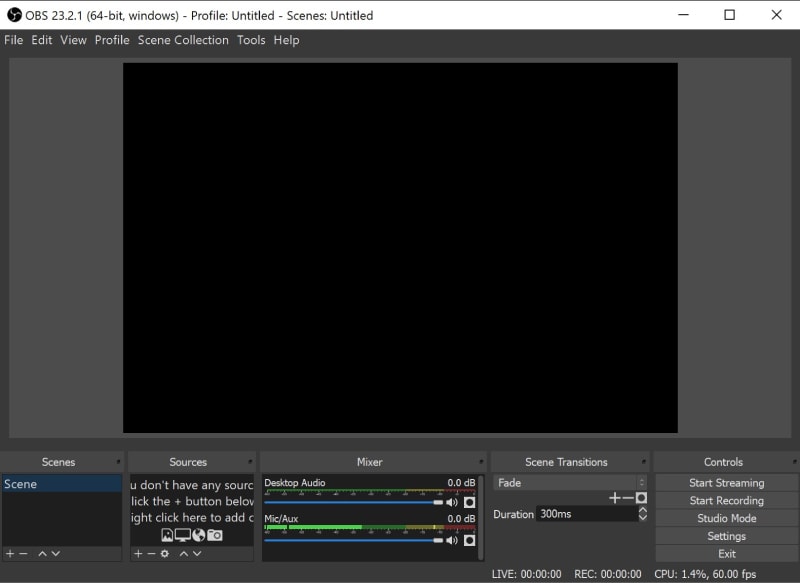
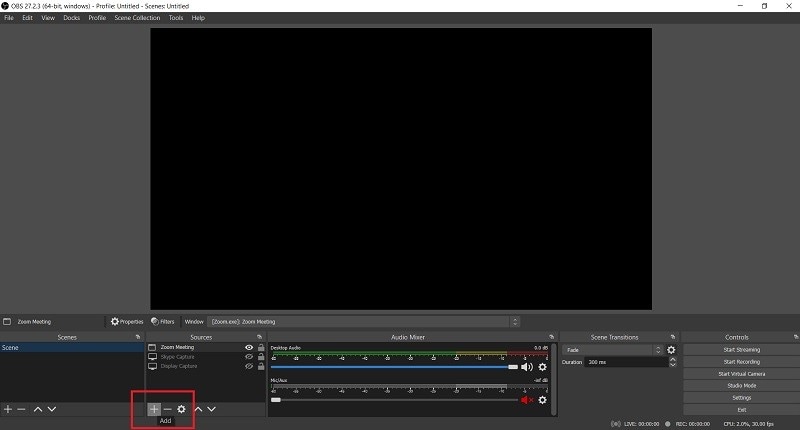
You’ll also need to add a source to this scene before you can begin recording. Click the Add button at the bottom of the Sources panel, then pick Screen Capture on Linux or Display Capture on Mac and Windows with the default Scene chosen (it will be highlighted).
Step 3. Customize the Recording Source
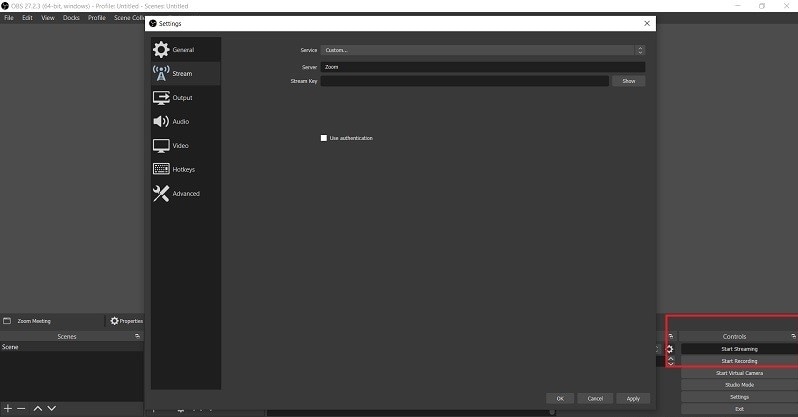
You’ll need to create a new source before you can begin recording your desktop screen. Select “Display Capture” by clicking the “+” icon on the Sources dock. You will be prompted to name the Display source in a popup window. Click “OK”. At the bottom right of the screen, click the Settings icon. Take note of the Recording Path field under the Output tab. This is where your recorded video will be kept on your computer.
Step 4. Start/Stop Recording
You’ll be able to choose the computer screen display you wish to capture in the following window. If you just have one monitor, make that the default. OBS Studios should show you the screen in the window after a valid display has been chosen. We need to change your graphics settings if OBS is unable to successfully load the screen video. Click the Start Recording button in the bottom right corner when you’re ready to begin recording. When you’re finished, click Stop Recording, and a movie will be saved to the folder you chose in the preferences.
Part 2. Edit Recorded Video in Filmora
Wondershare Filmora is a powerful screen recording application that includes a video editing suite, screen sketching tools, AI face recognition, built-in video effect packs, customizable branding watermark, and more. It may not only make recording movies simpler, but it may also provide you more possibilities for making your films more professional, creative, and attractive. Filmora is a great tool for beginners who want to make high-quality explainer films, training videos, demo videos, and more quickly. Because of the excellent video templates, screen recording is more appealing. To highlight important information, people might utilize annotation tools like as callouts, arrows, and drawing motions.
Steps to Record and Edit with Filmora
Step 1: Install Filmora on your laptop
To begin, you must first download this software program to your system from the following links:
For Win 7 or later (64-bit)
For macOS 10.12 or later
After you’ve finished downloading it, you’ll need to install it on your computer so that you can start using it with your laptop.
Step 2: Launch the Program and Begin Customizing It
The next step is to launch the software application and start recording your screen. Simply click the New Recording button in the start-up box to start recording. You may totally alter your screen recordings using the tools included in Filmora. You may also incorporate your laptop’s Webcam or a microphone as an audio source in your recordings.

Step 3: Start/Stop Screen Recording
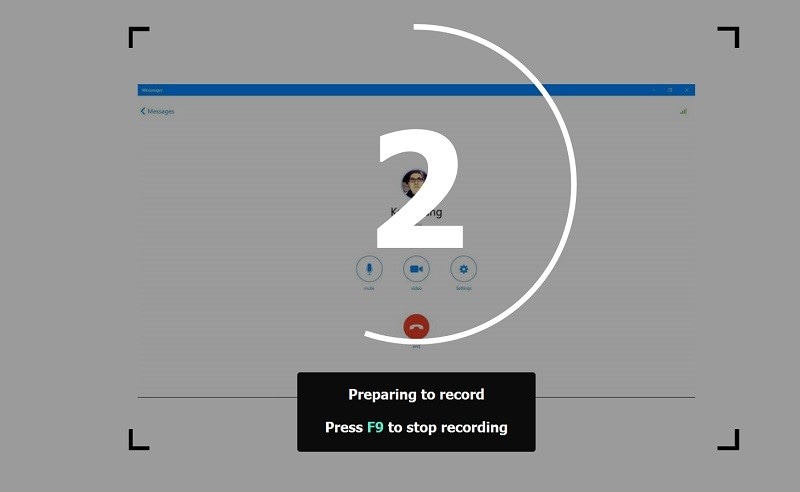
Now is the time to begin recording your audio, which you can accomplish by hitting the red circular recording button. Press the Square-shaped button on your laptop’s screen to end the recording.
Step 4: Edit the Recordings and Save Them
Finally, you may adjust your audio recordings with entirely configurable editing tools. To do so, use Filmora’s editor and utilize easy to complicated editing ways to edit your recorded audio files. Filmora’s Editor lets you add Animated Titles, amazing effects, Audio Enhancements, and more to your recorded video to make it more polished.

Step 5: Add Special Effects to Your Video
Wondershare Filmora was designed specifically to provide a professional touch to your videos. It includes a number of eye-catching and adaptable effects that you can use to make your video projects stand out from the crowd. We’ve gone through some of the greatest effects for giving life to your drab and amateurish videos in this section.

Step 6: Save or Share the Videos
Finally, after you’ve finished editing the recorded video, you may utilize the Filmora editor in its entirety, as described before. Click the Export option and select the platform where you wish to share your video clip to post your work of art immediately to YouTube or another well-known website. You may even alter the movie before sharing it if you desire.

Part 3. Edit Recorded Video with Zoom
Trimming and editing Zoom recordings is a necessary for digging out value-packed nuggets from captured footage. But although you already know this, you’re probably putting off doing so as you’re anticipating you’ll need to learn a ton of new tools to edit Zoom recordings.
Steps to Record Videos with Zoom
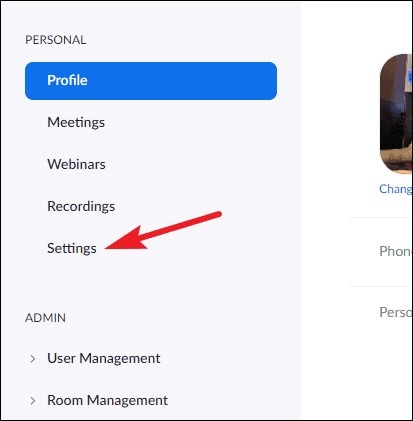
Step 1For the cloud recordings, go to zoom.us and log in to your account. Then, navigate to ‘Settings’ from the navigation menu on the left.
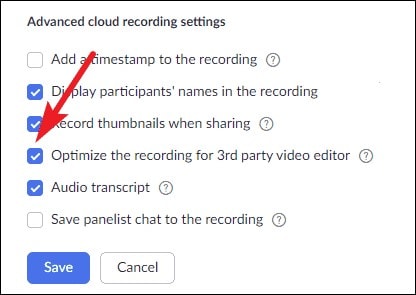
Step 2 Under Advanced cloud recording options, tick the option for ‘Optimize the recording for 3rd party video editor’ and click ‘Save’.
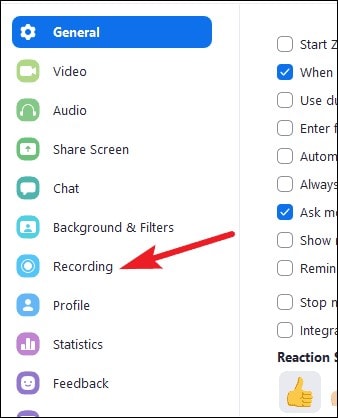
Step 3Then, navigate to ‘Recording’ from the navigation menu on the left. Check the option for ‘Optimize for 3rd party video editor.
Step 4To really edit a Zoom recording, whether it’s stored on your PC or Zoom cloud, you need to utilize third-party video editing software. But no worries, you don’t need any sophisticated equipment or software here.
Part 4. Edit Recorded Video in Teams
Teams gives the opportunity to record your online meetings. This may be especially beneficial for sharing meeting recordings with individuals unable to attend live, to preserve instructional material for future use, or to enable participants to revisit prior meeting topics. At the top of the meeting window, a message will appear stating that the recording has begun, which alerts participants that their interactions in the meeting may be recorded by the recording. You will also notice a recording sign and the duration of the recording in the top-left corner of the meeting window.
Steps to Record Videos with Teams
Step 1 Open Microsoft Teams on Windows and Mac.
Step 2 Go to appropriate Teams or Channel and click on the Video button at the top to create a video call.
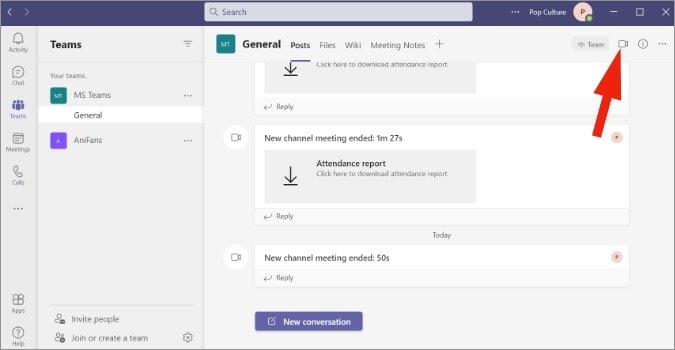
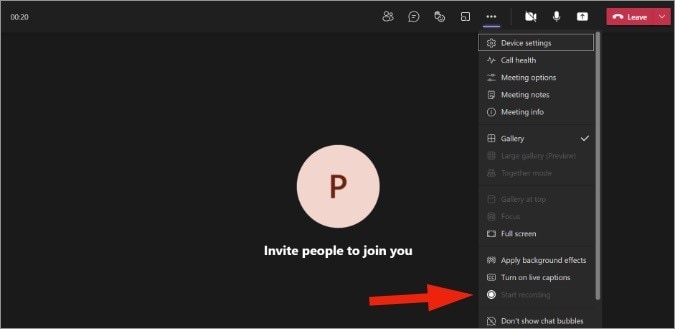
Step 3Invite people and organize a meeting. Whenever you feel you need to record any significant point, click on the three-dot menu at the top.

Step 4 Click on Start recording and Microsoft Teams will start recording the video/voice call. As soon as you start recording, every participant will be told about it.
At any moment, you may stop recording from the same. Once the meeting as concluded, your recording will display in the Chat panel in the main Teams window. Please note that depending on the length of the recording it might take some time for the recording to complete and display in the meeting chat. To find the recording, pick the Chat panel, open the correct meeting from the chat list and the recording will display in the chat window once processed.
Part 5. Edit Recorded Video in Google Meet
With more individuals working from home these days, services like Google Meet are rising in popularity. You may have an online video conference, see everyone’s face, communicate, and take care of business. As with in-office meetings, notes with action items and summaries for online meetings are just as crucial. Unfortunately, it doesn’t always happen. To have formal documentation for your meeting or share it with people who couldn’t attend, try recording your Google Meet.
Steps to Record and Edit Videos by Meet
Step 1. Launch Meet
Visit Google Meet and sign in to join or start your meeting.
Step 2. Start Recording
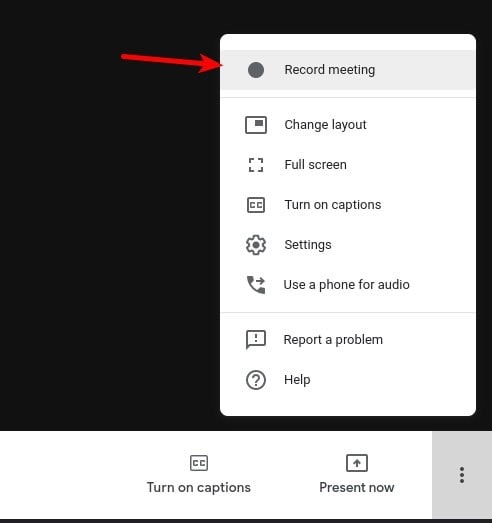
Select the Activities symbol on the bottom right and pick Recording when you’re ready to start recording.
Step 3. Stop/Save Recording
Visit Google Drive and login in if required. Navigate to My Drive on the left and search for the Meet Recordings folder on the right. It may take several minutes for the recording to show. If you do not already have a Meet Recordings folder, Google Drive will create one. You’ll notice the recording named with the meeting identifier along with the date and hour. If Chat took occurred during the meeting, you’d view this as a distinct text file.
To get a preview of your recording or chat transcript, just double-click the file in the Meet Recordings folder on Google Drive. You may download, distribute, or acquire a link to the recording (or chat) file from the Meet Recordings folder or the File Preview. In the folder, right-click the file and pick an action from the menu. Notice you may execute further options such as Rename, Make a copy, and Open with.

Step 4. Use WeVideo to Edit Videos
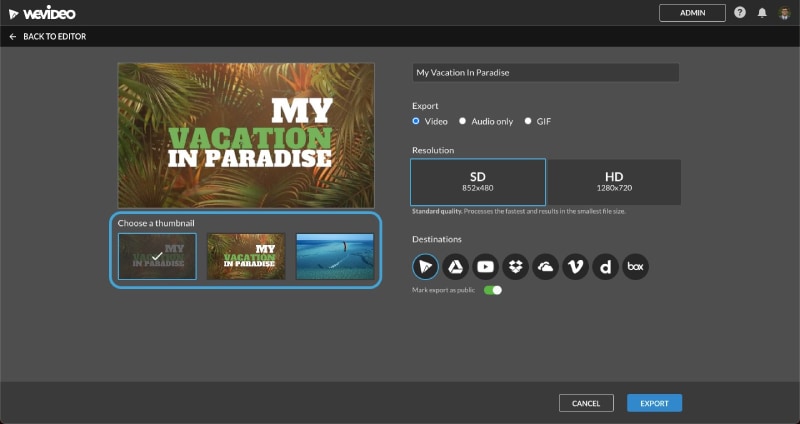
WeVideo is the cloud-based video production tool that supports student creativity, narrative, engagement and multimodal learning. Video projects develop deep knowledge about a subject through creating abilities like teamwork, communication and critical thinking. Log in and click Create New. Choose what you want to make (video, recording, etc.) and a format. Upload your media or search the Stock media repository. Make any extra modifications and preview your movie one final time. All done? Click Finish to export, download and share your video!
Part 6: Related FAQs
1. How do I edit video recordings?
Most individuals have the tools they need to film and edit small videos. With a smartphone or tablet and access to a computer, you can get the job done without even checking out equipment, much less employing a key grip. A laptop isn’t the finest equipment to film a movie–that would be extremely uncomfortable. Smartphone or tablet is easy to use. This topic is for those with access to an iPhone and a PC. Android, iPad, and Mac users will have a distinct process. Smartphones and tablets often default to recording video at a very high-Quality level, which takes up a lot of memory and results in big file sizes. Most likely you will want to lessen the resolution that you photograph.
Can you edit an already uploaded video?
If you have found yourself in this circumstance, your initial instinct could be to worry and assume you must repair the issue, delete the uploaded video, and re-upload the new one. However, this procedure will make your prior video URL dead, and any embeds of your video will display the following graphic to visitors. Nevertheless, these aforementioned sites recognizes that artists occasionally make small honest errors, or someone included in the uploaded video may demand that they be removed from it. So, to permit that, makers may chop away sections from their film without resetting a video’s metrics.
How to edit recorded video on iPhone?
If you have iOS 13 or later, you can edit films in the built-in Photos app… much as you edit your images. You may cut, crop, and straighten your films. And you may make your film more attractive by altering brightness, color, or even making it black and white. Filming films on iPhone has gotten more popular as iPhone camera lenses have progressed over the years. Many iPhone filmmakers desire the capacity to edit their video directly from their phone for simple social sharing. Using a video editing software for iPhone is a terrific method to effortlessly produce and upload videos. just open the video you want to modify, then press Edit at the upper right to get it done.
Conclusion:
If you routinely use Google Meet or Zoom, it can be a good idea to record your conferences so you can still return to them at a later period. Recording these conversations and meetings may be a big assistance when it’s time for later evaluations, updates, and enabling absent team members catch up on the meeting topic. For instance, do you wish to share meeting minutes or information with people missing in this meeting? Essentially the call recording is for other co-workers to view afterwards. Instead, you may use the recommended screen recorders to capture every moment and then use a specialist video editor like Filmora to make the required edits before sharing it with others.
For macOS 10.12 or later
After you’ve finished downloading it, you’ll need to install it on your computer so that you can start using it with your laptop.
Step 2: Launch the Program and Begin Customizing It
The next step is to launch the software application and start recording your screen. Simply click the New Recording button in the start-up box to start recording. You may totally alter your screen recordings using the tools included in Filmora. You may also incorporate your laptop’s Webcam or a microphone as an audio source in your recordings.

Step 3: Start/Stop Screen Recording
Now is the time to begin recording your audio, which you can accomplish by hitting the red circular recording button. Press the Square-shaped button on your laptop’s screen to end the recording.

Step 4: Edit the Recordings and Save Them
Finally, you may adjust your audio recordings with entirely configurable editing tools. To do so, use Filmora’s editor and utilize easy to complicated editing ways to edit your recorded audio files. Filmora’s Editor lets you add Animated Titles, amazing effects, Audio Enhancements, and more to your recorded video to make it more polished.

Step 5: Add Special Effects to Your Video
Wondershare Filmora was designed specifically to provide a professional touch to your videos. It includes a number of eye-catching and adaptable effects that you can use to make your video projects stand out from the crowd. We’ve gone through some of the greatest effects for giving life to your drab and amateurish videos in this section.

Step 6: Save or Share the Videos
Finally, after you’ve finished editing the recorded video, you may utilize the Filmora editor in its entirety, as described before. Click the Export option and select the platform where you wish to share your video clip to post your work of art immediately to YouTube or another well-known website. You may even alter the movie before sharing it if you desire.

Part 3. Edit Recorded Video with Zoom
Trimming and editing Zoom recordings is a necessary for digging out value-packed nuggets from captured footage. But although you already know this, you’re probably putting off doing so as you’re anticipating you’ll need to learn a ton of new tools to edit Zoom recordings.
Steps to Record Videos with Zoom
Step 1For the cloud recordings, go to zoom.us and log in to your account. Then, navigate to ‘Settings’ from the navigation menu on the left.

Step 2 Under Advanced cloud recording options, tick the option for ‘Optimize the recording for 3rd party video editor’ and click ‘Save’.

Step 3Then, navigate to ‘Recording’ from the navigation menu on the left. Check the option for ‘Optimize for 3rd party video editor.

Step 4To really edit a Zoom recording, whether it’s stored on your PC or Zoom cloud, you need to utilize third-party video editing software. But no worries, you don’t need any sophisticated equipment or software here.
Part 4. Edit Recorded Video in Teams
Teams gives the opportunity to record your online meetings. This may be especially beneficial for sharing meeting recordings with individuals unable to attend live, to preserve instructional material for future use, or to enable participants to revisit prior meeting topics. At the top of the meeting window, a message will appear stating that the recording has begun, which alerts participants that their interactions in the meeting may be recorded by the recording. You will also notice a recording sign and the duration of the recording in the top-left corner of the meeting window.
Steps to Record Videos with Teams
Step 1 Open Microsoft Teams on Windows and Mac.
Step 2 Go to appropriate Teams or Channel and click on the Video button at the top to create a video call.

Step 3Invite people and organize a meeting. Whenever you feel you need to record any significant point, click on the three-dot menu at the top.

Step 4 Click on Start recording and Microsoft Teams will start recording the video/voice call. As soon as you start recording, every participant will be told about it.
At any moment, you may stop recording from the same. Once the meeting as concluded, your recording will display in the Chat panel in the main Teams window. Please note that depending on the length of the recording it might take some time for the recording to complete and display in the meeting chat. To find the recording, pick the Chat panel, open the correct meeting from the chat list and the recording will display in the chat window once processed.

Part 5. Edit Recorded Video in Google Meet
With more individuals working from home these days, services like Google Meet are rising in popularity. You may have an online video conference, see everyone’s face, communicate, and take care of business. As with in-office meetings, notes with action items and summaries for online meetings are just as crucial. Unfortunately, it doesn’t always happen. To have formal documentation for your meeting or share it with people who couldn’t attend, try recording your Google Meet.
Steps to Record and Edit Videos by Meet
Step 1. Launch Meet
Visit Google Meet and sign in to join or start your meeting.
Step 2. Start Recording
Select the Activities symbol on the bottom right and pick Recording when you’re ready to start recording.

Step 3. Stop/Save Recording
Visit Google Drive and login in if required. Navigate to My Drive on the left and search for the Meet Recordings folder on the right. It may take several minutes for the recording to show. If you do not already have a Meet Recordings folder, Google Drive will create one. You’ll notice the recording named with the meeting identifier along with the date and hour. If Chat took occurred during the meeting, you’d view this as a distinct text file.
To get a preview of your recording or chat transcript, just double-click the file in the Meet Recordings folder on Google Drive. You may download, distribute, or acquire a link to the recording (or chat) file from the Meet Recordings folder or the File Preview. In the folder, right-click the file and pick an action from the menu. Notice you may execute further options such as Rename, Make a copy, and Open with.

Step 4. Use WeVideo to Edit Videos
WeVideo is the cloud-based video production tool that supports student creativity, narrative, engagement and multimodal learning. Video projects develop deep knowledge about a subject through creating abilities like teamwork, communication and critical thinking. Log in and click Create New. Choose what you want to make (video, recording, etc.) and a format. Upload your media or search the Stock media repository. Make any extra modifications and preview your movie one final time. All done? Click Finish to export, download and share your video!

Part 6: Related FAQs
1. How do I edit video recordings?
Most individuals have the tools they need to film and edit small videos. With a smartphone or tablet and access to a computer, you can get the job done without even checking out equipment, much less employing a key grip. A laptop isn’t the finest equipment to film a movie–that would be extremely uncomfortable. Smartphone or tablet is easy to use. This topic is for those with access to an iPhone and a PC. Android, iPad, and Mac users will have a distinct process. Smartphones and tablets often default to recording video at a very high-Quality level, which takes up a lot of memory and results in big file sizes. Most likely you will want to lessen the resolution that you photograph.
Can you edit an already uploaded video?
If you have found yourself in this circumstance, your initial instinct could be to worry and assume you must repair the issue, delete the uploaded video, and re-upload the new one. However, this procedure will make your prior video URL dead, and any embeds of your video will display the following graphic to visitors. Nevertheless, these aforementioned sites recognizes that artists occasionally make small honest errors, or someone included in the uploaded video may demand that they be removed from it. So, to permit that, makers may chop away sections from their film without resetting a video’s metrics.
How to edit recorded video on iPhone?
If you have iOS 13 or later, you can edit films in the built-in Photos app… much as you edit your images. You may cut, crop, and straighten your films. And you may make your film more attractive by altering brightness, color, or even making it black and white. Filming films on iPhone has gotten more popular as iPhone camera lenses have progressed over the years. Many iPhone filmmakers desire the capacity to edit their video directly from their phone for simple social sharing. Using a video editing software for iPhone is a terrific method to effortlessly produce and upload videos. just open the video you want to modify, then press Edit at the upper right to get it done.
Conclusion:
If you routinely use Google Meet or Zoom, it can be a good idea to record your conferences so you can still return to them at a later period. Recording these conversations and meetings may be a big assistance when it’s time for later evaluations, updates, and enabling absent team members catch up on the meeting topic. For instance, do you wish to share meeting minutes or information with people missing in this meeting? Essentially the call recording is for other co-workers to view afterwards. Instead, you may use the recommended screen recorders to capture every moment and then use a specialist video editor like Filmora to make the required edits before sharing it with others.
For macOS 10.12 or later
After you’ve finished downloading it, you’ll need to install it on your computer so that you can start using it with your laptop.
Step 2: Launch the Program and Begin Customizing It
The next step is to launch the software application and start recording your screen. Simply click the New Recording button in the start-up box to start recording. You may totally alter your screen recordings using the tools included in Filmora. You may also incorporate your laptop’s Webcam or a microphone as an audio source in your recordings.

Step 3: Start/Stop Screen Recording
Now is the time to begin recording your audio, which you can accomplish by hitting the red circular recording button. Press the Square-shaped button on your laptop’s screen to end the recording.

Step 4: Edit the Recordings and Save Them
Finally, you may adjust your audio recordings with entirely configurable editing tools. To do so, use Filmora’s editor and utilize easy to complicated editing ways to edit your recorded audio files. Filmora’s Editor lets you add Animated Titles, amazing effects, Audio Enhancements, and more to your recorded video to make it more polished.

Step 5: Add Special Effects to Your Video
Wondershare Filmora was designed specifically to provide a professional touch to your videos. It includes a number of eye-catching and adaptable effects that you can use to make your video projects stand out from the crowd. We’ve gone through some of the greatest effects for giving life to your drab and amateurish videos in this section.

Step 6: Save or Share the Videos
Finally, after you’ve finished editing the recorded video, you may utilize the Filmora editor in its entirety, as described before. Click the Export option and select the platform where you wish to share your video clip to post your work of art immediately to YouTube or another well-known website. You may even alter the movie before sharing it if you desire.

Part 3. Edit Recorded Video with Zoom
Trimming and editing Zoom recordings is a necessary for digging out value-packed nuggets from captured footage. But although you already know this, you’re probably putting off doing so as you’re anticipating you’ll need to learn a ton of new tools to edit Zoom recordings.
Steps to Record Videos with Zoom
Step 1For the cloud recordings, go to zoom.us and log in to your account. Then, navigate to ‘Settings’ from the navigation menu on the left.

Step 2 Under Advanced cloud recording options, tick the option for ‘Optimize the recording for 3rd party video editor’ and click ‘Save’.

Step 3Then, navigate to ‘Recording’ from the navigation menu on the left. Check the option for ‘Optimize for 3rd party video editor.

Step 4To really edit a Zoom recording, whether it’s stored on your PC or Zoom cloud, you need to utilize third-party video editing software. But no worries, you don’t need any sophisticated equipment or software here.
Part 4. Edit Recorded Video in Teams
Teams gives the opportunity to record your online meetings. This may be especially beneficial for sharing meeting recordings with individuals unable to attend live, to preserve instructional material for future use, or to enable participants to revisit prior meeting topics. At the top of the meeting window, a message will appear stating that the recording has begun, which alerts participants that their interactions in the meeting may be recorded by the recording. You will also notice a recording sign and the duration of the recording in the top-left corner of the meeting window.
Steps to Record Videos with Teams
Step 1 Open Microsoft Teams on Windows and Mac.
Step 2 Go to appropriate Teams or Channel and click on the Video button at the top to create a video call.

Step 3Invite people and organize a meeting. Whenever you feel you need to record any significant point, click on the three-dot menu at the top.

Step 4 Click on Start recording and Microsoft Teams will start recording the video/voice call. As soon as you start recording, every participant will be told about it.
At any moment, you may stop recording from the same. Once the meeting as concluded, your recording will display in the Chat panel in the main Teams window. Please note that depending on the length of the recording it might take some time for the recording to complete and display in the meeting chat. To find the recording, pick the Chat panel, open the correct meeting from the chat list and the recording will display in the chat window once processed.

Part 5. Edit Recorded Video in Google Meet
With more individuals working from home these days, services like Google Meet are rising in popularity. You may have an online video conference, see everyone’s face, communicate, and take care of business. As with in-office meetings, notes with action items and summaries for online meetings are just as crucial. Unfortunately, it doesn’t always happen. To have formal documentation for your meeting or share it with people who couldn’t attend, try recording your Google Meet.
Steps to Record and Edit Videos by Meet
Step 1. Launch Meet
Visit Google Meet and sign in to join or start your meeting.
Step 2. Start Recording
Select the Activities symbol on the bottom right and pick Recording when you’re ready to start recording.

Step 3. Stop/Save Recording
Visit Google Drive and login in if required. Navigate to My Drive on the left and search for the Meet Recordings folder on the right. It may take several minutes for the recording to show. If you do not already have a Meet Recordings folder, Google Drive will create one. You’ll notice the recording named with the meeting identifier along with the date and hour. If Chat took occurred during the meeting, you’d view this as a distinct text file.
To get a preview of your recording or chat transcript, just double-click the file in the Meet Recordings folder on Google Drive. You may download, distribute, or acquire a link to the recording (or chat) file from the Meet Recordings folder or the File Preview. In the folder, right-click the file and pick an action from the menu. Notice you may execute further options such as Rename, Make a copy, and Open with.

Step 4. Use WeVideo to Edit Videos
WeVideo is the cloud-based video production tool that supports student creativity, narrative, engagement and multimodal learning. Video projects develop deep knowledge about a subject through creating abilities like teamwork, communication and critical thinking. Log in and click Create New. Choose what you want to make (video, recording, etc.) and a format. Upload your media or search the Stock media repository. Make any extra modifications and preview your movie one final time. All done? Click Finish to export, download and share your video!

Part 6: Related FAQs
1. How do I edit video recordings?
Most individuals have the tools they need to film and edit small videos. With a smartphone or tablet and access to a computer, you can get the job done without even checking out equipment, much less employing a key grip. A laptop isn’t the finest equipment to film a movie–that would be extremely uncomfortable. Smartphone or tablet is easy to use. This topic is for those with access to an iPhone and a PC. Android, iPad, and Mac users will have a distinct process. Smartphones and tablets often default to recording video at a very high-Quality level, which takes up a lot of memory and results in big file sizes. Most likely you will want to lessen the resolution that you photograph.
Can you edit an already uploaded video?
If you have found yourself in this circumstance, your initial instinct could be to worry and assume you must repair the issue, delete the uploaded video, and re-upload the new one. However, this procedure will make your prior video URL dead, and any embeds of your video will display the following graphic to visitors. Nevertheless, these aforementioned sites recognizes that artists occasionally make small honest errors, or someone included in the uploaded video may demand that they be removed from it. So, to permit that, makers may chop away sections from their film without resetting a video’s metrics.
How to edit recorded video on iPhone?
If you have iOS 13 or later, you can edit films in the built-in Photos app… much as you edit your images. You may cut, crop, and straighten your films. And you may make your film more attractive by altering brightness, color, or even making it black and white. Filming films on iPhone has gotten more popular as iPhone camera lenses have progressed over the years. Many iPhone filmmakers desire the capacity to edit their video directly from their phone for simple social sharing. Using a video editing software for iPhone is a terrific method to effortlessly produce and upload videos. just open the video you want to modify, then press Edit at the upper right to get it done.
Conclusion:
If you routinely use Google Meet or Zoom, it can be a good idea to record your conferences so you can still return to them at a later period. Recording these conversations and meetings may be a big assistance when it’s time for later evaluations, updates, and enabling absent team members catch up on the meeting topic. For instance, do you wish to share meeting minutes or information with people missing in this meeting? Essentially the call recording is for other co-workers to view afterwards. Instead, you may use the recommended screen recorders to capture every moment and then use a specialist video editor like Filmora to make the required edits before sharing it with others.
For macOS 10.12 or later
After you’ve finished downloading it, you’ll need to install it on your computer so that you can start using it with your laptop.
Step 2: Launch the Program and Begin Customizing It
The next step is to launch the software application and start recording your screen. Simply click the New Recording button in the start-up box to start recording. You may totally alter your screen recordings using the tools included in Filmora. You may also incorporate your laptop’s Webcam or a microphone as an audio source in your recordings.

Step 3: Start/Stop Screen Recording
Now is the time to begin recording your audio, which you can accomplish by hitting the red circular recording button. Press the Square-shaped button on your laptop’s screen to end the recording.

Step 4: Edit the Recordings and Save Them
Finally, you may adjust your audio recordings with entirely configurable editing tools. To do so, use Filmora’s editor and utilize easy to complicated editing ways to edit your recorded audio files. Filmora’s Editor lets you add Animated Titles, amazing effects, Audio Enhancements, and more to your recorded video to make it more polished.

Step 5: Add Special Effects to Your Video
Wondershare Filmora was designed specifically to provide a professional touch to your videos. It includes a number of eye-catching and adaptable effects that you can use to make your video projects stand out from the crowd. We’ve gone through some of the greatest effects for giving life to your drab and amateurish videos in this section.

Step 6: Save or Share the Videos
Finally, after you’ve finished editing the recorded video, you may utilize the Filmora editor in its entirety, as described before. Click the Export option and select the platform where you wish to share your video clip to post your work of art immediately to YouTube or another well-known website. You may even alter the movie before sharing it if you desire.

Part 3. Edit Recorded Video with Zoom
Trimming and editing Zoom recordings is a necessary for digging out value-packed nuggets from captured footage. But although you already know this, you’re probably putting off doing so as you’re anticipating you’ll need to learn a ton of new tools to edit Zoom recordings.
Steps to Record Videos with Zoom
Step 1For the cloud recordings, go to zoom.us and log in to your account. Then, navigate to ‘Settings’ from the navigation menu on the left.

Step 2 Under Advanced cloud recording options, tick the option for ‘Optimize the recording for 3rd party video editor’ and click ‘Save’.

Step 3Then, navigate to ‘Recording’ from the navigation menu on the left. Check the option for ‘Optimize for 3rd party video editor.

Step 4To really edit a Zoom recording, whether it’s stored on your PC or Zoom cloud, you need to utilize third-party video editing software. But no worries, you don’t need any sophisticated equipment or software here.
Part 4. Edit Recorded Video in Teams
Teams gives the opportunity to record your online meetings. This may be especially beneficial for sharing meeting recordings with individuals unable to attend live, to preserve instructional material for future use, or to enable participants to revisit prior meeting topics. At the top of the meeting window, a message will appear stating that the recording has begun, which alerts participants that their interactions in the meeting may be recorded by the recording. You will also notice a recording sign and the duration of the recording in the top-left corner of the meeting window.
Steps to Record Videos with Teams
Step 1 Open Microsoft Teams on Windows and Mac.
Step 2 Go to appropriate Teams or Channel and click on the Video button at the top to create a video call.

Step 3Invite people and organize a meeting. Whenever you feel you need to record any significant point, click on the three-dot menu at the top.

Step 4 Click on Start recording and Microsoft Teams will start recording the video/voice call. As soon as you start recording, every participant will be told about it.
At any moment, you may stop recording from the same. Once the meeting as concluded, your recording will display in the Chat panel in the main Teams window. Please note that depending on the length of the recording it might take some time for the recording to complete and display in the meeting chat. To find the recording, pick the Chat panel, open the correct meeting from the chat list and the recording will display in the chat window once processed.

Part 5. Edit Recorded Video in Google Meet
With more individuals working from home these days, services like Google Meet are rising in popularity. You may have an online video conference, see everyone’s face, communicate, and take care of business. As with in-office meetings, notes with action items and summaries for online meetings are just as crucial. Unfortunately, it doesn’t always happen. To have formal documentation for your meeting or share it with people who couldn’t attend, try recording your Google Meet.
Steps to Record and Edit Videos by Meet
Step 1. Launch Meet
Visit Google Meet and sign in to join or start your meeting.
Step 2. Start Recording
Select the Activities symbol on the bottom right and pick Recording when you’re ready to start recording.

Step 3. Stop/Save Recording
Visit Google Drive and login in if required. Navigate to My Drive on the left and search for the Meet Recordings folder on the right. It may take several minutes for the recording to show. If you do not already have a Meet Recordings folder, Google Drive will create one. You’ll notice the recording named with the meeting identifier along with the date and hour. If Chat took occurred during the meeting, you’d view this as a distinct text file.
To get a preview of your recording or chat transcript, just double-click the file in the Meet Recordings folder on Google Drive. You may download, distribute, or acquire a link to the recording (or chat) file from the Meet Recordings folder or the File Preview. In the folder, right-click the file and pick an action from the menu. Notice you may execute further options such as Rename, Make a copy, and Open with.

Step 4. Use WeVideo to Edit Videos
WeVideo is the cloud-based video production tool that supports student creativity, narrative, engagement and multimodal learning. Video projects develop deep knowledge about a subject through creating abilities like teamwork, communication and critical thinking. Log in and click Create New. Choose what you want to make (video, recording, etc.) and a format. Upload your media or search the Stock media repository. Make any extra modifications and preview your movie one final time. All done? Click Finish to export, download and share your video!

Part 6: Related FAQs
1. How do I edit video recordings?
Most individuals have the tools they need to film and edit small videos. With a smartphone or tablet and access to a computer, you can get the job done without even checking out equipment, much less employing a key grip. A laptop isn’t the finest equipment to film a movie–that would be extremely uncomfortable. Smartphone or tablet is easy to use. This topic is for those with access to an iPhone and a PC. Android, iPad, and Mac users will have a distinct process. Smartphones and tablets often default to recording video at a very high-Quality level, which takes up a lot of memory and results in big file sizes. Most likely you will want to lessen the resolution that you photograph.
Can you edit an already uploaded video?
If you have found yourself in this circumstance, your initial instinct could be to worry and assume you must repair the issue, delete the uploaded video, and re-upload the new one. However, this procedure will make your prior video URL dead, and any embeds of your video will display the following graphic to visitors. Nevertheless, these aforementioned sites recognizes that artists occasionally make small honest errors, or someone included in the uploaded video may demand that they be removed from it. So, to permit that, makers may chop away sections from their film without resetting a video’s metrics.
How to edit recorded video on iPhone?
If you have iOS 13 or later, you can edit films in the built-in Photos app… much as you edit your images. You may cut, crop, and straighten your films. And you may make your film more attractive by altering brightness, color, or even making it black and white. Filming films on iPhone has gotten more popular as iPhone camera lenses have progressed over the years. Many iPhone filmmakers desire the capacity to edit their video directly from their phone for simple social sharing. Using a video editing software for iPhone is a terrific method to effortlessly produce and upload videos. just open the video you want to modify, then press Edit at the upper right to get it done.
Conclusion:
If you routinely use Google Meet or Zoom, it can be a good idea to record your conferences so you can still return to them at a later period. Recording these conversations and meetings may be a big assistance when it’s time for later evaluations, updates, and enabling absent team members catch up on the meeting topic. For instance, do you wish to share meeting minutes or information with people missing in this meeting? Essentially the call recording is for other co-workers to view afterwards. Instead, you may use the recommended screen recorders to capture every moment and then use a specialist video editor like Filmora to make the required edits before sharing it with others.
2 Effective Ways to Make SRT File Translation Like a Pro
Whether you download YouTube SRT in Spanish or want to add translated subtitles to your favorite cartoon video, having an SRT translator will come in handy. The SRT subtitle file is based on texts divided into multiple sections. When you add it to a video, the texts will be displayed as you wrote in the file.
As most people find the translation work tedious, we have presented the two easiest ways of SRT file translation so without anyone’s assistance or prior training.
- Method 2 Translate subtitle .srt file without Downloading Any Software
- [Optional] If you hope to Edit SRT file for Video, here is the Best Way
Method 1 Translate SRT subtitles with third-party translator software
As there are so many different translator software platforms you can try to convert the SRT file to another language, you may be unable to choose the right one. That’s why we have explained the proper process for better clarification.
1. Redokun
One of the best software platforms you can use to translate the SRT file into another language is Redokun. It comes with a machine-automated translation that will automatically translate one language to another within minutes, increasing the overall productivity by 60%. It accurately processes the translation and ensures the texts don’t change during translation. Besides, this SRT file translator comes with a Translator Memory to help you quickly check past files.

Pros
- Easy to use software
- Supports smart revisions for last-minute alterations
- Precise and accurate translator
Cons
- Supports only 14 days of trial
How to translate SRT files?
- Visit Redokun and open the translator.
- Upload the SRT file from local or cloud storage and wait for the document to get uploaded.
- Set the input and output languages and click on the Translate button.
- The new SRT file will get generated with translated text.
Supported OS: Mac and Windows
Supported language translation: English, German, Chinese, and so on.
2. Smartcat
Another outstanding online tool you can use is Smartcat. It supports eight different translator engines, including Amazon and Google. It also accepts multiple file formats and supports over 240 languages, ensuring the SRT file can be translated within minutes.

Pros
- Does not require any expert knowledge
- Translates through AI program for more accuracy
- Support extracting the text from .xml
Cons
- Might not be suitable for beginners
How to translate SRT files?
- Log in to Smartcat and click on Upload. Choose the SRT file and click on Open.
- As the document downloads on the translator, set its language if the default language is not the same. Also, set the new language in which you want the translation.
- Click on Translate and wait for a couple of minutes.
- After a certain time, the new file will be generated with texts written in the language you have set.
Supported OS: Windows and Mac
Supported language translation: English, Mexican, Spanish, Brazilian, and more
3. SDL Trados Studio
SDL Trados Studio is a perfect tool for SRT file translation into another language in no time. It features an AI-powered algorithm that ensures the maximum accuracy in the translated file.

Pros
- Supports multiple languages for translation
- Has free plans
- Accurate translation with no error
Cons
- Not suitable for pros
How to translate SRT files?
- Upload the SRT file on SDL Trados Studio and select the original language from the dropdown.
- Open the language dropdown from the output window and choose the desired language.
- Click on Translate and wait for the new file to be generated.
Supported OS: Mac and Windows
Supported language translation: English, Japanese, Spanish, French, and Italian
4. MemoQ Translator Pro
Based on a computer-based program, this translator software makes the work easier, ensuring easy usage without any hurdles. You won’t have to worry about the texts changing their meaning or getting corrupted during translation.

Pros
- Remembers the past translations
- Increases productivity with faster translation
- Open-source platform
Cons
- Not ideal for beginners
How to translate SRT files?
- Once you upload the file to the software, the texts will be displayed on one side. Choose the language in which you want the final file and click on Translate.
- Each text block will be translated at a time. Once it is over, a green mark will be shown on the side.
Supported OS: Windows
Supported language translation: English, French, Italian, Greek, and Hindi
5. Lokalise
Used even by professional companies, this excellent online tool SRT translator is perfect for Windows and Mac and allows hassle-free translation. It comes with an intuitive UI, ensuring beginners can also efficiently work on the SRT file translation.

Pros
- Easy user interface
- Supports multiple languages
- Allows export of the translated file
Cons
- Does not allow editing of the SRT file
How to translate SRT files?
- Choose the languages for both sides from the dropdown and then upload the concerned SRT file.
- Click on the Translate button and wait for the new file to be generated.
- Once the translation is completed, it will generate the file, and you can download it.
Supported OS: Windows and Mac
Supported language translation: French, Italian, Korean, Spanish, Chinese, etc.
6. Text United
This online platform allows you to translate and upload SRT files easily. It ensures maximum accuracy and does not introduce any error in the translated file.

Pros
- Interface is easy-to-use with clear translating process
- Faster translation for more productivity
- Free software
Cons
- Not an open-source platform
How to translate SRT files?
- Upload the original SRT file and select the input language.
- Once done, select the output language and click on Translate.
- The new subtitles will be generated in the new language after a couple of minutes.
Supported OS: Mac and Windows
Supported language translation: English, German, French
Method 2 Translate subtitle .srt file without Downloading Any Software
The other method for translating the SRT files from one language to another is Notepad (for Windows) or TextEdit (for Mac). As these are simple text editor applications built into the OS, you don’t require any downloading or another person’s help to complete the job.
Note: TextEdit and Notebook are best suited for translating short SRT files from one language to another, especially if the subtitles present are not that much complicated.
Step-by-step guide for SRT translation on Notepad
- Go to the drive where you have stored the file and right-click on the same. Click on “Open with” and choose Notepad from the list of options displayed.

- The file will open in Notepad. Now, edit the SRT file according to the subtitle positions and the text you want to add to the video. Check the time codes because they need to be in sync with the video file.

- Once done, save the file and open Google Translate. Copy each text line and paste the same into the translator’s input box. If the language of the original text is not English, change the language from the dropdown in the translator for easier and more accurate interpretation.

- Click on Translate and wait till the translated text is generated. You need to select the language of the output section according to the required language of the translated SRT file.

- Once the translated text is generated, copy the new text and paste it in place of the original text you copied.
Pros
- Does not need to know about the usage of any software
- Best for small SRT files
- Better for beginners
Cons
- Can change the text during translation
- Time consuming process
Step-by-step guide for SRT translation on TextEdit
- Go to the stored location of the SRT file and right-click on the selected file. Once the menu expands, click on “Open With” and then choose TextEdit as the option. You can also change the default file type to TextEdit. Right-click on the file and select Properties. Once the dialog box opens, click on the “Open With” option and select TextEdit from there. Click on Apply and then Save to change the default file type.

- Once you complete all the edits, open Google Translator and select the input and output languages. The input language will be the one in which your original text is written, and the output is the language you need to transfer the SRT file into.
- Copy and paste the text line from the beginning and click on Translate. Wait for the tool to evaluate and display the translated text.
- Copy it and paste the text into the SRT file. Ensure all the texts are adequately translated before saving and uploading the file to the video.
Pros
- No need to know about the technical use of a software
- Can convert the languages of a small file
- Best for immediate translation
Cons
- Errors can occur during translation
- Needs a lot of time
[Optional] If you hope to Edit SRT file for Video, here is the Best Way
Now that you know the best tools for high-quality video-based subtitle translation, you can choose. However, not all of them support the ability to edit SRT files; for that, you can rely on Wondershare Filmora .
The software is a desktop-based program that users can try out for varying levels of video editing work. You can optimize the videos with features like speed ramping, audio visualization, and speech-to-text. You can add subtitles to videos with the last feature or add external SRT files. Editing is possible as well.
How to Use Filmora to Edit SRT Subtitles for Videos?
Free Download For Win 7 or later(64-bit)
Free Download For macOS 10.14 or later
Step1 Open the Filmora software and add the video file.
Step2 Click on Media to upload SRT file.
Step3 Right-click your subtitle file on the editor timeline> Choose “Advanced Edit”.

Step4 Make changes to the time code, add/merge/remove the strips of subtitle, modify the SRT file, or change the font style similar to Filmora’s Advanced Edit-based text format.

Step5 Right-click on the SRT file in the timeline and press the “Export Subtitle File” option.

Step6 Make other video edits, like merging, equalization, etc.
Step7 Click on Export > Local > YouTube. Make changes in the settings and click the Export button.
Conclusion
We have given you the top six options if you are looking for the best online tool for SRT translation. You need to weigh the options according to your requirements and start translating your subtitle file to a language you want for the video.

Method 1 Translate SRT subtitles with third-party translator software
As there are so many different translator software platforms you can try to convert the SRT file to another language, you may be unable to choose the right one. That’s why we have explained the proper process for better clarification.
1. Redokun
One of the best software platforms you can use to translate the SRT file into another language is Redokun. It comes with a machine-automated translation that will automatically translate one language to another within minutes, increasing the overall productivity by 60%. It accurately processes the translation and ensures the texts don’t change during translation. Besides, this SRT file translator comes with a Translator Memory to help you quickly check past files.

Pros
- Easy to use software
- Supports smart revisions for last-minute alterations
- Precise and accurate translator
Cons
- Supports only 14 days of trial
How to translate SRT files?
- Visit Redokun and open the translator.
- Upload the SRT file from local or cloud storage and wait for the document to get uploaded.
- Set the input and output languages and click on the Translate button.
- The new SRT file will get generated with translated text.
Supported OS: Mac and Windows
Supported language translation: English, German, Chinese, and so on.
2. Smartcat
Another outstanding online tool you can use is Smartcat. It supports eight different translator engines, including Amazon and Google. It also accepts multiple file formats and supports over 240 languages, ensuring the SRT file can be translated within minutes.

Pros
- Does not require any expert knowledge
- Translates through AI program for more accuracy
- Support extracting the text from .xml
Cons
- Might not be suitable for beginners
How to translate SRT files?
- Log in to Smartcat and click on Upload. Choose the SRT file and click on Open.
- As the document downloads on the translator, set its language if the default language is not the same. Also, set the new language in which you want the translation.
- Click on Translate and wait for a couple of minutes.
- After a certain time, the new file will be generated with texts written in the language you have set.
Supported OS: Windows and Mac
Supported language translation: English, Mexican, Spanish, Brazilian, and more
3. SDL Trados Studio
SDL Trados Studio is a perfect tool for SRT file translation into another language in no time. It features an AI-powered algorithm that ensures the maximum accuracy in the translated file.

Pros
- Supports multiple languages for translation
- Has free plans
- Accurate translation with no error
Cons
- Not suitable for pros
How to translate SRT files?
- Upload the SRT file on SDL Trados Studio and select the original language from the dropdown.
- Open the language dropdown from the output window and choose the desired language.
- Click on Translate and wait for the new file to be generated.
Supported OS: Mac and Windows
Supported language translation: English, Japanese, Spanish, French, and Italian
4. MemoQ Translator Pro
Based on a computer-based program, this translator software makes the work easier, ensuring easy usage without any hurdles. You won’t have to worry about the texts changing their meaning or getting corrupted during translation.

Pros
- Remembers the past translations
- Increases productivity with faster translation
- Open-source platform
Cons
- Not ideal for beginners
How to translate SRT files?
- Once you upload the file to the software, the texts will be displayed on one side. Choose the language in which you want the final file and click on Translate.
- Each text block will be translated at a time. Once it is over, a green mark will be shown on the side.
Supported OS: Windows
Supported language translation: English, French, Italian, Greek, and Hindi
5. Lokalise
Used even by professional companies, this excellent online tool SRT translator is perfect for Windows and Mac and allows hassle-free translation. It comes with an intuitive UI, ensuring beginners can also efficiently work on the SRT file translation.

Pros
- Easy user interface
- Supports multiple languages
- Allows export of the translated file
Cons
- Does not allow editing of the SRT file
How to translate SRT files?
- Choose the languages for both sides from the dropdown and then upload the concerned SRT file.
- Click on the Translate button and wait for the new file to be generated.
- Once the translation is completed, it will generate the file, and you can download it.
Supported OS: Windows and Mac
Supported language translation: French, Italian, Korean, Spanish, Chinese, etc.
6. Text United
This online platform allows you to translate and upload SRT files easily. It ensures maximum accuracy and does not introduce any error in the translated file.

Pros
- Interface is easy-to-use with clear translating process
- Faster translation for more productivity
- Free software
Cons
- Not an open-source platform
How to translate SRT files?
- Upload the original SRT file and select the input language.
- Once done, select the output language and click on Translate.
- The new subtitles will be generated in the new language after a couple of minutes.
Supported OS: Mac and Windows
Supported language translation: English, German, French
Method 2 Translate subtitle .srt file without Downloading Any Software
The other method for translating the SRT files from one language to another is Notepad (for Windows) or TextEdit (for Mac). As these are simple text editor applications built into the OS, you don’t require any downloading or another person’s help to complete the job.
Note: TextEdit and Notebook are best suited for translating short SRT files from one language to another, especially if the subtitles present are not that much complicated.
Step-by-step guide for SRT translation on Notepad
- Go to the drive where you have stored the file and right-click on the same. Click on “Open with” and choose Notepad from the list of options displayed.

- The file will open in Notepad. Now, edit the SRT file according to the subtitle positions and the text you want to add to the video. Check the time codes because they need to be in sync with the video file.

- Once done, save the file and open Google Translate. Copy each text line and paste the same into the translator’s input box. If the language of the original text is not English, change the language from the dropdown in the translator for easier and more accurate interpretation.

- Click on Translate and wait till the translated text is generated. You need to select the language of the output section according to the required language of the translated SRT file.

- Once the translated text is generated, copy the new text and paste it in place of the original text you copied.
Pros
- Does not need to know about the usage of any software
- Best for small SRT files
- Better for beginners
Cons
- Can change the text during translation
- Time consuming process
Step-by-step guide for SRT translation on TextEdit
- Go to the stored location of the SRT file and right-click on the selected file. Once the menu expands, click on “Open With” and then choose TextEdit as the option. You can also change the default file type to TextEdit. Right-click on the file and select Properties. Once the dialog box opens, click on the “Open With” option and select TextEdit from there. Click on Apply and then Save to change the default file type.

- Once you complete all the edits, open Google Translator and select the input and output languages. The input language will be the one in which your original text is written, and the output is the language you need to transfer the SRT file into.
- Copy and paste the text line from the beginning and click on Translate. Wait for the tool to evaluate and display the translated text.
- Copy it and paste the text into the SRT file. Ensure all the texts are adequately translated before saving and uploading the file to the video.
Pros
- No need to know about the technical use of a software
- Can convert the languages of a small file
- Best for immediate translation
Cons
- Errors can occur during translation
- Needs a lot of time
[Optional] If you hope to Edit SRT file for Video, here is the Best Way
Now that you know the best tools for high-quality video-based subtitle translation, you can choose. However, not all of them support the ability to edit SRT files; for that, you can rely on Wondershare Filmora .
The software is a desktop-based program that users can try out for varying levels of video editing work. You can optimize the videos with features like speed ramping, audio visualization, and speech-to-text. You can add subtitles to videos with the last feature or add external SRT files. Editing is possible as well.
How to Use Filmora to Edit SRT Subtitles for Videos?
Free Download For Win 7 or later(64-bit)
Free Download For macOS 10.14 or later
Step1 Open the Filmora software and add the video file.
Step2 Click on Media to upload SRT file.
Step3 Right-click your subtitle file on the editor timeline> Choose “Advanced Edit”.

Step4 Make changes to the time code, add/merge/remove the strips of subtitle, modify the SRT file, or change the font style similar to Filmora’s Advanced Edit-based text format.

Step5 Right-click on the SRT file in the timeline and press the “Export Subtitle File” option.

Step6 Make other video edits, like merging, equalization, etc.
Step7 Click on Export > Local > YouTube. Make changes in the settings and click the Export button.
Conclusion
We have given you the top six options if you are looking for the best online tool for SRT translation. You need to weigh the options according to your requirements and start translating your subtitle file to a language you want for the video.

Easy Ways to Remove Motion Blur In Photoshop
The motion blur effect is created in photos when the picture is taken in poor light conditions or due to a fast-moving object. Moreover, if the shutter speed of the camera is too low, it will also produce a motion blur effect. In such a situation, the captured picture may look out of focus and tedious. In order to fix this issue, this article can help you.
By reading this article, you can learn how to remove motion blur in Photoshop with simple steps. Moreover, we will also provide the best alternatives to Photoshop that you can utilize to remove motion blur from your photos.
Part 1: How to Remove the Motion Blur in Photoshop?
To fix a motion blur in an image, you would require a professional tool such as Adobe Photoshop . Photoshop is a well-recognized tool comprising tons of features for image editing and graphic designing. It offers selection tools that enable you to choose the specific parts of a photo efficiently. You can also add layers to your photo to modify and edit specific areas of the image.
You can also apply appealing filters from this platform to transform an ordinary image drastically. Moreover, using this precise tool, you can also fix motion blur in Photoshop. You can choose the blurry areas of your photo through its selection tools. Thus, with a few clicks, you can eliminate the flaws from your image easily.
Steps to Fix Motion Blur in Photos Using Photoshop
If you are new to Photoshop and don’t know how to fix motion blur in photos, then follow the instructions described below:
Step1 Open the Photoshop tool on your PC or Mac and upload your photo. From the “Layers” section, press “Ctrl + J” or “Command + J” to copy the first layer. Afterward, convert the first layer by choosing the option “Smart Object.”

Step2 Now head to the “Filter” section and tap on “Sharpen” to proceed. Afterward, proceed with the option of “Shake Reduction” by clicking on it. Now Photoshop will automatically reduce the blur effect. From the displayed panel, uncheck the option called “Artifact Suppression.”

Step3 To continue, open the “Advanced” tab from the left panel and enhance the size of your rectangular. Manage the position of the rectangle according to your preference. By doing so, you can see the details of the image clearly.

Step4 From the left panel, manage the options like “Blur Trace Bounds” and “Smoothing” according to your desire. Once done, press the “OK” button. For adding more modifications, add a blank layer and choose the “Clone Stamp Tool.” Afterward, select “Soft Round Brush” from the general brushes.

Step5 Now adjust the Opacity to 100% and Flow to 50%. Moreover, select “Current & Below” as the sample. Press the Alt key to take a sample of any flawless part of your photo and apply it to the blurry area. Make sure that the color of the sample taken is the same as the blurry area in the photo.

Part 2: Remove the Motion Blur with an Alternative to Photoshop
It may be possible that you don’t get satisfactory results from Photoshop removing motion blur. Or, if you find the interface of Photoshop intimidating, it can affect your productivity. For your assistance, this section will bring you the best alternatives to Photoshop.
1. IMAGamigo
IMAGamigo is an online tool that allows you to perform different operations on pictures efficiently. To fix motion blur, it offers a Deblurrer feature. Using this feature, you can automatically remove blur from your photos without any external effort. It also provides other distinct features such as Background Remover, Restorer, Colorizer, Upscale, etc.
To use this tool, first, navigate to its official website. From its tools, select “Deblurrer” to proceed. A new window will open on your screen instantly. Scroll down a little bit and locate the area saying, “Drop Image Here.” Click on this area and upload your image. Afterward, the tool will automatically start analyzing the picture. Once the process gets finished, click on the Download button to save your photo.

2. Vance.AI
This online platform is also a well-trusted tool by professionals and content creators. It provides AI-supported tools such as AI Image Denoiser, AI Image Upscaler, AI Photo Enhancer, etc. You can use its AI Image Sharpener to eliminate motion blur from pictures. It supports all popular image file formats, such as JPEG, PNG, and JPG. Thus, without any installations, you can quickly utilize this tool to fix motion blur photos.
To use this tool, access the official webpage of Vance.AI and select the “AI Image Sharpener” feature. Once done, click on the “Upload Image” option and import your blurry photo. Afterward, a new window will be open from which you can adjust the settings. Select the “Sharpen” option and choose the preferred Sharpen Mode. Afterward, click on the “Start to Process” option. Once the process ends, you can download the picture with a single click.

3. AKVIS Refocus AI
AKVIS is an offline tool that produces high-end results at a fast processing speed. You can find multiple options in this tool, such as Airbrush, Retoucher, Sketch, Decorator, etc. When it comes to fixing blurry pictures, this tool provides an exclusive feature called “Refocus AI.” Through this feature, you can instantly increase the sharpness of your photo. Also, it offers different modes such as Motion Blur, Radial Blur, Refocus-AI, and Tilt-Shift.
To fix motion blur:
Step1 Launch this tool and navigate to its Refocus AI option.
Step2 Select Refocus AI as your mode and upload the blurry picture. The default preset will be AKVIS Default AI.
Step3 Disable the “Image Sharpening” feature and navigate to the “Motion Deblur AI” section.
Step4 From there, adjust your Focus accordingly.
Step5 For more enhancements, enable the Image Sharpening feature and adjust the parameters.

Bonus Tip – How to Add Motion Blur to Your Images?
Do you want to add motion blur to your images? Many people like to intentionally add a motion blur effect in their images to add an artistic element. If you are interested in doing so, the best desktop tool you can try is Wondershare Filmora . This tool offers trending and high-quality effects that you can easily apply to your images.
Free Download For Win 7 or later(64-bit)
Free Download For macOS 10.14 or later
To add a motion blur effect:
Step1 Launch Filmora and create a new project.
Step2 Import your photo on this tool and drop it into the timeline.
Step3 Split the clip where you want to add the blur effect.
Once done, go to the Effects tab and search “Blur.” By doing so, you would be able to check all the blur effects on your screen. Choose and apply the blur effect to the split part of your clip. Once done, hit the Export button.

Conclusion
Photoshop is an excellent tool to edit and modify your pictures in great quality. You can use this article to take guidance to remove motion blur from photos. However, if you are not getting desired results from Photoshop, we have also provided the best alternatives to Photoshop to remove motion blur. Moreover, to create a motion blur effect in your images, you can explore the Wondershare Filmora tool.
Part 1: How to Remove the Motion Blur in Photoshop?
To fix a motion blur in an image, you would require a professional tool such as Adobe Photoshop . Photoshop is a well-recognized tool comprising tons of features for image editing and graphic designing. It offers selection tools that enable you to choose the specific parts of a photo efficiently. You can also add layers to your photo to modify and edit specific areas of the image.
You can also apply appealing filters from this platform to transform an ordinary image drastically. Moreover, using this precise tool, you can also fix motion blur in Photoshop. You can choose the blurry areas of your photo through its selection tools. Thus, with a few clicks, you can eliminate the flaws from your image easily.
Steps to Fix Motion Blur in Photos Using Photoshop
If you are new to Photoshop and don’t know how to fix motion blur in photos, then follow the instructions described below:
Step1 Open the Photoshop tool on your PC or Mac and upload your photo. From the “Layers” section, press “Ctrl + J” or “Command + J” to copy the first layer. Afterward, convert the first layer by choosing the option “Smart Object.”

Step2 Now head to the “Filter” section and tap on “Sharpen” to proceed. Afterward, proceed with the option of “Shake Reduction” by clicking on it. Now Photoshop will automatically reduce the blur effect. From the displayed panel, uncheck the option called “Artifact Suppression.”

Step3 To continue, open the “Advanced” tab from the left panel and enhance the size of your rectangular. Manage the position of the rectangle according to your preference. By doing so, you can see the details of the image clearly.

Step4 From the left panel, manage the options like “Blur Trace Bounds” and “Smoothing” according to your desire. Once done, press the “OK” button. For adding more modifications, add a blank layer and choose the “Clone Stamp Tool.” Afterward, select “Soft Round Brush” from the general brushes.

Step5 Now adjust the Opacity to 100% and Flow to 50%. Moreover, select “Current & Below” as the sample. Press the Alt key to take a sample of any flawless part of your photo and apply it to the blurry area. Make sure that the color of the sample taken is the same as the blurry area in the photo.

Part 2: Remove the Motion Blur with an Alternative to Photoshop
It may be possible that you don’t get satisfactory results from Photoshop removing motion blur. Or, if you find the interface of Photoshop intimidating, it can affect your productivity. For your assistance, this section will bring you the best alternatives to Photoshop.
1. IMAGamigo
IMAGamigo is an online tool that allows you to perform different operations on pictures efficiently. To fix motion blur, it offers a Deblurrer feature. Using this feature, you can automatically remove blur from your photos without any external effort. It also provides other distinct features such as Background Remover, Restorer, Colorizer, Upscale, etc.
To use this tool, first, navigate to its official website. From its tools, select “Deblurrer” to proceed. A new window will open on your screen instantly. Scroll down a little bit and locate the area saying, “Drop Image Here.” Click on this area and upload your image. Afterward, the tool will automatically start analyzing the picture. Once the process gets finished, click on the Download button to save your photo.

2. Vance.AI
This online platform is also a well-trusted tool by professionals and content creators. It provides AI-supported tools such as AI Image Denoiser, AI Image Upscaler, AI Photo Enhancer, etc. You can use its AI Image Sharpener to eliminate motion blur from pictures. It supports all popular image file formats, such as JPEG, PNG, and JPG. Thus, without any installations, you can quickly utilize this tool to fix motion blur photos.
To use this tool, access the official webpage of Vance.AI and select the “AI Image Sharpener” feature. Once done, click on the “Upload Image” option and import your blurry photo. Afterward, a new window will be open from which you can adjust the settings. Select the “Sharpen” option and choose the preferred Sharpen Mode. Afterward, click on the “Start to Process” option. Once the process ends, you can download the picture with a single click.

3. AKVIS Refocus AI
AKVIS is an offline tool that produces high-end results at a fast processing speed. You can find multiple options in this tool, such as Airbrush, Retoucher, Sketch, Decorator, etc. When it comes to fixing blurry pictures, this tool provides an exclusive feature called “Refocus AI.” Through this feature, you can instantly increase the sharpness of your photo. Also, it offers different modes such as Motion Blur, Radial Blur, Refocus-AI, and Tilt-Shift.
To fix motion blur:
Step1 Launch this tool and navigate to its Refocus AI option.
Step2 Select Refocus AI as your mode and upload the blurry picture. The default preset will be AKVIS Default AI.
Step3 Disable the “Image Sharpening” feature and navigate to the “Motion Deblur AI” section.
Step4 From there, adjust your Focus accordingly.
Step5 For more enhancements, enable the Image Sharpening feature and adjust the parameters.

Bonus Tip – How to Add Motion Blur to Your Images?
Do you want to add motion blur to your images? Many people like to intentionally add a motion blur effect in their images to add an artistic element. If you are interested in doing so, the best desktop tool you can try is Wondershare Filmora . This tool offers trending and high-quality effects that you can easily apply to your images.
Free Download For Win 7 or later(64-bit)
Free Download For macOS 10.14 or later
To add a motion blur effect:
Step1 Launch Filmora and create a new project.
Step2 Import your photo on this tool and drop it into the timeline.
Step3 Split the clip where you want to add the blur effect.
Once done, go to the Effects tab and search “Blur.” By doing so, you would be able to check all the blur effects on your screen. Choose and apply the blur effect to the split part of your clip. Once done, hit the Export button.

Conclusion
Photoshop is an excellent tool to edit and modify your pictures in great quality. You can use this article to take guidance to remove motion blur from photos. However, if you are not getting desired results from Photoshop, we have also provided the best alternatives to Photoshop to remove motion blur. Moreover, to create a motion blur effect in your images, you can explore the Wondershare Filmora tool.
Also read:
- Updated 2024 Approved Tips to Make Cinematic Color Grading
- New How to Create Custom Lower Thirds in Filmora
- New Discover the Ultimate LUTs for Wondershare Filmora Uncover the Answer
- Updated 2024 Approved Best Image (JPG/PNG) to GIF Converters
- Want to Create a Stunning Intro Video on Your Smartphone? Legend Intro Maker Is a Popular Choice. Learn the Steps to Design Intro Video Legend Intro Maker for 2024
- Steps to Add Subtitles in Canva for 2024
- Updated Unraveling How the Slow Motion Guys Have Revolutionized The Slow Motion Game for 2024
- New Which 10 Best Video Editing Online Makers Is Worth Your Attention for 2024
- Updated Guide to Making Cinematography for Music Video
- Looking Into How Slow Mo Guys Have Changed the Dynamics of Slow-Motion
- New Best 15 Subtitle Apps for 2024
- New The Best 10 AI Video Analytics Companies at a Glance
- 2024 Approved This Article Describes Different Ways for Removing Gif Backgrounds, How We Can Use Them, and How This Way Differs From One Another
- Updated In 2024, Add some Sci-Fi Touch to Your Next Video Content Using Wondershare Filmora Editing Tools to Create an Alternate Reality Effect
- How to Make a Smooth Speed Ramping in Premiere Pro?
- New 5 Tried-And-True Methods to GIF Making
- Updated In 2024, Best Text Animations In After Effects
- New How to Create a Vacation Slideshow in 5 Minutes for 2024
- 2024 Approved Do You Want to Remove Unnecessary Sound From Your Video? We Are Providing You the List of the Best Software to Remove Audio From Video for Mac and Apple
- New The Glitch Filter Is Similar to an Error or a Distorted Effect in the Video. The Article Enables the Users to Get the VHS Filter in One of Their Travel Videos and Instagram Accounts
- New In 2024, How to Create Your Own LUTs for Your Video
- In 2024, Best iOS Slow Motion Apps To Work With
- In 2024, Follow a Few Simple Steps and Learn How to Create a Professional Glowing Edge Effect to Your Videos in Filmora
- New 2024 Approved How to Be a Good Podcast Host
- Updated In 2024, 3 Effective Methods to Correct Color Distortion in Videos
- New 100+ Best TikTok Captions Enhance Your Content
- New Level Up Videos By Applying Keyframe Like A Pro for 2024
- Detailed Steps to Resize Video in Davinci Resolve
- In 2024, The Ultimate Wedding Videography Checklist
- Want to Know the Simplest Way to Match the Colors of Your Photos in Photoshop? The Following Discussion Will Help Match Color in Photoshop, Almost Effortlessly
- Updated 2024 Approved Finding the Best Voice Changers for WhatsApp Free and Paid
- New 2024 Approved 10 Best Cartoon Video Makers (Online and Desktop Solution)
- Updated Top 5 Solutions on How to Add Emojis to iPhone
- New How to Make Video Fade to Black in Movie Maker Easily
- New Best Video Grabbers for Chrome
- A Complete Guide to the Best Brand Story Videos |2023|
- New 2024 Approved Troubleshoot Snapchat Camera Zoomed in Issue
- New How To Change Speed of Video in Final Cut Pro for 2024
- WMV File Format Has Many Benefits over the Video Industry. If You Are Excited to Know More About the Format and Its Pros and Cons, Then Lets Start the Discussion
- How to Be a Good Podcast Host for 2024
- Updated How To Polish Your Music Video Edits Using Filmora
- In 2024, Top 8 AI Video Denoise Software
- Boost the Pace of Your Instagram Reels Videos with These Simple Tricks for 2024
- Updated HOW to Add Fade to Black on Premiere Pro
- Updated How to Create Discord GIF Avatar in Depth Guide for 2024
- Find Out How to Add Subtitles in the VLC Media Player on Your Windows and Mac System with Quick and Simple Instructions for 2024
- New How To Perform a Successful Streaming on Twitch for 2024
- How to Track Apple iPhone 12 Pro by Phone Number | Dr.fone
- How to Fake GPS on Android without Mock Location For your Oppo Find X6 Pro | Dr.fone
- How to Track WhatsApp Messages on Motorola Moto G84 5G Without Them Knowing? | Dr.fone
- In 2024, Apple iPhone 11 Pro Max Mirror to PC? Top Apps You Must Know | Dr.fone
- In 2024, How to Change/Fake Your Apple iPhone 11 Pro Max Location on Viber | Dr.fone
- In 2024, How To Fix Auto Lock Greyed Out on iPhone 6 Plus
- My Videos Arent Playing on Tecno Phantom V Fold – What Can I Do? | Dr.fone
- In 2024, Top 4 Ways to Trace Vivo S17e Location | Dr.fone
- How to Reset Realme 12 Pro 5G without Losing Data | Dr.fone
- In 2024, A How-To Guide on Bypassing Apple iPhone SE (2022) iCloud Activation Lock
- How To Simulate GPS Movement With Location Spoofer On Realme GT 3? | Dr.fone
- Getting the Pokemon Go GPS Signal Not Found 11 Error in Realme 11 5G | Dr.fone
- In 2024, How To Track IMEI Number Of Vivo Y100i Power 5G Through Google Earth?
- Cellular Network Not Available for Voice Calls On Meizu 21 | Dr.fone
- In 2024, iPogo will be the new iSpoofer On Realme 11 Pro? | Dr.fone
- In 2024, How to Transfer Data from Oppo F23 5G to Other Android Devices? | Dr.fone
- How to Unlock iPhone XS Max Passcode Screen?
- Is your Realme Narzo 60 Pro 5G working too slow? Heres how you can hard reset it | Dr.fone
- How to Retrieve deleted photos on Nokia
- Unova Stone Pokémon Go Evolution List and How Catch Them For Tecno Spark Go (2023) | Dr.fone
- How To Fix Auto Lock Greyed Out on Apple iPhone XS
- 4 Solutions to Fix Unfortunately Your App Has Stopped Error on Lava Yuva 3 | Dr.fone
- Full Guide to Fix iToolab AnyGO Not Working On Oppo A79 5G | Dr.fone
- How to Fix Excel 2010 has Encountered a Problem
- A Perfect Guide To Remove or Disable Google Smart Lock On OnePlus Ace 3
- How to Change Google Play Location On Realme GT 5 Pro | Dr.fone
- 7 Ways to Unlock a Locked OnePlus 11 5G Phone
- How to Reset a Realme GT Neo 5 SE Phone that is Locked?
- In 2024, The 6 Best SIM Unlock Services That Actually Work On Your Oppo K11x Device
- Life360 Learn How Everything Works On Xiaomi Civi 3 Disney 100th Anniversary Edition | Dr.fone
- In 2024, How to Reset a ZTE Blade A73 5G Phone that is Locked?
- In 2024, How Can I Use a Fake GPS Without Mock Location On Motorola Moto G73 5G? | Dr.fone
- Title: Steps to Make a Neon Dance Effect With Filmora for 2024
- Author: Chloe
- Created at : 2024-04-24 07:08:14
- Updated at : 2024-04-25 07:08:14
- Link: https://ai-editing-video.techidaily.com/steps-to-make-a-neon-dance-effect-with-filmora-for-2024/
- License: This work is licensed under CC BY-NC-SA 4.0.

