:max_bytes(150000):strip_icc():format(webp)/GettyImages-591408071-5bc7767d4cedfd0026a2ce3f.jpg)
Text Animation Intro Tutorial in Filmora

Text Animation Intro Tutorial in Filmora
Preparation
What you need to prepare:
- A computer (Windows or macOS)
- Your video materials.
- Filmora video editor
Step 1
Download and Install the Filmora video editor . Then, click on New Project once the program starts.
Step 2
Go to Titles and drag the Default Title to the Timeline. Then, double-click on the Default Title clip to open its settings. Here, type in your text → change the text color to Black → click OK → take a snapshot.

Step 3
Double-click on the Default Title once more and simply change the text color to anything other than black this time. Then, click OK and take another snapshot. After this, delete the Default Title from the Timeline.
Step 4
Next, go to Sample Color and drag the White color to the Timeline. Increase the White Color clip’s duration to 10 seconds by dragging the tail of the clip to the right.

Step 5
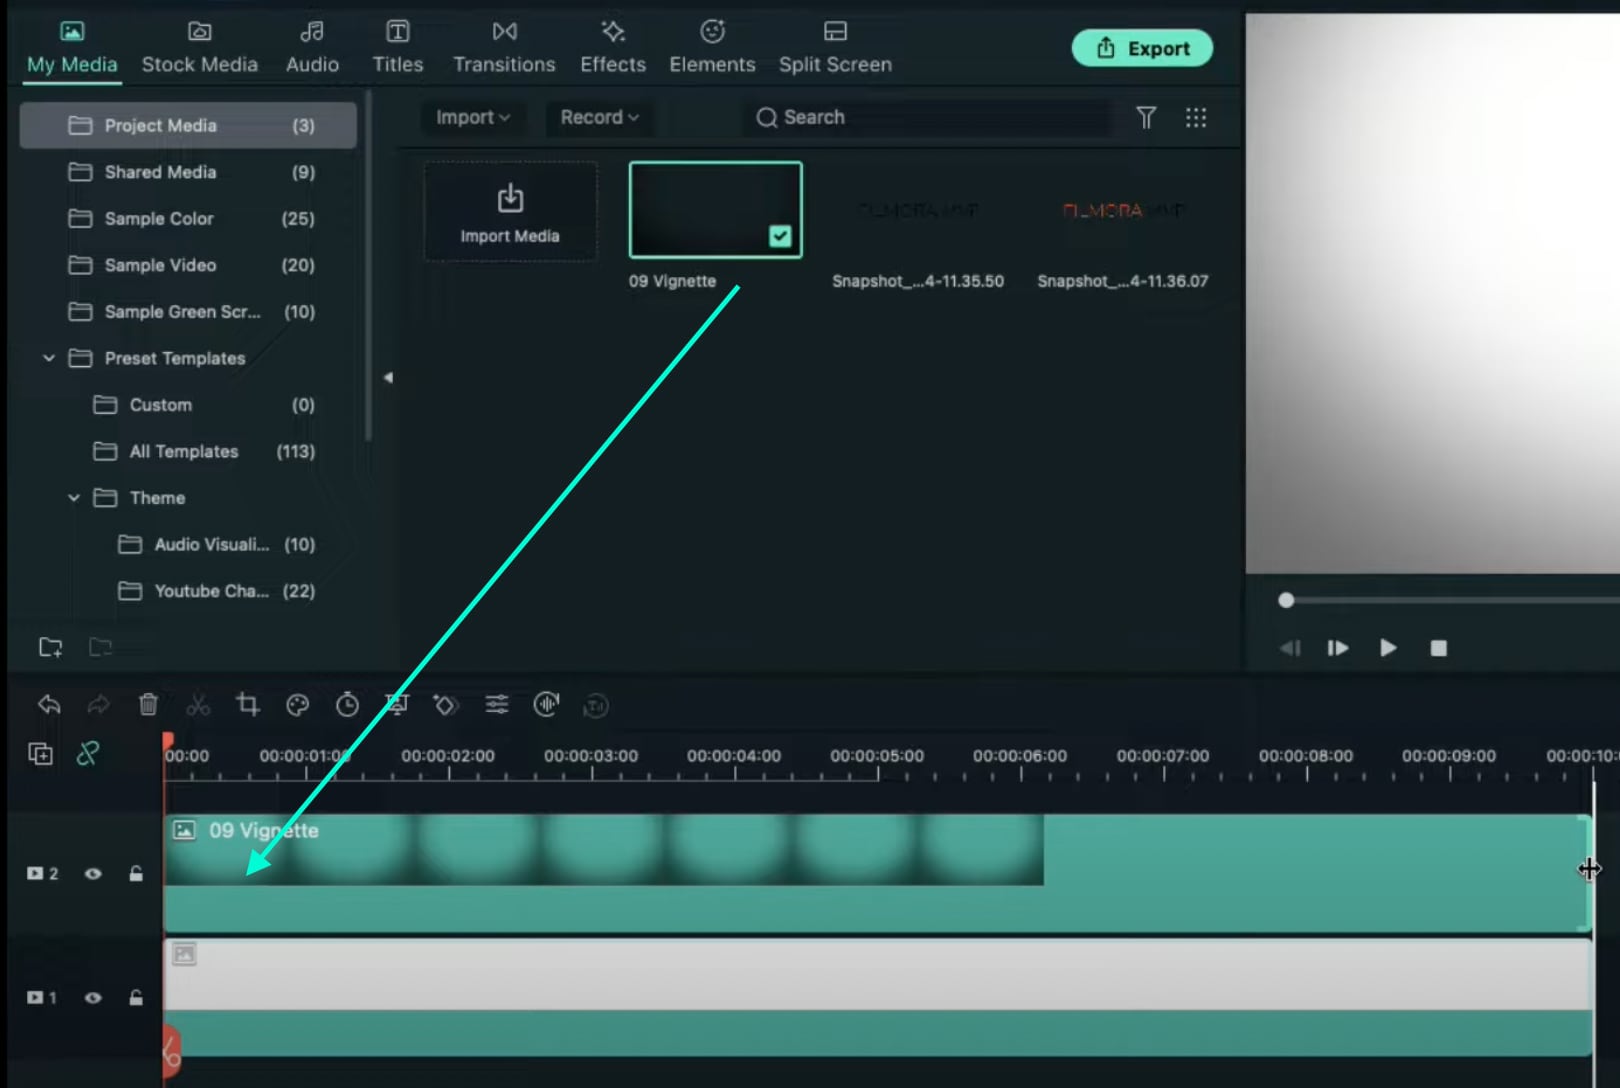
For the next step, you need to download a simple Vignette png image . Then, import the Vignette image into Filmora. Go to My Media and click on Import Media. Import it and drag the image to the Timeline. Then, move that clip to Track 3.
Step 6
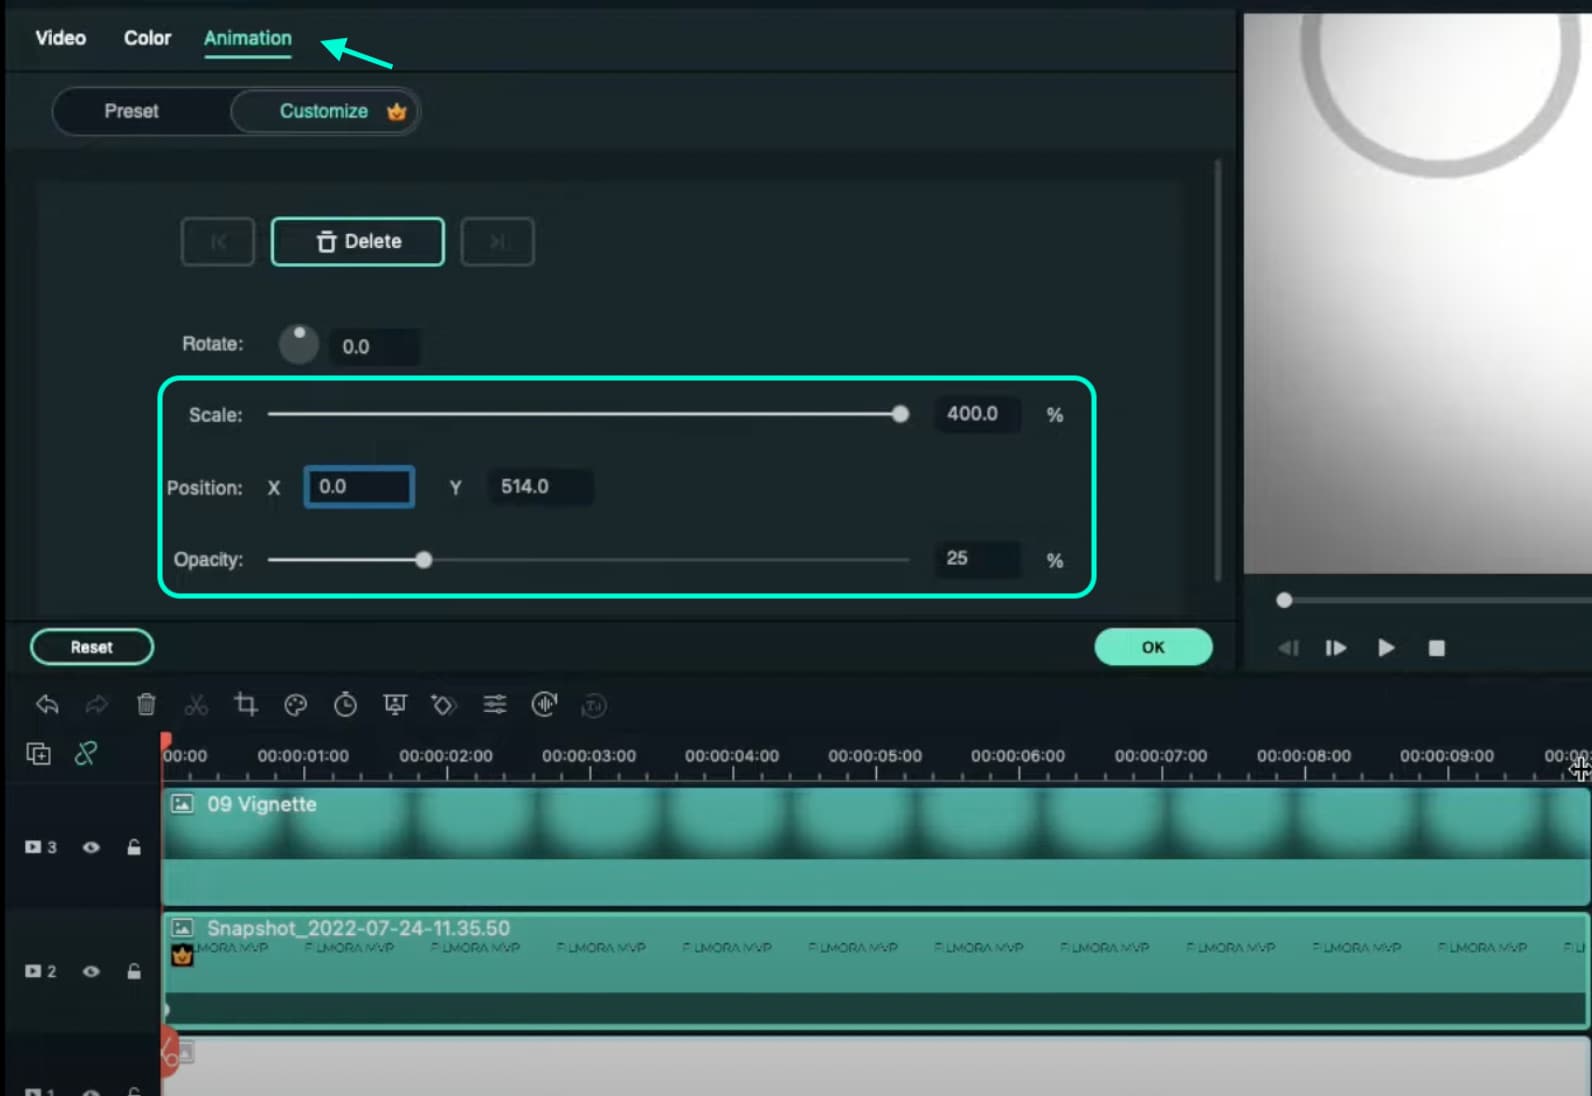
Drop the Black snapshot you took earlier to Track 2. Double-click on it, go to Animation, and apply these settings. After this, move the Playhead to the end of the clip and change the X-axis value to “-800”.
Step 7
Go to Effects and drag the Square Blur effect to Track 4 on the Timeline. Increase its duration to match the other clips. Then, click on the effect and change its Size bar value to 4. Click OK.

Step 8
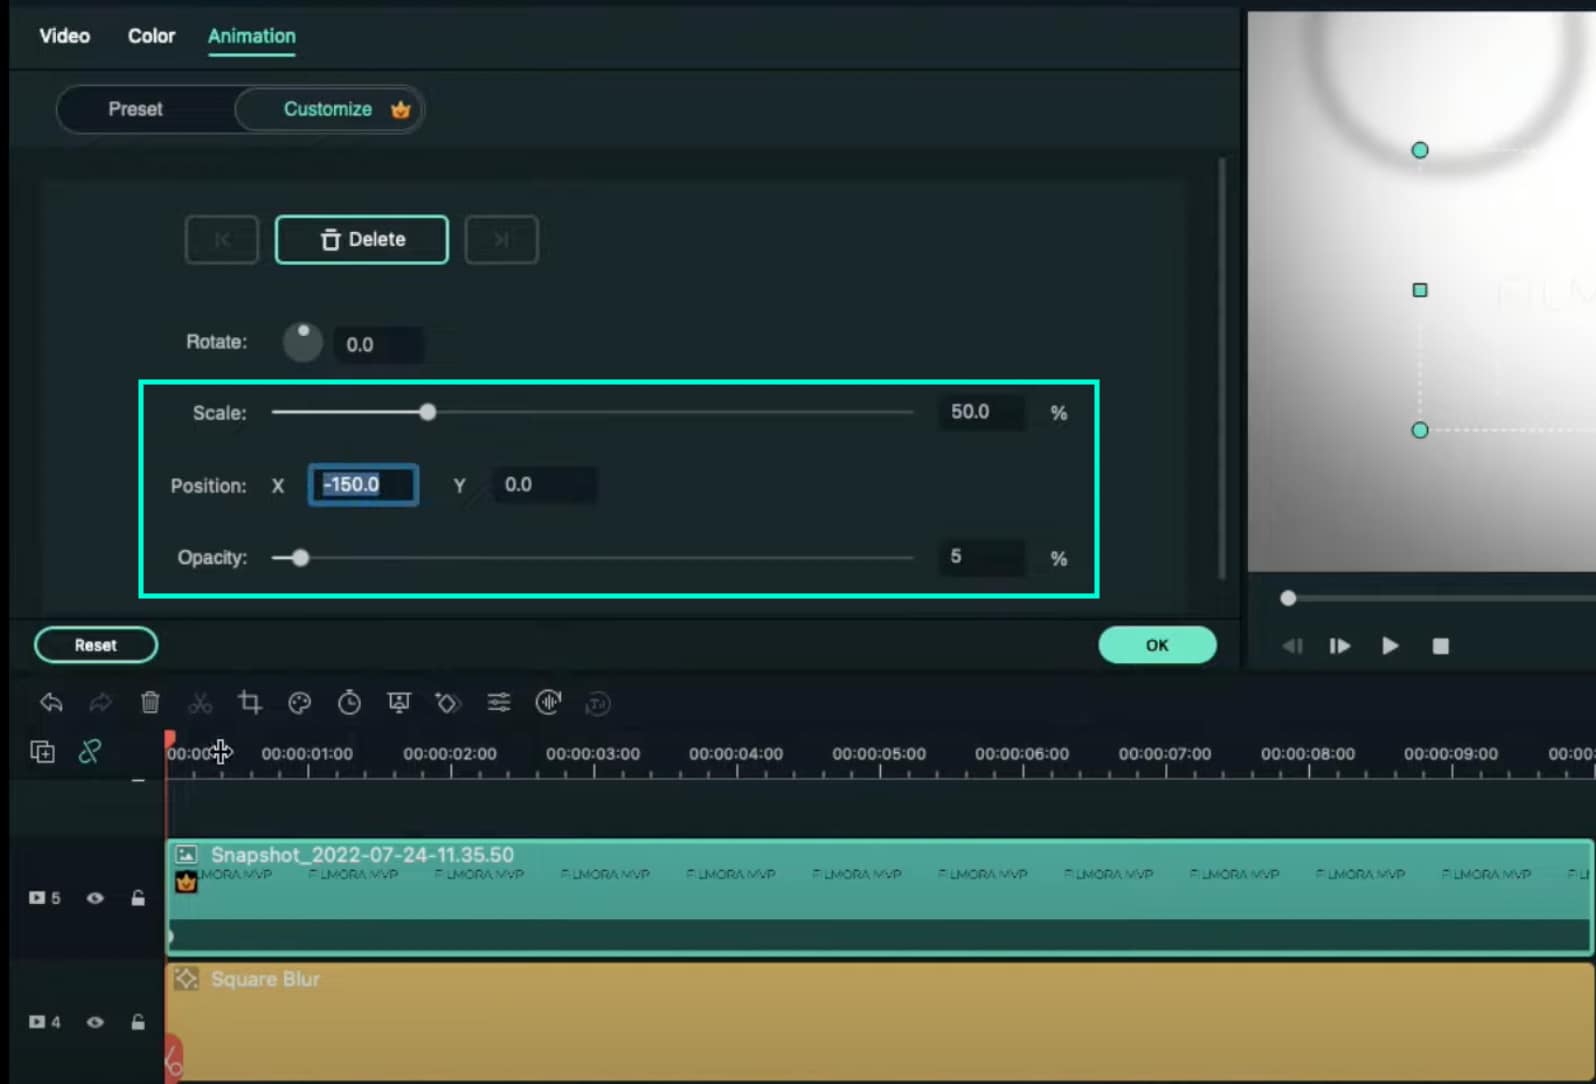
Place the Playhead at the beginning of the clip. Go to My Media and drag the Black snapshot to Track 5. Double-click on it → go to Animation and change the settings to look like this. Then, move the Playhead to 9 seconds. Here, change the X-axis to “150” and the Scale to 75%.
Step 9
Now, place the Playhead at the starting point and drag the colored snapshot in Track 6. Double-click on it and change the Scale to 50%. Then, move the Playhead to 9 seconds again and change the Scale to 75%. Click OK.
Step 10
Go to Sample Color and drag “Gradient 4” to Track 7 on the Timeline. Double-click on it → go to the Video tab → change the Blending Mode to Overlay → decrease the Opacity to 25%. Click OK.

Step 11
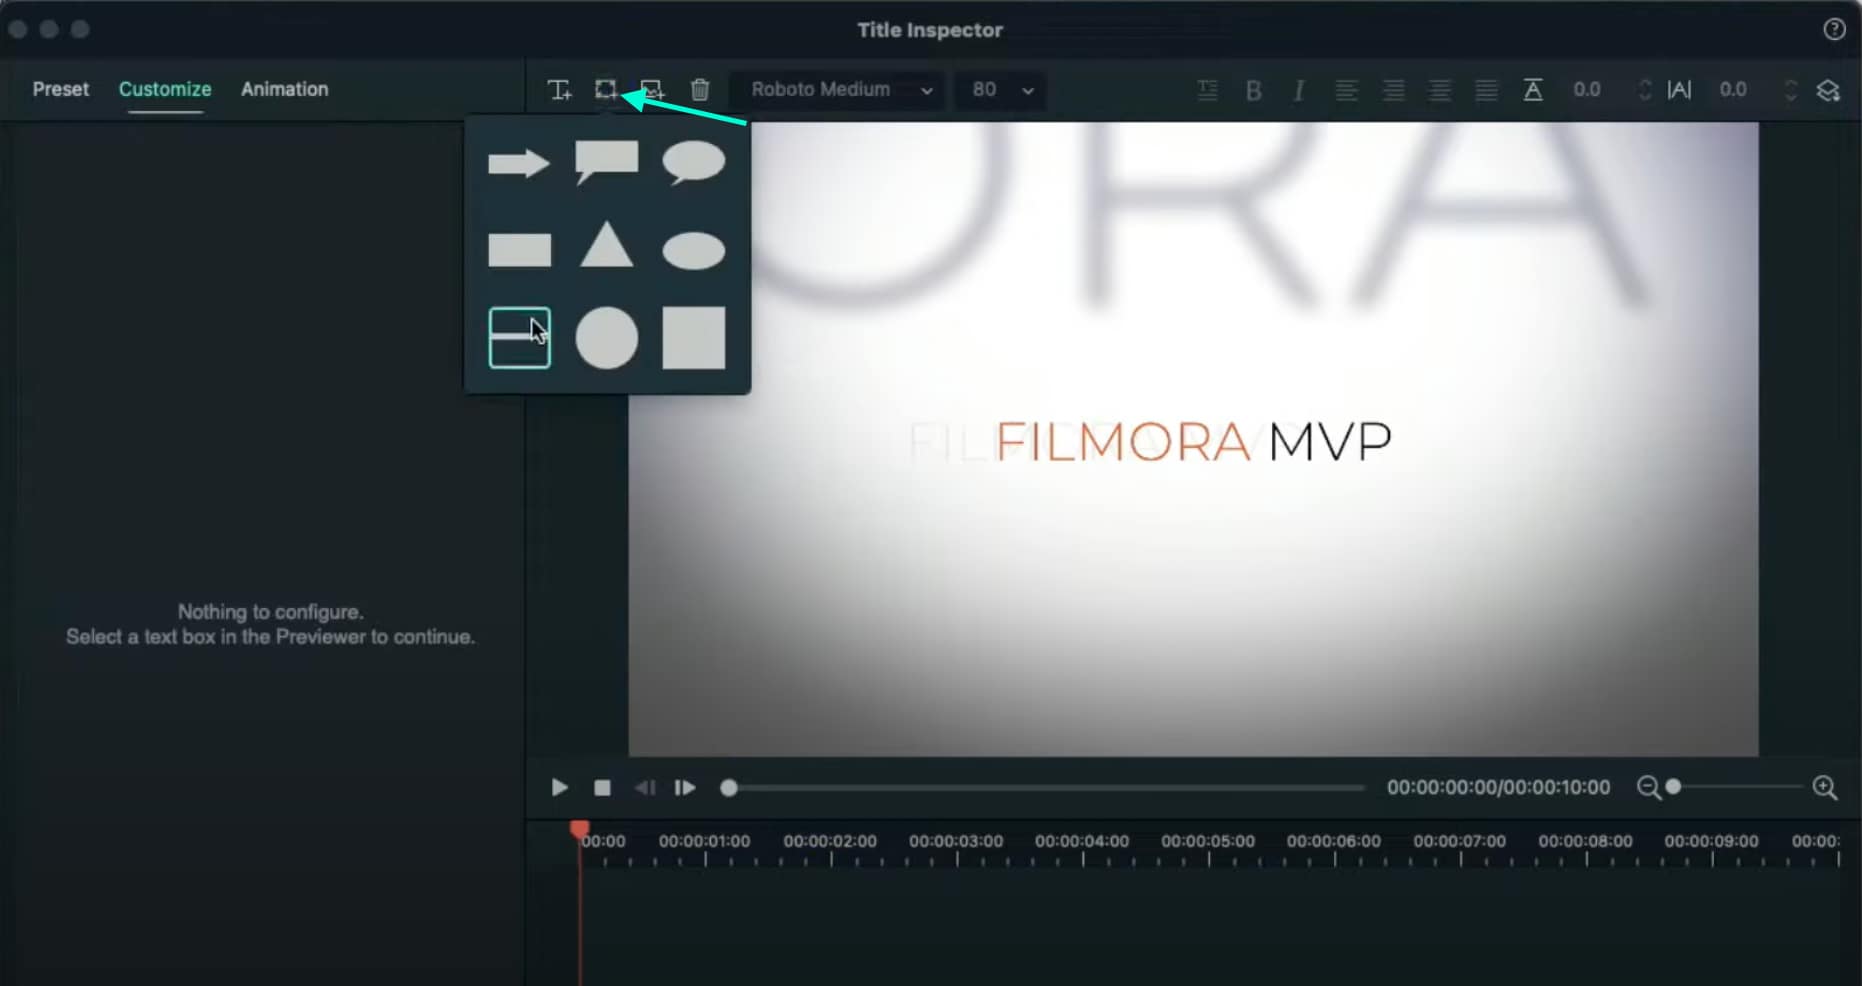
Drag a Default Title to Track 8 and double-click on it to open its Advanced settings. From here, delete the yellow text clip located under the video. Then, insert a Line shape.
Step 12
Increase the Line’s length to be almost as long as the screen. Then adjust its position until half of the Line is visible on the screen. Like this.
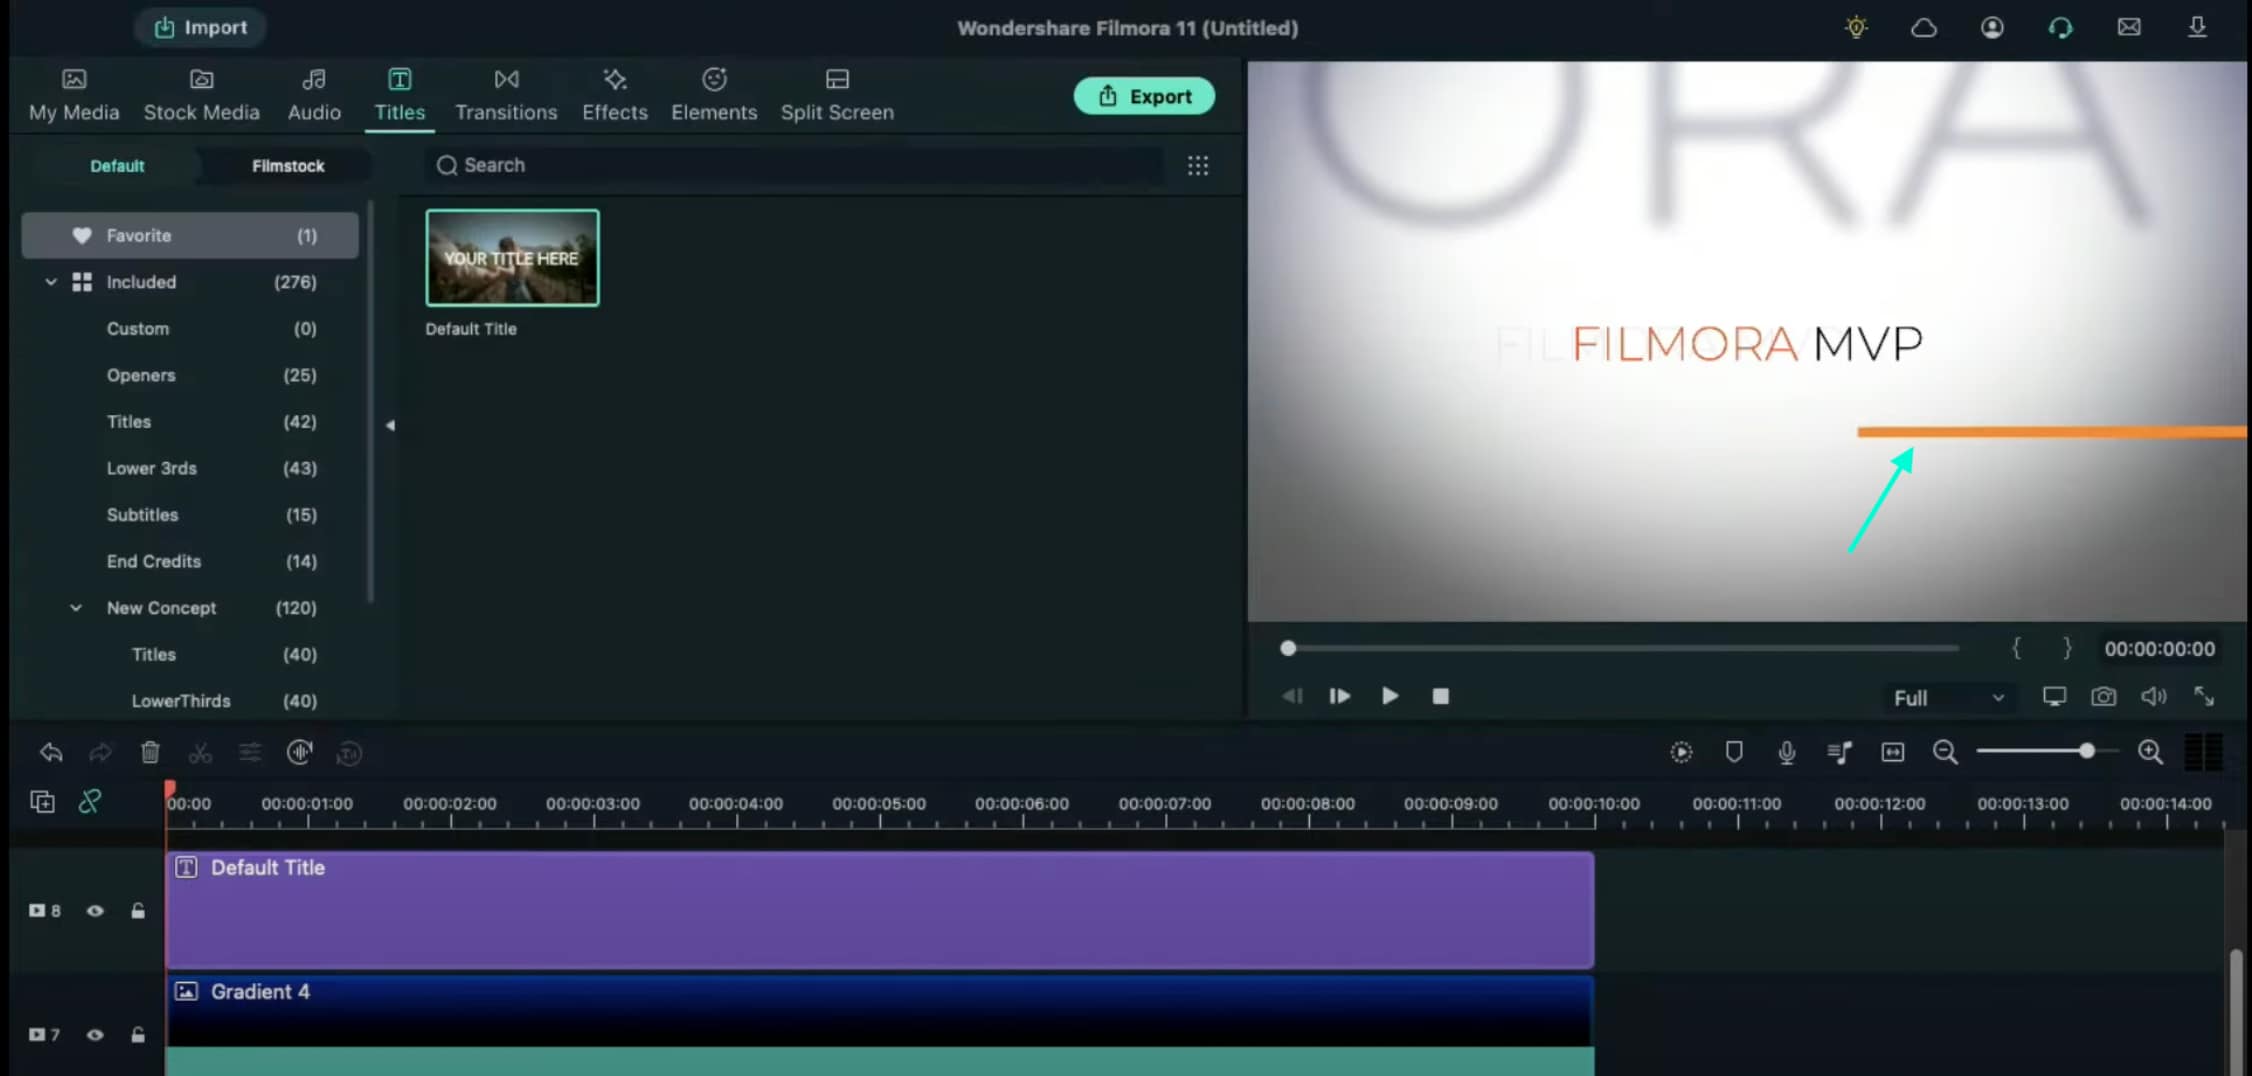
Step 13
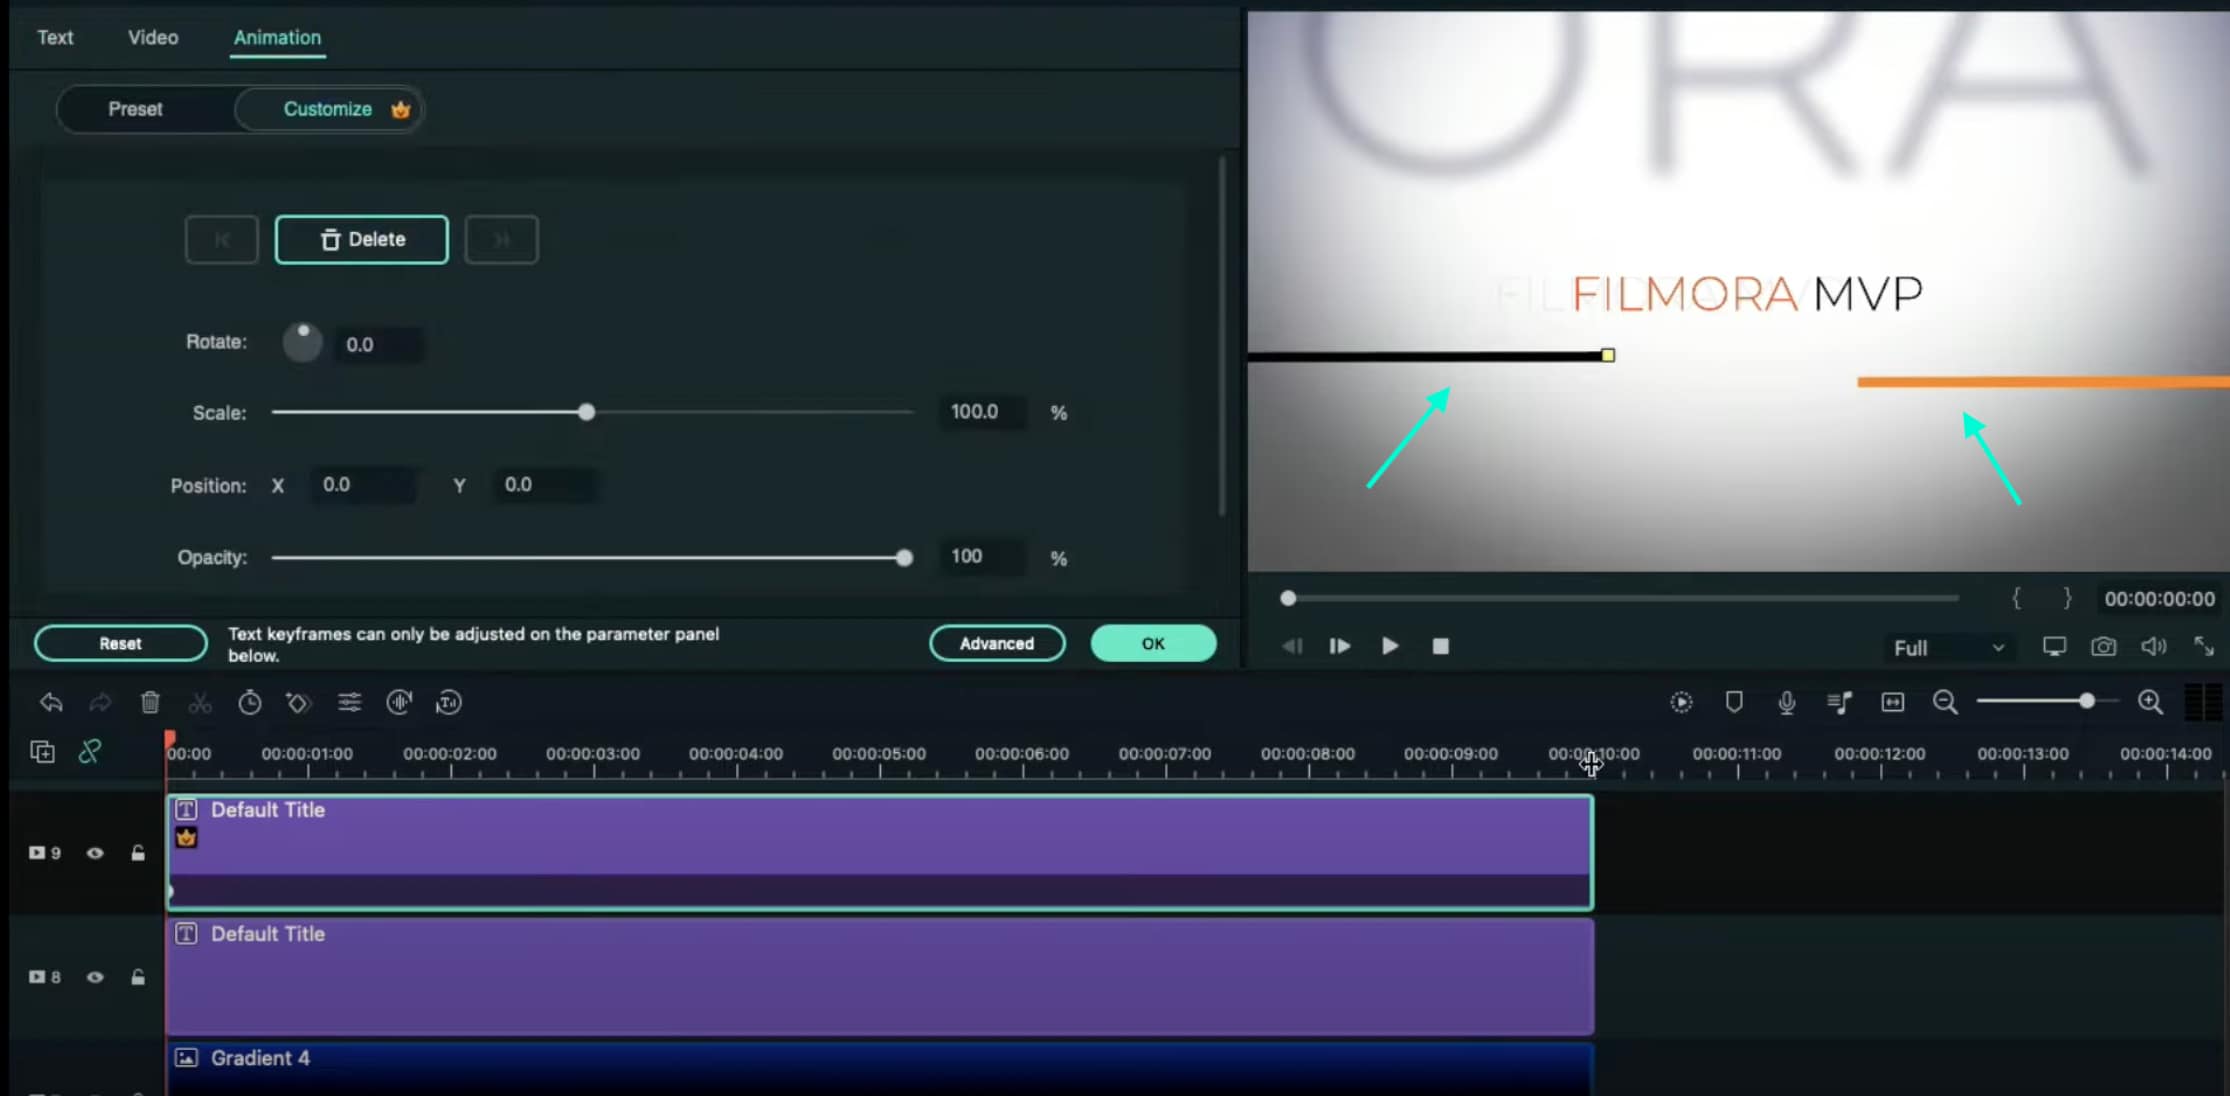
Copy this Default Title and paste it into Track 9. Open its Advanced settings and change the Line color to something different than the previous one. Then, move it to the other side of the screen, slightly above the previous line. Click OK.
Step 14
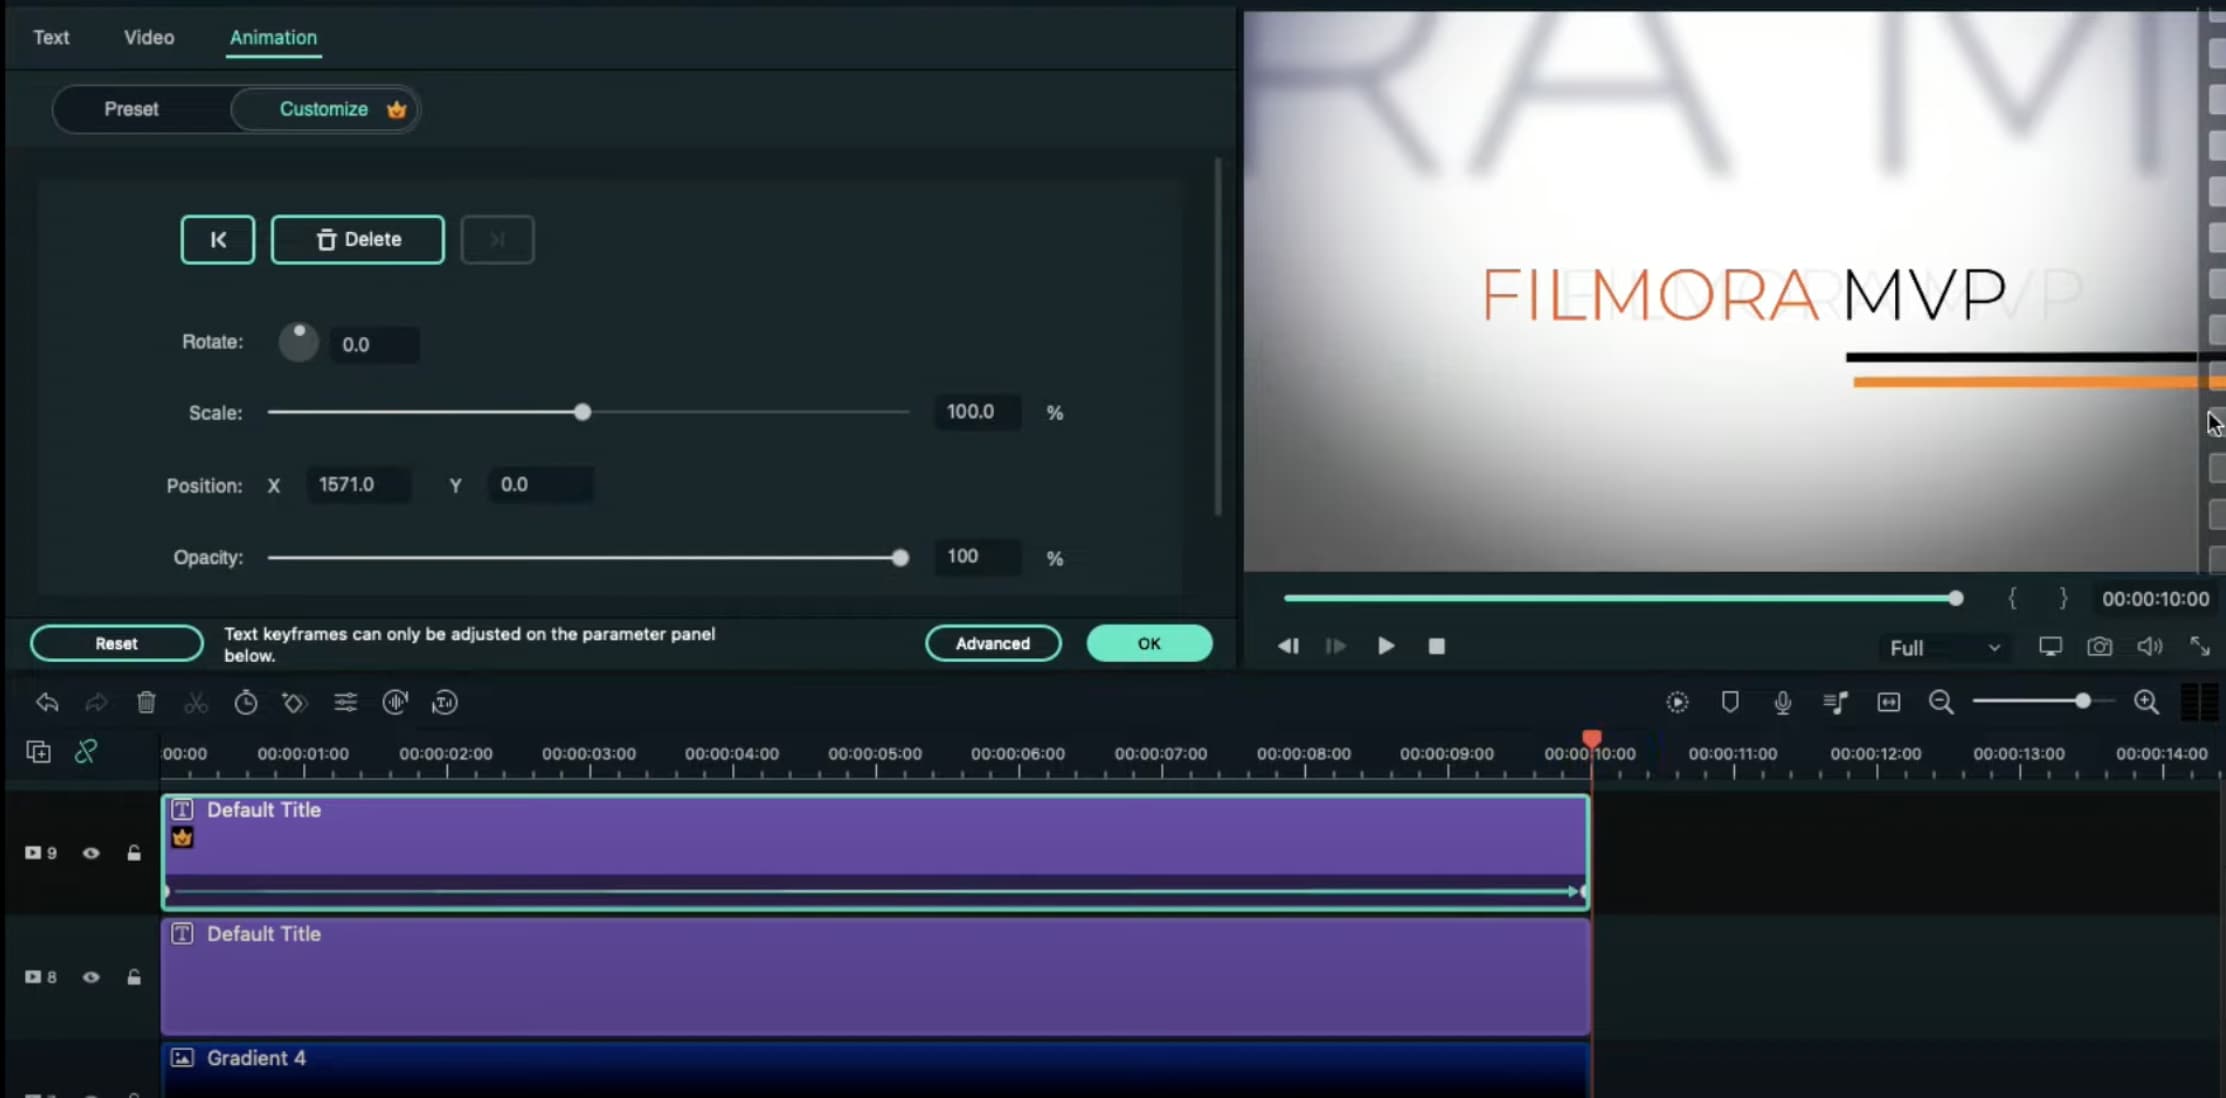
Now, select the Default Title on Track 9, double-click it, and go to the Animation tab. Move the Playhead at the starting point of the Timeline and add a keyframe. Then, move the Playhead to the end of the clip. Drag the X-axis position to the right until the Line shape moves all the way to the right side of the screen.
Do the same for the Default Title on Track 8. But this time, drag the X-axis position toward the other side. When you’re done, press OK.
Step 15
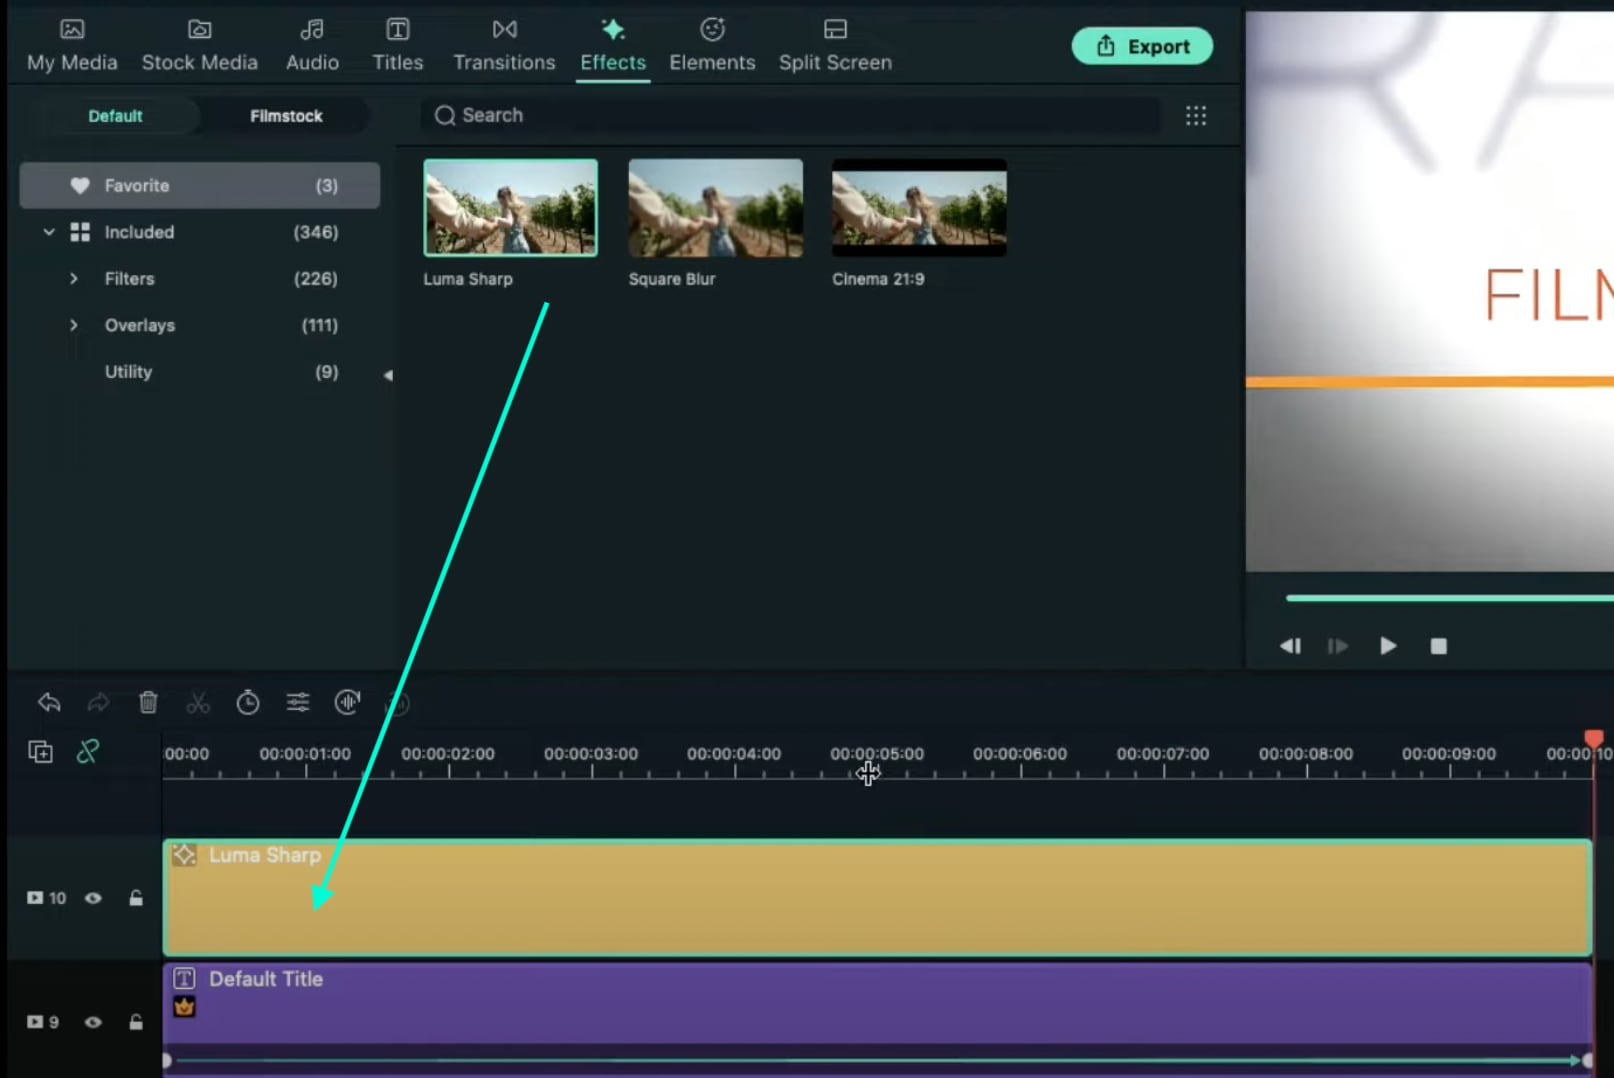
Go to the Effects tab → drag the Luma Sharp effect to Track 10. Click it and change its Intensity to 10.
Step 16
You’re all done. Click on the Render button to render all the clips and finally preview your creation. Congratulations on creating a text animation intro in Filmora.

Summary
What you’ve learned:
- Create a unique text animation intro in Filmora
- Animate text and titles
- How to add and animate different shapes in Filmora
- Edit the advanced settings of elements in the Filmora video editor
What you need to prepare:
- A computer (Windows or macOS)
- Your video materials.
- Filmora video editor
Step 1
Download and Install the Filmora video editor . Then, click on New Project once the program starts.
Step 2
Go to Titles and drag the Default Title to the Timeline. Then, double-click on the Default Title clip to open its settings. Here, type in your text → change the text color to Black → click OK → take a snapshot.

Step 3
Double-click on the Default Title once more and simply change the text color to anything other than black this time. Then, click OK and take another snapshot. After this, delete the Default Title from the Timeline.
Step 4
Next, go to Sample Color and drag the White color to the Timeline. Increase the White Color clip’s duration to 10 seconds by dragging the tail of the clip to the right.

Step 5
For the next step, you need to download a simple Vignette png image . Then, import the Vignette image into Filmora. Go to My Media and click on Import Media. Import it and drag the image to the Timeline. Then, move that clip to Track 3.

Step 6
Drop the Black snapshot you took earlier to Track 2. Double-click on it, go to Animation, and apply these settings. After this, move the Playhead to the end of the clip and change the X-axis value to “-800”.

Step 7
Go to Effects and drag the Square Blur effect to Track 4 on the Timeline. Increase its duration to match the other clips. Then, click on the effect and change its Size bar value to 4. Click OK.

Step 8
Place the Playhead at the beginning of the clip. Go to My Media and drag the Black snapshot to Track 5. Double-click on it → go to Animation and change the settings to look like this. Then, move the Playhead to 9 seconds. Here, change the X-axis to “150” and the Scale to 75%.

Step 9
Now, place the Playhead at the starting point and drag the colored snapshot in Track 6. Double-click on it and change the Scale to 50%. Then, move the Playhead to 9 seconds again and change the Scale to 75%. Click OK.
Step 10
Go to Sample Color and drag “Gradient 4” to Track 7 on the Timeline. Double-click on it → go to the Video tab → change the Blending Mode to Overlay → decrease the Opacity to 25%. Click OK.

Step 11
Drag a Default Title to Track 8 and double-click on it to open its Advanced settings. From here, delete the yellow text clip located under the video. Then, insert a Line shape.

Step 12
Increase the Line’s length to be almost as long as the screen. Then adjust its position until half of the Line is visible on the screen. Like this.

Step 13
Copy this Default Title and paste it into Track 9. Open its Advanced settings and change the Line color to something different than the previous one. Then, move it to the other side of the screen, slightly above the previous line. Click OK.

Step 14
Now, select the Default Title on Track 9, double-click it, and go to the Animation tab. Move the Playhead at the starting point of the Timeline and add a keyframe. Then, move the Playhead to the end of the clip. Drag the X-axis position to the right until the Line shape moves all the way to the right side of the screen.
Do the same for the Default Title on Track 8. But this time, drag the X-axis position toward the other side. When you’re done, press OK.

Step 15
Go to the Effects tab → drag the Luma Sharp effect to Track 10. Click it and change its Intensity to 10.

Step 16
You’re all done. Click on the Render button to render all the clips and finally preview your creation. Congratulations on creating a text animation intro in Filmora.

Summary
What you’ve learned:
- Create a unique text animation intro in Filmora
- Animate text and titles
- How to add and animate different shapes in Filmora
- Edit the advanced settings of elements in the Filmora video editor
What you need to prepare:
- A computer (Windows or macOS)
- Your video materials.
- Filmora video editor
Step 1
Download and Install the Filmora video editor . Then, click on New Project once the program starts.
Step 2
Go to Titles and drag the Default Title to the Timeline. Then, double-click on the Default Title clip to open its settings. Here, type in your text → change the text color to Black → click OK → take a snapshot.

Step 3
Double-click on the Default Title once more and simply change the text color to anything other than black this time. Then, click OK and take another snapshot. After this, delete the Default Title from the Timeline.
Step 4
Next, go to Sample Color and drag the White color to the Timeline. Increase the White Color clip’s duration to 10 seconds by dragging the tail of the clip to the right.

Step 5
For the next step, you need to download a simple Vignette png image . Then, import the Vignette image into Filmora. Go to My Media and click on Import Media. Import it and drag the image to the Timeline. Then, move that clip to Track 3.

Step 6
Drop the Black snapshot you took earlier to Track 2. Double-click on it, go to Animation, and apply these settings. After this, move the Playhead to the end of the clip and change the X-axis value to “-800”.

Step 7
Go to Effects and drag the Square Blur effect to Track 4 on the Timeline. Increase its duration to match the other clips. Then, click on the effect and change its Size bar value to 4. Click OK.

Step 8
Place the Playhead at the beginning of the clip. Go to My Media and drag the Black snapshot to Track 5. Double-click on it → go to Animation and change the settings to look like this. Then, move the Playhead to 9 seconds. Here, change the X-axis to “150” and the Scale to 75%.

Step 9
Now, place the Playhead at the starting point and drag the colored snapshot in Track 6. Double-click on it and change the Scale to 50%. Then, move the Playhead to 9 seconds again and change the Scale to 75%. Click OK.
Step 10
Go to Sample Color and drag “Gradient 4” to Track 7 on the Timeline. Double-click on it → go to the Video tab → change the Blending Mode to Overlay → decrease the Opacity to 25%. Click OK.

Step 11
Drag a Default Title to Track 8 and double-click on it to open its Advanced settings. From here, delete the yellow text clip located under the video. Then, insert a Line shape.

Step 12
Increase the Line’s length to be almost as long as the screen. Then adjust its position until half of the Line is visible on the screen. Like this.

Step 13
Copy this Default Title and paste it into Track 9. Open its Advanced settings and change the Line color to something different than the previous one. Then, move it to the other side of the screen, slightly above the previous line. Click OK.

Step 14
Now, select the Default Title on Track 9, double-click it, and go to the Animation tab. Move the Playhead at the starting point of the Timeline and add a keyframe. Then, move the Playhead to the end of the clip. Drag the X-axis position to the right until the Line shape moves all the way to the right side of the screen.
Do the same for the Default Title on Track 8. But this time, drag the X-axis position toward the other side. When you’re done, press OK.

Step 15
Go to the Effects tab → drag the Luma Sharp effect to Track 10. Click it and change its Intensity to 10.

Step 16
You’re all done. Click on the Render button to render all the clips and finally preview your creation. Congratulations on creating a text animation intro in Filmora.

Summary
What you’ve learned:
- Create a unique text animation intro in Filmora
- Animate text and titles
- How to add and animate different shapes in Filmora
- Edit the advanced settings of elements in the Filmora video editor
What you need to prepare:
- A computer (Windows or macOS)
- Your video materials.
- Filmora video editor
Step 1
Download and Install the Filmora video editor . Then, click on New Project once the program starts.
Step 2
Go to Titles and drag the Default Title to the Timeline. Then, double-click on the Default Title clip to open its settings. Here, type in your text → change the text color to Black → click OK → take a snapshot.

Step 3
Double-click on the Default Title once more and simply change the text color to anything other than black this time. Then, click OK and take another snapshot. After this, delete the Default Title from the Timeline.
Step 4
Next, go to Sample Color and drag the White color to the Timeline. Increase the White Color clip’s duration to 10 seconds by dragging the tail of the clip to the right.

Step 5
For the next step, you need to download a simple Vignette png image . Then, import the Vignette image into Filmora. Go to My Media and click on Import Media. Import it and drag the image to the Timeline. Then, move that clip to Track 3.

Step 6
Drop the Black snapshot you took earlier to Track 2. Double-click on it, go to Animation, and apply these settings. After this, move the Playhead to the end of the clip and change the X-axis value to “-800”.

Step 7
Go to Effects and drag the Square Blur effect to Track 4 on the Timeline. Increase its duration to match the other clips. Then, click on the effect and change its Size bar value to 4. Click OK.

Step 8
Place the Playhead at the beginning of the clip. Go to My Media and drag the Black snapshot to Track 5. Double-click on it → go to Animation and change the settings to look like this. Then, move the Playhead to 9 seconds. Here, change the X-axis to “150” and the Scale to 75%.

Step 9
Now, place the Playhead at the starting point and drag the colored snapshot in Track 6. Double-click on it and change the Scale to 50%. Then, move the Playhead to 9 seconds again and change the Scale to 75%. Click OK.
Step 10
Go to Sample Color and drag “Gradient 4” to Track 7 on the Timeline. Double-click on it → go to the Video tab → change the Blending Mode to Overlay → decrease the Opacity to 25%. Click OK.

Step 11
Drag a Default Title to Track 8 and double-click on it to open its Advanced settings. From here, delete the yellow text clip located under the video. Then, insert a Line shape.

Step 12
Increase the Line’s length to be almost as long as the screen. Then adjust its position until half of the Line is visible on the screen. Like this.

Step 13
Copy this Default Title and paste it into Track 9. Open its Advanced settings and change the Line color to something different than the previous one. Then, move it to the other side of the screen, slightly above the previous line. Click OK.

Step 14
Now, select the Default Title on Track 9, double-click it, and go to the Animation tab. Move the Playhead at the starting point of the Timeline and add a keyframe. Then, move the Playhead to the end of the clip. Drag the X-axis position to the right until the Line shape moves all the way to the right side of the screen.
Do the same for the Default Title on Track 8. But this time, drag the X-axis position toward the other side. When you’re done, press OK.

Step 15
Go to the Effects tab → drag the Luma Sharp effect to Track 10. Click it and change its Intensity to 10.

Step 16
You’re all done. Click on the Render button to render all the clips and finally preview your creation. Congratulations on creating a text animation intro in Filmora.

Summary
What you’ve learned:
- Create a unique text animation intro in Filmora
- Animate text and titles
- How to add and animate different shapes in Filmora
- Edit the advanced settings of elements in the Filmora video editor
If You Are Looking for an Open-Source, Cross-Platform Video Editor, Shotcut Is a Great Choice? But Is It Truly the Best Video Editor or Is There a Better Alternative Available?
If you are looking for a free video editor, you should definitely opt for an open-source video editor. They come free of cost without locking any feature and they are compatible with all desktop operating systems. The user interface of Shotcut looks powerful still easy to operate. There are dockable panels and flexible layouts to customize the interface.
Coming to the features, there are plenty of video effects and filters to enhance video content. You can do all the standard video editing works comfortably. There are certain advanced features available such as keyframe, audio mixing and much more. However, can we consider Shotcut video editor the best for editing professional-quality videos? Find out the complete Shotcut reviews.
Part 1. How to Download and Install Shotcut
Shotcut is completely compatible with Windows, Mac and Linux. The company has discontinued Shotcut 32 bit version and the current version only supports 64 bit computer. Shotcut is safe to download and the installer is free of spyware and malware. Here are the steps to download and install Shotcut.

Step 1: From your web browser, visit “shotcut.org/download”. It automatically detects your operating system and provides you the installer to download Shotcut that could be compatible with your system.
Step 2: You can download the installer from Site 1(FossHub) or Site 2(GitHub). Besides, you can download the .exe file from Windows installer link or .zip file from Windows portable zip file.
Step 3: After downloading the installer file, install Shotcut from it by following the on-screen instructions.
Step 4: After installation, launch Shotcut and import all video and audio clips from Open File option. Bring them down to Timeline for basic editing.
Part 2. Key Features of Shotcut
Shotcut has all the standard features for basic video editing. Before downloading Shotcut, you should be aware of the features so that you can decide whether the video editor is suitable for your video editing purpose. Here are all the key features of Shotcut that stand out.
Video Capture – You can capture your screen as well as webcam video. Shotcut supports audio capture from the system as well as from the external mic. In fact, the software supports 4K resolution which is great being an open-source video editor.
Standard Editing – You can trim video clips and perform cut-copy-paste on clips. You can also append clips, insert clips in between, and extract audio from the videos. There are keyframes for video filters, presents, and markers. You can drag and drop files and keep notes. Besides, Shotcut uses proxy editing for handling high-resolution video files.
Audio Features – Shotcut comes with several audio filters that you can apply on your audio clips to enhance them. There are options for volume control, audio mixing, tone generator, and pitch adjustment. The popular fade in and fade out effects are also available along with audio scopes.
Video Effects – There is no dearth of effects and filters on Shotcut. In fact, you can compare Shotcut with premium video editors when it comes to video filters. Besides, there are blending modes and track compositing. Moreover, there are several transitions and deinterlacing. You can opt for 360-degree filters and reverse video clips as well as use video scopes.
Wide Support – Shotcut supports almost all the different video and audio formats. In fact, you get to select different photo file formats. The multi-format timeline supports mixing video and audio of different parameters perfectly. The software also supports network streaming and alpha channel videos.
Part 3. How to Edit Videos with Shotcut
Shotcut is good as a free video editor for standard editing options. You can add texts and titles, crop and trim video clips, as well as split and join clips. Besides, you can control the speed of the video clips as well as add transitions. Thereafter, you can export the video and publish online. Here are the steps about Shotcut editing videos.
Step 1: Launch Shotcut and go to File> New. Select Projects Folder and Video Mode and enter Project Name. Finally, click on Start button to get started.
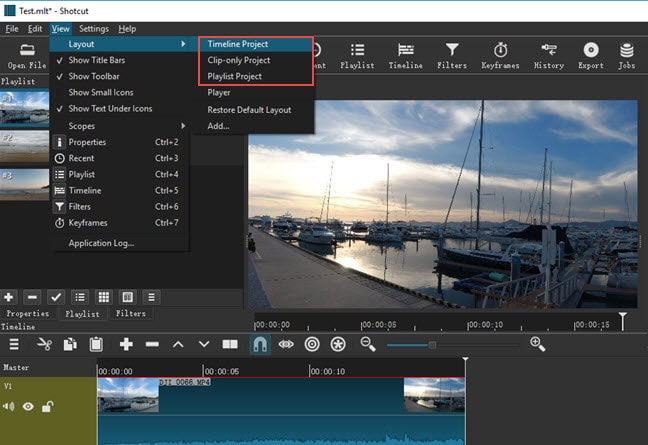
Step 2: Go to View> Layout> Timeline Project for the best editing layer.
Step 3: To import media files, go to File> Open File> and select media files.
Step 4: To add texts, go to Filters> “+” icon> Video tab> select “Text:Simple”. Thereafter, type anything and choose a font and select any color.

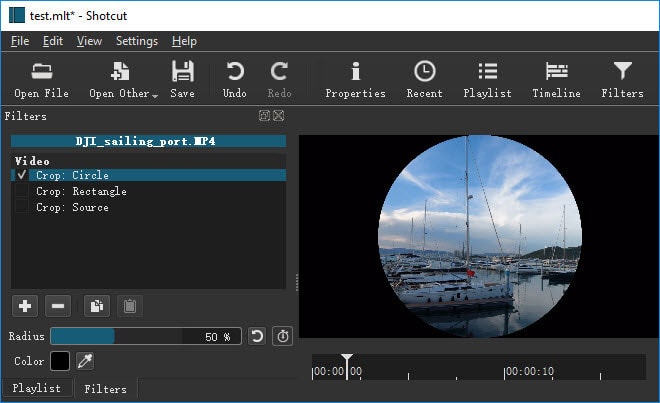
Step 5: To crop any video, go to Filters> Video> and Crop option. You can select various geometry shapes as you think appropriate.
Step 6: To add transitions, keep two clips on the same track and get them overlapped. Choose a transition from Properties and apply to your video.
Step 7: Finally, go to File> Export Video option. You can choose from different option and select frame rate, video resolution, and others from Advanced option.

Part 4. Shotcut Alternative to Edit Videos
There are many reasons why you could be looking for a better alternative to Shotcut. First of all, there is a big lack of advanced video editing features. That is why editing professional-quality videos with Shotcut is not highly feasible. The user interface is not as robust as the standard user interface of video. The editing cannot be as fluent as any premium and professional video editor. That is why we recommend Wondershare Filmora as the best alternative to Shotcut.
Wondershare Filmora is a premium video editor where there is a perfect balance of standard and advanced features. You can also capture screen and webcam video. There are tons of transitions, effects, filters, elements, and much more. There is also a stock media library available. Filmora has wider support for different file formats. Here are the steps on how to edit videos with Filmora.
For Win 7 or later (64-bit)
For macOS 10.12 or later
Step 1: Download and install Filmora as per your operating system. Launch Filmora and click on New Project option on the welcome screen. Drag and drop media files into Project Media folder.
Step 2: Drag and drop video clips and audio clips on the timeline in proper sequence. Thereafter, you can do basic editing such as trimming, cropping, splitting, and much more.

Step 3: Go to Transitions option and add your desired transitions in between clips. You can also opt for Titles for texts, Effects for animations, and Elements for objects.

Step 4: Once you are satisfied with the editing, click on Export button to save your video to your hard drive.

Part 5. FAQs about Shotcut
**Is Shotcut totally free?
Yes, Shotcut is a completely free video editor as it belongs to the open-source software category. It is available for free for Windows, Mac, and Linux users. All the features are completely unlocked, and there is no premium version available.
**Is Openshot better than Shotcut?
Openshot is equally good as Shotcut in terms of features. But in terms of user experience and editing 4K videos, Shotcut scores better than Openshot. Shotcut is a more lightweight video editor, and hence, the chances of crashes are relatively low.
**Is Shotcut good for YouTube?
Shotcut is particularly good for YouTube if you need only basic editing on your videos. You can export the edited video file from Shotcut to YouTube after basic editing. You can get eh frame rate, video resolution, and aspect ratio as per your requirements.
For macOS 10.12 or later
Step 1: Download and install Filmora as per your operating system. Launch Filmora and click on New Project option on the welcome screen. Drag and drop media files into Project Media folder.
Step 2: Drag and drop video clips and audio clips on the timeline in proper sequence. Thereafter, you can do basic editing such as trimming, cropping, splitting, and much more.

Step 3: Go to Transitions option and add your desired transitions in between clips. You can also opt for Titles for texts, Effects for animations, and Elements for objects.

Step 4: Once you are satisfied with the editing, click on Export button to save your video to your hard drive.

Part 5. FAQs about Shotcut
**Is Shotcut totally free?
Yes, Shotcut is a completely free video editor as it belongs to the open-source software category. It is available for free for Windows, Mac, and Linux users. All the features are completely unlocked, and there is no premium version available.
**Is Openshot better than Shotcut?
Openshot is equally good as Shotcut in terms of features. But in terms of user experience and editing 4K videos, Shotcut scores better than Openshot. Shotcut is a more lightweight video editor, and hence, the chances of crashes are relatively low.
**Is Shotcut good for YouTube?
Shotcut is particularly good for YouTube if you need only basic editing on your videos. You can export the edited video file from Shotcut to YouTube after basic editing. You can get eh frame rate, video resolution, and aspect ratio as per your requirements.
For macOS 10.12 or later
Step 1: Download and install Filmora as per your operating system. Launch Filmora and click on New Project option on the welcome screen. Drag and drop media files into Project Media folder.
Step 2: Drag and drop video clips and audio clips on the timeline in proper sequence. Thereafter, you can do basic editing such as trimming, cropping, splitting, and much more.

Step 3: Go to Transitions option and add your desired transitions in between clips. You can also opt for Titles for texts, Effects for animations, and Elements for objects.

Step 4: Once you are satisfied with the editing, click on Export button to save your video to your hard drive.

Part 5. FAQs about Shotcut
**Is Shotcut totally free?
Yes, Shotcut is a completely free video editor as it belongs to the open-source software category. It is available for free for Windows, Mac, and Linux users. All the features are completely unlocked, and there is no premium version available.
**Is Openshot better than Shotcut?
Openshot is equally good as Shotcut in terms of features. But in terms of user experience and editing 4K videos, Shotcut scores better than Openshot. Shotcut is a more lightweight video editor, and hence, the chances of crashes are relatively low.
**Is Shotcut good for YouTube?
Shotcut is particularly good for YouTube if you need only basic editing on your videos. You can export the edited video file from Shotcut to YouTube after basic editing. You can get eh frame rate, video resolution, and aspect ratio as per your requirements.
For macOS 10.12 or later
Step 1: Download and install Filmora as per your operating system. Launch Filmora and click on New Project option on the welcome screen. Drag and drop media files into Project Media folder.
Step 2: Drag and drop video clips and audio clips on the timeline in proper sequence. Thereafter, you can do basic editing such as trimming, cropping, splitting, and much more.

Step 3: Go to Transitions option and add your desired transitions in between clips. You can also opt for Titles for texts, Effects for animations, and Elements for objects.

Step 4: Once you are satisfied with the editing, click on Export button to save your video to your hard drive.

Part 5. FAQs about Shotcut
**Is Shotcut totally free?
Yes, Shotcut is a completely free video editor as it belongs to the open-source software category. It is available for free for Windows, Mac, and Linux users. All the features are completely unlocked, and there is no premium version available.
**Is Openshot better than Shotcut?
Openshot is equally good as Shotcut in terms of features. But in terms of user experience and editing 4K videos, Shotcut scores better than Openshot. Shotcut is a more lightweight video editor, and hence, the chances of crashes are relatively low.
**Is Shotcut good for YouTube?
Shotcut is particularly good for YouTube if you need only basic editing on your videos. You can export the edited video file from Shotcut to YouTube after basic editing. You can get eh frame rate, video resolution, and aspect ratio as per your requirements.
How to Use Lumetri Color in Adobe After Effects
Create High-Quality Video - Wondershare Filmora
An easy and powerful YouTube video editor
Numerous video and audio effects to choose from
Detailed tutorials provided by the official channel
When going forth with film post-production, video game creation, and television production, almost every video editor’s goal is to produce outstanding results. Usually, this cannot be achieved by using mediocre tools. One of the top-notch software video editors need to use is Adobe After Effect. Adobe After Effect is a motion graphics, digital visual effect, and compositing application developed by the Adobe system.
Adobe After Effects has tons of tools, and an exceptional one is a Lumetri color. With this functionality, you can easily carry out your color correction and color grading. Read this article and get to the bottom line on how to use Lumetri Color in Adobe After Effects.
Let’s dig in!
In this article
01 Does After Effects have Lumetri Color?
02 How to use Lumetri Color in Adobe After Effects
03 Is there a simple way to Unionise the Color of my Video?
Does After Effects have Lumetri Color?
Yes, there is lumetri color in After Effects. Lumetri Color allows you to adjust contrast, light, and color to your video based on your preference. With After Effects, you can carry out various color customizations in the Lumerti panel without exiting your current project.
Furthermore, the Lumetri color panel in Adobe After Effects allows you to export your settings to another different premiere pro project wholly. Usually, the file is exported as a .cube file – This relieves you from the wearisomeness of creating new grading features.
How to use Lumetri Color in Adobe After Effects
You don’t need to be a pro for you to use Lumetri Color in Adobe After Effects. The color workspace in Adobe After Effect is designed to be straightforward and user-friendly.
The Lumetri Color panel in Adobe contains the histogram, vectorscope, parade scope, and waveform monitor. The histogram, parade scope, and waveform monitor display image intensity, whereas the vectorscope display hue and color saturation.
Lumetri Color is considered an ultimate choice by most editors due to its wide range of functionalities. Some of the functionalities in the Lumetri panel include:
1. Vignettes
Vignette is an outstanding feature that effortlessly allows Lumetri users to adjust lightness and darkness using sliders.
Vignettes allow you to darken the borders and highlight certain parts. You will therefore create more emphasis on highlighted parts in your clip.
2. HSL Secondary
When you want to get exceptional footage controls, HSL Secondary (Hue, Saturation, and Luminance) is often the best functionality. HSL Secondary easily separates your footage and works on a selected piece.
With the functionality, you can easily manipulate the skin tones in your footage and refocus images.

3. Curves
The Lumetri panel in Adobe After Effects renders its users the curves functionality. There are two curves in the Lumetri Panel, i.e., Hue Saturation curves and luminesce curves.
The Hue/Saturation curve uses the red, green, and blue (RBG) flagship, whereas the luminance curve helps manage the frame curve’s tone.

4. Fx Bypass
Fx Bypass is a new functionality feature in the Lumetri panel. It allows you to bypass and reset effects without switching to the controls panel.
How to use Lumetri Color
With your Adobe After Effects, you can make quick and advanced color changes to your clips. Here are the simple steps on how to use Lumetri Color.
Step 1. Add your footage to the timeline
First, open your Adobe After Effect and add your video file to the software. Drag and drop to add it to the timeline.

Step 2. Open Lumetri Color
Here, you highlight your video in the timeline, then head over to the “Window” menu. From the drop-down menu, select “Effects & presets” > “Lumetri Color.”
Alternatively, you can go to the “Effects” menu, which is at the left-hand side of your interface, then select “Color Correction”> “Lumetri Color.”

Step 3. Carry out your Color Grading and Saturation
With the “Lumetri Color” functionality, you can carry out various adjustable settings such as tone, hue, saturation and color grading.
To carry out saturation:
Click on the “ Hue/Saturation “ from the drop-down menu in “Lumetri Color.” You can change the color of the entire footage by adjusting the “Master Hue” from the Effects Control Panel.
Alternatively, you can opt to fine-tune the freshly selected color by using the “Master Saturation” and Master Lightness.”
To carry out color grading:
- After opening the “Lumetri Color” panel as in step 2 above, click on the eyedropper to select the curve you want to use.
- Click the color in your footage that you wish to adjust. Usually, when you use the eyedropper, three points will be added to the graph. The two bottom points restrict color selection to a minimum range, whereas the first represents your selected color.
How to Use Lumetri Scope
Besides the Lumetric Color, Lumetric Scope is another essential tool for post-film production in Adobe After Effects. The color correcting tool, Lumetric scope guarantees its users’ accurate results when used correctly.
When carrying out color corrections in films, it is advisable to use quality monitor calibrators and paint your workspace walls neutral grey. Usually, it reduces lighting distraction and the external color effect, respectively.
However, not every editor can meet all the required basics, and that is where Lumetri scope comes in. Lumetri Scope allows one to get the best color results in their videos. Here are the steps on how to use Lumetri Scope:

Step 1. Open Lumetric Scope
First, open your Adobe After Effect application and add your footage to the timeline. Go to the “ Window “ menu at the top-left-hand side of your interface.
In the drop-down menu, select “Lumetri Scopes” or “Workspaces,” then click on the “Color” option.
The Lumetri Scope tab will be displayed adjacent to the timeline footage.
Step 2. Evaluate Hue and Saturation using Vectorscope
In the Lumetri Scope tab, click on the wrench icon, and a drop-down menu will be displayed. From the menu, select “Vectorscope YUV” and read the saturation. When reading saturation, begin from the center going outwards.
Hue, on the other hand, is read in a circular direction.

Step 3. Evaluate the tonal values and Brightness using Histogram
The histogram in Lumetri Scope displays an image’s tonal values and brightness levels.
To measure the brightness and tonal values, go back to the Lumetri Scope panel and click on the wrench icon. Click on “Presets” from the drop-down menu and select “Histogram.”
The scale in the histogram starts from 0 (pure black) to 225 (pure white). You, therefore, need to view the number of pixels for every color horizontally when reading.

Step 4. Evaluate Color and Brightness Intensities using Waveform Monitor
The color and brightness are read from the bottom to the top in the waveform monitor.
Click on the wrench icon to view the intensities, then pick the “Presets” option > “Waveform RBG.” A drop-down menu (RGB, YC, Luma, and YC no Chroma) will be displayed that allows you to do the readings.
Reading the IRE scale is usually done in ascension (0 to 100).

Step 5. Evaluate the Individual color channels using Parade Scope
Here, click on the wrench icon in the Lumetri Scopes panel, then select the “Presets”> “Parade RGB.” Select from the alternate Lumetri scope combinations of RGB, RGB-White, YUV, YUV white.
Is there a simple way to Unionise the Color of my Video?
Have you tried color grading and color correction in Lumetri using Adobe After Effects, but your efforts are bearing no fruits? It would be best not to worry since there is a simple way out. So, Yes! There is a simple way to unionize the color of your video – it is by using Wondershare Filmora .
Wondershare Filmora is a professional application to edit videos with a wide range of tools that allows its users to create stunning videos with ease. From its simple and intuitive design to its wide range of functionalities and affordability, Filmora users have every reason to stick to the software.
Some of the functionality features that make Wondershare Filmora easy to use include:
Curve Section
Filmora has way simpler curves than Adobe After Effects. Filmora has two presets, i.e., One that creates an S-curve over the graph, and the other resets graph to a straight linear line. Usually, the S-curve represents soft contrasts.
YUV color correction
The YUV color correction feature in Filmora functions straightforwardly when compared to Adobe After Effects. The Y and V channels in Filmora stores color data, whereas the U channel carries the brightness data. Editors find it effortlessly using the YUV color correction in Filmora.
Hue and Saturation
Hue, saturation, and lightness levels in Wondershare Filmora are undeniably very easy to understand unline other premiere software applications.
In Filmora, the Hue shift plays an essential role in shuffling the colors, whereas the Saturation defines the overall intensity of colors in an image.
For Win 7 or later (64-bit)
For macOS 10.12 or later
Conclusion
● With the above illustrations, you need not find it challenging to use Lumetri Color in Adobe After Effect. But if you are getting your head stuck when using Adobe After Effects, you need not stress out. There is an ultimate solution, and that is Wondershare Filmora. Incorporate this easy-to-use and pocket-friendly software in your edits. Besides, you will not have to go through the user guide to get started.
When going forth with film post-production, video game creation, and television production, almost every video editor’s goal is to produce outstanding results. Usually, this cannot be achieved by using mediocre tools. One of the top-notch software video editors need to use is Adobe After Effect. Adobe After Effect is a motion graphics, digital visual effect, and compositing application developed by the Adobe system.
Adobe After Effects has tons of tools, and an exceptional one is a Lumetri color. With this functionality, you can easily carry out your color correction and color grading. Read this article and get to the bottom line on how to use Lumetri Color in Adobe After Effects.
Let’s dig in!
In this article
01 Does After Effects have Lumetri Color?
02 How to use Lumetri Color in Adobe After Effects
03 Is there a simple way to Unionise the Color of my Video?
Does After Effects have Lumetri Color?
Yes, there is lumetri color in After Effects. Lumetri Color allows you to adjust contrast, light, and color to your video based on your preference. With After Effects, you can carry out various color customizations in the Lumerti panel without exiting your current project.
Furthermore, the Lumetri color panel in Adobe After Effects allows you to export your settings to another different premiere pro project wholly. Usually, the file is exported as a .cube file – This relieves you from the wearisomeness of creating new grading features.
How to use Lumetri Color in Adobe After Effects
You don’t need to be a pro for you to use Lumetri Color in Adobe After Effects. The color workspace in Adobe After Effect is designed to be straightforward and user-friendly.
The Lumetri Color panel in Adobe contains the histogram, vectorscope, parade scope, and waveform monitor. The histogram, parade scope, and waveform monitor display image intensity, whereas the vectorscope display hue and color saturation.
Lumetri Color is considered an ultimate choice by most editors due to its wide range of functionalities. Some of the functionalities in the Lumetri panel include:
1. Vignettes
Vignette is an outstanding feature that effortlessly allows Lumetri users to adjust lightness and darkness using sliders.
Vignettes allow you to darken the borders and highlight certain parts. You will therefore create more emphasis on highlighted parts in your clip.
2. HSL Secondary
When you want to get exceptional footage controls, HSL Secondary (Hue, Saturation, and Luminance) is often the best functionality. HSL Secondary easily separates your footage and works on a selected piece.
With the functionality, you can easily manipulate the skin tones in your footage and refocus images.

3. Curves
The Lumetri panel in Adobe After Effects renders its users the curves functionality. There are two curves in the Lumetri Panel, i.e., Hue Saturation curves and luminesce curves.
The Hue/Saturation curve uses the red, green, and blue (RBG) flagship, whereas the luminance curve helps manage the frame curve’s tone.

4. Fx Bypass
Fx Bypass is a new functionality feature in the Lumetri panel. It allows you to bypass and reset effects without switching to the controls panel.
How to use Lumetri Color
With your Adobe After Effects, you can make quick and advanced color changes to your clips. Here are the simple steps on how to use Lumetri Color.
Step 1. Add your footage to the timeline
First, open your Adobe After Effect and add your video file to the software. Drag and drop to add it to the timeline.

Step 2. Open Lumetri Color
Here, you highlight your video in the timeline, then head over to the “Window” menu. From the drop-down menu, select “Effects & presets” > “Lumetri Color.”
Alternatively, you can go to the “Effects” menu, which is at the left-hand side of your interface, then select “Color Correction”> “Lumetri Color.”

Step 3. Carry out your Color Grading and Saturation
With the “Lumetri Color” functionality, you can carry out various adjustable settings such as tone, hue, saturation and color grading.
To carry out saturation:
Click on the “ Hue/Saturation “ from the drop-down menu in “Lumetri Color.” You can change the color of the entire footage by adjusting the “Master Hue” from the Effects Control Panel.
Alternatively, you can opt to fine-tune the freshly selected color by using the “Master Saturation” and Master Lightness.”
To carry out color grading:
- After opening the “Lumetri Color” panel as in step 2 above, click on the eyedropper to select the curve you want to use.
- Click the color in your footage that you wish to adjust. Usually, when you use the eyedropper, three points will be added to the graph. The two bottom points restrict color selection to a minimum range, whereas the first represents your selected color.
How to Use Lumetri Scope
Besides the Lumetric Color, Lumetric Scope is another essential tool for post-film production in Adobe After Effects. The color correcting tool, Lumetric scope guarantees its users’ accurate results when used correctly.
When carrying out color corrections in films, it is advisable to use quality monitor calibrators and paint your workspace walls neutral grey. Usually, it reduces lighting distraction and the external color effect, respectively.
However, not every editor can meet all the required basics, and that is where Lumetri scope comes in. Lumetri Scope allows one to get the best color results in their videos. Here are the steps on how to use Lumetri Scope:

Step 1. Open Lumetric Scope
First, open your Adobe After Effect application and add your footage to the timeline. Go to the “ Window “ menu at the top-left-hand side of your interface.
In the drop-down menu, select “Lumetri Scopes” or “Workspaces,” then click on the “Color” option.
The Lumetri Scope tab will be displayed adjacent to the timeline footage.
Step 2. Evaluate Hue and Saturation using Vectorscope
In the Lumetri Scope tab, click on the wrench icon, and a drop-down menu will be displayed. From the menu, select “Vectorscope YUV” and read the saturation. When reading saturation, begin from the center going outwards.
Hue, on the other hand, is read in a circular direction.

Step 3. Evaluate the tonal values and Brightness using Histogram
The histogram in Lumetri Scope displays an image’s tonal values and brightness levels.
To measure the brightness and tonal values, go back to the Lumetri Scope panel and click on the wrench icon. Click on “Presets” from the drop-down menu and select “Histogram.”
The scale in the histogram starts from 0 (pure black) to 225 (pure white). You, therefore, need to view the number of pixels for every color horizontally when reading.

Step 4. Evaluate Color and Brightness Intensities using Waveform Monitor
The color and brightness are read from the bottom to the top in the waveform monitor.
Click on the wrench icon to view the intensities, then pick the “Presets” option > “Waveform RBG.” A drop-down menu (RGB, YC, Luma, and YC no Chroma) will be displayed that allows you to do the readings.
Reading the IRE scale is usually done in ascension (0 to 100).

Step 5. Evaluate the Individual color channels using Parade Scope
Here, click on the wrench icon in the Lumetri Scopes panel, then select the “Presets”> “Parade RGB.” Select from the alternate Lumetri scope combinations of RGB, RGB-White, YUV, YUV white.
Is there a simple way to Unionise the Color of my Video?
Have you tried color grading and color correction in Lumetri using Adobe After Effects, but your efforts are bearing no fruits? It would be best not to worry since there is a simple way out. So, Yes! There is a simple way to unionize the color of your video – it is by using Wondershare Filmora .
Wondershare Filmora is a professional application to edit videos with a wide range of tools that allows its users to create stunning videos with ease. From its simple and intuitive design to its wide range of functionalities and affordability, Filmora users have every reason to stick to the software.
Some of the functionality features that make Wondershare Filmora easy to use include:
Curve Section
Filmora has way simpler curves than Adobe After Effects. Filmora has two presets, i.e., One that creates an S-curve over the graph, and the other resets graph to a straight linear line. Usually, the S-curve represents soft contrasts.
YUV color correction
The YUV color correction feature in Filmora functions straightforwardly when compared to Adobe After Effects. The Y and V channels in Filmora stores color data, whereas the U channel carries the brightness data. Editors find it effortlessly using the YUV color correction in Filmora.
Hue and Saturation
Hue, saturation, and lightness levels in Wondershare Filmora are undeniably very easy to understand unline other premiere software applications.
In Filmora, the Hue shift plays an essential role in shuffling the colors, whereas the Saturation defines the overall intensity of colors in an image.
For Win 7 or later (64-bit)
For macOS 10.12 or later
Conclusion
● With the above illustrations, you need not find it challenging to use Lumetri Color in Adobe After Effect. But if you are getting your head stuck when using Adobe After Effects, you need not stress out. There is an ultimate solution, and that is Wondershare Filmora. Incorporate this easy-to-use and pocket-friendly software in your edits. Besides, you will not have to go through the user guide to get started.
When going forth with film post-production, video game creation, and television production, almost every video editor’s goal is to produce outstanding results. Usually, this cannot be achieved by using mediocre tools. One of the top-notch software video editors need to use is Adobe After Effect. Adobe After Effect is a motion graphics, digital visual effect, and compositing application developed by the Adobe system.
Adobe After Effects has tons of tools, and an exceptional one is a Lumetri color. With this functionality, you can easily carry out your color correction and color grading. Read this article and get to the bottom line on how to use Lumetri Color in Adobe After Effects.
Let’s dig in!
In this article
01 Does After Effects have Lumetri Color?
02 How to use Lumetri Color in Adobe After Effects
03 Is there a simple way to Unionise the Color of my Video?
Does After Effects have Lumetri Color?
Yes, there is lumetri color in After Effects. Lumetri Color allows you to adjust contrast, light, and color to your video based on your preference. With After Effects, you can carry out various color customizations in the Lumerti panel without exiting your current project.
Furthermore, the Lumetri color panel in Adobe After Effects allows you to export your settings to another different premiere pro project wholly. Usually, the file is exported as a .cube file – This relieves you from the wearisomeness of creating new grading features.
How to use Lumetri Color in Adobe After Effects
You don’t need to be a pro for you to use Lumetri Color in Adobe After Effects. The color workspace in Adobe After Effect is designed to be straightforward and user-friendly.
The Lumetri Color panel in Adobe contains the histogram, vectorscope, parade scope, and waveform monitor. The histogram, parade scope, and waveform monitor display image intensity, whereas the vectorscope display hue and color saturation.
Lumetri Color is considered an ultimate choice by most editors due to its wide range of functionalities. Some of the functionalities in the Lumetri panel include:
1. Vignettes
Vignette is an outstanding feature that effortlessly allows Lumetri users to adjust lightness and darkness using sliders.
Vignettes allow you to darken the borders and highlight certain parts. You will therefore create more emphasis on highlighted parts in your clip.
2. HSL Secondary
When you want to get exceptional footage controls, HSL Secondary (Hue, Saturation, and Luminance) is often the best functionality. HSL Secondary easily separates your footage and works on a selected piece.
With the functionality, you can easily manipulate the skin tones in your footage and refocus images.

3. Curves
The Lumetri panel in Adobe After Effects renders its users the curves functionality. There are two curves in the Lumetri Panel, i.e., Hue Saturation curves and luminesce curves.
The Hue/Saturation curve uses the red, green, and blue (RBG) flagship, whereas the luminance curve helps manage the frame curve’s tone.

4. Fx Bypass
Fx Bypass is a new functionality feature in the Lumetri panel. It allows you to bypass and reset effects without switching to the controls panel.
How to use Lumetri Color
With your Adobe After Effects, you can make quick and advanced color changes to your clips. Here are the simple steps on how to use Lumetri Color.
Step 1. Add your footage to the timeline
First, open your Adobe After Effect and add your video file to the software. Drag and drop to add it to the timeline.

Step 2. Open Lumetri Color
Here, you highlight your video in the timeline, then head over to the “Window” menu. From the drop-down menu, select “Effects & presets” > “Lumetri Color.”
Alternatively, you can go to the “Effects” menu, which is at the left-hand side of your interface, then select “Color Correction”> “Lumetri Color.”

Step 3. Carry out your Color Grading and Saturation
With the “Lumetri Color” functionality, you can carry out various adjustable settings such as tone, hue, saturation and color grading.
To carry out saturation:
Click on the “ Hue/Saturation “ from the drop-down menu in “Lumetri Color.” You can change the color of the entire footage by adjusting the “Master Hue” from the Effects Control Panel.
Alternatively, you can opt to fine-tune the freshly selected color by using the “Master Saturation” and Master Lightness.”
To carry out color grading:
- After opening the “Lumetri Color” panel as in step 2 above, click on the eyedropper to select the curve you want to use.
- Click the color in your footage that you wish to adjust. Usually, when you use the eyedropper, three points will be added to the graph. The two bottom points restrict color selection to a minimum range, whereas the first represents your selected color.
How to Use Lumetri Scope
Besides the Lumetric Color, Lumetric Scope is another essential tool for post-film production in Adobe After Effects. The color correcting tool, Lumetric scope guarantees its users’ accurate results when used correctly.
When carrying out color corrections in films, it is advisable to use quality monitor calibrators and paint your workspace walls neutral grey. Usually, it reduces lighting distraction and the external color effect, respectively.
However, not every editor can meet all the required basics, and that is where Lumetri scope comes in. Lumetri Scope allows one to get the best color results in their videos. Here are the steps on how to use Lumetri Scope:

Step 1. Open Lumetric Scope
First, open your Adobe After Effect application and add your footage to the timeline. Go to the “ Window “ menu at the top-left-hand side of your interface.
In the drop-down menu, select “Lumetri Scopes” or “Workspaces,” then click on the “Color” option.
The Lumetri Scope tab will be displayed adjacent to the timeline footage.
Step 2. Evaluate Hue and Saturation using Vectorscope
In the Lumetri Scope tab, click on the wrench icon, and a drop-down menu will be displayed. From the menu, select “Vectorscope YUV” and read the saturation. When reading saturation, begin from the center going outwards.
Hue, on the other hand, is read in a circular direction.

Step 3. Evaluate the tonal values and Brightness using Histogram
The histogram in Lumetri Scope displays an image’s tonal values and brightness levels.
To measure the brightness and tonal values, go back to the Lumetri Scope panel and click on the wrench icon. Click on “Presets” from the drop-down menu and select “Histogram.”
The scale in the histogram starts from 0 (pure black) to 225 (pure white). You, therefore, need to view the number of pixels for every color horizontally when reading.

Step 4. Evaluate Color and Brightness Intensities using Waveform Monitor
The color and brightness are read from the bottom to the top in the waveform monitor.
Click on the wrench icon to view the intensities, then pick the “Presets” option > “Waveform RBG.” A drop-down menu (RGB, YC, Luma, and YC no Chroma) will be displayed that allows you to do the readings.
Reading the IRE scale is usually done in ascension (0 to 100).

Step 5. Evaluate the Individual color channels using Parade Scope
Here, click on the wrench icon in the Lumetri Scopes panel, then select the “Presets”> “Parade RGB.” Select from the alternate Lumetri scope combinations of RGB, RGB-White, YUV, YUV white.
Is there a simple way to Unionise the Color of my Video?
Have you tried color grading and color correction in Lumetri using Adobe After Effects, but your efforts are bearing no fruits? It would be best not to worry since there is a simple way out. So, Yes! There is a simple way to unionize the color of your video – it is by using Wondershare Filmora .
Wondershare Filmora is a professional application to edit videos with a wide range of tools that allows its users to create stunning videos with ease. From its simple and intuitive design to its wide range of functionalities and affordability, Filmora users have every reason to stick to the software.
Some of the functionality features that make Wondershare Filmora easy to use include:
Curve Section
Filmora has way simpler curves than Adobe After Effects. Filmora has two presets, i.e., One that creates an S-curve over the graph, and the other resets graph to a straight linear line. Usually, the S-curve represents soft contrasts.
YUV color correction
The YUV color correction feature in Filmora functions straightforwardly when compared to Adobe After Effects. The Y and V channels in Filmora stores color data, whereas the U channel carries the brightness data. Editors find it effortlessly using the YUV color correction in Filmora.
Hue and Saturation
Hue, saturation, and lightness levels in Wondershare Filmora are undeniably very easy to understand unline other premiere software applications.
In Filmora, the Hue shift plays an essential role in shuffling the colors, whereas the Saturation defines the overall intensity of colors in an image.
For Win 7 or later (64-bit)
For macOS 10.12 or later
Conclusion
● With the above illustrations, you need not find it challenging to use Lumetri Color in Adobe After Effect. But if you are getting your head stuck when using Adobe After Effects, you need not stress out. There is an ultimate solution, and that is Wondershare Filmora. Incorporate this easy-to-use and pocket-friendly software in your edits. Besides, you will not have to go through the user guide to get started.
When going forth with film post-production, video game creation, and television production, almost every video editor’s goal is to produce outstanding results. Usually, this cannot be achieved by using mediocre tools. One of the top-notch software video editors need to use is Adobe After Effect. Adobe After Effect is a motion graphics, digital visual effect, and compositing application developed by the Adobe system.
Adobe After Effects has tons of tools, and an exceptional one is a Lumetri color. With this functionality, you can easily carry out your color correction and color grading. Read this article and get to the bottom line on how to use Lumetri Color in Adobe After Effects.
Let’s dig in!
In this article
01 Does After Effects have Lumetri Color?
02 How to use Lumetri Color in Adobe After Effects
03 Is there a simple way to Unionise the Color of my Video?
Does After Effects have Lumetri Color?
Yes, there is lumetri color in After Effects. Lumetri Color allows you to adjust contrast, light, and color to your video based on your preference. With After Effects, you can carry out various color customizations in the Lumerti panel without exiting your current project.
Furthermore, the Lumetri color panel in Adobe After Effects allows you to export your settings to another different premiere pro project wholly. Usually, the file is exported as a .cube file – This relieves you from the wearisomeness of creating new grading features.
How to use Lumetri Color in Adobe After Effects
You don’t need to be a pro for you to use Lumetri Color in Adobe After Effects. The color workspace in Adobe After Effect is designed to be straightforward and user-friendly.
The Lumetri Color panel in Adobe contains the histogram, vectorscope, parade scope, and waveform monitor. The histogram, parade scope, and waveform monitor display image intensity, whereas the vectorscope display hue and color saturation.
Lumetri Color is considered an ultimate choice by most editors due to its wide range of functionalities. Some of the functionalities in the Lumetri panel include:
1. Vignettes
Vignette is an outstanding feature that effortlessly allows Lumetri users to adjust lightness and darkness using sliders.
Vignettes allow you to darken the borders and highlight certain parts. You will therefore create more emphasis on highlighted parts in your clip.
2. HSL Secondary
When you want to get exceptional footage controls, HSL Secondary (Hue, Saturation, and Luminance) is often the best functionality. HSL Secondary easily separates your footage and works on a selected piece.
With the functionality, you can easily manipulate the skin tones in your footage and refocus images.

3. Curves
The Lumetri panel in Adobe After Effects renders its users the curves functionality. There are two curves in the Lumetri Panel, i.e., Hue Saturation curves and luminesce curves.
The Hue/Saturation curve uses the red, green, and blue (RBG) flagship, whereas the luminance curve helps manage the frame curve’s tone.

4. Fx Bypass
Fx Bypass is a new functionality feature in the Lumetri panel. It allows you to bypass and reset effects without switching to the controls panel.
How to use Lumetri Color
With your Adobe After Effects, you can make quick and advanced color changes to your clips. Here are the simple steps on how to use Lumetri Color.
Step 1. Add your footage to the timeline
First, open your Adobe After Effect and add your video file to the software. Drag and drop to add it to the timeline.

Step 2. Open Lumetri Color
Here, you highlight your video in the timeline, then head over to the “Window” menu. From the drop-down menu, select “Effects & presets” > “Lumetri Color.”
Alternatively, you can go to the “Effects” menu, which is at the left-hand side of your interface, then select “Color Correction”> “Lumetri Color.”

Step 3. Carry out your Color Grading and Saturation
With the “Lumetri Color” functionality, you can carry out various adjustable settings such as tone, hue, saturation and color grading.
To carry out saturation:
Click on the “ Hue/Saturation “ from the drop-down menu in “Lumetri Color.” You can change the color of the entire footage by adjusting the “Master Hue” from the Effects Control Panel.
Alternatively, you can opt to fine-tune the freshly selected color by using the “Master Saturation” and Master Lightness.”
To carry out color grading:
- After opening the “Lumetri Color” panel as in step 2 above, click on the eyedropper to select the curve you want to use.
- Click the color in your footage that you wish to adjust. Usually, when you use the eyedropper, three points will be added to the graph. The two bottom points restrict color selection to a minimum range, whereas the first represents your selected color.
How to Use Lumetri Scope
Besides the Lumetric Color, Lumetric Scope is another essential tool for post-film production in Adobe After Effects. The color correcting tool, Lumetric scope guarantees its users’ accurate results when used correctly.
When carrying out color corrections in films, it is advisable to use quality monitor calibrators and paint your workspace walls neutral grey. Usually, it reduces lighting distraction and the external color effect, respectively.
However, not every editor can meet all the required basics, and that is where Lumetri scope comes in. Lumetri Scope allows one to get the best color results in their videos. Here are the steps on how to use Lumetri Scope:

Step 1. Open Lumetric Scope
First, open your Adobe After Effect application and add your footage to the timeline. Go to the “ Window “ menu at the top-left-hand side of your interface.
In the drop-down menu, select “Lumetri Scopes” or “Workspaces,” then click on the “Color” option.
The Lumetri Scope tab will be displayed adjacent to the timeline footage.
Step 2. Evaluate Hue and Saturation using Vectorscope
In the Lumetri Scope tab, click on the wrench icon, and a drop-down menu will be displayed. From the menu, select “Vectorscope YUV” and read the saturation. When reading saturation, begin from the center going outwards.
Hue, on the other hand, is read in a circular direction.

Step 3. Evaluate the tonal values and Brightness using Histogram
The histogram in Lumetri Scope displays an image’s tonal values and brightness levels.
To measure the brightness and tonal values, go back to the Lumetri Scope panel and click on the wrench icon. Click on “Presets” from the drop-down menu and select “Histogram.”
The scale in the histogram starts from 0 (pure black) to 225 (pure white). You, therefore, need to view the number of pixels for every color horizontally when reading.

Step 4. Evaluate Color and Brightness Intensities using Waveform Monitor
The color and brightness are read from the bottom to the top in the waveform monitor.
Click on the wrench icon to view the intensities, then pick the “Presets” option > “Waveform RBG.” A drop-down menu (RGB, YC, Luma, and YC no Chroma) will be displayed that allows you to do the readings.
Reading the IRE scale is usually done in ascension (0 to 100).

Step 5. Evaluate the Individual color channels using Parade Scope
Here, click on the wrench icon in the Lumetri Scopes panel, then select the “Presets”> “Parade RGB.” Select from the alternate Lumetri scope combinations of RGB, RGB-White, YUV, YUV white.
Is there a simple way to Unionise the Color of my Video?
Have you tried color grading and color correction in Lumetri using Adobe After Effects, but your efforts are bearing no fruits? It would be best not to worry since there is a simple way out. So, Yes! There is a simple way to unionize the color of your video – it is by using Wondershare Filmora .
Wondershare Filmora is a professional application to edit videos with a wide range of tools that allows its users to create stunning videos with ease. From its simple and intuitive design to its wide range of functionalities and affordability, Filmora users have every reason to stick to the software.
Some of the functionality features that make Wondershare Filmora easy to use include:
Curve Section
Filmora has way simpler curves than Adobe After Effects. Filmora has two presets, i.e., One that creates an S-curve over the graph, and the other resets graph to a straight linear line. Usually, the S-curve represents soft contrasts.
YUV color correction
The YUV color correction feature in Filmora functions straightforwardly when compared to Adobe After Effects. The Y and V channels in Filmora stores color data, whereas the U channel carries the brightness data. Editors find it effortlessly using the YUV color correction in Filmora.
Hue and Saturation
Hue, saturation, and lightness levels in Wondershare Filmora are undeniably very easy to understand unline other premiere software applications.
In Filmora, the Hue shift plays an essential role in shuffling the colors, whereas the Saturation defines the overall intensity of colors in an image.
For Win 7 or later (64-bit)
For macOS 10.12 or later
Conclusion
● With the above illustrations, you need not find it challenging to use Lumetri Color in Adobe After Effect. But if you are getting your head stuck when using Adobe After Effects, you need not stress out. There is an ultimate solution, and that is Wondershare Filmora. Incorporate this easy-to-use and pocket-friendly software in your edits. Besides, you will not have to go through the user guide to get started.
LumaFusion – One of the Best Video Editors for iOS
LumaFusion makes itself known as a multi-track video editor available for iOS users. While it presents other compatible versions, it provides some of the most professional video editing and enhancement features that make editing proficient on mobile devices. Its easy-to-use interface, combined with advanced functions of editing videos, adding audio, and adjusting speed, gives a perfect non-linear editing experience.
Pros
- Manageable and Proficient user interface
- Image stabilization is available to enhance performance
- Can add third-party plugins for video enhancement
- Trim unused media before exporting the video
- Videos can be exported directly to Final Cut Pro
Cons
- The user has to pay for the app to download
- Audio synchronization issues in large videos
- You can only add up to 6 audio/video tracks to the timeline
Part 1: What is LumaFusion?
LumaFusion is a multi-track video editing mobile application providing a professional video editing experience on portable devices. It gives uses a platform to create the perfect storyline and environments for bringing out the perfect features of the story that is held by the video. So, while you get a platform with interactive features and tools to work with, video editing simultaneously gets extensive and simple.
People who are not having the time to bring in a professional video editor to work on a task can look forward to this progressive tool designed for portable video editing. While you do not confuse it with a basic video editor, you can find tools that can help you adjust parameters such as the aspect ratio.

Download LumaFusion: Android | iOS
You can download this proficient video editor for your iPhone and iPad. It can also be enjoyed on Mac devices, which are now available on Android devices. LumaFusion has scaled its support and compatibility of devices over time.
Pricing Plan
If you intend to use the LumaFusion app to inject creativity into your videos, you must have to pay a single-time price of $19.99 to get access to the application. Apart from that, there are several in-app purchases that you can look forward to for increasing the hold on different tools and features, as per the requirement.
System Requirements of LumaFusion iOS
| iPhone | Requires iOS 15.4 or later. |
|---|---|
| iPad | Requires iPadOS 15.4 or later. |
| iPod Touch | Requires iOS 15.4 or later. |
| Mac | Requires macOS 12.3 or later and a Mac with Apple M1 chip or later. |
| Size | 192.9 MB |
Part 2: Key Features of LumaFusion Video Editor
We will now highlight some essential features that can be considered about the LumaFusion video editor. These features will give a better understanding of the tool and provide a guideline on how to utilize the best functions with ease:
1. Interface
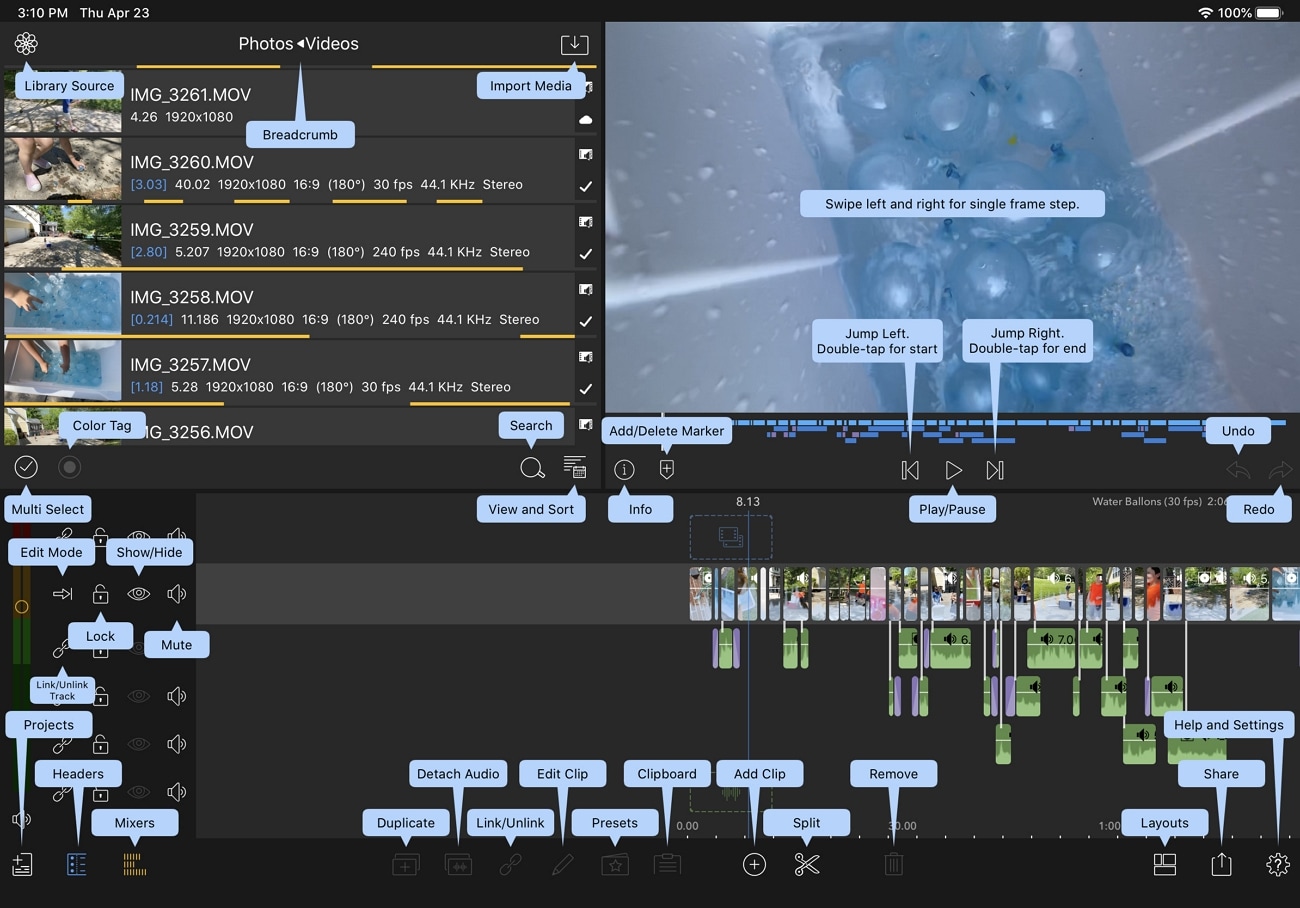
When understanding the interface of the LumaFusion app on iOS, many would think the application won’t provide extensive tools to work with. This video editor does not come with a bland user interface but provides some great functions and features on an interface that allows you to create professional-level videos.
With the option of adding titles, transitions, color grading, and effects, LumaFusion is a complete video editor that provides features that are not commonly observed in many desktop-based video editors. Regardless, it presents an efficient workspace that has managed all the functions properly in rows and different sections.
2. Video’s Layers
Creating proper movies on your iOS device is not difficult with LumaFusion. With the option of including six layers of video in the timeline, a lot can be done with them for improvising different sequences and multiple effects. Its picture-in-picture presets, layered transitions, graphic equalizer, and the use of additional plugins allow you to create complete videos with proper control.
Talking about some renowned iOS video editors in the market, you will find LumaFusion a much better option. iMovie, the dedicated video editor for iOS devices, can only embed two layers of videos in the timeline. This clearly explains why LumaFusion is a much better option with its video layers.

3. Powerful Keyframe
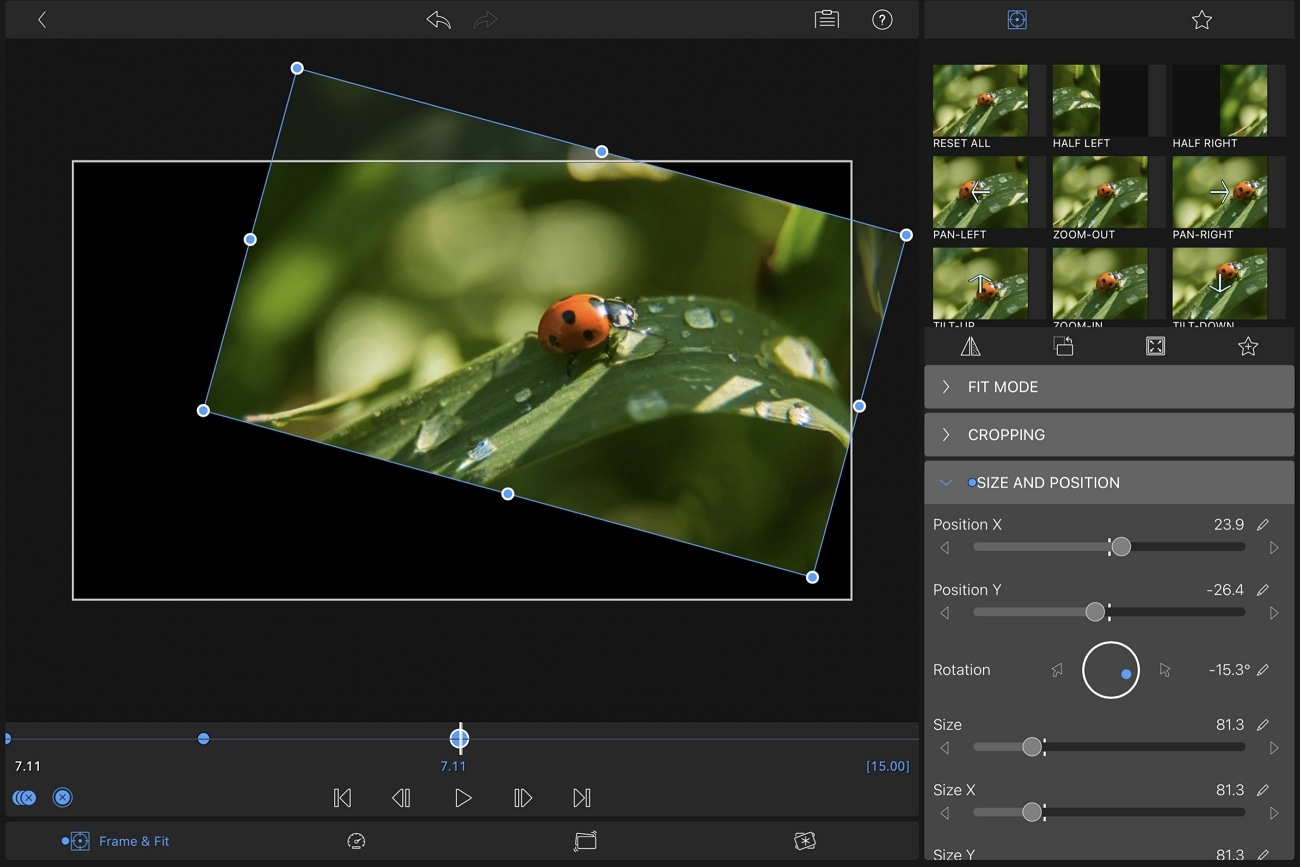
The keyframes function on LumaFusion is not challenging to work with on the video editor. You can ecstatically create animating effects with the help of the keyframe sounds within the application. These effects, once created, can be saved and used on other videos within the platform. To improve your effects on the mobile video editor, you can use the powerful keyframe feature of LumaFusion to create the best results.
With a small price to pay for the video editor, you can gain access to a diversity of keyframes that can help you design the perfect effects for your video.
4. Export to Final Cut Pro
Another impressive and touching feature this video editor provides to its users is its integration with Final Cut Pro - a proficient desktop video editor offered on macOS. You can easily export your created video to Final Cut Pro as an FCPXML.zip file directly after paying a one-time price. Users who are having a rough time editing the file on LumaFusion can easily shift to Final Cut Pro.
This process has disadvantages, regardless of the extensive control and accessibility provided between the applications. If you seek to use Final Cut Pro after editing a video on the LumaFusion app, you will have to add all the assets on FCP when you shift the file onto the platform.
Also, you might have to include many effects such as LUTs, Chroma key, and other relevant features. With this effort, you can easily put your video from LumaFusion to Final Cut Pro.
Part 3: Advantages and Disadvantages of LumaFusion Video Editor
Suppose you are considering using the LumaFusion video editor on your iOS device. In that case, there are a few advantages and disadvantages you must look into to understand more about the tool and get to an absolute decision:
Pros
- You can add third-party plugins to your video editor to enhance the video editing features. This allows you to put better effects, transitions, and enhancement elements in your video.
- It can create smooth slow-motion videos with 120fps and 240fps results.
- Multi-layer titles can be created within the platform and used in further actions.
- The display of the edited video can be previewed across an external monitor.
- It provides stability in video editing by using color tags within frame rates up to 18fps.
Cons
- For large video files, you might face lagging issues and audio synchronization within videos.
- To access the complete library of music and clips, you will have to subscribe to their additional plans.
- The tool is already available at a price tag, which is associated with more subscription plans, making it a devalued option.
Part 4: What’s New in LumaFusion 3.2 Version
The latest iteration of the LumaFusion app brings new and exciting features to the market. To learn more about these features, you will know better how the video editor is improving its operations:
1. 35+ New Transitions
LumaFusion 3.2 comes with a new set of transitions, with almost 35 in number. With different blur transitions, there are some new introductions in the transition section that offers multiple motions.
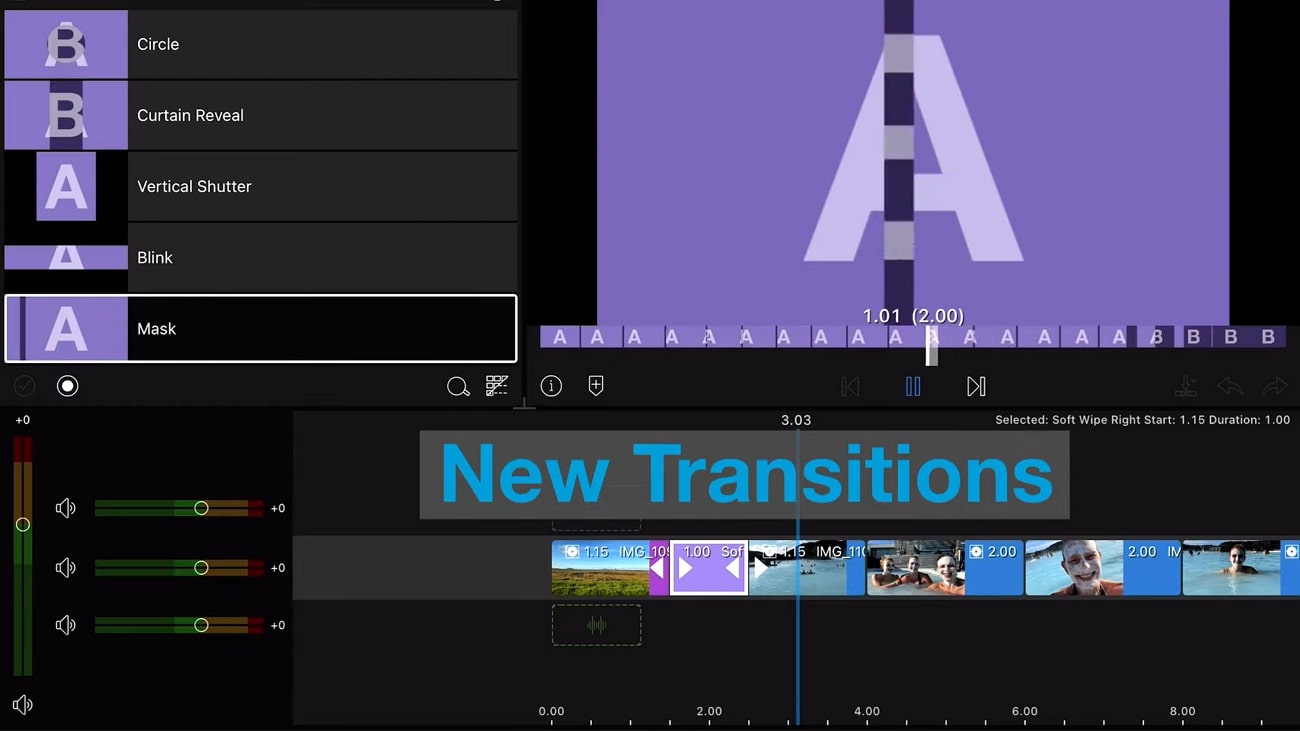
2. iCloud Backups
If you are confused about how to sustain the storage space on your iOS device, LumaFusion now provides iCloud Drive support and allows the user to back up their data. The data from the iCloud Drive can also be restored directly from the platform.

3. Rename Linked Folders
In the previous versions of LumaFusion, you could not rename the linked folders, or the platform incorrectly named them. With this update, you can now easily rename the linked folders by selecting and holding them within the interface.
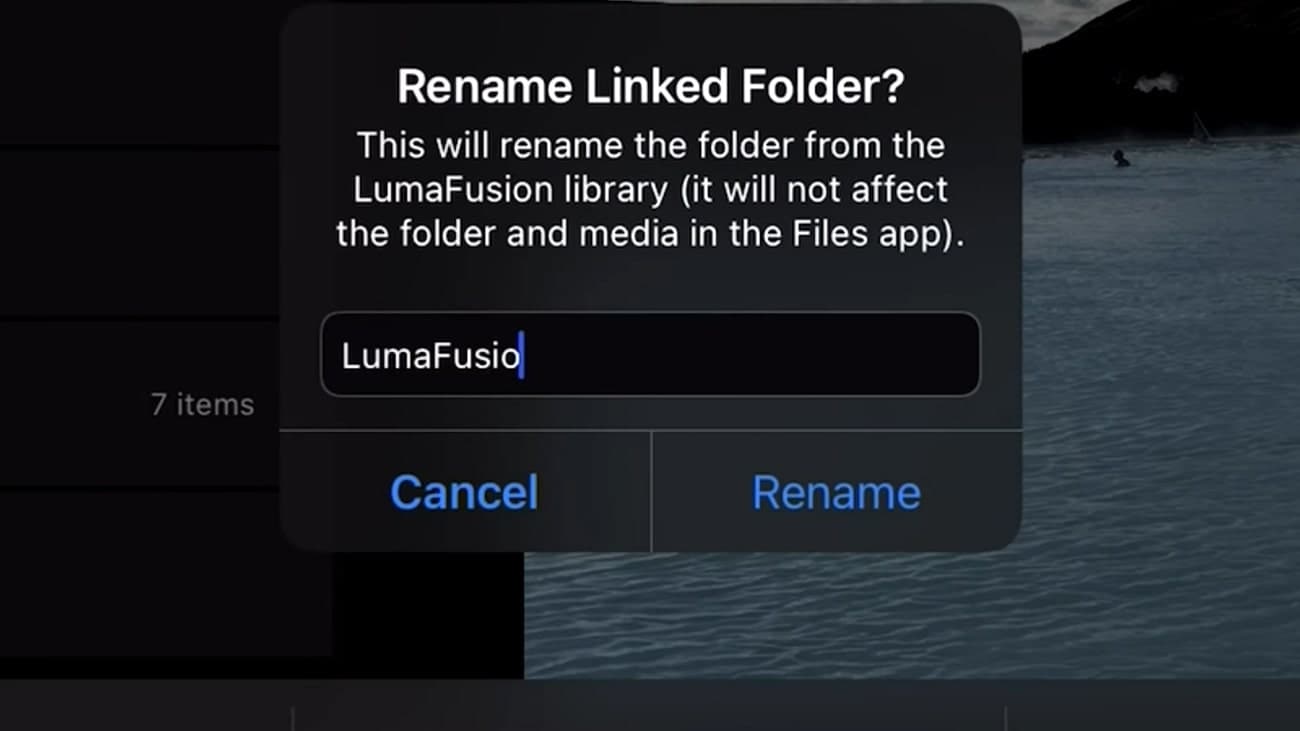
4. Localizations for 2 New Versions
Traditional Chinese and Brazilian Portuguese are now among the added localizations in the video editor. The wide range of language support is helping this application set up a new precedent in the market for other mobile video editors.
Part 5: Best Alternative to LumaFusion Video Editor for iOS
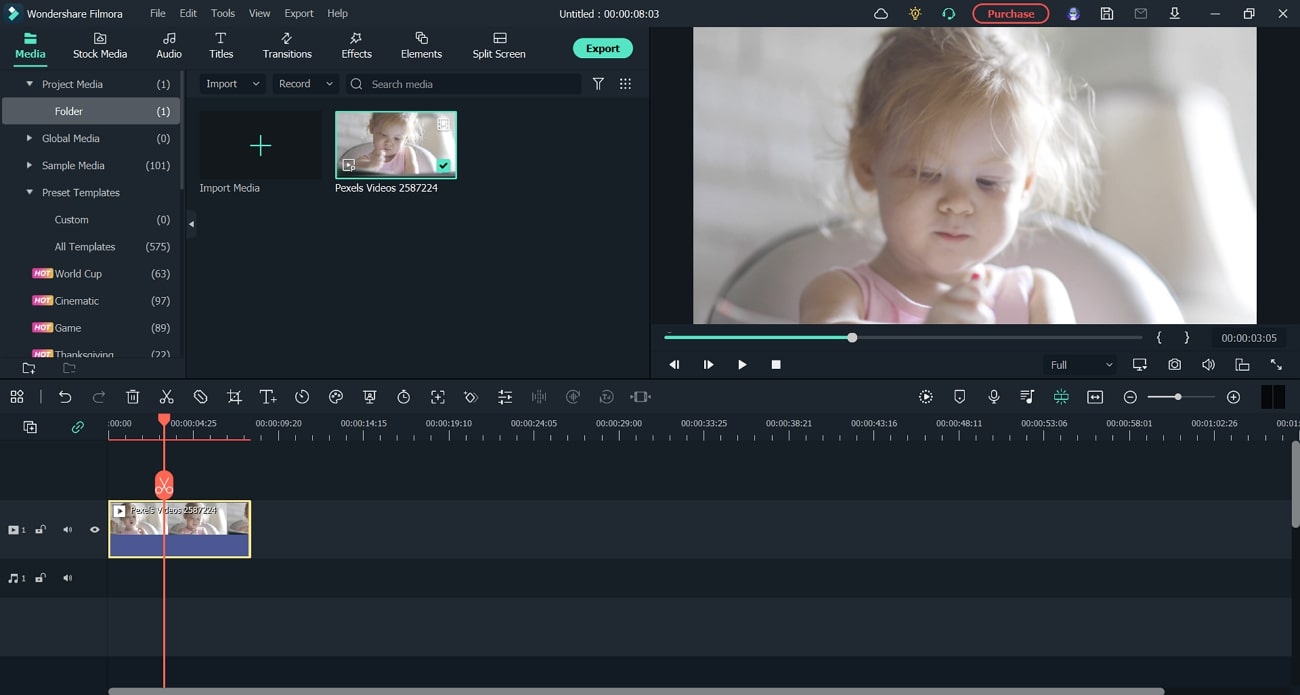
LumaFusion video editor is a great option, but its drawbacks restrict it to some extent. To answer this, Wondershare Filmora provides a better option for video editing, offering compatibility on Windows and all other platforms supported by the LumaFusion video editing application. To know more about how good Filmora is, look ahead.
Wondershare Filmora is a complete, easy-to-use video editor providing many features and creativity options. For example, you can find the perfect set of effects and transitions on the platform by supporting a diversity of filters and text overlays. With other options, such as PIP mode and video beautification, Wondershare Filmora supports many file formats for video editing.
Free Download For Win 7 or later(64-bit)
Free Download For macOS 10.14 or later
Conclusion
This article has provided a prominent overview of the LumaFusion review, a video editor that has made video editing operations easier on smartphones. While it is a great iOS video editor, you can find other prominent functions with extensive layered support, intuitive keyframes, and consolidated connectivity to other platforms. As a better option, this article has offered Wondershare Filmora as a more potent tool with better compatibility and inexpensive features.
People Also Want to Know
1. How to download LumaFusion on Windows?
LumaFusion is unavailable on the Windows platform, where you can only find it on Mac, iOS, and Android. As an alternative to this video editor, you can try using Wondershare Filmora.
2. Can LumaFusion edit 4K?
You can easily edit, manage, and export 4K videos within the platform. LumaFusion provides extensive support for managing a broad range of video resolutions.
Part 1: What is LumaFusion?
LumaFusion is a multi-track video editing mobile application providing a professional video editing experience on portable devices. It gives uses a platform to create the perfect storyline and environments for bringing out the perfect features of the story that is held by the video. So, while you get a platform with interactive features and tools to work with, video editing simultaneously gets extensive and simple.
People who are not having the time to bring in a professional video editor to work on a task can look forward to this progressive tool designed for portable video editing. While you do not confuse it with a basic video editor, you can find tools that can help you adjust parameters such as the aspect ratio.

Download LumaFusion: Android | iOS
You can download this proficient video editor for your iPhone and iPad. It can also be enjoyed on Mac devices, which are now available on Android devices. LumaFusion has scaled its support and compatibility of devices over time.
Pricing Plan
If you intend to use the LumaFusion app to inject creativity into your videos, you must have to pay a single-time price of $19.99 to get access to the application. Apart from that, there are several in-app purchases that you can look forward to for increasing the hold on different tools and features, as per the requirement.
System Requirements of LumaFusion iOS
| iPhone | Requires iOS 15.4 or later. |
|---|---|
| iPad | Requires iPadOS 15.4 or later. |
| iPod Touch | Requires iOS 15.4 or later. |
| Mac | Requires macOS 12.3 or later and a Mac with Apple M1 chip or later. |
| Size | 192.9 MB |
Part 2: Key Features of LumaFusion Video Editor
We will now highlight some essential features that can be considered about the LumaFusion video editor. These features will give a better understanding of the tool and provide a guideline on how to utilize the best functions with ease:
1. Interface
When understanding the interface of the LumaFusion app on iOS, many would think the application won’t provide extensive tools to work with. This video editor does not come with a bland user interface but provides some great functions and features on an interface that allows you to create professional-level videos.
With the option of adding titles, transitions, color grading, and effects, LumaFusion is a complete video editor that provides features that are not commonly observed in many desktop-based video editors. Regardless, it presents an efficient workspace that has managed all the functions properly in rows and different sections.

2. Video’s Layers
Creating proper movies on your iOS device is not difficult with LumaFusion. With the option of including six layers of video in the timeline, a lot can be done with them for improvising different sequences and multiple effects. Its picture-in-picture presets, layered transitions, graphic equalizer, and the use of additional plugins allow you to create complete videos with proper control.
Talking about some renowned iOS video editors in the market, you will find LumaFusion a much better option. iMovie, the dedicated video editor for iOS devices, can only embed two layers of videos in the timeline. This clearly explains why LumaFusion is a much better option with its video layers.

3. Powerful Keyframe
The keyframes function on LumaFusion is not challenging to work with on the video editor. You can ecstatically create animating effects with the help of the keyframe sounds within the application. These effects, once created, can be saved and used on other videos within the platform. To improve your effects on the mobile video editor, you can use the powerful keyframe feature of LumaFusion to create the best results.
With a small price to pay for the video editor, you can gain access to a diversity of keyframes that can help you design the perfect effects for your video.

4. Export to Final Cut Pro
Another impressive and touching feature this video editor provides to its users is its integration with Final Cut Pro - a proficient desktop video editor offered on macOS. You can easily export your created video to Final Cut Pro as an FCPXML.zip file directly after paying a one-time price. Users who are having a rough time editing the file on LumaFusion can easily shift to Final Cut Pro.
This process has disadvantages, regardless of the extensive control and accessibility provided between the applications. If you seek to use Final Cut Pro after editing a video on the LumaFusion app, you will have to add all the assets on FCP when you shift the file onto the platform.
Also, you might have to include many effects such as LUTs, Chroma key, and other relevant features. With this effort, you can easily put your video from LumaFusion to Final Cut Pro.
Part 3: Advantages and Disadvantages of LumaFusion Video Editor
Suppose you are considering using the LumaFusion video editor on your iOS device. In that case, there are a few advantages and disadvantages you must look into to understand more about the tool and get to an absolute decision:
Pros
- You can add third-party plugins to your video editor to enhance the video editing features. This allows you to put better effects, transitions, and enhancement elements in your video.
- It can create smooth slow-motion videos with 120fps and 240fps results.
- Multi-layer titles can be created within the platform and used in further actions.
- The display of the edited video can be previewed across an external monitor.
- It provides stability in video editing by using color tags within frame rates up to 18fps.
Cons
- For large video files, you might face lagging issues and audio synchronization within videos.
- To access the complete library of music and clips, you will have to subscribe to their additional plans.
- The tool is already available at a price tag, which is associated with more subscription plans, making it a devalued option.
Part 4: What’s New in LumaFusion 3.2 Version
The latest iteration of the LumaFusion app brings new and exciting features to the market. To learn more about these features, you will know better how the video editor is improving its operations:
1. 35+ New Transitions
LumaFusion 3.2 comes with a new set of transitions, with almost 35 in number. With different blur transitions, there are some new introductions in the transition section that offers multiple motions.

2. iCloud Backups
If you are confused about how to sustain the storage space on your iOS device, LumaFusion now provides iCloud Drive support and allows the user to back up their data. The data from the iCloud Drive can also be restored directly from the platform.

3. Rename Linked Folders
In the previous versions of LumaFusion, you could not rename the linked folders, or the platform incorrectly named them. With this update, you can now easily rename the linked folders by selecting and holding them within the interface.

4. Localizations for 2 New Versions
Traditional Chinese and Brazilian Portuguese are now among the added localizations in the video editor. The wide range of language support is helping this application set up a new precedent in the market for other mobile video editors.
Part 5: Best Alternative to LumaFusion Video Editor for iOS
LumaFusion video editor is a great option, but its drawbacks restrict it to some extent. To answer this, Wondershare Filmora provides a better option for video editing, offering compatibility on Windows and all other platforms supported by the LumaFusion video editing application. To know more about how good Filmora is, look ahead.
Wondershare Filmora is a complete, easy-to-use video editor providing many features and creativity options. For example, you can find the perfect set of effects and transitions on the platform by supporting a diversity of filters and text overlays. With other options, such as PIP mode and video beautification, Wondershare Filmora supports many file formats for video editing.
Free Download For Win 7 or later(64-bit)
Free Download For macOS 10.14 or later

Conclusion
This article has provided a prominent overview of the LumaFusion review, a video editor that has made video editing operations easier on smartphones. While it is a great iOS video editor, you can find other prominent functions with extensive layered support, intuitive keyframes, and consolidated connectivity to other platforms. As a better option, this article has offered Wondershare Filmora as a more potent tool with better compatibility and inexpensive features.
People Also Want to Know
1. How to download LumaFusion on Windows?
LumaFusion is unavailable on the Windows platform, where you can only find it on Mac, iOS, and Android. As an alternative to this video editor, you can try using Wondershare Filmora.
2. Can LumaFusion edit 4K?
You can easily edit, manage, and export 4K videos within the platform. LumaFusion provides extensive support for managing a broad range of video resolutions.
Also read:
- New How to Perfectly Use Canva Color Match for 2024
- Updated Step by Step to Crop Videos Using Lightworks
- 2024 Approved Here Are the Steps to Crop a Video in Sony Vegas Pro Step 1 Click on Import and Import the Video to Be Edited. Click on It and Drag-Drop to Timeline
- New In 2024, How to Comment on YouTube Live Chat
- In 2024, Create Slide Masking Effect Intro
- What Is Motion Tracking and How to Use It
- 2024 Approved REVIEW Whats Best 10 Software to Make AI Upscaling Video
- Updated In 2024, 15 Best Travel Vloggers That You Should Follow
- Updated Ultimate Guide To Make A Political Video
- Updated Have You Been Looking for Online YouTube Video Trimmer? You Will Be Introduced to Different Ways to Trim YouTube Videos as Introduced by YouTube Itself and some Online and Desktop Software to Help You Learn Video Trimming in This Article
- 3 Ways to Create Motion Text Effects for Your Video for 2024
- If You Are Looking for an Open-Source, Cross-Platform Video Editor, Shotcut Is a Great Choice for 2024 But Is It Truly the Best Video Editor or Is There a Better Alternative Available?
- New Quick Answer Why Did Filmora AI Portrait Attract People, In 2024
- 2024 Approved Guide Cropping and Combining Content in Wondershare Filmora Latest
- Updated 2024 Approved Featuring The Use of Camera Shake in Creating the Best Videos
- Updated Top 10 Fun Discord Bots You Need
- Updated 2024 Approved Create Slow Motion Videos Using Final Cut Pro with Ease
- Updated Finding the Best Game Recorder for PC
- New Live Chat With WooCommerce Leading Into the Live Selling World for 2024
- How to Transfer Data from Tecno Spark 20 to Any iOS Devices | Dr.fone
- In 2024, Bypass iCloud Activation Lock with IMEI Code From your Apple iPhone SE (2022)
- How To Bypass Activation Lock On Apple Watch Or iPhone 12 Pro Max?
- How to Mirror Your Nubia Red Magic 9 Pro+ Screen to PC with Chromecast | Dr.fone
- 10 Easy-to-Use FRP Bypass Tools for Unlocking Google Accounts On Asus ROG Phone 7 Ultimate
- In 2024, How To Bypass iCloud Activation Lock on Mac For Apple iPhone SE (2020)?
- Network Locked SIM Card Inserted On Your Vivo Y100A Phone? Unlock It Now
- How to Fix Life360 Shows Wrong Location On Infinix Smart 7? | Dr.fone
- Complete guide for recovering call logs on Vivo Y100 5G
- 6 Solutions to Fix Error 505 in Google Play Store on Tecno Camon 20 Premier 5G | Dr.fone
- Pattern Locks Are Unsafe Secure Your Infinix Note 30 VIP Racing Edition Phone Now with These Tips
- Title: Text Animation Intro Tutorial in Filmora
- Author: Chloe
- Created at : 2024-05-20 03:37:24
- Updated at : 2024-05-21 03:37:24
- Link: https://ai-editing-video.techidaily.com/text-animation-intro-tutorial-in-filmora/
- License: This work is licensed under CC BY-NC-SA 4.0.

