
The Power of Music in Videos (+Filmora Editing Tricks)

The Power of Music in Videos (+Filmora Editing Tricks)
No video is complete without suitable audio. Adding audio to a video is not that difficult, but choosing the right audio can be a hassle. You want something that captures the ears of the audience but, at the same time, compliments your video. The best way to do this is by adding music to your videos with Wondershare Filmora .
Free Download For Win 7 or later(64-bit)
Free Download For macOS 10.14 or later
The following passage will guide you through everything you must consider while choosing music for your videos. But first, we’ll show you how easy it is to alter your video with music using Wondershare Filmora.
How different types of music affect your videos
You can easily change the viewer’s perception using different music, even with the same visuals. The right song will elevate your video to another level and assist in relaying your feelings and emotions to the viewers. The following examples will illustrate how changing the audio changes the impression of the video.
Example #1
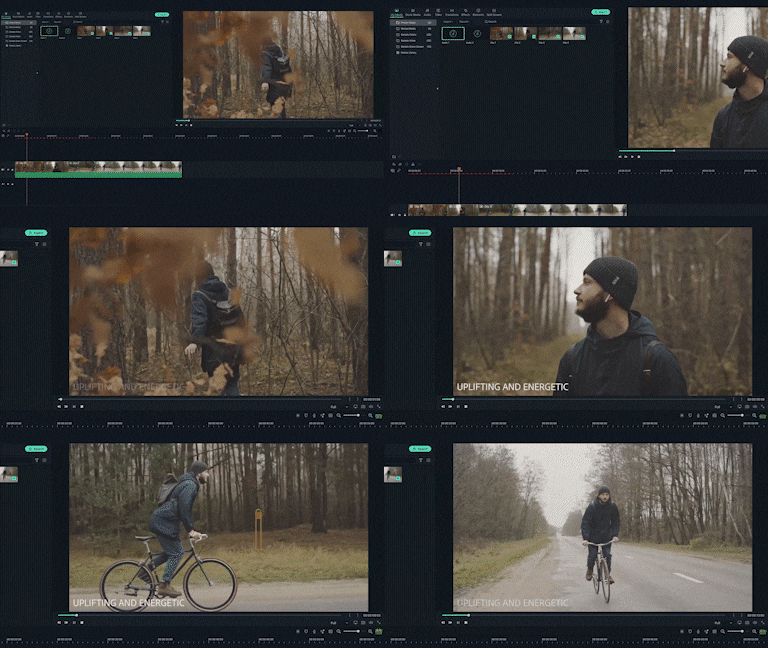
Let’s say you have a video of someone walking through the woods. Now without music audio, your video will be boring. You can quickly fix this by adding an upbeat song to make your video more energetic.
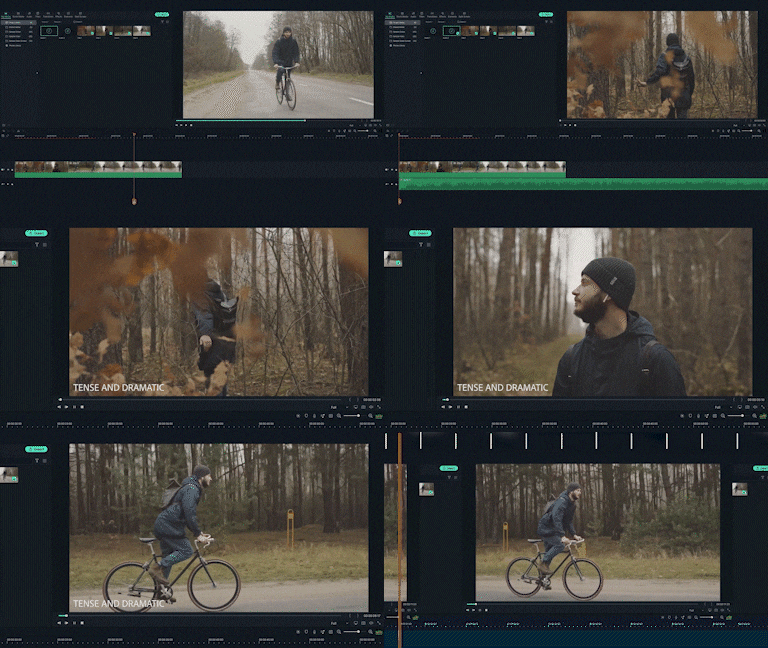
Using the same visuals, you can add a more tense and dramatic song, like from a horror movie. You have successfully changed the entire vibe of the same video from “inspiring” to “sinister.” It proves the importance of the balance between audio and visuals.
Example #2
For a better understanding, let’s look at a movie scene we all know and love. Take the entrance scene from Avengers: Endgame. The music used by the producer aims to excite the audience while building up the hype for the upcoming battle. However, if we change the audio of this scene, we end up with a completely different set of emotions that might not go too well with the shot.

Now that we’ve seen how crucial audio can be in a video, let’s see how to choose the best music audio for your video.
Tip #1: Identify the mood
As we’ve demonstrated before, the audio can change the entire mood of the video. The right music for any video will be the one that compliments the spirit of the visuals and relays the emotions the producer intended.
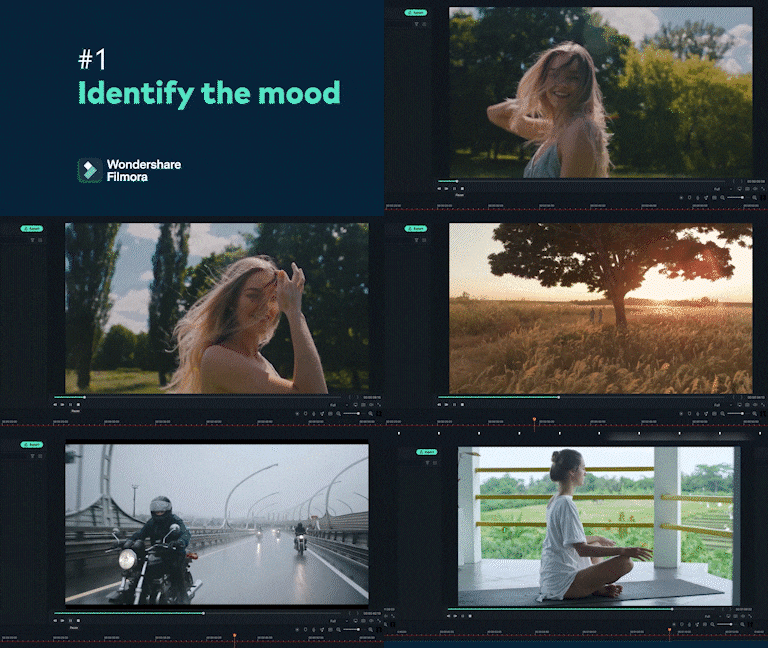
Rewatch your recorded clips until you know the mood portrayed by the visuals. Select music that matches the spirit of your visuals. For example, you would use different music for a sunny day compared to a cloudy day. Once you’ve figured out the mood and understand the emotions you want to elicit, search for audio that achieves this and balances out your visuals.
Tip #2: Video and music style
We’ve already established that different styles of music complement other types of videos. So, keep the type of your video in consideration. For example, is your video fast-paced and full of action, or is it more serious in nature, like an interview or documentary?

Once you have music that matches your video style, check the audio wave. The four most common patterns are steady, ascending, descending, or furious. The audio wave will help you select the visuals that best match that audio.
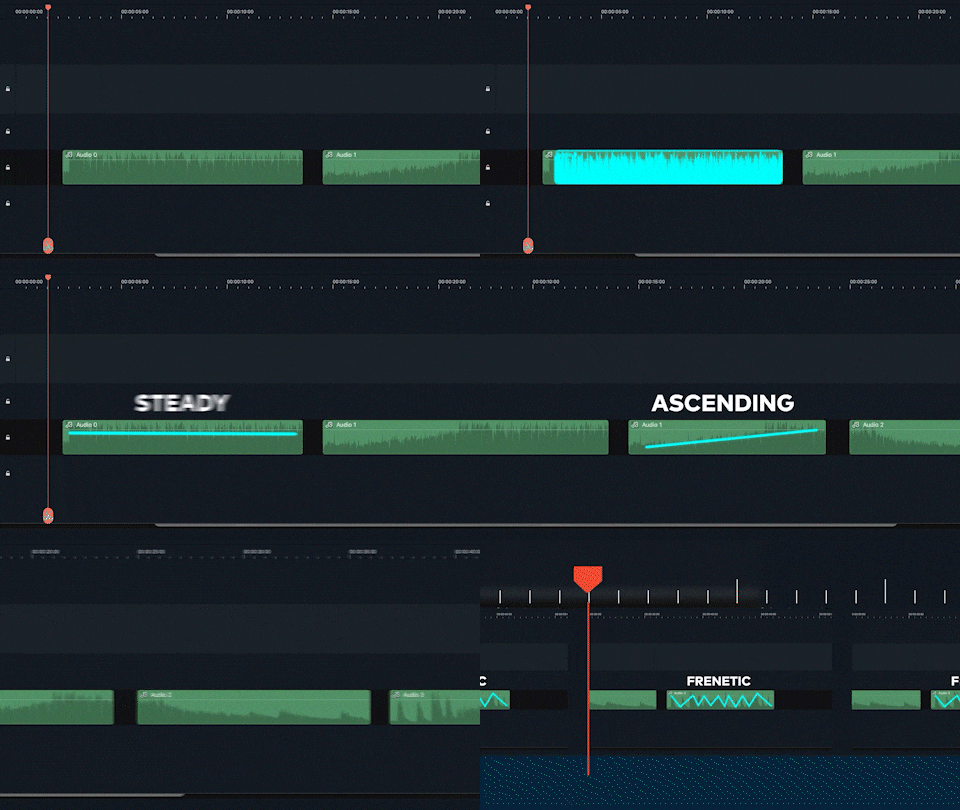
For example, if you’re using audio with an ascending audio wave, you would use visuals that build up with the audio. The beat drop will signal the transition to reveal a powerful shot.
Tip #3: Don’t force the music
As emphasized before, your music should match your video. We all have a favorite music genre, but sometimes that may not go well with our visuals. For example, you love country music but have a video about the nightlife in the city. Using country music in a video about the town does not match well and will confuse your audience.
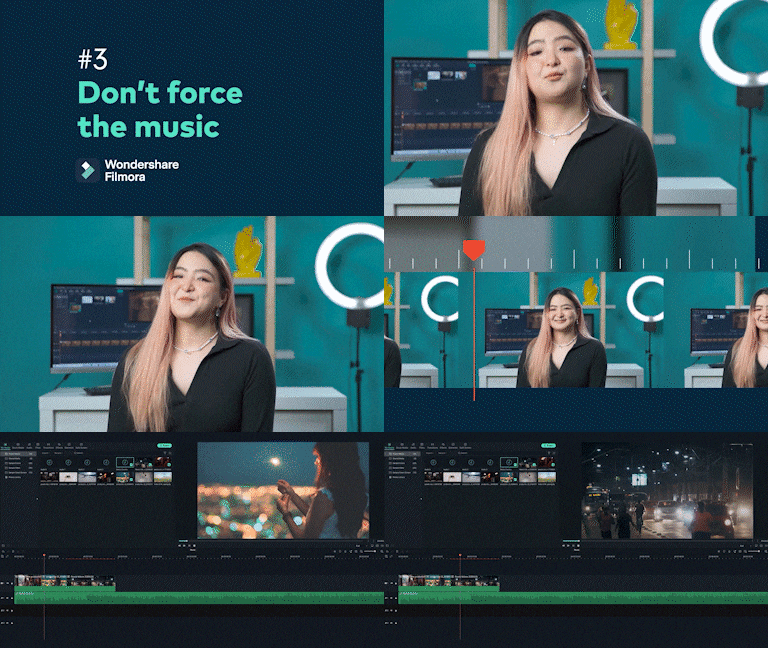
To get music that best suits our video, we must be open and explore all music genres. You’ll see how easy it is to scout a song that fits perfectly with your visuals. The easiest way is to choose a song that gives out the same emotions as intended by the visuals.
Final Words
Now, you clearly understand the importance of music in videos. The right music can uplift your video into a viral sensation, while the wrong music track will turn your video into a catastrophe. Remember to review the legalities of copyright and infringement before using any music in your videos to avoid legal issues. Make sure you have permission to use the music or use royalty-free music.
Share this article with your friends and family interested in making stunning videos with perfect music audio. Comment below on your favorite scene from a movie or show where the music perfectly matched the visuals and left you with goosebumps.
Free Download For macOS 10.14 or later
The following passage will guide you through everything you must consider while choosing music for your videos. But first, we’ll show you how easy it is to alter your video with music using Wondershare Filmora.
How different types of music affect your videos
You can easily change the viewer’s perception using different music, even with the same visuals. The right song will elevate your video to another level and assist in relaying your feelings and emotions to the viewers. The following examples will illustrate how changing the audio changes the impression of the video.
Example #1
Let’s say you have a video of someone walking through the woods. Now without music audio, your video will be boring. You can quickly fix this by adding an upbeat song to make your video more energetic.

Using the same visuals, you can add a more tense and dramatic song, like from a horror movie. You have successfully changed the entire vibe of the same video from “inspiring” to “sinister.” It proves the importance of the balance between audio and visuals.

Example #2
For a better understanding, let’s look at a movie scene we all know and love. Take the entrance scene from Avengers: Endgame. The music used by the producer aims to excite the audience while building up the hype for the upcoming battle. However, if we change the audio of this scene, we end up with a completely different set of emotions that might not go too well with the shot.

Now that we’ve seen how crucial audio can be in a video, let’s see how to choose the best music audio for your video.
Tip #1: Identify the mood
As we’ve demonstrated before, the audio can change the entire mood of the video. The right music for any video will be the one that compliments the spirit of the visuals and relays the emotions the producer intended.

Rewatch your recorded clips until you know the mood portrayed by the visuals. Select music that matches the spirit of your visuals. For example, you would use different music for a sunny day compared to a cloudy day. Once you’ve figured out the mood and understand the emotions you want to elicit, search for audio that achieves this and balances out your visuals.
Tip #2: Video and music style
We’ve already established that different styles of music complement other types of videos. So, keep the type of your video in consideration. For example, is your video fast-paced and full of action, or is it more serious in nature, like an interview or documentary?

Once you have music that matches your video style, check the audio wave. The four most common patterns are steady, ascending, descending, or furious. The audio wave will help you select the visuals that best match that audio.

For example, if you’re using audio with an ascending audio wave, you would use visuals that build up with the audio. The beat drop will signal the transition to reveal a powerful shot.
Tip #3: Don’t force the music
As emphasized before, your music should match your video. We all have a favorite music genre, but sometimes that may not go well with our visuals. For example, you love country music but have a video about the nightlife in the city. Using country music in a video about the town does not match well and will confuse your audience.

To get music that best suits our video, we must be open and explore all music genres. You’ll see how easy it is to scout a song that fits perfectly with your visuals. The easiest way is to choose a song that gives out the same emotions as intended by the visuals.
Final Words
Now, you clearly understand the importance of music in videos. The right music can uplift your video into a viral sensation, while the wrong music track will turn your video into a catastrophe. Remember to review the legalities of copyright and infringement before using any music in your videos to avoid legal issues. Make sure you have permission to use the music or use royalty-free music.
Share this article with your friends and family interested in making stunning videos with perfect music audio. Comment below on your favorite scene from a movie or show where the music perfectly matched the visuals and left you with goosebumps.
IMovie Review – Is It The Best Video Editor for Mac Users
If you are a Mac user and you are getting started in video editing, it is better if you start with a free video editing software. There is no need to download any external free video editor when you are a Mac user. This is because Mac comes with a pre-installed free video editor called iMovie editor. iMovie is a video editing app from Apple where you will get all the standard and some advanced features.
iMovie is extremely popular among Mac users for video editing because it is completely free and easy to use. In fact, iMovie is also available for iPhone and iPad users. You can start your video editing on your iPhone and transfer the same work to Mac to continue editing on your Mac. But the most important question is if iMovie editor is the best video editor for Mac users. Read our iMovie review and find out a better alternative.
Part 1. Key Features of iMovie
Even iMovie is completely free to use, it competes with several premium video editors in terms of features. There are only a handful of free video editors available that lets you edit 4K videos, and iMovie is one of them. Similarly, there are only a few premium video editors available that support editing the same video project on different devices like iMovie. Here are all the key features of iMovie that you should know.
Templates and Themes – iMovie comes with different templates and themes for creating different types of videos including cinematic videos. There are classy and trending themes available to create trailers and short films. These themes and templates have limited customization options so that you can adjust as per your requirements.
Basic Editing – iMovie lets you combine video clips, split a large video file, trim video parts, crop and rotate video. Besides, you get to zoom videos as well as resize them as you need. You can add texts and titles as well as apply different transitions wherever you want to.
Advanced Editing – You can change speed and turn your video clips into slow-motion videos. You can correct the color as well as stabilize them. Besides, you can apply green screen effect and split screen effect. Moreover, you can reverse video as well as put overlays on videos. iMovie is also capable of recording video and audio if you want to record your screen or webcam video.
Audio Editing – iMovie lets you edit audio as well which is an essential requirement in video editing. You can increase and decrease volume, change speed and add beat markers to a video if required. Coming to audio effects, you can apply fade-in and fade-out effects. You can mute the audio in your recorded video and add a background music instead. Moreover, you can add voiceover and choose royalty-free audio clips.
Transitions and Effects – Even though there are limited visual effects, there are unique and eye-catchy. iMovie keeps on adding new and trending effects with every update so that the users have enough options to make their videos stand out. iMovie also provides different backgrounds that you can use on your video to enhance its quality. Apart from visual effects, there are several standard audio effects available.
User Interface – iMovie comes with a simple and intuitive user interface that lets everyone edit videos instantly without prior experience. This is exactly why some users never go for premium video editors. The user interface is clean, and all options are readily available. You can upload media files on Media Library, and they are automatically categorized from where you can access them instantly.
Part 2. How to Edit Videos with iMovie?
iMovie comes pre-installed on Mac, and hence, there is no need to download and install the application. Coming to how to use iMovie, there are three types of projects you can choose on iMovie. They are Media, Projects, and Theater. Media is where your footages reside, Projects represent the main workspace, and Theater is where your finished projects reside. Here are the steps regarding iMovie edit video.
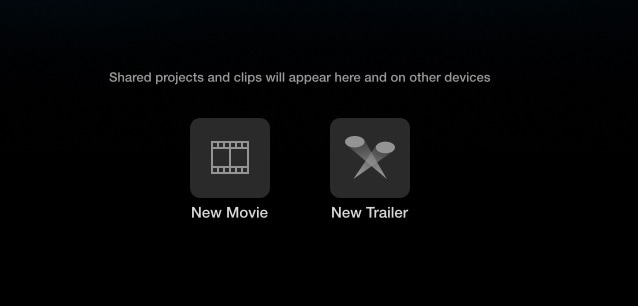
Step 1: Open iMovie and click on Projects. You will see two options Movie and Trailer. Click on Movie to edit your videos.
Step 2: Click on My Movie under Project Media and go to My Media. Import your video clips and audio files under My Media.
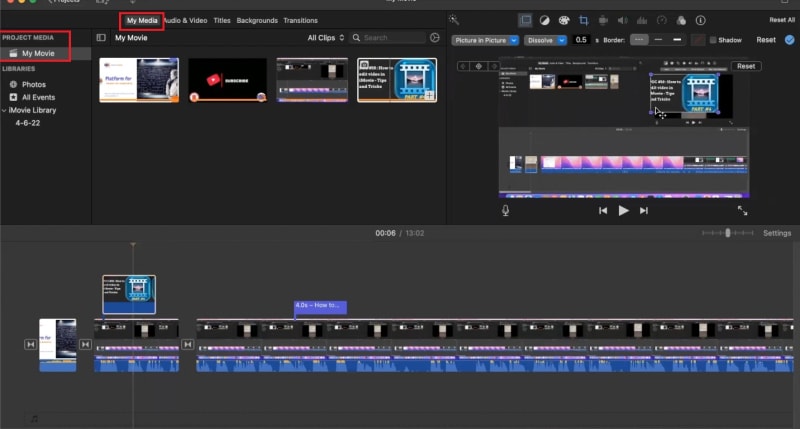
Step 3: Drag and drop the video clips and audio clips on the timeline in proper order. You can go for iMovie edit audio and video such as trimming as required.
Step 4: Go to Transitions located at the top bar beside My Media and place the desired transitions in between the video clips.
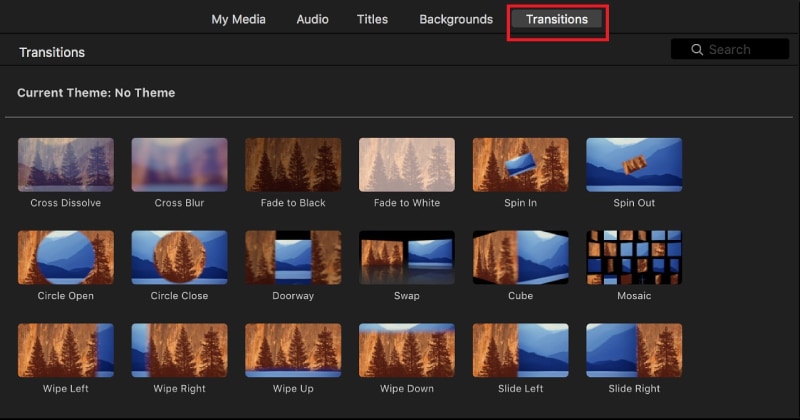
Step 5: Similarly, go to Titles located at the top bar beside Transitions and place them on the timeline wherever appropriate.
Step 6: Finally, check your edited video on the canvas and then go to the top-right corner and click on Export. You will have to option to save it in Theater and share on social media as well as through email and iTunes.

Part 3. Alternative to Edit Videos - Filmora
In spite of iMovie being a good video editor, Mac users search for a better alternative. This is because there are limited transitions and effects available. You can have two video tracks only on the timeline and there is lack of customization. Besides, the advanced features of video editing such as motion tracking are not available. Moreover, there are limited file formats supported for importing and exporting.
Wondershare Filmora is the best alternative to iMovie for Mac users. Filmora is a premium video editor where all the shortcomings of iMovie are taken care of. Filmora supports almost all file formats for media files. There is a wide range of transitions, effects, elements as well as animations available. Besides, there are different styles of texts and titles available along with stock media library. Here are the steps to edit videos with iMovie.
For Win 7 or later (64-bit)
For macOS 10.12 or later
Step 1: Download and install Filmora on your Mac. Launch Filmora and click on New Project.
Step 2: Drag and drop your video clips and audio files Project Media folder. Drag and place the video clips on the timeline and arrange per perfectly. Place audio files on the timeline on a different track.

Step 3: If you want to apply transitions, go to Transitions at the top bar and drag any transition in between video clips on the timeline. You can also insert texts from Titles and objects from Elements from the top bar.

Step 4: Play the video to see the changes you have made, and click on Export button to save the video when you are satisfied.

Part 4. FAQs about iMovie
Is iMovie good for video editing?
Yes, iMovie is good for basic video editing. You can edit 4K videos, and iMovie is available on macOS and iOS. If you are a beginner, iMovie is perfect for you. If you want advanced editing features, we recommend Wondershare Filmora.
What’s better Premiere Pro or iMovie?
In terms of features and functionalities, Premiere Pro is far better than iMovie. However, Premiere Pro is more for advanced video editing while iMovie is more for beginners. iMovie is simpler to use than Premiere Pro, and hence, beginners will love it.
Can I make YouTube videos with iMovie?
Yes, you can make YouTube videos with iMovie as it has all the required tools and options. Import your video clips and audio files on the timeline, go for iMovie edit clip like trim and crop as required, add transitions, texts, and effects as applicable and publish your finished video on YouTube.
For macOS 10.12 or later
Step 1: Download and install Filmora on your Mac. Launch Filmora and click on New Project.
Step 2: Drag and drop your video clips and audio files Project Media folder. Drag and place the video clips on the timeline and arrange per perfectly. Place audio files on the timeline on a different track.

Step 3: If you want to apply transitions, go to Transitions at the top bar and drag any transition in between video clips on the timeline. You can also insert texts from Titles and objects from Elements from the top bar.

Step 4: Play the video to see the changes you have made, and click on Export button to save the video when you are satisfied.

Part 4. FAQs about iMovie
Is iMovie good for video editing?
Yes, iMovie is good for basic video editing. You can edit 4K videos, and iMovie is available on macOS and iOS. If you are a beginner, iMovie is perfect for you. If you want advanced editing features, we recommend Wondershare Filmora.
What’s better Premiere Pro or iMovie?
In terms of features and functionalities, Premiere Pro is far better than iMovie. However, Premiere Pro is more for advanced video editing while iMovie is more for beginners. iMovie is simpler to use than Premiere Pro, and hence, beginners will love it.
Can I make YouTube videos with iMovie?
Yes, you can make YouTube videos with iMovie as it has all the required tools and options. Import your video clips and audio files on the timeline, go for iMovie edit clip like trim and crop as required, add transitions, texts, and effects as applicable and publish your finished video on YouTube.
For macOS 10.12 or later
Step 1: Download and install Filmora on your Mac. Launch Filmora and click on New Project.
Step 2: Drag and drop your video clips and audio files Project Media folder. Drag and place the video clips on the timeline and arrange per perfectly. Place audio files on the timeline on a different track.

Step 3: If you want to apply transitions, go to Transitions at the top bar and drag any transition in between video clips on the timeline. You can also insert texts from Titles and objects from Elements from the top bar.

Step 4: Play the video to see the changes you have made, and click on Export button to save the video when you are satisfied.

Part 4. FAQs about iMovie
Is iMovie good for video editing?
Yes, iMovie is good for basic video editing. You can edit 4K videos, and iMovie is available on macOS and iOS. If you are a beginner, iMovie is perfect for you. If you want advanced editing features, we recommend Wondershare Filmora.
What’s better Premiere Pro or iMovie?
In terms of features and functionalities, Premiere Pro is far better than iMovie. However, Premiere Pro is more for advanced video editing while iMovie is more for beginners. iMovie is simpler to use than Premiere Pro, and hence, beginners will love it.
Can I make YouTube videos with iMovie?
Yes, you can make YouTube videos with iMovie as it has all the required tools and options. Import your video clips and audio files on the timeline, go for iMovie edit clip like trim and crop as required, add transitions, texts, and effects as applicable and publish your finished video on YouTube.
For macOS 10.12 or later
Step 1: Download and install Filmora on your Mac. Launch Filmora and click on New Project.
Step 2: Drag and drop your video clips and audio files Project Media folder. Drag and place the video clips on the timeline and arrange per perfectly. Place audio files on the timeline on a different track.

Step 3: If you want to apply transitions, go to Transitions at the top bar and drag any transition in between video clips on the timeline. You can also insert texts from Titles and objects from Elements from the top bar.

Step 4: Play the video to see the changes you have made, and click on Export button to save the video when you are satisfied.

Part 4. FAQs about iMovie
Is iMovie good for video editing?
Yes, iMovie is good for basic video editing. You can edit 4K videos, and iMovie is available on macOS and iOS. If you are a beginner, iMovie is perfect for you. If you want advanced editing features, we recommend Wondershare Filmora.
What’s better Premiere Pro or iMovie?
In terms of features and functionalities, Premiere Pro is far better than iMovie. However, Premiere Pro is more for advanced video editing while iMovie is more for beginners. iMovie is simpler to use than Premiere Pro, and hence, beginners will love it.
Can I make YouTube videos with iMovie?
Yes, you can make YouTube videos with iMovie as it has all the required tools and options. Import your video clips and audio files on the timeline, go for iMovie edit clip like trim and crop as required, add transitions, texts, and effects as applicable and publish your finished video on YouTube.
How to Remove Audio From Video on Mac? Free and Official Solutions
Videography is getting into a trend nowadays. Everyone is recording videos for different reasons. However, when shooting outside, background sounds and noise reduce video quality.
You can remove audio from your video on Mac devices using different software. For instance, you can go for iMovie to remove sound from video on Mac. Filmora also allows you to remove audio from video on Mac.
Method 1: Use online and free solutions to mute audio in videos
1. Canva
Canva is a free design platform for anyone. It has both web and app versions. A very user-friendly graphic design tool that is easy to use, even for those with no design experience.
Canva offers a wide selection of templates and over 1 million templates. A library of over 2 million stock photos and illustrations for free. It also has a paid option at an affordable price.
An Ultimate Guide to How to remove audio from video in Canva?
To remove audio from your video in Canva, you can do so by following these simple steps:
Step1 Open the video in Canva.
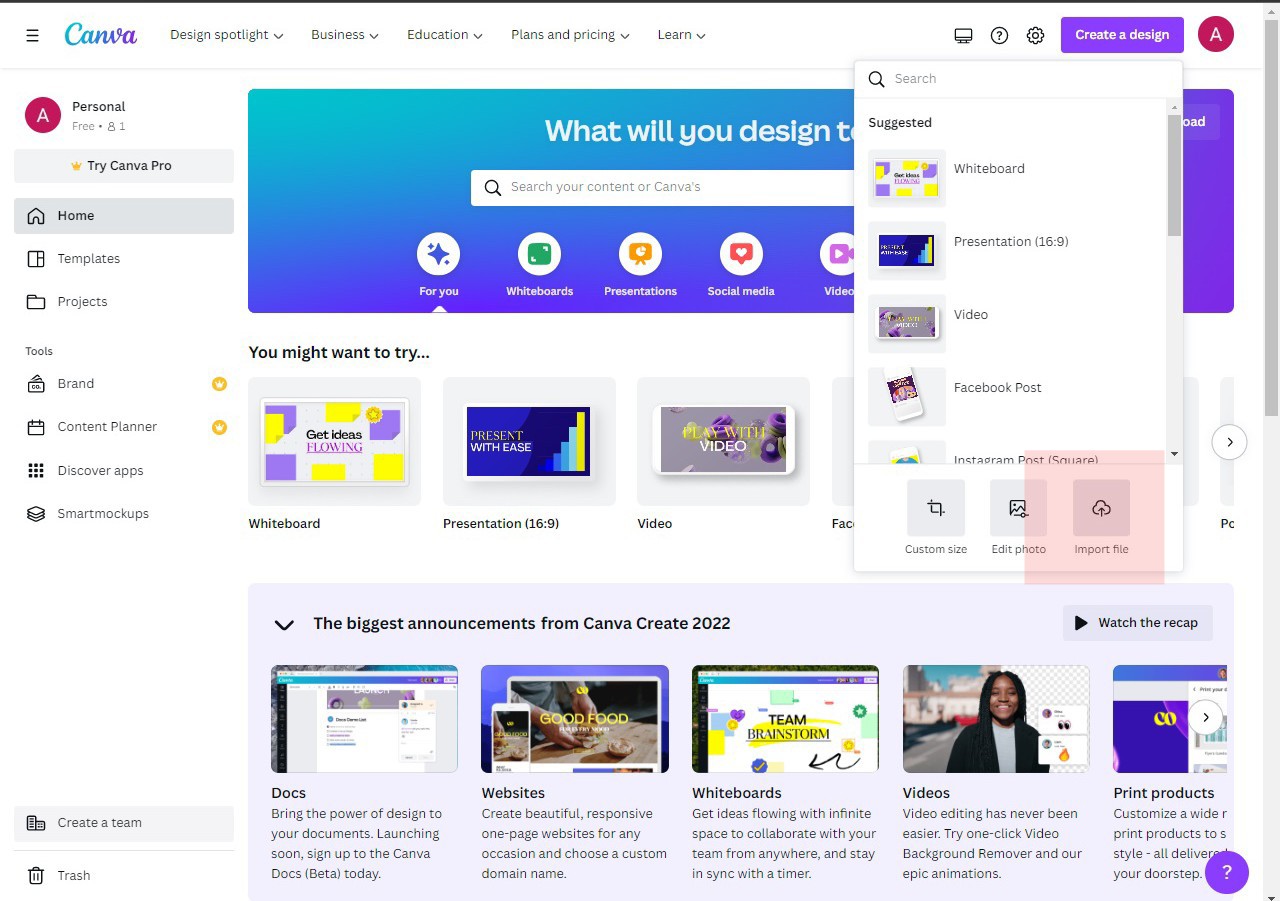
Step2 Click on the “Audio” tab in the toolbar and remove the audio.
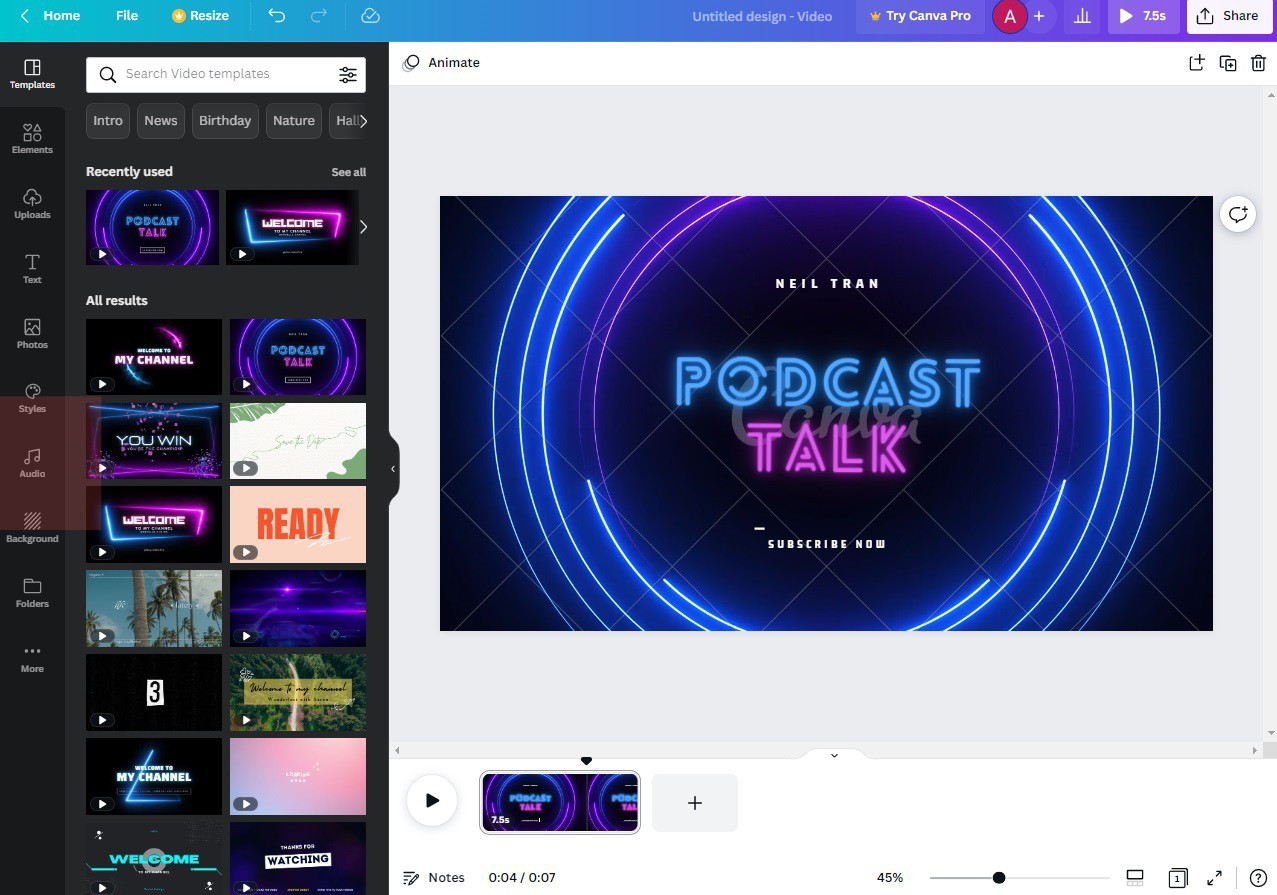
Step3 Save the video in desired option.
2. Clideo
Clideo is a cloud-based video editing tool that offers a simple yet powerful way to edit videos. With Cleo, you can trim, crop, merge, and audio or text to their videos.
Its user-friendly interface makes it easy to edit videos. Clideo offers a variety of effects and transitions that let you create videos that look unique. It supports a wide range of video formats, making it easy to export your videos.
An Ultimate Guide to How to remove audio from video in Clideo?
This online video editor offers a straightforward way to remove audio from any video file.
Here’s how you can do it:
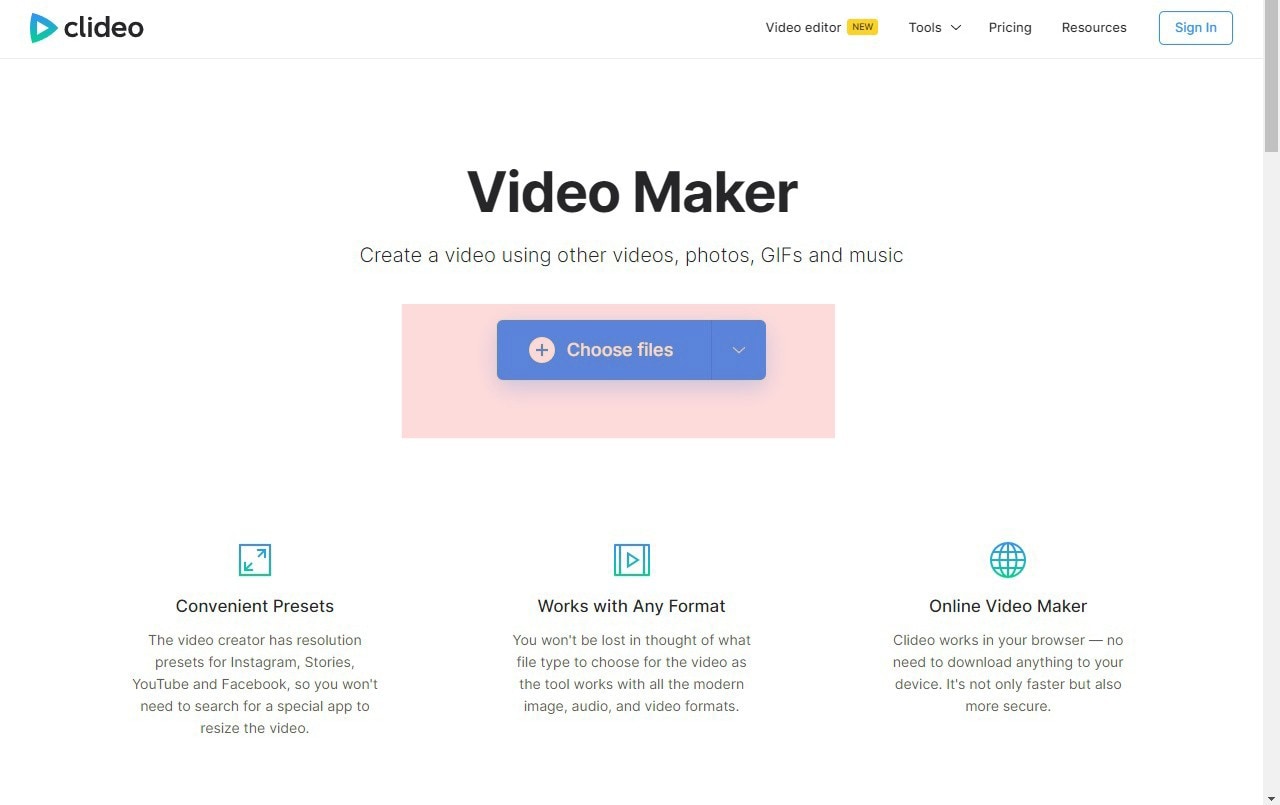
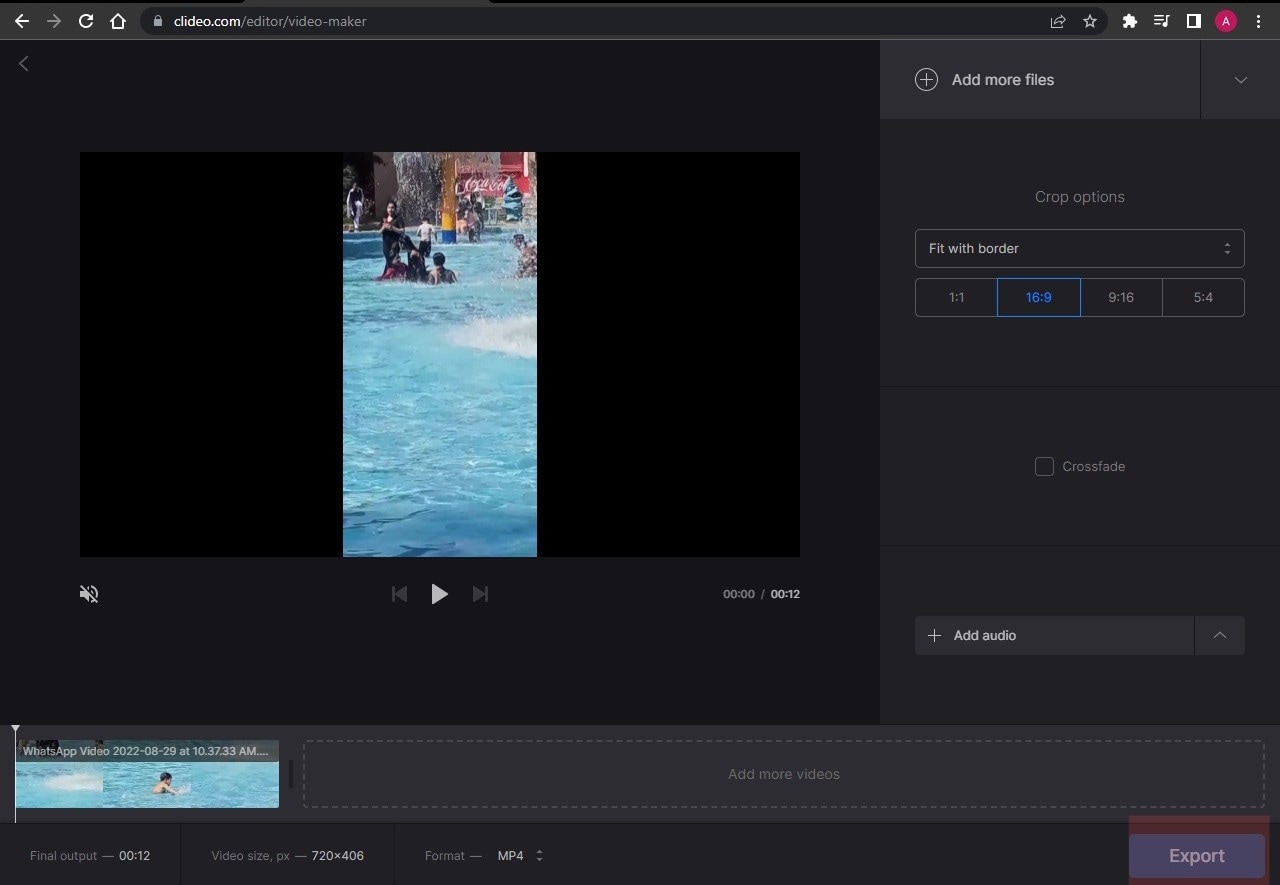
Step1 Go to clideo.com and upload the video from which you want to remove the audio. You can either drag and drop the file into the designated area or click the “Choose file” button.
Step2 Once the video is uploaded, select the “Mute” option from the toolbar above the video player.
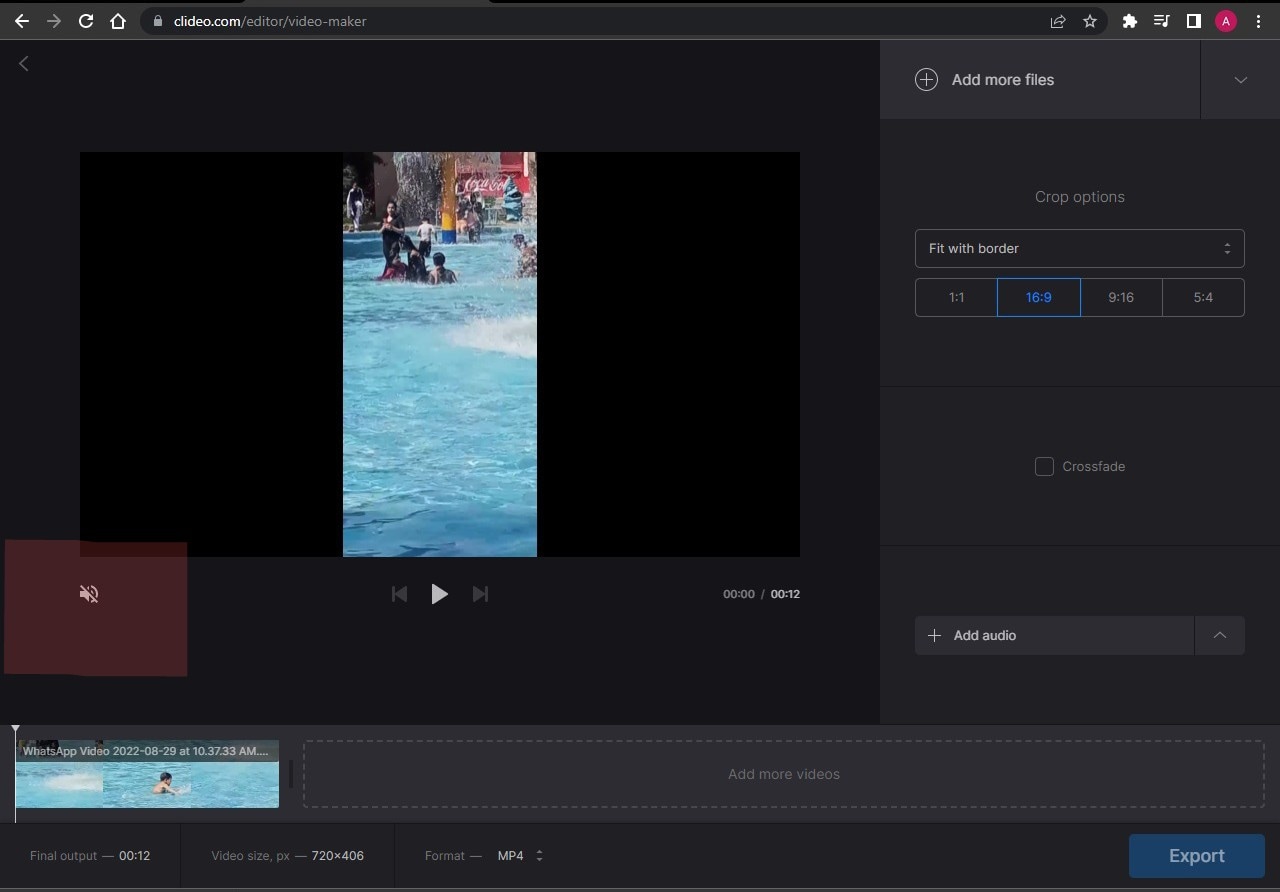
Step3 Click on “Export” to save the video without audio.
3. Ezgif
Ezgif.com is a great online resource for creating and editing GIF images. This online software has a user-friendly interface.
You can upload images or video files from your computer or a URL, and Ezgif will create a GIF for you. It lets you edit your GIFs before you download them. You can crop, resize, rotate, and reverse your GIFs and add text, filters, audio, and other effects.
How to remove audio from video in Ezgif?
To remove audio from a video using Ezgif, follow the steps below;
Step1 Upload the video to the website.
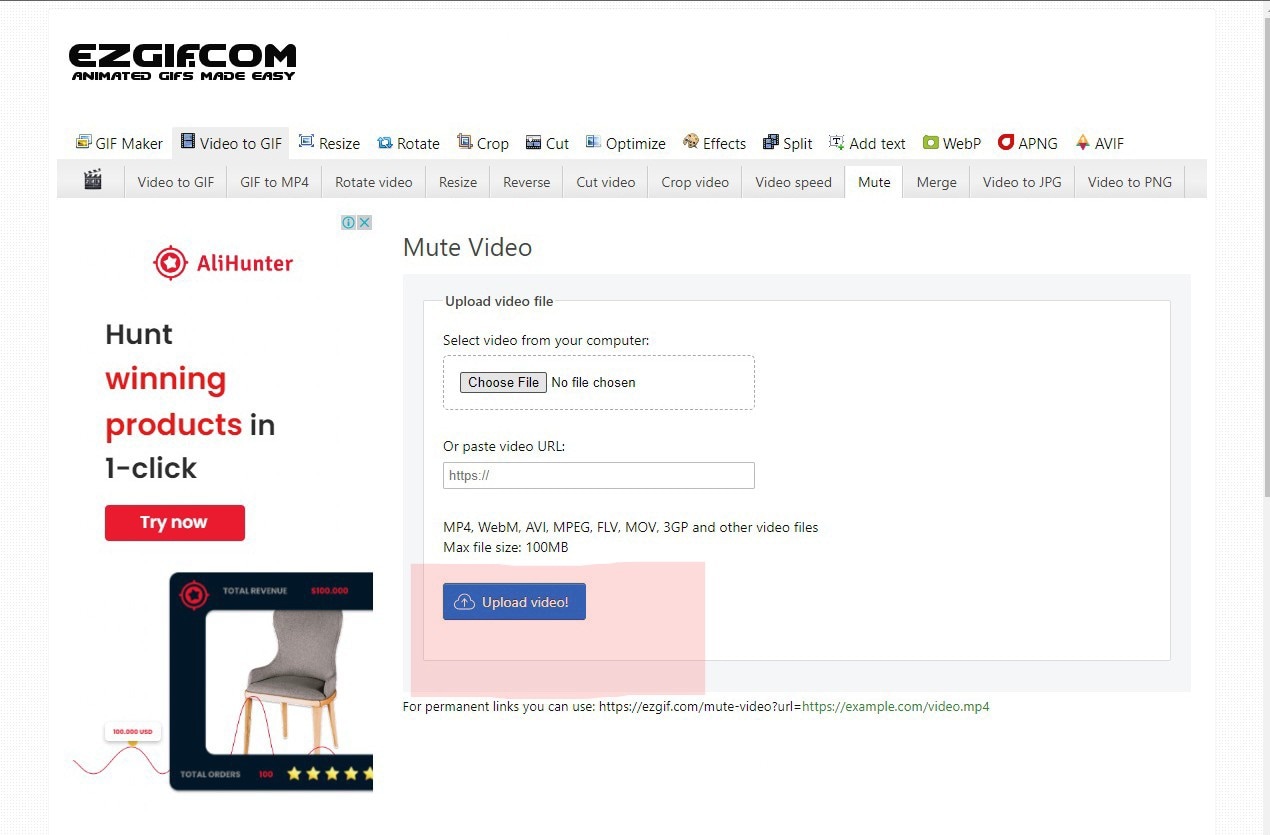
Step2 Once the video is uploaded, select the “Audio” tab and click on the “Remove audio” button.

Step3 It will remove the audio from the video, and you can download the new video file.
Method2: Use Apple official tools to remove audio from videos
1.QuickTime
QuickTime is a video editor that comes installed on all Mac computers. It is easy to use yet packed with features that allow you to create, edit, and share your work.
QuickTime includes a basic set of video editing features perfect for simple tasks like trimming a clip or adding a title. You can export your video in various formats or upload it directly to YouTube.
An Ultimate Guide to How to remove audio from video in QuickTime?
You can remove and mute the audio from video in Quicktime as follows:
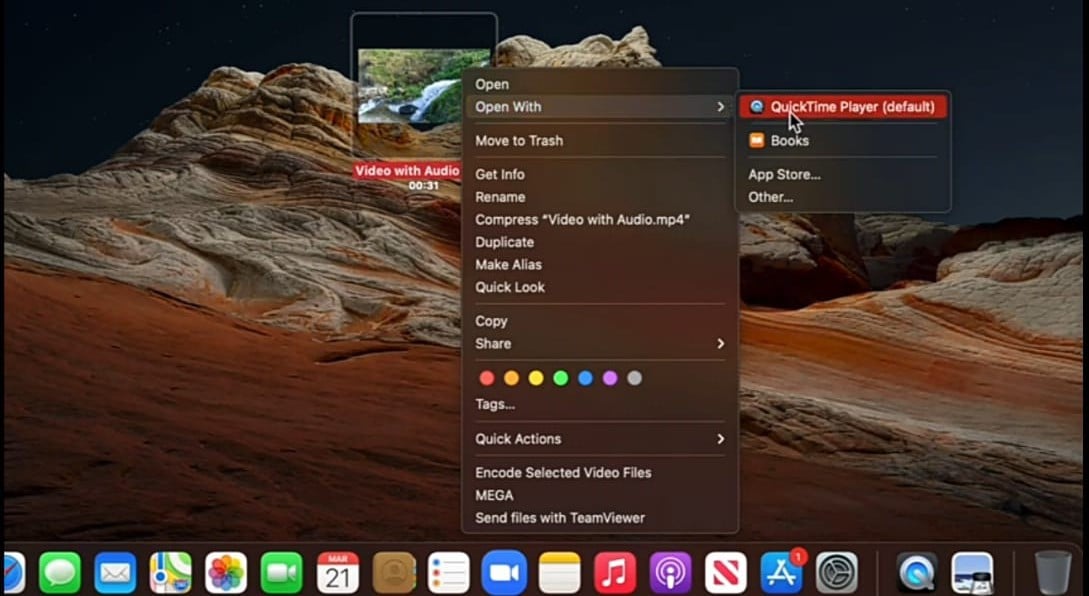
Step1 Open the video with “QuickTime Player,” from which you want to remove the audio.
Step2 Select “Edit” from the taskbar and click “Remove Audio.”
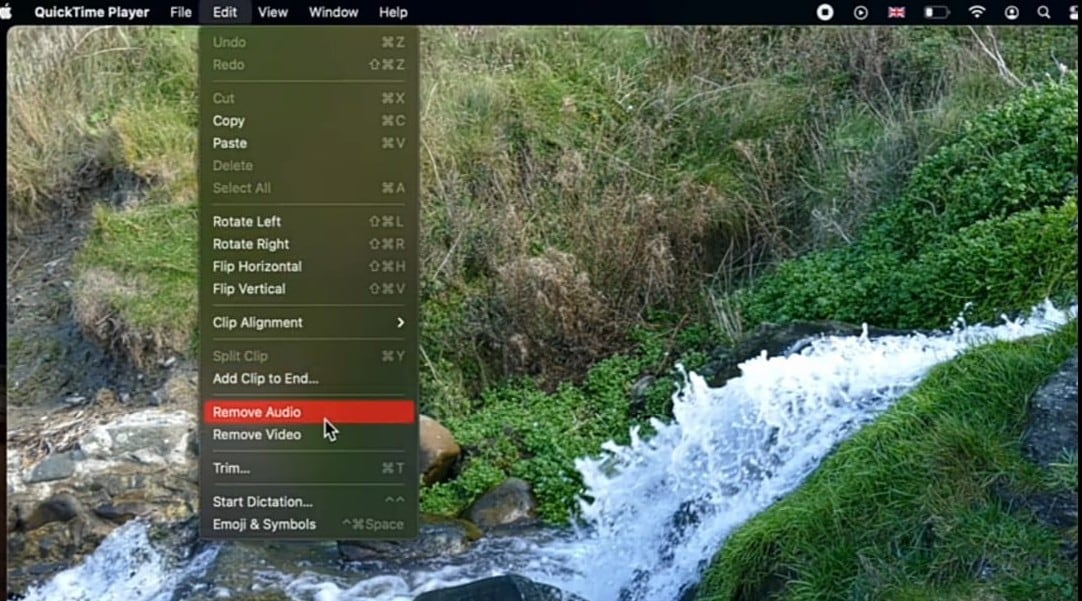
Step3 Now select ‘File” and then click “Save.” It will save the muted video.
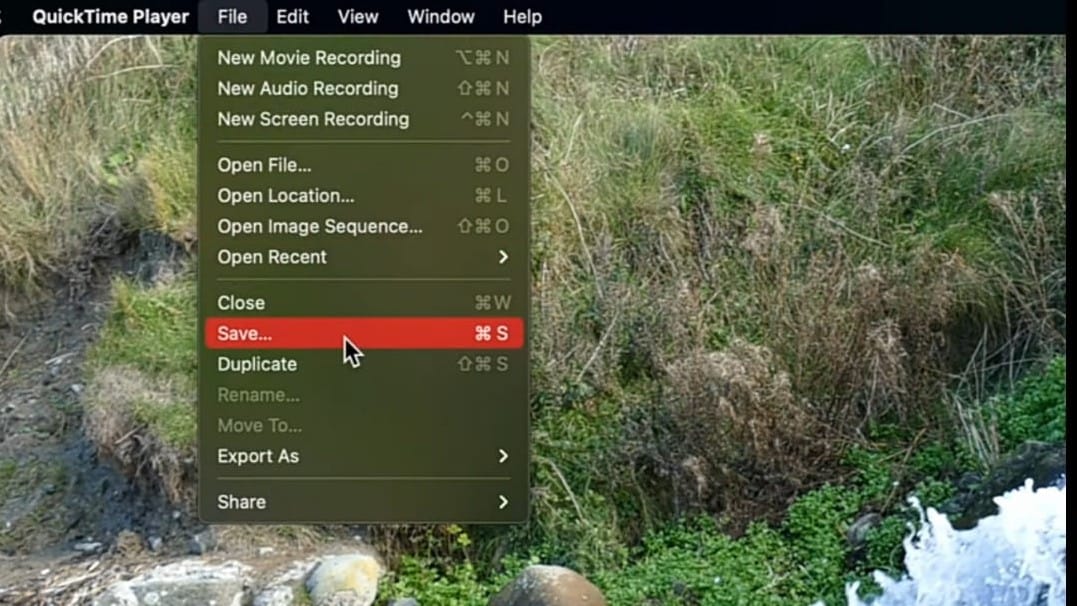
2. iMovie:
iMovie is a video editing software application by Apple Inc. It was released in 1999 as a Mac OS. iMovie is a cross-platform application with the Mac OS X operating system and iOS.
It is easy to use and free. You can use iMovie to make movies from your photos and video clips. You can add titles, transitions, filters, text, background music, audio, color correction, animations, and video effects.
How to remove audio from video in iMovie?
There are a few different ways that you can remove audio from video in iMovie.
Step1 Click on the “Movie” button. Select the video whose audio is to be removed.
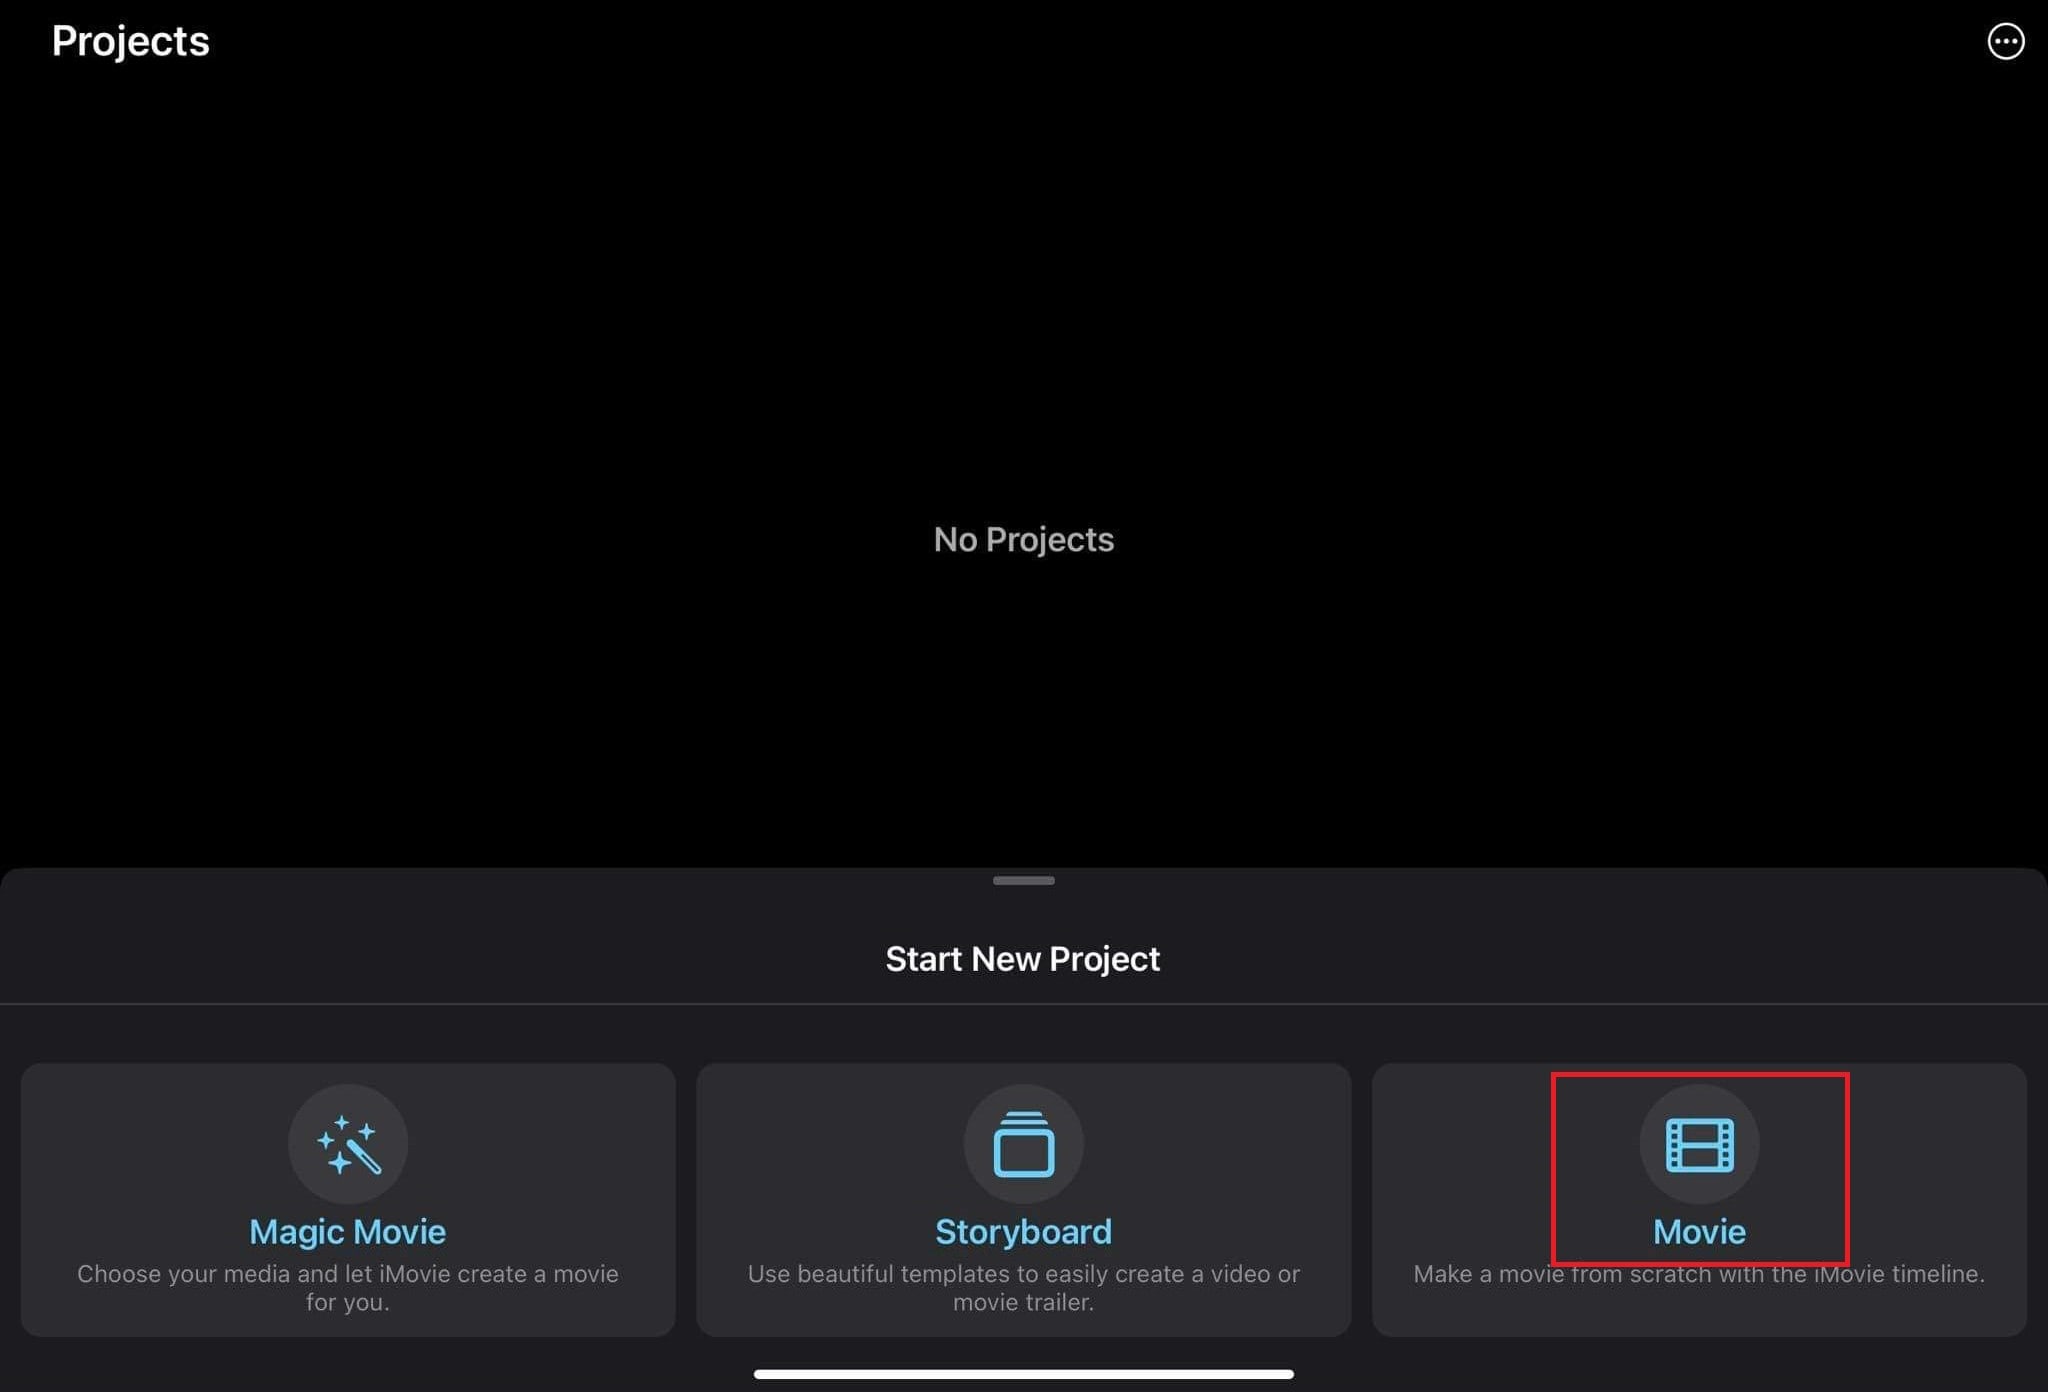
Step2 Now press and hold the timeline. Some options will appear. Click on the “Volume” button.
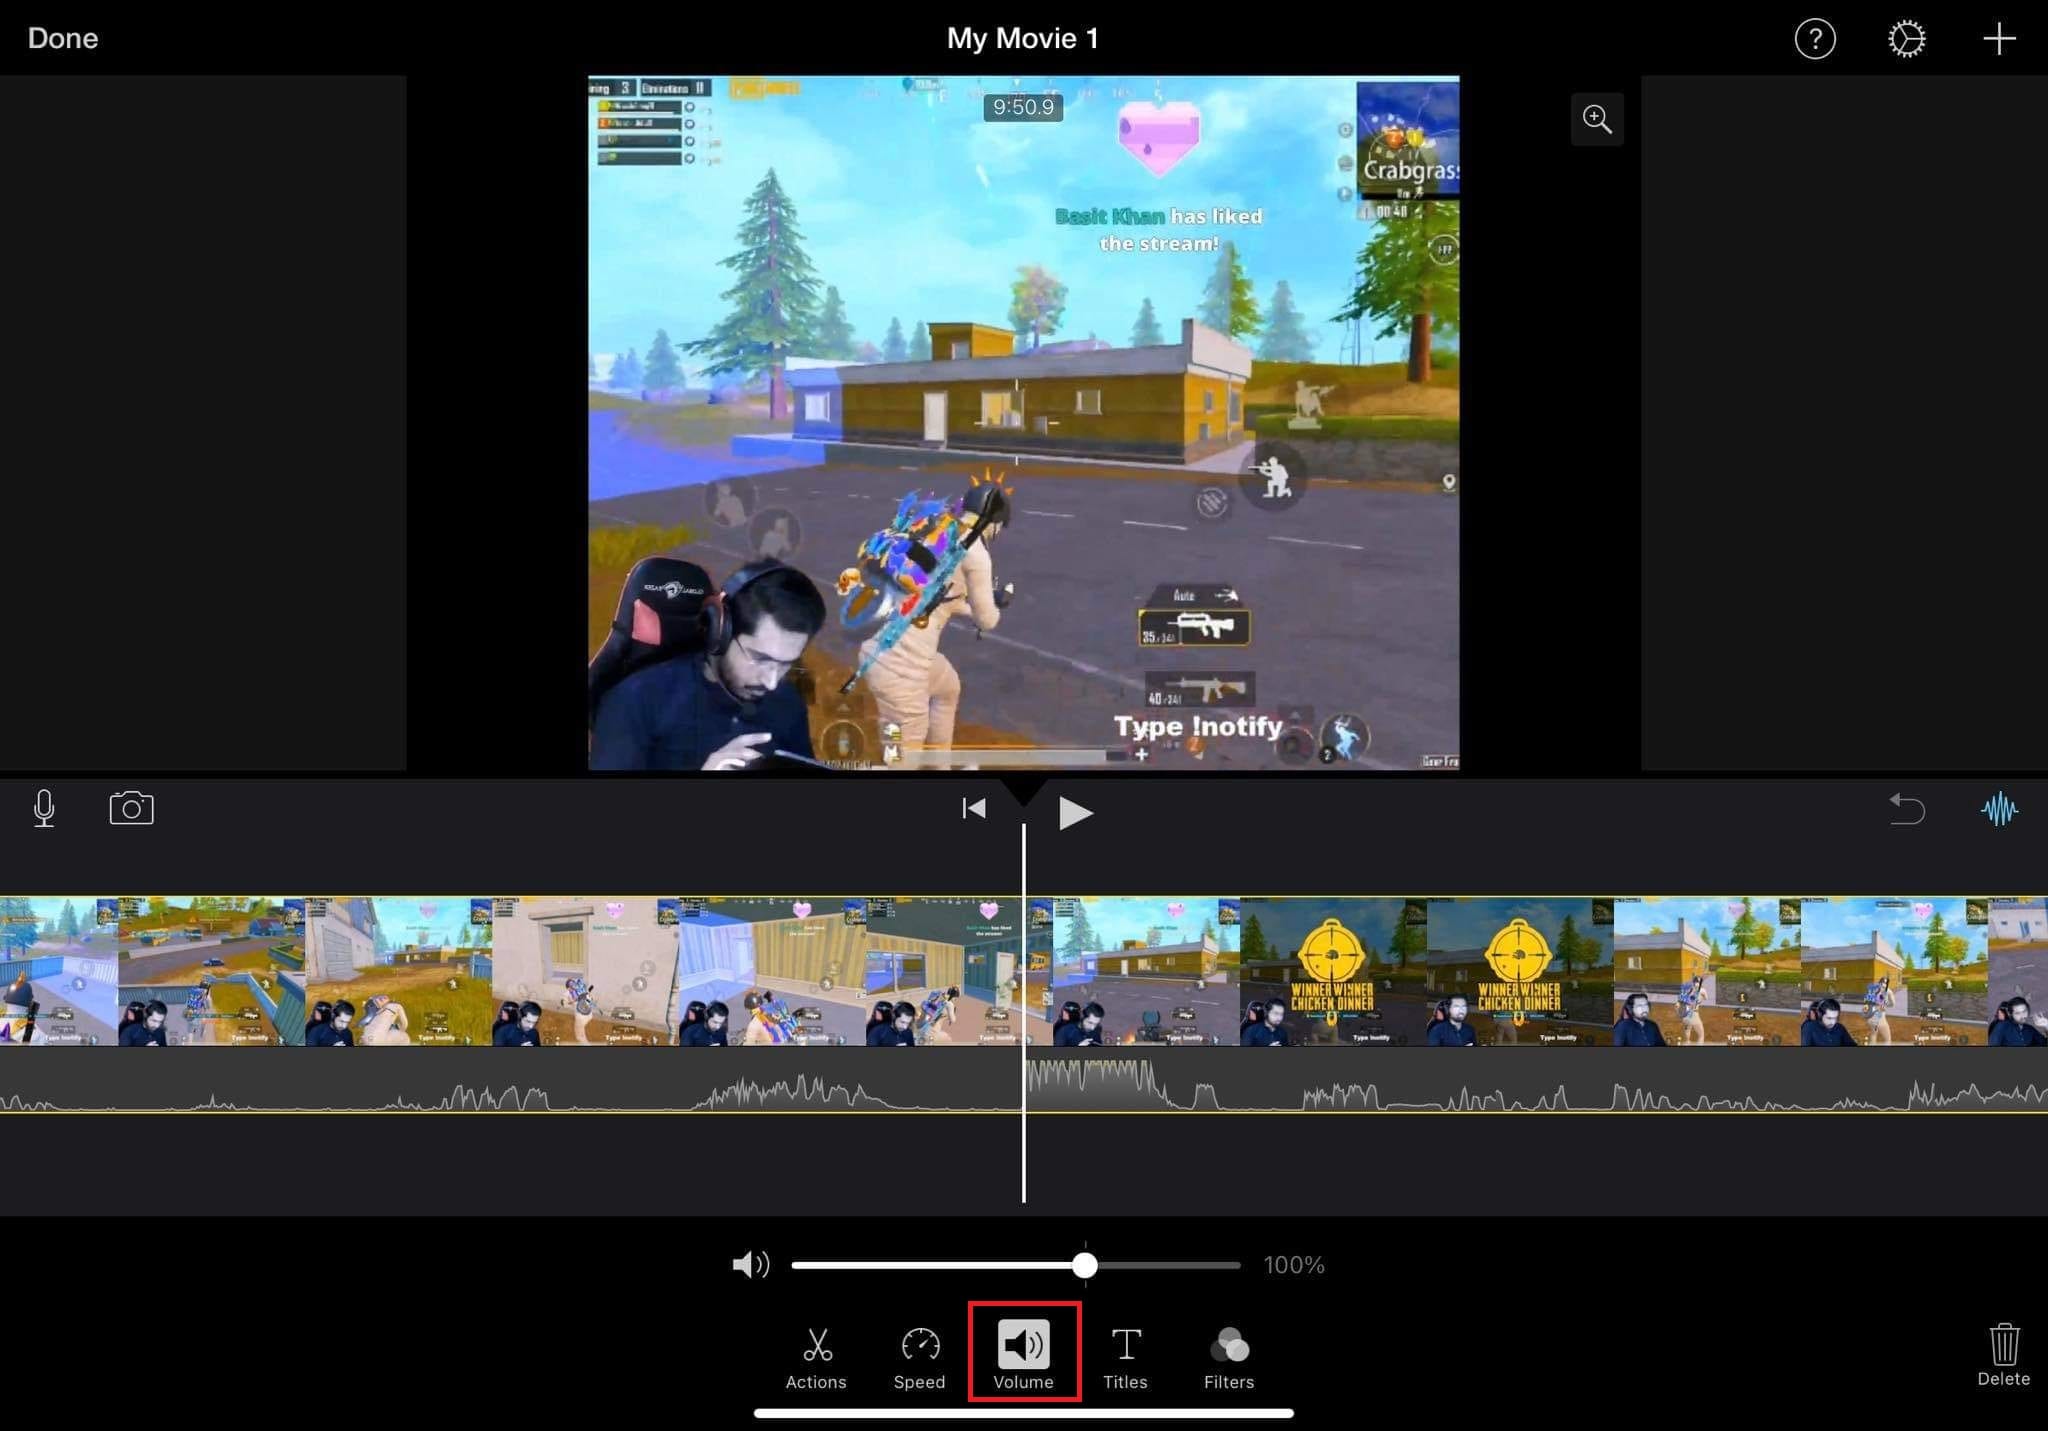
Step3 Mute the audio.
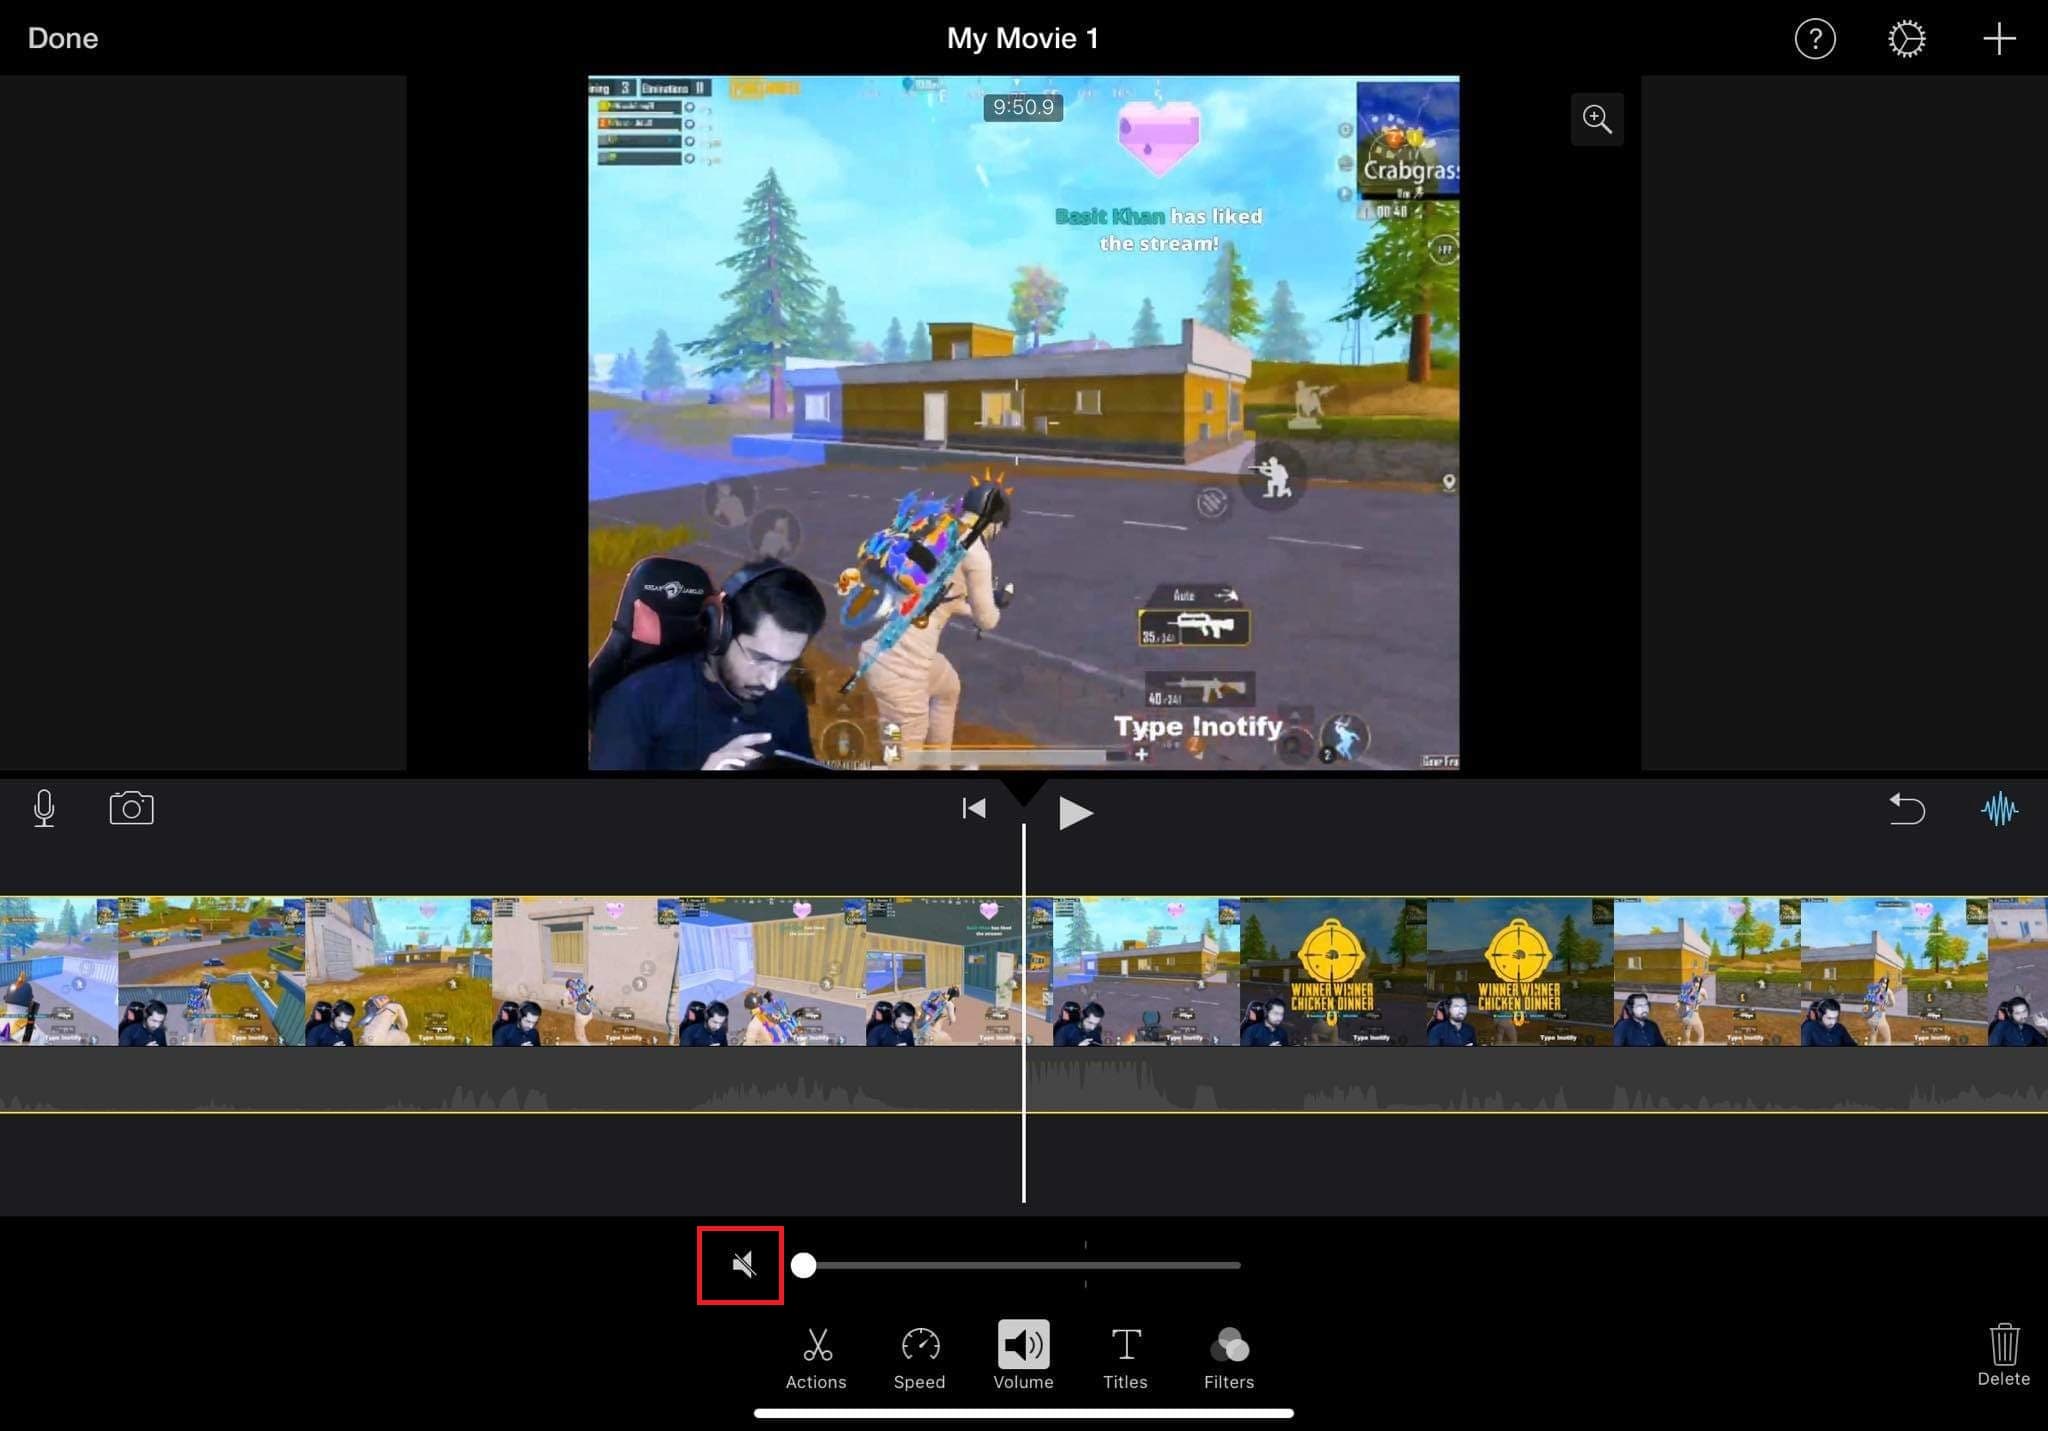
Step4 Now release the timeline and click the “arrow “button.
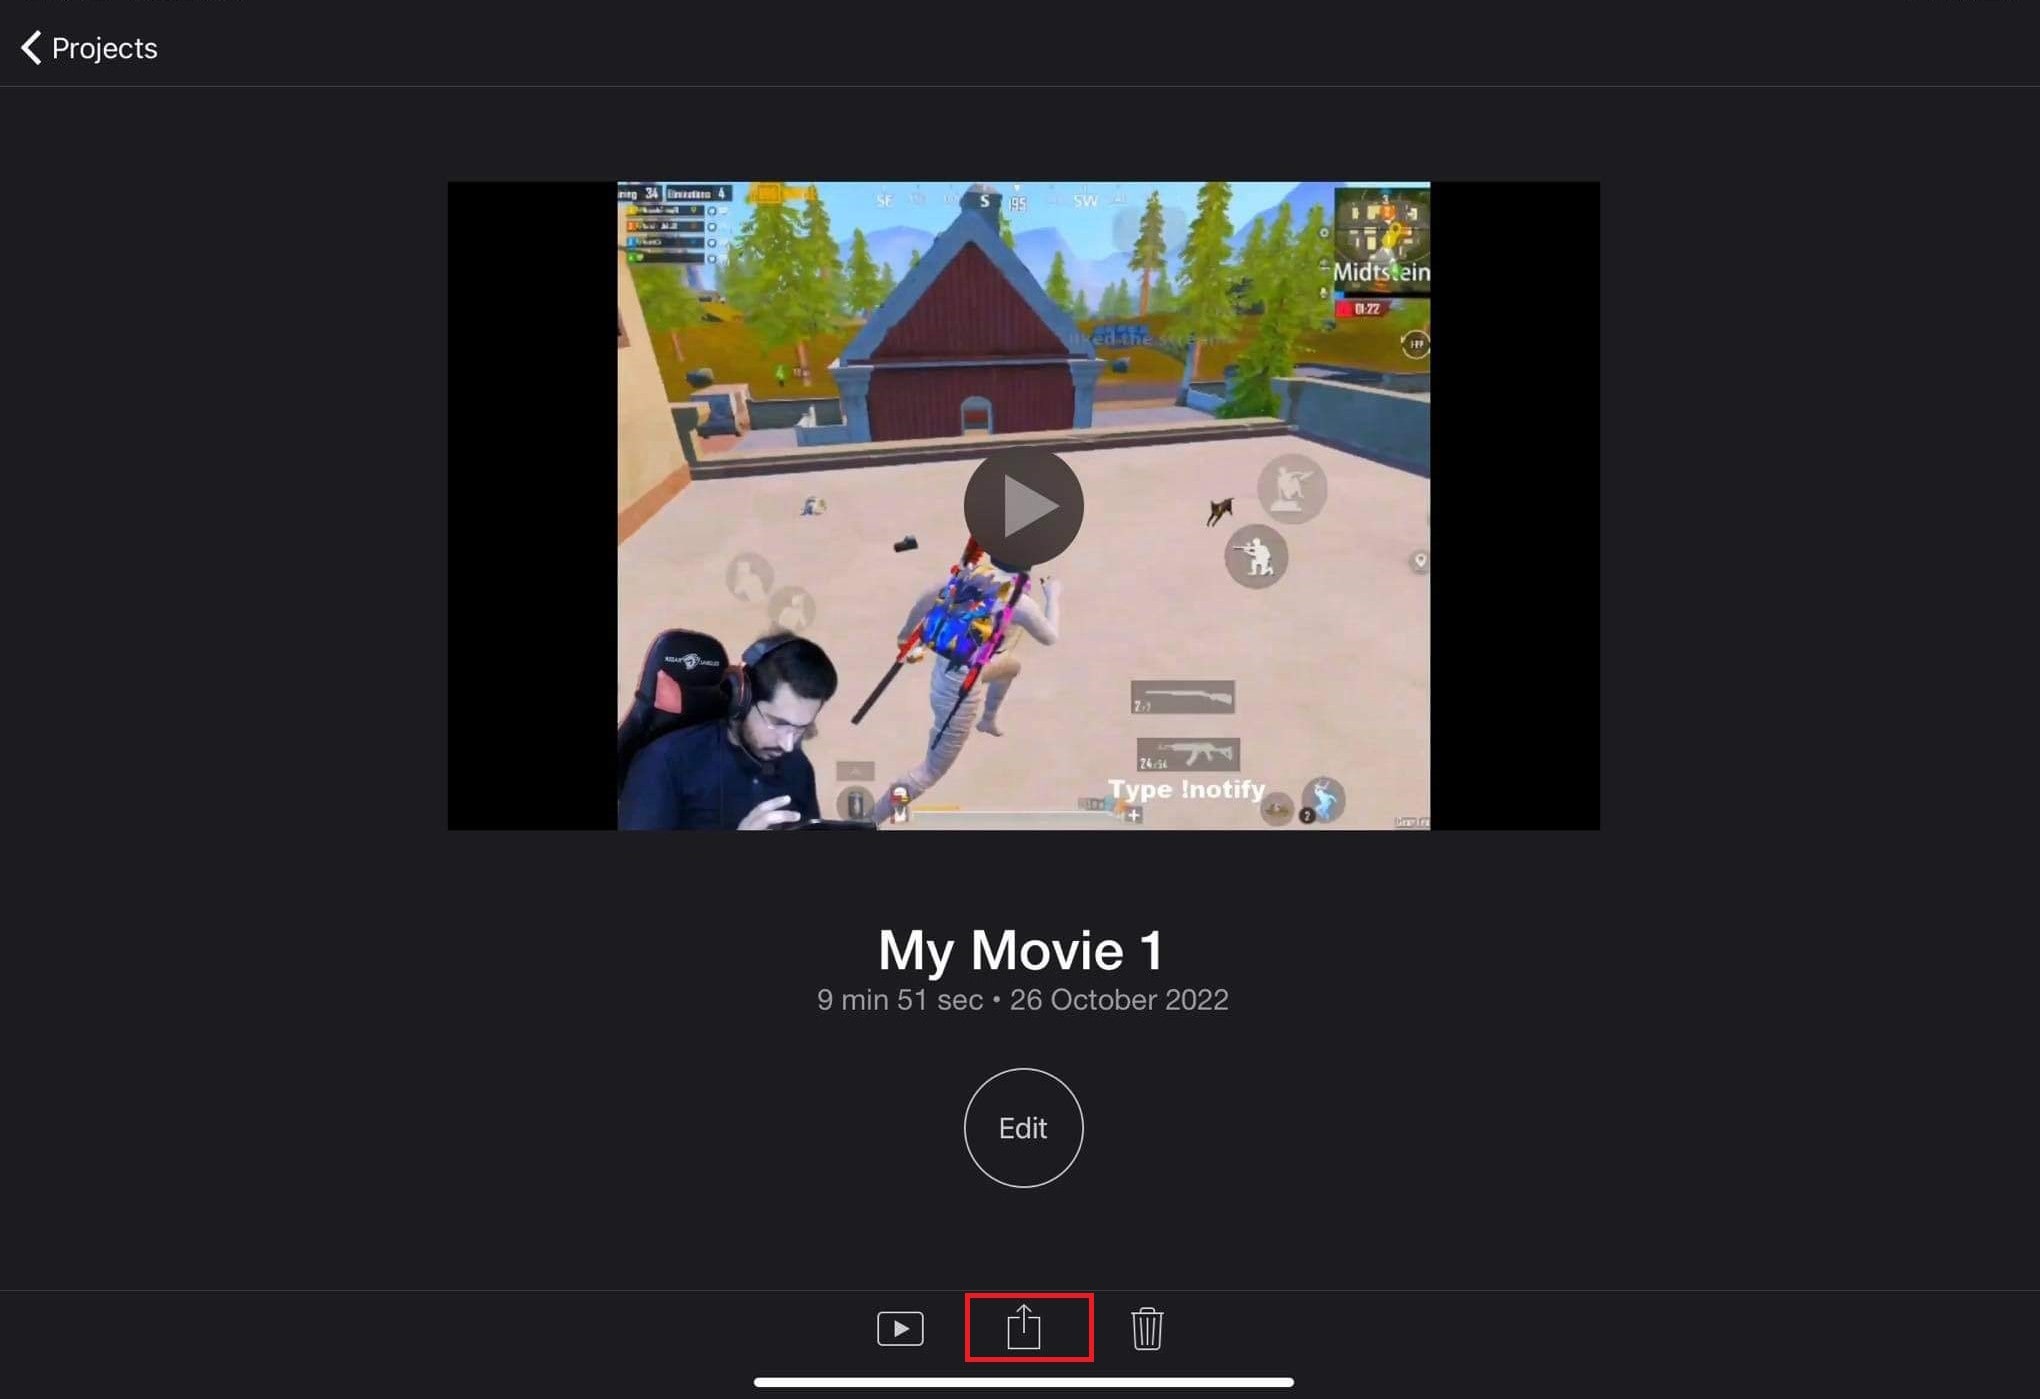
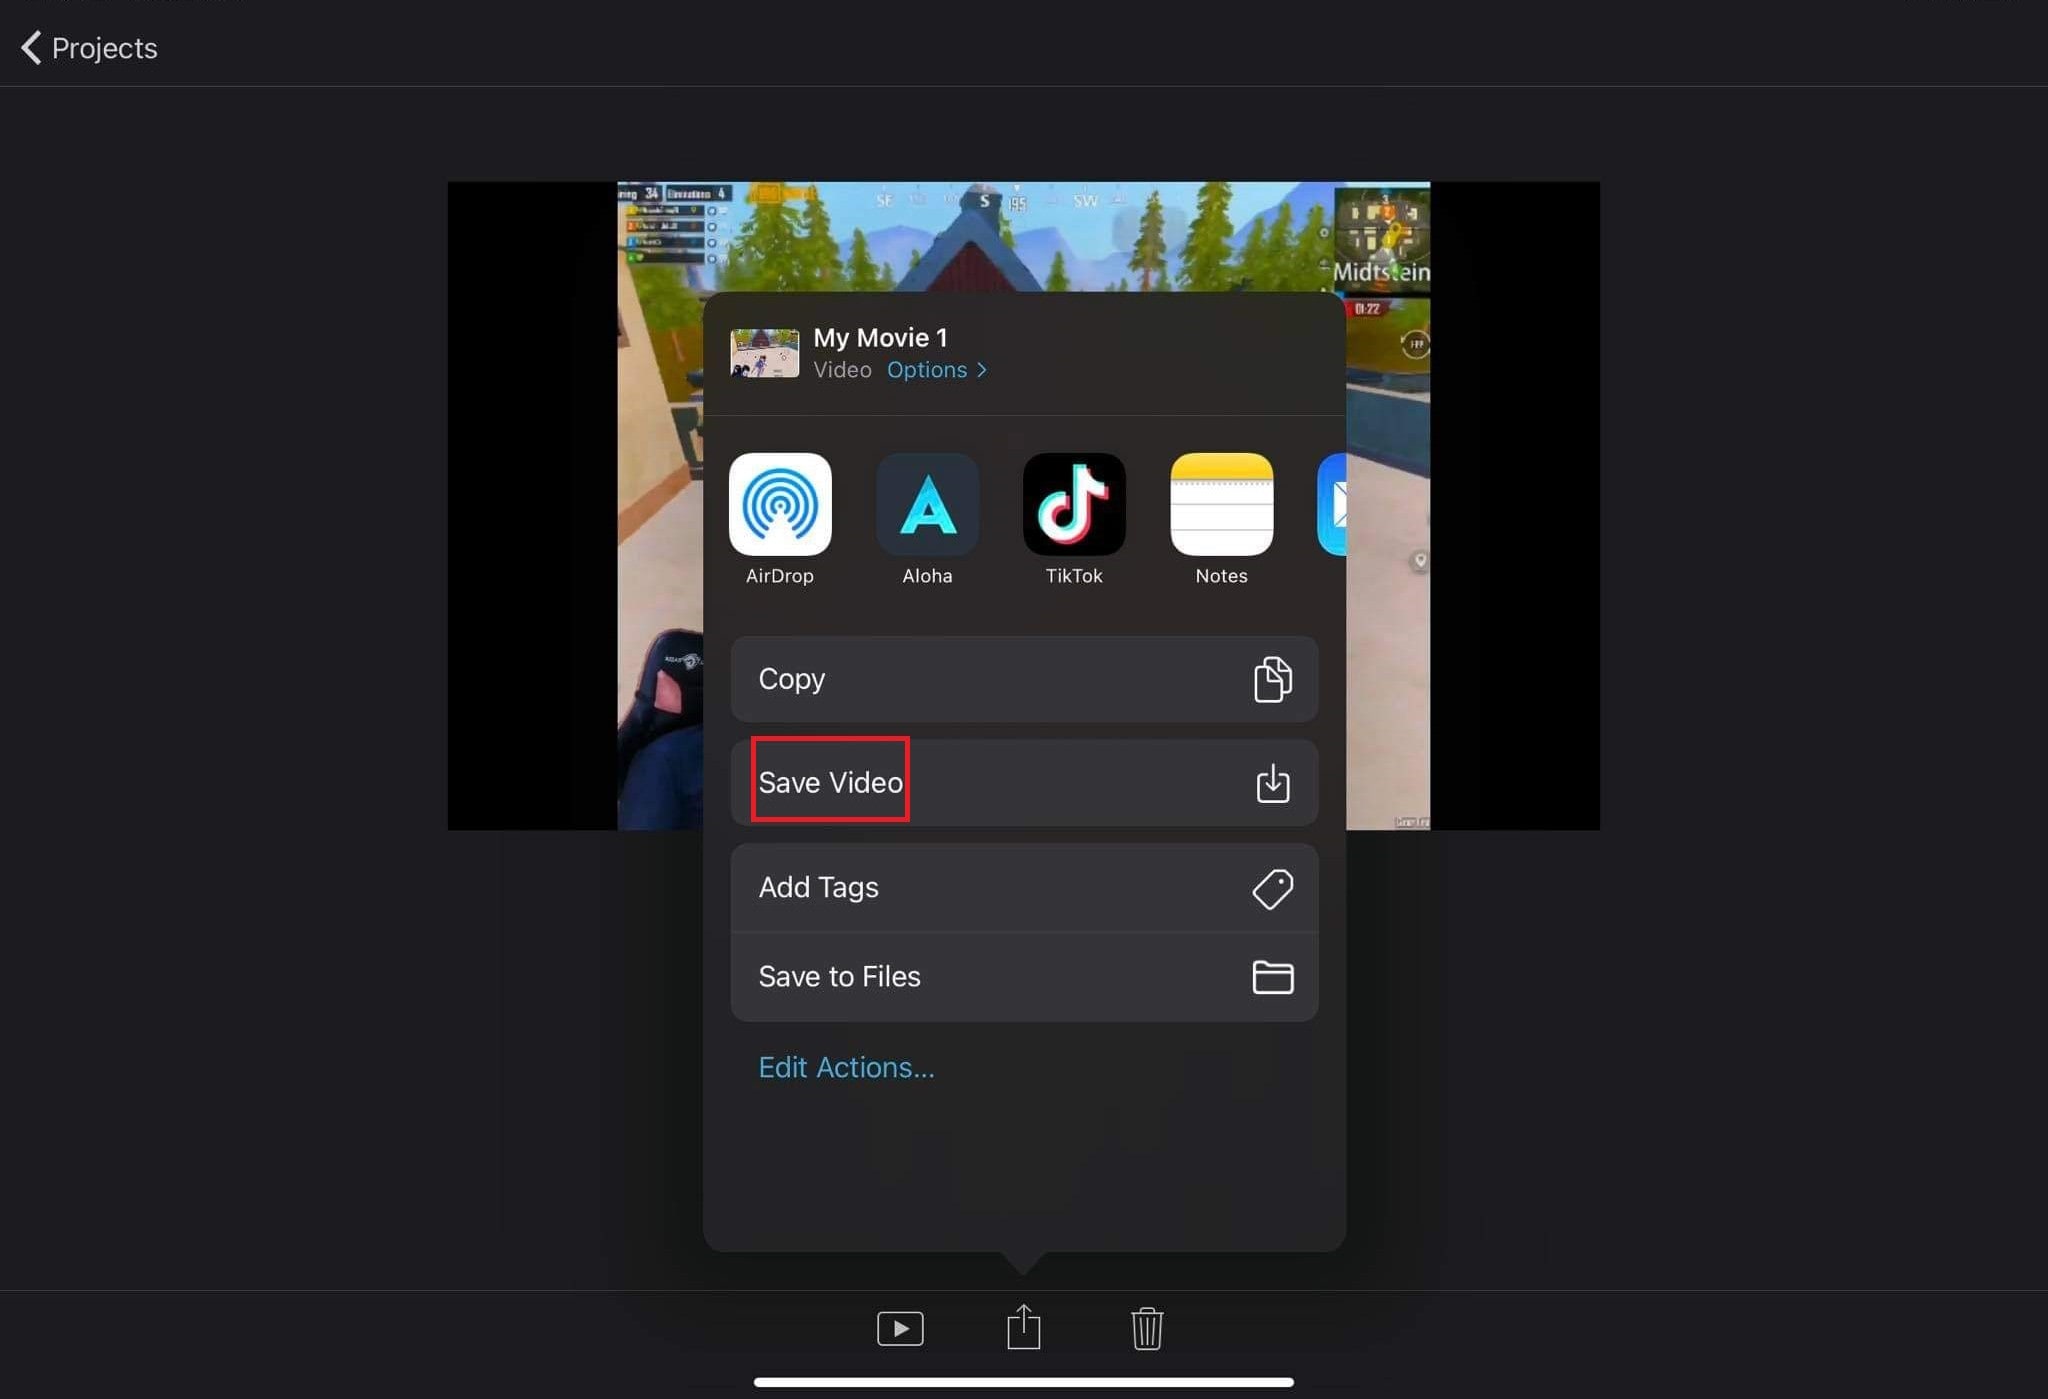
Step5 Save the muted file on your Mac by clicking “Save.”
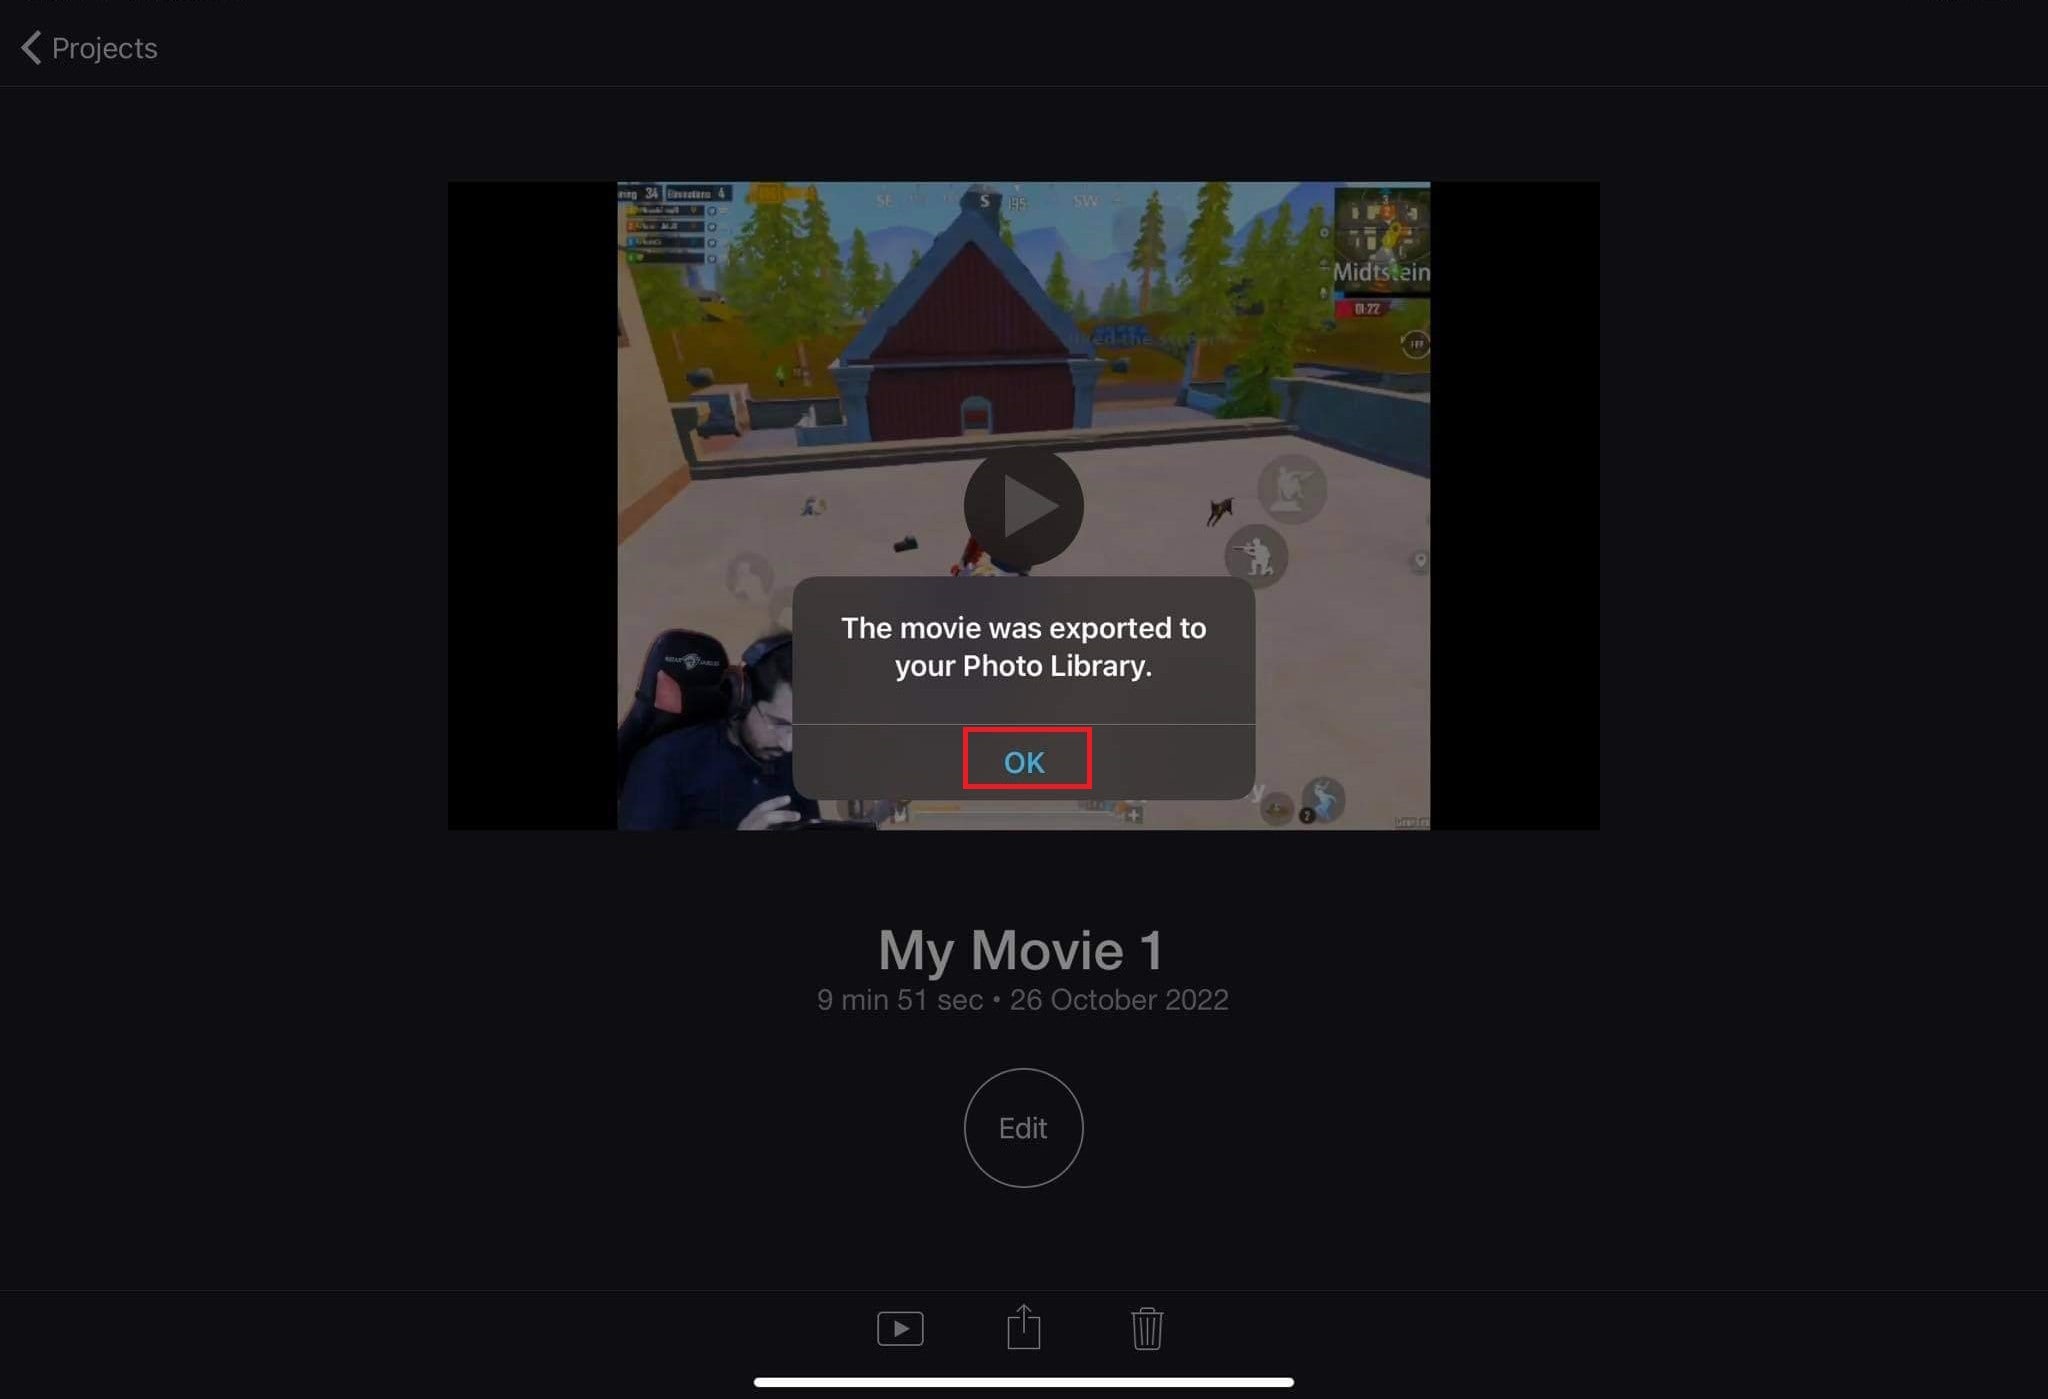
Step6 Muted videos will get exported to your library.
3. Final Cut Pro
Final Cut Pro is a powerful video editor that allows users to create professional-quality videos. With its intuitive design and wide range of features, Final Cut Pro is the perfect tool for anyone looking to create videos for personal or professional use.
Final Cut Pro is a professional-grade video editing software for some of the biggest Hollywood movies. It’s also become a favorite among YouTubers and filmmakers.
How to remove audio from video in Final Cut Pro?
You can remove audio from your video in either of two ways.
Step1 Open the video from which the audio is to be removed.
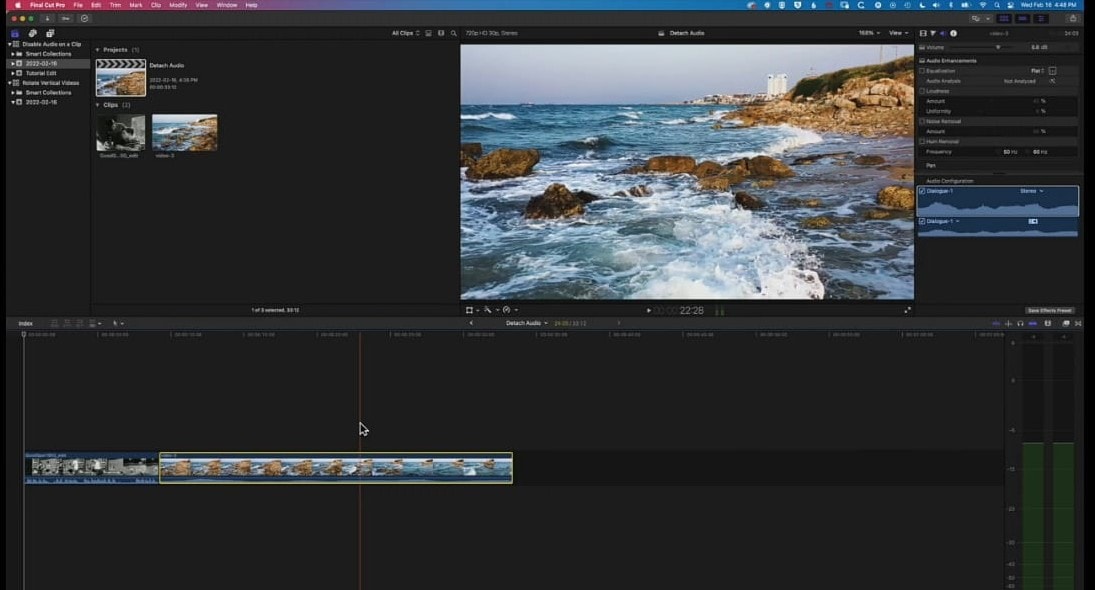
Step2 Now select the timeline.
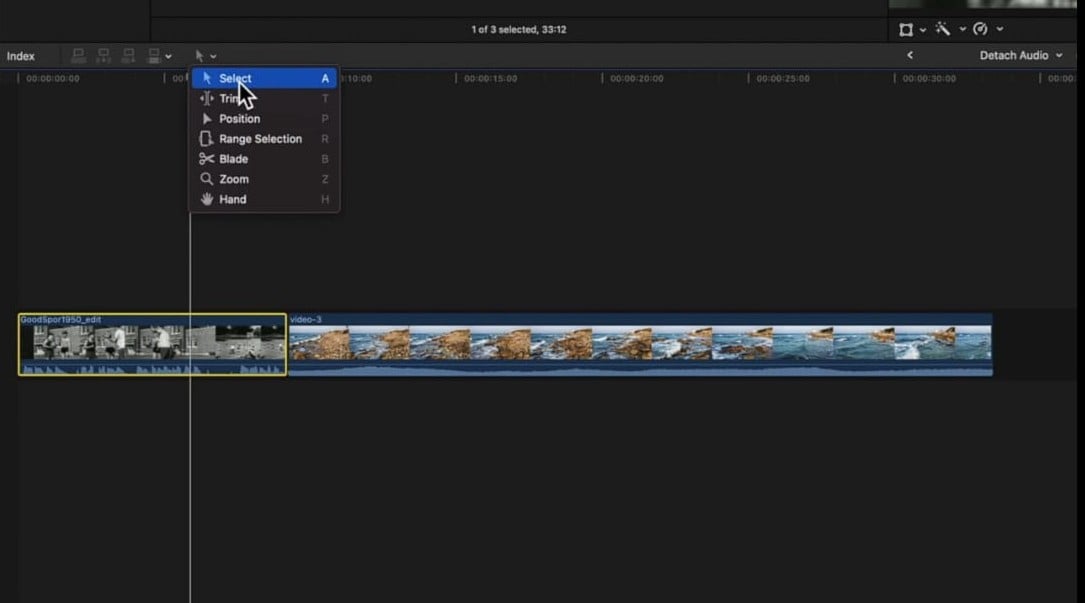
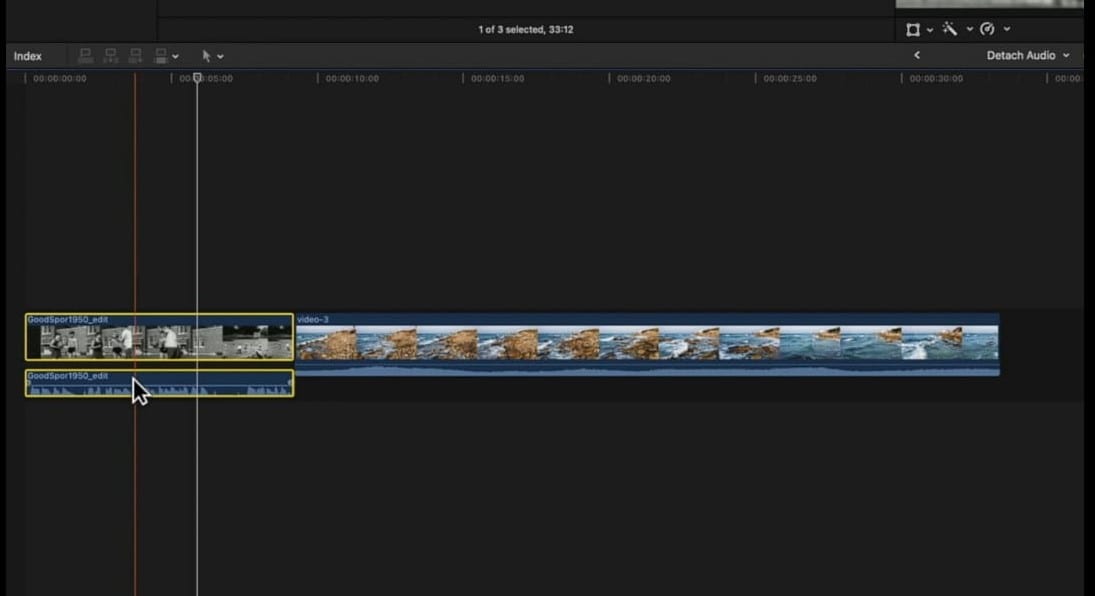
Step3 Double-click on the timeline. It will detach the audio from the video.
Now press the “Delete key” on the keyboard. The audio will get removed.
Method 3: Use Filmora to remove audio from the video
Filmora
If you’re looking for easy-to-use video editing software, Filmora is a great option. It’s simple to use yet still offers a wide range of features. Plus, it’s affordable and supports both Windows and Mac computers.
Free Download For Win 7 or later(64-bit)
Free Download For macOS 10.14 or later
An Ultimate Guide to How to remove audio from video in Filmora?
One way is to mute the audio track. To do this, follow the given steps.
Step1 Open a new project in Filmora.

Step2 Click on the audio track in the timeline.
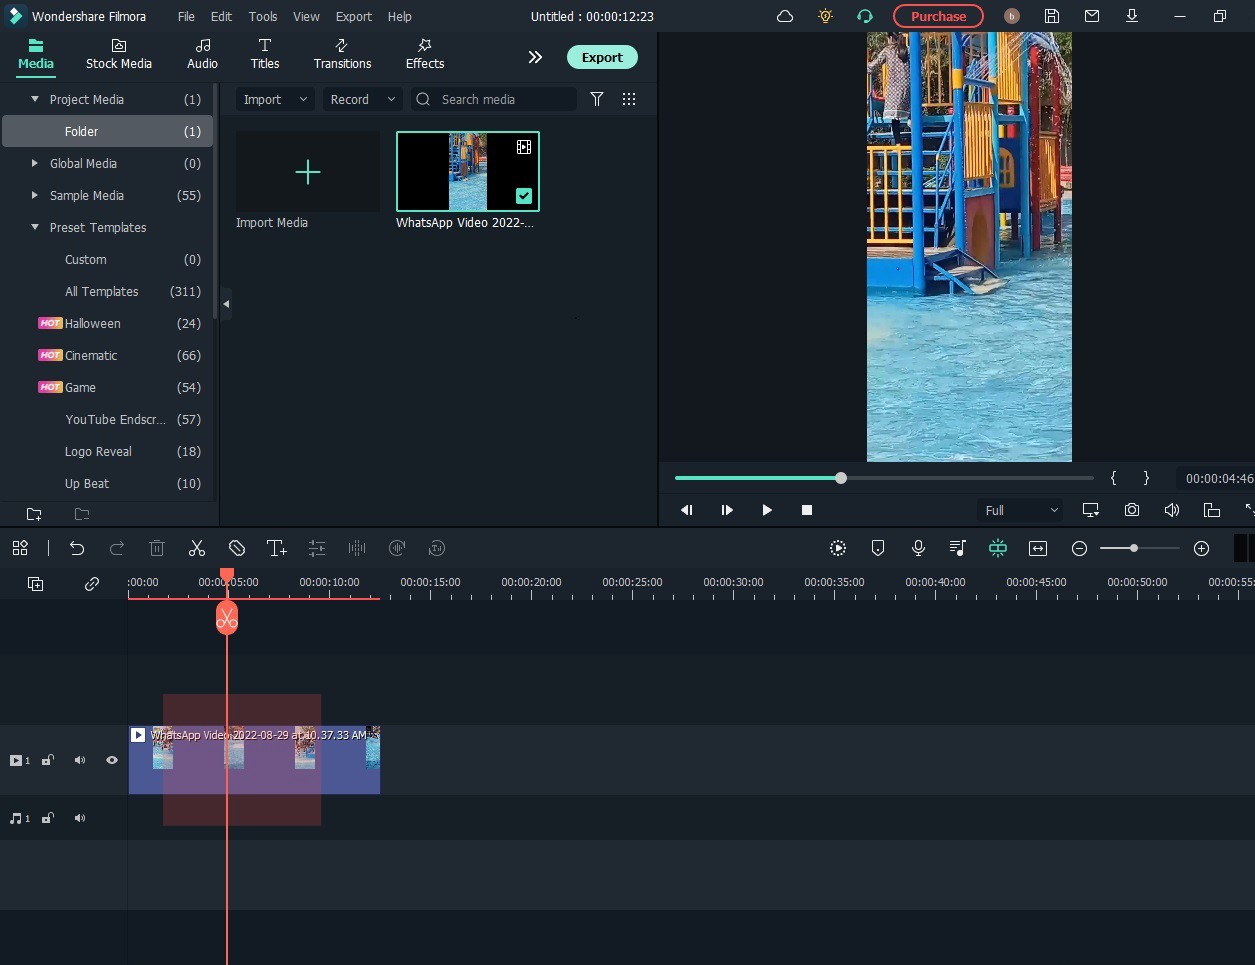
Step3 Now, click the mute button.
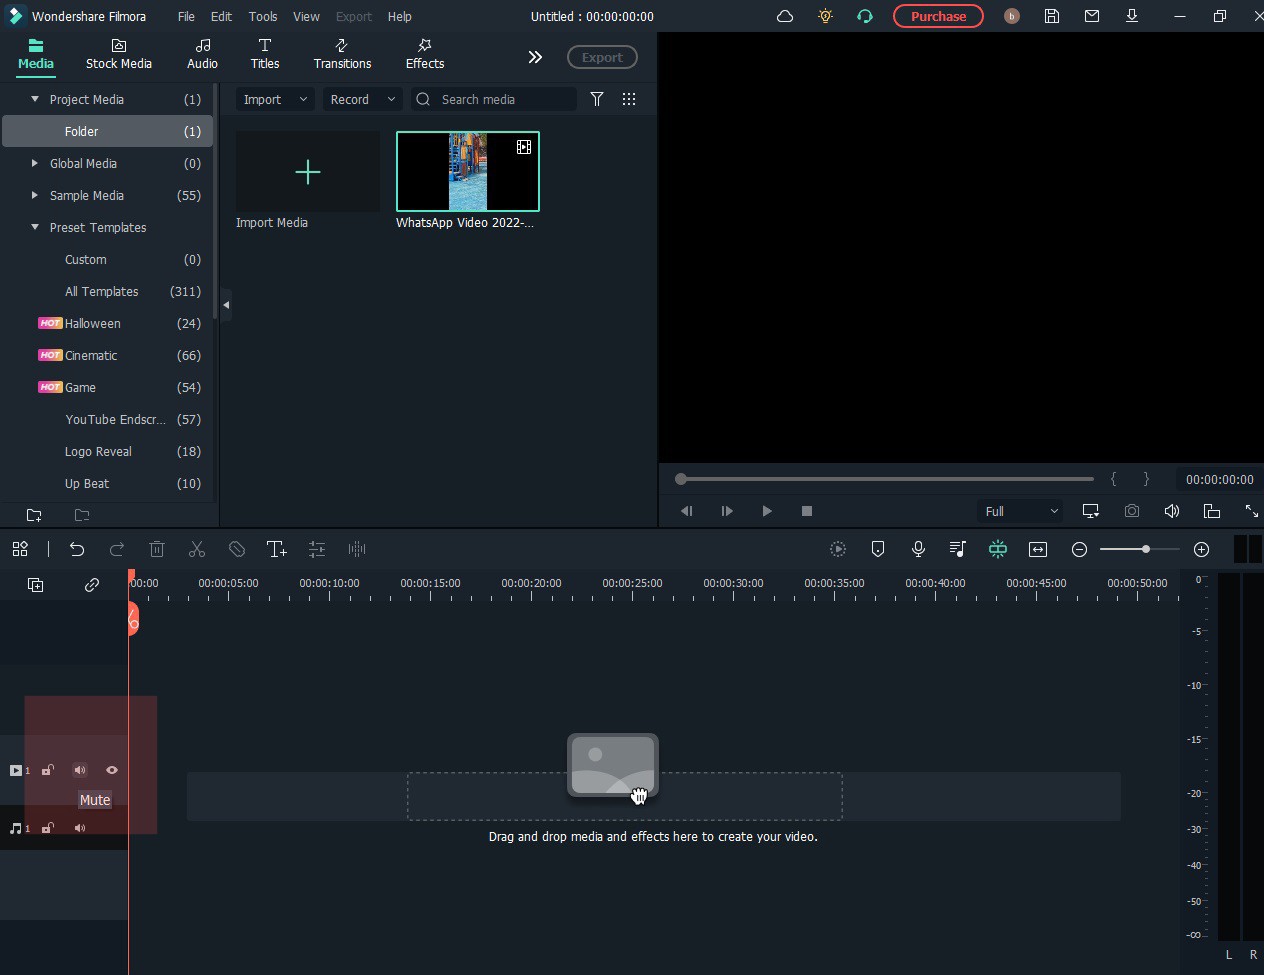
Another way to remove the audio from a video is to delete the audio track. To do this:
Step1 Click on the audio track in the timeline
Step2 Press the delete key on your keyboard.
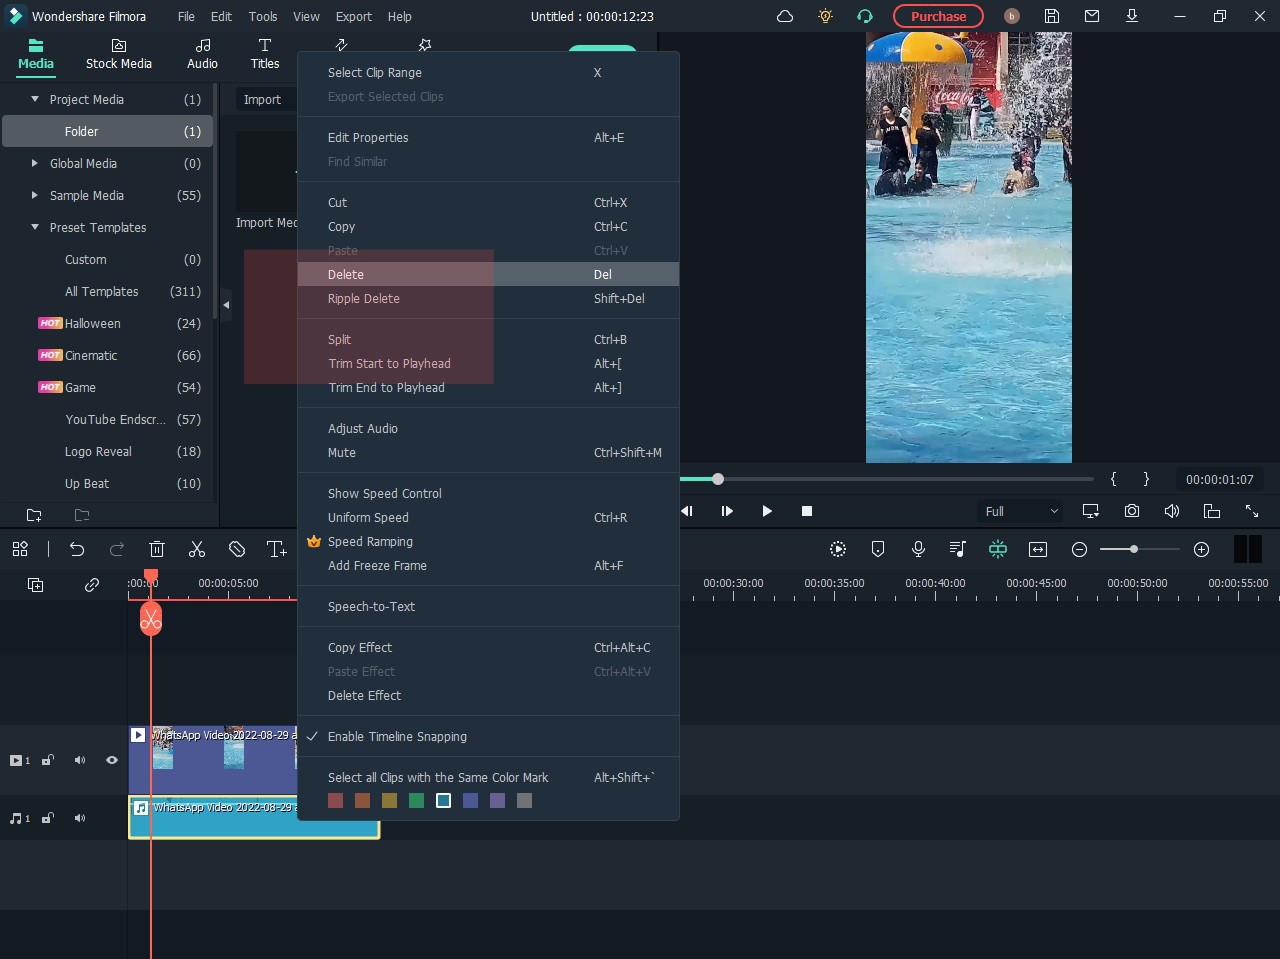
Step3 Click on the export button.
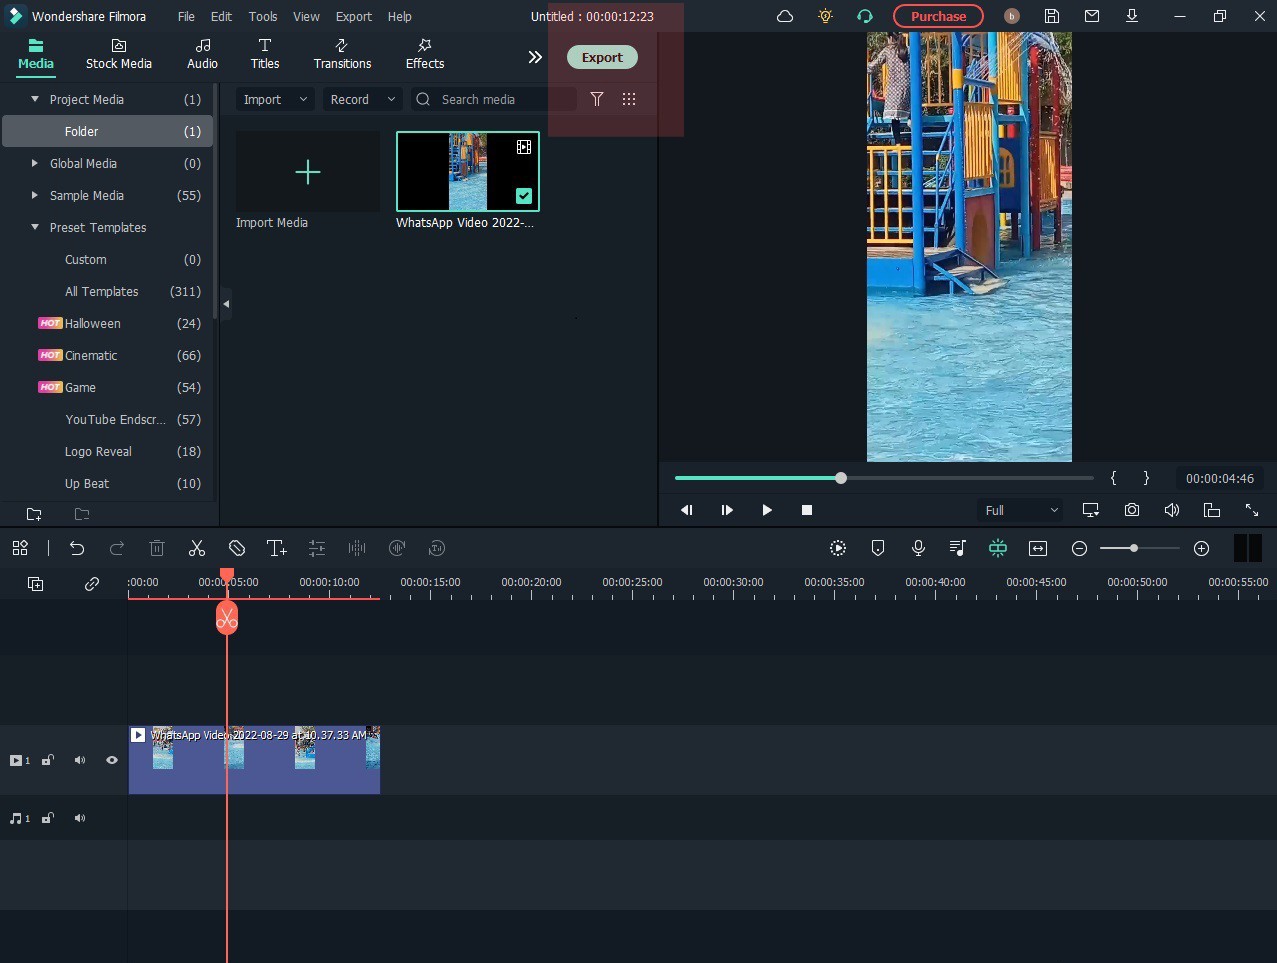
Special Features:
#Silent Detection
With silence detection, you can quickly and easily find the silent moments in your footage. It is great for finding those perfect moments of silence that can impact your film much.
#Audio Ducking
Audio Ducking is a feature in Filmora that automatically lowers the volume of an audio track when another audio track is getting played. It can help ensure that dialog is always audible, even when other sounds are playing in the background.
#TTS and STT
TTS and STT are two features in Filmora that you can use to create subtitles for your video.
TTS stands for text-to-speech, meaning you can create subtitles by typing in the text you want to speak in the video.
STT stands for speech-to-text, meaning you can create subtitles by recording your voice and having Filmora transcribe the text.
Conclusion
Here you go, the best solutions to remove audio from video on Mac. You may choose anyone as per your need.
However, Wondershare Filmora is recommended due to its cross-platform nature and unlimited features.
Free Download For macOS 10.14 or later
An Ultimate Guide to How to remove audio from video in Filmora?
One way is to mute the audio track. To do this, follow the given steps.
Step1 Open a new project in Filmora.

Step2 Click on the audio track in the timeline.

Step3 Now, click the mute button.

Another way to remove the audio from a video is to delete the audio track. To do this:
Step1 Click on the audio track in the timeline
Step2 Press the delete key on your keyboard.

Step3 Click on the export button.

Special Features:
#Silent Detection
With silence detection, you can quickly and easily find the silent moments in your footage. It is great for finding those perfect moments of silence that can impact your film much.
#Audio Ducking
Audio Ducking is a feature in Filmora that automatically lowers the volume of an audio track when another audio track is getting played. It can help ensure that dialog is always audible, even when other sounds are playing in the background.
#TTS and STT
TTS and STT are two features in Filmora that you can use to create subtitles for your video.
TTS stands for text-to-speech, meaning you can create subtitles by typing in the text you want to speak in the video.
STT stands for speech-to-text, meaning you can create subtitles by recording your voice and having Filmora transcribe the text.
Conclusion
Here you go, the best solutions to remove audio from video on Mac. You may choose anyone as per your need.
However, Wondershare Filmora is recommended due to its cross-platform nature and unlimited features.
Dubbing Videos With Voiceovers | Using Wondershare Filmora
Voiceovers have been a great utility in the digital ecosystem for a while. From movies to videos, the use of voiceovers has provided content creators with new dynamics. While it has enhanced the quality of video creation, there are other technicalities that have arisen against it. In this article, we will be discussing the details involving voiceovers and recordings.
Also, it includes a discussion of tools that can be used to ensure professional voice recordings. Go through the provided details to know how to utilize voiceovers to perfection.
Part 1: What is The Difference Between Voice Recording and Voiceover?
Do you know voiceover and voice recording are two different terms? They are often used correspondingly but have different meanings. Here are a few differences between the two in the section below:
Voice Recording
It is a process in which you can capture audio in your device using a microphone. Voice recordings can be any type of audio content, such as conversations, interviews, and much more. There are various settings for voice recording as well. It starts from studio recordings, outside and even home set-up recordings.
Voiceover
On the other hand, voiceover specifically refers to a recorded narration or video commentary. This includes documentaries, advertisements, films, television shows, and more. It provides information, explains visuals, or narrates a story to your audience. Mostly voiceover is scripted and well synchronized to convey the message to its audience successfully.
Summary
Wrapping up, the main difference between these two terms is the intent of audio content. In general, voice recording allows you to capture audio. In contrast, voiceover refers explicitly to the recording of some specific narrations. Ultimately, we can say that voiceover is a part of voice recording that should be synchronized with the visual media to fulfill its purpose.
Automatically Generate Text-to-Speech
Simply and efficiently convert text to speech with Filmora Video Editor! Experience the magic of cool yet outstanding video effects, where your videos come to life in beautiful visuals.
Start Video Voice Over Start Video Voice Over Learn More >

Part 2: How is Voiceover Beneficial in Video Editing?
As we all know, narration in a video is essential as it adds a character to your video. There are many options, like AI voice text-to-speech tools, to generate voiceovers. Regardless, do you know why voiceovers are considered beneficial in video editing? Let’s look ahead into some prominent benefits of using voiceovers:
1. Narrative and Information
Voiceover provides a narrative element to a video. This further guides the viewers through the content and conveys important information. It also allows you to explain concepts, provide context, or tell a story to your engaged audience.
2. Clarity and Comprehension
This also helps clarify complex concepts by providing a verbal explanation. It ensures that viewers can easily understand the message or purpose of the video. Even if the visuals alone are insufficient, text-to-speech generators can help. Moreover, voiceover adds an additional layer of information that can aid comprehension.
3. Storytelling and Emotional Impact
It allows you to add emotions, tone, and personality to the video. Furthermore, it can set the mood to create a connection with the audience. A well-executed voiceover can also improve the storytelling aspect of the video. Similarly, people tend to memorize such videos which have an impactful speech or voice recording.
4. Professionalism and Polishing
Including a voiceover in your video adds a level of professionalism and polish. It gives the impression that careful thought and planning went into the production. A high-quality voiceover with clear pronunciation allows the audience to understand the topic better. Moreover, proper timing and appropriate intonation also polish the video content.
5. Localization and Accessibility
Speech-to-text software can easily translate and localize into different languages. This function of voiceovers can make the video accessible to a wider audience. By generating voiceovers in different languages, you can help you reach international viewers. Similarly, it expands your audience and increases the video’s potential impact.
6. Flexibility and Flexibility
Another benefit of voiceover is that it provides flexibility during the editing process. You can record it separately and edit and improve it to fit the visuals precisely. This allows you to refine the narration, adjust the pacing, and ensure synchronization. Additionally, it also provides flexibility in terms of making changes or updates to the script.
7. Reducing Noise and Distractions
Lastly, voiceover allows you to reduce or eliminate background noise and even unwanted sounds. You can also enhance the audio quality and eliminate distractions from your video. Meanwhile, the elimination of such elements also improves the overall viewer experience.
Part 3: How Can You Consume the Text-to-Speech Feature in Wondershare Filmora?
Wondershare Filmora is an explicit video editor that provides text-to-speech effects . Along with that, it also features a list of different features, which makes operations easy. To know how you can utilize this function in Filmora to create a voiceover, look into the steps below:
Convert Text-to-Speech For Win 7 or later(64-bit)
Convert Text-to-Speech For macOS 10.14 or later
Step 1Import Media Files For Editing
Open Wondershare Filmora and continue to select the “New Project” button to open a new window. As it opens, click the “Import” option and select the “Import Media Files” option from the drop-down.

Step 2Add Titles to the Video
After importing the respective media files, drag them to the timeline. As it is added successfully, lead to the “Titles” section to add a basic title element in the video. Place it where you want to add the particular voiceover in Filmora.

Step 3Change Title Settings
On adding the title element, continue to double-click on it to open its settings. In the provided space, change the title text and make other edits to the presentation. Once done, click “OK” to save all changes in the added titles.

Step 4Use Text-to-Speech Feature
Continue to select the “Text-to-Speech“ feature from the bar above the timeline to activate the feature. A new window opens where you have to set some particular parameters for the process. It includes the language, speaker, and other settings, such as speed and pitch. Once done, click “OK” to save all changes in the AI-generated voiceover.

Step 5Execute and Export
You will be led to the screen where the process is executed and displayed accordingly. Once completed, you can find the generated voiceover in the timeline. Continue to export the video and save it on your device successfully.

Part 4: Record a Voiceover Using Filmora - Guide
Filmora Video Editor is an exceptional tool that enables you to add voiceovers or voice recordings. You can simply add voice recordings to your project by importing them. However, this tool allows you to record voiceovers directly in the tool. Following these simple steps, you can easily record voiceovers in the tool.
Record a Voiceover For Win 7 or later(64-bit)
Record a Voiceover For macOS 10.14 or later
Step 1Launch The Tool and Import Your Media Assets
Once you’ve launched the software of Wondershare Filmora, import your media assets. To do so, locate the “Import” section and click to import your media files.

Step 2Record Your Voiceover
Continue to import your video in your timeline, and then locate and find the “Mic” icon or hit the “Alt + R” keys. You will be further navigated to the “Record Audio” window, and by pressing the Rec button, you can start recording your voiceover. Then, hit “OK” once you are done recording your voiceover. Lastly, save your video with the added voiceover by exporting the project to your system.

Conclusion
In summary, this article has provided readers with an understanding of how they should perceive voiceovers. Along with a comparison with voice recordings, the article has shown the benefits of using voiceovers and AI voice text-to-speech. Furthermore, Wondershare Filmora has been displayed as the perfect text-to-speech generator tool that can be used to record and manage voiceovers with the embodiment of artificial intelligence.
Start Video Voice Over Start Video Voice Over Learn More >

Part 2: How is Voiceover Beneficial in Video Editing?
As we all know, narration in a video is essential as it adds a character to your video. There are many options, like AI voice text-to-speech tools, to generate voiceovers. Regardless, do you know why voiceovers are considered beneficial in video editing? Let’s look ahead into some prominent benefits of using voiceovers:
1. Narrative and Information
Voiceover provides a narrative element to a video. This further guides the viewers through the content and conveys important information. It also allows you to explain concepts, provide context, or tell a story to your engaged audience.
2. Clarity and Comprehension
This also helps clarify complex concepts by providing a verbal explanation. It ensures that viewers can easily understand the message or purpose of the video. Even if the visuals alone are insufficient, text-to-speech generators can help. Moreover, voiceover adds an additional layer of information that can aid comprehension.
3. Storytelling and Emotional Impact
It allows you to add emotions, tone, and personality to the video. Furthermore, it can set the mood to create a connection with the audience. A well-executed voiceover can also improve the storytelling aspect of the video. Similarly, people tend to memorize such videos which have an impactful speech or voice recording.
4. Professionalism and Polishing
Including a voiceover in your video adds a level of professionalism and polish. It gives the impression that careful thought and planning went into the production. A high-quality voiceover with clear pronunciation allows the audience to understand the topic better. Moreover, proper timing and appropriate intonation also polish the video content.
5. Localization and Accessibility
Speech-to-text software can easily translate and localize into different languages. This function of voiceovers can make the video accessible to a wider audience. By generating voiceovers in different languages, you can help you reach international viewers. Similarly, it expands your audience and increases the video’s potential impact.
6. Flexibility and Flexibility
Another benefit of voiceover is that it provides flexibility during the editing process. You can record it separately and edit and improve it to fit the visuals precisely. This allows you to refine the narration, adjust the pacing, and ensure synchronization. Additionally, it also provides flexibility in terms of making changes or updates to the script.
7. Reducing Noise and Distractions
Lastly, voiceover allows you to reduce or eliminate background noise and even unwanted sounds. You can also enhance the audio quality and eliminate distractions from your video. Meanwhile, the elimination of such elements also improves the overall viewer experience.
Part 3: How Can You Consume the Text-to-Speech Feature in Wondershare Filmora?
Wondershare Filmora is an explicit video editor that provides text-to-speech effects . Along with that, it also features a list of different features, which makes operations easy. To know how you can utilize this function in Filmora to create a voiceover, look into the steps below:
Convert Text-to-Speech For Win 7 or later(64-bit)
Convert Text-to-Speech For macOS 10.14 or later
Step 1Import Media Files For Editing
Open Wondershare Filmora and continue to select the “New Project” button to open a new window. As it opens, click the “Import” option and select the “Import Media Files” option from the drop-down.

Step 2Add Titles to the Video
After importing the respective media files, drag them to the timeline. As it is added successfully, lead to the “Titles” section to add a basic title element in the video. Place it where you want to add the particular voiceover in Filmora.

Step 3Change Title Settings
On adding the title element, continue to double-click on it to open its settings. In the provided space, change the title text and make other edits to the presentation. Once done, click “OK” to save all changes in the added titles.

Step 4Use Text-to-Speech Feature
Continue to select the “Text-to-Speech“ feature from the bar above the timeline to activate the feature. A new window opens where you have to set some particular parameters for the process. It includes the language, speaker, and other settings, such as speed and pitch. Once done, click “OK” to save all changes in the AI-generated voiceover.

Step 5Execute and Export
You will be led to the screen where the process is executed and displayed accordingly. Once completed, you can find the generated voiceover in the timeline. Continue to export the video and save it on your device successfully.

Part 4: Record a Voiceover Using Filmora - Guide
Filmora Video Editor is an exceptional tool that enables you to add voiceovers or voice recordings. You can simply add voice recordings to your project by importing them. However, this tool allows you to record voiceovers directly in the tool. Following these simple steps, you can easily record voiceovers in the tool.
Record a Voiceover For Win 7 or later(64-bit)
Record a Voiceover For macOS 10.14 or later
Step 1Launch The Tool and Import Your Media Assets
Once you’ve launched the software of Wondershare Filmora, import your media assets. To do so, locate the “Import” section and click to import your media files.

Step 2Record Your Voiceover
Continue to import your video in your timeline, and then locate and find the “Mic” icon or hit the “Alt + R” keys. You will be further navigated to the “Record Audio” window, and by pressing the Rec button, you can start recording your voiceover. Then, hit “OK” once you are done recording your voiceover. Lastly, save your video with the added voiceover by exporting the project to your system.

Conclusion
In summary, this article has provided readers with an understanding of how they should perceive voiceovers. Along with a comparison with voice recordings, the article has shown the benefits of using voiceovers and AI voice text-to-speech. Furthermore, Wondershare Filmora has been displayed as the perfect text-to-speech generator tool that can be used to record and manage voiceovers with the embodiment of artificial intelligence.
Also read:
- [New] Expert Choices Best Video Cards for YouTube's Clearest Output
- [New] The Art of HDR Enhancement Your Lightroom Journey for 2024
- 15 Best Strongest Pokémon To Use in Pokémon GO PvP Leagues For Vivo Y78+ (T1) Edition | Dr.fone
- 2024 Approved Apowersoft Examined A Full Review of Its Capabilities
- 2024 Approved Maximizing Video Channels Earning with New Policies
- A Comprehensive Guide to Climbing the Facebook Rankings Ladder
- In 2024, Explore the Best Photo Enhancement Apps for Android and iPhone
- Mastering DaVinci Resolve Scopes A Comprehensive Guide for 2024
- New 2024 Approved Complete Guide to Make a Super Easy Rotating Video Effect
- New 2024 Approved How to Add Freeze Frame to Your Video From Any Device?
- New Add VHS Effects to Videos for Free A 2024 Guide
- Protecting Your Privacy How To Remove Apple ID From Apple iPhone SE
- Seamless Print-to-Computer Scanning Techniques Unveiled
- Ten Proven Methods for Correcting Phantom Inputs on iPhones
- Title: The Power of Music in Videos (+Filmora Editing Tricks)
- Author: Chloe
- Created at : 2024-09-30 05:12:37
- Updated at : 2024-10-03 10:46:49
- Link: https://ai-editing-video.techidaily.com/the-power-of-music-in-videos-plusfilmora-editing-tricks/
- License: This work is licensed under CC BY-NC-SA 4.0.

