
:max_bytes(150000):strip_icc():format(webp)/how-to-see-who-viewed-your-tiktok-5271090-e2cb663541b8484a8a2e80ffbdd98db3.jpg)
The Quick and Simple Way to Mirror Video in Premiere Pro
The Quick and Simple Way to Mirror Video in Premiere Pro
Video editing is a crucial part of filmmaking, and it can make or break the outcome of a project. Adobe Premiere Pro is a widely used video editing software that provides a vast range of tools for professional video editing. One of the features that Premiere Pro offers is the ability to mirror video clips, which can add an interesting visual element to your footage.
In this article, we will look at how to mirror a video clip in Premiere Pro in a few simple steps. Whether you’re a seasoned video editor or just starting, this guide will help you achieve the desired effect in your videos. From basic mirroring to advanced techniques, we will cover everything you need to know to create a symmetrical and visually appealing look in your projects.

What Is To “Mirror” a Video?
Mirroring a video in Adobe Premiere Pro refers to reflecting the footage along either the horizontal or vertical axis. This results in the composition being flipped and reversed, creating a reflection-like effect. Flipping a video is distinct from rotating it, as the orientation of the elements is changed, but their position remains the same.
Flipping can serve both creative and practical purposes. On the one hand, it can add a unique and visually interesting element to a project, creating a form of self-reflection or self-analysis. On the other hand, flipping can also be used to correct videos accidentally captured upside down. For example, flipping a video recorded with a selfie camera along the horizontal axis will correctly display the right side up.
It is important to note the distinction between flipping and rotating a video. A flipped video will look like a mirror image, whereas a video rotated 180 degrees will not. By understanding the differences between these techniques, you can effectively use mirroring to achieve the desired result in your projects.
How To Mirror a Video in Adobe Premiere Pro
Mirroring a video in Adobe Premiere Pro is a quick and simple process that can add a unique and visually appealing touch to your projects. Whether you want to create a symmetrical look or experiment with a new visual style, this guide will mirror a video clip in Premiere Pro. From basic to advanced techniques, you’ll be able to create stunning and reflective videos in no time. So, let’s get started!
Step1 Choose the “Effects“ option from the menu.

Step2 Look for the “Transform“ tab.

Step3 Pick the “Horizontal Flip“ or “Vertical Flip“ from the drop-down list.

Step4 Drag the desired flip onto the selected clip, which will immediately reverse the image displayed on the Program Monitor.

How To Create Mirror Video Effect in Premiere Pro
Creating a mirror video effect in Adobe Premiere Pro opens up a world of artistic possibilities for your projects. With the right techniques, you can create visually appealing and symmetrical videos that stand out from the crowd. This guide will show you how to master the art of mirror video effects in Premiere Pro, from the basics to more advanced techniques. Get ready to explore the creative side of video editing and elevate your projects to the next level.
Step1 Access the “Effects“ menu and select “Video Effects.”

Step2 Pick “Distort“, then the “Mirror“.

Step3 Apply the Mirror effect to your clip.

Step4 Adjust “Reflection Center“ for side-by-side effect or “Reflection Angle“ for up-and-down effect in the Effect Controls panel.

[Bonus] Wondershare Filmora – A Great Alternative to Premiere Pro Mirror Tool
Wondershare Filmora is a great alternative to Adobe Premiere Pro for video editing. Not only does it offer an intuitive interface for both beginners and professionals, but it also offers a range of video editing tools and features. One of those features is its ability to easily mirror a video. With Filmora, you can flip your videos vertically or horizontally with just a few clicks.
Free Download For Win 7 or later(64-bit)
Free Download For macOS 10.14 or later

Filmora also offers a variety of creative video effects and templates, making it easy to add a unique touch to your projects. In addition, its built-in audio editing tools allow you to create professional-sounding soundtracks for your videos. Filmora’s easy-to-use keyframe animation feature gives you precise control over the animation of your elements, allowing you to add movement and bring your videos to life.
Furthermore, Filmora’s advanced color correction tools help you achieve the perfect color balance in your videos. Whether you’re a beginner or a professional, Wondershare Filmora is a great option for anyone looking for a powerful and easy-to-use video editor.
How To Mirror a Video Clip With Wondershare Filmora
Mirroring a video clip is a simple process with Wondershare Filmora. This video editing software provides an intuitive and user-friendly interface, making it easy to achieve the desired result.
To mirror your video in Filmora, you can follow a few straightforward steps. Whether you want to flip your video horizontally or vertically, Filmora’s mirroring tool will help you achieve the perfect reflection with just a few clicks. So, if you’re looking for an alternative to Adobe Premiere Pro, Wondershare Filmora is a great option to consider for your video editing needs.
Step1 Within the “Flip“ section, there are four options available. To flip the clip from left to right, select the “Flip Horizontal“ icon, or if you want to turn the clip upside down, choose the “Flip “ option.

Step2 You can rotate the clip by clicking either the “Clockwise“ or “Counterclockwise“ icons under the Rotate section.

Step3 If you want to specify the rotation angle, you can either enter a value in the box under the Rotate tab or manipulate the dot in the circle to achieve the desired angle.

How To Create Mirror Video Effect in Wondershare Filmora
Wondershare Filmora is an excellent video editing software that offers a simple solution for creating a mirror video effect. Its intuitive interface and powerful features make it possible for amateur and professional video editors to achieve stunning results. Filmora provides users with an array of tools to create a mirror effect on their video clip effortlessly.
Whether you want to create a reversed image, flip the orientation vertically, or rotate the clip in a specific direction, Filmora has got you covered. Let’s see how to create a mirror video effect with Wondershare Filmora.
Step1 Add the video clip to a video track on the timeline

Step2 Click the “Filters“ icon and choose the “Distortion“ category

Step3 Locate the “Mirror“ effect, drag and drop it to the filter track, and adjust its duration to match the video clip

Step4 Preview the results in the Preview Window before exporting the video from Filmora.

Conclusion
Mirroring a video can add an interesting and unique visual effect to your videos. Adobe Premiere Pro and Wondershare Filmora provide easy-to-use tools to achieve this effect. While Premiere Pro offers more advanced features and customization options, Filmora provides a simpler and more user-friendly interface for those who want to achieve the same results without the hassle. Whichever option you choose, you can create stunning mirror videos in no time.
Free Download For macOS 10.14 or later
Filmora also offers a variety of creative video effects and templates, making it easy to add a unique touch to your projects. In addition, its built-in audio editing tools allow you to create professional-sounding soundtracks for your videos. Filmora’s easy-to-use keyframe animation feature gives you precise control over the animation of your elements, allowing you to add movement and bring your videos to life.
Furthermore, Filmora’s advanced color correction tools help you achieve the perfect color balance in your videos. Whether you’re a beginner or a professional, Wondershare Filmora is a great option for anyone looking for a powerful and easy-to-use video editor.
How To Mirror a Video Clip With Wondershare Filmora
Mirroring a video clip is a simple process with Wondershare Filmora. This video editing software provides an intuitive and user-friendly interface, making it easy to achieve the desired result.
To mirror your video in Filmora, you can follow a few straightforward steps. Whether you want to flip your video horizontally or vertically, Filmora’s mirroring tool will help you achieve the perfect reflection with just a few clicks. So, if you’re looking for an alternative to Adobe Premiere Pro, Wondershare Filmora is a great option to consider for your video editing needs.
Step1 Within the “Flip“ section, there are four options available. To flip the clip from left to right, select the “Flip Horizontal“ icon, or if you want to turn the clip upside down, choose the “Flip “ option.
Step2 You can rotate the clip by clicking either the “Clockwise“ or “Counterclockwise“ icons under the Rotate section.
Step3 If you want to specify the rotation angle, you can either enter a value in the box under the Rotate tab or manipulate the dot in the circle to achieve the desired angle.
How To Create Mirror Video Effect in Wondershare Filmora
Wondershare Filmora is an excellent video editing software that offers a simple solution for creating a mirror video effect. Its intuitive interface and powerful features make it possible for amateur and professional video editors to achieve stunning results. Filmora provides users with an array of tools to create a mirror effect on their video clip effortlessly.
Whether you want to create a reversed image, flip the orientation vertically, or rotate the clip in a specific direction, Filmora has got you covered. Let’s see how to create a mirror video effect with Wondershare Filmora.
Step1 Add the video clip to a video track on the timeline
Step2 Click the “Filters“ icon and choose the “Distortion“ category
Step3 Locate the “Mirror“ effect, drag and drop it to the filter track, and adjust its duration to match the video clip
Step4 Preview the results in the Preview Window before exporting the video from Filmora.
Conclusion
Mirroring a video can add an interesting and unique visual effect to your videos. Adobe Premiere Pro and Wondershare Filmora provide easy-to-use tools to achieve this effect. While Premiere Pro offers more advanced features and customization options, Filmora provides a simpler and more user-friendly interface for those who want to achieve the same results without the hassle. Whichever option you choose, you can create stunning mirror videos in no time.
Top Best Free LUTs For Premiere Pro
Videos and images are essential digital media for storing memories, moments, and special occasions. Hence, you cannot compromise on the quality of your visual content. So, it’s necessary to use free LUTs Premiere Pro that upgrades content visual quality. In this article, you will find 15 different types of LUT effects . So, start making your videos and photos attractive again.
Part 1: What Are LUTs? What Are They Used For?
LUTs, known as Look-Up Tables, enhance the quality of photos and videos. Meanwhile, LUTs are involved in color grading, computer graphics, and image processing. In color grading, you can use Premiere Pro LUTs for color correction and enhancement. Within computer graphics, LUTs have been used within color hue, saturation, and brightness. In image processing, you can use LUTs for color thresholding and inversion.
Uses of LUT Premiere Pro
- Color Enhancement: With available color wheels, LUTs allow for enhancing the colors of photos and videos. This way, users can highlight the shadows, highlights, and mid-tones. For vlogs or landscape films, color wheels are essential in enhancing visual quality.
- Effects & Filters: By using special effects and filters, add a new touch to your visual content. Hence, your video or photo will be improved with appropriate reflections, lighting, and colors. With a unique appearance, make your visual content more enchanting.
- Adjust Intensity: LUTs allow customizing intensity within applied filters and color gradients. So, users can adjust hue, brightness, and saturation within the 0 – 100% range. Thus, as a user, you can set a darker or lighter tone for your visual media.
- Theme Personalization: Apply visualized LUTs themes within different resources in high-quality color schemas. Hence, you can make your photo or video look blurry, colorful, retro, sharpening, etc.
Empower your videos with a new mood using different LUTs. Filmora now offers 800+ top-quality 3D LUTs cover a broad range of scenarios. Transform your videos with Filmora’s powerful 3D LUTs.
Apply LUT on Videos Apply LUT on Videos Learn More


Part 2: LUTs are Good for Which Profession and Why?
With the advancement of digital technology, the need for enhanced graphical media is rising. Meanwhile, LUT Adobe Premiere Pro is great for upscaling photo and video quality. Hence, LUTs can be an ideal solution for optimizing work in different professions, including:
1. Video Production
Within film industries, video and film production is common. Thereafter, using LUTs Adobe Premiere Pro is a perfect option for color grading. Hence, film directors can correct, adjust, or enhance colors across scenes. This saves time during the video editing process.
2. Advertising
LUTs are a great source of visual enhancement for the advertising industry. Since they allow adjusting colors of advertising content like clips, posters, and brochures. When marketing content is appealing, there will be more audience engagement and sales.
3. Photography
Photographers can use LUTs to add special styles and effects to their photographs. This way, they can increase their photography standards with more enchanting looks. With improved color vision, correction, and grading, LUTs are great for photography.
4. Broadcasting
The broadcasters are required to adjust the colors of their live shows or streaming. Thus, using LUTs can save time from deep video editing. Using LUTs, they can apply filters to improve the visual quality of live videos.
Part 3: Best Free LUTs For Premiere Pro That Can Be Used
The internet has many options when choosing the best free LUTs for Premiere Pro. Similarly, you can get confused as a user. After all, selecting suitable LUTs can be difficult. Thus, here you’ll find 15 top colors preset Premiere Pro LUTs:
1. Custom Styled LUTs
If you have log footage with flat looks, these custom-styled LUTs are a great solution. There’re 13 different LUT profiles in this LUT Premiere Pro free pack. Meanwhile, you can easily customize video color gradients. The color presets are unique with their standard color curve. By tweaking settings and adjusting intensity, you can customize LUTs.

2. Cinematic LUTs for Premiere Pro
Improvise your video colors with Cinematic LUTs for Premiere Pro. This LUTs Premiere Pro pack comes with unique cinematic effects. This means you can improve your video engagement with cinematic style and color. There are 8 special filters that are very easy to implement into your videos. So even if you’re a beginner, you can use this LUT pack.

3. Free Vintage LUT for Premiere Pro
This Premiere Pro-free LUTs pack is a perfect solution for video styling. So you can enhance your videos with special colors and unique gradients. This way, you can add natural looks to your video with personalized saturation. With a range of color filters, this LUT pack can offer enhanced video upscaling.

4. Fashion LUTs
If you’re inspired by fashion, blend fashionable looks into your videos. Hence, your videos will look more professional with these Fashion LUTs. There are 15 Premiere LUTs presets for extending video color grading. This way, your videos will look more cinematic with extended styling. Meanwhile, it’s easy to download LUTs for Premiere Pro on your device.

5. Free Reign Sample LUT
Blend creativity into your videos with Free Reign Sample LUT. This LUT color preset Premiere Pro pack has multiple color presets. With each preset, there comes a unique filter with a different color gradient. So you can style your videos in appealing textures, teal, and saturation. For photography or videography, this LUT pack is an ideal solution.

6. Carbon Sample LUT
Add carbon contrast to your videos using the carbon Premiere Pro LUTs free pack. There are special carbon effects that utilize advanced color grading. This way, you can make your videos more interesting and engaging. The availability of different color arts ensures cinematic looks with specialized saturation. This LUT can be integrated into any video type.

7. Grecian Ideal LUTs
With 9 different color gradients, upgrade your videos using this LUTs pack. Meanwhile, you can use these LUTs in Adobe Premiere Pro or any program. By using these LUTs, you’ll experience unique color styling in your videos. If you are a photographer, these LUTs will help enhance your pictures and snaps. After all, there are special filters in this LUT pack Premiere Pro.

8. Instagram LUTs Color Filters Preset
Instagram is a popular video and image-sharing platform. Thus, it’s essential to transform your visual media with specialized Instagram LUTs. After all, these LUTs transform your content with special filters in unique colors. In total, there are 12 filters, and all of them are unique. So you can choose any filter preset in this free LUTs premiere pack.

9. Lutify Me 7 Free LUTs
Add life to your visual content with the Lutify LUTs pack. There are 7 different LUTs for upscaling color schemas in your photos and videos. All these LUTs utilize unique and enticing cinematography with extended color grading. Thus, you can adjust tone and contrast as needed. Meanwhile, you will not face any problems using this free premiere LUTs pack.

10. IWLTBAP 10 Free LUTs
Experience ultimate cinematic effects with IWLTBAP Free LUTs. There are 10 free LUTs, and more than 290 color presets. Thus, you can easily enhance the visual quality of your photos and videos. This LUTs for Premiere Pro free download pack is an ideal choice for color grading. Meanwhile, all the color elements are based on providing cinematic touch.

11. Free Edgy LUT Pack
Edge your favorite visual content with enchanting looks. This free-edge LUT pack comprises 5 different LUTs to make your videos special. With unique color correction, these LUTs have magical gradients in them. Thus, the quality of your pictures and videos will improve. The color schemas will also improve using this LUTs Premiere Pro pack.

12. Sports LUTs
Lift your sports enthusiasm with a special sports LUTs pack. By using these free LUTs for Premiere Pro, add sports-like filters to videos. After all, there are special filters with color presets to enhance visual quality. This way, your videos will start looking more attractive with retouching colors. Even your darker videos will appear more transparent.

13. Universal LUTs Pack
Make your video starting more visually appealing with Universal LUTs Pack. After all, there are a bunch of filters presets that offer color correction and enhancement. Hence, your videos will be transformed into special art. Meanwhile, your videography could get a huge boost with scintillating colors. Using this LUT color preset Premiere Pro is simple and convenient.

14. SB Wedding LUTs Pack
Weddings are momentous occasions, and they involve both videography and photography. By using the SB Wedding LUTs pack, now add different color elements to wedding visuals. There are unique romantic tones, color schemas, and 12 video LUTs. All these video LUTs are unique, with special color presets in different styles. Making weddings memorable is what this free LUTs premiere pack achieves.

15. 8 Movie Look LUTs
Movies are entertaining and unique because of cinematic color styles. With this movie LUTs pack, experience 8 different movie color presets. The identification of LUTs is taken from movies. Thus, they can turn your simple videos into ultimate movies. Meanwhile, this LUTs Adobe Premiere Pro pack can upscale video colors in multiple schemas.

Bonus Part: Finding the Best Free LUTs in Wondershare Filmora
Video editing is a way to enhance the quality of videos in an optimal way. Wondershare Filmora is a perfect video editor that provides instant solutions to upscale video. There are different elements, effects, stickers, and other filters to upgrade your video’s visual look. Meanwhile, the availability of LUTs allows users to extend the color patterns and textures of their videos.
Add LUTs on Video For Win 7 or later(64-bit)
Add LUTs on Video For macOS 10.14 or later
Wondershare Filmora contained more than 800 LUTs in different styles and tones. However, the exquisite video editing software has added more, taking its number above 800+ LUTs for optimizing color enhancement in your videos.

Key Features of Wondershare Filmora
- Color Sharpening: Filmora allows you to adjust the color sharpness of videos. It’s done by setting color blur and base as required. The feature is ideal if you want to record events or broadcast videos.
- Cover Optimization: You can create and optimize your video covers with Wondershare Filmora. Enhancing video covers with special LUTs, elements, text styles, and other effects is simpler.
- Effect Mask: There is also an option to use masking effects. You can use video overlays to modify, duplicate, hide, or reveal footage. The objects in the video can be covered using different shapes.
Conclusion
Colors are unique pieces of elements that gain attention at a glance. Similarly, adding colors to videos can make them more impressive and appealing. By using LUTs, you can optimize the color styling of your videos. After all, LUTs can enhance color saturation, brightness, lightning, and tone. Meanwhile, Wondershare Filmora equips the best LUTs for Premiere Pro in many gradients.
Apply LUT on Videos Apply LUT on Videos Learn More
Part 2: LUTs are Good for Which Profession and Why?
With the advancement of digital technology, the need for enhanced graphical media is rising. Meanwhile, LUT Adobe Premiere Pro is great for upscaling photo and video quality. Hence, LUTs can be an ideal solution for optimizing work in different professions, including:
1. Video Production
Within film industries, video and film production is common. Thereafter, using LUTs Adobe Premiere Pro is a perfect option for color grading. Hence, film directors can correct, adjust, or enhance colors across scenes. This saves time during the video editing process.
2. Advertising
LUTs are a great source of visual enhancement for the advertising industry. Since they allow adjusting colors of advertising content like clips, posters, and brochures. When marketing content is appealing, there will be more audience engagement and sales.
3. Photography
Photographers can use LUTs to add special styles and effects to their photographs. This way, they can increase their photography standards with more enchanting looks. With improved color vision, correction, and grading, LUTs are great for photography.
4. Broadcasting
The broadcasters are required to adjust the colors of their live shows or streaming. Thus, using LUTs can save time from deep video editing. Using LUTs, they can apply filters to improve the visual quality of live videos.
Part 3: Best Free LUTs For Premiere Pro That Can Be Used
The internet has many options when choosing the best free LUTs for Premiere Pro. Similarly, you can get confused as a user. After all, selecting suitable LUTs can be difficult. Thus, here you’ll find 15 top colors preset Premiere Pro LUTs:
1. Custom Styled LUTs
If you have log footage with flat looks, these custom-styled LUTs are a great solution. There’re 13 different LUT profiles in this LUT Premiere Pro free pack. Meanwhile, you can easily customize video color gradients. The color presets are unique with their standard color curve. By tweaking settings and adjusting intensity, you can customize LUTs.
2. Cinematic LUTs for Premiere Pro
Improvise your video colors with Cinematic LUTs for Premiere Pro. This LUTs Premiere Pro pack comes with unique cinematic effects. This means you can improve your video engagement with cinematic style and color. There are 8 special filters that are very easy to implement into your videos. So even if you’re a beginner, you can use this LUT pack.
3. Free Vintage LUT for Premiere Pro
This Premiere Pro-free LUTs pack is a perfect solution for video styling. So you can enhance your videos with special colors and unique gradients. This way, you can add natural looks to your video with personalized saturation. With a range of color filters, this LUT pack can offer enhanced video upscaling.
4. Fashion LUTs
If you’re inspired by fashion, blend fashionable looks into your videos. Hence, your videos will look more professional with these Fashion LUTs. There are 15 Premiere LUTs presets for extending video color grading. This way, your videos will look more cinematic with extended styling. Meanwhile, it’s easy to download LUTs for Premiere Pro on your device.
5. Free Reign Sample LUT
Blend creativity into your videos with Free Reign Sample LUT. This LUT color preset Premiere Pro pack has multiple color presets. With each preset, there comes a unique filter with a different color gradient. So you can style your videos in appealing textures, teal, and saturation. For photography or videography, this LUT pack is an ideal solution.
6. Carbon Sample LUT
Add carbon contrast to your videos using the carbon Premiere Pro LUTs free pack. There are special carbon effects that utilize advanced color grading. This way, you can make your videos more interesting and engaging. The availability of different color arts ensures cinematic looks with specialized saturation. This LUT can be integrated into any video type.
7. Grecian Ideal LUTs
With 9 different color gradients, upgrade your videos using this LUTs pack. Meanwhile, you can use these LUTs in Adobe Premiere Pro or any program. By using these LUTs, you’ll experience unique color styling in your videos. If you are a photographer, these LUTs will help enhance your pictures and snaps. After all, there are special filters in this LUT pack Premiere Pro.
8. Instagram LUTs Color Filters Preset
Instagram is a popular video and image-sharing platform. Thus, it’s essential to transform your visual media with specialized Instagram LUTs. After all, these LUTs transform your content with special filters in unique colors. In total, there are 12 filters, and all of them are unique. So you can choose any filter preset in this free LUTs premiere pack.
9. Lutify Me 7 Free LUTs
Add life to your visual content with the Lutify LUTs pack. There are 7 different LUTs for upscaling color schemas in your photos and videos. All these LUTs utilize unique and enticing cinematography with extended color grading. Thus, you can adjust tone and contrast as needed. Meanwhile, you will not face any problems using this free premiere LUTs pack.
10. IWLTBAP 10 Free LUTs
Experience ultimate cinematic effects with IWLTBAP Free LUTs. There are 10 free LUTs, and more than 290 color presets. Thus, you can easily enhance the visual quality of your photos and videos. This LUTs for Premiere Pro free download pack is an ideal choice for color grading. Meanwhile, all the color elements are based on providing cinematic touch.
11. Free Edgy LUT Pack
Edge your favorite visual content with enchanting looks. This free-edge LUT pack comprises 5 different LUTs to make your videos special. With unique color correction, these LUTs have magical gradients in them. Thus, the quality of your pictures and videos will improve. The color schemas will also improve using this LUTs Premiere Pro pack.
12. Sports LUTs
Lift your sports enthusiasm with a special sports LUTs pack. By using these free LUTs for Premiere Pro, add sports-like filters to videos. After all, there are special filters with color presets to enhance visual quality. This way, your videos will start looking more attractive with retouching colors. Even your darker videos will appear more transparent.
13. Universal LUTs Pack
Make your video starting more visually appealing with Universal LUTs Pack. After all, there are a bunch of filters presets that offer color correction and enhancement. Hence, your videos will be transformed into special art. Meanwhile, your videography could get a huge boost with scintillating colors. Using this LUT color preset Premiere Pro is simple and convenient.
14. SB Wedding LUTs Pack
Weddings are momentous occasions, and they involve both videography and photography. By using the SB Wedding LUTs pack, now add different color elements to wedding visuals. There are unique romantic tones, color schemas, and 12 video LUTs. All these video LUTs are unique, with special color presets in different styles. Making weddings memorable is what this free LUTs premiere pack achieves.
15. 8 Movie Look LUTs
Movies are entertaining and unique because of cinematic color styles. With this movie LUTs pack, experience 8 different movie color presets. The identification of LUTs is taken from movies. Thus, they can turn your simple videos into ultimate movies. Meanwhile, this LUTs Adobe Premiere Pro pack can upscale video colors in multiple schemas.
Bonus Part: Finding the Best Free LUTs in Wondershare Filmora
Video editing is a way to enhance the quality of videos in an optimal way. Wondershare Filmora is a perfect video editor that provides instant solutions to upscale video. There are different elements, effects, stickers, and other filters to upgrade your video’s visual look. Meanwhile, the availability of LUTs allows users to extend the color patterns and textures of their videos.
Add LUTs on Video For Win 7 or later(64-bit)
Add LUTs on Video For macOS 10.14 or later
Wondershare Filmora contained more than 800 LUTs in different styles and tones. However, the exquisite video editing software has added more, taking its number above 800+ LUTs for optimizing color enhancement in your videos.
Key Features of Wondershare Filmora
- Color Sharpening: Filmora allows you to adjust the color sharpness of videos. It’s done by setting color blur and base as required. The feature is ideal if you want to record events or broadcast videos.
- Cover Optimization: You can create and optimize your video covers with Wondershare Filmora. Enhancing video covers with special LUTs, elements, text styles, and other effects is simpler.
- Effect Mask: There is also an option to use masking effects. You can use video overlays to modify, duplicate, hide, or reveal footage. The objects in the video can be covered using different shapes.
Conclusion
Colors are unique pieces of elements that gain attention at a glance. Similarly, adding colors to videos can make them more impressive and appealing. By using LUTs, you can optimize the color styling of your videos. After all, LUTs can enhance color saturation, brightness, lightning, and tone. Meanwhile, Wondershare Filmora equips the best LUTs for Premiere Pro in many gradients.
Best 8 Augmented Reality Video Games
Top 8 Augmented Reality Video Games
An easy yet powerful editor
Numerous effects to choose from
Detailed tutorials provided by the official channel
Augmented reality video games are the latest sensation in the gamer fraternity. Be here to know everything about the top 8 AR video games of all times!
In this article
01 [What Is AR in Gaming? Is AR the Future of Gaming?](#Part 1)
02 [What Is the Most Popular AR Game Now?](#Part 2)
03 [8 Best Augmented Reality Games (For iOS & Android)](#Part 3)
Part 1 What Is AR in Gaming? Is AR the Future of Gaming?
Before taking a dive into the most appealing augmented reality gaming alternatives, it would be better to have a generalized understanding of the concept behind the AR utility. Sticking to digital terms, augmented reality refers to an enhanced presentation of your real world environment with the use of suitable digital equipments. The most basic example in this regard is using your smartphone camera to view the nearby environment in a considerably upgraded graphic setting through an AR application.
When thinking to experiment with the diversity of graphic elements in augmented reality, you can explore the digital overlays by trying hands at one or more of the following enhancements:
● Changing the color perspectives of the screen backgrounds, along with applying suitable filters to produce the effect of high quality chromatic scaling in the graphic elements.
● Superimposition of 3D graphic models, images and other elements conveying snippets of digital information.
● Add labels to screen elements for precise recognition and convenient location, when using the augmented reality concept for gaming purposes.
● Integrate the AR concept to with social media platforms, like using SnapChat and Instagram’s image filters to modify the player’s appearance within the game surroundings.
Moving ahead to the specific discussion on augmented reality video games, the concept was introduced in 2016, with Pokemon GO being the inaugural AR experiment. Since then, the gaming fraternity is dedicated towards providing a real-time perception of different gaming environments with high quality graphic imagery, matchless storytelling and an exquisite range of gaming hardware.
About the latest trends in the domain, you will land across a diversity of immersive augmented reality games introduced by some of the most pronounced game developing companies. These games are a complete entertainment package, where you gave the surety of getting a maximized real-time gameplay experience with enhanced capacities of headsets and motion controls.
Most of the aforesaid games use a GPS tracking system to create a more responsive and realistic gaming environment, allowing the player to undertake a flawless transition amid the real world and its technological replica.
● Augmented Reality: The Future of Console Gaming
Talking about the modern day console gaming prospects, a lot needs to be owed to the revolutions encountered in the gaming technology in the past decade. While the integration of augmented reality into conventional video gaming has come up with upgraded concepts of real-time gaming that has definitely given a boost to the present time gaming aspects.
Augmented reality is being regarded as a potential candidate in the domain of computer based gaming platforms, considering the fact that the latter has brought about an integration of real-world elements into gaming alternatives with minimal prerequisites. As of now, AR based games are all set to provide you with the most immersive gaming experience you have ever had.
As far as the future if console gaming in the light of augmented reality is concerned, it would be a rather quick judgment to define the latter’s prospects within any constraints. With the technology being a relatively newer entrant to the world of gaming, the realm of feature-based enhancement is wide open.
All said and done, the bottom line of the discussion is that the future would have a huge storehouse of immersive gaming alternatives, with the most realistic AR approaches, which would further be supplemented by the day to day technological advancements in the IT and communication industry. The introduction of high tech 5G devices will further let players embrace the real world through their console, thus ensuring a perfect synchronization of virtual gaming technology with the real-time environment.
Part 2 What Is the Most Popular AR Game Now?
Since its advent in 2016, augmented reality gaming has mastered the art of ruling the hearts of gamers around the world. Right from graphical enhancement to real-time modulation, and top quality futures to convenient gameplay, AR gaming has everything to keep you glued to your consoles and smartphones for hours that refuse to end!
AR video games are the talk of the trend, and boast of presenting an enormous variety of gaming choices in front of dedicated players. While it is quite obvious to have a tough time choosing your best AR game, you can begin your gaming streak with Pokemon GO, the first and the most popular entry into the series, till you make a new choice.
Diving into the game specifications, Pokemon GO is a location centered, augmented reality game, which is conveniently compatible to any of your smartphones. The game marked the entry of the augmented reality concept into the realm of video game development with its release in July 2016 as a new member of the Pokemon franchise. Talking of the game’s popularity, the latter became successful in becoming an absolute favorite among global gamers and is known to have generated the maximum revenue at the time of its release, taking the credit of being recognized as the first mainstream console game based on augmented reality.
As reviewed by the players, Pokemon GO is loaded with excellent features of storyline flow, game controls and interface mechanics, sociability and of course, the undeniably appealing legacy of the Pokemon brand. Other attractions of the game with special reference to augmented reality include, a free access revenue model and adequate information safety.

Part 2 Best Augmented Reality Games (For iOS & Android)
Having discussed enough about the advent and credibility of augmented reality based console gaming, you might easily feel motivated to try hands at the popular and appealing integration of technology and entertainment. Adhering to the concern, let us browse through the most interactive choices of augmented reality infused games that you would love to relish on your iOS and Android devices:
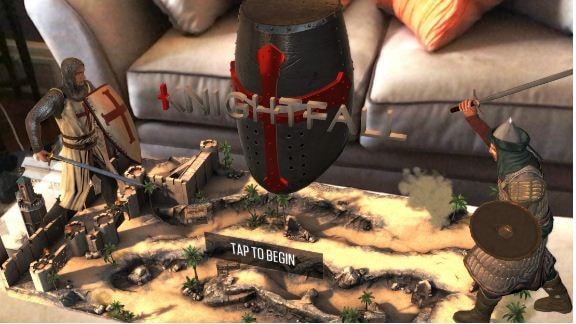
01Knightfall AR
Set in the fictional region of The Knights Templar, this one is a combat oriented AR video game that tasks you with the responsibility of defending the land of Acre against a rival army invasion, while protecting the Holy Grail, which is the most valuable relic of Christianity. When playing the game, you will be grouped into teams of Knights and Warriors to proceed with the quest.
This AR game promises you of an everlasting real-time action gaming experience, where you can fire bullets to kill enemies, collect gold and reconstruct your defense system. You need to win battles, while unlocking features and challenges to proceed through the gameplay. You are also allowed to choose a character in the game’s Photo mode for entertainment purposes.
02Zombie, Run
If you have a soft corner for your morning jog routine, get ready dive into the most thrilling sporty adventure with the aforesaid augmented reality gaming application. The gameplay put you amid a world of attacking zombies, where you are required to run and simultaneously collect specified game items to escape the fatal attacks of the nasty creatures.
You are entitled to enjoy an amplified experience of your regular morning jogs with the game’s motivating narration and complementing background music that boosts your gaming as well as exercising willpower.

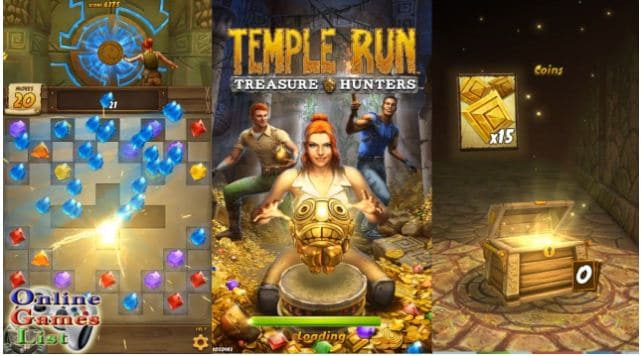
03Temple Treasure Hunt
This one is the perfect game for you if the idea of treasure hunting and mystery solving turns you on. Using the concept of geo-location to inculcate the augmented reality characteristic, Temple Treasure Hunt is a simple yet exciting game with a diversity of legends to hear, mysteries to solve and adventures to experience.
As a player of the game, you are allowed to make a choice between assuming the role of either a treasure protector or a hunter. While the former requires you to create challenging treasure tests that would make it difficult for the hunters to locate the same, the latter, on the other hand demands you to hunt the protected treasure to win the game. Regardless of the role you pick, you are required to follow a route map to proceed through the game.
04Jurassic World Alive
The aforesaid game is a treat for those who have always been the secret admirers of the gigantic creatures of the prehistoric period. The thrilling gameplay of Jurassic World Alive lets you have an encounter with the freely wandering prehistoric beings within the modern day civilizations. Packed with well designed graphics, the game is all set to give its players an exciting and unforgettable augmented reality experience.
Landing into the game, you are given the liberty to explore the diversity of elements in the realms of the Jurassic World, while completing the game’s task if collecting DNA samples of the giant mammoths, Pteranodons and dinosaurs. If that is not enough, you are free to create a customized raptor of your own, and share the same while competing with similar counterparts in real-time.

05Harry Potter: Wizards Unite
Who amongst us is not a die-hard fan of the magically fantasizing Harry Potter series! Thanks to augmented reality, the love of the same can now be relished in real-time. Talking of the aforesaid Wizards Unite edition, this one is a fantasy adventure game that requires the players to relieve Harry Potter’s magical universe from the drastic doom that has struck upon the land with an aim of ultimate destruction.
When playing the game, you are supposed to slip into the role of a Wizard and proceed through the game by overcoming challenges and combating enemies. With the integration of realistic graphics, players get to experience wizard magic in true sense.

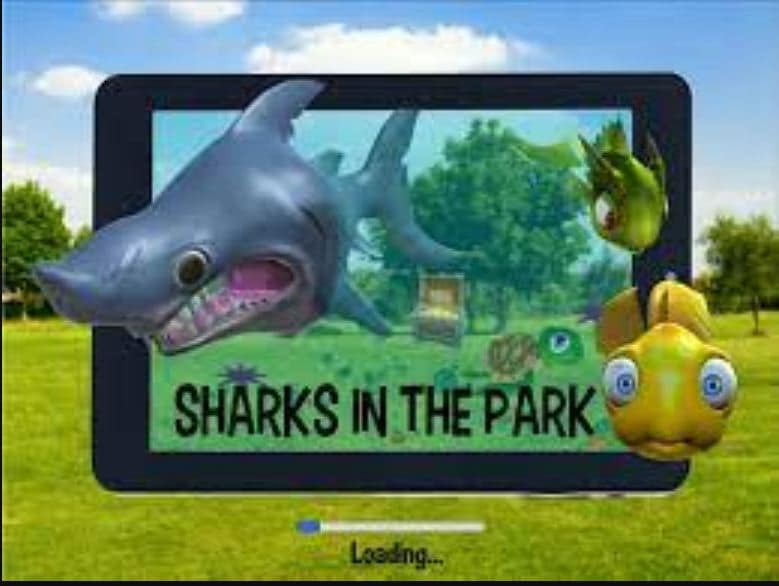
06Sharks in the Park
This one is a fun centered augmented reality game, set within an oceanic ecosystem. When traversing through the exquisite regions of the aquatic world, you will come across a hoard of newly found water species, which you need to interact with, in real-time for addressing the different aspects of the game quest.
The game accesses the GPS functionality of your smartphone to help you to walk through the ocean while you are on your expedition of discovering the different forms of aquatic life under the sea. The game further utilizes smartphone sensors for a synchronized movement tracking of the players, which means that your movements in real-time will be exactly replicated in the digital environment.
07Beer Pong AR
This game is conveniently regarded as the digital prototype of board games in the future and showcases the fusion of augmented reality into the already entertaining world of console gaming. The gameplay begins with the players getting a choice to select a preferred set of surroundings for installing the beer. This is followed by throwing ping pong balls from the most suitable angle.
Talking of the games another attraction is the perfect sync between the real and digital worlds and the non-messy post game experience. If you are keen on enjoying augmented reality gaming on an Android phone, Beer Pong AR is possibly the best alternative you can rely on.

08Dark: Subject One
If you are more comfortable in the adventure and mystery centered gameplay genres, consider trying hands at this game in the environment of augmented reality. The gameplay unfolds a horror storyline, where the player being the hero of the game, adheres to the task of searching for his disappeared friend. As the game progresses, the player is directed to a parallel universe, where he is welcomed by terrifying encounters.
Beating through the eerie landscapes and overcoming scary hurdles, the player lands across clues and hints to unravel the mystery of the case. The top class augmented reality elements promise you of an escalated horrid feel all through the gameplay.

09Experiencing Augmented Reality With Filmora
When looking for suitable alternatives to edit augmented reality video games, you can rely on the Wondershare Filmora Video Editor software without a second thought. Right from welcoming you with the most user-cohesive working interface to presenting a diverse library of top class video editing effects, this application has visibly everything that an editor of augmented reality video game will ever need.
For Win 7 or later (64-bit)
For macOS 10.12 or later
The software program even furnishes you with an additional in-built screen recorder program that allows you to record and edit video games with the most stunning audio-visual editing effects and filters within the app’s editing library.
● Ending Thoughts →
● The advent of augmented reality has put console gaming on a different level with the integration of real-time features.
● When looking for the best alternatives for landing into AR gaming, there are a variety of Android and iOS compatible games to choose from.
● To address the need of editing an AR video game, you can conveniently seek the help of Wondershare Filmora for the best quality editing output.
Augmented reality video games are the latest sensation in the gamer fraternity. Be here to know everything about the top 8 AR video games of all times!
In this article
01 [What Is AR in Gaming? Is AR the Future of Gaming?](#Part 1)
02 [What Is the Most Popular AR Game Now?](#Part 2)
03 [8 Best Augmented Reality Games (For iOS & Android)](#Part 3)
Part 1 What Is AR in Gaming? Is AR the Future of Gaming?
Before taking a dive into the most appealing augmented reality gaming alternatives, it would be better to have a generalized understanding of the concept behind the AR utility. Sticking to digital terms, augmented reality refers to an enhanced presentation of your real world environment with the use of suitable digital equipments. The most basic example in this regard is using your smartphone camera to view the nearby environment in a considerably upgraded graphic setting through an AR application.
When thinking to experiment with the diversity of graphic elements in augmented reality, you can explore the digital overlays by trying hands at one or more of the following enhancements:
● Changing the color perspectives of the screen backgrounds, along with applying suitable filters to produce the effect of high quality chromatic scaling in the graphic elements.
● Superimposition of 3D graphic models, images and other elements conveying snippets of digital information.
● Add labels to screen elements for precise recognition and convenient location, when using the augmented reality concept for gaming purposes.
● Integrate the AR concept to with social media platforms, like using SnapChat and Instagram’s image filters to modify the player’s appearance within the game surroundings.
Moving ahead to the specific discussion on augmented reality video games, the concept was introduced in 2016, with Pokemon GO being the inaugural AR experiment. Since then, the gaming fraternity is dedicated towards providing a real-time perception of different gaming environments with high quality graphic imagery, matchless storytelling and an exquisite range of gaming hardware.
About the latest trends in the domain, you will land across a diversity of immersive augmented reality games introduced by some of the most pronounced game developing companies. These games are a complete entertainment package, where you gave the surety of getting a maximized real-time gameplay experience with enhanced capacities of headsets and motion controls.
Most of the aforesaid games use a GPS tracking system to create a more responsive and realistic gaming environment, allowing the player to undertake a flawless transition amid the real world and its technological replica.
● Augmented Reality: The Future of Console Gaming
Talking about the modern day console gaming prospects, a lot needs to be owed to the revolutions encountered in the gaming technology in the past decade. While the integration of augmented reality into conventional video gaming has come up with upgraded concepts of real-time gaming that has definitely given a boost to the present time gaming aspects.
Augmented reality is being regarded as a potential candidate in the domain of computer based gaming platforms, considering the fact that the latter has brought about an integration of real-world elements into gaming alternatives with minimal prerequisites. As of now, AR based games are all set to provide you with the most immersive gaming experience you have ever had.
As far as the future if console gaming in the light of augmented reality is concerned, it would be a rather quick judgment to define the latter’s prospects within any constraints. With the technology being a relatively newer entrant to the world of gaming, the realm of feature-based enhancement is wide open.
All said and done, the bottom line of the discussion is that the future would have a huge storehouse of immersive gaming alternatives, with the most realistic AR approaches, which would further be supplemented by the day to day technological advancements in the IT and communication industry. The introduction of high tech 5G devices will further let players embrace the real world through their console, thus ensuring a perfect synchronization of virtual gaming technology with the real-time environment.
Part 2 What Is the Most Popular AR Game Now?
Since its advent in 2016, augmented reality gaming has mastered the art of ruling the hearts of gamers around the world. Right from graphical enhancement to real-time modulation, and top quality futures to convenient gameplay, AR gaming has everything to keep you glued to your consoles and smartphones for hours that refuse to end!
AR video games are the talk of the trend, and boast of presenting an enormous variety of gaming choices in front of dedicated players. While it is quite obvious to have a tough time choosing your best AR game, you can begin your gaming streak with Pokemon GO, the first and the most popular entry into the series, till you make a new choice.
Diving into the game specifications, Pokemon GO is a location centered, augmented reality game, which is conveniently compatible to any of your smartphones. The game marked the entry of the augmented reality concept into the realm of video game development with its release in July 2016 as a new member of the Pokemon franchise. Talking of the game’s popularity, the latter became successful in becoming an absolute favorite among global gamers and is known to have generated the maximum revenue at the time of its release, taking the credit of being recognized as the first mainstream console game based on augmented reality.
As reviewed by the players, Pokemon GO is loaded with excellent features of storyline flow, game controls and interface mechanics, sociability and of course, the undeniably appealing legacy of the Pokemon brand. Other attractions of the game with special reference to augmented reality include, a free access revenue model and adequate information safety.
Part 2 Best Augmented Reality Games (For iOS & Android)
Having discussed enough about the advent and credibility of augmented reality based console gaming, you might easily feel motivated to try hands at the popular and appealing integration of technology and entertainment. Adhering to the concern, let us browse through the most interactive choices of augmented reality infused games that you would love to relish on your iOS and Android devices:
01Knightfall AR
Set in the fictional region of The Knights Templar, this one is a combat oriented AR video game that tasks you with the responsibility of defending the land of Acre against a rival army invasion, while protecting the Holy Grail, which is the most valuable relic of Christianity. When playing the game, you will be grouped into teams of Knights and Warriors to proceed with the quest.
This AR game promises you of an everlasting real-time action gaming experience, where you can fire bullets to kill enemies, collect gold and reconstruct your defense system. You need to win battles, while unlocking features and challenges to proceed through the gameplay. You are also allowed to choose a character in the game’s Photo mode for entertainment purposes.
02Zombie, Run
If you have a soft corner for your morning jog routine, get ready dive into the most thrilling sporty adventure with the aforesaid augmented reality gaming application. The gameplay put you amid a world of attacking zombies, where you are required to run and simultaneously collect specified game items to escape the fatal attacks of the nasty creatures.
You are entitled to enjoy an amplified experience of your regular morning jogs with the game’s motivating narration and complementing background music that boosts your gaming as well as exercising willpower.
03Temple Treasure Hunt
This one is the perfect game for you if the idea of treasure hunting and mystery solving turns you on. Using the concept of geo-location to inculcate the augmented reality characteristic, Temple Treasure Hunt is a simple yet exciting game with a diversity of legends to hear, mysteries to solve and adventures to experience.
As a player of the game, you are allowed to make a choice between assuming the role of either a treasure protector or a hunter. While the former requires you to create challenging treasure tests that would make it difficult for the hunters to locate the same, the latter, on the other hand demands you to hunt the protected treasure to win the game. Regardless of the role you pick, you are required to follow a route map to proceed through the game.
04Jurassic World Alive
The aforesaid game is a treat for those who have always been the secret admirers of the gigantic creatures of the prehistoric period. The thrilling gameplay of Jurassic World Alive lets you have an encounter with the freely wandering prehistoric beings within the modern day civilizations. Packed with well designed graphics, the game is all set to give its players an exciting and unforgettable augmented reality experience.
Landing into the game, you are given the liberty to explore the diversity of elements in the realms of the Jurassic World, while completing the game’s task if collecting DNA samples of the giant mammoths, Pteranodons and dinosaurs. If that is not enough, you are free to create a customized raptor of your own, and share the same while competing with similar counterparts in real-time.
05Harry Potter: Wizards Unite
Who amongst us is not a die-hard fan of the magically fantasizing Harry Potter series! Thanks to augmented reality, the love of the same can now be relished in real-time. Talking of the aforesaid Wizards Unite edition, this one is a fantasy adventure game that requires the players to relieve Harry Potter’s magical universe from the drastic doom that has struck upon the land with an aim of ultimate destruction.
When playing the game, you are supposed to slip into the role of a Wizard and proceed through the game by overcoming challenges and combating enemies. With the integration of realistic graphics, players get to experience wizard magic in true sense.
06Sharks in the Park
This one is a fun centered augmented reality game, set within an oceanic ecosystem. When traversing through the exquisite regions of the aquatic world, you will come across a hoard of newly found water species, which you need to interact with, in real-time for addressing the different aspects of the game quest.
The game accesses the GPS functionality of your smartphone to help you to walk through the ocean while you are on your expedition of discovering the different forms of aquatic life under the sea. The game further utilizes smartphone sensors for a synchronized movement tracking of the players, which means that your movements in real-time will be exactly replicated in the digital environment.
07Beer Pong AR
This game is conveniently regarded as the digital prototype of board games in the future and showcases the fusion of augmented reality into the already entertaining world of console gaming. The gameplay begins with the players getting a choice to select a preferred set of surroundings for installing the beer. This is followed by throwing ping pong balls from the most suitable angle.
Talking of the games another attraction is the perfect sync between the real and digital worlds and the non-messy post game experience. If you are keen on enjoying augmented reality gaming on an Android phone, Beer Pong AR is possibly the best alternative you can rely on.
08Dark: Subject One
If you are more comfortable in the adventure and mystery centered gameplay genres, consider trying hands at this game in the environment of augmented reality. The gameplay unfolds a horror storyline, where the player being the hero of the game, adheres to the task of searching for his disappeared friend. As the game progresses, the player is directed to a parallel universe, where he is welcomed by terrifying encounters.
Beating through the eerie landscapes and overcoming scary hurdles, the player lands across clues and hints to unravel the mystery of the case. The top class augmented reality elements promise you of an escalated horrid feel all through the gameplay.
09Experiencing Augmented Reality With Filmora
When looking for suitable alternatives to edit augmented reality video games, you can rely on the Wondershare Filmora Video Editor software without a second thought. Right from welcoming you with the most user-cohesive working interface to presenting a diverse library of top class video editing effects, this application has visibly everything that an editor of augmented reality video game will ever need.
For Win 7 or later (64-bit)
For macOS 10.12 or later
The software program even furnishes you with an additional in-built screen recorder program that allows you to record and edit video games with the most stunning audio-visual editing effects and filters within the app’s editing library.
● Ending Thoughts →
● The advent of augmented reality has put console gaming on a different level with the integration of real-time features.
● When looking for the best alternatives for landing into AR gaming, there are a variety of Android and iOS compatible games to choose from.
● To address the need of editing an AR video game, you can conveniently seek the help of Wondershare Filmora for the best quality editing output.
Ideas That Will Help You Out in Making Transparent Image
Ideas That Will Help You Out in Making Transparent Image
An easy yet powerful editor
Numerous effects to choose from
Detailed tutorials provided by the official channel
Want to explore your graphic creativity with transparent images? Stay tuned for the most trending ideas to fill in your social media handles with unlimited likes!
In this article
01 [What Is a Transparent PNG Background?](#Part 1)
02 [Differences Among PNG vs JPG vs GIF](#Part 2)
03 [How to Make an Image Background Transparent](#Part 3)
04 [How to Convert JPG to Transparent PNG](#Part 4)
Part 1 What Is a Transparent PNG Background?
Transparent backgrounds are essentially faded overlays to any graphic content, like, an image or a video, that are useful in emphasizing the main element in the substance. Compatible to a variety of image and video formats, these are the talk of the trend, owing to their excellent content promotion utility. These are the latest and creative examples of information presentation, along with being among the best branding tools that can potentially make your content fresh and unique.
Using a transparent background as a brand promotion tool helps to project forward the major highlights of your product with a supportive background image, like the brand logo. This helps the audience to have a general idea of your brand. Apart from this, you can also assure the authenticity and quality of your brand by using a watermark in the background image.
Images with transparent backgrounds are the current promotion trends, owing to their convenient compatibility with any web design and the flexibility to mix with the most diverse color palettes and different elements on the product webpage. These can further be easily rendered in 3D to present realistic product images.
Part 2 Differences Among PNG vs JPG vs GIF
Diversity in requirement and usage has led to the advent of a variety of image formats, each suited to a specific purpose. On account of this variation, it becomes a confusing task to select the best image format that can fetch the most affordable images results in cohesion with exact user needs.
It is recommenced to use the JPG image format for natural stills that have a smooth variations in intensity and color. If your content requires image transparency, or contains texts and elements that have a sharp contrast image, like a brand logo, you should ideally prefer the PNG image format, while the GIF format is best suited for presenting animated content. As an explanation to the above usage constraints, here’s a comparison of the popular PNG, JPG and GIF image formats in the light of some common credibility parameters.
01Compression
Image compression facilitates a quick data transmission across different web based platforms, owing to the reduced file size. While compression can be either lossy or lossless, choose an image format that maintains the size credibility in resonance with your data needs. A lossless compression guarantees the retrieval of original image, but a lossy compression fails to do so.
JPG
The JPG format is a lossy compressor that plays on your ability to perceive. The format has the credibility of a 1:10 compression ratio, without comprising with the original image quality. However, a further increased compression ratio may generate perceivable differences in image quality.
The JPG compression utilizes the concept of Discrete Cosine Transform, i.e., a color averaging of the image pixels in close proximity. Hence, it is suitable to use this format for natural and scenic stills, having a smooth color and intensity transition. Preferring this image format for a transmission of high contrast and sharpened images is however, not advisable.
PNG
This format supports the Deflate Compression technique and neither introduces artefacts, nor cuts down on the image quality. Choose the PNG image format for a lossless and high quality compression in comparison to JPG. This one is a more effective format with higher image quality, sharper image presentation and occupies a larger memory space on your device.
You can rely on PNG images for presenting data with text, shapes and logos with high contrast pixelation. It is however, not a good choice for transferring digital images that have a high resolution.
GIF
Working on the LZW Compression Algorithm, this image format was originally used to showcase simple website graphics, when the PNG format was still at a developing stage. However, with the advancement of PNG as a more effective compression format, the use of GIF is now restricted to animated content sharing.
02Transparency
Transparency is tern used to describe some invisible content. This is suitable to use in image backgrounds when you need to lay extra stress on the main content, like the logo of your product with a cohesive brand text, etc. the transparent background used here facilitates the use of a particular image with a series of background and color variations.
JPG
The JPG format has a limitation of not being compatible with image transparency, and hence is not suitable for related applications.
PNG
The PNG format gives you the liberty to use image transparency in two selective ways. You can either choose to make your image partially transparent by an alpha channel insertion for a smooth edge-background blend, or use index transparency to make the pixels of any particular color as transparent. PNG8 AND PNG24 versions of the format are supportive of index and alpha channel transparencies respectively.
GIF
This format inherently supports index transparency and declares a chosen color on the palette as transparent. Owing to the absence of alpha channel transparency, there is an unsatisfactory blend of edges with the image background. The unevenness becomes more prominent in case of highly detailed and rounded images.
While it is possible to mitigate this loss to some extent with the use of image dithering, the GIF format is still not a preferred choice for creating images with transparent backgrounds. The PNG format is instead, more credible on that aspect.
03Color
Color is a visibly strong parameter of difference among the JPG, PNG and GIF image formats, with each one supporting as specific number of colors on the palette.
JPG
The color palette of JPG images is a huge inventory of 16 million colors, rendering them suitable for storing natural stills having a smooth color transition.
PNG
The two versions of PNG format differ on color variance. While PNG8 permits 256 colors, the PNG24 format supports 16 million colors, similar to the JPG format. Consider using the PNG8 format for an image with simple shapes and lesser variations in color. It is, on the other hand better to use the PNG24 format for images with transparent backgrounds, high image quality and complex shapes with detailed edges.
GIF
The GIF format is a host to 256 colors, one of which becomes transparent on using index transparency and the other 255 support different color variations.
04Animation
Animation here, is not necessarily restricted to having frame rates, but refers to a certain periodic movement of specific image sections with time. Out of JPG, PNG and GIF, only the last one is compatible with GIFs. You can use this utility to crate and share eye catching banners and advertisements. The advent of GIF specific content platforms, such as, GIPHY, Tumblr, etc., has further uplifted GIF reach and usage.
A variety of image formats are available to choose from for catering to specific content requirements. However, you can always optimize the format selection in cohesion with the current need.
Part 3 How to Make an Image Background Transparent
Having known enough about the credibility of transparent background images, it sounds quite interesting to try your hands at creating these of your own. The software market offers some over the top tools for creating stunning examples of images with transparent backgrounds. When looking for alternatives on how to make an image with a transparent background, some of your best choices are discussed below:
01Canva
This one is a top class image creator and editor tool, which you can use to add that extra tint to your website design material, watermark images or even display your image creativity for fun and entertainment purposes. The tool comes with a simple and quick process to make transparent background images.
This tool grants you the liberty to choose from various s transparency levels, image layers and effects to give the perfect professional look to your creation. The tool further promises you of a clean and subtle transparent background image that is bound to attract viewer attention.
This graphic design tool is available for a free usage, if you limit yourself within image design and effect play. However, if you want to experience the fun of creating transparent background images with this tool, you need to take its paid subscription.
How to Make Canva Transparent Background
Here’s the know how to add transparent background in still images with this tool:
Step 1: Account Creation
In order to use this graphic tool for image design, you need to have its official account. Visit the tool’s official site, launch the same on your system, create a Canva account and log in.

Step 2: Image Selection
Consider browsing through your device to choose an image for creating a transparent background artwork.

Step 3: Background Removal
You now need to remove the background color of the selected image. In the tool’s welcome interface, navigate to ‘Effects’ in the top toolbar and select ‘Background Remover’ from the available options to remove the background layer and make a transparent design.

Step 4: Save Your Image
After removing the image background, download it into your system. To do this, navigate to the ‘Download’ icon at the top right and click on it.

Step 5: File Format Selection
Here, you need to select the PNG file format to get a transparent background image.

Step 6: Transparency
It is now time to make your image background transparent. You can do this by clicking the ‘Transparency’ checkbox below the ‘File Format‘selection dialog box.

Step 7: Download Your Creation
When you are happy with setting the above parameters, hit the ‘Download’ tab to import your artwork to your device gallery.

02Photoshop
This one is excellent image editor and graphic designer tool that allows you to add diversification and class to your brand images. You can play with a variety of display features to enhance and objectify your image to your heart’s content.
Using Photoshop allows a presentation of your content against a dynamic color background, thus favoring a background interaction selective to the viewer’s serene size. Photoshop can create transparent logos for the products on your site, that are suitable to be placed anywhere on the webpage, regardless of the latter’s background color.
How to Make Photoshop Transparent Background
See through the following section of this article for a guided tutorial to create a transparent background image in Photoshop:

Step 1: Download Adobe Photoshop
Navigate to Adobe’s official website and download the Photoshop application in your device. Install and launch the same to reach the app’s welcome interface.

Step 2: Make a Layered Image File
In the main interface, open a selected image and navigate to the ‘Layers Panel’ in the right of the image window. However, if the ‘Layers Panel’ does not show up by default, reach to the top toolbar and hit the ‘Window’ tab. From the drop sown menu that follows, select ‘Layers’.

In this panel, double tap the ‘Background‘layer. This causes the ‘Rename Layer’ dialog box to appear. You can either enter a suitable name or continue with the default ‘Layer 0’ name. When you are done, click on ‘OK’.

Step 3: Let’s Get Creating!
In the application interface, navigate to the toolbar at the left and choose the ‘Magic Wand’ tool. Again, reach to the ‘Options’ bar at the top and choose ‘Select Subject’. This will facilitate the selection of the min object of the image, irrespective of its background and the selection will be visible as ‘marching ants’ around the object.

If you find the selection to be improper, use the ‘Magic Wand’ to ward off excessive background portions by choosing the ’Subtract From Selection’ option, or even add some extra product portions, suited to your requirement. While making your selection, take care to include any holes in the product image.

Step 4: Background Deletion
When you are left with only the selected product, navigate to the top toolbar and hit the ’Select’ tab and choose ‘Inverse’ from the drop down menu that follows. You can alternatively use the ‘Shift+Ctrl+I’ command for a Windows device, or enter ‘Shift+Command+I’ command, in case you are using a Mac supported device.

Make a selection of the inverse background and tap ‘Backspace’ or ‘Delete’ in your Windows and Mac devices respectively. This will cause your background to get transparent. In the Photoshop application, a gray-white checkerboard represents a transparent background.
In case you require deselecting any selection, enter ‘Ctrl+D’ in Windows or ‘Command+D’ in a Mac device.

Step 5: Save Your Creation in a Web Compatible Format
When you are done creating the transparent background artwork, it becomes equally important to save your creation in a web compatible format to export them on different media platforms and product websites.
Talking of the preferable image format, it is highly recommended to use the PNG24 one, owing to its flexibility of alpha channel transparency, which permits partially transparent image backgrounds along with layered transparency. This in turn makes it possible to integrate the image with varying color backgrounds on different sites and platforms without hollow pixelation.
To save your artwork in the PNG24 file format, navigate to the application toolbar bat the top and hit the ‘File’ tab and choose the ‘Export’ option from the drop sown menu that appears. Select the ‘Export As’ option from the ‘Export’ popup menu.
For an older Photoshop version, hit the ‘Export’ tab and choose ‘Save for Web’ from the dropdown menu, followed by selecting the PNG24 option. A format dialog box appears where you can set the transparency settings. To do this, navigate to ‘File Settings’ at the right, choose the PNG file format and check the ‘Transparency’ box. Avoid checking the ‘Smaller Size’ box, else the image will get saved in the PNG8 format.

In the left of the screen, the image file size is displayed. Maintain an affordable file size, preferably within 200 KB, to avoid slower image loading on the sharing platform. You can adjust this in the ‘Image Size’ option at the right.

Set a conveniently reduced dimension, while taking care not to set an extremely small size, else it will produce a pixelated output on the site. It is preferable to set a 50-100% larger image size for a convenient display across different devices.
Step 6: Final Save
Once you are satisfied with all the image settings, tap ‘Export All’ to save your artwork locally in your device. In the ‘File Save’ dialog box, choose a preferred device location, enter a suitable file name and choose the .png extension. At last, click on ‘Save’.
03Filmora
Launched by Wondershare, this is excellent image editor and creator software that you can rely on to make stunning artworks in a variety of file formats. Talking of background transparency in particular, the software comes with a unique ‘Green Screen’ feature to create high quality, transparent background images in a matter of a few clicks. You can further, give a professional touch to your creation with a storehouse of classic video and image editing effects that are just perfect to stand out in the crowd.
How to Make Filmora Transparent Background
A stepwise tutorial on how to create image with transparent background images using Filmora is discussed below:
Step 1: Download the Software
Visit the official website of Wondershare Filmora Video Editor to download and install the software in any of your Windows or Mac devices.
For Win 7 or later (64-bit)
For macOS 10.12 or later
Step 2: Import Media File
Launch the app to reach the main interface, where you will find the ‘Import’ tab. Hit it and choose ‘Import Media File’ from the drop down menu that follows. This will upload your selected image to the software’s media library.

Step 2: Timeline Dragging
You now need to insert the selected image from Filmora’s media library to the software’s editing timeline. You can do this either by right clicking the selected image, followed by choosing the ‘Insert’ option, or a simple ’Drag and Drop’ method.

Step 3: Transparency Adjustments
In the editor timeline, double click your selected image to open the ‘Settings’ tab. Scroll down the tab options to locate ‘Chroma Key Settings’. Make a right toggle to enable the ‘Chroma Key’ and you will see the image get transparent with the default ’Green’ background color.
You can alternatively, navigate to the ‘Select Color’ option and choose ‘Color Picker’ at its right, reach the image section you wish to make transparent and make a single click.

In case you get a partially transparent background, you can make further adjustments in the ‘Chroma Key’ settings, such as, tolerance, edge thickness, offset, edge feather, etc., to ascertain complete background transparency. When you are satisfied with your work, click on ‘OK’.

Step 4: Media Export
You can now try adding the transparent image to any video or export the same to any media platform. To do this, hit the ‘Export’ tab at the top right corner in the editor timeline.

Part 4 How to Convert JPG to Transparent PNG
Taking into account the diverse information sharing and content specification requirements, an obvious need to switch between different file formats may arise at a number of instants. One such example is the conversion of images in JPG format into that of a transparent PNG image. When looking through convenient alternatives to set the issue straight, the software market has a pouring flood of choices.
Discussed below are some of the best JPG to transparent PNG converter solutions you can pick to convert color background JPG stills into transparent PNG background images, while sorting the concern of how to save PNG with transparent background:
Filmora JPG to Transparent PNG Converter
Filmora is top rated and highly preferred graphic design software that caters to all of your video and image design and conversion needs in the most convenient manner. Developed by Wondershare, this is the worthiest pick for all graphic editing. While the software is packed with extensive and over the top features to provide a professional elegance to almost and design artwork, the transparent image backgrounds created by Filmora are simply remarkable.
If you are done with those usual and commonplace captures, try hands at creating transparent background images with this software, which promises you of a stand out result on account of the following features:
● Filmora comes with a distinguished ‘Green Screen’ feature that is known to create transparent background images in time instants shorter than an eye blink. You just need to upload an image in the software timeline and adjust a few chroma settings, and that’s really the end!
● Apart from this, you can play with a diverse inventory of results and image filters, like, graphic and text overlays, subtitles and tons of audio-visual upshots to create an absolute graphic masterpiece.
● The software further, is free to use and welcomes you with a clean, cohesive and responsive user interface, guiding you at each step of the design task.
● Ending Thoughts →
● Transparent image backgrounds are the current in house trends of content branding and product promotion alternatives. While there are varieties of requirement specific image file formats, the PNG format is best suited for creating a transparent background image.
● The software market is an in depth pool of choices for graphic and image editing tools, Wondershare Filmora happens to be a distinguished name among all to create and convert images with transparent backgrounds.
Want to explore your graphic creativity with transparent images? Stay tuned for the most trending ideas to fill in your social media handles with unlimited likes!
In this article
01 [What Is a Transparent PNG Background?](#Part 1)
02 [Differences Among PNG vs JPG vs GIF](#Part 2)
03 [How to Make an Image Background Transparent](#Part 3)
04 [How to Convert JPG to Transparent PNG](#Part 4)
Part 1 What Is a Transparent PNG Background?
Transparent backgrounds are essentially faded overlays to any graphic content, like, an image or a video, that are useful in emphasizing the main element in the substance. Compatible to a variety of image and video formats, these are the talk of the trend, owing to their excellent content promotion utility. These are the latest and creative examples of information presentation, along with being among the best branding tools that can potentially make your content fresh and unique.
Using a transparent background as a brand promotion tool helps to project forward the major highlights of your product with a supportive background image, like the brand logo. This helps the audience to have a general idea of your brand. Apart from this, you can also assure the authenticity and quality of your brand by using a watermark in the background image.
Images with transparent backgrounds are the current promotion trends, owing to their convenient compatibility with any web design and the flexibility to mix with the most diverse color palettes and different elements on the product webpage. These can further be easily rendered in 3D to present realistic product images.
Part 2 Differences Among PNG vs JPG vs GIF
Diversity in requirement and usage has led to the advent of a variety of image formats, each suited to a specific purpose. On account of this variation, it becomes a confusing task to select the best image format that can fetch the most affordable images results in cohesion with exact user needs.
It is recommenced to use the JPG image format for natural stills that have a smooth variations in intensity and color. If your content requires image transparency, or contains texts and elements that have a sharp contrast image, like a brand logo, you should ideally prefer the PNG image format, while the GIF format is best suited for presenting animated content. As an explanation to the above usage constraints, here’s a comparison of the popular PNG, JPG and GIF image formats in the light of some common credibility parameters.
01Compression
Image compression facilitates a quick data transmission across different web based platforms, owing to the reduced file size. While compression can be either lossy or lossless, choose an image format that maintains the size credibility in resonance with your data needs. A lossless compression guarantees the retrieval of original image, but a lossy compression fails to do so.
JPG
The JPG format is a lossy compressor that plays on your ability to perceive. The format has the credibility of a 1:10 compression ratio, without comprising with the original image quality. However, a further increased compression ratio may generate perceivable differences in image quality.
The JPG compression utilizes the concept of Discrete Cosine Transform, i.e., a color averaging of the image pixels in close proximity. Hence, it is suitable to use this format for natural and scenic stills, having a smooth color and intensity transition. Preferring this image format for a transmission of high contrast and sharpened images is however, not advisable.
PNG
This format supports the Deflate Compression technique and neither introduces artefacts, nor cuts down on the image quality. Choose the PNG image format for a lossless and high quality compression in comparison to JPG. This one is a more effective format with higher image quality, sharper image presentation and occupies a larger memory space on your device.
You can rely on PNG images for presenting data with text, shapes and logos with high contrast pixelation. It is however, not a good choice for transferring digital images that have a high resolution.
GIF
Working on the LZW Compression Algorithm, this image format was originally used to showcase simple website graphics, when the PNG format was still at a developing stage. However, with the advancement of PNG as a more effective compression format, the use of GIF is now restricted to animated content sharing.
02Transparency
Transparency is tern used to describe some invisible content. This is suitable to use in image backgrounds when you need to lay extra stress on the main content, like the logo of your product with a cohesive brand text, etc. the transparent background used here facilitates the use of a particular image with a series of background and color variations.
JPG
The JPG format has a limitation of not being compatible with image transparency, and hence is not suitable for related applications.
PNG
The PNG format gives you the liberty to use image transparency in two selective ways. You can either choose to make your image partially transparent by an alpha channel insertion for a smooth edge-background blend, or use index transparency to make the pixels of any particular color as transparent. PNG8 AND PNG24 versions of the format are supportive of index and alpha channel transparencies respectively.
GIF
This format inherently supports index transparency and declares a chosen color on the palette as transparent. Owing to the absence of alpha channel transparency, there is an unsatisfactory blend of edges with the image background. The unevenness becomes more prominent in case of highly detailed and rounded images.
While it is possible to mitigate this loss to some extent with the use of image dithering, the GIF format is still not a preferred choice for creating images with transparent backgrounds. The PNG format is instead, more credible on that aspect.
03Color
Color is a visibly strong parameter of difference among the JPG, PNG and GIF image formats, with each one supporting as specific number of colors on the palette.
JPG
The color palette of JPG images is a huge inventory of 16 million colors, rendering them suitable for storing natural stills having a smooth color transition.
PNG
The two versions of PNG format differ on color variance. While PNG8 permits 256 colors, the PNG24 format supports 16 million colors, similar to the JPG format. Consider using the PNG8 format for an image with simple shapes and lesser variations in color. It is, on the other hand better to use the PNG24 format for images with transparent backgrounds, high image quality and complex shapes with detailed edges.
GIF
The GIF format is a host to 256 colors, one of which becomes transparent on using index transparency and the other 255 support different color variations.
04Animation
Animation here, is not necessarily restricted to having frame rates, but refers to a certain periodic movement of specific image sections with time. Out of JPG, PNG and GIF, only the last one is compatible with GIFs. You can use this utility to crate and share eye catching banners and advertisements. The advent of GIF specific content platforms, such as, GIPHY, Tumblr, etc., has further uplifted GIF reach and usage.
A variety of image formats are available to choose from for catering to specific content requirements. However, you can always optimize the format selection in cohesion with the current need.
Part 3 How to Make an Image Background Transparent
Having known enough about the credibility of transparent background images, it sounds quite interesting to try your hands at creating these of your own. The software market offers some over the top tools for creating stunning examples of images with transparent backgrounds. When looking for alternatives on how to make an image with a transparent background, some of your best choices are discussed below:
01Canva
This one is a top class image creator and editor tool, which you can use to add that extra tint to your website design material, watermark images or even display your image creativity for fun and entertainment purposes. The tool comes with a simple and quick process to make transparent background images.
This tool grants you the liberty to choose from various s transparency levels, image layers and effects to give the perfect professional look to your creation. The tool further promises you of a clean and subtle transparent background image that is bound to attract viewer attention.
This graphic design tool is available for a free usage, if you limit yourself within image design and effect play. However, if you want to experience the fun of creating transparent background images with this tool, you need to take its paid subscription.
How to Make Canva Transparent Background
Here’s the know how to add transparent background in still images with this tool:
Step 1: Account Creation
In order to use this graphic tool for image design, you need to have its official account. Visit the tool’s official site, launch the same on your system, create a Canva account and log in.
Step 2: Image Selection
Consider browsing through your device to choose an image for creating a transparent background artwork.
Step 3: Background Removal
You now need to remove the background color of the selected image. In the tool’s welcome interface, navigate to ‘Effects’ in the top toolbar and select ‘Background Remover’ from the available options to remove the background layer and make a transparent design.
Step 4: Save Your Image
After removing the image background, download it into your system. To do this, navigate to the ‘Download’ icon at the top right and click on it.
Step 5: File Format Selection
Here, you need to select the PNG file format to get a transparent background image.
Step 6: Transparency
It is now time to make your image background transparent. You can do this by clicking the ‘Transparency’ checkbox below the ‘File Format‘selection dialog box.
Step 7: Download Your Creation
When you are happy with setting the above parameters, hit the ‘Download’ tab to import your artwork to your device gallery.
02Photoshop
This one is excellent image editor and graphic designer tool that allows you to add diversification and class to your brand images. You can play with a variety of display features to enhance and objectify your image to your heart’s content.
Using Photoshop allows a presentation of your content against a dynamic color background, thus favoring a background interaction selective to the viewer’s serene size. Photoshop can create transparent logos for the products on your site, that are suitable to be placed anywhere on the webpage, regardless of the latter’s background color.
How to Make Photoshop Transparent Background
See through the following section of this article for a guided tutorial to create a transparent background image in Photoshop:
Step 1: Download Adobe Photoshop
Navigate to Adobe’s official website and download the Photoshop application in your device. Install and launch the same to reach the app’s welcome interface.
Step 2: Make a Layered Image File
In the main interface, open a selected image and navigate to the ‘Layers Panel’ in the right of the image window. However, if the ‘Layers Panel’ does not show up by default, reach to the top toolbar and hit the ‘Window’ tab. From the drop sown menu that follows, select ‘Layers’.
In this panel, double tap the ‘Background‘layer. This causes the ‘Rename Layer’ dialog box to appear. You can either enter a suitable name or continue with the default ‘Layer 0’ name. When you are done, click on ‘OK’.
Step 3: Let’s Get Creating!
In the application interface, navigate to the toolbar at the left and choose the ‘Magic Wand’ tool. Again, reach to the ‘Options’ bar at the top and choose ‘Select Subject’. This will facilitate the selection of the min object of the image, irrespective of its background and the selection will be visible as ‘marching ants’ around the object.
If you find the selection to be improper, use the ‘Magic Wand’ to ward off excessive background portions by choosing the ’Subtract From Selection’ option, or even add some extra product portions, suited to your requirement. While making your selection, take care to include any holes in the product image.
Step 4: Background Deletion
When you are left with only the selected product, navigate to the top toolbar and hit the ’Select’ tab and choose ‘Inverse’ from the drop down menu that follows. You can alternatively use the ‘Shift+Ctrl+I’ command for a Windows device, or enter ‘Shift+Command+I’ command, in case you are using a Mac supported device.
Make a selection of the inverse background and tap ‘Backspace’ or ‘Delete’ in your Windows and Mac devices respectively. This will cause your background to get transparent. In the Photoshop application, a gray-white checkerboard represents a transparent background.
In case you require deselecting any selection, enter ‘Ctrl+D’ in Windows or ‘Command+D’ in a Mac device.
Step 5: Save Your Creation in a Web Compatible Format
When you are done creating the transparent background artwork, it becomes equally important to save your creation in a web compatible format to export them on different media platforms and product websites.
Talking of the preferable image format, it is highly recommended to use the PNG24 one, owing to its flexibility of alpha channel transparency, which permits partially transparent image backgrounds along with layered transparency. This in turn makes it possible to integrate the image with varying color backgrounds on different sites and platforms without hollow pixelation.
To save your artwork in the PNG24 file format, navigate to the application toolbar bat the top and hit the ‘File’ tab and choose the ‘Export’ option from the drop sown menu that appears. Select the ‘Export As’ option from the ‘Export’ popup menu.
For an older Photoshop version, hit the ‘Export’ tab and choose ‘Save for Web’ from the dropdown menu, followed by selecting the PNG24 option. A format dialog box appears where you can set the transparency settings. To do this, navigate to ‘File Settings’ at the right, choose the PNG file format and check the ‘Transparency’ box. Avoid checking the ‘Smaller Size’ box, else the image will get saved in the PNG8 format.
In the left of the screen, the image file size is displayed. Maintain an affordable file size, preferably within 200 KB, to avoid slower image loading on the sharing platform. You can adjust this in the ‘Image Size’ option at the right.
Set a conveniently reduced dimension, while taking care not to set an extremely small size, else it will produce a pixelated output on the site. It is preferable to set a 50-100% larger image size for a convenient display across different devices.
Step 6: Final Save
Once you are satisfied with all the image settings, tap ‘Export All’ to save your artwork locally in your device. In the ‘File Save’ dialog box, choose a preferred device location, enter a suitable file name and choose the .png extension. At last, click on ‘Save’.
03Filmora
Launched by Wondershare, this is excellent image editor and creator software that you can rely on to make stunning artworks in a variety of file formats. Talking of background transparency in particular, the software comes with a unique ‘Green Screen’ feature to create high quality, transparent background images in a matter of a few clicks. You can further, give a professional touch to your creation with a storehouse of classic video and image editing effects that are just perfect to stand out in the crowd.
How to Make Filmora Transparent Background
A stepwise tutorial on how to create image with transparent background images using Filmora is discussed below:
Step 1: Download the Software
Visit the official website of Wondershare Filmora Video Editor to download and install the software in any of your Windows or Mac devices.
For Win 7 or later (64-bit)
For macOS 10.12 or later
Step 2: Import Media File
Launch the app to reach the main interface, where you will find the ‘Import’ tab. Hit it and choose ‘Import Media File’ from the drop down menu that follows. This will upload your selected image to the software’s media library.
Step 2: Timeline Dragging
You now need to insert the selected image from Filmora’s media library to the software’s editing timeline. You can do this either by right clicking the selected image, followed by choosing the ‘Insert’ option, or a simple ’Drag and Drop’ method.
Step 3: Transparency Adjustments
In the editor timeline, double click your selected image to open the ‘Settings’ tab. Scroll down the tab options to locate ‘Chroma Key Settings’. Make a right toggle to enable the ‘Chroma Key’ and you will see the image get transparent with the default ’Green’ background color.
You can alternatively, navigate to the ‘Select Color’ option and choose ‘Color Picker’ at its right, reach the image section you wish to make transparent and make a single click.
In case you get a partially transparent background, you can make further adjustments in the ‘Chroma Key’ settings, such as, tolerance, edge thickness, offset, edge feather, etc., to ascertain complete background transparency. When you are satisfied with your work, click on ‘OK’.
Step 4: Media Export
You can now try adding the transparent image to any video or export the same to any media platform. To do this, hit the ‘Export’ tab at the top right corner in the editor timeline.
Part 4 How to Convert JPG to Transparent PNG
Taking into account the diverse information sharing and content specification requirements, an obvious need to switch between different file formats may arise at a number of instants. One such example is the conversion of images in JPG format into that of a transparent PNG image. When looking through convenient alternatives to set the issue straight, the software market has a pouring flood of choices.
Discussed below are some of the best JPG to transparent PNG converter solutions you can pick to convert color background JPG stills into transparent PNG background images, while sorting the concern of how to save PNG with transparent background:
Filmora JPG to Transparent PNG Converter
Filmora is top rated and highly preferred graphic design software that caters to all of your video and image design and conversion needs in the most convenient manner. Developed by Wondershare, this is the worthiest pick for all graphic editing. While the software is packed with extensive and over the top features to provide a professional elegance to almost and design artwork, the transparent image backgrounds created by Filmora are simply remarkable.
If you are done with those usual and commonplace captures, try hands at creating transparent background images with this software, which promises you of a stand out result on account of the following features:
● Filmora comes with a distinguished ‘Green Screen’ feature that is known to create transparent background images in time instants shorter than an eye blink. You just need to upload an image in the software timeline and adjust a few chroma settings, and that’s really the end!
● Apart from this, you can play with a diverse inventory of results and image filters, like, graphic and text overlays, subtitles and tons of audio-visual upshots to create an absolute graphic masterpiece.
● The software further, is free to use and welcomes you with a clean, cohesive and responsive user interface, guiding you at each step of the design task.
● Ending Thoughts →
● Transparent image backgrounds are the current in house trends of content branding and product promotion alternatives. While there are varieties of requirement specific image file formats, the PNG format is best suited for creating a transparent background image.
● The software market is an in depth pool of choices for graphic and image editing tools, Wondershare Filmora happens to be a distinguished name among all to create and convert images with transparent backgrounds.
Also read:
- 2024 Approved Complete Tutorial to Make an Impressive Countdown Timer Video
- In 2024, There Are 10 Slideshow Makers Coming with Beautiful Music for Creating a Stunning Slideshow
- New Does the Customary Speed of Your TikTok Slideshow Appear to Be Slow Enough of Late? If Yes, Drop Your Worries Here with the Know-How of Increasing the TikTok Slideshow Speed
- How to Loop a Video on Android
- 2024 Approved How to Add a Green Screen to Zoom
- Updated Finding The Finest Way To Add Subtitles to Videos | Filmora for 2024
- New 2024 Approved Top 8 Video Editor with Useful Masking
- This Article Is Regarding the Guideline for Splitting the Video Clips in Adobe After Effects. Here, You Will Also Know About the Most Appropriate Substitute, Wondershare Filmora. Being Economical, You Can Also Use It Practically for 2024
- Updated 2024 Approved Best Online MPEG to GIF Converters
- In 2024, Progressive Solutions to Adding VHS Effects to Video with Ease
- In 2024, You May Want to Create Your Video Tutorial and Share Your Knowledge with Others. Fortunately, You Can Easily Create a Professionally Edited Tutorial Video with Filmora. Keep Reading This Article Since We Will Show You How to Do It
- Updated How to Do Masking in After Effects Alternative Provided
- Is Augmented Reality Conferencing the Future of Workplace Collaboratio for 2024
- Updated How to Create Simple Slideshow Word
- How to Add Text Effects in Adobe Premiere Pro, In 2024
- Updated How To Make a Video Podcast
- New In 2024, How To Quick Guide for Making Google Slideshows
- Updated Ideas That Will Help You Out in Making Transparent Image
- How to Loop QuickTime Video
- 2024 Approved LUTs Can Make Ordinary-Looking Footage Look More Attractive. Read This Guide to Learn How You Can Easily Create Your Own LUTs Using Filmora
- How to Make Video Slow Motion? Complete Guide
- New How to Make a Smooth Speed Ramping in Premiere Pro?
- Updated 10 Top Free GIF Background Remover for PC and Online for 2024
- Updated 2024 Approved How to Achieve GoPro Slow Motion With Quality
- New Do You Like Clouds or Sky and Want to Use Them as a Video Background? Explore This Article to Learn About the Sky Change Video in Filmora
- Updated How to Make a Vacation Slideshow in 5 Minutes
- New 8 Ways To Live Stream Pre-Recorded Video
- New A Review of 3D LUT Mobile App - A Composite Application for Editing Media
- Methods on How to Speed Up Video on Splice
- Tutorial How To Add Motion Blur in Blender?
- New 2024 Approved How to Brighten a Video in Windows 10 Easily
- In 2024, 3 Ways to Track Realme C51 without Them Knowing | Dr.fone
- In 2024, How To Create an Apple Developer Account On Apple iPhone 12 mini
- 4 Methods to Turn off Life 360 On Vivo S17 Pro without Anyone Knowing | Dr.fone
- In 2024, How Do You Unlock your Apple iPhone 6 Plus? Learn All 4 Methods
- How to recover lost data from Honor Play 7T?
- How to Soft Reset Infinix Smart 7 HD phone? | Dr.fone
- Which Pokémon can Evolve with a Moon Stone For Apple iPhone 13 Pro Max? | Dr.fone
- How To Bypass Honor 90 Pro FRP In 3 Different Ways
- 7 Solutions to Fix Error Code 963 on Google Play Of Xiaomi Redmi Note 12 Pro 4G | Dr.fone
- In 2024, Still Using Pattern Locks with Poco X6? Tips, Tricks and Helpful Advice
- In 2024, How to Screen Mirroring Infinix Smart 7? | Dr.fone
- 3 Solutions to Hard Reset Motorola Moto G73 5G Phone Using PC | Dr.fone
- How to Transfer Photos From Tecno Pop 8 to Samsung Galaxy S21 Ultra | Dr.fone
- Easy steps to recover deleted photos from Itel P55+.
- How to Bypass FRP from Xiaomi Redmi Note 12 Pro 4G?
- The Top 5 Android Apps That Use Fingerprint Sensor to Lock Your Apps On Nokia C32
- How to Detect and Stop mSpy from Spying on Your Oppo K11x | Dr.fone
- Remove Device Supervision From your iPhone 14 Pro | Dr.fone
- How to X90S Get Deleted Pictures Back with Ease and Safety?
- In 2024, What Legendaries Are In Pokemon Platinum On Tecno Pova 5? | Dr.fone
- Latest Guide on iPad 2/3 and Apple iPhone 11 Pro iCloud Activation Lock Bypass
- In 2024, Best Ways on How to Unlock/Bypass/Swipe/Remove Infinix Fingerprint Lock
- How To Transfer Data From Apple iPhone 12 To Other iPhone 14 Pro devices? | Dr.fone
- How to add digital signature to a PDF v1.3 document
- Unlock android phone if you forget the Vivo password or pattern lock
- In 2024, How to Cast Lenovo ThinkPhone Screen to PC Using WiFi | Dr.fone
- In 2024, How to Watch Hulu Outside US On Honor Magic 5 Pro | Dr.fone
- In 2024, 4 Ways to Transfer Music from OnePlus Nord CE 3 5G to iPhone | Dr.fone
- Recover your music after Samsung Galaxy XCover 6 Pro Tactical Edition has been deleted
- Title: The Quick and Simple Way to Mirror Video in Premiere Pro
- Author: Chloe
- Created at : 2024-05-20 03:37:30
- Updated at : 2024-05-21 03:37:30
- Link: https://ai-editing-video.techidaily.com/the-quick-and-simple-way-to-mirror-video-in-premiere-pro/
- License: This work is licensed under CC BY-NC-SA 4.0.
