:max_bytes(150000):strip_icc():format(webp)/dns-wordcloud-lifewire-2-0c92c02113cb4832870891ac0e13ccbc.png)
The Ultimate Guide to Using Shotcut To Rotate Videos for 2024

The Ultimate Guide to Using Shotcut To Rotate Videos
Video editing has come a long way in recent years, and with the advancement of technology, it’s now easier than ever to produce high-quality videos. However, one common issue that many video editors encounter is uneven footage. Various reasons can cause this, but the solution is simple - rotating your videos. Shotcut is a powerful video editing software that provides various tools to help you rotate your videos easily.
This guide will explore the ins and outs of using Shotcut to rotate your videos. Whether you’re a seasoned editor or just starting, this guide will provide you with everything you need to know to get the perfect shot every time. This guide has everything from rotating your footage to more advanced tips and tricks. So, if you’re ready to take your video editing skills to the next level, keep reading!
Overview of Shotcut Video Editor
Shotcut is a free, open-source video editing software that offers a range of features for basic video editing. Before downloading Shotcut, it is important to know its features to determine if it suits your video editing needs. Here are the key features of Shotcut that stand out:

- Video Capture. Shotcut allows for screen and webcam capture and audio capture from the system or external microphone. It supports 4K resolution.
- Standard Editing. Shotcut allows for trimming, cutting/copying/pasting of clips and keyframes for video filters and markers. It also uses proxy editing for high-resolution video files.
- Audio Features. Shotcut includes several audio filters for enhancing audio clips and volume control, audio mixing, tone generator, and pitch adjustment options.
- Video Effects. Shotcut offers a range of effects and filters, including blending modes, track compositing, and transitions. It also supports 360-degree filters, reverse video clips, and video scopes.
- Wide Support. Shotcut supports a variety of video and audio formats, as well as photo file formats. The multi-format timeline allows for the mixing of different parameters, and the software supports network streaming and alpha-channel videos.
Shotcut is a versatile video editor that offers a range of features for basic video editing and is a great choice for those looking for a free and open-source video editor.
How To Rotate Videos in Shotcut?
Rotating videos in Shotcut is a simple process. With its user-friendly interface, you can quickly and easily adjust the orientation of your videos to get the perfect shot every time. Whether you need to rotate your footage 90 degrees or make more subtle adjustments, Shotcut has all the tools you need to get the job done.
In this section, we’ll walk you through the steps to rotate your videos in Shotcut and provide you with tips and tricks to ensure that your footage is perfectly aligned every time. So, if you’re ready to rotate your videos, let’s get started!
Step1 Start a new Shotcut project and import the video
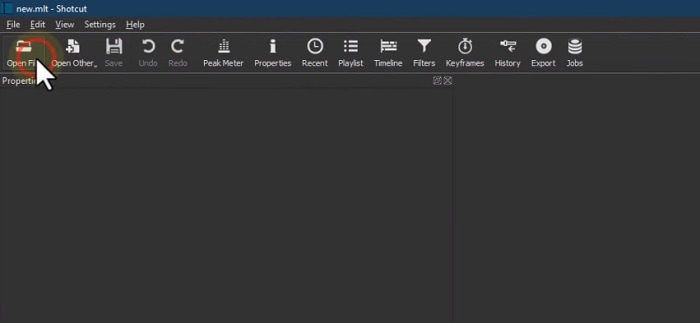
Step2 Drag the video to the Timeline
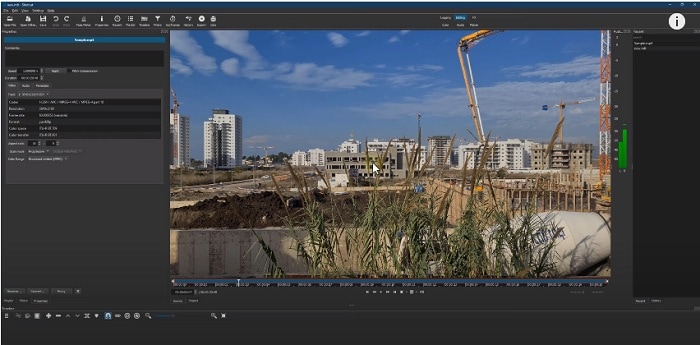
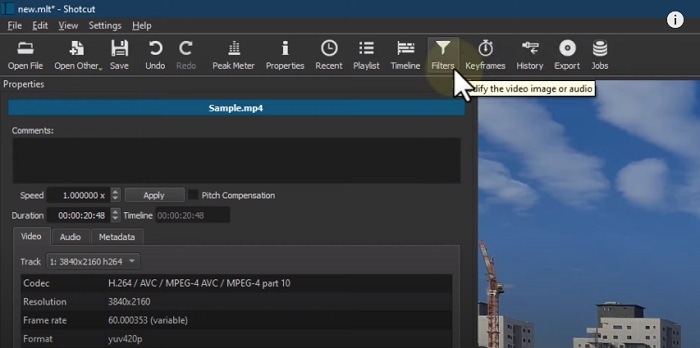
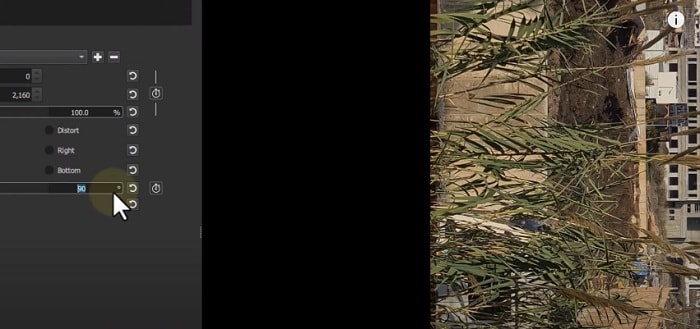
Step3 Go to “Filters“ and press the “+” icon
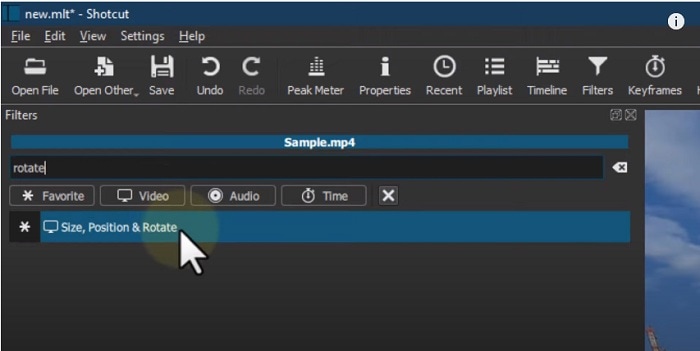
Step4 Search for “Rotate“ and select “Size, Position & Rotate.”
Step5 Use the bar or enter degrees in numbers to rotate the video.
How To Mirror or Flip Videos in Shotcut?
Do you want to flip or mirror your videos in Shotcut? This feature can add a creative twist to your footage and make your videos stand out. Luckily, Shotcut makes it easy to mirror or flip your videos with just a few simple steps.
Whether you want to add a reflection effect or change the direction of your footage, Shotcut has the tools you need to get the job done. So, get ready to take your videos to the next level with Shotcut’s mirroring and flipping capabilities!
For Steps 1-3, follow the steps from the “How To Rotate Videos in Shotcut?“ section.
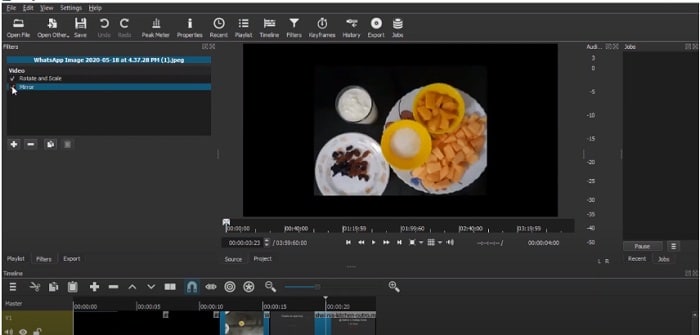
Step4 Search for the “Mirror“ effect.
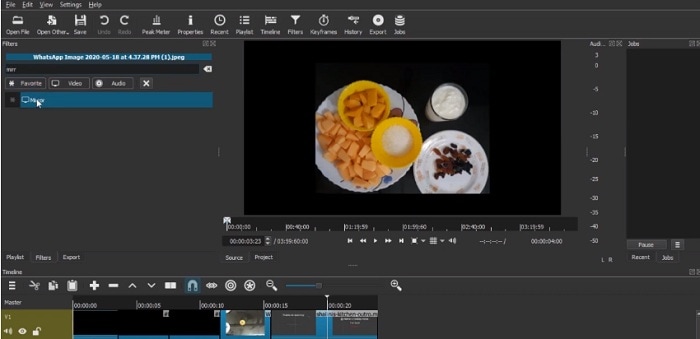
Step5 Select the “Mirror“ effect, and your video will be automatically flipped or mirrored.
How To Make a Vertical Video Horizontal in Shotcut
Are you tired of having a vertical video that doesn’t fit the standard aspect ratio? Don’t worry; Shotcut makes it easy to convert your vertical video into a horizontal format. By converting your vertical video into a horizontal format, you’ll be able to showcase your footage in a more professional and visually appealing manner.
In this section, we’ll walk you through making your vertical video horizontal in Shotcut. With these simple steps, you’ll be able to turn your vertical footage into a horizontal masterpiece in no time!
Step1 Drag the video to the timeline
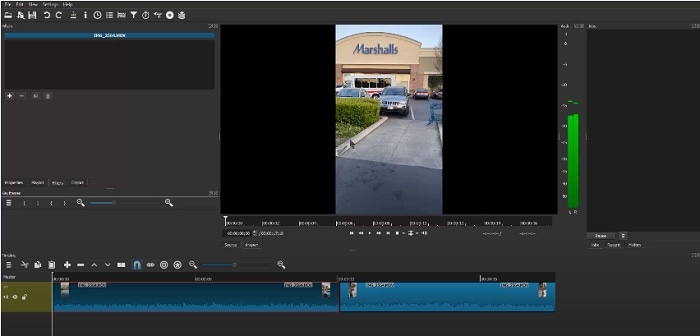
Step2 Go to “Filters“ and press the “+” icon. Search for the “Crop Source“ effect.
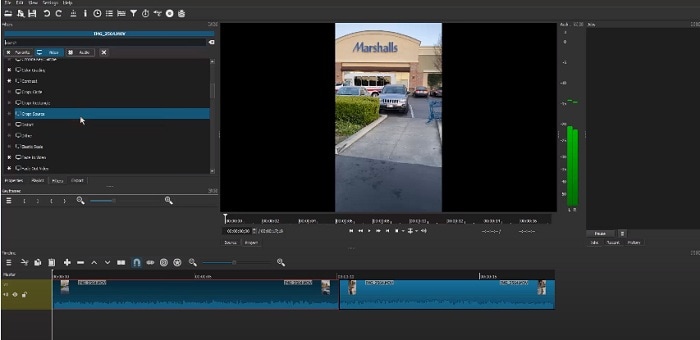
Step3 Toggle “Center“ and notice that it removed the black padding of the horizontal video.
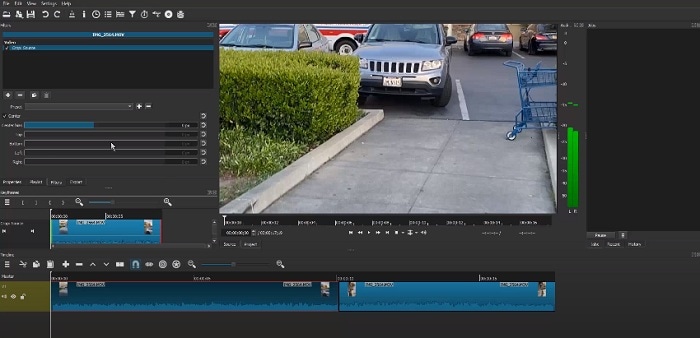
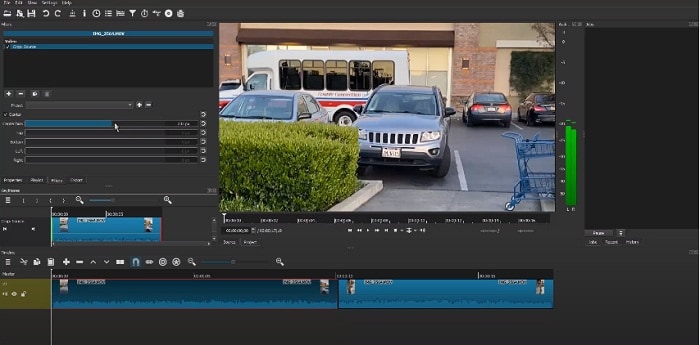
Step4 Adjust the part you want your video to focus on.
Wondershare Filmora – Shotcut’s Alternative To Rotate Videos
If you’re looking for an alternative to Shotcut for rotating your videos, consider Wondershare Filmora . This powerful video editing software is packed with features and is ideal for both beginners and professionals. While Shotcut is a great option for rotating videos, Filmora offers additional capabilities that make it an excellent choice for those who need a more advanced video editing solution.
Free Download For Win 7 or later(64-bit)
Free Download For macOS 10.14 or later

With Wondershare Filmora, you’ll be able to rotate your videos with ease, as well as perform a variety of other editing tasks. From adding music, filters, and text to splitting, trimming, and merging videos, Filmora has you covered.
Additionally, you’ll enjoy the user-friendly interface of Filmora that makes it easy to navigate and find the features you need. Whether you’re just starting with video editing or are a seasoned professional, Wondershare Filmora is the perfect solution for rotating videos and more.
How To Rotate or Flip a Video With Wondershare Filmora?
Wondershare Filmora is a great alternative to Shotcut for those looking to rotate or flip their video clips. It offers an intuitive and user-friendly interface, making rotating or flipping a video simple.
To mirror your video in Filmora, you follow a few easy steps. Whether you want to flip your video horizontally or vertically, Filmora’s rotating tool will help you achieve the perfect reflection with just a few clicks.
In addition to its rotating capabilities, Wondershare Filmora also offers a wide range of features for video editing. From basic video editing tools like trimming and cutting to advanced features like color correction and audio editing, Filmora has everything you need to take your video projects to the next level.
With its user-friendly interface and comprehensive feature set, Wondershare Filmora is a great option for anyone looking for an alternative to Shotcut for their video editing needs.
Step1 Choose between “Flip Horizontal“ or “Flip Vertical“ in the “Flip“ section to mirror the clip left to right or turn it upside down.

Step2 Select either the “Clockwise“ or “Counterclockwise“ icon under the “Rotate“ section to rotate the clip.

Step3 Enter a specific angle value in the “Rotate“ tab or adjust the dot in the circle to reach the desired rotation angle.

How To Make a Vertical Video Horizontal With Filmora?
Are you looking for a solution to convert a vertical video into a horizontal one? Filmora is a great video editing software that can help you do that!
Step1 Launch Filmora and import the video.

Step2 Drag the video to the timeline.

Step3 Right-click on the video and then click on “Crop and Zoom.”
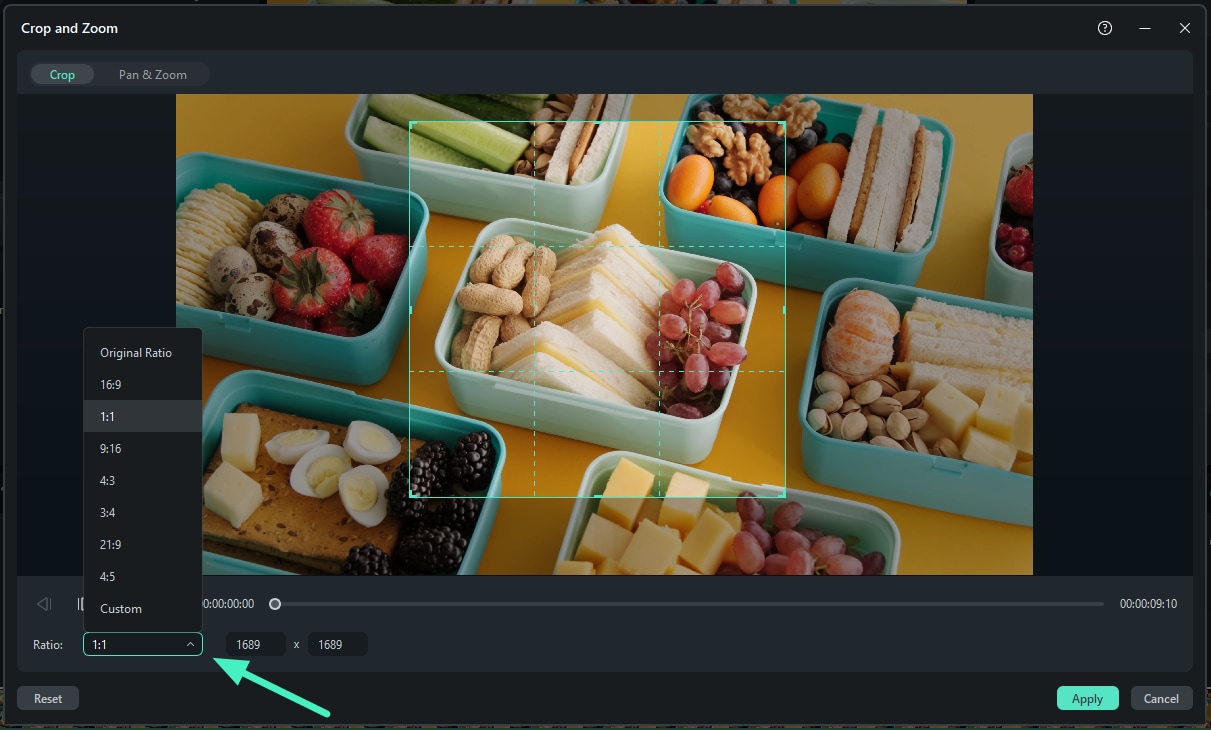
Step4 Click on the “Aspect Ratio“ option and change it to “16:9.”
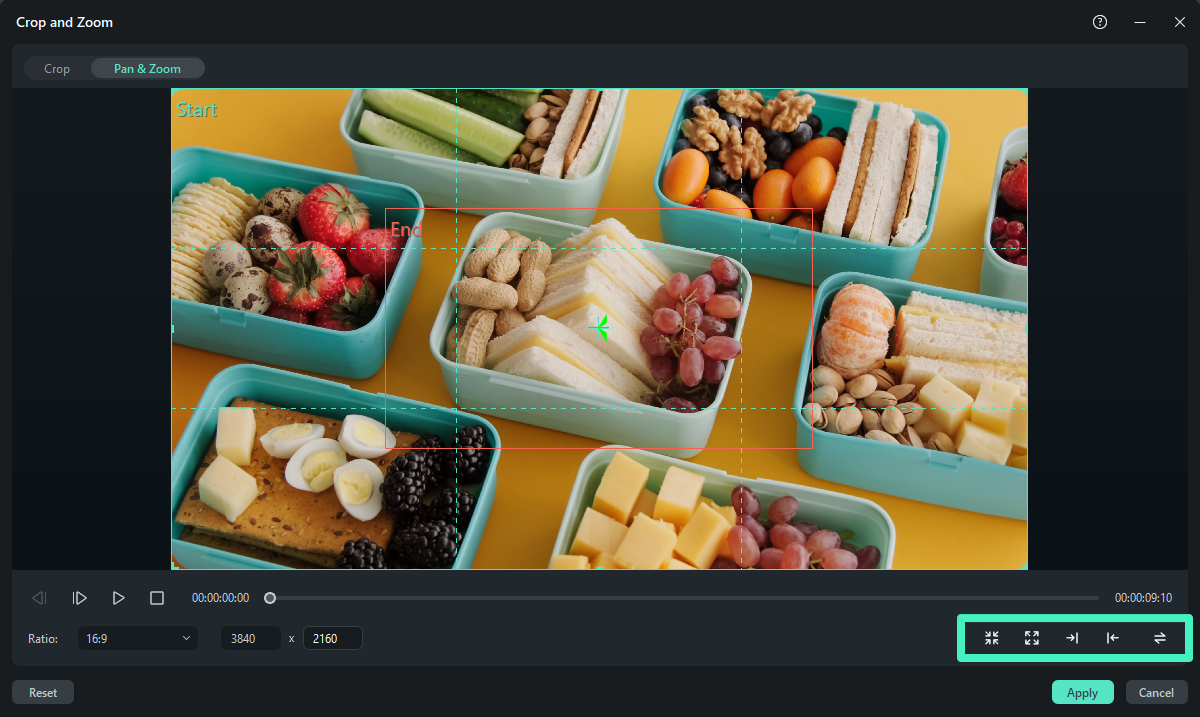
Step5 Keep the video part that you want to focus on, then click “OK.”
Step6 Your vertical video is now horizontal.
Conclusion
Rotating a video in Shotcut or Wondershare Filmora is a simple process. Both video editing software provides a user-friendly interface and various options to achieve the desired result. Shotcut and Filmora can help you achieve the perfect reflection with a few clicks, whether you want to rotate, flip, or make a horizontal or vertical video. So, choose the one that fits your needs and start creating stunning videos.
Free Download For macOS 10.14 or later

With Wondershare Filmora, you’ll be able to rotate your videos with ease, as well as perform a variety of other editing tasks. From adding music, filters, and text to splitting, trimming, and merging videos, Filmora has you covered.
Additionally, you’ll enjoy the user-friendly interface of Filmora that makes it easy to navigate and find the features you need. Whether you’re just starting with video editing or are a seasoned professional, Wondershare Filmora is the perfect solution for rotating videos and more.
How To Rotate or Flip a Video With Wondershare Filmora?
Wondershare Filmora is a great alternative to Shotcut for those looking to rotate or flip their video clips. It offers an intuitive and user-friendly interface, making rotating or flipping a video simple.
To mirror your video in Filmora, you follow a few easy steps. Whether you want to flip your video horizontally or vertically, Filmora’s rotating tool will help you achieve the perfect reflection with just a few clicks.
In addition to its rotating capabilities, Wondershare Filmora also offers a wide range of features for video editing. From basic video editing tools like trimming and cutting to advanced features like color correction and audio editing, Filmora has everything you need to take your video projects to the next level.
With its user-friendly interface and comprehensive feature set, Wondershare Filmora is a great option for anyone looking for an alternative to Shotcut for their video editing needs.
Step1 Choose between “Flip Horizontal“ or “Flip Vertical“ in the “Flip“ section to mirror the clip left to right or turn it upside down.

Step2 Select either the “Clockwise“ or “Counterclockwise“ icon under the “Rotate“ section to rotate the clip.

Step3 Enter a specific angle value in the “Rotate“ tab or adjust the dot in the circle to reach the desired rotation angle.

How To Make a Vertical Video Horizontal With Filmora?
Are you looking for a solution to convert a vertical video into a horizontal one? Filmora is a great video editing software that can help you do that!
Step1 Launch Filmora and import the video.

Step2 Drag the video to the timeline.

Step3 Right-click on the video and then click on “Crop and Zoom.”

Step4 Click on the “Aspect Ratio“ option and change it to “16:9.”

Step5 Keep the video part that you want to focus on, then click “OK.”
Step6 Your vertical video is now horizontal.
Conclusion
Rotating a video in Shotcut or Wondershare Filmora is a simple process. Both video editing software provides a user-friendly interface and various options to achieve the desired result. Shotcut and Filmora can help you achieve the perfect reflection with a few clicks, whether you want to rotate, flip, or make a horizontal or vertical video. So, choose the one that fits your needs and start creating stunning videos.
Best Video Title Generators
The ranking of videos in search results depends on the quality of their titles; making video title maker an essentiality. Similar to metadata, titles provide important information about your video, like its genre, subject, etc., to YouTube, Google, and TikTok viewers. The likelihood that the audience will locate and watch your film will rise if you provide the appropriate titles. To assist you in choosing which option will work best for you, we have included video title makers online in this post.
The process of making video titles may be laborious and time-consuming. However, not with the video title maker online free. You can utilize one of the title video makers online for free and your social media videos might rank higher and get more views altogether. But even when you know where to start, there are so many different factors that it may be perplexing. Fortunately, the fantastic video title generator provided in this post will make the process fast and simple.
Part 1. Tools to Generate Video Titles
1. TubeRanker Title Generator
A collection of YouTube SEO tools called TubeRanker may be used to optimize videos on Facebook, YouTube, and TikTok. Creators may utilize the short bursts of video title suggestions provided by the TubeRanker Title Generator in the names of their YouTube videos. Creators of videos may arrange and produce flawless, SEO-optimized video descriptions with the aid of the TubeRanker Video Description Generator. With the help of its title generator tool, TubeRanker can extract and display the meta tags connected to any public movie.
Steps to Use TubeRanker:
Step1 Visit the Website
In the first step, refer to the TubeRanker official website and you will be shown to the following UI. As a result, it’s a good idea to start with some keyword research instructions; you can read the TubeRanker title generator instructions to do so.
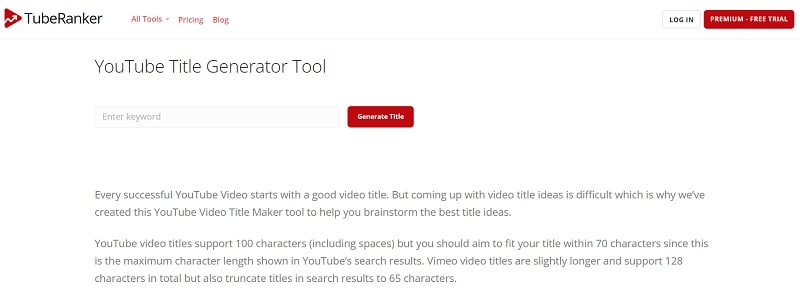
Step2 Launch the Title Generator
Your video’s ranking on search engine results pages in TubeRanker depends heavily on your keywords, which also assist viewers determine if the post is relevant to them. From the webpage, refer to the title generator as shown here:

Step3 Generate Video Title
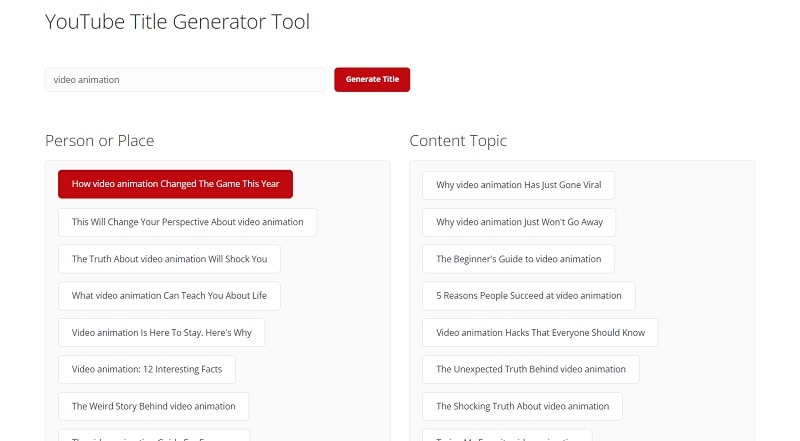
Simply enter your keyword into the title generator and press the red button to complete this phase. You’ll see many titles as soon as you do that and begin reading the headlines. Write down the ones that make sense as you go down. Make a few minor edits to ensure that they are grammatically sound. Run a search using the niche and after that the automatically created titles are getting in the way as shown here:

Step4 Copy the Title (s)
After that, you’ll have a lot of options from which to choose. Some individuals push for names that are SEO-friendly, while others try for titles that are distinctive to stand out from the throng. maintain a careful balance. Both include a powerful keyword and making your title stand out should be your goals.
2. TunePocket Title Generator
For background music for your video and YouTube video SEO, TunePocket might be a top-notch tool. Additionally, the fact that it is free to use and that no account creation is necessary is beneficial. A stock music library, TunePocket provides a variety of music services. Additionally, we have discovered some incredible YouTube tools, such as YouTube tag generators. The fact that you can use this tag generator on YouTube without creating an account is what made us appreciate it even more.
Steps to Use TunePocket:
Step1 Visit the Website
The title generating procedure for your films may be started by first visiting the official TunePocket website, as illustrated here:
image name: visit-tunepocket.jpg
Step2 Launch the Title Generator
While on the webpage, you can refer to the YouTube title generator section. This will let you enter the topic of your video in the referred box as shown here:

Step3 Generate Video Title
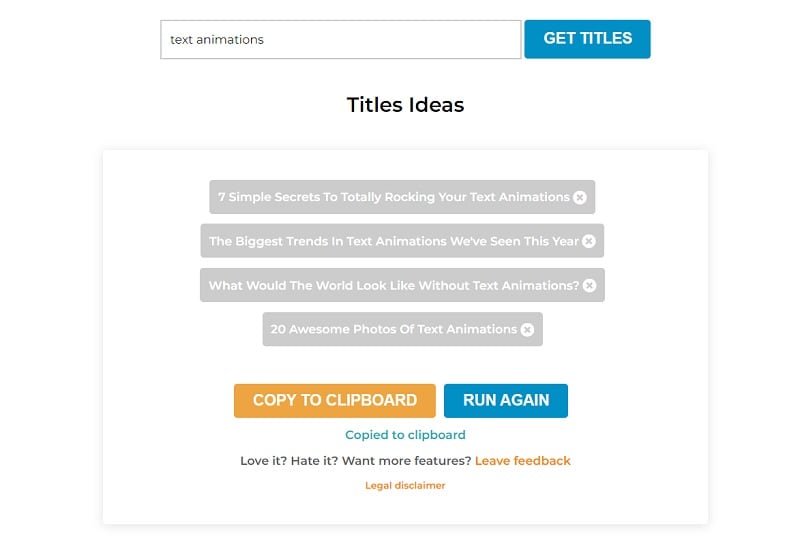
You may save a lot of time by using TunePocket title generator to create creative titles. Simply type in your target term, choose your desired region, and language, then click “Get Titles.” There will be a list of useful keywords returned by TunePocket. You can run again the generator in order to get the desired results. For that, click on the Run again button down the line as shown here:

Step4 Copy the Title to Clipboard
A title generator may be processed in a matter of seconds and a few clicks. You don’t need to spend hours and hours coming up with numerous titles; you can copy more than one in a matter of minutes. Simply hit the Copy to Clipboard and get done with the title:
Part 2. Tips to Create Video Titles
Whether you’ve been video marketing for years or are just starting out, coming up with catchy video titles might be the most difficult aspect of the process. The title of a video has a significant role in whether or not viewers choose to click the play button, making it more than simply a minor feature. Poor titles make it difficult to attract views and expand your following, regardless of how fantastic your videos are. Here are the best scrutinized tips for creating best ranking titles for your videos:
1. Optimize the title using keywords for improved SEO
It might be difficult to come up with a title that is original, concise, and descriptive. However, a strong video title stays something original. Keywords are crucial for more than simply your website. They are important for video titles, too. If you want people to see your videos when they search for certain phrases, those keywords should be in the title because Google and YouTube can’t watch videos and grasp the content (yet).
2. Perfectly Match the Content
A excellent video title explains to viewers what to anticipate from the video. It’s unambiguous, straightforward, and sincere. Additionally, if you are familiar with your target demographic, you will be able to generate a lot more hits to your videos. Using a vague or confusing title is problematic as people are busy and need a reason to watch your movie. Similar to false content, misleading headlines deceive viewers and damage your reputation.
3. Attempt to pique interest
Keep in mind that compelling video titles are an art form that appeals to viewers’ emotions rather than being a precise SEO science. Try answering the questions on your own to get a catchy video title. People are more inclined to watch a video if you make reference to a secret or exceptional knowledge that you will disclose in it. Keep in mind that your goal is not to deceive viewers into viewing your video.
4. Increase the Click Through Rate
The finest titles are those that best expose the vulnerabilities of the reader. Consider it a little preview for your video. If you are creating a how-to or instructive video that answers a question or gives information, you may want to consider include the question in the title. It also makes it simple to think up video concept.
5. Attempt to utilize cue (triggering) words
Your title and description should both include your target keyword. You’ll probably start to generate some ideas for a real video title after you begin your keyword research. To determine how persuasive these concepts are, use a trigger analyzer. You’ll need to do study in order to accomplish this. As for the knowledge gap, consider how your target audience would respond.
The Bottom Line
In this article, we’ve compiled a list of the best tag generators for videos, including everything from video names and descriptions to titles, thumbnail design elements, and video ideas. You may get some useful tips as well for creating the greatest video titles by using this guide to the video title generator to obtain the ideal title for your social media videos. Find out the best suitable video title maker online free in the post above and tweak your video titles for social platforms rankings.
Free Download For Win 7 or later(64-bit)
Free Download For macOS 10.14 or later
1. TubeRanker Title GeneratorA collection of YouTube SEO tools called TubeRanker may be used to optimize videos on Facebook, YouTube, and TikTok. Creators may utilize the short bursts of video title suggestions provided by the TubeRanker Title Generator in the names of their YouTube videos. Creators of videos may arrange and produce flawless, SEO-optimized video descriptions with the aid of the TubeRanker Video Description Generator. With the help of its title generator tool, TubeRanker can extract and display the meta tags connected to any public movie.
Steps to Use TubeRanker:
Step1 Visit the Website
In the first step, refer to the TubeRanker official website and you will be shown to the following UI. As a result, it’s a good idea to start with some keyword research instructions; you can read the TubeRanker title generator instructions to do so.

Step2 Launch the Title Generator
Your video’s ranking on search engine results pages in TubeRanker depends heavily on your keywords, which also assist viewers determine if the post is relevant to them. From the webpage, refer to the title generator as shown here:

Step3 Generate Video Title
Simply enter your keyword into the title generator and press the red button to complete this phase. You’ll see many titles as soon as you do that and begin reading the headlines. Write down the ones that make sense as you go down. Make a few minor edits to ensure that they are grammatically sound. Run a search using the niche and after that the automatically created titles are getting in the way as shown here:

Step4 Copy the Title (s)
After that, you’ll have a lot of options from which to choose. Some individuals push for names that are SEO-friendly, while others try for titles that are distinctive to stand out from the throng. maintain a careful balance. Both include a powerful keyword and making your title stand out should be your goals.

2. TunePocket Title Generator
For background music for your video and YouTube video SEO, TunePocket might be a top-notch tool. Additionally, the fact that it is free to use and that no account creation is necessary is beneficial. A stock music library, TunePocket provides a variety of music services. Additionally, we have discovered some incredible YouTube tools, such as YouTube tag generators. The fact that you can use this tag generator on YouTube without creating an account is what made us appreciate it even more.
Steps to Use TunePocket:
Step1 Visit the Website
The title generating procedure for your films may be started by first visiting the official TunePocket website, as illustrated here:
image name: visit-tunepocket.jpg
Step2 Launch the Title Generator
While on the webpage, you can refer to the YouTube title generator section. This will let you enter the topic of your video in the referred box as shown here:

Step3 Generate Video Title
You may save a lot of time by using TunePocket title generator to create creative titles. Simply type in your target term, choose your desired region, and language, then click “Get Titles.” There will be a list of useful keywords returned by TunePocket. You can run again the generator in order to get the desired results. For that, click on the Run again button down the line as shown here:

Step4 Copy the Title to Clipboard
A title generator may be processed in a matter of seconds and a few clicks. You don’t need to spend hours and hours coming up with numerous titles; you can copy more than one in a matter of minutes. Simply hit the Copy to Clipboard and get done with the title:

Part 2. Tips to Create Video Titles
Whether you’ve been video marketing for years or are just starting out, coming up with catchy video titles might be the most difficult aspect of the process. The title of a video has a significant role in whether or not viewers choose to click the play button, making it more than simply a minor feature. Poor titles make it difficult to attract views and expand your following, regardless of how fantastic your videos are. Here are the best scrutinized tips for creating best ranking titles for your videos:
1. Optimize the title using keywords for improved SEO
It might be difficult to come up with a title that is original, concise, and descriptive. However, a strong video title stays something original. Keywords are crucial for more than simply your website. They are important for video titles, too. If you want people to see your videos when they search for certain phrases, those keywords should be in the title because Google and YouTube can’t watch videos and grasp the content (yet).
2. Perfectly Match the Content
A excellent video title explains to viewers what to anticipate from the video. It’s unambiguous, straightforward, and sincere. Additionally, if you are familiar with your target demographic, you will be able to generate a lot more hits to your videos. Using a vague or confusing title is problematic as people are busy and need a reason to watch your movie. Similar to false content, misleading headlines deceive viewers and damage your reputation.
3. Attempt to pique interest
Keep in mind that compelling video titles are an art form that appeals to viewers’ emotions rather than being a precise SEO science. Try answering the questions on your own to get a catchy video title. People are more inclined to watch a video if you make reference to a secret or exceptional knowledge that you will disclose in it. Keep in mind that your goal is not to deceive viewers into viewing your video.
4. Increase the Click Through Rate
The finest titles are those that best expose the vulnerabilities of the reader. Consider it a little preview for your video. If you are creating a how-to or instructive video that answers a question or gives information, you may want to consider include the question in the title. It also makes it simple to think up video concept.
5. Attempt to utilize cue (triggering) words
Your title and description should both include your target keyword. You’ll probably start to generate some ideas for a real video title after you begin your keyword research. To determine how persuasive these concepts are, use a trigger analyzer. You’ll need to do study in order to accomplish this. As for the knowledge gap, consider how your target audience would respond.
The Bottom Line
In this article, we’ve compiled a list of the best tag generators for videos, including everything from video names and descriptions to titles, thumbnail design elements, and video ideas. You may get some useful tips as well for creating the greatest video titles by using this guide to the video title generator to obtain the ideal title for your social media videos. Find out the best suitable video title maker online free in the post above and tweak your video titles for social platforms rankings.
Free Download For Win 7 or later(64-bit)
Free Download For macOS 10.14 or later
How to Create Freeze Frame Clone Effect
Preparation
What you need to prepare:
- A computer (Windows or macOS)
- Your video materials.
- Filmora video editor
Step 1
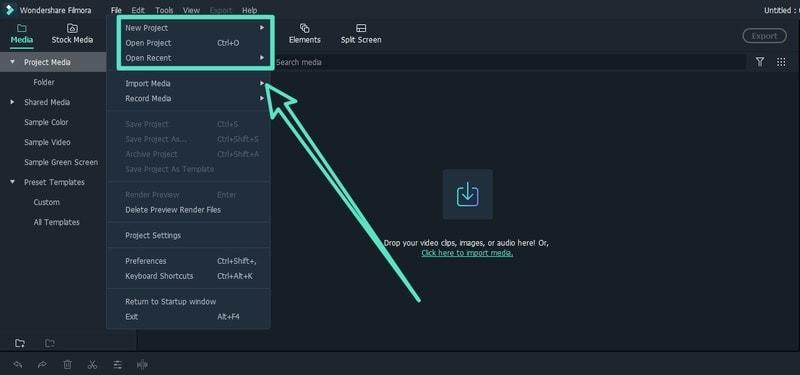
Download and install Wondershare Filmora on your computer. Launch Filmora and click on New Project on the welcome screen. Alternatively, go to File menu and select New Project option.
Step 2
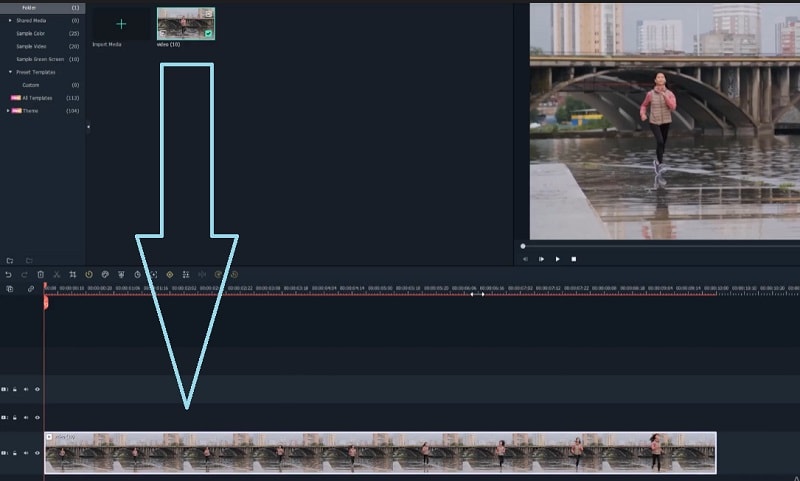
Import your video clip to Project Media folder. Go to File> Import Media and click on Import Media Files option. Select the video clip from your hard drive. Otherwise, you can drag and drop the video clip directly into the Project Media folder. Finally, drop the video clip from Project Media folder onto the timeline.
Step 3
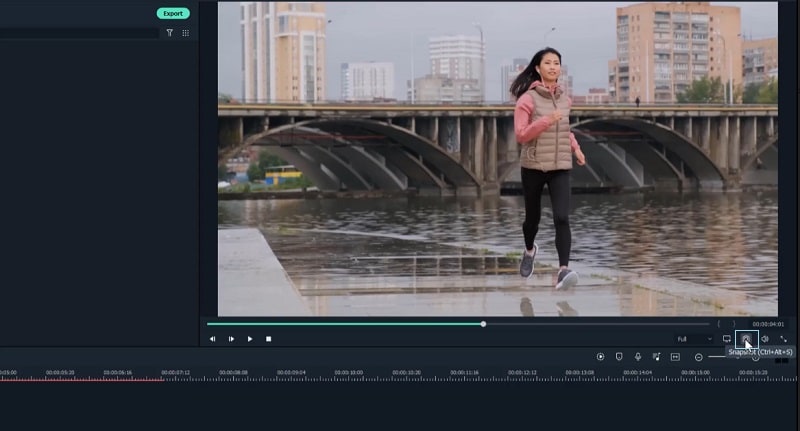
Place the marker where you want the frame to freeze. Click on Camera icon under Program window. This will take a snapshot of the current frame and place it under Project Media folder. Drag and drop the snapshot onto the timeline.
Step 4
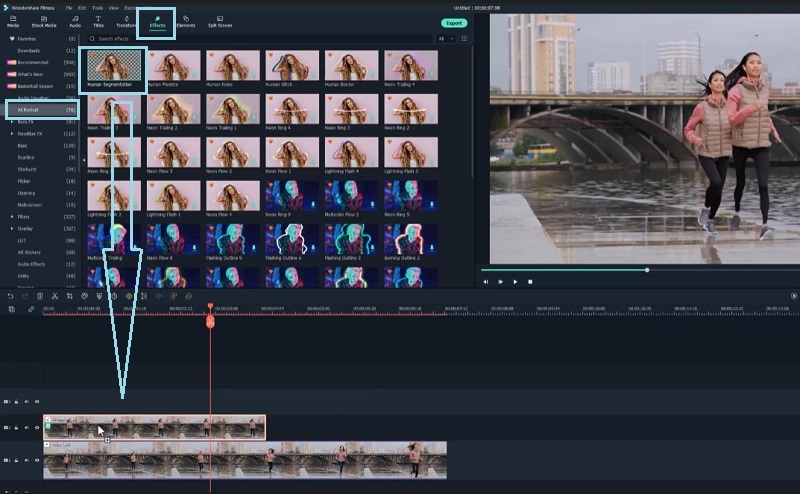
Match the duration of the snapshot with the point where you want the frame to freeze. Go to Effects> AI Portrait> Human Segmentation and drop the effect on the snapshot layer to make the background disappear.
Step 5
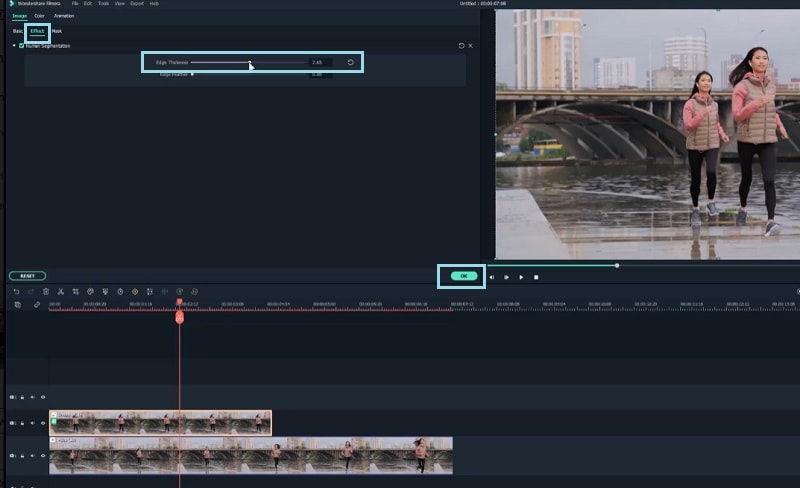
Double-click on the snapshot layer. Go to Effect and adjust the Edge thickness so that it looks perfect. Click on OK button and play the video to check out the effect.
Step 6
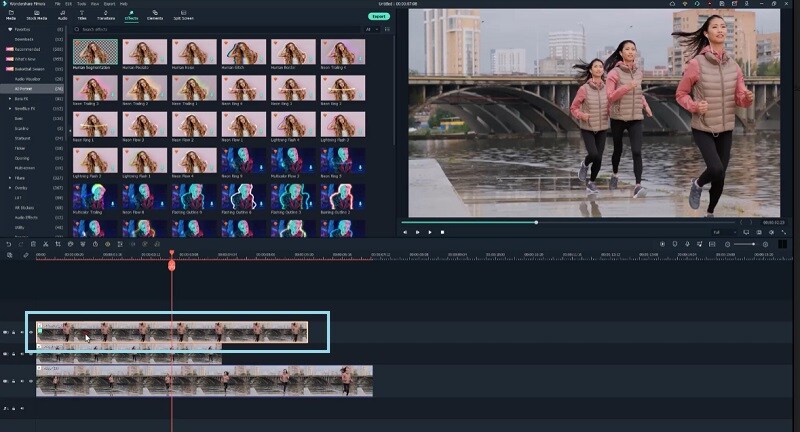
Perform Step 3 to Step 5 again where you need to select a frame to freeze, take snapshot, drop onto timeline and remove background. Finally, play the video to check out the freeze frame clone effect. Save the video on your hard drive by click on Export button.
Summary
What you’ve learned:
- How to take snapshot from a video for freeze frame
- How to remove background from snapshot
- How to mix snapshots and video for cloning effect
What you need to prepare:
- A computer (Windows or macOS)
- Your video materials.
- Filmora video editor
Step 1
Download and install Wondershare Filmora on your computer. Launch Filmora and click on New Project on the welcome screen. Alternatively, go to File menu and select New Project option.

Step 2
Import your video clip to Project Media folder. Go to File> Import Media and click on Import Media Files option. Select the video clip from your hard drive. Otherwise, you can drag and drop the video clip directly into the Project Media folder. Finally, drop the video clip from Project Media folder onto the timeline.

Step 3
Place the marker where you want the frame to freeze. Click on Camera icon under Program window. This will take a snapshot of the current frame and place it under Project Media folder. Drag and drop the snapshot onto the timeline.

Step 4
Match the duration of the snapshot with the point where you want the frame to freeze. Go to Effects> AI Portrait> Human Segmentation and drop the effect on the snapshot layer to make the background disappear.

Step 5
Double-click on the snapshot layer. Go to Effect and adjust the Edge thickness so that it looks perfect. Click on OK button and play the video to check out the effect.

Step 6
Perform Step 3 to Step 5 again where you need to select a frame to freeze, take snapshot, drop onto timeline and remove background. Finally, play the video to check out the freeze frame clone effect. Save the video on your hard drive by click on Export button.

Summary
What you’ve learned:
- How to take snapshot from a video for freeze frame
- How to remove background from snapshot
- How to mix snapshots and video for cloning effect
What you need to prepare:
- A computer (Windows or macOS)
- Your video materials.
- Filmora video editor
Step 1
Download and install Wondershare Filmora on your computer. Launch Filmora and click on New Project on the welcome screen. Alternatively, go to File menu and select New Project option.

Step 2
Import your video clip to Project Media folder. Go to File> Import Media and click on Import Media Files option. Select the video clip from your hard drive. Otherwise, you can drag and drop the video clip directly into the Project Media folder. Finally, drop the video clip from Project Media folder onto the timeline.

Step 3
Place the marker where you want the frame to freeze. Click on Camera icon under Program window. This will take a snapshot of the current frame and place it under Project Media folder. Drag and drop the snapshot onto the timeline.

Step 4
Match the duration of the snapshot with the point where you want the frame to freeze. Go to Effects> AI Portrait> Human Segmentation and drop the effect on the snapshot layer to make the background disappear.

Step 5
Double-click on the snapshot layer. Go to Effect and adjust the Edge thickness so that it looks perfect. Click on OK button and play the video to check out the effect.

Step 6
Perform Step 3 to Step 5 again where you need to select a frame to freeze, take snapshot, drop onto timeline and remove background. Finally, play the video to check out the freeze frame clone effect. Save the video on your hard drive by click on Export button.

Summary
What you’ve learned:
- How to take snapshot from a video for freeze frame
- How to remove background from snapshot
- How to mix snapshots and video for cloning effect
What you need to prepare:
- A computer (Windows or macOS)
- Your video materials.
- Filmora video editor
Step 1
Download and install Wondershare Filmora on your computer. Launch Filmora and click on New Project on the welcome screen. Alternatively, go to File menu and select New Project option.

Step 2
Import your video clip to Project Media folder. Go to File> Import Media and click on Import Media Files option. Select the video clip from your hard drive. Otherwise, you can drag and drop the video clip directly into the Project Media folder. Finally, drop the video clip from Project Media folder onto the timeline.

Step 3
Place the marker where you want the frame to freeze. Click on Camera icon under Program window. This will take a snapshot of the current frame and place it under Project Media folder. Drag and drop the snapshot onto the timeline.

Step 4
Match the duration of the snapshot with the point where you want the frame to freeze. Go to Effects> AI Portrait> Human Segmentation and drop the effect on the snapshot layer to make the background disappear.

Step 5
Double-click on the snapshot layer. Go to Effect and adjust the Edge thickness so that it looks perfect. Click on OK button and play the video to check out the effect.

Step 6
Perform Step 3 to Step 5 again where you need to select a frame to freeze, take snapshot, drop onto timeline and remove background. Finally, play the video to check out the freeze frame clone effect. Save the video on your hard drive by click on Export button.

Summary
What you’ve learned:
- How to take snapshot from a video for freeze frame
- How to remove background from snapshot
- How to mix snapshots and video for cloning effect
Cropping Video in VLC [Step by Step]
Want to crop your videos but don’t know how to start?
A video editor needs to know how he can crop his videos. There is a way to do this using the VLC that is installed in your computer. This guide will teach you a simple way to get what you want. This might appear as complicated at first sight but it will be shown to you in a digestible way. An alternative way would be to use Wondershare Filmora. You will also be guided on how to use this software to crop your videos. Don’t worry and just take it one step at a time.
How to Crop a Video using VLC
Have you ever heard of the VLC media player? If not, you can browse through it online and install it on your computer. Aside from watching content, you can also crop videos with it. Cropping is a way to remove spaces that you would not want to be included on your video.
Find the software on your computer and don’t be overwhelmed by the interface.
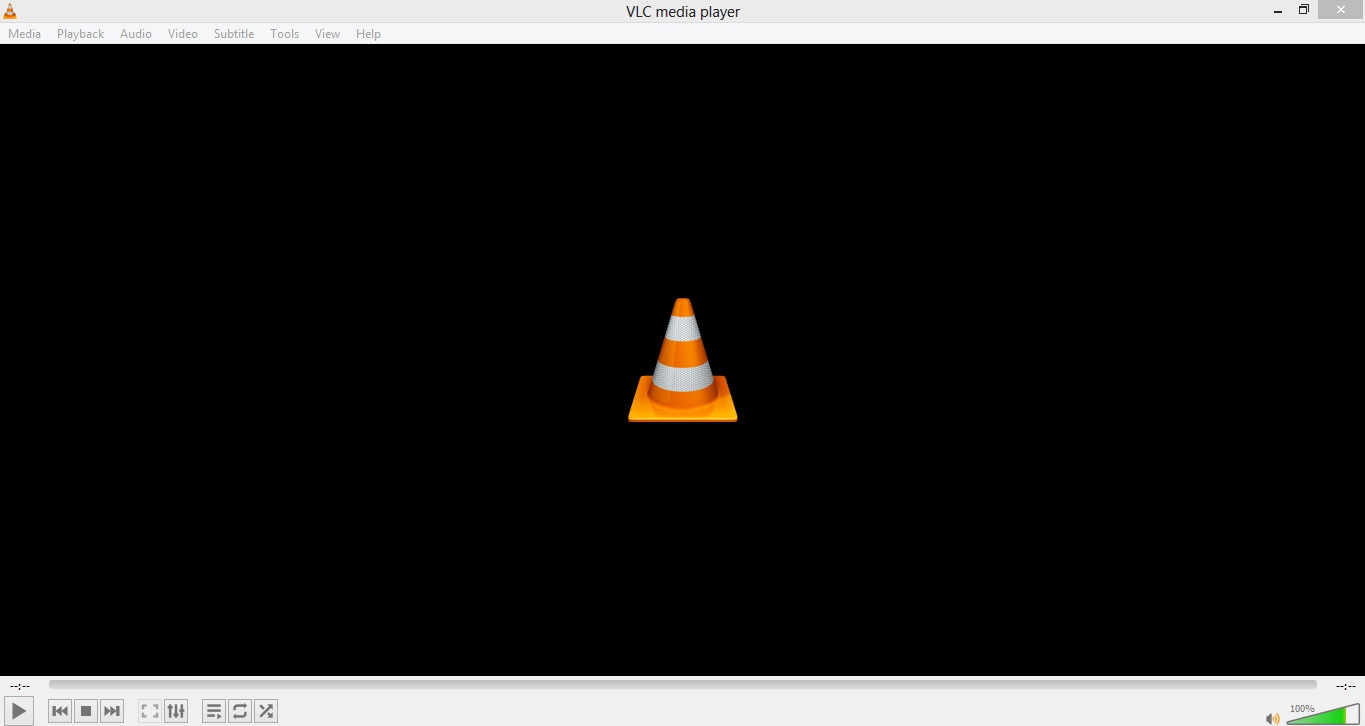
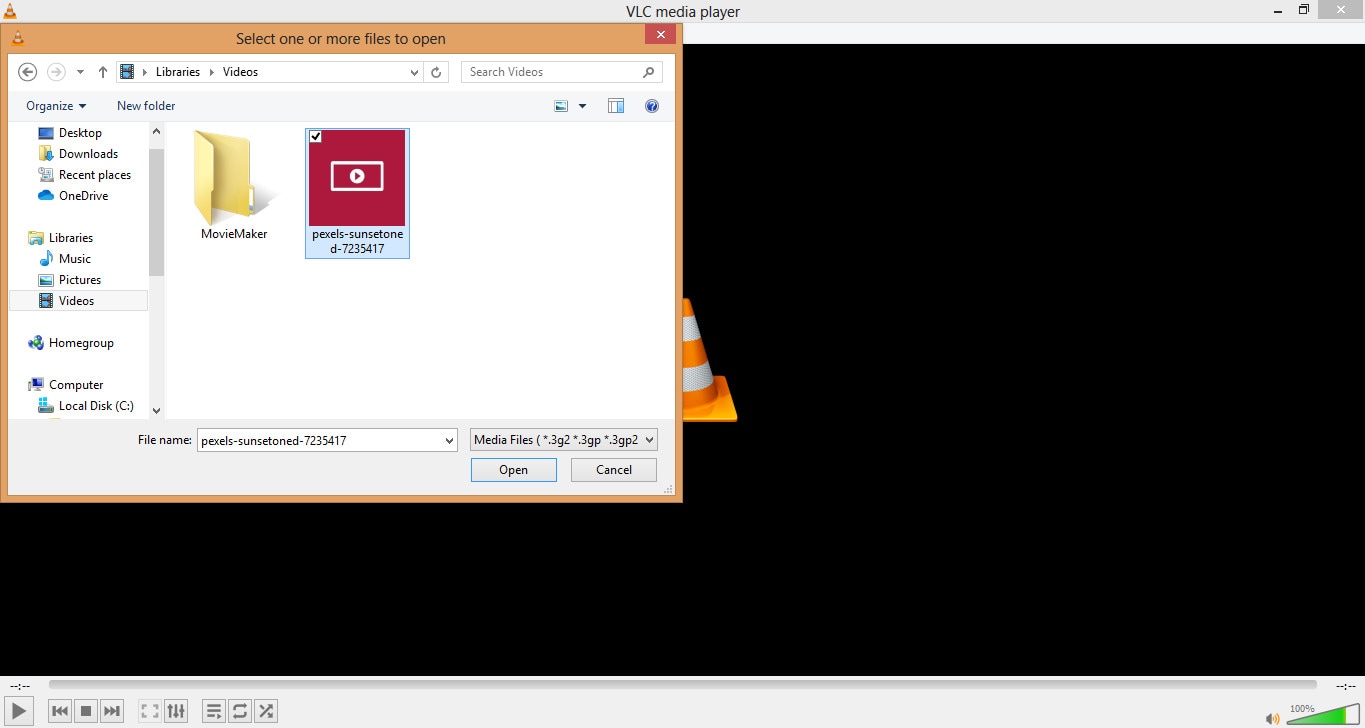
Then click the Media and select Open File to choose the video that you want to crop. You should prepare the videos that you want to be cropped and rename them to avoid confusion.
Click the Tools on the menu and select the Effects and Filters.
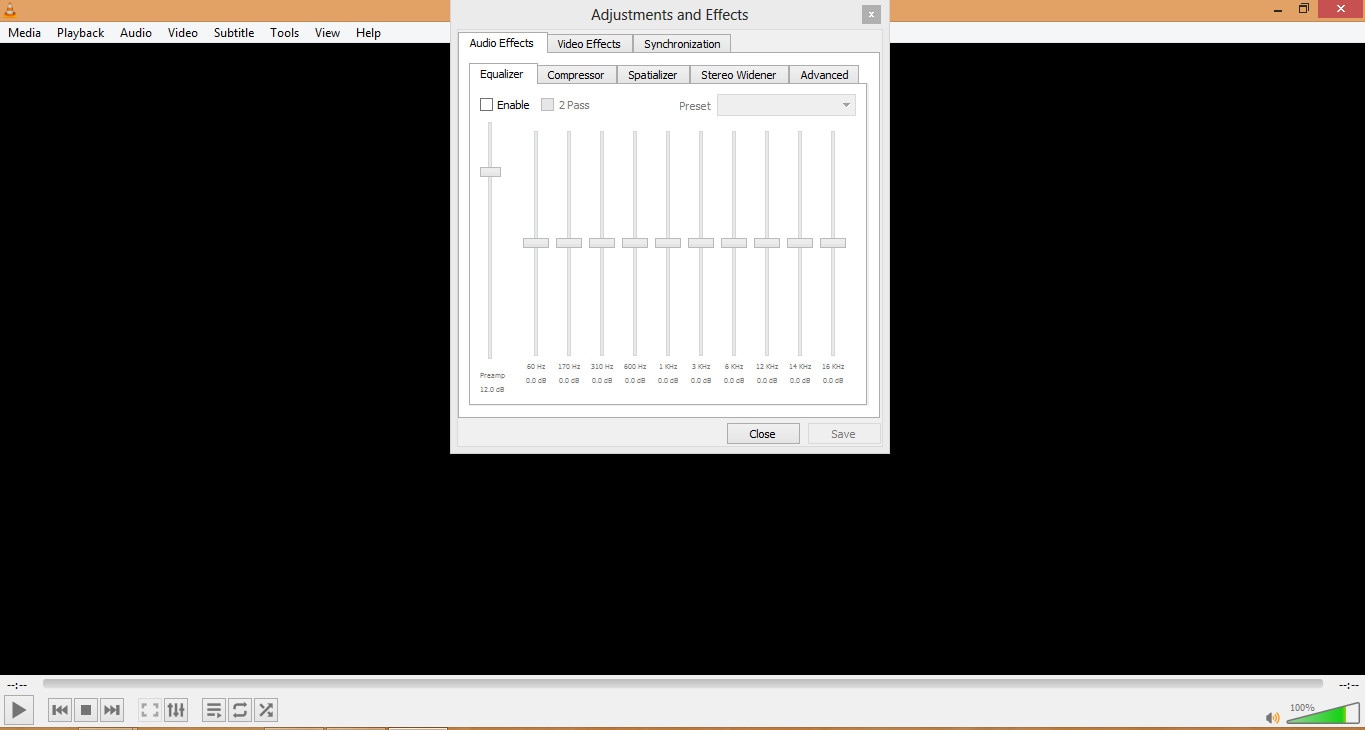
After that, click on the Video Effects and under that select Crop. Doing this, will open the cropping editor.
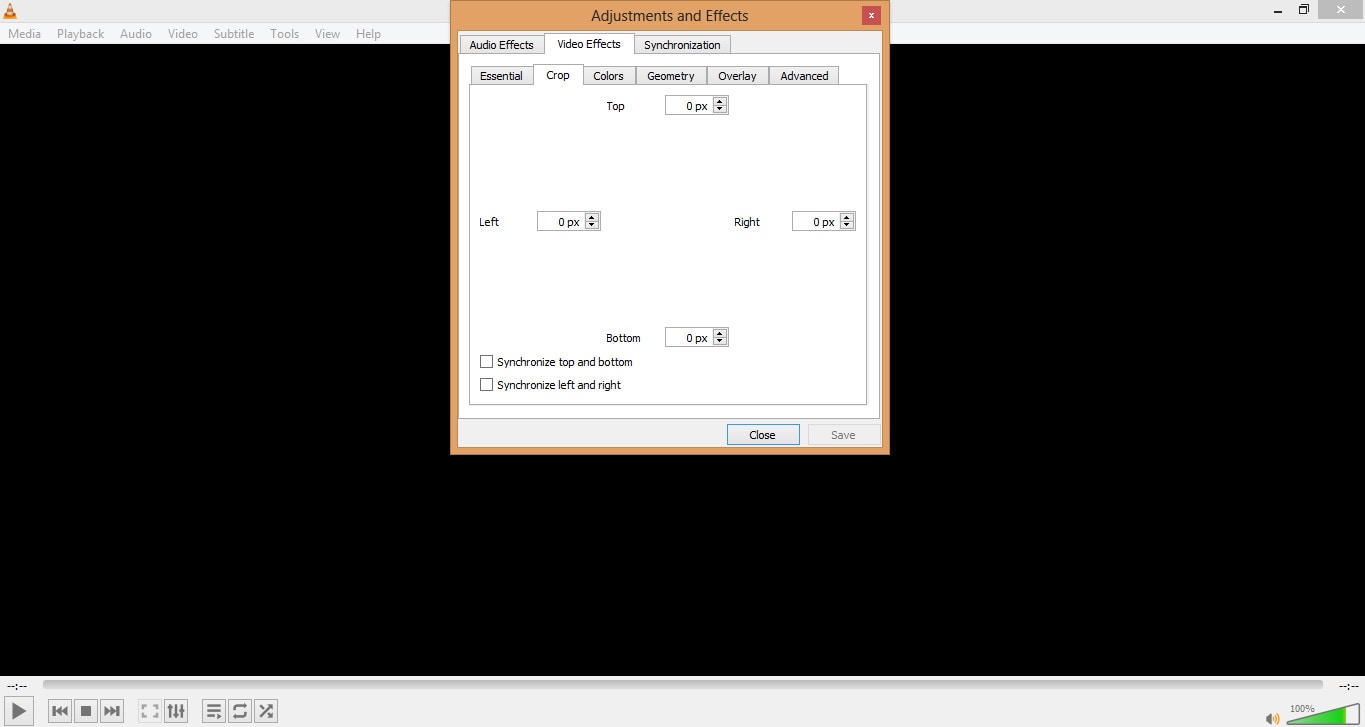
You need to enter specific pixels on the left, right, top and bottom. This will depend on your preferences. If it is your first time and you don’t know the exact pixels then just input what you think would be enough.
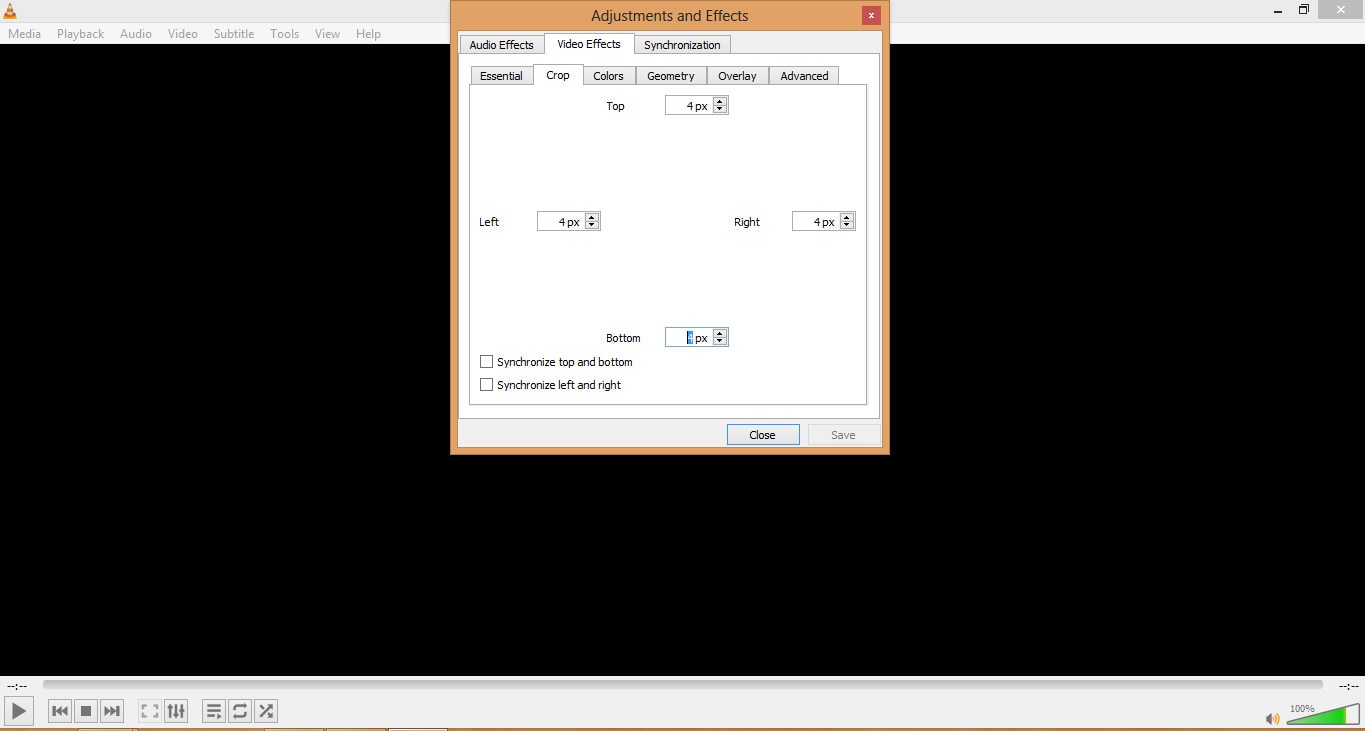
After entering your preferred pixels, you can preview it. If you would like to adjust then just simply repeat entering the specific pixels.
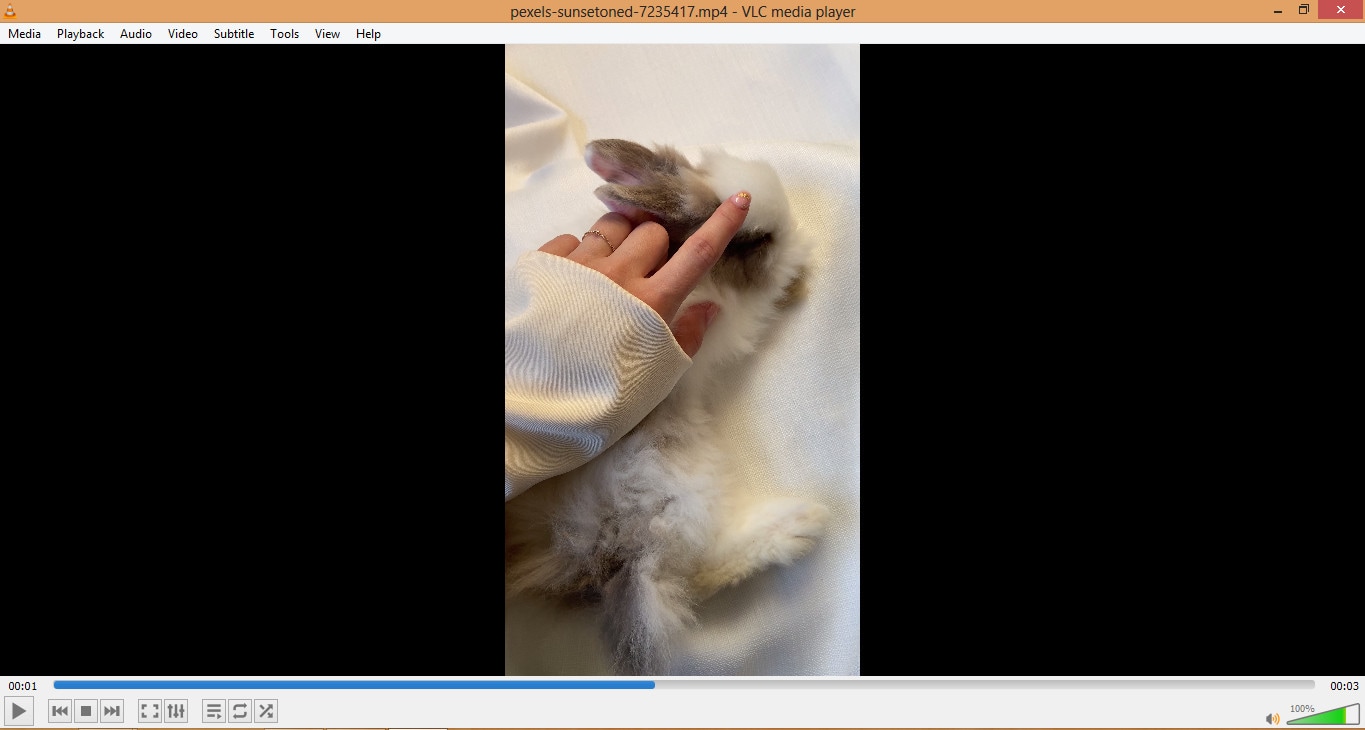
You decided to save the cropped video. Find the Tools menu and select Preferences.
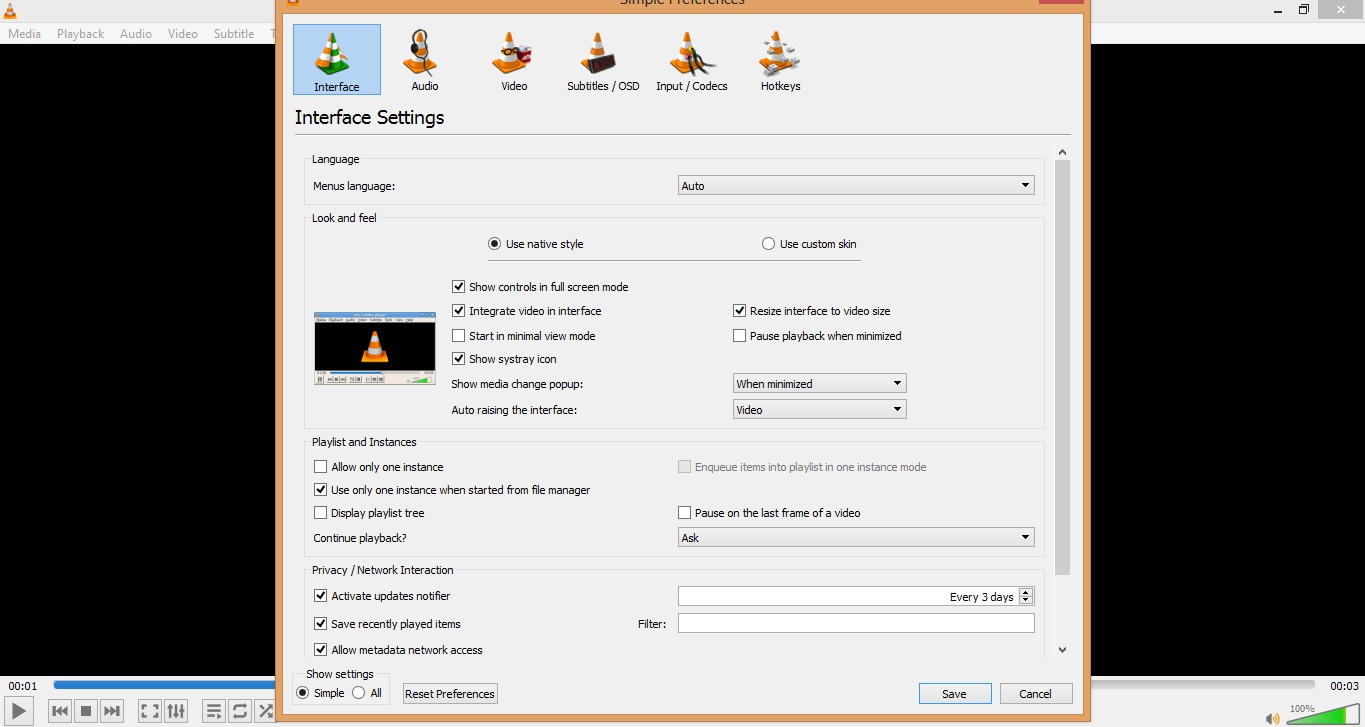
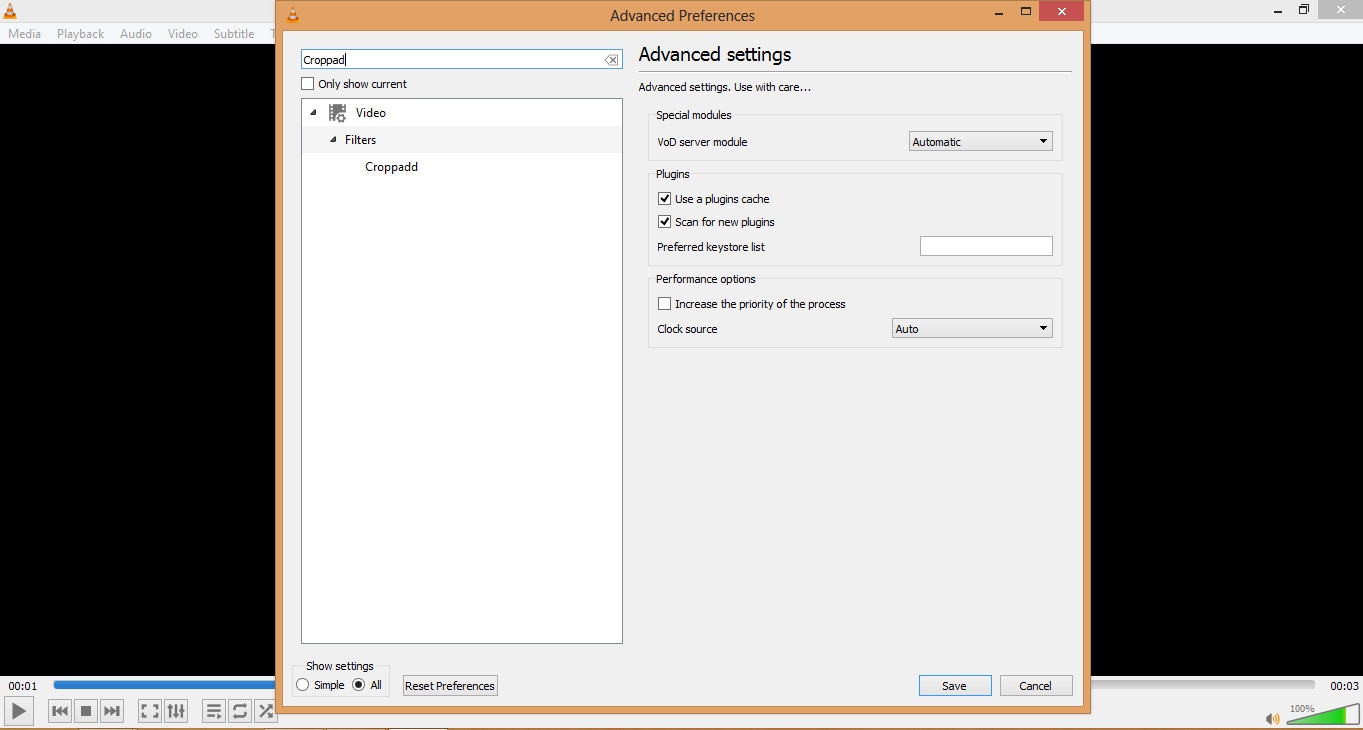
Find the Show settings and click All. In the search bar type Croppadd then save your previous preferred pixel settings. Lastly, click Save.
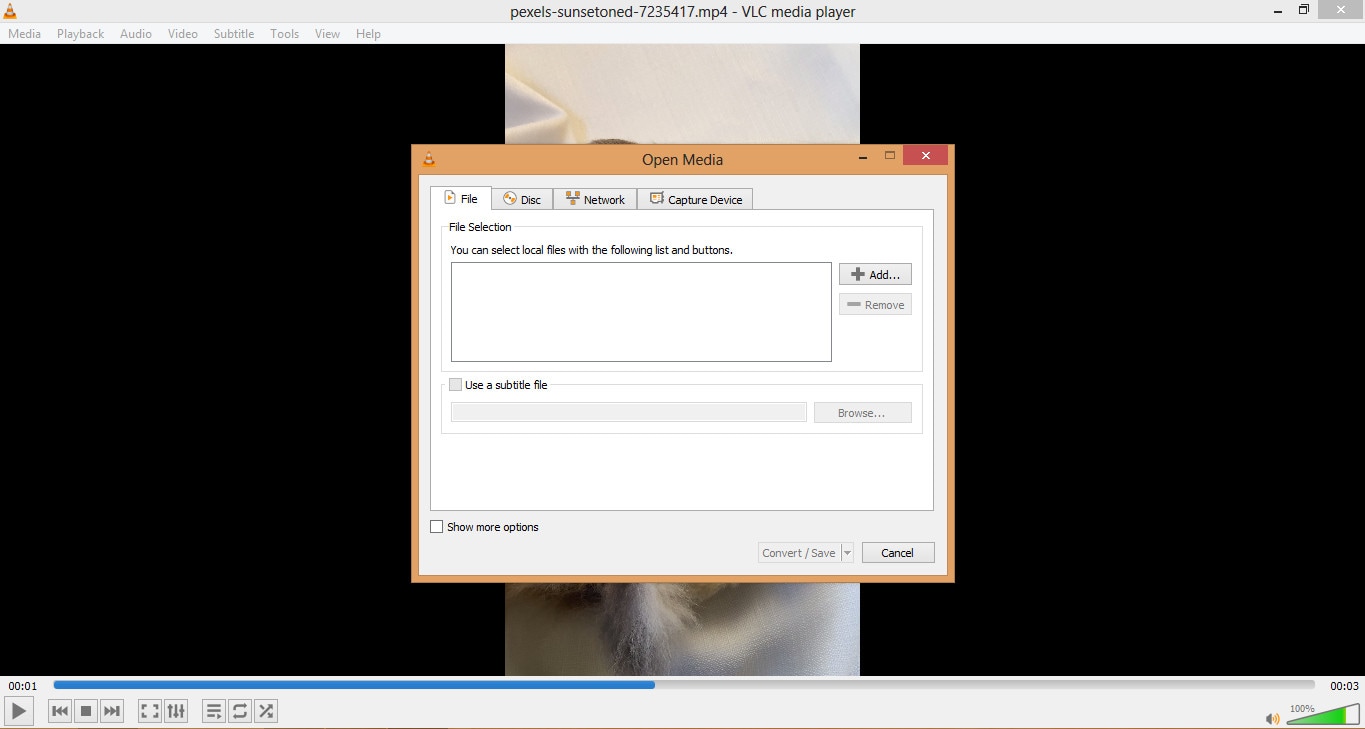
In the Media menu select the Convert/Save. You can drag and drop the cropped video to the File box.
You can select your file format and codecs by clicking Convert/Save.
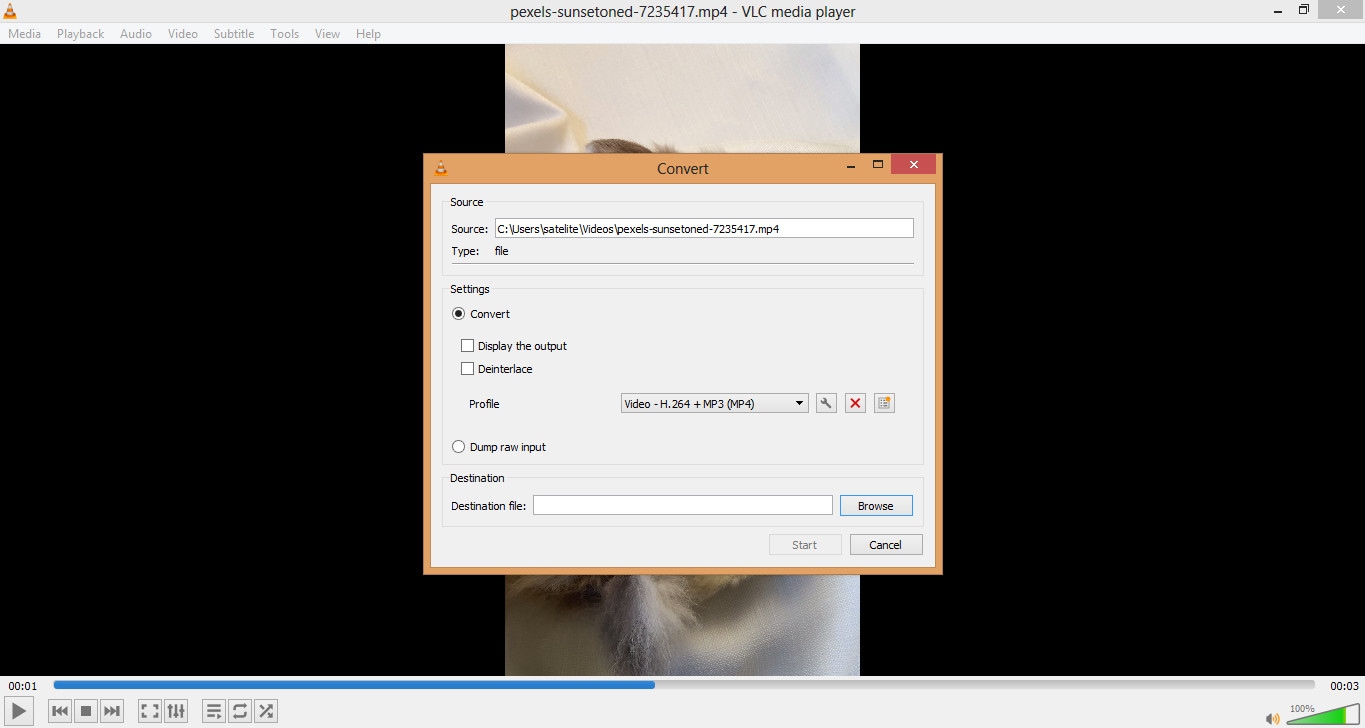
Find the Edit Selected Profile and click the Video Codec. Then under the Filters tab, select the Video cropping filter. Finally, click Save.
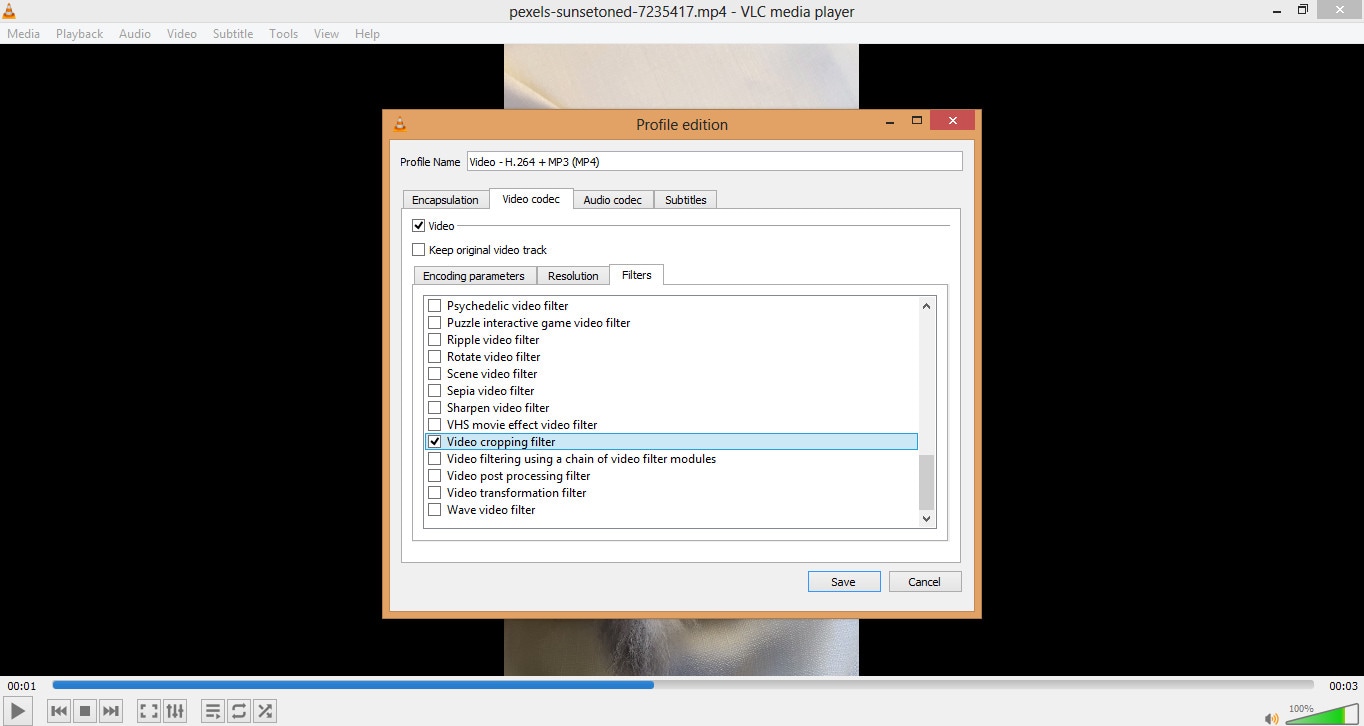
In the Destination file select where you want it to be saved.
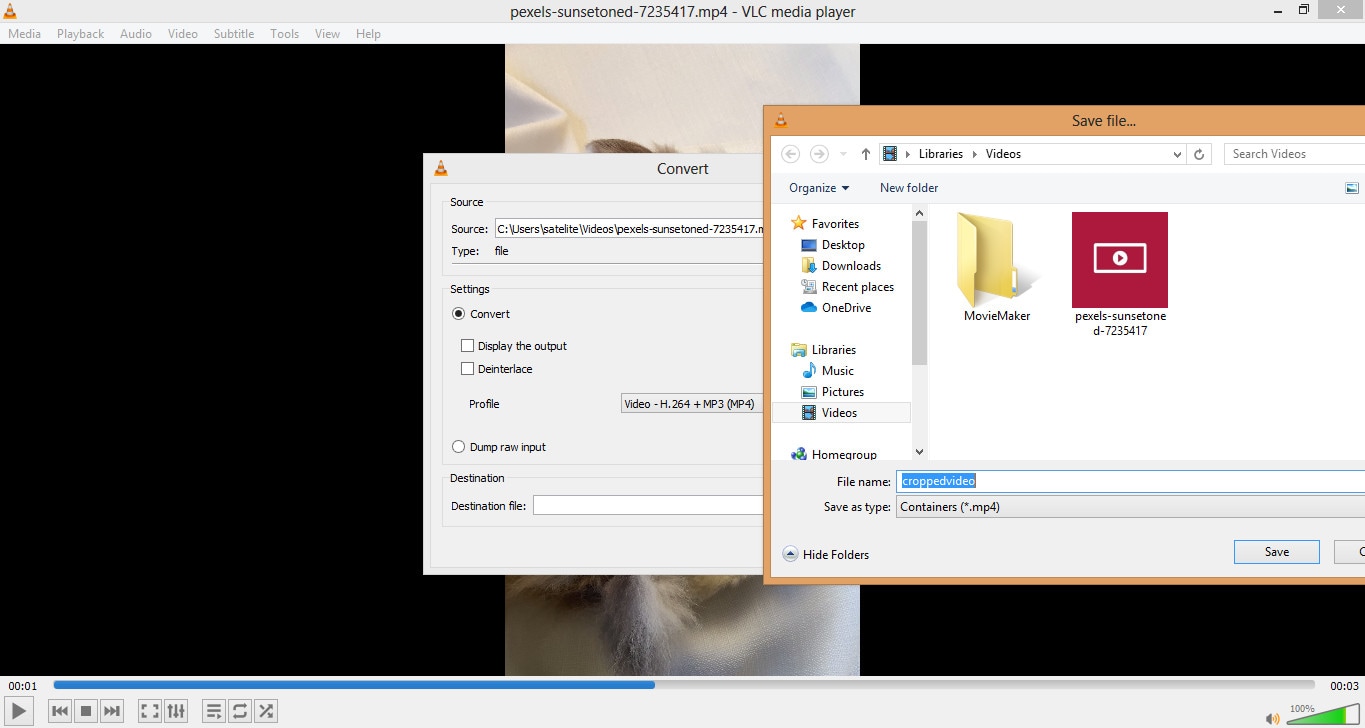
Then click Start.
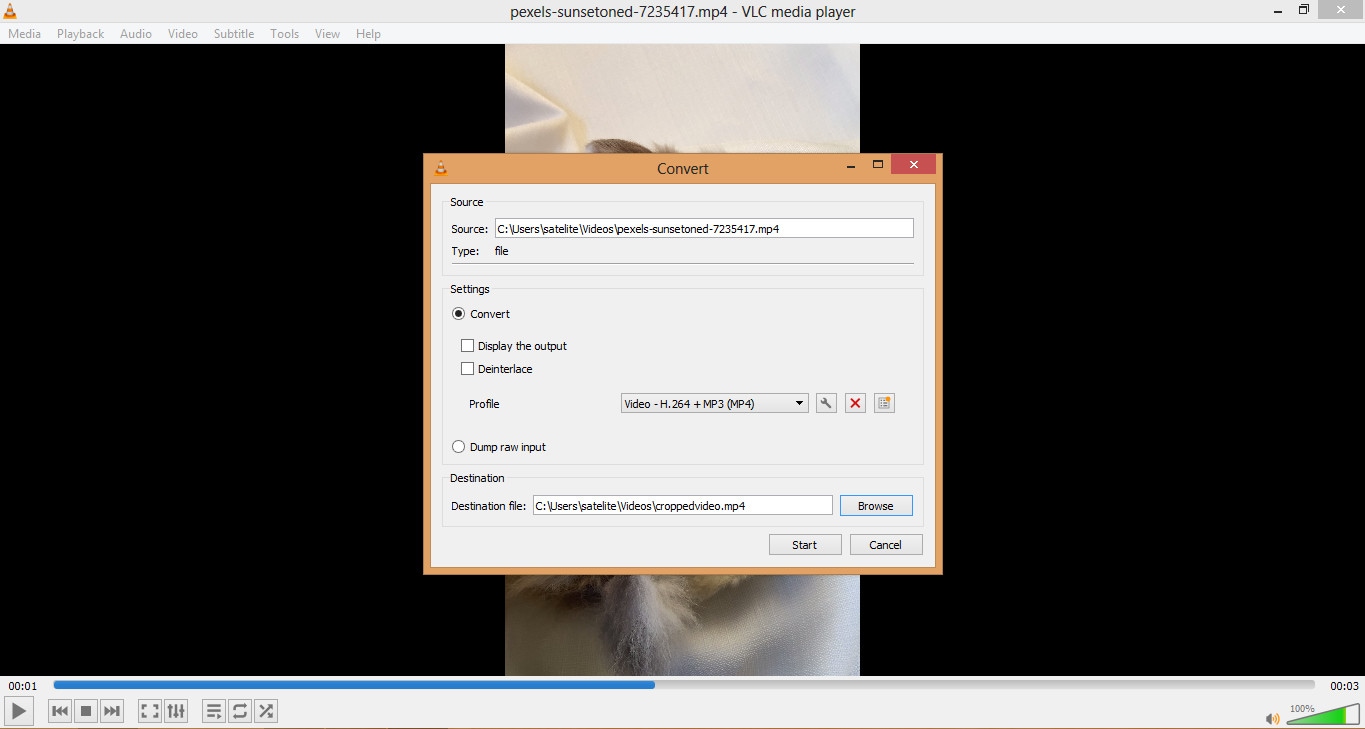
Congratulations on getting here! You finally cropped your video using the VLC media player.
Although there are disadvantages to using this as your cropping tool. Like for example you want the real-time preview of what you’ve changed in your video. This would be a turn off for some that want their outputs to be shown to them immediately. Aside from this, there is a chance that you will forget one step to make and thus, the whole process would need to start over from scratch. Lastly, is the freedom to batch crop multiple videos. This is especially important for those that need to have many clips in one video. A user might lose the continuity of the story within his video.
While one of its strong suits is the affordability of the software. It is completely free and has no additional charges that may surprise you in the future. Finally, your output won’t have watermarks that could destroy the aesthetics of your video.
What are your experiences with using it as a cropping tool? What would you recommend to improve it? It is up to you the user if you want to continue using this as your partner in removing the excess in your videos.
An Easier Way to Crop a Video using Wondershare Filmora
Have you heard of an editing tool called Wondershare Filmora Video Editor ? What are your first impressions of this software? You can download this for free by going to the official site.
Wondershare Filmora is a useful editor that can help you produce the content that you want. It is packed with beneficial tools that you can learn to apply. If it is already installed on your computer then proceed to opening it.
For Win 7 or later (64-bit)
For macOS 10.14 or later
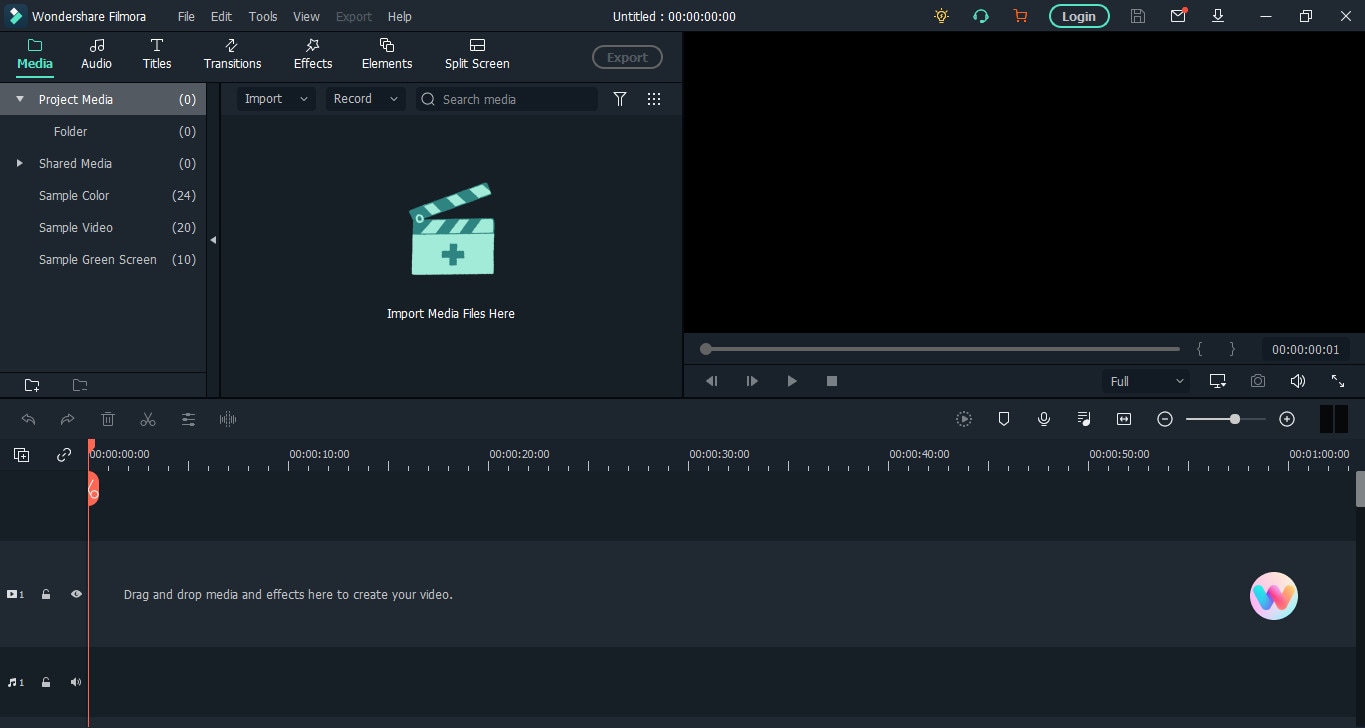
Prepare your videos that you need to crop. You can drag and drop your video or click the Import.
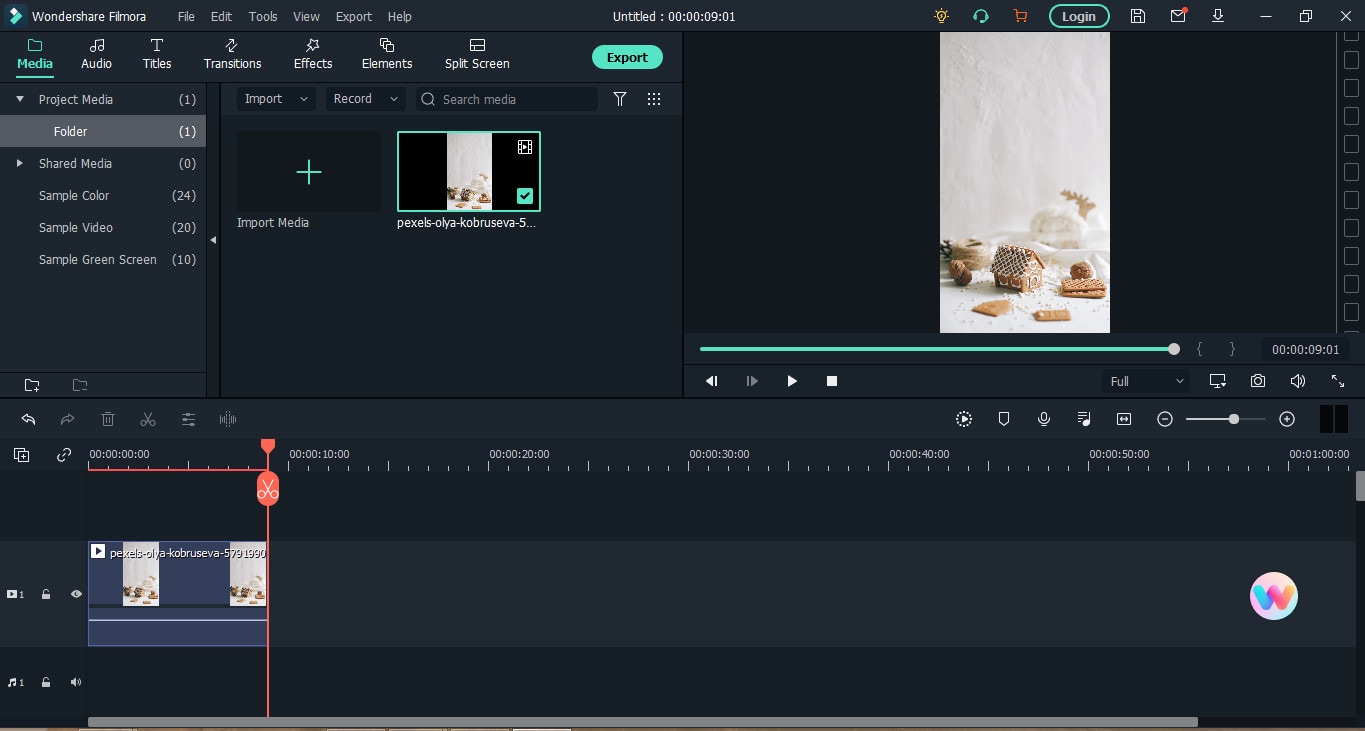
Select the video clip that you want to crop. Then, click the Crop tool and choose if you want the Crop or Pan & Zoom.
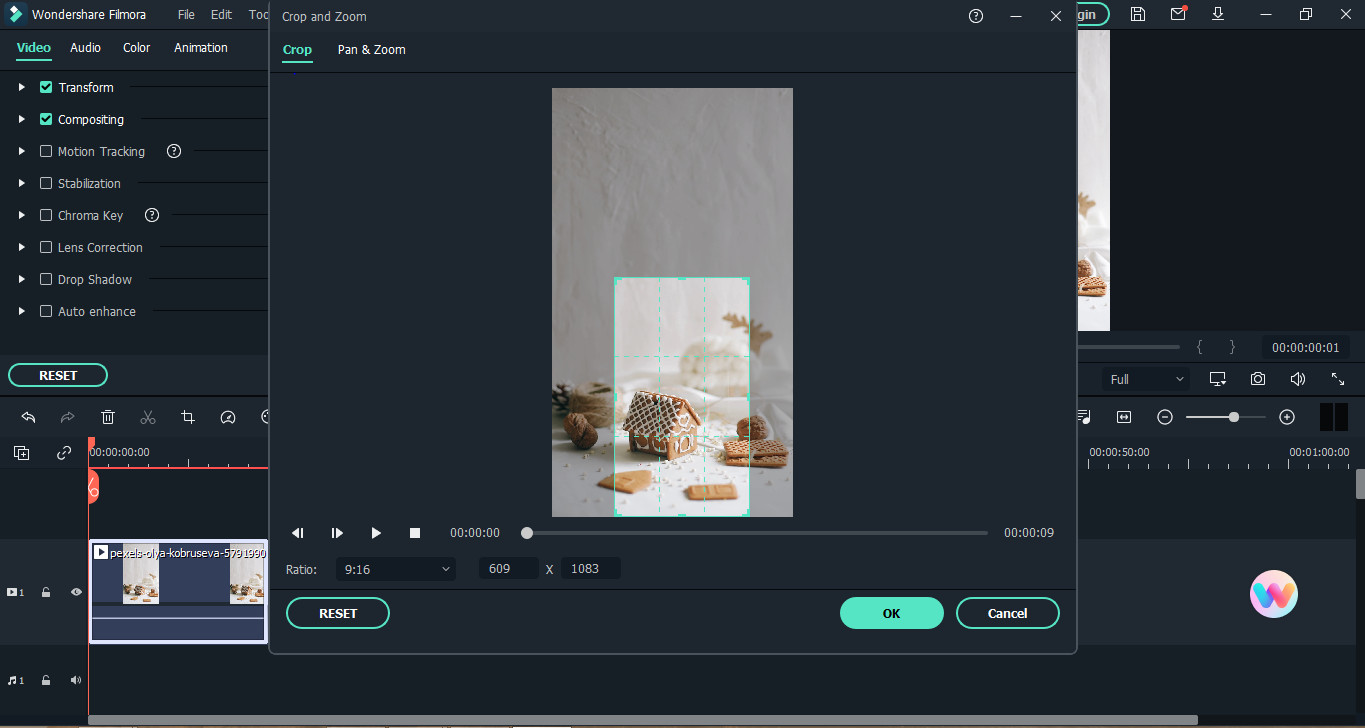
You can also right click the video clip .Under the Video tab you can select the Crop and Zoom or Crop to Fit then adjust to your preferred ratio.
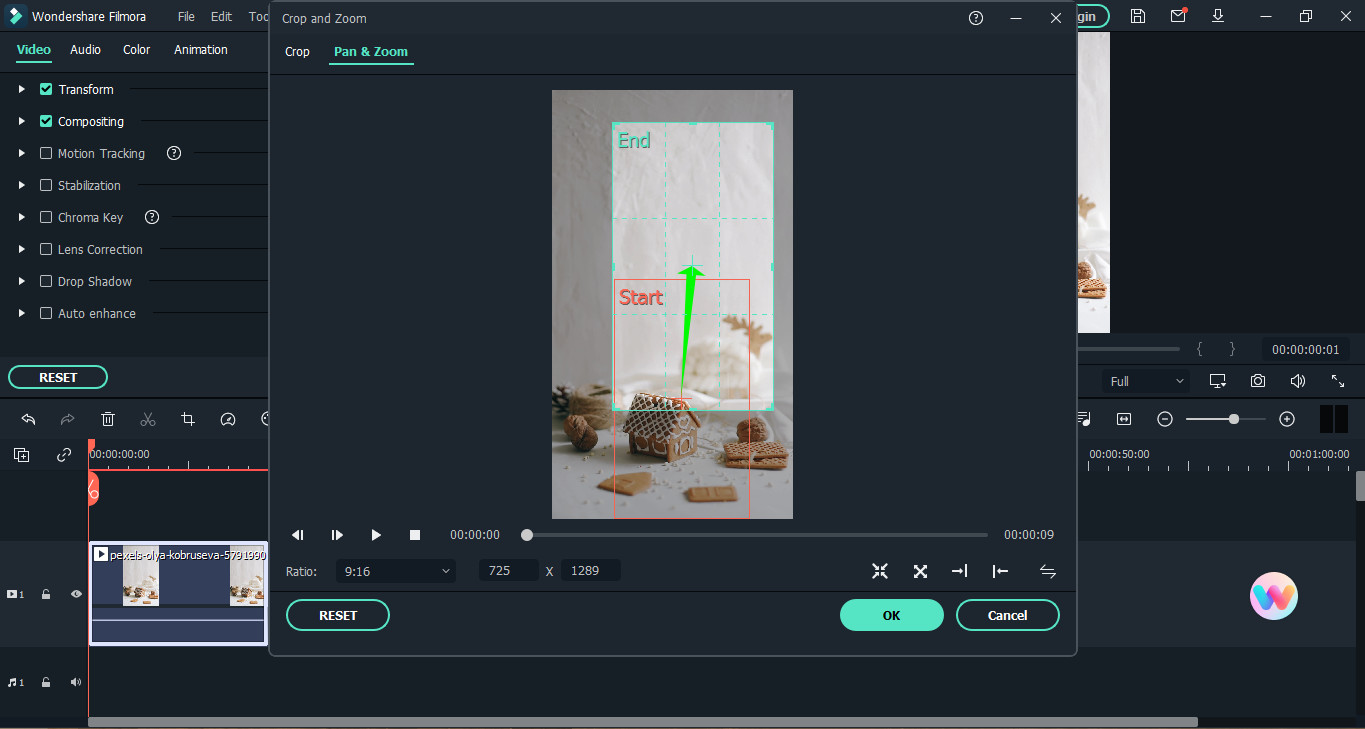
One of the advantages of Filmora is you can preview what you have cropped immediately. This will greatly help you if you’re not sure what kind of crop that you want. If you’ve thought that you made a mistake then a simple Undo button could fix it. In short, you’re not going through the gruesome process of starting all over again. You can also do the batch cropping of multiple videos helping you ensure the smoothness of flow in the final output.
Although the Filmora is not free, there is a trial that you can use to test it to check if this video editor would meet your needs. It has tools that a beginner to expert video editor could use to produce high quality videos that would make the audience think that it was life from the movies.
The Bottom Line
The journey of exploring different options would help you make the decision. Both VLC media player and Wondershare Filmora have their great features which would aid the user to crop his videos in an efficient way. What are your thoughts on each of them? As an individual you have varied needs that a video tool should meet.
After reading this, you’ve had a clearer view of what these video softwares offers. Did this guide help you decide which would fit your needs as a video editor? What are your suggestions for improvement?
You could share with us the tips and tricks you know on cropping videos using these applications.
A video editor needs to know how he can crop his videos. There is a way to do this using the VLC that is installed in your computer. This guide will teach you a simple way to get what you want. This might appear as complicated at first sight but it will be shown to you in a digestible way. An alternative way would be to use Wondershare Filmora. You will also be guided on how to use this software to crop your videos. Don’t worry and just take it one step at a time.
How to Crop a Video using VLC
Have you ever heard of the VLC media player? If not, you can browse through it online and install it on your computer. Aside from watching content, you can also crop videos with it. Cropping is a way to remove spaces that you would not want to be included on your video.
Find the software on your computer and don’t be overwhelmed by the interface.

Then click the Media and select Open File to choose the video that you want to crop. You should prepare the videos that you want to be cropped and rename them to avoid confusion.

Click the Tools on the menu and select the Effects and Filters.

After that, click on the Video Effects and under that select Crop. Doing this, will open the cropping editor.

You need to enter specific pixels on the left, right, top and bottom. This will depend on your preferences. If it is your first time and you don’t know the exact pixels then just input what you think would be enough.

After entering your preferred pixels, you can preview it. If you would like to adjust then just simply repeat entering the specific pixels.

You decided to save the cropped video. Find the Tools menu and select Preferences.

Find the Show settings and click All. In the search bar type Croppadd then save your previous preferred pixel settings. Lastly, click Save.

In the Media menu select the Convert/Save. You can drag and drop the cropped video to the File box.

You can select your file format and codecs by clicking Convert/Save.

Find the Edit Selected Profile and click the Video Codec. Then under the Filters tab, select the Video cropping filter. Finally, click Save.

In the Destination file select where you want it to be saved.

Then click Start.

Congratulations on getting here! You finally cropped your video using the VLC media player.
Although there are disadvantages to using this as your cropping tool. Like for example you want the real-time preview of what you’ve changed in your video. This would be a turn off for some that want their outputs to be shown to them immediately. Aside from this, there is a chance that you will forget one step to make and thus, the whole process would need to start over from scratch. Lastly, is the freedom to batch crop multiple videos. This is especially important for those that need to have many clips in one video. A user might lose the continuity of the story within his video.
While one of its strong suits is the affordability of the software. It is completely free and has no additional charges that may surprise you in the future. Finally, your output won’t have watermarks that could destroy the aesthetics of your video.
What are your experiences with using it as a cropping tool? What would you recommend to improve it? It is up to you the user if you want to continue using this as your partner in removing the excess in your videos.
An Easier Way to Crop a Video using Wondershare Filmora
Have you heard of an editing tool called Wondershare Filmora Video Editor ? What are your first impressions of this software? You can download this for free by going to the official site.
Wondershare Filmora is a useful editor that can help you produce the content that you want. It is packed with beneficial tools that you can learn to apply. If it is already installed on your computer then proceed to opening it.
For Win 7 or later (64-bit)
For macOS 10.14 or later

Prepare your videos that you need to crop. You can drag and drop your video or click the Import.

Select the video clip that you want to crop. Then, click the Crop tool and choose if you want the Crop or Pan & Zoom.

You can also right click the video clip .Under the Video tab you can select the Crop and Zoom or Crop to Fit then adjust to your preferred ratio.

One of the advantages of Filmora is you can preview what you have cropped immediately. This will greatly help you if you’re not sure what kind of crop that you want. If you’ve thought that you made a mistake then a simple Undo button could fix it. In short, you’re not going through the gruesome process of starting all over again. You can also do the batch cropping of multiple videos helping you ensure the smoothness of flow in the final output.
Although the Filmora is not free, there is a trial that you can use to test it to check if this video editor would meet your needs. It has tools that a beginner to expert video editor could use to produce high quality videos that would make the audience think that it was life from the movies.
The Bottom Line
The journey of exploring different options would help you make the decision. Both VLC media player and Wondershare Filmora have their great features which would aid the user to crop his videos in an efficient way. What are your thoughts on each of them? As an individual you have varied needs that a video tool should meet.
After reading this, you’ve had a clearer view of what these video softwares offers. Did this guide help you decide which would fit your needs as a video editor? What are your suggestions for improvement?
You could share with us the tips and tricks you know on cropping videos using these applications.
A video editor needs to know how he can crop his videos. There is a way to do this using the VLC that is installed in your computer. This guide will teach you a simple way to get what you want. This might appear as complicated at first sight but it will be shown to you in a digestible way. An alternative way would be to use Wondershare Filmora. You will also be guided on how to use this software to crop your videos. Don’t worry and just take it one step at a time.
How to Crop a Video using VLC
Have you ever heard of the VLC media player? If not, you can browse through it online and install it on your computer. Aside from watching content, you can also crop videos with it. Cropping is a way to remove spaces that you would not want to be included on your video.
Find the software on your computer and don’t be overwhelmed by the interface.

Then click the Media and select Open File to choose the video that you want to crop. You should prepare the videos that you want to be cropped and rename them to avoid confusion.

Click the Tools on the menu and select the Effects and Filters.

After that, click on the Video Effects and under that select Crop. Doing this, will open the cropping editor.

You need to enter specific pixels on the left, right, top and bottom. This will depend on your preferences. If it is your first time and you don’t know the exact pixels then just input what you think would be enough.

After entering your preferred pixels, you can preview it. If you would like to adjust then just simply repeat entering the specific pixels.

You decided to save the cropped video. Find the Tools menu and select Preferences.

Find the Show settings and click All. In the search bar type Croppadd then save your previous preferred pixel settings. Lastly, click Save.

In the Media menu select the Convert/Save. You can drag and drop the cropped video to the File box.

You can select your file format and codecs by clicking Convert/Save.

Find the Edit Selected Profile and click the Video Codec. Then under the Filters tab, select the Video cropping filter. Finally, click Save.

In the Destination file select where you want it to be saved.

Then click Start.

Congratulations on getting here! You finally cropped your video using the VLC media player.
Although there are disadvantages to using this as your cropping tool. Like for example you want the real-time preview of what you’ve changed in your video. This would be a turn off for some that want their outputs to be shown to them immediately. Aside from this, there is a chance that you will forget one step to make and thus, the whole process would need to start over from scratch. Lastly, is the freedom to batch crop multiple videos. This is especially important for those that need to have many clips in one video. A user might lose the continuity of the story within his video.
While one of its strong suits is the affordability of the software. It is completely free and has no additional charges that may surprise you in the future. Finally, your output won’t have watermarks that could destroy the aesthetics of your video.
What are your experiences with using it as a cropping tool? What would you recommend to improve it? It is up to you the user if you want to continue using this as your partner in removing the excess in your videos.
An Easier Way to Crop a Video using Wondershare Filmora
Have you heard of an editing tool called Wondershare Filmora Video Editor ? What are your first impressions of this software? You can download this for free by going to the official site.
Wondershare Filmora is a useful editor that can help you produce the content that you want. It is packed with beneficial tools that you can learn to apply. If it is already installed on your computer then proceed to opening it.
For Win 7 or later (64-bit)
For macOS 10.14 or later

Prepare your videos that you need to crop. You can drag and drop your video or click the Import.

Select the video clip that you want to crop. Then, click the Crop tool and choose if you want the Crop or Pan & Zoom.

You can also right click the video clip .Under the Video tab you can select the Crop and Zoom or Crop to Fit then adjust to your preferred ratio.

One of the advantages of Filmora is you can preview what you have cropped immediately. This will greatly help you if you’re not sure what kind of crop that you want. If you’ve thought that you made a mistake then a simple Undo button could fix it. In short, you’re not going through the gruesome process of starting all over again. You can also do the batch cropping of multiple videos helping you ensure the smoothness of flow in the final output.
Although the Filmora is not free, there is a trial that you can use to test it to check if this video editor would meet your needs. It has tools that a beginner to expert video editor could use to produce high quality videos that would make the audience think that it was life from the movies.
The Bottom Line
The journey of exploring different options would help you make the decision. Both VLC media player and Wondershare Filmora have their great features which would aid the user to crop his videos in an efficient way. What are your thoughts on each of them? As an individual you have varied needs that a video tool should meet.
After reading this, you’ve had a clearer view of what these video softwares offers. Did this guide help you decide which would fit your needs as a video editor? What are your suggestions for improvement?
You could share with us the tips and tricks you know on cropping videos using these applications.
A video editor needs to know how he can crop his videos. There is a way to do this using the VLC that is installed in your computer. This guide will teach you a simple way to get what you want. This might appear as complicated at first sight but it will be shown to you in a digestible way. An alternative way would be to use Wondershare Filmora. You will also be guided on how to use this software to crop your videos. Don’t worry and just take it one step at a time.
How to Crop a Video using VLC
Have you ever heard of the VLC media player? If not, you can browse through it online and install it on your computer. Aside from watching content, you can also crop videos with it. Cropping is a way to remove spaces that you would not want to be included on your video.
Find the software on your computer and don’t be overwhelmed by the interface.

Then click the Media and select Open File to choose the video that you want to crop. You should prepare the videos that you want to be cropped and rename them to avoid confusion.

Click the Tools on the menu and select the Effects and Filters.

After that, click on the Video Effects and under that select Crop. Doing this, will open the cropping editor.

You need to enter specific pixels on the left, right, top and bottom. This will depend on your preferences. If it is your first time and you don’t know the exact pixels then just input what you think would be enough.

After entering your preferred pixels, you can preview it. If you would like to adjust then just simply repeat entering the specific pixels.

You decided to save the cropped video. Find the Tools menu and select Preferences.

Find the Show settings and click All. In the search bar type Croppadd then save your previous preferred pixel settings. Lastly, click Save.

In the Media menu select the Convert/Save. You can drag and drop the cropped video to the File box.

You can select your file format and codecs by clicking Convert/Save.

Find the Edit Selected Profile and click the Video Codec. Then under the Filters tab, select the Video cropping filter. Finally, click Save.

In the Destination file select where you want it to be saved.

Then click Start.

Congratulations on getting here! You finally cropped your video using the VLC media player.
Although there are disadvantages to using this as your cropping tool. Like for example you want the real-time preview of what you’ve changed in your video. This would be a turn off for some that want their outputs to be shown to them immediately. Aside from this, there is a chance that you will forget one step to make and thus, the whole process would need to start over from scratch. Lastly, is the freedom to batch crop multiple videos. This is especially important for those that need to have many clips in one video. A user might lose the continuity of the story within his video.
While one of its strong suits is the affordability of the software. It is completely free and has no additional charges that may surprise you in the future. Finally, your output won’t have watermarks that could destroy the aesthetics of your video.
What are your experiences with using it as a cropping tool? What would you recommend to improve it? It is up to you the user if you want to continue using this as your partner in removing the excess in your videos.
An Easier Way to Crop a Video using Wondershare Filmora
Have you heard of an editing tool called Wondershare Filmora Video Editor ? What are your first impressions of this software? You can download this for free by going to the official site.
Wondershare Filmora is a useful editor that can help you produce the content that you want. It is packed with beneficial tools that you can learn to apply. If it is already installed on your computer then proceed to opening it.
For Win 7 or later (64-bit)
For macOS 10.14 or later

Prepare your videos that you need to crop. You can drag and drop your video or click the Import.

Select the video clip that you want to crop. Then, click the Crop tool and choose if you want the Crop or Pan & Zoom.

You can also right click the video clip .Under the Video tab you can select the Crop and Zoom or Crop to Fit then adjust to your preferred ratio.

One of the advantages of Filmora is you can preview what you have cropped immediately. This will greatly help you if you’re not sure what kind of crop that you want. If you’ve thought that you made a mistake then a simple Undo button could fix it. In short, you’re not going through the gruesome process of starting all over again. You can also do the batch cropping of multiple videos helping you ensure the smoothness of flow in the final output.
Although the Filmora is not free, there is a trial that you can use to test it to check if this video editor would meet your needs. It has tools that a beginner to expert video editor could use to produce high quality videos that would make the audience think that it was life from the movies.
The Bottom Line
The journey of exploring different options would help you make the decision. Both VLC media player and Wondershare Filmora have their great features which would aid the user to crop his videos in an efficient way. What are your thoughts on each of them? As an individual you have varied needs that a video tool should meet.
After reading this, you’ve had a clearer view of what these video softwares offers. Did this guide help you decide which would fit your needs as a video editor? What are your suggestions for improvement?
You could share with us the tips and tricks you know on cropping videos using these applications.
Also read:
- New Best 8 Free Video Editing Software Reddit for 2024
- Updated 2024 Approved Come And Pick! Best MOV to GIF Converters
- Updated Find The Best Free Canon LUTs for 2024
- How to Add a Lower Third to Your Video for 2024
- New Elevate Your Designs with Feather Shapes in After Effects
- Updated In 2024, | How to Share YouTube Video on Zoom?
- New Final Cut Pro for iPad- Is It Available?
- New Top 10 Free Spanish Text To Speech Converter Websites
- Using Slow Motion in Adobe After Effects A Step-by-Step Procession for 2024
- In 2024, 4 Methods for Rotating Your GoPro Videos Professionally
- Updated In 2024, 10 Innovative AR Teaching Examples to Tell You What Is AR in Teaching
- Updated Replacing Sky Background Using Adobe Photoshop A Comprehensive Guide for 2024
- New 10 Best Camera for YouTube Beginners
- New 2024 Approved Blender - A Video Editor for Every Professional
- Updated How to Add Text Animation Online
- New Are You Looking for a Video Format Converter Free? We Will Introduce the 5 Best Online Converters and Also the 5 Best Video Format Converters for PC
- New How to Slow-Mo YouTube Videos
- New Reviewing Efectum App and The Best Alternatives for Smartphone Users for 2024
- Updated Top 10 Text to Robot Voice Generators Windows, Mac, Android, iPhone
- New 2 Solutions to Crop a Video Using After Effects for 2024
- 2024 Approved How to Use Deep Fried Meme Maker
- In 2024, Ways to Learn Discord Game Bots – Even if Youre Just Starting Out 20
- New Best Cloud Storage Service for Videos for 2024
- In 2024, You Need to Follow Certain Steps to Complete Your Project. In the Section Below, We Will Discuss in Detail the Steps to Make a Movie From Windows Movie Maker
- 2024 Approved Do You Wish to Create the Best Video Collages ? No Problem, because Wondershare Filmora Will Help You Make the Best Video Collages
- 2024 Approved Steps to Rotate Videos Using Handbrake
- New Easy Ways to Remove Motion Blur In Photoshop
- New How to Make A Tattoo Disappear Like A Magic
- New In 2024, How to Crop Videos in Windows Media Player
- In 2024, How To Track and Blur Faces in Premiere Pro
- In 2024, 10 Catchy Pixel Art Wallpapers and How to Custom Your Own
- New How to Create an Instant Slideshow on Mac for 2024
- Easy Steps to Loop YouTube Videos on iPhone
- Updated In 2024, A Review of Efectum App Making Slow Motion Video
- New Top 6 Best Alternatives to Clownfish Voice Changer
- New In 2024, How to Fade in Text in Adobe Premiere Pro
- 2024 Approved Overview About Supported iPhone Video Formats and Best iPhone Video Editor & Converter
- New How To Make a Timelapse in After Effects
- Best Online GIF to Image (PNG/JPG) Converter for 2024
- New Do You Wish to Learn About some Tools to Slow Down a Video? Discover How to Slow Down Time Lapse on iPhone Throughout This Article
- Twitch Green Screen Guide
- In 2024, A Detailed Guid to Remove Background From a Video in Premier Pro
- Updated 2024 Approved Color Lut in Video -How to Color Grade Your Video
- 2024 Approved Learn About Splice Video Online and Its Advantages. Also, Check Out the Best Online Apps for Splice Editing
- In 2024, The Best iSpoofer Alternative to Try On Vivo V27 | Dr.fone
- Top 5 Car Locator Apps for Samsung Galaxy S24+ | Dr.fone
- Fake Android Location without Rooting For Your Oppo F23 5G | Dr.fone
- How to Unlock Samsung Galaxy S23+ Phone Pattern Lock without Factory Reset
- In 2024, Full Guide to Bypass Tecno Spark 20C FRP
- In 2024, Unlock Your Device iCloud DNS Bypass Explained and Tested, Plus Easy Alternatives From Apple iPhone 8 Plus
- In 2024, Hassle-Free Ways to Remove FRP Lock from Vivo Y100 Phones with/without a PC
- Additional Tips About Sinnoh Stone For Honor Magic5 Ultimate | Dr.fone
- In 2024, How to Spy on Text Messages from Computer & Samsung Galaxy XCover 6 Pro Tactical Edition | Dr.fone
- Best Android Data Recovery - undelete lost call logs from Motorola Moto G84 5G
- Getting the Pokemon Go GPS Signal Not Found 11 Error in Infinix Note 30 VIP Racing Edition | Dr.fone
- How to Mirror PC Screen to Oppo A78 5G Phones? | Dr.fone
- How to Easily Hard reset my Xiaomi Redmi Note 12 Pro 4G | Dr.fone
- Ultimate Guide from Itel S23+ FRP Bypass
- In 2024, Network Locked SIM Card Inserted On Your Nokia 150 (2023) Phone? Unlock It Now
- In 2024, How to Unlock Samsung Galaxy M14 4G Pattern Lock if Forgotten? 6 Ways
- How to Detect and Stop mSpy from Spying on Your Sony Xperia 10 V | Dr.fone
- The Best Android Unlock Software For Lava Storm 5G Device Top 5 Picks to Remove Android Locks
- In 2024, How to Track OnePlus Ace 2V Location by Number | Dr.fone
- In 2024, How to Watch Hulu Outside US On Tecno Spark 20 Pro | Dr.fone
- In 2024, How To Use Korean to English Video Translators for Creators
- How to Unlock Apple iPhone 8 with a Mask On | Dr.fone
- Solutions to restore deleted files from Honor
- How to Mirror Samsung Galaxy F04 to Mac? | Dr.fone
- Unlock locked iPhone 7 by restoring it to factory settings
- How to Cast Huawei Nova Y71 to Computer for iPhone and Android? | Dr.fone
- Vivo Y100i Power 5G ADB Format Tool for PC vs. Other Unlocking Tools Which One is the Best?
- Updated In 2024, The Best Tools to Convert Text to MP3 With the Best Natural Voices
- In 2024, How to Fix Pokemon Go Route Not Working On Apple iPhone 11 Pro? | Dr.fone
- How to Fix Infinix Smart 8 Pro Find My Friends No Location Found? | Dr.fone
- How To Deal With the HTC U23 Screen Black But Still Works? | Dr.fone
- Here are Some Pro Tips for Pokemon Go PvP Battles On Honor X50 GT | Dr.fone
- How To Transfer WhatsApp From iPhone 15 to other iPhone 11 devices? | Dr.fone
- Why Does My Xiaomi 14 Pro Keep Turning Off By Itself? 6 Fixes Are Here | Dr.fone
- 3uTools Virtual Location Not Working On Apple iPhone 14 Pro? Fix Now | Dr.fone
- In 2024, Pattern Locks Are Unsafe Secure Your Motorola Moto G24 Phone Now with These Tips
- How To Stream Anything From Oppo A79 5G to Apple TV | Dr.fone
- Downloading SamFw FRP Tool 3.0 for Google Pixel 8
- In 2024, How to Reset Gmail Password on Oppo Find X7 Devices
- In 2024, Which Pokémon can Evolve with a Moon Stone For Poco C65? | Dr.fone
- Android Call History Recovery - recover deleted call logs from Honor Magic V2
- In 2024, Best Anti Tracker Software For Nokia 105 Classic | Dr.fone
- New 2024 Approved Best 5 Quandale Dingle Voice Generators
- Title: The Ultimate Guide to Using Shotcut To Rotate Videos for 2024
- Author: Chloe
- Created at : 2024-05-20 03:38:19
- Updated at : 2024-05-21 03:38:19
- Link: https://ai-editing-video.techidaily.com/the-ultimate-guide-to-using-shotcut-to-rotate-videos-for-2024/
- License: This work is licensed under CC BY-NC-SA 4.0.


