
:max_bytes(150000):strip_icc():format(webp)/how-to-set-up-a-ps5-5088641-1bcc6bca24cd460bb2b276fdeb6cb830.jpg)
This Article Aims to Show You How to Improve Your Lighting in the Sun for 2024
This Article Aims to Show You How to Improve Your Lighting in the Sun
Shooting outdoors is a challenge in most situations. We have to deal with the sun being overexposed or the background is too dark.
In this article, we’ll show you how to light with the sun the easiest way. These simple and effective tips can help you block the harsh sun and make it to your advantage!
1) Preparation
You may need those things to film under the harsh sun:
- An ND filter for your lens
- A flag to block the sun. It can be anything like a black poster.
- A white poster to bounce the sunlight.
- Artificial light equipment.
Now let’s see when and how to use them against the strong sunlight!
2) Direct to the Sun
If we want a specific background for our shot but our talent has to face the sun, here are some tips you can do to undermine the unflattering light or the blindness.
1. Pick up an ND filter on your lens

We use it outside so we can open our aperture to get nice blurry backgrounds without overexposing our footage.
2. Use a “flag” to block or shape the sunlight

Using a black piece of poster board works perfectly fine, hold it up to the sun. Also, remember to angle your “flag” to create harsh lines or fully shade your talent.
3. Adjust your camera to fit the environment
For example, you can change the exposure of your camera to match the talent’s face giving a more silhouette look.
3) Back to the Sun
Have you ever been filming outside only to see your talent dark in the frame with the background blown out with light? To fix the problem, the simplest way is to use a “bounce”.
By using a “bounce”, we can reflect the light from the sun to our talent. Make sure to lift the bounce and move it around to get the right amount of light on your talent.
This should give us a nice look with the sun backlighting our subject and the bounce filling in the shadows and giving us soft light on our talent’s face!
4) Artificial lighting
If we want to control our lighting better, we will want to use artificial lights in combination with the sun.
For example, weather changes. As you shot, the sun will move and make lighting challenging to keep consistent.
In that case, we can use the flag technique that we used before to block the harsh sunlight and then use our lights on our talent’s face, this keeps our lighting more consistent than if we relied on just the natural light.
Now, take a look at the comparison with all the lighting conditions we create:
- Flag VS Flag & Light

- Backlight VS Backlight & Bounce

Summary
If you shoot or film outdoors, you must learn how to cope with the unsteady natural light. Hope this article helps you with that and kindly leave your thoughts below.
Free Download For Win 7 or later(64-bit)
Free Download For macOS 10.14 or later
Free Download For macOS 10.14 or later
Facts About GIF Background You Didn’t Know
Some Facts About GIF Background You Didn’t Know
An easy yet powerful editor
Numerous effects to choose from
Detailed tutorials provided by the official channel
Once you start using GIFs in your everyday conversations, there’s no going back. GIFs make the conversation more immersive and enjoyable and add a sense of emotion that is not possible with ordinary text. You probably loved some gifs more than others, or there were moments when you wanted to turn them into gifs and wished you could use them as a gif background on your device or presentation but couldn’t figure out how to do it. But, now you don’t have to bury your wish any longer. During this article, you will learn everything there is to know about all the different ways you can use gifs as your background and many more. In addition, you will learn how to use them as your background and how to create them.
In this article
01 [How to Use a GIF as Your Desktop Background on Windows](#Part 1)
02 [How to Make GIF Background on Windows/Mac/Android/iPhone](#Part 2)
03 [How to Make GIF Powerpoint Background](#Part 3)
04 [How to Make GIF Without Background - Free & Efficiently?](#Part 4)
Part 1 How to Use a GIF as Your Desktop Background on Windows?
Although Windows doesn’t have native support to keep animated gif backgrounds, you can use third-party services to keep gifs as background images.
Using Plastuer or BioniX wallpaper changer as a 3rd party software is the best way to use animated gifs for your desktop.
As a starting point, we’ll cover plastuer, which uses WebGL and chromium-browser to make gifs as your background.

The software includes selecting different screens where you want the wallpaper to appear, making it possible to apply it to different screens at once.
To select the gif you want:
● You can paste the URL of the gif you want to use.
● You can also use the “create playlist” field to add multiple gifs as your background.
● You can select a file from your device using the “select file” option.
● Or you can choose from hundreds of gifs present in the plastuer library.
● You can disable the wallpaper whenever you wish by clicking on the “disable wallpaper” option.

How to use the bioniX wallpaper changer?
BioniX comes with several options that one may need to apply to their Windows device’s background, and animated gif backgrounds are one of them.

You will need to download the software and once it is installed, launch it on your PC to apply cool gif backgrounds. To choose files from the device itself, you will have to use the shortcut command “CTRL+F”, or you can also choose to insert the URL of the gif you want to use as your background.
Once your image gets uploaded into the software, double click on it to set it as your windows wallpaper. You can also choose a launch of gifs, create a playlist, and select the timer to change wallpaper regularly.
Part 2 How to Make GIF Background on Windows/Mac/Android/iPhone?
So, how can you create moving background gifs on your different devices like Windows/Mac/Android/iPhone?
In case you thought that was hard, you were entirely mistaken. Now, you can easily create or customize cool background gifs for your computer, tablet, phone, or other devices that you own. The best part is that you don’t need any technical skills to use different tools.
You can create gifs with the help of many tools such as Giphy and share them with your family, friends, and coworkers.
01Giphy
Giphy is a one-stop destination for all of your gifs needs. You can create or choose from thousands of gifs present in their library. Furthermore, one can make personalized gifs with all the tools they provide and add custom stickers, texts or different filters. There is also a live wallpaper section present in giphy, from where you can download hundreds of cool gif backgrounds and make your old machine look fabulous again.

02Pinterest
It’s no secret that Pinterest has a lot of great images, but did you know you can also find gif backgrounds here in various genres that you like and then download them?
It’s straightforward to use, and you can also find anime gif backgrounds on Pinterest if you are an anime fan.

03Tenor
This site offers online gif backgrounds. One may choose from a wide selection of wallpapers and backgrounds available on this site. Online Library is filled up with all sorts of aesthetic gif backgrounds and other types of background that people like.
A few more tools fit the need, but most of them are not reliable, and the tools mentioned above are currently the best ones available for you to use.

Part 3 How to Make a GIF Powerpoint Background?
If you make PowerPoint presentations, you can use various tools to modify your presentation. But did you know that you can also include an aesthetic gif background as part of your presentation?
The steps to creating a gif PowerPoint background are very simple, and below you will find all the steps you need to follow:
● You’ll need to choose the PPTx file that you want to use the GIF background on to get started. Then you can choose the specific slide.
● Navigate to the “design” tab, then to the “background” section. You will see a “background styles” option where you will have to select “format background” to complete the process.
● Select “fill” in the left-hand side panel of the appeared window. Now, select “picture or texture fill” and choose the “file” button, which will lead to another window.
● In the “look in” menu, find the folder or file where the required gif is present. Go on to select the “ok” option. You can either select “close” to apply the gif to a particular slide or “apply to all” to use the gif background in the whole presentation.
Part 4 How to Make GIF Without Background - Free & Efficiently?
One may also look for transparent gif maker websites that will help them make gifs without background and use them on different devices they own.
Here are a few websites that are best for this job; they won’t only help you make transparent gifs but also edit various features like delay time, animation speed etc.
01Using EzGif
Using EzGif is probably one of the best options available in the market at the moment. You can go to their website and create a transparent gif background of high resolution.
Doing that is easy; you need to upload PNG type images that don’t have a background or combine transparent background to form a gif. You can choose up to 2000 images with a maximum file size of 100 MB for all images combined.
To create a gif, go on their site, then to the “gif maker” section to upload the images, and click on “make a gif” to make a transparent gif from the selected images. Once the gif is created, you can use it as a moving gif background and share it with friends or family.
02Use animizer.net to create a gif without background
It is effortless to use software to create transparent gifs by uploading multiple transparent PNG images and combining them to form a gif.
You can use unlimited images for your gif and animated gif background. It also lets you adjust various settings for your transparent gifs like loops, animation speed and much more.
03Use filmora for making gifs without background easily
Wondershare Filmora Video Editor is an all in one tool that will help you create all sorts of gifs, including transparent gifs. You can take advantage of their easy to use tools that are fir for people who have no technical skills at all.
You can easily upload the images and remove their background in the software itself and later use it in the gif you are willing to create.

Wondershare Filmora - Best Video Editor for Mac/Windows
5,481,435 people have downloaded it.
Build unique custom animations without breaking a sweat.
Focus on creating epic stories and leave the details to Filmora’s auto features.
Start a creative adventure with drag & drop effects and endless possibilities.
Filmora simplifies advanced features to save you time and effort.
Filmora cuts out repetition so you can move on to your next creative breakthrough.
This is probably one of the best options if you are looking for an all in one tool for all your needs.
● Ending Thoughts →
● The techniques that we have talked about in this guide may help you discover things about gif backgrounds you have not known before.
● They are incredible and can help you utilize gifs in ways you hadn’t even considered.
● Create a moving gif background and apply it to any device easily.
● Of course, a simple background won’t provide the same type of effect as a moving gif. With this guide, you’ll learn about every tool that you may use and how to apply or create a cool gif background on your own.
Once you start using GIFs in your everyday conversations, there’s no going back. GIFs make the conversation more immersive and enjoyable and add a sense of emotion that is not possible with ordinary text. You probably loved some gifs more than others, or there were moments when you wanted to turn them into gifs and wished you could use them as a gif background on your device or presentation but couldn’t figure out how to do it. But, now you don’t have to bury your wish any longer. During this article, you will learn everything there is to know about all the different ways you can use gifs as your background and many more. In addition, you will learn how to use them as your background and how to create them.
In this article
01 [How to Use a GIF as Your Desktop Background on Windows](#Part 1)
02 [How to Make GIF Background on Windows/Mac/Android/iPhone](#Part 2)
03 [How to Make GIF Powerpoint Background](#Part 3)
04 [How to Make GIF Without Background - Free & Efficiently?](#Part 4)
Part 1 How to Use a GIF as Your Desktop Background on Windows?
Although Windows doesn’t have native support to keep animated gif backgrounds, you can use third-party services to keep gifs as background images.
Using Plastuer or BioniX wallpaper changer as a 3rd party software is the best way to use animated gifs for your desktop.
As a starting point, we’ll cover plastuer, which uses WebGL and chromium-browser to make gifs as your background.
The software includes selecting different screens where you want the wallpaper to appear, making it possible to apply it to different screens at once.
To select the gif you want:
● You can paste the URL of the gif you want to use.
● You can also use the “create playlist” field to add multiple gifs as your background.
● You can select a file from your device using the “select file” option.
● Or you can choose from hundreds of gifs present in the plastuer library.
● You can disable the wallpaper whenever you wish by clicking on the “disable wallpaper” option.
How to use the bioniX wallpaper changer?
BioniX comes with several options that one may need to apply to their Windows device’s background, and animated gif backgrounds are one of them.
You will need to download the software and once it is installed, launch it on your PC to apply cool gif backgrounds. To choose files from the device itself, you will have to use the shortcut command “CTRL+F”, or you can also choose to insert the URL of the gif you want to use as your background.
Once your image gets uploaded into the software, double click on it to set it as your windows wallpaper. You can also choose a launch of gifs, create a playlist, and select the timer to change wallpaper regularly.
Part 2 How to Make GIF Background on Windows/Mac/Android/iPhone?
So, how can you create moving background gifs on your different devices like Windows/Mac/Android/iPhone?
In case you thought that was hard, you were entirely mistaken. Now, you can easily create or customize cool background gifs for your computer, tablet, phone, or other devices that you own. The best part is that you don’t need any technical skills to use different tools.
You can create gifs with the help of many tools such as Giphy and share them with your family, friends, and coworkers.
01Giphy
Giphy is a one-stop destination for all of your gifs needs. You can create or choose from thousands of gifs present in their library. Furthermore, one can make personalized gifs with all the tools they provide and add custom stickers, texts or different filters. There is also a live wallpaper section present in giphy, from where you can download hundreds of cool gif backgrounds and make your old machine look fabulous again.
02Pinterest
It’s no secret that Pinterest has a lot of great images, but did you know you can also find gif backgrounds here in various genres that you like and then download them?
It’s straightforward to use, and you can also find anime gif backgrounds on Pinterest if you are an anime fan.
03Tenor
This site offers online gif backgrounds. One may choose from a wide selection of wallpapers and backgrounds available on this site. Online Library is filled up with all sorts of aesthetic gif backgrounds and other types of background that people like.
A few more tools fit the need, but most of them are not reliable, and the tools mentioned above are currently the best ones available for you to use.
Part 3 How to Make a GIF Powerpoint Background?
If you make PowerPoint presentations, you can use various tools to modify your presentation. But did you know that you can also include an aesthetic gif background as part of your presentation?
The steps to creating a gif PowerPoint background are very simple, and below you will find all the steps you need to follow:
● You’ll need to choose the PPTx file that you want to use the GIF background on to get started. Then you can choose the specific slide.
● Navigate to the “design” tab, then to the “background” section. You will see a “background styles” option where you will have to select “format background” to complete the process.
● Select “fill” in the left-hand side panel of the appeared window. Now, select “picture or texture fill” and choose the “file” button, which will lead to another window.
● In the “look in” menu, find the folder or file where the required gif is present. Go on to select the “ok” option. You can either select “close” to apply the gif to a particular slide or “apply to all” to use the gif background in the whole presentation.
Part 4 How to Make GIF Without Background - Free & Efficiently?
One may also look for transparent gif maker websites that will help them make gifs without background and use them on different devices they own.
Here are a few websites that are best for this job; they won’t only help you make transparent gifs but also edit various features like delay time, animation speed etc.
01Using EzGif
Using EzGif is probably one of the best options available in the market at the moment. You can go to their website and create a transparent gif background of high resolution.
Doing that is easy; you need to upload PNG type images that don’t have a background or combine transparent background to form a gif. You can choose up to 2000 images with a maximum file size of 100 MB for all images combined.
To create a gif, go on their site, then to the “gif maker” section to upload the images, and click on “make a gif” to make a transparent gif from the selected images. Once the gif is created, you can use it as a moving gif background and share it with friends or family.
02Use animizer.net to create a gif without background
It is effortless to use software to create transparent gifs by uploading multiple transparent PNG images and combining them to form a gif.
You can use unlimited images for your gif and animated gif background. It also lets you adjust various settings for your transparent gifs like loops, animation speed and much more.
03Use filmora for making gifs without background easily
Wondershare Filmora Video Editor is an all in one tool that will help you create all sorts of gifs, including transparent gifs. You can take advantage of their easy to use tools that are fir for people who have no technical skills at all.
You can easily upload the images and remove their background in the software itself and later use it in the gif you are willing to create.
Wondershare Filmora - Best Video Editor for Mac/Windows
5,481,435 people have downloaded it.
Build unique custom animations without breaking a sweat.
Focus on creating epic stories and leave the details to Filmora’s auto features.
Start a creative adventure with drag & drop effects and endless possibilities.
Filmora simplifies advanced features to save you time and effort.
Filmora cuts out repetition so you can move on to your next creative breakthrough.
This is probably one of the best options if you are looking for an all in one tool for all your needs.
● Ending Thoughts →
● The techniques that we have talked about in this guide may help you discover things about gif backgrounds you have not known before.
● They are incredible and can help you utilize gifs in ways you hadn’t even considered.
● Create a moving gif background and apply it to any device easily.
● Of course, a simple background won’t provide the same type of effect as a moving gif. With this guide, you’ll learn about every tool that you may use and how to apply or create a cool gif background on your own.
How to Create One Click Video Reverse Effect in Filmora
All great video editors use phenomenal video effects in their videos. One of the most professional effects is the reverse video effect. This unique effect is always challenging for the makers to shoot and portray on the screen flawlessly.
At the same time, it is intriguing and always draws the audience’s attention. In this article, you will learn to shoot and edit the video for reverse effects using Filmora. But first, we will learn what does video reverse effect mean. So let us get into this!
Part 1. What Is Video Reverse Effect?
It is a special video effect in which a motion of things starts in the backward direction. This unique effect is used to intrigue the audience.
For example, if a bullet is fired from a gun. With the reverse effect, you can rewind the footage, and the shot goes back into the gun. So today, you can easily rewind fast action scenes and get a wow reaction from the audience.
Famous Examples of Reverse Effect in Films
1- Demolition of a Wall (1896)
Filmmakers first used this striking effect in 1896 in a 90 seconds film, “Demolition of a wall.” Louis Lumiere was the one who made that video. Below is shown an image from the film.

2- Tenet (2020)
It is a viral film by Christopher Nolan, which was a great success. He explained the concept of reverse entropy, in which you start moving back chronologically in time instead of forward. This concept is all shown through this special video reverse effect. Unfortunately, the audience had difficulty digesting this unique concept, which generated an awful response.

Part 2. How To Shoot Video Reverse Effect?
The reverse effect is unique, so special attention should be paid while filming a video. This section will cover some of the crucial prerequisites to film a video.
Steady Camera
It would be best to have your camera placed on a steady surface or mounted on a tripod stand to lock the focus. We will split the area and perform different tasks to make it look smooth. The audience will not get the idea that you completed the tasks separately. And it helps in the editing process as well.

A Spacious Area
You will need a spacious area in which you will perform different tasks. Make sure your camera stands still while shooting all the frames of video. In an ample space, it becomes easier to do movements freely. It also helps prevent glitches in the final product.
Splitting of Area into Portions
Now you have to split your area into portions. Each task is in its part of the frame, and actions in one frame should not pass over into another. You will do one activity per portion. It makes the editing process a lot easier. Finally, we get all three videos to merge and make it look like a single video.

After covering the prerequisites, we will now learn the editing process of creating a video reverse effect.
Part 3. How To Edit Video Reverse Effect In Filmora? [Stepwise Guide]
Creating video reverse effects is much easier these days. Wondershare Filmora is going to help you a lot. Filmora is an exceptional platform for creating innovative and creative videos. It has advanced editing features, which help make professional videos.
Free Download For Win 7 or later(64-bit)
Free Download For macOS 10.14 or later
Applying video reverse effects to your shots here is a wise guide. Please follow the instructions given below.
Step1 Downloading Filmora and Importing Files
- After recording your shots, you will edit them in Filmora. But first, download Filmora from the website and install it.
- After opening the software, import the recording files by clicking “Import Media.”

Step2 Drag the Shots to the Timeline
- Drag the shots to the timeline and drop it. If Filmora asks for a matching resolution on the timeline, please click “Match to Media.” It will adjust your media resolution according to the timeline.

- Add videos of each action on the layers above by drag and drop.
Step3 Adding Image Mask to the Clips
- Now you will add an image mask to the clips you shot at the area’s corners.
- To simultaneously show each action in the final video, go to “Effects” and click on the search tab.
- Please search “Image Mask.”
- Now drag and drop this effect to the footage shot at corners of the area.

Step4 Adjustment of the Image Mask of each Footage
- Now we will adjust the image mask of each footage so that each will show the task without any glitches.
- For that purpose, double-click on the video. Next, click on “Effects” in the top right corner of the screen. Then select “Image Mask” and make the necessary adjustments so that each mask shows each footage.

Step5 Trimming the Video Clip
- You can trim the footage to create a smooth movement in each portion. In this way, all the clips gel together in a single frame.

- We have successfully gelled together three video clips in a single frame.
- But all these videos are moving forward. So let us now apply the reverse effect to a video clip.
Step6 Apply Reverse Speed to Video Clip
- Please right-click on the video and select “Show speed control.”
- The Control panel will open in the right corner of the screen.
- Then enable the “Reverse Speed” option. You will apply a reverse effect to that clip.

- Your video is ready now, with one clip moving in reverse and two in the forward direction.
- Take a look at the preview of your final product.
- Apply some changes to it if needed.
Step7 Export the Final Project
- Now it’s time to export the project to the device.
- Please select “Export” in the top right corner of the screen. And ship it to the device.

Step8 Final Video
Now have a look at the final project. How smooth and perfect it looks. That’s it!

Conclusion
The reverse video effect has a unique characteristic of its own. And it will always work when you use it in your videos. The great success of many popular films is evident by the captivating feature that this effect has got. In this article, we have discussed the prerequisites and steps of creating a reverse video effect.
If this article has helped you, please mention your experience in the comment box. Also, please share this article with your friends and colleagues. Keep creating!
Free Download For macOS 10.14 or later
Applying video reverse effects to your shots here is a wise guide. Please follow the instructions given below.
Step1 Downloading Filmora and Importing Files
- After recording your shots, you will edit them in Filmora. But first, download Filmora from the website and install it.
- After opening the software, import the recording files by clicking “Import Media.”
Step2 Drag the Shots to the Timeline
- Drag the shots to the timeline and drop it. If Filmora asks for a matching resolution on the timeline, please click “Match to Media.” It will adjust your media resolution according to the timeline.
- Add videos of each action on the layers above by drag and drop.
Step3 Adding Image Mask to the Clips
- Now you will add an image mask to the clips you shot at the area’s corners.
- To simultaneously show each action in the final video, go to “Effects” and click on the search tab.
- Please search “Image Mask.”
- Now drag and drop this effect to the footage shot at corners of the area.
Step4 Adjustment of the Image Mask of each Footage
- Now we will adjust the image mask of each footage so that each will show the task without any glitches.
- For that purpose, double-click on the video. Next, click on “Effects” in the top right corner of the screen. Then select “Image Mask” and make the necessary adjustments so that each mask shows each footage.
Step5 Trimming the Video Clip
- You can trim the footage to create a smooth movement in each portion. In this way, all the clips gel together in a single frame.
- We have successfully gelled together three video clips in a single frame.
- But all these videos are moving forward. So let us now apply the reverse effect to a video clip.
Step6 Apply Reverse Speed to Video Clip
- Please right-click on the video and select “Show speed control.”
- The Control panel will open in the right corner of the screen.
- Then enable the “Reverse Speed” option. You will apply a reverse effect to that clip.
- Your video is ready now, with one clip moving in reverse and two in the forward direction.
- Take a look at the preview of your final product.
- Apply some changes to it if needed.
Step7 Export the Final Project
- Now it’s time to export the project to the device.
- Please select “Export” in the top right corner of the screen. And ship it to the device.
Step8 Final Video
Now have a look at the final project. How smooth and perfect it looks. That’s it!
Conclusion
The reverse video effect has a unique characteristic of its own. And it will always work when you use it in your videos. The great success of many popular films is evident by the captivating feature that this effect has got. In this article, we have discussed the prerequisites and steps of creating a reverse video effect.
If this article has helped you, please mention your experience in the comment box. Also, please share this article with your friends and colleagues. Keep creating!
Top 7 Easy Ways to Convert a Video to a GIF Online
Looking for the best video to gif online conversion tools? No worries, as we have done all the research work and have shortlisted the best tools that can assist you with the task. GIF is short and cute animated files that help in interestingly conveying a message. These short-animated visuals help in reaching and creating an impact on the target audience. So, if you have some videos, GIF animations can be created from them using a good converter tool which can be an online program or system software.
Online programs are preferred by the users owing to their simple and hassle-free use, support for basic features, and cost-saving options. So, here in this topic, we will discuss the top and easy ways to convert video to GIF online.

Part 1: Top 7 Easy Ways to Convert a Video to a GIF Online
Several online tools can be used for converting a video file into GIF, but all do not stand up to the tall claims it makes. So, if you are in search of an easy yet effective tool, shortlisted below are the top 7 tools for video into GIF online conversion.
1. Adobe Express
Powered by Adobe Premiere, this is an excellent online tool that allows converting videos in all key formats in GIF format. The free version allows adding videos for up to 1 hour and the processed files can be downloaded to the local system.
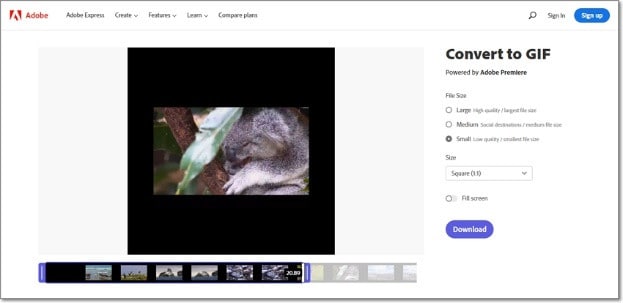
Key features
- Video files in all key formats can be converted to GIF.
- Allows selecting the aspect ratio and the file size of the target file.
- This video to GIF converter online tool support drag and drop feature.
- Allows trimming the video so that the file portion can be selected.
Pros:
- Simple and clean interface.
- Quick file processing.
- Allows selecting aspect ratio and file size.
Cons:
- Only one file at a time can be processed.
- Only desktop files can be added.
- To download the file, you need to free sign-up.
User Review:
A good online multi-platform service that works with interesting features. -TechRadar
This is one of the best programs that comes packed with wide range of features that can assist you in getting the target customized files.
2. Ezgif
Using this browser-based tool, local as well as online videos in key formats can be converted to GIFs. The interface is simple where you just need to add the file and the conversion will be done automatically.
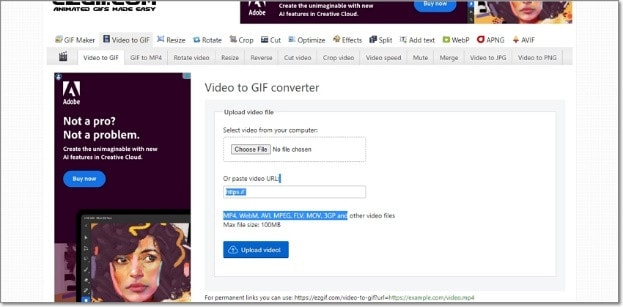
Key features
- GIF can be created from the local and online video files in all key formats.
- Choose the video part for creating the GIF file else by default, the first 5 seconds of the video are used.
Pros:
- All popular video formats like MP4, MPEG, FLV, MOV, and others are supported for conversion to GIF.
- Local, as well as file links in case of online files, can be added.
- Allows selecting the video part for which the GIF has to be created.
- Allows choosing the frame rate, and the size of the video.
This online GIF converter has an option to set static background.
Cons:
- File size limitation of 100 MB.
- Internet dependency.
User Review
“A website with many important and good tools that facilitates making your task easier. You get all features in one place. -Sasa011, Mywot.
This simple online tool is a pocket friendly option for converting your videos into GIF with added option for editing them. Supporting all key formats, the program supports additional tools as well.
3. Img2Go
Your videos on the system, cloud storage, as well as using URLs can be added to this online tool for conversion to GIF format. The look and the quality of GIFs can be adjusted by making changes in the file parameters.

Key features
- Convert all key video files like MP4, MOV, MPEG, and others to GIF.
- Customize the GIF look by editing the file size and applying the color filter.
- This online video to GIF converter allows to choose to enhance, sharpen, equalize, and edit files in other ways.
- Files to be converted can be added from the desktop, Google Drive, Dropbox, as well as URL.
- Processed files can be saved to the cloud storage in addition to the local system.
Pros:
- Multiple sources to add the video file.
- Customize the file parameters and enhance its look.
- Converted file is downloaded automatically to the local system.
Cons:
- Free version allows converting only 3 files at a time.
- Dependency on internet connectivity.
User review:
“This is the best online converter app I have discovered. It is really easy and fast to use. I absolutely recommend it and it really works.”-Maria Ancil, ChromeStats
When you need to convert only a few files at a time in a hassle-free manner consider this simple online tool. After the conversion is done, you would not have any hassles of file downloading as it is automatically saved to the system.
4. CloudConvert
Convert your videos in MP4, FLV, WebM, and other key formats to GIF using this browser-based tool that is simple and free to use. Multiple file parameters can be changed using the tool to get the desired file.

Key Features:
- Allows converting all key video formats.
- Files to be converted can be added from the desktop, URL, Dropbox, Google Drive, and OneDrive.
- Allows adjusting the fit, codec, resolution, aspect ratio, and fps.
- Option to trim the file and also add a watermark.
Pros:
- Files to be converted can be added from multiple sources.
- All key video formats supported.
- Option to control the video size, quality, and aspect ratio.
Cons:
- Free version allows only 25 conversions per day.
- Converted files need to be downloaded.
User Review
“Instant way of converting small-sized files online in many different formats.”
-Sushil, SoftwareAdvice
When conversion of cloud-based files is needed, this works a good online tool that also allows you to edit and change the key file parameters.
5. io
This is a free browser-based tool that allows creating of animated GIF files from videos. There are several video editing options also supported by the tool like split, cut, adding text, and more. You can even add a YouTube video or its link to create a GIF.

Key features:
- Free online tool for creating a GIF file.
- Support all key video formats like MP4, MOV, FLV, and others.
- Local, YouTube as well as videos from Dropbox can be added.
- Option to record the video and create its GIF.
- ‘Allows choosing the size, duration, background color, and several other file parameters.
Pros:
- Videos from multiple sources can be added.
- YouTube videos can also be converted to GIFs.
- Option to record the video and create its GIF.
- Support multiple video editing options.
Cons:
- Slow processing speed.
- Files processed through the free version have a watermark.
- Free version allows processing files under 10 minutes and of 250Mb in size.
User Review:
“It is just a perfect tool and easy to use. It supports a wide variety of media files.” - Koi, Trustpilot.
Option to convert the YouTube videos as well as the recorded videos make this tool different from the others. All popular file formats are supported and you can even customize and change the file parameters as per your requirements.
6. VistaCreate
This is another simple-to-use tool that allows converting all key video formats to a GIF file. The program allows setting various parameters as needed.
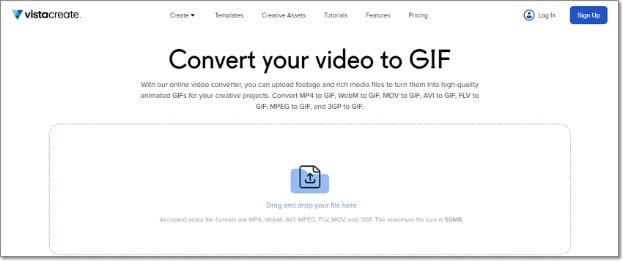
Key Features
- Convert MP4, WebM, AVI, MPEG, FLV, MOV, and 3GP to GIF.
- Support Drag and Drop feature.
- Videos up to 50MB can be processed.
- Allows choosing the video start and the end time for which GIF is to be created. If no time is selected, the first 5 seconds of the video are used.
Pros:
- Simple user interface.
- Allows selecting the video part for which GIF is to be created.
- Choose the frame rate and the speed.
Cons:
- Limited format support.
- Free version has a limitation of 50Mb file size.
- Processing speed is slow.
User Review:
“It is a simple and fast online tool that works. The program allows creating eye-catchy visuals and is free to use.”-Kshitij T, G2. Com
Simple to use, this online tool is apt when you need selected parts of the video for creating a GIF. Though it is compatible with a few selected formats, the process of conversion is simple.
7. XConvert
This online tool support conversion of wide range of file types and formats including videos to GIF. The supported video formats are MP4, WebM, MOV, and MKV. The tool also allows changing the target file parameters.

Key Features
- Free to use online tool with a simple interface.
- Allows converting MO4, MOV, WebM, and MKV videos to GIF.
- Frame Rate and resolution of the target GIF file can be selected.
- Allows adding local as well as files saved to the cloud storage.
Pros:
- Add videos from the desktop, Google Drive, and Dropbox.
- Choose the desired frame rate and resolution.
- Option to save the processed file to the system or Dropbox. Option to get the converted file download link.
Cons:
- Limited file support.
- Converted files need to be downloaded.
- Internet dependency.
User Review:
Portable, nice UI, cross-platform tool and has a lot of actions and run fast. -Roflpancake, Alternativeto
When simple conversion with basic file editing is needed, consider this online tool for your task. In addition to the local system, you can even save the files to your cloud storage.
Part 2: Comparison Table of the Best Video to GIF Converters
The table below compares the above 7 listed tools based on the formats supports, speed of file processing, and the watermark on the processed files.
| Features/Tool | Supported Format | Free Version with watermark or not | Speed of conversion |
|---|---|---|---|
| Adobe Express | All key video formats | No watermark | 2 (Fast) |
| Ezgif | All key formats including MP4, MPEG, FLV, MOV, and others. | No watermark. | 4 (Slow) |
| Img2Go | MP4, FLV, MOV, and all key video formats. | No Watermark | 2 (Fast) |
| CloudConvert | All popular video formats including MP4, MOV, FLV, MPEG, and more. | No Watermark | 2(Fast) |
| Veed.io | All key formats | Yes, free version has a watermark. | 5 (very Slow) |
| VistaCreate | MP4, WebM, AVI, MPEG, FLV, MOV, and 3GP. | No watermark | 5 (Very Slow) |
| XConvert | MP4, WebM, MOV, MKV. | No watermark | 3 (Average) |
Part 3: Best Solution to Convert Video to GIF on Windows/Mac
To convert videos to GIF on your Windows and Mac without worrying about any limitations or internet dependency, desktop software works as the best option. If you too have been looking for one such desktop program, we recommend Filmora Video Editor as the best choice. Though the software is used majorly for advanced video editing options, it is capable of performing a variety of other tasks as well including video to GIF conversion. The software allows file conversion through its export feature.
For Win 7 or later (64-bit)
For macOS 10.14 or later
Key Features
- Almost all video formats like MOV, MP4, MKV, FLV, and others can be converted to GIF.
- High-quality conversion at a fast speed.
- Support batch processing so that multiple files can be processed at a time.
- Allows editing and customizing videos using the built-in features of the software like effects, subtitles, crop, cut, and more.
Pros:
- The interface is simple which makes the software suitable even for beginners.
- Almost all popular video formats are supported.
- High-quality conversion in a hassle-free manner.
- Windows and Mac support.
Cons:
- Being a desktop software, it needs download and installation.
- Need to purchase the software subscription.
Steps to convert videos to GIF using Wondershare Filmora
Step 1. Launch the installed software on your system and the main interface select Create Project > New Project.

Step 2. Click on Import Media Files Here option under the Media tab to browse and add the local video file. Multiple files for batch processing can be added here.

Step 3. After the files are added, now it’s time to move them to the time and for this, you can simply drag and drop them to the bottom. Now at the timeline, using the built-in editing features, customization can be done as required.

Step 4. Finally, tap on the Export button and then choose GIF as the desired target format and also the location to save the converted files.

Conclusion
If one of the above-listed online tools serves your videos for GIF conversion purposes, it’s great. If not, you can use the Wondershare Filmora software. Once downloaded, the software can be used for several editing and other video-related tasks.
For macOS 10.14 or later
Key Features
- Almost all video formats like MOV, MP4, MKV, FLV, and others can be converted to GIF.
- High-quality conversion at a fast speed.
- Support batch processing so that multiple files can be processed at a time.
- Allows editing and customizing videos using the built-in features of the software like effects, subtitles, crop, cut, and more.
Pros:
- The interface is simple which makes the software suitable even for beginners.
- Almost all popular video formats are supported.
- High-quality conversion in a hassle-free manner.
- Windows and Mac support.
Cons:
- Being a desktop software, it needs download and installation.
- Need to purchase the software subscription.
Steps to convert videos to GIF using Wondershare Filmora
Step 1. Launch the installed software on your system and the main interface select Create Project > New Project.
Step 2. Click on Import Media Files Here option under the Media tab to browse and add the local video file. Multiple files for batch processing can be added here.
Step 3. After the files are added, now it’s time to move them to the time and for this, you can simply drag and drop them to the bottom. Now at the timeline, using the built-in editing features, customization can be done as required.
Step 4. Finally, tap on the Export button and then choose GIF as the desired target format and also the location to save the converted files.
Conclusion
If one of the above-listed online tools serves your videos for GIF conversion purposes, it’s great. If not, you can use the Wondershare Filmora software. Once downloaded, the software can be used for several editing and other video-related tasks.
Also read:
- In 2024, WMV File Format Has Many Benefits over the Video Industry. If You Are Excited to Know More About the Format and Its Pros and Cons, Then Lets Start the Discussion
- Quickest Guide | Zoom In and Out on Snapchat for 2024
- New 2024 Approved How to Create a Slideshow with Movavi Slideshow Maker
- Step by Step to Split Clips in VLC
- How To Add Motion Blur Effect To Photos in GIMP for 2024
- 2024 Approved How To Create A YouTube Intro
- New 2024 Approved Some Leading AI Tools to Replace Sky Backgrounds
- New In 2024, Color Match Game Top Tips for You
- New 2024 Approved How to Create LUTs with LUTs Generator
- New Phone Aspect Ratio Vertical Definition, Types and Tips
- New 2024 Approved How to Create a Vacation Slideshow in 5 Minutes
- Best GIF to AVI Converters (Online + Software Solutions)
- New How to Trim Video in QuickTime Player on Your Mac
- 2024 Approved Zoom In and Out on Snapchat
- Updated In 2024, Finding Best GIF Websites Is Easy as Pie
- New 2024 Approved How to Make a Movie with Windows Movie Maker?
- New In 2024, Make A Countdown Video
- What Is Motion Tracking and How to Use It for 2024
- Updated 2024 Approved How to Create Discord Logo GIF
- Updated In 2024, What If YouTube Zoom to Fill Not Working?
- New In 2024, Adding a Spooky Shadow Effect with Filmora
- New In 2024, How to Create Chroma Key Written Text Effects in Filmora
- How Does the YouTube AI Algorithm Work
- The Easiest Way to Make Time-Lapse Videos. Yes, You Can Make a Time-Lapse Video with Your Phone. It Powers a Very Simple and Easy Way to Make Time-Lapse Videos for 2024
- Fascinated About Exploring Your Graphic Creativity by Experimenting with Designing Slideshow Presentations on a Variety of Software Programs? Stay Here to Get the Know-How of Using Clideo
- In 2024, Learn How to Merge Audio and Video Like a Pro with This Step-by-Step Guide to Using FFmpeg. Create Seamless Videos and Improve Your Video Production Skills
- Updated Whatre the Best Alternatives to Pexels?
- New Do You Want a LUT that You Can Use for Your High-Definition Content? You Can Use Rec 709 LUT Premiere Pro for Your HD Digital Media to Give the Perfect Result
- In 2024, What Anime Character Are You Look Like?
- New In 2024, The Best Peter McKinnon LUTs for Perfect Video Editing
- In 2024, How to Make Dynamic Video Collages?
- Updated How to Get the Most Out of KineMaster Video Templates
- How To Synchronize Your Audio And Videos Properly for 2024
- Updated 2024 Approved Phone Aspect Ratio Vertical Definition, Types and Tips
- Why You Should Master Slideshows In Lightroom, In 2024
- Updated 2024 Approved Top 15 Best Free MP4 Video Rotators Windows, Mac, Android, iPhone & Online
- In 2024, Learn How to Use and Download KineMaster Templates Like a Pro. Discover Alternative Video Templates to Elevate Your Video Creation
- New In 2024, Detailed Guide to Crop Videos in Sony Vegas Pro
- 2024 Approved How to Split Videos - 33 Best Video Splitter Recommend
- 2024 Approved Are You Looking to Store Your Videos Securely and Efficiently? Look No Further than Our Top Pick for the Best Cloud Storage Service for Videos
- 2024 Approved Step by Step to Rotate Video in Google Photos
- Converting Files Is Easy with the Right Tools, and Likewise, GIF to JPG Conversion Is. Choose the Best Tool and Get the Expected Results Within the Blink of an Eye
- New In 2024, Dollar-Store DIY Hacks to Use for Filmmaking on a Budget
- Any Video May Be Enhanced Using Adobe Premiere Transitions. If You Are Looking to Learn How to Add Fade to Black in Premiere Pro? Then, Check Out This Fade to Black Transition Premiere Pro Guide to Learn the Trick
- Updated Make Your Presentation More Attractive with Best Google Slideshows Templates. How to Make a Google Slideshow in Simple Step? Do You Know How to Create Google Images Slideshow?
- Updated A Guide to Effective Video Marketing for 2024
- 2024 Approved Do You Want to Edit a TikTok After Posting? This Article Will Provide Multiple Methods Through Which You Can Do It in No Time
- Updated Deleting White Background in Photoshop Is Hard?
- How to Track a Lost Oppo Find X6 for Free? | Dr.fone
- How to Bypass Activation Lock on Apple iPhone 11 Pro or iPad?
- Complete Guide on Unlocking iPhone 11 with a Broken Screen?
- Bypassing Google Account With vnROM Bypass For OnePlus Nord N30 5G
- A Detailed VPNa Fake GPS Location Free Review On Samsung Galaxy S24 | Dr.fone
- Guide to Mirror Your ZTE Nubia Flip 5G to Other Android devices | Dr.fone
- Top 10 Nokia C12 Pro Android SIM Unlock APK
- Hacks to do pokemon go trainer battles For Lava Yuva 3 | Dr.fone
- In 2024, Full Guide to Catch 100 IV Pokémon Using a Map On Vivo V29e | Dr.fone
- In 2024, Here are Some of the Best Pokemon Discord Servers to Join On Honor 90 GT | Dr.fone
- New Top 4 Hatsune Miku Voice AI Generators for All Times
- Undelete lost messages from Motorola Edge 40 Pro
- In 2024, How To Use Allshare Cast To Turn On Screen Mirroring On Oppo K11 5G | Dr.fone
- Preparation to Beat Giovani in Pokemon Go For Vivo S17t | Dr.fone
- A Step-by-Step Guide on Using ADB and Fastboot to Remove FRP Lock on your Oppo A58 4G
- In 2024, Android to Apple How To Transfer Photos From Xiaomi Redmi Note 12 Pro 4G to iPad Easily | Dr.fone
- Remove the Lock Screen Fingerprint Of Your Samsung Galaxy A14 5G
- Why Is My Vivo X Flip Offline? Troubleshooting Guide | Dr.fone
- In 2024, How to Watch Hulu Outside US On Motorola Moto G Stylus (2023) | Dr.fone
- 11 Best Location Changers for Tecno Camon 20 Premier 5G | Dr.fone
- For People Wanting to Mock GPS on Oppo Reno 8T Devices | Dr.fone
- In 2024, Getting the Pokemon Go GPS Signal Not Found 11 Error in Tecno Camon 20 | Dr.fone
- In 2024, How and Where to Find a Shiny Stone Pokémon For Oppo Find X7 Ultra? | Dr.fone
- How To Unlock Cricket iPhone X for Free
- Top 15 Apps To Hack WiFi Password On Itel
- 2 Ways to Monitor Samsung Galaxy M54 5G Activity | Dr.fone
- How To Change Your Apple ID on iPhone 15 Pro With or Without Password
- In 2024, iPhone 14 Asking for Passcode after iOS 17/14 Update, What to Do? | Dr.fone
- In 2024, How To Factory Unlock Your Telstra Apple iPhone 7 Plus
- How to Fix Life360 Shows Wrong Location On Vivo Y78 5G? | Dr.fone
- In 2024, 5 Quick Methods to Bypass Tecno Spark 10C FRP
- Can I Bypass a Forgotten Phone Password Of Lava Storm 5G?
- In 2024, Android to Apple How To Transfer Photos From Vivo V29 to iPad Easily | Dr.fone
- Full Tutorial to Bypass Your Infinix Note 30 Pro Face Lock?
- 4 solution to get rid of pokemon fail to detect location On Nokia G42 5G | Dr.fone
- How to Come up With the Best Pokemon Team On Tecno Spark Go (2024)? | Dr.fone
- In 2024, Does Vivo Y77t Have Find My Friends? | Dr.fone
- In 2024, How to Transfer from Apple iPhone 6 Plus to Samsung Galaxy S20? | Dr.fone
- In 2024, How to Unlock Your iPhone 14 Pro Max Passcode 4 Easy Methods (With or Without iTunes) | Dr.fone
- How To Repair Apple iPhone 11 Pro System? | Dr.fone
- Title: This Article Aims to Show You How to Improve Your Lighting in the Sun for 2024
- Author: Chloe
- Created at : 2024-04-24 07:08:23
- Updated at : 2024-04-25 07:08:23
- Link: https://ai-editing-video.techidaily.com/this-article-aims-to-show-you-how-to-improve-your-lighting-in-the-sun-for-2024/
- License: This work is licensed under CC BY-NC-SA 4.0.
