

This Article Talks in Detail About How to Edit Videos with Windows Movie Maker 10, How to Download or Install It, and so On. It Further Involves the Use of an Alternative to This Tool. Check Out Now
This Article Talks in Detail About How to Edit Videos with Windows Movie Maker 10, How to Download or Install It, and so On. It Further Involves the Use of an Alternative to This Tool. Check Out Now
Looking to create captivating movies from video clips? The best tool for the purpose can be the Windows movie maker 10. The program provides video editors with various tools to create professional-looking videos, including audio options, animations, transition overlays, and timeline narrations. Its functions are simple to use and enjoyable to explore, and its XML code enables users to create new effects and transitions or change current ones. Windows Movie Maker also allows for basic track editings, such as adding fade-in and fade-out features for audio tracks.
It’s also simple to upload finished Windows Movie Maker productions to social media platforms. One of the best benefits of using the Window Movie Maker is its user-friendliness, simple controls, and automatic preview. This program is perfect for beginners, and it comes free on the Windows PC with workflow and essential features in the video editing systems that are made for professionals. Let’s check out how you can download and use Windows Movie Maker and the alternative of this program.
Part 1. How to Download Windows Movie Maker on Win 10?
Who loved the older version of Windows Movie Maker, which was easy to use and a free editing tool? You might have searched “Where is movie maker in windows 10“ in google. If you are missing your favorite video editor, this article will help you download and install the Windows Movie Maker for your PC, which runs on Windows 10. You can download it from their official application; the best part is that it is free of cost. Now here are some steps by which you can download and install the Windows Movie Maker on your Windows 10:-
- Download the installer file of Movie Maker:- Authentic Movie Maker can be easily downloaded through Windows Essentials.
- Extract Zip file:- After completing your download process, you can extract the zip file and run the .exe file. Your Windows essentials will get started.
- Choose programs you wish to install:- You can install all Windows essentials, tap on select the programs you wish to install. Here you can have an option for selecting Movie Maker.

- Choose movie Maker and photo gallery:- On the screen, you must choose “Movie Maker and Photo Gallery” because you will install it on your PC. A simple tap on “Install,” and you will be ready, and the installation procedure will start.

- Launch Movie Maker:- Visit the Start menu and type Movie Maker to launch the app. Open the app and use it. It is a free and easy video editor.

Part 2. How to Edit Videos with Windows Movie Maker?
Before starting your editing on Win10 movie maker, you must ensure that the movie maker supports the format. It’s because it accepts a few formats that includes:- MP3, .WAV, .WMA, .AVI(DV-AVI), .MPG(MPEG-1), .ASF/.WMV. If the videos are not supported in the Moviemaker for Windows 10, you might need to use a converter to convert the video and import the files into it.
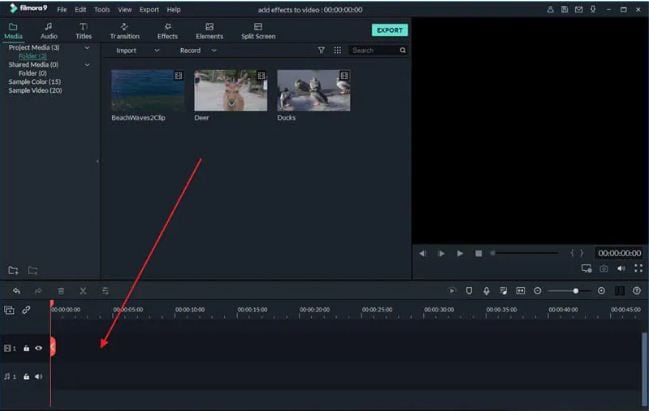
Step1 Import clips to movie maker
- To import the photo or video in Windows Movie Maker, click “Add Photos or Videos.” A window will get opened, and users might select a video from their computer.
- After you select the files, you can click on “OK” to import the files to the storyboard.
Step2 Combine/Split/Cut/Trim the videos
You can preview the clips in the preview box. Users can use the Next or Previous Frame to preview the clips. While editing the video, you might have to trim the unwanted part and combine multiple clips into a new one.

To remove the video parts, you can select the “Start frame” of the video you wish to eliminate, tap on a split button for splitting the segment, select the end frame you wish to remove, and tap on the “Split” option again. You can do it numerous times to edit the video.
Step3 Apply visual effects and transitions to the clips
Once you have the clips for your video, you can add transitions to your video. You can click on Animations to view various options. You will have to choose the clip and add some transitions which you wish.

The software will do the work. You can preview the result by tapping on “Play.” After applying the visual effects, you will have to click on the Visual effects to add filter and overlays, and users can apply the effects to the clip.
Step4 Edit audio in the video
Are you planning to add some music to the video? You will have to double-click on your clip to enter into “Edit Panel” and click on the Volume button. You can mute or adjust the volume with the help of a volume slider, which will affect every sound of the clip.
After you adjust the sound of your clips, you can add your music to video clips. Add the music by tapping “Add Music” and choosing music for importing. One can even add the music from the PC.
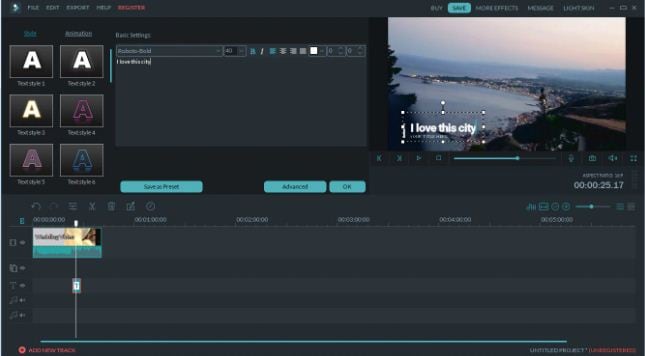
Step5 Add text and title to the video
Windows Movie Maker allows users to add several types of texts to their videos. You can see three buttons that allow several types of texts to their video:- rolling credits, captions, and stationary title. Tap on the title; you will get options to add text before your video begins.
Choose a caption that you will add to your video frames and tap on the Credits to add effects to the video. After selecting the text type, one can enter the test and edit text effects. You can change the text visuals, duration, outline size, etc.
Step6 Save and Publish
After you have completed your edits, you can save your video by tapping on “File” and then clicking on Publish Movie. One can even choose the place where you wish to save your file.
You can even save the videos on your PC with various formats and resolutions. This editor allows users to save their videos for mobile devices or Email.
Part 3. Movie Maker Alternatives for Win 10 PC
If you want to create a polished clip for public consumption or if you want to experiment with your creativity while learning a new art form, Wondershare Filmora has swiftly established itself as one of the finest Windows 10 movie maker alternatives. Both seasoned and first-time users may successfully produce amazing videos with special effects thanks to Filmora’s user-friendly and straightforward interface. Wondershare Filmora supports a vast range of video formats, including AVCHD, MOV, AVI, MP4, and more. This allows you to combine, split, trim, crop and cut the clips in a few clicks. Now let’s see how you can edit your videos in Wondershare Filmora:-
Free Download For Win 7 or later(64-bit)
Free Download For macOS 10.14 or later
Step1 Create a new project and import the video
Tap “New Project” on the welcome screen and get into a video editor. Click on the “Register” option to register the product. Go to the “File” menu and tap on “Project Setting,” choose the ratio, and cut the video.

You can select from options like 4:3 or 16:9 ratios and customize the ratio according to your needs.
Step2 Place the audio and video files on the timeline and cut the unwanted parts
The raw clips mostly contain unwanted parts and mistakes which don’t belong in the video. If you want to trim or cut the videos, you can drag the video from your Media Tab and drop it on your timeline.

Users can add numerous video clips, but every file you will add will get placed after the previous clip. If you want to rearrange it, you can drag the clips to desired positions.
Step3 Apply the visual effects to your clips
Now that you have removed the unwanted parts from the video clips, you will have to detach the video and audio files, insert transitions, and add music to the clips or use a few visual effects of the Filmora software.

Click on the Credit or Text icon to add subtitles, end credits, or opening titles to the video. This software offers various text templates that you can utilize for your video.
Step4 Use color correction
You can utilize the hundreds of filters and overlays available under the Effects icon in your projects to give the colors in the clip a more vibrant appearance. Please drag & drop the filter you wish to use onto the timeline by clicking the icon and choosing it.
Simply sliding any end of a filter will change how long it lasts. After you are done with everything, save and publish it.
Conclusion
Now, you know the steps to download Windows Movie Maker on your PC. You can use it easily because of its friendly user interface. Editing and publishing videos with Windows Movie Maker becomes easy, and it is a perfect fit for beginners. But if you want something that supports everything, you can choose Wondershare Filmora because it is the best alternative to Windows movie maker. Wondershare Filmora offers limitless editing features and supports every video format. One can easily do professional-level editing in this user-friendly video editing software.
Free Download For macOS 10.14 or later
Step1 Create a new project and import the video
Tap “New Project” on the welcome screen and get into a video editor. Click on the “Register” option to register the product. Go to the “File” menu and tap on “Project Setting,” choose the ratio, and cut the video.
You can select from options like 4:3 or 16:9 ratios and customize the ratio according to your needs.
Step2 Place the audio and video files on the timeline and cut the unwanted parts
The raw clips mostly contain unwanted parts and mistakes which don’t belong in the video. If you want to trim or cut the videos, you can drag the video from your Media Tab and drop it on your timeline.
Users can add numerous video clips, but every file you will add will get placed after the previous clip. If you want to rearrange it, you can drag the clips to desired positions.
Step3 Apply the visual effects to your clips
Now that you have removed the unwanted parts from the video clips, you will have to detach the video and audio files, insert transitions, and add music to the clips or use a few visual effects of the Filmora software.
Click on the Credit or Text icon to add subtitles, end credits, or opening titles to the video. This software offers various text templates that you can utilize for your video.
Step4 Use color correction
You can utilize the hundreds of filters and overlays available under the Effects icon in your projects to give the colors in the clip a more vibrant appearance. Please drag & drop the filter you wish to use onto the timeline by clicking the icon and choosing it.
Simply sliding any end of a filter will change how long it lasts. After you are done with everything, save and publish it.
Conclusion
Now, you know the steps to download Windows Movie Maker on your PC. You can use it easily because of its friendly user interface. Editing and publishing videos with Windows Movie Maker becomes easy, and it is a perfect fit for beginners. But if you want something that supports everything, you can choose Wondershare Filmora because it is the best alternative to Windows movie maker. Wondershare Filmora offers limitless editing features and supports every video format. One can easily do professional-level editing in this user-friendly video editing software.
Finding Best GIF Websites Is Easy as Pie
Finding Best GIF Websites Is Easy as Pie — Here’s What You Should Know
An easy yet powerful editor
Numerous effects to choose from
Detailed tutorials provided by the official channel
Want a heap of the most exiting GIFs? Here are the best websites to visit.
In this article
01 [10 Sites for Finding the Perfect GIF](#Part 1)
02 [How to Use Animated GIF Makers](#Part 2)
03 [5 Stunning Examples of Gifs in Web Design](#Part 3)
Part 1 Sites for Finding the Perfect GIF
Information was never so expressive until GIFs came up as delivery platform. Looking through the frame of content diversity and effective delivery, there’s possibly nothing that is left untouched by these short, precise and creative snippets. When the talk is about long term user credibility, creativity is one thing, while reach is the other.
No doubt about the creative aspect, but the convenient availability holds equal importance. However captivating a utility nay be, you would certainly not be interested to spend quality time searching the apt content. Let’s take a look at some of the most popular and convenient GIF website that will surely put a full stop on your search spree for a relatable GIF.
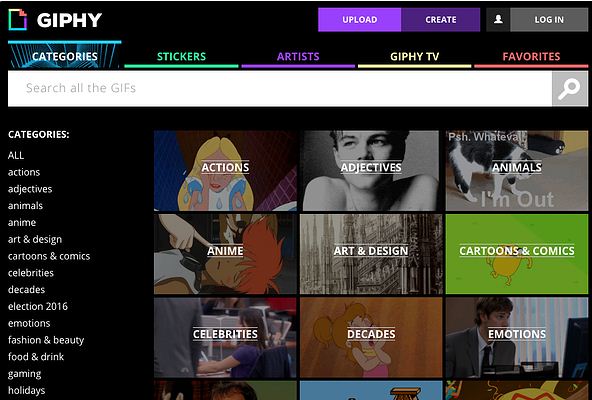
01GIPHY
Initially launched as a GIF search engine, thin is a complete storehouse on almost everything that you can possibly think of. The extensive content library of this site is all set to meet your most specific content requirements in less than a blink’s time. You get an access to quality content in music, science, nature and what not on this free GIF website.
Talking of search flexibility, GIPHY is known to have the most advanced and updated search bar that ensures that top quality and fresh content is always at the hand of its users. You can browse through the vast GIF categories of the site or look for your exact content using a specific search keyword.
02Reddit
You can regard this site as a GIF membership community, where you can find a variety of impressive sub-reddits in the GIF category. The best part is, you will never find recursive content on any two or more sub-reddits as each one is developed and updated keeping different content specifications in mind.

You are given access to even finer content libraries in some particular sub-reddits that follow a sequential guideline to filter their entries according to user preferences. Some popular sub-reddits are listed below:
03Tumblr
Originally a blogging site, Tumblr is simply heaven for creating and sharing GIFs across media platforms. What’s interesting about the site is its content categorization, where bloggers on the site group relatable content under specific categories, which facilitates an easy, quick and hassle free search. Most of the GIF content on the site is either created in Photoshop or taken from across the web.
While the site has exciting GIF content for almost every scenario, the comedy genre is the st5arb attraction of this GIF platform. The huge comic content library of the site has hilarious memes and GIFs that will certainly leave you rolling over the floor. To enjoy your favorite content daily, you just need to search a relatable hashtag and follow some blogs on your searched content.

04Gfycat
This one lands among the most preferred GIF sites and is packed with an enormous inventory of memes and GIFs. Not just this, this one is a free GIF maker website that allows you to convert videos from almost every media platform into GIFs, independent of the video file format via its ‘Video to GIF Converter’ tool.
You can set a daily dose of your favorite, exciting GIF content by using either the search bar or the ‘Selection Menu’ in the left of the site’s Home page. You can even browse through latest GIF categories by navigating to the ‘Trending’ and ‘Explore’ sections.

05Tenor
You can prefer this site to enjoy your favorite GIFs on your PC or iOS device. The site gives you the liberty to share GIFs and memes directly from its library into any of your Instant Messaging chats or community conversations on social media platforms.
All you need to do is navigate to the Tenor search bar, put in a suitable keyword and there you can see loads of GIF content on your screen in less than a second’s time. With periodic updates and a cohesive interface, this site is your storehouse of latest and trendy GIFs, anytime and anywhere.
06Reaction GIFs
This site is known for having an exact content database for almost every thought that crosses your mind. It serves you with a refined search mechanism, having a different pathway for every search, depending on the content you are looking for. This is a perfect aid to get exactly what you want, without having to fuss out with unwanted stuff.
Talking of search methods, you will find a drop-down menu at the right to search GIFs that express ‘Emotions’ or one word answers (preferably a ‘Yes’ or a ‘No’). If you want something related to a more specific category, you can browse through the ‘Galleries’ and ‘Tags’ of the site (categories, like, OMG, LOL, etc).

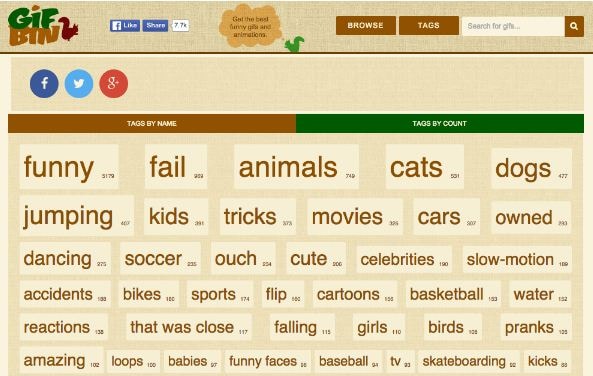
07GIFbin
This is again a trunk of latest, funny and entertaining GIFs tom watch and share. On this site, you get to add search filters, like, ‘Most Viewed’, ‘Latest’, ‘Top Rated’, etc., that refine your search to fetch exactly what you are looking for. You are also free to use ‘Search Tags’ grouped according to name and search count on the site.
The tag names are standard keywords (like, animals, sports, nature, etc.) and the count feature keeps a track of the most frequent searches, thus allowing you to find out your favorite GIFs in a more explicit manner. If you are clueless about anything specific, don’t worry. Hit the ‘Random GIFs’ button to explore a whole new world of fun and excitement.
08Imgur
This site is popular in the meme world as a GIF sub-reddit that has explicitly no text threads. You can take this one as a free, GIF hosting and sharing website. While you can find loads of quality content on the site convenient to almost any genre, it is a leader in comic and funny GIFs. You can use different search tags for hilarious movie snippets, or some other fun element of your liking. This site’s image library is a hub of latest and nostalgic content.

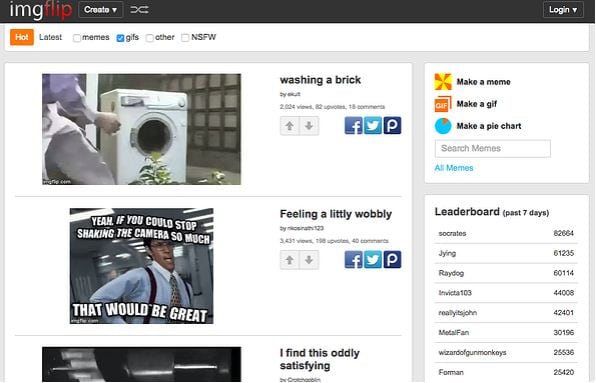
09Imgflip
This is one more hotspot for relatable GIFs and memes. The best thing about the site is that it has separate search pathways to refine your search in cohesion with your content preference. Some common pathways are explained below:
● Browse the site’s homepage for the latest and trending GIF content.
● Simplify your search on specific content pages using the ‘Random’, ‘Next’ or ‘Previous’ navigation options.
● Prefer using ‘Image Hotkeys’ on the content pages.
● Try on ‘Tagging’ specific content pages (sunrise, snowfall, cats, etc.).
If you like competing with fellow visitors on the site, you can experiment with creating GIFs of your own and get ranked on the creator scoreboard. Bag a high vote count to get your GIF trending on the site.
10Gyazo
Last on the list, this is a somewhat different site in terms of features and search constraints. The exclusively unique ’Screen Capture’ feature of this site allows you to take a video of your device screen and use it to create a GIF of your own, making itself a quick and effective ‘Video to GIF Converter’ tool.
You will require creating an account on the site to maintain a library of your searched contents, which you can either tag on the site or downloaded to your device. You can further, export and share your creations across media platforms through this site.

Part 2 How to Use Animated GIF Makers
Landing into the creative and exciting world of GIFs, you can easily get motivated to try hands on making your own GIFs. The online market is a pool of solutions that claim of adhering to this concern in the most effective ways. When looking for the best GIF maker tools and software, you can definitely count upon the following choices:
01** Wondershare Filmora Video Editor
This one is undoubtedly the best GIF creator software in current times. Using the plethora of audio-visual features, effects and image filters that are offered by this tool, creating animated GIFs is a spic and span process. The software grants you the liberty to play with and explore your editing skills to generate professional quality GIFs within minutes.

Wondershare Filmora - Best Video Editor for Mac/Windows
5,481,435 people have downloaded it.
Build unique custom animations without breaking a sweat.
Focus on creating epic stories and leave the details to Filmora’s auto features.
Start a creative adventure with drag & drop effects and endless possibilities.
Filmora simplifies advanced features to save you time and effort.
Filmora cuts out repetition so you can move on to your next creative breakthrough.
Here’s how you can use this software to become a pro at creating GIFs:
● Step 1: Import Required Media Files
To begin with, select any desired set of images or a particular video file to the Filmora timeline. You don’t need to be format specific; the software is compatible with over 150 different file formats.
● Step 2: Drag Files to Edit
Once you are done with selecting the files, you need to drag the same to the Filmora Editor Timeline, where you can transform the file contents with your editing skills.
● Step 3: Let’s Get Editing.
In the editor window, you are free tom choose from a range of effects, tools and filters suitable to your GIF content to give your artwork a new and engaging look. You can experiment with the cutting, cropping and trimming tools or play with effects, like, overlays, rotation and speed adjustments and even add texts to deliver messages that intensify your GIF.
● Step 4: Time to Save and Share.
Now is the time to save your work locally to your device using the .gif extension with your created file, as well as share it among your peers on social communities.

03Deal With It
This one is an online GIF maker tool that allows you to make top quality animated GIFs within a few seconds and you don’t even need to take up any third party software installation. Creating GIFs with this user friendly, clean interface and quick GIF generator utility is an absolute fun, to say the least.
Once you are done creating, the tools gives you the liberty to experiment with effects like, texts and glasses that would further intensify your GIF to the next level, and the best part is, all of this is available to you without having to spend a penny out of your pocket.
Explained below is the step wise user guide to use this tool for creating GIFs:
● Step 1:
Navigate to official website of the GIF creator tool.
● Step 2:
Choose a desired locally saved image from your device and upload it in the tool’s editor window. To do this, click on the ‘Load Image’ button.
● Step 3:
You can now modify the uploaded image with text and glasses. This is it. Your GIF is ready to save and export.

03LunaPic
This one lands among the most preferred GIF maker tools available across the web. It comes with a clean interface, is free to use and does not require any third party software installation. You can create catchy and interesting GIF banners, or make captivating, animated GIF files with a series of still images using this tool. However, this GIF maker does not give you the liberty to take up editing and speed or accuracy modifications on your creation.
You need to follow the steps explained below to create your own GIF with LunaPic:
● Step 1:
Open the official site of LunaPic in your web browser.
● Step 2:
Upload a desired one or a set of images you wish to use for making your GIF on the site. To do this, select a group of images from your device and tap ‘Upload’
.

● Step 3:
Once uploaded, you can use your creativity to play with the effects library of the site and edit your images in its editing interface.
● Step 4:
When satisfied, choose the file type as GIF and hit the ‘Save’ option at the bottom. This will save your creation locally in your device, once the file conversion gets completed.
Image Name: Finding-best-gif-websites-is-easy-as-pie—here’s-what-you-should-know-22 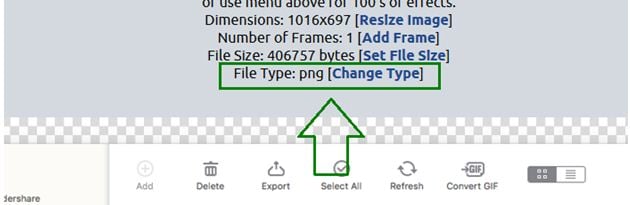
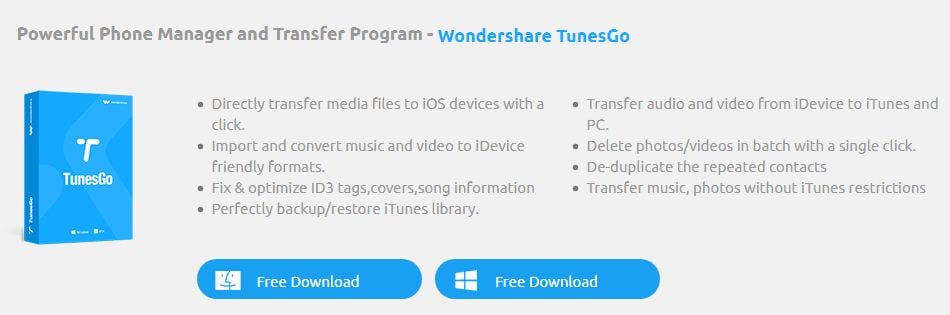
04Wondershare TunesGo
This one is another efficient animated GIF creator utility on the internet. Available to you as free online software, this tool promises you an amazing and hassle free GIF making experience. You can either create stunning GIFs of your own, or convert video files and even live photos into the same using this software. It allows you to set time slots for file conversions and make speed and flow adjustments for GIF frames, along with offering a plethora of editing effects to play with.
Here’s the know-how of using this software to create top quality animated GIFs:
● Step 1: Download and Launch the Software
Pay a visit to the official TunesGo website to download the software. Begin with installing and launching the same on your preferred device. When you finish, click on the ‘Toolbox’ tab at the top in the welcome screen.
● Step 2: Upload Media Files
In the software’s opening interface, choose the GIF Maker tool. In the following window that pops-up, click on ‘Add’ to upload the desired media files saved in your device, you want to create a GIF with.
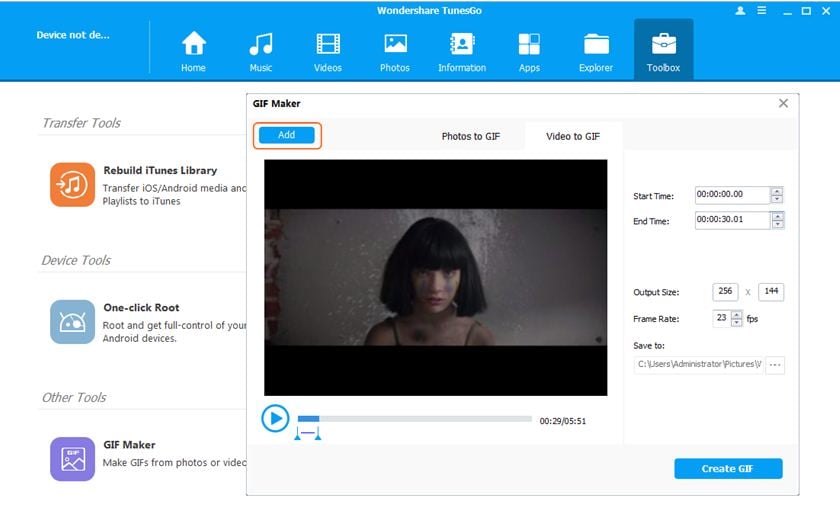
● Step 3: Convert to GIF
Set the media file to GIF conversion time and tap the ‘Create GIF’ button in the bottom-right to initiate the conversion process.

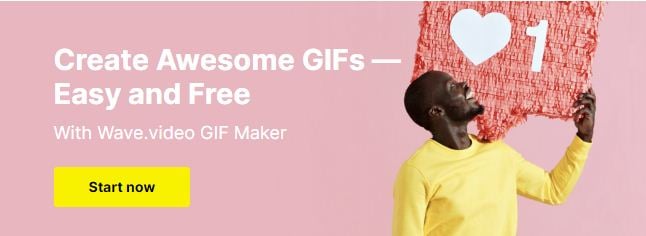
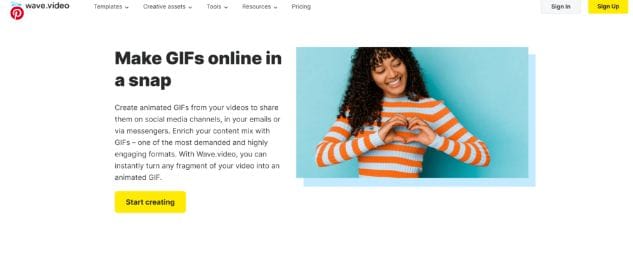
05Wave.video
This one is among the latest GIF maker tools that allow you to create animated GIFs from videos. What’s quite interesting about this Gif creation platform is, you can trim videos to the exact part depending on your content preference before beginning with the conversion process. You can also save your creation as a group of trimmed clips. It is a user friendly, free access online tool that does not ask you to install any third party software, and GIF creation with its mess-free interface is absolute fun.
Take the steps listed below to make GIFs with this online tool:
● Step 1: Choose a Project
To start working with this tool, you need to create an account on its official site. Having done that, just log into your account and upload a desired video you would like to use for creating a GIF. You have a choice to select a locally saved video, choose one from the templates available on the site or create something of your own.
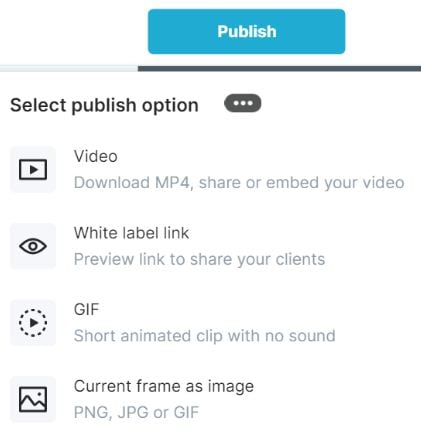
● Step 2: Customization and Publishing
It is now time to try hands on editing your video with stunning effects like, overlays glasses, etc., or add impactful elements, such as, texts, stickers, etc., to make your artwork more impressive. When you are happy, navigate to the top-right and tap ‘Publish’. From the menu that drops down, select ‘GIF’.
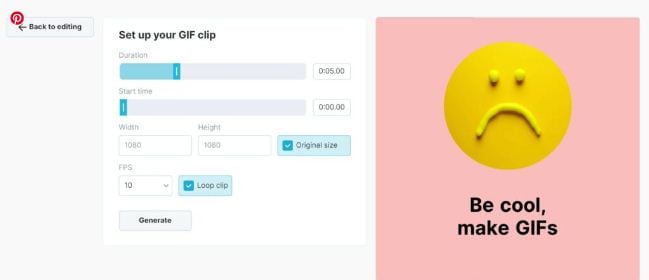
● Step 3: Download Your Creation
Select the section of your video you wish to convert into a GIF and proceed to fix the GIF start time and play duration. Check for any frame resize requirements, set an adequate frame rate and lastly, click on the ‘Loop Clip’ checkbox. This will produce an infinite loop GIF. When everything seems perfect, tap on ‘Generate’ followed by ‘Download’ to save your creation and share it on social media.
Part 3 5 Stunning Examples of Gifs in Web Design
The credibility of GIFs in market oriented content sharing and information publishing evidently does not require an introduction. These attractive snippets are expert means of business growth and customer appealing strategy planning to address attract a massive target audience within seconds.
Now that you are quite accustomed with the market reliability of GIFs, you may visibly feel motivated to use them to improvise your product websites for a next level market approach. However, before you plunge into using GIFs for your brand promotion, consider sparing a few minutes to browse through some top class product based GIFs to enhance your GIF creation and implementation aptitude.
Described below are some eye-catching examples of GIF for website background, you should certainly look forward to using in your business campaigns:
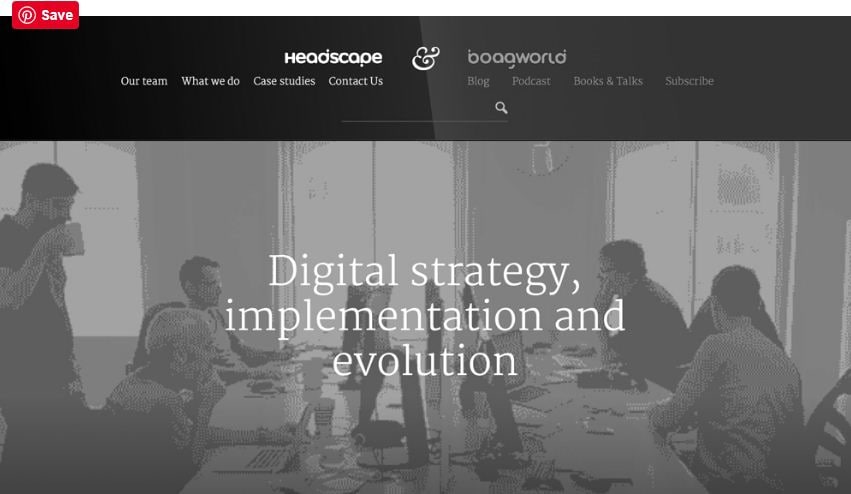
01Headscape
Having its roots in the United Kingdom, this is a top rated, digital media design corporation that excels in providing web design solutions to a diverse global clientele. Their unique idea of using GIFs in grayscale to depict conducive business settings is just perfect.
The monochromatic color balance with parallax scrolls makes this GIF all the more impactful. You can find impressive ways of using GIFs with a professional instinct on the company website and begin to add appeal to your market buildup strategies.
02Invision
This is another high ranked application marketing site that uses GIF for website background to improvise its product promotion. Equipped with a preset world class page makeover, the site’s look and appeal simply gets a boost with floating-text animated GIFs on an otherwise normal webpage.
As you move further on the Invision homepage, you will get to see a demonstration of the site’s prototype tool through GIFs that explain its working functionalities in the most interesting and convenient manner, thus putting forward and outrageously professional and effective marketing strategy.
03Macaw
This one is an excellent design utility that is equally suited to both web designers as well as site developers. On visiting the tool’s homepage, you are welcomed with a streamlined text setting on a black and white theme. Move a bit downwards, and there you see a cluster of animated GIFs in action to get you familiar with the interface and usage pattern of the Macaw design utility with utmost ease. It is convenient enough to make you feel as if you are actually using the tool.

04Giant Ant
Established as a creative firm, this one is known for its appealing website design. As you navigate through the site, you will find a still image complemented by cohesive text overlays. Beneath that, there are caricature forms of everyday objects, but the real magic happens when you click on a particular object and woosh. It instantly turns into an animated GIF. This explicit style of infusing dynamism to your website is simply awesome, to say the least.
05Tinke
This is intuitively a fitness tracker that keeps a record of your system vitals in the most effective manner. But that’s not all. The tracker website is equally amazing, setting the perfect example of using GIFs to improve market buildup. The site majorly utilizes the parallax scroll effect with animated GIFs to facilitate a live demonstration of the tracker functionality, coupled with an iPhone user guide and ways of sharing relatable content with fellow users.
● Key Takeaways from This Episode →
● Surfing the internet, you will land across some of the best GIF creator and downloader sites that are flooded with brilliant GIF content suited for almost every purpose.
● You can create your own animated GIFs on any GIF maker website or enjoy pre-made stuff to your heart’s content, where using Filmora is certainly the best choice. To explore something more exciting, try hands on using GIFs for product marketing and brand promotions on your business sites.
Want a heap of the most exiting GIFs? Here are the best websites to visit.
In this article
01 [10 Sites for Finding the Perfect GIF](#Part 1)
02 [How to Use Animated GIF Makers](#Part 2)
03 [5 Stunning Examples of Gifs in Web Design](#Part 3)
Part 1 Sites for Finding the Perfect GIF
Information was never so expressive until GIFs came up as delivery platform. Looking through the frame of content diversity and effective delivery, there’s possibly nothing that is left untouched by these short, precise and creative snippets. When the talk is about long term user credibility, creativity is one thing, while reach is the other.
No doubt about the creative aspect, but the convenient availability holds equal importance. However captivating a utility nay be, you would certainly not be interested to spend quality time searching the apt content. Let’s take a look at some of the most popular and convenient GIF website that will surely put a full stop on your search spree for a relatable GIF.
01GIPHY
Initially launched as a GIF search engine, thin is a complete storehouse on almost everything that you can possibly think of. The extensive content library of this site is all set to meet your most specific content requirements in less than a blink’s time. You get an access to quality content in music, science, nature and what not on this free GIF website.
Talking of search flexibility, GIPHY is known to have the most advanced and updated search bar that ensures that top quality and fresh content is always at the hand of its users. You can browse through the vast GIF categories of the site or look for your exact content using a specific search keyword.
02Reddit
You can regard this site as a GIF membership community, where you can find a variety of impressive sub-reddits in the GIF category. The best part is, you will never find recursive content on any two or more sub-reddits as each one is developed and updated keeping different content specifications in mind.
You are given access to even finer content libraries in some particular sub-reddits that follow a sequential guideline to filter their entries according to user preferences. Some popular sub-reddits are listed below:
03Tumblr
Originally a blogging site, Tumblr is simply heaven for creating and sharing GIFs across media platforms. What’s interesting about the site is its content categorization, where bloggers on the site group relatable content under specific categories, which facilitates an easy, quick and hassle free search. Most of the GIF content on the site is either created in Photoshop or taken from across the web.
While the site has exciting GIF content for almost every scenario, the comedy genre is the st5arb attraction of this GIF platform. The huge comic content library of the site has hilarious memes and GIFs that will certainly leave you rolling over the floor. To enjoy your favorite content daily, you just need to search a relatable hashtag and follow some blogs on your searched content.
04Gfycat
This one lands among the most preferred GIF sites and is packed with an enormous inventory of memes and GIFs. Not just this, this one is a free GIF maker website that allows you to convert videos from almost every media platform into GIFs, independent of the video file format via its ‘Video to GIF Converter’ tool.
You can set a daily dose of your favorite, exciting GIF content by using either the search bar or the ‘Selection Menu’ in the left of the site’s Home page. You can even browse through latest GIF categories by navigating to the ‘Trending’ and ‘Explore’ sections.
05Tenor
You can prefer this site to enjoy your favorite GIFs on your PC or iOS device. The site gives you the liberty to share GIFs and memes directly from its library into any of your Instant Messaging chats or community conversations on social media platforms.
All you need to do is navigate to the Tenor search bar, put in a suitable keyword and there you can see loads of GIF content on your screen in less than a second’s time. With periodic updates and a cohesive interface, this site is your storehouse of latest and trendy GIFs, anytime and anywhere.
06Reaction GIFs
This site is known for having an exact content database for almost every thought that crosses your mind. It serves you with a refined search mechanism, having a different pathway for every search, depending on the content you are looking for. This is a perfect aid to get exactly what you want, without having to fuss out with unwanted stuff.
Talking of search methods, you will find a drop-down menu at the right to search GIFs that express ‘Emotions’ or one word answers (preferably a ‘Yes’ or a ‘No’). If you want something related to a more specific category, you can browse through the ‘Galleries’ and ‘Tags’ of the site (categories, like, OMG, LOL, etc).
07GIFbin
This is again a trunk of latest, funny and entertaining GIFs tom watch and share. On this site, you get to add search filters, like, ‘Most Viewed’, ‘Latest’, ‘Top Rated’, etc., that refine your search to fetch exactly what you are looking for. You are also free to use ‘Search Tags’ grouped according to name and search count on the site.
The tag names are standard keywords (like, animals, sports, nature, etc.) and the count feature keeps a track of the most frequent searches, thus allowing you to find out your favorite GIFs in a more explicit manner. If you are clueless about anything specific, don’t worry. Hit the ‘Random GIFs’ button to explore a whole new world of fun and excitement.
08Imgur
This site is popular in the meme world as a GIF sub-reddit that has explicitly no text threads. You can take this one as a free, GIF hosting and sharing website. While you can find loads of quality content on the site convenient to almost any genre, it is a leader in comic and funny GIFs. You can use different search tags for hilarious movie snippets, or some other fun element of your liking. This site’s image library is a hub of latest and nostalgic content.
09Imgflip
This is one more hotspot for relatable GIFs and memes. The best thing about the site is that it has separate search pathways to refine your search in cohesion with your content preference. Some common pathways are explained below:
● Browse the site’s homepage for the latest and trending GIF content.
● Simplify your search on specific content pages using the ‘Random’, ‘Next’ or ‘Previous’ navigation options.
● Prefer using ‘Image Hotkeys’ on the content pages.
● Try on ‘Tagging’ specific content pages (sunrise, snowfall, cats, etc.).
If you like competing with fellow visitors on the site, you can experiment with creating GIFs of your own and get ranked on the creator scoreboard. Bag a high vote count to get your GIF trending on the site.
10Gyazo
Last on the list, this is a somewhat different site in terms of features and search constraints. The exclusively unique ’Screen Capture’ feature of this site allows you to take a video of your device screen and use it to create a GIF of your own, making itself a quick and effective ‘Video to GIF Converter’ tool.
You will require creating an account on the site to maintain a library of your searched contents, which you can either tag on the site or downloaded to your device. You can further, export and share your creations across media platforms through this site.
Part 2 How to Use Animated GIF Makers
Landing into the creative and exciting world of GIFs, you can easily get motivated to try hands on making your own GIFs. The online market is a pool of solutions that claim of adhering to this concern in the most effective ways. When looking for the best GIF maker tools and software, you can definitely count upon the following choices:
01** Wondershare Filmora Video Editor
This one is undoubtedly the best GIF creator software in current times. Using the plethora of audio-visual features, effects and image filters that are offered by this tool, creating animated GIFs is a spic and span process. The software grants you the liberty to play with and explore your editing skills to generate professional quality GIFs within minutes.
Wondershare Filmora - Best Video Editor for Mac/Windows
5,481,435 people have downloaded it.
Build unique custom animations without breaking a sweat.
Focus on creating epic stories and leave the details to Filmora’s auto features.
Start a creative adventure with drag & drop effects and endless possibilities.
Filmora simplifies advanced features to save you time and effort.
Filmora cuts out repetition so you can move on to your next creative breakthrough.
Here’s how you can use this software to become a pro at creating GIFs:
● Step 1: Import Required Media Files
To begin with, select any desired set of images or a particular video file to the Filmora timeline. You don’t need to be format specific; the software is compatible with over 150 different file formats.
● Step 2: Drag Files to Edit
Once you are done with selecting the files, you need to drag the same to the Filmora Editor Timeline, where you can transform the file contents with your editing skills.
● Step 3: Let’s Get Editing.
In the editor window, you are free tom choose from a range of effects, tools and filters suitable to your GIF content to give your artwork a new and engaging look. You can experiment with the cutting, cropping and trimming tools or play with effects, like, overlays, rotation and speed adjustments and even add texts to deliver messages that intensify your GIF.
● Step 4: Time to Save and Share.
Now is the time to save your work locally to your device using the .gif extension with your created file, as well as share it among your peers on social communities.
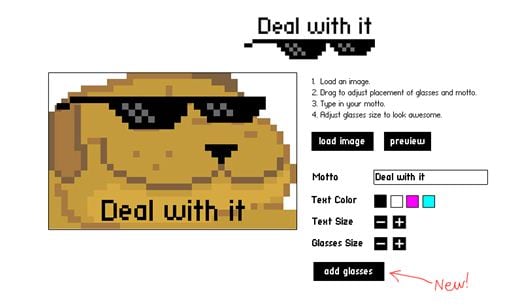
03Deal With It
This one is an online GIF maker tool that allows you to make top quality animated GIFs within a few seconds and you don’t even need to take up any third party software installation. Creating GIFs with this user friendly, clean interface and quick GIF generator utility is an absolute fun, to say the least.
Once you are done creating, the tools gives you the liberty to experiment with effects like, texts and glasses that would further intensify your GIF to the next level, and the best part is, all of this is available to you without having to spend a penny out of your pocket.
Explained below is the step wise user guide to use this tool for creating GIFs:
● Step 1:
Navigate to official website of the GIF creator tool.
● Step 2:
Choose a desired locally saved image from your device and upload it in the tool’s editor window. To do this, click on the ‘Load Image’ button.
● Step 3:
You can now modify the uploaded image with text and glasses. This is it. Your GIF is ready to save and export.
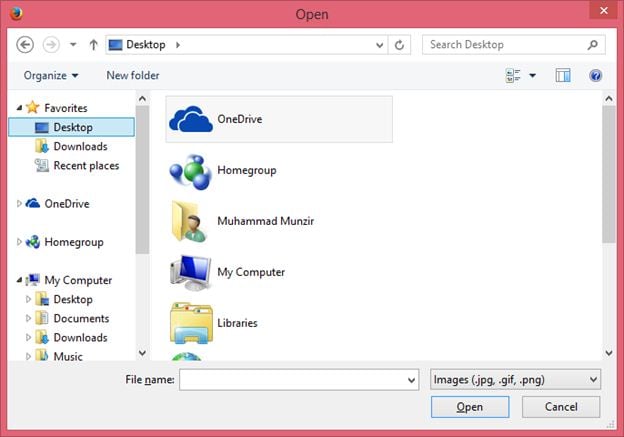
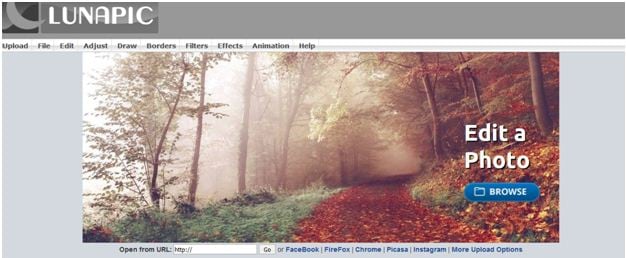
03LunaPic
This one lands among the most preferred GIF maker tools available across the web. It comes with a clean interface, is free to use and does not require any third party software installation. You can create catchy and interesting GIF banners, or make captivating, animated GIF files with a series of still images using this tool. However, this GIF maker does not give you the liberty to take up editing and speed or accuracy modifications on your creation.
You need to follow the steps explained below to create your own GIF with LunaPic:
● Step 1:
Open the official site of LunaPic in your web browser.
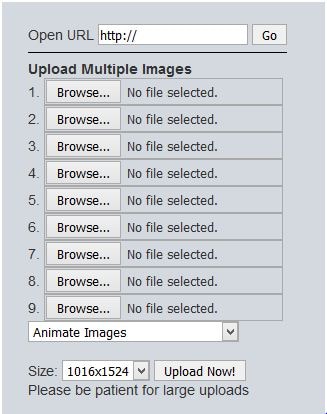
● Step 2:
Upload a desired one or a set of images you wish to use for making your GIF on the site. To do this, select a group of images from your device and tap ‘Upload’
.
● Step 3:
Once uploaded, you can use your creativity to play with the effects library of the site and edit your images in its editing interface.
● Step 4:
When satisfied, choose the file type as GIF and hit the ‘Save’ option at the bottom. This will save your creation locally in your device, once the file conversion gets completed.
Image Name: Finding-best-gif-websites-is-easy-as-pie—here’s-what-you-should-know-22
04Wondershare TunesGo
This one is another efficient animated GIF creator utility on the internet. Available to you as free online software, this tool promises you an amazing and hassle free GIF making experience. You can either create stunning GIFs of your own, or convert video files and even live photos into the same using this software. It allows you to set time slots for file conversions and make speed and flow adjustments for GIF frames, along with offering a plethora of editing effects to play with.
Here’s the know-how of using this software to create top quality animated GIFs:
● Step 1: Download and Launch the Software
Pay a visit to the official TunesGo website to download the software. Begin with installing and launching the same on your preferred device. When you finish, click on the ‘Toolbox’ tab at the top in the welcome screen.
● Step 2: Upload Media Files
In the software’s opening interface, choose the GIF Maker tool. In the following window that pops-up, click on ‘Add’ to upload the desired media files saved in your device, you want to create a GIF with.
● Step 3: Convert to GIF
Set the media file to GIF conversion time and tap the ‘Create GIF’ button in the bottom-right to initiate the conversion process.
05Wave.video
This one is among the latest GIF maker tools that allow you to create animated GIFs from videos. What’s quite interesting about this Gif creation platform is, you can trim videos to the exact part depending on your content preference before beginning with the conversion process. You can also save your creation as a group of trimmed clips. It is a user friendly, free access online tool that does not ask you to install any third party software, and GIF creation with its mess-free interface is absolute fun.
Take the steps listed below to make GIFs with this online tool:
● Step 1: Choose a Project
To start working with this tool, you need to create an account on its official site. Having done that, just log into your account and upload a desired video you would like to use for creating a GIF. You have a choice to select a locally saved video, choose one from the templates available on the site or create something of your own.
● Step 2: Customization and Publishing
It is now time to try hands on editing your video with stunning effects like, overlays glasses, etc., or add impactful elements, such as, texts, stickers, etc., to make your artwork more impressive. When you are happy, navigate to the top-right and tap ‘Publish’. From the menu that drops down, select ‘GIF’.
● Step 3: Download Your Creation
Select the section of your video you wish to convert into a GIF and proceed to fix the GIF start time and play duration. Check for any frame resize requirements, set an adequate frame rate and lastly, click on the ‘Loop Clip’ checkbox. This will produce an infinite loop GIF. When everything seems perfect, tap on ‘Generate’ followed by ‘Download’ to save your creation and share it on social media.
Part 3 5 Stunning Examples of Gifs in Web Design
The credibility of GIFs in market oriented content sharing and information publishing evidently does not require an introduction. These attractive snippets are expert means of business growth and customer appealing strategy planning to address attract a massive target audience within seconds.
Now that you are quite accustomed with the market reliability of GIFs, you may visibly feel motivated to use them to improvise your product websites for a next level market approach. However, before you plunge into using GIFs for your brand promotion, consider sparing a few minutes to browse through some top class product based GIFs to enhance your GIF creation and implementation aptitude.
Described below are some eye-catching examples of GIF for website background, you should certainly look forward to using in your business campaigns:
01Headscape
Having its roots in the United Kingdom, this is a top rated, digital media design corporation that excels in providing web design solutions to a diverse global clientele. Their unique idea of using GIFs in grayscale to depict conducive business settings is just perfect.
The monochromatic color balance with parallax scrolls makes this GIF all the more impactful. You can find impressive ways of using GIFs with a professional instinct on the company website and begin to add appeal to your market buildup strategies.
02Invision
This is another high ranked application marketing site that uses GIF for website background to improvise its product promotion. Equipped with a preset world class page makeover, the site’s look and appeal simply gets a boost with floating-text animated GIFs on an otherwise normal webpage.
As you move further on the Invision homepage, you will get to see a demonstration of the site’s prototype tool through GIFs that explain its working functionalities in the most interesting and convenient manner, thus putting forward and outrageously professional and effective marketing strategy.
03Macaw
This one is an excellent design utility that is equally suited to both web designers as well as site developers. On visiting the tool’s homepage, you are welcomed with a streamlined text setting on a black and white theme. Move a bit downwards, and there you see a cluster of animated GIFs in action to get you familiar with the interface and usage pattern of the Macaw design utility with utmost ease. It is convenient enough to make you feel as if you are actually using the tool.
04Giant Ant
Established as a creative firm, this one is known for its appealing website design. As you navigate through the site, you will find a still image complemented by cohesive text overlays. Beneath that, there are caricature forms of everyday objects, but the real magic happens when you click on a particular object and woosh. It instantly turns into an animated GIF. This explicit style of infusing dynamism to your website is simply awesome, to say the least.
05Tinke
This is intuitively a fitness tracker that keeps a record of your system vitals in the most effective manner. But that’s not all. The tracker website is equally amazing, setting the perfect example of using GIFs to improve market buildup. The site majorly utilizes the parallax scroll effect with animated GIFs to facilitate a live demonstration of the tracker functionality, coupled with an iPhone user guide and ways of sharing relatable content with fellow users.
● Key Takeaways from This Episode →
● Surfing the internet, you will land across some of the best GIF creator and downloader sites that are flooded with brilliant GIF content suited for almost every purpose.
● You can create your own animated GIFs on any GIF maker website or enjoy pre-made stuff to your heart’s content, where using Filmora is certainly the best choice. To explore something more exciting, try hands on using GIFs for product marketing and brand promotions on your business sites.
Want a heap of the most exiting GIFs? Here are the best websites to visit.
In this article
01 [10 Sites for Finding the Perfect GIF](#Part 1)
02 [How to Use Animated GIF Makers](#Part 2)
03 [5 Stunning Examples of Gifs in Web Design](#Part 3)
Part 1 Sites for Finding the Perfect GIF
Information was never so expressive until GIFs came up as delivery platform. Looking through the frame of content diversity and effective delivery, there’s possibly nothing that is left untouched by these short, precise and creative snippets. When the talk is about long term user credibility, creativity is one thing, while reach is the other.
No doubt about the creative aspect, but the convenient availability holds equal importance. However captivating a utility nay be, you would certainly not be interested to spend quality time searching the apt content. Let’s take a look at some of the most popular and convenient GIF website that will surely put a full stop on your search spree for a relatable GIF.
01GIPHY
Initially launched as a GIF search engine, thin is a complete storehouse on almost everything that you can possibly think of. The extensive content library of this site is all set to meet your most specific content requirements in less than a blink’s time. You get an access to quality content in music, science, nature and what not on this free GIF website.
Talking of search flexibility, GIPHY is known to have the most advanced and updated search bar that ensures that top quality and fresh content is always at the hand of its users. You can browse through the vast GIF categories of the site or look for your exact content using a specific search keyword.
02Reddit
You can regard this site as a GIF membership community, where you can find a variety of impressive sub-reddits in the GIF category. The best part is, you will never find recursive content on any two or more sub-reddits as each one is developed and updated keeping different content specifications in mind.
You are given access to even finer content libraries in some particular sub-reddits that follow a sequential guideline to filter their entries according to user preferences. Some popular sub-reddits are listed below:
03Tumblr
Originally a blogging site, Tumblr is simply heaven for creating and sharing GIFs across media platforms. What’s interesting about the site is its content categorization, where bloggers on the site group relatable content under specific categories, which facilitates an easy, quick and hassle free search. Most of the GIF content on the site is either created in Photoshop or taken from across the web.
While the site has exciting GIF content for almost every scenario, the comedy genre is the st5arb attraction of this GIF platform. The huge comic content library of the site has hilarious memes and GIFs that will certainly leave you rolling over the floor. To enjoy your favorite content daily, you just need to search a relatable hashtag and follow some blogs on your searched content.
04Gfycat
This one lands among the most preferred GIF sites and is packed with an enormous inventory of memes and GIFs. Not just this, this one is a free GIF maker website that allows you to convert videos from almost every media platform into GIFs, independent of the video file format via its ‘Video to GIF Converter’ tool.
You can set a daily dose of your favorite, exciting GIF content by using either the search bar or the ‘Selection Menu’ in the left of the site’s Home page. You can even browse through latest GIF categories by navigating to the ‘Trending’ and ‘Explore’ sections.
05Tenor
You can prefer this site to enjoy your favorite GIFs on your PC or iOS device. The site gives you the liberty to share GIFs and memes directly from its library into any of your Instant Messaging chats or community conversations on social media platforms.
All you need to do is navigate to the Tenor search bar, put in a suitable keyword and there you can see loads of GIF content on your screen in less than a second’s time. With periodic updates and a cohesive interface, this site is your storehouse of latest and trendy GIFs, anytime and anywhere.
06Reaction GIFs
This site is known for having an exact content database for almost every thought that crosses your mind. It serves you with a refined search mechanism, having a different pathway for every search, depending on the content you are looking for. This is a perfect aid to get exactly what you want, without having to fuss out with unwanted stuff.
Talking of search methods, you will find a drop-down menu at the right to search GIFs that express ‘Emotions’ or one word answers (preferably a ‘Yes’ or a ‘No’). If you want something related to a more specific category, you can browse through the ‘Galleries’ and ‘Tags’ of the site (categories, like, OMG, LOL, etc).
07GIFbin
This is again a trunk of latest, funny and entertaining GIFs tom watch and share. On this site, you get to add search filters, like, ‘Most Viewed’, ‘Latest’, ‘Top Rated’, etc., that refine your search to fetch exactly what you are looking for. You are also free to use ‘Search Tags’ grouped according to name and search count on the site.
The tag names are standard keywords (like, animals, sports, nature, etc.) and the count feature keeps a track of the most frequent searches, thus allowing you to find out your favorite GIFs in a more explicit manner. If you are clueless about anything specific, don’t worry. Hit the ‘Random GIFs’ button to explore a whole new world of fun and excitement.
08Imgur
This site is popular in the meme world as a GIF sub-reddit that has explicitly no text threads. You can take this one as a free, GIF hosting and sharing website. While you can find loads of quality content on the site convenient to almost any genre, it is a leader in comic and funny GIFs. You can use different search tags for hilarious movie snippets, or some other fun element of your liking. This site’s image library is a hub of latest and nostalgic content.
09Imgflip
This is one more hotspot for relatable GIFs and memes. The best thing about the site is that it has separate search pathways to refine your search in cohesion with your content preference. Some common pathways are explained below:
● Browse the site’s homepage for the latest and trending GIF content.
● Simplify your search on specific content pages using the ‘Random’, ‘Next’ or ‘Previous’ navigation options.
● Prefer using ‘Image Hotkeys’ on the content pages.
● Try on ‘Tagging’ specific content pages (sunrise, snowfall, cats, etc.).
If you like competing with fellow visitors on the site, you can experiment with creating GIFs of your own and get ranked on the creator scoreboard. Bag a high vote count to get your GIF trending on the site.
10Gyazo
Last on the list, this is a somewhat different site in terms of features and search constraints. The exclusively unique ’Screen Capture’ feature of this site allows you to take a video of your device screen and use it to create a GIF of your own, making itself a quick and effective ‘Video to GIF Converter’ tool.
You will require creating an account on the site to maintain a library of your searched contents, which you can either tag on the site or downloaded to your device. You can further, export and share your creations across media platforms through this site.
Part 2 How to Use Animated GIF Makers
Landing into the creative and exciting world of GIFs, you can easily get motivated to try hands on making your own GIFs. The online market is a pool of solutions that claim of adhering to this concern in the most effective ways. When looking for the best GIF maker tools and software, you can definitely count upon the following choices:
01** Wondershare Filmora Video Editor
This one is undoubtedly the best GIF creator software in current times. Using the plethora of audio-visual features, effects and image filters that are offered by this tool, creating animated GIFs is a spic and span process. The software grants you the liberty to play with and explore your editing skills to generate professional quality GIFs within minutes.
Wondershare Filmora - Best Video Editor for Mac/Windows
5,481,435 people have downloaded it.
Build unique custom animations without breaking a sweat.
Focus on creating epic stories and leave the details to Filmora’s auto features.
Start a creative adventure with drag & drop effects and endless possibilities.
Filmora simplifies advanced features to save you time and effort.
Filmora cuts out repetition so you can move on to your next creative breakthrough.
Here’s how you can use this software to become a pro at creating GIFs:
● Step 1: Import Required Media Files
To begin with, select any desired set of images or a particular video file to the Filmora timeline. You don’t need to be format specific; the software is compatible with over 150 different file formats.
● Step 2: Drag Files to Edit
Once you are done with selecting the files, you need to drag the same to the Filmora Editor Timeline, where you can transform the file contents with your editing skills.
● Step 3: Let’s Get Editing.
In the editor window, you are free tom choose from a range of effects, tools and filters suitable to your GIF content to give your artwork a new and engaging look. You can experiment with the cutting, cropping and trimming tools or play with effects, like, overlays, rotation and speed adjustments and even add texts to deliver messages that intensify your GIF.
● Step 4: Time to Save and Share.
Now is the time to save your work locally to your device using the .gif extension with your created file, as well as share it among your peers on social communities.
03Deal With It
This one is an online GIF maker tool that allows you to make top quality animated GIFs within a few seconds and you don’t even need to take up any third party software installation. Creating GIFs with this user friendly, clean interface and quick GIF generator utility is an absolute fun, to say the least.
Once you are done creating, the tools gives you the liberty to experiment with effects like, texts and glasses that would further intensify your GIF to the next level, and the best part is, all of this is available to you without having to spend a penny out of your pocket.
Explained below is the step wise user guide to use this tool for creating GIFs:
● Step 1:
Navigate to official website of the GIF creator tool.
● Step 2:
Choose a desired locally saved image from your device and upload it in the tool’s editor window. To do this, click on the ‘Load Image’ button.
● Step 3:
You can now modify the uploaded image with text and glasses. This is it. Your GIF is ready to save and export.
03LunaPic
This one lands among the most preferred GIF maker tools available across the web. It comes with a clean interface, is free to use and does not require any third party software installation. You can create catchy and interesting GIF banners, or make captivating, animated GIF files with a series of still images using this tool. However, this GIF maker does not give you the liberty to take up editing and speed or accuracy modifications on your creation.
You need to follow the steps explained below to create your own GIF with LunaPic:
● Step 1:
Open the official site of LunaPic in your web browser.
● Step 2:
Upload a desired one or a set of images you wish to use for making your GIF on the site. To do this, select a group of images from your device and tap ‘Upload’
.
● Step 3:
Once uploaded, you can use your creativity to play with the effects library of the site and edit your images in its editing interface.
● Step 4:
When satisfied, choose the file type as GIF and hit the ‘Save’ option at the bottom. This will save your creation locally in your device, once the file conversion gets completed.
Image Name: Finding-best-gif-websites-is-easy-as-pie—here’s-what-you-should-know-22
04Wondershare TunesGo
This one is another efficient animated GIF creator utility on the internet. Available to you as free online software, this tool promises you an amazing and hassle free GIF making experience. You can either create stunning GIFs of your own, or convert video files and even live photos into the same using this software. It allows you to set time slots for file conversions and make speed and flow adjustments for GIF frames, along with offering a plethora of editing effects to play with.
Here’s the know-how of using this software to create top quality animated GIFs:
● Step 1: Download and Launch the Software
Pay a visit to the official TunesGo website to download the software. Begin with installing and launching the same on your preferred device. When you finish, click on the ‘Toolbox’ tab at the top in the welcome screen.
● Step 2: Upload Media Files
In the software’s opening interface, choose the GIF Maker tool. In the following window that pops-up, click on ‘Add’ to upload the desired media files saved in your device, you want to create a GIF with.
● Step 3: Convert to GIF
Set the media file to GIF conversion time and tap the ‘Create GIF’ button in the bottom-right to initiate the conversion process.
05Wave.video
This one is among the latest GIF maker tools that allow you to create animated GIFs from videos. What’s quite interesting about this Gif creation platform is, you can trim videos to the exact part depending on your content preference before beginning with the conversion process. You can also save your creation as a group of trimmed clips. It is a user friendly, free access online tool that does not ask you to install any third party software, and GIF creation with its mess-free interface is absolute fun.
Take the steps listed below to make GIFs with this online tool:
● Step 1: Choose a Project
To start working with this tool, you need to create an account on its official site. Having done that, just log into your account and upload a desired video you would like to use for creating a GIF. You have a choice to select a locally saved video, choose one from the templates available on the site or create something of your own.
● Step 2: Customization and Publishing
It is now time to try hands on editing your video with stunning effects like, overlays glasses, etc., or add impactful elements, such as, texts, stickers, etc., to make your artwork more impressive. When you are happy, navigate to the top-right and tap ‘Publish’. From the menu that drops down, select ‘GIF’.
● Step 3: Download Your Creation
Select the section of your video you wish to convert into a GIF and proceed to fix the GIF start time and play duration. Check for any frame resize requirements, set an adequate frame rate and lastly, click on the ‘Loop Clip’ checkbox. This will produce an infinite loop GIF. When everything seems perfect, tap on ‘Generate’ followed by ‘Download’ to save your creation and share it on social media.
Part 3 5 Stunning Examples of Gifs in Web Design
The credibility of GIFs in market oriented content sharing and information publishing evidently does not require an introduction. These attractive snippets are expert means of business growth and customer appealing strategy planning to address attract a massive target audience within seconds.
Now that you are quite accustomed with the market reliability of GIFs, you may visibly feel motivated to use them to improvise your product websites for a next level market approach. However, before you plunge into using GIFs for your brand promotion, consider sparing a few minutes to browse through some top class product based GIFs to enhance your GIF creation and implementation aptitude.
Described below are some eye-catching examples of GIF for website background, you should certainly look forward to using in your business campaigns:
01Headscape
Having its roots in the United Kingdom, this is a top rated, digital media design corporation that excels in providing web design solutions to a diverse global clientele. Their unique idea of using GIFs in grayscale to depict conducive business settings is just perfect.
The monochromatic color balance with parallax scrolls makes this GIF all the more impactful. You can find impressive ways of using GIFs with a professional instinct on the company website and begin to add appeal to your market buildup strategies.
02Invision
This is another high ranked application marketing site that uses GIF for website background to improvise its product promotion. Equipped with a preset world class page makeover, the site’s look and appeal simply gets a boost with floating-text animated GIFs on an otherwise normal webpage.
As you move further on the Invision homepage, you will get to see a demonstration of the site’s prototype tool through GIFs that explain its working functionalities in the most interesting and convenient manner, thus putting forward and outrageously professional and effective marketing strategy.
03Macaw
This one is an excellent design utility that is equally suited to both web designers as well as site developers. On visiting the tool’s homepage, you are welcomed with a streamlined text setting on a black and white theme. Move a bit downwards, and there you see a cluster of animated GIFs in action to get you familiar with the interface and usage pattern of the Macaw design utility with utmost ease. It is convenient enough to make you feel as if you are actually using the tool.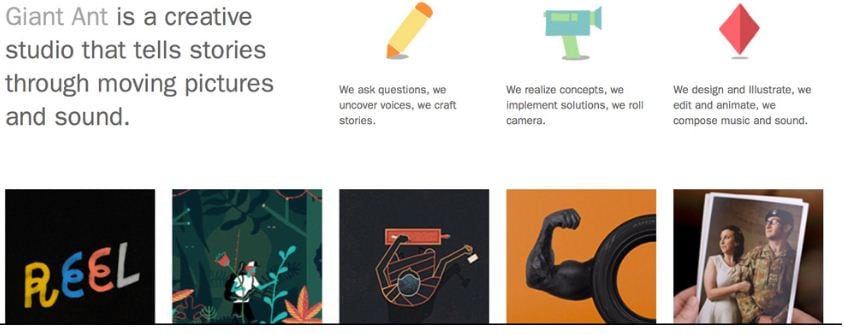
04Giant Ant
Established as a creative firm, this one is known for its appealing website design. As you navigate through the site, you will find a still image complemented by cohesive text overlays. Beneath that, there are caricature forms of everyday objects, but the real magic happens when you click on a particular object and woosh. It instantly turns into an animated GIF. This explicit style of infusing dynamism to your website is simply awesome, to say the least.
05Tinke
This is intuitively a fitness tracker that keeps a record of your system vitals in the most effective manner. But that’s not all. The tracker website is equally amazing, setting the perfect example of using GIFs to improve market buildup. The site majorly utilizes the parallax scroll effect with animated GIFs to facilitate a live demonstration of the tracker functionality, coupled with an iPhone user guide and ways of sharing relatable content with fellow users.
● Key Takeaways from This Episode →
● Surfing the internet, you will land across some of the best GIF creator and downloader sites that are flooded with brilliant GIF content suited for almost every purpose.
● You can create your own animated GIFs on any GIF maker website or enjoy pre-made stuff to your heart’s content, where using Filmora is certainly the best choice. To explore something more exciting, try hands on using GIFs for product marketing and brand promotions on your business sites.
Learn How to Blur Faces in Your Video on iPhone
Create High-Quality Video - Wondershare Filmora
An easy and powerful YouTube video editor
Numerous video and audio effects to choose from
Detailed tutorials provided by the official channel
Blurring faces on a video allow you to safeguard sensitive data in your screencast video. Blurring also helps you conceal the identity of someone who doesn’t want to appear in your video. When you are recording a video with your iPhone in public places, you cannot always get everyone’s consent. So you might want to blur their faces to protect their identities. Keep reading to learn how to blur faces in a video on iPhone.
In this article
01 How to Blur Faces in Your Video on iPhone
02 Other Useful Apps for Blurring Faces in Videos on iPhone
03 Tutorial for How to Record on GarageBand
How to Blur Faces in Your Video on iPhone
The iMovie app allows you to blur faces in your videos on your iPhone. Apple Inc. developed this pre-installed video editing app for iPadOS, iOS, and macOS devices. The iMovie app started life as an iPhone application in 2010. The app is user-friendly, meaning that you don’t have to be tech-savvy to use it to blur faces in your video on your iPhone.
Follow the steps below to learn how to blur face on iPhone video using this preinstalled video editing application.
- Launch the iMovie application on your iPhone.
- Next, you have to get the video clip that you want to edit into the iMovie app. This process is known as importing. You can import videos by selecting the Plus + option or pressing ⌘ + I.
- Choose the Movie option to create a new project.

- Select the video with the person who you would like to blur their face from the media library.

- Tap Create Movie and add the picture you want to use to hide the face of someone on your video.
- Now, tap the Plus + sign from the iMovie editing timeline.

- Select the photo, then tap the three dots to choose the Picture in Picture option.
- Once you have added the photo you want, edit and drag it to the face you want to blur.
- Play the video to see if the face was successfully blurred.
- Tap Done to save the edited video on your iMovie Projects.
Once you have finished editing your video, it is time to share it with the world. To do this, all you have to do is export your complete project. Exporting allows you to compress your project into a single video file. iMovie will do all this hard work for you. You only have to choose the platform you would like to upload your edited video (like Facebook or YouTube), and this program will export and publish the video for you. You do not have to worry about the complicated settings that resemble hieroglyphics.
Other Useful Apps for Blurring Faces in Videos on iPhone
You can also use other apps to blur faces in videos on your iPhone. A video blur app allows you to blur any part of your video, including the face. It also lets users add blur video effects to their streams. With that in mind, here are some of the applications you can use to blur faces in videos if you are using an iPhone.
1. Blur Video Background
Compatible with iOS 13.0 or later, Blur Video Background can help you blur out moving objects or apply blur filters to videos. You can try radial or rectangular blur shapes and then resize the tool to blur perfectly. Users can also choose from a range of blurry effects, including Pixelate and Gaussian blur.
Additionally, this video blur app allows you to blur multiple objects in your videos. The application has a video keyframe feature that allows users to obscure moving objects and faces in a video. All you have to do is place the keyframe on the area of the video you would like to conceal and keep adjusting the position. Indeed, this video blur app has made censoring videos a breeze.
You can choose from several blurred backgrounds, such as Sepia, Matrix, Fade, or Vignette, and renovate your movies. When you complete making the edits, you can export your video in 4K resolution, Full HD, or HD. What’s more? You can share your edited videos through social profiles with ease.
To learn how to blur part of a video on iPhone using this application, you first need to launch the app on your device. You can select videos from the Gallery or record one directly with your iPhone camera. Next, you have to choose the blur shape you prefer: either circular blur or rectangular blur.
Use your finger to drag the blurred area on the face to get a pixelated face. Once you have done this, you need to adjust the strength of the blur tool with the slider until you get the desired blurred faces. Export your video by tapping the save icon. Getting censored videos or blurry faces has never been this easier.

2. Blur-Video
This blur video app is compatible with iOS 13.0 or later, and it allows you to hide unwanted objects, blur faces, and remove backgrounds from images in your videos. As such, you can easily apply a wide range of effects to blurred video backgrounds and hide sensitive objects and faces of people. The best part is: Blur-Video editor comes with an option to blur multiple areas in a single video.
Blur Video features three blur video modes: Fun Blur, Instagram no Crop, and FreeStyle Blur. The FreeStyle option allows you to blur the outside or inside of any shape, locate the position and content you want to blur, and choose the blur intensity you want. You can also blur up and down, left and right sides. Moreover, you can create a blurred square around your video.
The Instagram no Crop option allows you to add blur effects in any missing portion to square your videos. You can decide to be creative and make your video stand out by adding effects or anything completely and truly yours. Use the free space to make your fantasy a reality.
With the Fun Blur option, you can select inside or outside, play the video, select a shape, and move your finger on your video. The preview allows you to check the changes you made in your video. The application will put a watermark after it has processed five videos separately in Instagram no Crop and Free Blur in the free version. Fun Blur is free for the first videos you edit.

3. VideoShow
With more than 400 million users worldwide, this blur video app is one of the most popular mobile video editors. VideoShow is designed for blurring portrait videos, and it features a powerful facial recognition function. Users can also add dynamic stickers and real-time facial effects.
In addition to blurring videos, this application comes with other editing tools, including creating slow-motion effects, adding visual effects, making music, sound effects, emoticons, and stickers, and using pictures to create videos or slideshows.
The application has hundreds of fully licensed music. Additionally, you can add local songs from your device. The vast local music and online catalogs make your video fun to watch. You can also record and use your voice to make your video more engaging.
The app also features a range of text opacity, fonts, outline color, and styles for you to choose from. Users can change their voices in videos into minions or robots, or extract audio from their videos. They can also doodle on videos and become video stars.
The best part about this blur video app is that it allows users to share their final videos in HD quality without cropping them. This video blur app supports multiple aspect ratios and the square theme. What’s more? You can upload your edited video to any social media platform.
The VideoShow VIP membership allows users to access long video GIF production, adjustable sound changes, scrolling subtitles, HD video export support, and no watermark. They will also access all paid materials, themes, music, sticker privileges, and much more.
The app offers a free trial, a permanent subscription, and an annual fee. The price will depend on the subscription package you’ll choose. VideoShow will charge you the subscription fee when you confirm the purchase. During the membership period, you can use all the paid features and blur as many faces in videos as you want without any limitations.

Conclusion
● Now that you know how to blur faces on iPhone video, you can hide the face of anyone you do not want your viewers to see. You may need to use these applications to keep the identity of people anonymous or cover an object that had accidentally gotten into the scene, but it wasn’t supposed to.
● Since you have checked the above options, you can decide which app suits your preferences. Each app comes with unique features and blur effects.
Blurring faces on a video allow you to safeguard sensitive data in your screencast video. Blurring also helps you conceal the identity of someone who doesn’t want to appear in your video. When you are recording a video with your iPhone in public places, you cannot always get everyone’s consent. So you might want to blur their faces to protect their identities. Keep reading to learn how to blur faces in a video on iPhone.
In this article
01 How to Blur Faces in Your Video on iPhone
02 Other Useful Apps for Blurring Faces in Videos on iPhone
03 Tutorial for How to Record on GarageBand
How to Blur Faces in Your Video on iPhone
The iMovie app allows you to blur faces in your videos on your iPhone. Apple Inc. developed this pre-installed video editing app for iPadOS, iOS, and macOS devices. The iMovie app started life as an iPhone application in 2010. The app is user-friendly, meaning that you don’t have to be tech-savvy to use it to blur faces in your video on your iPhone.
Follow the steps below to learn how to blur face on iPhone video using this preinstalled video editing application.
- Launch the iMovie application on your iPhone.
- Next, you have to get the video clip that you want to edit into the iMovie app. This process is known as importing. You can import videos by selecting the Plus + option or pressing ⌘ + I.
- Choose the Movie option to create a new project.
- Select the video with the person who you would like to blur their face from the media library.
- Tap Create Movie and add the picture you want to use to hide the face of someone on your video.
- Now, tap the Plus + sign from the iMovie editing timeline.
- Select the photo, then tap the three dots to choose the Picture in Picture option.
- Once you have added the photo you want, edit and drag it to the face you want to blur.
- Play the video to see if the face was successfully blurred.
- Tap Done to save the edited video on your iMovie Projects.
Once you have finished editing your video, it is time to share it with the world. To do this, all you have to do is export your complete project. Exporting allows you to compress your project into a single video file. iMovie will do all this hard work for you. You only have to choose the platform you would like to upload your edited video (like Facebook or YouTube), and this program will export and publish the video for you. You do not have to worry about the complicated settings that resemble hieroglyphics.
Other Useful Apps for Blurring Faces in Videos on iPhone
You can also use other apps to blur faces in videos on your iPhone. A video blur app allows you to blur any part of your video, including the face. It also lets users add blur video effects to their streams. With that in mind, here are some of the applications you can use to blur faces in videos if you are using an iPhone.
1. Blur Video Background
Compatible with iOS 13.0 or later, Blur Video Background can help you blur out moving objects or apply blur filters to videos. You can try radial or rectangular blur shapes and then resize the tool to blur perfectly. Users can also choose from a range of blurry effects, including Pixelate and Gaussian blur.
Additionally, this video blur app allows you to blur multiple objects in your videos. The application has a video keyframe feature that allows users to obscure moving objects and faces in a video. All you have to do is place the keyframe on the area of the video you would like to conceal and keep adjusting the position. Indeed, this video blur app has made censoring videos a breeze.
You can choose from several blurred backgrounds, such as Sepia, Matrix, Fade, or Vignette, and renovate your movies. When you complete making the edits, you can export your video in 4K resolution, Full HD, or HD. What’s more? You can share your edited videos through social profiles with ease.
To learn how to blur part of a video on iPhone using this application, you first need to launch the app on your device. You can select videos from the Gallery or record one directly with your iPhone camera. Next, you have to choose the blur shape you prefer: either circular blur or rectangular blur.
Use your finger to drag the blurred area on the face to get a pixelated face. Once you have done this, you need to adjust the strength of the blur tool with the slider until you get the desired blurred faces. Export your video by tapping the save icon. Getting censored videos or blurry faces has never been this easier.
2. Blur-Video
This blur video app is compatible with iOS 13.0 or later, and it allows you to hide unwanted objects, blur faces, and remove backgrounds from images in your videos. As such, you can easily apply a wide range of effects to blurred video backgrounds and hide sensitive objects and faces of people. The best part is: Blur-Video editor comes with an option to blur multiple areas in a single video.
Blur Video features three blur video modes: Fun Blur, Instagram no Crop, and FreeStyle Blur. The FreeStyle option allows you to blur the outside or inside of any shape, locate the position and content you want to blur, and choose the blur intensity you want. You can also blur up and down, left and right sides. Moreover, you can create a blurred square around your video.
The Instagram no Crop option allows you to add blur effects in any missing portion to square your videos. You can decide to be creative and make your video stand out by adding effects or anything completely and truly yours. Use the free space to make your fantasy a reality.
With the Fun Blur option, you can select inside or outside, play the video, select a shape, and move your finger on your video. The preview allows you to check the changes you made in your video. The application will put a watermark after it has processed five videos separately in Instagram no Crop and Free Blur in the free version. Fun Blur is free for the first videos you edit.
3. VideoShow
With more than 400 million users worldwide, this blur video app is one of the most popular mobile video editors. VideoShow is designed for blurring portrait videos, and it features a powerful facial recognition function. Users can also add dynamic stickers and real-time facial effects.
In addition to blurring videos, this application comes with other editing tools, including creating slow-motion effects, adding visual effects, making music, sound effects, emoticons, and stickers, and using pictures to create videos or slideshows.
The application has hundreds of fully licensed music. Additionally, you can add local songs from your device. The vast local music and online catalogs make your video fun to watch. You can also record and use your voice to make your video more engaging.
The app also features a range of text opacity, fonts, outline color, and styles for you to choose from. Users can change their voices in videos into minions or robots, or extract audio from their videos. They can also doodle on videos and become video stars.
The best part about this blur video app is that it allows users to share their final videos in HD quality without cropping them. This video blur app supports multiple aspect ratios and the square theme. What’s more? You can upload your edited video to any social media platform.
The VideoShow VIP membership allows users to access long video GIF production, adjustable sound changes, scrolling subtitles, HD video export support, and no watermark. They will also access all paid materials, themes, music, sticker privileges, and much more.
The app offers a free trial, a permanent subscription, and an annual fee. The price will depend on the subscription package you’ll choose. VideoShow will charge you the subscription fee when you confirm the purchase. During the membership period, you can use all the paid features and blur as many faces in videos as you want without any limitations.
Conclusion
● Now that you know how to blur faces on iPhone video, you can hide the face of anyone you do not want your viewers to see. You may need to use these applications to keep the identity of people anonymous or cover an object that had accidentally gotten into the scene, but it wasn’t supposed to.
● Since you have checked the above options, you can decide which app suits your preferences. Each app comes with unique features and blur effects.
How to Denoise in After Effects – Audio & Video Noise Removal
I was filming with my mobile phone, and the light was low, and it happened so that I had to shake the phone a little because I was in movement. I return home, thinking that the shots were not so bad, look at the new footage on the bigger screen than my phone would have provided, and – no! I am totally wrong! This footage has some kind of little dots all over it, the whole shot looks sort of pixelated. I understand that the circumstances were not so good for shooting, but how come the video is actually this bad? How to get rid of this annoying dot-like overlay, that hinders me from seeing some details and makes my eyes exhausted? Is there a way to make this better at all?
Yeah, this is something called noise, and something called grain can also be in play. And is there a way to solve the problem? –Yes! Technology is getting so good from day to day that editing programs offer the ways to not be bothered because of this problem.
But noise is a word that not necessarily evoke the image of the visual side, rather, for the broader society, it is connected to the audio. A room, filled with some people hanging out and chatting, air conditioner that creates some sound, an opened window from where the chirping of the birds are coming… Anyway, I am still trying to concentrate, to make my voice recording, and then edit the video. Even in this case, I think everything is going pretty well, and the scenario is so alike: I record the whole text I have to follow, then try to listen to it in the speakers or in the headphones, and – SOS again! These noises I mentioned, are filling up my recording, where only my words should be played. Now, I don’t like to cut the parts of my whole recording one by one, and relentlessly, like a butcher, because I am just trying to create a good listener, or viewer experience, and slicing my piece will only make things work. There should be another way!
And yes, there also is. I can solve this problem using some editing software as well. It might even take me only a while and I will have a great voice recording to include in my content. So, my choice, in this case, would be Adobe After Effects – you will say, wow, why so serious? (because this is a very powerful and sophisticated program!) but the answer is – because we can, and because it gives us many opportunity.
So, as you may have noticed already, in this article we will be touching upon audio and video denoising in Adobe After Effects! Let’s get started and solve those little problems we have in our everyday life and work!
How to denoise a video in Adobe After Effects
So, denoising in image and video production is used as a technique to take footage from grainy to crystal-clear, and this is exactly our target. But when can we say that the video noise reduction went well? This method achieves its goal If it suppresses noise effectively in uniform regions; preserves edges and other characteristics, such as fine details and textures; and provides a visually natural experience.
Primarily, Adobe After Effects is a digital visual effects, motion graphics, and compositing application. If you are skilled, you are almost invincible in this software, meaning that you can do almost everything that sparks your imagination. So, if that is the sophistication of the program, why can it not be so that it can help us get rid of the unwanted noise and grain on the scene? There is no answer, because of course, it can.
Even though sometimes this kind of software requires you to download and install and then finally use some external resources, such as plugins, there is a way to do what we are going to, without any help from outside of the program.
First of all, I suppose you have some video you want to edit and make better. Bringing that clip into the program would be the first step of our little adventure. And see the menu where it says Effect? – you need to click on it. Then it gets pretty, meaning very… meaning extremely straightforward – you will find it written – Noise and Grain. Of course, you will need to choose it, and then see the Remove Grain option, to which you are going to stick.

Then, you will need to move your attention to the left side of the screen, where Effects Control will open. By default, you are able to see viewing mode, where Preview can be changed to Final Output, which is exactly what you are going to do.

This will be the video with Preview checked:

And this is the look of the same frame from the video whenever Final Output is turned on:

Yes, it’s true – we have done it already! This is actually this fast and easy in Adobe After Effects – no more noise, no more grain! Anyway, if you want to see the whole process on the video, you can check it here !
How to denoise an audio in Adobe After Effects
When it comes to audio noise, as we have mentioned already, it is possible to master the recording in After Effects in terms of the voice as well, but in reality, After Effects requires another Adobe program called Audition. Let us say that you have a video with audio attached, and you are working in AE, but in order to remove the background noise, you will need to open Audition. Here’s how it’s done:
First, in the sequence, you will need to click twice on the video clip, which will open audio graphics below.

Then, go to Edit in the Navbar, and choose Edit in Adobe Audition.

This program will open and show you more detailed graphic image of the voice recording. Now, you will find the space of time in your recording when you have a somewhat damaged audio and you will select the beginning and the end of it with the mouse. Keep in mind that in case you need to take a look at the video when your audio is played, you can see a little window showing the scene on the left and bottom of your screen.

Once you have the selection and are determined with it, you right click on the selection and find Capture Noise Print. Then, you will click on the selection again and find Select all, which will cover the whole audio. That’s when you go to the Navbar again and find Effects -> Noise Reduction / Restoration -> Noise Reduction (process). This will open the graphics again, where you can reduce the noise – you will see the percentage scale where you can modify the noise.

After changing it a little, you will click on the Apply and be able to visually see how the flow has changed and lowered.

So, when you deselect the selection and play the recording, you will notice that from now on the words are hearable, but some background noise is not there anymore! In order to export, please go to the File and Export, choose your preferred settings and you are ready to go!
Bonus tip: how to remove audio noise in video with Wondershare Filmora
When it comes to audio noise removal, it’s also good to have some alternatives, and you might not even have Adobe After Effects installed on your computer, because there exist a lot of programs easier to use. One of them is Wondershare Filmora, which can play a major role in background noise removal, in a simple way. For this to play out, you will need to pursue the following steps:
To bring your video clip in the program, drag and drop it into the timeline. Right-clicking on the video and hitting Detach Audio will enable you to separate audio and video from each other and work on them individually.

Click twice on the audio track, which will make sure you can see the editing panel and find Remove background noise option there – it can remove the noise right away.

And, that’s it – hard to believe it’s so simple!
So, in this article, you followed us through the steps of how to denoise in Adobe After Effects – first, we touched upon video noise reduction, and then, background noise removal, for which we had to open the audio in Adobe Audition from After Effects. Last but not least, we took a look at how another magnificent software, Wondershare Filmora can help us in doing the same task! Armed with different tools and knowledge, now you can go for it and make your videos and audios more appealing for everyone!
Then, you will need to move your attention to the left side of the screen, where Effects Control will open. By default, you are able to see viewing mode, where Preview can be changed to Final Output, which is exactly what you are going to do.
This will be the video with Preview checked:
And this is the look of the same frame from the video whenever Final Output is turned on:
Yes, it’s true – we have done it already! This is actually this fast and easy in Adobe After Effects – no more noise, no more grain! Anyway, if you want to see the whole process on the video, you can check it here !
How to denoise an audio in Adobe After Effects
When it comes to audio noise, as we have mentioned already, it is possible to master the recording in After Effects in terms of the voice as well, but in reality, After Effects requires another Adobe program called Audition. Let us say that you have a video with audio attached, and you are working in AE, but in order to remove the background noise, you will need to open Audition. Here’s how it’s done:
First, in the sequence, you will need to click twice on the video clip, which will open audio graphics below.
Then, go to Edit in the Navbar, and choose Edit in Adobe Audition.
This program will open and show you more detailed graphic image of the voice recording. Now, you will find the space of time in your recording when you have a somewhat damaged audio and you will select the beginning and the end of it with the mouse. Keep in mind that in case you need to take a look at the video when your audio is played, you can see a little window showing the scene on the left and bottom of your screen.
Once you have the selection and are determined with it, you right click on the selection and find Capture Noise Print. Then, you will click on the selection again and find Select all, which will cover the whole audio. That’s when you go to the Navbar again and find Effects -> Noise Reduction / Restoration -> Noise Reduction (process). This will open the graphics again, where you can reduce the noise – you will see the percentage scale where you can modify the noise.
After changing it a little, you will click on the Apply and be able to visually see how the flow has changed and lowered.
So, when you deselect the selection and play the recording, you will notice that from now on the words are hearable, but some background noise is not there anymore! In order to export, please go to the File and Export, choose your preferred settings and you are ready to go!
Bonus tip: how to remove audio noise in video with Wondershare Filmora
When it comes to audio noise removal, it’s also good to have some alternatives, and you might not even have Adobe After Effects installed on your computer, because there exist a lot of programs easier to use. One of them is Wondershare Filmora, which can play a major role in background noise removal, in a simple way. For this to play out, you will need to pursue the following steps:
To bring your video clip in the program, drag and drop it into the timeline. Right-clicking on the video and hitting Detach Audio will enable you to separate audio and video from each other and work on them individually.
Click twice on the audio track, which will make sure you can see the editing panel and find Remove background noise option there – it can remove the noise right away.
And, that’s it – hard to believe it’s so simple!
So, in this article, you followed us through the steps of how to denoise in Adobe After Effects – first, we touched upon video noise reduction, and then, background noise removal, for which we had to open the audio in Adobe Audition from After Effects. Last but not least, we took a look at how another magnificent software, Wondershare Filmora can help us in doing the same task! Armed with different tools and knowledge, now you can go for it and make your videos and audios more appealing for everyone!
Also read:
- 2024 Approved Shoot Video with Virtual Green Screen
- In 2024, Easy Steps to Create Intro Video with After Effects
- New Shoot Video with Virtual Green Screen
- 2024 Approved The Ultimate Guide to Using AR Emoji Stickers in Your Videos
- New Blender - A Video Editor for All Professor
- New 2024 Approved How to Create a Slideshow on iPhone
- Updated Looking for a Free and Open Source Video Editor with Cross-Platform Support? Kdenlive Video Editor Is Great but Is It the Best? Find Out From Our Complete Kdenlive Review
- Updated 2024 Approved How to Use a Stabilization Tool in Filmora
- Updated How to Speed Up and Slow Down a Video
- New Tactics to Create Transparent Image in Minimal Steps
- Updated If You Want to Color Grading Your Video, Final Cut Pro Can Be One of the Best Choices. However, Its Not Easy for Everyone to Use Color Grading Feature, and in This Guide Well Show You How to Do That
- Updated 2024 Approved Find The Best Free Canon LUTs
- 2024 Approved GIF Splitting Into Frames Is an Interesting Activity to Do with the Right Tools. Convert GIFs Into Frames Easily with Tools and Use Them as Needed
- Updated 2024 Approved What Are AR Emoji Stickers & How to Add Them to Your Video
- New 2024 Approved 10 Best Voice Over Generators Windows, Mac, Android, iPhone, and Online
- In 2024, 10 Best Free Text to Speech Software Windows, Mac,Android, iPhone & Online
- Ideas That Help You Out in Converting AVI to GIF for 2024
- New How to Create The Best Video Collages , In 2024
- New Best AR Video App - Top 10 Picks for 2024
- Updated How to Make Text Reveal Effect Easily
- Updated Hitfilm Express Video Editor Review
- 2024 Approved How to Select and Use The Best BRAW LUTs
- Updated Dubbing Videos With Voiceovers | Using Wondershare Filmora for 2024
- How to Change Spotify Location After Moving to Another Country On Realme C51 | Dr.fone
- How to Fix Error 495 While Download/Updating Android Apps On Infinix Note 30 5G | Dr.fone
- Fixing Persistent Pandora Crashes on Honor Play 8T | Dr.fone
- The Ultimate Guide to Get the Rare Candy on Pokemon Go Fire Red On Vivo T2 Pro 5G | Dr.fone
- How to remove Google FRP Lock on Infinix
- 4 Methods to Turn off Life 360 On Infinix Note 30i without Anyone Knowing | Dr.fone
- In 2024, 2 Ways to Monitor Oppo Reno 10 Pro 5G Activity | Dr.fone
- 2024 Approved Clone Your Voice Harness the Potential of AI
- In 2024, How to Unlock Apple ID Activation Lock From Apple iPhone 15?
- How to Fix Apple iPhone 14 Pro Max Find My Friends No Location Found? | Dr.fone
- How To Bypass Activation Lock On Apple Watch Or iPhone 8 Plus?
- Solved Bad and Corrupt Videos that won't Play on Oppo Find X7
- Honor Bypass Tools to Bypass Lock Screen(Honor 100)
- How to Use Phone Clone to Migrate Your Oppo A38 Data? | Dr.fone
- How to Transfer Photos from Itel P55T to New Android? | Dr.fone
- Easy steps to recover deleted data from Honor Magic 6 Pro
- Quickly Remove Google FRP Lock on Lava Agni 2 5G
- Complete Tutorial to Use GPS Joystick to Fake GPS Location On Samsung Galaxy A24 | Dr.fone
- Title: This Article Talks in Detail About How to Edit Videos with Windows Movie Maker 10, How to Download or Install It, and so On. It Further Involves the Use of an Alternative to This Tool. Check Out Now
- Author: Chloe
- Created at : 2024-06-26 06:24:15
- Updated at : 2024-06-27 06:24:15
- Link: https://ai-editing-video.techidaily.com/this-article-talks-in-detail-about-how-to-edit-videos-with-windows-movie-maker-10-how-to-download-or-install-it-and-so-on-it-further-involves-the-use-of-an-/
- License: This work is licensed under CC BY-NC-SA 4.0.
