:max_bytes(150000):strip_icc():format(webp)/how-to-increase-internet-speed-5181475-b6fd84098c634a04a6934302184c5b1b.jpg)
This Article Will Show You the Steps to Make Coin Magic in Videos with Filmora

This Article Will Show You the Steps to Make Coin Magic in Videos with Filmora
Do you want to become a magician in your videos? Now, everyone can look like a magician with the magic of editing. This article will show you how to do a cool coin trick in Filmora 11 .
Part 1: What is the filmmaking technique “Cutting on action”
Cutting on action is a technique the editors use to cut in the middle of an action to another shot that matches the first shot’s action. Typically, the subject starts an action in one shot and continues the action in another, creating a smooth transition. For example, when you make the coin trick video, you need to cut on the tapping so it can trick the eyes, and the cut won’t be noticeable.
Part 2: Things You Need to Prepare for The Coin Magic Trick
- Glass and two coins

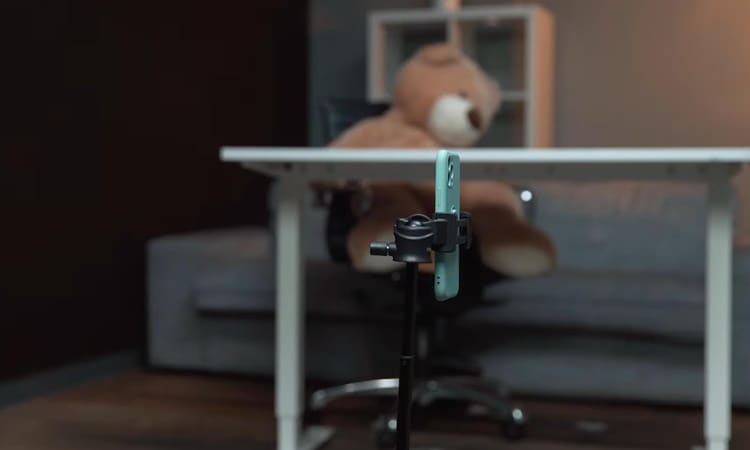
- Set the phone on a tripod. Because utilizing a tripod can significantly improve the recording’s stability.
Part 3: Start Filming
Step1 Firstly, you must show the coin and the bottom of the glass.
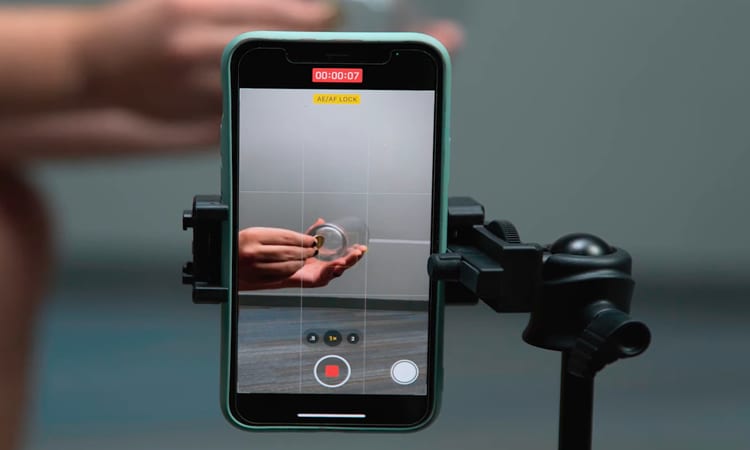
Step2 After that, you need to hold the coin with the fingers part of one hand and tap down on the coin. Make sure it looks like the coin is going through straight to the glass.
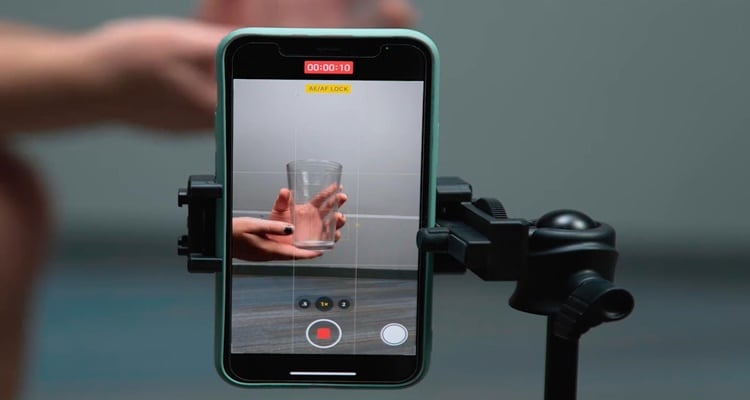
Step3 You need someone else to drop the other coin from the top. Meanwhile, you are pretending to tap a coin on the glass. You don’t need to worry about someone else hand in the frame. Since you can remove it easily with the masking feature in Filmora.
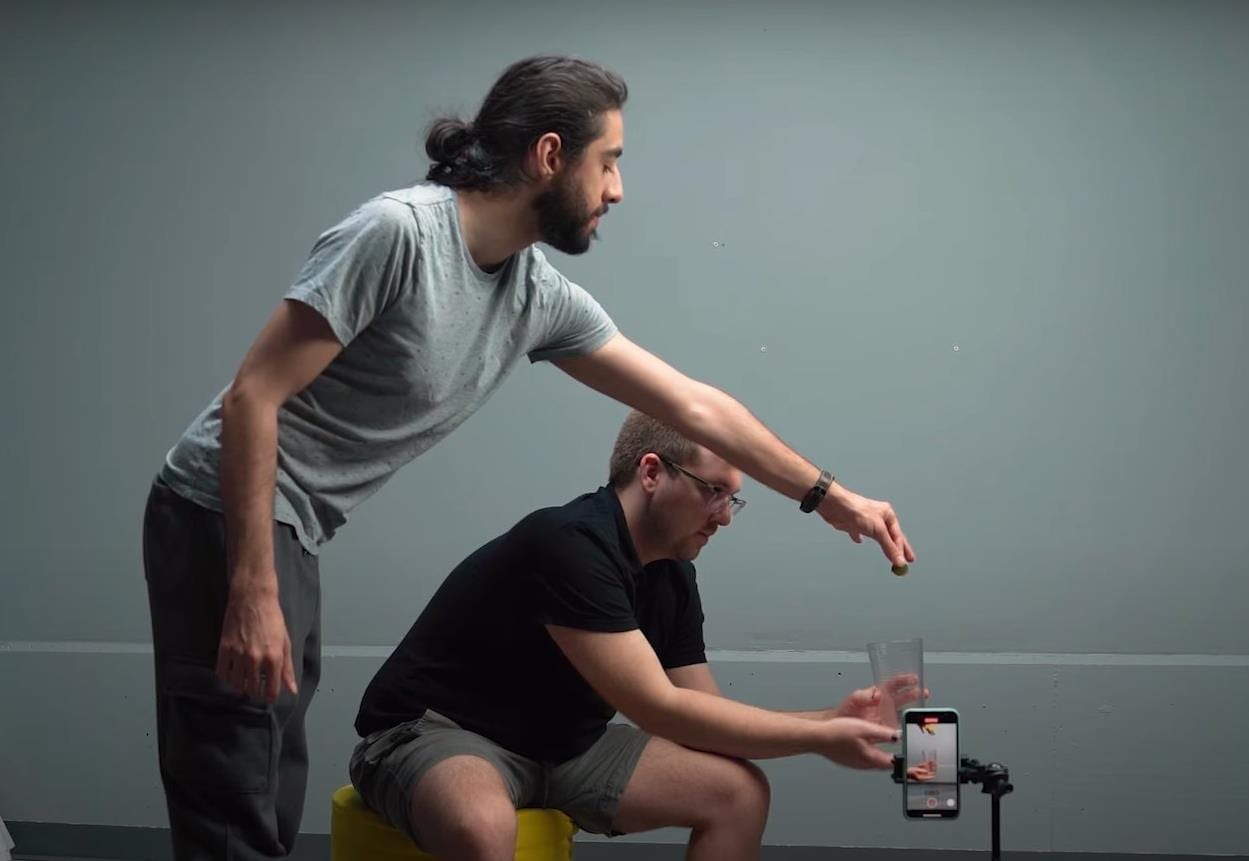
Step4 It would help if you had a second shot for a clean plate of the background. You can record background for 20 seconds.
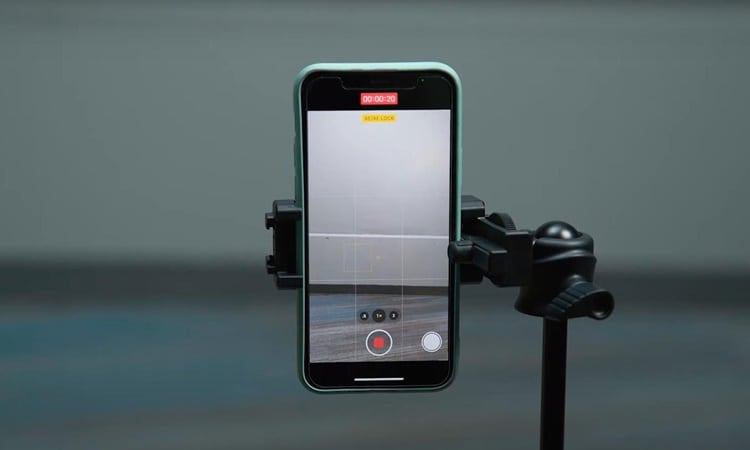
Part 4: Bring the clips into Filmora 11
Step1 If you have not downloaded Filmora, you can visit filmora.wondershare.com to download Filmora’s new version.
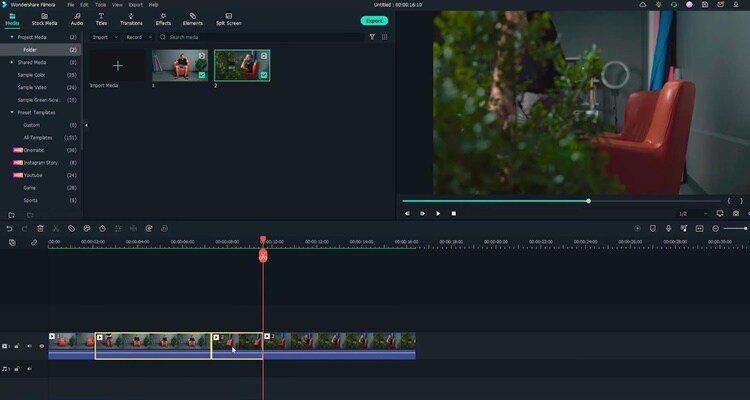
Step2 Drag and drop the clip onto the first track of the timeline.Afterward, move the playhead to the right and find the spot where you tapped the coin last time before your friend drops the other coin. Additionally, make sure it is in the middle of the tapping action and cut.
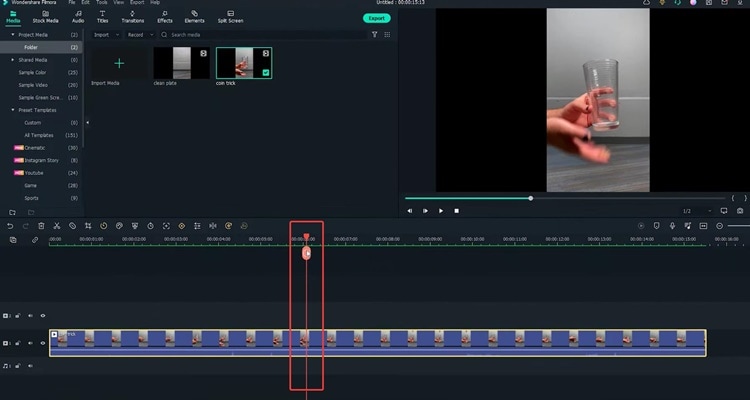
Step3 Then move the playhead to the right and find the spot where your friend drops the coin while you tap without the coin in your hand. Make sure it is in the middle of the tapping action, and the position of your hand roughly matches that in the last cut and make a cut.
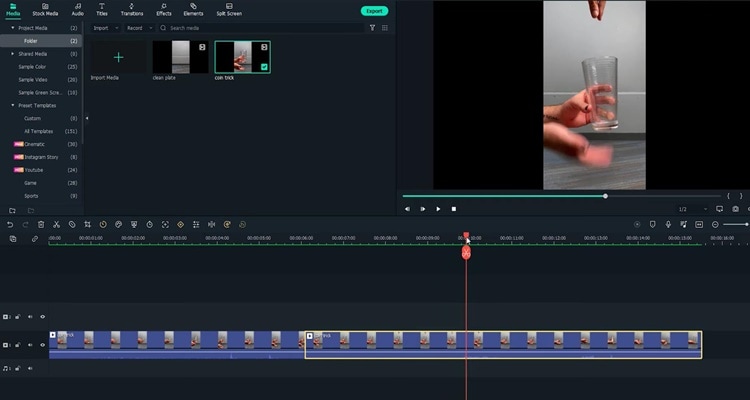
Step4 Now you need to delete the middle part and play it back. Indeed, cutting on action is the key to creating the illusion that the action is continued without editing.
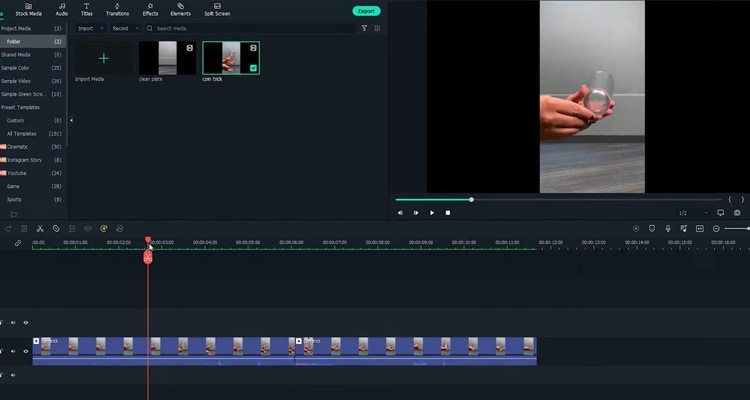
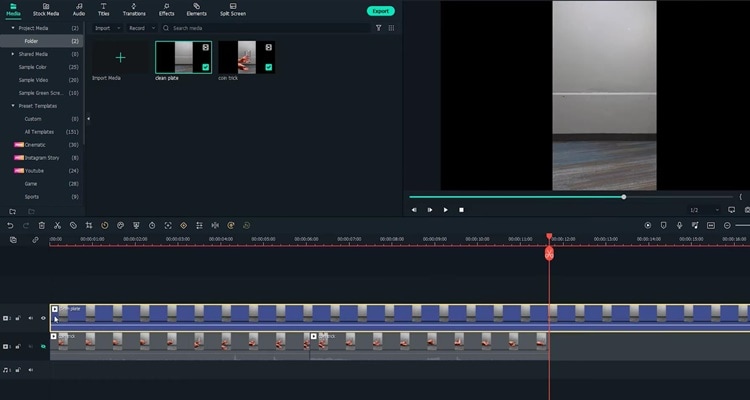
Step5 Next, you must remove your friend’s hand in the frame with the Filmora masking feature. Afterwards. drag and drop the clean plate video onto the second track of the timeline.
Step6 Next, double-click the clip to open the setting video. Find the Mask Section and select the single line.
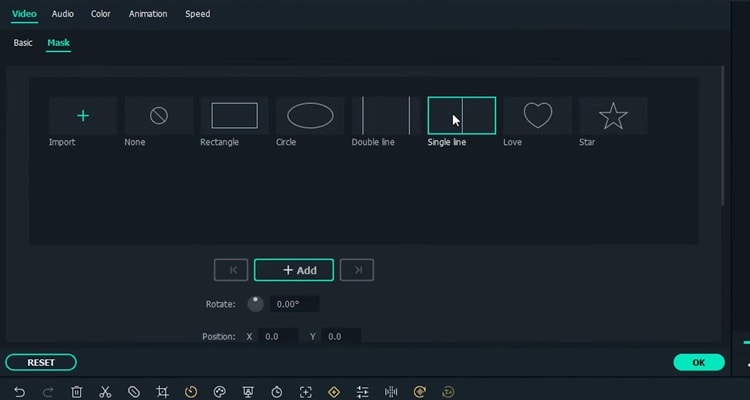
Step7 Here you can see the mask is applied.First, adjust the angle and position of the mask to only show the top part of the frame. Then you have to change the Blur Strength to add more blur to the edge of the mask.
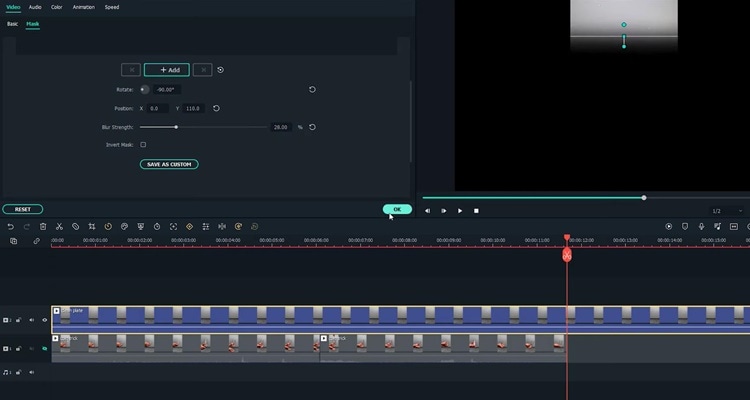
Step8 With the mask finalized, unhide the first video track and adjust the length of the clip on the timeline. Finally, playback the video and see how it looks.
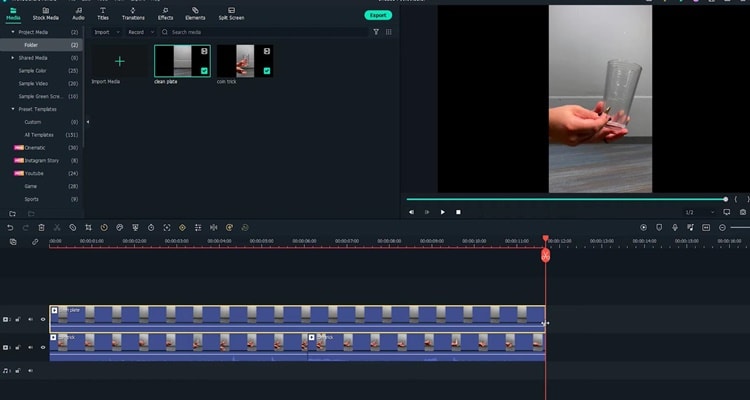
Summary
That’s how to make a coin move through a glass-like MAGIC with the cutting on action editing technique. You can pay close attention to the steps above and follow each step for perfect results.
Free Download For Win 7 or later(64-bit)
Free Download For macOS 10.14 or later
Free Download For macOS 10.14 or later
How to Make a Gaming Montage - Guide & Tips
The popularity of gaming montage is growing every day in today’s pop culture. There are currently more than 2.5 billion gamers, and most of them love watching gaming video content on YouTube. Whether people use a montage to parody gaming montages themselves or show off their skills, the effort and time put into them create impressive results.
We will explain how to create gaming montages and give you some tips that you might want to keep in mind to make epic videos.
How to Make a Gaming Montage
You have several options when it comes to creating gaming montages. You can include a random cut of great scenes, a mixture of the highlighted moments you found thrilling and would like to share with other gamers. In other cases, you’ll have to think of an engaging story in advance, then base your gameplay on this story.
Essentially, the workflow will be slightly different for these two scenarios. It’s much easier with the random cut type, especially when using a reliable video editor. Editing montages is as exciting as playing the game.
With that in mind, here is how to make a gaming montage.
1) Decide Your Montage Story/Type
Deciding your montage type beforehand helps clear your mind and create an epic gaming montage that will keep viewers watching. It allows you to choose the relevant video clips for your gaming montage.
Choose the topic of the video and decide the length of each clip and the sequence of the clips. Be sure to put the most epic or funny clips in the last section of your video. And this will make your viewers watch the video until the end.
2) Record Your Gameplay Footage
The methods to capture the gameplay varies depending on the platform where the game is. The most important thing you have to keep in mind is to ensure your recorder supports Replay Buffer; this will allow you to record scenes that occurred minutes or seconds ago.
That means you do not need to record the gameplay the whole time and burn your hardware. Instead, you’ll capture the moment after interesting things occur.
Game consoles like PS4 allow you to record the video natively for a maximum of one hour with the gamepad. A capture card lets you record it longer than 60 minutes.
Once you’ve all the clips you want on your PC, head over to https://filmora.wondershare.net/filmora-video-editor.html and download Filmora and install the software on your computer. This program allows you to edit your video clips and add cool effects that will make viewers keep watching.
3) Import You Videos to Media Library
You only have to import the videos to Filmora’s media library and then drag and drop them into the timeline, where you can start making the edits.
By right-clicking on the clip in your timeline, you’ll see the options to zoom, speed, change, split, or trim your videos. You can also add sound effects by going to the Audio Tab.

Import Videos
4) Choose Background Music for Your Montage
Music will help make your gaming montage engaging. Make sure you use a license-free track if you plan to post it on social media.
Using copyrighted music tracks and uploading the video on social media platforms can lead to video strikes. Luckily, Filmora has loads of non-copyrighted music tracks.
Navigate to Stock Media, where you’ll find non-copyrighted music on Pixabay, and choose the one you prefer.

Choose Background Music
5) Edit the Gaming Montage
With Filmora’s auto gaming montage maker, you can watch the video clip with the music you have selected. This tool will analyze beat points to change the video and effects.
Additionally, the tool can identify any bad parts in your video and delete them so that the video matches the music.
The Effects tab allows you to add multiple overlays and filters to your gaming montage video. Filmora has different categories of overlays that let you add emotions or personality to your montage. You can also use it to set the tone in your video.
Filters allow you to spice up your gaming videos. There are also different types of filters on Filmora.

Edit Gaming Montage
6) Export Your Gaming Montage Video
Once you have finished editing your video and added music, hit the Export button. Doing this will allow you to export your edited video and save it on your computer.
You can now enter your login details and upload your gaming montage video on your YouTube channel to share it with other players.
Useful Tips for Making a Gaming Montage
Making gaming montages can help you build a large online community if you do the right thing. When making a gaming montage, there are a few tips that you should keep in mind. They include:
1. Apply Velocity Effects
Adding velocity effects to your montage will help get the attention of viewers. You can couple the transition between scenes with a speed ramping effect.
Include slow motion where there is a gunshot or other big gaming moment. You can then speed up things to quickly move into another scene. You can create these velocity effects in Filmora and make it smooth.
2. Avoid Game Loading Scenes
Do not include game loading scenes or any unnecessary clips in the gaming montage. Your audience does not have the time to wait for the scenes to load because they want to see action fast.
3. Sync Gunshot with Music Beat
Try to match gunshot sounds with beats and rhythms in shooter video games. The beats of the music and the soothing sync of gunshots will catch viewers’ attention and your video will become popular among gamers.
4. Add Creative Transitions
You can spice up your gaming montage by adding transitions, especially when you have loads of clips for the montage. But avoid overusing it, as you could confuse your audience with a range of dazzling and glaring transitions.
5. Color Grade the Video for the Mood
Use color grading to your advantage, as it can set the mood of your viewers. You can decide to make some scenes black and white to catch the viewers’ attention.
6. Add Video Vignettes for Special Occasions
You can add dark edges around the corners of your video to highlight action or create a certain mood. For gameplay based on a story, use vignetting to add a sense of nostalgia or as a flashback that shows viewers the past.
You can use Filmora to apply the vignetting effect by heading to Advanced Color Tuning, then clicking the Vignette option. You can then add the vignette effect to the video. Additionally, you can adjust the vignette’s exposure, feather, roundness, size, and highlights.
Best Gaming Montage for Studying
Here are three gaming montages that are good for studying.
1. Call of Duty: Modern Warfare
Uploaded by DemixB, the Call of Duty Game Montage uses Jacques Offenbach’s Can Can Music track. It’s a happy song that has a tempo of 81 BPM. The track has average danceable energy, and it’s somewhat danceable.
DemixB set the gunshot in the montage video to the music tune. The track builds up to the climax when the gunshot echoes with the attention-grabbing orchestral explosions.

Call of Duty: Modern Warfare
2. ShutteR’s Gaming Montage
In the gaming montage uploaded by ShutteR on his YouTube channel, he used velocity effects to enhance the video. You’ll see that the transition in each scene is paired with adrenaline-pumping, speed-ramping effects.
ShutteR used a slow-motion to highlight action in each scene, then speeds up again when he wants to fast out into the next scene.; this makes the video more engaging to keep viewers glued to their screens.

ShutteR’s Gaming Montage
3. NEVERMORE [CS: GO]
NEVERMORE [CS: GO] was uploaded by Fuze on his YouTube channel, and it has creative gameplay. The gaming montage is based on a story. He did the project with Apel, an artist who designed the Fever Dream series skins in the video.
The basic idea of this gaming montage was that the main game character is a corrupted policeman with purple glowing eyes because he’s not human.
When the edits begin, the shape of the main character will shift from CS: GO CT models and turn into his real corrupt CT shape. So that’s why his name keeps changing. You can get his real identity by pausing some of the frames and looking at the “Killfeed.”

NEVERMORE [CS: GO]
Closing Thoughts:
Gaming montage involves picking and editing a range of video clips, which are brought together to create engaging video content. It consists of the best scenes from gameplay and non-copyrighted background music.
Use Filmora to edit and add effects to your video, including transitions and overlays. Your gaming montage will get more views, hence becoming popular among players.
The popularity of gaming montage is growing every day in today’s pop culture. There are currently more than 2.5 billion gamers, and most of them love watching gaming video content on YouTube. Whether people use a montage to parody gaming montages themselves or show off their skills, the effort and time put into them create impressive results.
We will explain how to create gaming montages and give you some tips that you might want to keep in mind to make epic videos.
How to Make a Gaming Montage
You have several options when it comes to creating gaming montages. You can include a random cut of great scenes, a mixture of the highlighted moments you found thrilling and would like to share with other gamers. In other cases, you’ll have to think of an engaging story in advance, then base your gameplay on this story.
Essentially, the workflow will be slightly different for these two scenarios. It’s much easier with the random cut type, especially when using a reliable video editor. Editing montages is as exciting as playing the game.
With that in mind, here is how to make a gaming montage.
1) Decide Your Montage Story/Type
Deciding your montage type beforehand helps clear your mind and create an epic gaming montage that will keep viewers watching. It allows you to choose the relevant video clips for your gaming montage.
Choose the topic of the video and decide the length of each clip and the sequence of the clips. Be sure to put the most epic or funny clips in the last section of your video. And this will make your viewers watch the video until the end.
2) Record Your Gameplay Footage
The methods to capture the gameplay varies depending on the platform where the game is. The most important thing you have to keep in mind is to ensure your recorder supports Replay Buffer; this will allow you to record scenes that occurred minutes or seconds ago.
That means you do not need to record the gameplay the whole time and burn your hardware. Instead, you’ll capture the moment after interesting things occur.
Game consoles like PS4 allow you to record the video natively for a maximum of one hour with the gamepad. A capture card lets you record it longer than 60 minutes.
Once you’ve all the clips you want on your PC, head over to https://filmora.wondershare.net/filmora-video-editor.html and download Filmora and install the software on your computer. This program allows you to edit your video clips and add cool effects that will make viewers keep watching.
3) Import You Videos to Media Library
You only have to import the videos to Filmora’s media library and then drag and drop them into the timeline, where you can start making the edits.
By right-clicking on the clip in your timeline, you’ll see the options to zoom, speed, change, split, or trim your videos. You can also add sound effects by going to the Audio Tab.

Import Videos
4) Choose Background Music for Your Montage
Music will help make your gaming montage engaging. Make sure you use a license-free track if you plan to post it on social media.
Using copyrighted music tracks and uploading the video on social media platforms can lead to video strikes. Luckily, Filmora has loads of non-copyrighted music tracks.
Navigate to Stock Media, where you’ll find non-copyrighted music on Pixabay, and choose the one you prefer.

Choose Background Music
5) Edit the Gaming Montage
With Filmora’s auto gaming montage maker, you can watch the video clip with the music you have selected. This tool will analyze beat points to change the video and effects.
Additionally, the tool can identify any bad parts in your video and delete them so that the video matches the music.
The Effects tab allows you to add multiple overlays and filters to your gaming montage video. Filmora has different categories of overlays that let you add emotions or personality to your montage. You can also use it to set the tone in your video.
Filters allow you to spice up your gaming videos. There are also different types of filters on Filmora.

Edit Gaming Montage
6) Export Your Gaming Montage Video
Once you have finished editing your video and added music, hit the Export button. Doing this will allow you to export your edited video and save it on your computer.
You can now enter your login details and upload your gaming montage video on your YouTube channel to share it with other players.
Useful Tips for Making a Gaming Montage
Making gaming montages can help you build a large online community if you do the right thing. When making a gaming montage, there are a few tips that you should keep in mind. They include:
1. Apply Velocity Effects
Adding velocity effects to your montage will help get the attention of viewers. You can couple the transition between scenes with a speed ramping effect.
Include slow motion where there is a gunshot or other big gaming moment. You can then speed up things to quickly move into another scene. You can create these velocity effects in Filmora and make it smooth.
2. Avoid Game Loading Scenes
Do not include game loading scenes or any unnecessary clips in the gaming montage. Your audience does not have the time to wait for the scenes to load because they want to see action fast.
3. Sync Gunshot with Music Beat
Try to match gunshot sounds with beats and rhythms in shooter video games. The beats of the music and the soothing sync of gunshots will catch viewers’ attention and your video will become popular among gamers.
4. Add Creative Transitions
You can spice up your gaming montage by adding transitions, especially when you have loads of clips for the montage. But avoid overusing it, as you could confuse your audience with a range of dazzling and glaring transitions.
5. Color Grade the Video for the Mood
Use color grading to your advantage, as it can set the mood of your viewers. You can decide to make some scenes black and white to catch the viewers’ attention.
6. Add Video Vignettes for Special Occasions
You can add dark edges around the corners of your video to highlight action or create a certain mood. For gameplay based on a story, use vignetting to add a sense of nostalgia or as a flashback that shows viewers the past.
You can use Filmora to apply the vignetting effect by heading to Advanced Color Tuning, then clicking the Vignette option. You can then add the vignette effect to the video. Additionally, you can adjust the vignette’s exposure, feather, roundness, size, and highlights.
Best Gaming Montage for Studying
Here are three gaming montages that are good for studying.
1. Call of Duty: Modern Warfare
Uploaded by DemixB, the Call of Duty Game Montage uses Jacques Offenbach’s Can Can Music track. It’s a happy song that has a tempo of 81 BPM. The track has average danceable energy, and it’s somewhat danceable.
DemixB set the gunshot in the montage video to the music tune. The track builds up to the climax when the gunshot echoes with the attention-grabbing orchestral explosions.

Call of Duty: Modern Warfare
2. ShutteR’s Gaming Montage
In the gaming montage uploaded by ShutteR on his YouTube channel, he used velocity effects to enhance the video. You’ll see that the transition in each scene is paired with adrenaline-pumping, speed-ramping effects.
ShutteR used a slow-motion to highlight action in each scene, then speeds up again when he wants to fast out into the next scene.; this makes the video more engaging to keep viewers glued to their screens.

ShutteR’s Gaming Montage
3. NEVERMORE [CS: GO]
NEVERMORE [CS: GO] was uploaded by Fuze on his YouTube channel, and it has creative gameplay. The gaming montage is based on a story. He did the project with Apel, an artist who designed the Fever Dream series skins in the video.
The basic idea of this gaming montage was that the main game character is a corrupted policeman with purple glowing eyes because he’s not human.
When the edits begin, the shape of the main character will shift from CS: GO CT models and turn into his real corrupt CT shape. So that’s why his name keeps changing. You can get his real identity by pausing some of the frames and looking at the “Killfeed.”

NEVERMORE [CS: GO]
Closing Thoughts:
Gaming montage involves picking and editing a range of video clips, which are brought together to create engaging video content. It consists of the best scenes from gameplay and non-copyrighted background music.
Use Filmora to edit and add effects to your video, including transitions and overlays. Your gaming montage will get more views, hence becoming popular among players.
How to Add Custom Filters in VN App: 2024 Quick Guide
In the colorful world of video editing, the ability to personalize and enhance your clips with unique looks is what stands your work out. Enter the VN app, the game-changer in mobile video editing, bursting with user-friendly features.
If you’ve been searching for a simple way to dive into the realm of video filters, you’re in luck. Today, we’ll decode how to jazz up your videos using the VN app’s built-in and custom video filter features. Ready to elevate your video content game? Let’s get started!
- Step 2: Save the Filter Preset and Use It Directly Next Time
- Part 3: Best Alternatives
- Part 4: Summary
Part 1: Use VN App Built-in Video Filters (LUTs)
Step 1: Locate the Filters Feature
You must know where the magic happens before you go Spielberg on your videos. Upon launching the VN app, you’ll see a range of editing tools. Look for an icon resembling a magic wand or palette – your gateway to the wonderful world of video filters.
Step 2: Preview and Apply Effects
This step is all about experimenting and having fun. Tap on the filter icon, and voilà! You’re greeted with various preset looks, waiting for your videos to don them. Glide through the options; VN has got it all from vintage vibes to futuristic glow. Found one that catches your eye?
Tap on it and watch your video transform instantly. Not sure about your pick? No worries; simply swipe left or right to preview other effects. Once you’re satisfied, tap ‘apply.’
Step 3: Adjust Details with Color Settings
Okay, young director, you’ve chosen your filter. But what if you want to tweak it just a bit? VN’s got your back.
Once a filter is applied, you’ll notice sliders or dials – these are your video filter editor tools. Play around with them! You can adjust the filter’s intensity, making it as subtle or dramatic as you like. Tweak the brightness, contrast, and saturation until your video looks like you envisioned.
Part 2: Download External Filter Installation Package
Step 1: Locate the My Filters Feature
The VN app is awesome, but can you add even more flair to your videos with custom filters? Yup! These aren’t just your regular video presets – they’re unique styles you can download and add to your VN arsenal.
To begin, tap on the “My Filters” section within the app. If you’re wondering where this is, it’s usually nestled beside the built-in filter options, represented by a ‘+’ or ‘Add’ icon. This personal space is ready to be filled with your downloaded filter goodies.
Step 2: Import the Downloaded VN Filter APK
Here comes the cool part! To get new custom filters:
- Visit the website or store where the VN filters are available for download. (Hint: Search for “vn filter download APK” or “vn iPhone filter download” based on your device.)
- Once downloaded, head back to the VN app and click the ‘Add’ or ‘+’ icon in the “My Filters”
- Navigate to your device’s download folder or wherever the vn filter apk is saved.
- Select the filter file (it should have a .apk or similar extension for Android users and a different format for iPhone users).
- Tap on ‘Import’ and wait for the magic to happen. Your brand-new filter will now be housed in “My Filters”!
Step 2: Save the Filter Preset and Use It Directly Next Time
After importing your snazzy new filter, the next step is super easy. Simply apply it to your video, and if you love how it looks, save it as a preset. This way, the next time you’re editing, you can head straight to “My Filters,” find your favorite custom filter and slap it onto your video without a hitch. Talk about convenience!
Part 3: Best Alternatives
Though VN offers many fantastic filter options, it’s always nice to have alternatives, right? Meet Filmora, another stellar video editing tool known for its expansive video filter collection.
Filmora is more than just an editor; it’s a canvas for videographers. One of its most raved-about features is its extensive range of video filters. With Filmora, you can transport your audience from a sun-kissed beach to a moody, rain-soaked alley in just a tap. Whether you’re going for a documentary feel, a Hollywood movie vibe, or something out of a dream, Filmora’s filters have covered you.
Getting started is a breeze:
- Launch Filmora and import your video.
- Head to the “Effects” tab and immerse yourself in the filter options.
- Preview, select, and apply – it’s that simple!
- Like VN, Filmora allows you to tweak the filter settings for that perfect look.
While Filmora is a great tool, the best fit depends on personal preferences and specific project needs. However, it’s always good to have choices in your editing toolkit. Variety is, after all, the spice of life (and video editing)!
Part 4: Summary
The beauty of video editing lies in the limitless possibilities it offers. With every video filter, editor tweak, and custom preset, you’re not just editing – you’re storytelling. And with tools like VN and Filmora at your fingertips, you have everything you need to tell your story your way.
Remember, whether you’re a seasoned videographer or someone just starting, there’s no ‘right’ or ‘wrong’ regarding creativity. Play around, experiment, and, most importantly, have fun with the process. In the vast universe of video editing, every filter is a star waiting to shine on your masterpiece.
How to Make Canva Collages
How to Make Canva Collages
An easy yet powerful editor
Numerous effects to choose from
Detailed tutorials provided by the official channel
Collages are everywhere, be it social media sites, shopping sites, business sites, personal blogs, or anywhere else. Whenever you need to showcase multiple images at one place for the visual experience, or for any other purpose, collages work best.
There are several popular tools available that help you create a collage-like pro and Canva is one of them. So, if you too have been wanting to use Canva collage tool, this article will surely help you to learn about the tool and its use. Keep reading!!!
In this article
01 [What are a collage and its use?](#Part 1)
02 [Using Canva to create a collage](#Part 2)
03 [Get stock of media files at Wondershare Filmora](#Part 3)
Part 1 Part 1. What are a collage and its use?
In simplest terms, a collage is a collection of items that have been placed on a single frame or a page. Thus, an image collage can be termed as a collection of images placed interestingly in a single frame and for this task to be done with perfection, several collage-making tools are available.
Collages can be created for various reasons be it personal or professional. You can create a collage of your best friend’s birthday, wedding, or any special occasion. An online shopping site can create a collage for showcasing all its product under a similar niche in one place. A company can create a collage showcasing its projects, and similar others. Thus, different types of collages can be created for different purposes and requirements.
Part 2 Using Canva to create a collage
Canva is one of the most widely collage-making tools that is user-friendly and comes with a wide range of templates and editing options to let you create a customized college like a pro. It is available as a desktop tool as well as an app for Android and iOS devices. You need to free sign-up using Google, Email, or Facebook at Canva and then you are all set to the collage-making world.
The templates at Canva are available in multiple categories like fashion, travel, food, wedding, beauty, and many more. The option to design your own collage is also there.
Key features
● Simple and easy-to-use desktop and app-based collage maker.
● Comes with several pre-design templates in different categories. Templates can be customized.
● Allows designing your own design.
● Multiple editing options are supported like adding filters, background removal, adding effects, and more.
● Comes with a huge collection of stock images to meet your requirements
● Collage on Canva can be created in high-quality and can be downloaded.
● Allows resizing of the designs depending on the platform it has to be used for.
Steps to create Canva picture collage
● Step 1. On your browser window open Canva collage-maker and choose the Photo Collage option. Sign-up or log in if you already have an account.
● Step 2. At the Home window, choose the desired template from the available options. Using the search bar, you can also look for other Canva collage templates that matches your theme.
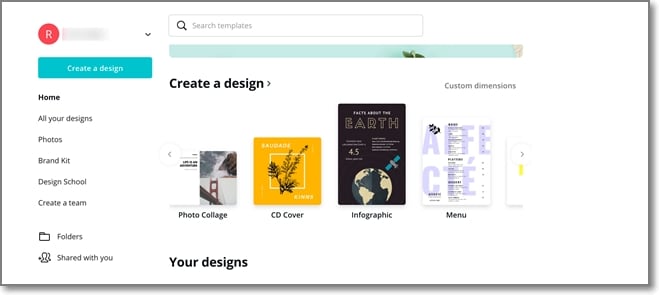
Note: Clicking on the arrow at the “Create a design” option will open the template options if not visible otherwise. Also, to get a customized size for your collage, click on the Custom dimensions button in the upper-right corner.
● Step 3. Selecting and clicking on the desired templatewill open a worktop window. Next, browse and add the images that you need to import to the collage by clicking on the Uploads tab. You can also drag and drop the images.
Images can be moved to place them in the right position.
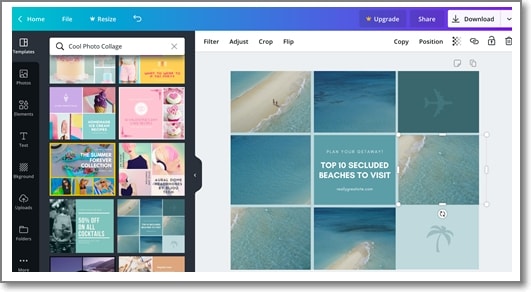
● Step 4. Click on the image and them using one of the tools you can edit it as needed using filter effects, and another toolbar. Use the Elements tab on the left side, for adjusting more elements.
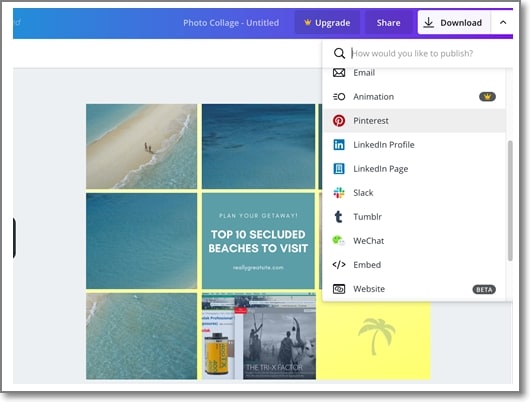
● Step 5. When all the settings are done, tap on the Download button to save the collage in one of the supported formats (JPEG, PNG, and others). You can also share or export the collage.
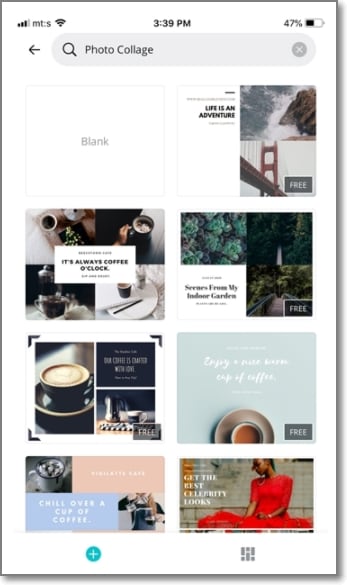
The steps for creating a collage using the Canva app are almost the same as that of the desktop with few changes.
Part 3 Get stock of media files at Wondershare Filmora
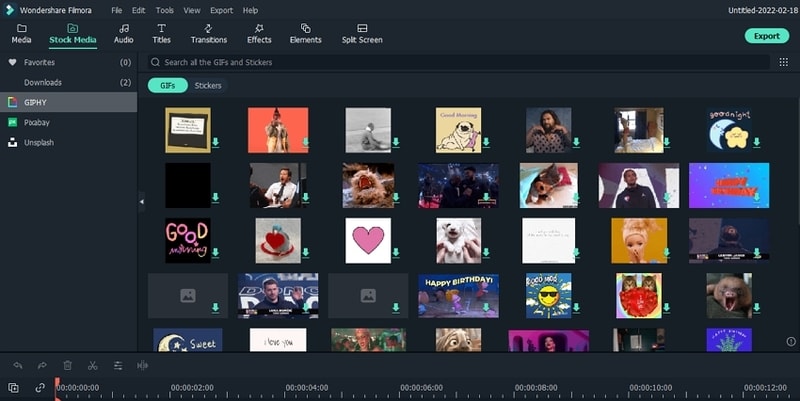
If you want to explore more media files for your collage, Wondershare Filmora Video Editor is excellent software. Though it is a professional video editing software, its latest version comes with a huge library of media files in an array of categories and themes. You can even search for your choice of GIFs and stickers at the tool.
Additional features of the software include creating a split-screen video that looks at a video slideshow, support to basic and advanced video editing functions, audio enhancement and editing functions, and more.
The interface of the software is simple and user-friendly making it apt for all types of users including the ones who have no prior experience of working with such tools.
● Key Takeaways from This Episode →
● Image collage is created by arranging multiple images on a single screen, frame, or page.
● Canva collage maker is one of the popular and widely used collage-maker that is available as a browser tool and phone app.
● To edit your videos professionally and also to get access to a wide range of media files Wondershare Filmora is an excellent tool.
Collages are everywhere, be it social media sites, shopping sites, business sites, personal blogs, or anywhere else. Whenever you need to showcase multiple images at one place for the visual experience, or for any other purpose, collages work best.

There are several popular tools available that help you create a collage-like pro and Canva is one of them. So, if you too have been wanting to use Canva collage tool, this article will surely help you to learn about the tool and its use. Keep reading!!!
In this article
01 [What are a collage and its use?](#Part 1)
02 [Using Canva to create a collage](#Part 2)
03 [Get stock of media files at Wondershare Filmora](#Part 3)
Part 1 Part 1. What are a collage and its use?
In simplest terms, a collage is a collection of items that have been placed on a single frame or a page. Thus, an image collage can be termed as a collection of images placed interestingly in a single frame and for this task to be done with perfection, several collage-making tools are available.
Collages can be created for various reasons be it personal or professional. You can create a collage of your best friend’s birthday, wedding, or any special occasion. An online shopping site can create a collage for showcasing all its product under a similar niche in one place. A company can create a collage showcasing its projects, and similar others. Thus, different types of collages can be created for different purposes and requirements.
Part 2 Using Canva to create a collage
Canva is one of the most widely collage-making tools that is user-friendly and comes with a wide range of templates and editing options to let you create a customized college like a pro. It is available as a desktop tool as well as an app for Android and iOS devices. You need to free sign-up using Google, Email, or Facebook at Canva and then you are all set to the collage-making world.
The templates at Canva are available in multiple categories like fashion, travel, food, wedding, beauty, and many more. The option to design your own collage is also there.
Key features
● Simple and easy-to-use desktop and app-based collage maker.
● Comes with several pre-design templates in different categories. Templates can be customized.
● Allows designing your own design.
● Multiple editing options are supported like adding filters, background removal, adding effects, and more.
● Comes with a huge collection of stock images to meet your requirements
● Collage on Canva can be created in high-quality and can be downloaded.
● Allows resizing of the designs depending on the platform it has to be used for.
Steps to create Canva picture collage
● Step 1. On your browser window open Canva collage-maker and choose the Photo Collage option. Sign-up or log in if you already have an account.
● Step 2. At the Home window, choose the desired template from the available options. Using the search bar, you can also look for other Canva collage templates that matches your theme.

Note: Clicking on the arrow at the “Create a design” option will open the template options if not visible otherwise. Also, to get a customized size for your collage, click on the Custom dimensions button in the upper-right corner.
● Step 3. Selecting and clicking on the desired templatewill open a worktop window. Next, browse and add the images that you need to import to the collage by clicking on the Uploads tab. You can also drag and drop the images.
Images can be moved to place them in the right position.

● Step 4. Click on the image and them using one of the tools you can edit it as needed using filter effects, and another toolbar. Use the Elements tab on the left side, for adjusting more elements.
● Step 5. When all the settings are done, tap on the Download button to save the collage in one of the supported formats (JPEG, PNG, and others). You can also share or export the collage.

The steps for creating a collage using the Canva app are almost the same as that of the desktop with few changes.

Part 3 Get stock of media files at Wondershare Filmora
If you want to explore more media files for your collage, Wondershare Filmora Video Editor is excellent software. Though it is a professional video editing software, its latest version comes with a huge library of media files in an array of categories and themes. You can even search for your choice of GIFs and stickers at the tool.
Additional features of the software include creating a split-screen video that looks at a video slideshow, support to basic and advanced video editing functions, audio enhancement and editing functions, and more.
The interface of the software is simple and user-friendly making it apt for all types of users including the ones who have no prior experience of working with such tools.

● Key Takeaways from This Episode →
● Image collage is created by arranging multiple images on a single screen, frame, or page.
● Canva collage maker is one of the popular and widely used collage-maker that is available as a browser tool and phone app.
● To edit your videos professionally and also to get access to a wide range of media files Wondershare Filmora is an excellent tool.
Collages are everywhere, be it social media sites, shopping sites, business sites, personal blogs, or anywhere else. Whenever you need to showcase multiple images at one place for the visual experience, or for any other purpose, collages work best.

There are several popular tools available that help you create a collage-like pro and Canva is one of them. So, if you too have been wanting to use Canva collage tool, this article will surely help you to learn about the tool and its use. Keep reading!!!
In this article
01 [What are a collage and its use?](#Part 1)
02 [Using Canva to create a collage](#Part 2)
03 [Get stock of media files at Wondershare Filmora](#Part 3)
Part 1 Part 1. What are a collage and its use?
In simplest terms, a collage is a collection of items that have been placed on a single frame or a page. Thus, an image collage can be termed as a collection of images placed interestingly in a single frame and for this task to be done with perfection, several collage-making tools are available.
Collages can be created for various reasons be it personal or professional. You can create a collage of your best friend’s birthday, wedding, or any special occasion. An online shopping site can create a collage for showcasing all its product under a similar niche in one place. A company can create a collage showcasing its projects, and similar others. Thus, different types of collages can be created for different purposes and requirements.
Part 2 Using Canva to create a collage
Canva is one of the most widely collage-making tools that is user-friendly and comes with a wide range of templates and editing options to let you create a customized college like a pro. It is available as a desktop tool as well as an app for Android and iOS devices. You need to free sign-up using Google, Email, or Facebook at Canva and then you are all set to the collage-making world.
The templates at Canva are available in multiple categories like fashion, travel, food, wedding, beauty, and many more. The option to design your own collage is also there.
Key features
● Simple and easy-to-use desktop and app-based collage maker.
● Comes with several pre-design templates in different categories. Templates can be customized.
● Allows designing your own design.
● Multiple editing options are supported like adding filters, background removal, adding effects, and more.
● Comes with a huge collection of stock images to meet your requirements
● Collage on Canva can be created in high-quality and can be downloaded.
● Allows resizing of the designs depending on the platform it has to be used for.
Steps to create Canva picture collage
● Step 1. On your browser window open Canva collage-maker and choose the Photo Collage option. Sign-up or log in if you already have an account.
● Step 2. At the Home window, choose the desired template from the available options. Using the search bar, you can also look for other Canva collage templates that matches your theme.

Note: Clicking on the arrow at the “Create a design” option will open the template options if not visible otherwise. Also, to get a customized size for your collage, click on the Custom dimensions button in the upper-right corner.
● Step 3. Selecting and clicking on the desired templatewill open a worktop window. Next, browse and add the images that you need to import to the collage by clicking on the Uploads tab. You can also drag and drop the images.
Images can be moved to place them in the right position.

● Step 4. Click on the image and them using one of the tools you can edit it as needed using filter effects, and another toolbar. Use the Elements tab on the left side, for adjusting more elements.
● Step 5. When all the settings are done, tap on the Download button to save the collage in one of the supported formats (JPEG, PNG, and others). You can also share or export the collage.

The steps for creating a collage using the Canva app are almost the same as that of the desktop with few changes.

Part 3 Get stock of media files at Wondershare Filmora
If you want to explore more media files for your collage, Wondershare Filmora Video Editor is excellent software. Though it is a professional video editing software, its latest version comes with a huge library of media files in an array of categories and themes. You can even search for your choice of GIFs and stickers at the tool.
Additional features of the software include creating a split-screen video that looks at a video slideshow, support to basic and advanced video editing functions, audio enhancement and editing functions, and more.
The interface of the software is simple and user-friendly making it apt for all types of users including the ones who have no prior experience of working with such tools.

● Key Takeaways from This Episode →
● Image collage is created by arranging multiple images on a single screen, frame, or page.
● Canva collage maker is one of the popular and widely used collage-maker that is available as a browser tool and phone app.
● To edit your videos professionally and also to get access to a wide range of media files Wondershare Filmora is an excellent tool.
Collages are everywhere, be it social media sites, shopping sites, business sites, personal blogs, or anywhere else. Whenever you need to showcase multiple images at one place for the visual experience, or for any other purpose, collages work best.

There are several popular tools available that help you create a collage-like pro and Canva is one of them. So, if you too have been wanting to use Canva collage tool, this article will surely help you to learn about the tool and its use. Keep reading!!!
In this article
01 [What are a collage and its use?](#Part 1)
02 [Using Canva to create a collage](#Part 2)
03 [Get stock of media files at Wondershare Filmora](#Part 3)
Part 1 Part 1. What are a collage and its use?
In simplest terms, a collage is a collection of items that have been placed on a single frame or a page. Thus, an image collage can be termed as a collection of images placed interestingly in a single frame and for this task to be done with perfection, several collage-making tools are available.
Collages can be created for various reasons be it personal or professional. You can create a collage of your best friend’s birthday, wedding, or any special occasion. An online shopping site can create a collage for showcasing all its product under a similar niche in one place. A company can create a collage showcasing its projects, and similar others. Thus, different types of collages can be created for different purposes and requirements.
Part 2 Using Canva to create a collage
Canva is one of the most widely collage-making tools that is user-friendly and comes with a wide range of templates and editing options to let you create a customized college like a pro. It is available as a desktop tool as well as an app for Android and iOS devices. You need to free sign-up using Google, Email, or Facebook at Canva and then you are all set to the collage-making world.
The templates at Canva are available in multiple categories like fashion, travel, food, wedding, beauty, and many more. The option to design your own collage is also there.
Key features
● Simple and easy-to-use desktop and app-based collage maker.
● Comes with several pre-design templates in different categories. Templates can be customized.
● Allows designing your own design.
● Multiple editing options are supported like adding filters, background removal, adding effects, and more.
● Comes with a huge collection of stock images to meet your requirements
● Collage on Canva can be created in high-quality and can be downloaded.
● Allows resizing of the designs depending on the platform it has to be used for.
Steps to create Canva picture collage
● Step 1. On your browser window open Canva collage-maker and choose the Photo Collage option. Sign-up or log in if you already have an account.
● Step 2. At the Home window, choose the desired template from the available options. Using the search bar, you can also look for other Canva collage templates that matches your theme.

Note: Clicking on the arrow at the “Create a design” option will open the template options if not visible otherwise. Also, to get a customized size for your collage, click on the Custom dimensions button in the upper-right corner.
● Step 3. Selecting and clicking on the desired templatewill open a worktop window. Next, browse and add the images that you need to import to the collage by clicking on the Uploads tab. You can also drag and drop the images.
Images can be moved to place them in the right position.

● Step 4. Click on the image and them using one of the tools you can edit it as needed using filter effects, and another toolbar. Use the Elements tab on the left side, for adjusting more elements.
● Step 5. When all the settings are done, tap on the Download button to save the collage in one of the supported formats (JPEG, PNG, and others). You can also share or export the collage.

The steps for creating a collage using the Canva app are almost the same as that of the desktop with few changes.

Part 3 Get stock of media files at Wondershare Filmora
If you want to explore more media files for your collage, Wondershare Filmora Video Editor is excellent software. Though it is a professional video editing software, its latest version comes with a huge library of media files in an array of categories and themes. You can even search for your choice of GIFs and stickers at the tool.
Additional features of the software include creating a split-screen video that looks at a video slideshow, support to basic and advanced video editing functions, audio enhancement and editing functions, and more.
The interface of the software is simple and user-friendly making it apt for all types of users including the ones who have no prior experience of working with such tools.

● Key Takeaways from This Episode →
● Image collage is created by arranging multiple images on a single screen, frame, or page.
● Canva collage maker is one of the popular and widely used collage-maker that is available as a browser tool and phone app.
● To edit your videos professionally and also to get access to a wide range of media files Wondershare Filmora is an excellent tool.
Also read:
- In 2024, The Ultimate Guide to Use LUTS to Color Grade on iPhone
- Do You Wish to Make Your Discord PFP an Attention-Seeker? If Yes, Try the Animated Discord PFP. Lets Go over Essential Facts on the Topic, Including How to Get an Animated Discord PFP
- This Article Will Explore in Detail How You Can Use the Features Available in Wondershare Filmora to Export the Video by Changing the Resolution of the Footage for 2024
- An Ultimate Guide on the Significance of Music in Videos and How to Choose the Right Music for Your Videos with Wondershare Filmora for 2024
- 2024 Approved Do You Want to Know How to Import or Adjust Clips in Wondershare Filmora? Dont Worry because Importing or Adjusting Video Clips in This Tool Is Pretty Easy
- 2024 Approved Techniques You Never Heard of for Learning AI Marketing YouTube
- In 2024, Here Are the Steps to Crop a Video in Sony Vegas Pro Step 1 Click on Import and Import the Video to Be Edited. Click on It and Drag-Drop to Timeline
- Updated How to Use Frame Blending in Premiere Pro
- In 2024, All About GIF Keyboard That You May Want to Know
- In 2024, Easy Guide to Overlay Videos in Premiere Pro
- New In 2024, Best 9 Amv Makers for Computer
- In 2024, Splitting Video Into Frames with the FFmpeg Step by Step
- New 2024 Approved A Complete Guide to the Best Brand Story Videos
- Updated Do You Want to Show Your Mood in Your Digital Media Content but Dont Know How To? There Are Many Moody LUTs Available that Highlight Your Mood in Your Content
- Create Your Face Zoom TikTok Now
- 2024 Approved 7 Solutions to Cut Video on Mac without Using FFmpeg?
- 2024 Approved Do You Know Everything Related to Wondershare Filmoras Video Editing Interface? If You Are Unaware of It, Read and Learn About Filmoras Interface
- Updated Zoom In and Out on Snapchat for 2024
- 2024 Approved How to Use Adjustment Layer in Final Cut Pro
- New How To Make An Interactive Quiz Video? Step-by-Step Guide
- New In 2024, Best 10 Mind-Blowing Video Collage Maker for PC
- New 2024 Approved Top 5 Tips to Freeze-Frame in After Effects
- 2024 Approved How to Make First Impression Review Video
- Updated An Ultimate Guide on the Significance of Music in Videos and How to Choose the Right Music for Your Videos with Wondershare Filmora
- Updated Top 5 Best Video Denoisers
- 2024 Approved 5 Tips for Faster Editing in Filmora Video Editor
- New Top 15 Best Free MP4 Video Rotators Windows, Mac, Android, iPhone & Online for 2024
- New TOP 10 Types of Video Framing From Novice to Master for 2024
- In 2024, Filmora Is a Great Video Editor that Many Users Are Making Intro Video with It. This Article Will Guide You How to Create an Intro Video with Filmora
- Updated Before & After Editing Trick | Wondershare Filmora Tutorial for 2024
- Adding a Spooky Shadow Effect with Filmora
- Updated In 2024, Discover How to Change Sky Background with The Best Applications? A Review
- Updated Having Issues Trying to View SRT Files when You Add Subtitle Files for VLC? Learn the Right Ways to Do so and the Best Alternative Solution
- Updated Guide on VHS Technology and Its Influence on Video Editing
- Updated In 2024, End This Problem! Make Transparent Background Video Today
- Are You Looking to Finish Your YouTube Video in Style? The Following Are the Best End Screen Makers to Choose From for 2024
- Updated How to Use Blender Green Screen for 2024
- New 2024 Approved How to Customize Your Loading Text Effect?
- New 2024 Approved How D AI Video Games Act More Human Than Human?
- In 2024, How Do You Get Sun Stone Evolutions in Pokémon For Xiaomi Redmi Note 12T Pro? | Dr.fone
- In 2024, Top 4 Ways to Trace Vivo Y100i Location | Dr.fone
- Updated How to Make My Photo 3D Cartoon Online
- New In 2024, How to Create a Whiteboard Animation Video
- In 2024, Full Guide to Bypass Oppo A56s 5G FRP
- In 2024, 3 Effective Methods to Fake GPS location on Android For your Motorola Moto G23 | Dr.fone
- Possible solutions to restore deleted messages from Lava Blaze 2
- Ultimate Guide from Vivo Y78t FRP Bypass
- In 2024, Is Fake GPS Location Spoofer a Good Choice On Tecno Spark 20 Pro? | Dr.fone
- In 2024, 3 Effective Methods to Fake GPS location on Android For your Lava Blaze Curve 5G | Dr.fone
- Ultimate guide to get the meltan box pokemon go For Motorola G24 Power | Dr.fone
- Best Anti Tracker Software For Motorola Edge 2023 | Dr.fone
- How To Change Realme Narzo 60 5G Lock Screen Clock in Seconds
- How to Bypass FRP on Samsung Galaxy Z Fold 5?
- Why can’t I play MP4 files on my Samsung Galaxy S23 Ultra?
- Thinking About Changing Your Netflix Region Without a VPN On Vivo Y27 4G? | Dr.fone
- In 2024, Ultimate guide to get the meltan box pokemon go For Apple iPhone 11 | Dr.fone
- In 2024, iPhone 7 Backup Password Never Set But Still Asking? Heres the Fix | Dr.fone
- Top 5 Tecno Camon 30 Pro 5G Bypass FRP Tools for PC That Actually Work
- Detailed Review of doctorSIM Unlock Service For Apple iPhone 6 Plus
- In 2024, Top 9 Realme C67 4G Monitoring Apps for Parental Controls | Dr.fone
- New What Is Still Motion Animation?
- In 2024, How to Mirror Samsung Galaxy M14 4G to Mac? | Dr.fone
- In 2024, How does the stardust trade cost In pokemon go On Nokia G22? | Dr.fone
- In 2024, How Can We Unlock Our Nubia Z50S Pro Phone Screen?
- Can You Unlock Apple iPhone 13 After Forgetting the Passcode?
- In 2024, How To Change Your Apple ID on iPhone 11 Pro Max With or Without Password | Dr.fone
- In 2024, Top 9 Vivo Y36 Monitoring Apps for Parental Controls | Dr.fone
- In 2024, Forgotten The Voicemail Password Of Vivo S18? Try These Fixes
- In 2024, How to Unlock Apple ID Activation Lock From iPhone X?
- How to view MOV files on HTC U23 ?
- In 2024, Step-by-Step Tutorial How To Bypass ZTE Axon 40 Lite FRP
- How to Quickly Fix Bluetooth Not Working on Samsung Galaxy S24+ | Dr.fone
- Title: This Article Will Show You the Steps to Make Coin Magic in Videos with Filmora
- Author: Chloe
- Created at : 2024-05-20 03:37:37
- Updated at : 2024-05-21 03:37:37
- Link: https://ai-editing-video.techidaily.com/this-article-will-show-you-the-steps-to-make-coin-magic-in-videos-with-filmora/
- License: This work is licensed under CC BY-NC-SA 4.0.

