:max_bytes(150000):strip_icc():format(webp)/GettyImages-1094009490-2694d308001d46049e0755f4dd7fdf4c.jpg)
This Easy Hack Using Wondershare Filmora New Masking Feature Will Be a Great Addition to Your Next Horror Video Content

This Easy Hack Using Wondershare Filmora New Masking Feature Will Be a Great Addition to Your Next Horror Video Content
Wondershare Filmora’s main purpose is the empowerment of content creators. The latest updates to the program are one of the pieces of evidence.
Whether you’re a horror content creator or simply living the Halloween vibe 24/7, continue reading to know how to use its latest masking feature to create a cool shadow effect for your next mind-blowing social media video.
How to Use The Masking Effect
Wondershare Filmora’s latest Masking feature allows its users to select a specific clip that they can overlay on other parts of the video or other clips.
Free Download For Win 7 or later(64-bit)
Free Download For macOS 10.14 or later
The feature allows you to insert the mask in any shape, such as a rectangle, circle, or triangle. You can also import any shapes you like if you can’t find them in the presets library. You can also adjust the mask placement, width, height, and feather effect.
Without further ado, let’s see the detailed step-by-step guide for this effect.
a. Preparation
You will need at least three shots of the same frame to get the shadow effect to work. The first is the main video, the second is the shadow clip, and the last would be a clip portraying just a plain background.
Make sure that your camera stays at the same point and angle. You can use a tripod for assurance.
Take the first main video and don’t forget to mark the positioning of the object for the next take. Then, you can shoot the shadow clip following the marking of the object to match its position in the main clip.
Finally, shoot the final clip without the object on the frame.

b. Steps to add the shadow effect to your videos using Masking
Step 1: Place the main clip on the timeline and find the start of the segment that you want to use. Press M on the keyboard to set a marker.

Step 2: Place the shadow clip on top of the main clip on the timeline. Trim and adjust until the shadow clip ends right at the marker of the main clip.

Step 3: Move the play head to the start of the shadow clip. Trim the main clip right on that mark so both clips have the same start by clicking the scissor icon and deleting the unused part.

Step 4: Double-click the shadow clip. OpenSettings > Mask Section > Rectangle to apply the mask. Adjust the blur strength to smooth out the edge.

Step 5: Play the result to see if there’s any part you need to block out. When you find them, repeat steps 1 to 4 but with the background clip. Try to conceal all things you need to hide using the masks. Make sure that you get the timings right.

Step6 Trim the length of the masking clips to match the main clip by sliding the play head and clicking the Split button.
Adjust the audio and preview the effect before you save the result. You can also add extra features like slow motion for maximum effect.

Summary
It is so easy to use this shadow effect on your video using Wondershare Filmora. The handy masking feature also comes with additional keyframe control and easy composite adjustment.
Wondershare Filmora is also packed with other powerful new features. This includes Auto Beat Sync, Speed Ramping, Quick Split Mode, and the upgraded Denoise feature. Update today to add more quirk to your content.
Free Download For macOS 10.14 or later
The feature allows you to insert the mask in any shape, such as a rectangle, circle, or triangle. You can also import any shapes you like if you can’t find them in the presets library. You can also adjust the mask placement, width, height, and feather effect.
Without further ado, let’s see the detailed step-by-step guide for this effect.
a. Preparation
You will need at least three shots of the same frame to get the shadow effect to work. The first is the main video, the second is the shadow clip, and the last would be a clip portraying just a plain background.
Make sure that your camera stays at the same point and angle. You can use a tripod for assurance.
Take the first main video and don’t forget to mark the positioning of the object for the next take. Then, you can shoot the shadow clip following the marking of the object to match its position in the main clip.
Finally, shoot the final clip without the object on the frame.

b. Steps to add the shadow effect to your videos using Masking
Step 1: Place the main clip on the timeline and find the start of the segment that you want to use. Press M on the keyboard to set a marker.

Step 2: Place the shadow clip on top of the main clip on the timeline. Trim and adjust until the shadow clip ends right at the marker of the main clip.

Step 3: Move the play head to the start of the shadow clip. Trim the main clip right on that mark so both clips have the same start by clicking the scissor icon and deleting the unused part.

Step 4: Double-click the shadow clip. OpenSettings > Mask Section > Rectangle to apply the mask. Adjust the blur strength to smooth out the edge.

Step 5: Play the result to see if there’s any part you need to block out. When you find them, repeat steps 1 to 4 but with the background clip. Try to conceal all things you need to hide using the masks. Make sure that you get the timings right.

Step6 Trim the length of the masking clips to match the main clip by sliding the play head and clicking the Split button.
Adjust the audio and preview the effect before you save the result. You can also add extra features like slow motion for maximum effect.

Summary
It is so easy to use this shadow effect on your video using Wondershare Filmora. The handy masking feature also comes with additional keyframe control and easy composite adjustment.
Wondershare Filmora is also packed with other powerful new features. This includes Auto Beat Sync, Speed Ramping, Quick Split Mode, and the upgraded Denoise feature. Update today to add more quirk to your content.
Free Download For macOS 10.14 or later
The feature allows you to insert the mask in any shape, such as a rectangle, circle, or triangle. You can also import any shapes you like if you can’t find them in the presets library. You can also adjust the mask placement, width, height, and feather effect.
Without further ado, let’s see the detailed step-by-step guide for this effect.
a. Preparation
You will need at least three shots of the same frame to get the shadow effect to work. The first is the main video, the second is the shadow clip, and the last would be a clip portraying just a plain background.
Make sure that your camera stays at the same point and angle. You can use a tripod for assurance.
Take the first main video and don’t forget to mark the positioning of the object for the next take. Then, you can shoot the shadow clip following the marking of the object to match its position in the main clip.
Finally, shoot the final clip without the object on the frame.

b. Steps to add the shadow effect to your videos using Masking
Step 1: Place the main clip on the timeline and find the start of the segment that you want to use. Press M on the keyboard to set a marker.

Step 2: Place the shadow clip on top of the main clip on the timeline. Trim and adjust until the shadow clip ends right at the marker of the main clip.

Step 3: Move the play head to the start of the shadow clip. Trim the main clip right on that mark so both clips have the same start by clicking the scissor icon and deleting the unused part.

Step 4: Double-click the shadow clip. OpenSettings > Mask Section > Rectangle to apply the mask. Adjust the blur strength to smooth out the edge.

Step 5: Play the result to see if there’s any part you need to block out. When you find them, repeat steps 1 to 4 but with the background clip. Try to conceal all things you need to hide using the masks. Make sure that you get the timings right.

Step6 Trim the length of the masking clips to match the main clip by sliding the play head and clicking the Split button.
Adjust the audio and preview the effect before you save the result. You can also add extra features like slow motion for maximum effect.

Summary
It is so easy to use this shadow effect on your video using Wondershare Filmora. The handy masking feature also comes with additional keyframe control and easy composite adjustment.
Wondershare Filmora is also packed with other powerful new features. This includes Auto Beat Sync, Speed Ramping, Quick Split Mode, and the upgraded Denoise feature. Update today to add more quirk to your content.
Free Download For macOS 10.14 or later
The feature allows you to insert the mask in any shape, such as a rectangle, circle, or triangle. You can also import any shapes you like if you can’t find them in the presets library. You can also adjust the mask placement, width, height, and feather effect.
Without further ado, let’s see the detailed step-by-step guide for this effect.
a. Preparation
You will need at least three shots of the same frame to get the shadow effect to work. The first is the main video, the second is the shadow clip, and the last would be a clip portraying just a plain background.
Make sure that your camera stays at the same point and angle. You can use a tripod for assurance.
Take the first main video and don’t forget to mark the positioning of the object for the next take. Then, you can shoot the shadow clip following the marking of the object to match its position in the main clip.
Finally, shoot the final clip without the object on the frame.

b. Steps to add the shadow effect to your videos using Masking
Step 1: Place the main clip on the timeline and find the start of the segment that you want to use. Press M on the keyboard to set a marker.

Step 2: Place the shadow clip on top of the main clip on the timeline. Trim and adjust until the shadow clip ends right at the marker of the main clip.

Step 3: Move the play head to the start of the shadow clip. Trim the main clip right on that mark so both clips have the same start by clicking the scissor icon and deleting the unused part.

Step 4: Double-click the shadow clip. OpenSettings > Mask Section > Rectangle to apply the mask. Adjust the blur strength to smooth out the edge.

Step 5: Play the result to see if there’s any part you need to block out. When you find them, repeat steps 1 to 4 but with the background clip. Try to conceal all things you need to hide using the masks. Make sure that you get the timings right.

Step6 Trim the length of the masking clips to match the main clip by sliding the play head and clicking the Split button.
Adjust the audio and preview the effect before you save the result. You can also add extra features like slow motion for maximum effect.

Summary
It is so easy to use this shadow effect on your video using Wondershare Filmora. The handy masking feature also comes with additional keyframe control and easy composite adjustment.
Wondershare Filmora is also packed with other powerful new features. This includes Auto Beat Sync, Speed Ramping, Quick Split Mode, and the upgraded Denoise feature. Update today to add more quirk to your content.
Top 10 Sound Extractors to Extract Sound From Video
It often happens that we get so engrossed in a movie or video and fall exceptionally hard for all elements. This can prompt us to extract sounds from videos, like the background music, a voiceover, or dialogue between characters.
Safe sound extraction from any type of video file will require the help of the best sound extractor software. Wondering about which you should try out? Go through this list, and then make up your mind.
- Adobe Premiere Pro
- Filmora
- iMovie
- VLC
- Online Audio Converter
- Audio Converter
- FFmpeg
- QuickTime
- Audio Extractor
- ASPOSE
- Practical Tips to Choose the Best One to Extract Sound from Videos
- Hot FAQs on Extract Sound from Videos
Top 10 Sound Extractors for Extracting Sound from video
We researched and found many software options for extracting Sound from video. After careful checking, we found 10 options with high-quality functions and performance levels. We recommend you consider them for pulling audio from video files- here’s why.
1. Adobe Premiere Pro
Adobe Premiere Pro is one of the top-level video editors available with various functions and pre-set filters/effects. So, one can customize the videos and audio as they require, like extracting Sound from video and saving them.
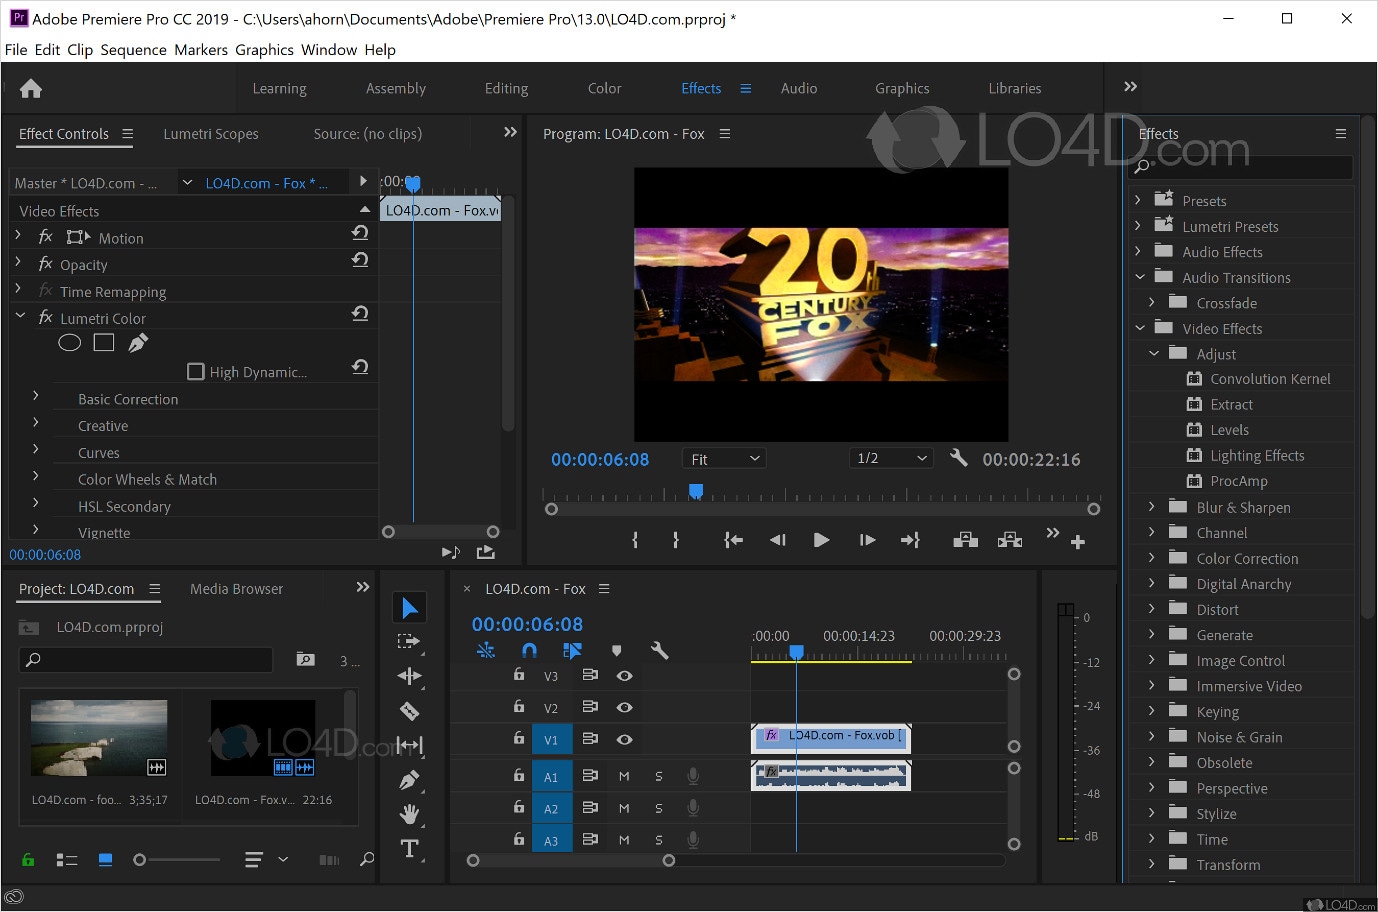
How to Download: Website
Compatible OS: Windows, Mac
Price: Individuals- USD 20.99/month. License for Teams- USD 35.99. All Apps-related plans.
Main Features:
- Pre-set templates are available in high-quality resolutions.
- Customize your titles and video edits.
- Automatically adjusts color matching in scenes.
- Robust text-to-speech function with multi-language support.
Pros
- Share easily across the platform with cloud support.
- Access to diverse stock media with Adobe membership.
- Supports many file formats like / (), MPEG-2, Apple ProRes, MPEG-4, native camera formats, etc.
Cons
- No perpetual license support.
- Strict eligibility rules to qualify for student-teacher plans.
Best for Users: Professionals and organization-based users, like teachers, can use this for personal and teaching-related video editing steps.
2. Filmora
If you want a software sound extractor that provides a wide range of audio editing functions, Filmora is one that we would recommend. While it is firstly a video editor, you can use audio-based editing functions like sound stabilization, extraction, visualization, audio ducking, silence detection, and more.
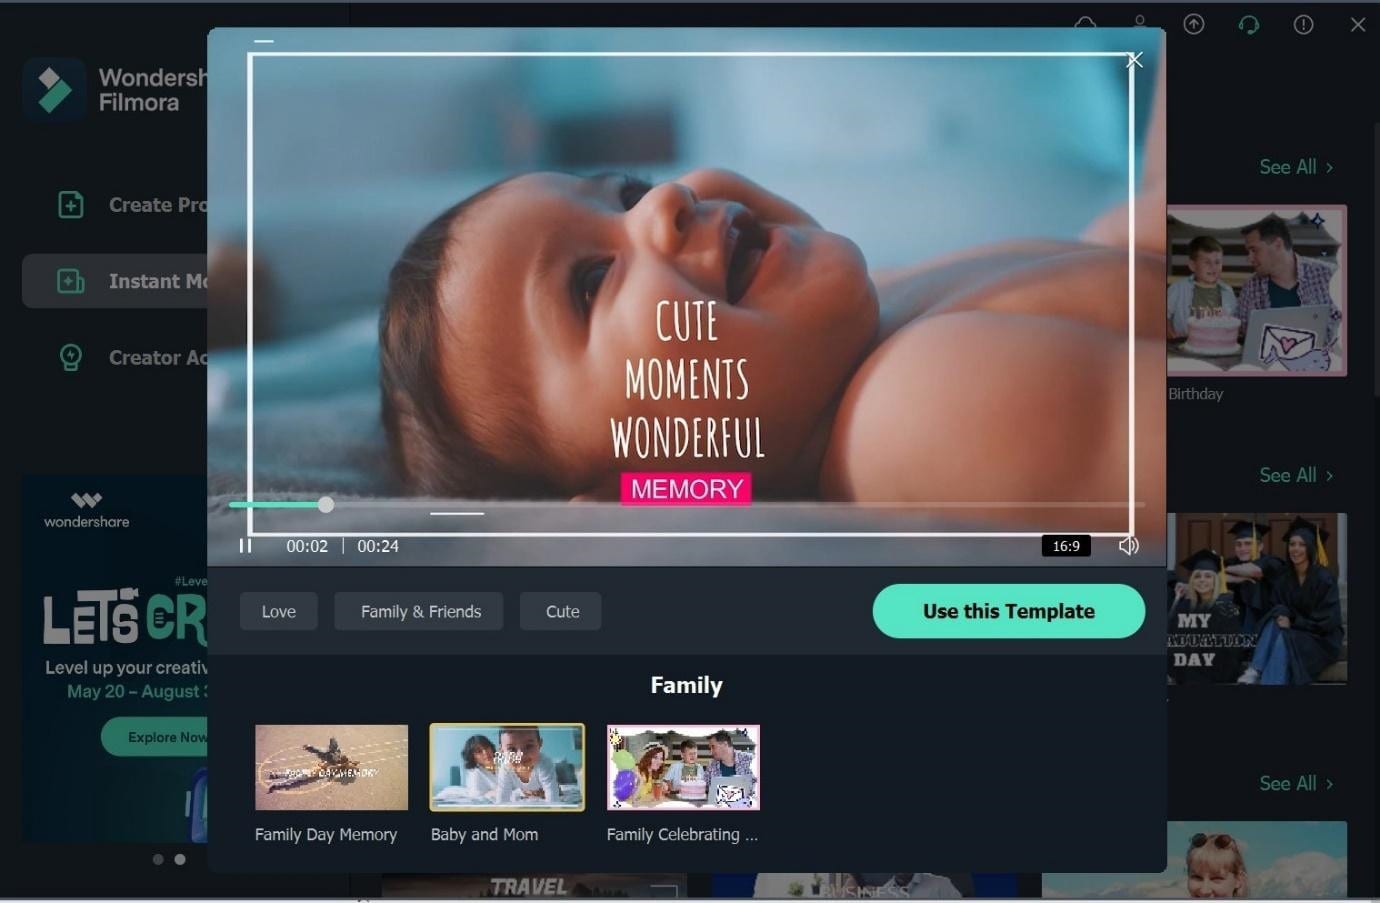
Free Download For Win 7 or later(64-bit)
Free Download For macOS 10.14 or later
Compatible OS: Windows, Mac
Price: Free, Annual- USD 49.99, Perpetual- USD 89.99
Main Features:
- The audio visualization feature analyzes and virtually shows beats.
- Detect silent sections in the video and remove them.
- Many audio stabilization settings like Denoise and Equalizer.
- Vital TTS/STT functions for voiceovers.
Pros
- Multiple video/audio formats are supported.
- Pre-set sound effects are present.
- Adjust the volume of videos during editing.
Cons
- Upgrade plan to remove ads.
- Audio output is mainly available in MP3.
How to use for extracting music from videos:
Step1 Download and install Filmora 11 .
Step2 Click on New Project.
Step3 Press “Click here to import Media” > choose file folder > Insert.
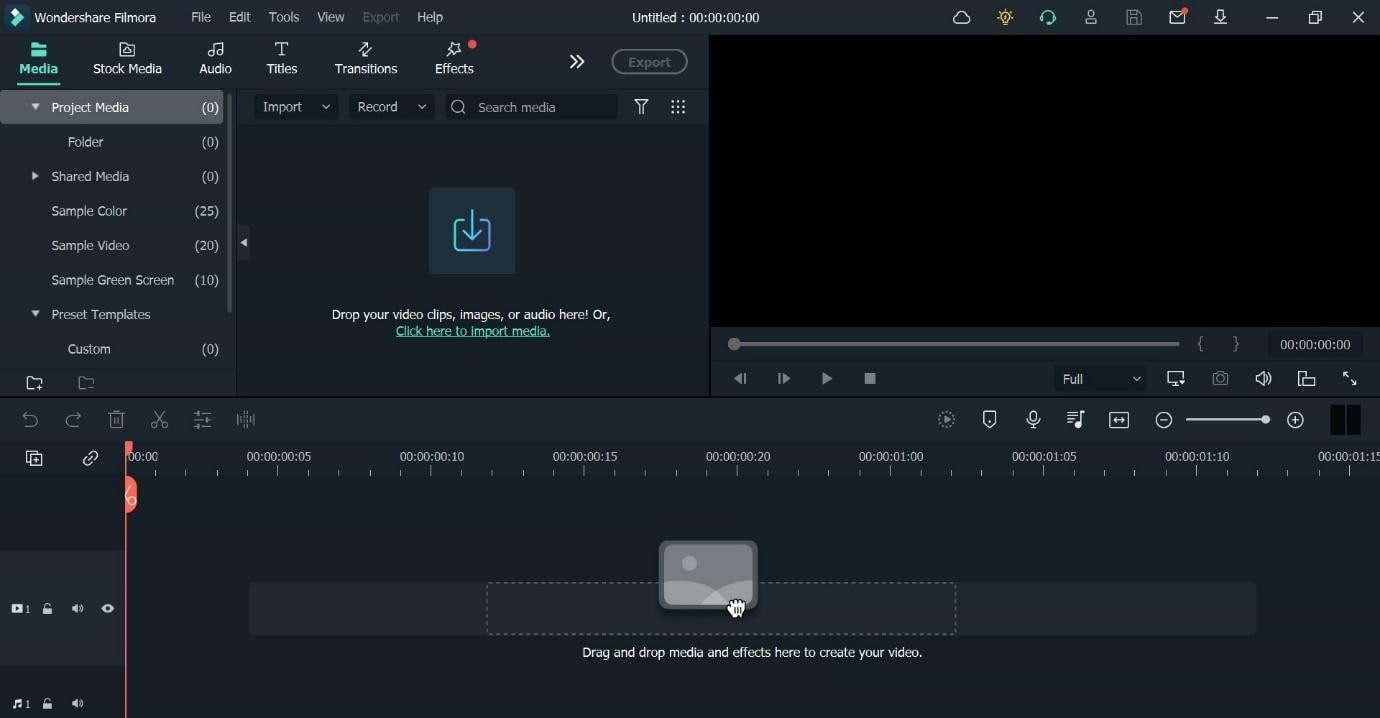
Step4 Drag file to editor timeline > Cut the file to a set suitable size for your audio extraction.
Step5 Click on the Edit icon from the list of icons above the timeline.
Step6 Press on Audio > Make adjustments for settings like Fade in/Face out, Equalizer, Pitch, etc.
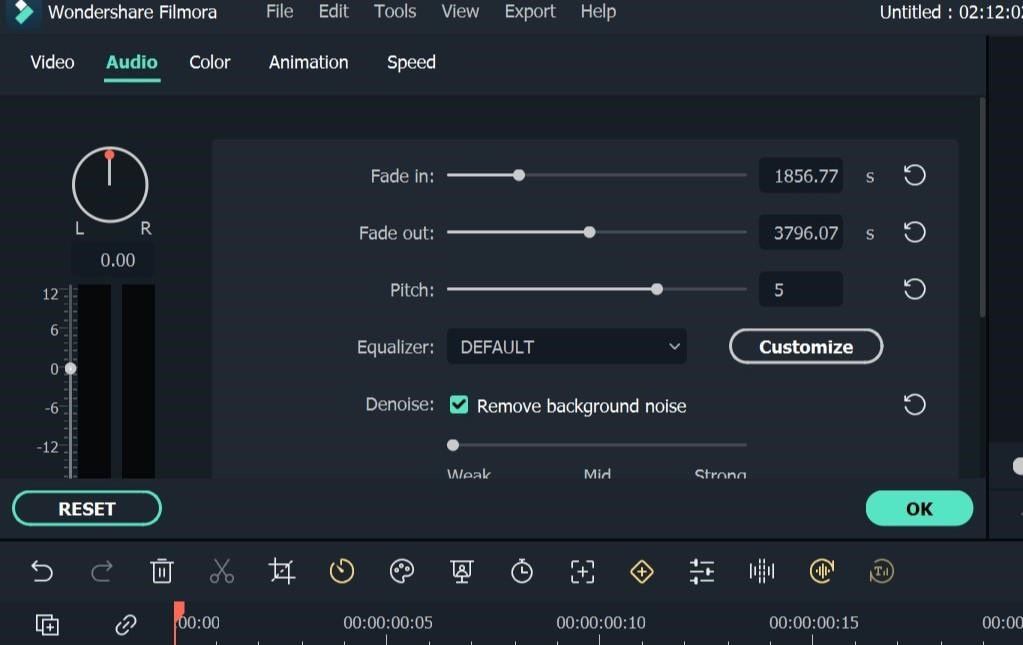
Step7 Click Export > Local > MP3. Make changes as needed.
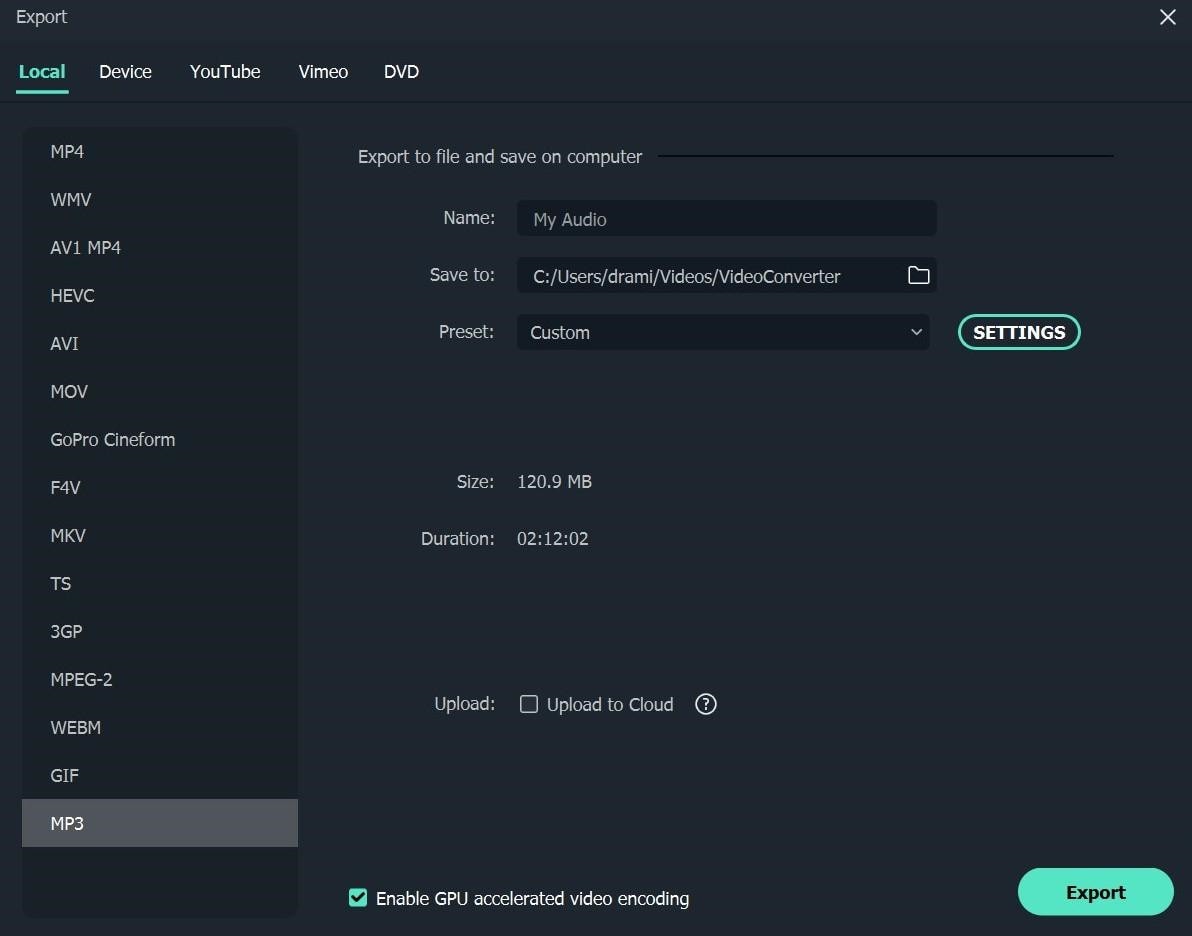
Step8 Hit the Export button.
Best for Users: Pro-level and beginner-level professionals and home-based users who want a comprehensive, feature-rich platform for video/audio editing can benefit from this.
3. iMovie
Mac and iOS users benefit significantly from this video editing software to create dynamic movie-quality videos. One major part of movies is the soundtrack, and you can use this software to add easily, control, and extract the sound clips.
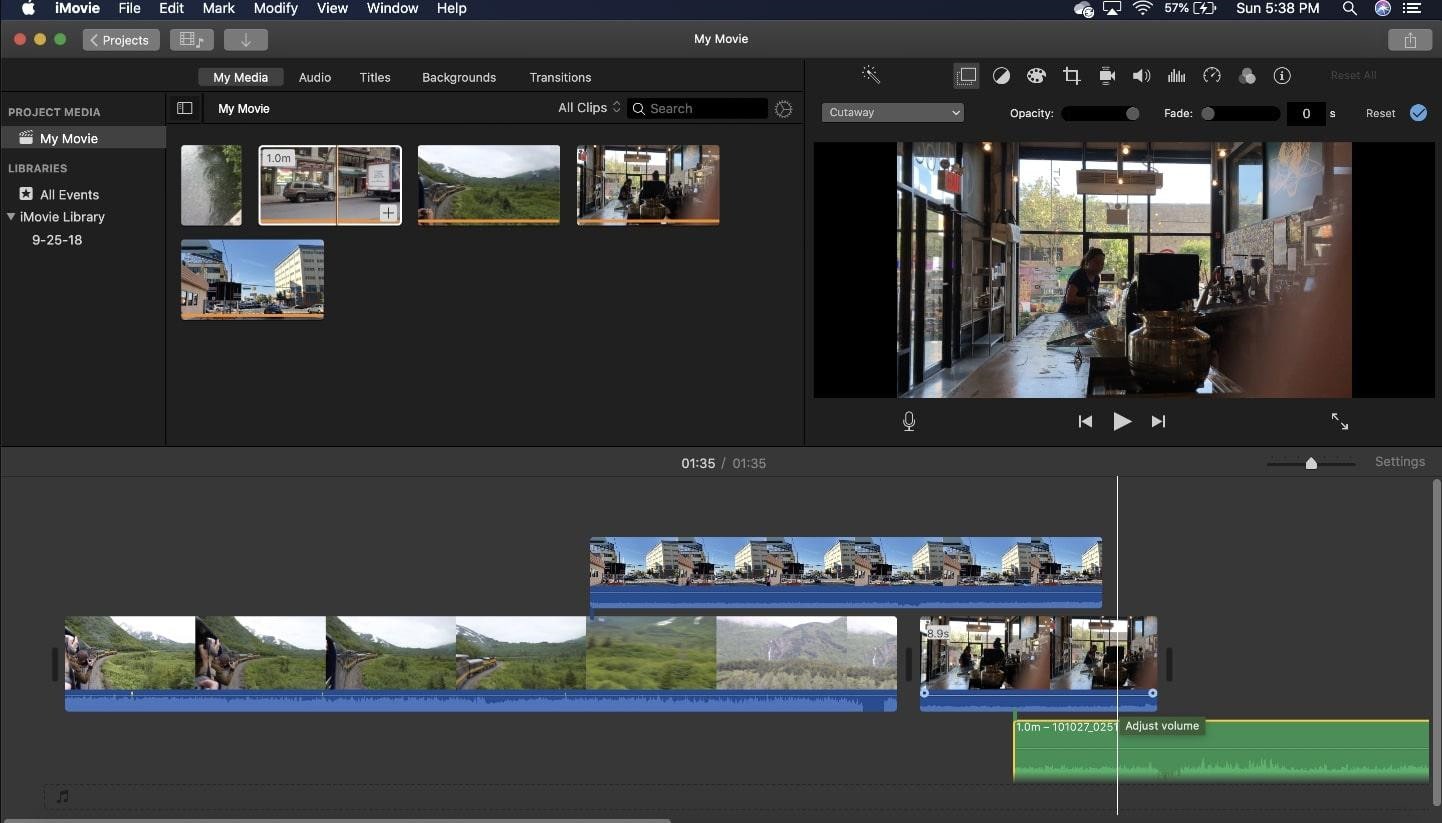
How to Download: Mac App Store , Apple App Store
Compatible OS: Mac, iOS
Price: Free
Main Features:
- Pre-set storyboard available for optimized and thematic video edits.
- Royalty-free audio files in the library.
- You can add voiceovers.
- Add pre-set sound effects or customize them, like removing/adding audio clips.
Pros
- Sound aligns precisely with video.
- Multiple effects, filters, and editing tools are available.
- Simple sharing via social media accounts.
Cons
- Only available for iOS 15.1+ and such newest versions of Apple devices.
- You cannot access it without an Apple ID.
Best for Users: Professional video editors with diverse movie-like presentation-making needs can use this.
4. VLC
VLC is a well-known Windows-based media player that is accessible as a Chrome extension and has mobile app versions. While you can use it mainly to view videos, the software can easily cut out sound clips from the video here.
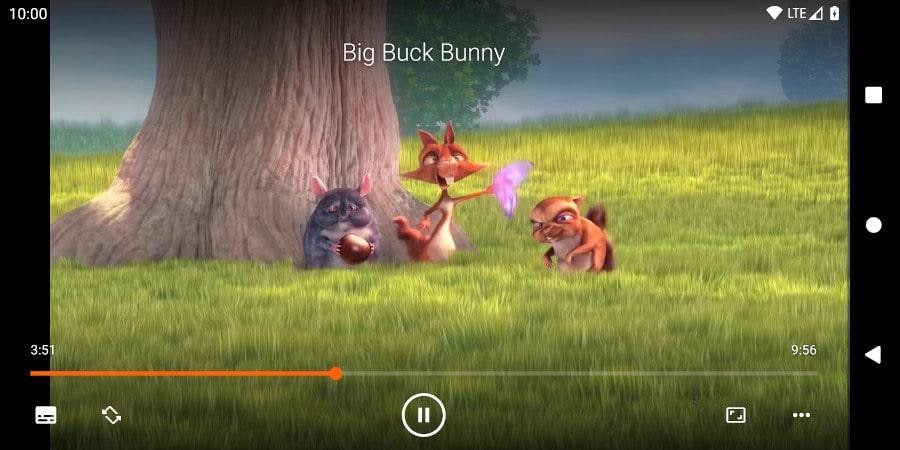
How to Download: Microsoft Store , Apple App Store , Google Play Store , Chrome Web Store
Compatible OS: Windows, iOS, Chromebook, Android
Price: Free
Main Features:
- Script the command line VLC-based invocations.
- Play different types of files with multi-format support.
- Use the in-built equalizer to optimize sound quality/effects.
- Sync with or create a new video stream.
Pros
- The software assures quick functions with all features.
- No codec installation is necessary.
- Keyboard shortcuts for specific actions.
Cons
- Difficult to search and open files.
- Not very customizable.
Best for Users: People can use VLC Media Player to stream or play videos and even make some minor adjustments/extraction.
5. Online Audio Converter
This is one of the more straightforward tools to add video files and extract Sound from video with some quick steps. The Online Audio Converter supports a wide range of video formats. You just have to add one file by dragging and dropping it from your device memory, inserting its URL, or uploading it via the cloud. Then, press the Start Extracting command.
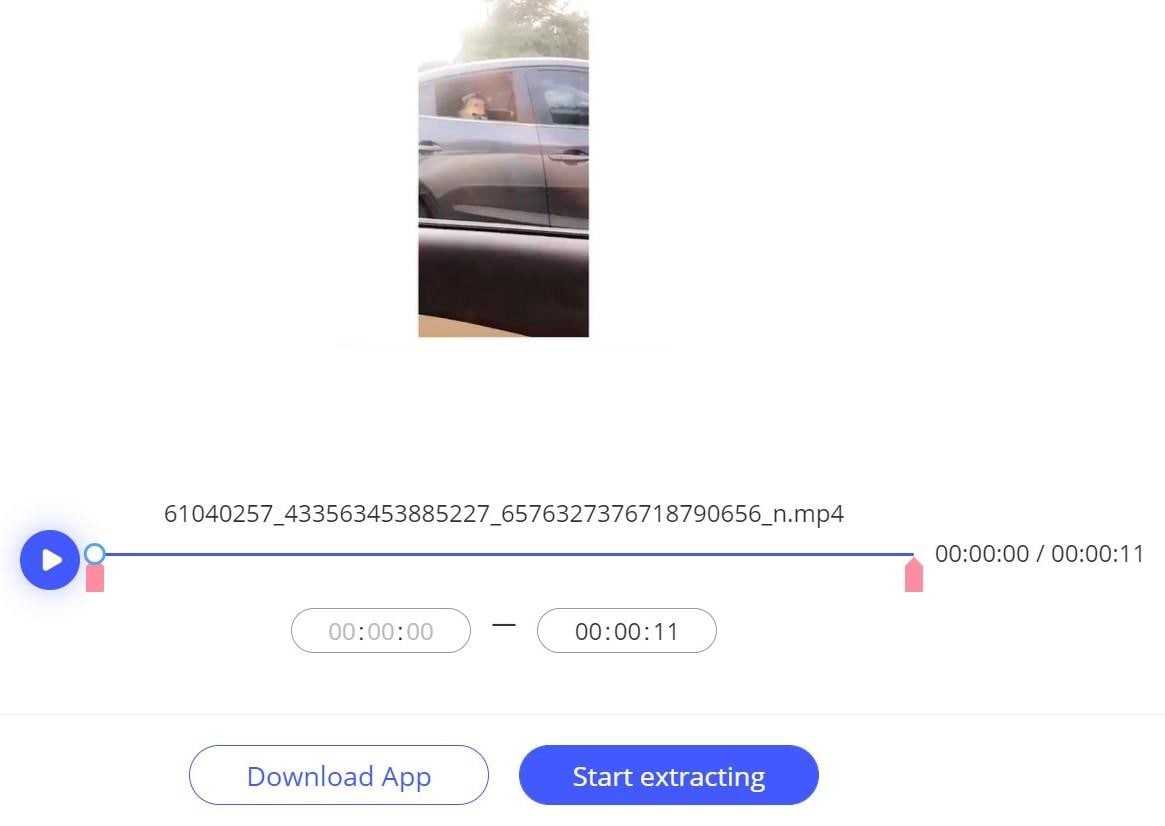
How to Download: Website
Compatible OS: Windows, Mac, Online
Price: Monthly- USD 29.95, Annual- USD 39.95, Lifetime- USD 59.95
Main Features:
- Add files either directly through the device or the cloud.
- Insert video URL for audio extraction from online video.
- Supports multiple video file formats like MPEG, MOV, AVI, and MP4.
- Scroll to select extraction end and start points.
Pros
- Only allows videos with 500MB or smaller size.
- Straightforward three steps for the whole extraction process.
- Zero quality loss after an extraction.
Cons
- Customization options are limited.
- The main audio format supported is MP3 for extraction.
Best for Users: Beginners and pro-level users who want to extract Sound from video files quickly.
6. Audio Converter
The Audio Converter app can efficiently pull out audio clips from video and is compatible with many such media formats. You can use this to cut and trim your file, mainly to decide how much of the audio will extract. Then, play it to see the quality of the output file.
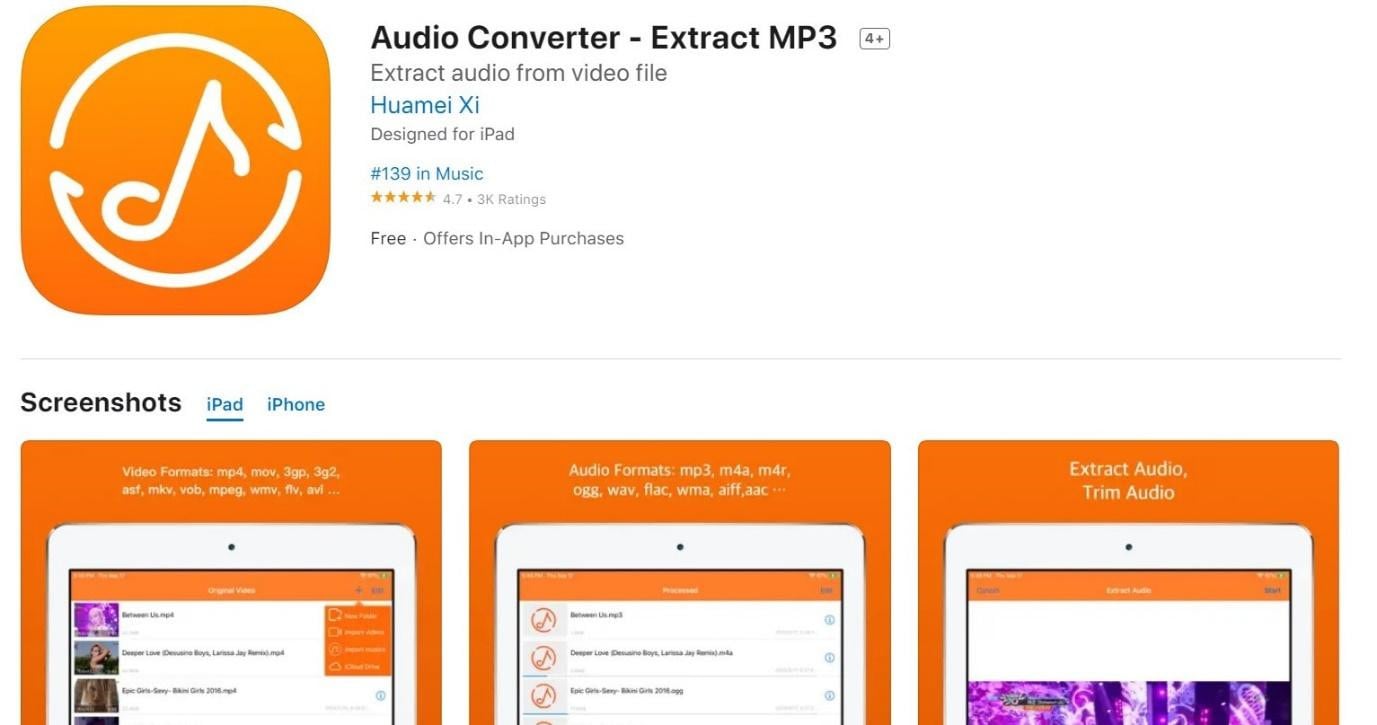
How to Download: Apple App Store
Compatible OS: iOS
Price: Free, Pro- USD 2.99.
Main Features:
- Extract sound from video in formats like M4A, MP3, OGG, M4R, FLAC, etc.
- Insert videos in formats like MP4, 3G2, 3GP, MOV, MKV, WMV, and more.
- Trim the audio to smaller sections for extraction.
- The media player version supports all audio/video types.
Pros
- Supports a wide variety of audio/video formats.
- A simple media player function is also available.
- It is compatible with many languages.
Cons
- App size of 143.1 MB can feel high to some users.
- Basic-level functions only.
Best for Users: People who want to extract Sound from video files to create ringtones can use this best.
7. FFmpeg
FFmpeg is one of the most trustworthy platforms for converting and extracting Sound from video. It is an open-source solution and comes with complete multi-media management work. This is mainly used for easily streaming, converting, and recording video/audio projects.
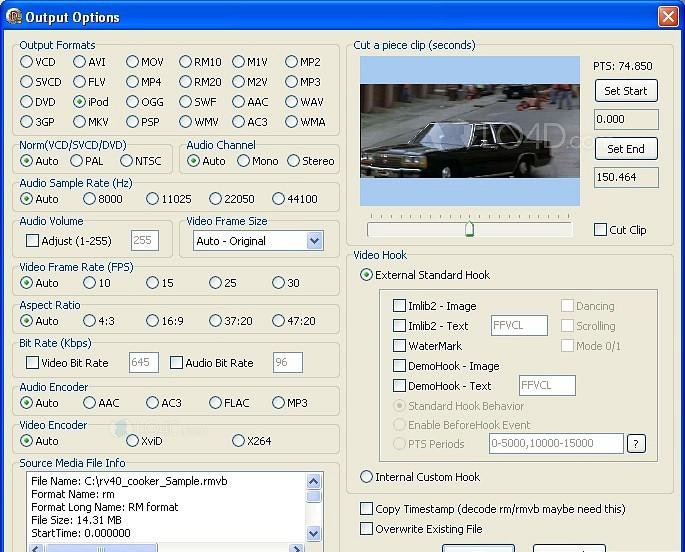
How to Download: Website
Compatible OS: Windows, Mac, etc.
Price: Free
Main Features:
- Audio filters are available, like virtualbass and tiltshelf.
- Video editing filters like colormap, blurdetect, and pixelize are available.
- Enhance dialog and extract sound clips.
- Constantly updating features.
Pros
- This has open-source benefits.
- No excessive installation steps are necessary.
- Supports a wide range of encoding benefits.
Cons
- One must have some sort of technical knowledge to use this.
- Finding the right features or solutions takes some time.
Best for Users: Developers with better technical knowledge can use this dynamic open-source platform for video/audio editing.
8. QuickTime
You can also use this Mac-based video player on Windows to watch different videos easily. Besides the streaming benefits, you can install plugins to optimize its available features, like adding the ability to record/edit video files.
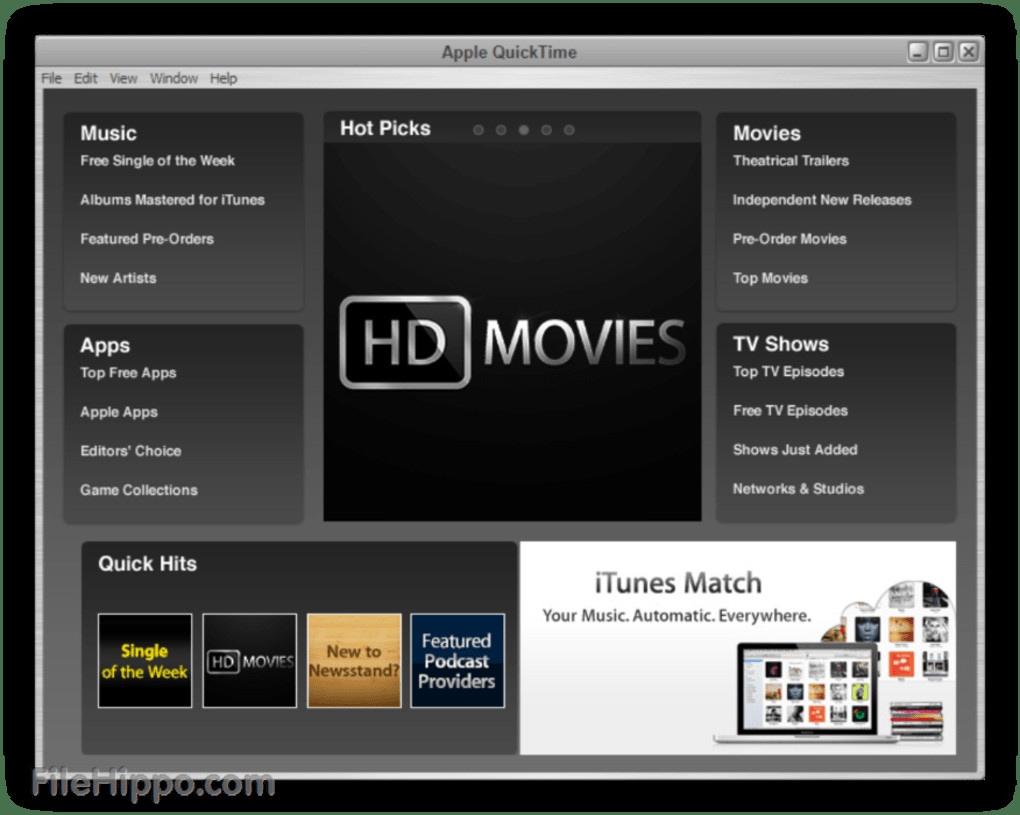
How to Download: Website
Compatible OS: Mac, Windows
Price: Free
Main Features:
- Stream videos and even extract Sound from the files.
- Supports many video formats in the player.
- Record audio on this media player.
- Import files from other Mac products like Final Cut Pro and iMovie.
Pros
- Works on both Windows and Mac.
- Pre-set effects and filters are available that one can edit.
- Simple interface for beginners.
Cons
- Unnecessary bloatware installation is needed.
- Playback support is lacking.
Best for Users: New users can simply operate this media player to watch videos and learn the extraction process.
9. Audio Extractor
You can use this conversion and extraction software to do many editing functions, like changing, cutting, and extracting video/audio files. The supported format here is MP3 and WAV - choose which you find compatible with your final project. You can decide and extract from specific sections.
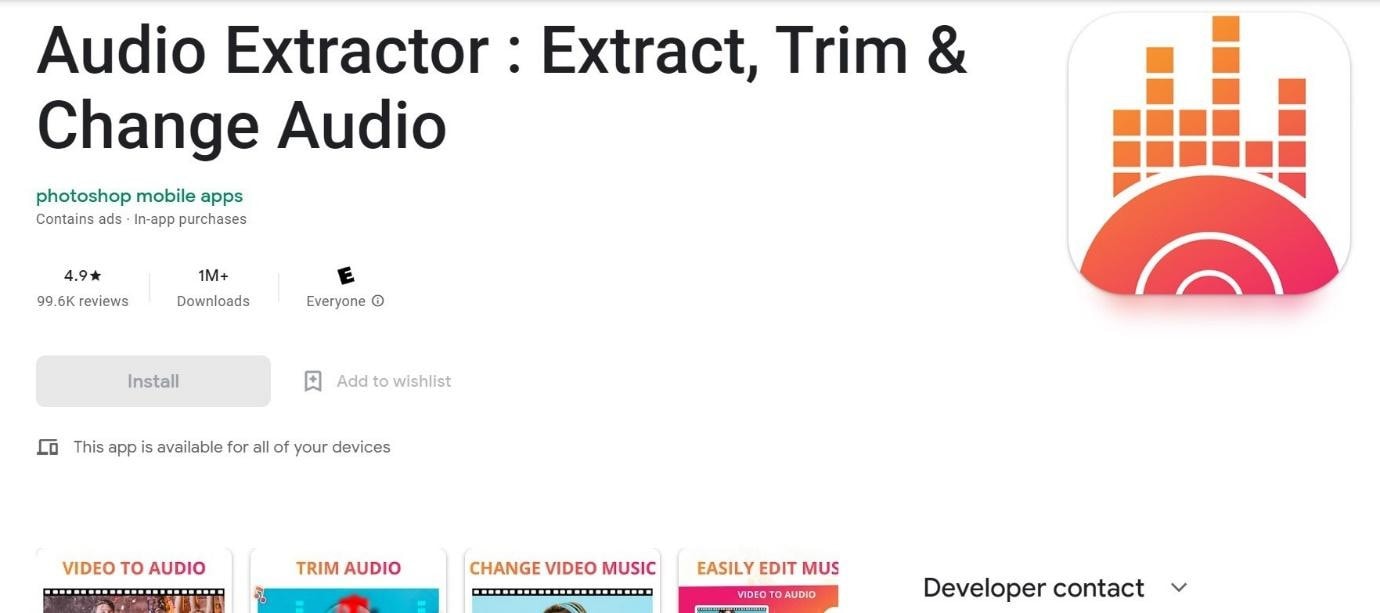
How to Download: Google Play Store
Compatible OS: Android
Price: Free with in-app purchases of USD 1.99- USD 6.99 for each item.
Main Features:
- Change audio file size and format.
- View/delete components through the app directly.
- Preview video/sound file.
- Trim/extract sounds from videos easily with the converter.
Pros <path d=”M7 22H4C3.46957 22 2.96086 21.7893 2.58579 21.4142C2.21071 21.0391 2 20.5304 2 20V13C2 12.4696 2.21071 11.9609 2.58579 11.5858C2.96086 11.2107 3.46957 11 4 11H7M14 9V5C14 4.20435
Top 10 Sound Extractors for Extracting Sound from video
We researched and found many software options for extracting Sound from video. After careful checking, we found 10 options with high-quality functions and performance levels. We recommend you consider them for pulling audio from video files- here’s why.
1. Adobe Premiere Pro
Adobe Premiere Pro is one of the top-level video editors available with various functions and pre-set filters/effects. So, one can customize the videos and audio as they require, like extracting Sound from video and saving them.

How to Download: Website
Compatible OS: Windows, Mac
Price: Individuals- USD 20.99/month. License for Teams- USD 35.99. All Apps-related plans.
Main Features:
- Pre-set templates are available in high-quality resolutions.
- Customize your titles and video edits.
- Automatically adjusts color matching in scenes.
- Robust text-to-speech function with multi-language support.
Pros
- Share easily across the platform with cloud support.
- Access to diverse stock media with Adobe membership.
- Supports many file formats like / (), MPEG-2, Apple ProRes, MPEG-4, native camera formats, etc.
Cons
- No perpetual license support.
- Strict eligibility rules to qualify for student-teacher plans.
Best for Users: Professionals and organization-based users, like teachers, can use this for personal and teaching-related video editing steps.
2. Filmora
If you want a software sound extractor that provides a wide range of audio editing functions, Filmora is one that we would recommend. While it is firstly a video editor, you can use audio-based editing functions like sound stabilization, extraction, visualization, audio ducking, silence detection, and more.

Free Download For Win 7 or later(64-bit)
Free Download For macOS 10.14 or later
Compatible OS: Windows, Mac
Price: Free, Annual- USD 49.99, Perpetual- USD 89.99
Main Features:
- The audio visualization feature analyzes and virtually shows beats.
- Detect silent sections in the video and remove them.
- Many audio stabilization settings like Denoise and Equalizer.
- Vital TTS/STT functions for voiceovers.
Pros
- Multiple video/audio formats are supported.
- Pre-set sound effects are present.
- Adjust the volume of videos during editing.
Cons
- Upgrade plan to remove ads.
- Audio output is mainly available in MP3.
How to use for extracting music from videos:
Step1 Download and install Filmora 11 .
Step2 Click on New Project.
Step3 Press “Click here to import Media” > choose file folder > Insert.

Step4 Drag file to editor timeline > Cut the file to a set suitable size for your audio extraction.
Step5 Click on the Edit icon from the list of icons above the timeline.
Step6 Press on Audio > Make adjustments for settings like Fade in/Face out, Equalizer, Pitch, etc.

Step7 Click Export > Local > MP3. Make changes as needed.

Step8 Hit the Export button.
Best for Users: Pro-level and beginner-level professionals and home-based users who want a comprehensive, feature-rich platform for video/audio editing can benefit from this.
3. iMovie
Mac and iOS users benefit significantly from this video editing software to create dynamic movie-quality videos. One major part of movies is the soundtrack, and you can use this software to add easily, control, and extract the sound clips.

How to Download: Mac App Store , Apple App Store
Compatible OS: Mac, iOS
Price: Free
Main Features:
- Pre-set storyboard available for optimized and thematic video edits.
- Royalty-free audio files in the library.
- You can add voiceovers.
- Add pre-set sound effects or customize them, like removing/adding audio clips.
Pros
- Sound aligns precisely with video.
- Multiple effects, filters, and editing tools are available.
- Simple sharing via social media accounts.
Cons
- Only available for iOS 15.1+ and such newest versions of Apple devices.
- You cannot access it without an Apple ID.
Best for Users: Professional video editors with diverse movie-like presentation-making needs can use this.
4. VLC
VLC is a well-known Windows-based media player that is accessible as a Chrome extension and has mobile app versions. While you can use it mainly to view videos, the software can easily cut out sound clips from the video here.

How to Download: Microsoft Store , Apple App Store , Google Play Store , Chrome Web Store
Compatible OS: Windows, iOS, Chromebook, Android
Price: Free
Main Features:
- Script the command line VLC-based invocations.
- Play different types of files with multi-format support.
- Use the in-built equalizer to optimize sound quality/effects.
- Sync with or create a new video stream.
Pros
- The software assures quick functions with all features.
- No codec installation is necessary.
- Keyboard shortcuts for specific actions.
Cons
- Difficult to search and open files.
- Not very customizable.
Best for Users: People can use VLC Media Player to stream or play videos and even make some minor adjustments/extraction.
5. Online Audio Converter
This is one of the more straightforward tools to add video files and extract Sound from video with some quick steps. The Online Audio Converter supports a wide range of video formats. You just have to add one file by dragging and dropping it from your device memory, inserting its URL, or uploading it via the cloud. Then, press the Start Extracting command.

How to Download: Website
Compatible OS: Windows, Mac, Online
Price: Monthly- USD 29.95, Annual- USD 39.95, Lifetime- USD 59.95
Main Features:
- Add files either directly through the device or the cloud.
- Insert video URL for audio extraction from online video.
- Supports multiple video file formats like MPEG, MOV, AVI, and MP4.
- Scroll to select extraction end and start points.
Pros
- Only allows videos with 500MB or smaller size.
- Straightforward three steps for the whole extraction process.
- Zero quality loss after an extraction.
Cons
- Customization options are limited.
- The main audio format supported is MP3 for extraction.
Best for Users: Beginners and pro-level users who want to extract Sound from video files quickly.
6. Audio Converter
The Audio Converter app can efficiently pull out audio clips from video and is compatible with many such media formats. You can use this to cut and trim your file, mainly to decide how much of the audio will extract. Then, play it to see the quality of the output file.

How to Download: Apple App Store
Compatible OS: iOS
Price: Free, Pro- USD 2.99.
Main Features:
- Extract sound from video in formats like M4A, MP3, OGG, M4R, FLAC, etc.
- Insert videos in formats like MP4, 3G2, 3GP, MOV, MKV, WMV, and more.
- Trim the audio to smaller sections for extraction.
- The media player version supports all audio/video types.
Pros
- Supports a wide variety of audio/video formats.
- A simple media player function is also available.
- It is compatible with many languages.
Cons
- App size of 143.1 MB can feel high to some users.
- Basic-level functions only.
Best for Users: People who want to extract Sound from video files to create ringtones can use this best.
7. FFmpeg
FFmpeg is one of the most trustworthy platforms for converting and extracting Sound from video. It is an open-source solution and comes with complete multi-media management work. This is mainly used for easily streaming, converting, and recording video/audio projects.

How to Download: Website
Compatible OS: Windows, Mac, etc.
Price: Free
Main Features:
- Audio filters are available, like virtualbass and tiltshelf.
- Video editing filters like colormap, blurdetect, and pixelize are available.
- Enhance dialog and extract sound clips.
- Constantly updating features.
Pros
- This has open-source benefits.
- No excessive installation steps are necessary.
- Supports a wide range of encoding benefits.
Cons
- One must have some sort of technical knowledge to use this.
- Finding the right features or solutions takes some time.
Best for Users: Developers with better technical knowledge can use this dynamic open-source platform for video/audio editing.
8. QuickTime
You can also use this Mac-based video player on Windows to watch different videos easily. Besides the streaming benefits, you can install plugins to optimize its available features, like adding the ability to record/edit video files.

How to Download: Website
Compatible OS: Mac, Windows
Price: Free
Main Features:
- Stream videos and even extract Sound from the files.
- Supports many video formats in the player.
- Record audio on this media player.
- Import files from other Mac products like Final Cut Pro and iMovie.
Pros
- Works on both Windows and Mac.
- Pre-set effects and filters are available that one can edit.
- Simple interface for beginners.
Cons
- Unnecessary bloatware installation is needed.
- Playback support is lacking.
Best for Users: New users can simply operate this media player to watch videos and learn the extraction process.
9. Audio Extractor
You can use this conversion and extraction software to do many editing functions, like changing, cutting, and extracting video/audio files. The supported format here is MP3 and WAV - choose which you find compatible with your final project. You can decide and extract from specific sections.

How to Download: Google Play Store
Compatible OS: Android
Price: Free with in-app purchases of USD 1.99- USD 6.99 for each item.
Main Features:
- Change audio file size and format.
- View/delete components through the app directly.
- Preview video/sound file.
- Trim/extract sounds from videos easily with the converter.
Pros <path d=”M7 22H4C3.46957 22 2.96086 21.7893 2.58579 21.4142C2.21071 21.0391 2 20.5304 2 20V13C2 12.4696 2.21071 11.9609 2.58579 11.5858C2.96086 11.2107 3.46957 11 4 11H7M14 9V5C14 4.20435
Frame Rates, Speed, and Wondershare Filmora
Ensuring smoother playback along with enhanced fluidity is a crucial part of boosting the engagement of videos. You also need to add the slow-motion effect at some points in videos. Along with this, syncing audio to video is also essential. Thus, you can take assistance from frame rates and speed to ensure you have these key features in the videos.
There is no need to be concerned about what video editor to choose because Wondershare Filmora can help you with this issue. In this article, you will find basic information about Filmora and the uses of frame rate and speed ramping. We will also provide the procedure for changing video frame rates with Filmora.
- Part 1: What is Frame Rate and How Important It Is In Videos?
- Part 2: What Are The Different Uses of Speed Ramping in Video Editing?
- Part 3: Perform Basic Speed Adjustments and Speed Ramping on Wondershare Filmora
- Part 4: [Basic] How to Change The Frame Rate in Wondershare Filmora?
- Conclusion
Part 1: What is Frame Rate and How Important It Is In Videos?
One of the most important metrics in videos is the frame rate. This term refers to the individual frames present in the video. While the frame represents a single second, this defines the frequency of the video. This is the display of consecutive frames every second, which brings up the illusion of motion for the viewers. In this way, the entire frame rate is explained as terminology to users new to video editing.
Importance of Frame Rate in Videos
We will highlight some prominent points explaining the importance of video frame rates. Continuing with these points, this will help users understand how essential video frame rate is:
01of 04Defines Smoothness in Videos
Having a higher frame rate in a video is equivalent to a smooth video. Users who consider having smoothness in their videos always consider the frame rates. Higher frame rates have better transitions and seamless motion.
02of 04The detail in the Video
If you have a low frame rate in your video, you cannot observe the details in the fast-moving objects. In such a scenario, you need to have a video with a good frame rate. This will help display the explicit details of the video, which cannot be viewed under every frame rate quality.
03of 04Realistic Effects
Old videos never had the kick that made them feel real. Videos with higher frame rates have changed the dynamics in the current system. Realism and immersive video experience are prominent getaways achieved with better frame rates.
04of 04Realistic Effects
The use of better frame rates gives the option of improving the effects of the video. Videos that did not have impressive frame rates are not able to display the mood or atmosphere. Better frame rates help display the environment better, thus explaining the importance.
Changing Video Frame Rates And Speed Editor A wonderful video editor - Wondershare Filmora providing frame rate and speed ramping features for all creators.
Free Download Free Download Learn More

Part 2: What Are The Different Uses of Speed Ramping in Video Editing?
Speed ramping and video frame rate are one of the most known techniques which are widely used in video editing. You must be wondering why paying attention to speed ramping is so important. Nothing to worry about because this part will give you the most implementable uses of speed ramping in video editing. Have a look below to discover further information about this:
Highlighting Actions and Dramas
You can use speed ramping to emphasize the actional and dramatic sequences. It also helps you draw the audience’s attention and make the essential factors more notable. Above all, the speed ramping also integrates the useable effects which can add a drastic touch of drama to your videos,
Transitions and Motion Tracking
With the good use of speed ramping, you can achieve a smooth transition in videos. It also helps you add seamless transitions in the videos to add a sense of consistency. One of the best things is adding slow-motion and motion-tracking effects in simple videos.
Syncing Audios
Syncing the audio beats with videos is crucial to enhance the user experience. Speed ramping offers capabilities through which you can easily sync the audio to the length of videos. As it never compromises the content or layout of videos, you don’t have to worry about anything.
Emphasized Storytelling
If you need to induce a sense of storytelling and optimize the video quality, consider speed ramping. You can control the overall speed of actions and dramas and convey a particular narrative to add depth to videos. It also helps to increase the frame rate of video.
Part 3: Perform Basic Speed Adjustments and Speed Ramping on Wondershare Filmora
Wondershare Filmora is a great video editor providing exquisite features and details to users. It embeds simple video editing tools and AI functionalities to provide a quick editing experience. However, the focus on the details is not lacking in this tool. Filmora provides a comprehensive set of effects, transitions, and elements to induce in videos.
Free Download For Win 7 or later(64-bit)
Free Download For macOS 10.14 or later
Along with that, it also includes multiple functionalities which cannot be observed in many video editors. However, since we are putting our focus on discussing the speed adjustments in Filmora, let’s look at the comprehensive steps explained below:
Method 1: Uniform Speed Adjustments in Videos
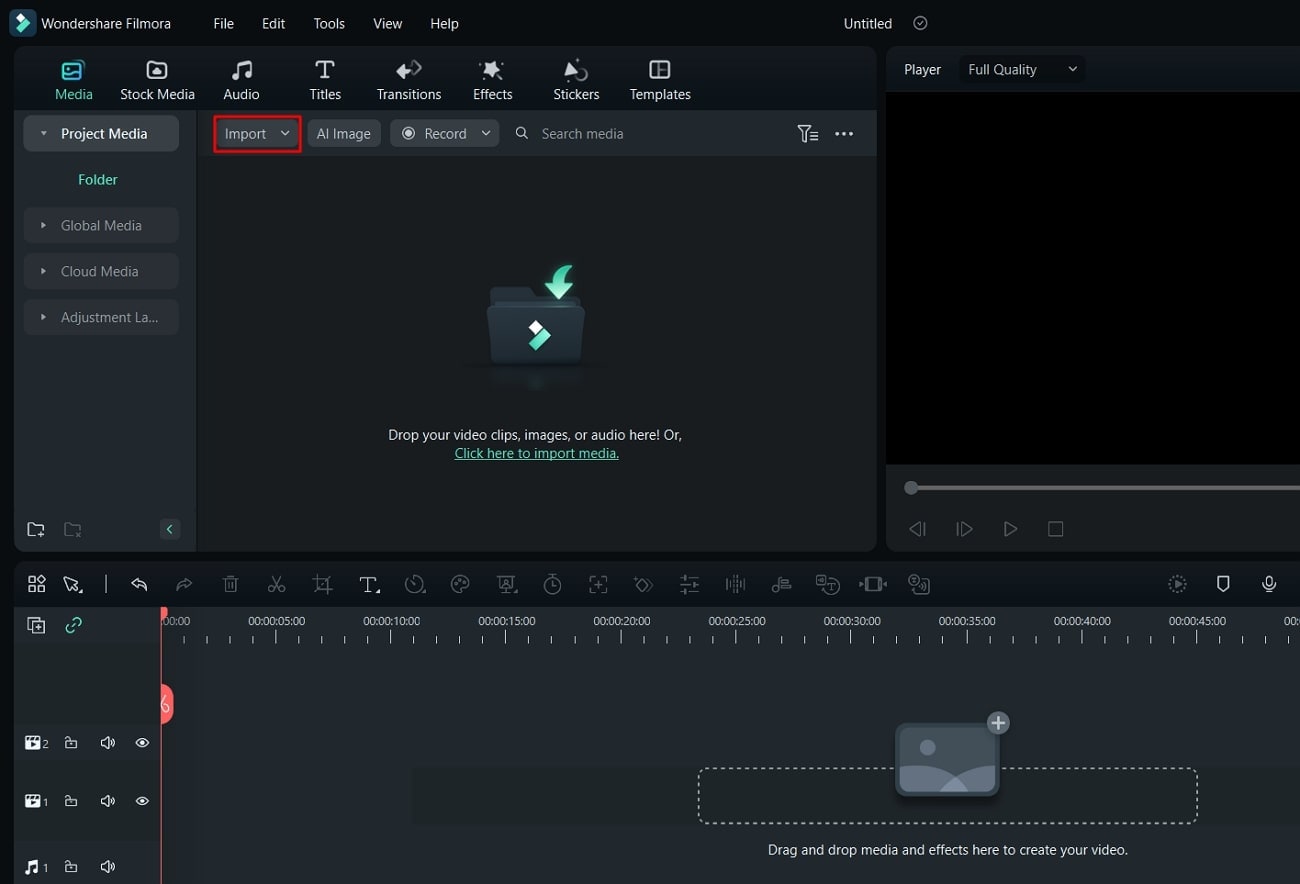
Step 1Import Video on Filmora for Speed Adjustments
Firstly, launch Wondershare Filmora on your computer and continue to open a new project. Once a window enters the display, lead into the “Import” section for importing the media files that need adjustment.
Step 2Select the Speed Option
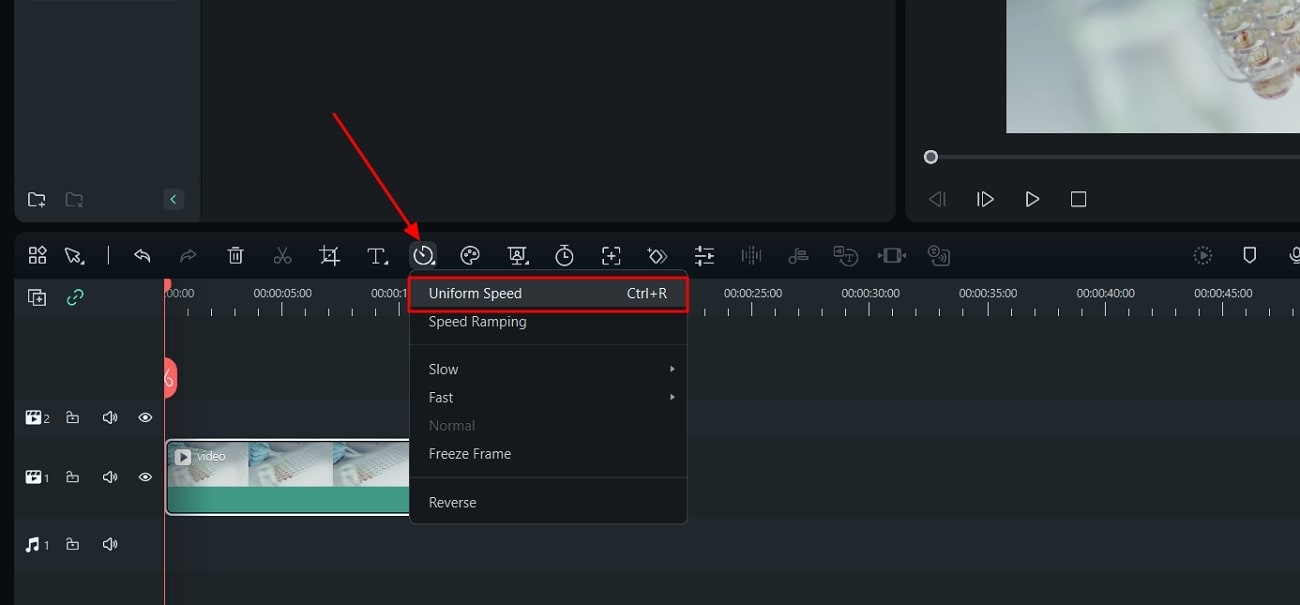
After adding the videos and dragging them to the timeline, continue to locate the “Speed “ option in the bar above the timeline. This opens a drop-down menu where you have to select “Uniform Speed” or use “Ctrl + R.”
Step 3Manage Speed Uniformly
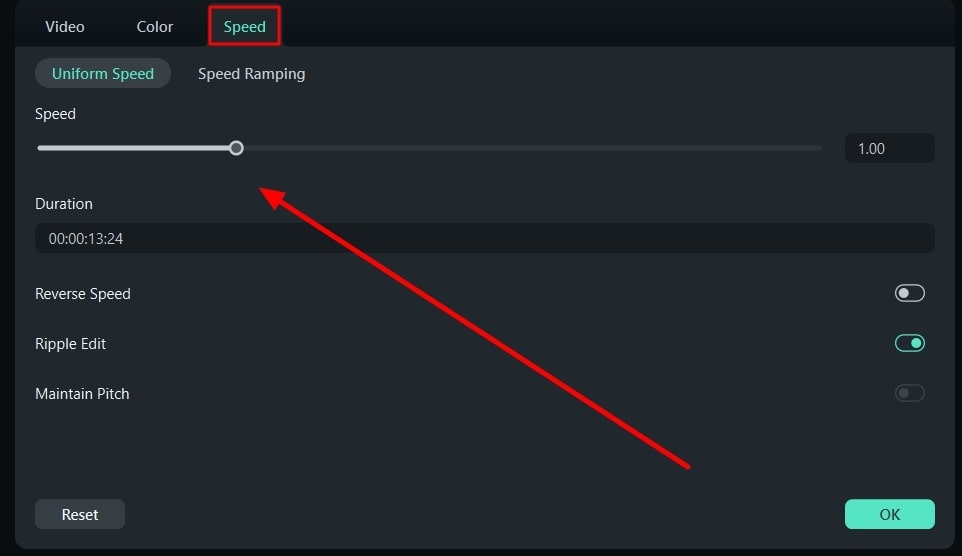
A new section opens on the video editor where you can define the speed using the slider. Also, you can activate options like “Reverse Speed,” “Ripple Edit,” and “Maintain Pitch,” if needed.
Method 2: Utilize the Option of Speed Ramping
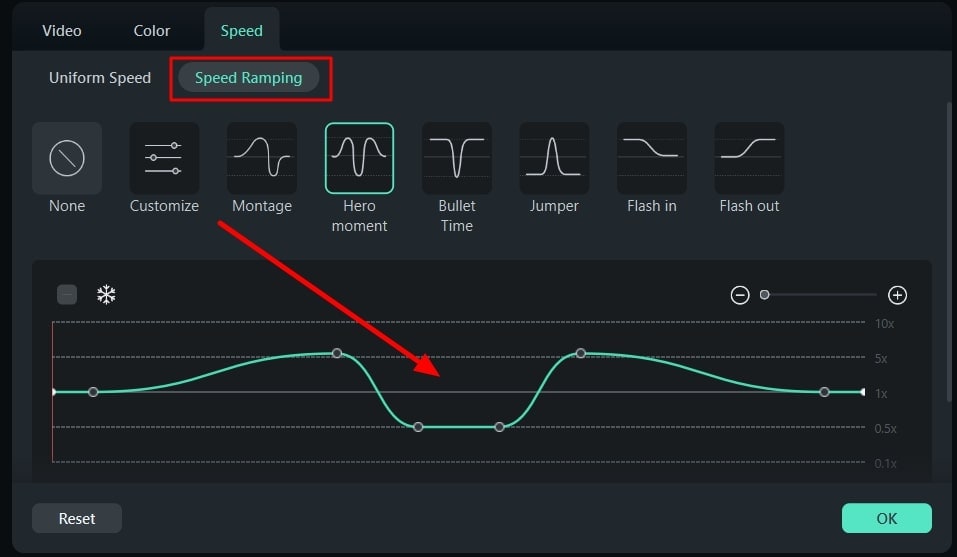
Step 1Access Speed Ramping Option
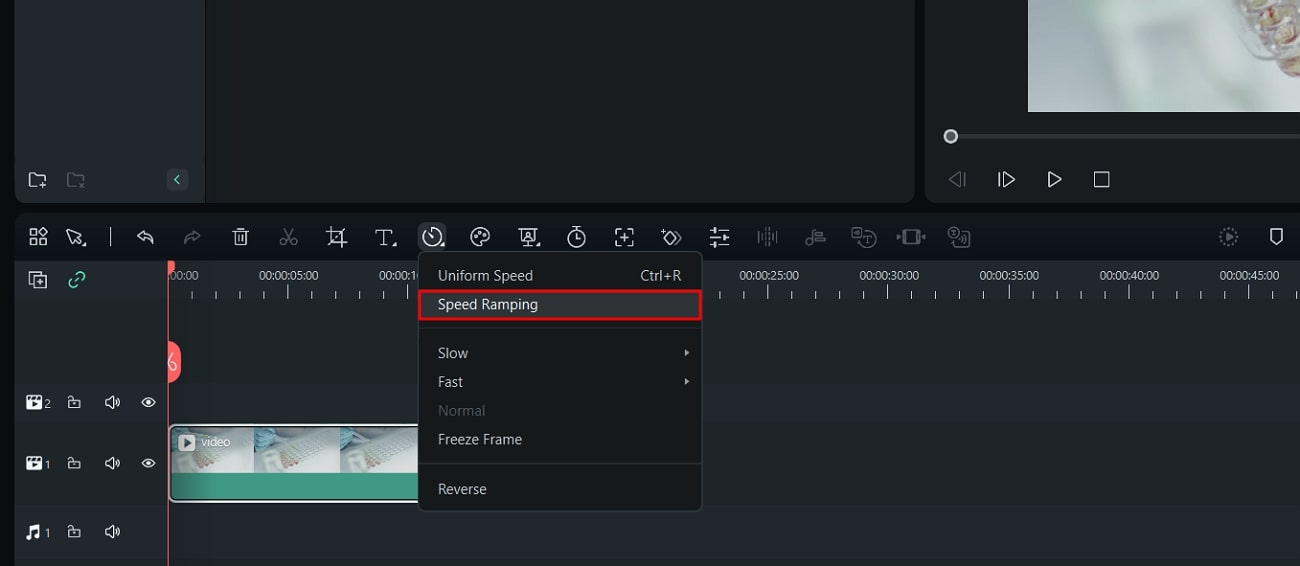
Once you have opened Filmora and imported a video on the timeline, lead to the “Speed” button again. Select the option of “Speed Ramping ” in the drop-down to continue.
Step 2Manage Speed Ramping of Video
As you find a new screen on your front, select the type of Speed Ramping you want to perform. Adjust the speed ramp on the line graph that comes in display and click “OK” to conclude.
Step 3Export the Final Video
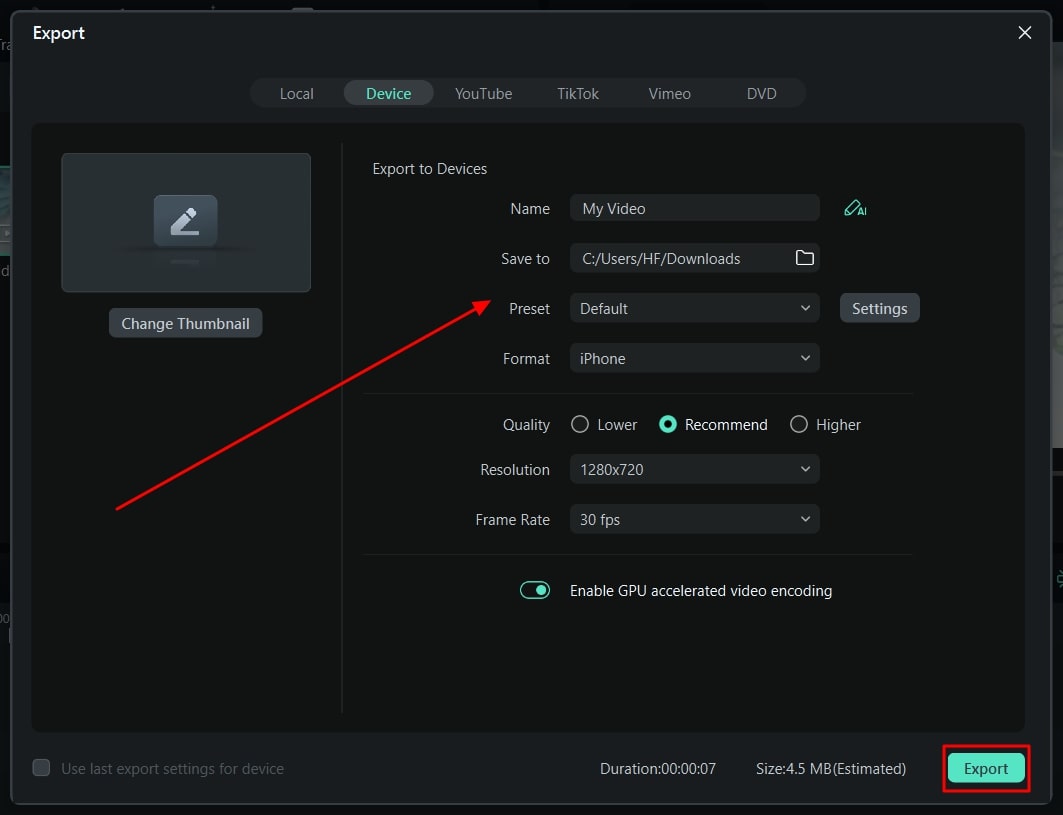
Once you are done editing your videos, lead to the “Export” button to save the videos on the device.
Part 4: [Basic] How to Change The Frame Rate in Wondershare Filmora?
While you find out the ways to change the speed of your videos, you can also change their frame rate. Filmora offers dedicated options on its platform to its users, which can be understood in the steps below:
Free Download For Win 7 or later(64-bit)
Free Download For macOS 10.14 or later
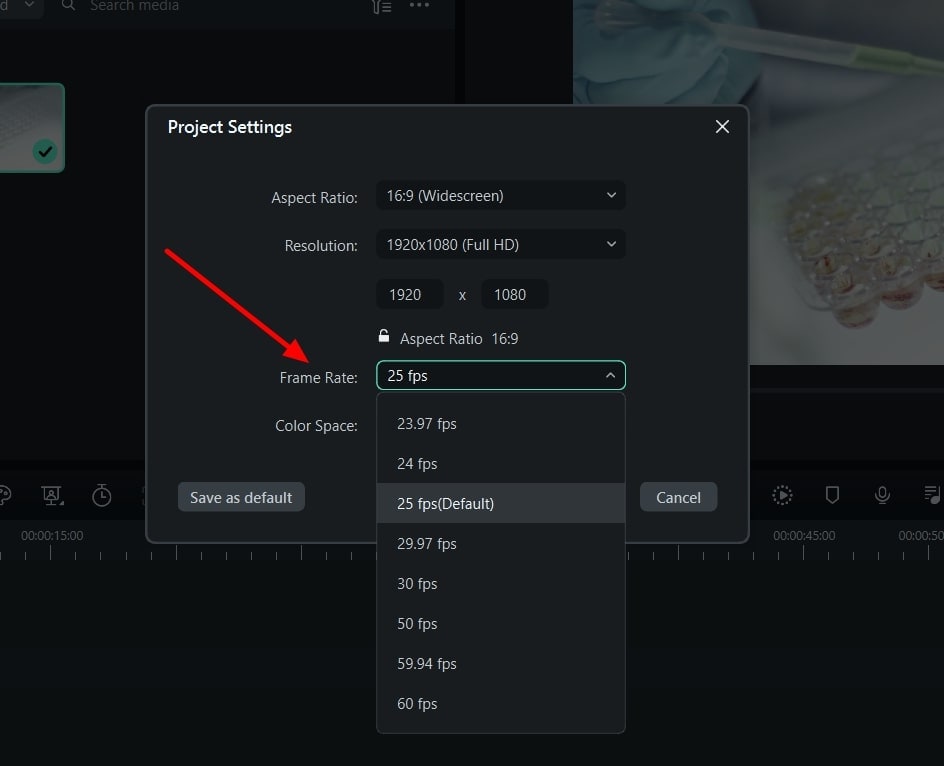
Step 1Open Settings For Changing Frame Rate
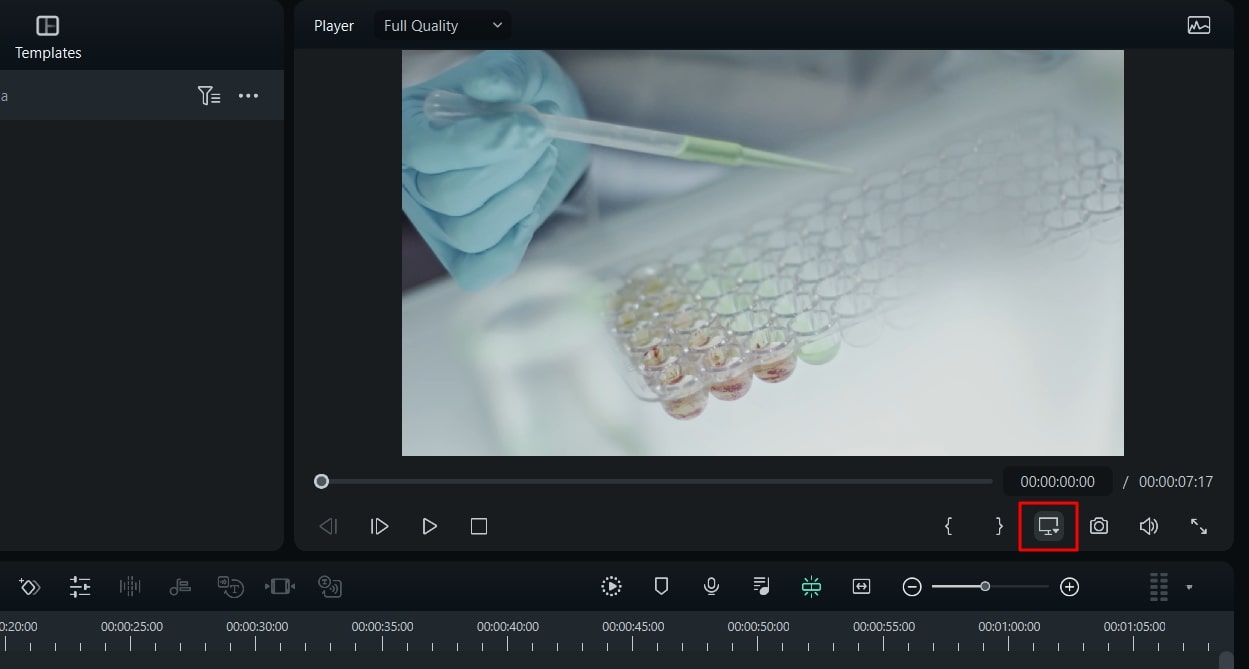
As you open Filmora and import a video, drag it to the timeline. Once the video is imported, lead to the “Preview quality and display settings” button on the right side of the screen.
Step 2Manage Speed Ramping of Video
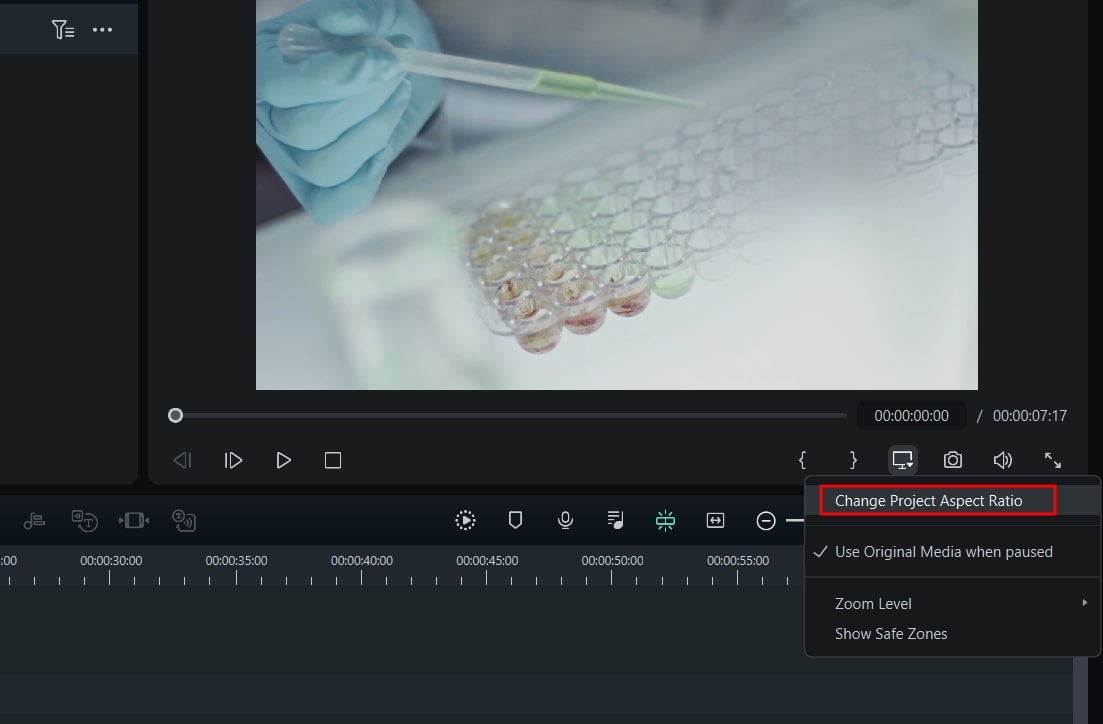
This opens a drop-down menu where you have to select the option “Change Project Aspect Ratio.”
Step 3Change Frame Rate Successfully
You will be led to a new screen where you can find the option of “Frame Rate” in the list. Change the frame rate according to the requirements and options available and click “OK.” The frame rate of your video will be changed using Filmora.
Conclusion
This article has displayed a conspicuous detail of what the frame rate in the video is and how it implicates video editing. Wondershare Filmora has been observed as the perfect way to manage the speeds of videos. Video frame rates can also be managed using the exquisite video editor. Those who wish to manage such features of the videos should consider using this tool.
Part 1: What is Frame Rate and How Important It Is In Videos?
One of the most important metrics in videos is the frame rate. This term refers to the individual frames present in the video. While the frame represents a single second, this defines the frequency of the video. This is the display of consecutive frames every second, which brings up the illusion of motion for the viewers. In this way, the entire frame rate is explained as terminology to users new to video editing.
Importance of Frame Rate in Videos
We will highlight some prominent points explaining the importance of video frame rates. Continuing with these points, this will help users understand how essential video frame rate is:
01of 04Defines Smoothness in Videos
Having a higher frame rate in a video is equivalent to a smooth video. Users who consider having smoothness in their videos always consider the frame rates. Higher frame rates have better transitions and seamless motion.
02of 04The detail in the Video
If you have a low frame rate in your video, you cannot observe the details in the fast-moving objects. In such a scenario, you need to have a video with a good frame rate. This will help display the explicit details of the video, which cannot be viewed under every frame rate quality.
03of 04Realistic Effects
Old videos never had the kick that made them feel real. Videos with higher frame rates have changed the dynamics in the current system. Realism and immersive video experience are prominent getaways achieved with better frame rates.
04of 04Realistic Effects
The use of better frame rates gives the option of improving the effects of the video. Videos that did not have impressive frame rates are not able to display the mood or atmosphere. Better frame rates help display the environment better, thus explaining the importance.
Changing Video Frame Rates And Speed Editor A wonderful video editor - Wondershare Filmora providing frame rate and speed ramping features for all creators.
Free Download Free Download Learn More

Part 2: What Are The Different Uses of Speed Ramping in Video Editing?
Speed ramping and video frame rate are one of the most known techniques which are widely used in video editing. You must be wondering why paying attention to speed ramping is so important. Nothing to worry about because this part will give you the most implementable uses of speed ramping in video editing. Have a look below to discover further information about this:
Highlighting Actions and Dramas
You can use speed ramping to emphasize the actional and dramatic sequences. It also helps you draw the audience’s attention and make the essential factors more notable. Above all, the speed ramping also integrates the useable effects which can add a drastic touch of drama to your videos,
Transitions and Motion Tracking
With the good use of speed ramping, you can achieve a smooth transition in videos. It also helps you add seamless transitions in the videos to add a sense of consistency. One of the best things is adding slow-motion and motion-tracking effects in simple videos.
Syncing Audios
Syncing the audio beats with videos is crucial to enhance the user experience. Speed ramping offers capabilities through which you can easily sync the audio to the length of videos. As it never compromises the content or layout of videos, you don’t have to worry about anything.
Emphasized Storytelling
If you need to induce a sense of storytelling and optimize the video quality, consider speed ramping. You can control the overall speed of actions and dramas and convey a particular narrative to add depth to videos. It also helps to increase the frame rate of video.
Part 3: Perform Basic Speed Adjustments and Speed Ramping on Wondershare Filmora
Wondershare Filmora is a great video editor providing exquisite features and details to users. It embeds simple video editing tools and AI functionalities to provide a quick editing experience. However, the focus on the details is not lacking in this tool. Filmora provides a comprehensive set of effects, transitions, and elements to induce in videos.
Free Download For Win 7 or later(64-bit)
Free Download For macOS 10.14 or later
Along with that, it also includes multiple functionalities which cannot be observed in many video editors. However, since we are putting our focus on discussing the speed adjustments in Filmora, let’s look at the comprehensive steps explained below:
Method 1: Uniform Speed Adjustments in Videos
Step 1Import Video on Filmora for Speed Adjustments
Firstly, launch Wondershare Filmora on your computer and continue to open a new project. Once a window enters the display, lead into the “Import” section for importing the media files that need adjustment.

Step 2Select the Speed Option
After adding the videos and dragging them to the timeline, continue to locate the “Speed “ option in the bar above the timeline. This opens a drop-down menu where you have to select “Uniform Speed” or use “Ctrl + R.”

Step 3Manage Speed Uniformly
A new section opens on the video editor where you can define the speed using the slider. Also, you can activate options like “Reverse Speed,” “Ripple Edit,” and “Maintain Pitch,” if needed.

Method 2: Utilize the Option of Speed Ramping
Step 1Access Speed Ramping Option
Once you have opened Filmora and imported a video on the timeline, lead to the “Speed” button again. Select the option of “Speed Ramping ” in the drop-down to continue.

Step 2Manage Speed Ramping of Video
As you find a new screen on your front, select the type of Speed Ramping you want to perform. Adjust the speed ramp on the line graph that comes in display and click “OK” to conclude.

Step 3Export the Final Video
Once you are done editing your videos, lead to the “Export” button to save the videos on the device.

Part 4: [Basic] How to Change The Frame Rate in Wondershare Filmora?
While you find out the ways to change the speed of your videos, you can also change their frame rate. Filmora offers dedicated options on its platform to its users, which can be understood in the steps below:
Free Download For Win 7 or later(64-bit)
Free Download For macOS 10.14 or later
Step 1Open Settings For Changing Frame Rate
As you open Filmora and import a video, drag it to the timeline. Once the video is imported, lead to the “Preview quality and display settings” button on the right side of the screen.

Step 2Manage Speed Ramping of Video
This opens a drop-down menu where you have to select the option “Change Project Aspect Ratio.”

Step 3Change Frame Rate Successfully
You will be led to a new screen where you can find the option of “Frame Rate” in the list. Change the frame rate according to the requirements and options available and click “OK.” The frame rate of your video will be changed using Filmora.

Conclusion
This article has displayed a conspicuous detail of what the frame rate in the video is and how it implicates video editing. Wondershare Filmora has been observed as the perfect way to manage the speeds of videos. Video frame rates can also be managed using the exquisite video editor. Those who wish to manage such features of the videos should consider using this tool.
Part 1: What is Frame Rate and How Important It Is In Videos?
One of the most important metrics in videos is the frame rate. This term refers to the individual frames present in the video. While the frame represents a single second, this defines the frequency of the video. This is the display of consecutive frames every second, which brings up the illusion of motion for the viewers. In this way, the entire frame rate is explained as terminology to users new to video editing.
Importance of Frame Rate in Videos
We will highlight some prominent points explaining the importance of video frame rates. Continuing with these points, this will help users understand how essential video frame rate is:
01of 04Defines Smoothness in Videos
Having a higher frame rate in a video is equivalent to a smooth video. Users who consider having smoothness in their videos always consider the frame rates. Higher frame rates have better transitions and seamless motion.
02of 04The detail in the Video
If you have a low frame rate in your video, you cannot observe the details in the fast-moving objects. In such a scenario, you need to have a video with a good frame rate. This will help display the explicit details of the video, which cannot be viewed under every frame rate quality.
03of 04Realistic Effects
Old videos never had the kick that made them feel real. Videos with higher frame rates have changed the dynamics in the current system. Realism and immersive video experience are prominent getaways achieved with better frame rates.
04of 04Realistic Effects
The use of better frame rates gives the option of improving the effects of the video. Videos that did not have impressive frame rates are not able to display the mood or atmosphere. Better frame rates help display the environment better, thus explaining the importance.
Changing Video Frame Rates And Speed Editor A wonderful video editor - Wondershare Filmora providing frame rate and speed ramping features for all creators.
Free Download Free Download Learn More

Part 2: What Are The Different Uses of Speed Ramping in Video Editing?
Speed ramping and video frame rate are one of the most known techniques which are widely used in video editing. You must be wondering why paying attention to speed ramping is so important. Nothing to worry about because this part will give you the most implementable uses of speed ramping in video editing. Have a look below to discover further information about this:
Highlighting Actions and Dramas
You can use speed ramping to emphasize the actional and dramatic sequences. It also helps you draw the audience’s attention and make the essential factors more notable. Above all, the speed ramping also integrates the useable effects which can add a drastic touch of drama to your videos,
Transitions and Motion Tracking
With the good use of speed ramping, you can achieve a smooth transition in videos. It also helps you add seamless transitions in the videos to add a sense of consistency. One of the best things is adding slow-motion and motion-tracking effects in simple videos.
Syncing Audios
Syncing the audio beats with videos is crucial to enhance the user experience. Speed ramping offers capabilities through which you can easily sync the audio to the length of videos. As it never compromises the content or layout of videos, you don’t have to worry about anything.
Emphasized Storytelling
If you need to induce a sense of storytelling and optimize the video quality, consider speed ramping. You can control the overall speed of actions and dramas and convey a particular narrative to add depth to videos. It also helps to increase the frame rate of video.
Part 3: Perform Basic Speed Adjustments and Speed Ramping on Wondershare Filmora
Wondershare Filmora is a great video editor providing exquisite features and details to users. It embeds simple video editing tools and AI functionalities to provide a quick editing experience. However, the focus on the details is not lacking in this tool. Filmora provides a comprehensive set of effects, transitions, and elements to induce in videos.
Free Download For Win 7 or later(64-bit)
Free Download For macOS 10.14 or later
Along with that, it also includes multiple functionalities which cannot be observed in many video editors. However, since we are putting our focus on discussing the speed adjustments in Filmora, let’s look at the comprehensive steps explained below:
Method 1: Uniform Speed Adjustments in Videos
Step 1Import Video on Filmora for Speed Adjustments
Firstly, launch Wondershare Filmora on your computer and continue to open a new project. Once a window enters the display, lead into the “Import” section for importing the media files that need adjustment.

Step 2Select the Speed Option
After adding the videos and dragging them to the timeline, continue to locate the “Speed “ option in the bar above the timeline. This opens a drop-down menu where you have to select “Uniform Speed” or use “Ctrl + R.”

Step 3Manage Speed Uniformly
A new section opens on the video editor where you can define the speed using the slider. Also, you can activate options like “Reverse Speed,” “Ripple Edit,” and “Maintain Pitch,” if needed.

Method 2: Utilize the Option of Speed Ramping
Step 1Access Speed Ramping Option
Once you have opened Filmora and imported a video on the timeline, lead to the “Speed” button again. Select the option of “Speed Ramping ” in the drop-down to continue.

Step 2Manage Speed Ramping of Video
As you find a new screen on your front, select the type of Speed Ramping you want to perform. Adjust the speed ramp on the line graph that comes in display and click “OK” to conclude.

Step 3Export the Final Video
Once you are done editing your videos, lead to the “Export” button to save the videos on the device.

Part 4: [Basic] How to Change The Frame Rate in Wondershare Filmora?
While you find out the ways to change the speed of your videos, you can also change their frame rate. Filmora offers dedicated options on its platform to its users, which can be understood in the steps below:
Free Download For Win 7 or later(64-bit)
Free Download For macOS 10.14 or later
Step 1Open Settings For Changing Frame Rate
As you open Filmora and import a video, drag it to the timeline. Once the video is imported, lead to the “Preview quality and display settings” button on the right side of the screen.

Step 2Manage Speed Ramping of Video
This opens a drop-down menu where you have to select the option “Change Project Aspect Ratio.”

Step 3Change Frame Rate Successfully
You will be led to a new screen where you can find the option of “Frame Rate” in the list. Change the frame rate according to the requirements and options available and click “OK.” The frame rate of your video will be changed using Filmora.

Conclusion
This article has displayed a conspicuous detail of what the frame rate in the video is and how it implicates video editing. Wondershare Filmora has been observed as the perfect way to manage the speeds of videos. Video frame rates can also be managed using the exquisite video editor. Those who wish to manage such features of the videos should consider using this tool.
Part 1: What is Frame Rate and How Important It Is In Videos?
One of the most important metrics in videos is the frame rate. This term refers to the individual frames present in the video. While the frame represents a single second, this defines the frequency of the video. This is the display of consecutive frames every second, which brings up the illusion of motion for the viewers. In this way, the entire frame rate is explained as terminology to users new to video editing.
Importance of Frame Rate in Videos
We will highlight some prominent points explaining the importance of video frame rates. Continuing with these points, this will help users understand how essential video frame rate is:
01of 04Defines Smoothness in Videos
Having a higher frame rate in a video is equivalent to a smooth video. Users who consider having smoothness in their videos always consider the frame rates. Higher frame rates have better transitions and seamless motion.
02of 04The detail in the Video
If you have a low frame rate in your video, you cannot observe the details in the fast-moving objects. In such a scenario, you need to have a video with a good frame rate. This will help display the explicit details of the video, which cannot be viewed under every frame rate quality.
03of 04Realistic Effects
Old videos never had the kick that made them feel real. Videos with higher frame rates have changed the dynamics in the current system. Realism and immersive video experience are prominent getaways achieved with better frame rates.
04of 04Realistic Effects
The use of better frame rates gives the option of improving the effects of the video. Videos that did not have impressive frame rates are not able to display the mood or atmosphere. Better frame rates help display the environment better, thus explaining the importance.
Changing Video Frame Rates And Speed Editor A wonderful video editor - Wondershare Filmora providing frame rate and speed ramping features for all creators.
Free Download Free Download Learn More

Part 2: What Are The Different Uses of Speed Ramping in Video Editing?
Speed ramping and video frame rate are one of the most known techniques which are widely used in video editing. You must be wondering why paying attention to speed ramping is so important. Nothing to worry about because this part will give you the most implementable uses of speed ramping in video editing. Have a look below to discover further information about this:
Highlighting Actions and Dramas
You can use speed ramping to emphasize the actional and dramatic sequences. It also helps you draw the audience’s attention and make the essential factors more notable. Above all, the speed ramping also integrates the useable effects which can add a drastic touch of drama to your videos,
Transitions and Motion Tracking
With the good use of speed ramping, you can achieve a smooth transition in videos. It also helps you add seamless transitions in the videos to add a sense of consistency. One of the best things is adding slow-motion and motion-tracking effects in simple videos.
Syncing Audios
Syncing the audio beats with videos is crucial to enhance the user experience. Speed ramping offers capabilities through which you can easily sync the audio to the length of videos. As it never compromises the content or layout of videos, you don’t have to worry about anything.
Emphasized Storytelling
If you need to induce a sense of storytelling and optimize the video quality, consider speed ramping. You can control the overall speed of actions and dramas and convey a particular narrative to add depth to videos. It also helps to increase the frame rate of video.
Part 3: Perform Basic Speed Adjustments and Speed Ramping on Wondershare Filmora
Wondershare Filmora is a great video editor providing exquisite features and details to users. It embeds simple video editing tools and AI functionalities to provide a quick editing experience. However, the focus on the details is not lacking in this tool. Filmora provides a comprehensive set of effects, transitions, and elements to induce in videos.
Free Download For Win 7 or later(64-bit)
Free Download For macOS 10.14 or later
Along with that, it also includes multiple functionalities which cannot be observed in many video editors. However, since we are putting our focus on discussing the speed adjustments in Filmora, let’s look at the comprehensive steps explained below:
Method 1: Uniform Speed Adjustments in Videos
Step 1Import Video on Filmora for Speed Adjustments
Firstly, launch Wondershare Filmora on your computer and continue to open a new project. Once a window enters the display, lead into the “Import” section for importing the media files that need adjustment.

Step 2Select the Speed Option
After adding the videos and dragging them to the timeline, continue to locate the “Speed “ option in the bar above the timeline. This opens a drop-down menu where you have to select “Uniform Speed” or use “Ctrl + R.”

Step 3Manage Speed Uniformly
A new section opens on the video editor where you can define the speed using the slider. Also, you can activate options like “Reverse Speed,” “Ripple Edit,” and “Maintain Pitch,” if needed.

Method 2: Utilize the Option of Speed Ramping
Step 1Access Speed Ramping Option
Once you have opened Filmora and imported a video on the timeline, lead to the “Speed” button again. Select the option of “Speed Ramping ” in the drop-down to continue.

Step 2Manage Speed Ramping of Video
As you find a new screen on your front, select the type of Speed Ramping you want to perform. Adjust the speed ramp on the line graph that comes in display and click “OK” to conclude.

Step 3Export the Final Video
Once you are done editing your videos, lead to the “Export” button to save the videos on the device.

Part 4: [Basic] How to Change The Frame Rate in Wondershare Filmora?
While you find out the ways to change the speed of your videos, you can also change their frame rate. Filmora offers dedicated options on its platform to its users, which can be understood in the steps below:
Free Download For Win 7 or later(64-bit)
Free Download For macOS 10.14 or later
Step 1Open Settings For Changing Frame Rate
As you open Filmora and import a video, drag it to the timeline. Once the video is imported, lead to the “Preview quality and display settings” button on the right side of the screen.

Step 2Manage Speed Ramping of Video
This opens a drop-down menu where you have to select the option “Change Project Aspect Ratio.”

Step 3Change Frame Rate Successfully
You will be led to a new screen where you can find the option of “Frame Rate” in the list. Change the frame rate according to the requirements and options available and click “OK.” The frame rate of your video will be changed using Filmora.

Conclusion
This article has displayed a conspicuous detail of what the frame rate in the video is and how it implicates video editing. Wondershare Filmora has been observed as the perfect way to manage the speeds of videos. Video frame rates can also be managed using the exquisite video editor. Those who wish to manage such features of the videos should consider using this tool.
How to Make A Fantastic Café Vlog
Cafes are believed to be an inclusive part of a society that interconnects people with each other. As it is considered a spot for long sittings, café vlogs are considered relatively common among such individuals.
With some specialty in the menu for specials, a café vlog can be helpful in pointing out the greatness in this individual. This article will portray how to make a perfect café vlog without putting yourself in difficulty.
In this article
01 What Does an Attractive Café Vlog Look Like?
02 Inspiration for Creating a Café Vlog
04 5 Most Popular Café Vlog on YouTube
Part 1: What Does an Attractive Café Vlog Look Like?
A perfect café vlog needs to have the traits that would make it be accounted as one attractive piece of work. This, however, does not always depend on the elements used across developing a vlog. It can also vary in the form of any particular announcement of operation, which lets it become creative and attractive in the eyes of other users. To make your café vlogs look attractive like this, you need to:
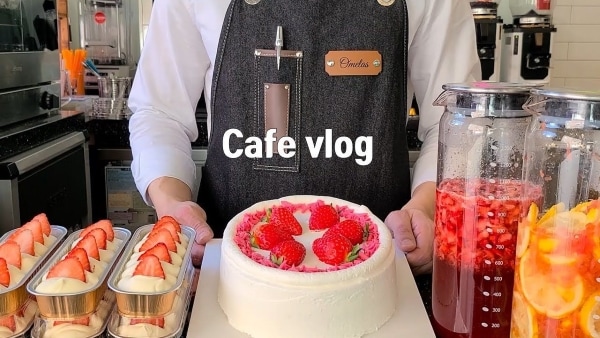
Follow the Theme of the Café
Your café vlog should be highly relevant to the theme of your café. Everything represented should be done under professional terms and would reflect a similar idea. This would bring up the attention of the fans of such themes, leading towards a better attractive viewership.
Highlights the Reality
People do believe that “Everything that glitters is not gold!” You should realize that the selection of content and the extent of highlighting it will present an attractive image of the café if presented perfectly.
Perfect Deals to Associate With
To make your vlogs exciting and interesting, it is considered to be perfect that the vlog should mainly give some special discount to enjoy from. These deals and discounts can bring and allure more viewers into the vlog.
Set up Competitions
Rewarding customers for being part of a greater cause is a perfect way of attracting viewers into watching your content. Café vlogs should be induced with such competitions that show the brighter side of the picture and show what brings greater loads of people into the abode.
Themed Campaigns
It is considered that the best thing to follow a professional way of interacting with such platforms is through themed campaigns. Any idea or belief backed with the platform set across the café will help the vlog target the region to the fullest.
Part 2: Inspiration for Creating a Café Vlog
How to make the perfect café vlog? This question can be covered coherently with an answer that would provoke you into making one yourself. This part shall provide some inspirations that need recognition for creating a café vlog to perfection.
Set Yourselves As a Brand
Before you put yourself in as an inspiration to the people, it is essential to develop a brand that would showcase its idea. An identity that helps people recognize the vlog; branding is believed to be the sole settlement of any particular motive that is started on different levels.
A Good Gear Is Equal to Good Video
Without a doubt, good gear would help a creator build a unique system for recording a café vlog. Rather than recording it from a primary mobile phone, a vlog is recorded with the best tools in mind, which initiate from the vlogging cameras. You need to be quite selective with your gear and select the best ones available in the market for the least possible price.
Always Look Out for Trends
If something new is being covered across cafes and is observed across other videos, you should realize the importance of adopting such trends on a bigger scale. Café vlogs should definitely follow a particular trend that would increase the presence of users within the premises of the café.
Using Good Elements
Once you are done recording the café vlog, the next step towards vlog excellency is how the user has edited it. If the elements used across the vlogs are catchy and attractive to watch, it will induce an increased number of views across the vlog too.
Part 3: How to Make a Café Vlog?
If you are making a café vlog for your channel, you need to figure out the editing tool that would assist your work to perfection. This editing environment is presented by Wondershare Filmora , a tool that combines uniqueness with ease of use. Along with presenting such an expressive environment, Filmora is quite effective in editing a vlog perfectly. To understand the process, look into the steps as shown below:
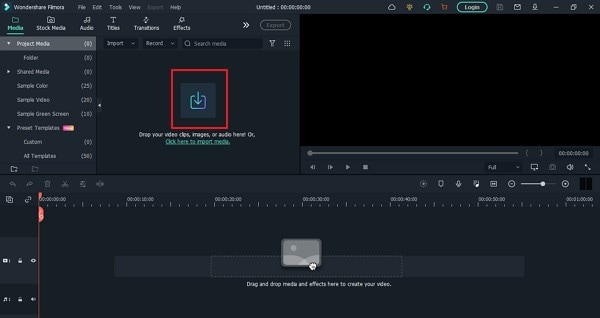
Step 1: Import Café Vlog Video
Launch Wondershare Filmora on your device and click on “New Project” to start a new project across the platform. Access the “Media Tab” and import the video you’ve recorded on your camera to start editing by clicking on the “Arrow Head” icon.
For Win 7 or later (64-bit)
For macOS 10.12 or later
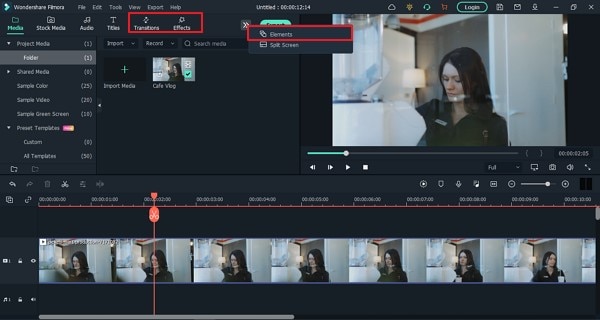
Step 2: Make Changes in Videos
Once you’ve added the video, drag it across the timeline to start editing. You can find the tabs of “Effects,” “Transitions,” and “Elements” that you can add within the vlog to make it more entertaining and attractive. The use of effects, filters, and transitions is believed to be catchy for the viewer’s eye. Along with that, you can include different stickers and emojis to bring the video to life with exceptional elements.
Step 3: Add & Edit Audio
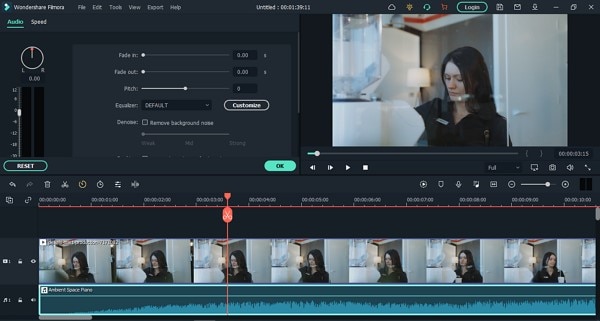
You can also add catchy audio effects to your vlog by clicking on the “Audio” tab of the Filmora. In this tab, you can get the audio effect of all categories and can also access the premium audio effects of Filmstock. For editing the video’s audio, you have to double-click on the audio track present on the timeline.
Step 4: Export File
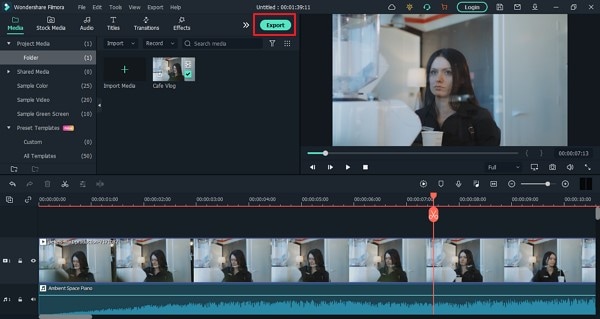
As you complete the editing across the platform, click on “Export” to open a new window. You can set up effective settings for your video before finalizing it and successfully rendering it across your device.
Part 4: 5 Most Popular Café Vlog on YouTube
If you are out there searching for the popular café vlogs that have gained a lot of traction in society, this part will offer you a list of some popular options that you can view and get inspiration from.
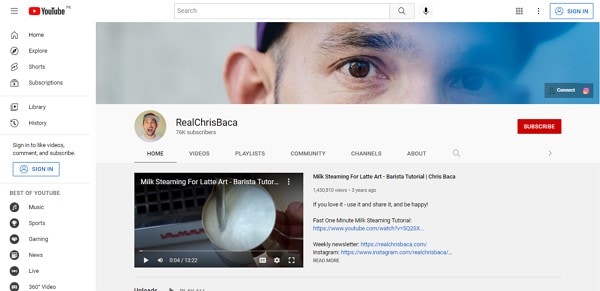
RealChrisBaca
Subscribers: 76K+
This individual has been around the corner for a while, where his love for coffee and barista has brought him into vlogging and sharing all ideas across social media. He has considered the use of different mediums for showcasing the idea of café and the elements that make up one.
Coffictures
Subscribers: 307K+
A cafe vlog known for its recipes, Coffictures has presented an exceptional set of recipes to its viewers across the vlogs and other videos it has posted. Being one of the most popular channels for baristas, they have included many café vlog for the sake of the user to enjoy their environment.

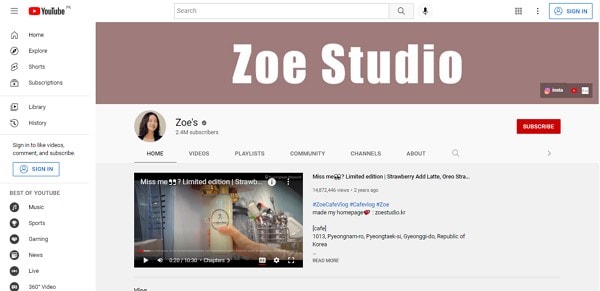
Zoe’s
Subscribers: 2.4M+
This Korean YouTuber works across her mother’s café and sets up café vlogs that outline everything that happens behind in a café. As many users are curious about the technical considerations, Zoe helps them figure out multiple things.
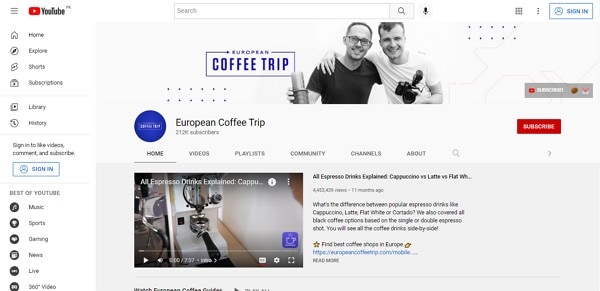
European Coffee Trip
Subscribers: 212K+
As this presents a new narrative to café vlogs, The European Coffee Trip showcases different coffee used across different cafés. To provide users with cognitive information, this project aims to induce vlogs with subtle information.
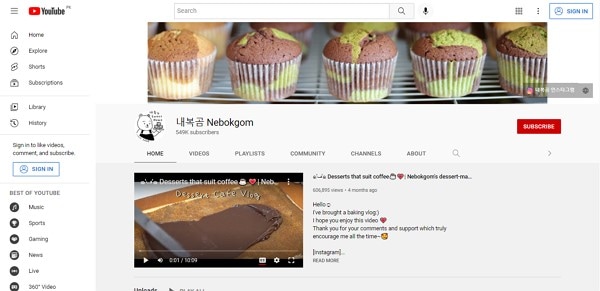
Nebokgom
Subscribers: 549K+
This YouTuber has provided a quite different perspective of café vlogs to the viewers. With immersive recipes of different types that can be used across cafes, this channel presents a complete story to its users, combined with aesthetic stuff.
Closing Words
Are you sure on how to create a café vlog? We hope that the tips and directions provided in the article were significant in guiding the users towards an excellent future. If you are looking forward to starting your own venture, you should definitely look across this.
02 Inspiration for Creating a Café Vlog
04 5 Most Popular Café Vlog on YouTube
Part 1: What Does an Attractive Café Vlog Look Like?
A perfect café vlog needs to have the traits that would make it be accounted as one attractive piece of work. This, however, does not always depend on the elements used across developing a vlog. It can also vary in the form of any particular announcement of operation, which lets it become creative and attractive in the eyes of other users. To make your café vlogs look attractive like this, you need to:

Follow the Theme of the Café
Your café vlog should be highly relevant to the theme of your café. Everything represented should be done under professional terms and would reflect a similar idea. This would bring up the attention of the fans of such themes, leading towards a better attractive viewership.
Highlights the Reality
People do believe that “Everything that glitters is not gold!” You should realize that the selection of content and the extent of highlighting it will present an attractive image of the café if presented perfectly.
Perfect Deals to Associate With
To make your vlogs exciting and interesting, it is considered to be perfect that the vlog should mainly give some special discount to enjoy from. These deals and discounts can bring and allure more viewers into the vlog.
Set up Competitions
Rewarding customers for being part of a greater cause is a perfect way of attracting viewers into watching your content. Café vlogs should be induced with such competitions that show the brighter side of the picture and show what brings greater loads of people into the abode.
Themed Campaigns
It is considered that the best thing to follow a professional way of interacting with such platforms is through themed campaigns. Any idea or belief backed with the platform set across the café will help the vlog target the region to the fullest.
Part 2: Inspiration for Creating a Café Vlog
How to make the perfect café vlog? This question can be covered coherently with an answer that would provoke you into making one yourself. This part shall provide some inspirations that need recognition for creating a café vlog to perfection.
Set Yourselves As a Brand
Before you put yourself in as an inspiration to the people, it is essential to develop a brand that would showcase its idea. An identity that helps people recognize the vlog; branding is believed to be the sole settlement of any particular motive that is started on different levels.
A Good Gear Is Equal to Good Video
Without a doubt, good gear would help a creator build a unique system for recording a café vlog. Rather than recording it from a primary mobile phone, a vlog is recorded with the best tools in mind, which initiate from the vlogging cameras. You need to be quite selective with your gear and select the best ones available in the market for the least possible price.
Always Look Out for Trends
If something new is being covered across cafes and is observed across other videos, you should realize the importance of adopting such trends on a bigger scale. Café vlogs should definitely follow a particular trend that would increase the presence of users within the premises of the café.
Using Good Elements
Once you are done recording the café vlog, the next step towards vlog excellency is how the user has edited it. If the elements used across the vlogs are catchy and attractive to watch, it will induce an increased number of views across the vlog too.
Part 3: How to Make a Café Vlog?
If you are making a café vlog for your channel, you need to figure out the editing tool that would assist your work to perfection. This editing environment is presented by Wondershare Filmora , a tool that combines uniqueness with ease of use. Along with presenting such an expressive environment, Filmora is quite effective in editing a vlog perfectly. To understand the process, look into the steps as shown below:
Step 1: Import Café Vlog Video
Launch Wondershare Filmora on your device and click on “New Project” to start a new project across the platform. Access the “Media Tab” and import the video you’ve recorded on your camera to start editing by clicking on the “Arrow Head” icon.

For Win 7 or later (64-bit)
For macOS 10.12 or later
Step 2: Make Changes in Videos
Once you’ve added the video, drag it across the timeline to start editing. You can find the tabs of “Effects,” “Transitions,” and “Elements” that you can add within the vlog to make it more entertaining and attractive. The use of effects, filters, and transitions is believed to be catchy for the viewer’s eye. Along with that, you can include different stickers and emojis to bring the video to life with exceptional elements.

Step 3: Add & Edit Audio
You can also add catchy audio effects to your vlog by clicking on the “Audio” tab of the Filmora. In this tab, you can get the audio effect of all categories and can also access the premium audio effects of Filmstock. For editing the video’s audio, you have to double-click on the audio track present on the timeline.

Step 4: Export File
As you complete the editing across the platform, click on “Export” to open a new window. You can set up effective settings for your video before finalizing it and successfully rendering it across your device.

Part 4: 5 Most Popular Café Vlog on YouTube
If you are out there searching for the popular café vlogs that have gained a lot of traction in society, this part will offer you a list of some popular options that you can view and get inspiration from.
RealChrisBaca
Subscribers: 76K+
This individual has been around the corner for a while, where his love for coffee and barista has brought him into vlogging and sharing all ideas across social media. He has considered the use of different mediums for showcasing the idea of café and the elements that make up one.

Coffictures
Subscribers: 307K+
A cafe vlog known for its recipes, Coffictures has presented an exceptional set of recipes to its viewers across the vlogs and other videos it has posted. Being one of the most popular channels for baristas, they have included many café vlog for the sake of the user to enjoy their environment.

Zoe’s
Subscribers: 2.4M+
This Korean YouTuber works across her mother’s café and sets up café vlogs that outline everything that happens behind in a café. As many users are curious about the technical considerations, Zoe helps them figure out multiple things.

European Coffee Trip
Subscribers: 212K+
As this presents a new narrative to café vlogs, The European Coffee Trip showcases different coffee used across different cafés. To provide users with cognitive information, this project aims to induce vlogs with subtle information.

Nebokgom
Subscribers: 549K+
This YouTuber has provided a quite different perspective of café vlogs to the viewers. With immersive recipes of different types that can be used across cafes, this channel presents a complete story to its users, combined with aesthetic stuff.

Closing Words
Are you sure on how to create a café vlog? We hope that the tips and directions provided in the article were significant in guiding the users towards an excellent future. If you are looking forward to starting your own venture, you should definitely look across this.
02 Inspiration for Creating a Café Vlog
04 5 Most Popular Café Vlog on YouTube
Part 1: What Does an Attractive Café Vlog Look Like?
A perfect café vlog needs to have the traits that would make it be accounted as one attractive piece of work. This, however, does not always depend on the elements used across developing a vlog. It can also vary in the form of any particular announcement of operation, which lets it become creative and attractive in the eyes of other users. To make your café vlogs look attractive like this, you need to:

Follow the Theme of the Café
Your café vlog should be highly relevant to the theme of your café. Everything represented should be done under professional terms and would reflect a similar idea. This would bring up the attention of the fans of such themes, leading towards a better attractive viewership.
Highlights the Reality
People do believe that “Everything that glitters is not gold!” You should realize that the selection of content and the extent of highlighting it will present an attractive image of the café if presented perfectly.
Perfect Deals to Associate With
To make your vlogs exciting and interesting, it is considered to be perfect that the vlog should mainly give some special discount to enjoy from. These deals and discounts can bring and allure more viewers into the vlog.
Set up Competitions
Rewarding customers for being part of a greater cause is a perfect way of attracting viewers into watching your content. Café vlogs should be induced with such competitions that show the brighter side of the picture and show what brings greater loads of people into the abode.
Themed Campaigns
It is considered that the best thing to follow a professional way of interacting with such platforms is through themed campaigns. Any idea or belief backed with the platform set across the café will help the vlog target the region to the fullest.
Part 2: Inspiration for Creating a Café Vlog
How to make the perfect café vlog? This question can be covered coherently with an answer that would provoke you into making one yourself. This part shall provide some inspirations that need recognition for creating a café vlog to perfection.
Set Yourselves As a Brand
Before you put yourself in as an inspiration to the people, it is essential to develop a brand that would showcase its idea. An identity that helps people recognize the vlog; branding is believed to be the sole settlement of any particular motive that is started on different levels.
A Good Gear Is Equal to Good Video
Without a doubt, good gear would help a creator build a unique system for recording a café vlog. Rather than recording it from a primary mobile phone, a vlog is recorded with the best tools in mind, which initiate from the vlogging cameras. You need to be quite selective with your gear and select the best ones available in the market for the least possible price.
Always Look Out for Trends
If something new is being covered across cafes and is observed across other videos, you should realize the importance of adopting such trends on a bigger scale. Café vlogs should definitely follow a particular trend that would increase the presence of users within the premises of the café.
Using Good Elements
Once you are done recording the café vlog, the next step towards vlog excellency is how the user has edited it. If the elements used across the vlogs are catchy and attractive to watch, it will induce an increased number of views across the vlog too.
Part 3: How to Make a Café Vlog?
If you are making a café vlog for your channel, you need to figure out the editing tool that would assist your work to perfection. This editing environment is presented by Wondershare Filmora , a tool that combines uniqueness with ease of use. Along with presenting such an expressive environment, Filmora is quite effective in editing a vlog perfectly. To understand the process, look into the steps as shown below:
Step 1: Import Café Vlog Video
Launch Wondershare Filmora on your device and click on “New Project” to start a new project across the platform. Access the “Media Tab” and import the video you’ve recorded on your camera to start editing by clicking on the “Arrow Head” icon.

For Win 7 or later (64-bit)
For macOS 10.12 or later
Step 2: Make Changes in Videos
Once you’ve added the video, drag it across the timeline to start editing. You can find the tabs of “Effects,” “Transitions,” and “Elements” that you can add within the vlog to make it more entertaining and attractive. The use of effects, filters, and transitions is believed to be catchy for the viewer’s eye. Along with that, you can include different stickers and emojis to bring the video to life with exceptional elements.

Step 3: Add & Edit Audio
You can also add catchy audio effects to your vlog by clicking on the “Audio” tab of the Filmora. In this tab, you can get the audio effect of all categories and can also access the premium audio effects of Filmstock. For editing the video’s audio, you have to double-click on the audio track present on the timeline.

Step 4: Export File
As you complete the editing across the platform, click on “Export” to open a new window. You can set up effective settings for your video before finalizing it and successfully rendering it across your device.

Part 4: 5 Most Popular Café Vlog on YouTube
If you are out there searching for the popular café vlogs that have gained a lot of traction in society, this part will offer you a list of some popular options that you can view and get inspiration from.
RealChrisBaca
Subscribers: 76K+
This individual has been around the corner for a while, where his love for coffee and barista has brought him into vlogging and sharing all ideas across social media. He has considered the use of different mediums for showcasing the idea of café and the elements that make up one.

Coffictures
Subscribers: 307K+
A cafe vlog known for its recipes, Coffictures has presented an exceptional set of recipes to its viewers across the vlogs and other videos it has posted. Being one of the most popular channels for baristas, they have included many café vlog for the sake of the user to enjoy their environment.

Zoe’s
Subscribers: 2.4M+
This Korean YouTuber works across her mother’s café and sets up café vlogs that outline everything that happens behind in a café. As many users are curious about the technical considerations, Zoe helps them figure out multiple things.

European Coffee Trip
Subscribers: 212K+
As this presents a new narrative to café vlogs, The European Coffee Trip showcases different coffee used across different cafés. To provide users with cognitive information, this project aims to induce vlogs with subtle information.

Nebokgom
Subscribers: 549K+
This YouTuber has provided a quite different perspective of café vlogs to the viewers. With immersive recipes of different types that can be used across cafes, this channel presents a complete story to its users, combined with aesthetic stuff.

Closing Words
Are you sure on how to create a café vlog? We hope that the tips and directions provided in the article were significant in guiding the users towards an excellent future. If you are looking forward to starting your own venture, you should definitely look across this.
02 Inspiration for Creating a Café Vlog
04 5 Most Popular Café Vlog on YouTube
Part 1: What Does an Attractive Café Vlog Look Like?
A perfect café vlog needs to have the traits that would make it be accounted as one attractive piece of work. This, however, does not always depend on the elements used across developing a vlog. It can also vary in the form of any particular announcement of operation, which lets it become creative and attractive in the eyes of other users. To make your café vlogs look attractive like this, you need to:

Follow the Theme of the Café
Your café vlog should be highly relevant to the theme of your café. Everything represented should be done under professional terms and would reflect a similar idea. This would bring up the attention of the fans of such themes, leading towards a better attractive viewership.
Highlights the Reality
People do believe that “Everything that glitters is not gold!” You should realize that the selection of content and the extent of highlighting it will present an attractive image of the café if presented perfectly.
Perfect Deals to Associate With
To make your vlogs exciting and interesting, it is considered to be perfect that the vlog should mainly give some special discount to enjoy from. These deals and discounts can bring and allure more viewers into the vlog.
Set up Competitions
Rewarding customers for being part of a greater cause is a perfect way of attracting viewers into watching your content. Café vlogs should be induced with such competitions that show the brighter side of the picture and show what brings greater loads of people into the abode.
Themed Campaigns
It is considered that the best thing to follow a professional way of interacting with such platforms is through themed campaigns. Any idea or belief backed with the platform set across the café will help the vlog target the region to the fullest.
Part 2: Inspiration for Creating a Café Vlog
How to make the perfect café vlog? This question can be covered coherently with an answer that would provoke you into making one yourself. This part shall provide some inspirations that need recognition for creating a café vlog to perfection.
Set Yourselves As a Brand
Before you put yourself in as an inspiration to the people, it is essential to develop a brand that would showcase its idea. An identity that helps people recognize the vlog; branding is believed to be the sole settlement of any particular motive that is started on different levels.
A Good Gear Is Equal to Good Video
Without a doubt, good gear would help a creator build a unique system for recording a café vlog. Rather than recording it from a primary mobile phone, a vlog is recorded with the best tools in mind, which initiate from the vlogging cameras. You need to be quite selective with your gear and select the best ones available in the market for the least possible price.
Always Look Out for Trends
If something new is being covered across cafes and is observed across other videos, you should realize the importance of adopting such trends on a bigger scale. Café vlogs should definitely follow a particular trend that would increase the presence of users within the premises of the café.
Using Good Elements
Once you are done recording the café vlog, the next step towards vlog excellency is how the user has edited it. If the elements used across the vlogs are catchy and attractive to watch, it will induce an increased number of views across the vlog too.
Part 3: How to Make a Café Vlog?
If you are making a café vlog for your channel, you need to figure out the editing tool that would assist your work to perfection. This editing environment is presented by Wondershare Filmora , a tool that combines uniqueness with ease of use. Along with presenting such an expressive environment, Filmora is quite effective in editing a vlog perfectly. To understand the process, look into the steps as shown below:
Step 1: Import Café Vlog Video
Launch Wondershare Filmora on your device and click on “New Project” to start a new project across the platform. Access the “Media Tab” and import the video you’ve recorded on your camera to start editing by clicking on the “Arrow Head” icon.

For Win 7 or later (64-bit)
For macOS 10.12 or later
Step 2: Make Changes in Videos
Once you’ve added the video, drag it across the timeline to start editing. You can find the tabs of “Effects,” “Transitions,” and “Elements” that you can add within the vlog to make it more entertaining and attractive. The use of effects, filters, and transitions is believed to be catchy for the viewer’s eye. Along with that, you can include different stickers and emojis to bring the video to life with exceptional elements.

Step 3: Add & Edit Audio
You can also add catchy audio effects to your vlog by clicking on the “Audio” tab of the Filmora. In this tab, you can get the audio effect of all categories and can also access the premium audio effects of Filmstock. For editing the video’s audio, you have to double-click on the audio track present on the timeline.

Step 4: Export File
As you complete the editing across the platform, click on “Export” to open a new window. You can set up effective settings for your video before finalizing it and successfully rendering it across your device.

Part 4: 5 Most Popular Café Vlog on YouTube
If you are out there searching for the popular café vlogs that have gained a lot of traction in society, this part will offer you a list of some popular options that you can view and get inspiration from.
RealChrisBaca
Subscribers: 76K+
This individual has been around the corner for a while, where his love for coffee and barista has brought him into vlogging and sharing all ideas across social media. He has considered the use of different mediums for showcasing the idea of café and the elements that make up one.

Coffictures
Subscribers: 307K+
A cafe vlog known for its recipes, Coffictures has presented an exceptional set of recipes to its viewers across the vlogs and other videos it has posted. Being one of the most popular channels for baristas, they have included many café vlog for the sake of the user to enjoy their environment.

Zoe’s
Subscribers: 2.4M+
This Korean YouTuber works across her mother’s café and sets up café vlogs that outline everything that happens behind in a café. As many users are curious about the technical considerations, Zoe helps them figure out multiple things.

European Coffee Trip
Subscribers: 212K+
As this presents a new narrative to café vlogs, The European Coffee Trip showcases different coffee used across different cafés. To provide users with cognitive information, this project aims to induce vlogs with subtle information.

Nebokgom
Subscribers: 549K+
This YouTuber has provided a quite different perspective of café vlogs to the viewers. With immersive recipes of different types that can be used across cafes, this channel presents a complete story to its users, combined with aesthetic stuff.

Closing Words
Are you sure on how to create a café vlog? We hope that the tips and directions provided in the article were significant in guiding the users towards an excellent future. If you are looking forward to starting your own venture, you should definitely look across this.
Also read:
- The Way to Make Dynamic Video Collages for 2024
- Have You Ever Wanted to Stop Your Video and Hold on to a Single Frame to Draw Attention to a Point or for Dramatic Flair? Good News! VEGAS Pro Makes It Easy to Do Just That. In This Tutorial, Well Look at How to Make Sony Vegas Freeze Frame
- In 2024, Step by Step to Rotate Videos Using Handbrake
- In 2024, Learn How to Extract Sound From Video Using the Different Online and Software Tools. Details About Their Features, Pros/Cons, and More Are Given
- This Review Post Introduces You to EasyHDR to Review and Customize Your HDR Photos. Youll Also Learn the Best Desktop Application to Edit Your HDR Videos Effortlessly
- How to Create Cooking Video Intro and Outro for YouTube Channel?
- New Easy Guide to Overlay Videos in Premiere Pro for 2024
- How to Save As MP4 File on Windows Movie Maker for 2024
- Updated The Ultimate Guide to Make a Text Collage for 2024
- 2024 Approved How to Use the Logo Intro Templates for Your Next Video
- Updated In 2024, How To Change Sky Background With Adobe Photoshop Best Ways
- Have You a Desire to Imbibe Your PowerPoint Presentations with Custom Effects and Tools? Be There to Learn All About Creating Custom Slideshows in PowerPoint with Utmost Ease
- Do You Want to Apply LUTs Using Open Broadcaster Software? You Can Download Free LUTs for OBS and Apply Them to Your Files. There Are Many LUTs Available for 2024
- How to Create Intro with Legend Intro Maker for 2024
- How D AI Video Games Act More Human Than Human for 2024
- Updated Best Filmic Pro LUTs For Video Editing for 2024
- 2024 Approved Best 5 PDF to GIF Converters You Should Know
- 4 Methods to Turn off Life 360 On Vivo Y27 5G without Anyone Knowing | Dr.fone
- Fixes for Apps Keep Crashing on Lava Yuva 3 | Dr.fone
- How to recover old call logs from your Realme 11 5G?
- In 2024, Top 10 Password Cracking Tools For Samsung Galaxy S23
- How to Unlock iPhone 13 mini Passcode without iTunes without Knowing Passcode?
- In 2024, Here are Some Pro Tips for Pokemon Go PvP Battles On Asus ROG Phone 7 | Dr.fone
- In 2024, How to Fake GPS on Android without Mock Location For your Vivo X90S | Dr.fone
- How do I reset my OnePlus 12 Phone without technical knowledge? | Dr.fone
- In 2024, 4 Quick Ways to Transfer Contacts from Apple iPhone XR to iPhone With/Without iTunes | Dr.fone
- In 2024, Fake the Location to Get Around the MLB Blackouts on Infinix Note 30 VIP Racing Edition | Dr.fone
- Apple iPhone 13 mini Backup Password Never Set But Still Asking? Heres the Fix
- 4 Ways to Transfer Music from Apple iPhone 13 to iPod touch | Dr.fone
- In 2024, Complete Fixes To Solve iPhone XR Randomly Asking for Apple ID Password | Dr.fone
- Title: This Easy Hack Using Wondershare Filmora New Masking Feature Will Be a Great Addition to Your Next Horror Video Content
- Author: Chloe
- Created at : 2024-05-20 03:37:37
- Updated at : 2024-05-21 03:37:37
- Link: https://ai-editing-video.techidaily.com/this-easy-hack-using-wondershare-filmora-new-masking-feature-will-be-a-great-addition-to-your-next-horror-video-content/
- License: This work is licensed under CC BY-NC-SA 4.0.

