:max_bytes(150000):strip_icc():format(webp)/GettyImages-1305200685-e977d0ca4e9a47e2b006e5b32a9922fd.jpg)
Top 16 Motion Blur Apps for Videos & Photos for 2024

Top 16 Motion Blur Apps for Videos & Photos
The blur observed in moving objects captured through the camera is called the motion blur effect. This, in particular, occurs due to the movement of the camera, subject, or both elements combined. People observe this effect in their real life through their eyes; thus, the motion blur effect is put into practice to give the clip or photo a touch of reality.
It is essentially used to display the message of speed or show the fast progression of time. Any object moving through a fast motion can be accompanied by the motion blur effect. There are many applications available to cater to this purpose. In this article, we will recommend some top-notch motion blur apps that will help you achieve this feat in no time.
- CapCut
- NSMB - Motion Blur Video
- BlurEffect - Blur Photo & Video
- Snapseed
- Picsart Photo Editor & Video
- Blur Video and Photo Editor
- Blur.r Photo, Pic.ture Motion
- Motion Blur Photo Effect
- Motion Blur Photo Editor
- Wondershare Filmora - The Best Motion Blur Effect App on Desktop
- Vegas Pro - Create Natural-Looking Motion Blurs With Ease
- Adobe Premiere Pro - Professionally Edit Motion Blur Videos
Best 4 Online Motion Blur Tools
Part 1: Best 9 Motion Blur Effect Apps for iPhone and Android
| Name | Price | Support System | Motion Blur for Photos | Motion Blur for Videos |
|---|---|---|---|---|
| CapCut | $0.99 - $74.99 Per Item | iPhone/Android | Yes | Yes |
| NSMB - Motion Blur Video | Not Provided | Android | No | Yes |
| BlurEffect - Blur Photo & Video | Full version: $39.99Premium - Monthly: $3.99Ad-Free & Watermark-Free: $14.99Up to 5 Minutes & Watermark-Free & Ad-Free: $19.99Premium - Annual: $19.99 | iPhone | Yes | Yes |
| Snapseed | Free | iPhone/Android | Yes | No |
| Picsart Photo Editor & Video | Ad Remover: $5.99Girl Minisketch: $1.99Food: $1.99Cartoon Animal Package: $2.99Grunge Stickers: $0.99Girly: $0.99Horoscope: $1.99Cute Thanksgiving: $2.99Happy Thanksgiving: $2.99Aliens: $0.99 | iPhone/Android | Yes | Yes |
| Blur Video and Photo Editor | $0.99 - $99.99 Per Item | Android | Yes | Yes |
| Blur.r Photo, Pic.ture Motion | Monthly Subscription: $ 11.98Weekly Subscription: $ 6.98One Week Subscription: $ 3.98Yearly Subscription: $ 94.98 | iPhone | Yes | No |
| Motion Blur Photo Effect | Premium Access: $7.99 - $29.99 | iPhone | Yes | No |
| Motion Blur Photo Editor | Not Provided | Android | Yes | No |
There are many motion blur effect applications available in the market, providing direct services for iPhone and Android users. However, finding the best app for this purpose is essential, which is why we came up with a list of the best motion blur apps that can be used on iPhone and Android.
1. CapCut
While it is known as an easy-to-use application, CapCut stands among the most premium mobile applications that help you create professional videos that can be posted on social media platforms. CapCut comes up with a dedicated motion blur effect that allows users to create stabilized videos with complete control over the speed of the video.
Following other adjustments in the video, CapCut is a complete tool designed to create advanced videos, including different effects such as motion blur.
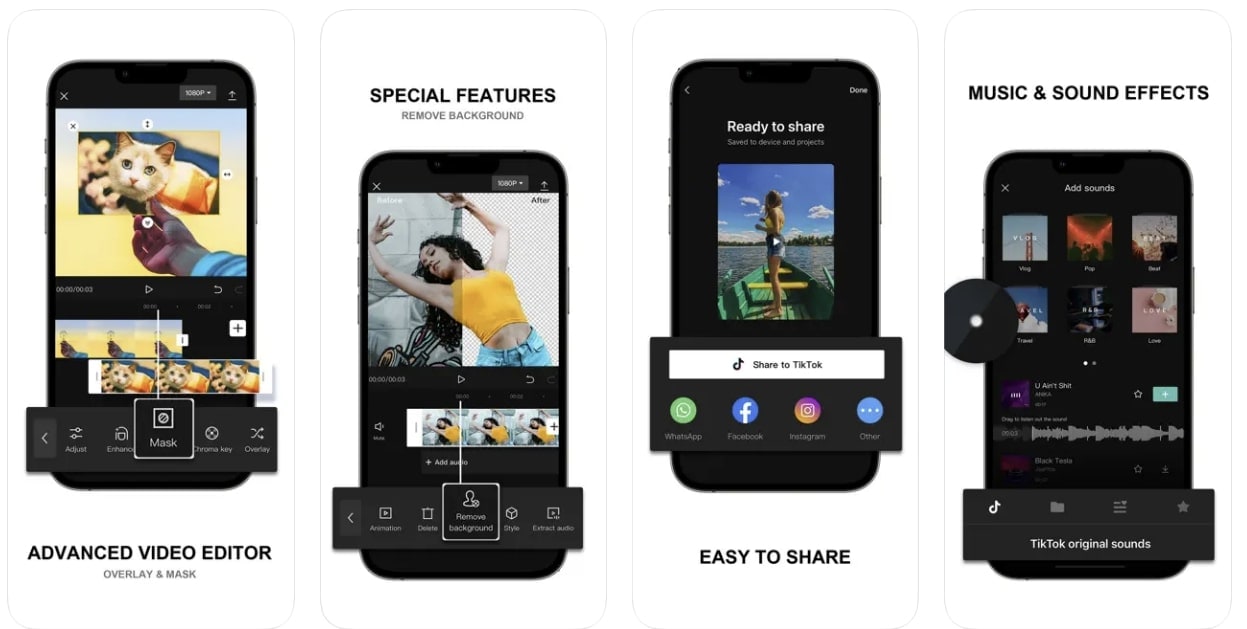
Download: Google Play Store | App Store
Key Features
- You can quickly put transitions between the video and the clips to blend in perfectly.
- Video clips can be animated with the help of zoom-in and out effects, providing all major professional touchups a video can have.
- Execute a perfect motion blur video with the help of the multi-track timeline for arranging and previewing clips.
Pros
- It provides the option of including music clips and sound effects on the videos from the vast collection.
- It supports exporting videos in 4K and 60fps with Smart HDR technology.
Cons
- Won’t work perfectly if the RAM and hardware of the phone are limited.
2. NSMB - Motion Blur Video
The motion blur effect is a great feature that can enhance the quality of the video and make it look realistic if used properly. NSMB - Motion Blur Video is an Android motion blur application that features the option of creating such videos in a matter of seconds.
With no particular learning requirement, NSMB makes the process look easy. You have to set the intensity of video, and that’s all you need to do within this application.
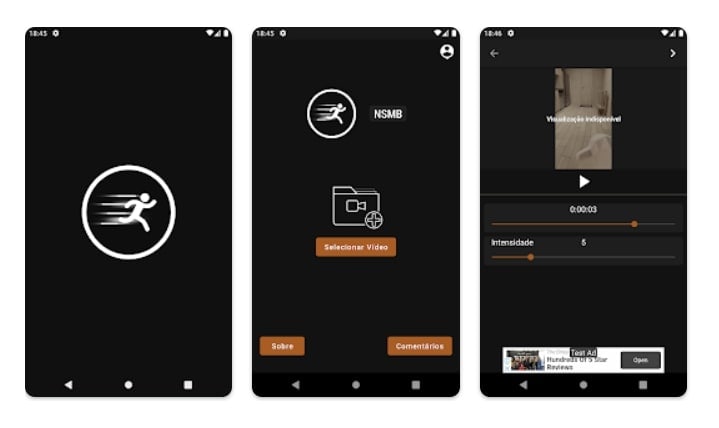
Download: Google Play Store
Key Features
- While the platform is easy-to-use, the interface is quite simple to understand, with no confusing structures.
- The platform comes up with an intelligent motion blur that automatically executes the process.
- It works with Android devices from Android 5.0 and later, making it a compatible tool with all major Android devices.
Pros
- You can set the resolution of your exported video to 1080p, which is a Full HD result.
- Set an appropriate fps value for your exported video with the available options.
Cons
- Long rendering times, which are not optimized and take up time.
3. BlurEffect - Blur Photo & Video
BlurEfffect - Blur Photo & Video is another great iOS application that provides the option of adding motion blur effects. This tool is built to include the blur effect to perfection in general. With defining blur options, you can create motion blur effects easily on your added videos. The functions are diverse and quite effective if appropriately observed.
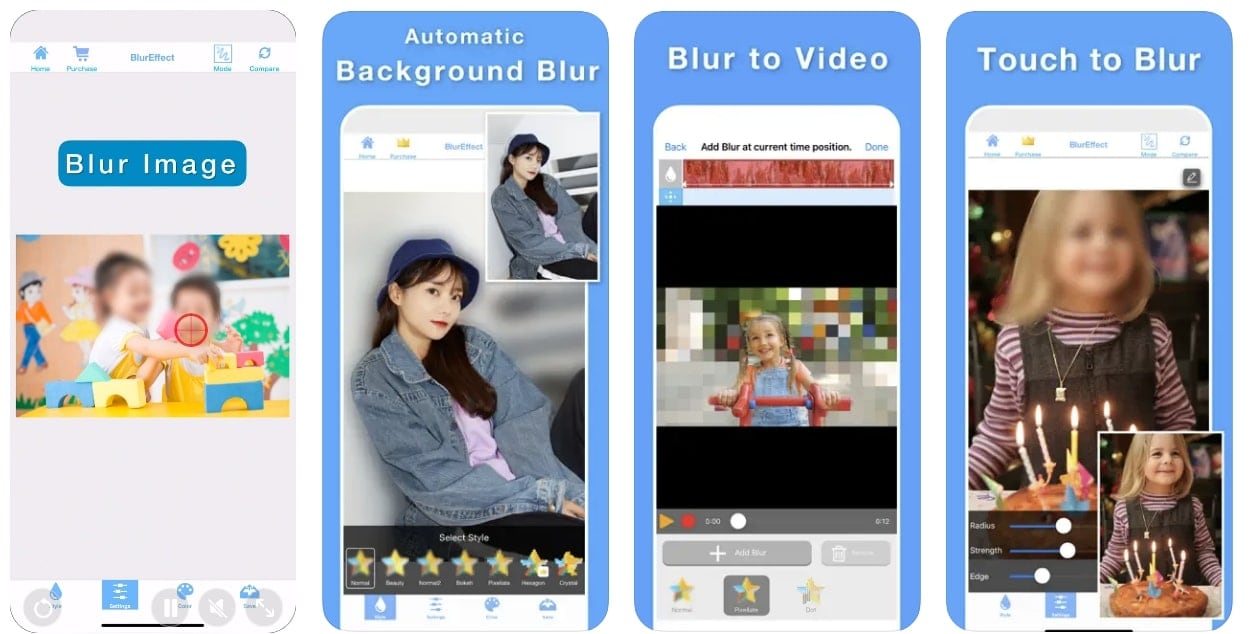
Download: App Store
Key Features
- As the name exclaim, it works perfectly for photos and videos, likewise.
- The paid version of the application can save videos up to 1080p in quality.
- It provides the feature of managing the strength of the “Auto Blurs” feature for controlling motion blur.
Pros
- Multiple effects are available on the platform, including normal blurs, pixelated and dotted blurs, etc.
- It also provides the option of trimming videos before adding the blur effect to them.
Cons
- The resolution of the video is lowered after blurring it out.
4. Snapseed
Google presented a great and quick photo editor for users confused about finding their perfect option. Snapseed was designed as a professional photo editor that allows users to add multiple touchups to the photo that is being edited.
While it backs itself up with Google Photos, this professional photo editor is enhanced and interconnected. Snapseed makes photo touchups simple; however, it does provide advanced functions that can help create motion blur pictures.
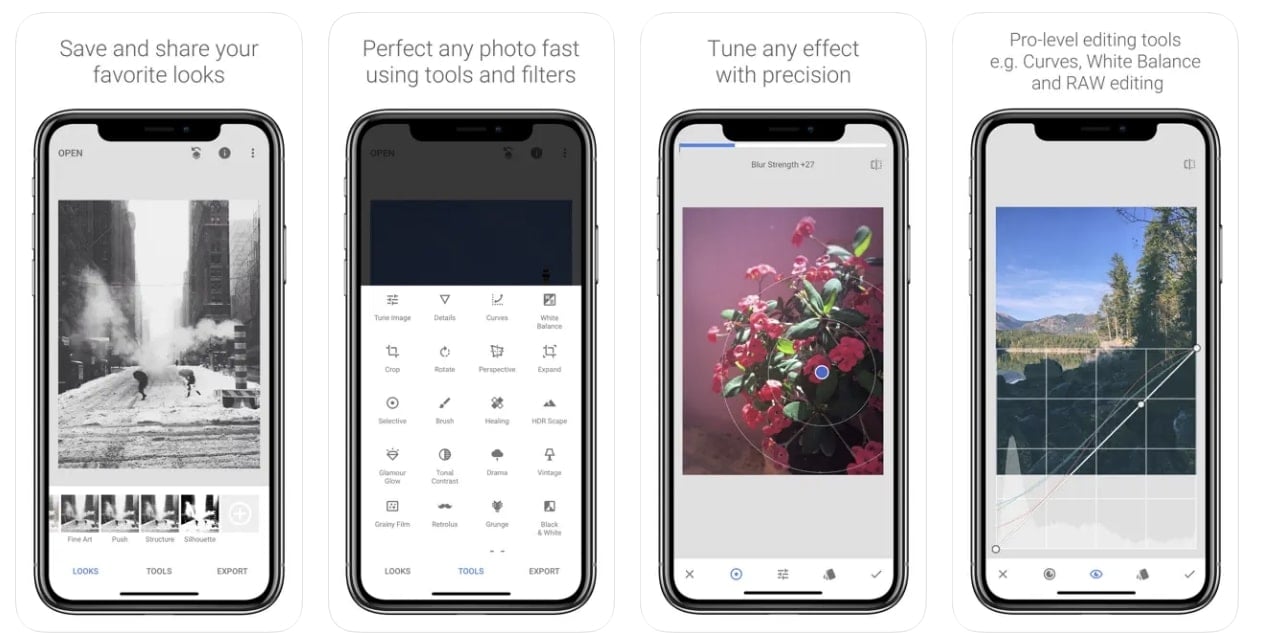
Download: Google Play Store | App Store
Key Features
- It combines with 29 different tools and filters, which also includes creating motion blur pictures.
- 38 predefined text styles are available in the editor for creating the text of different styles and forms.
- Create effects with multiple exposures brought with HDR Scape.
Pros
- Enhance a specific photo element with the help of the Face Enhance feature, which adds focus to the facial features.
- You can selectively retouch the photo and manage its exposure, saturation, and other elements.
Cons
- The application has no undo button, making it challenging to manage edits.
5. Picsart Photo Editor & Video
Picsart is a renowned photo and video editor available on App Store and Play Store. This exceptional editor covers a creative set of features combined with artificial intelligence to present some of the best options for retouching photos and videos. If you seek to create a motion blur effect with this application, it surely won’t disappoint, presenting a high-resolution result.
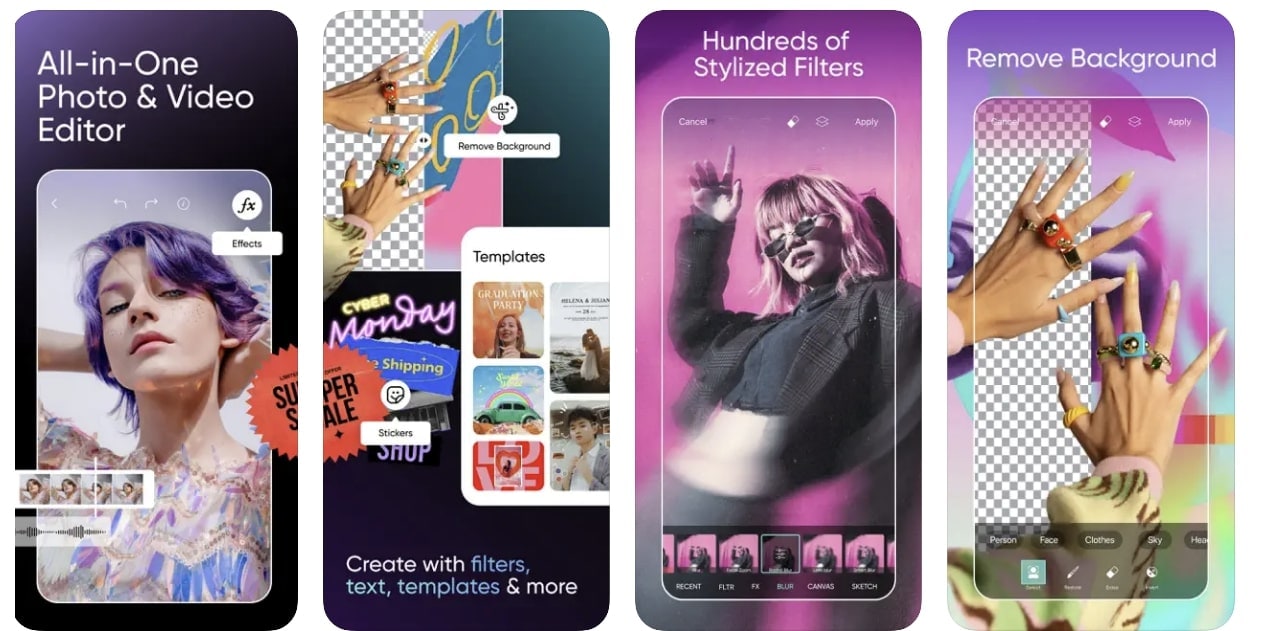
Download: Google Play Store | App Store
Key Features
- It helps users customize photos and videos with customizable brushes, layers, and drawing tools.
- Present a realistic display of motion blur with the help of the multiple effects and filters used for blending in perfectly.
- More than 60 million stickers are available in Picsart, which can be effectively used within any editing media.
Pros
- You can easily share the edited content with your friends through the platform.
- It provides multiple video effects and trendy filters to make video editing easier.
Cons
- There is a lot of lag in the application while editing the video.
6. Blur Video and Photo Editor
This is one of the motion blur apps that provides a simple set of options for managing and enhancing the videos and photos on your Android device. Motion blur can be confusing if not managed properly; however, Blur Video and Photo Editor provides a simple platform to include the blurry effect and make the moving object look perfect in the preview.
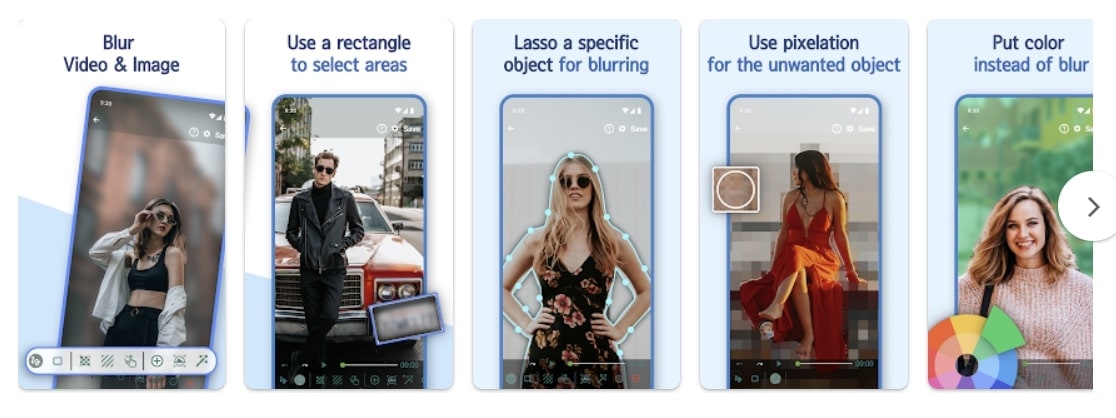
Download: Google Play Store
Key Features
- You can blur out the background of the imported photo or video while adjusting the intensity with the help of an easy tool.
- It also allows you to pixelate the unwanted sections and portions of the media files.
- Define more than one area for blurring with the help of shapes.
Pros
- It features the intuitive option of blurring out an object that is moving in the video.
- You can track an object with a simple definition of the area within the platform.
Cons
- The user interface is not exceptional, with buttons that are not even usable.
7. Blur.r Photo, Pic.ture Motion
Not many tools provide a simple and customized set of options for including motion blur within photos and other media. Blur.r Photo, Pic.ture Motion has been tangibly designed to improvise a perfect motion-blurring photo platform. While it provides a quick set of tools to work with, the results are exquisite and better than most in the market.
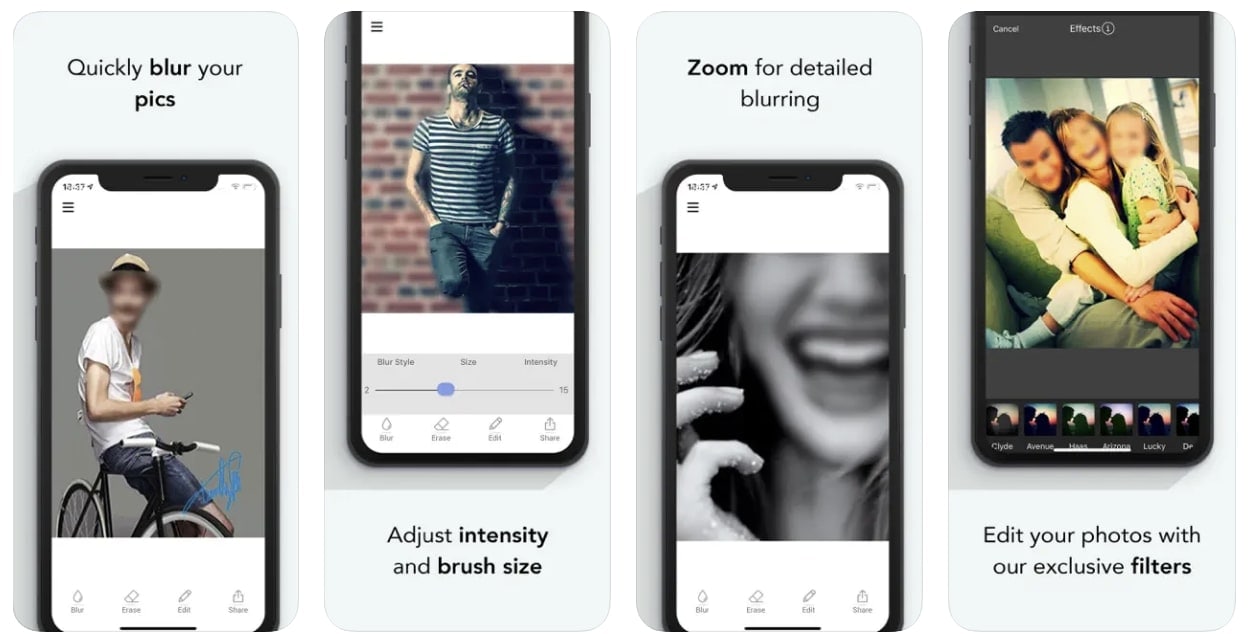
Download: App Store
Key Features
- Set the intensity of the blurriness and size on the photo with custom tools.
- A complete set of sharing options is available on the platform, which is covered in a single click.
- For detailed blurring, you can consume the option of Zoom and Pan the photo.
Pros
- You can easily undo and redo actions on the edited photos to avoid repeating actions and wasting time.
- Use different filters within photos to edit them to perfection.
Cons
- It does not allow for adjustment of the intensity of the blur, as stated in the services.
8. Motion Blur Photo Effect
While finding the perfect motion blur effect app on iPhone for presenting realistic effects in photos, you might come across Motion Blur Photo Effect, a perfect motion blur photo application for iOS users. The tool is known for its fast processing and quick execution, with an easy-to-use interface for creating perfect blurred pictures.
You can find multiple features and effects in this application that relate to motion blur, providing a diverse range of options when seeking this effect.

Download: App Store
Key Features
- Protects the user’s privacy while maintaining its policy of avoiding illegal breaches.
- Emphasize the light spot in the background of a picture with the help of the Bokeh effect.
- Get a complete set of blur effects to include in the photo, which features advanced functionality.
Pros
- You can find different types of blur effects, such as Zoom Blur, Motion Blur, and Mosaic Effect, to enhance the motion blur.
- It is extremely simple and quick in procession.
Cons
- It does not provide motion blurring for videos, making it restricted.
9. Motion Blur Photo Editor
Adding realistic effects to images is important if your work involves professional requirements. Motion blur is an effect used in multiple places, which makes it a critical feat to achieve. While obtaining the effect, the simplicity of the procedure holds importance. This is why Motion Blur Photo Editor gives the perfect result with explicit functions and features to enhance the motion blur effect.
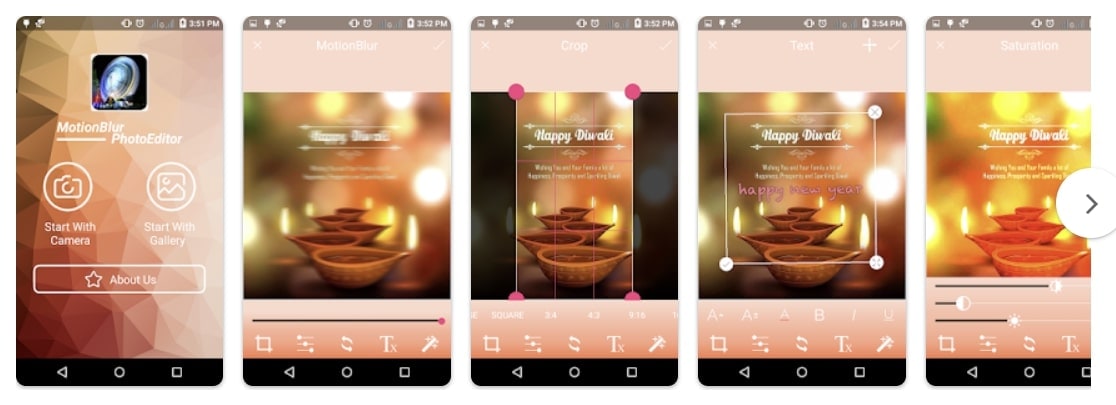
Download: Google Play Store
Key Features
- Make your images look realistic with the help of magic effects.
- Manage different elements, including the text and other features, such as the brightness of the tool.
- It allows you to share the rendered result on different social applications.
Pros
- Features support for Android devices with OS 4.2 or above.
- The process of including motion blur in photos is quite basic.
Cons
- An outdated application, which was last updated in 2019.
Part 2: 3 Motion Blur Apps for Mac and Windows
As you have consulted the motion blur apps for iPhone and Android, you might require something more professional. For this, you first have to shift onto a computer or Mac that provides you with a perfect platform for creating content. Let’s find out some top-notch motion blur effect apps that you can use on your Mac and Windows:
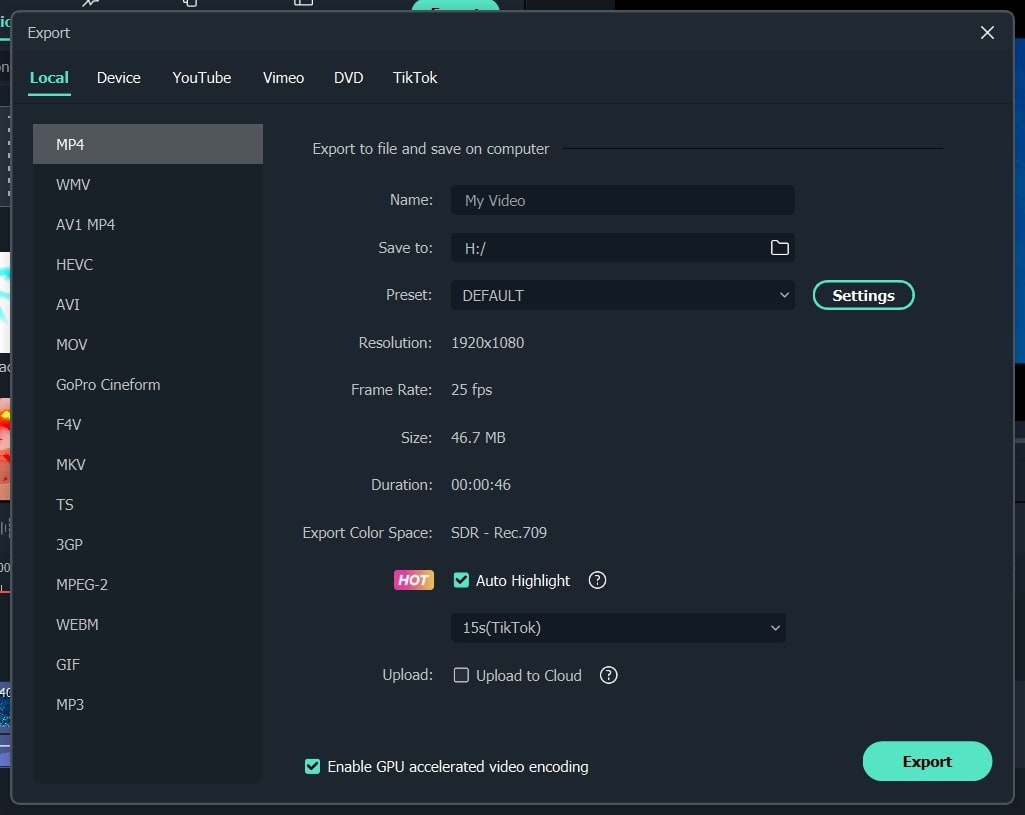
1. Wondershare Filmora - The Best Motion Blur Effect App on Desktop
Free Download For Win 7 or later(64-bit)
Free Download For macOS 10.14 or later
Not many tools provide a complete set of tools to manage the videos on your computer and create the best version out of them. Wondershare Filmora is a complete package for creating a motion blur effect on a video.
With a quick and effective toolkit available on the platform, Filmora turns out to simplify the process, thereby making the process look basic. Filmora unleashes the creativity of a beginner, helping them create a perfect video with its intuitive and impressive interface.
Supported System
- Windows, Mac, and iOS
Pricing
- Month Plan: $19.99
- Annual Plan: $49.99
- Perpetual Plan: $79.99
Key Features
- It provides support to a variety of file formats which allows you to recreate motion blur out of any video with ease.
- The variety of video transformation features offered in the tool is exquisite, where you can manage motion tracking, stabilization, and several other video parameters.
- Use effects and transitions to create the perfect motion blur video for yourselves.
Pros
- You can find the support of resolution up to 4K in the video editing platform.
- It also features the option of enhancing GPU acceleration for faster encoding.
Cons
- Puts a watermark on the export video for the free version.
Step-by-Step Guide on How to Create Motion Blur Effect on Filmora
We will now discuss how you can create a motion blur effect on Filmora, the best app for motion blur, using the right tools. First, look into the steps provided below for a better understanding:
Step 1 Add Video File to Platform
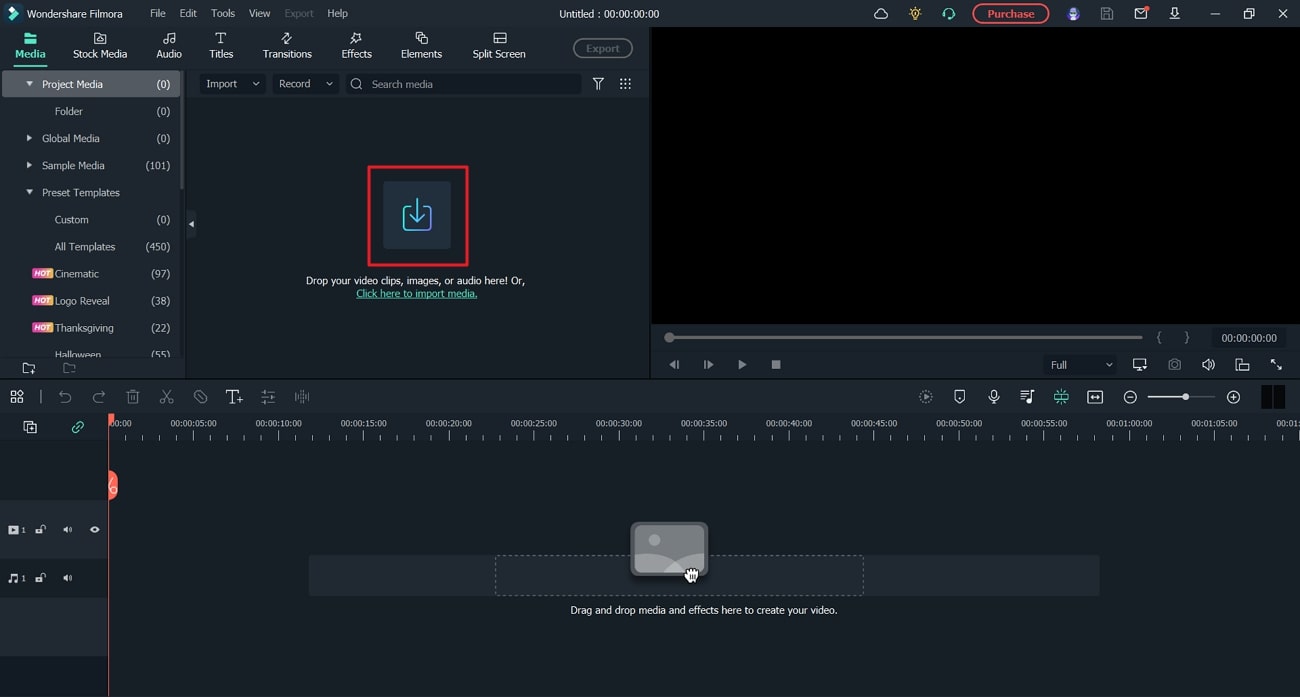
Launch Wondershare Filmora on your computer and select “Create New Project” to open a new canvas. Click on the “Arrow” icon to import the video or photo.
Step 2 Cut Down Sections of Clips
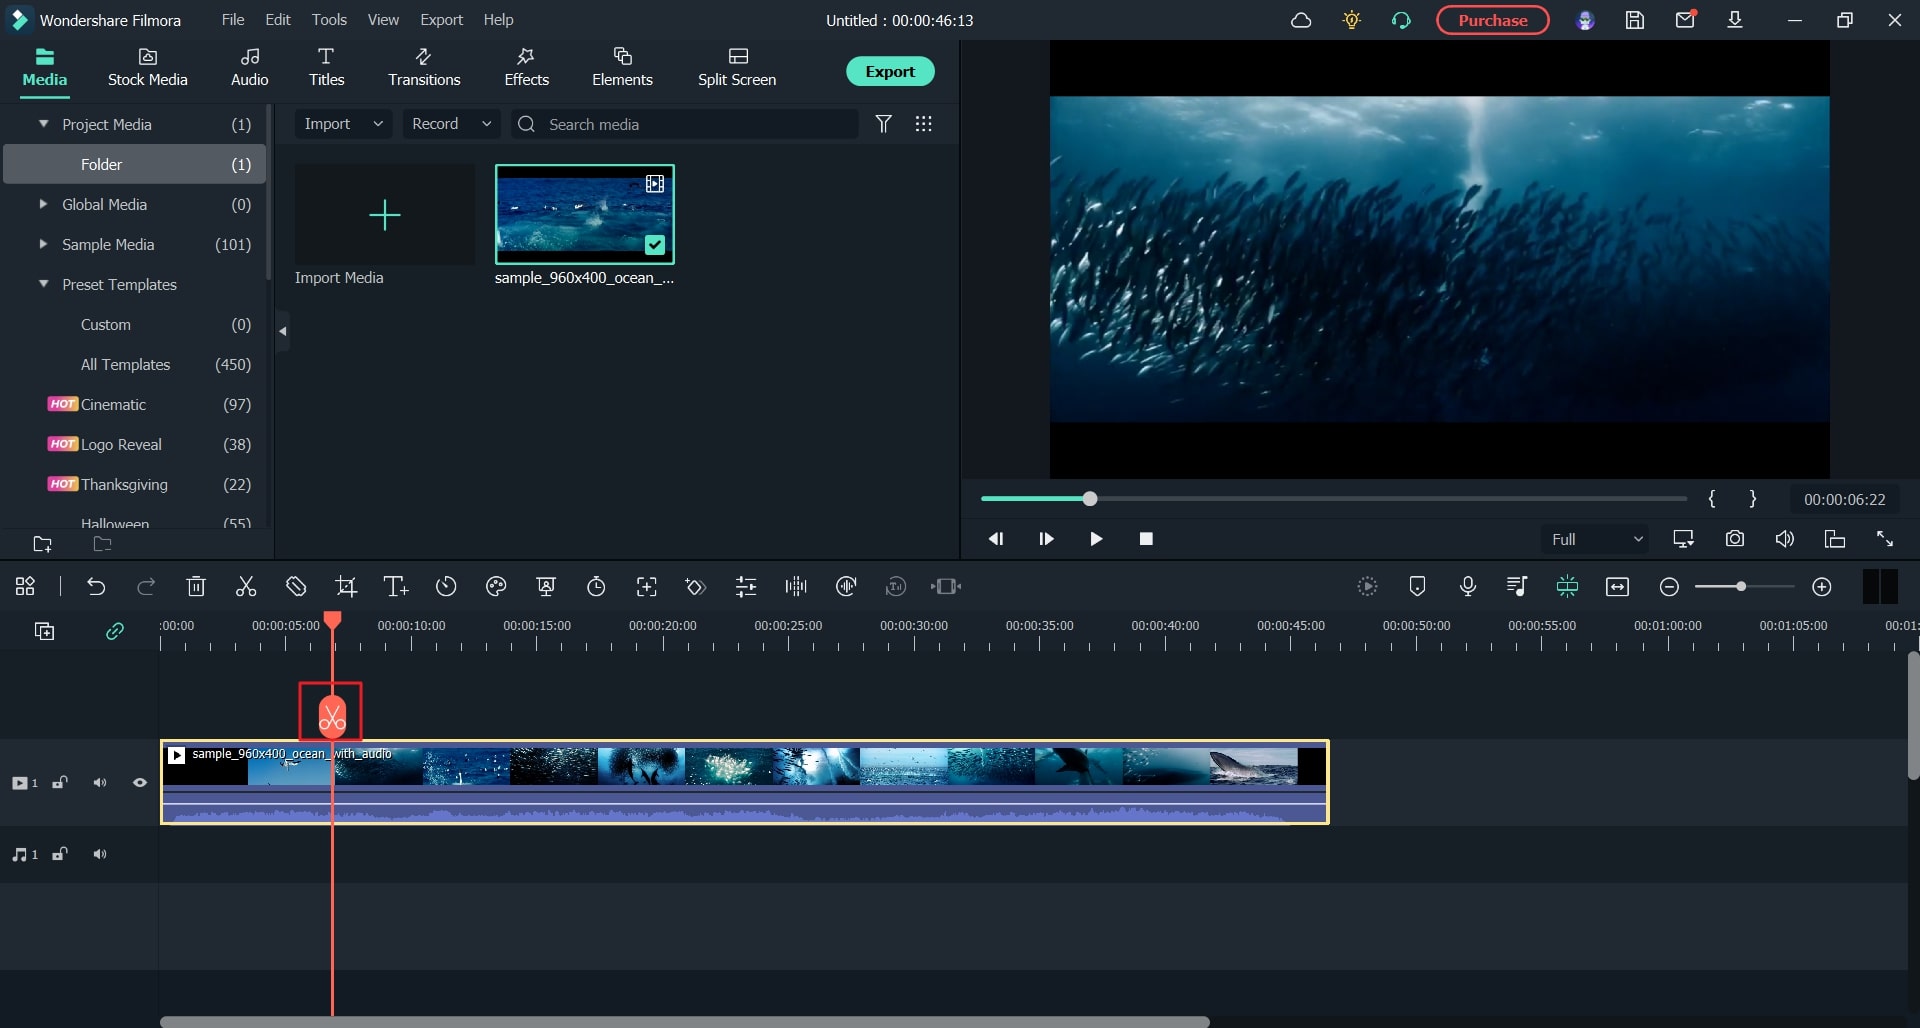
As you add the media into the timeline, lead to the point where you want to add the motion blur. Select the “Scissors” icon for splitting the clip and repeat this for every point where you want to add the effect.
Step 3 Include the Blur Effect
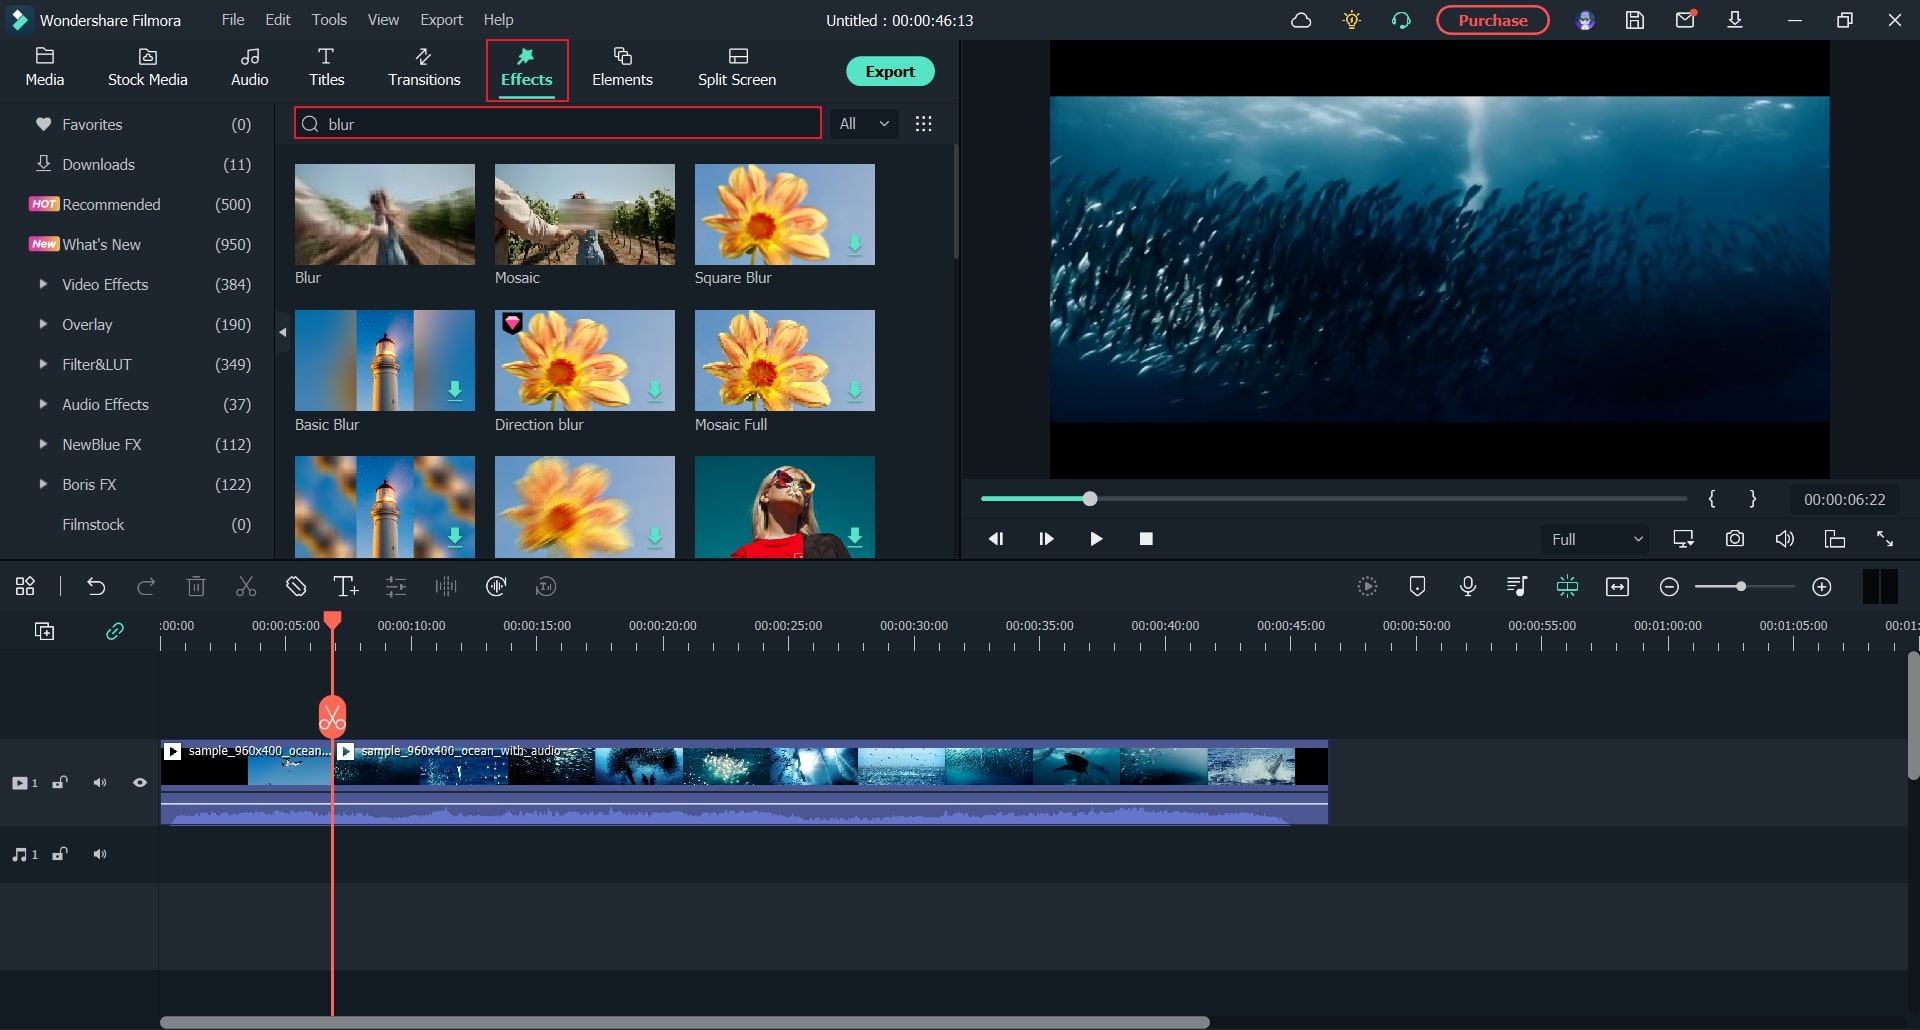
Access the “Effects” tab and look for the “Blur” effect. Add the blur effect by dragging it into the timeline on the split part of the video.
Step 4 Change Parameters to Smoothen Results
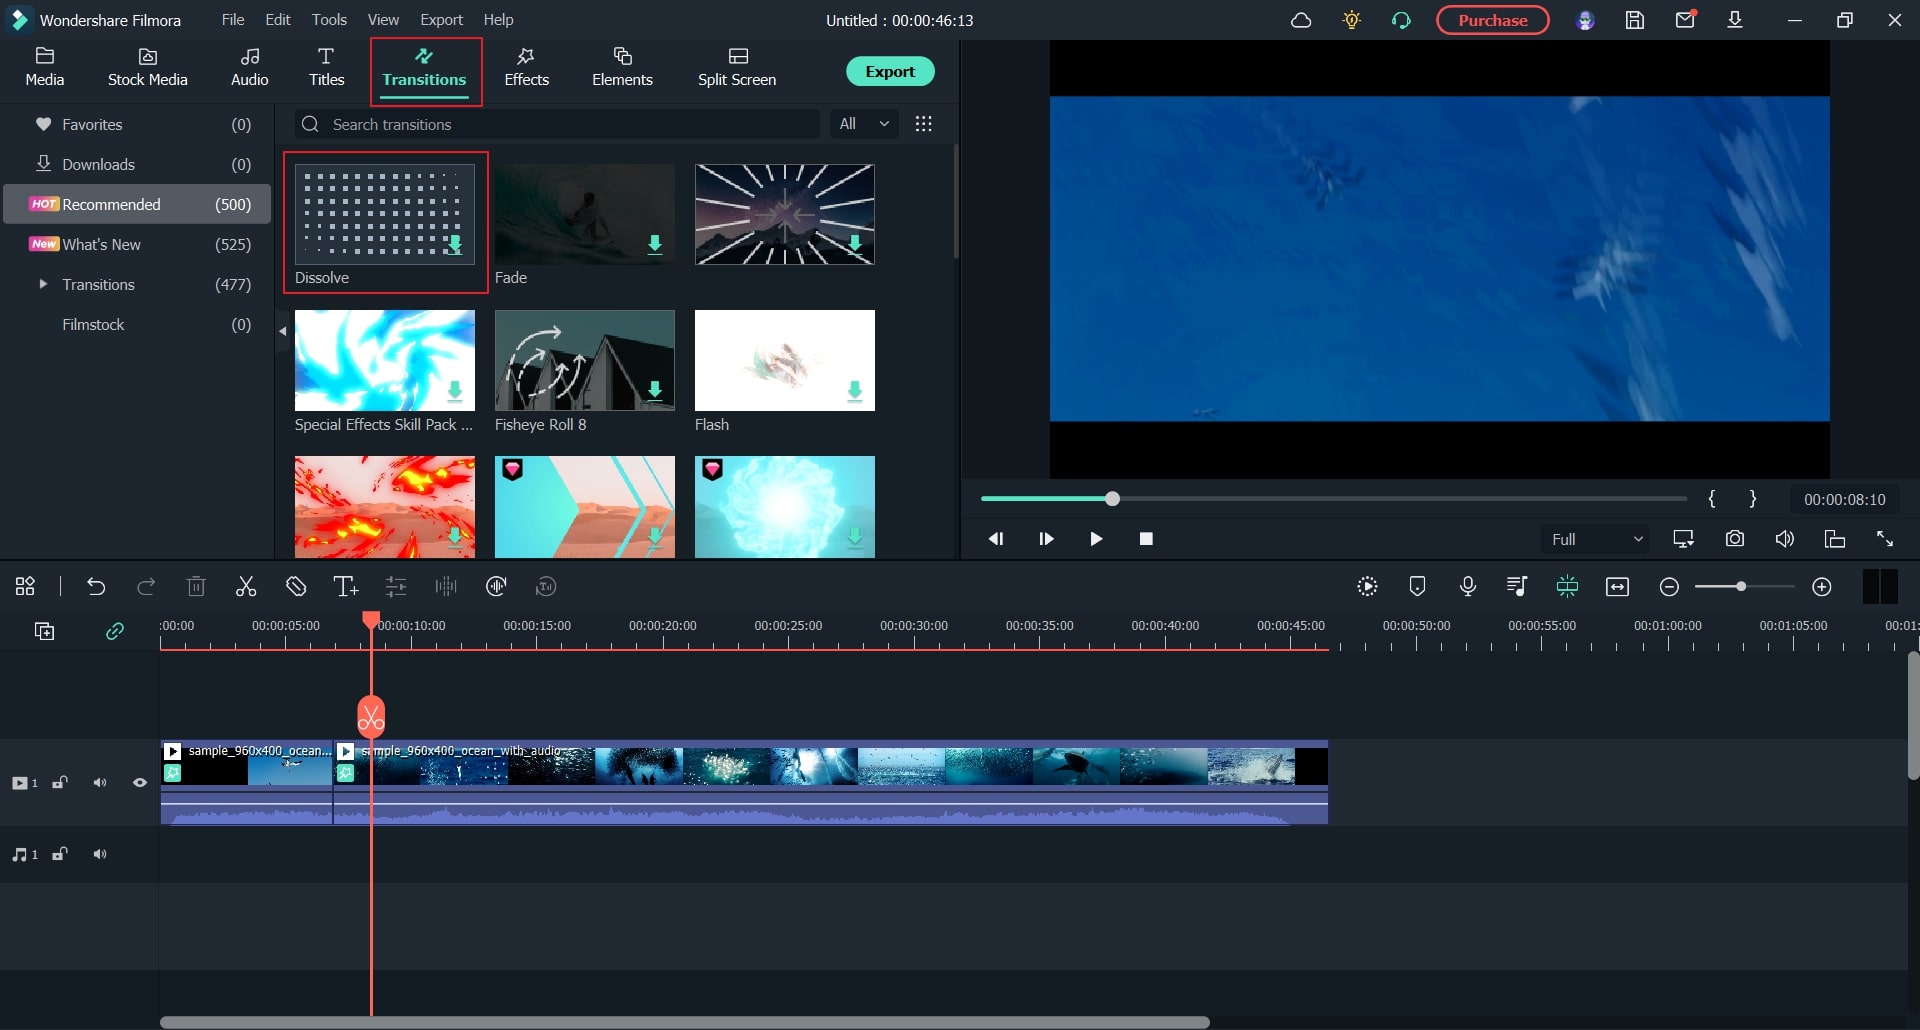
Adjust the parameters of the added effect to make it smooth. You can also access the “Dissolve” option in the Transitions. Add the motion blur effect and perform other vital changes in parameters that are required.
Step 5 Export Video File
Afterward, select the “Export” button and define the desired resolution and frame rate to conclude. You can also share your video on your social media accounts.
2. Vegas Pro - Create Natural-Looking Motion Blurs With Ease
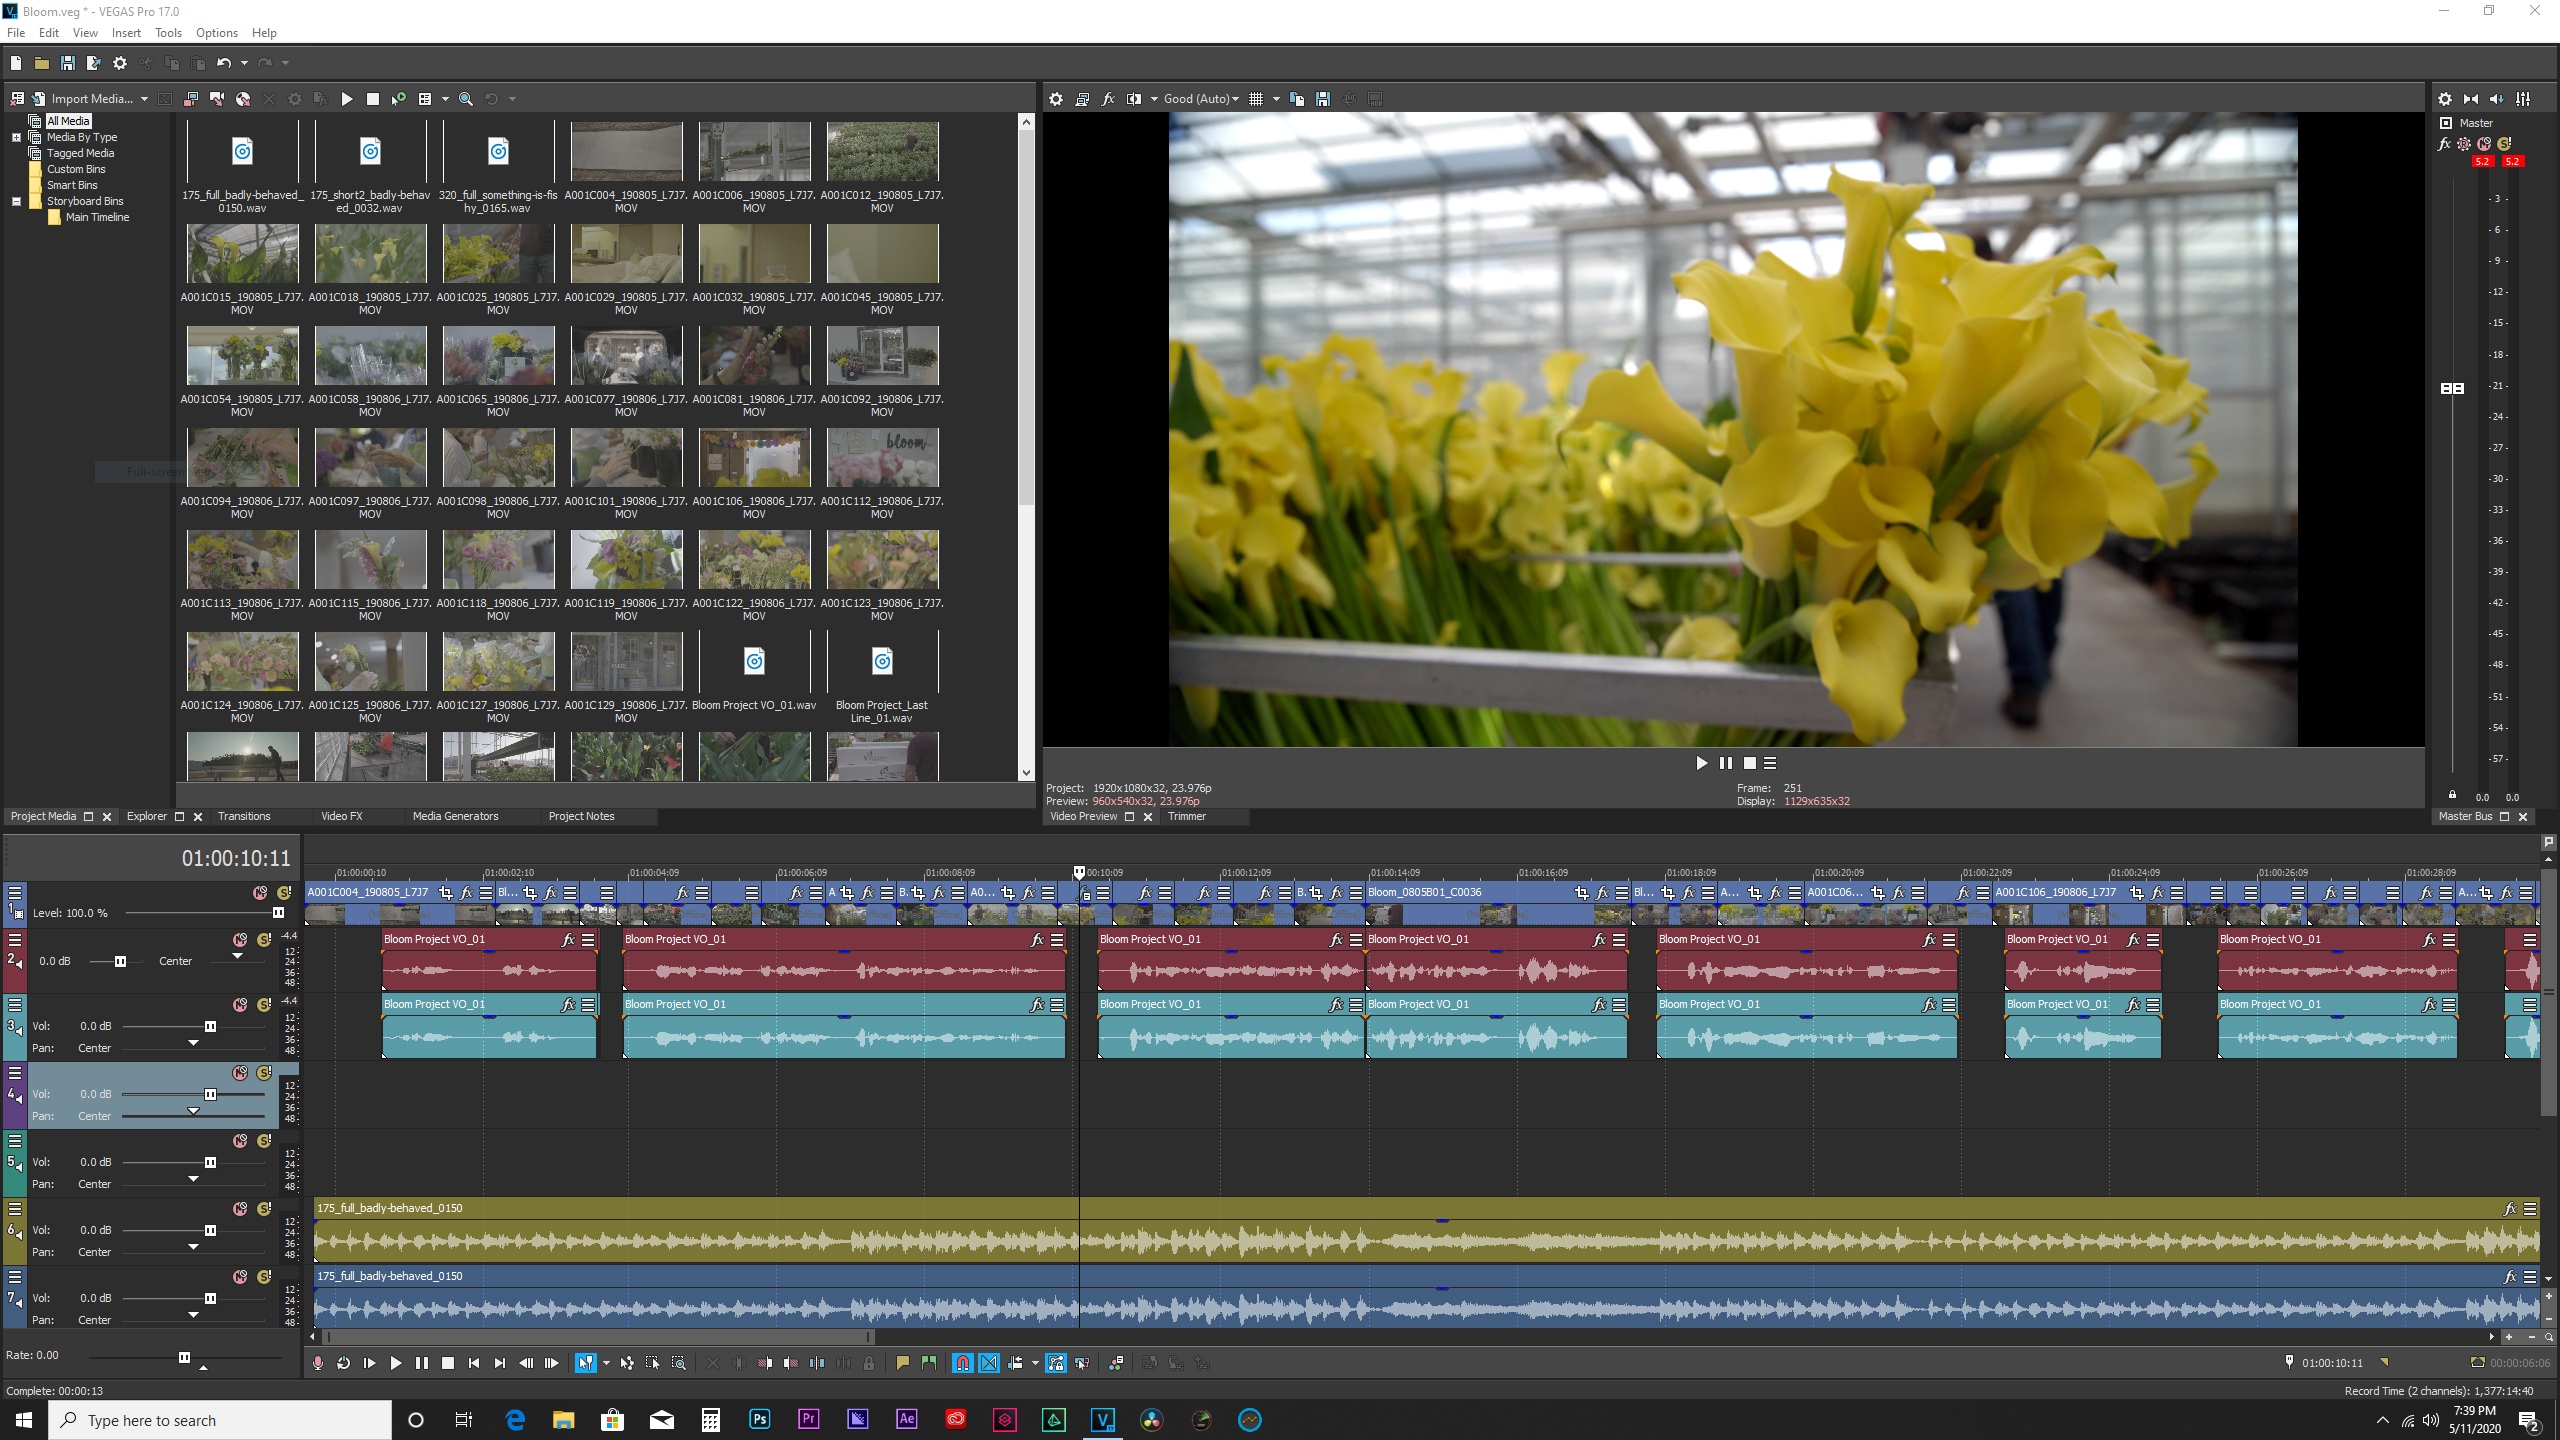
Vegas Pro is an impressive video editing platform that provides the option of creating motion blurs that look completely natural. It does not edit a specific element in the video but allows you to make changes in any other element that can be used to define motion. Motion blur can be added and edited to a fraction of a second with this platform.
3. Adobe Premiere Pro - Professionally Edit Motion Blur Videos
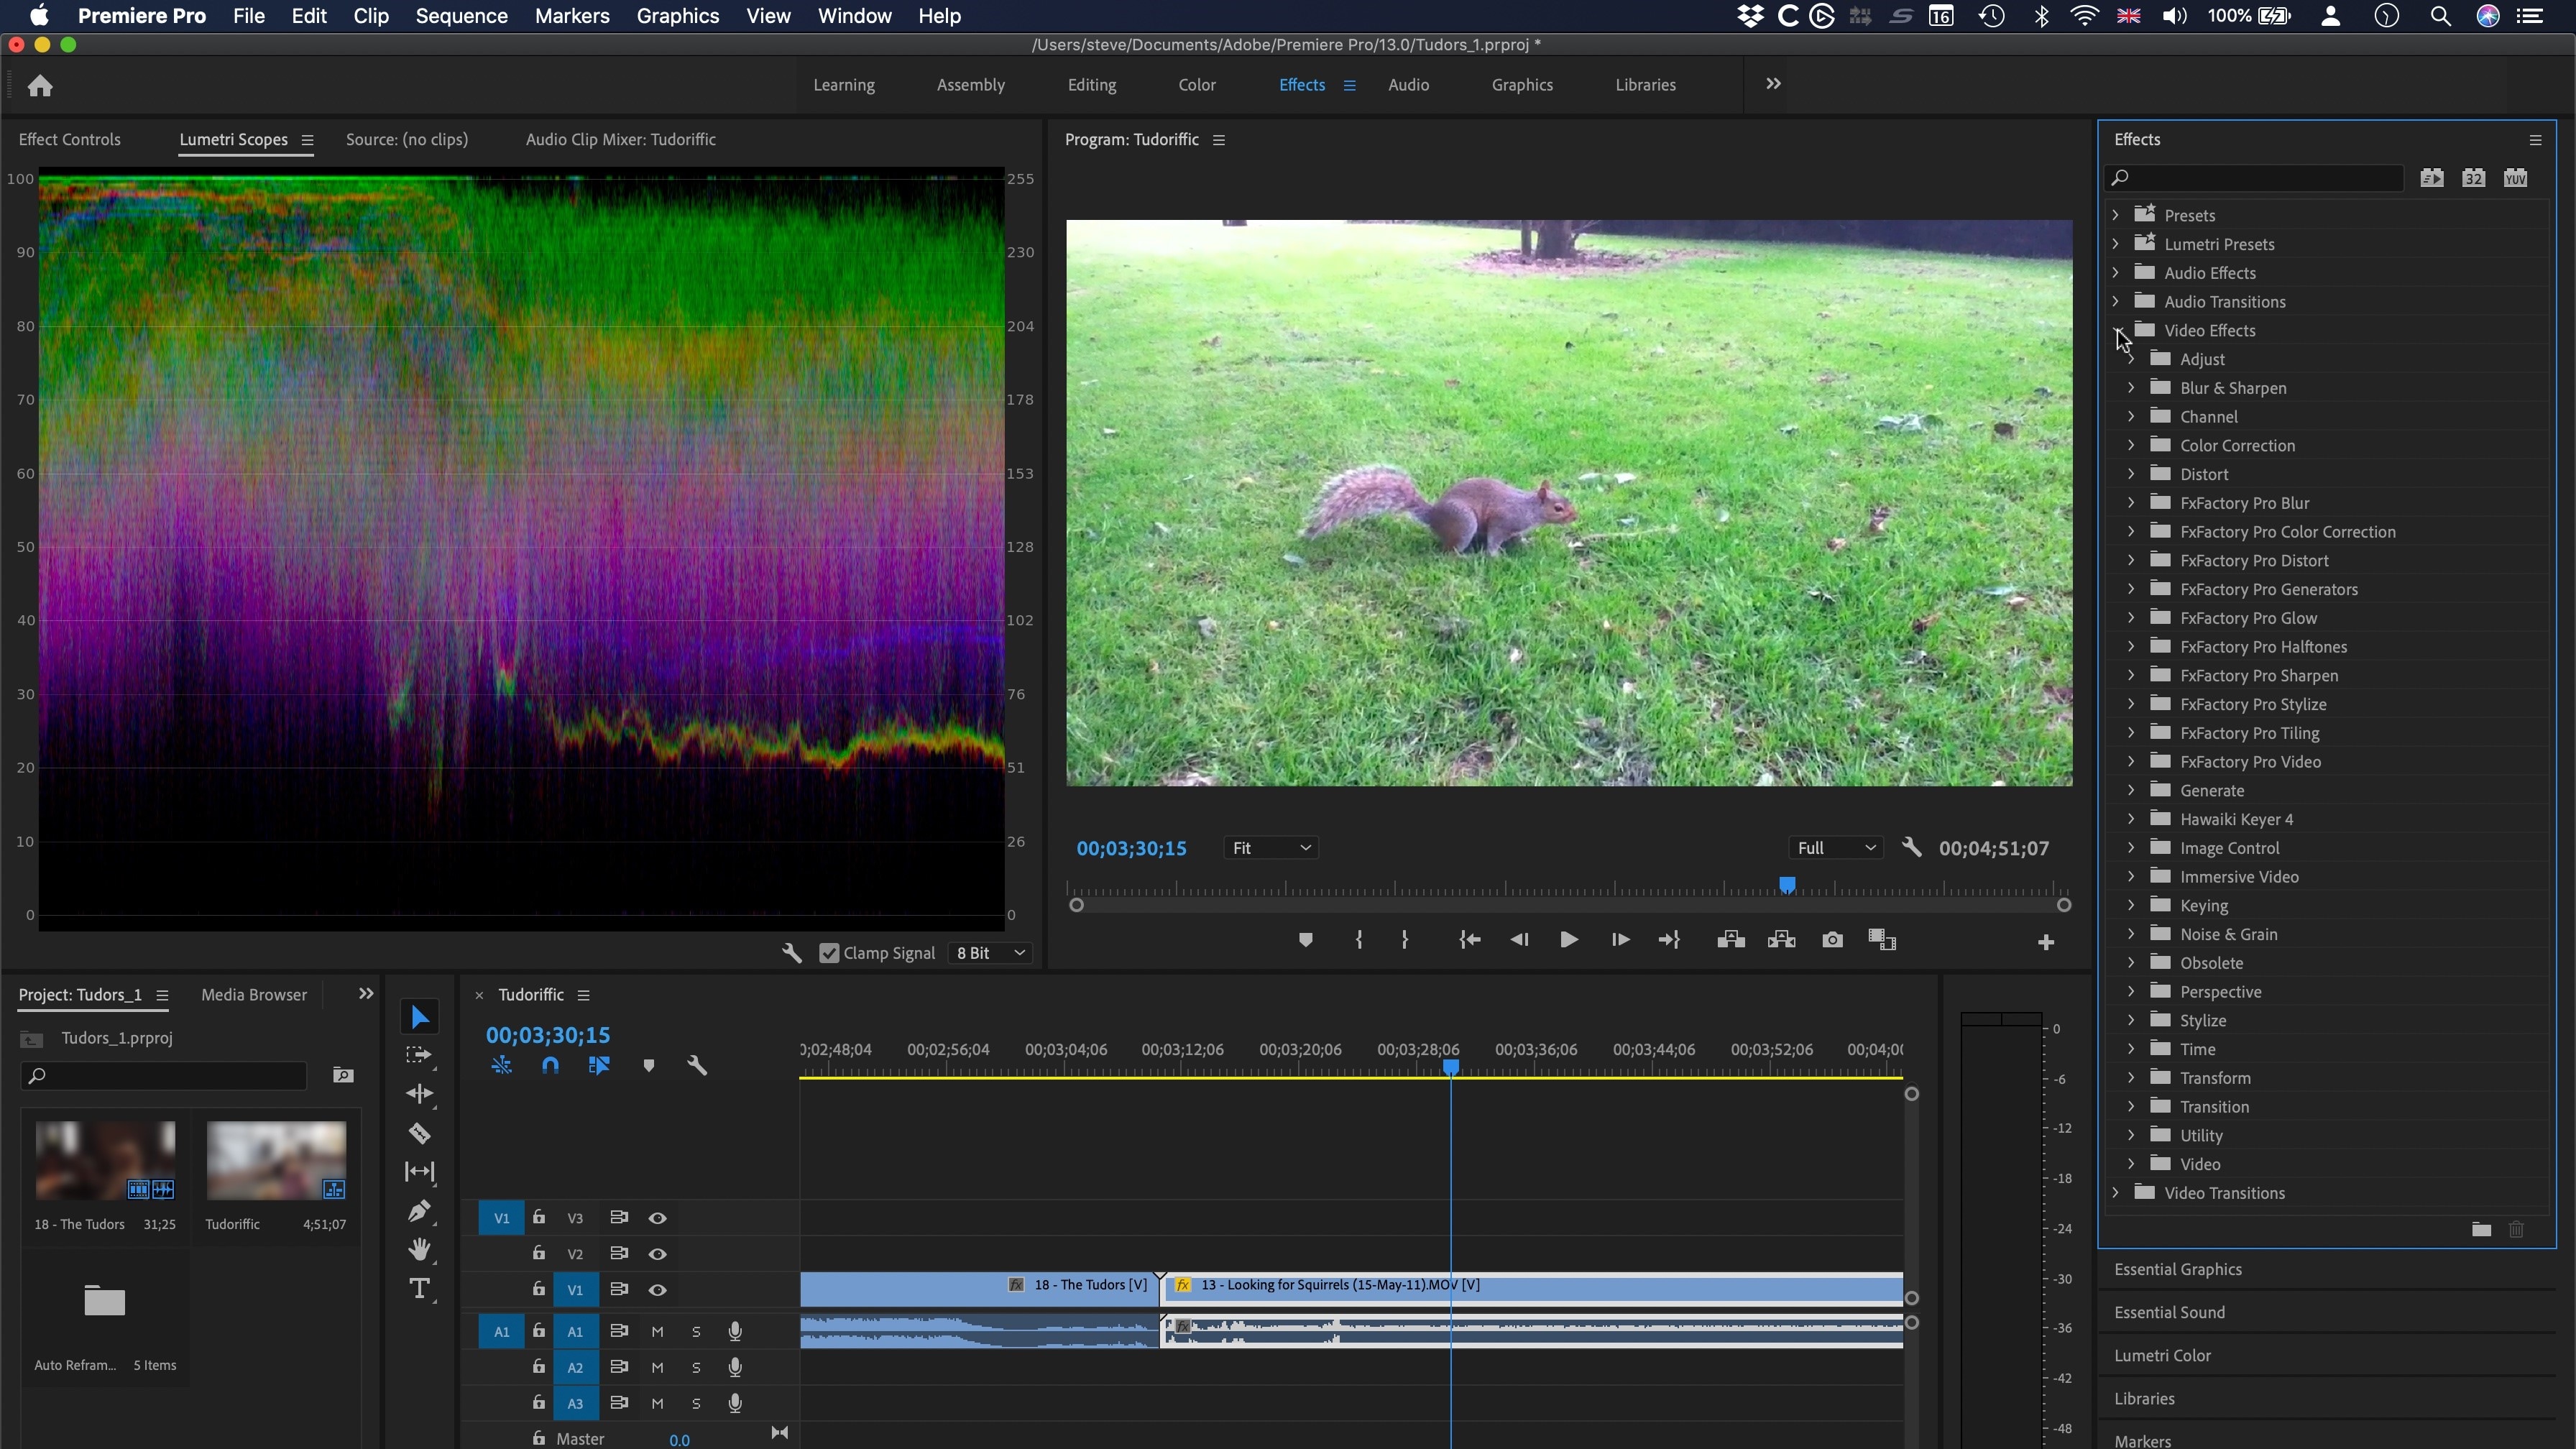
Adobe Premiere Pro is a great tool for improvising professional videos. With quick edits, you can come across every second of the video and present the perfect editing model with the help of the advanced toolkit. The major issue with such platforms is the high learning curve that prevents many users from considering this platform for tasks like executing motion blur in videos.
Part 3: Best 4 Online Motion Blur Tools
Many online platforms feature the option of introducing motion blur effects on videos. While we point out the best ones in the list, you should carefully assess them all to know more about them:
1. Lunapic
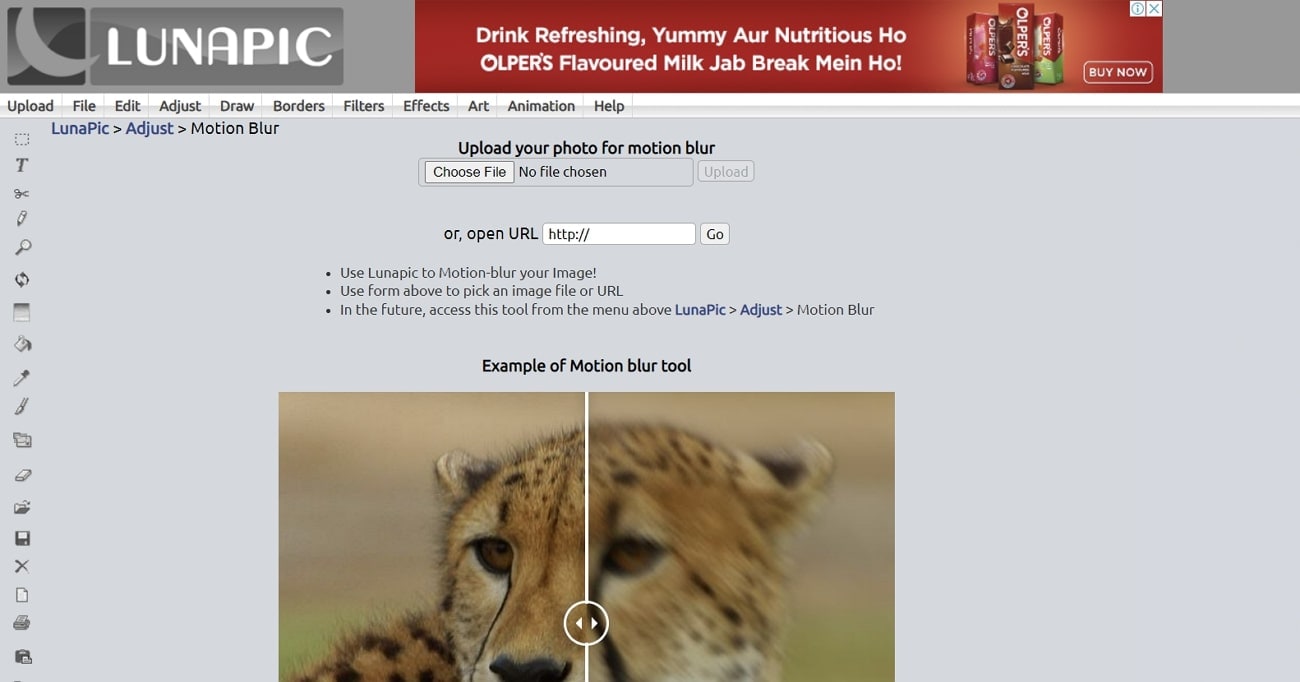
Lunapic is a great option for introducing motion blur into pictures. Being an online tool, it is pretty straightforward with its functionality, as you will only have to adjust some settings in the picture to edit it. Lunapic, being an online photo editor, provides different editing functions and tools in its interface. The result of motion blur turns out to be excellent in terms of it being an online tool.
Pros
- You can scale the image before putting a motion blur on the output.
- Add different shapes to highlight the image that is being edited.
Cons
- It provides an outdated interface when compared with other online photo editing tools.
2. Aspose
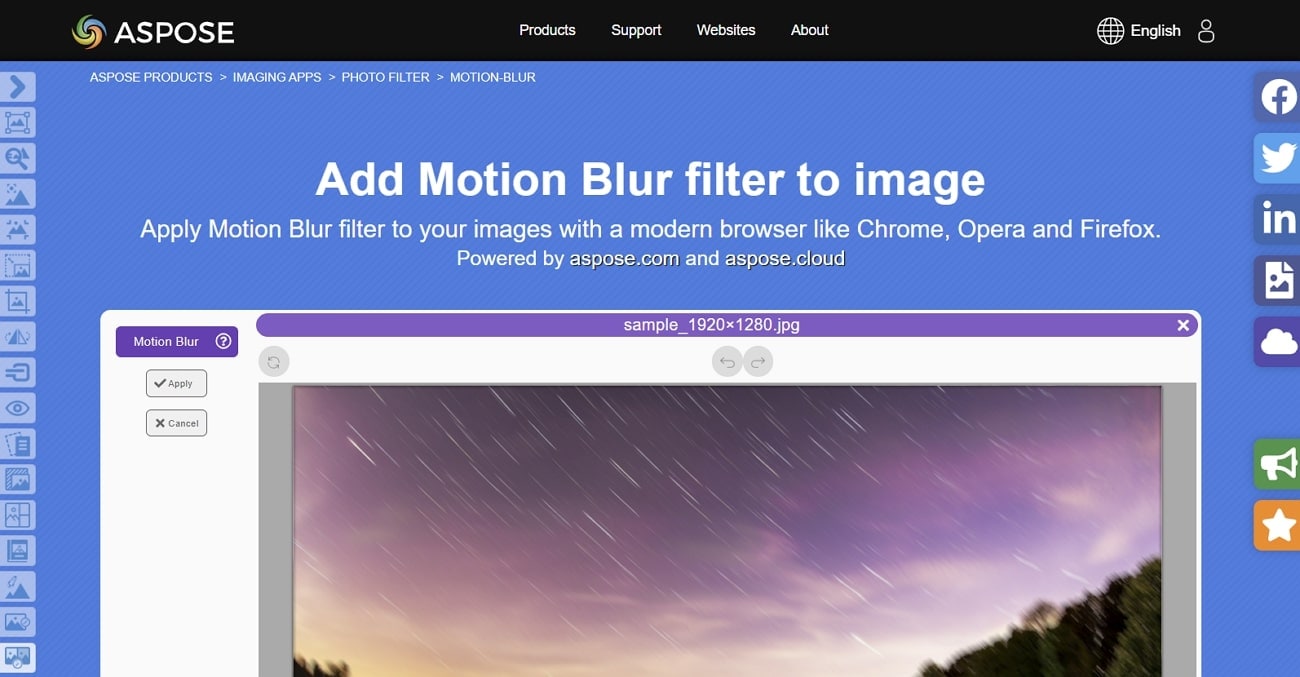
This excellent photo editing platform provides you with a dedicated function of adding motion blur to an image as a filter. Aspose allows adding files from the computer and Dropbox while providing a straightforward process of putting motion blur into a photo. You have to adjust the filter parameters to create the perfect picture.
Pros
- You can also detect objects within the image with the help of the “Object detection” feature.
- Create Photo Book Maker along with including motion blurs on the image for managing a collection of pictures.
Cons
- It does not offer any adjustment sliders and options while performing motion blur.
3. Kapwing
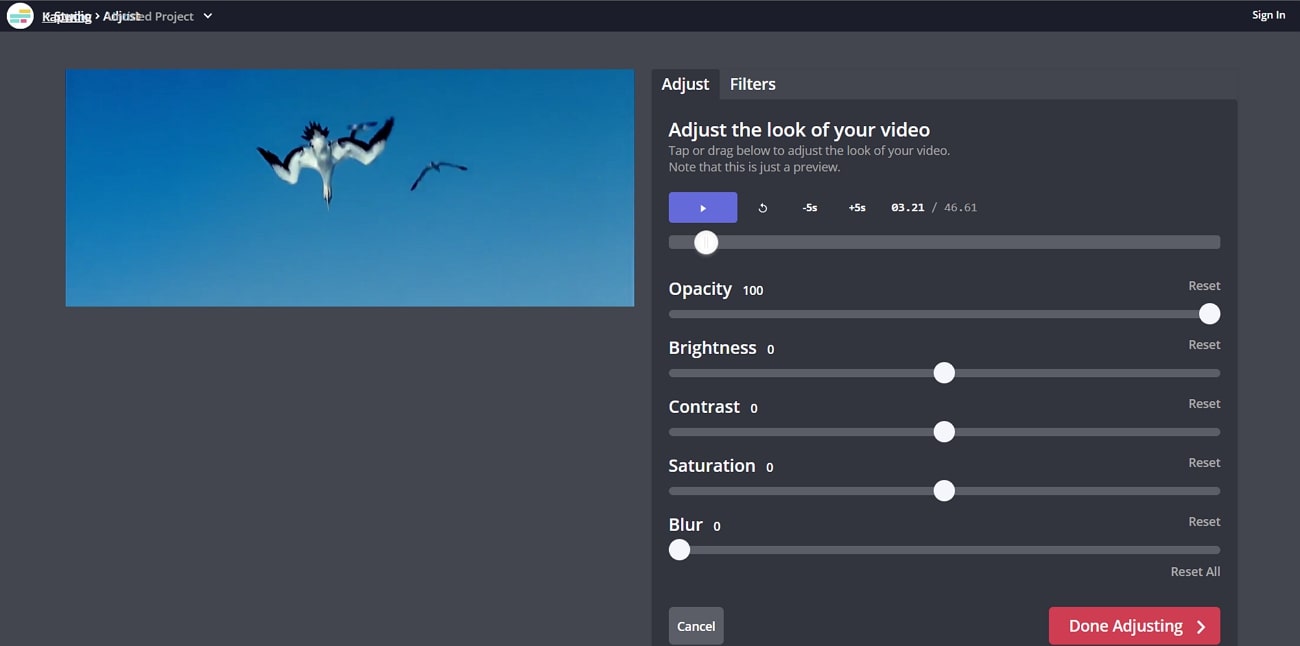
As an online tool, Kapwing provides many features that can be used to edit videos. Its ability to blur the videos is exceptional and tends to offer great results with the least of parameters. Users who are uncomfortable with editing videos on professional tools can consider this an alternative.
Pros
- No spam and ads are present in the tool while protecting the user’s information.
- The tool provides AI-Powered features, which can be easily used to manage videos.
Cons
- It does not maintain the quality of the videos after exporting the edits.
4. Flixier
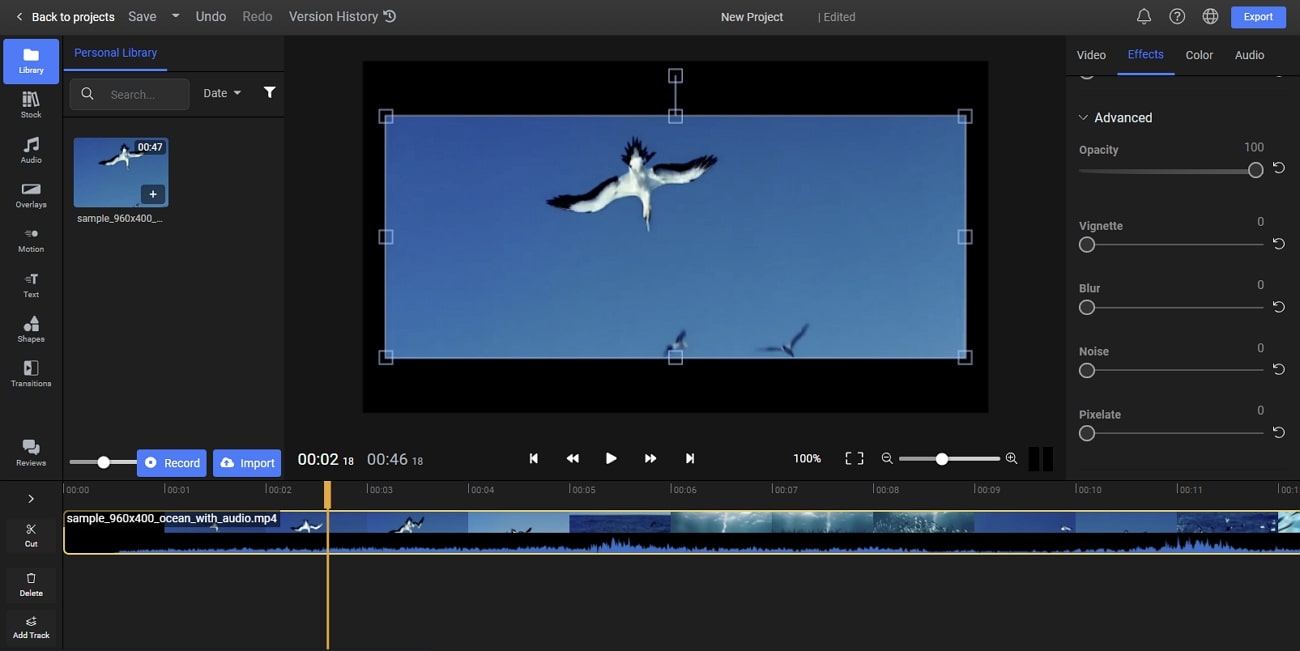
For quick motion blurs, people can use Flixier to create motion blurs with its pixelating technology. Along with other features for managing videos and enhancing their outlook, Flixier can be used for editing videos quickly. You can easily attach the effect while setting up its time parameters and other functions.
Pros
- You can integrate the features used in Flixier for creating videos for your YouTube channel.
- Works on low-powered devices, including Chromebooks and old devices.
Cons
- There are not a lot of features available on the online platform, limiting its use.
Last Words
This article has provided an overview of the best motion blur apps you can find in the market to create a realistic effect on your photo or video. As the article covers all kinds of compatible devices, it turns out to be an informative article to go through. Ensure to fill in all the details and see which application serves the best purpose.
For iOS and Android devices, CapCut turns out to be a great option to work with. Filmora has shown promising results with its Mac and Windows version, and Kapwing presents an excellent interface to edit videos regardless of being an online editor. Wondershare Filmora provides the best features for creating motion blur pictures and videos if you tend to work on your desktop.
- Wondershare Filmora - The Best Motion Blur Effect App on Desktop
- Vegas Pro - Create Natural-Looking Motion Blurs With Ease
- Adobe Premiere Pro - Professionally Edit Motion Blur Videos
Best 4 Online Motion Blur Tools
Part 1: Best 9 Motion Blur Effect Apps for iPhone and Android
| Name | Price | Support System | Motion Blur for Photos | Motion Blur for Videos |
|---|---|---|---|---|
| CapCut | $0.99 - $74.99 Per Item | iPhone/Android | Yes | Yes |
| NSMB - Motion Blur Video | Not Provided | Android | No | Yes |
| BlurEffect - Blur Photo & Video | Full version: $39.99Premium - Monthly: $3.99Ad-Free & Watermark-Free: $14.99Up to 5 Minutes & Watermark-Free & Ad-Free: $19.99Premium - Annual: $19.99 | iPhone | Yes | Yes |
| Snapseed | Free | iPhone/Android | Yes | No |
| Picsart Photo Editor & Video | Ad Remover: $5.99Girl Minisketch: $1.99Food: $1.99Cartoon Animal Package: $2.99Grunge Stickers: $0.99Girly: $0.99Horoscope: $1.99Cute Thanksgiving: $2.99Happy Thanksgiving: $2.99Aliens: $0.99 | iPhone/Android | Yes | Yes |
| Blur Video and Photo Editor | $0.99 - $99.99 Per Item | Android | Yes | Yes |
| Blur.r Photo, Pic.ture Motion | Monthly Subscription: $ 11.98Weekly Subscription: $ 6.98One Week Subscription: $ 3.98Yearly Subscription: $ 94.98 | iPhone | Yes | No |
| Motion Blur Photo Effect | Premium Access: $7.99 - $29.99 | iPhone | Yes | No |
| Motion Blur Photo Editor | Not Provided | Android | Yes | No |
There are many motion blur effect applications available in the market, providing direct services for iPhone and Android users. However, finding the best app for this purpose is essential, which is why we came up with a list of the best motion blur apps that can be used on iPhone and Android.
1. CapCut
While it is known as an easy-to-use application, CapCut stands among the most premium mobile applications that help you create professional videos that can be posted on social media platforms. CapCut comes up with a dedicated motion blur effect that allows users to create stabilized videos with complete control over the speed of the video.
Following other adjustments in the video, CapCut is a complete tool designed to create advanced videos, including different effects such as motion blur.

Download: Google Play Store | App Store
Key Features
- You can quickly put transitions between the video and the clips to blend in perfectly.
- Video clips can be animated with the help of zoom-in and out effects, providing all major professional touchups a video can have.
- Execute a perfect motion blur video with the help of the multi-track timeline for arranging and previewing clips.
Pros
- It provides the option of including music clips and sound effects on the videos from the vast collection.
- It supports exporting videos in 4K and 60fps with Smart HDR technology.
Cons
- Won’t work perfectly if the RAM and hardware of the phone are limited.
2. NSMB - Motion Blur Video
The motion blur effect is a great feature that can enhance the quality of the video and make it look realistic if used properly. NSMB - Motion Blur Video is an Android motion blur application that features the option of creating such videos in a matter of seconds.
With no particular learning requirement, NSMB makes the process look easy. You have to set the intensity of video, and that’s all you need to do within this application.

Download: Google Play Store
Key Features
- While the platform is easy-to-use, the interface is quite simple to understand, with no confusing structures.
- The platform comes up with an intelligent motion blur that automatically executes the process.
- It works with Android devices from Android 5.0 and later, making it a compatible tool with all major Android devices.
Pros
- You can set the resolution of your exported video to 1080p, which is a Full HD result.
- Set an appropriate fps value for your exported video with the available options.
Cons
- Long rendering times, which are not optimized and take up time.
3. BlurEffect - Blur Photo & Video
BlurEfffect - Blur Photo & Video is another great iOS application that provides the option of adding motion blur effects. This tool is built to include the blur effect to perfection in general. With defining blur options, you can create motion blur effects easily on your added videos. The functions are diverse and quite effective if appropriately observed.

Download: App Store
Key Features
- As the name exclaim, it works perfectly for photos and videos, likewise.
- The paid version of the application can save videos up to 1080p in quality.
- It provides the feature of managing the strength of the “Auto Blurs” feature for controlling motion blur.
Pros
- Multiple effects are available on the platform, including normal blurs, pixelated and dotted blurs, etc.
- It also provides the option of trimming videos before adding the blur effect to them.
Cons
- The resolution of the video is lowered after blurring it out.
4. Snapseed
Google presented a great and quick photo editor for users confused about finding their perfect option. Snapseed was designed as a professional photo editor that allows users to add multiple touchups to the photo that is being edited.
While it backs itself up with Google Photos, this professional photo editor is enhanced and interconnected. Snapseed makes photo touchups simple; however, it does provide advanced functions that can help create motion blur pictures.

Download: Google Play Store | App Store
Key Features
- It combines with 29 different tools and filters, which also includes creating motion blur pictures.
- 38 predefined text styles are available in the editor for creating the text of different styles and forms.
- Create effects with multiple exposures brought with HDR Scape.
Pros
- Enhance a specific photo element with the help of the Face Enhance feature, which adds focus to the facial features.
- You can selectively retouch the photo and manage its exposure, saturation, and other elements.
Cons
- The application has no undo button, making it challenging to manage edits.
5. Picsart Photo Editor & Video
Picsart is a renowned photo and video editor available on App Store and Play Store. This exceptional editor covers a creative set of features combined with artificial intelligence to present some of the best options for retouching photos and videos. If you seek to create a motion blur effect with this application, it surely won’t disappoint, presenting a high-resolution result.

Download: Google Play Store | App Store
Key Features
- It helps users customize photos and videos with customizable brushes, layers, and drawing tools.
- Present a realistic display of motion blur with the help of the multiple effects and filters used for blending in perfectly.
- More than 60 million stickers are available in Picsart, which can be effectively used within any editing media.
Pros
- You can easily share the edited content with your friends through the platform.
- It provides multiple video effects and trendy filters to make video editing easier.
Cons
- There is a lot of lag in the application while editing the video.
6. Blur Video and Photo Editor
This is one of the motion blur apps that provides a simple set of options for managing and enhancing the videos and photos on your Android device. Motion blur can be confusing if not managed properly; however, Blur Video and Photo Editor provides a simple platform to include the blurry effect and make the moving object look perfect in the preview.

Download: Google Play Store
Key Features
- You can blur out the background of the imported photo or video while adjusting the intensity with the help of an easy tool.
- It also allows you to pixelate the unwanted sections and portions of the media files.
- Define more than one area for blurring with the help of shapes.
Pros
- It features the intuitive option of blurring out an object that is moving in the video.
- You can track an object with a simple definition of the area within the platform.
Cons
- The user interface is not exceptional, with buttons that are not even usable.
7. Blur.r Photo, Pic.ture Motion
Not many tools provide a simple and customized set of options for including motion blur within photos and other media. Blur.r Photo, Pic.ture Motion has been tangibly designed to improvise a perfect motion-blurring photo platform. While it provides a quick set of tools to work with, the results are exquisite and better than most in the market.

Download: App Store
Key Features
- Set the intensity of the blurriness and size on the photo with custom tools.
- A complete set of sharing options is available on the platform, which is covered in a single click.
- For detailed blurring, you can consume the option of Zoom and Pan the photo.
Pros
- You can easily undo and redo actions on the edited photos to avoid repeating actions and wasting time.
- Use different filters within photos to edit them to perfection.
Cons
- It does not allow for adjustment of the intensity of the blur, as stated in the services.
8. Motion Blur Photo Effect
While finding the perfect motion blur effect app on iPhone for presenting realistic effects in photos, you might come across Motion Blur Photo Effect, a perfect motion blur photo application for iOS users. The tool is known for its fast processing and quick execution, with an easy-to-use interface for creating perfect blurred pictures.
You can find multiple features and effects in this application that relate to motion blur, providing a diverse range of options when seeking this effect.

Download: App Store
Key Features
- Protects the user’s privacy while maintaining its policy of avoiding illegal breaches.
- Emphasize the light spot in the background of a picture with the help of the Bokeh effect.
- Get a complete set of blur effects to include in the photo, which features advanced functionality.
Pros
- You can find different types of blur effects, such as Zoom Blur, Motion Blur, and Mosaic Effect, to enhance the motion blur.
- It is extremely simple and quick in procession.
Cons
- It does not provide motion blurring for videos, making it restricted.
9. Motion Blur Photo Editor
Adding realistic effects to images is important if your work involves professional requirements. Motion blur is an effect used in multiple places, which makes it a critical feat to achieve. While obtaining the effect, the simplicity of the procedure holds importance. This is why Motion Blur Photo Editor gives the perfect result with explicit functions and features to enhance the motion blur effect.

Download: Google Play Store
Key Features
- Make your images look realistic with the help of magic effects.
- Manage different elements, including the text and other features, such as the brightness of the tool.
- It allows you to share the rendered result on different social applications.
Pros
- Features support for Android devices with OS 4.2 or above.
- The process of including motion blur in photos is quite basic.
Cons
- An outdated application, which was last updated in 2019.
Part 2: 3 Motion Blur Apps for Mac and Windows
As you have consulted the motion blur apps for iPhone and Android, you might require something more professional. For this, you first have to shift onto a computer or Mac that provides you with a perfect platform for creating content. Let’s find out some top-notch motion blur effect apps that you can use on your Mac and Windows:
1. Wondershare Filmora - The Best Motion Blur Effect App on Desktop
Free Download For Win 7 or later(64-bit)
Free Download For macOS 10.14 or later
Not many tools provide a complete set of tools to manage the videos on your computer and create the best version out of them. Wondershare Filmora is a complete package for creating a motion blur effect on a video.
With a quick and effective toolkit available on the platform, Filmora turns out to simplify the process, thereby making the process look basic. Filmora unleashes the creativity of a beginner, helping them create a perfect video with its intuitive and impressive interface.
Supported System
- Windows, Mac, and iOS
Pricing
- Month Plan: $19.99
- Annual Plan: $49.99
- Perpetual Plan: $79.99
Key Features
- It provides support to a variety of file formats which allows you to recreate motion blur out of any video with ease.
- The variety of video transformation features offered in the tool is exquisite, where you can manage motion tracking, stabilization, and several other video parameters.
- Use effects and transitions to create the perfect motion blur video for yourselves.
Pros
- You can find the support of resolution up to 4K in the video editing platform.
- It also features the option of enhancing GPU acceleration for faster encoding.
Cons
- Puts a watermark on the export video for the free version.
Step-by-Step Guide on How to Create Motion Blur Effect on Filmora
We will now discuss how you can create a motion blur effect on Filmora, the best app for motion blur, using the right tools. First, look into the steps provided below for a better understanding:
Step 1 Add Video File to Platform
Launch Wondershare Filmora on your computer and select “Create New Project” to open a new canvas. Click on the “Arrow” icon to import the video or photo.

Step 2 Cut Down Sections of Clips
As you add the media into the timeline, lead to the point where you want to add the motion blur. Select the “Scissors” icon for splitting the clip and repeat this for every point where you want to add the effect.

Step 3 Include the Blur Effect
Access the “Effects” tab and look for the “Blur” effect. Add the blur effect by dragging it into the timeline on the split part of the video.

Step 4 Change Parameters to Smoothen Results
Adjust the parameters of the added effect to make it smooth. You can also access the “Dissolve” option in the Transitions. Add the motion blur effect and perform other vital changes in parameters that are required.

Step 5 Export Video File
Afterward, select the “Export” button and define the desired resolution and frame rate to conclude. You can also share your video on your social media accounts.

2. Vegas Pro - Create Natural-Looking Motion Blurs With Ease
Vegas Pro is an impressive video editing platform that provides the option of creating motion blurs that look completely natural. It does not edit a specific element in the video but allows you to make changes in any other element that can be used to define motion. Motion blur can be added and edited to a fraction of a second with this platform.

3. Adobe Premiere Pro - Professionally Edit Motion Blur Videos
Adobe Premiere Pro is a great tool for improvising professional videos. With quick edits, you can come across every second of the video and present the perfect editing model with the help of the advanced toolkit. The major issue with such platforms is the high learning curve that prevents many users from considering this platform for tasks like executing motion blur in videos.

Part 3: Best 4 Online Motion Blur Tools
Many online platforms feature the option of introducing motion blur effects on videos. While we point out the best ones in the list, you should carefully assess them all to know more about them:
1. Lunapic
Lunapic is a great option for introducing motion blur into pictures. Being an online tool, it is pretty straightforward with its functionality, as you will only have to adjust some settings in the picture to edit it. Lunapic, being an online photo editor, provides different editing functions and tools in its interface. The result of motion blur turns out to be excellent in terms of it being an online tool.

Pros
- You can scale the image before putting a motion blur on the output.
- Add different shapes to highlight the image that is being edited.
Cons
- It provides an outdated interface when compared with other online photo editing tools.
2. Aspose
This excellent photo editing platform provides you with a dedicated function of adding motion blur to an image as a filter. Aspose allows adding files from the computer and Dropbox while providing a straightforward process of putting motion blur into a photo. You have to adjust the filter parameters to create the perfect picture.

Pros
- You can also detect objects within the image with the help of the “Object detection” feature.
- Create Photo Book Maker along with including motion blurs on the image for managing a collection of pictures.
Cons
- It does not offer any adjustment sliders and options while performing motion blur.
3. Kapwing
As an online tool, Kapwing provides many features that can be used to edit videos. Its ability to blur the videos is exceptional and tends to offer great results with the least of parameters. Users who are uncomfortable with editing videos on professional tools can consider this an alternative.

Pros
- No spam and ads are present in the tool while protecting the user’s information.
- The tool provides AI-Powered features, which can be easily used to manage videos.
Cons
- It does not maintain the quality of the videos after exporting the edits.
4. Flixier
For quick motion blurs, people can use Flixier to create motion blurs with its pixelating technology. Along with other features for managing videos and enhancing their outlook, Flixier can be used for editing videos quickly. You can easily attach the effect while setting up its time parameters and other functions.

Pros
- You can integrate the features used in Flixier for creating videos for your YouTube channel.
- Works on low-powered devices, including Chromebooks and old devices.
Cons
- There are not a lot of features available on the online platform, limiting its use.
Last Words
This article has provided an overview of the best motion blur apps you can find in the market to create a realistic effect on your photo or video. As the article covers all kinds of compatible devices, it turns out to be an informative article to go through. Ensure to fill in all the details and see which application serves the best purpose.
For iOS and Android devices, CapCut turns out to be a great option to work with. Filmora has shown promising results with its Mac and Windows version, and Kapwing presents an excellent interface to edit videos regardless of being an online editor. Wondershare Filmora provides the best features for creating motion blur pictures and videos if you tend to work on your desktop.
15 Best Free Cinematic LUTs for Your Film
Create High-Quality Video - Wondershare Filmora
An easy and powerful YouTube video editor
Numerous video and audio effects to choose from
Detailed tutorials are provided by the official channel
A significant way of creating cinematic looks for your project is by using LUTs. And with a single click, you will transform your footage into an absolute masterpiece. By using free LUTs, not only will you save on cost but also on the hassle and bustle of having to color grade your film.
LUTs function to create a uniform color throughout a film while enhancing or preserving skin tones. You don’t have to use all the LUTs in this world to create splendid films. Besides, most professional video editors and colorists prefer to work with a handful of LUTs and create stunning films. By going through this article, you will come to learn about 15 free cinematic LUTs for your film.
In this article
01 How Cinematic LUTs Affect Your Film
02 15 Free Cinematic LUTs for Your Film
03 Edit Your Film with Filmora and its Cinematic LUTs
How Cinematic LUTs Affect Your Film
When it comes to marketing, videos often tend to play a huge role. And to market your brand effectively, you need to have top-notch videos. It doesn’t mean that you should go and study to become a colorist or a video editor. Besides, there are professional colorists and video editors who gave in their time and effort to design powerful LUTs and offer them for free.
You can use those free LUTs to create mesmerizing videos and photos for your projects. And depending on the nature of your project, you will find here a free LUT that will work best for you.
There are two types of LUTs;
- 1. Conversion LUTs
Conversion LUTs function by correcting the Log color space back to the standard color space. Professional colorists often use this LUT to obtain a high dynamic range by maintaining more details in the highlights and shadows. - 2. Creative LUTs
Creative LUTs are essentially used in bringing out the creative colors of footage. Color styles in creative LUT are of a wide range, such as moody, cinematic, vintage, and summer, among others.
Creative LUTs is the one that is often used in many cases.

Filmora 3D LUT
Empower your videos with a new mood using different LUTs
Filmora now offers 800+ top-quality LUTs cover a broad range of scenarios. Transform your videos with Filmora’s powerful 3D LUTs.
Apply LUT on Videos Apply LUT on Videos Learn More >
15 Free Cinematic LUTs for Your Film
A good LUT is one that can be applied to several setups and different lighting situations. Besides, it doesn’t mean that a single LUT should be applied to every project; instead, it should be able to produce several perfect matches to your project.
Here are some of the top-tier free cinematic LUTs that you can apply to your film.
1. 40 Free Instagram LUTs
Create amazing Instagram footage using these 40 free LUTs. Besides, you can use these free LUTs in a couple of applications, including Adobe Premiere Pro, Wondershare Filmora, Photoshop, and Da Vinci Resolve.
After applying these LUTs, you can carry out bits of basic corrections such as brightness and contrast to your footage.
2. 3 Eyes and Teeth Whitening LUTs
Eye and teeth whitening LUTs are often used in movies and quality photos. Whiten the color of your teeth and eyes using these three free LUTs.
These LUTs are very simple to use, and when you effectively incorporate them, you are assured of creating magnificent photos.

3. 70 Free Hollywood Film LUTs
Do you have a project file and want it to appear like the ones in Hollywood films? You need not to worry since here are 70 eye-catching LUTs that you can add to your project and get that ‘Hollywood” look you’ve always wanted.
4. Free Summer LUTs
Summer clips perfectly match the orange, teal look. Here, you will get summer LUTs that will work perfectly with your project.
You can use these LUTs in Adobe Premiere, Wondershare Filmora, Da Vinci Resolve, and Lightroom.
5. Free Moody Green LUTs
Footages taken in the jungle work ideally with the moody green LUTs. Here are some of the amazing LUTs you can incorporate into your project.
6. Moody Blue LUTs
When it comes to appreciating nature, moody blue LUTs tend to be the perfect resort. Create cinematic scenes for your videos using these LUTs for free.
The LUTs here are protected with a password, what you do is to watch that video to completion, and you will come across the password.
7. 3 Free Urban Dark Cinematic LUTs
Often in many movies, you will come across urban scenes that are moody, dark, and portrayed as something out-of-this-world. You can also create such scenes with these three free urban dark cinematic LUTs.
You can use these three free cinema LUTs to your Wondershare Filmora or Adobe Premiere.
8. 10 Free Winter LUTs
Footages shot in winter outdoors don’t just work with any LUTs. Besides, there are LUTs designed explicitly for winter footage, and here are the ten best winters LUTs.
Download the LUTs and apply one that you find the perfect match for your project.
9. 20 Free Travel LUTs
When traveling, you may capture several photos and videos that are not very appealing – This may hinder you from sharing them with your friends or family. Besides, you don’t have to discard those footage since you can give them a new mind-blowing look using these 20 free travel LUTs.
To access all the 20 LUTs, you only need to subscribe to their YouTube channel, and you are good to go.
10. Free Korean Tone LUT
Korean movies are enticing because of their unique, bewildering LUT mood. You can also employ this LUT to your footage and leave your followers jaw-dropping.
Here, this free LUT pack is protected, and the only catch is to watch the YouTube video and get the password.
11. 5 Free Wedding LUTs
Wedding footages often require that romantic mood. Get the best five free wedding LUTs here.
The LUT file pack here is protected by a password. So to access the password, watch the YouTube video to completion and access it. Often, it is displayed in the top-right corner of the clip.
12. Free Sunset LUTs
Sunsets footages go simultaneously with the golden light or dark violet colors. Here, you will access the free sunset LUTs that you can incorporate into your project.
After downloading the file, you will realize it is protected. What you do is only watch this YouTube video and access the password.
13. Vintage LUTs
One of the commonly used LUTs in movies is the vintage LUTs. Access over 28 free vintage LUTs here and give your footage that brilliant vintage appearance.
14. Free Warm LUT
Warm LUTs do create a sensational atmosphere in the footage. Incorporate this LUT into your footage and get jaw-dropping results.
After downloading this free LUT pack, input the password displayed in the top-right corner of this YouTube video.
15. Free Music LUTs
In music, fans are always allured by the quality of the video. Besides, you may also gain or lose fans through your video quality. Improve the quality of your music video using this free LUT pack.
To download it for free, input 0$ under the payout bar and click “Buy Now.” Complete the other forms and download your music LUT for free.

Edit Your Film with Filmora and its Cinematic LUTs
Wondershare Filmora is an award-winning video editing software that allows its users to create stunning videos through its wide array of powerful video editing tools. The platform is well aware of all your video editing needs and provides easy-to-use functionalities that include LUTs.
For Win 7 or later (64-bit)
For macOS 10.14 or later
Use LUTs in Wondershare Filmora to express your intended video ideas.
Here are the simple steps on how to edit your film with Filmora:
Step 1. Download Wondershare Filmora
First, download Wondershare Fimora to your computer and allow it to run.
Step 2. Add your Footage to the Timeline
Load your video to Filmora. Drag and drop them to your timeline.
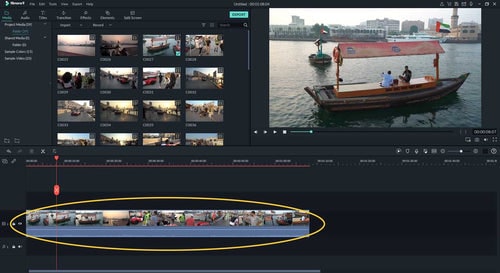
Step 3. Access your LUT Library
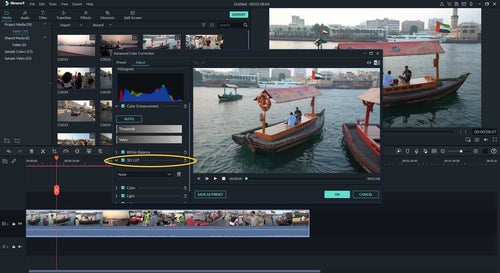
To access your LUT library, open “Color Correction.” Then click on “3D LUT.”
Step 4. Add your preferred LUT to your Project video
After clicking on “3D LUT,” a drop-down list showing all the available LUTs will be displayed. Scroll and select your preferred LUT.
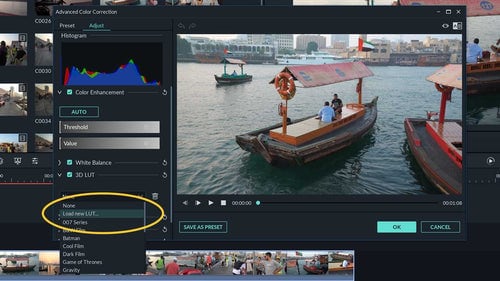
When you want to apply your LUTs in Filmora, click on “Load new LUT,” which is still under “3D LUTs.” You will be directed to your computer storage space to select the folder containing your LUTs.
After selecting your preferred LUT folder, hit the “OK” button to apply.
Conclusion
● Worry no more when you have a small budget and a tight deadline for your project. Depending on your project’s type, nature, and requirements, create bewildering footage using the above 15 LUTs. After applying your favorite LUT, carry out small basic adjustments such as the white balance, brightness, and contrast to your footage when necessary. By doing so, you are going to leave your clients and viewers ground rooted.
● A few of these free LUTs have a catch: watching the YouTube video and getting a password for unlocking their free LUT pack. The password is often displayed on the top-right corners of the YouTube videos.
A significant way of creating cinematic looks for your project is by using LUTs. And with a single click, you will transform your footage into an absolute masterpiece. By using free LUTs, not only will you save on cost but also on the hassle and bustle of having to color grade your film.
LUTs function to create a uniform color throughout a film while enhancing or preserving skin tones. You don’t have to use all the LUTs in this world to create splendid films. Besides, most professional video editors and colorists prefer to work with a handful of LUTs and create stunning films. By going through this article, you will come to learn about 15 free cinematic LUTs for your film.

In this article
01 How Cinematic LUTs Affect Your Film
02 15 Free Cinematic LUTs for Your Film
03 Edit Your Film with Filmora and its Cinematic LUTs
How Cinematic LUTs Affect Your Film
When it comes to marketing, videos often tend to play a huge role. And to market your brand effectively, you need to have top-notch videos. It doesn’t mean that you should go and study to become a colorist or a video editor. Besides, there are professional colorists and video editors who gave in their time and effort to design powerful LUTs and offer them for free.
You can use those free LUTs to create mesmerizing videos and photos for your projects. And depending on the nature of your project, you will find here a free LUT that will work best for you.
There are two types of LUTs;
- 1. Conversion LUTs
Conversion LUTs function by correcting the Log color space back to the standard color space. Professional colorists often use this LUT to obtain a high dynamic range by maintaining more details in the highlights and shadows. - 2. Creative LUTs
Creative LUTs are essentially used in bringing out the creative colors of footage. Color styles in creative LUT are of a wide range, such as moody, cinematic, vintage, and summer, among others.
Creative LUTs is the one that is often used in many cases.

Filmora 3D LUT
Empower your videos with a new mood using different LUTs
Filmora now offers 800+ top-quality LUTs cover a broad range of scenarios. Transform your videos with Filmora’s powerful 3D LUTs.
Apply LUT on Videos Apply LUT on Videos Learn More >
15 Free Cinematic LUTs for Your Film
A good LUT is one that can be applied to several setups and different lighting situations. Besides, it doesn’t mean that a single LUT should be applied to every project; instead, it should be able to produce several perfect matches to your project.
Here are some of the top-tier free cinematic LUTs that you can apply to your film.
1. 40 Free Instagram LUTs
Create amazing Instagram footage using these 40 free LUTs. Besides, you can use these free LUTs in a couple of applications, including Adobe Premiere Pro, Wondershare Filmora, Photoshop, and Da Vinci Resolve.
After applying these LUTs, you can carry out bits of basic corrections such as brightness and contrast to your footage.
2. 3 Eyes and Teeth Whitening LUTs
Eye and teeth whitening LUTs are often used in movies and quality photos. Whiten the color of your teeth and eyes using these three free LUTs.
These LUTs are very simple to use, and when you effectively incorporate them, you are assured of creating magnificent photos.

3. 70 Free Hollywood Film LUTs
Do you have a project file and want it to appear like the ones in Hollywood films? You need not to worry since here are 70 eye-catching LUTs that you can add to your project and get that ‘Hollywood” look you’ve always wanted.
4. Free Summer LUTs
Summer clips perfectly match the orange, teal look. Here, you will get summer LUTs that will work perfectly with your project.
You can use these LUTs in Adobe Premiere, Wondershare Filmora, Da Vinci Resolve, and Lightroom.
5. Free Moody Green LUTs
Footages taken in the jungle work ideally with the moody green LUTs. Here are some of the amazing LUTs you can incorporate into your project.
6. Moody Blue LUTs
When it comes to appreciating nature, moody blue LUTs tend to be the perfect resort. Create cinematic scenes for your videos using these LUTs for free.
The LUTs here are protected with a password, what you do is to watch that video to completion, and you will come across the password.
7. 3 Free Urban Dark Cinematic LUTs
Often in many movies, you will come across urban scenes that are moody, dark, and portrayed as something out-of-this-world. You can also create such scenes with these three free urban dark cinematic LUTs.
You can use these three free cinema LUTs to your Wondershare Filmora or Adobe Premiere.
8. 10 Free Winter LUTs
Footages shot in winter outdoors don’t just work with any LUTs. Besides, there are LUTs designed explicitly for winter footage, and here are the ten best winters LUTs.
Download the LUTs and apply one that you find the perfect match for your project.
9. 20 Free Travel LUTs
When traveling, you may capture several photos and videos that are not very appealing – This may hinder you from sharing them with your friends or family. Besides, you don’t have to discard those footage since you can give them a new mind-blowing look using these 20 free travel LUTs.
To access all the 20 LUTs, you only need to subscribe to their YouTube channel, and you are good to go.
10. Free Korean Tone LUT
Korean movies are enticing because of their unique, bewildering LUT mood. You can also employ this LUT to your footage and leave your followers jaw-dropping.
Here, this free LUT pack is protected, and the only catch is to watch the YouTube video and get the password.
11. 5 Free Wedding LUTs
Wedding footages often require that romantic mood. Get the best five free wedding LUTs here.
The LUT file pack here is protected by a password. So to access the password, watch the YouTube video to completion and access it. Often, it is displayed in the top-right corner of the clip.
12. Free Sunset LUTs
Sunsets footages go simultaneously with the golden light or dark violet colors. Here, you will access the free sunset LUTs that you can incorporate into your project.
After downloading the file, you will realize it is protected. What you do is only watch this YouTube video and access the password.
13. Vintage LUTs
One of the commonly used LUTs in movies is the vintage LUTs. Access over 28 free vintage LUTs here and give your footage that brilliant vintage appearance.
14. Free Warm LUT
Warm LUTs do create a sensational atmosphere in the footage. Incorporate this LUT into your footage and get jaw-dropping results.
After downloading this free LUT pack, input the password displayed in the top-right corner of this YouTube video.
15. Free Music LUTs
In music, fans are always allured by the quality of the video. Besides, you may also gain or lose fans through your video quality. Improve the quality of your music video using this free LUT pack.
To download it for free, input 0$ under the payout bar and click “Buy Now.” Complete the other forms and download your music LUT for free.

Edit Your Film with Filmora and its Cinematic LUTs
Wondershare Filmora is an award-winning video editing software that allows its users to create stunning videos through its wide array of powerful video editing tools. The platform is well aware of all your video editing needs and provides easy-to-use functionalities that include LUTs.
For Win 7 or later (64-bit)
For macOS 10.14 or later
Use LUTs in Wondershare Filmora to express your intended video ideas.
Here are the simple steps on how to edit your film with Filmora:
Step 1. Download Wondershare Filmora
First, download Wondershare Fimora to your computer and allow it to run.
Step 2. Add your Footage to the Timeline
Load your video to Filmora. Drag and drop them to your timeline.

Step 3. Access your LUT Library
To access your LUT library, open “Color Correction.” Then click on “3D LUT.”

Step 4. Add your preferred LUT to your Project video
After clicking on “3D LUT,” a drop-down list showing all the available LUTs will be displayed. Scroll and select your preferred LUT.

When you want to apply your LUTs in Filmora, click on “Load new LUT,” which is still under “3D LUTs.” You will be directed to your computer storage space to select the folder containing your LUTs.
After selecting your preferred LUT folder, hit the “OK” button to apply.
Conclusion
● Worry no more when you have a small budget and a tight deadline for your project. Depending on your project’s type, nature, and requirements, create bewildering footage using the above 15 LUTs. After applying your favorite LUT, carry out small basic adjustments such as the white balance, brightness, and contrast to your footage when necessary. By doing so, you are going to leave your clients and viewers ground rooted.
● A few of these free LUTs have a catch: watching the YouTube video and getting a password for unlocking their free LUT pack. The password is often displayed on the top-right corners of the YouTube videos.
A significant way of creating cinematic looks for your project is by using LUTs. And with a single click, you will transform your footage into an absolute masterpiece. By using free LUTs, not only will you save on cost but also on the hassle and bustle of having to color grade your film.
LUTs function to create a uniform color throughout a film while enhancing or preserving skin tones. You don’t have to use all the LUTs in this world to create splendid films. Besides, most professional video editors and colorists prefer to work with a handful of LUTs and create stunning films. By going through this article, you will come to learn about 15 free cinematic LUTs for your film.

In this article
01 How Cinematic LUTs Affect Your Film
02 15 Free Cinematic LUTs for Your Film
03 Edit Your Film with Filmora and its Cinematic LUTs
How Cinematic LUTs Affect Your Film
When it comes to marketing, videos often tend to play a huge role. And to market your brand effectively, you need to have top-notch videos. It doesn’t mean that you should go and study to become a colorist or a video editor. Besides, there are professional colorists and video editors who gave in their time and effort to design powerful LUTs and offer them for free.
You can use those free LUTs to create mesmerizing videos and photos for your projects. And depending on the nature of your project, you will find here a free LUT that will work best for you.
There are two types of LUTs;
- 1. Conversion LUTs
Conversion LUTs function by correcting the Log color space back to the standard color space. Professional colorists often use this LUT to obtain a high dynamic range by maintaining more details in the highlights and shadows. - 2. Creative LUTs
Creative LUTs are essentially used in bringing out the creative colors of footage. Color styles in creative LUT are of a wide range, such as moody, cinematic, vintage, and summer, among others.
Creative LUTs is the one that is often used in many cases.

Filmora 3D LUT
Empower your videos with a new mood using different LUTs
Filmora now offers 800+ top-quality LUTs cover a broad range of scenarios. Transform your videos with Filmora’s powerful 3D LUTs.
Apply LUT on Videos Apply LUT on Videos Learn More >
15 Free Cinematic LUTs for Your Film
A good LUT is one that can be applied to several setups and different lighting situations. Besides, it doesn’t mean that a single LUT should be applied to every project; instead, it should be able to produce several perfect matches to your project.
Here are some of the top-tier free cinematic LUTs that you can apply to your film.
1. 40 Free Instagram LUTs
Create amazing Instagram footage using these 40 free LUTs. Besides, you can use these free LUTs in a couple of applications, including Adobe Premiere Pro, Wondershare Filmora, Photoshop, and Da Vinci Resolve.
After applying these LUTs, you can carry out bits of basic corrections such as brightness and contrast to your footage.
2. 3 Eyes and Teeth Whitening LUTs
Eye and teeth whitening LUTs are often used in movies and quality photos. Whiten the color of your teeth and eyes using these three free LUTs.
These LUTs are very simple to use, and when you effectively incorporate them, you are assured of creating magnificent photos.

3. 70 Free Hollywood Film LUTs
Do you have a project file and want it to appear like the ones in Hollywood films? You need not to worry since here are 70 eye-catching LUTs that you can add to your project and get that ‘Hollywood” look you’ve always wanted.
4. Free Summer LUTs
Summer clips perfectly match the orange, teal look. Here, you will get summer LUTs that will work perfectly with your project.
You can use these LUTs in Adobe Premiere, Wondershare Filmora, Da Vinci Resolve, and Lightroom.
5. Free Moody Green LUTs
Footages taken in the jungle work ideally with the moody green LUTs. Here are some of the amazing LUTs you can incorporate into your project.
6. Moody Blue LUTs
When it comes to appreciating nature, moody blue LUTs tend to be the perfect resort. Create cinematic scenes for your videos using these LUTs for free.
The LUTs here are protected with a password, what you do is to watch that video to completion, and you will come across the password.
7. 3 Free Urban Dark Cinematic LUTs
Often in many movies, you will come across urban scenes that are moody, dark, and portrayed as something out-of-this-world. You can also create such scenes with these three free urban dark cinematic LUTs.
You can use these three free cinema LUTs to your Wondershare Filmora or Adobe Premiere.
8. 10 Free Winter LUTs
Footages shot in winter outdoors don’t just work with any LUTs. Besides, there are LUTs designed explicitly for winter footage, and here are the ten best winters LUTs.
Download the LUTs and apply one that you find the perfect match for your project.
9. 20 Free Travel LUTs
When traveling, you may capture several photos and videos that are not very appealing – This may hinder you from sharing them with your friends or family. Besides, you don’t have to discard those footage since you can give them a new mind-blowing look using these 20 free travel LUTs.
To access all the 20 LUTs, you only need to subscribe to their YouTube channel, and you are good to go.
10. Free Korean Tone LUT
Korean movies are enticing because of their unique, bewildering LUT mood. You can also employ this LUT to your footage and leave your followers jaw-dropping.
Here, this free LUT pack is protected, and the only catch is to watch the YouTube video and get the password.
11. 5 Free Wedding LUTs
Wedding footages often require that romantic mood. Get the best five free wedding LUTs here.
The LUT file pack here is protected by a password. So to access the password, watch the YouTube video to completion and access it. Often, it is displayed in the top-right corner of the clip.
12. Free Sunset LUTs
Sunsets footages go simultaneously with the golden light or dark violet colors. Here, you will access the free sunset LUTs that you can incorporate into your project.
After downloading the file, you will realize it is protected. What you do is only watch this YouTube video and access the password.
13. Vintage LUTs
One of the commonly used LUTs in movies is the vintage LUTs. Access over 28 free vintage LUTs here and give your footage that brilliant vintage appearance.
14. Free Warm LUT
Warm LUTs do create a sensational atmosphere in the footage. Incorporate this LUT into your footage and get jaw-dropping results.
After downloading this free LUT pack, input the password displayed in the top-right corner of this YouTube video.
15. Free Music LUTs
In music, fans are always allured by the quality of the video. Besides, you may also gain or lose fans through your video quality. Improve the quality of your music video using this free LUT pack.
To download it for free, input 0$ under the payout bar and click “Buy Now.” Complete the other forms and download your music LUT for free.

Edit Your Film with Filmora and its Cinematic LUTs
Wondershare Filmora is an award-winning video editing software that allows its users to create stunning videos through its wide array of powerful video editing tools. The platform is well aware of all your video editing needs and provides easy-to-use functionalities that include LUTs.
For Win 7 or later (64-bit)
For macOS 10.14 or later
Use LUTs in Wondershare Filmora to express your intended video ideas.
Here are the simple steps on how to edit your film with Filmora:
Step 1. Download Wondershare Filmora
First, download Wondershare Fimora to your computer and allow it to run.
Step 2. Add your Footage to the Timeline
Load your video to Filmora. Drag and drop them to your timeline.

Step 3. Access your LUT Library
To access your LUT library, open “Color Correction.” Then click on “3D LUT.”

Step 4. Add your preferred LUT to your Project video
After clicking on “3D LUT,” a drop-down list showing all the available LUTs will be displayed. Scroll and select your preferred LUT.

When you want to apply your LUTs in Filmora, click on “Load new LUT,” which is still under “3D LUTs.” You will be directed to your computer storage space to select the folder containing your LUTs.
After selecting your preferred LUT folder, hit the “OK” button to apply.
Conclusion
● Worry no more when you have a small budget and a tight deadline for your project. Depending on your project’s type, nature, and requirements, create bewildering footage using the above 15 LUTs. After applying your favorite LUT, carry out small basic adjustments such as the white balance, brightness, and contrast to your footage when necessary. By doing so, you are going to leave your clients and viewers ground rooted.
● A few of these free LUTs have a catch: watching the YouTube video and getting a password for unlocking their free LUT pack. The password is often displayed on the top-right corners of the YouTube videos.
A significant way of creating cinematic looks for your project is by using LUTs. And with a single click, you will transform your footage into an absolute masterpiece. By using free LUTs, not only will you save on cost but also on the hassle and bustle of having to color grade your film.
LUTs function to create a uniform color throughout a film while enhancing or preserving skin tones. You don’t have to use all the LUTs in this world to create splendid films. Besides, most professional video editors and colorists prefer to work with a handful of LUTs and create stunning films. By going through this article, you will come to learn about 15 free cinematic LUTs for your film.

In this article
01 How Cinematic LUTs Affect Your Film
02 15 Free Cinematic LUTs for Your Film
03 Edit Your Film with Filmora and its Cinematic LUTs
How Cinematic LUTs Affect Your Film
When it comes to marketing, videos often tend to play a huge role. And to market your brand effectively, you need to have top-notch videos. It doesn’t mean that you should go and study to become a colorist or a video editor. Besides, there are professional colorists and video editors who gave in their time and effort to design powerful LUTs and offer them for free.
You can use those free LUTs to create mesmerizing videos and photos for your projects. And depending on the nature of your project, you will find here a free LUT that will work best for you.
There are two types of LUTs;
- 1. Conversion LUTs
Conversion LUTs function by correcting the Log color space back to the standard color space. Professional colorists often use this LUT to obtain a high dynamic range by maintaining more details in the highlights and shadows. - 2. Creative LUTs
Creative LUTs are essentially used in bringing out the creative colors of footage. Color styles in creative LUT are of a wide range, such as moody, cinematic, vintage, and summer, among others.
Creative LUTs is the one that is often used in many cases.

Filmora 3D LUT
Empower your videos with a new mood using different LUTs
Filmora now offers 800+ top-quality LUTs cover a broad range of scenarios. Transform your videos with Filmora’s powerful 3D LUTs.
Apply LUT on Videos Apply LUT on Videos Learn More >
15 Free Cinematic LUTs for Your Film
A good LUT is one that can be applied to several setups and different lighting situations. Besides, it doesn’t mean that a single LUT should be applied to every project; instead, it should be able to produce several perfect matches to your project.
Here are some of the top-tier free cinematic LUTs that you can apply to your film.
1. 40 Free Instagram LUTs
Create amazing Instagram footage using these 40 free LUTs. Besides, you can use these free LUTs in a couple of applications, including Adobe Premiere Pro, Wondershare Filmora, Photoshop, and Da Vinci Resolve.
After applying these LUTs, you can carry out bits of basic corrections such as brightness and contrast to your footage.
2. 3 Eyes and Teeth Whitening LUTs
Eye and teeth whitening LUTs are often used in movies and quality photos. Whiten the color of your teeth and eyes using these three free LUTs.
These LUTs are very simple to use, and when you effectively incorporate them, you are assured of creating magnificent photos.

3. 70 Free Hollywood Film LUTs
Do you have a project file and want it to appear like the ones in Hollywood films? You need not to worry since here are 70 eye-catching LUTs that you can add to your project and get that ‘Hollywood” look you’ve always wanted.
4. Free Summer LUTs
Summer clips perfectly match the orange, teal look. Here, you will get summer LUTs that will work perfectly with your project.
You can use these LUTs in Adobe Premiere, Wondershare Filmora, Da Vinci Resolve, and Lightroom.
5. Free Moody Green LUTs
Footages taken in the jungle work ideally with the moody green LUTs. Here are some of the amazing LUTs you can incorporate into your project.
6. Moody Blue LUTs
When it comes to appreciating nature, moody blue LUTs tend to be the perfect resort. Create cinematic scenes for your videos using these LUTs for free.
The LUTs here are protected with a password, what you do is to watch that video to completion, and you will come across the password.
7. 3 Free Urban Dark Cinematic LUTs
Often in many movies, you will come across urban scenes that are moody, dark, and portrayed as something out-of-this-world. You can also create such scenes with these three free urban dark cinematic LUTs.
You can use these three free cinema LUTs to your Wondershare Filmora or Adobe Premiere.
8. 10 Free Winter LUTs
Footages shot in winter outdoors don’t just work with any LUTs. Besides, there are LUTs designed explicitly for winter footage, and here are the ten best winters LUTs.
Download the LUTs and apply one that you find the perfect match for your project.
9. 20 Free Travel LUTs
When traveling, you may capture several photos and videos that are not very appealing – This may hinder you from sharing them with your friends or family. Besides, you don’t have to discard those footage since you can give them a new mind-blowing look using these 20 free travel LUTs.
To access all the 20 LUTs, you only need to subscribe to their YouTube channel, and you are good to go.
10. Free Korean Tone LUT
Korean movies are enticing because of their unique, bewildering LUT mood. You can also employ this LUT to your footage and leave your followers jaw-dropping.
Here, this free LUT pack is protected, and the only catch is to watch the YouTube video and get the password.
11. 5 Free Wedding LUTs
Wedding footages often require that romantic mood. Get the best five free wedding LUTs here.
The LUT file pack here is protected by a password. So to access the password, watch the YouTube video to completion and access it. Often, it is displayed in the top-right corner of the clip.
12. Free Sunset LUTs
Sunsets footages go simultaneously with the golden light or dark violet colors. Here, you will access the free sunset LUTs that you can incorporate into your project.
After downloading the file, you will realize it is protected. What you do is only watch this YouTube video and access the password.
13. Vintage LUTs
One of the commonly used LUTs in movies is the vintage LUTs. Access over 28 free vintage LUTs here and give your footage that brilliant vintage appearance.
14. Free Warm LUT
Warm LUTs do create a sensational atmosphere in the footage. Incorporate this LUT into your footage and get jaw-dropping results.
After downloading this free LUT pack, input the password displayed in the top-right corner of this YouTube video.
15. Free Music LUTs
In music, fans are always allured by the quality of the video. Besides, you may also gain or lose fans through your video quality. Improve the quality of your music video using this free LUT pack.
To download it for free, input 0$ under the payout bar and click “Buy Now.” Complete the other forms and download your music LUT for free.

Edit Your Film with Filmora and its Cinematic LUTs
Wondershare Filmora is an award-winning video editing software that allows its users to create stunning videos through its wide array of powerful video editing tools. The platform is well aware of all your video editing needs and provides easy-to-use functionalities that include LUTs.
For Win 7 or later (64-bit)
For macOS 10.14 or later
Use LUTs in Wondershare Filmora to express your intended video ideas.
Here are the simple steps on how to edit your film with Filmora:
Step 1. Download Wondershare Filmora
First, download Wondershare Fimora to your computer and allow it to run.
Step 2. Add your Footage to the Timeline
Load your video to Filmora. Drag and drop them to your timeline.

Step 3. Access your LUT Library
To access your LUT library, open “Color Correction.” Then click on “3D LUT.”

Step 4. Add your preferred LUT to your Project video
After clicking on “3D LUT,” a drop-down list showing all the available LUTs will be displayed. Scroll and select your preferred LUT.

When you want to apply your LUTs in Filmora, click on “Load new LUT,” which is still under “3D LUTs.” You will be directed to your computer storage space to select the folder containing your LUTs.
After selecting your preferred LUT folder, hit the “OK” button to apply.
Conclusion
● Worry no more when you have a small budget and a tight deadline for your project. Depending on your project’s type, nature, and requirements, create bewildering footage using the above 15 LUTs. After applying your favorite LUT, carry out small basic adjustments such as the white balance, brightness, and contrast to your footage when necessary. By doing so, you are going to leave your clients and viewers ground rooted.
● A few of these free LUTs have a catch: watching the YouTube video and getting a password for unlocking their free LUT pack. The password is often displayed on the top-right corners of the YouTube videos.
Demystifying the Vectorscope: A Comprehensive Guide for Premiere Pro Color Correction
Our eyes process colors differently. When two people look at the same picture, they may see different shades of colors. In post-production, Vectorscopes help to color grade and make sure you get your images exactly right. This means that you will process the exact color that you want across devices. Premiere Vectorscope is a great choice for anyone looking to correct and grade colors. Using Vectorscope Premiere allows you to get quantitative data about your image for a more accurate assessment of colors within the film. In this article, we explore what comprises Premiere Pro Vectorscope and how to use them in video editing.
Color Correction Editor An easy-to-use video editor helps you make color correction and color grading experience for videos!
Free Download Use Vectorscope in Filmora Try Color Correction

Part 1. Vectorscope: What is It and How to Read
Vectorscopes provide a great post-production way for color correction. It is video scope that provides greater data about the color properties of an image. Another way to look at it is that a Vectorscope is a circular graph, which monitors the following information of an image. By looking at it, you can measure saturation outward from the center while hue is measured in a circular pattern.
The Vectorscope contains markings indicating the degree of saturation and hue in an image. The distance of the markings from the center indicates how saturated the color is in your image. In simple terms, the further the markings, the more saturated the color. The two main options of Vectorscope are HLS and YUV. The HLS displays the hue, lightness, saturation, and signal information at a glance. On the other hand, the YUV mode contains several color boxes, giving accurate levels of hue and saturation.
Vectorscopes are useful to filmmakers and editors to ensure greater conformity in a film as they transition from one shot to the next. When the camera captures an image with too much saturation, using a Vectorscope helps to reduce the said saturation. This makes Vectorscope a useful feature for color correction and color grading. Color correction involves altering the colors of an image within a film to provide consistency and tone for the film. On the other hand, color grading is more like a supercharged version of color correction. It refers to altering a film so that it matches a tone or theme. Since the two, grading and correction are important, more video editing will use a combination of both.
How to Read a Vectorscope
Learning how to read a Vectorscope will make your video editing fun and easier. The best way is to view the Vectorscope in relation to the color wheel. When using Premiere Vectorscope, the colors are nicely labeled for anyone to understand. You only need to understand the primary colors of saturation and hue to accurately read a Vectorscope.
The hue color is the direction to which the marketer points. For instance, a marker pointing toward the boxes labeled “R” indicates that the hue is predominantly red. On the other hand, the saturation correlates to the length of the marker. The image is more saturated when the marker is furthest from the center of the wheel.
Keep note of the two boxes in each main color. The box that is close to the center indicates 75%, and you will normally avoid the marker extending beyond this first box. Any marketer that extends beyond this is known as non-broadcast safe or illegal colors. Although you may need to go beyond the first box in some projects for stylistic reasons, the general rule of thumb is to avoid that.
Without proper calibration, your images may end up looking too red or too blue. They will not look natural at all and will affect the overall quality of your video. Therefore, using the features within the vectorsope will help you color-grade your images to perfection.
Part 2. Vectorscope in Premiere Pro : A Brief Guide
Just like many other video editing software, Adobe Premiere Pro offers Vectorscope to help in post-production. The best way to look at Vectorscope in Premiere Pro is to use the Color Correction workspace. Once you have launched the software, Click Window, followed by Workspace, and then Color Correction. Access the reference monitor directly to deliver the program.
The reference monitor will first display composite video. Clicking on the setting icon allows you to access the panel and choose the video scope you want to use. Now, this is how you use the Vectorscope in Premiere Pro:
1. Reading a Vectorscope on Premiere Pro
A Vectorscope is similar to a color wheel. It displays colors in the same places as the wheel, with cyan to the bottom right and red to the top left. When you see a dot or line in the Vectorscope, you can tell it is giving you information about the color or chrominance of a shot. Essentially, this information is the hue (specific color) and the saturation (the strength of that hue).
As you examine the Vectorscope, you get to see how strong a particular color is by the length of the line from the center of the wheel. A longer line indicates that the color is more saturated. However, all Vectorscopes have small color targets. The Vectorscope points are lined with a drop-down used to read the scope. The default is set to 75%, which is a good limit for a typical broadcast system.
2. Adjusting Skin Tones
A commonly used feature of the Premier Pro Vectorscope is the Skin Tone Line. With this feature, you get the line on the scope between the Yellow and the Red sections at about 10.30 or 11 o’clock position.
The Vectorscope skin tone line represents the color of blood flowing through the skin. You can use this line to check the accuracy of skin tone color representation regardless of the ethnicity of the person you’re filming. In particular, video images are more accurate
The major problem is figuring out how to look at skin tones in a shot with many other colors. With the skin tons line in Premiere Pro, color correction becomes easy and quick. You only need to use a garbage matte, which is found under video effects then keying. Adjust the points so that they cover the skin of the person on the shot, then look at the Premiere Pro Vectorscope to see your end results.
Part 3. How to Use Vectorscope in Filmora : Step-by-Step Guide
The choice of video editing software can have an impact on how well you use your Vectorscopes. Wondershare Filmora is a great choice for anyone who wants to achieve great results with their videos. The versatile video editing software offers four types of video scopes, including the Vectorscope. This gives you more flexibility in video editing and achieving accurate results in color correction and grading. With the recent V13, you also get access to a range of AI features that make video editing quicker and easier.
Free Download For Win 7 or later(64-bit)
Free Download For macOS 10.14 or later
Access Vectorscope on Filmora
Accessing Vectorscope in Filmora is straightforward. As part of the four available video scopes, Filmora has made it easy to use Vectorscope during video editing. Here is a step-by-step guide to follow:
Step 1Create a New Project on Filmora
Once you have downloaded and installed the Filmora software on your desktop, launch it and click Create a New Project.
Step 2Access Video Scopes
After starting a new project, head to the top right corner of the main interface. Click on the Video Scope button to launch the video scope bar on the preview screen.
Step 3Customize Video Scopes Layout Bar
Customizing the layout of the video scope bar allows you to have more freedom in using the feature. You have the option to choose from four layouts or expand the button to display the video scope’s name. The purpose of this step is to modify the display option of the video scopes, allowing you to have a clear view of what you are editing.
Step 4Manage the Vectorscope as Desired
On the preview screen, choose the Vectorscope option. This video scope allows you to define the skin tone indication for better color grading and correction.
Step 5Change Other Video Scopes
To achieve more accurate and better results, explore the other video scopes in the same window. View the color changes in your image through parade, histogram, and waveform video scopes. You can also change the color channels to view specific color changes across the video.
Conclusion
Vectorscopes are great for post-production color correction. Although lesser-known features to many people, they are widely used in video production. They ensure that the colors in your video are consistent across all clips or shots of your film. Since filming will often involve different shots and settings, we recommend using Wondershare Filmora for your video editing. It comes with an easy-to-use Vectorscope and other video scopes that help you achieve great results with color correction and grading.
Free Download Use Vectorscope in Filmora Try Color Correction

Part 1. Vectorscope: What is It and How to Read
Vectorscopes provide a great post-production way for color correction. It is video scope that provides greater data about the color properties of an image. Another way to look at it is that a Vectorscope is a circular graph, which monitors the following information of an image. By looking at it, you can measure saturation outward from the center while hue is measured in a circular pattern.
The Vectorscope contains markings indicating the degree of saturation and hue in an image. The distance of the markings from the center indicates how saturated the color is in your image. In simple terms, the further the markings, the more saturated the color. The two main options of Vectorscope are HLS and YUV. The HLS displays the hue, lightness, saturation, and signal information at a glance. On the other hand, the YUV mode contains several color boxes, giving accurate levels of hue and saturation.
Vectorscopes are useful to filmmakers and editors to ensure greater conformity in a film as they transition from one shot to the next. When the camera captures an image with too much saturation, using a Vectorscope helps to reduce the said saturation. This makes Vectorscope a useful feature for color correction and color grading. Color correction involves altering the colors of an image within a film to provide consistency and tone for the film. On the other hand, color grading is more like a supercharged version of color correction. It refers to altering a film so that it matches a tone or theme. Since the two, grading and correction are important, more video editing will use a combination of both.
How to Read a Vectorscope
Learning how to read a Vectorscope will make your video editing fun and easier. The best way is to view the Vectorscope in relation to the color wheel. When using Premiere Vectorscope, the colors are nicely labeled for anyone to understand. You only need to understand the primary colors of saturation and hue to accurately read a Vectorscope.
The hue color is the direction to which the marketer points. For instance, a marker pointing toward the boxes labeled “R” indicates that the hue is predominantly red. On the other hand, the saturation correlates to the length of the marker. The image is more saturated when the marker is furthest from the center of the wheel.
Keep note of the two boxes in each main color. The box that is close to the center indicates 75%, and you will normally avoid the marker extending beyond this first box. Any marketer that extends beyond this is known as non-broadcast safe or illegal colors. Although you may need to go beyond the first box in some projects for stylistic reasons, the general rule of thumb is to avoid that.
Without proper calibration, your images may end up looking too red or too blue. They will not look natural at all and will affect the overall quality of your video. Therefore, using the features within the vectorsope will help you color-grade your images to perfection.
Part 2. Vectorscope in Premiere Pro : A Brief Guide
Just like many other video editing software, Adobe Premiere Pro offers Vectorscope to help in post-production. The best way to look at Vectorscope in Premiere Pro is to use the Color Correction workspace. Once you have launched the software, Click Window, followed by Workspace, and then Color Correction. Access the reference monitor directly to deliver the program.
The reference monitor will first display composite video. Clicking on the setting icon allows you to access the panel and choose the video scope you want to use. Now, this is how you use the Vectorscope in Premiere Pro:
1. Reading a Vectorscope on Premiere Pro
A Vectorscope is similar to a color wheel. It displays colors in the same places as the wheel, with cyan to the bottom right and red to the top left. When you see a dot or line in the Vectorscope, you can tell it is giving you information about the color or chrominance of a shot. Essentially, this information is the hue (specific color) and the saturation (the strength of that hue).
As you examine the Vectorscope, you get to see how strong a particular color is by the length of the line from the center of the wheel. A longer line indicates that the color is more saturated. However, all Vectorscopes have small color targets. The Vectorscope points are lined with a drop-down used to read the scope. The default is set to 75%, which is a good limit for a typical broadcast system.
2. Adjusting Skin Tones
A commonly used feature of the Premier Pro Vectorscope is the Skin Tone Line. With this feature, you get the line on the scope between the Yellow and the Red sections at about 10.30 or 11 o’clock position.
The Vectorscope skin tone line represents the color of blood flowing through the skin. You can use this line to check the accuracy of skin tone color representation regardless of the ethnicity of the person you’re filming. In particular, video images are more accurate
The major problem is figuring out how to look at skin tones in a shot with many other colors. With the skin tons line in Premiere Pro, color correction becomes easy and quick. You only need to use a garbage matte, which is found under video effects then keying. Adjust the points so that they cover the skin of the person on the shot, then look at the Premiere Pro Vectorscope to see your end results.
Part 3. How to Use Vectorscope in Filmora : Step-by-Step Guide
The choice of video editing software can have an impact on how well you use your Vectorscopes. Wondershare Filmora is a great choice for anyone who wants to achieve great results with their videos. The versatile video editing software offers four types of video scopes, including the Vectorscope. This gives you more flexibility in video editing and achieving accurate results in color correction and grading. With the recent V13, you also get access to a range of AI features that make video editing quicker and easier.
Free Download For Win 7 or later(64-bit)
Free Download For macOS 10.14 or later
Access Vectorscope on Filmora
Accessing Vectorscope in Filmora is straightforward. As part of the four available video scopes, Filmora has made it easy to use Vectorscope during video editing. Here is a step-by-step guide to follow:
Step 1Create a New Project on Filmora
Once you have downloaded and installed the Filmora software on your desktop, launch it and click Create a New Project.
Step 2Access Video Scopes
After starting a new project, head to the top right corner of the main interface. Click on the Video Scope button to launch the video scope bar on the preview screen.
Step 3Customize Video Scopes Layout Bar
Customizing the layout of the video scope bar allows you to have more freedom in using the feature. You have the option to choose from four layouts or expand the button to display the video scope’s name. The purpose of this step is to modify the display option of the video scopes, allowing you to have a clear view of what you are editing.
Step 4Manage the Vectorscope as Desired
On the preview screen, choose the Vectorscope option. This video scope allows you to define the skin tone indication for better color grading and correction.
Step 5Change Other Video Scopes
To achieve more accurate and better results, explore the other video scopes in the same window. View the color changes in your image through parade, histogram, and waveform video scopes. You can also change the color channels to view specific color changes across the video.
Conclusion
Vectorscopes are great for post-production color correction. Although lesser-known features to many people, they are widely used in video production. They ensure that the colors in your video are consistent across all clips or shots of your film. Since filming will often involve different shots and settings, we recommend using Wondershare Filmora for your video editing. It comes with an easy-to-use Vectorscope and other video scopes that help you achieve great results with color correction and grading.
What Are the Best Video Background Changers Online?
Popular Trends in the creative space engendered the creation of several tools that have reduced the difficulties involved in content creation. A few years ago, executing simple post-production tricks was a huge task. Simple edits like changing video backgrounds needed an expensive light setup and a proper green/blue screen background. In simpler words, it was expensive.
Today, we can utilize a video background changer online without an expensive setup. It has brought out the hidden creativity in thousands of content creators worldwide. Check out TikTok, Instagram, and other social media platforms to verify this claim.
This article covers a list of tools that can edit video backgrounds online. Content creators and anyone who wants to explore creativity can use these tools. Before we jump into the substance of this article, you might be wondering;
What is a Video Background Changer?
A video background changer is a tool that can swap the background of any video. These tools usually work in three simple steps.
- Analyze the footage.
- Separate the subject or “subjects” from the background
- Switch backgrounds.
The process starts when a user uploads a video clip. The tool analyzes the footage and separates the subjects from the background. The user can select other available pre-made backgrounds or upload a preferred one to the platform. After this process, users can share the finished video or save it to their devices. Other kinds of background changers only merge a transparent clip with a background.
How to Remove Background without Green Screen
Free Download For Win 7 or later(64-bit)
Free Download For macOS 10.14 or later
3 Video Background Changers Online
Veed.io

Veed is an online feature-packed video editing platform. It comes with an interface that is suitable for newbies and professionals alike. Like many other competitors, it offers a free and premium version that unlocks more tools for you to play around with.
This tool allows you to edit video background online, transcribe audio, add subtitles, etc. Since this tool is web-based, there is no need to download any storage-intensive application. You can quickly edit your content online and share your videos.
Features
- Recorder feature for recording tutorials and online meetings
- Edit feature for creating catchy videos
- Transcriptions and subtitle module
- Color grading feature
- Online video hosting and storage
BeeCut

BeeCut is a video editing software specifically created and designed for simplicity. Quick trims and edits for short videos are the primary focus of the BeeCut online application. A compilation of over 60+ reviews quickly exposes BeeCut as a beginner-friendly editing software. You can acquaint yourself with this platform in less than 24 hours.
You can change your background online for free using the BeeCut online editor. It allows you to Import a background and merge it with the clip that contains your subject. BeeCut has a familiar user interface that feels like it came from mobile editors. This simplicity makes it easy to understand.
Features
- Trim and cut your footage
- Add custom video intros and overlays
- Speech recognition for transcription and subtitling
- Online and offline versions for different functions
- Large community of over 1 million users
Unscreen

If you’re searching for one of the fastest background removers, you’re in luck. Unscreen is the “sit tight and relax” version of background changers. You can change the video background online without clicking any buttons or learning how to use the software. You also don’t need to select pixels or use a color picker from an “ultra key” function. You only upload a video, and the platform does the rest.
In simple steps, you can quickly acquaint yourself with Unscreen. It also promises a risk-free money-back guarantee that lasts for 14 days only.
Features
- Other platforms can integrate it as a tool
- No watermarks
- Full HD video upload and download
- Affordable and more realistic payment structure
- Specialized background remover
3 Video Background Changers on Desktop
Final Cut Pro

The video editors’ community refers to Final Cut Pro as one of the most professional applications for Mac users. It is a standard editing software that competes with DaVinci Resolve, Premiere Pro, and the rest. It uses the standard ground-to-top layering system to organize a timeline and is easy to learn.
Though it cannot edit background videos online, users can download it and use its chroma key effect. Like Premiere’s ultra-key effect, the chroma key function can select and remove a specific color. This is not the only way to remove backgrounds, but it is the most effective. If done correctly, no bleeding or distorted subject traces will be found.
Features
- Simple object motion tracking
- Color grading and cinematic color LUTs
- Supports 4k - 8k footage editing, rendering, and exporting
- Text animations
- Apple’s Neural Engine for speed edits
Adobe Premiere Pro

Adobe Premiere Pro is one of the best-selling products from the Adobe franchise, apart from Acrobat Reader and Photoshop. Professionals worldwide trust Premiere Pro as their go-to editor. With features like cut & trim, animations (using keyframing), an in-built graphics panel, and a lumetri color grading panel. Most beginners start their creative video editing careers using Premiere Pro.
Online change video background features don’t come with this application. To change a video background, you have to use its “Ultra Key” effect, or mask out your subject frame-by-frame. The easiest way to achieve this is to use the color picker from the ultra key effect in your effects control panel. Premier Pro has a wide range of free tutorials on YouTube from various content creators. This makes the learning process a breeze.
Features
- AI-assisted transcription and subtitling
- Customizable workspaces
- Audio effects and dedicated audio editing interface
- Work seamlessly between After Effects (for complex motion graphics and effects) and Audition (for dedicated audio effects and editing)
- Large community support base
Filmora

If you’re searching for easy-to-use video editing software for beginners and professionals, Filmora might be your best choice. With AI-assisted creative features, you can easily add effects and style to your video. Its AI Text-based editing feature makes adding effects enjoyable.
As a perfect alternative to getting a video background changer online, Filmora can save you hours in editing time. With AI assistance, you can separate your subject from your background without needing to do the work. You can add creative texts and colors to your background with a few clicks.
Features
- AI-assisted editing
- Hundreds of templates
- Countless effect templates.
Free Online Background Changer Fantastic tool for effortlessly transforming and enhancing your videos.
Try Filmora’s Background Changer Try Filmora’s Background Changer Explore Background Changer with Filmora

Conclusion
In finding the right Video background changer online, knowing the description and the features offered is key. We’ve saved you the stress of having to try them all out. With this article, you should be able to pick what works best for you.
Out of these mentioned tools, no one stands out as a better money’s worth like Filmora. With AI assistance, you can save hours in editing time, and get better results. Users worldwide have reviewed this app, and recommend it for easy use, quality exports, and seamless AI-assisted editing.
Free Download For Win 7 or later(64-bit)
Free Download For macOS 10.14 or later
3 Video Background Changers Online
Veed.io

Veed is an online feature-packed video editing platform. It comes with an interface that is suitable for newbies and professionals alike. Like many other competitors, it offers a free and premium version that unlocks more tools for you to play around with.
This tool allows you to edit video background online, transcribe audio, add subtitles, etc. Since this tool is web-based, there is no need to download any storage-intensive application. You can quickly edit your content online and share your videos.
Features
- Recorder feature for recording tutorials and online meetings
- Edit feature for creating catchy videos
- Transcriptions and subtitle module
- Color grading feature
- Online video hosting and storage
BeeCut

BeeCut is a video editing software specifically created and designed for simplicity. Quick trims and edits for short videos are the primary focus of the BeeCut online application. A compilation of over 60+ reviews quickly exposes BeeCut as a beginner-friendly editing software. You can acquaint yourself with this platform in less than 24 hours.
You can change your background online for free using the BeeCut online editor. It allows you to Import a background and merge it with the clip that contains your subject. BeeCut has a familiar user interface that feels like it came from mobile editors. This simplicity makes it easy to understand.
Features
- Trim and cut your footage
- Add custom video intros and overlays
- Speech recognition for transcription and subtitling
- Online and offline versions for different functions
- Large community of over 1 million users
Unscreen

If you’re searching for one of the fastest background removers, you’re in luck. Unscreen is the “sit tight and relax” version of background changers. You can change the video background online without clicking any buttons or learning how to use the software. You also don’t need to select pixels or use a color picker from an “ultra key” function. You only upload a video, and the platform does the rest.
In simple steps, you can quickly acquaint yourself with Unscreen. It also promises a risk-free money-back guarantee that lasts for 14 days only.
Features
- Other platforms can integrate it as a tool
- No watermarks
- Full HD video upload and download
- Affordable and more realistic payment structure
- Specialized background remover
3 Video Background Changers on Desktop
Final Cut Pro

The video editors’ community refers to Final Cut Pro as one of the most professional applications for Mac users. It is a standard editing software that competes with DaVinci Resolve, Premiere Pro, and the rest. It uses the standard ground-to-top layering system to organize a timeline and is easy to learn.
Though it cannot edit background videos online, users can download it and use its chroma key effect. Like Premiere’s ultra-key effect, the chroma key function can select and remove a specific color. This is not the only way to remove backgrounds, but it is the most effective. If done correctly, no bleeding or distorted subject traces will be found.
Features
- Simple object motion tracking
- Color grading and cinematic color LUTs
- Supports 4k - 8k footage editing, rendering, and exporting
- Text animations
- Apple’s Neural Engine for speed edits
Adobe Premiere Pro

Adobe Premiere Pro is one of the best-selling products from the Adobe franchise, apart from Acrobat Reader and Photoshop. Professionals worldwide trust Premiere Pro as their go-to editor. With features like cut & trim, animations (using keyframing), an in-built graphics panel, and a lumetri color grading panel. Most beginners start their creative video editing careers using Premiere Pro.
Online change video background features don’t come with this application. To change a video background, you have to use its “Ultra Key” effect, or mask out your subject frame-by-frame. The easiest way to achieve this is to use the color picker from the ultra key effect in your effects control panel. Premier Pro has a wide range of free tutorials on YouTube from various content creators. This makes the learning process a breeze.
Features
- AI-assisted transcription and subtitling
- Customizable workspaces
- Audio effects and dedicated audio editing interface
- Work seamlessly between After Effects (for complex motion graphics and effects) and Audition (for dedicated audio effects and editing)
- Large community support base
Filmora

If you’re searching for easy-to-use video editing software for beginners and professionals, Filmora might be your best choice. With AI-assisted creative features, you can easily add effects and style to your video. Its AI Text-based editing feature makes adding effects enjoyable.
As a perfect alternative to getting a video background changer online, Filmora can save you hours in editing time. With AI assistance, you can separate your subject from your background without needing to do the work. You can add creative texts and colors to your background with a few clicks.
Features
- AI-assisted editing
- Hundreds of templates
- Countless effect templates.
Free Online Background Changer Fantastic tool for effortlessly transforming and enhancing your videos.
Try Filmora’s Background Changer Try Filmora’s Background Changer Explore Background Changer with Filmora

Conclusion
In finding the right Video background changer online, knowing the description and the features offered is key. We’ve saved you the stress of having to try them all out. With this article, you should be able to pick what works best for you.
Out of these mentioned tools, no one stands out as a better money’s worth like Filmora. With AI assistance, you can save hours in editing time, and get better results. Users worldwide have reviewed this app, and recommend it for easy use, quality exports, and seamless AI-assisted editing.
Free Download For Win 7 or later(64-bit)
Free Download For macOS 10.14 or later
3 Video Background Changers Online
Veed.io

Veed is an online feature-packed video editing platform. It comes with an interface that is suitable for newbies and professionals alike. Like many other competitors, it offers a free and premium version that unlocks more tools for you to play around with.
This tool allows you to edit video background online, transcribe audio, add subtitles, etc. Since this tool is web-based, there is no need to download any storage-intensive application. You can quickly edit your content online and share your videos.
Features
- Recorder feature for recording tutorials and online meetings
- Edit feature for creating catchy videos
- Transcriptions and subtitle module
- Color grading feature
- Online video hosting and storage
BeeCut

BeeCut is a video editing software specifically created and designed for simplicity. Quick trims and edits for short videos are the primary focus of the BeeCut online application. A compilation of over 60+ reviews quickly exposes BeeCut as a beginner-friendly editing software. You can acquaint yourself with this platform in less than 24 hours.
You can change your background online for free using the BeeCut online editor. It allows you to Import a background and merge it with the clip that contains your subject. BeeCut has a familiar user interface that feels like it came from mobile editors. This simplicity makes it easy to understand.
Features
- Trim and cut your footage
- Add custom video intros and overlays
- Speech recognition for transcription and subtitling
- Online and offline versions for different functions
- Large community of over 1 million users
Unscreen

If you’re searching for one of the fastest background removers, you’re in luck. Unscreen is the “sit tight and relax” version of background changers. You can change the video background online without clicking any buttons or learning how to use the software. You also don’t need to select pixels or use a color picker from an “ultra key” function. You only upload a video, and the platform does the rest.
In simple steps, you can quickly acquaint yourself with Unscreen. It also promises a risk-free money-back guarantee that lasts for 14 days only.
Features
- Other platforms can integrate it as a tool
- No watermarks
- Full HD video upload and download
- Affordable and more realistic payment structure
- Specialized background remover
3 Video Background Changers on Desktop
Final Cut Pro

The video editors’ community refers to Final Cut Pro as one of the most professional applications for Mac users. It is a standard editing software that competes with DaVinci Resolve, Premiere Pro, and the rest. It uses the standard ground-to-top layering system to organize a timeline and is easy to learn.
Though it cannot edit background videos online, users can download it and use its chroma key effect. Like Premiere’s ultra-key effect, the chroma key function can select and remove a specific color. This is not the only way to remove backgrounds, but it is the most effective. If done correctly, no bleeding or distorted subject traces will be found.
Features
- Simple object motion tracking
- Color grading and cinematic color LUTs
- Supports 4k - 8k footage editing, rendering, and exporting
- Text animations
- Apple’s Neural Engine for speed edits
Adobe Premiere Pro

Adobe Premiere Pro is one of the best-selling products from the Adobe franchise, apart from Acrobat Reader and Photoshop. Professionals worldwide trust Premiere Pro as their go-to editor. With features like cut & trim, animations (using keyframing), an in-built graphics panel, and a lumetri color grading panel. Most beginners start their creative video editing careers using Premiere Pro.
Online change video background features don’t come with this application. To change a video background, you have to use its “Ultra Key” effect, or mask out your subject frame-by-frame. The easiest way to achieve this is to use the color picker from the ultra key effect in your effects control panel. Premier Pro has a wide range of free tutorials on YouTube from various content creators. This makes the learning process a breeze.
Features
- AI-assisted transcription and subtitling
- Customizable workspaces
- Audio effects and dedicated audio editing interface
- Work seamlessly between After Effects (for complex motion graphics and effects) and Audition (for dedicated audio effects and editing)
- Large community support base
Filmora

If you’re searching for easy-to-use video editing software for beginners and professionals, Filmora might be your best choice. With AI-assisted creative features, you can easily add effects and style to your video. Its AI Text-based editing feature makes adding effects enjoyable.
As a perfect alternative to getting a video background changer online, Filmora can save you hours in editing time. With AI assistance, you can separate your subject from your background without needing to do the work. You can add creative texts and colors to your background with a few clicks.
Features
- AI-assisted editing
- Hundreds of templates
- Countless effect templates.
Free Online Background Changer Fantastic tool for effortlessly transforming and enhancing your videos.
Try Filmora’s Background Changer Try Filmora’s Background Changer Explore Background Changer with Filmora

Conclusion
In finding the right Video background changer online, knowing the description and the features offered is key. We’ve saved you the stress of having to try them all out. With this article, you should be able to pick what works best for you.
Out of these mentioned tools, no one stands out as a better money’s worth like Filmora. With AI assistance, you can save hours in editing time, and get better results. Users worldwide have reviewed this app, and recommend it for easy use, quality exports, and seamless AI-assisted editing.
Free Download For Win 7 or later(64-bit)
Free Download For macOS 10.14 or later
3 Video Background Changers Online
Veed.io

Veed is an online feature-packed video editing platform. It comes with an interface that is suitable for newbies and professionals alike. Like many other competitors, it offers a free and premium version that unlocks more tools for you to play around with.
This tool allows you to edit video background online, transcribe audio, add subtitles, etc. Since this tool is web-based, there is no need to download any storage-intensive application. You can quickly edit your content online and share your videos.
Features
- Recorder feature for recording tutorials and online meetings
- Edit feature for creating catchy videos
- Transcriptions and subtitle module
- Color grading feature
- Online video hosting and storage
BeeCut

BeeCut is a video editing software specifically created and designed for simplicity. Quick trims and edits for short videos are the primary focus of the BeeCut online application. A compilation of over 60+ reviews quickly exposes BeeCut as a beginner-friendly editing software. You can acquaint yourself with this platform in less than 24 hours.
You can change your background online for free using the BeeCut online editor. It allows you to Import a background and merge it with the clip that contains your subject. BeeCut has a familiar user interface that feels like it came from mobile editors. This simplicity makes it easy to understand.
Features
- Trim and cut your footage
- Add custom video intros and overlays
- Speech recognition for transcription and subtitling
- Online and offline versions for different functions
- Large community of over 1 million users
Unscreen

If you’re searching for one of the fastest background removers, you’re in luck. Unscreen is the “sit tight and relax” version of background changers. You can change the video background online without clicking any buttons or learning how to use the software. You also don’t need to select pixels or use a color picker from an “ultra key” function. You only upload a video, and the platform does the rest.
In simple steps, you can quickly acquaint yourself with Unscreen. It also promises a risk-free money-back guarantee that lasts for 14 days only.
Features
- Other platforms can integrate it as a tool
- No watermarks
- Full HD video upload and download
- Affordable and more realistic payment structure
- Specialized background remover
3 Video Background Changers on Desktop
Final Cut Pro

The video editors’ community refers to Final Cut Pro as one of the most professional applications for Mac users. It is a standard editing software that competes with DaVinci Resolve, Premiere Pro, and the rest. It uses the standard ground-to-top layering system to organize a timeline and is easy to learn.
Though it cannot edit background videos online, users can download it and use its chroma key effect. Like Premiere’s ultra-key effect, the chroma key function can select and remove a specific color. This is not the only way to remove backgrounds, but it is the most effective. If done correctly, no bleeding or distorted subject traces will be found.
Features
- Simple object motion tracking
- Color grading and cinematic color LUTs
- Supports 4k - 8k footage editing, rendering, and exporting
- Text animations
- Apple’s Neural Engine for speed edits
Adobe Premiere Pro

Adobe Premiere Pro is one of the best-selling products from the Adobe franchise, apart from Acrobat Reader and Photoshop. Professionals worldwide trust Premiere Pro as their go-to editor. With features like cut & trim, animations (using keyframing), an in-built graphics panel, and a lumetri color grading panel. Most beginners start their creative video editing careers using Premiere Pro.
Online change video background features don’t come with this application. To change a video background, you have to use its “Ultra Key” effect, or mask out your subject frame-by-frame. The easiest way to achieve this is to use the color picker from the ultra key effect in your effects control panel. Premier Pro has a wide range of free tutorials on YouTube from various content creators. This makes the learning process a breeze.
Features
- AI-assisted transcription and subtitling
- Customizable workspaces
- Audio effects and dedicated audio editing interface
- Work seamlessly between After Effects (for complex motion graphics and effects) and Audition (for dedicated audio effects and editing)
- Large community support base
Filmora

If you’re searching for easy-to-use video editing software for beginners and professionals, Filmora might be your best choice. With AI-assisted creative features, you can easily add effects and style to your video. Its AI Text-based editing feature makes adding effects enjoyable.
As a perfect alternative to getting a video background changer online, Filmora can save you hours in editing time. With AI assistance, you can separate your subject from your background without needing to do the work. You can add creative texts and colors to your background with a few clicks.
Features
- AI-assisted editing
- Hundreds of templates
- Countless effect templates.
Free Online Background Changer Fantastic tool for effortlessly transforming and enhancing your videos.
Try Filmora’s Background Changer Try Filmora’s Background Changer Explore Background Changer with Filmora

Conclusion
In finding the right Video background changer online, knowing the description and the features offered is key. We’ve saved you the stress of having to try them all out. With this article, you should be able to pick what works best for you.
Out of these mentioned tools, no one stands out as a better money’s worth like Filmora. With AI assistance, you can save hours in editing time, and get better results. Users worldwide have reviewed this app, and recommend it for easy use, quality exports, and seamless AI-assisted editing.
Also read:
- In 2024, Want to Learn How to Make a Fortnite Montage? This Guide Will Give You the Low-Down on Creating Epic Montage Fortnite Videos that You Can Share with Other Players on Social Media Platforms
- In 2024, How To Export Video in Filmora
- Updated 2024 Approved How to Create A Freeze Frame Sequence in Video
- Updated A Countdown Effect Is Widely Used in Gaming and Report Videos. So How to Create Your Own Countdown Video? This Article Will Tell You some Ideas About Contdown Video Editing for 2024
- Updated Guide of 8 Photo Collage Apps for PC for 2024
- Updated In 2024, 4 Ways to Rotate Videos on Windows PC
- All Things About Adding Effects In Kinemaster for 2024
- Updated How to Loop a Video on Android
- Updated Top 10 Old Film Overlays to Make Your Videos Look Vintage
- New What Is Animated GIF | GIF Example & Advantages of GIF for 2024
- In 2024, 4K Videos Are the in Thing because of Their Flexibility and High Resolution. Stick Around to Learn How to Choose the Best Frame Rate for 4K Videos
- Updated Do You Wish to Know How FFmpeg Can Remove Audio From a Video? If Yes, Keep Scrolling This Guide to Remove Audio From Video with FFmpeg and Other Alternative Software
- Updated How to Correct Lens Distortion in Videos
- Updated Want Make a Slide Show Video? Heres How for 2024
- Updated 2024 Approved How to Make a Slideshow with Icecream Slideshow Maker
- Create Chroma Key Written Text Effects in Filmora
- 2024 Approved Step by Step to Cut Videos in Lightworks
- 2024 Approved Adding Text to Your Collage Not only Makes It Look Sophisticated but Also Versatile. So, if You Too Are Looking for Ways to Create a Collage Text, Check Out Our Article
- Updated In 2024, How to Make Video Fade to Black in Movie Maker Easily
- Updated 2024 Approved How to Change Frame Rate in Premiere Pro
- Updated How to Add Text Effects in Adobe Premiere Pro for 2024
- New In 2024, Top 10 Transparent Image Online Tools That Give You an Advantage
- Updated 15 Best CapCut Templates for Slow Motion Editing
- Updated In 2024, Featuring The Use of Camera Shake in Creating the Best Videos
- Updated Turn Your Text Into a Podcast Made Possible (+ EASY Editing Tips)
- 2024 Approved Have You Ever Created a Slow Motion Video on Your Phonr or Camera? This Article Will Show You some Knowledge About Slow Motion Photography
- Updated In 2024, How to Color Grade Your Picture in LightRoom
- How to Make Glitch Effect with Filmora for 2024
- New Free Ways To Split Video For Whatsapp Status On All Platforms
- 2 Actionable Ways to Extract Subtitles From MKV Videos without Quality Loss
- New 2024 Approved A Guide To Adopting Lumetri Color Presets in Effective Color Grading
- How to Exit Android Factory Mode On Xiaomi Redmi A2? | Dr.fone
- In 2024, Delete Gmail Account With/Without Password On Samsung Galaxy A24
- In 2024, How to Check Distance and Radius on Google Maps For your Vivo V30 Pro | Dr.fone
- Best Methods for Realme GT 3 Wont Turn On | Dr.fone
- In 2024, How to Unlock Samsung Pattern Lock if Forgotten? 6 Ways
- In 2024, Complete Review & Guide to Techeligible FRP Bypass and More For Poco C50
- How to Change Spotify Location After Moving to Another Country On Samsung Galaxy A14 4G | Dr.fone
- 6 Methods to Mirror Apple iPhone 13 Pro Max to your Windows PC | Dr.fone
- In 2024, 5 Ways To Teach You To Transfer Files from Samsung Galaxy A54 5G to Other Android Devices Easily | Dr.fone
- Best 3 Honor X7b Emulator for Mac to Run Your Wanted Android Apps | Dr.fone
- Recommended Best Applications for Mirroring Your Vivo X Fold 2 Screen | Dr.fone
- Looking For A Location Changer On Xiaomi Redmi Note 13 Pro+ 5G? Look No Further | Dr.fone
- Additional Tips About Sinnoh Stone For Apple iPhone 11 Pro | Dr.fone
- How to Transfer Data After Switching From Vivo Y200e 5G to Latest Samsung | Dr.fone
- 2024 Approved Fuel Creativity with 10 Awesome Collection of 2D Animation Examples
- Ways To Find Unlocking Codes For Lava Storm 5G Phones
- In 2024, Dose Life360 Notify Me When Someone Checks My Location On Realme GT 5 Pro? | Dr.fone
- In 2024, How to Bypass Apple iPhone 6s Passcode Easily Video Inside | Dr.fone
- 3 Best Tools to Hard Reset OnePlus Ace 2 | Dr.fone
- Gmail Not Working on Realme GT Neo 5 7 Common Problems & Fixes | Dr.fone
- Why does the pokemon go battle league not available On Samsung Galaxy A23 5G | Dr.fone
- Is your ZTE Nubia Z60 Ultra working too slow? Heres how you can hard reset it | Dr.fone
- In 2024, How to Fake Snapchat Location without Jailbreak On Oppo Reno 8T 5G | Dr.fone
- In 2024, How to Watch Hulu Outside US On OnePlus Ace 2V | Dr.fone
- Title: Top 16 Motion Blur Apps for Videos & Photos for 2024
- Author: Chloe
- Created at : 2024-04-24 07:08:15
- Updated at : 2024-04-25 07:08:15
- Link: https://ai-editing-video.techidaily.com/top-16-motion-blur-apps-for-videos-and-photos-for-2024/
- License: This work is licensed under CC BY-NC-SA 4.0.


