
:max_bytes(150000):strip_icc():format(webp)/Childlearningonline_WillieBThomas_Getty-3e51600a64d742a0b5db4fadacead069.jpg)
Top 5 AI Music Video Examples and Makers to Make Them for 2024
Top 5 AI Music Video Examples and Makers to Make Them
Best 5 AI Music Video Examples and Makers to Make Them
An easy yet powerful editor
Numerous effects to choose from
Detailed tutorials provided by the official channel
Music videos are an excellent combination of interesting videos and music files and with double entertainment, the efforts to make these videos are also double. Creating and editing these tools manually is not only a tedious but also time-consuming task and to help with this there are an array of music video maker tools and software available. With the advancement in technology these days, a lot of tools, companies, and setups are also creating versatile AI-generated videos which are a treat to eyes as well as ears. To learn more about these AI music video and creation tools, this article will be a great read.

In this article
01 [Some Interesting Examples Of AI Music Videos](#Part 1)
02 [Top 5 Music Video Makers](#Part 2)
Part 1 Some Interesting Examples Of AI Music Videos
The AI generated music video are getting the attention of a lot of users these days and if you too are keen to check out some of these files, check out the list below of YouTube music ai files.
Part 2 Top 5 Music Video Makers
To help you create music videos in a hassle-free manner and like a pro, several music video makers are available. We have shortlisted the list of popular 5 as below.
01**Wondershare Filmora Video Editor **
This is one of the best tools for creating a music video on your Windows and Mac systems. Quick to download, the program comes with several features that can be further customized for creating your desired footage. The drag and drop function further make the task quick and easy. To ensure that along with customized videos, the audio quality is also great, the software support functions like automatic audio sync, audio compression, audio equalizer, and more. For video editing, you can add transitions, filters, effects, and many other elements. By the way, now, you can generate music for commercial use and seamlessly select sound effects with Filmora’s filtering features. The interface is simple and user-friendly which makes the software apt for beginners as well as pros.

02Rotor Videos
This is an online music video-making service that can help you create your desired music videos within your budget. The process of creating the footage is simple where you just need to add and upload your music file, select the video clips that go with the theme of the audio, add the lyrics, and then finally process. The video will be ready and can be downloaded for further use. The tool is capable of analyzing the tempo, beat, and other elements of the music file and if needed you can also pay for accessing the video stock collection.

04VideoFX Music Video Maker
This is an Android-based app developed by FuzeBits Inc that allows the creation of interesting music videos. Using the app, you can also record the lip-sync music and then customize it using over 50 filters like neon, mirror, thermal, and more. Preset shooting modes – fast motion, auto-pause, and stop motion is also sorted. Other editing functions include stickers, text, filters, and more.

05Mixxx
This is an interesting tool for creating professional-looking music videos using its advanced features. With the drag and drop function, using the tool becomes very easy and it supports the function where the places on the track can be marked using the Hot Keys. The tempo of the song can also be changed by controlling the pitch and its complete music mixer will let you create awesome DJ-type tracks.

● Ending Thoughts →
● Music videos are everywhere on digital media platforms and used for entertainment, promotion, and all other tasks.
● The latest technology has taken these videos to another level by creating AI-generated music videos.
● Several music video maker tools, apps, and software are available, and depending on what are your requirements, a selection can be done.
Music videos are an excellent combination of interesting videos and music files and with double entertainment, the efforts to make these videos are also double. Creating and editing these tools manually is not only a tedious but also time-consuming task and to help with this there are an array of music video maker tools and software available. With the advancement in technology these days, a lot of tools, companies, and setups are also creating versatile AI-generated videos which are a treat to eyes as well as ears. To learn more about these AI music video and creation tools, this article will be a great read.
In this article
01 [Some Interesting Examples Of AI Music Videos](#Part 1)
02 [Top 5 Music Video Makers](#Part 2)
Part 1 Some Interesting Examples Of AI Music Videos
The AI generated music video are getting the attention of a lot of users these days and if you too are keen to check out some of these files, check out the list below of YouTube music ai files.
Part 2 Top 5 Music Video Makers
To help you create music videos in a hassle-free manner and like a pro, several music video makers are available. We have shortlisted the list of popular 5 as below.
01**Wondershare Filmora Video Editor **
This is one of the best tools for creating a music video on your Windows and Mac systems. Quick to download, the program comes with several features that can be further customized for creating your desired footage. The drag and drop function further make the task quick and easy. To ensure that along with customized videos, the audio quality is also great, the software support functions like automatic audio sync, audio compression, audio equalizer, and more. For video editing, you can add transitions, filters, effects, and many other elements. By the way, now, you can generate music for commercial use and seamlessly select sound effects with Filmora’s filtering features. The interface is simple and user-friendly which makes the software apt for beginners as well as pros.
02Rotor Videos
This is an online music video-making service that can help you create your desired music videos within your budget. The process of creating the footage is simple where you just need to add and upload your music file, select the video clips that go with the theme of the audio, add the lyrics, and then finally process. The video will be ready and can be downloaded for further use. The tool is capable of analyzing the tempo, beat, and other elements of the music file and if needed you can also pay for accessing the video stock collection.
04VideoFX Music Video Maker
This is an Android-based app developed by FuzeBits Inc that allows the creation of interesting music videos. Using the app, you can also record the lip-sync music and then customize it using over 50 filters like neon, mirror, thermal, and more. Preset shooting modes – fast motion, auto-pause, and stop motion is also sorted. Other editing functions include stickers, text, filters, and more.
05Mixxx
This is an interesting tool for creating professional-looking music videos using its advanced features. With the drag and drop function, using the tool becomes very easy and it supports the function where the places on the track can be marked using the Hot Keys. The tempo of the song can also be changed by controlling the pitch and its complete music mixer will let you create awesome DJ-type tracks.
● Ending Thoughts →
● Music videos are everywhere on digital media platforms and used for entertainment, promotion, and all other tasks.
● The latest technology has taken these videos to another level by creating AI-generated music videos.
● Several music video maker tools, apps, and software are available, and depending on what are your requirements, a selection can be done.
How Does the YouTube AI Algorithm Work
How Does the YouTube AI Algorithm Work - AI EXPLAINED
An easy yet powerful editor
Numerous effects to choose from
Detailed tutorials provided by the official channel
YouTube is a video sharing platform that is popular among people of all age groups. It was launched back in the year 2007 by 3 PayPal employees. Now, it has become the world’s largest search engine and visited websites after Google. It is the abode of the modern world that has something for everyone.
Per day, people spend approximately 1 billion hours watching videos on YouTube. At the same time, the users of YouTube upload approximately 300 hours of video per minute. But, do you know like Google, this video platform works on a technique known as the YouTube AI algorithm? The platform highly depends on these algorithms to deliver content to the viewers. As YouTube is overloaded with content, AI is a powerful weapon that helps to decide the video recommendation for the huge number of users. This recommendation system for YouTube works on certain factors.
In this article
01 [The Aim of YouTube’s Algorithm](#Part 1)
02 [How the YouTube Algorithm Works](#Part 2)
03 [Ways to Improve the Odds of Your Video = Ranking Well With the YouTube Algorithm](#Part 3)
04 [Ways to Improve Your Video Quality](#Part 4)
Part 1 The Aim of YouTube’s Algorithm
YouTube’s algorithms work with 2 major aims. Its first aim is helping the viewers easily get what they want to watch. The second aim of YouTube’s algorithm is to maximize the satisfaction rate of viewers which ultimately leads to long term engagement.
Part 2 How the YouTube Algorithm Works
YouTube has a well defined AI-based algorithm. The working of the YouTube algorithm AI depends on several factors. It decides the position of videos at 6 different places as per the viewer’s interest. These locations include:
Notifications, Channel subscriptions, Trending streams, YouTube’s homepage, Recommended streams, and Search results.
Let’s understand some more facts about the working of the YouTube algorithm.
01How YouTube Determines The Algorithm
The traffic source for each video might be different. But YouTube’s approach to determine the algorithm for video recommendation is decided by:
● External factors i.e. the overall audience or market
● Performance i.e. the success rate of video
● Personalization i.e. the history and preferences of viewers
02How YouTube Determines Its Homepage Algorithm
You might have found a large array of videos when you type Youtube.com or open the app. YouTube shows these videos thinking that person might be interested in watching any video from the list. The selection of these videos is based on performance and personalization. Performance is measured depending on the metrics such as viewer surveys, likes, dislikes, average percentage viewed, average view duration, and click-through rates. Personalization means the selection of videos based on the past behavior of the viewers.

03How YouTube Determines Its Suggested Video Algorithm
When a person watches any video on YouTube, they always find some video options to watch on the right side. These videos are decided by the suggested videos algorithm. Such videos are decided by AI based on the viewer’s interest in a particular visit. The recommendations for these videos are decided by the following:
● Performance
● Personalization
● Videos watched by the user in the past
● Topically related videos
● Videos that are often watched together

04How YouTube Determines Its Search Algorithm
Just like Google, YouTube is also a search engine. Its search algorithm works when a user comes to search for a particular video or keyword. When the viewer types something on the search bar, it decides the recommendation based on:
● Keywords used on the metadata of video
● Performance of the video

Part 3 Ways to Improve the Odds of Your Video = Ranking Well With the YouTube Algorithm
Algorithms work following the actions of the audience and the creator’s intelligence. If you are planning to do YouTube marketing or are struggling to get your video ranked or appear trending, then let us help you with it. Here, we will let you know about the ways to increase the views. These ways will increase the odds of your video ranking well with the YouTube algorithm. So, let’s understand what all you need to do:
01Keyword Research Is Important
YouTube decides the recommendations based on the user’s action. What they type to search for a particular video keyword plays a very important role. So, you need to understand your target audience and research the keyword that the target audience might be interested in.
The YouTube AI algorithm follows the metadata to decide the category of your video and the target audience. Use the language which the people are using while explaining your video to the AI.
Do proper keyword research and put the keywords in the following places:
● The filename of the video
● Title of the video
● Description of the video (first 2 lines)
● Script of the video (subtitle and closed caption)
Note: It is not required to put the keyword in the video tags.
Methods to Identify Right Keywords
There are numerous techniques available to do keyword research, both free as well as paid. Here, we will discuss some of the options to find keywords for YouTube videos:
YouTube’s Search Bar
Go to YouTube’s search bar and enter the word or term of your interest. The autocomplete feature of YouTube will present the list of related keywords. These are the terms that people are searching for and you can use them in your future videos.
View Page Source
Look for a video that contains the terms that you wish to rank for. Load it on the desktop computer. Tap on “view source” by right-clicking on the page. The HTML code of the YouTube page will appear on your screen. Press CTRL + F, and enter the “Keywords” on the search bar. You will get the list of keywords for that particular video.
Tubebuddy
Tubebuddy is a browser extension that is available both for paid and free. It is useful for the optimization of YouTube videos.
02Optimize Video Titles
Optimization of YouTube video titles is very essential to get more clicks. There are 4 key elements that make a title effective. These 4 key elements are Urgency, Useful, Unique, and Ultra-specific. Use at least 3 among them to create an attractive and powerful title.
03Create a Compelling Description
The description of YouTube videos is the write-ups that details the content of your video. It contains the information that makes the viewer understand the content of your video. Creating a compelling description is easy, you just need to put the details.
04Transcribe Your Videos
Transcription is the process of converting video into text. It is very beneficial to include a transcript or subtitles in the video. According to the researchers, approximately 69% of viewers watch videos by muting them. They understand the video through the subtitles. You can add a transcript to the video both while and after uploading the video.
05Create Custom Thumbnails
Custom thumbnails are necessary to enhance the experience of the video. There are some steps that are required to follow to create a custom thumbnail. These steps are as follows:
● Capture an action-driven still image from the video
● Use a human face to express emotions
● Pique curiosity
● Add color contrast
● Brand your videos
Following these steps, you will be able to create interesting as well as captivating thumbnails.
06Use Pattern Interrupts
Watch time is an important factor to rank your videos on YouTube. The viewers should watch the video wholly, which means it should appeal to the audience throughout. Pattern interrupts are the perfect key for this purpose. It makes the viewers pause the video and pay more attention in between binge-watching. Pattern interrupt is just the method of introducing graphics, B-roll footage, full shot, close-up shot, etc in between the video.
07Include Call to Action
Call to action sounds like something which is not so important. But it plays a crucial role that triggers actions from the viewers. It should be added at the conclusion part of the video. There are many ways to ask the users to take calls to action, according to your particular aim. For example, you can ask them to like, share, subscribe, etc.
08Promote, promote, promote
Promotion is the most important step to getting your work noticed by the audience. Promote the video as much as possible. Some of the techniques for video promotion are:
● Cross-pollinate on social media
● Send to email subscribers
● Add videos to your website
09Engage Your Audience
To grow on YouTube as a brand, you must plan for the long term engagement of the viewers. Also, you can engage the audience by asking questions, answers and commenting on the comments. There are 3 quick tips that are essential to engage your viewers and they are:
● Dedicate time
● Always keep it positive
● Answer all questions
10Pay Attention to Your Analytics
YouTube analytics gives the overall information about the performance of your video or channel. The analytics show results based on Revenue, Audience, Engagement, and Reach. It will help you to understand where you need to invest your time for better performance.
Part 4 Ways to Improve Your Video Quality
The quality of a video has a great impact on its performance as well as user engagement. There are many tools available using which you can enhance the quality of your video. Some of the good video editing software options are Adobe Premiere Pro CC, PowerDirector, Studio, etc. But, Wondershare Filmora is the best of all the tools.
Wondershare Filmora Video Editor is an easy to use tool with lots of features that help to make your video look great. One can use it for free or buy a paid version. Its features such as saturation controls, tint, contrast, brightness, and stabilization help to enhance the video quality. The software also offers a lot of title templates, motion graphics, overlays, etc. Moreover, Filmora supports various video formats. You can export the video in an optimized format to post on YouTube.
For Win 7 or later (64-bit)
For macOS 10.12 or later
● Ending Thoughts →
● So, we have shared all the required information when it comes to YouTube and YouTube algorithm AI.
● You might get an idea of what you need to do to impress the AI of YouTube and appear on the user YouTube page.
● It is very easy to perform well and get success if you understand the working of AI correctly.
● Moreover, never compromise on the quality of the video as it is a vital factor.
● Wondershare Filmora is a handy tool that will enhance your video quality like a pro.
YouTube is a video sharing platform that is popular among people of all age groups. It was launched back in the year 2007 by 3 PayPal employees. Now, it has become the world’s largest search engine and visited websites after Google. It is the abode of the modern world that has something for everyone.
Per day, people spend approximately 1 billion hours watching videos on YouTube. At the same time, the users of YouTube upload approximately 300 hours of video per minute. But, do you know like Google, this video platform works on a technique known as the YouTube AI algorithm? The platform highly depends on these algorithms to deliver content to the viewers. As YouTube is overloaded with content, AI is a powerful weapon that helps to decide the video recommendation for the huge number of users. This recommendation system for YouTube works on certain factors.
In this article
01 [The Aim of YouTube’s Algorithm](#Part 1)
02 [How the YouTube Algorithm Works](#Part 2)
03 [Ways to Improve the Odds of Your Video = Ranking Well With the YouTube Algorithm](#Part 3)
04 [Ways to Improve Your Video Quality](#Part 4)
Part 1 The Aim of YouTube’s Algorithm
YouTube’s algorithms work with 2 major aims. Its first aim is helping the viewers easily get what they want to watch. The second aim of YouTube’s algorithm is to maximize the satisfaction rate of viewers which ultimately leads to long term engagement.
Part 2 How the YouTube Algorithm Works
YouTube has a well defined AI-based algorithm. The working of the YouTube algorithm AI depends on several factors. It decides the position of videos at 6 different places as per the viewer’s interest. These locations include:
Notifications, Channel subscriptions, Trending streams, YouTube’s homepage, Recommended streams, and Search results.
Let’s understand some more facts about the working of the YouTube algorithm.
01How YouTube Determines The Algorithm
The traffic source for each video might be different. But YouTube’s approach to determine the algorithm for video recommendation is decided by:
● External factors i.e. the overall audience or market
● Performance i.e. the success rate of video
● Personalization i.e. the history and preferences of viewers
02How YouTube Determines Its Homepage Algorithm
You might have found a large array of videos when you type Youtube.com or open the app. YouTube shows these videos thinking that person might be interested in watching any video from the list. The selection of these videos is based on performance and personalization. Performance is measured depending on the metrics such as viewer surveys, likes, dislikes, average percentage viewed, average view duration, and click-through rates. Personalization means the selection of videos based on the past behavior of the viewers.
03How YouTube Determines Its Suggested Video Algorithm
When a person watches any video on YouTube, they always find some video options to watch on the right side. These videos are decided by the suggested videos algorithm. Such videos are decided by AI based on the viewer’s interest in a particular visit. The recommendations for these videos are decided by the following:
● Performance
● Personalization
● Videos watched by the user in the past
● Topically related videos
● Videos that are often watched together
04How YouTube Determines Its Search Algorithm
Just like Google, YouTube is also a search engine. Its search algorithm works when a user comes to search for a particular video or keyword. When the viewer types something on the search bar, it decides the recommendation based on:
● Keywords used on the metadata of video
● Performance of the video
Part 3 Ways to Improve the Odds of Your Video = Ranking Well With the YouTube Algorithm
Algorithms work following the actions of the audience and the creator’s intelligence. If you are planning to do YouTube marketing or are struggling to get your video ranked or appear trending, then let us help you with it. Here, we will let you know about the ways to increase the views. These ways will increase the odds of your video ranking well with the YouTube algorithm. So, let’s understand what all you need to do:
01Keyword Research Is Important
YouTube decides the recommendations based on the user’s action. What they type to search for a particular video keyword plays a very important role. So, you need to understand your target audience and research the keyword that the target audience might be interested in.
The YouTube AI algorithm follows the metadata to decide the category of your video and the target audience. Use the language which the people are using while explaining your video to the AI.
Do proper keyword research and put the keywords in the following places:
● The filename of the video
● Title of the video
● Description of the video (first 2 lines)
● Script of the video (subtitle and closed caption)
Note: It is not required to put the keyword in the video tags.
Methods to Identify Right Keywords
There are numerous techniques available to do keyword research, both free as well as paid. Here, we will discuss some of the options to find keywords for YouTube videos:
YouTube’s Search Bar
Go to YouTube’s search bar and enter the word or term of your interest. The autocomplete feature of YouTube will present the list of related keywords. These are the terms that people are searching for and you can use them in your future videos.
View Page Source
Look for a video that contains the terms that you wish to rank for. Load it on the desktop computer. Tap on “view source” by right-clicking on the page. The HTML code of the YouTube page will appear on your screen. Press CTRL + F, and enter the “Keywords” on the search bar. You will get the list of keywords for that particular video.
Tubebuddy
Tubebuddy is a browser extension that is available both for paid and free. It is useful for the optimization of YouTube videos.
02Optimize Video Titles
Optimization of YouTube video titles is very essential to get more clicks. There are 4 key elements that make a title effective. These 4 key elements are Urgency, Useful, Unique, and Ultra-specific. Use at least 3 among them to create an attractive and powerful title.
03Create a Compelling Description
The description of YouTube videos is the write-ups that details the content of your video. It contains the information that makes the viewer understand the content of your video. Creating a compelling description is easy, you just need to put the details.
04Transcribe Your Videos
Transcription is the process of converting video into text. It is very beneficial to include a transcript or subtitles in the video. According to the researchers, approximately 69% of viewers watch videos by muting them. They understand the video through the subtitles. You can add a transcript to the video both while and after uploading the video.
05Create Custom Thumbnails
Custom thumbnails are necessary to enhance the experience of the video. There are some steps that are required to follow to create a custom thumbnail. These steps are as follows:
● Capture an action-driven still image from the video
● Use a human face to express emotions
● Pique curiosity
● Add color contrast
● Brand your videos
Following these steps, you will be able to create interesting as well as captivating thumbnails.
06Use Pattern Interrupts
Watch time is an important factor to rank your videos on YouTube. The viewers should watch the video wholly, which means it should appeal to the audience throughout. Pattern interrupts are the perfect key for this purpose. It makes the viewers pause the video and pay more attention in between binge-watching. Pattern interrupt is just the method of introducing graphics, B-roll footage, full shot, close-up shot, etc in between the video.
07Include Call to Action
Call to action sounds like something which is not so important. But it plays a crucial role that triggers actions from the viewers. It should be added at the conclusion part of the video. There are many ways to ask the users to take calls to action, according to your particular aim. For example, you can ask them to like, share, subscribe, etc.
08Promote, promote, promote
Promotion is the most important step to getting your work noticed by the audience. Promote the video as much as possible. Some of the techniques for video promotion are:
● Cross-pollinate on social media
● Send to email subscribers
● Add videos to your website
09Engage Your Audience
To grow on YouTube as a brand, you must plan for the long term engagement of the viewers. Also, you can engage the audience by asking questions, answers and commenting on the comments. There are 3 quick tips that are essential to engage your viewers and they are:
● Dedicate time
● Always keep it positive
● Answer all questions
10Pay Attention to Your Analytics
YouTube analytics gives the overall information about the performance of your video or channel. The analytics show results based on Revenue, Audience, Engagement, and Reach. It will help you to understand where you need to invest your time for better performance.
Part 4 Ways to Improve Your Video Quality
The quality of a video has a great impact on its performance as well as user engagement. There are many tools available using which you can enhance the quality of your video. Some of the good video editing software options are Adobe Premiere Pro CC, PowerDirector, Studio, etc. But, Wondershare Filmora is the best of all the tools.
Wondershare Filmora Video Editor is an easy to use tool with lots of features that help to make your video look great. One can use it for free or buy a paid version. Its features such as saturation controls, tint, contrast, brightness, and stabilization help to enhance the video quality. The software also offers a lot of title templates, motion graphics, overlays, etc. Moreover, Filmora supports various video formats. You can export the video in an optimized format to post on YouTube.
For Win 7 or later (64-bit)
For macOS 10.12 or later
● Ending Thoughts →
● So, we have shared all the required information when it comes to YouTube and YouTube algorithm AI.
● You might get an idea of what you need to do to impress the AI of YouTube and appear on the user YouTube page.
● It is very easy to perform well and get success if you understand the working of AI correctly.
● Moreover, never compromise on the quality of the video as it is a vital factor.
● Wondershare Filmora is a handy tool that will enhance your video quality like a pro.
Add Green Screen Effects in Final Cut Pro
No matter the type of video you are shooting, the background of the video plays a major play. The background determines how eye-pleasing the frame of the entire video looks. A beautiful background enhances the video content while a distracting background can deteriorate the video outlook. You do not need to be in exotic locations or have eye-catching backgrounds in reality while shooting a video thanks to the use of the green screen effect.
Once you shoot a video with green screen background, you can replace the green screen with anything you want. You will need a video editor to replace the green screen, and Final Cut Pro is the most widely used video editor among Mac Users. We will illustrate how to add green screen in Final Cut Pro and get any background for your recorded video. We will also recommend an alternative watt to add green screen effect to your video.
Part 1. How to add green screen on Final Cut Pro
Final Cut Pro is the most popular professional video editor among Mac users. The learning curve is slightly steep, but once you get used to Final Cut Pro, you can take your recorded video to the next level with profound editing. The most important part of adding green screen effect to a video is shooting the video with a proper green screen in the background. Once you have successfully recorded your video, here are the steps on how to add background to green screen Final Cut Pro.
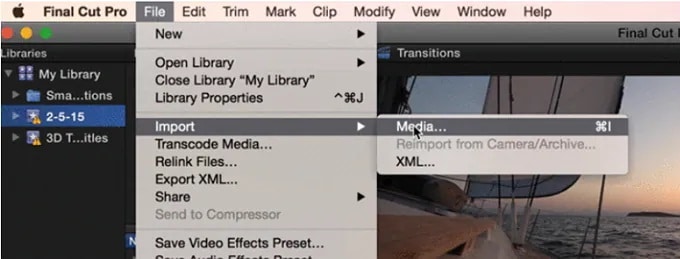
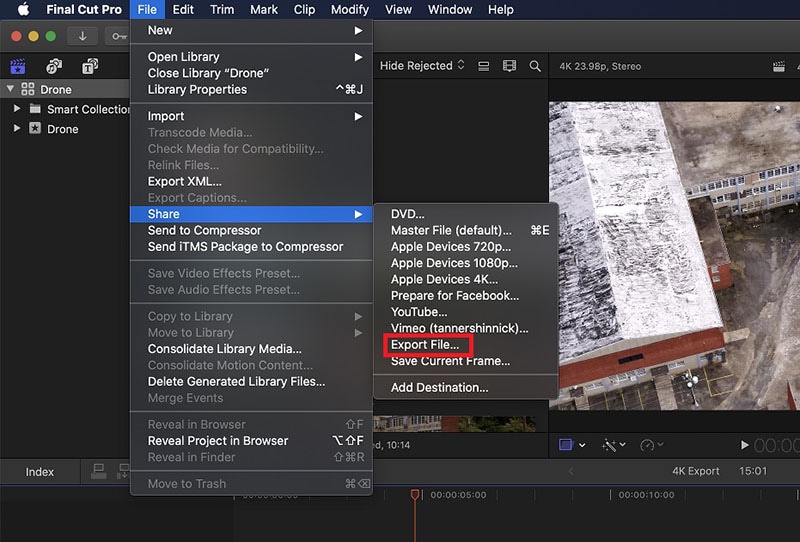
Step1 Launch Final Cut Pro and go to File> Import> Media. Select the video file with green screen background from your storage to import the file into FCP. Similarly, you should import the video or photo with which you want to replace the green screen.
Step2 Drag the video clip with green screen background (called foreground clip) to Timeline and place it to Primary Storyline. Drag the replacement video (called background clip) below the foreground clip in Timeline.
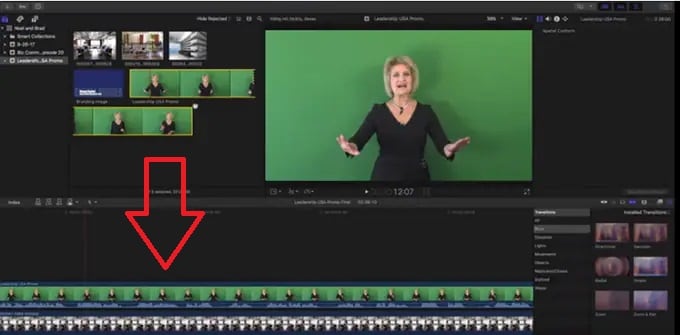
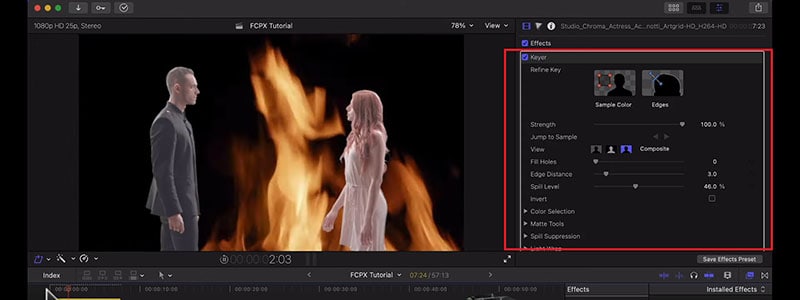
Step3 Select the foreground clip and click on Effects button present at the extreme top-right corner of the Timeline.
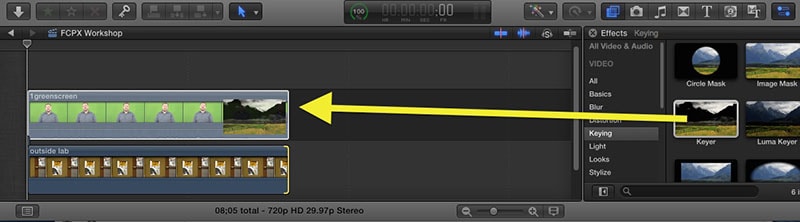
Step4 From the Effects options, select Keyer effect. If you cannot spot it immediately, you can search for it from the search field.
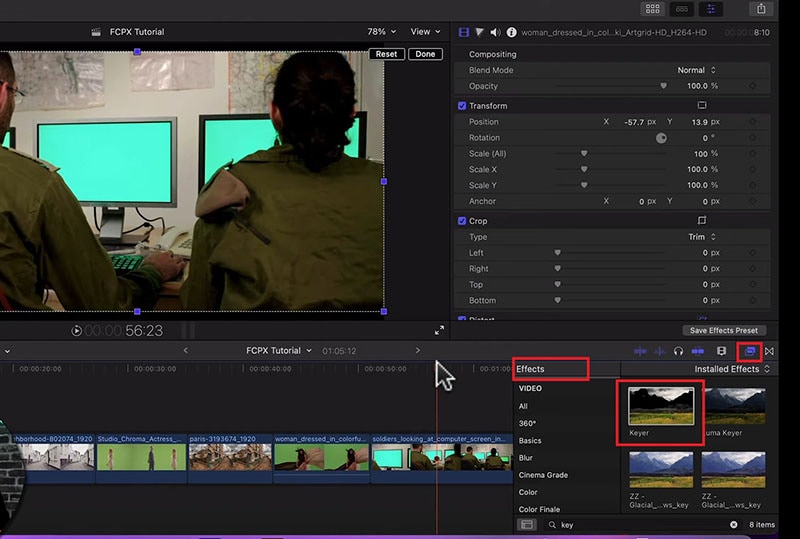
Step5 Drag and drop Keyer effect to the foreground clip. The effect detects the green screen and replaces it with the available background clip.
Step6 You might have to adjust the Keyer effect settings to get the green screen effect perfectly. Go to Inspector Window and click on Sample color and fine-tune the available settings to get it correct.
Step7 Once you are satisfied with the effect, go to File> Share> Export File and save the modified video.
Part 2. Alternative Way to Add Green Screen to Videos
Final Cut Pro is a professional but highly expensive video editor. The learning curve is not very suitable for amateur video editors. That is why if you are looking for a better alternative way to add green screen to videos, we recommend Wondershare Filmora . Filmora is a popular video editor that is available for Mac and Windows users. The user interface is extremely intuitive, and adding green screen effect is super easy. Here are the steps on how to add background to green screen effect.
Free Download For Win 7 or later(64-bit)
Free Download For macOS 10.14 or later
Step1 Download and install Filmora on your computer. Launch Filmora and click on New Projects.
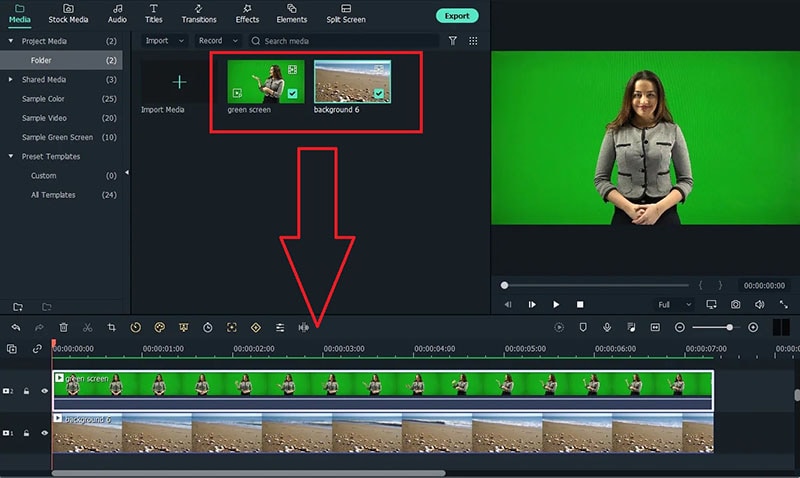
Step2 Under Project Media folder, Drag and drop the video clip with green screen background as well as the photo or video with which you want to replace the green screen.
Step3 Drag and drop the video clips on the Timeline. The video with green screen should be at the top while the replacement video or photo should be below it.
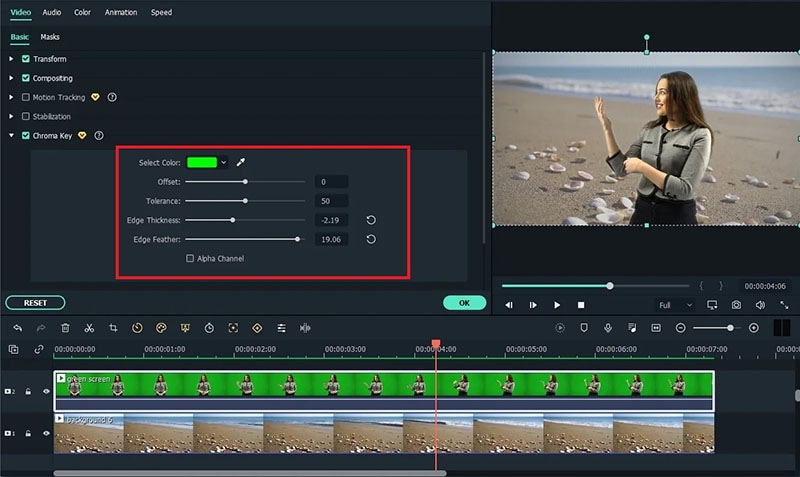
Step4 Double-click on the green screen video clip on Timeline. Go to Video>Basic and turn on Chroma key option.
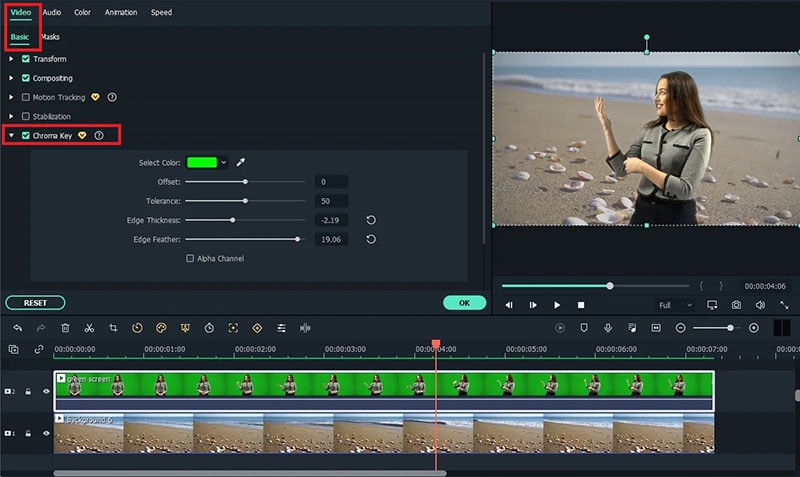
Step5 Adjust the different parameters such as offset to get the effect perfect and click on Ok button.
Step6 Play the video and if you are satisfied with the result, click on Export button to save the modified video file.
Part 3. Green Screen Video Tips to Use
We have already stated that replacing green screen in your video with an eye-catching background is the easiest part. On the contrary, shooting the green screen video is the most important part. If you shoot the video perfectly, replacing the background accurately in the video editor becomes super easy. Here are some important tips to use while shooting green screen video.
Distance – There should be enough distance between the subject and the green screen background so that the subject does not cast a shadow on the green screen. This distance is also important to place lights in between so that the green screen is perfectly lit for a great video shooting session.
Quality – You should opt for a high-quality green screen cloth for the background. This means the green screen should have a solid color instead of light and dark patches here and there. Besides, you should ensure that there are no wrinkles on the green screen.
Otherwise, when you will apply green screen effect through the video editor, the transformation will be uneven. You have to spend a lot of time adjusting the parameters to cover up uneven patches in the background.
Lighting – The way you set up your lights plays a major role in shooting green screen video perfectly. The light falling on the green screen will light up the screen evenly so that there are no light and dark patches. Transforming the green screen in the video editor will become that much easier.
You should focus on soft and even lighting for the entire green screen, and you should check through your camera to ensure the lighting is perfect. Sometimes, you can place lights behind the subject if the subject is staying stationary throughout the video. Otherwise, you can place the light above the subject for even distribution.
Aperture – The settings of your camera are equally important to smoothen out the green screen in the background and focus on the subject sharply. That is where aperture comes into the scene, and you need to use low aperture while shooting green screen videos. Low aperture opens up the camera lens, and the green screen turns softer in the background. The subject stands out while the background turns uniformly green.
Shutter Speed – While shooting a green screen video, you should keep a high shutter speed to prevent motion blur and uneven background. If the subject stays fixed throughout, the shutter speed should be double the frame rate. If the subject is moving throughout, the shutter speed should be around 4 times the frame rate such as 1/100.
ISO – The last thing you want in a green screen video is grainy footage. Your life will turn upside down editing the video and getting the green screen effect perfectly in any video editor. ISO determines the sensitivity and thereby, the grainy effect in your video. When the ISO is too high, the chance of getting grains in the video is high. It is better to use a native ISO for green screen effect, but you need to check with a sample recording and adjust if required.
Conclusion
We have answered how to add background to green screen Final Cut Pro. You can replace any green screen in your video with any video or photo for the background of the video. If you do not have Final Cut Pro or you find the steps slightly complicated, we recommend you to use Wondershare Filmora for instant green screen effect and quick adjustments for the best outcome.
Free Download For macOS 10.14 or later
Step1 Download and install Filmora on your computer. Launch Filmora and click on New Projects.
Step2 Under Project Media folder, Drag and drop the video clip with green screen background as well as the photo or video with which you want to replace the green screen.
Step3 Drag and drop the video clips on the Timeline. The video with green screen should be at the top while the replacement video or photo should be below it.
Step4 Double-click on the green screen video clip on Timeline. Go to Video>Basic and turn on Chroma key option.
Step5 Adjust the different parameters such as offset to get the effect perfect and click on Ok button.
Step6 Play the video and if you are satisfied with the result, click on Export button to save the modified video file.
Part 3. Green Screen Video Tips to Use
We have already stated that replacing green screen in your video with an eye-catching background is the easiest part. On the contrary, shooting the green screen video is the most important part. If you shoot the video perfectly, replacing the background accurately in the video editor becomes super easy. Here are some important tips to use while shooting green screen video.
Distance – There should be enough distance between the subject and the green screen background so that the subject does not cast a shadow on the green screen. This distance is also important to place lights in between so that the green screen is perfectly lit for a great video shooting session.
Quality – You should opt for a high-quality green screen cloth for the background. This means the green screen should have a solid color instead of light and dark patches here and there. Besides, you should ensure that there are no wrinkles on the green screen.
Otherwise, when you will apply green screen effect through the video editor, the transformation will be uneven. You have to spend a lot of time adjusting the parameters to cover up uneven patches in the background.
Lighting – The way you set up your lights plays a major role in shooting green screen video perfectly. The light falling on the green screen will light up the screen evenly so that there are no light and dark patches. Transforming the green screen in the video editor will become that much easier.
You should focus on soft and even lighting for the entire green screen, and you should check through your camera to ensure the lighting is perfect. Sometimes, you can place lights behind the subject if the subject is staying stationary throughout the video. Otherwise, you can place the light above the subject for even distribution.
Aperture – The settings of your camera are equally important to smoothen out the green screen in the background and focus on the subject sharply. That is where aperture comes into the scene, and you need to use low aperture while shooting green screen videos. Low aperture opens up the camera lens, and the green screen turns softer in the background. The subject stands out while the background turns uniformly green.
Shutter Speed – While shooting a green screen video, you should keep a high shutter speed to prevent motion blur and uneven background. If the subject stays fixed throughout, the shutter speed should be double the frame rate. If the subject is moving throughout, the shutter speed should be around 4 times the frame rate such as 1/100.
ISO – The last thing you want in a green screen video is grainy footage. Your life will turn upside down editing the video and getting the green screen effect perfectly in any video editor. ISO determines the sensitivity and thereby, the grainy effect in your video. When the ISO is too high, the chance of getting grains in the video is high. It is better to use a native ISO for green screen effect, but you need to check with a sample recording and adjust if required.
Conclusion
We have answered how to add background to green screen Final Cut Pro. You can replace any green screen in your video with any video or photo for the background of the video. If you do not have Final Cut Pro or you find the steps slightly complicated, we recommend you to use Wondershare Filmora for instant green screen effect and quick adjustments for the best outcome.
How to Customize Your Loading Text Effect?
Wondershare Filmora is all you need when it is to professional and creative video editing. The tool is equipped with multiple effects to optimize video editing based on your immediate needs. Using these effects is essential to grand and hold the attention of the audience easily.
Out of all the video effects available in Wondershare Filmora, the loading text effect can be a game changer for keeping your audience engaged. It will reduce the chances of the viewer’s churn and ensure that you offer them something amazing in every part of the video. The best part here is that Wondershare Filmora allows quick customization of this loading text effect.
Let us go through the detailed steps to customize the loading text effect in Wondershare Filmora for your next project. Not to miss is that the customized text effects can be quickly accessed from the “Text Edit” panel or “Advanced Text Edit” panel for future reference.
Step1Download, install, and launch Wondershare Filmora
Free Download For Win 7 or later(64-bit)
Free Download For macOS 10.14 or later
The first step to start creating impressive videos using Wondershare Filmora is to download this amazing tool on your Mac or Windows system. It is recommended to go for a quick download and install from the official website of Wondershare Filmora only. The detailed steps for completing this are:
- Open the official website https://filmora.wondershare.com/video-editor/ of the Wondershare Filmora in your Windows or Mac browser.
- Go to the “Download” option located in the top right corner of the web page. Click on it to start downloading the Wondershare Filmora installer.
- Once the download is complete, double-click on it, and accept the terms and conditions. The Wondershare Filmora installer will start running and complete the installation process in a couple of seconds only.
- Once the installation is complete, Wondershare Filmora will get opened on your system for quick use.

Step2Go to the Titles option
Once Wondershare Filmora is running on your system, it is time to take the first step for customizing the loading text effect. It starts with the titles option where you can select the font of your choice and manage the text spacing. The quick steps for the same are:
- Start by dropping the default title on track 1.
- Keep the title up to 17 seconds long.
- Double-click on the default title to open the font selection.
- Select the font of your choice from the available options of the numerous fonts.
- It is easy to change the text loading here.
- You can increase the text spacing by 15 and then click the ok to close the Titles option.

Step3Go to the My Media option
Now move to the My Media option to add color to the loading text. Here, the blending mode required is also selected. The quick steps to follow in the My Media option are:
- Open the My Media option and select the red color under the sample color option.
- Drop red color on track 2.
- Double-click on the red color and go to the video option.
- Open the composting option in the video and select the blending mode.
- Change the blending mode to multiply.

Step4Using the Crop tool
The next step is to move to the crop tool. You have to select the red color ratio and position. The steps for using the crop tool are:
- Go to the crop tool and select the custom option under the “Ratio” section.
- Crop red color in the ratio of 80 * 1080.
- Go to the “Basics” menu located upside to define its position on the left side edge.
- End the process by placing the playhead at the starting point.

Step5Using Animations option
After the crop tool, it is time to use the animations option to create a loading text effect. You will be placing the keyframes and arranging the playheads in this section. The quick steps for the same are:
- Add a keyframe to the track and place the playhead to 20 frames further.
- Start by defining the x-axis position of the red color on the third dot of the “Loading …” text.
- Now, copy the red color and paste it on the blank space on track two.
- Next, click on the second keyframe and shift the pasted red color clip on track three to the playhead position.
- It is time for the third clip now. Click on the second keyframe on the track three clip and define its x-axis position on the second dot of the “Loading …” text.
- Repeat for track three copying the red color clip and pasting it on the blank space.
- Click again on the second keyframe on the track three clip and shift the pasted clip to the playhead position.
- Now, click on the second keyframe of the track four clip and define its x-axis on the first dot of the loading text.
- You have to repeat the same process until you will the whole “Loading…” text with red color.

Step6Extending the clip durations
After getting the red color in all the loading text, it is time to make the clips in uniformity. All you need to do is extend the clip duration, cut them in uniformity, and place playheads and keyframes accordingly. The detailed steps for the same are:
- Start by extending every red color clip duration to 17 seconds.
- Place the playhead at the 14 seconds position and cut all the clips.
- Delete the extra part left after cutting the clips.
- Keep track 1 and copy and paste the text on it. Keep the length at 2 seconds only. Leave the rest of the clip part.
- Start by dropping the red color on track 2 and keep it for 2 seconds duration.
- Now double-click on the red color and change the “Blending Mode” to multiply.
- Put the playhead at 14 seconds and add a blank keyframe at the 15th
- Now put the playhead at the 15 seconds at the 10th frame. Here, define the x-axis position by dragging it from the left to right out of the loading text.

Step7Selecting render preview
The last step but most important is to go for the render preview option. It offers a fast and quick review of the created video file to incorporate any last-minute changes. The quick steps for the same are:
- Click on the render preview button to see the final preview
- It will take a few seconds to prepare the rendering frame and will show the preview of the file.

Wrapping Up
Hope everything is clear to you about customizing the loading text effect in Wondershare Filmora. All you need to do is download this amazing video editing software on your Windows and Mac and start using it instantly. It has an easy-to-use interface which is liked by beginners and professionals in video creation like the same.
Wondershare Filmora users can easily start adding customized loading text effects to their videos by accessing the titles menu. Once the font size of the text and other specifications are selected here, you can quickly move to the My Media section to select the color. The next step is to use the crop tool and animations option to bring the red color loading text effect to your video.
Once done with all the steps, it is time to cut the clips and go for the render preview option. Hence, your professional-grade video having the loading text effect is ready. Go for downloading Wondershare Filmora today for creating some exclusive masterpieces.
Free Download For macOS 10.14 or later
The first step to start creating impressive videos using Wondershare Filmora is to download this amazing tool on your Mac or Windows system. It is recommended to go for a quick download and install from the official website of Wondershare Filmora only. The detailed steps for completing this are:
- Open the official website https://filmora.wondershare.com/video-editor/ of the Wondershare Filmora in your Windows or Mac browser.
- Go to the “Download” option located in the top right corner of the web page. Click on it to start downloading the Wondershare Filmora installer.
- Once the download is complete, double-click on it, and accept the terms and conditions. The Wondershare Filmora installer will start running and complete the installation process in a couple of seconds only.
- Once the installation is complete, Wondershare Filmora will get opened on your system for quick use.
Step2Go to the Titles option
Once Wondershare Filmora is running on your system, it is time to take the first step for customizing the loading text effect. It starts with the titles option where you can select the font of your choice and manage the text spacing. The quick steps for the same are:
- Start by dropping the default title on track 1.
- Keep the title up to 17 seconds long.
- Double-click on the default title to open the font selection.
- Select the font of your choice from the available options of the numerous fonts.
- It is easy to change the text loading here.
- You can increase the text spacing by 15 and then click the ok to close the Titles option.
Step3Go to the My Media option
Now move to the My Media option to add color to the loading text. Here, the blending mode required is also selected. The quick steps to follow in the My Media option are:
- Open the My Media option and select the red color under the sample color option.
- Drop red color on track 2.
- Double-click on the red color and go to the video option.
- Open the composting option in the video and select the blending mode.
- Change the blending mode to multiply.
Step4Using the Crop tool
The next step is to move to the crop tool. You have to select the red color ratio and position. The steps for using the crop tool are:
- Go to the crop tool and select the custom option under the “Ratio” section.
- Crop red color in the ratio of 80 * 1080.
- Go to the “Basics” menu located upside to define its position on the left side edge.
- End the process by placing the playhead at the starting point.
Step5Using Animations option
After the crop tool, it is time to use the animations option to create a loading text effect. You will be placing the keyframes and arranging the playheads in this section. The quick steps for the same are:
- Add a keyframe to the track and place the playhead to 20 frames further.
- Start by defining the x-axis position of the red color on the third dot of the “Loading …” text.
- Now, copy the red color and paste it on the blank space on track two.
- Next, click on the second keyframe and shift the pasted red color clip on track three to the playhead position.
- It is time for the third clip now. Click on the second keyframe on the track three clip and define its x-axis position on the second dot of the “Loading …” text.
- Repeat for track three copying the red color clip and pasting it on the blank space.
- Click again on the second keyframe on the track three clip and shift the pasted clip to the playhead position.
- Now, click on the second keyframe of the track four clip and define its x-axis on the first dot of the loading text.
- You have to repeat the same process until you will the whole “Loading…” text with red color.
Step6Extending the clip durations
After getting the red color in all the loading text, it is time to make the clips in uniformity. All you need to do is extend the clip duration, cut them in uniformity, and place playheads and keyframes accordingly. The detailed steps for the same are:
- Start by extending every red color clip duration to 17 seconds.
- Place the playhead at the 14 seconds position and cut all the clips.
- Delete the extra part left after cutting the clips.
- Keep track 1 and copy and paste the text on it. Keep the length at 2 seconds only. Leave the rest of the clip part.
- Start by dropping the red color on track 2 and keep it for 2 seconds duration.
- Now double-click on the red color and change the “Blending Mode” to multiply.
- Put the playhead at 14 seconds and add a blank keyframe at the 15th
- Now put the playhead at the 15 seconds at the 10th frame. Here, define the x-axis position by dragging it from the left to right out of the loading text.
Step7Selecting render preview
The last step but most important is to go for the render preview option. It offers a fast and quick review of the created video file to incorporate any last-minute changes. The quick steps for the same are:
- Click on the render preview button to see the final preview
- It will take a few seconds to prepare the rendering frame and will show the preview of the file.
Wrapping Up
Hope everything is clear to you about customizing the loading text effect in Wondershare Filmora. All you need to do is download this amazing video editing software on your Windows and Mac and start using it instantly. It has an easy-to-use interface which is liked by beginners and professionals in video creation like the same.
Wondershare Filmora users can easily start adding customized loading text effects to their videos by accessing the titles menu. Once the font size of the text and other specifications are selected here, you can quickly move to the My Media section to select the color. The next step is to use the crop tool and animations option to bring the red color loading text effect to your video.
Once done with all the steps, it is time to cut the clips and go for the render preview option. Hence, your professional-grade video having the loading text effect is ready. Go for downloading Wondershare Filmora today for creating some exclusive masterpieces.
Also read:
- How To Remove Audio From Video
- New 2024 Approved How to Resize FLV Videos Efficiently Windows, Mac,Android, iPhone & Online
- How to Make a Slideshow with Movavi Slideshow Maker
- New How to Change the Speed of Video in DaVinci Resolve, In 2024
- In 2024, Updated 8 Ways to Merge SRT with MP4
- New 20 Best LUTs for Music Videos for 2024
- New How to Create and Add an Adjustment Layer in Final Cut Pro for 2024
- How to Make A Funny Vlog for TikTok, In 2024
- How to Convert SRT to DOCX
- New In 2024, 9 Best Sparkle Effects Photo and Video Editors You Should Know
- How to Create Photoshop GIF The Easy Way for 2024
- Updated In 2024, Best MOV to GIF Converters
- New In 2024, Color Lut in Video - Color Grade Your Video
- Updated 2024 Approved Full Guide to Discord Boost
- Best Movie Title Maker for 2024
- New In 2024, Vintage Film Effect 1920S - How to Make
- New 2024 Approved 10 Apps to Make Videos with Pictures and Music
- Updated How to Create Educational Teaching Videos in An Outstanding Way?
- New In 2024, 6 Top Online MP4 Croppers
- Updated Add Green Screen Effects in Final Cut Pro
- Updated 2024 Approved Create Promotional Video
- Updated In 2024, Easy Way to Add Effects to Art Video
- Updated 2024 Approved Top Free Video Editing Software Enhance Your Content with These Essential Tools
- New Top 5 Tools to Help You Know More Freeze-Frame Video Editing Skills
- In 2024, A Guide to Color Grade Your Picture in LightRoom
- Updated Want to Find some Creative, Entertaining Ways to Preserve Precious Memories& Pass Them On-To Upcoming Generations? Well, Surely You Can Do It
- Updated How To Quick Guide for Making Google Slideshows for 2024
- New Discord Is Becoming More Popular with Time with Millions of Users. Are You Thinking of Getting a GIF for Discord Profile? If Yes, Learn From This Piece Since We Have a Conclusive Summary of Getting a GIF Profile Picture for Discord
- In 2024, Do You Know About some Efficient Slow-Motion Video Editors? Read This Article to Find Out the Best Slow-Motion Video Editing Tools that You Can Try
- New In 2024, 3 In-Camera Transitions Tricks To Make Videos Like a Pro
- 2024 Approved How to Make Subtitle Videos
- Learn How to Make Modern TikTok Velocity Dance Videos in Filmora Just Like the Ones You See on TikTok and Instagram Reels for 2024
- Updated How to Create a Clideo Slideshow Simply for 2024
- 2024 Approved Create the Night-to-Day Effect Videos
- 2024 Approved Best 8 Augmented Reality Video Games
- Top 10 Transparent Image Online Tools That Help You A Lot
- New 2024 Approved How to Make Loop Video in PowerPoint
- New 2024 Approved Best 5 GIF to Video Converters You Cant-Miss
- New Follow a Few Simple Steps and Learn How to Create a Professional Glowing Edge Effect to Your Videos in Filmora
- Mask Tracking Is Believed to Be a Helpful Procedure for Marking Proper Areas in Videos. Learn How to Perform Premiere Pro Mask Tracking in This Guide
- Updated 2024 Approved Top 10 Fun Discord Bots You Need
- New Exploring the Top Professional Tools to Perform Mask Tracking for 2024
- Updated Getting To Know More About the Video Editing Interface of Wondershare Filmora for 2024
- New How To Create a Polaroid Collage?
- New Splice Video Editor Online - Get Your Videos Splice Easily
- Updated 2024 Approved Create Amazing Slow-Motion Videos 8 Affordable Slow-Motion Cameras
- How to Combine Videos Into One on Instagram
- In 2024, How to Bypass iCloud Lock from iPhone 8
- How To Bypass iCloud By Checkra1n Even From iPhone 12 Pro If Youve Tried Everything
- In 2024, How to Come up With the Best Pokemon Team On Apple iPhone 14 Pro Max? | Dr.fone
- How To Repair System Issues of Apple iPhone 15 Pro Max? | Dr.fone
- How to Fix Life360 Shows Wrong Location On Honor 90 Lite? | Dr.fone
- How To Transfer Data From Apple iPhone 13 Pro Max To Other iPhone 15 devices? | Dr.fone
- Possible solutions to restore deleted pictures from Infinix Hot 40 Pro.
- Turn Off Screen Lock - Itel
- Hard Reset Tecno Spark 10 Pro in 3 Efficient Ways | Dr.fone
- Why does the pokemon go battle league not available On Tecno Pop 8 | Dr.fone
- How to Successfully Bypass iCloud Activation Lock from Apple iPhone 12 mini
- Reliable User Guide to Fix Tecno Pova 5 Running Slow and Freezing | Dr.fone
- Solutions to Spy on Asus ROG Phone 7 with and without jailbreak | Dr.fone
- How to Use Phone Clone to Migrate Your Tecno Spark 20 Pro Data? | Dr.fone
- Top 15 Augmented Reality Games Like Pokémon GO To Play On Motorola Moto G13 | Dr.fone
- Everything You Need To Know About Unlocked Apple iPhone 12
- A Comprehensive Guide to Mastering iPogo for Pokémon GO On Apple iPhone XS Max | Dr.fone
- In 2024, Best 3 Xiaomi 13T Emulator for Mac to Run Your Wanted Android Apps | Dr.fone
- In 2024, 8 Best Apps for Screen Mirroring Motorola Moto G13 PC | Dr.fone
- In 2024, Best 3 Software to Transfer Files to/from Your Xiaomi Redmi Note 13 Pro 5G via a USB Cable | Dr.fone
- 9 Quick Fixes to Unfortunately TouchWiz has stopped Of Sony Xperia 1 V | Dr.fone
- Apply These Techniques to Improve How to Detect Fake GPS Location On Lava Blaze 2 Pro | Dr.fone
- How to Transfer Photos From Lava Yuva 2 Pro to Samsung Galaxy S21 Ultra | Dr.fone
- How to Use Google Assistant on Your Lock Screen Of Oppo A38 Phone
- In 2024, How to Intercept Text Messages on Motorola Moto G34 5G | Dr.fone
- Complete Guide to Hard Reset Your Poco C51 | Dr.fone
- Guide to Mirror Your Itel P55T to Other Android devices | Dr.fone
- Unlocking Apple iPhone 7 Plus Passcode without a Computer
- Why Your WhatsApp Location is Not Updating and How to Fix On Motorola Edge 40 | Dr.fone
- How to Mirror Your Oppo Find X6 Pro Screen to PC with Chromecast | Dr.fone
- The Complete Guide to Samsung Galaxy S24 Ultra FRP Bypass Everything You Need to Know
- In 2024, How Can We Bypass Vivo Y78+ FRP?
- How to Fix Life360 Shows Wrong Location On Honor 90 Pro? | Dr.fone
- How to restore wiped messages on Tecno Spark Go (2024)
- How To Fix Unresponsive Touch Screen on Vivo X100 Pro | Dr.fone
- 5 Hassle-Free Solutions to Fake Location on Find My Friends Of Xiaomi Redmi Note 13 Pro+ 5G | Dr.fone
- 3 Ways for Android Pokemon Go Spoofing On Oppo A59 5G | Dr.fone
- Android Unlock Code Sim Unlock Your Samsung Galaxy A54 5G Phone and Remove Locked Screen
- Title: Top 5 AI Music Video Examples and Makers to Make Them for 2024
- Author: Chloe
- Created at : 2024-04-24 07:08:15
- Updated at : 2024-04-25 07:08:15
- Link: https://ai-editing-video.techidaily.com/top-5-ai-music-video-examples-and-makers-to-make-them-for-2024/
- License: This work is licensed under CC BY-NC-SA 4.0.
