:max_bytes(150000):strip_icc():format(webp)/GettyImages-475157855-5b24021b04d1cf00369d7e11-5c66f1c04cedfd00010a2553.jpg)
Top Fixes to Resolve Issues with Premiere Pro Slow Playback

Top Fixes to Resolve Issues with Premiere Pro Slow Playback
Video editors are massively relying on Adobe Premiere Pro for their professional projects. This tool ensures workflow in video production and relieves several complex editing tasks. Unfortunately, it does have some errors, like Premiere Pro playback slow, which users refer to as patience-testing. Apart from being the most stable video editor, Premiere Pro consumes many resources.
Due to this, users encounter Premiere playback issues during video editing. If your choppy playback and unexpected freeze have annoyed you, keep reading this article. Here, you will find the best 8 solutions to instantly fix Premiere Pro’s slow playback. Plus, there will be an alternative that you can consider for error-free video editing.
Slow Motion Video Maker Slow your video’s speed with better control of your keyframes to create unique cinematic effects!
Make A Slow Motion Video Make A Slow Motion Video More Features

Part 1: What Does a Video with a Slow Playback Mean?
Premiere Pro Playback Slow is a common issue faced by editors these days. It refers to playback slowness and choppiness of a fresh or edited video. Many users report a complete blackout in video footage during the playback. Lagging in playback might result from insufficient RAM or inadequate storage space. Maybe an outdated GPU, heavy video effects, or active background programs cause it.
Such playback lagging can prove incredibly frustrating or test your patience beyond limits. It can desync the audio and video components of files during the playback. You can consider it a sign that your computer does not have the right specs for Adobe Premiere Pro . Also, it could mean that this tool is dropping frames in the Playback of videos.
Part 2: Fixing the Premiere Pro Slow Playback Issue [100% Effective Solutions]
If your Premiere Pro is not smoothly playing the videos, this section is for you. Firstly, you should confirm that your playback is lagging or slowing down. To do so, analyze whether your playhead is making small jumps or playing smoothly. There are plenty of things that you can do to reduce or minimize the Premiere playback slow.
- Solution 1: Disable High-Quality Playback
- Solution 2: Delete Media Cache Files
- Solution 3: Optimize Rendering for Performance
- Solution 4: Close Unnecessary Applications
- Solution 5: Turn on GPU Acceleration
- Solution 6: Change Playback Resolution
- Solution 7: Use Proxy Videos in Adobe
- Solution 8: Mute FX Effects
Solution 1: Disable High-Quality Playback
Adobe Premiere Pro enables a High-Quality playback option by default. It helps in watching videos clearly but causes trouble. Thus, turning it off can fix the playback lagging. Tap on the “Settings” icon, which is next to the playback resolution menu. From there, disable the “High-Quality Playback” option by selecting it.

Solution 2: Delete Media Cache Files
In Premiere Pro, the Media cache is a temporary storage space that keeps copies of files. It allows you to access the files faster and cause a good playback. If these media caches use hefty hard disk space, then to enhance playback performance.
To do so, open the Premiere Pro and go to the “Preferences” menu. From the list, select “Media Cache.” Now browse to select the media and tap on the “Delete Unused” next to the “Delete Unused Media Cache Files. After choosing the option to delete cache files, click on “OK and the files will be removed.

Solution 3: Optimize Rendering for Performance
If Premiere Pro slow playback still exists, then use this method to fix it. Set the optimized rendering to fix the performance of playback. Press the “Edit” option from the top toolbar and choose the “Preferences.” Then, navigate toward “Memory” and find a pop-up window. From that screen, click on “Memory” dropdown and pick “Performance.” Finally, tap on “OK” and get a better playback.

Solution 4: Close Unnecessary Applications
Sometimes, lagging in playback occurs when you work on multiple applications. The system gets burdened and might slow down every process at that time. For a quick and effective solution, you should close the other tabs immediately. Only Adobe Premiere Pro and your file manager can remain open for continuous playback.

Solution 5: Turn on GPU Acceleration
There is another fix you can try to overcome Premiere Pro playback slow. Without any delay, ensure that the Render is set to GPU Acceleration. Simply go to the “File” option at the top toolbar and click on the “Project Settings.” Then, pick “General” and set it to “Mercury Playback Engine GPU Acceleration.” This option is under the Playback Section and Video Render.

Solution 6: Change Playback Resolution
Due to the higher resolution of videos, playback lagging occurs. It has a quick solution: changing the playback resolution to a lower rate. For this purpose, go to “Settings” at the top right and choose the “Dynamic Quality” option. Select a lower resolution, like 1:2 or lower. You should look for options that can reduce resolution from the original resolution of the clip.

Solution 7: Use Proxy Videos in Adobe
Proxy videos are proxy files that are compressed versions of original projects. They help users edit heavy and lengthy videos with any Premiere Playback slow. In your project panel, select your video and right-click on it. From the list, choose “Proxy” and explore “Create Proxies.”
Now, pick the “Codec” option from another window and tap “QuickTime.” Specify a location for proxies and try to keep them in a new folder with the original media. Lastly, click “OK,” and Adobe Media Encoder will instantly produce video proxies.

Solution 8: Mute FX Effects
The working size of video files gets increased with visual and audio effects. If your videos are still lagging in playbacks, then head to mute those effects to fix this issue. From the playback toolbar, choose the “fx” button. Alternatively, click on the “+” icon at the top right side of Program Monitor. Drag it to the button panel and press the “fx” button to toggle it “Off.”

Part 3: Make the Slow-Motion Video Making Easy with Wondershare Filmora
Apart from Premiere Pro’s slow playback, it’s a difficult tool to work with. Even professional video editors face several challenges and look for fix guides. As an effective solution, Wondershare Filmora is a good option for all users. It is a great video editor with AI-integrated features. Non-tech persons can even maintain smooth editing with Filmora’s AI assistant.
This software equips you with a complete video editing suit. Using any feature, you will not face laggings during the editing process. Many editors want to add slow motion or speed ramping in their videos to embrace creativity. They can freely use Filmora without fearing system crashes or playback slowing down.
Step-by-Step Guide to Perform Slow Motion Effect with Optical Flow
Without any playback, slow down and enjoy slow-motion effects in your videos. To add such an effect with optical flow, you can follow the steps below.
Free Download For Win 7 or later(64-bit)
Free Download For macOS 10.14 or later
Step 1Import Project in the Timeline Section
Successfully install Filmora and head to its main interface. Start working on your project by tapping “New Project” and importing the file into the timeline. You can press the “Ctrl + I” keys, browse the project to import, and drag it into the timeline.

Step 2Slow Down Video with the Optical Flow Option
Right-click on your clip and pick “Speed Ramping” from the list. Now, choose the “Customize” option and move below to edit it. Hold the dots and adjust their location to change the video speed. You can select Montage and Jumper effects to change the speed of clips.
Now, scroll down and find “AI Frame Interpolation.” Click on the downward icon and tap “Optical Flow” for slow but high-quality video.

Step 3Export After Finalizing
After making edits, look for the “Export” option at the top right side. Make changes in resolution, project name, and other aspects. Press “Export” to get the file to your assigned location.

Effective Key Features of Filmora
Besides smooth playback, Filmora offers powerful AI features to edit videos. Let’s explore some of its dynamic and innovative options.
AI Copilot: This tool provides you with an AI assistant in case you are unfamiliar with editing basics. It can not only guide you but also navigate towards the respective features. Users can ask anything and find solutions with natural language prompts.
AI Music Generator: Are you tired of internet surfing but haven’t found perfect music? Filmora offers AI-generated music that perfectly aligns with your content needs. It allows you to choose the number of music tracks, moods, and duration of the videos.
AI Image: With Filmora, getting a copyright-free image is not a big deal. Users have to describe an image and pick one style to grab their dream image. Also, they can select an aspect ratio to start creating an image.
AI Smart Masking: Often, the best-captured media seems useless because of its messy background. AI masking comes to rescue your projects. You can use the Chroma key or AI portrait to remove or change the backgrounds of the media.
Conclusion
To wrap up, Adobe Premiere Pro’s slow playback can occur for several reasons. Many solutions are discussed above to tackle such errors and avoid frustration. Meanwhile, you can use Wondershare Filmora, which is much easier. Also, it does not cause any errors while working and ensures a smooth workflow. With AI features, users can effectively perform every kind of video editing task.
Make A Slow Motion Video Make A Slow Motion Video More Features

Part 1: What Does a Video with a Slow Playback Mean?
Premiere Pro Playback Slow is a common issue faced by editors these days. It refers to playback slowness and choppiness of a fresh or edited video. Many users report a complete blackout in video footage during the playback. Lagging in playback might result from insufficient RAM or inadequate storage space. Maybe an outdated GPU, heavy video effects, or active background programs cause it.
Such playback lagging can prove incredibly frustrating or test your patience beyond limits. It can desync the audio and video components of files during the playback. You can consider it a sign that your computer does not have the right specs for Adobe Premiere Pro . Also, it could mean that this tool is dropping frames in the Playback of videos.
Part 2: Fixing the Premiere Pro Slow Playback Issue [100% Effective Solutions]
If your Premiere Pro is not smoothly playing the videos, this section is for you. Firstly, you should confirm that your playback is lagging or slowing down. To do so, analyze whether your playhead is making small jumps or playing smoothly. There are plenty of things that you can do to reduce or minimize the Premiere playback slow.
- Solution 1: Disable High-Quality Playback
- Solution 2: Delete Media Cache Files
- Solution 3: Optimize Rendering for Performance
- Solution 4: Close Unnecessary Applications
- Solution 5: Turn on GPU Acceleration
- Solution 6: Change Playback Resolution
- Solution 7: Use Proxy Videos in Adobe
- Solution 8: Mute FX Effects
Solution 1: Disable High-Quality Playback
Adobe Premiere Pro enables a High-Quality playback option by default. It helps in watching videos clearly but causes trouble. Thus, turning it off can fix the playback lagging. Tap on the “Settings” icon, which is next to the playback resolution menu. From there, disable the “High-Quality Playback” option by selecting it.

Solution 2: Delete Media Cache Files
In Premiere Pro, the Media cache is a temporary storage space that keeps copies of files. It allows you to access the files faster and cause a good playback. If these media caches use hefty hard disk space, then to enhance playback performance.
To do so, open the Premiere Pro and go to the “Preferences” menu. From the list, select “Media Cache.” Now browse to select the media and tap on the “Delete Unused” next to the “Delete Unused Media Cache Files. After choosing the option to delete cache files, click on “OK and the files will be removed.

Solution 3: Optimize Rendering for Performance
If Premiere Pro slow playback still exists, then use this method to fix it. Set the optimized rendering to fix the performance of playback. Press the “Edit” option from the top toolbar and choose the “Preferences.” Then, navigate toward “Memory” and find a pop-up window. From that screen, click on “Memory” dropdown and pick “Performance.” Finally, tap on “OK” and get a better playback.

Solution 4: Close Unnecessary Applications
Sometimes, lagging in playback occurs when you work on multiple applications. The system gets burdened and might slow down every process at that time. For a quick and effective solution, you should close the other tabs immediately. Only Adobe Premiere Pro and your file manager can remain open for continuous playback.

Solution 5: Turn on GPU Acceleration
There is another fix you can try to overcome Premiere Pro playback slow. Without any delay, ensure that the Render is set to GPU Acceleration. Simply go to the “File” option at the top toolbar and click on the “Project Settings.” Then, pick “General” and set it to “Mercury Playback Engine GPU Acceleration.” This option is under the Playback Section and Video Render.

Solution 6: Change Playback Resolution
Due to the higher resolution of videos, playback lagging occurs. It has a quick solution: changing the playback resolution to a lower rate. For this purpose, go to “Settings” at the top right and choose the “Dynamic Quality” option. Select a lower resolution, like 1:2 or lower. You should look for options that can reduce resolution from the original resolution of the clip.

Solution 7: Use Proxy Videos in Adobe
Proxy videos are proxy files that are compressed versions of original projects. They help users edit heavy and lengthy videos with any Premiere Playback slow. In your project panel, select your video and right-click on it. From the list, choose “Proxy” and explore “Create Proxies.”
Now, pick the “Codec” option from another window and tap “QuickTime.” Specify a location for proxies and try to keep them in a new folder with the original media. Lastly, click “OK,” and Adobe Media Encoder will instantly produce video proxies.

Solution 8: Mute FX Effects
The working size of video files gets increased with visual and audio effects. If your videos are still lagging in playbacks, then head to mute those effects to fix this issue. From the playback toolbar, choose the “fx” button. Alternatively, click on the “+” icon at the top right side of Program Monitor. Drag it to the button panel and press the “fx” button to toggle it “Off.”

Part 3: Make the Slow-Motion Video Making Easy with Wondershare Filmora
Apart from Premiere Pro’s slow playback, it’s a difficult tool to work with. Even professional video editors face several challenges and look for fix guides. As an effective solution, Wondershare Filmora is a good option for all users. It is a great video editor with AI-integrated features. Non-tech persons can even maintain smooth editing with Filmora’s AI assistant.
This software equips you with a complete video editing suit. Using any feature, you will not face laggings during the editing process. Many editors want to add slow motion or speed ramping in their videos to embrace creativity. They can freely use Filmora without fearing system crashes or playback slowing down.
Step-by-Step Guide to Perform Slow Motion Effect with Optical Flow
Without any playback, slow down and enjoy slow-motion effects in your videos. To add such an effect with optical flow, you can follow the steps below.
Free Download For Win 7 or later(64-bit)
Free Download For macOS 10.14 or later
Step 1Import Project in the Timeline Section
Successfully install Filmora and head to its main interface. Start working on your project by tapping “New Project” and importing the file into the timeline. You can press the “Ctrl + I” keys, browse the project to import, and drag it into the timeline.

Step 2Slow Down Video with the Optical Flow Option
Right-click on your clip and pick “Speed Ramping” from the list. Now, choose the “Customize” option and move below to edit it. Hold the dots and adjust their location to change the video speed. You can select Montage and Jumper effects to change the speed of clips.
Now, scroll down and find “AI Frame Interpolation.” Click on the downward icon and tap “Optical Flow” for slow but high-quality video.

Step 3Export After Finalizing
After making edits, look for the “Export” option at the top right side. Make changes in resolution, project name, and other aspects. Press “Export” to get the file to your assigned location.

Effective Key Features of Filmora
Besides smooth playback, Filmora offers powerful AI features to edit videos. Let’s explore some of its dynamic and innovative options.
AI Copilot: This tool provides you with an AI assistant in case you are unfamiliar with editing basics. It can not only guide you but also navigate towards the respective features. Users can ask anything and find solutions with natural language prompts.
AI Music Generator: Are you tired of internet surfing but haven’t found perfect music? Filmora offers AI-generated music that perfectly aligns with your content needs. It allows you to choose the number of music tracks, moods, and duration of the videos.
AI Image: With Filmora, getting a copyright-free image is not a big deal. Users have to describe an image and pick one style to grab their dream image. Also, they can select an aspect ratio to start creating an image.
AI Smart Masking: Often, the best-captured media seems useless because of its messy background. AI masking comes to rescue your projects. You can use the Chroma key or AI portrait to remove or change the backgrounds of the media.
Conclusion
To wrap up, Adobe Premiere Pro’s slow playback can occur for several reasons. Many solutions are discussed above to tackle such errors and avoid frustration. Meanwhile, you can use Wondershare Filmora, which is much easier. Also, it does not cause any errors while working and ensures a smooth workflow. With AI features, users can effectively perform every kind of video editing task.
A Guide to Create Your Own LOL Montage Video
Mostly, the lol montage videos help to excite the League of Legend players by displaying powerful attacks in the game. These videos help to entertain the viewers. In this article, you will study the importance of making these videos and the related steps in creating such content like a profession. There are many video editing tools available in the digital space to build videos according to your needs. Through efficient edits, you can make the best out of the captured content. The below content helps you to choose the right tool to carry out your video edits optimally. Connect with this article and find out the best ways to make the montage videos efficiently.

LOL Montage
Why we need to make LOL Montage Video
You can create lol montage videos for various reasons. Here are some of them are listed below.
Reason 1: Enlighten the viewers on how to play the game
As the game comprises two teams each five players fight one another using their powers. There are different ways to earn points, rewards and extra features for their characters while playing the game. Using the lol montage videos, you can teach the newbie users about the tips and tricks in this game.
Reason 2: Enhanced visuals
When creating montage videos, you can bring out the real effects of the content. There are options to edit the video effects and convincingly display them. The lol montage video grabs the attention of the viewers in no time and you can convey your message easily to the audience.
Reason 3: Increase the players
After streaming the LOL montage videos, you can expect many viewers will become players trying the tips highlighted in your content. It excites the audience and helps them to succeed in the game flawlessly.
How to create your own LOL Montage video
It is simple to create a lol montage video. Creativity with innovative edits is sufficient to develop outstanding montage content for your needs.

How to Create LOL Montage
1. Prepare your LOL video clips
Initially, prepare lol video clips as separate pieces. You can also pick the older images or videos if you have any in your gallery that is recorded when you had played the game. Capture fresh copies if possible but ensure it lasts for a short duration. Avoid recording longer content because it reduces the excitement in the audience.
2. How to pick the right video editing software
Next, after collecting the number of League of legends play recordings, pick the ones that are important in creating the montage video. Then, select the best video editor to perform the desired edits on the collected content. Here is a few recommended video editing tool to enhance the overall edits on the recorded content.
• Wondershare Filmora
The Filmora video editor is a simple tool with an excellent user interface. You can perform any edits effortlessly using this program. All the controls are explicitly available for quick access. Using Filmora video editor, you can add visual effects, transitions, and animations to the content like a pro. This app serves the needs of both professionals and newbies. You can also insert advanced features like audio ducking, freeze frames, keyframes, split the screens and stream desired music tracks with the content. You can explore more if you make a quick download of this application.
You can work on many factors in the videos to enhance their overall performance. Edit the background using the Chroma key and green screen effect and adjust the visuals by modifying the attributes like color gradients, hue, saturation, and brightness. You can insert motion elements, filters, and titles to add flavors to the content. Improve the audio quality in the content by removing the noise factors and adjusting the audio equalizers to sound precise.
• OpenShot Video editor
It is an exclusive video editor compatible with multi-platforms like Linux, Mac, and Windows, and you can use this app to trim and slice the videos into desired pieces. There are options to animate and keyframe the content hassle-free. This app enables you to work with multiple tracks without any watermark issues. Insert slow-motion effects and playback speed variations to add flavors to the edited content. It supports more than 70 languages and displays a simple interface.
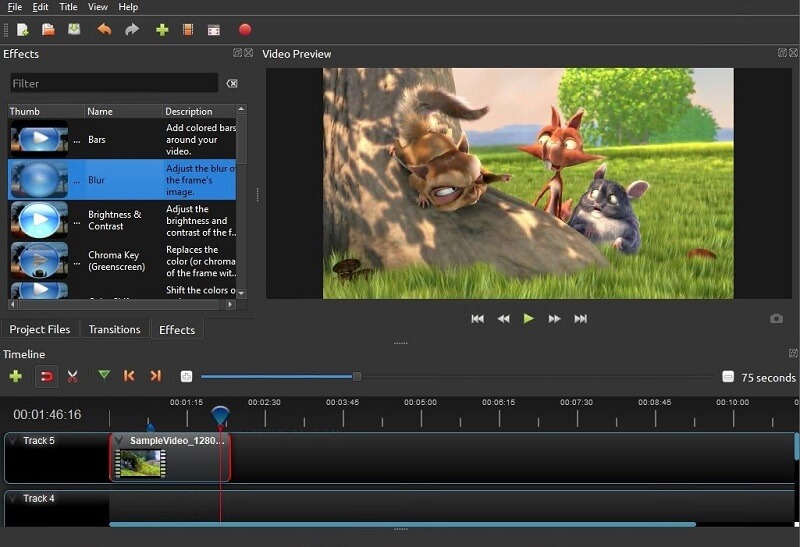
Openshot Video Editor
• AVS video editor
Here comes another efficient video editor that works on the HD content like a pro. It is compatible with all file formats and processes the videos using its in-built features. This app allows adding texts, annotating, and splitting the recordings according to your requirement. Get a professional look at the content by working on its color gradients. Remove the shaking effects on the footage using the video stabilization features and change the background by triggering the Chroma Key effects.
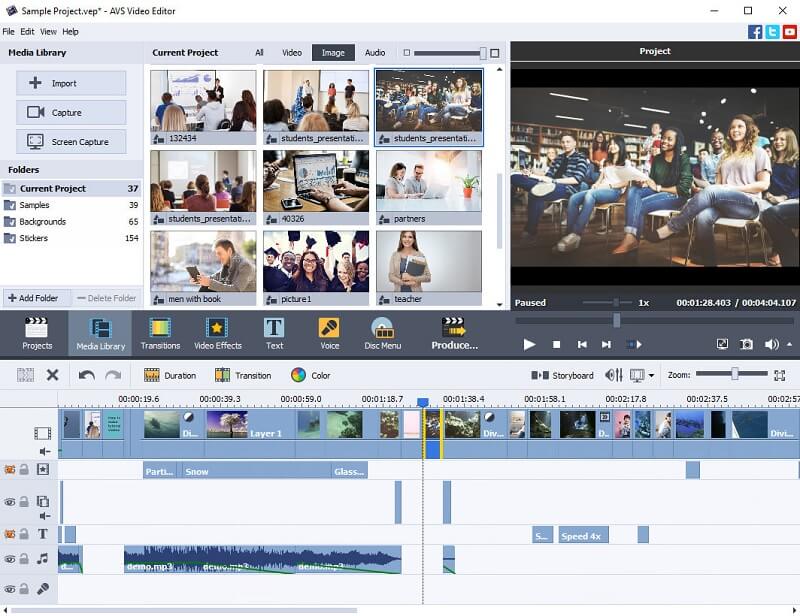
AVS video editor
The above-discussed video editors are reliable, and you can go for them without hesitation. It brings impressive effects to the recordings and helps you create lol montage video content.
How to edit your LOL Montage video
Consider the Filmora video editor after recording the content to edit the file in the Filmora video editor by following the below instructions.
Step1Install the app
Go to the official webpage of Filmora and download the correct version of the tool based on the system OS. Then, install and launch the program. Next, upload the recorded file into the working space of Filmora using the Import Files option.
Wondershare Filmora11 Express Better
Achieve More
Grow Together
Free Download Free Download Learn More

Step2Add Visual effects
Now, select the Effects option in the Menu and witness the list of visual effects available as a built-in asset in the Filmora library. Then, choose the favorite effect option and right-click to select the Apply pop-up message. This activity applies the effect to the uploaded content in no time. You can use the Preview option to view the video effect on the recordings before making the final download of the edited content.
Step3Add Transitions and Effects to make it better
If you want to increase the effects on the recordings, then try some transitions and animations.
Select the Transitions option in the Menu and choose the desired transition effect listed on the screen. Choose your favorite one and right-click to hit the Apply pop-up option. This action applies the video effect to the uploaded file. You can witness the changes in the Preview button by playing the edited video.
Likewise, you can also add animations to the content. Use the in-built resource of Filmora by using the above method. Access the asset library of Filmora to add extra flavors to the content.
image / video 16:9
Conclusion:
Thus, this article has given valuable insights into the LOL montage video making. You can use the instructions wisely and build a montage video according to your needs. Increase the overall appearance of the content using reliable video editors like Filmora. Apply the basic and advanced edits on the video content and enhance the recordings for better outcomes. Stay connected with this article to learn more about the video edits and the reliable video editors that bring miraculous changes in the video content.
Free Download Free Download Learn More

Step2Add Visual effects
Now, select the Effects option in the Menu and witness the list of visual effects available as a built-in asset in the Filmora library. Then, choose the favorite effect option and right-click to select the Apply pop-up message. This activity applies the effect to the uploaded content in no time. You can use the Preview option to view the video effect on the recordings before making the final download of the edited content.
Step3Add Transitions and Effects to make it better
If you want to increase the effects on the recordings, then try some transitions and animations.
Select the Transitions option in the Menu and choose the desired transition effect listed on the screen. Choose your favorite one and right-click to hit the Apply pop-up option. This action applies the video effect to the uploaded file. You can witness the changes in the Preview button by playing the edited video.
Likewise, you can also add animations to the content. Use the in-built resource of Filmora by using the above method. Access the asset library of Filmora to add extra flavors to the content.
image / video 16:9
Conclusion:
Thus, this article has given valuable insights into the LOL montage video making. You can use the instructions wisely and build a montage video according to your needs. Increase the overall appearance of the content using reliable video editors like Filmora. Apply the basic and advanced edits on the video content and enhance the recordings for better outcomes. Stay connected with this article to learn more about the video edits and the reliable video editors that bring miraculous changes in the video content.
TEXT REVEAL Animation | Easy Masking Filmora
Preparation
What you need to prepare:
- A computer (Windows or macOS)
- Your video materials.
- Filmora video editor
Step 1
Download the Filmora video editor and install it. Once it loads, click on “New Project”.
Step 2
Import your footage by clicking on “Import Media”. Then, drag your clip to the Timeline to start editing it.
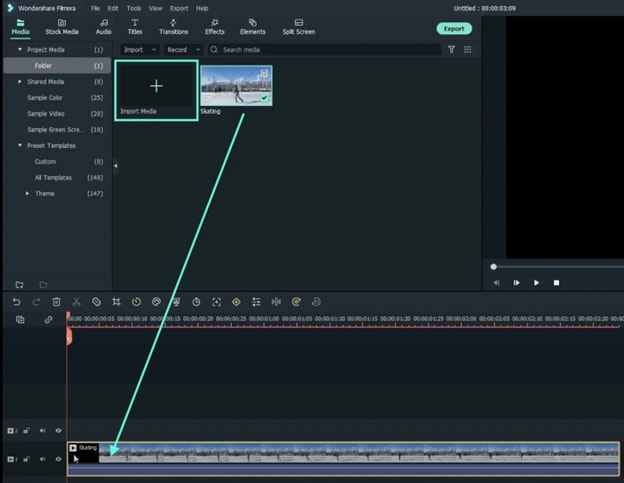
Step 3
Review your video and place the Playhead at the point where you want the text reveal to begin.
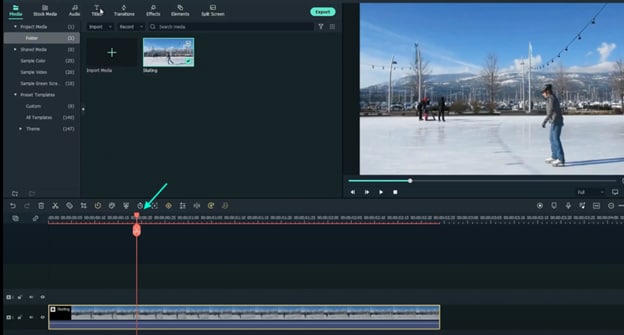
Step 4
Go to the Titles tab and drag the Basic title to Track 2 on the Timeline. Then, right-click on the Title clip and go to Edit Properties. Here, type in your text and change the font to any bold one. You can also go to the WordArt tab to further customize your text. Click OK.
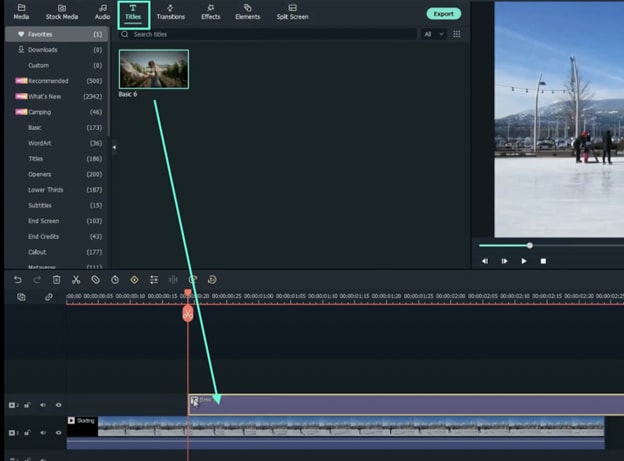
Step 5
Now, move the text to fit the objects or people on your video perfectly. Copy the video clip on Track 1. Then, lock both Track 1 and Track 2 by pressing the key-lock button. Right-click anywhere above Track 2 and select Paste.
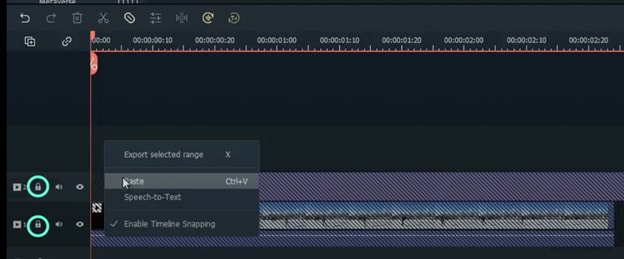
Step 6
Move the Playhead to where the clip on Track 2 starts. Right-click on the clip in Track 3 → go to Edit Properties → select the Mask tab → click on Single Line. Then, adjust the Rotate value to “-180°”. Drag the slider on the screen to the right side until the text totally disappears next to your moving object. Now, scroll down from the panel on the left and change Blur Strength to 1%.
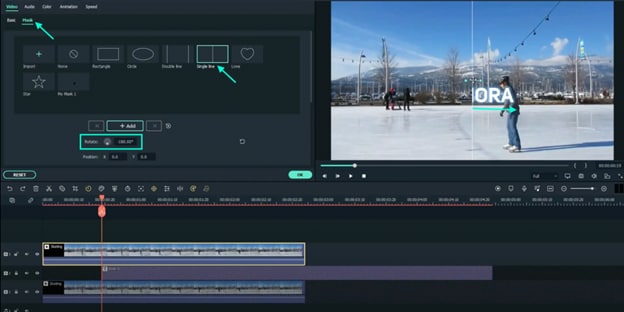
Step 7
Next, add a keyframe by clicking on the “**+Add**” button. Move the Playhead one frame forward. Drag the X-axis to the left slowly to reveal a tiny portion of the text on the screen. Then, repeat this as many times as it takes until the full text is revealed, going one frame at a time.
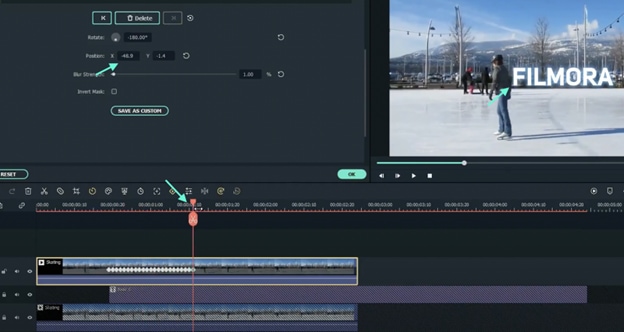
Step 8
Finally, Render the video and watch the final preview. Congratulations, you’ve just successfully created a text reveal animation in FIlmora.
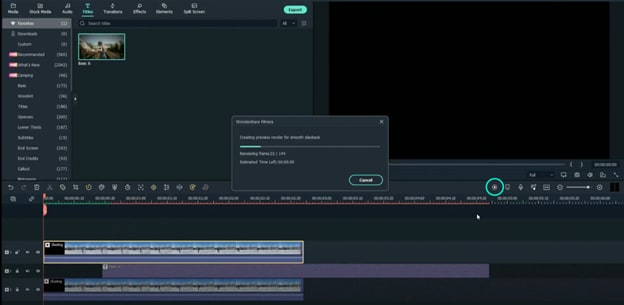
Summary
What you’ve learned:
- Animate text frame by frame in Filmora
- Edit the properties of clips in the video editor
- Add titles and manipulate clips on the Timeline
What you need to prepare:
- A computer (Windows or macOS)
- Your video materials.
- Filmora video editor
Step 1
Download the Filmora video editor and install it. Once it loads, click on “New Project”.
Step 2
Import your footage by clicking on “Import Media”. Then, drag your clip to the Timeline to start editing it.

Step 3
Review your video and place the Playhead at the point where you want the text reveal to begin.

Step 4
Go to the Titles tab and drag the Basic title to Track 2 on the Timeline. Then, right-click on the Title clip and go to Edit Properties. Here, type in your text and change the font to any bold one. You can also go to the WordArt tab to further customize your text. Click OK.

Step 5
Now, move the text to fit the objects or people on your video perfectly. Copy the video clip on Track 1. Then, lock both Track 1 and Track 2 by pressing the key-lock button. Right-click anywhere above Track 2 and select Paste.

Step 6
Move the Playhead to where the clip on Track 2 starts. Right-click on the clip in Track 3 → go to Edit Properties → select the Mask tab → click on Single Line. Then, adjust the Rotate value to “-180°”. Drag the slider on the screen to the right side until the text totally disappears next to your moving object. Now, scroll down from the panel on the left and change Blur Strength to 1%.

Step 7
Next, add a keyframe by clicking on the “**+Add**” button. Move the Playhead one frame forward. Drag the X-axis to the left slowly to reveal a tiny portion of the text on the screen. Then, repeat this as many times as it takes until the full text is revealed, going one frame at a time.

Step 8
Finally, Render the video and watch the final preview. Congratulations, you’ve just successfully created a text reveal animation in FIlmora.

Summary
What you’ve learned:
- Animate text frame by frame in Filmora
- Edit the properties of clips in the video editor
- Add titles and manipulate clips on the Timeline
What you need to prepare:
- A computer (Windows or macOS)
- Your video materials.
- Filmora video editor
Step 1
Download the Filmora video editor and install it. Once it loads, click on “New Project”.
Step 2
Import your footage by clicking on “Import Media”. Then, drag your clip to the Timeline to start editing it.

Step 3
Review your video and place the Playhead at the point where you want the text reveal to begin.

Step 4
Go to the Titles tab and drag the Basic title to Track 2 on the Timeline. Then, right-click on the Title clip and go to Edit Properties. Here, type in your text and change the font to any bold one. You can also go to the WordArt tab to further customize your text. Click OK.

Step 5
Now, move the text to fit the objects or people on your video perfectly. Copy the video clip on Track 1. Then, lock both Track 1 and Track 2 by pressing the key-lock button. Right-click anywhere above Track 2 and select Paste.

Step 6
Move the Playhead to where the clip on Track 2 starts. Right-click on the clip in Track 3 → go to Edit Properties → select the Mask tab → click on Single Line. Then, adjust the Rotate value to “-180°”. Drag the slider on the screen to the right side until the text totally disappears next to your moving object. Now, scroll down from the panel on the left and change Blur Strength to 1%.

Step 7
Next, add a keyframe by clicking on the “**+Add**” button. Move the Playhead one frame forward. Drag the X-axis to the left slowly to reveal a tiny portion of the text on the screen. Then, repeat this as many times as it takes until the full text is revealed, going one frame at a time.

Step 8
Finally, Render the video and watch the final preview. Congratulations, you’ve just successfully created a text reveal animation in FIlmora.

Summary
What you’ve learned:
- Animate text frame by frame in Filmora
- Edit the properties of clips in the video editor
- Add titles and manipulate clips on the Timeline
What you need to prepare:
- A computer (Windows or macOS)
- Your video materials.
- Filmora video editor
Step 1
Download the Filmora video editor and install it. Once it loads, click on “New Project”.
Step 2
Import your footage by clicking on “Import Media”. Then, drag your clip to the Timeline to start editing it.

Step 3
Review your video and place the Playhead at the point where you want the text reveal to begin.

Step 4
Go to the Titles tab and drag the Basic title to Track 2 on the Timeline. Then, right-click on the Title clip and go to Edit Properties. Here, type in your text and change the font to any bold one. You can also go to the WordArt tab to further customize your text. Click OK.

Step 5
Now, move the text to fit the objects or people on your video perfectly. Copy the video clip on Track 1. Then, lock both Track 1 and Track 2 by pressing the key-lock button. Right-click anywhere above Track 2 and select Paste.

Step 6
Move the Playhead to where the clip on Track 2 starts. Right-click on the clip in Track 3 → go to Edit Properties → select the Mask tab → click on Single Line. Then, adjust the Rotate value to “-180°”. Drag the slider on the screen to the right side until the text totally disappears next to your moving object. Now, scroll down from the panel on the left and change Blur Strength to 1%.

Step 7
Next, add a keyframe by clicking on the “**+Add**” button. Move the Playhead one frame forward. Drag the X-axis to the left slowly to reveal a tiny portion of the text on the screen. Then, repeat this as many times as it takes until the full text is revealed, going one frame at a time.

Step 8
Finally, Render the video and watch the final preview. Congratulations, you’ve just successfully created a text reveal animation in FIlmora.

Summary
What you’ve learned:
- Animate text frame by frame in Filmora
- Edit the properties of clips in the video editor
- Add titles and manipulate clips on the Timeline
TXT to SRT: 3 Effective Ways to Convert TXT to SRT
Adding subtitles to your videos allow more people to understand and relate to your content.
If your video script is in a text file (.txt), and you need to convert the TXT to SRT to create a subtitles file for your video.
You can create your subtitles files just by using plain text that contains your video script. If you are wondering how you can convert text to SRT, then we have all the answers.
Let’s find out.
- Solution 3: How to Edit TXT File and Save It into .SRT Without Any Tools
- Bonus Tip: Editing SRT Subtitles with Fancy Effects to Make Your Video More Impressive
Can You Convert TXT to SRT?
Yes, you can convert .txt to .srt document. Let’s understand a little bit of context first. You can even hardcode your subtitles to your video, and automatically generate subtitle files and transcriptions from any audio and video file format. There are many online and offline tools come to help. And we’ll introduce some in detail in the following part.
Why Do You Need to Convert TXT to SRT?
A word file in TXT format or having a script of the video doesn’t indicate the start and stop time of the subtitle content. An SRT file, on the other hand, has the information about captioning and the start and stop times of the subtitles.
To put it simply, a TXT file is unformatted and needs to be converted into an SRT file so it has all the necessary information to be used as subtitles.
There are different ways to do that, and we’ll discuss three solutions in this article.
Solution 1: Get a TXT-to-SRT Converter Online
Out of the different ways to convert TXT to SRT, using an online converter is the easiest one. You can access it online without having to download it on your computer.
Most online TXT to SRT converters allow drag & drop functionality and are easy to use. While plenty of such tools are available online, we’ll review a few here.
Ebby
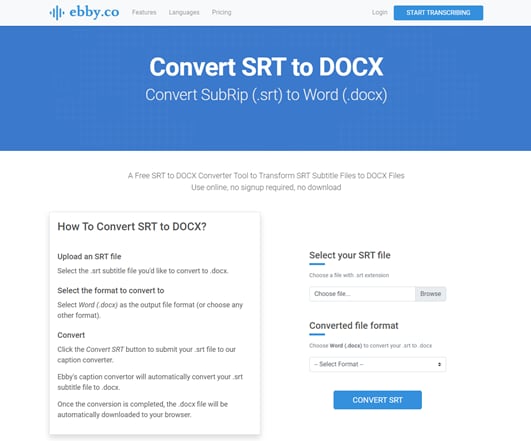
Ebby is essentially a transcription tool that converts audio to text. You can use it to create an automatic transcription and to convert one TXT to SRT format. It uses voice recognition technology to create text with timestamps, making them subtitles for your videos. It supports over 100 languages and dialects. You can export transcripts in different formats.
Pros
- Equipped with speech recognition technology
- Features playback controls
- Offers 24/7 support
- Offers a free trial
Cons
- Only available online
- Not suitable for manual transcription
Features
- You can upload both audio and video files.
- It can create automatic transcriptions.
- Supports multiple languages to produce subtitles in all popular languages.
- It’s equipped with speech recognition technology.
- Apart from subtitles, it produces closed captions as well to help deaf people.
- You can edit the text within the tool.
Best for
Podcasters, lawyers, journalists, authors, and marketing experts.
Rev
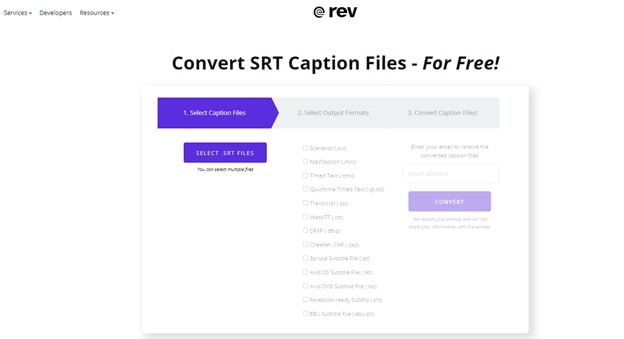
Another transcription tool, Rev is widely used by more than 170,000 users. It can cater to the growing needs of its users. Its pricing model is a bit different from other names in the industry.
Pros
- Supports both automated and manual transcription
- Up to 99% accuracy in manual transcription
- Closed captions
Cons
- Per video-based pricing model
Features
- It works on AI and Machine Learning models to produce accurate subtitles.
- It allows you to annotate subtitles for better understanding.
- File sharing is allowed on Rev.
- You can search particular text using its Full-Text Search functionality.
- It supports 16 different languages.
- It is capable of Natural Language Processing.
Best for
Rev’s users belong to a variety of industries including journalism, video production, medical, podcasters, and writers.
ToolSlick
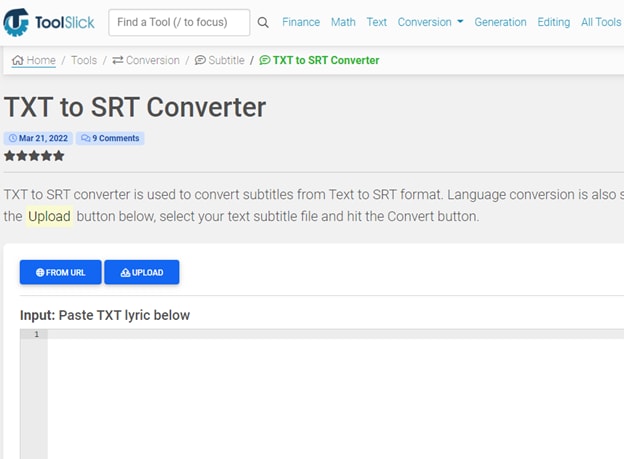
It’s an online platform dedicated to a variety of functions, and converting files from one format to another is one of them. It has tools for handling and processing finance, math, editing, and other tasks.
Pros
- Easy to use
- Supports major languages
- Manually select start and end times
Cons
- Ads on the website can be inconvenient
Features
- It has a dedicated section for financial calculations.
- You can perform mathematics calculations using its Math section.
- It allows you to generate code in different programming languages.
- It has video editing tools.
Best for
ToolSlick is an easy to use online tool to convert TXT to SRT for beginners.
How to Convert Txt to SRT Using an Online Converter
Here, we take ToolSlick as an example to show you how to use an online tool to convert text to an SRT file. Let’s get into it now.
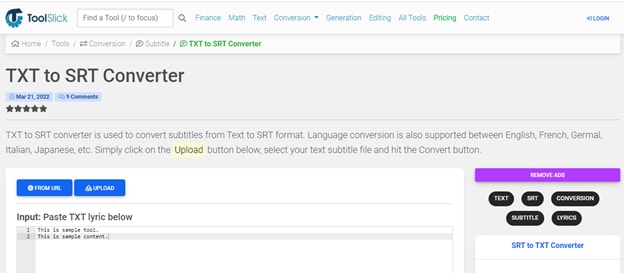
1. Open ToolSlick online converter on your browser. In the below image, you can see how its interface looks. All you need to do is to input or paste the TXT content in the Input box. Make sure to write each line separately.
2. After writing the content, go to the Settings section and specify the subtitle’s Start Time and End Time. You can also change the target language.
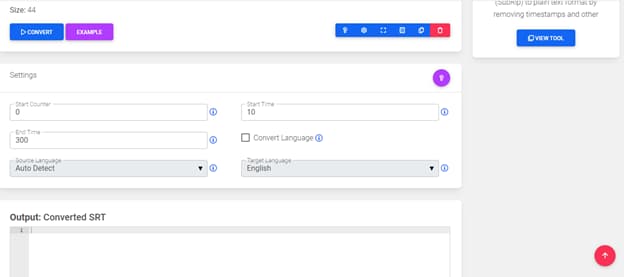
3. Now, you can hit the CONVERT button to convert TXT to SRT. The output file will be automatically downloaded to your computer. Also, the SRT file content appears in the Output box.

Solution 2: Convert TXT to SRT Using Converting Software
Having an online TXT to SRT converter means you can access it online without downloading it on your computer. But, you’ll always have to rely on an internet connection to access one. Instead, you can download and install software on your laptop or computer and have the freedom to convert TXT to SRT on the go.
There’s a variety of converting software available in the market. Let’s review some of them.
UniConverter

Formerly known as Wondershare Video Converter Ultimate, Wondershare Uniconverter is an best subtitle editor for Mac and Windows, and it enables everyone to create subtitles, add, convert subtitles for videos and movies permanently.
Besides, it is also a powerful video file converter, video compressor, video editor, DVD burner, and more.
Pros
- Support converting subtitles in more than 18 formats, export in AAS/SSA/SRT, etc
- 30x faster converting speed without losing information
- Free trial available
Cons
- Not fast while rendering big files
Features
- It’s an all-in-one tool for video, audio and subtitle compression, conversion, download, and more.
- You can preview to check the quality of the output.
- It offers 90x faster-converting speed.
- It can auto-generate subtitles and add them to the video.
- It can solve the problem of video jitter.
- You can convert normal videos to VR videos and enjoy them on your VR headset.
Best for
For download, burn, compress, and conversion.
Batch Subtitles Converter
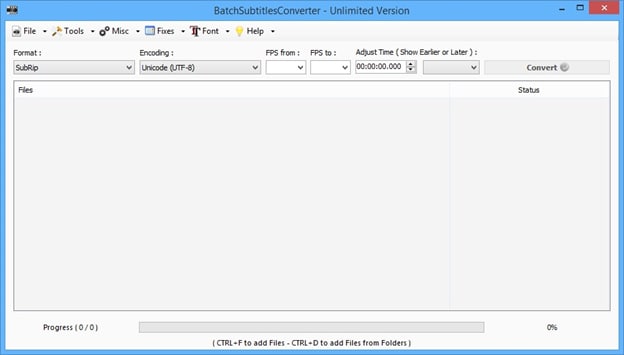
It’s a dedicated subtitles converting program. You can create subtitles in a variety of formats for videos in multiple formats. It’s very easy to use with a simple interface.
Pros
- Supports batch processing
- Free to use
- Framerate and encoding can be set as required
Cons
- It might seem like an outdated tool
Features
- It supports more than 20 output formats.
- You can set custom font sizes for the subtitles.
- You can convert 3 files simultaneously.
- It allows you to change the encoding and frame rate.
Best for
For anyone who’s looking for a free and easy tool
Jubler
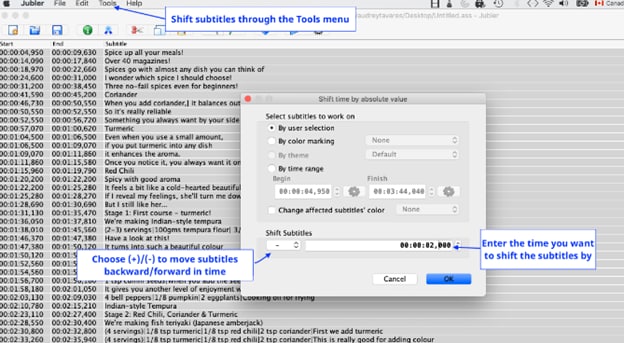
It’s a basic tool that can be used to edit text-based subtitles. You can use it to author new subtitles or convert text files to subtitles. In addition, you can transform, correct, and refine existing subtitles.
Pros
- Free to use
- A powerful tool to create and edit subtitles
Cons
- Outdated interface, not easy-to-use
Features
- It supports most of the popular formats.
- You can preview subtitles to see whether or not they serve the purpose.
- It has spell-checking capabilities to indicate mistakes in your subtitles.
- It has a translation mode to change the language.
Best for
Anyone who’s looking for a powerful and free subtitle creator.
After getting an overview of all of these txt-to-srt converting software, we are here to tell take Wondershare UniConverter as an example to show you concrete how-to steps.
Here’s how you can do it:
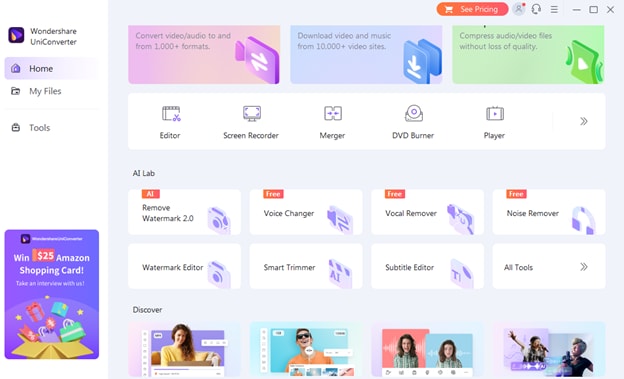
1. Download and install UniConverter on your computer and launch it.
2. Access the Subtitle Editor and upload the file you want to add subtitles to.
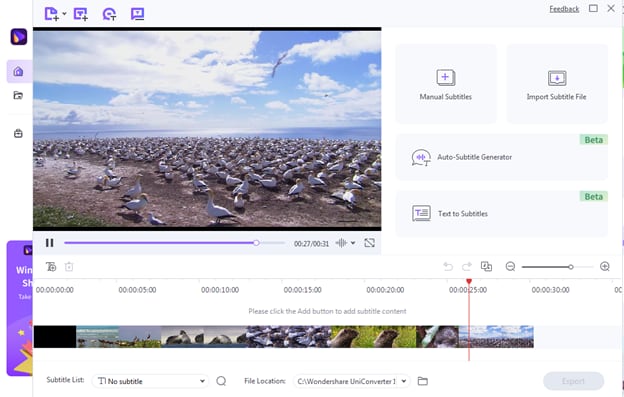
3. Here, you can either import a subtitle file, manually add subtitles, or opt for Text to Subtitles.
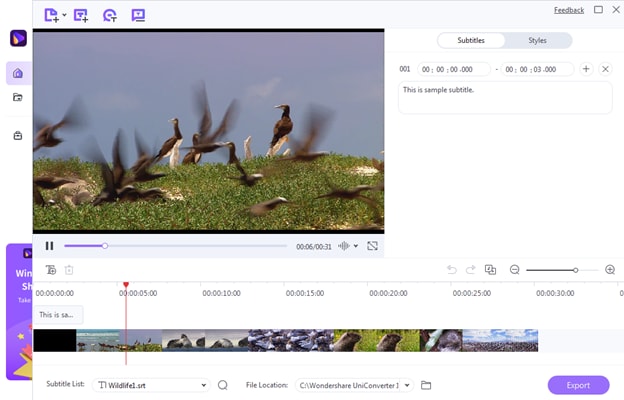
4. You can set the font style, color, size, and timeline as you want.
5. Now, hit the Export button and select SRT Files to download the subtitles file. You can also export it as an MP4 video file.
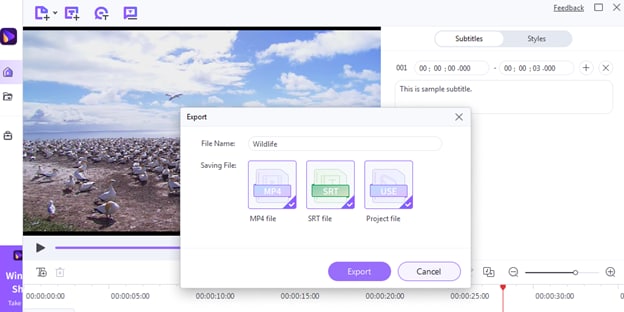
Since you selected to save the file as SRT Files, the text you wrote in the manual subtitles section will convert to an SRT file.
Solution 3: How to Edit TXT File and Save It into .SRT Without Any Tools
While there are different online and downloadable TXT to SRT converting tools available out there, you might not have access to them all the time. That’s when knowing “how to edit TXT file and save it as SRT file” would come in handy.
Here’s how you can edit the TXT file without using any external software and online tools:
- If you’re using a Windows computer, then you can open your TXT document in Microsoft Notepad. For a Mac computer, you can use TextEdit. On the very first line of the document, type a number to identify the subtitle’s section. Each section indicates an individual subtitle, which could be a sound or one sentence from a dialogue.
- The next line would be the timestamp of the subtitle. Timestamp follows this formatting: hours: minutes: seconds, milliseconds.
- In the next line, write your caption.
- Now add double space between the next section and write it as you did for the previous section.
Now that you’ve formatted the TXT file to use it as a subtitle file, let’s save it .SRT format. Here’s how to save your file as .SRT:
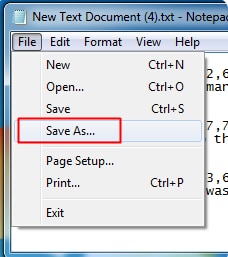
1. Go to the File tab and select Save as.
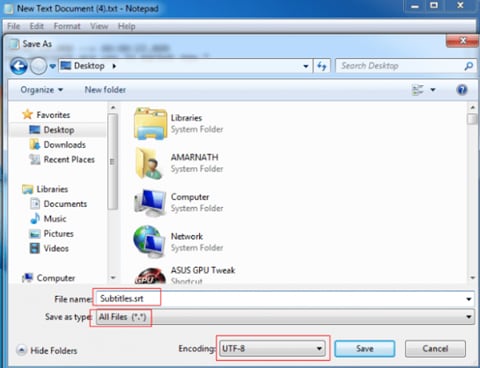
2. Now, save the document with a .**SRT** extension.
![]()
Note: the advantage of converting TXT file to SRT manually is that it does not require tools and is free, but it does have disadvantages. The bad site is that it is troublesome, time-consuming, and easy to get format mistakes. That is why we recommend professional converting tools most for TXT to SRT conversion.
Now, you can use this file as the subtitle file while watching the video on any video playback software such as the VLC media player.
Bonus Tip: Editing SRT Subtitles with Fancy Effects to Make Your Video More Impressive
When you add subtitles to your video, they typically appear in plain font. If you only need subtitles for their functionality, then a plain font would do the job. However, if you want to make your videos more appealing and engaging, then it calls for adding fancy effects to your subtitles.
No TXT-to-SRT converting tool will make your subtitles fancy by adding effects to them, so you need a professional video editing tool like Filmora .
Wondershare Filmora is a high-quality and professional video editing software with a lot of features. From cut, merge, crop, trim, to transition, effects, and more – a lot can be done using Filmora.
How to Edit SRT Subtitles with Filmora
Following are the steps to add effects to your SRT subtitles and make them look appealing:
Free Download For Win 7 or later(64-bit)
Free Download For macOS 10.14 or later
Step1 Download and install Filmora
Firstly, you need to go to Wondershare Filmora’s official website and download it on your computer. Then, launch the setup and install it on your computer.
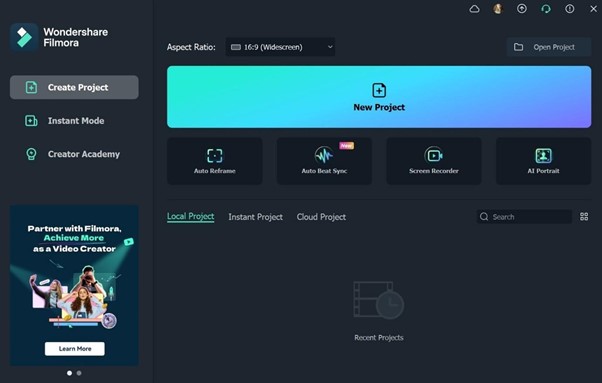
Step2 Open Filmora and import the video
After installation, open Filmora and import the video to which you want to add subtitles.
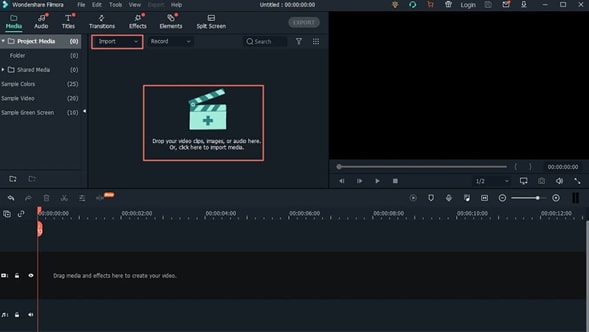
Step3 Add SRT subtitles file
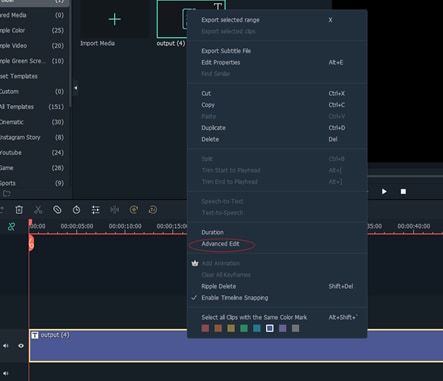
Once your video is open in the editor, use the import option and select your SRT subtitle file, and choose “Advanced Edit” to change styling of the SRT subtitles.
Customize the subtitle styles and then edit it in the subtitle editing window.
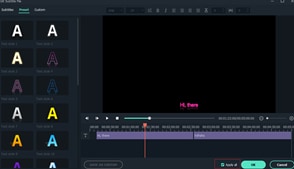
After you’re done editing, click the Export button to save the video.
Hot FAQs on Converting TXT to SRT
1. How to Open and Edit a Text File on a Mac
You can open and edit a text file on a Mac computer using its built-in TextEdit software.
2. What is the difference between SRT and TXT?
TXT is a file format for a text file or Word document. A TXT file might have caption content for a video, but it can’t be used as a subtitle file since it’s unformatted. An SRT file, on the other hand, has the information about captioning and the start and stop times of the subtitles. It’s in a proper format to be used as a subtitle file.
3. Is TXT a subtitle file?
TXT, itself isn’t a subtitle file. It might have the content for subtitles but can’t be used as a subtitle file.
Final Words
This article has shown you some best tools and a concrete step-by-step guide on how you can convert TXT to SRT and use it as your subtitle file. We hope you find it resourceful and are now aware of the different methods to TXT to SRT conversion.
- UniConverter
- Batch Subtitles Converter
- Jubler
- Solution 3: How to Edit TXT File and Save It into .SRT Without Any Tools
- Bonus Tip: Editing SRT Subtitles with Fancy Effects to Make Your Video More Impressive
Can You Convert TXT to SRT?
Yes, you can convert .txt to .srt document. Let’s understand a little bit of context first. You can even hardcode your subtitles to your video, and automatically generate subtitle files and transcriptions from any audio and video file format. There are many online and offline tools come to help. And we’ll introduce some in detail in the following part.
Why Do You Need to Convert TXT to SRT?
A word file in TXT format or having a script of the video doesn’t indicate the start and stop time of the subtitle content. An SRT file, on the other hand, has the information about captioning and the start and stop times of the subtitles.
To put it simply, a TXT file is unformatted and needs to be converted into an SRT file so it has all the necessary information to be used as subtitles.
There are different ways to do that, and we’ll discuss three solutions in this article.
Solution 1: Get a TXT-to-SRT Converter Online
Out of the different ways to convert TXT to SRT, using an online converter is the easiest one. You can access it online without having to download it on your computer.
Most online TXT to SRT converters allow drag & drop functionality and are easy to use. While plenty of such tools are available online, we’ll review a few here.
Ebby

Ebby is essentially a transcription tool that converts audio to text. You can use it to create an automatic transcription and to convert one TXT to SRT format. It uses voice recognition technology to create text with timestamps, making them subtitles for your videos. It supports over 100 languages and dialects. You can export transcripts in different formats.
Pros
- Equipped with speech recognition technology
- Features playback controls
- Offers 24/7 support
- Offers a free trial
Cons
- Only available online
- Not suitable for manual transcription
Features
- You can upload both audio and video files.
- It can create automatic transcriptions.
- Supports multiple languages to produce subtitles in all popular languages.
- It’s equipped with speech recognition technology.
- Apart from subtitles, it produces closed captions as well to help deaf people.
- You can edit the text within the tool.
Best for
Podcasters, lawyers, journalists, authors, and marketing experts.
Rev

Another transcription tool, Rev is widely used by more than 170,000 users. It can cater to the growing needs of its users. Its pricing model is a bit different from other names in the industry.
Pros
- Supports both automated and manual transcription
- Up to 99% accuracy in manual transcription
- Closed captions
Cons
- Per video-based pricing model
Features
- It works on AI and Machine Learning models to produce accurate subtitles.
- It allows you to annotate subtitles for better understanding.
- File sharing is allowed on Rev.
- You can search particular text using its Full-Text Search functionality.
- It supports 16 different languages.
- It is capable of Natural Language Processing.
Best for
Rev’s users belong to a variety of industries including journalism, video production, medical, podcasters, and writers.
ToolSlick

It’s an online platform dedicated to a variety of functions, and converting files from one format to another is one of them. It has tools for handling and processing finance, math, editing, and other tasks.
Pros
- Easy to use
- Supports major languages
- Manually select start and end times
Cons
- Ads on the website can be inconvenient
Features
- It has a dedicated section for financial calculations.
- You can perform mathematics calculations using its Math section.
- It allows you to generate code in different programming languages.
- It has video editing tools.
Best for
ToolSlick is an easy to use online tool to convert TXT to SRT for beginners.
How to Convert Txt to SRT Using an Online Converter
Here, we take ToolSlick as an example to show you how to use an online tool to convert text to an SRT file. Let’s get into it now.
1. Open ToolSlick online converter on your browser. In the below image, you can see how its interface looks. All you need to do is to input or paste the TXT content in the Input box. Make sure to write each line separately.

2. After writing the content, go to the Settings section and specify the subtitle’s Start Time and End Time. You can also change the target language.

3. Now, you can hit the CONVERT button to convert TXT to SRT. The output file will be automatically downloaded to your computer. Also, the SRT file content appears in the Output box.

Solution 2: Convert TXT to SRT Using Converting Software
Having an online TXT to SRT converter means you can access it online without downloading it on your computer. But, you’ll always have to rely on an internet connection to access one. Instead, you can download and install software on your laptop or computer and have the freedom to convert TXT to SRT on the go.
There’s a variety of converting software available in the market. Let’s review some of them.
UniConverter

Formerly known as Wondershare Video Converter Ultimate, Wondershare Uniconverter is an best subtitle editor for Mac and Windows, and it enables everyone to create subtitles, add, convert subtitles for videos and movies permanently.
Besides, it is also a powerful video file converter, video compressor, video editor, DVD burner, and more.
Pros
- Support converting subtitles in more than 18 formats, export in AAS/SSA/SRT, etc
- 30x faster converting speed without losing information
- Free trial available
Cons
- Not fast while rendering big files
Features
- It’s an all-in-one tool for video, audio and subtitle compression, conversion, download, and more.
- You can preview to check the quality of the output.
- It offers 90x faster-converting speed.
- It can auto-generate subtitles and add them to the video.
- It can solve the problem of video jitter.
- You can convert normal videos to VR videos and enjoy them on your VR headset.
Best for
For download, burn, compress, and conversion.
Batch Subtitles Converter

It’s a dedicated subtitles converting program. You can create subtitles in a variety of formats for videos in multiple formats. It’s very easy to use with a simple interface.
Pros
- Supports batch processing
- Free to use
- Framerate and encoding can be set as required
Cons
- It might seem like an outdated tool
Features
- It supports more than 20 output formats.
- You can set custom font sizes for the subtitles.
- You can convert 3 files simultaneously.
- It allows you to change the encoding and frame rate.
Best for
For anyone who’s looking for a free and easy tool
Jubler

It’s a basic tool that can be used to edit text-based subtitles. You can use it to author new subtitles or convert text files to subtitles. In addition, you can transform, correct, and refine existing subtitles.
Pros
- Free to use
- A powerful tool to create and edit subtitles
Cons
- Outdated interface, not easy-to-use
Features
- It supports most of the popular formats.
- You can preview subtitles to see whether or not they serve the purpose.
- It has spell-checking capabilities to indicate mistakes in your subtitles.
- It has a translation mode to change the language.
Best for
Anyone who’s looking for a powerful and free subtitle creator.
After getting an overview of all of these txt-to-srt converting software, we are here to tell take Wondershare UniConverter as an example to show you concrete how-to steps.
Here’s how you can do it:
1. Download and install UniConverter on your computer and launch it.
2. Access the Subtitle Editor and upload the file you want to add subtitles to.

3. Here, you can either import a subtitle file, manually add subtitles, or opt for Text to Subtitles.

4. You can set the font style, color, size, and timeline as you want.

5. Now, hit the Export button and select SRT Files to download the subtitles file. You can also export it as an MP4 video file.

Since you selected to save the file as SRT Files, the text you wrote in the manual subtitles section will convert to an SRT file.
Solution 3: How to Edit TXT File and Save It into .SRT Without Any Tools
While there are different online and downloadable TXT to SRT converting tools available out there, you might not have access to them all the time. That’s when knowing “how to edit TXT file and save it as SRT file” would come in handy.
Here’s how you can edit the TXT file without using any external software and online tools:
- If you’re using a Windows computer, then you can open your TXT document in Microsoft Notepad. For a Mac computer, you can use TextEdit. On the very first line of the document, type a number to identify the subtitle’s section. Each section indicates an individual subtitle, which could be a sound or one sentence from a dialogue.
- The next line would be the timestamp of the subtitle. Timestamp follows this formatting: hours: minutes: seconds, milliseconds.
- In the next line, write your caption.
- Now add double space between the next section and write it as you did for the previous section.
Now that you’ve formatted the TXT file to use it as a subtitle file, let’s save it .SRT format. Here’s how to save your file as .SRT:
1. Go to the File tab and select Save as.

2. Now, save the document with a .**SRT** extension.

![]()
Note: the advantage of converting TXT file to SRT manually is that it does not require tools and is free, but it does have disadvantages. The bad site is that it is troublesome, time-consuming, and easy to get format mistakes. That is why we recommend professional converting tools most for TXT to SRT conversion.
Now, you can use this file as the subtitle file while watching the video on any video playback software such as the VLC media player.
Bonus Tip: Editing SRT Subtitles with Fancy Effects to Make Your Video More Impressive
When you add subtitles to your video, they typically appear in plain font. If you only need subtitles for their functionality, then a plain font would do the job. However, if you want to make your videos more appealing and engaging, then it calls for adding fancy effects to your subtitles.
No TXT-to-SRT converting tool will make your subtitles fancy by adding effects to them, so you need a professional video editing tool like Filmora .
Wondershare Filmora is a high-quality and professional video editing software with a lot of features. From cut, merge, crop, trim, to transition, effects, and more – a lot can be done using Filmora.
How to Edit SRT Subtitles with Filmora
Following are the steps to add effects to your SRT subtitles and make them look appealing:
Free Download For Win 7 or later(64-bit)
Free Download For macOS 10.14 or later
Step1 Download and install Filmora
Firstly, you need to go to Wondershare Filmora’s official website and download it on your computer. Then, launch the setup and install it on your computer.

Step2 Open Filmora and import the video
After installation, open Filmora and import the video to which you want to add subtitles.

Step3 Add SRT subtitles file
Once your video is open in the editor, use the import option and select your SRT subtitle file, and choose “Advanced Edit” to change styling of the SRT subtitles.

Customize the subtitle styles and then edit it in the subtitle editing window.

After you’re done editing, click the Export button to save the video.
Hot FAQs on Converting TXT to SRT
1. How to Open and Edit a Text File on a Mac
You can open and edit a text file on a Mac computer using its built-in TextEdit software.
2. What is the difference between SRT and TXT?
TXT is a file format for a text file or Word document. A TXT file might have caption content for a video, but it can’t be used as a subtitle file since it’s unformatted. An SRT file, on the other hand, has the information about captioning and the start and stop times of the subtitles. It’s in a proper format to be used as a subtitle file.
3. Is TXT a subtitle file?
TXT, itself isn’t a subtitle file. It might have the content for subtitles but can’t be used as a subtitle file.
Final Words
This article has shown you some best tools and a concrete step-by-step guide on how you can convert TXT to SRT and use it as your subtitle file. We hope you find it resourceful and are now aware of the different methods to TXT to SRT conversion.
Also read:
- Updated Detailed Tutorial to Merge Videos in VLC Media Player
- Updated In 2024, Ideas for Time-Lapse Video
- In 2024, Color Match Game Tips for You
- 2024 Approved How to Make Split Screen Videos in Filmora
- Updated 2024 Approved Top Applications That Can Help Apply The Best VHS Camera Effect
- Updated Are You Looking for the Best Premiere Pro Slideshow Template Online for Free? If Yes, You Can Find a Few Exciting Slideshow Templates Here. They Are Worth Using
- Updated If You Want an App to Make Videos with Pictures and Music for Social Media Posts, We Are with the Best Apps to Make Videos with Music and Pictures
- Updated 8 Best Free Photo Collage with Music Video Maker for 2024
- Updated Best GIF to MOV Converters
- New In 2024, How Can You Deny These Best 10 Free Speech to Text Software
- New How Long Does It Take To Edit A Video
- New Would You Like to Know How to Change the Ratio of the Video or Which Is the Correct Aspect Ratio for Uploading to the Online Platform? Then, Go Through the Article to Get Complete Details About the Video Aspect Ratio
- 2024 Approved How to Control the Speed of Video
- 6 Best Text to Speech Generators for YouTube Videos Windows, Mac, Android, iPhone & Online for 2024
- New 3 Actionable Ways to Create Countdown Animation for Videos for 2024
- New How to Make After Effects Gifs
- 2024 Approved Want to Make Use of a Lovely Background for Your Image by Removing the Background or Making It Transparent? Here Is Something You Need to Cover
- 2024 Approved 6 Best Text to Speech Generators for YouTube Videos Windows, Mac, Android, iPhone & Online
- 2024 Approved How to Create an Aesthetic Slideshow Presentation
- Create the Stranger Things Upside Down Effect Video for 2024
- In 2024, Best iPhone LUTs App to Use
- Why You Should Master Slideshows In Lightroom?
- 2024 Approved Things You Need to Know About Color Grading in Photography
- New Why Your Transparent GIF Is Hard to Remove
- New To Add SRT to MP4 Is Not as Hard as You Might Think. All You Just Need Is the Right Tool to Help You Get the Job Done. Read This Article and Learn the 8 Latest Methods to Merge SRT with MP4 Effortlessly
- New How to Create a Freeze Frame Sequence Effect
- Updated In 2024, Achieving GoPro Slow Motion with Quality An In-Depth Overview
- In 2024, The Ultimate Guide to Get the Rare Candy on Pokemon Go Fire Red On Oppo A78 | Dr.fone
- How to Transfer Videos from Itel P40+ to iPad | Dr.fone
- Here are Some of the Best Pokemon Discord Servers to Join On Oppo Reno 11F 5G | Dr.fone
- In 2024, How to fix iCloud lock on your iPhone 12 and iPad
- In 2024, How Xiaomi Redmi K70 Pro Mirror Screen to PC? | Dr.fone
- How to Unlock Vivo T2x 5G Bootloader Easily
- Simple ways to get lost messages back from Itel
- What To Do if Your Realme Narzo N55 Auto Does Not Work | Dr.fone
- In 2024, A Quick Guide to Samsung Galaxy A14 5G FRP Bypass Instantly
- Network Locked SIM Card Inserted On Your Oppo K11 5G Phone? Unlock It Now
- 2024 Approved How to Make GIF Instagram | Quick Tips
- Three Solutions to Hard Reset Samsung Galaxy S23 Ultra? | Dr.fone
- In 2024, Ways To Find Unlocking Codes For Vivo S17 Pro Phones
- How to Fix Pokemon Go Route Not Working On Apple iPhone 6s Plus? | Dr.fone
- Three Solutions to Hard Reset Honor X7b? | Dr.fone
- 10 Free Location Spoofers to Fake GPS Location on your Vivo V29 Pro | Dr.fone
- In 2024, Apple iPhone 6 Mirror to PC? Top Apps You Must Know | Dr.fone
- In 2024, Guide to Mirror Your Xiaomi Redmi Note 12 Pro+ 5G to Other Android devices | Dr.fone
- Fixes for Apps Keep Crashing on Vivo T2x 5G | Dr.fone
- In 2024, Pokémon Go Cooldown Chart On Xiaomi Civi 3 | Dr.fone
- New Easy Cartoon Characters Drawing Tutorials for You Beginners for 2024
- Title: Top Fixes to Resolve Issues with Premiere Pro Slow Playback
- Author: Chloe
- Created at : 2024-05-20 03:37:25
- Updated at : 2024-05-21 03:37:25
- Link: https://ai-editing-video.techidaily.com/top-fixes-to-resolve-issues-with-premiere-pro-slow-playback/
- License: This work is licensed under CC BY-NC-SA 4.0.


