:max_bytes(150000):strip_icc():format(webp)/GettyImages-545995058-58ed21243df78cadab023f3c.jpg)
Top Ways to Make Fast Motion Video on iPhone Solved

Top Ways to Make Fast Motion Video on iPhone [Solved]
Fast motion has always been a time saver since it covers the unnecessary details in seconds. Acquiring this skill is important if you are a content creator or videographer. You might already be aware of how to make fast-motion videos on iPhone.
However, if this is unheard of or you are new to video editing, we’ve got you covered. This article covers the ins and outs of how to make a video fast-motion iPhone. In addition, users can gain insights into some applications and their guides. Moreover, we’ll discuss an AI alternative to those applications.
Slow Motion Video Maker Slow your video’s speed with better control of your keyframes to create unique cinematic effects!
Make A Slow Motion Video Make A Slow Motion Video More Features

Part 1: What are the Different Use Cases of Fast-Motion Videos?
The fast motion effect covers multiple creative ways of speed increase that you can incorporate. All these ways apply to different genres of videos. This section diverts your focus on different use cases of fast-motion videos. Here is how to make video fast motion on iPhone for different purposes:
1. Construction and Development Videos
Fast-motion videos help in video creation where development is happening. Such videos show the before and after results of an area, location, or building. The construction or manufacturing process is shown in fast motion in engineering videos. It also helps in showing the transformation of a non-populated or undeveloped city.
2. Nature Photography or Documentaries
Natural phenomenon like the blooming of a flower usually occurs at a slower rate. Capturing them takes a long time, but the audience may not like such a long duration. Hence, editors can increase the speed of such videos to speed up the phenomenon. In addition, if you watch wildlife or nature documentaries, they also use this effect.
3. Aesthetic Expression
Fast-paced videos bring a sense of creativity to your videos as they are an artistic expression of time. To indicate the passing of time in movies or to show a scene at a railway station or airport. It also indicates that the filmmakers and editors have put in an effort.
Part 2: Different Tools to Help You Make Fast Motion Video on iPhone
Fast-motion tools are important in video editing since they offer a chance at creativity. They have a wide range of applications in the filmmaking and media industry. Do you know how to make a video fast-motion iPhone using a third-party application? If not, here is a detailed guide on some of them:
1. iMovie
If you are looking for an accessible application with an easy-to-use interface, this is for you. The process of speed manipulation consists of a slider for control. After editing, you can integrate multiple soundtracks from 130 pre-assembled tracks. The application is compatible with iPhone X and newer versions.
Steps to Create a Fast Motion Video Using iMovie
Do you want to learn how to make fast-motion videos on your iPhone with this application? Given Below is your perfect guide to crafting a fast-paced video:
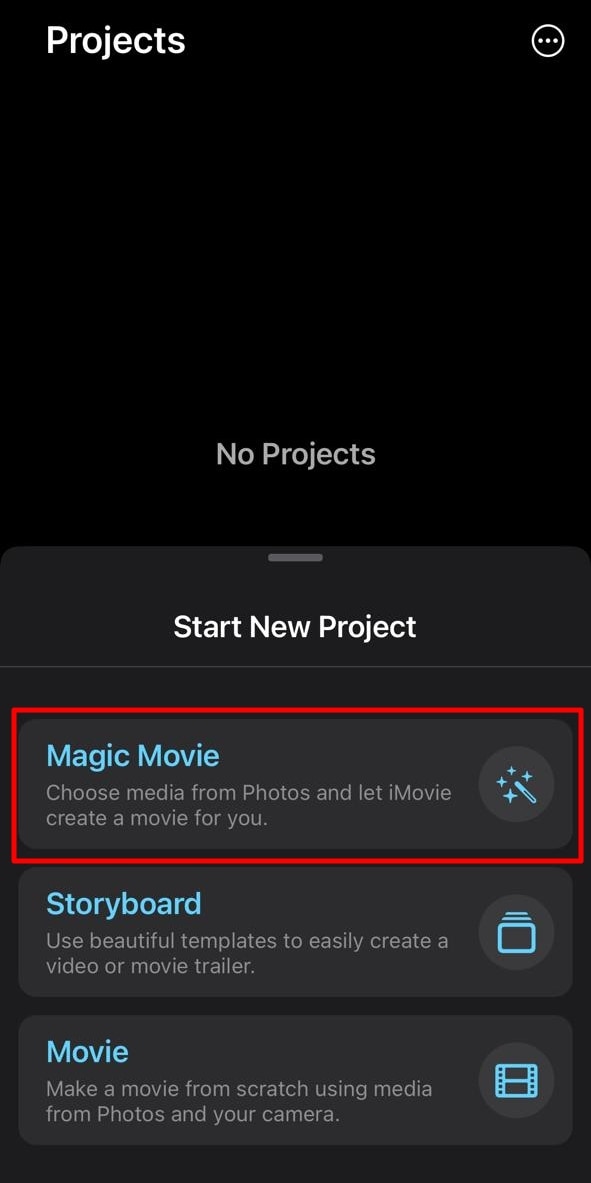
Step 1: After downloading the application on your iPhone, access it and “Start New Project.” Then, select a video from your media library to edit.
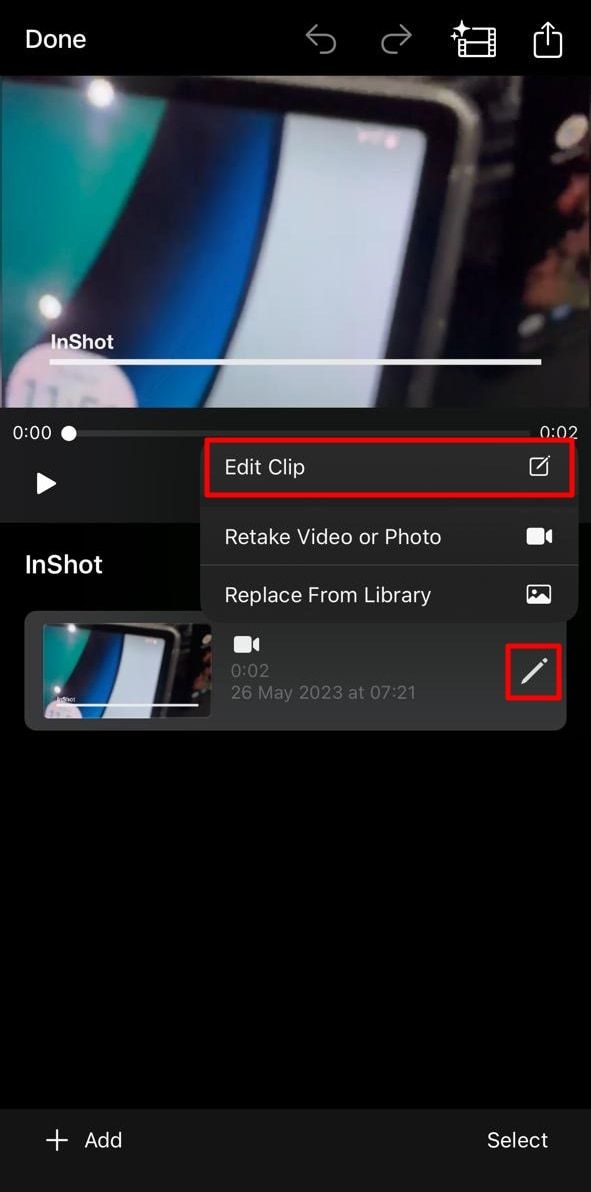
Step 2: After importing the video, click the “Pen” icon to access editing options. Then, click the “Edit Clip” option to do so.
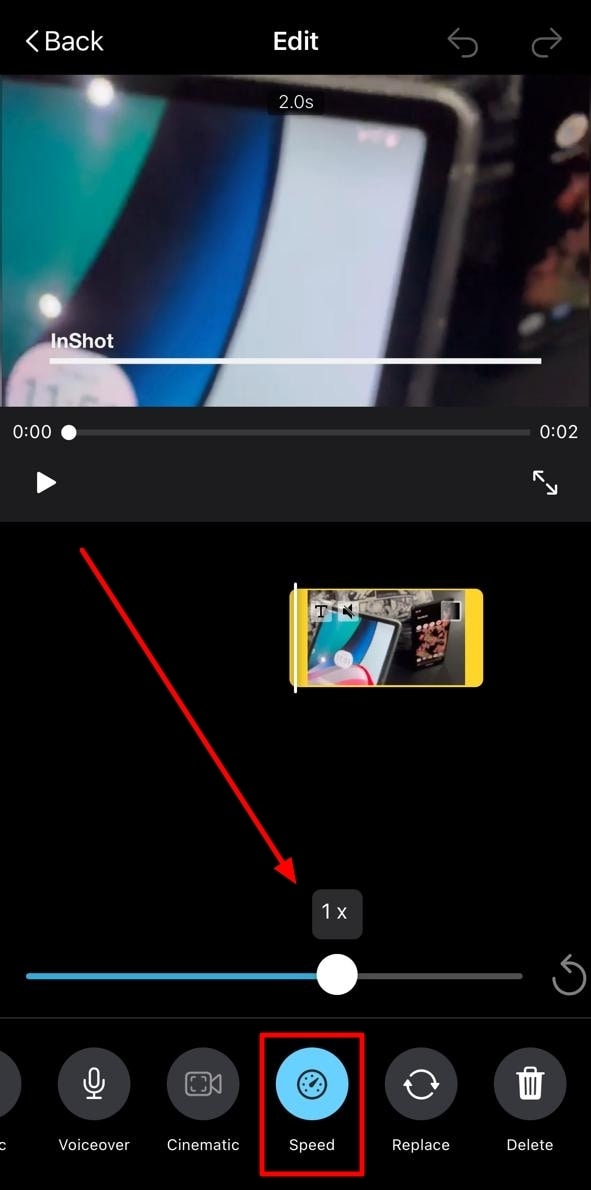
Step 3: Move to the bottom of the screen and slide the given option to access “Speed.” Click it and drag the speed slider towards the right side to increase the speed of the video.
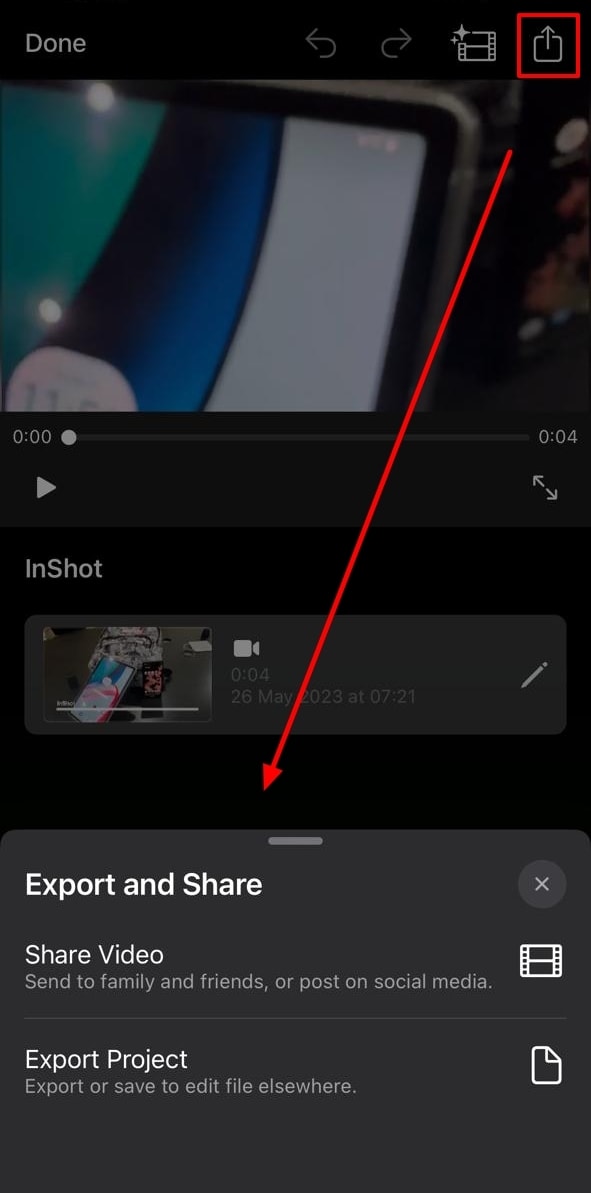
Step 4: Hit the “Play” button to see the speed of the video and re-adjust if required. Go to the top right corner of the screen, locate the “Export” icon, and click it.
2. Video Speed Changer – Editor
Want to learn how to make video fast motion on iPhone without additional technicalities? This application ensures a comprehensive narrative just for speed change. Users can formulate 3 fast motion effects with it at specific frames. For pre-recorded or new videos, it offers Time Wrap, Time Lapse, and Hyper-lapse. The application has been found to support iOS 12.3 and later versions.
Steps to Create a Fast Motion Video Using Video Speed Changer
Multiple applications provide similar services, but none can compare to its UI. Here is how to make a video fast motion iPhone using this
Step 1: Access this application from the App Store and launch it after installation. Click on the “Select Video” button and import a clip.

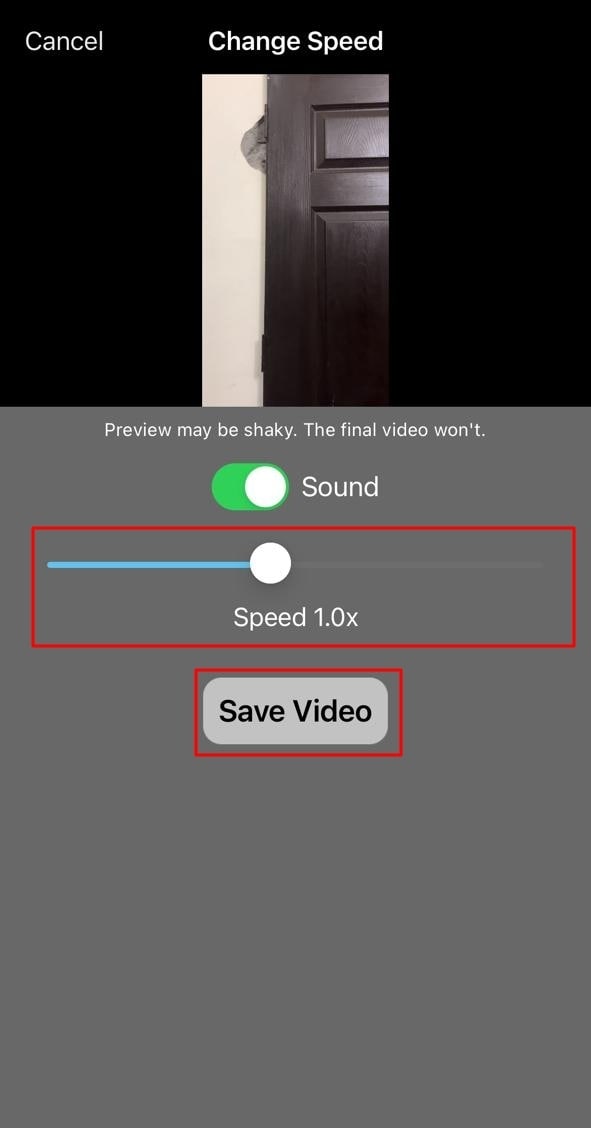
Step 2: Once you have selected a video, it will take you straight to the speed change option. Change the position of the given slider. Finally, preview the video and click the “Save Video” button to save it on your device.
3. Slow Motion Video FX Edit
Although the name indicates otherwise, this video editor is capable of high-speed change. It comes with an intuitive user interface and is easy for anyone to employ. In addition to speed alteration, you can insert 40 different filters into your video. You can also commence its freeze frame action to add an extra layer of creativity. The tool is compatible with iOS 13.0 and higher versions.
Steps to Create Fast Motion Using Slow Motion Video FX
This is another editor to gain insights on how to make fast-motion videos on an iPhone. We have given the verified step-by-step guide to using this app:
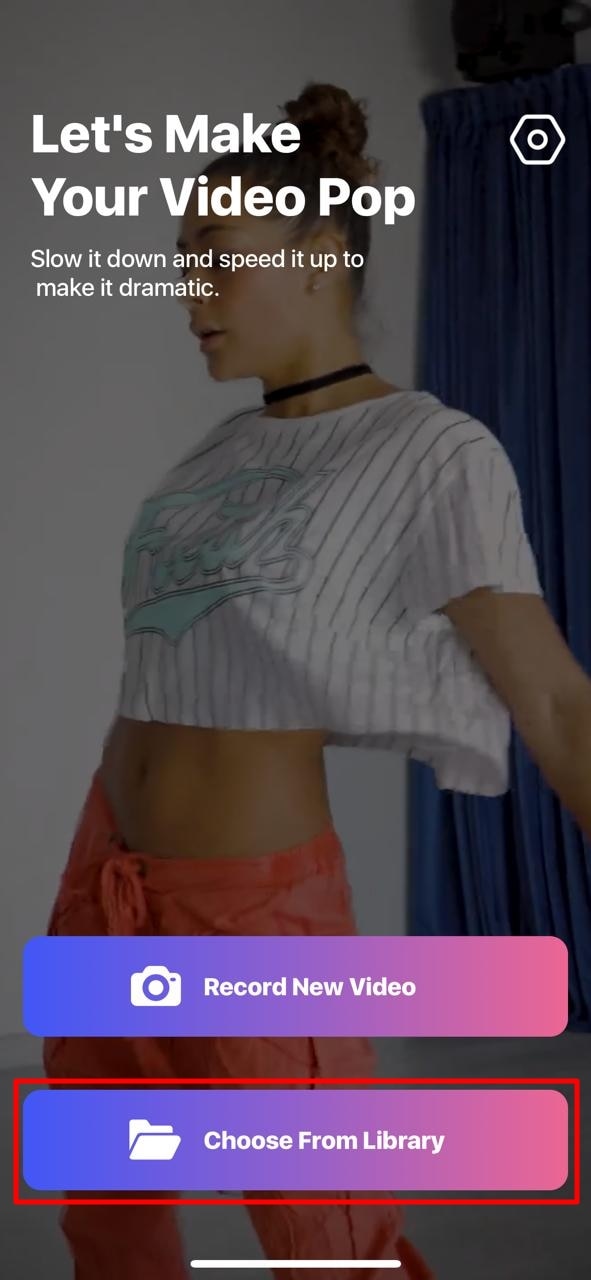
Step 1: After launching this application, click the “Choose From Library” option. Then, select a clip from your device’s gallery.
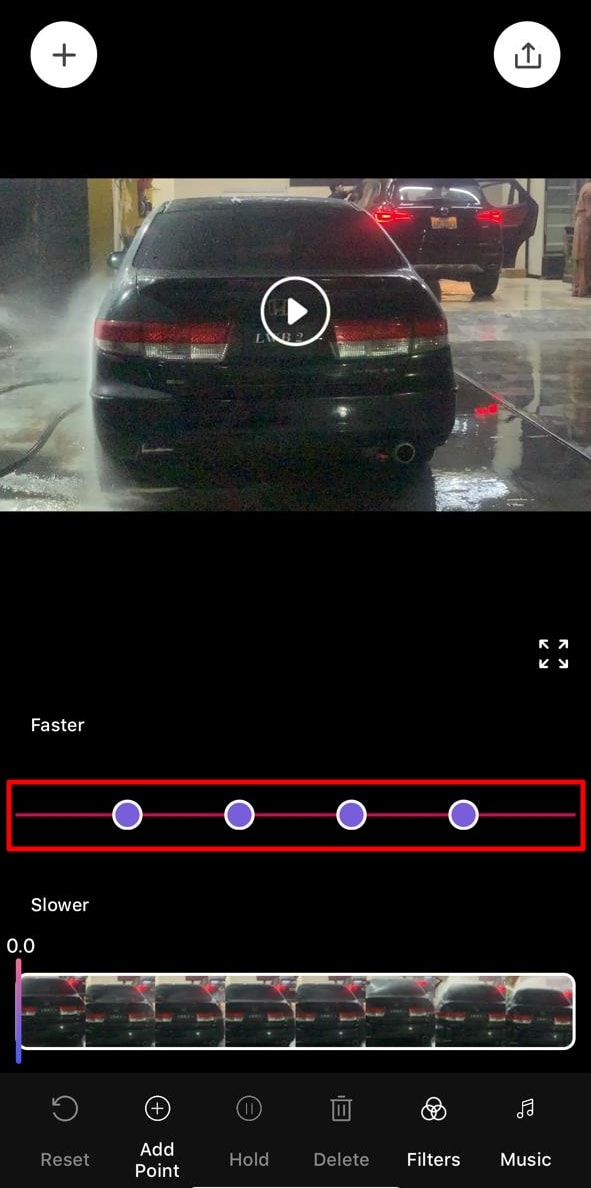
Step 2: Once the video is compressed, you’ll be taken to the speed change screen. From there, you can alter the speed of different clip sections. Move the slider of the relevant section upward to increase the speed.
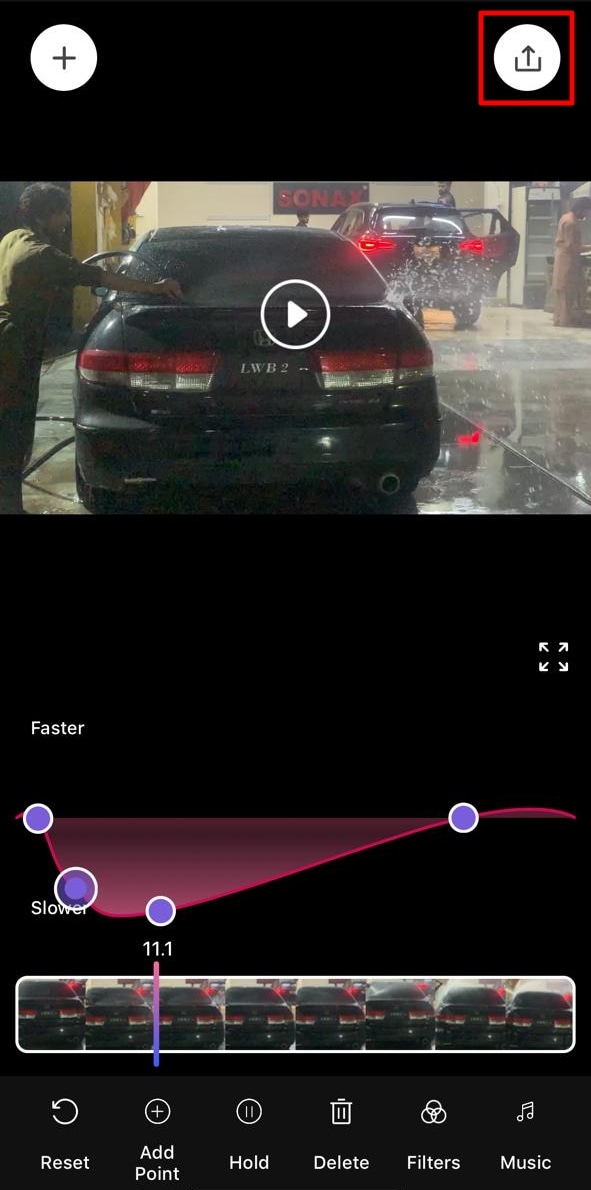
Step 3: Once you have altered the speed, navigate towards the top right corner and click the “Export” icon.
Part 3: Desktop Solution: Remedy for Those Who Want to Speed Up Video on Their Computer
If you have gone through the above applications, you know the fast-motion effect. Do you want to know how to make a video fast motion on an iPhone using a computer? Wondershare Filmora is the best alternative to the above applications for creating this effect. The software is compatible with all the macOS and iOS devices and allows seamless editing.
With this editor, you get multiple options to create a fast-motion video. In this article, we will use the Uniform Speed feature. The operating process is very accessible and designed to assist both professionals and beginners. You can also apply the AI Frame Interpolation option to apply “Frame Bending.”
Free Download For Win 7 or later(64-bit)
Free Download For macOS 10.14 or later
Step-by-Step Guide to Speed Up Video with Filmora
After reading the article till now, you have gained knowledge of Filmora’s speeding options. How to make fast motion video on iPhone now seems like an easy option. Even though the process is easy, we want you to stay ahead. Hence, here is a step-by-step procedure for creating fast motion in Filmora:
Step 1Create a New Project and Import Media
First, connect your iOS device to your Wondershare Filmora device. After that, launch Filmora to access the main menu. From there, click on the “New Project” tab fashioned in the center. Expand the “Import” option in the Project Media section and select the suitable option. In this case, choose the “Import from Phone or Camera” option.
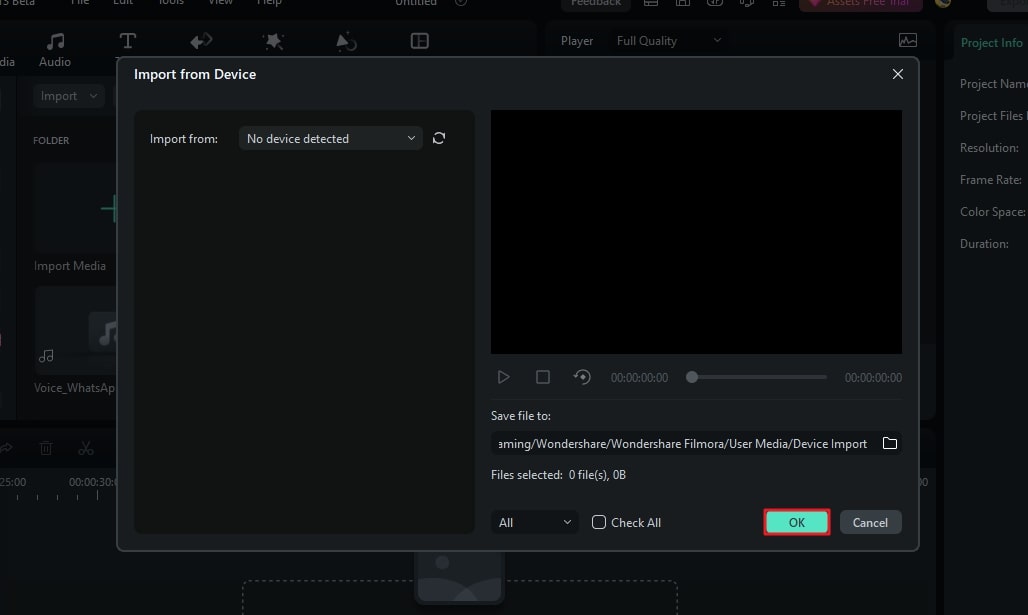
Step 2Access the Uniform Speed Section
After bringing the imported media to the timeline, select it to access the settings panel. Select the “Speed > Uniform Speed” tab from the appeared panel. Then, drag the Speed slider on the right side to increase speed. Afterward, click the “Play” button on the preview screen to see the results.
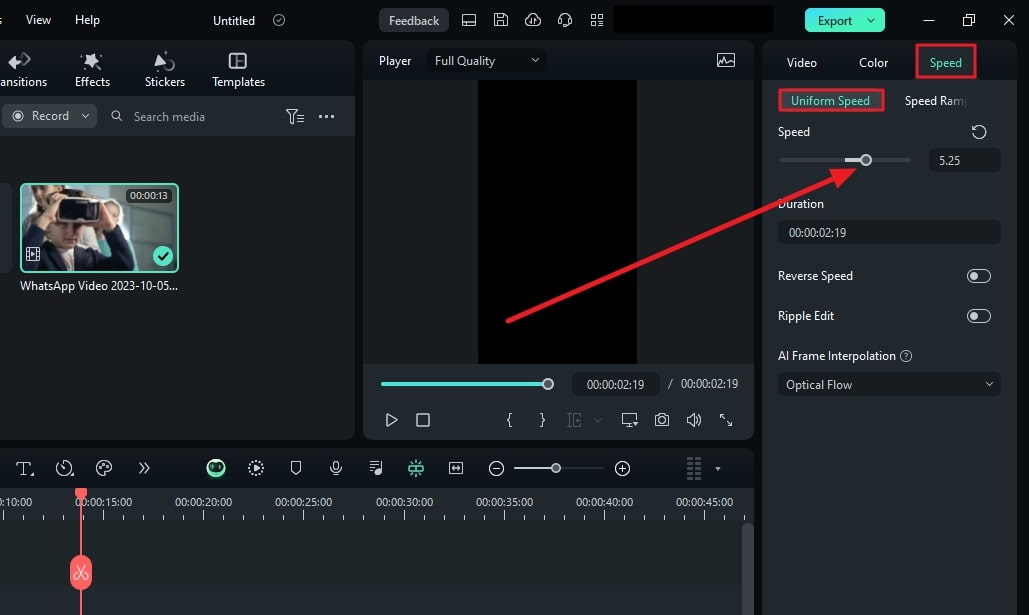
Step 3Apply Frame Bending and Export
This part is optional, but if you find an irregularity or roughness to the video, apply this. Go to the “AI Frame Interpolation” section at the bottom and expand the options. From the dropdown menu, select the “Frame Bending” option and do the rendering from the timeline. After everything is set, select the “Export” button at the top right corner.
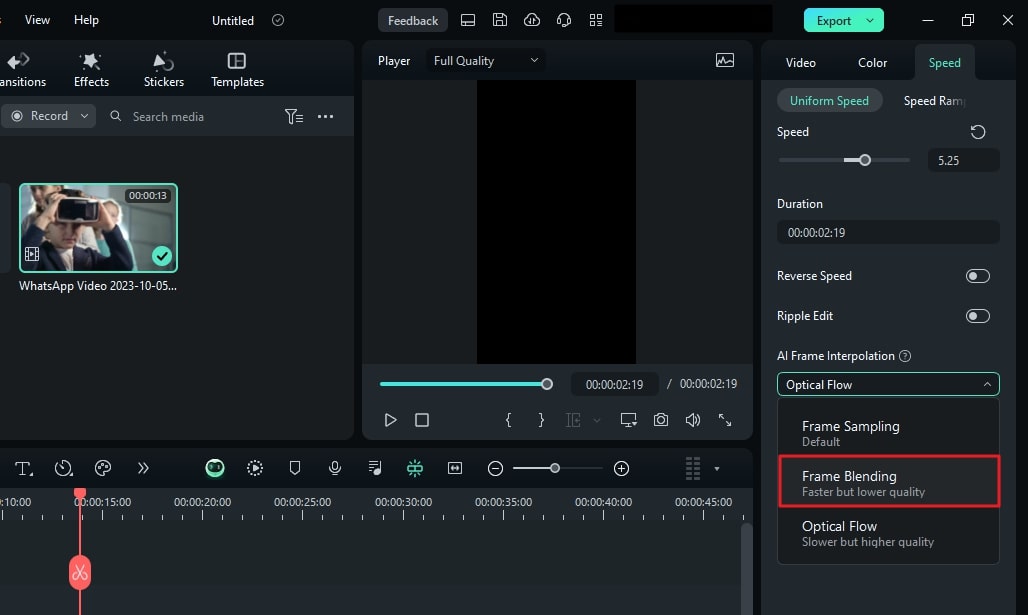
Trending Video Editing Features of Wondershare Filmora
Filmora is a versatile tool that is not confined to speed manipulation or fast motion only. This editor offers audio, text, AI editing options, and video. Here are some prominent key features of Wondershare Filmora to help you in editing:
1. Speed Ramping
The other option for speed modification mentioned previously is speed ramping. This option comes with 6 editable speed change presets for automated editing. However, you can also employ the custom preset to create your own way. Moreover, it allows the audio pitch option to enable automated maintenance of audio.
2. AI Smart Cutout
There is more than one way of removing and replacing a background in Filmora. Smart Cutout offers an AI-integrated masking option to cut out the selected parts. You can also set preferences for Edge Thickness or Edge Feather for accuracy. Afterward, you can introduce three background options: color, grid, or more.
3. AI Text-to-Video
Bring your imagination to visuals with this amazing generative AI video creator. It creates videos from text and covers the voice and graphical elements. Users can customize the AI voice and ratio before generating a video. The prompt section offers up to 1000 characters for adding a script or giving directions.
4. AI Smart Masking
Are there any effects or filters you want to introduce to only a specific part of the video? Use Filmora’s AI mask for automated masking of an object or background. The mask brush selects the relevant area on its own. Besides AI masks, there is a manual masking option or mask shapes to apply. You can also customize the Brush size according to the video.
Conclusion
The article highlighted the importance of increasing video speed in many industries. In addition, we discussed some tools that make fast motion with ease. We also provided step-by-step guides on how to make fast motion video on iPhone. Wondershare Filmora stands amongst all those applications to create fast motion. We recommend this software due to its multiple functionalities and detailed editing abilities.
Make A Slow Motion Video Make A Slow Motion Video More Features

Part 1: What are the Different Use Cases of Fast-Motion Videos?
The fast motion effect covers multiple creative ways of speed increase that you can incorporate. All these ways apply to different genres of videos. This section diverts your focus on different use cases of fast-motion videos. Here is how to make video fast motion on iPhone for different purposes:
1. Construction and Development Videos
Fast-motion videos help in video creation where development is happening. Such videos show the before and after results of an area, location, or building. The construction or manufacturing process is shown in fast motion in engineering videos. It also helps in showing the transformation of a non-populated or undeveloped city.
2. Nature Photography or Documentaries
Natural phenomenon like the blooming of a flower usually occurs at a slower rate. Capturing them takes a long time, but the audience may not like such a long duration. Hence, editors can increase the speed of such videos to speed up the phenomenon. In addition, if you watch wildlife or nature documentaries, they also use this effect.
3. Aesthetic Expression
Fast-paced videos bring a sense of creativity to your videos as they are an artistic expression of time. To indicate the passing of time in movies or to show a scene at a railway station or airport. It also indicates that the filmmakers and editors have put in an effort.
Part 2: Different Tools to Help You Make Fast Motion Video on iPhone
Fast-motion tools are important in video editing since they offer a chance at creativity. They have a wide range of applications in the filmmaking and media industry. Do you know how to make a video fast-motion iPhone using a third-party application? If not, here is a detailed guide on some of them:
1. iMovie
If you are looking for an accessible application with an easy-to-use interface, this is for you. The process of speed manipulation consists of a slider for control. After editing, you can integrate multiple soundtracks from 130 pre-assembled tracks. The application is compatible with iPhone X and newer versions.
Steps to Create a Fast Motion Video Using iMovie
Do you want to learn how to make fast-motion videos on your iPhone with this application? Given Below is your perfect guide to crafting a fast-paced video:
Step 1: After downloading the application on your iPhone, access it and “Start New Project.” Then, select a video from your media library to edit.

Step 2: After importing the video, click the “Pen” icon to access editing options. Then, click the “Edit Clip” option to do so.

Step 3: Move to the bottom of the screen and slide the given option to access “Speed.” Click it and drag the speed slider towards the right side to increase the speed of the video.

Step 4: Hit the “Play” button to see the speed of the video and re-adjust if required. Go to the top right corner of the screen, locate the “Export” icon, and click it.

2. Video Speed Changer – Editor
Want to learn how to make video fast motion on iPhone without additional technicalities? This application ensures a comprehensive narrative just for speed change. Users can formulate 3 fast motion effects with it at specific frames. For pre-recorded or new videos, it offers Time Wrap, Time Lapse, and Hyper-lapse. The application has been found to support iOS 12.3 and later versions.
Steps to Create a Fast Motion Video Using Video Speed Changer
Multiple applications provide similar services, but none can compare to its UI. Here is how to make a video fast motion iPhone using this
Step 1: Access this application from the App Store and launch it after installation. Click on the “Select Video” button and import a clip.

Step 2: Once you have selected a video, it will take you straight to the speed change option. Change the position of the given slider. Finally, preview the video and click the “Save Video” button to save it on your device.

3. Slow Motion Video FX Edit
Although the name indicates otherwise, this video editor is capable of high-speed change. It comes with an intuitive user interface and is easy for anyone to employ. In addition to speed alteration, you can insert 40 different filters into your video. You can also commence its freeze frame action to add an extra layer of creativity. The tool is compatible with iOS 13.0 and higher versions.
Steps to Create Fast Motion Using Slow Motion Video FX
This is another editor to gain insights on how to make fast-motion videos on an iPhone. We have given the verified step-by-step guide to using this app:
Step 1: After launching this application, click the “Choose From Library” option. Then, select a clip from your device’s gallery.

Step 2: Once the video is compressed, you’ll be taken to the speed change screen. From there, you can alter the speed of different clip sections. Move the slider of the relevant section upward to increase the speed.

Step 3: Once you have altered the speed, navigate towards the top right corner and click the “Export” icon.

Part 3: Desktop Solution: Remedy for Those Who Want to Speed Up Video on Their Computer
If you have gone through the above applications, you know the fast-motion effect. Do you want to know how to make a video fast motion on an iPhone using a computer? Wondershare Filmora is the best alternative to the above applications for creating this effect. The software is compatible with all the macOS and iOS devices and allows seamless editing.
With this editor, you get multiple options to create a fast-motion video. In this article, we will use the Uniform Speed feature. The operating process is very accessible and designed to assist both professionals and beginners. You can also apply the AI Frame Interpolation option to apply “Frame Bending.”
Free Download For Win 7 or later(64-bit)
Free Download For macOS 10.14 or later
Step-by-Step Guide to Speed Up Video with Filmora
After reading the article till now, you have gained knowledge of Filmora’s speeding options. How to make fast motion video on iPhone now seems like an easy option. Even though the process is easy, we want you to stay ahead. Hence, here is a step-by-step procedure for creating fast motion in Filmora:
Step 1Create a New Project and Import Media
First, connect your iOS device to your Wondershare Filmora device. After that, launch Filmora to access the main menu. From there, click on the “New Project” tab fashioned in the center. Expand the “Import” option in the Project Media section and select the suitable option. In this case, choose the “Import from Phone or Camera” option.

Step 2Access the Uniform Speed Section
After bringing the imported media to the timeline, select it to access the settings panel. Select the “Speed > Uniform Speed” tab from the appeared panel. Then, drag the Speed slider on the right side to increase speed. Afterward, click the “Play” button on the preview screen to see the results.

Step 3Apply Frame Bending and Export
This part is optional, but if you find an irregularity or roughness to the video, apply this. Go to the “AI Frame Interpolation” section at the bottom and expand the options. From the dropdown menu, select the “Frame Bending” option and do the rendering from the timeline. After everything is set, select the “Export” button at the top right corner.

Trending Video Editing Features of Wondershare Filmora
Filmora is a versatile tool that is not confined to speed manipulation or fast motion only. This editor offers audio, text, AI editing options, and video. Here are some prominent key features of Wondershare Filmora to help you in editing:
1. Speed Ramping
The other option for speed modification mentioned previously is speed ramping. This option comes with 6 editable speed change presets for automated editing. However, you can also employ the custom preset to create your own way. Moreover, it allows the audio pitch option to enable automated maintenance of audio.
2. AI Smart Cutout
There is more than one way of removing and replacing a background in Filmora. Smart Cutout offers an AI-integrated masking option to cut out the selected parts. You can also set preferences for Edge Thickness or Edge Feather for accuracy. Afterward, you can introduce three background options: color, grid, or more.
3. AI Text-to-Video
Bring your imagination to visuals with this amazing generative AI video creator. It creates videos from text and covers the voice and graphical elements. Users can customize the AI voice and ratio before generating a video. The prompt section offers up to 1000 characters for adding a script or giving directions.
4. AI Smart Masking
Are there any effects or filters you want to introduce to only a specific part of the video? Use Filmora’s AI mask for automated masking of an object or background. The mask brush selects the relevant area on its own. Besides AI masks, there is a manual masking option or mask shapes to apply. You can also customize the Brush size according to the video.
Conclusion
The article highlighted the importance of increasing video speed in many industries. In addition, we discussed some tools that make fast motion with ease. We also provided step-by-step guides on how to make fast motion video on iPhone. Wondershare Filmora stands amongst all those applications to create fast motion. We recommend this software due to its multiple functionalities and detailed editing abilities.
Green Screen YouTube Videos
This is a large green backdrop that is placed in the background of a shot to allow for digital effects later on. A majority of popular YouTube vloggers use green to enhance interesting background views to their videos. Screen replaces the background and adds depth and visually interesting patterns that ends up keeping the viewer captivated.
Why use Green Screen
1. Creativity
There are several effects that can be applied to green screen video editing in the editing process, it gives one a chance to explore their imagination. A good editor can really customize the video to make the production really stand out from those of the competitors.
2. Flexibility
There are portable green screens that can be taken to any location of choice for video shooting. Location allows one endless possibilities without having to spend time and resources doing assembling of different sets and backgrounds. The desired feel to the video can be simply achieved by an image.
3. Budget
Filming YouTube using green screen is a cost effective way of producing professional video content on a small budget. This is a great idea for upcoming YouTube vloggers as expenses catering for travel and location are eliminated.
4. Consistency
At some point in YouTube green screen use, you may be affected by the weather and worse pf all, natural lighting may end up being problematic while you are on location doing your video shots. However, with YouTube Video green screen technology, ambient lighting is blocked out and the screen can be lit the same way every time. This brings consistency over a number of videos the user applies green screen on.
5. Clarity
Youtube video green screen allows for an additional visual ellements and diagrams such as graphics, this can be added on to the video to illustrate what the speaker is saying. This green screen effect helps the viewer to gain a better understanding of any concepts or complex illustrations mentioned by the presenter.
6. Branding
YouTube green screen logo and branding colors can be easily added into the video, this can easily make the viewers to identify the video with your business. Apart from standing out from other competitors, you will also have a professional, high quality and reliable video to use anytime you please.
Best Places to find Green Screen Effects
Filmstock
Filmstock features a massive library full of royalty-free stock video, video effects, sound effects, video templates, and so much more. There are resources on the platform for all kinds of creators, including video editors, content creators, social media influencers, and marketers. You get unlimited access to all these resources for a single price when you subscribe to Filmstock. While there are other marketplaces that offer similar options, Filmstock does things differently.
Green Screen Effects
1. Balance Beam
Ever wanted to walk across a small beam way high up in the air? Me neither, but you can make a cool effect that looks like you did. Throwing a green screen on the ground and then building a balance beam over top of it you can start recording the main shot. Strap a GoPro to your head and look down while walking across the beam.
2. Shrink Effect
Okay this one is really easy. Take some footage of a person walking in front of a green screen, ideally looking at something to be featured in the main shot to sell the effect. Then take a close up of a small object. Key out the green behind the person, take the footage and drop it over your close up, and then scale it to match. Duplicate it, mirror it horizontally to act as a reflection and then drop the opacity and add some blur to make it look more realistic. It’s a fun little trick.
3. Floating Object
This is a simple one, making an object appear to be floating. This is another two clip shot. First, take a shot with the object hanging in front of a blue screen. Then on the same location, take another shot but while pretending to levitate the hammer. Masking around the hammer will get rid of the string for hanging, key out the blue, and then dropping it on top of the other clip is all you need.
Best Green Screen Video Editor for YouTube
Filmora
If you’re just starting out with video editing, or just want a simple program that works, Wondershare Filmora might be what you’re looking for. It has the essential tools, and anyone can learn to use it easily.
Wondershare Filmora is the one of best video editing software with cool features that compares to other competing video editing Softwares. Many video editing programs claim to offer professional results; Filmora is one of a few consumer-level tools that actually delivers.
For Win 7 or later (64-bit)
For macOS 10.12 or later
Installation Steps
- Click the icon in the center of the Media Library to add files directly.
- Go File > Import Media > Import Media Files.
- Drag and drop to the Media Library directly.
While importing a media file, Wondershar Filmora may ask you if you wish to create a proxy file to accelerate the editing process. Select “Yes” to have a fast video editing experience.
You can also import video clips using your Touch Bar controls if your computer has Touch Bar.
Record a media file
Apart from the videos shot by your digital devices, you can also directly import media files by recording video from your webcam, capturing the computer screen, or recording a voice-over.
Find green screen effects: Now you can select the different types of green screen effects.

Apply green screen: drag the effects to the timeline to apply it to your videos.

Save and Export: Then you can save or export the video.
A green screen is a green surface used as a background when filming so that any image can replace the screen behind the actor or presenter. Shooting with a green screen involves filming a person or adding visual effects in front of a solid color. Then, by digitally removing or “keying out” that color, you can drop that scene onto the background of your choice in post-production. Removing the colored background is also referred to as “chroma keying.”
Steps with Images
The first step is to record footage in front of a green screen so that you can import it into WeVideo as a media file. To capture footage that is optimal for the Green Screen effect, please ensure the following:
- There is ample lighting distributed evenly around you with no shadows.
- You are in front of a solid background with no creases. Green or blue is the recommended color for your background.
- The quality of your camera is high enough so that the footage is not pixelated or grainy. 720p HD footage or above is recommended.
Step 2) Add media to the Timeline
Once you’ve captured the footage you want to use for the Green Screen effect, import that media file and add it to the Timeline. Remember to place the green screen footage in the Video 2 track and the clip you would like to use as the background in the Video 1 track.
If you are using more than two video tracks, place the green screen footage in the track above whichever track holds the background footage to ensure proper layering techniques are used.
Step 3) Open the clip editor
Double click on the green screen clip in the Timeline to open the clip editor. In the clip editor, navigate to the Color Keying tab.
Step 4) Use the color picker tool
Select the color picker tool and then click anywhere on the green screen footage to apply the effect.
Step 5) _(optional) Adjust the color settings
The Green Screen effect should automatically apply without the need to adjust the color settings. However, if you would like to make these additional modifications, you can use the scroll bars to make the following adjustments:
- **Show- You can select Mask to reveal a black and white representation of the mask you are applying using the color keying tool. Notice that the black area represents transparent sections of your video, while the white area represents opaque sections.
- **Color Balance- This adjusts how selective the effect is. The further right you scroll, the wider the range of tints and shades are removed.
- **Color Sensitivity- This smooths out any pixelation and rough edges of color that remain.
- **Defringe- This helps reduce color bleeding at the edges of your mask. The left and right sliders control the level of white and black respectively to help match the edges of the mask with your new background color.
For macOS 10.12 or later
Installation Steps
- Click the icon in the center of the Media Library to add files directly.
- Go File > Import Media > Import Media Files.
- Drag and drop to the Media Library directly.
While importing a media file, Wondershar Filmora may ask you if you wish to create a proxy file to accelerate the editing process. Select “Yes” to have a fast video editing experience.
You can also import video clips using your Touch Bar controls if your computer has Touch Bar.
Record a media file
Apart from the videos shot by your digital devices, you can also directly import media files by recording video from your webcam, capturing the computer screen, or recording a voice-over.
Find green screen effects: Now you can select the different types of green screen effects.

Apply green screen: drag the effects to the timeline to apply it to your videos.

Save and Export: Then you can save or export the video.
A green screen is a green surface used as a background when filming so that any image can replace the screen behind the actor or presenter. Shooting with a green screen involves filming a person or adding visual effects in front of a solid color. Then, by digitally removing or “keying out” that color, you can drop that scene onto the background of your choice in post-production. Removing the colored background is also referred to as “chroma keying.”
Steps with Images
The first step is to record footage in front of a green screen so that you can import it into WeVideo as a media file. To capture footage that is optimal for the Green Screen effect, please ensure the following:
- There is ample lighting distributed evenly around you with no shadows.
- You are in front of a solid background with no creases. Green or blue is the recommended color for your background.
- The quality of your camera is high enough so that the footage is not pixelated or grainy. 720p HD footage or above is recommended.
Step 2) Add media to the Timeline
Once you’ve captured the footage you want to use for the Green Screen effect, import that media file and add it to the Timeline. Remember to place the green screen footage in the Video 2 track and the clip you would like to use as the background in the Video 1 track.
If you are using more than two video tracks, place the green screen footage in the track above whichever track holds the background footage to ensure proper layering techniques are used.
Step 3) Open the clip editor
Double click on the green screen clip in the Timeline to open the clip editor. In the clip editor, navigate to the Color Keying tab.
Step 4) Use the color picker tool
Select the color picker tool and then click anywhere on the green screen footage to apply the effect.
Step 5) _(optional) Adjust the color settings
The Green Screen effect should automatically apply without the need to adjust the color settings. However, if you would like to make these additional modifications, you can use the scroll bars to make the following adjustments:
- **Show- You can select Mask to reveal a black and white representation of the mask you are applying using the color keying tool. Notice that the black area represents transparent sections of your video, while the white area represents opaque sections.
- **Color Balance- This adjusts how selective the effect is. The further right you scroll, the wider the range of tints and shades are removed.
- **Color Sensitivity- This smooths out any pixelation and rough edges of color that remain.
- **Defringe- This helps reduce color bleeding at the edges of your mask. The left and right sliders control the level of white and black respectively to help match the edges of the mask with your new background color.
For macOS 10.12 or later
Installation Steps
- Click the icon in the center of the Media Library to add files directly.
- Go File > Import Media > Import Media Files.
- Drag and drop to the Media Library directly.
While importing a media file, Wondershar Filmora may ask you if you wish to create a proxy file to accelerate the editing process. Select “Yes” to have a fast video editing experience.
You can also import video clips using your Touch Bar controls if your computer has Touch Bar.
Record a media file
Apart from the videos shot by your digital devices, you can also directly import media files by recording video from your webcam, capturing the computer screen, or recording a voice-over.
Find green screen effects: Now you can select the different types of green screen effects.

Apply green screen: drag the effects to the timeline to apply it to your videos.

Save and Export: Then you can save or export the video.
A green screen is a green surface used as a background when filming so that any image can replace the screen behind the actor or presenter. Shooting with a green screen involves filming a person or adding visual effects in front of a solid color. Then, by digitally removing or “keying out” that color, you can drop that scene onto the background of your choice in post-production. Removing the colored background is also referred to as “chroma keying.”
Steps with Images
The first step is to record footage in front of a green screen so that you can import it into WeVideo as a media file. To capture footage that is optimal for the Green Screen effect, please ensure the following:
- There is ample lighting distributed evenly around you with no shadows.
- You are in front of a solid background with no creases. Green or blue is the recommended color for your background.
- The quality of your camera is high enough so that the footage is not pixelated or grainy. 720p HD footage or above is recommended.
Step 2) Add media to the Timeline
Once you’ve captured the footage you want to use for the Green Screen effect, import that media file and add it to the Timeline. Remember to place the green screen footage in the Video 2 track and the clip you would like to use as the background in the Video 1 track.
If you are using more than two video tracks, place the green screen footage in the track above whichever track holds the background footage to ensure proper layering techniques are used.
Step 3) Open the clip editor
Double click on the green screen clip in the Timeline to open the clip editor. In the clip editor, navigate to the Color Keying tab.
Step 4) Use the color picker tool
Select the color picker tool and then click anywhere on the green screen footage to apply the effect.
Step 5) _(optional) Adjust the color settings
The Green Screen effect should automatically apply without the need to adjust the color settings. However, if you would like to make these additional modifications, you can use the scroll bars to make the following adjustments:
- **Show- You can select Mask to reveal a black and white representation of the mask you are applying using the color keying tool. Notice that the black area represents transparent sections of your video, while the white area represents opaque sections.
- **Color Balance- This adjusts how selective the effect is. The further right you scroll, the wider the range of tints and shades are removed.
- **Color Sensitivity- This smooths out any pixelation and rough edges of color that remain.
- **Defringe- This helps reduce color bleeding at the edges of your mask. The left and right sliders control the level of white and black respectively to help match the edges of the mask with your new background color.
For macOS 10.12 or later
Installation Steps
- Click the icon in the center of the Media Library to add files directly.
- Go File > Import Media > Import Media Files.
- Drag and drop to the Media Library directly.
While importing a media file, Wondershar Filmora may ask you if you wish to create a proxy file to accelerate the editing process. Select “Yes” to have a fast video editing experience.
You can also import video clips using your Touch Bar controls if your computer has Touch Bar.
Record a media file
Apart from the videos shot by your digital devices, you can also directly import media files by recording video from your webcam, capturing the computer screen, or recording a voice-over.
Find green screen effects: Now you can select the different types of green screen effects.

Apply green screen: drag the effects to the timeline to apply it to your videos.

Save and Export: Then you can save or export the video.
A green screen is a green surface used as a background when filming so that any image can replace the screen behind the actor or presenter. Shooting with a green screen involves filming a person or adding visual effects in front of a solid color. Then, by digitally removing or “keying out” that color, you can drop that scene onto the background of your choice in post-production. Removing the colored background is also referred to as “chroma keying.”
Steps with Images
The first step is to record footage in front of a green screen so that you can import it into WeVideo as a media file. To capture footage that is optimal for the Green Screen effect, please ensure the following:
- There is ample lighting distributed evenly around you with no shadows.
- You are in front of a solid background with no creases. Green or blue is the recommended color for your background.
- The quality of your camera is high enough so that the footage is not pixelated or grainy. 720p HD footage or above is recommended.
Step 2) Add media to the Timeline
Once you’ve captured the footage you want to use for the Green Screen effect, import that media file and add it to the Timeline. Remember to place the green screen footage in the Video 2 track and the clip you would like to use as the background in the Video 1 track.
If you are using more than two video tracks, place the green screen footage in the track above whichever track holds the background footage to ensure proper layering techniques are used.
Step 3) Open the clip editor
Double click on the green screen clip in the Timeline to open the clip editor. In the clip editor, navigate to the Color Keying tab.
Step 4) Use the color picker tool
Select the color picker tool and then click anywhere on the green screen footage to apply the effect.
Step 5) _(optional) Adjust the color settings
The Green Screen effect should automatically apply without the need to adjust the color settings. However, if you would like to make these additional modifications, you can use the scroll bars to make the following adjustments:
- **Show- You can select Mask to reveal a black and white representation of the mask you are applying using the color keying tool. Notice that the black area represents transparent sections of your video, while the white area represents opaque sections.
- **Color Balance- This adjusts how selective the effect is. The further right you scroll, the wider the range of tints and shades are removed.
- **Color Sensitivity- This smooths out any pixelation and rough edges of color that remain.
- **Defringe- This helps reduce color bleeding at the edges of your mask. The left and right sliders control the level of white and black respectively to help match the edges of the mask with your new background color.
Split Audio From Video in Adobe Premiere Pro [Step by Step]
Adobe Premiere Pro is mainly designed and helpful for all video editors looking for options to enhance their tasks. It is beneficial for transforming any random video into an awesome video. There are different tools so you can experience your creative skills on Premiere Pro. It enables the fine-tuning of the audio, adjustments of the colourings, and supports various formats.
There is an integration of this software with other products of Adobe. So, it is pretty easy for you to transfer the task from one adobe software to another. This helps in editing and using the complete outcome according to the needs. This article is regarding the guidance about the split of the audio from the video in Premiere Pro. And also, the discussion of the Wondershare Fllmora as the replacement and how to perform a similar task in it.
How is it possible to split the audio from the video in Adobe Premiere Pro?
The Adobe Premiere Pro is quite popular for its tools and works smoothly. The whole interface also helps increase the entire work’s productivity, efficiency, and effectiveness. It is very easy to open several projects at the exact timings. It is very simple and easy to add the clips and even extract the audio from the video clips. Please take a step by step below to extract the audio from your video files, whether it is on Windows or Mac operating system.
Step 1: The first step is the creation of the project. Go to the File tab on the toolbar and select the New option.

Step 2: Import the video that you want to be mute. File à Import.

Step 3: From the project panel, drag and drop the project in the timeline panel.

Step 4: Now is the time to select the video clip from the timeline. Click on the video layer for the selection.

Step 5: Right-click on the video presentation on the timeline and select the option of “unlink” from the drop-down menu.

Step 6: Now delete the audio from the video you want to separate. For deleting the audio, either select the layer and press the “delete” key. Or you can choose the layer from audio from which you are unlinking from the video and choose the option of “Clear” from the menu.
You have received success in separating the audio from the video clip with the help of Adobe Premiere Pro. It is easy to edit the track as your own choice. Export options are also available, so you can share them wherever you want.

One easier way to separate the audio from the video clips
It is a fact that Premiere Pro is an extraordinary software, but unluckily, its features depend on the subscription monthly or yearly. It requires high storage memory from your system. While working on this software, it increases the complexity.
That’s the reason the graphic designers and video editor are always in search of feasible and straight forward editing software. Filmora Video Editor is the right solution of all the issues.
It is light to the systems and all the features are freely available without any subscription. No matter which operating system you are using Wondershare Filmora is easily available to run on it. Whether it is separating the audio or removing the background, each and everything is simple for handling.
For Win 7 or later (64-bit)
For macOS 10.14 or later
Features:
- Preview of using the tools before applying the changes
- Numerous tools are available for customizing the videos and images
- Splitting of the clips and screens as well
- Involving of the graphics and animation
- Simply drag and drop the videos in the timeline
- Mixing of the audio
- Removing the noise
Under this heading are the steps for guiding you regarding the extraction or separation of the audio from your videos.
Step :1
Simply launch the Wondershare Filmora after it installs your system. If it is already installed, then start creating the new project.
Step:2
Import the file in the timeline you want to remove or separate the audio. Go to the File menuàimport the media file or press the keys of CTRL+I on the keyboard.

Step :3
Drag and drop the video clip in the timeline to proceed with editing.

Step:4
Right-click on your video and choose the option of “Detach Audio”. Then the new track of the audio appears in the timeline.

Step:5
Select the audio you have just received above and select the option of “Delete”.

Step:6
Click on the button “Export” for exporting the video.

Step:7
Please choose the format of your choice, name the file and choose the folder where you want to save it. Even setting the resolution, decoding the video and frame rate is also possible. These options are under the settings button. Click on “Export” to begin the exporting of the video. Wondershare Filmora supports a number of video formats, as you can see in the picture below. So, it is also possible to save the video in the format of your choice. It supports 4K quality.

Every website, blog or social media page doesn’t look appealing without the videos. So, the video plays an essential role in showing your presence on the web, and for this purpose, you need the most straightforward editing software. Wondershare Filmora is the proper selection as it has all the tools no matter you are familiar with it or not.
It can completely transform your videos with amazing tools and features that bring a WOW factor to your images and videos. There is a whole library for effects; whether for transition or animation; everything is available. Start using Wondershare Filmora today and have fun.
Step 2: Import the video that you want to be mute. File à Import.

Step 3: From the project panel, drag and drop the project in the timeline panel.

Step 4: Now is the time to select the video clip from the timeline. Click on the video layer for the selection.

Step 5: Right-click on the video presentation on the timeline and select the option of “unlink” from the drop-down menu.

Step 6: Now delete the audio from the video you want to separate. For deleting the audio, either select the layer and press the “delete” key. Or you can choose the layer from audio from which you are unlinking from the video and choose the option of “Clear” from the menu.
You have received success in separating the audio from the video clip with the help of Adobe Premiere Pro. It is easy to edit the track as your own choice. Export options are also available, so you can share them wherever you want.

One easier way to separate the audio from the video clips
It is a fact that Premiere Pro is an extraordinary software, but unluckily, its features depend on the subscription monthly or yearly. It requires high storage memory from your system. While working on this software, it increases the complexity.
That’s the reason the graphic designers and video editor are always in search of feasible and straight forward editing software. Filmora Video Editor is the right solution of all the issues.
It is light to the systems and all the features are freely available without any subscription. No matter which operating system you are using Wondershare Filmora is easily available to run on it. Whether it is separating the audio or removing the background, each and everything is simple for handling.
For Win 7 or later (64-bit)
For macOS 10.14 or later
Features:
- Preview of using the tools before applying the changes
- Numerous tools are available for customizing the videos and images
- Splitting of the clips and screens as well
- Involving of the graphics and animation
- Simply drag and drop the videos in the timeline
- Mixing of the audio
- Removing the noise
Under this heading are the steps for guiding you regarding the extraction or separation of the audio from your videos.
Step :1
Simply launch the Wondershare Filmora after it installs your system. If it is already installed, then start creating the new project.
Step:2
Import the file in the timeline you want to remove or separate the audio. Go to the File menuàimport the media file or press the keys of CTRL+I on the keyboard.

Step :3
Drag and drop the video clip in the timeline to proceed with editing.

Step:4
Right-click on your video and choose the option of “Detach Audio”. Then the new track of the audio appears in the timeline.

Step:5
Select the audio you have just received above and select the option of “Delete”.

Step:6
Click on the button “Export” for exporting the video.

Step:7
Please choose the format of your choice, name the file and choose the folder where you want to save it. Even setting the resolution, decoding the video and frame rate is also possible. These options are under the settings button. Click on “Export” to begin the exporting of the video. Wondershare Filmora supports a number of video formats, as you can see in the picture below. So, it is also possible to save the video in the format of your choice. It supports 4K quality.

Every website, blog or social media page doesn’t look appealing without the videos. So, the video plays an essential role in showing your presence on the web, and for this purpose, you need the most straightforward editing software. Wondershare Filmora is the proper selection as it has all the tools no matter you are familiar with it or not.
It can completely transform your videos with amazing tools and features that bring a WOW factor to your images and videos. There is a whole library for effects; whether for transition or animation; everything is available. Start using Wondershare Filmora today and have fun.
Step 2: Import the video that you want to be mute. File à Import.

Step 3: From the project panel, drag and drop the project in the timeline panel.

Step 4: Now is the time to select the video clip from the timeline. Click on the video layer for the selection.

Step 5: Right-click on the video presentation on the timeline and select the option of “unlink” from the drop-down menu.

Step 6: Now delete the audio from the video you want to separate. For deleting the audio, either select the layer and press the “delete” key. Or you can choose the layer from audio from which you are unlinking from the video and choose the option of “Clear” from the menu.
You have received success in separating the audio from the video clip with the help of Adobe Premiere Pro. It is easy to edit the track as your own choice. Export options are also available, so you can share them wherever you want.

One easier way to separate the audio from the video clips
It is a fact that Premiere Pro is an extraordinary software, but unluckily, its features depend on the subscription monthly or yearly. It requires high storage memory from your system. While working on this software, it increases the complexity.
That’s the reason the graphic designers and video editor are always in search of feasible and straight forward editing software. Filmora Video Editor is the right solution of all the issues.
It is light to the systems and all the features are freely available without any subscription. No matter which operating system you are using Wondershare Filmora is easily available to run on it. Whether it is separating the audio or removing the background, each and everything is simple for handling.
For Win 7 or later (64-bit)
For macOS 10.14 or later
Features:
- Preview of using the tools before applying the changes
- Numerous tools are available for customizing the videos and images
- Splitting of the clips and screens as well
- Involving of the graphics and animation
- Simply drag and drop the videos in the timeline
- Mixing of the audio
- Removing the noise
Under this heading are the steps for guiding you regarding the extraction or separation of the audio from your videos.
Step :1
Simply launch the Wondershare Filmora after it installs your system. If it is already installed, then start creating the new project.
Step:2
Import the file in the timeline you want to remove or separate the audio. Go to the File menuàimport the media file or press the keys of CTRL+I on the keyboard.

Step :3
Drag and drop the video clip in the timeline to proceed with editing.

Step:4
Right-click on your video and choose the option of “Detach Audio”. Then the new track of the audio appears in the timeline.

Step:5
Select the audio you have just received above and select the option of “Delete”.

Step:6
Click on the button “Export” for exporting the video.

Step:7
Please choose the format of your choice, name the file and choose the folder where you want to save it. Even setting the resolution, decoding the video and frame rate is also possible. These options are under the settings button. Click on “Export” to begin the exporting of the video. Wondershare Filmora supports a number of video formats, as you can see in the picture below. So, it is also possible to save the video in the format of your choice. It supports 4K quality.

Every website, blog or social media page doesn’t look appealing without the videos. So, the video plays an essential role in showing your presence on the web, and for this purpose, you need the most straightforward editing software. Wondershare Filmora is the proper selection as it has all the tools no matter you are familiar with it or not.
It can completely transform your videos with amazing tools and features that bring a WOW factor to your images and videos. There is a whole library for effects; whether for transition or animation; everything is available. Start using Wondershare Filmora today and have fun.
Step 2: Import the video that you want to be mute. File à Import.

Step 3: From the project panel, drag and drop the project in the timeline panel.

Step 4: Now is the time to select the video clip from the timeline. Click on the video layer for the selection.

Step 5: Right-click on the video presentation on the timeline and select the option of “unlink” from the drop-down menu.

Step 6: Now delete the audio from the video you want to separate. For deleting the audio, either select the layer and press the “delete” key. Or you can choose the layer from audio from which you are unlinking from the video and choose the option of “Clear” from the menu.
You have received success in separating the audio from the video clip with the help of Adobe Premiere Pro. It is easy to edit the track as your own choice. Export options are also available, so you can share them wherever you want.

One easier way to separate the audio from the video clips
It is a fact that Premiere Pro is an extraordinary software, but unluckily, its features depend on the subscription monthly or yearly. It requires high storage memory from your system. While working on this software, it increases the complexity.
That’s the reason the graphic designers and video editor are always in search of feasible and straight forward editing software. Filmora Video Editor is the right solution of all the issues.
It is light to the systems and all the features are freely available without any subscription. No matter which operating system you are using Wondershare Filmora is easily available to run on it. Whether it is separating the audio or removing the background, each and everything is simple for handling.
For Win 7 or later (64-bit)
For macOS 10.14 or later
Features:
- Preview of using the tools before applying the changes
- Numerous tools are available for customizing the videos and images
- Splitting of the clips and screens as well
- Involving of the graphics and animation
- Simply drag and drop the videos in the timeline
- Mixing of the audio
- Removing the noise
Under this heading are the steps for guiding you regarding the extraction or separation of the audio from your videos.
Step :1
Simply launch the Wondershare Filmora after it installs your system. If it is already installed, then start creating the new project.
Step:2
Import the file in the timeline you want to remove or separate the audio. Go to the File menuàimport the media file or press the keys of CTRL+I on the keyboard.

Step :3
Drag and drop the video clip in the timeline to proceed with editing.

Step:4
Right-click on your video and choose the option of “Detach Audio”. Then the new track of the audio appears in the timeline.

Step:5
Select the audio you have just received above and select the option of “Delete”.

Step:6
Click on the button “Export” for exporting the video.

Step:7
Please choose the format of your choice, name the file and choose the folder where you want to save it. Even setting the resolution, decoding the video and frame rate is also possible. These options are under the settings button. Click on “Export” to begin the exporting of the video. Wondershare Filmora supports a number of video formats, as you can see in the picture below. So, it is also possible to save the video in the format of your choice. It supports 4K quality.

Every website, blog or social media page doesn’t look appealing without the videos. So, the video plays an essential role in showing your presence on the web, and for this purpose, you need the most straightforward editing software. Wondershare Filmora is the proper selection as it has all the tools no matter you are familiar with it or not.
It can completely transform your videos with amazing tools and features that bring a WOW factor to your images and videos. There is a whole library for effects; whether for transition or animation; everything is available. Start using Wondershare Filmora today and have fun.
Best Audio Plug-Ins For Video Editors
When it comes to improving the sound of the audio in your video editing projects, you have a variety of options to choose from when approaching the editing. Most plugins that we will cover today will be helpful for many different effects instead of only one particular one.
Let’s get started!
1. Synchro Arts Revoice Pro
Let’s talk about Revoice Pro 4. This is an awesome plugin for when you are finishing complex editing projects when you work with dialogues and need to synchronize other lines to fit the shot. Revoice Pro 4 combines timing and pitch alignment technology, together with as a pair of cutting-edge tuning tools and a natural-sounding vocal doubler for people working on the narrator voice.
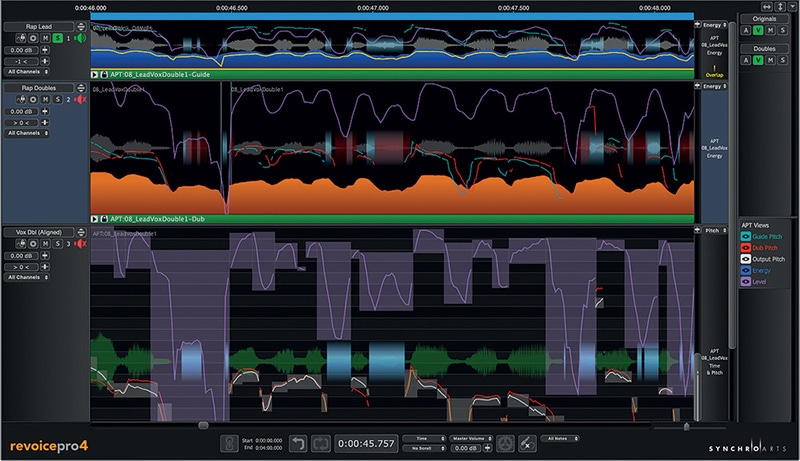
For the video editors working in audio post-production, the stand out new feature added to Revoice Pro is Smart Align combined with a fast workflow, meaning that you don’t need to leave Pro Tools to synchronize ADR to the location audio. Although Version 4.3 presented an ARA version of the Revoice Pro link plug-in for Logic Pro users, so providing immediate transfers back and forth between Logic Pro or higher Synchro Arts haven’t counted out Pro Tools users by preparing a new set of AudioSuite plugins.
The APT procedures, used to align the pitch and timing of multiple vocal tracks, now includes SmartAlign. When this is turned on, it can align audio with significant gaps in the guide or even dub the audio. This feature enables you to align much longer performances, which in the past had to be divided into smaller sections.
As Revoice Pro has improved over the years, the latest version is giving you the ultimate workflow it should always have had in the past. Synchro Arts have been able to create the perfect workflow with an AudioSuite plugin, that runs Revoice Pro in the background without having to have to switch back between Revoice Pro and Pro Tools. Select your audio and the desiredRevoice Pro preset, process the audio in Revoice Pro and place it directly into the timeline without having to leave Pro Tools.
Smart Align and the Quick APT AudioSuite plugin made this fairly easy, yet powerful, workflow. Synchro Arts has also been able to fix the tasks of how to handle gaps. Before V4.3, you had to make sure there weren’t any unexpected empty spots, or it was not able to work out what to do. Using Smart Align, it handles the gaps without any problems.
Whether you need to tighten any kind of pitch or timings on a vocal recording, Revoice Pro is the one for you. Revoice Pro is great for working with vocal recordings, but it’s perfectly suitable for instruments like guitars and strings too.
Synchro Arts Revoice Pro is available for $599.
2. Red Giant Magic Bullet Colorista
This is a very interesting plugin. Colorista tries to cancel out the need for a separate color-specific program by increasing more color correction options. This plugin allows you to have more color control with tools for tints, temperatures, vignetting, RGB curving, and so forth. Colorista contains a three-way color function and support for LOG clips and LUT filters. Colorista is not a stand-alone program. It’s designed to integrate into existing software and offer better functionality. Plugins let you design something that wasn’t there originally. You don’t have to load a certain project to activate them.
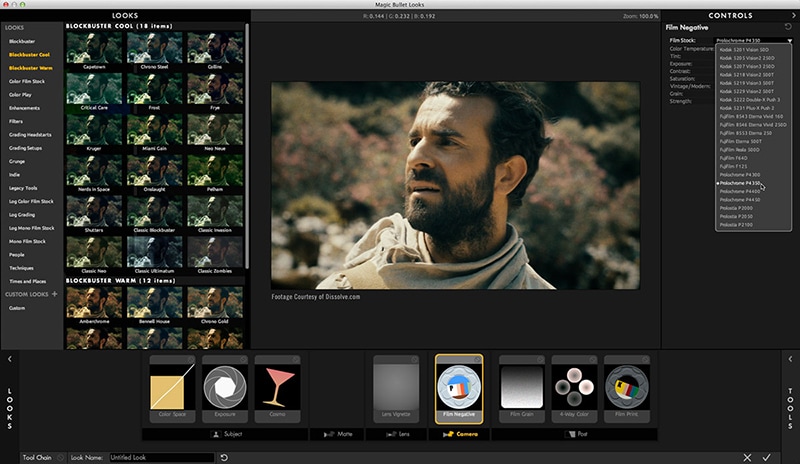
For years, Red Giant has been one of the biggest developers of plugins designed for video editing software. Among the other ones is the Magic bullet suite, which contains quite some plugins to solve video noise problems and do some color grading. We believe the versatility of Red Giant allow content creators and movie producers to let their ideas come to life, create dynamic art and create better content overall.
Even though Red Giant’s Magic Bullet Suite is a plugin suite created for Adobe After Effects and Premiere Pro, it also works with other video editing software such as VEGAS Pro. The suite focuses on color correction and color grading improvements. VEGAS Pro is my software of choice, but one aspect of Premiere that I’ve always thought inadequate were the color correction tools. Looks is completely customizable, and a “preset” can be built up from zero. The Colorista suite comes with a lot of other plugins that have crucial roles in the color grading aspect of video editing. Denoiser II is ideal for clearing up scratchy footage.
Red Giant Magic Bullet Colorista is available for $199.
3. Boris FX Continuum 2022
The thriving film industry’s filmmakers choose Boris FX Continuum. This package contains super strong, timesaving plugins for a smoother workflow with seventeen effects and quick fix plug-in options. Continuum Includes over 200 effects and more than 3500 presets. Each pair will be suitable for each project. Continuum 2022 is the latest biggest release of the post-production plugin collection. The release includes 6 transitions, 4 effects and nearly 100 professionally developed templates. It’s definitely worth checking it out!
This 2022 release brings 50+ film and TV-inspired color grades to assist you in transforming the clips into amazing looks. Included presets like The Wizard of Oz, E.T., Euphoria, and The Grand Budapest Hotel. BCC+Light adds 50+ digital gobos templates to have the overall number of gobos ready to over 700 options.
Boris FX Continuum is available for $495 and $2,195 depending on your payment plan.
Free Download For Win 7 or later(64-bit)
Free Download For macOS 10.14 or later
Also read:
- Updated 2024 Approved How to Add Miniature Effect in Video with Filmora
- In 2024, Are You Looking to Freeze-Frame in FCP? If Yes, Read One, as Here Is a Guide About How to Freeze-Frame in Final Cut Pro (FCP) with Ease
- Updated YouTube Algorithm Hacks
- In This Article, We Will Discuss How to Rotate Videos in the Lightworks Application. Below Is a Way to Rotate Videos in Lightworks Manually, Here, We Will Use the Z-Axis Rotation
- In 2024, Ways to Make Sure Your Video Editing Course Is Worthing to Watch
- In 2024, Best Slow Motion Camera Apps for Best Content Creation
- 2024 Approved Know How to Create OBS Slideshow. Creating OBS Slideshow in Simple Steps; Application for Creating OBS Slideshow. Make OBS Slideshow Online
- In 2024, What Is the Selective Color Effect, and How Can You Add This Effect to Your Videos Using Wondershare Filmora? A Complete Guide for Beginners
- In 2024, Splitting a Video in VSDC Step by Step
- How to Make a Smooth Speed Ramping in Premiere Pro?
- To Get Cinematographs of a Music Video, You Need to Understand the Basics of Camera Movement. As Well Framing and Lighting of the Setup Are Illustrated in This Article
- New 8 Apps to Custom GIF Stickers
- New Want to Add Life to Your Customary Business Presentations and Videos on a MacOs Device with Expressive Emojis? Dive in to Have an Insight Into the Credibility of Using Emojis on a Mac
- Updated 2024 Approved How To Change Font In Premiere Pro
- Updated How to Create Educational Teaching Videos in An Outstanding Way?
- New Creating Flawless Slow-Motion Videos Is Every Content Creators Dream. Learn About DaVinci Resolve Slow-Motion Video Creation, Amongst Other Tools
- New Do You Want to Create a Zoom Motion Blur Effect Using Photoshop? If You Are Unaware of How to Do This, Read This Article to Learn Simple yet Authentic Instructions
- Updated Easy Steps to Add Miniature Effect to Videos for 2024
- 2024 Approved With Looping Videos, People Stay on Your Site Longer, Boosting Engagement. With Video Being Watched on Mobile over 3X More than Any Other Content, Its an Essential Part of Mobile Advertising
- Updated Guide To Cropping and Combining Content in Wondershare Filmora Latest for 2024
- Want to Make a Funny Vlog on TikTok? Trying to Find the Right Topic for It? This Article Presents some Impressive Options for Making a Funny Vlog for TikTok
- 2024 Approved Progressive Solutions to Add VHS Effects to Video with Ease
- 2024 Approved Top 10 TEXT TO SPEECH VIDEO MAKERS
- 2024 Approved How to Make a Neon Dance Effect With Filmora
- Looking for Efficient Ways to Create a Slow-Motion Video? Read the Article for Reliable Solutions that Provide Excellent Results
- New Every Compositor Should Know The Tips of Color Match in After Effects for 2024
- 7 Best MP4 Video Editors on Mac Edit MP4 Videos Easily
- In 2024, Guiding Principles of Track Matte and Tracking in Adobe After Effects
- Updated In 2024, Final Cut Pro for iPad
- How Can I Control Speed of a Video for 2024
- 2024 Approved How to Apply Gaussian Blur Effect to Videos In Premiere Pro?
- New 2024 Approved A Complete Guide to Use Distortion Effect in Premiere Pro
- How To Create The Best AI Thumbnail Using The Right Tools?
- New How To Make a Timelapse in After Effects for 2024
- New Best 5 AI Music Video Examples and Makers to Make Them for 2024
- Updated 2024 Approved Online Video Makers
- New Kdenlive Review – Is It The Best Video Editor?
- Top 12 Sony Vegas Slideshow Templates for Free Download for 2024
- Super Easy Ways To Deal with OnePlus 12R Unresponsive Screen | Dr.fone
- How To Remove Phone Number From Your Apple ID on Your iPhone 14 Plus?
- How To Change Your Apple ID Password On your iPhone 12
- Top 9 HTC U23 Pro Monitoring Apps for Parental Controls | Dr.fone
- In 2024, How To Change Your Apple ID Password On your Apple iPhone XS
- In 2024, Remove the Lock Screen Fingerprint Of Your Itel A70
- In 2024, How To Unlock iPhone 8 Without Passcode? 4 Easy Methods
- In 2024, Best Pokemons for PVP Matches in Pokemon Go For Honor 100 Pro | Dr.fone
- A Guide Tecno Spark 10 4G Wireless and Wired Screen Mirroring | Dr.fone
- The Ultimate Guide to Unlocking Your iPhone 15 Plus on MetroPCS
- In 2024, Does Life360 Notify When You Log Out On Oppo F23 5G? | Dr.fone
- Ultimate Guide on Itel A60 FRP Bypass
- 4 Methods to Turn off Life 360 On Samsung Galaxy M54 5G without Anyone Knowing | Dr.fone
- How to retrieve erased call logs from Redmi Note 13 5G?
- How To Change Your Apple ID on Apple iPhone 12 Pro Max With or Without Password | Dr.fone
- Full guide to iPhone 15 Plus iCloud Bypass
- How to get back lost photos from Nokia C22.
- How to Factory Reset Itel P55+ If I Forgot Security Code or Password? | Dr.fone
- 2024 Approved How To Create Video From Text Easily Step-by-Step
- Tips And Tricks To Tell if Your iPhone 14 Pro Is Unlocked
- A Perfect Guide To Remove or Disable Google Smart Lock On Nokia 105 Classic
- In 2024, Unlock Your Disabled iPhone SE (2022) Without iTunes in 5 Ways
- Fixing Foneazy MockGo Not Working On Tecno Spark 10 5G | Dr.fone
- In 2024, The Best Methods to Unlock the iPhone Locked to Owner for iPhone 11 Pro | Dr.fone
- How Can Tecno Spark 20CMirror Share to PC? | Dr.fone
- Title: Top Ways to Make Fast Motion Video on iPhone Solved
- Author: Chloe
- Created at : 2024-05-20 03:37:31
- Updated at : 2024-05-21 03:37:31
- Link: https://ai-editing-video.techidaily.com/top-ways-to-make-fast-motion-video-on-iphone-solved/
- License: This work is licensed under CC BY-NC-SA 4.0.

