:max_bytes(150000):strip_icc():format(webp)/handstypingonkeyboardCROPPED-6b13200ac0d24ef58817343cc4975ebd.jpg)
Ultimate Guide on Making A Slideshow Video

Ultimate Guide on Making A Slideshow Video
You have taken photos and videos all over your trip. Showing them to your friends and family can be a hassle if you have a lot of pictures. Viewing them all at once is possible by creating a slideshow video.
The slideshow video combines all the memories in one place. To make one on your own, we prefer just one best UI editing tools, Wondershare Filmora.
Before we create a slideshow, ensure to learn the basics of the slideshow video. Then, scroll below to get more!
Part 1. What Is a Slideshow Video?
A slideshow video is a video that combines your photos and videos to create a montage. This slideshow can be used as a collection of memories you can watch whenever you like.
You might have a photo album lying around somewhere in your house. A slideshow video can act like a modern-day photo album. But instead of photos, you can also add videos and create a monument of your precious memories.
Modern-day content creators on Youtube and other platforms can use a slideshow method to create short recap videos of their travels.
Part 2. What Are Some of the Uses of Slideshow Videos?
A slideshow video can be a great way to summarize all the moments of a marriage ceremony, graduation event, etc. And the list goes on and on.
- A wedding ceremony
- Anniversary recording
- A graduation ceremony
- A birthday party
- Your pet
- Your friends
- Your family
- A trip that you went on
Part 3. What Are the Benefits of a Slideshow?
There are many benefits to creating a slideshow video.
A long-lasting memory
Creating a slideshow video can be a digital reminiscent, allowing you to hold a precious video with your friends and family. Apart from physical portraits, a slideshow video will be a digital backup for your memories that you can watch in the future.
Easy to save and share
Since a video slideshow is a digital content, typically with an extension .mp4, .mov, etc., you can watch it whenever and wherever you want. Moreover, you can conveniently send it to the person who spent the time and shares the same memories with you.
Part 4. What Will You Need To Make a Slideshow?
To create an attractive slideshow video, you must fulfill the following requirements.
1. Good Quality Photos
To create a good slideshow, you must have good-quality photos with good resolution. Always take pictures with a good-quality camera or a mobile phone whenever you want to create a slideshow. Using filters in the editing software can disrupt the quality of your slideshow.
2. Video Clips
The slideshow is always combined with videos and photos. After taking good-quality images, remember always to record short video clips you can add between your pictures.
3. A Good Video Editor - Wondershare Filmora
To edit a slideshow video, you will need editing software. There’s no better tool to do the job than Wondershare Filmora . Wondershare Filmora enables you to make creative and appealing videos. It has a very engaging system UI that allows even novice users to get the hang of it quickly. You will learn how to make a slideshow in a few simple steps.
Free Download For Win 7 or later(64-bit)
Free Download For macOS 10.14 or later

Let’s start with the step-by-step instructions for making a slideshow video now that you know the requirements for generating a slideshow.
Part 5. Step-by-Step Guide to Creating a Slideshow Video
Utilizing filmora will reduce your workload while producing quality work. Follow the below step-by-step guide to make your slideshow video instantly!
Step1 Download Wondershare Filmora
Wondershare Filmora will provide the working platform. Follow the below steps to download it:
- First, install the Wondershare Filmora.
- Then, launch this application on your PC or Mac
Let’s proceed to edit our video after downloading the Wondershare Filmora software. Continue reading to find out how to begin the editing process.
Step2 Import your Photos and Videos
Importing your videos and pictures to Filmora’s media panel is best to have them all in one folder. Therefore, when you open Wondershare Filmora, you will notice the main import window in the top left corner.
- Click in the center of the import window upon the import icon.
- Browse from the PC library to where your target Videos and Photos are stored.
- Please select the required videos and photos and Open
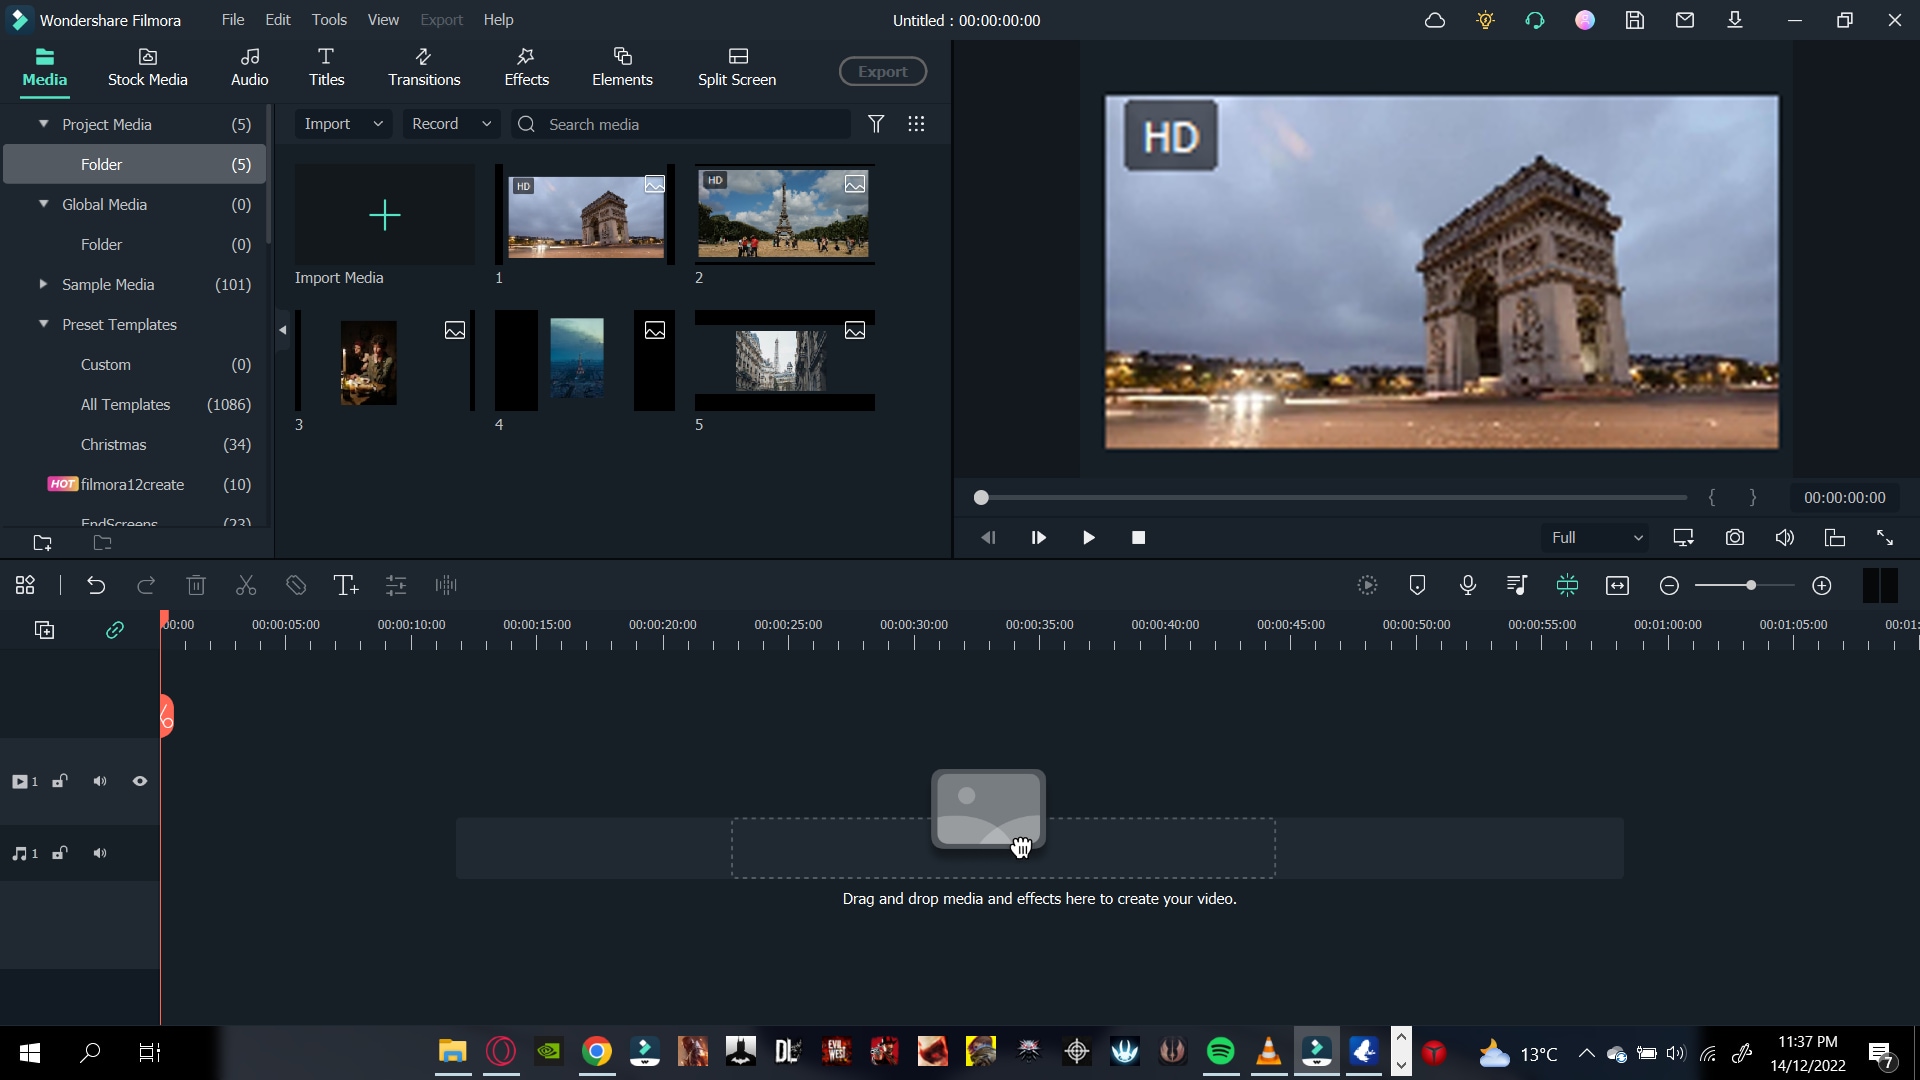
Your next step will be to add the imported videos and images to the timeline.
Step3 Add your Photos and Videos to the Timeline
When you have multiple videos and photos, you can add all of them simultaneously. Or you can also add them one by one wherever you need. Follow the steps mentioned:
- Right-click on the photo or video you want.
- Keep holding the Right-click and drag it down to the timeline.
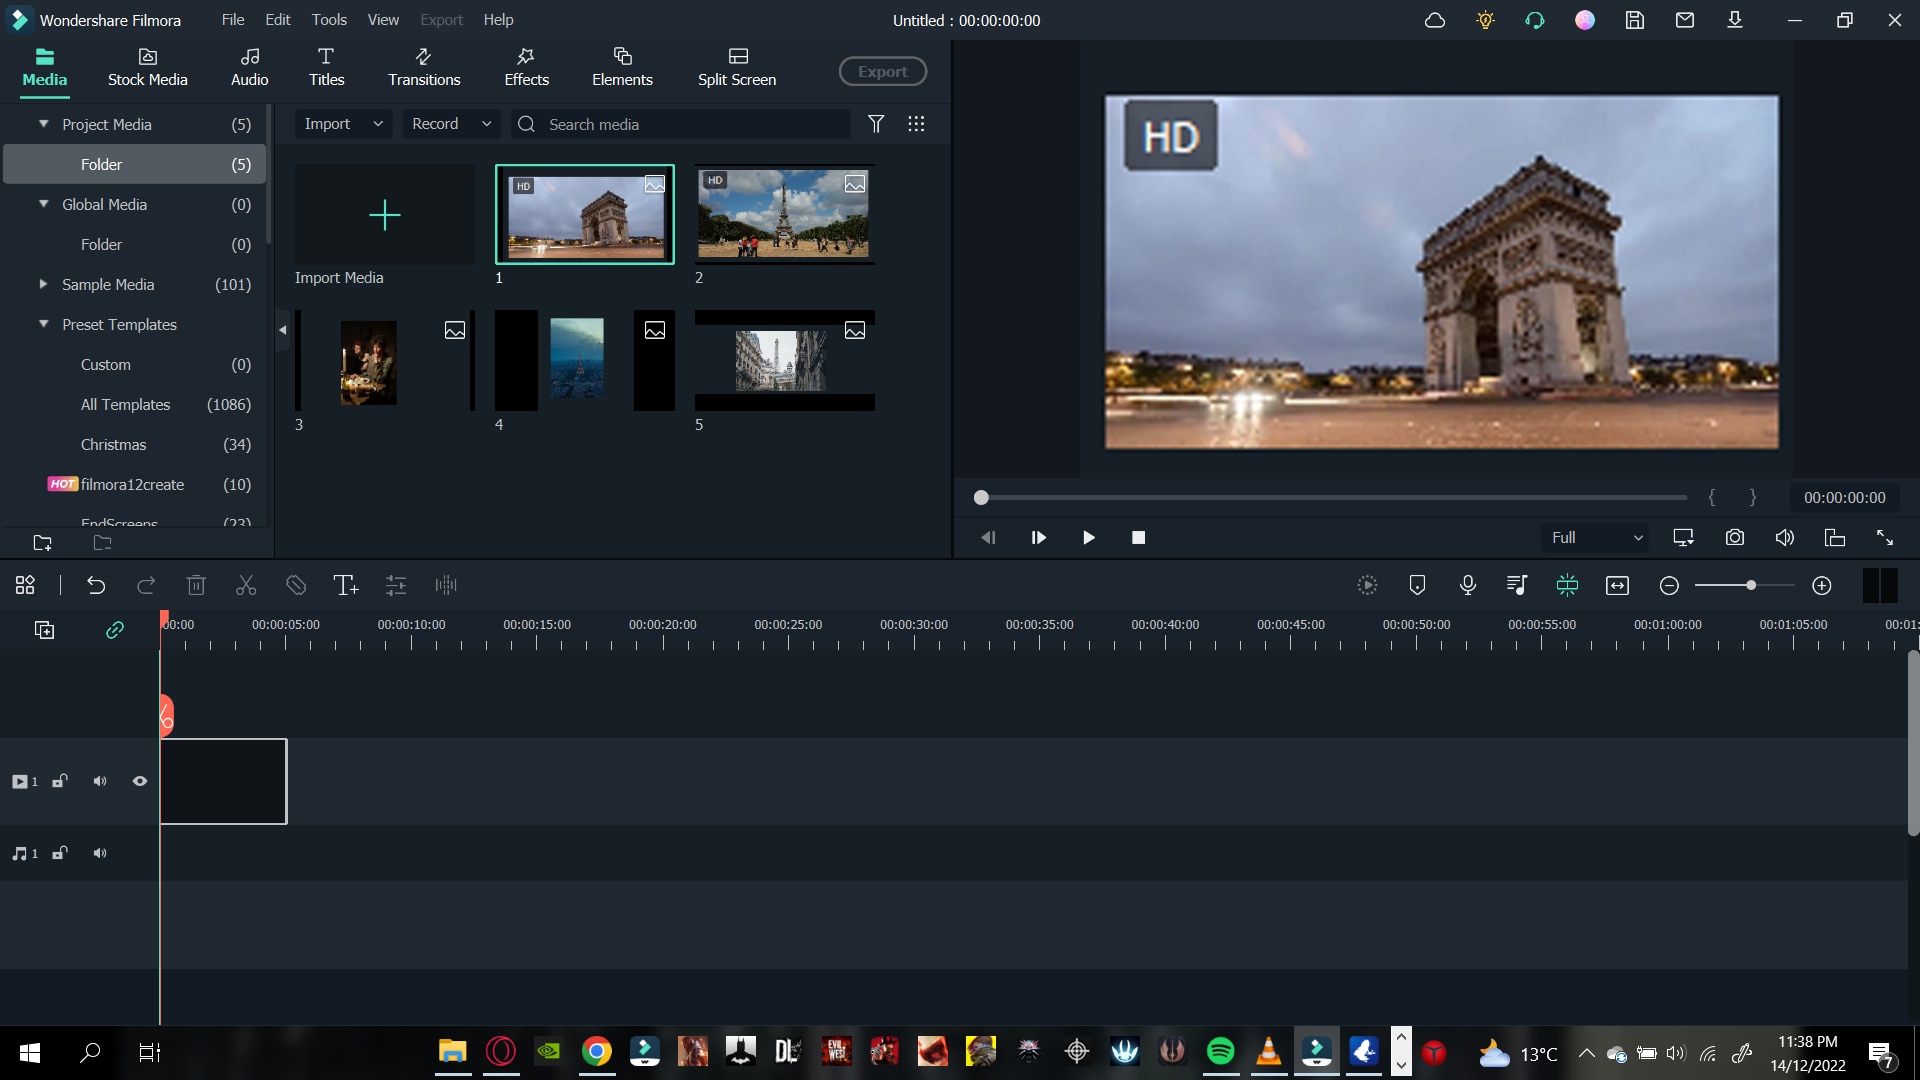
Now that we have imported your photos and videos into the timeline, it is time to align and add text.
Step4 Add the Title
To create an attractive slideshow, you will need to add a title before the start of the video. Doing so will allow you to gain more viewers and audiences.
Add a Black Screen
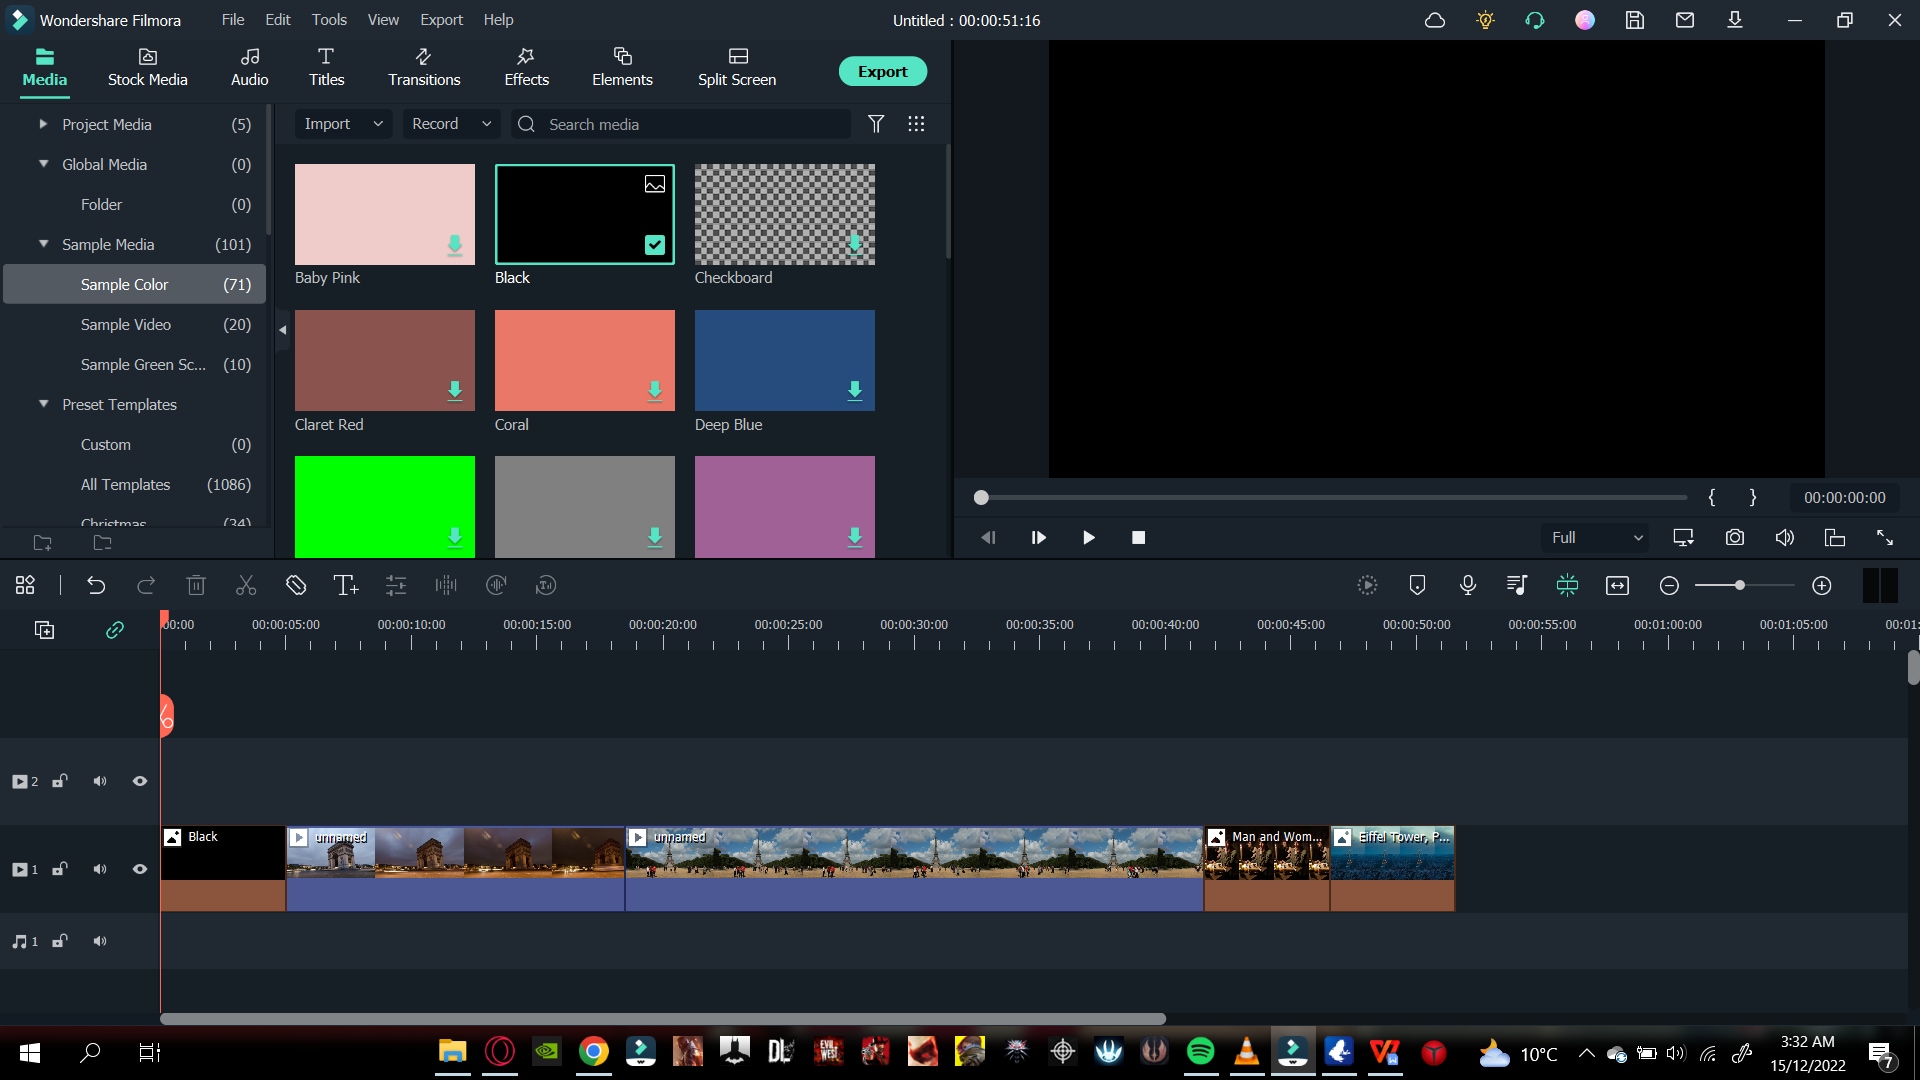
The black screen will eventually act like a canvas to give your title a good look. To add a black screen, follow the steps mentioned:
- Click on the media icon from the bar above the import window.
- You will notice many tabs on the left-hand side under a drop-down bar.
- Scroll below to find the sample media
- Download the black color if it is not downloaded already.
- Click and drag it down below to the start of your video.
Add a Title Tile
Now that we have our canvas, we will now add the title. Above the import media library, there will be a Title icon.
- Click on the title icon, and select the title that you want for your video by browsing and scrolling down.
- For this purpose, we will use a simple title tile called “Title 29.”
![]()
Note: You can find the same title by scrolling, browsing, or searching in the search bar above the import library.
- Click and drag the title onto the black screen that we added.
- Double-click the title to open its settings.
- Here you can type in the text that you want.
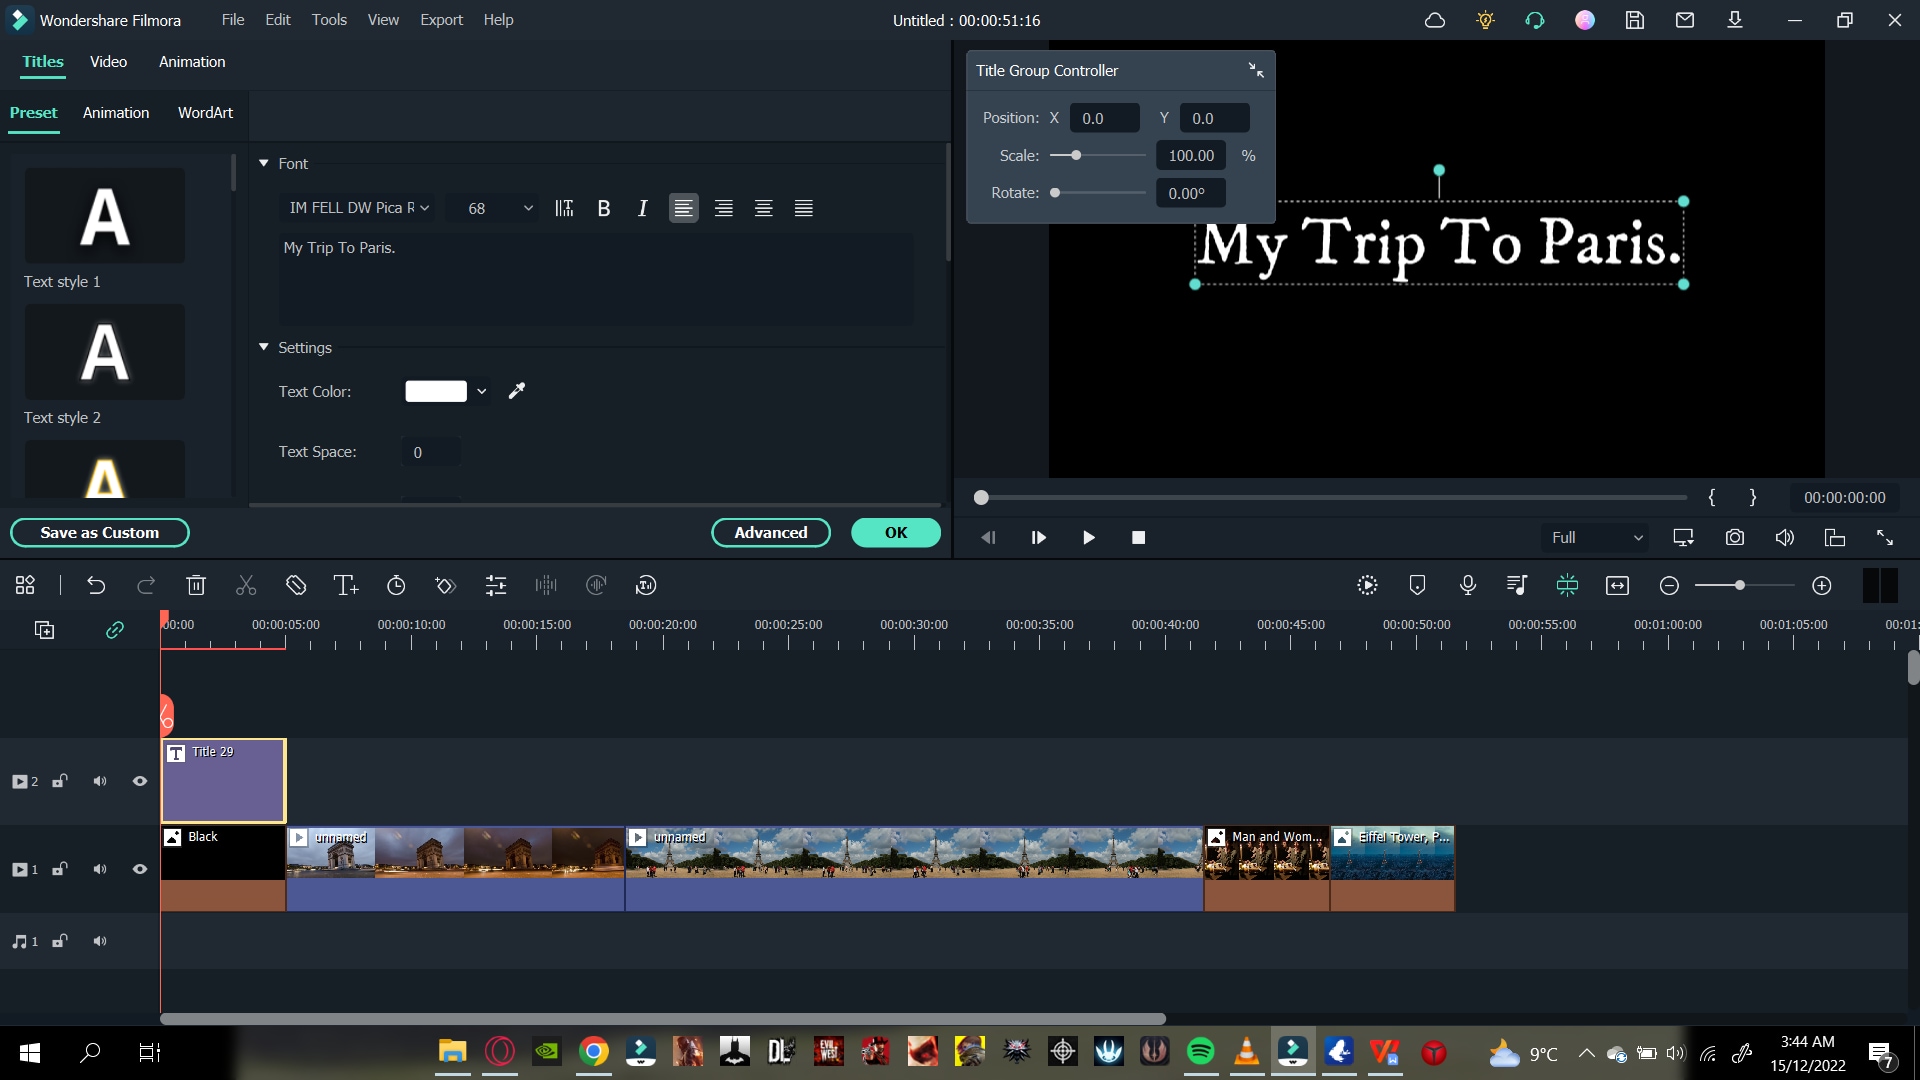
You can also change its font. When you click on the font bar, a drop-down option will pop up, and you choose whichever you like.
- Change the animation of the text title from the top left corner animation
Change The Timing of The Title
You can also adjust the timing of the title by below steps:
- Click on the advanced option in the bottom right corner, and settings will pop up.
- Find the title bar and drag it to the right side to increase the timing of the title.
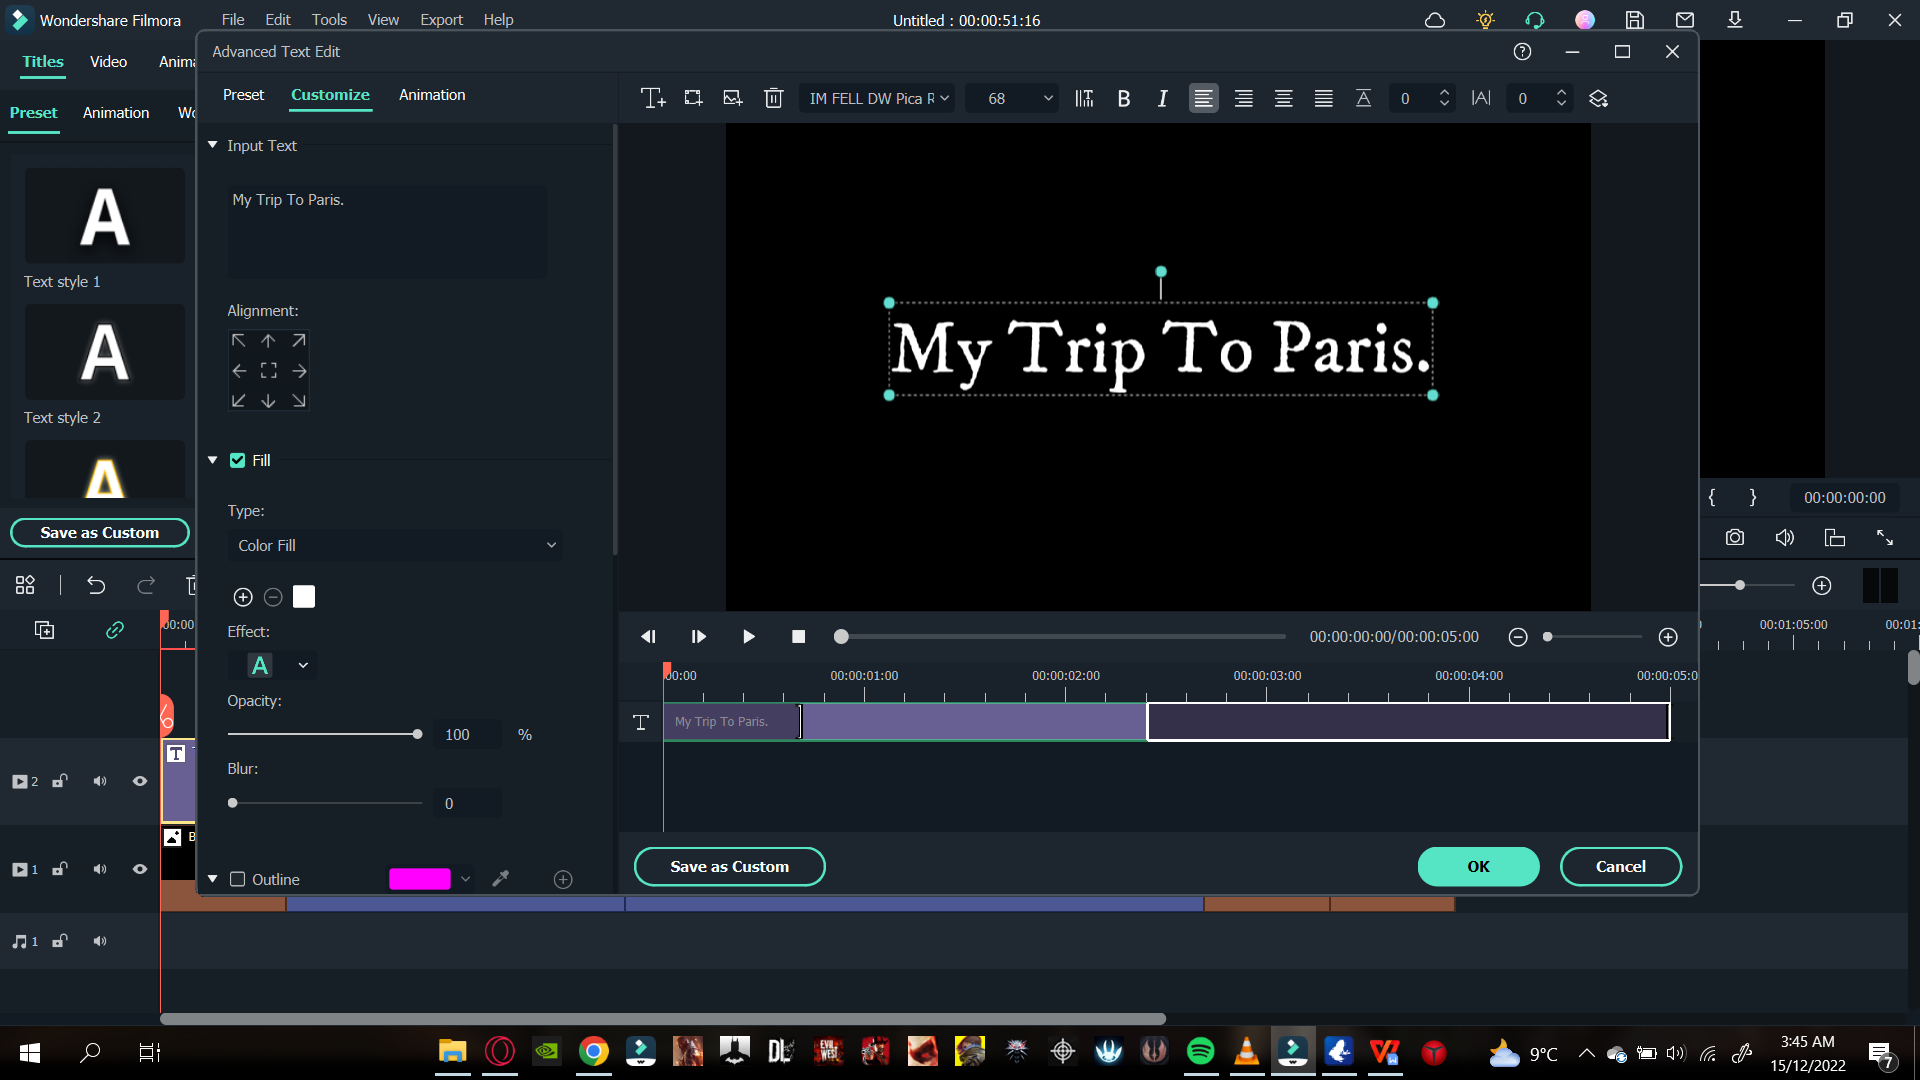
After adding the title, it’s time to go with fading effect as shown below!
Step5 Add a Fade effect
You can also add a fade transition to the start of your video. It will blend the title with the first clip. Follow the steps mentioned to add the transition effects:
- Search the Fade option from the Transitions tab above the import window
![]()
Note: A fade transition will allow your title to fade into the first clip creating a visually pleasing effect.
- Download the Fade transition and drag it between the Black screen and the first clip.
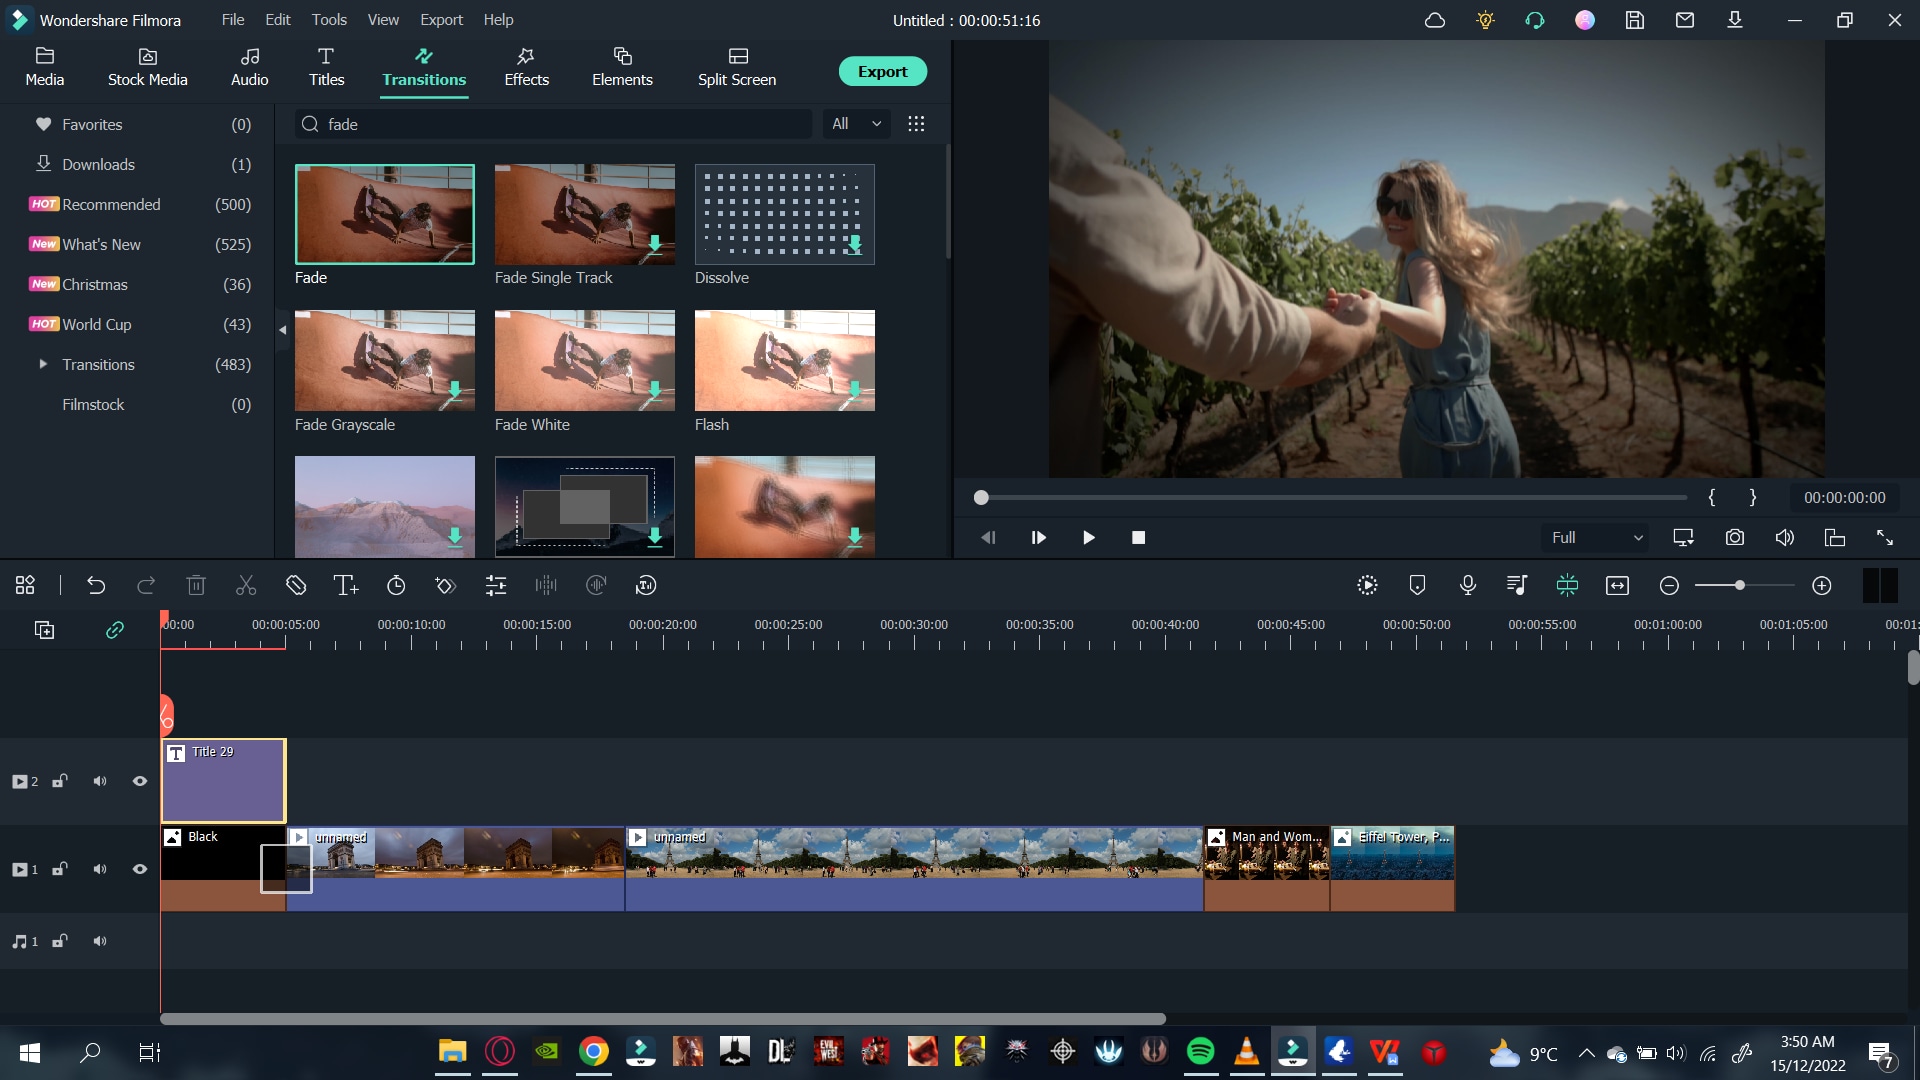
Now that we have added a transition, it is time to move on to our music!
Step6 Add The Music
You can add your music to the slideshow from your PC library, but make sure you have the music rights. It is better to use stock audio by following the steps:
- Click on the Audio icon on the bar above the import window, and the list will pop up.
- Please browse the library to find music that best suits your video and download it.
- Then add it to the timeline’s audio track.
Add Beat Detection
To match your video clips properly with the music, so it remains in sync, you can adjust it with the beat of the music. To add beat detection, follow the steps mentioned:
- Right-Click on the audio that you selected in the audio library.
- You will see a pop-up list, and in the options, you will see Beat detection.
- Click on Beat detection.
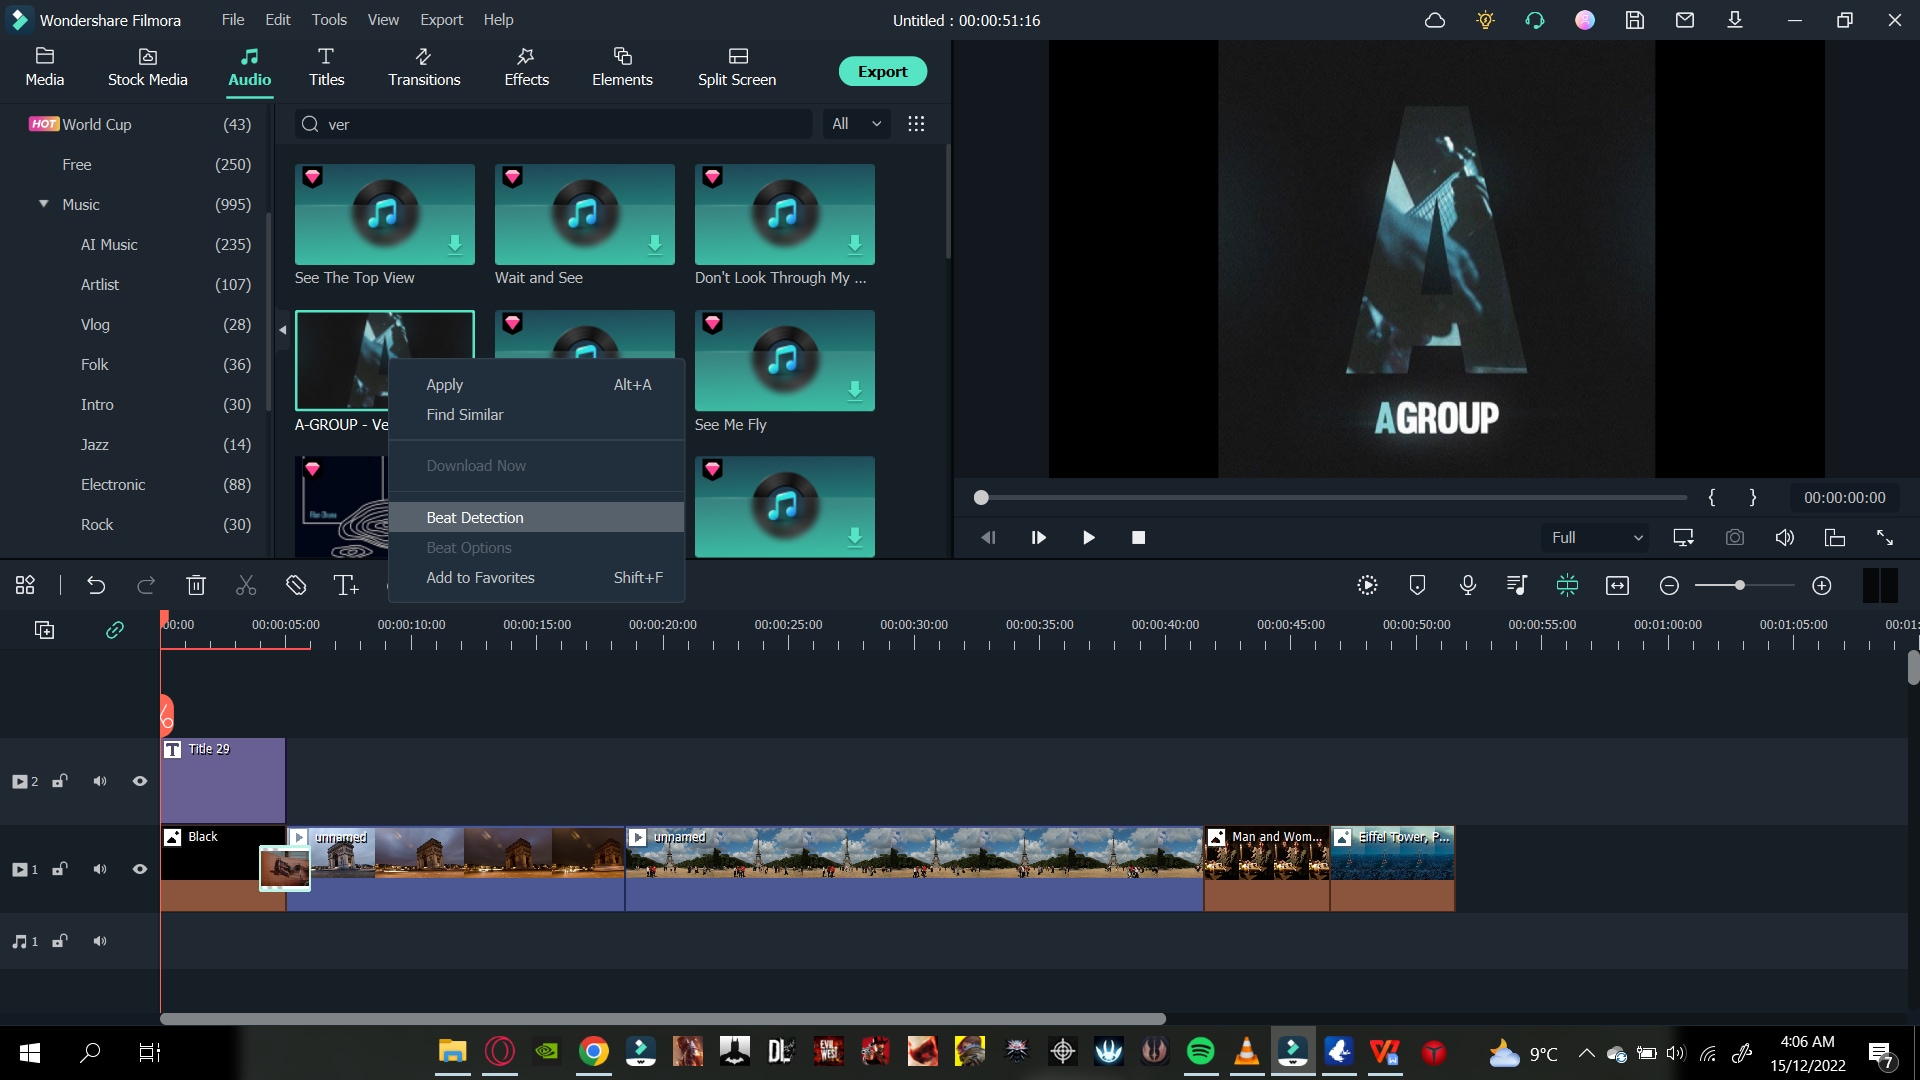
- Then click on the audio and drag it below on the timeline.
Match The Video With The Audio Markers
To have the full advantage of beat detection, you must adjust your videos and photos to the markers. Follow the steps mentioned below to do so:
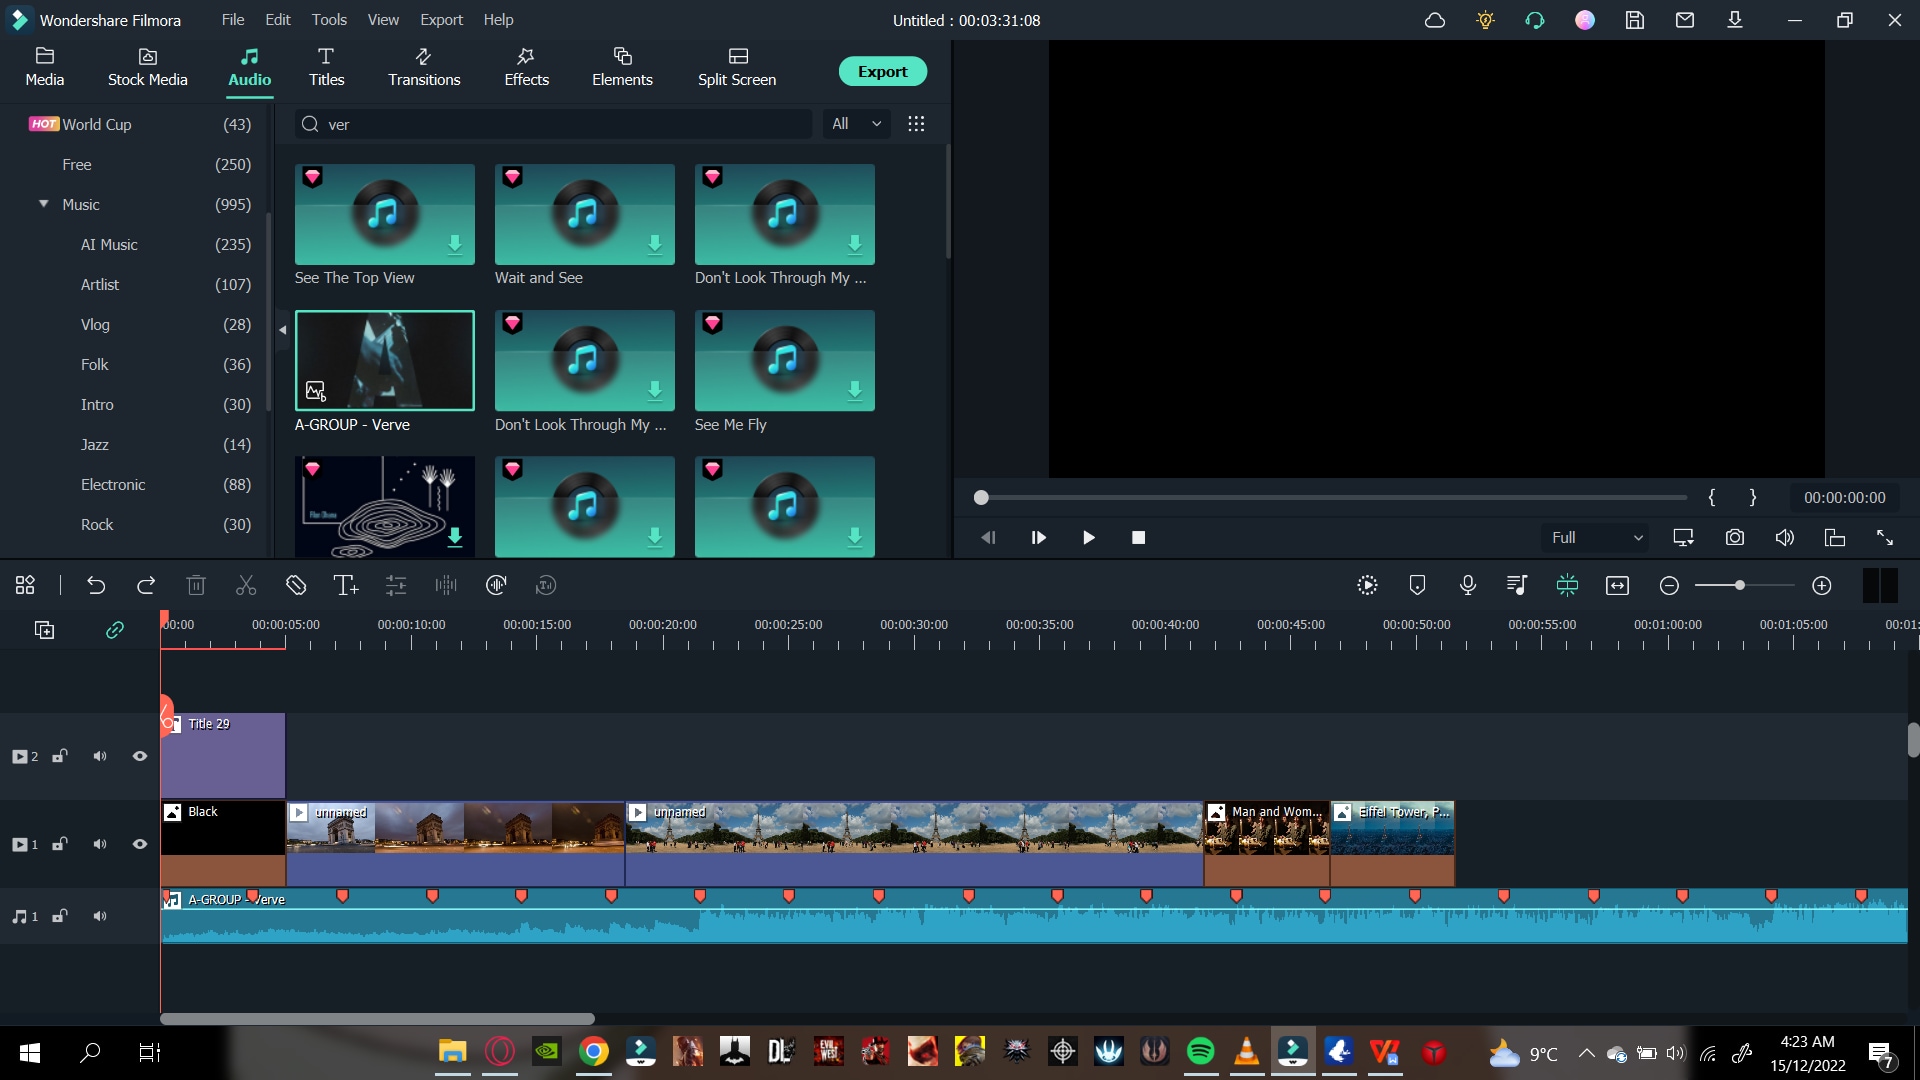
- Check that the video clips are in sync with the marker on the audio.
- For this, drag one video end to a marker or as many videos as you want.
- Ultimately, you will create a timeline in which your videos sync with the audio beat.
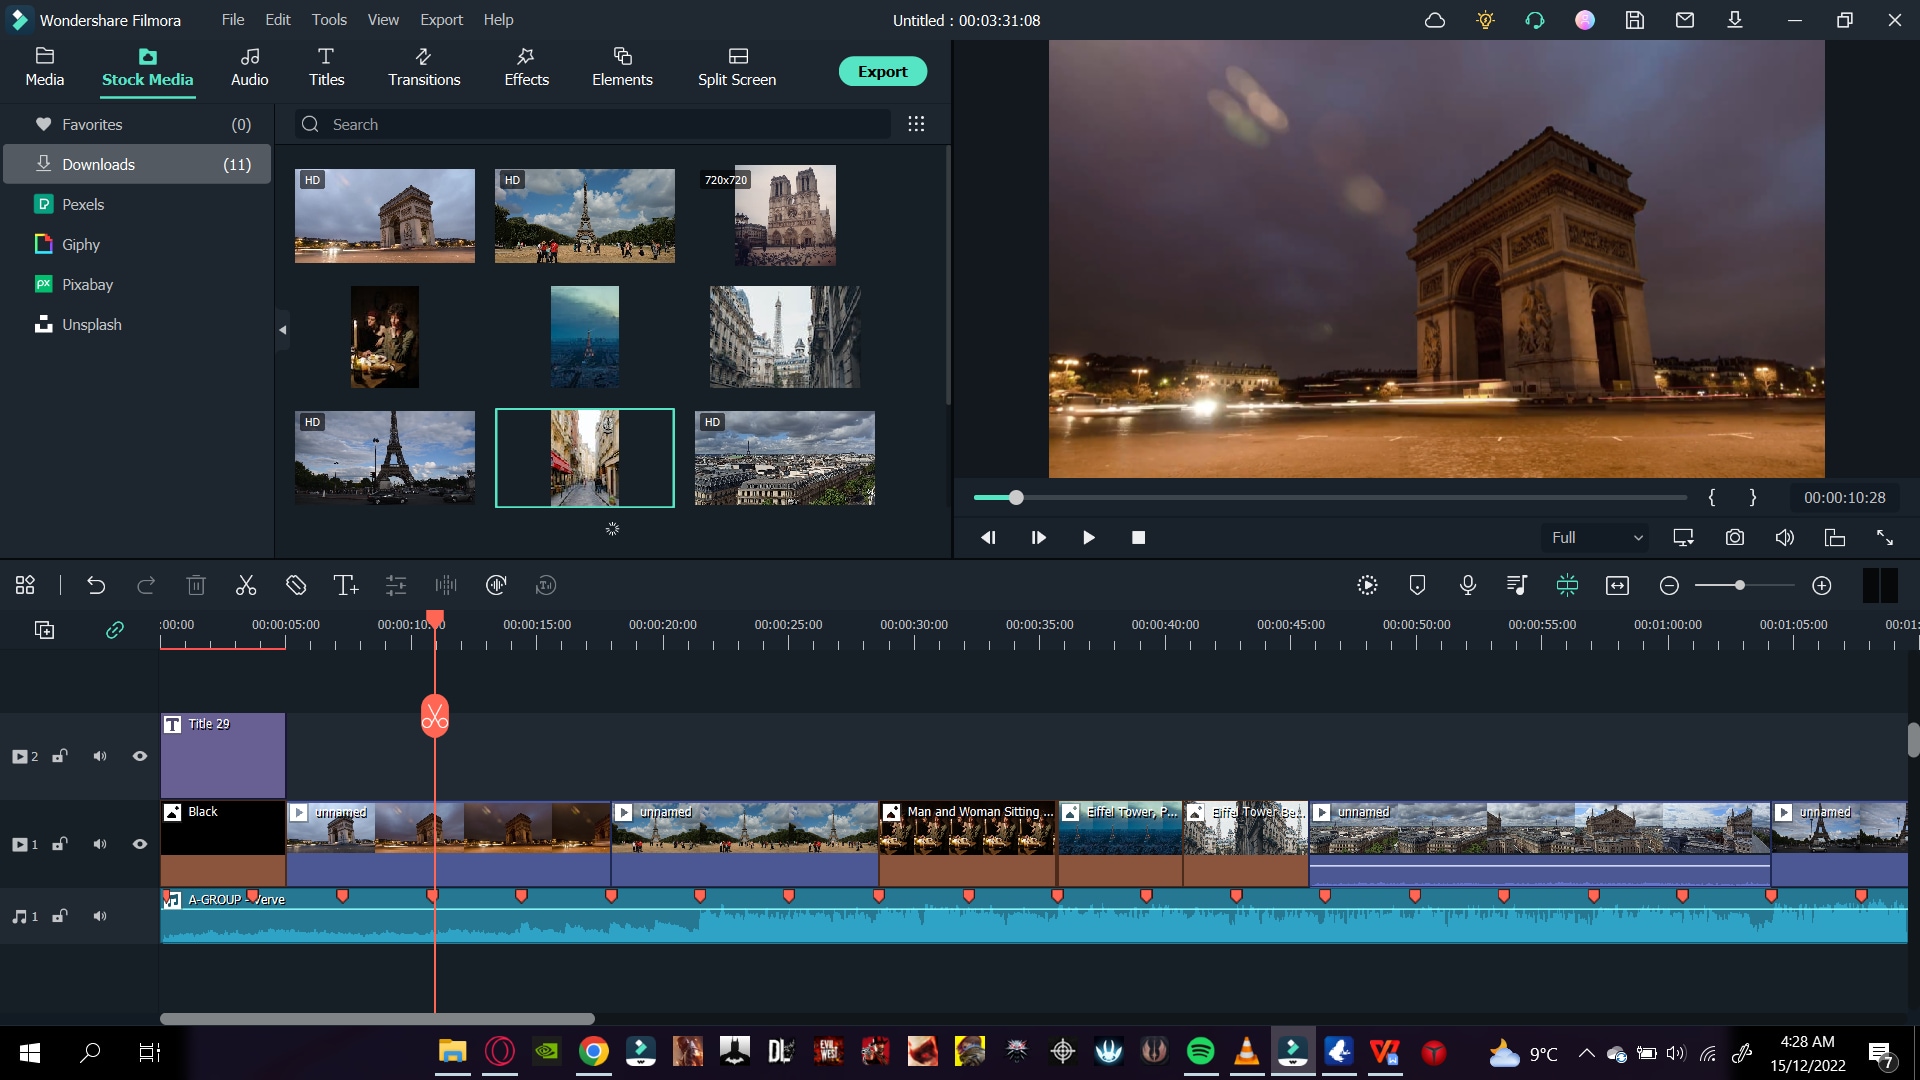
After syncing your videos and photos to the audio, it is time to move on to the scaling and background blur.
Step7 Scale and Blur The Background
Now, some of the pictures you have added must-have black borders. It usually means that your image is shorter than the aspect ratio.
If you leave the picture/photo as it is, the black borders will make it look shorter and out of proportion. As a result, it gives a generally poor look, as shown below.
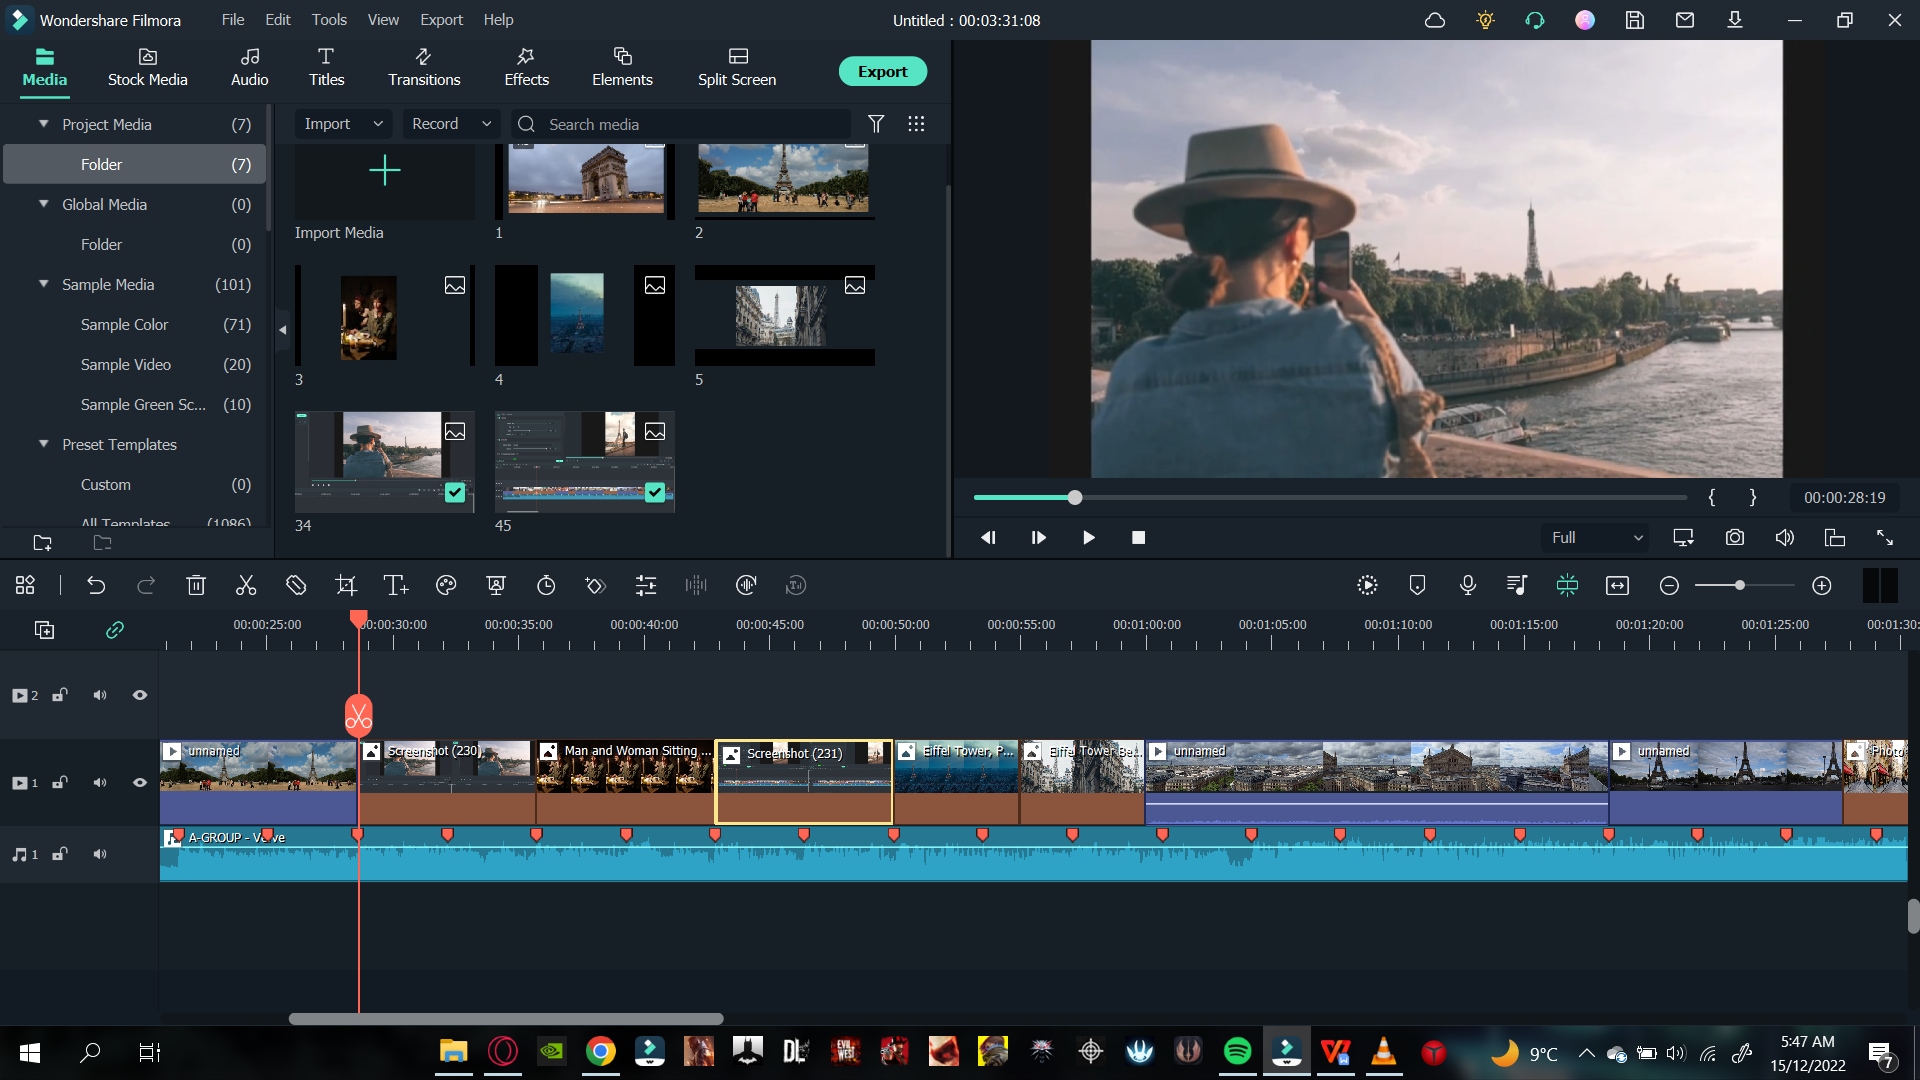
To counter this problem, follow some easy steps:
- Double-click on the picture with black borders, and it will open the settings list.
- Go into the Transform Here you can see multiple settings.
- Increase the size of your photo to match the aspect ratio.
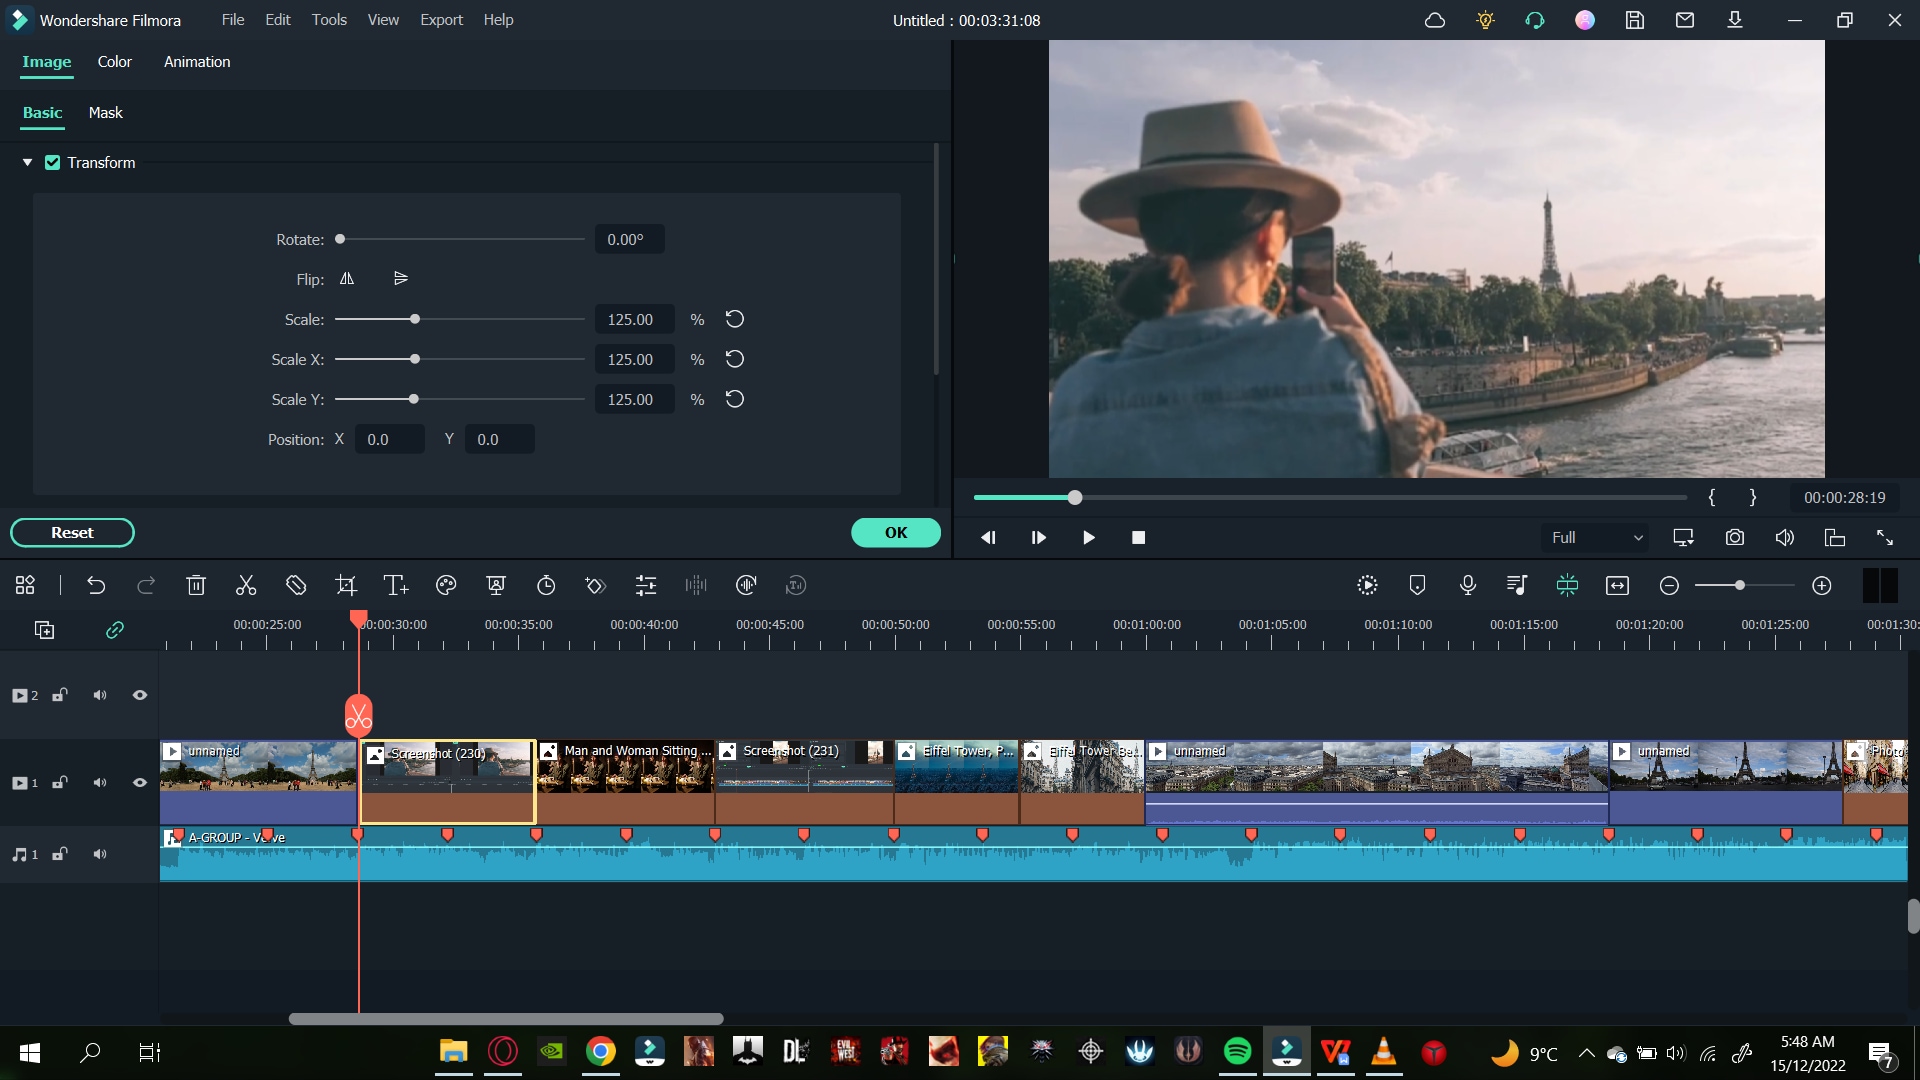
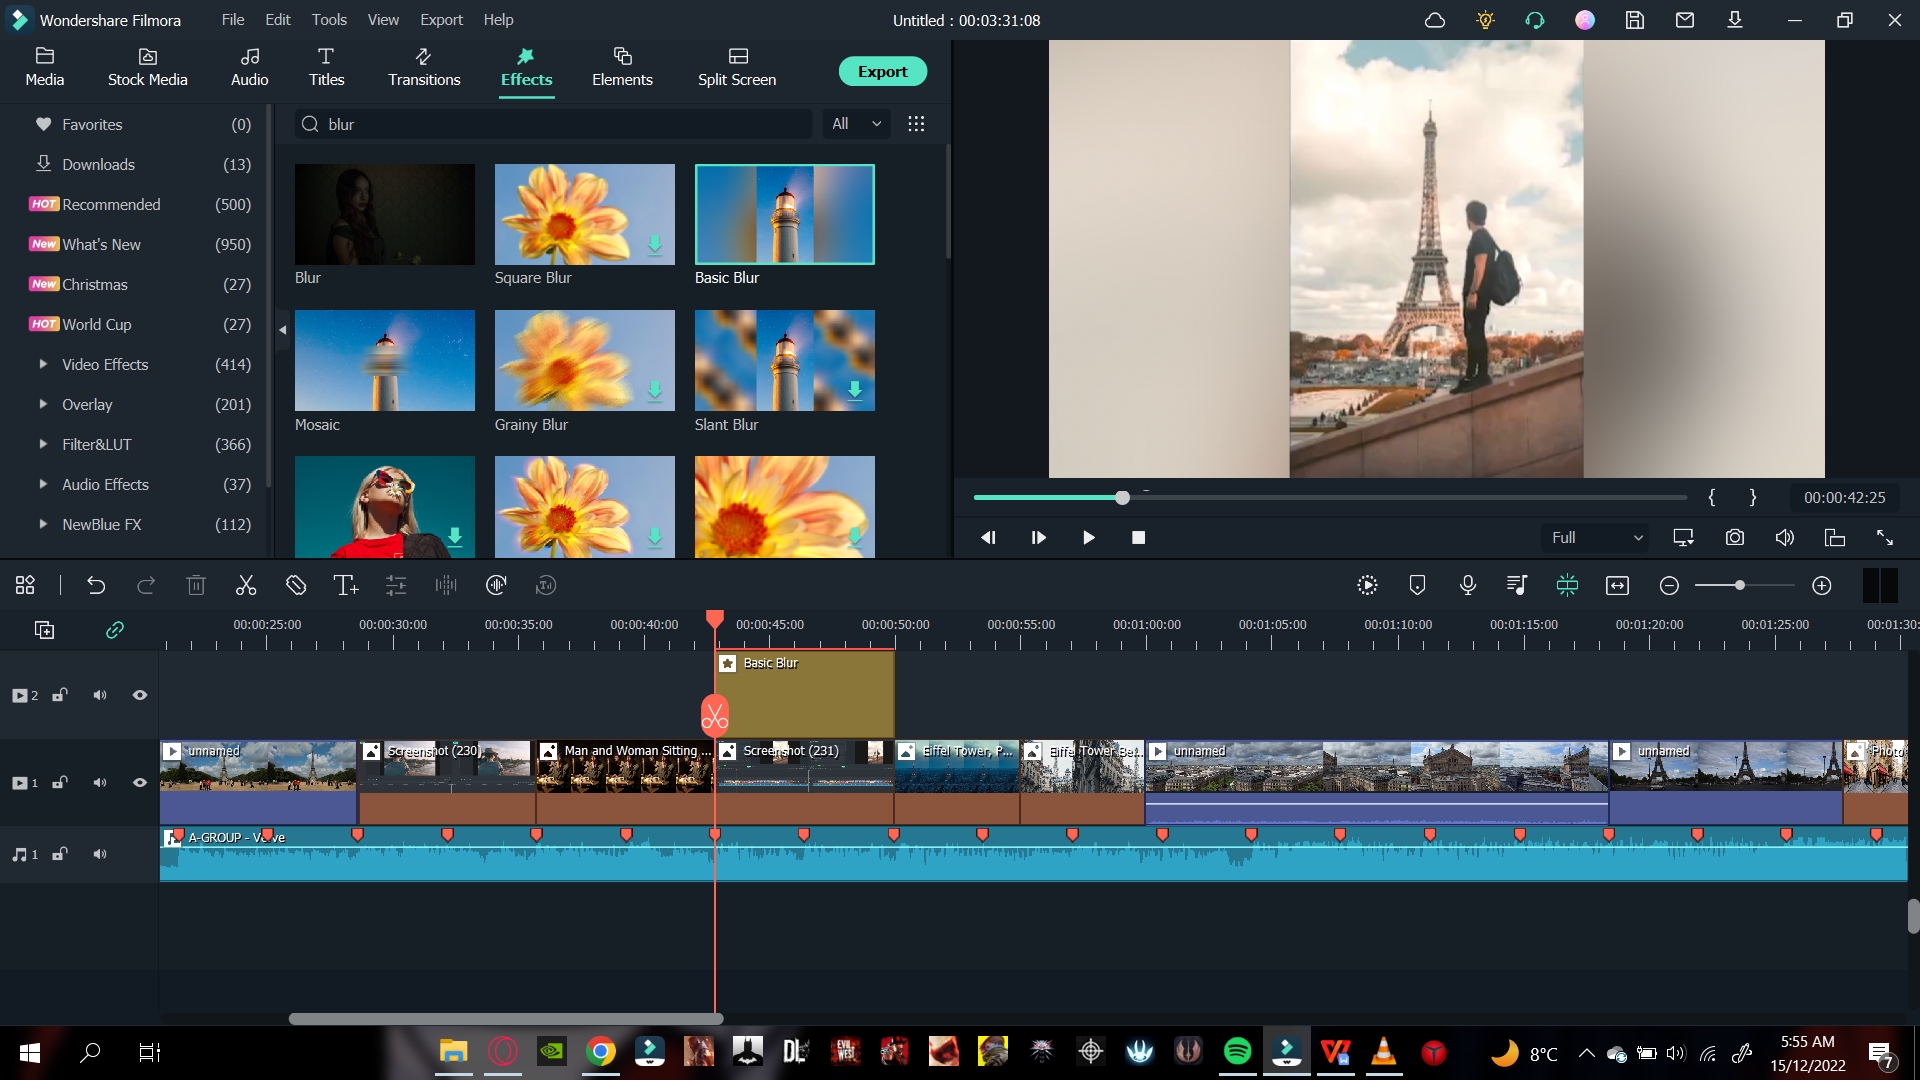
Add a Background Blur Effect
In some cases where you have taken a portrait photo where the picture is vertical, it ultimately stays out of proportion to the aspect ratio.
![]()
Note: Simply scaling the image to match the aspect ratio size is not sensible in this case. Doing so will hide the many pretty features of a portrait.
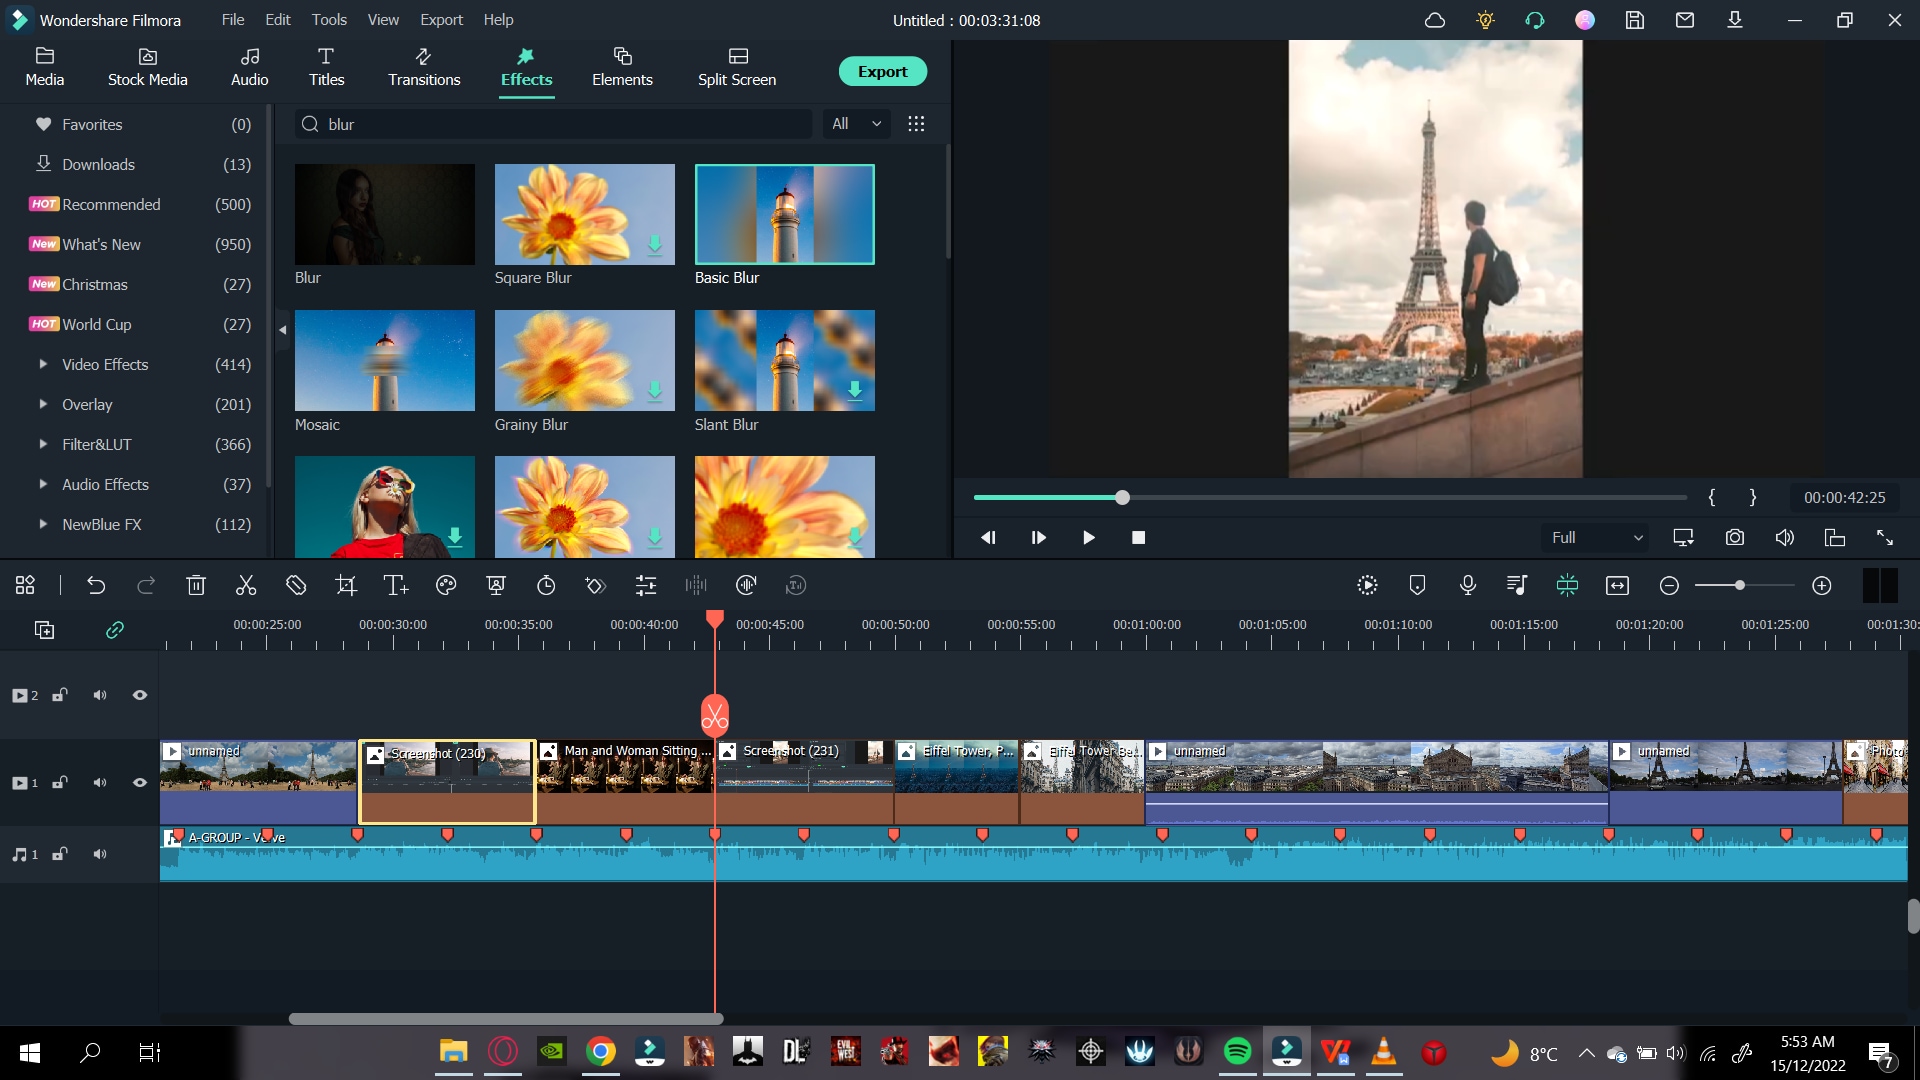
To counter this problem, you can add a blur effect. This effect will turn your background blur, matching the aspect ratio. Follow the steps mentioned below:
- Click on the Effects tab above the import window and search for Blur.
- Download the blur effect that suits you best and then drag the blur effect above your photo in the timeline.
You will notice the background turn to a blur in the main play screen.
Step8 Add a Transition
You can also add a transition effect to spice up things. It can get bland when your video or photo changes from one to another. To create a good slideshow video, you can add a transition effect by following the steps mentioned below:
- Click on the Transition icon above the import window.
- Browse the library until you find a transition you like, then download one.
- Click on the transition and drag it between the clips.

Adjust The Duration and Placement of The Transition
Now it’s time to adjust the duration and placement of the transition. For this, you can follow the steps mentioned below:
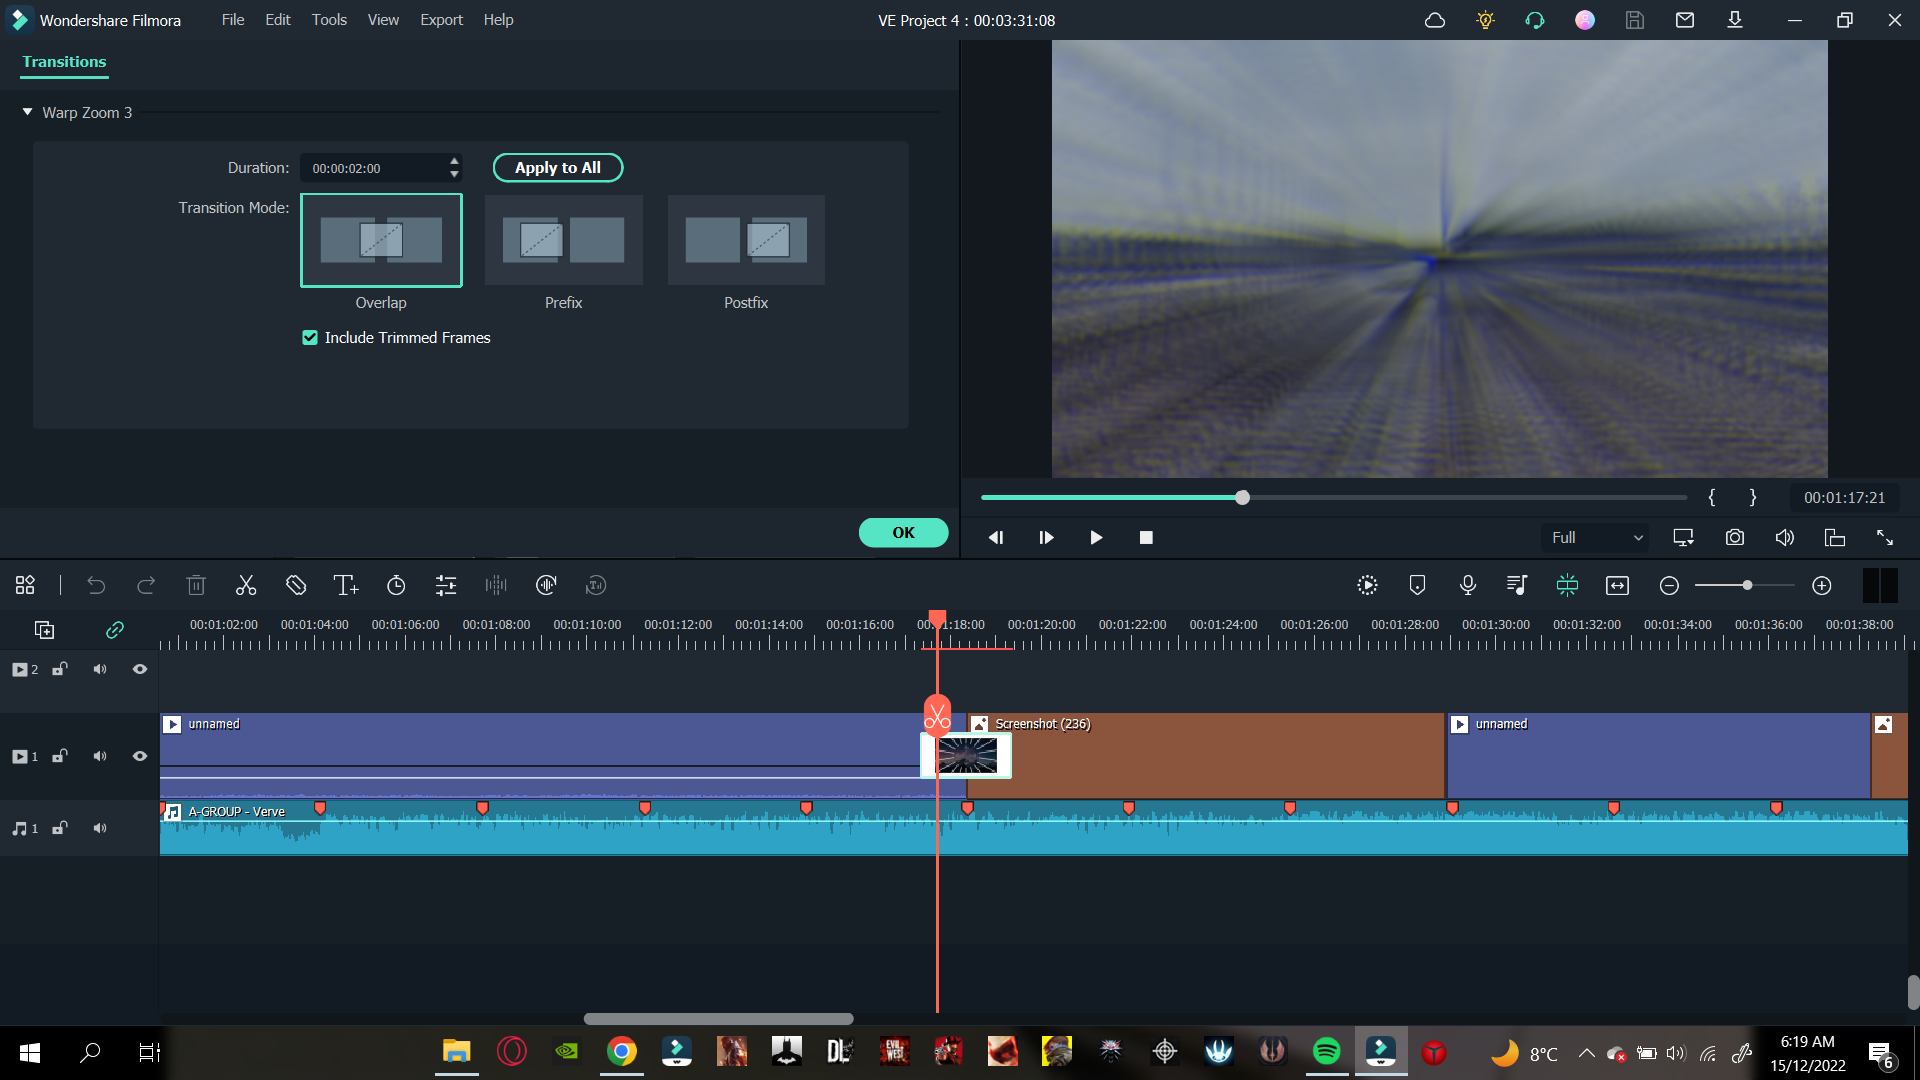
- Double-click on the transition effect, and it will open the settings list.
- You can adjust the duration by setting the timer as per your requirement.
![]()
Note: If other transitions are added to the timeline, you can adjust them by clicking Apply to all.
When you have adjusted the slideshow transitions, it is time to move on to the effects and filters.
Step9 Add the Effects and Filters
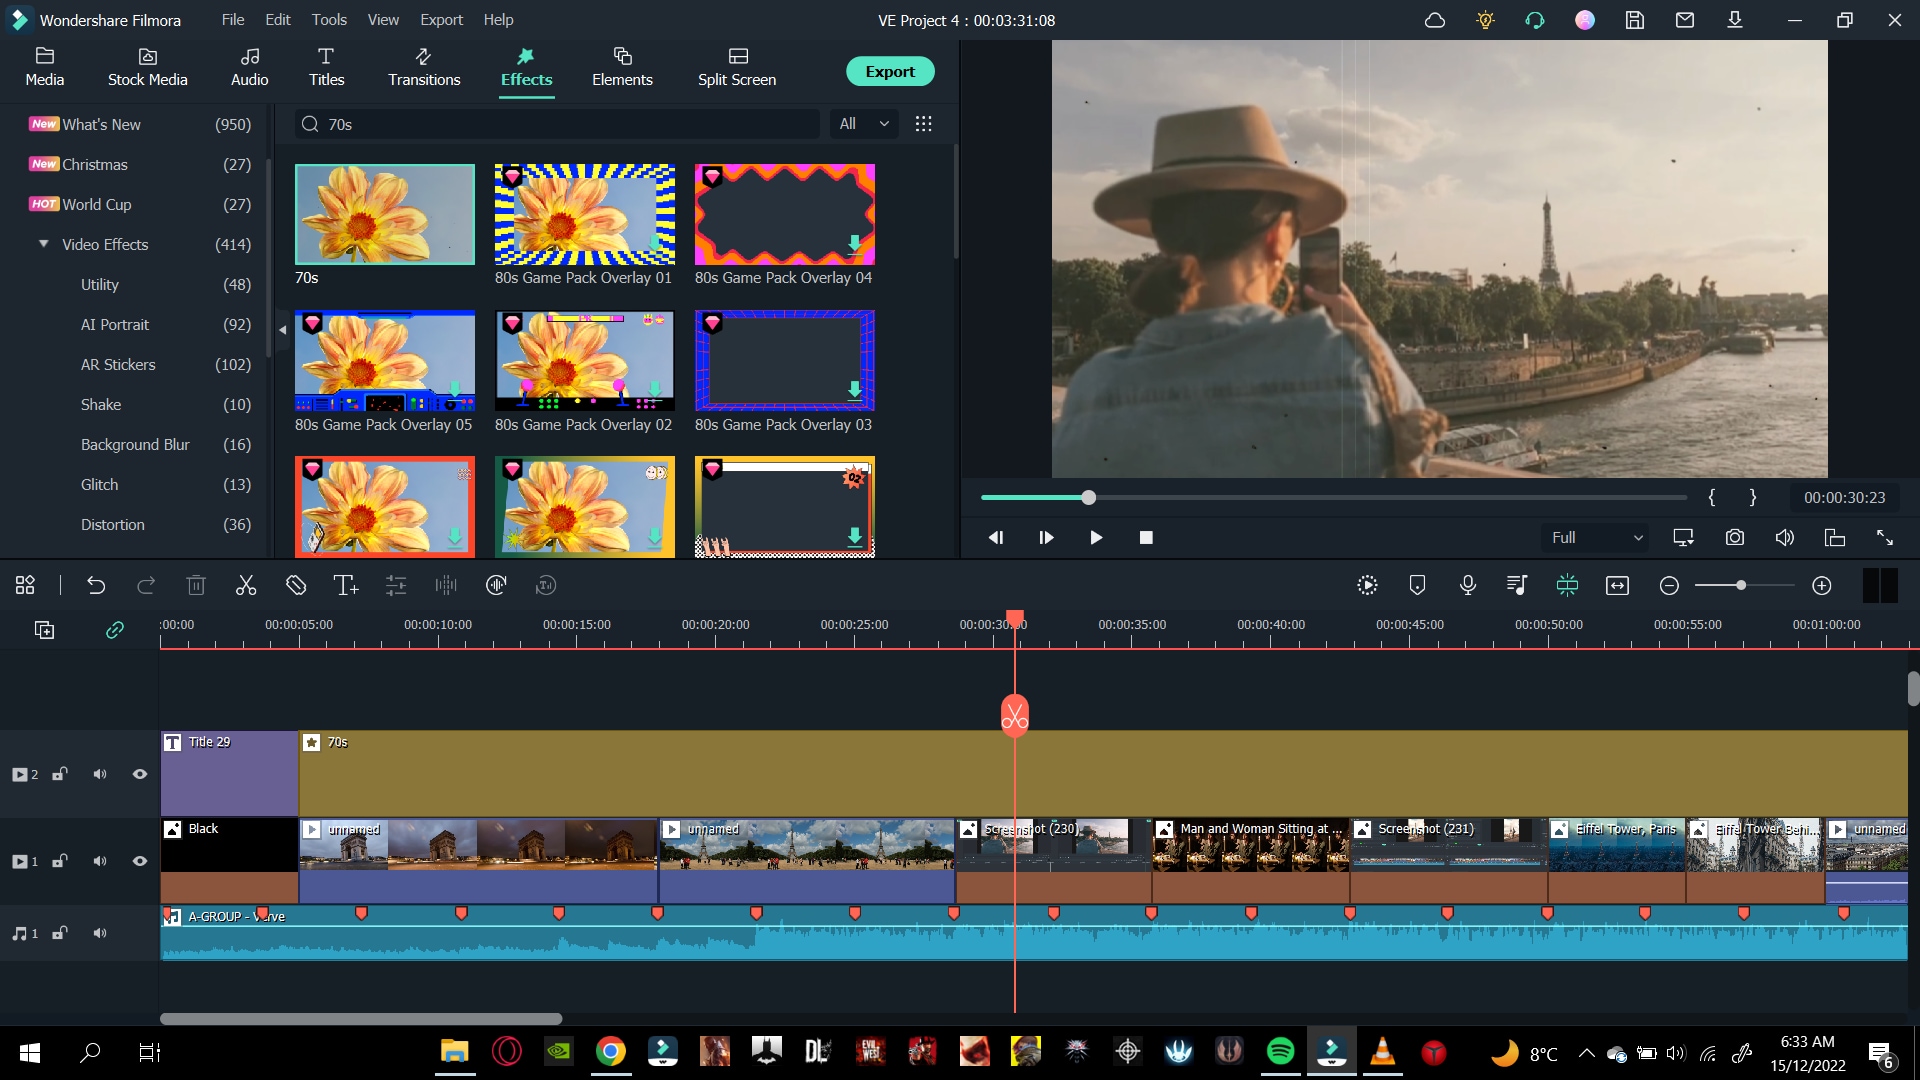
If you create a slideshow video of your trip to a historical place. You can add a Vintage filter to your video to give it that vintage tint. Follow the steps mentioned below:
- Head over to the Effects tab, where the effects library will open up
- Select any effect and download
- Click on the effect and drag it to drop in the timeline.
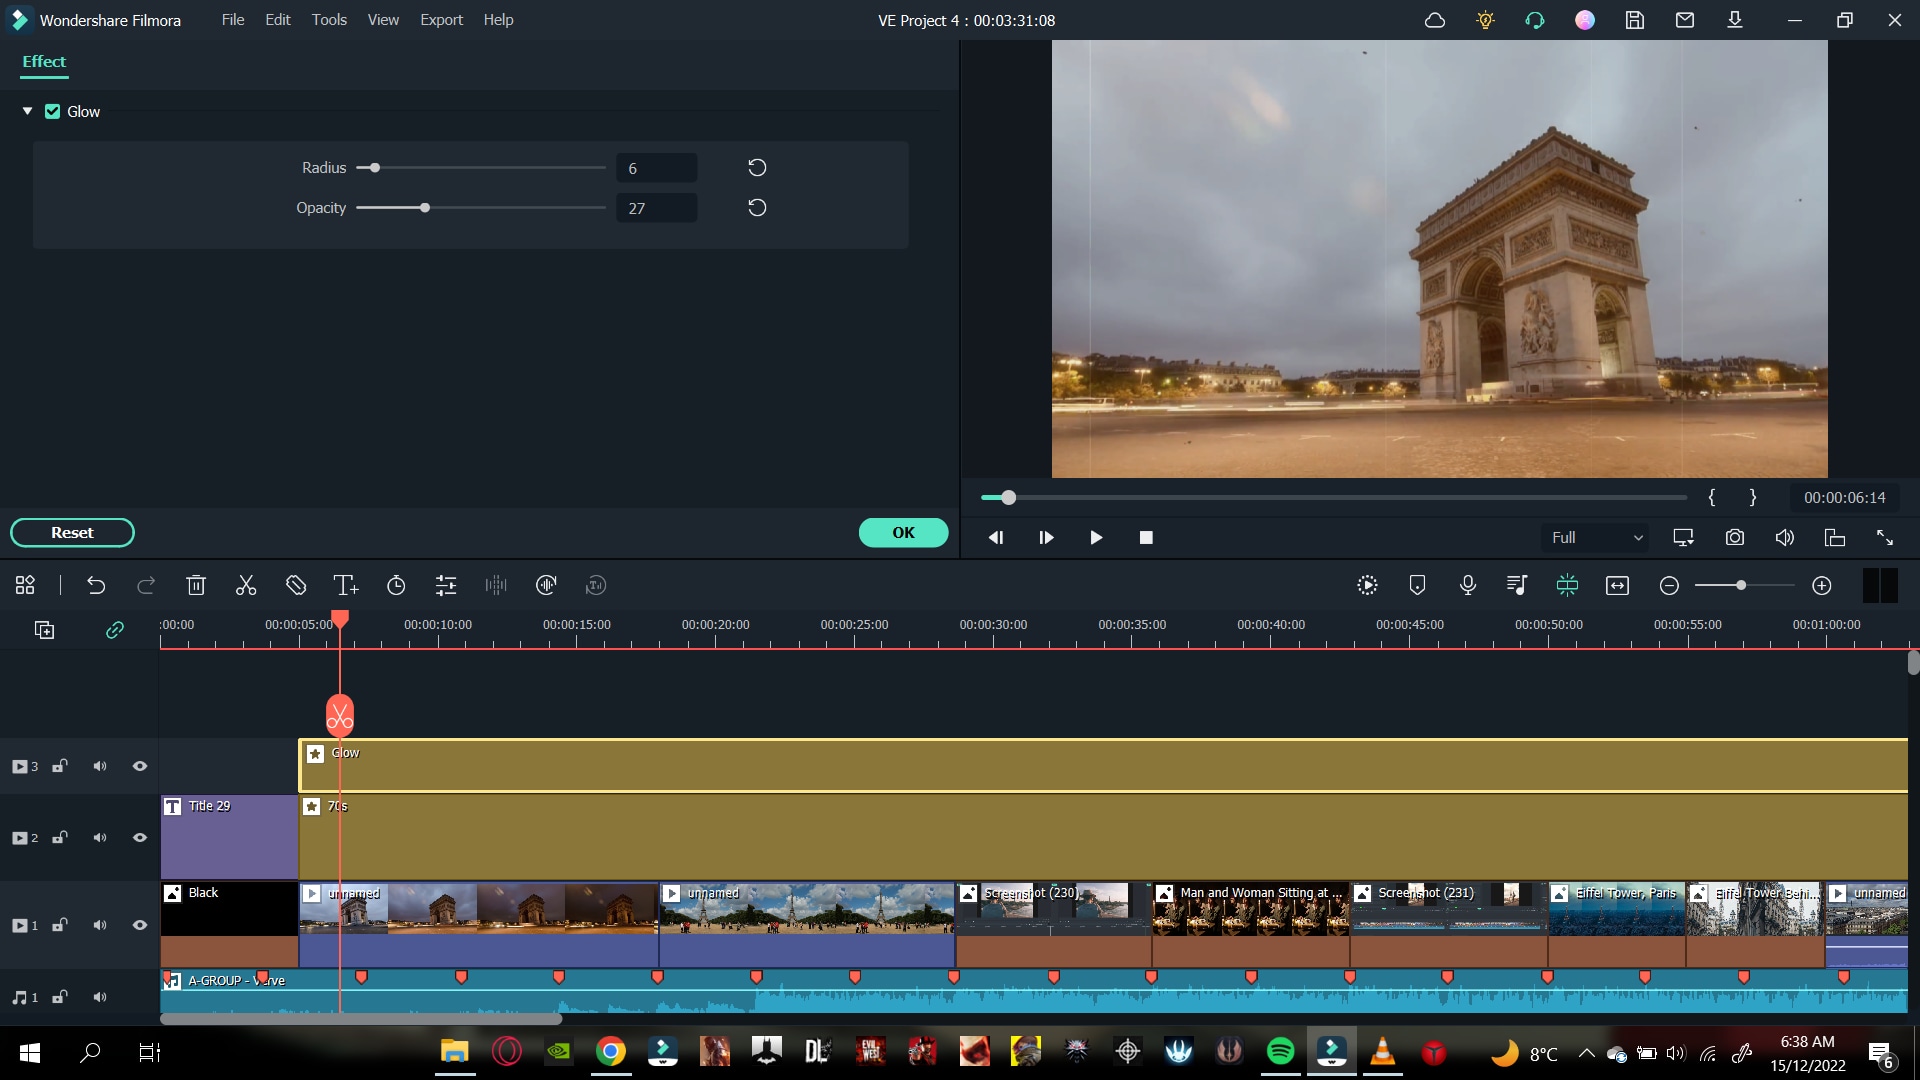
Combining a vintage effect with a dreamy glow will make your video pop up even more. To add a nostalgic glow to your video, follow the steps:
- Click on the effects and search for Glow in the search bar.
- Click and drag the glow effect above the timeline and ensure the effect is in the separate video timeline.
- Ensure the effect is applied to every photo and video.
- Double-click on the effect, and settings will open in the import window.
- Then, you can adjust the radius and opacity of the video. Adjust as you desire.
We are almost done. Let us now move toward our outro!
Step10 Create an Outro
The steps we will do will be similar to the ones we did initially. As we are creating, we will again need a canvas. Follow the steps mentioned below:
- Head to the media icon on the bar and scroll until you see the sample media tab.
- In the sample color option, drag and drop the black color at the end of your video.
Add an Outro Transition
To finalize things, add a transition effect at the end of the clip by these steps:
- In the Transition tab, search for the Fade effect.
- Drag and drop the Fade effect between your last video clip and the Black screen.
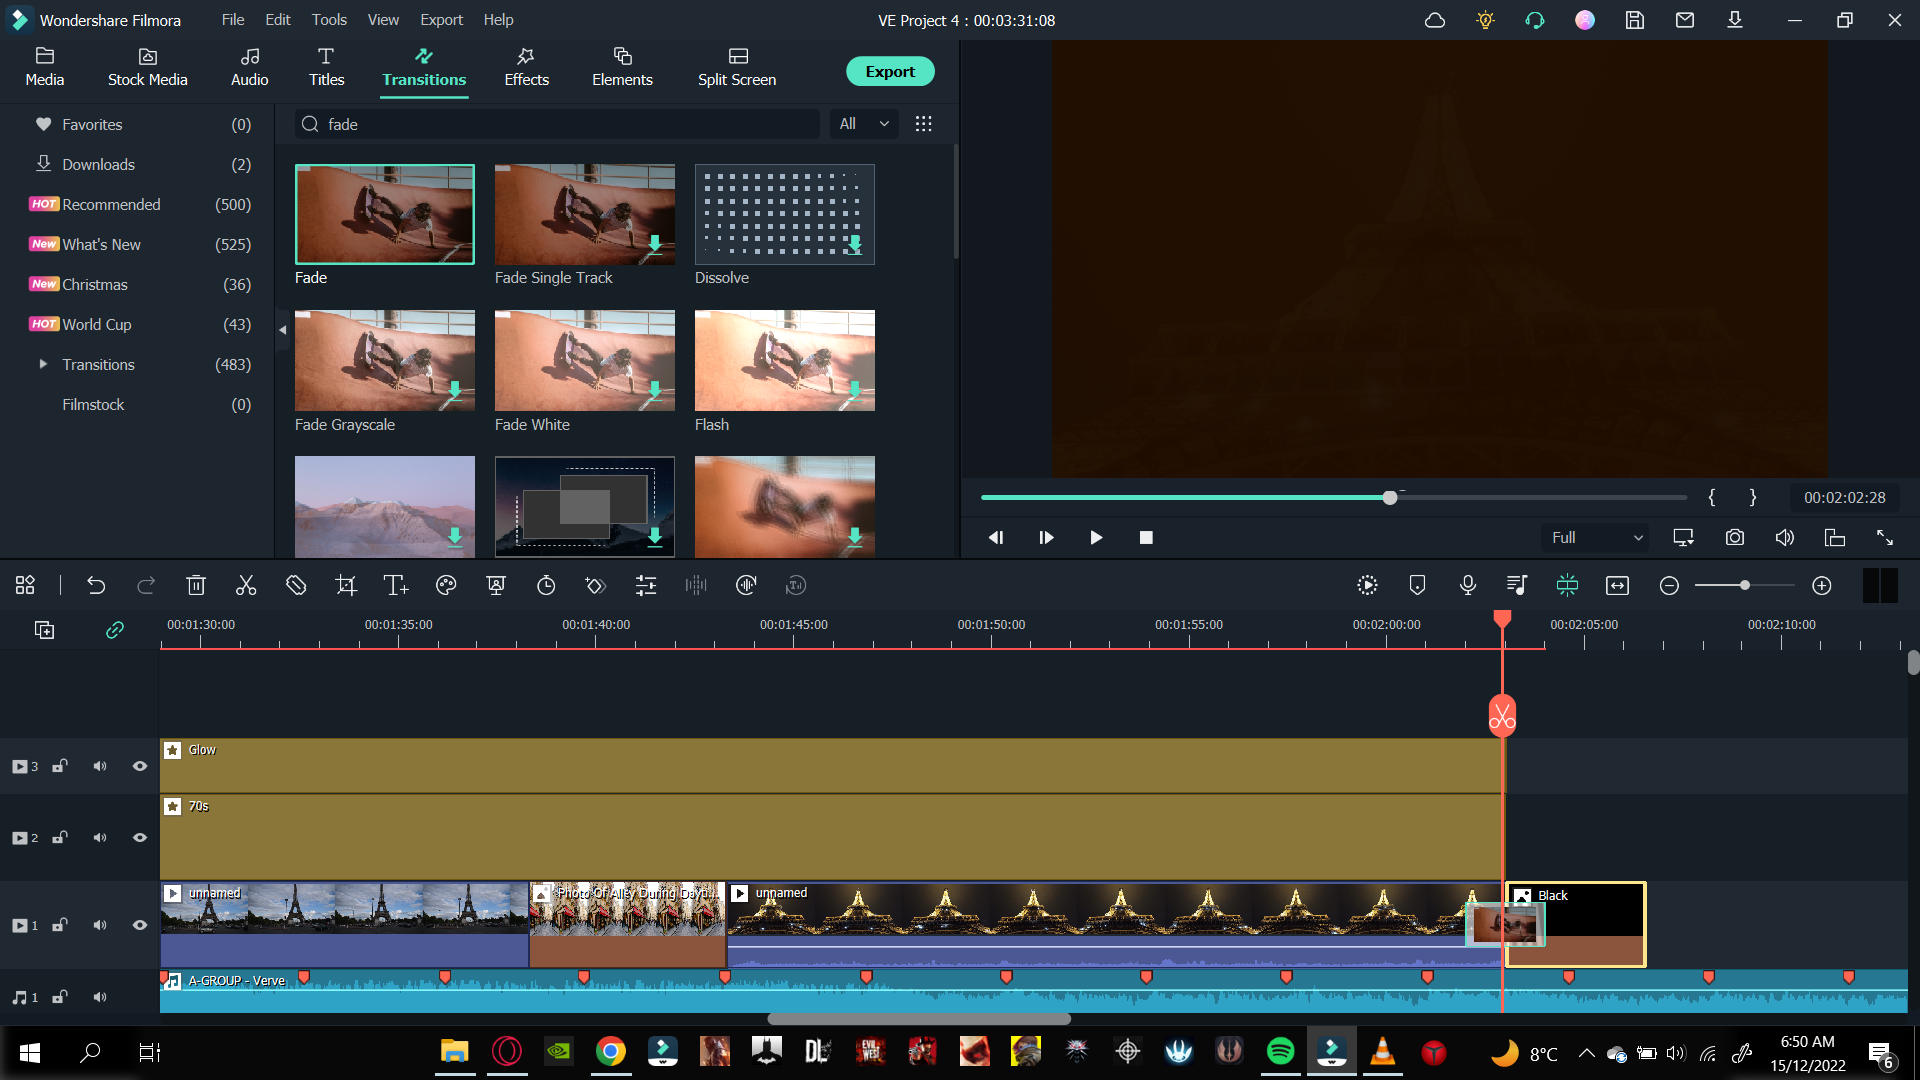
Fade out The Audio
If the audio suddenly ends at the end of your slideshow, it will create a bitter effect. Therefore, you should always fade out audio at the end of the video. To do this, follow the steps mentioned:
- Double-click on the audio in the timeline, and the settings list will pop up.
- On the top section of the import window, you will notice fade options.
- In the fade-out bar, drag it to the side to set your fade-out timer.
You can show your friends and family the slideshow or upload it to Youtube. Play the Slideshow Video from the beginning to see the changes.
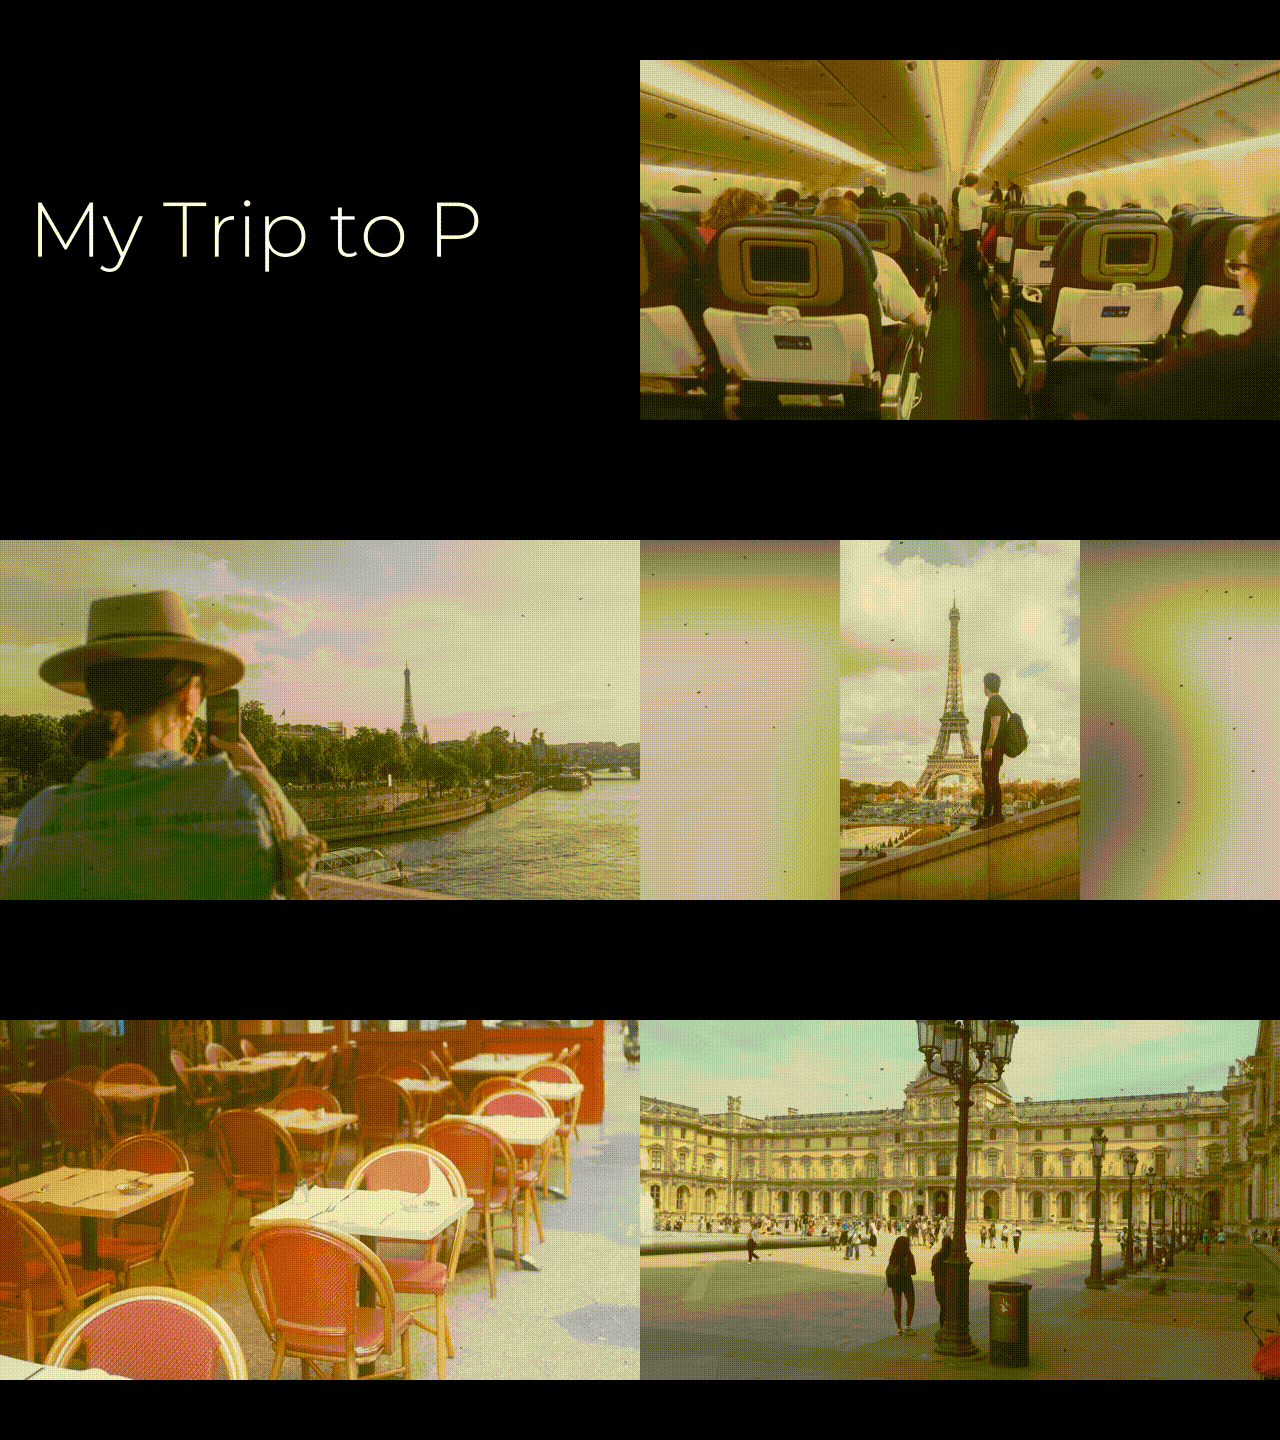
Conclusion
By the steps mentioned above, you can create a slideshow video. Give every moment a chance to align everything on one side! The slideshow will also save your device space by aligning everything in one video.
Free Download For macOS 10.14 or later

Let’s start with the step-by-step instructions for making a slideshow video now that you know the requirements for generating a slideshow.
Part 5. Step-by-Step Guide to Creating a Slideshow Video
Utilizing filmora will reduce your workload while producing quality work. Follow the below step-by-step guide to make your slideshow video instantly!
Step1 Download Wondershare Filmora
Wondershare Filmora will provide the working platform. Follow the below steps to download it:
- First, install the Wondershare Filmora.
- Then, launch this application on your PC or Mac
Let’s proceed to edit our video after downloading the Wondershare Filmora software. Continue reading to find out how to begin the editing process.
Step2 Import your Photos and Videos
Importing your videos and pictures to Filmora’s media panel is best to have them all in one folder. Therefore, when you open Wondershare Filmora, you will notice the main import window in the top left corner.
- Click in the center of the import window upon the import icon.
- Browse from the PC library to where your target Videos and Photos are stored.
- Please select the required videos and photos and Open

Your next step will be to add the imported videos and images to the timeline.
Step3 Add your Photos and Videos to the Timeline
When you have multiple videos and photos, you can add all of them simultaneously. Or you can also add them one by one wherever you need. Follow the steps mentioned:
- Right-click on the photo or video you want.
- Keep holding the Right-click and drag it down to the timeline.

Now that we have imported your photos and videos into the timeline, it is time to align and add text.
Step4 Add the Title
To create an attractive slideshow, you will need to add a title before the start of the video. Doing so will allow you to gain more viewers and audiences.
Add a Black Screen
The black screen will eventually act like a canvas to give your title a good look. To add a black screen, follow the steps mentioned:
- Click on the media icon from the bar above the import window.
- You will notice many tabs on the left-hand side under a drop-down bar.
- Scroll below to find the sample media
- Download the black color if it is not downloaded already.
- Click and drag it down below to the start of your video.

Add a Title Tile
Now that we have our canvas, we will now add the title. Above the import media library, there will be a Title icon.
- Click on the title icon, and select the title that you want for your video by browsing and scrolling down.
- For this purpose, we will use a simple title tile called “Title 29.”
![]()
Note: You can find the same title by scrolling, browsing, or searching in the search bar above the import library.
- Click and drag the title onto the black screen that we added.
- Double-click the title to open its settings.
- Here you can type in the text that you want.

You can also change its font. When you click on the font bar, a drop-down option will pop up, and you choose whichever you like.
- Change the animation of the text title from the top left corner animation
Change The Timing of The Title
You can also adjust the timing of the title by below steps:
- Click on the advanced option in the bottom right corner, and settings will pop up.
- Find the title bar and drag it to the right side to increase the timing of the title.

After adding the title, it’s time to go with fading effect as shown below!
Step5 Add a Fade effect
You can also add a fade transition to the start of your video. It will blend the title with the first clip. Follow the steps mentioned to add the transition effects:
- Search the Fade option from the Transitions tab above the import window
![]()
Note: A fade transition will allow your title to fade into the first clip creating a visually pleasing effect.
- Download the Fade transition and drag it between the Black screen and the first clip.

Now that we have added a transition, it is time to move on to our music!
Step6 Add The Music
You can add your music to the slideshow from your PC library, but make sure you have the music rights. It is better to use stock audio by following the steps:
- Click on the Audio icon on the bar above the import window, and the list will pop up.
- Please browse the library to find music that best suits your video and download it.
- Then add it to the timeline’s audio track.
Add Beat Detection
To match your video clips properly with the music, so it remains in sync, you can adjust it with the beat of the music. To add beat detection, follow the steps mentioned:
- Right-Click on the audio that you selected in the audio library.
- You will see a pop-up list, and in the options, you will see Beat detection.
- Click on Beat detection.

- Then click on the audio and drag it below on the timeline.
Match The Video With The Audio Markers
To have the full advantage of beat detection, you must adjust your videos and photos to the markers. Follow the steps mentioned below to do so:

- Check that the video clips are in sync with the marker on the audio.
- For this, drag one video end to a marker or as many videos as you want.
- Ultimately, you will create a timeline in which your videos sync with the audio beat.

After syncing your videos and photos to the audio, it is time to move on to the scaling and background blur.
Step7 Scale and Blur The Background
Now, some of the pictures you have added must-have black borders. It usually means that your image is shorter than the aspect ratio.
If you leave the picture/photo as it is, the black borders will make it look shorter and out of proportion. As a result, it gives a generally poor look, as shown below.

To counter this problem, follow some easy steps:
- Double-click on the picture with black borders, and it will open the settings list.
- Go into the Transform Here you can see multiple settings.
- Increase the size of your photo to match the aspect ratio.

Add a Background Blur Effect
In some cases where you have taken a portrait photo where the picture is vertical, it ultimately stays out of proportion to the aspect ratio.
![]()
Note: Simply scaling the image to match the aspect ratio size is not sensible in this case. Doing so will hide the many pretty features of a portrait.

To counter this problem, you can add a blur effect. This effect will turn your background blur, matching the aspect ratio. Follow the steps mentioned below:
- Click on the Effects tab above the import window and search for Blur.
- Download the blur effect that suits you best and then drag the blur effect above your photo in the timeline.
You will notice the background turn to a blur in the main play screen.

Step8 Add a Transition
You can also add a transition effect to spice up things. It can get bland when your video or photo changes from one to another. To create a good slideshow video, you can add a transition effect by following the steps mentioned below:
- Click on the Transition icon above the import window.
- Browse the library until you find a transition you like, then download one.
- Click on the transition and drag it between the clips.

Adjust The Duration and Placement of The Transition
Now it’s time to adjust the duration and placement of the transition. For this, you can follow the steps mentioned below:
- Double-click on the transition effect, and it will open the settings list.
- You can adjust the duration by setting the timer as per your requirement.
![]()
Note: If other transitions are added to the timeline, you can adjust them by clicking Apply to all.

When you have adjusted the slideshow transitions, it is time to move on to the effects and filters.
Step9 Add the Effects and Filters
If you create a slideshow video of your trip to a historical place. You can add a Vintage filter to your video to give it that vintage tint. Follow the steps mentioned below:
- Head over to the Effects tab, where the effects library will open up
- Select any effect and download
- Click on the effect and drag it to drop in the timeline.

Combining a vintage effect with a dreamy glow will make your video pop up even more. To add a nostalgic glow to your video, follow the steps:
- Click on the effects and search for Glow in the search bar.
- Click and drag the glow effect above the timeline and ensure the effect is in the separate video timeline.
- Ensure the effect is applied to every photo and video.
- Double-click on the effect, and settings will open in the import window.
- Then, you can adjust the radius and opacity of the video. Adjust as you desire.

We are almost done. Let us now move toward our outro!
Step10 Create an Outro
The steps we will do will be similar to the ones we did initially. As we are creating, we will again need a canvas. Follow the steps mentioned below:
- Head to the media icon on the bar and scroll until you see the sample media tab.
- In the sample color option, drag and drop the black color at the end of your video.
Add an Outro Transition
To finalize things, add a transition effect at the end of the clip by these steps:
- In the Transition tab, search for the Fade effect.
- Drag and drop the Fade effect between your last video clip and the Black screen.

Fade out The Audio
If the audio suddenly ends at the end of your slideshow, it will create a bitter effect. Therefore, you should always fade out audio at the end of the video. To do this, follow the steps mentioned:
- Double-click on the audio in the timeline, and the settings list will pop up.
- On the top section of the import window, you will notice fade options.
- In the fade-out bar, drag it to the side to set your fade-out timer.
You can show your friends and family the slideshow or upload it to Youtube. Play the Slideshow Video from the beginning to see the changes.

Conclusion
By the steps mentioned above, you can create a slideshow video. Give every moment a chance to align everything on one side! The slideshow will also save your device space by aligning everything in one video.
As an Online Marketer, It Is Important to Know the Algorithm of YouTube Platform. I’ll Share You the History of Algorithm of YouTube and the New Changes in This Year
Every day, more than 1 billion hours of YouTube videos are seen by users worldwide, including cat videos and videos for cats. The YouTube algorithm determines the videos YouTube recommends to its more than 2 billion human users (and untold numbers of feline users).

The subject of how to encourage YouTube’s algorithm to promote your videos and give you more likes is crucial for marketers, influencers, and creators alike.
We’ll discuss what the algorithm is (and isn’t), the most recent updates for 2022, and how experts use
YouTube’s search and discovery tools to push their videos in front of viewers in this blog post.
Let’s start!
Part 1. YouTube’s algorithm’s history
The YouTube algorithm: What is it? Let’s take a quick look at how YouTube’s algorithm has evolved through time and how it functions now in order to respond to your question.
2005 to 2011: Click-and-view optimization
In order to crowdsource footage of Janet Jackson and Justin Timberlake’s infamous Superbowl performance, according to YouTube founder Jawed Karim (a.k.a. the star of Me at the Zoo), YouTube was established in 2005. Therefore, it should not be surprising that YouTube’s algorithm for many years displayed suggested videos that had the most views or clicks. Unfortunately, this resulted in an increase in deceptive titles and thumbnails, or clickbait. User experience suffered as a result of videos that made viewers feel duped, dissatisfied, or just plain irritated.
2012: Watch time optimization
YouTube made changes to its recommendation engine in 2012 to account for the amount of time spent watching each video as well as the total amount of time spent on the site. According to theory, when people find videos important and engaging, they watch them for a longer period of time, possibly all the way through. Due to this, some creators tried to make their movies shorter to enhance the likelihood that viewers would watch them through, while others made their videos longer to boost overall viewing time. YouTube maintained the official line—create content your audience wants to watch, and the algorithm will reward you—while refusing to support either of these strategies. However, as anyone who has used the internet for any length of time can attest, not all time spent online is created equal. YouTube has adopted a new strategy.
2015–2016: maximizing fulfillment
In addition to emphasizing direct reaction metrics like Shares, Likes, and Dislikes (and, of course, the extremely cruel “not interested” button), YouTube started monitoring viewer happiness directly using user surveys in 2005. YouTube published a whitepaper titled Deep Neural Networks for YouTube Recommendations in 2016 that detailed some of the inner workings of its AI.
2016-present: demonetization, and brand safety
The size and popularity of YouTube have led to an increase in content moderation difficulties over time, and what the algorithm suggests is now a major topic for news outlets and the government in addition to creators and advertisers.
YouTube has stated that it takes seriously its obligation to promote a variety of viewpoints while limiting the spread of damaging false material. For instance, algorithm modifications implemented in the beginning of 2019 have reduced consumption of questionable content by 70%. (According to YouTube, borderline content is that which is harmful or misleading but doesn’t quite go against community standards. On the other hand, offensive material is taken down right away.)
Creators are impacted by this problem because they worry about unintentionally breaking the constantly evolving community rules and getting punished with strikes, demonetization, or worse. (In fact, enhancing openness for community norms for artists is one of YouTube’s priorities for 2021, according to CEO Susan Wojcicki.) Brands and advertisers are also impacted since they don’t want their name and logo to be associated with white nationalists.
Politicians in America are growing more concerned about the societal impact of social media algorithms like YouTube’s. Democrats introduced the “Protecting Americans from Dangerous Algorithms Act” in early 2021, and YouTube (and other platforms) have been called to testify before Senate committees about their algorithms. Let’s now discuss what is known about this hazardous beast’s mechanism.
Part 2. How will YouTube’s algorithm function in 2022?
The YouTube algorithm chooses videos for users with the intention of finding the most relevant content for them and keeping them interested. When we refer to “the algorithm,” we mean one of three selection or discovery techniques that are related but slightly different: three different algorithms: one that chooses videos for YouTube’s main page, one that ranks the results of any given search, and one that chooses what videos users should watch next are used.
According to YouTube, in 2022 the majority of channels’ top traffic sources would often be their homepage and suggested videos. With the exception of explainer or instructional films, which frequently receive the most traffic via search (e.g., “how to tune up a bicycle”)
Part 3. How is the algorithm set up on YouTube?
What ranking factors does YouTube consider when deciding which videos to display to users? Every traffic source varies a little. But in the end, a combination of factors including customization (the history and preferences of the viewer) performance (the success of the video) external variables (the overall audience or market)
Part 4. How YouTube determines its homepage algorithm
The YouTube algorithm presents a wide selection of videos that it thinks a user might like to view every time they open the YouTube app or type in youtube.com. Because the computer hasn’t yet determined what the viewer wants—acoustic versions of popular songs, for example—this selection is frequently broad. talks that are motivating against procrastination? to watch their preferred possum vlogger? Two categories of ranking signals are used to determine which videos appear on the homepage:
Performance:
YouTube gauges performance using indicators including the click-through rate, typical viewing time, typical percentage of views, likes, and disapproval ratings from viewers. After you upload a video, the algorithm initially displays it to a small number of users on their homepage. If it appeals to, engages, and satisfies those viewers (i.e., they click on it, watch it through, like it, share it, etc.), then it is then presented to an increasing number of users on their homepages.
Personalization:
However, the trending tab does not include YouTube. According to their past activity, also known as their watch history, or personalization, YouTube suggests videos to users based on what it believes are relevant to their interests. More of the same will be presented to a user if they frequently watch a particular channel or show they have an interest in. This element is also responsive to behavioral alterations throughout time as a person’s affinities and interests change.
Conclusion
It’s a fallacy that the algorithm would penalize you for publishing too regularly or insufficiently frequently, even if YouTube undoubtedly promotes the idea of uploading constantly in order to develop and maintain a relationship with your audience. The growth of the audience is unrelated to the interval between uploads. The zeitgeist can change quickly, but by keeping an eye on Google Trends and giving yourself opportunity to explore, you won’t fall behind.
Free Download For Win 7 or later(64-bit)
Free Download For macOS 10.14 or later
Free Download For macOS 10.14 or later
How to Make Foggy Text Reflection Effect
Preparation
What you need to prepare:
- A computer (Windows or macOS)
- Your video materials.
- Filmora video editor
Step 1
Download the Filmora video editor → run it → and click on “New Project”.
Step 2
Go to Titles → drag the Default Title to the Timeline below. Double-click on the clip to open its settings. Here, type in your text → change the font to Montserrat Light. Scroll down and increase Text Spacing to 5.0. Now, select only the first word in the box where you typed your text. Then, change its font to Montserrat Bold. Click OK.

Step 3
Take a Snapshot of the text you just created. Now, delete the Default Title clip from the Timeline and drag the Snapshot you took to the Timeline.

Step 4
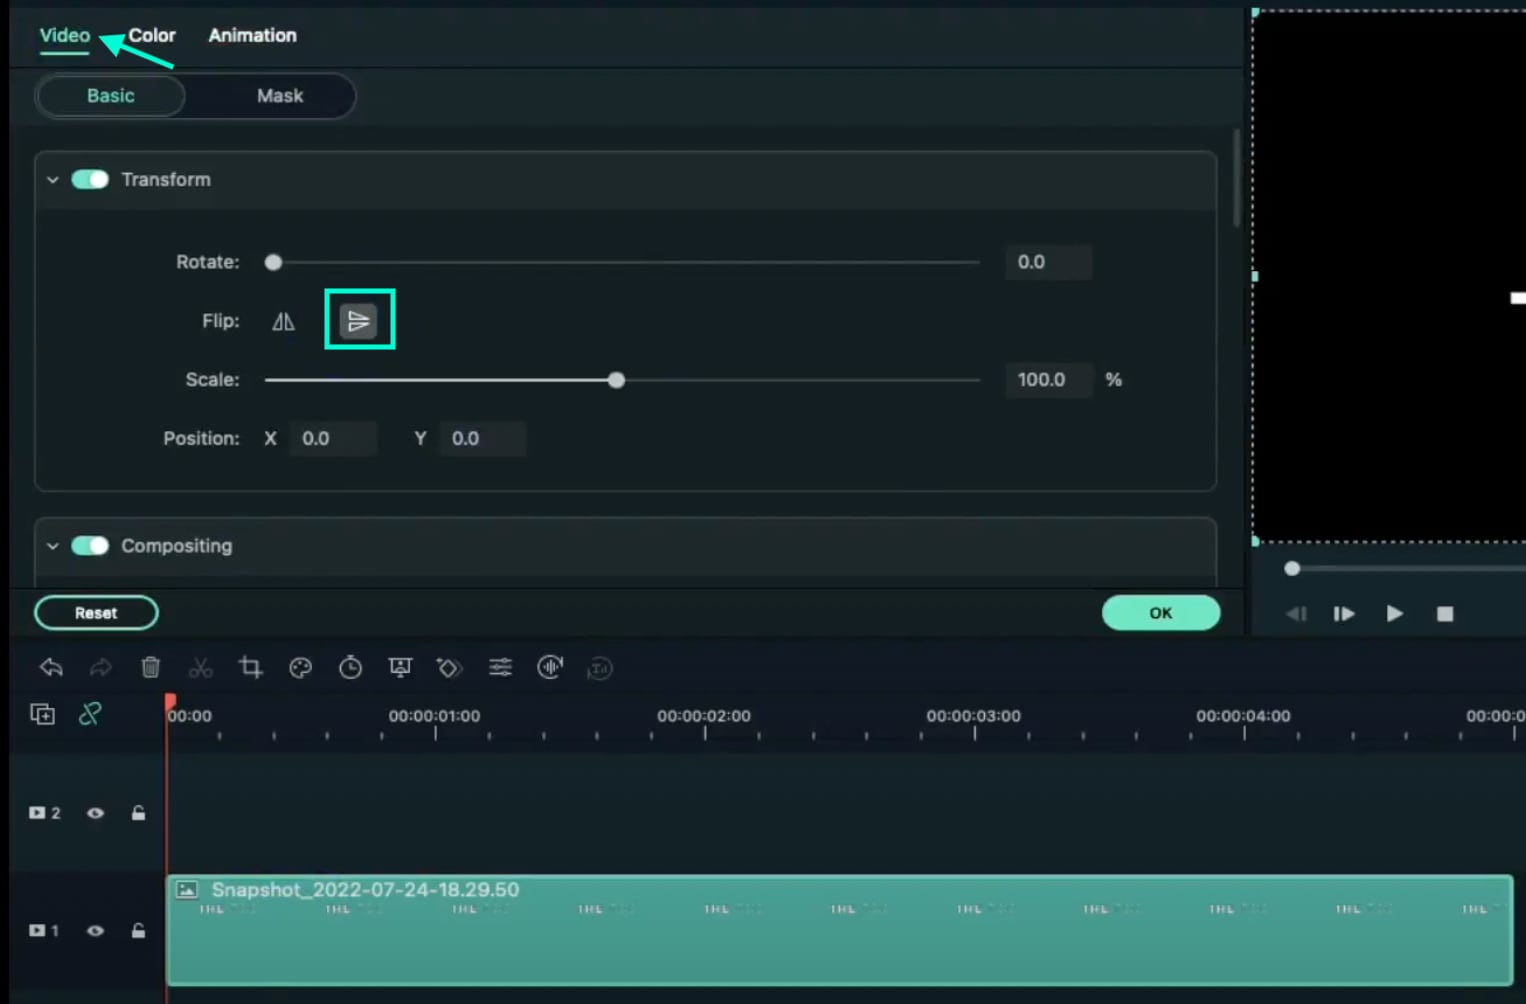
Double-click the Snapshot clip → go to the Video tab → click the highlighted button below to flip the text. Then, take a Snapshot of this flipped version of the text and delete the clip from the Timeline.
Step 5
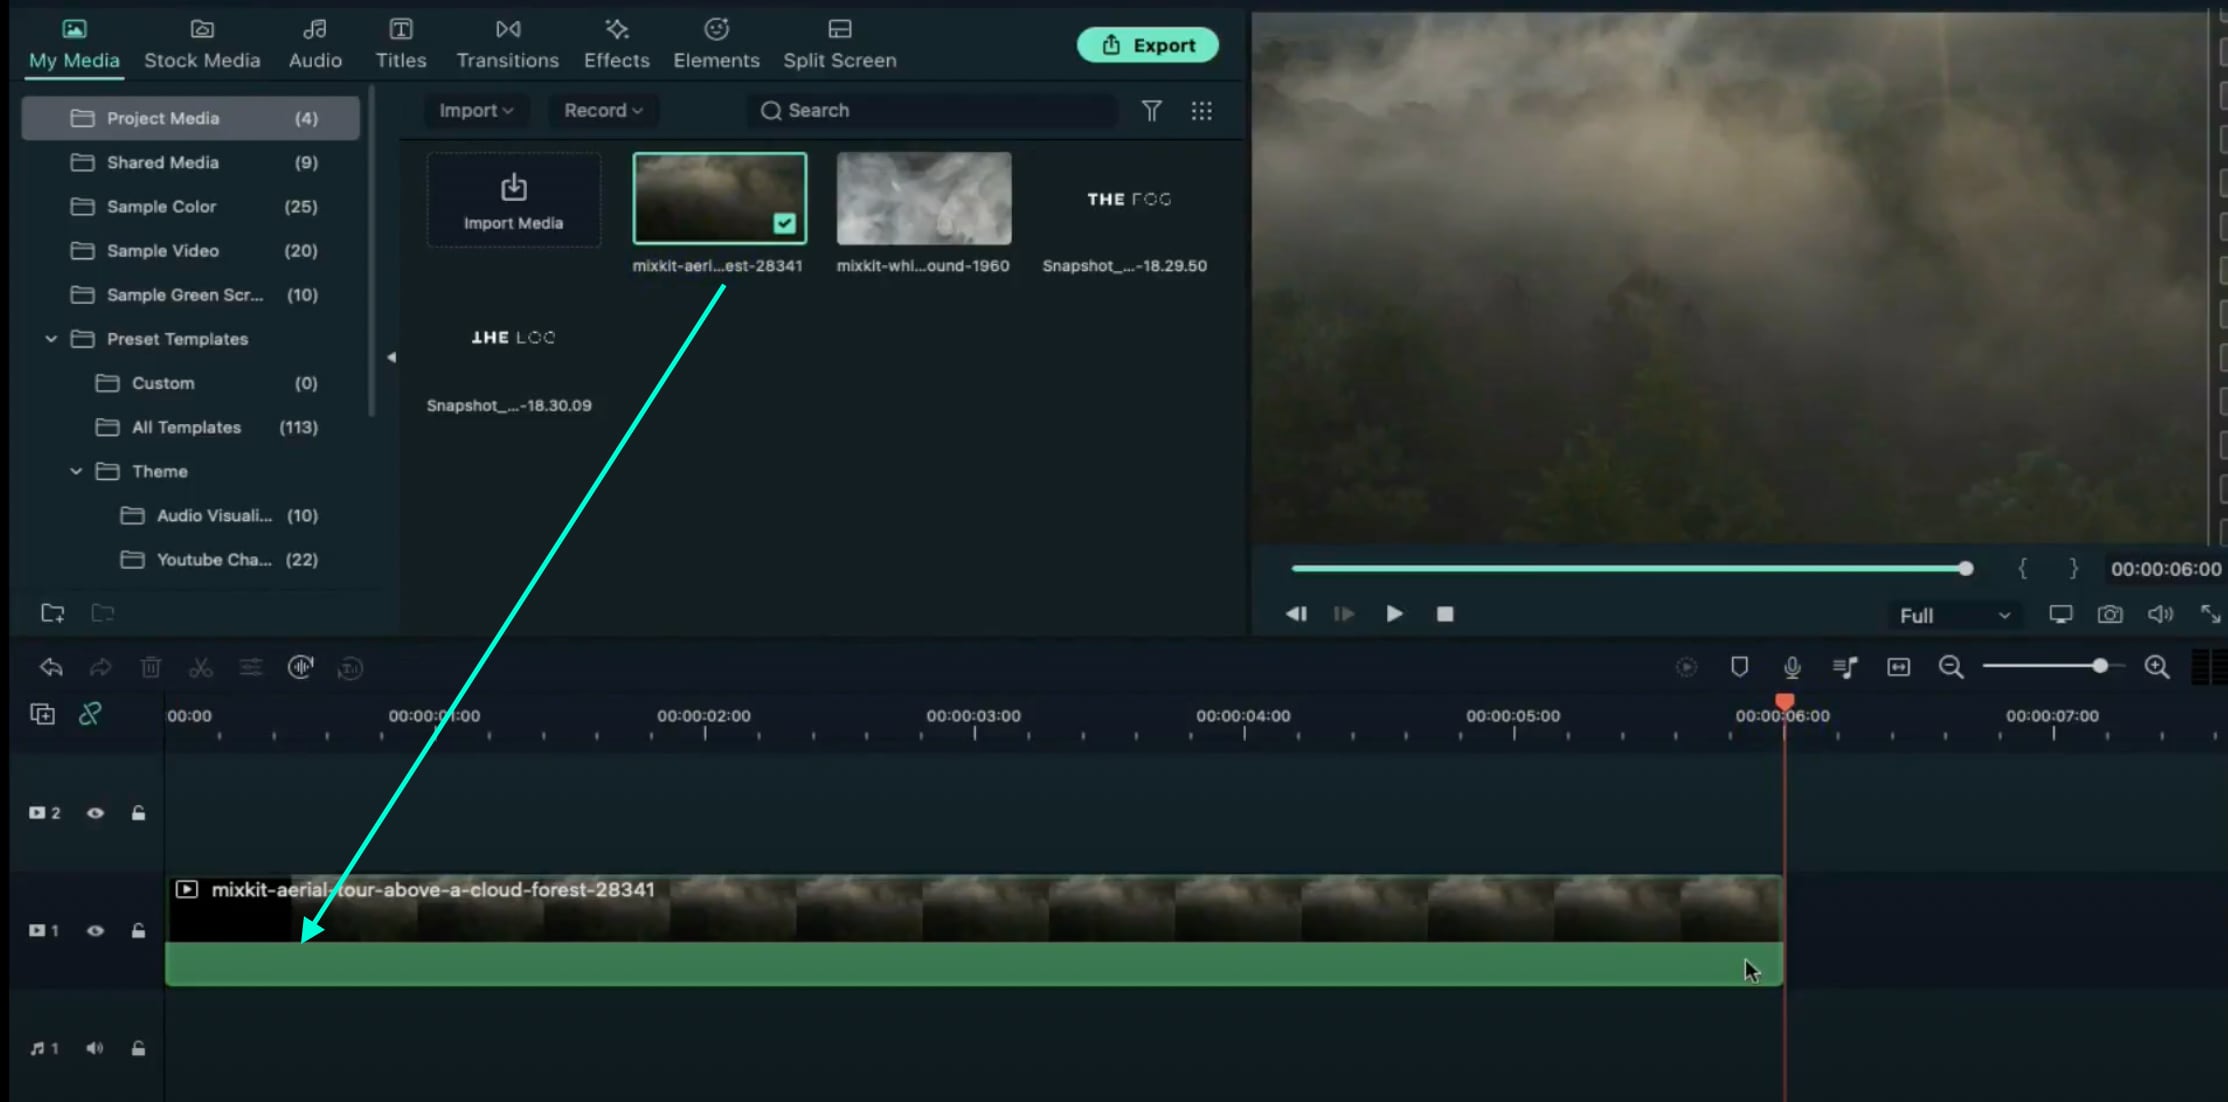
Visit the free stock footage site Mixkit and download any smoke or fog background video you like. Then, go to Filmora → My Media → Import Media → and select the footage you downloaded to import it into the video editor. Then, drag the Smoke clip to the Timeline and make it 6 seconds long.
Step 6
Double-click on the clip → go to Color. Now, change Contrast to “49”, Saturation to “100”, and Brightness to “18”. Below, set the 3D LUT option to “Game of Thrones”. Click OK.

Step 7
Drag the other Smoke clip to Track 2 of the Timeline. Make it 6 seconds long. Then, move the Playhead to the starting point of the video.
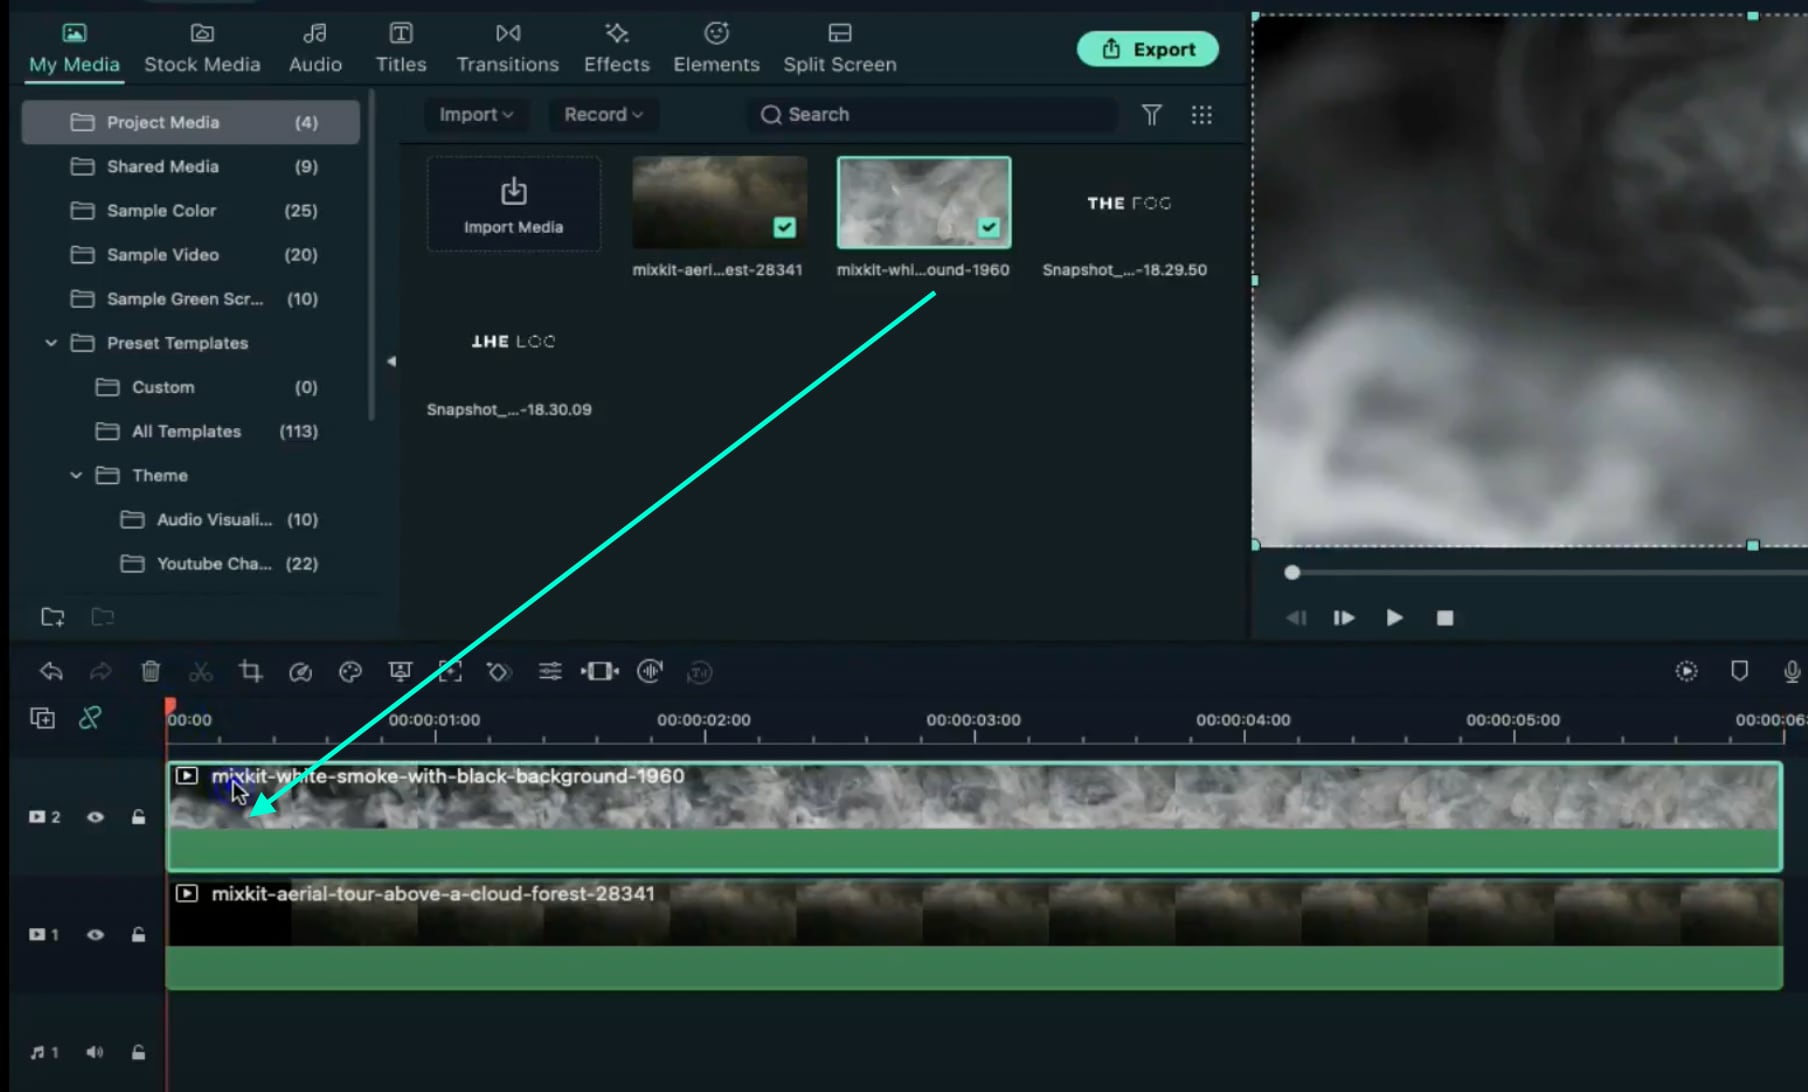
Step 8
Double-click on the new smoke clip. Go to Animation. Decrease the Opacity to 0%. Move the Playhead 10 frames forward → increase the Opacity to 6%. Don’t click OK yet.
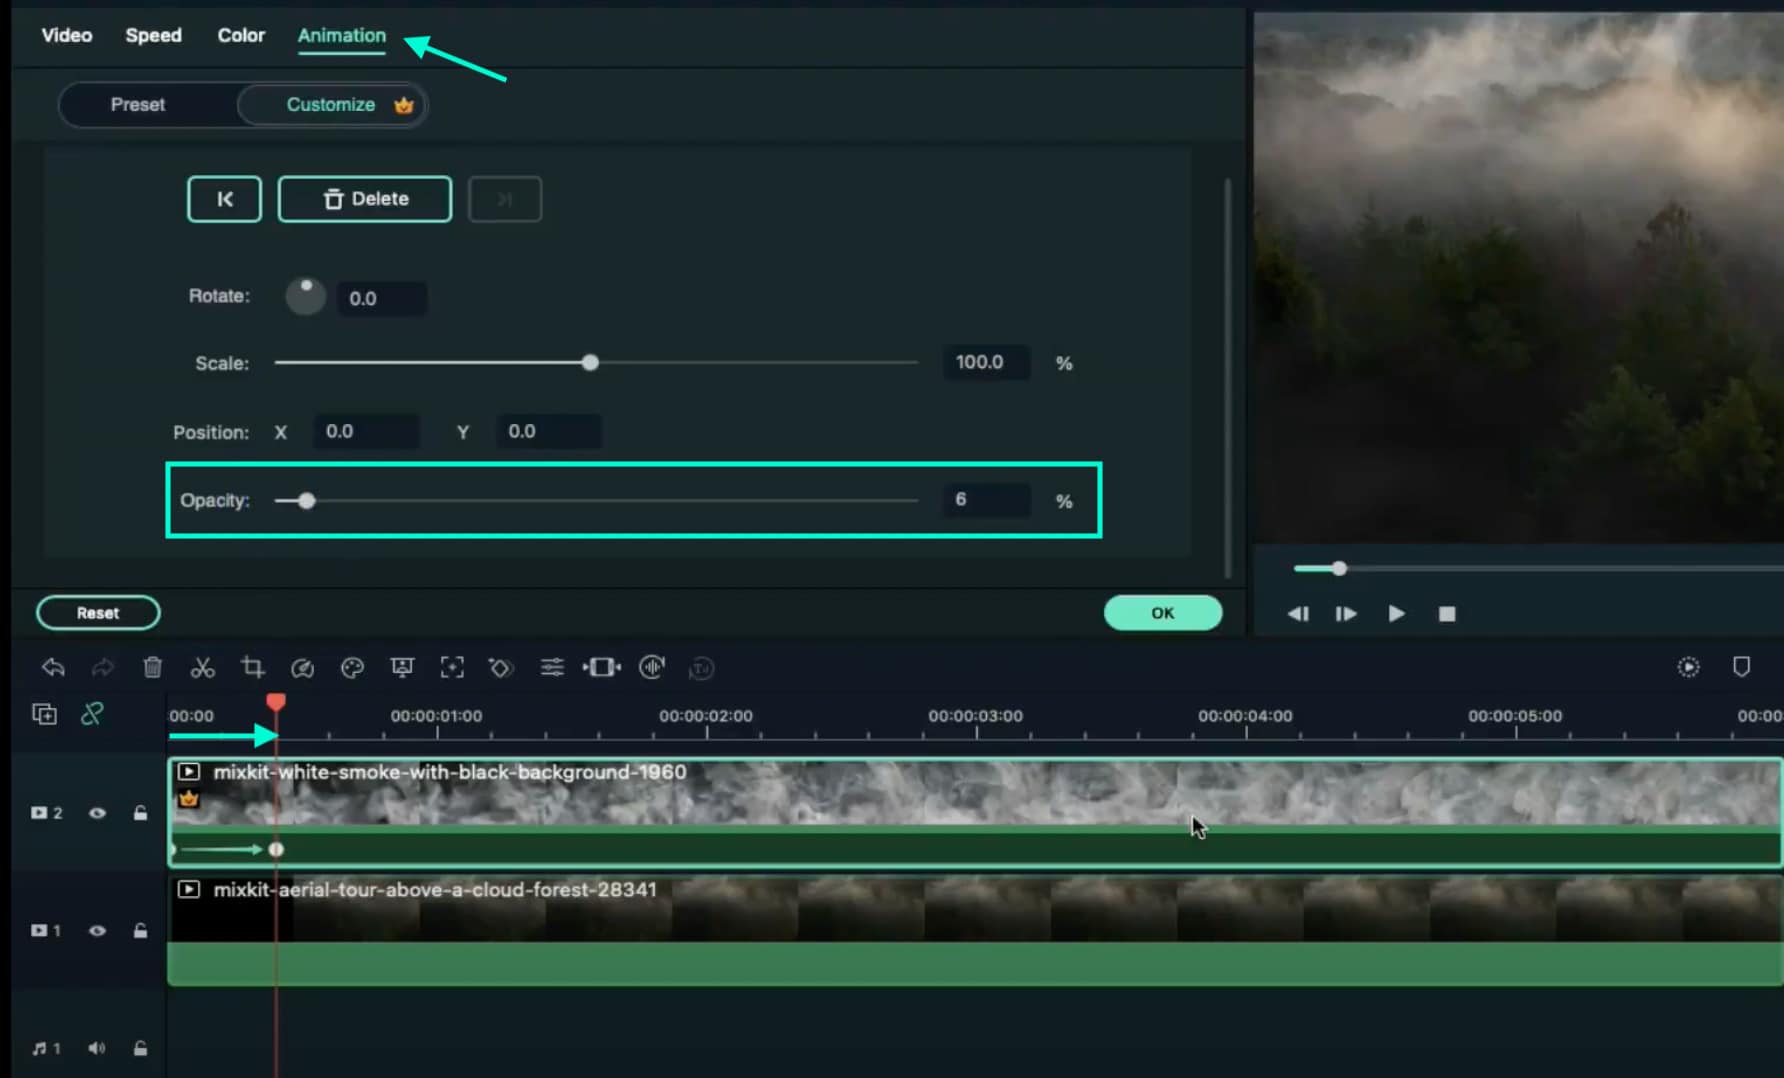
Step 9
Move the Playhead to 5 seconds. Click on “**+Add**” to add a keyframe to the clip. Then, move the Playhead to the next-to-last frame and increase the Opacity to 100%. Click OK.

Step 10
Set the Playhead to the second frame and drop the first Snapshot we took earlier at that starting point. Drag the clip to be 6 seconds long. Then, double-click on the clip and adjust the settings exactly as you see in this image here. Don’t click on OK yet.

Step 11
Move the Playhead at the 17th frame → increase the Opacity to 6%. Move the Playhead to 5 seconds and 23rd frame → change the X-axis value to “1973”. Click OK.
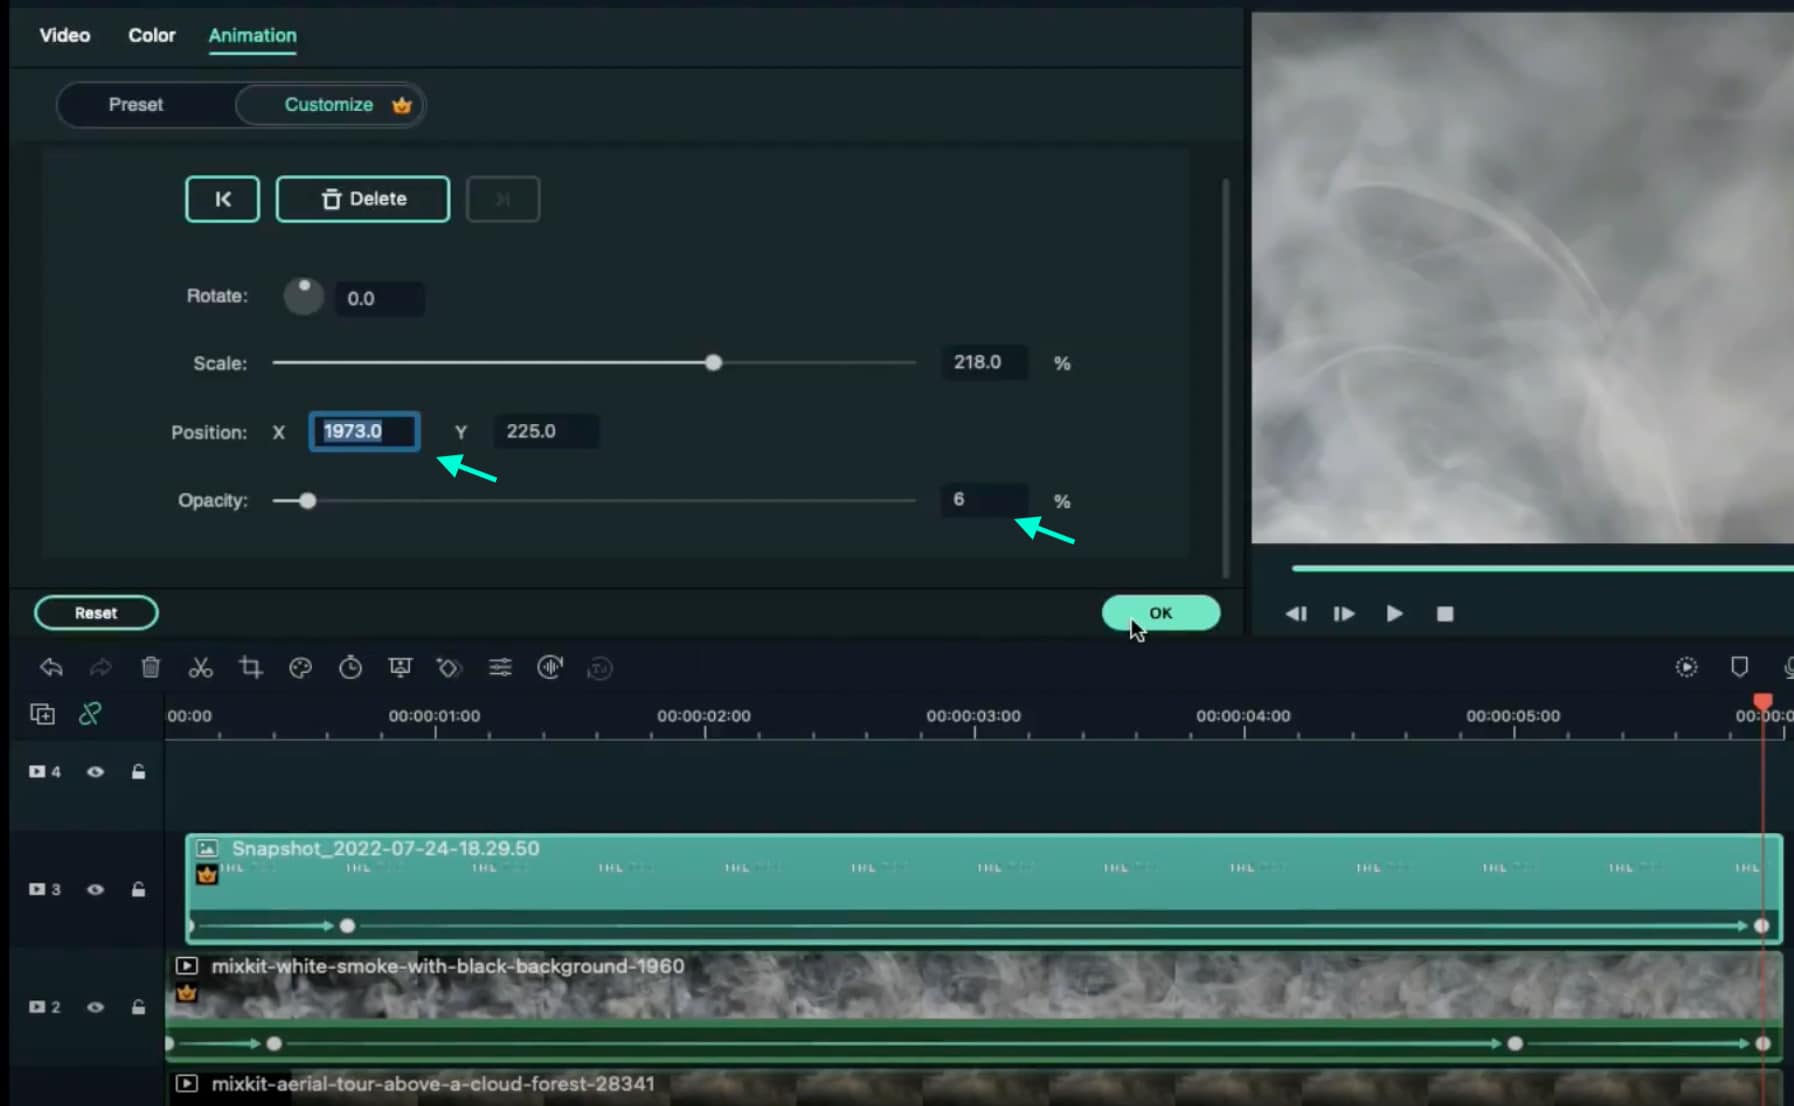
Step 12
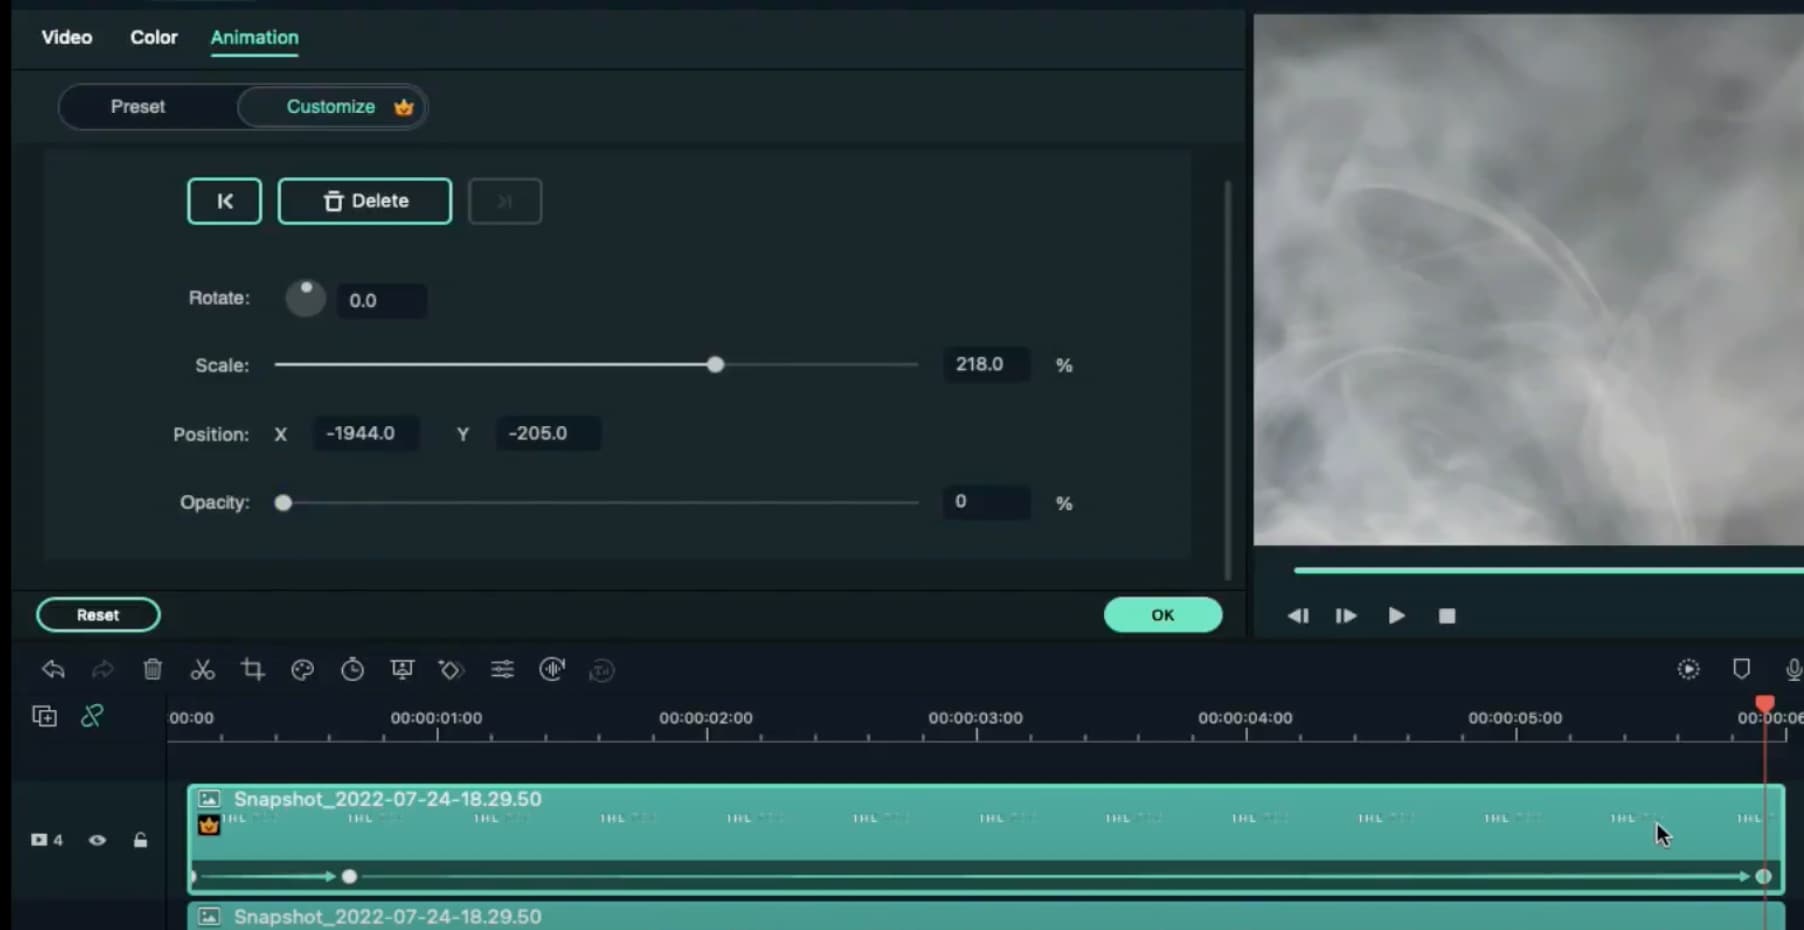
Drag the same Snapshot file to Track 4, directly on top of the clip in Track 3. Make its duration the same too. Now, double-click on this clip and apply the exact same settings as in the image here. Don’t click on OK yet.
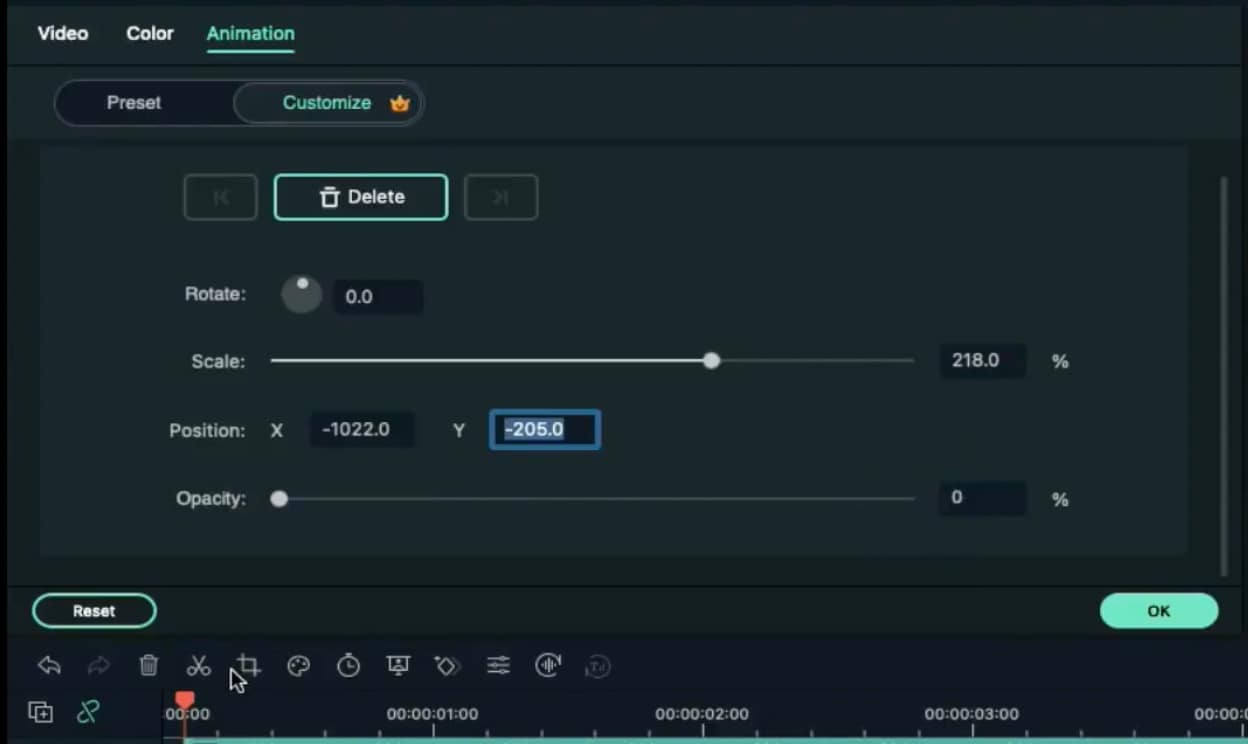
Step 13
Move the Playhead to the 17th frame → increase the Opacity to 6%. Now, move the Playhead to 5 seconds and 23rd frame → change X-axis value to “-1944” and the Opacity to 0%. Click OK.
Step 14
Go to Sample Color and drag the White color on Track 6 in the Timeline. Place this clip at the same starting point as the snapshots below it. Set its duration the same as the clips below too. Then, move the Playhead at its starting point.

Step 15
Double-click on the Sample Color clip → go to Video → Mask → Import. Here, select the first Snapshot we created earlier in this tutorial.

Step 16
Now, go straight to the Animation tab and click the “**+Add**” button to add a keyframe. Then, compress the text in the preview screen until it’s not visible anymore on the screen.

Step 17
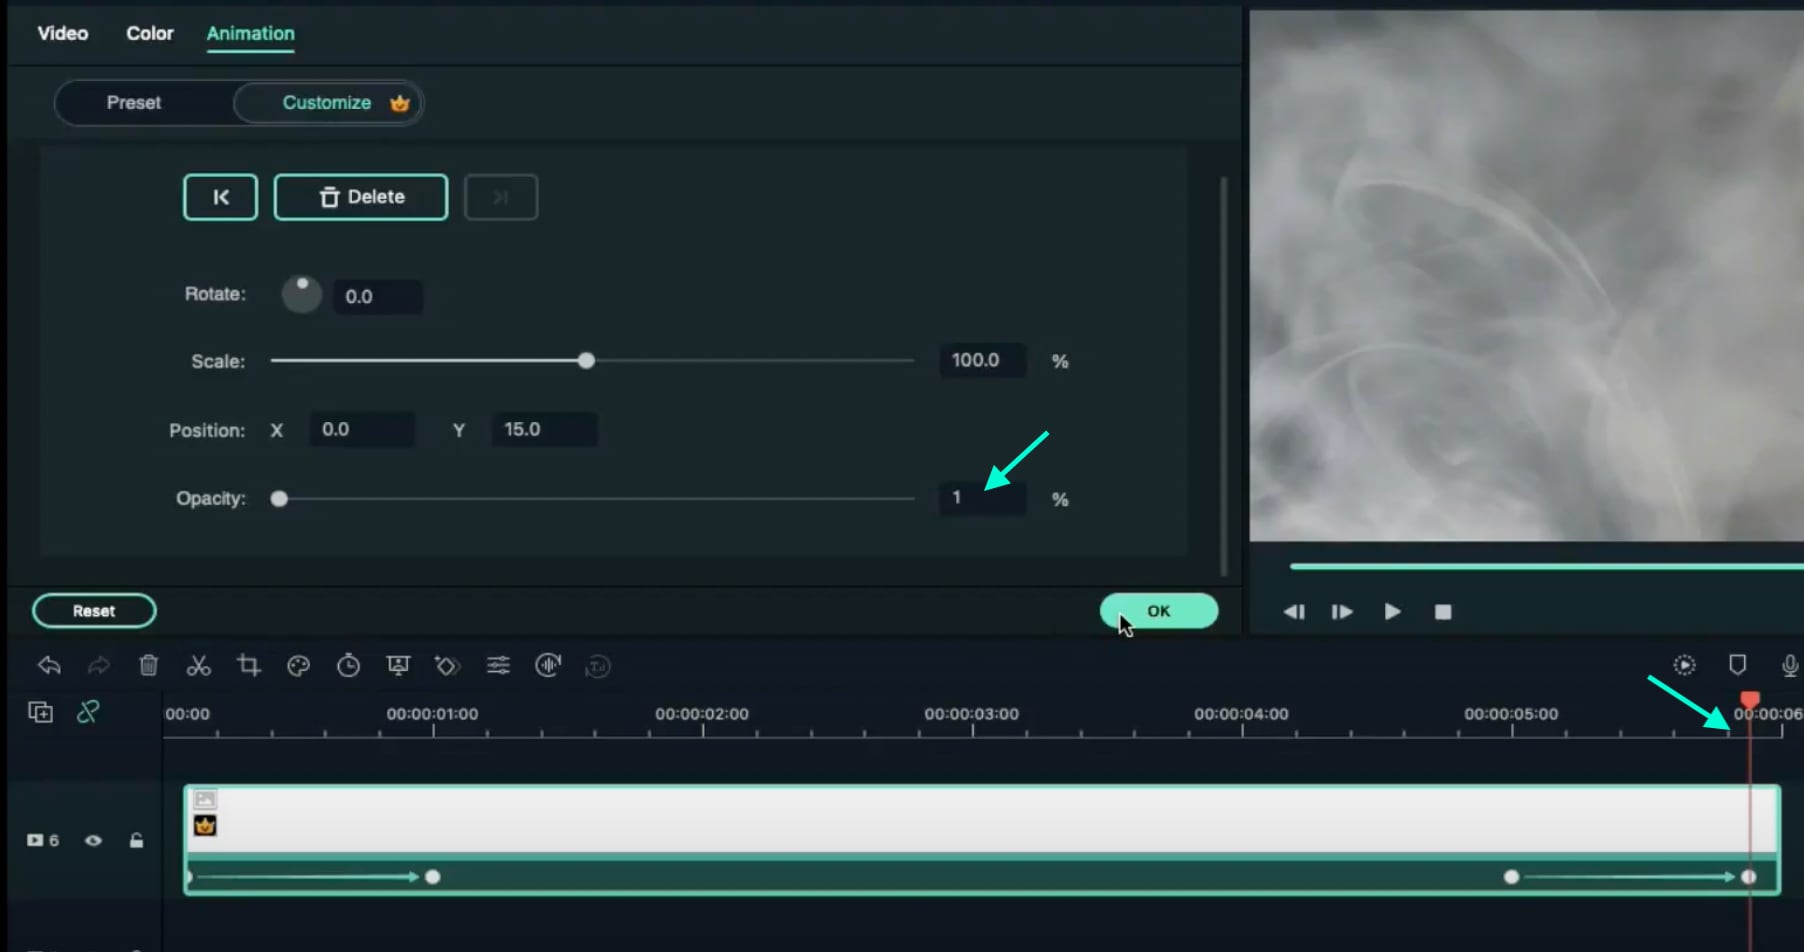
Add keyframes at the 1-second position and at the 5-second position. Then, move the Playhead once more to the 5-second and 22nd frame. Reduce the Opacity to 1%. Click OK.
Step 18
Drag another White Sample Color to Track 5 this time. Adjust its duration and starting point to be the same as the clip above it. Double-click on it → go to Video → Mask → Import. Here, select the flipped text Snapshot we created earlier.
Step 19
Now, go to Animation and add a keyframe at the starting point. Then, compress the text on the preview screen exactly as we did before with the other one. Then, add a keyframe at the 1-second position of the clip. Then, adjust the Y-axis position to create a reflection effect, just like this.

Step 20
Move the Playhead to the 5-second position and add a keyframe. Now, move the Playhead directly to 5-seconds and 22 frames. Here, reduce the Opacity to 0%.
Step 21
Go back to the Video tab from the upper-left corner of the panel. Now, move the Playhead to the clip’s starting point. Select the Mask tab. Add a keyframe. Move the Playhead to 1 second and set the Blur Strength to 6%.

Step 22
Move the Playhead to 3 seconds. Scroll down and set Vertical to 259%. Set Y-axis to “-157”. Then, increase Blur Strength to 25%. Click OK.

Step 23
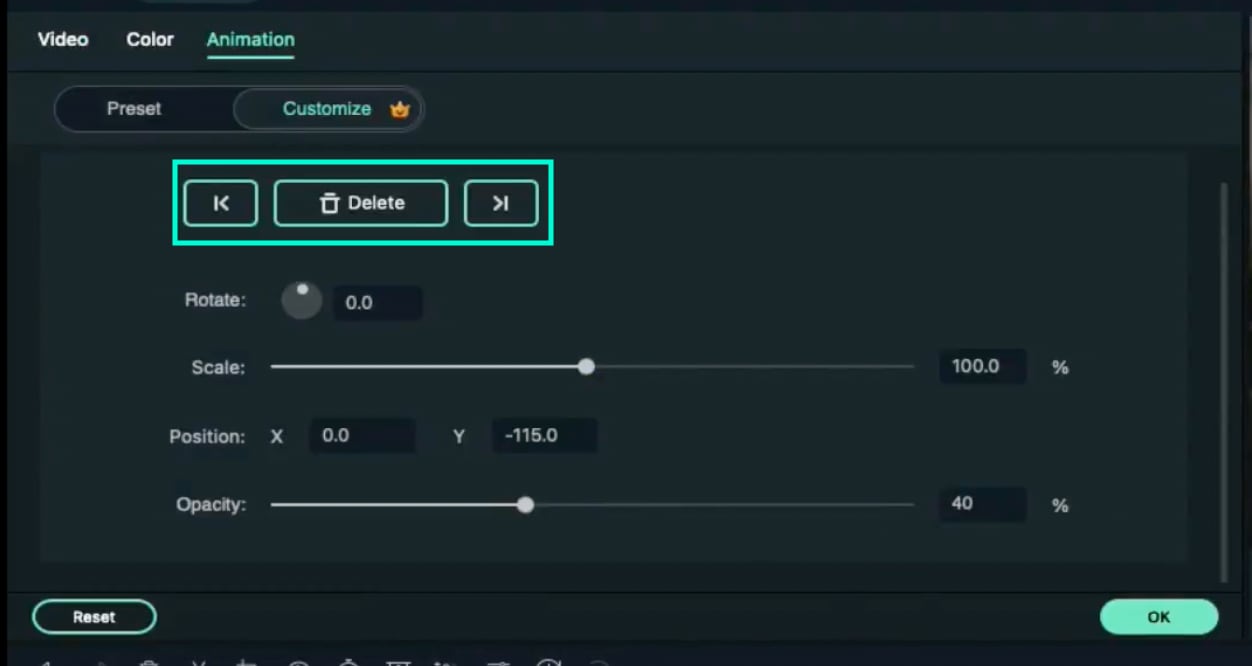
Click on the Sample Color in Track 5 and change the Opacity to 40% for the second and third keyframes. You can move between the keyframes on the arrows highlighted below. Click OK.
Step 24
Go to Sample Color and drag the “Gradient 4” color to Track 7 on the Timeline. Allow this clip to start from the very beginning and adjust its end time to be the same as all the other clips.
Step 25
Double-click on the Gradient 4 clip → go to Video → Basic. Change the Blending Mode to “Soft Light”. Reduce the Opacity to 42%. Click OK.

Step 26
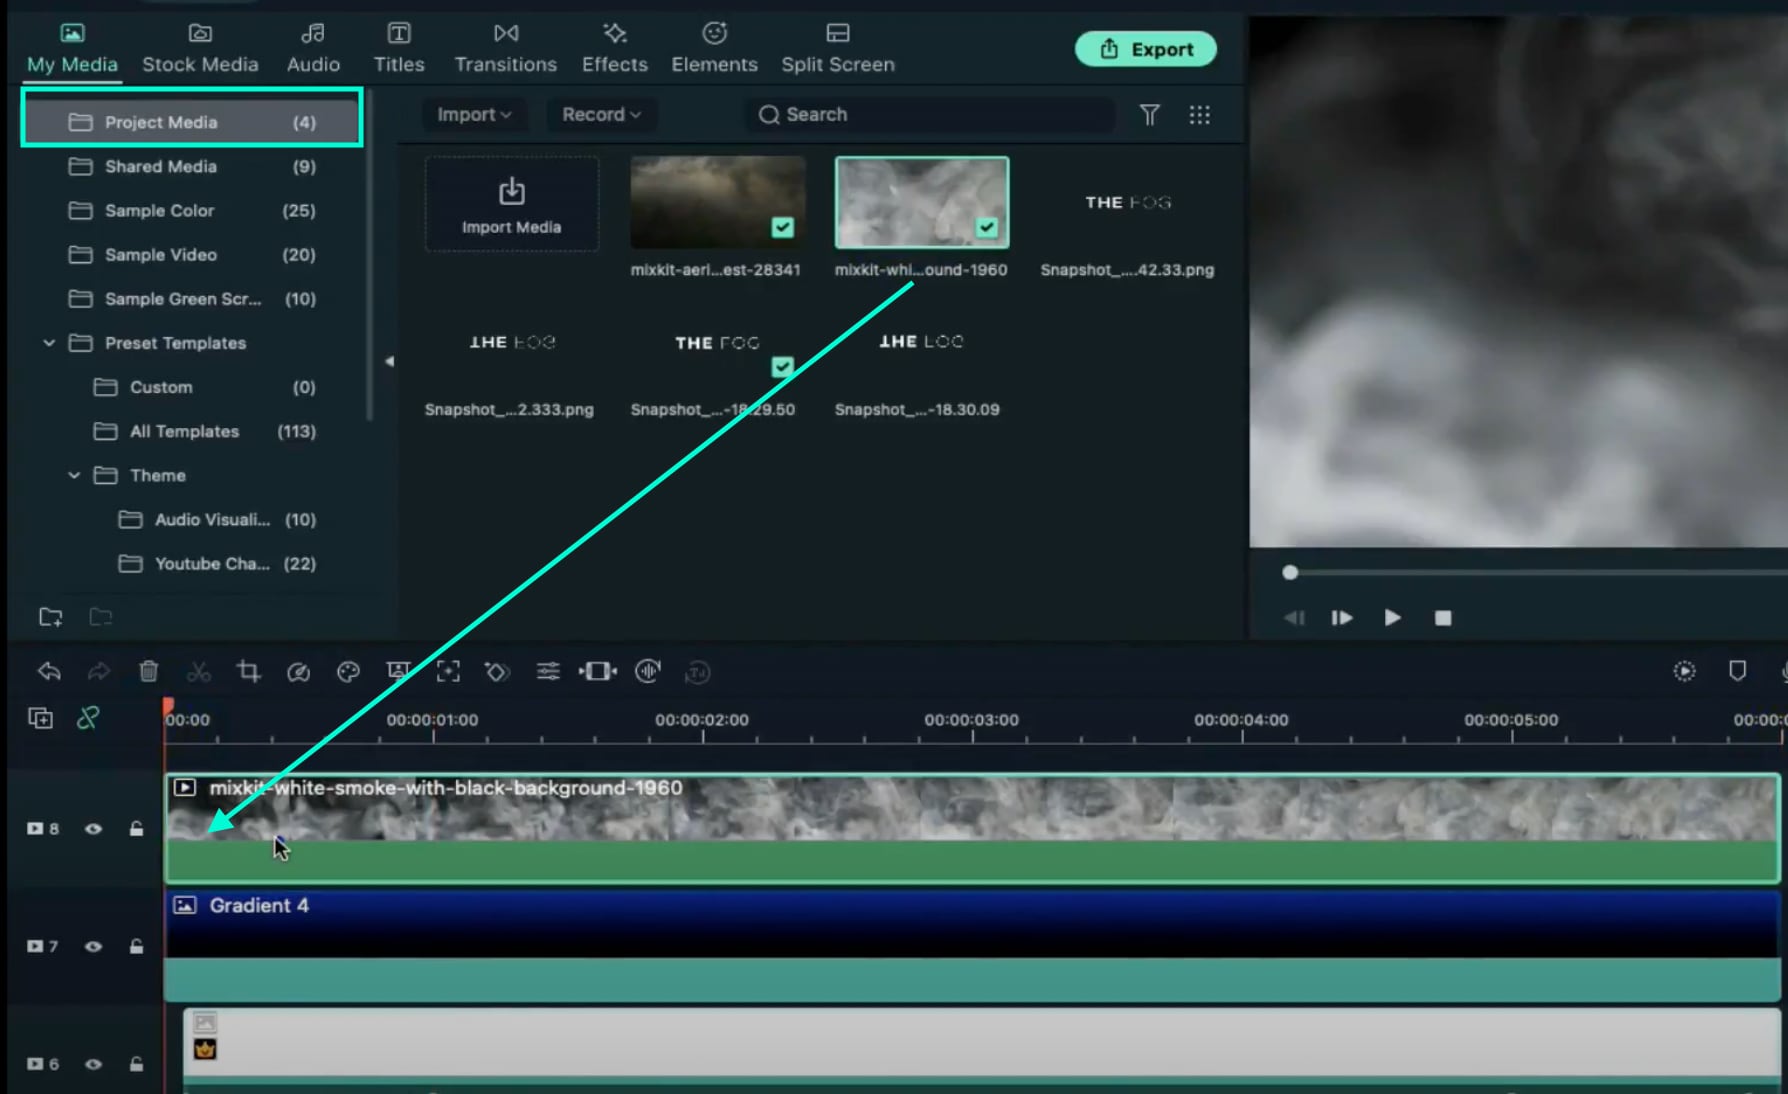
Go to Project Media and drag the white smoke clip on Track 8. Place the Playhead at the starting point and double-click on the clip.
Step 27
Change its Blending Mode to “Screen”. Go to the Animation tab and decrease the Opacity to 0%. Move the Playhead to frame 10 → increase Opacity to 12%. Move the Playhead to the 5-second position → add a keyframe. Then, move the Playhead at 5 seconds and 23rd frame → increase the Opacity back to 100%. Click OK.
Step 28
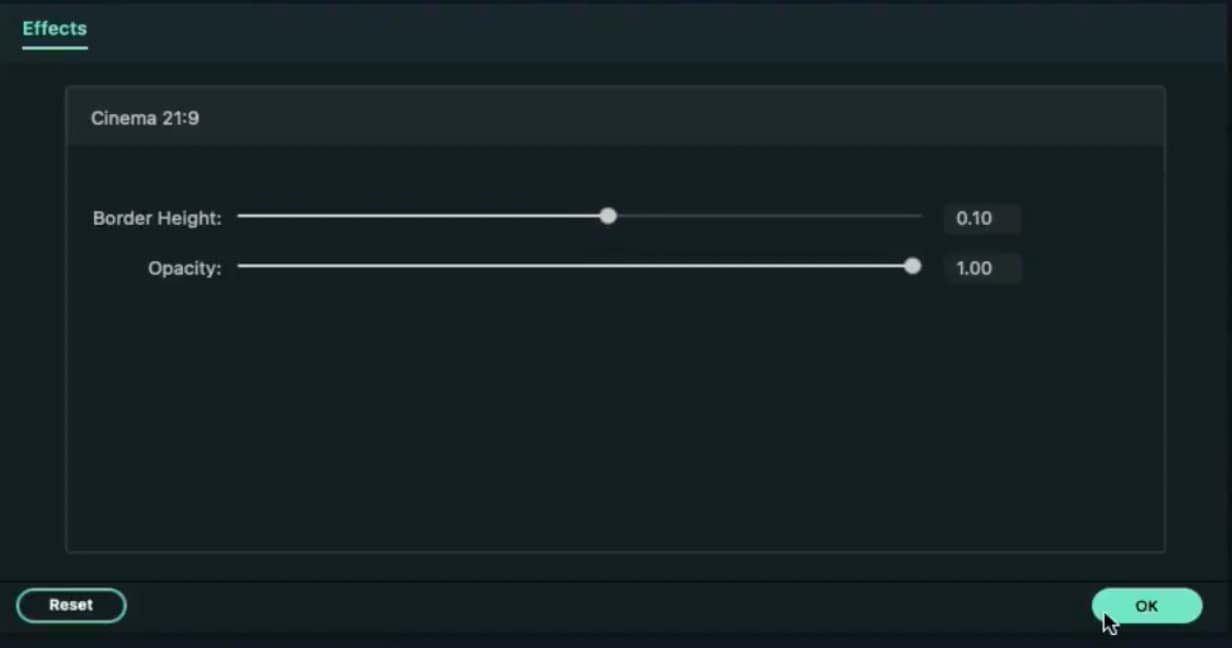
Go to Effects and drag the Cinema effect to Track 9. Adjust its duration to match all the other clips. Double-click on the clip and increase its Border Height to “0.10”. Click OK.
Step 29
Finally, Render the video and watch the final result. You’re done! Congratulations on resting a foggy text reflection effect in Filmora.

Summary
What you’ve learned:
- Create a foggy text reflection effect in the Filmora video editor
- Add and adjust keyframes to clips
- Edit and customize text
- Take and edit snapshots
What you need to prepare:
- A computer (Windows or macOS)
- Your video materials.
- Filmora video editor
Step 1
Download the Filmora video editor → run it → and click on “New Project”.
Step 2
Go to Titles → drag the Default Title to the Timeline below. Double-click on the clip to open its settings. Here, type in your text → change the font to Montserrat Light. Scroll down and increase Text Spacing to 5.0. Now, select only the first word in the box where you typed your text. Then, change its font to Montserrat Bold. Click OK.

Step 3
Take a Snapshot of the text you just created. Now, delete the Default Title clip from the Timeline and drag the Snapshot you took to the Timeline.

Step 4
Double-click the Snapshot clip → go to the Video tab → click the highlighted button below to flip the text. Then, take a Snapshot of this flipped version of the text and delete the clip from the Timeline.

Step 5
Visit the free stock footage site Mixkit and download any smoke or fog background video you like. Then, go to Filmora → My Media → Import Media → and select the footage you downloaded to import it into the video editor. Then, drag the Smoke clip to the Timeline and make it 6 seconds long.

Step 6
Double-click on the clip → go to Color. Now, change Contrast to “49”, Saturation to “100”, and Brightness to “18”. Below, set the 3D LUT option to “Game of Thrones”. Click OK.

Step 7
Drag the other Smoke clip to Track 2 of the Timeline. Make it 6 seconds long. Then, move the Playhead to the starting point of the video.

Step 8
Double-click on the new smoke clip. Go to Animation. Decrease the Opacity to 0%. Move the Playhead 10 frames forward → increase the Opacity to 6%. Don’t click OK yet.

Step 9
Move the Playhead to 5 seconds. Click on “**+Add**” to add a keyframe to the clip. Then, move the Playhead to the next-to-last frame and increase the Opacity to 100%. Click OK.

Step 10
Set the Playhead to the second frame and drop the first Snapshot we took earlier at that starting point. Drag the clip to be 6 seconds long. Then, double-click on the clip and adjust the settings exactly as you see in this image here. Don’t click on OK yet.

Step 11
Move the Playhead at the 17th frame → increase the Opacity to 6%. Move the Playhead to 5 seconds and 23rd frame → change the X-axis value to “1973”. Click OK.

Step 12
Drag the same Snapshot file to Track 4, directly on top of the clip in Track 3. Make its duration the same too. Now, double-click on this clip and apply the exact same settings as in the image here. Don’t click on OK yet.

Step 13
Move the Playhead to the 17th frame → increase the Opacity to 6%. Now, move the Playhead to 5 seconds and 23rd frame → change X-axis value to “-1944” and the Opacity to 0%. Click OK.

Step 14
Go to Sample Color and drag the White color on Track 6 in the Timeline. Place this clip at the same starting point as the snapshots below it. Set its duration the same as the clips below too. Then, move the Playhead at its starting point.

Step 15
Double-click on the Sample Color clip → go to Video → Mask → Import. Here, select the first Snapshot we created earlier in this tutorial.

Step 16
Now, go straight to the Animation tab and click the “**+Add**” button to add a keyframe. Then, compress the text in the preview screen until it’s not visible anymore on the screen.

Step 17
Add keyframes at the 1-second position and at the 5-second position. Then, move the Playhead once more to the 5-second and 22nd frame. Reduce the Opacity to 1%. Click OK.

Step 18
Drag another White Sample Color to Track 5 this time. Adjust its duration and starting point to be the same as the clip above it. Double-click on it → go to Video → Mask → Import. Here, select the flipped text Snapshot we created earlier.
Step 19
Now, go to Animation and add a keyframe at the starting point. Then, compress the text on the preview screen exactly as we did before with the other one. Then, add a keyframe at the 1-second position of the clip. Then, adjust the Y-axis position to create a reflection effect, just like this.

Step 20
Move the Playhead to the 5-second position and add a keyframe. Now, move the Playhead directly to 5-seconds and 22 frames. Here, reduce the Opacity to 0%.
Step 21
Go back to the Video tab from the upper-left corner of the panel. Now, move the Playhead to the clip’s starting point. Select the Mask tab. Add a keyframe. Move the Playhead to 1 second and set the Blur Strength to 6%.

Step 22
Move the Playhead to 3 seconds. Scroll down and set Vertical to 259%. Set Y-axis to “-157”. Then, increase Blur Strength to 25%. Click OK.

Step 23
Click on the Sample Color in Track 5 and change the Opacity to 40% for the second and third keyframes. You can move between the keyframes on the arrows highlighted below. Click OK.

Step 24
Go to Sample Color and drag the “Gradient 4” color to Track 7 on the Timeline. Allow this clip to start from the very beginning and adjust its end time to be the same as all the other clips.
Step 25
Double-click on the Gradient 4 clip → go to Video → Basic. Change the Blending Mode to “Soft Light”. Reduce the Opacity to 42%. Click OK.

Step 26
Go to Project Media and drag the white smoke clip on Track 8. Place the Playhead at the starting point and double-click on the clip.

Step 27
Change its Blending Mode to “Screen”. Go to the Animation tab and decrease the Opacity to 0%. Move the Playhead to frame 10 → increase Opacity to 12%. Move the Playhead to the 5-second position → add a keyframe. Then, move the Playhead at 5 seconds and 23rd frame → increase the Opacity back to 100%. Click OK.
Step 28
Go to Effects and drag the Cinema effect to Track 9. Adjust its duration to match all the other clips. Double-click on the clip and increase its Border Height to “0.10”. Click OK.

Step 29
Finally, Render the video and watch the final result. You’re done! Congratulations on resting a foggy text reflection effect in Filmora.

Summary
What you’ve learned:
- Create a foggy text reflection effect in the Filmora video editor
- Add and adjust keyframes to clips
- Edit and customize text
- Take and edit snapshots
What you need to prepare:
- A computer (Windows or macOS)
- Your video materials.
- Filmora video editor
Step 1
Download the Filmora video editor → run it → and click on “New Project”.
Step 2
Go to Titles → drag the Default Title to the Timeline below. Double-click on the clip to open its settings. Here, type in your text → change the font to Montserrat Light. Scroll down and increase Text Spacing to 5.0. Now, select only the first word in the box where you typed your text. Then, change its font to Montserrat Bold. Click OK.

Step 3
Take a Snapshot of the text you just created. Now, delete the Default Title clip from the Timeline and drag the Snapshot you took to the Timeline.

Step 4
Double-click the Snapshot clip → go to the Video tab → click the highlighted button below to flip the text. Then, take a Snapshot of this flipped version of the text and delete the clip from the Timeline.

Step 5
Visit the free stock footage site Mixkit and download any smoke or fog background video you like. Then, go to Filmora → My Media → Import Media → and select the footage you downloaded to import it into the video editor. Then, drag the Smoke clip to the Timeline and make it 6 seconds long.

Step 6
Double-click on the clip → go to Color. Now, change Contrast to “49”, Saturation to “100”, and Brightness to “18”. Below, set the 3D LUT option to “Game of Thrones”. Click OK.

Step 7
Drag the other Smoke clip to Track 2 of the Timeline. Make it 6 seconds long. Then, move the Playhead to the starting point of the video.

Step 8
Double-click on the new smoke clip. Go to Animation. Decrease the Opacity to 0%. Move the Playhead 10 frames forward → increase the Opacity to 6%. Don’t click OK yet.

Step 9
Move the Playhead to 5 seconds. Click on “**+Add**” to add a keyframe to the clip. Then, move the Playhead to the next-to-last frame and increase the Opacity to 100%. Click OK.

Step 10
Set the Playhead to the second frame and drop the first Snapshot we took earlier at that starting point. Drag the clip to be 6 seconds long. Then, double-click on the clip and adjust the settings exactly as you see in this image here. Don’t click on OK yet.

Step 11
Move the Playhead at the 17th frame → increase the Opacity to 6%. Move the Playhead to 5 seconds and 23rd frame → change the X-axis value to “1973”. Click OK.

Step 12
Drag the same Snapshot file to Track 4, directly on top of the clip in Track 3. Make its duration the same too. Now, double-click on this clip and apply the exact same settings as in the image here. Don’t click on OK yet.

Step 13
Move the Playhead to the 17th frame → increase the Opacity to 6%. Now, move the Playhead to 5 seconds and 23rd frame → change X-axis value to “-1944” and the Opacity to 0%. Click OK.

Step 14
Go to Sample Color and drag the White color on Track 6 in the Timeline. Place this clip at the same starting point as the snapshots below it. Set its duration the same as the clips below too. Then, move the Playhead at its starting point.

Step 15
Double-click on the Sample Color clip → go to Video → Mask → Import. Here, select the first Snapshot we created earlier in this tutorial.

Step 16
Now, go straight to the Animation tab and click the “**+Add**” button to add a keyframe. Then, compress the text in the preview screen until it’s not visible anymore on the screen.

Step 17
Add keyframes at the 1-second position and at the 5-second position. Then, move the Playhead once more to the 5-second and 22nd frame. Reduce the Opacity to 1%. Click OK.

Step 18
Drag another White Sample Color to Track 5 this time. Adjust its duration and starting point to be the same as the clip above it. Double-click on it → go to Video → Mask → Import. Here, select the flipped text Snapshot we created earlier.
Step 19
Now, go to Animation and add a keyframe at the starting point. Then, compress the text on the preview screen exactly as we did before with the other one. Then, add a keyframe at the 1-second position of the clip. Then, adjust the Y-axis position to create a reflection effect, just like this.

Step 20
Move the Playhead to the 5-second position and add a keyframe. Now, move the Playhead directly to 5-seconds and 22 frames. Here, reduce the Opacity to 0%.
Step 21
Go back to the Video tab from the upper-left corner of the panel. Now, move the Playhead to the clip’s starting point. Select the Mask tab. Add a keyframe. Move the Playhead to 1 second and set the Blur Strength to 6%.

Step 22
Move the Playhead to 3 seconds. Scroll down and set Vertical to 259%. Set Y-axis to “-157”. Then, increase Blur Strength to 25%. Click OK.

Step 23
Click on the Sample Color in Track 5 and change the Opacity to 40% for the second and third keyframes. You can move between the keyframes on the arrows highlighted below. Click OK.

Step 24
Go to Sample Color and drag the “Gradient 4” color to Track 7 on the Timeline. Allow this clip to start from the very beginning and adjust its end time to be the same as all the other clips.
Step 25
Double-click on the Gradient 4 clip → go to Video → Basic. Change the Blending Mode to “Soft Light”. Reduce the Opacity to 42%. Click OK.

Step 26
Go to Project Media and drag the white smoke clip on Track 8. Place the Playhead at the starting point and double-click on the clip.

Step 27
Change its Blending Mode to “Screen”. Go to the Animation tab and decrease the Opacity to 0%. Move the Playhead to frame 10 → increase Opacity to 12%. Move the Playhead to the 5-second position → add a keyframe. Then, move the Playhead at 5 seconds and 23rd frame → increase the Opacity back to 100%. Click OK.
Step 28
Go to Effects and drag the Cinema effect to Track 9. Adjust its duration to match all the other clips. Double-click on the clip and increase its Border Height to “0.10”. Click OK.

Step 29
Finally, Render the video and watch the final result. You’re done! Congratulations on resting a foggy text reflection effect in Filmora.

Summary
What you’ve learned:
- Create a foggy text reflection effect in the Filmora video editor
- Add and adjust keyframes to clips
- Edit and customize text
- Take and edit snapshots
What you need to prepare:
- A computer (Windows or macOS)
- Your video materials.
- Filmora video editor
Step 1
Download the Filmora video editor → run it → and click on “New Project”.
Step 2
Go to Titles → drag the Default Title to the Timeline below. Double-click on the clip to open its settings. Here, type in your text → change the font to Montserrat Light. Scroll down and increase Text Spacing to 5.0. Now, select only the first word in the box where you typed your text. Then, change its font to Montserrat Bold. Click OK.

Step 3
Take a Snapshot of the text you just created. Now, delete the Default Title clip from the Timeline and drag the Snapshot you took to the Timeline.

Step 4
Double-click the Snapshot clip → go to the Video tab → click the highlighted button below to flip the text. Then, take a Snapshot of this flipped version of the text and delete the clip from the Timeline.

Step 5
Visit the free stock footage site Mixkit and download any smoke or fog background video you like. Then, go to Filmora → My Media → Import Media → and select the footage you downloaded to import it into the video editor. Then, drag the Smoke clip to the Timeline and make it 6 seconds long.

Step 6
Double-click on the clip → go to Color. Now, change Contrast to “49”, Saturation to “100”, and Brightness to “18”. Below, set the 3D LUT option to “Game of Thrones”. Click OK.

Step 7
Drag the other Smoke clip to Track 2 of the Timeline. Make it 6 seconds long. Then, move the Playhead to the starting point of the video.

Step 8
Double-click on the new smoke clip. Go to Animation. Decrease the Opacity to 0%. Move the Playhead 10 frames forward → increase the Opacity to 6%. Don’t click OK yet.

Step 9
Move the Playhead to 5 seconds. Click on “**+Add**” to add a keyframe to the clip. Then, move the Playhead to the next-to-last frame and increase the Opacity to 100%. Click OK.

Step 10
Set the Playhead to the second frame and drop the first Snapshot we took earlier at that starting point. Drag the clip to be 6 seconds long. Then, double-click on the clip and adjust the settings exactly as you see in this image here. Don’t click on OK yet.

Step 11
Move the Playhead at the 17th frame → increase the Opacity to 6%. Move the Playhead to 5 seconds and 23rd frame → change the X-axis value to “1973”. Click OK.

Step 12
Drag the same Snapshot file to Track 4, directly on top of the clip in Track 3. Make its duration the same too. Now, double-click on this clip and apply the exact same settings as in the image here. Don’t click on OK yet.

Step 13
Move the Playhead to the 17th frame → increase the Opacity to 6%. Now, move the Playhead to 5 seconds and 23rd frame → change X-axis value to “-1944” and the Opacity to 0%. Click OK.

Step 14
Go to Sample Color and drag the White color on Track 6 in the Timeline. Place this clip at the same starting point as the snapshots below it. Set its duration the same as the clips below too. Then, move the Playhead at its starting point.

Step 15
Double-click on the Sample Color clip → go to Video → Mask → Import. Here, select the first Snapshot we created earlier in this tutorial.

Step 16
Now, go straight to the Animation tab and click the “**+Add**” button to add a keyframe. Then, compress the text in the preview screen until it’s not visible anymore on the screen.

Step 17
Add keyframes at the 1-second position and at the 5-second position. Then, move the Playhead once more to the 5-second and 22nd frame. Reduce the Opacity to 1%. Click OK.

Step 18
Drag another White Sample Color to Track 5 this time. Adjust its duration and starting point to be the same as the clip above it. Double-click on it → go to Video → Mask → Import. Here, select the flipped text Snapshot we created earlier.
Step 19
Now, go to Animation and add a keyframe at the starting point. Then, compress the text on the preview screen exactly as we did before with the other one. Then, add a keyframe at the 1-second position of the clip. Then, adjust the Y-axis position to create a reflection effect, just like this.

Step 20
Move the Playhead to the 5-second position and add a keyframe. Now, move the Playhead directly to 5-seconds and 22 frames. Here, reduce the Opacity to 0%.
Step 21
Go back to the Video tab from the upper-left corner of the panel. Now, move the Playhead to the clip’s starting point. Select the Mask tab. Add a keyframe. Move the Playhead to 1 second and set the Blur Strength to 6%.

Step 22
Move the Playhead to 3 seconds. Scroll down and set Vertical to 259%. Set Y-axis to “-157”. Then, increase Blur Strength to 25%. Click OK.

Step 23
Click on the Sample Color in Track 5 and change the Opacity to 40% for the second and third keyframes. You can move between the keyframes on the arrows highlighted below. Click OK.

Step 24
Go to Sample Color and drag the “Gradient 4” color to Track 7 on the Timeline. Allow this clip to start from the very beginning and adjust its end time to be the same as all the other clips.
Step 25
Double-click on the Gradient 4 clip → go to Video → Basic. Change the Blending Mode to “Soft Light”. Reduce the Opacity to 42%. Click OK.

Step 26
Go to Project Media and drag the white smoke clip on Track 8. Place the Playhead at the starting point and double-click on the clip.

Step 27
Change its Blending Mode to “Screen”. Go to the Animation tab and decrease the Opacity to 0%. Move the Playhead to frame 10 → increase Opacity to 12%. Move the Playhead to the 5-second position → add a keyframe. Then, move the Playhead at 5 seconds and 23rd frame → increase the Opacity back to 100%. Click OK.
Step 28
Go to Effects and drag the Cinema effect to Track 9. Adjust its duration to match all the other clips. Double-click on the clip and increase its Border Height to “0.10”. Click OK.

Step 29
Finally, Render the video and watch the final result. You’re done! Congratulations on resting a foggy text reflection effect in Filmora.

Summary
What you’ve learned:
- Create a foggy text reflection effect in the Filmora video editor
- Add and adjust keyframes to clips
- Edit and customize text
- Take and edit snapshots
Introduction to LUTs: Their Overview and Benefits
In video editing, you mainly face problems related to color grading and lower attractiveness of video. To cater to these issues, you can use the LUTs because they can upscale the performance of your video in no time. Yet, if you are not familiar with the concept of LUTs, this article is for you. Here, we will discuss the meaning of having LUTs in editing and other metrics of this exceptional element.
By the end of this article, you will also discover a tool that will help you with LUTs video editing. Thus, let’s get below to learn more about LUTs.
Part 1: What Do You Know About LUTs?
LUTs are data files that stand for Look-Up Tables. These are used in video editing because they have mathematical algorithms that can color-transform both videos and photos. LUTs can also upscale the contrast and color grading of simple videos and make them color-friendly. If you are a filmmaker or a videographer, you should be familiar with the concept of LUTs.
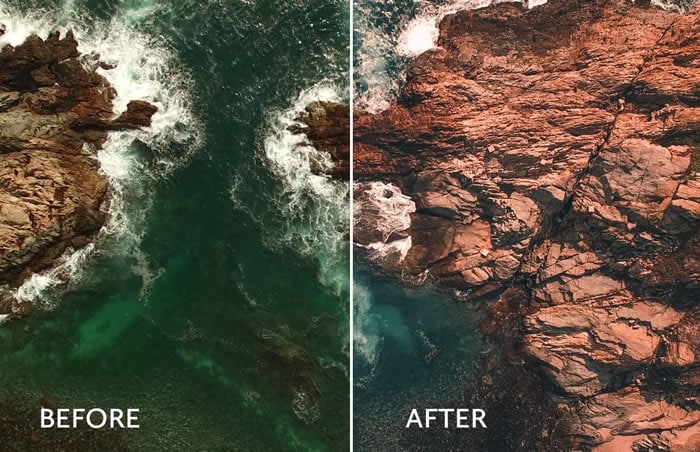
LUTs video editing also ensures that white balance and all the color metrics in your videos are consistent so they can be used for professional purposes. Moreover, you can also implement your creativity in the video with them. There are several formats of LUTs, such as 3DL, CUBE, DAT, CSP, and more, that you can discover in various editing tools. You can find them across several platforms, such as Adobe Photoshop, DaVinci Resolve, and more.
Empower your videos with a new mood using different LUTs. Filmora now offers 100+ top-quality 3D LUTs cover a broad range of scenarios. Transform your videos with Filmora’s powerful 3D LUTs.
Apply LUT on Videos Apply LUT on Videos Learn More

Part 2: What Are the Different Types of LUTs Available for Utility?
To fully understand LUT editing, you need to be aware of the types of LUTs. In this section, we will discuss the types of LUTs. Have a look below to find out more about them:
Technical LUTs
You can use technical LUTs for postproduction editing. It can help with gamma correction, white balance adjustments, and color grading. Moreover, the main purpose of using this LUT is to ensure consistency in the videos.
Creative LUTs
If you are an artist and want to work on art photos and videos, you can use creative LUTs. With this, you can adjust colors and contrast to customize the outlook of your media. Moreover, it can also create cozy and environment-friendly looks in your videos.
Camera Specific LUTs
As the name indicates, you can use camera-specific LUTs to work with different camera brands. The camera can lead to several color dysfunctionality, but you can correct them with camera-specific LUTs. It never compromises the quality of the video, so you can use it without any issues.
Display LUTs
If you wish to customize the colors of videos or photos for a specific display device, this is your best option. It can modify the video as per the computer or television specifications. Above all, you can match the output look of your video with your intentional look with this.
Input LUTs
With this, you can manage the colors of your video from the beginning. It can help you to apply a consistent starting point to your video in an optimized manner.
Part 3: Why Are LUTs Beneficial in the Current Video Editing Fraternity?
There are several reasons that show that LUTs are beneficial for the current video editing fraternity. While you have learned some important points explaining what are LUTs, here are some of the reasons explaining their importance:
Improved Color Grading
By using LUTs, you can apply predesigned colors to the videos and photos. It can save you both time and effort and fasten the procedure of working. Thus, if you are working on tight deadlines, this can be your savior.
Highest Consistency
If you don’t have consistency in your videos, no one will watch them for a long time. To solve this issue, you can use LUTs because they can add a sense of consistency to any type of video.
Creativity Ratio
There is a wide array of creative options in LUTs. From adding vibrant colors to modifying styles, LUTs can help you with everything. Thus, it is an optimized solution to add creativity to videos.
Compatibility of LUTs
LUTs are compatible with a considerable number of video editing software. So, you can also streamline your workflow efficiency with the help of LUTs while editing your favorite videos.
Part 4: What Do You Believe About The Future of LUTs in the Video Industry?
In this digital world, you need to work with the most modernized solutions to solve your digital problems. We all make videos and photos, but bad colors can degrade their performance and attractiveness. For this reason, you can use LUTs editing. However, to import or apply LUTs, you need to know the best video editing platform.
The best and most optimized platform that can be used for this purpose is Wondershare Filmora . With this tool, you can apply LUTs to the videos and can also preview them before actually downloading the video. Other than this, it also has an effect mask by which you can apply special effect filters to the videos. It also offers video cover and export process optimization.
Add LUTs on Video For Win 7 or later(64-bit)
Add LUTs on Video For macOS 10.14 or later

Key Features of Wondershare Filmora
Wondershare Filmora has built much in LUTs video editing over time. From changing its existence from a category to a dedicated section, Filmora has come a long way. Find out some important features about Filmora and its exceptional functionality:
- With Filmora, you can optimize the cache file management along with using the feedback channels.
- You can make the interface adjustments and can also customize the intensity of LUTs from 0 to 100%.
- There are several adjustment filters in it, and you can also work on several types of videos with it, including travel and more.
Conclusion
In the following article, you have learned what are LUTs in video editing. From the definition to the compatible video editing software, you can find everything about LUTs above. Moreover, there are several types of LUTs, and you can use them as per your need. If you are looking for a platform to apply LUTs to the video, the answer is Wondershare Filmora.
Apply LUT on Videos Apply LUT on Videos Learn More

Part 2: What Are the Different Types of LUTs Available for Utility?
To fully understand LUT editing, you need to be aware of the types of LUTs. In this section, we will discuss the types of LUTs. Have a look below to find out more about them:
Technical LUTs
You can use technical LUTs for postproduction editing. It can help with gamma correction, white balance adjustments, and color grading. Moreover, the main purpose of using this LUT is to ensure consistency in the videos.
Creative LUTs
If you are an artist and want to work on art photos and videos, you can use creative LUTs. With this, you can adjust colors and contrast to customize the outlook of your media. Moreover, it can also create cozy and environment-friendly looks in your videos.
Camera Specific LUTs
As the name indicates, you can use camera-specific LUTs to work with different camera brands. The camera can lead to several color dysfunctionality, but you can correct them with camera-specific LUTs. It never compromises the quality of the video, so you can use it without any issues.
Display LUTs
If you wish to customize the colors of videos or photos for a specific display device, this is your best option. It can modify the video as per the computer or television specifications. Above all, you can match the output look of your video with your intentional look with this.
Input LUTs
With this, you can manage the colors of your video from the beginning. It can help you to apply a consistent starting point to your video in an optimized manner.
Part 3: Why Are LUTs Beneficial in the Current Video Editing Fraternity?
There are several reasons that show that LUTs are beneficial for the current video editing fraternity. While you have learned some important points explaining what are LUTs, here are some of the reasons explaining their importance:
Improved Color Grading
By using LUTs, you can apply predesigned colors to the videos and photos. It can save you both time and effort and fasten the procedure of working. Thus, if you are working on tight deadlines, this can be your savior.
Highest Consistency
If you don’t have consistency in your videos, no one will watch them for a long time. To solve this issue, you can use LUTs because they can add a sense of consistency to any type of video.
Creativity Ratio
There is a wide array of creative options in LUTs. From adding vibrant colors to modifying styles, LUTs can help you with everything. Thus, it is an optimized solution to add creativity to videos.
Compatibility of LUTs
LUTs are compatible with a considerable number of video editing software. So, you can also streamline your workflow efficiency with the help of LUTs while editing your favorite videos.
Part 4: What Do You Believe About The Future of LUTs in the Video Industry?
In this digital world, you need to work with the most modernized solutions to solve your digital problems. We all make videos and photos, but bad colors can degrade their performance and attractiveness. For this reason, you can use LUTs editing. However, to import or apply LUTs, you need to know the best video editing platform.
The best and most optimized platform that can be used for this purpose is Wondershare Filmora . With this tool, you can apply LUTs to the videos and can also preview them before actually downloading the video. Other than this, it also has an effect mask by which you can apply special effect filters to the videos. It also offers video cover and export process optimization.
Add LUTs on Video For Win 7 or later(64-bit)
Add LUTs on Video For macOS 10.14 or later

Key Features of Wondershare Filmora
Wondershare Filmora has built much in LUTs video editing over time. From changing its existence from a category to a dedicated section, Filmora has come a long way. Find out some important features about Filmora and its exceptional functionality:
- With Filmora, you can optimize the cache file management along with using the feedback channels.
- You can make the interface adjustments and can also customize the intensity of LUTs from 0 to 100%.
- There are several adjustment filters in it, and you can also work on several types of videos with it, including travel and more.
Conclusion
In the following article, you have learned what are LUTs in video editing. From the definition to the compatible video editing software, you can find everything about LUTs above. Moreover, there are several types of LUTs, and you can use them as per your need. If you are looking for a platform to apply LUTs to the video, the answer is Wondershare Filmora.
Also read:
- New 2024 Approved Best Guide for Setting TikTok Countdown Timer
- Splitting Video Into Frames with the FFmpeg Step by Step for 2024
- Ideas That Will Help You Out in Converting AVI to GIF for 2024
- New Practical Ways to Resize Video in Handbrake
- In 2024, 10 Best Suggestions for AI Video Interviews
- Top Tools To Create Blend Image Collage for 2024
- Updated 2024 Approved 3 Ways to Combine 2 or 3 Videos Into 1
- 2024 Approved If the Phenomenon of Augmented Reality Fascinates You, Consider Entering Into the Gaming World with the Best AR Games You Will Ever Come Across
- 2024 Approved Hard to Remove Black Background in After Effects? Heres the Best Way to Deal With It
- Updated Best Practical Tips to Improve Your Lighting in the Sun for 2024
- In 2024, How To Fade Audio In Kinemaster
- New Looking for a Free Video Editor to Edit Videos on Mac? IMovie by Apple Is a Great Choice? But Is It the Best Video Editor or Is There a Better Alternative Available? Check Out Our iMovie Review
- In 2024, Are You in Search for a Step-by-Step Guide to How to Add Effects in TikTok? Here It Is. To Add some Flavor to Your TikTok Videos. Use These How to Add Effect to TikTok Recommendations
- In 2024, Best 8 Animated Video Makers
- Updated 2024 Approved How to Create a Vacation Slideshow in 5 Minutes
- In 2024, Magic Effects Video Making How To
- Updated Best 8 Online MPEG to GIF Converters
- New 2024 Approved Thousands Already Know Ezgif and So Can You
- Updated Best 10 Options Slow Down Video Online with Perfection
- New How to Add Subtitles to Videos With Kapwing for 2024
- Do You Want to Use the Best LUTs for Your Media Content but Need Help Finding Them? Here Is the Overview of the Best Free LUTs for You to Use
- New Make Eye Zoom Transition Effect with Filmora
- New The Way to Make Dynamic Video Collages, In 2024
- Step by Step Guide of Make Gimp Transparent Background PNG
- In 2024, If Youre Trying to Create a Countdown Effect, but Youre Not Sure Where to Start, Then This Post Is Going to Show You some Ways to Create a Countdown Animation for Your Videos
- In 2024, Adobe Photoshop Is the Best Photo Editor to Add Green Screen Effect to Your Photo While Wondershare Filmora Is the Best Video Editor to Add Green Screen Effect to Your Video
- Best Practical Tips to Improve Your Lighting in the Sun for 2024
- Updated 2024 Approved Camtasia Video Editor Review
- New Guide to Synchronizing Your Audio And Videos Properly, In 2024
- Updated In 2024, Best Free Video Editing Software to Boost Your Content Creation
- Updated In 2024, How Much Wedding Videographer Cost
- Top 6 Apps/Services to Trace Any Vivo T2x 5G Location By Mobile Number | Dr.fone
- In 2024, How to Lock Apps on Realme C67 5G to Protect Your Individual Information
- 9 Mind-Blowing Tricks to Hatch Eggs in Pokemon Go Without Walking On Xiaomi Redmi Note 12 Pro 5G | Dr.fone
- In 2024, How to Send and Fake Live Location on Facebook Messenger Of your Samsung Galaxy M14 4G | Dr.fone
- In 2024, How to Unlock AT&T Apple iPhone 12 mini with 3 Methods
- In 2024, How to Detect and Stop mSpy from Spying on Your Samsung Galaxy Z Fold 5 | Dr.fone
- In 2024, What Legendaries Are In Pokemon Platinum On Motorola Edge 40 Pro? | Dr.fone
- In 2024, Android to Apple How To Transfer Photos From Honor Magic 6 Pro to iPad Easily | Dr.fone
- How to Transfer/Sync Notes from Apple iPhone XS to iPad | Dr.fone
- Updated 2024 Approved How to Convert Animated GIF From Video
- Possible solutions to restore deleted contacts from Vivo Y78t.
- In 2024, How to Change/Fake Your Poco X5 Location on Viber | Dr.fone
- Why Does My Samsung Galaxy A14 5G Keep Turning Off By Itself? 6 Fixes Are Here | Dr.fone
- In 2024, Quick Steps to Change Weather Location on Apple iPhone 8 Plus | Dr.fone
- The Easiest Methods to Hard Reset Nokia C02 | Dr.fone
- In 2024, 5 Ways to Track Vivo Y77t without App | Dr.fone
- 7 Solutions to Fix Error Code 963 on Google Play Of Samsung Galaxy A24 | Dr.fone
- In 2024, Set Your Preferred Job Location on LinkedIn App of your Samsung Galaxy Z Fold 5 | Dr.fone
- How to Fix My OnePlus Nord 3 5G Location Is Wrong | Dr.fone
- In 2024, How I Transferred Messages from Realme Narzo 60x 5G to iPhone 12/XS (Max) in Seconds | Dr.fone
- In 2024, Hassle-Free Ways to Remove FRP Lock on Vivo Y27 4Gwith/without a PC
- Top 8 Live Selling Platforms & Beginners Tool Suggestion for 2024
- Updated In 2024, What Is an AI Video Generator?
- Top 7 Skype Hacker to Hack Any Skype Account On your OnePlus Nord N30 5G | Dr.fone
- Updated Common Platforms for Live Streaming | Virbo AI Live Stream for 2024
- How to Rescue Lost Contacts from Realme GT Neo 5 SE?
- Possible solutions to restore deleted photos from Huawei .
- Title: Ultimate Guide on Making A Slideshow Video
- Author: Chloe
- Created at : 2024-05-20 03:37:25
- Updated at : 2024-05-21 03:37:25
- Link: https://ai-editing-video.techidaily.com/ultimate-guide-on-making-a-slideshow-video/
- License: This work is licensed under CC BY-NC-SA 4.0.


