
:max_bytes(150000):strip_icc():format(webp)/GettyImages-Macys-59e6c3699abed500118af858.jpg)
Updated 2024 Approved Add Stylish Text to Videos
Add Stylish Text to Videos
Create your style. Let it be unique for yourself and yet identifiable for others – Anna Wintour. Adding Stylish Text to your video helps to communicate the clarity of the story’s message, tone, and sentiment. But how much text on video is enough? This article will teach you how and when to add stylish text to your video and its importance.
What is Stylish Text
In general, Stylish text is preset animations that you can use to the text in your video with just one click, adding an efficient plan to grab your viewers’ attentiveness. From bold to essential, stylish text can help give your video a clear look while also increasing the accessibility of your videos. Text styles offer a monochrome highlight on your text and added movement to make your videos more engaging to the audience.
Most of the video editing software released offers different text style presets that you can use to accomplish the look you’re aiming. In Wondershare Filmora 11 , browsing the Title menu, there are a lot of Text categories available that you can use depending on the type of video you are working with, whether it’s all about events like Mother’s Day, Valentine’s day, or gaming text style, travel, sports, everything in one total package.

Free Download For Win 7 or later(64-bit)
Free Download For macOS 10.14 or later
How to use Stylish Text
As mentioned, Styles help you add dynamic effects that make your videos exceptional, whether you use a template or start from scratch.
For this example, we’ll walk you through using text styles on the Short video clip that I made using Wondershare Filmora 11 .
Step1 Open your Wondershare Filmora 11 Video editing software
- Launch Wondershare Filmora 11 from your system and select New Project.
- Import the selected videos and open them in the program to enhance the speed and duration of the video. The video can also be dragged and dropped to the interface.

Step2 Imported Video Clips

In using the Title or the Stylish Text, you can add your video clip on Timeline Panel, or you can first add the Title text.
Step3 Add Stylish Text
Let’s first add our selected Stylish text/title, or you can search in the Search box above for any related text you want.
- Go to Title Menu above, click the Title category that you want, and drag it to the Timeline Panel below. Once added, you can check if this will fit the story of your video.

Step4 Change Stylish Text Duration and Effects
You can also modify or change the Duration of the Title you’ve added in the Timeline panel. The default length of a text effect is 5 seconds. There are two ways to change the course of a text effect.
- Drag the text on the timeline directly and adjust the duration either on the left or right side.
- Or you can select the text in the timeline panel and click the duration icon to set a new duration. The duration setting will pop out then you can input your desired period.

Step5 Edit Text Effects
- In Editing the Added Stylish Text, you can double click on it in the timeline to open the Text editing panel. From here, you can change the style (color, font, size, alignment, transform, and compositing) and choose the Word Art type and animation of your text.
Before (Default)

After

Step6 Advanced Text Editing
To edit your text in more ways, click the Advanced button to enter the Advanced Text Edit panel.

In the Advanced Text Edit panel, you can edit and add more elements to the selected title effects, such as text boxes, shapes, or images.
You can modify your text effects in the Advanced Text Edit panel in the following ways: color, font, animation, fill, border, and many more.

You can explore each Title properties/setting to modify your text.
![]()
Note: Remove Title/Texts
There are two ways to remove Title/ Texts from your video: (In Wondershare Filmora )
Just select the text you want to remove in your Timeline Panel and hit Delete on your keyboard.
Right-click on the text in the timeline and select DELETE from the menu.
What is the importance of Adding Stylish Text?
As a Youtuber, creating thumbnails is one of the essential aspects of getting the attention of your audience. A thumbnail is a small image inserted into a video that exemplifies larger content inside the video or article. Millions of videos are produced and uploaded on the Internet every single day, so it’s essential for yours to stand out. Text on videos has several different added benefits as well. In this video, we’ll give four reasons why you should start adding text to your videos.
1. Content becomes easy to remember
Viewer Retention (sometimes referred to as “Audience Retention”) is the average percentage of a video that people watch. Videos with high Viewer Retention scores tend to sell more. Adding some Text/Title in your video is one of the critical factors to remember because the viewers get multiple cue points (example: audio and text on video) to confirm their understanding and retain the essence of the messaging.
2. Make sense even without sound
A lot of people watch videos on mute mode. A recent study indicates that 85% of Facebook videos are watched without sound. A lot of us consume videos while in transit and sometimes at work as well :).
Text is very expository for most of these videos since it’d help in building the proper context for the viewer.
3. It Helps Summarize Key Points
Some audiences are looking for a summary of the video in an instant to save more time. As Youtuber, it is very helpful if you will add Text/Titles as caption perse in a video. For example, one needs to remember 2-3 tips for driving. If the captions or text show up on the video when the driver talks about this and that, that’s better!
4. Aesthetics
Some people don’t care much about the graphics; they just go through the textual content. This is because texts are the major sources of information. Adding Styling Text/Titles can make a video engaging and attractive. The audience wants to see some color and action in the videos to grasp the storyboard easily.
Free Download For macOS 10.14 or later
How to use Stylish Text
As mentioned, Styles help you add dynamic effects that make your videos exceptional, whether you use a template or start from scratch.
For this example, we’ll walk you through using text styles on the Short video clip that I made using Wondershare Filmora 11 .
Step1 Open your Wondershare Filmora 11 Video editing software
- Launch Wondershare Filmora 11 from your system and select New Project.
- Import the selected videos and open them in the program to enhance the speed and duration of the video. The video can also be dragged and dropped to the interface.
Step2 Imported Video Clips
In using the Title or the Stylish Text, you can add your video clip on Timeline Panel, or you can first add the Title text.
Step3 Add Stylish Text
Let’s first add our selected Stylish text/title, or you can search in the Search box above for any related text you want.
- Go to Title Menu above, click the Title category that you want, and drag it to the Timeline Panel below. Once added, you can check if this will fit the story of your video.
Step4 Change Stylish Text Duration and Effects
You can also modify or change the Duration of the Title you’ve added in the Timeline panel. The default length of a text effect is 5 seconds. There are two ways to change the course of a text effect.
- Drag the text on the timeline directly and adjust the duration either on the left or right side.
- Or you can select the text in the timeline panel and click the duration icon to set a new duration. The duration setting will pop out then you can input your desired period.
Step5 Edit Text Effects
- In Editing the Added Stylish Text, you can double click on it in the timeline to open the Text editing panel. From here, you can change the style (color, font, size, alignment, transform, and compositing) and choose the Word Art type and animation of your text.
Before (Default)
After
Step6 Advanced Text Editing
To edit your text in more ways, click the Advanced button to enter the Advanced Text Edit panel.
In the Advanced Text Edit panel, you can edit and add more elements to the selected title effects, such as text boxes, shapes, or images.
You can modify your text effects in the Advanced Text Edit panel in the following ways: color, font, animation, fill, border, and many more.
You can explore each Title properties/setting to modify your text.
![]()
Note: Remove Title/Texts
There are two ways to remove Title/ Texts from your video: (In Wondershare Filmora )
Just select the text you want to remove in your Timeline Panel and hit Delete on your keyboard.
Right-click on the text in the timeline and select DELETE from the menu.
What is the importance of Adding Stylish Text?
As a Youtuber, creating thumbnails is one of the essential aspects of getting the attention of your audience. A thumbnail is a small image inserted into a video that exemplifies larger content inside the video or article. Millions of videos are produced and uploaded on the Internet every single day, so it’s essential for yours to stand out. Text on videos has several different added benefits as well. In this video, we’ll give four reasons why you should start adding text to your videos.
1. Content becomes easy to remember
Viewer Retention (sometimes referred to as “Audience Retention”) is the average percentage of a video that people watch. Videos with high Viewer Retention scores tend to sell more. Adding some Text/Title in your video is one of the critical factors to remember because the viewers get multiple cue points (example: audio and text on video) to confirm their understanding and retain the essence of the messaging.
2. Make sense even without sound
A lot of people watch videos on mute mode. A recent study indicates that 85% of Facebook videos are watched without sound. A lot of us consume videos while in transit and sometimes at work as well :).
Text is very expository for most of these videos since it’d help in building the proper context for the viewer.
3. It Helps Summarize Key Points
Some audiences are looking for a summary of the video in an instant to save more time. As Youtuber, it is very helpful if you will add Text/Titles as caption perse in a video. For example, one needs to remember 2-3 tips for driving. If the captions or text show up on the video when the driver talks about this and that, that’s better!
4. Aesthetics
Some people don’t care much about the graphics; they just go through the textual content. This is because texts are the major sources of information. Adding Styling Text/Titles can make a video engaging and attractive. The audience wants to see some color and action in the videos to grasp the storyboard easily.
8 Excellent Video and Photo Mergers on Desktop/Mobile/Online
When it comes to creating and sharing visual content, it’s important to have a variety of tools at your disposal. Whether you’re a professional photographer or a hobbyist, merging photos and videos can add a whole new dimension to your work. You can create stunning visuals with the right tools that captivate your audience.
This article will look at some of the best video and photo merging tools available for desktop, mobile, and online use. From free and easy-to-use options to more advanced and feature-rich applications, there’s something for everyone on this list. Whether you’re looking to create a short film, a time-lapse video, or a panorama, these tools will help you take your visual storytelling to the next level.
- Combine Videos and Pictures Using Wondershare Filmora
- Merge Videos and Photos With Windows Movie Maker
- How To Add Photos and Videos Together With iMovie
- Combine Video and Picture With Filmora for Mobile
- BeeCut Video and Picture Combiner
- VN Photo and Video Merger
3 Video and Photo Mergers for Windows/Mac
There are several options available for those looking for a robust video and photo merging tool for their Windows or Mac computer. In this section, we’ll highlight three popular choices that offer a wide range of features and capabilities. Whether you’re a professional photographer or videographer or just looking for a fun and easy way to merge your media, these tools will meet your needs.
1. Combine Videos and Pictures Using Wondershare Filmora
Free Download For Win 7 or later(64-bit)
Free Download For macOS 10.14 or later

Ratings from G2: 4.4 out of 5
Operating Systems: Windows / Mac
Pricing:
- $49.99 - Annual Plan
- $79.99 - Perpetual Plan
Pros
- Easy to use
- Number of transitions and video results
- Beautiful effects
- Can enhance the quality of video
- Can export/import files easily
- Perfect for beginners
Cons
- Watermarking
- Proxy set up
- Compatibility of video importing
- A bit pricey
Wondershare Filmora is a popular video editing software for Windows and Mac. It offers a wide range of features, including merging videos and pictures. With Filmora, you can easily import your photos and videos and then drag and drop them into the timeline to create a cohesive video.
Filmora offers a range of customization options, such as adjusting video speed, adding transitions, and overlaying text and graphics. Additionally, it provides a user-friendly interface which makes it easy for anyone to use and navigate.
To merge video and picture using Wondershare Filmora Video Editor, follow these steps:
Step1 Open the software and select “New Project,” then go to “File“ > “Import Media“ > “Import Media Files“ to add the video and picture files you want to merge.

Step2 Drag the video clip to the timeline, then place the photo on a track above it.

Step3 Press the “Play“ button to preview your video.

Step4 Edit the photo to your liking.

Step5 Once you are satisfied with the result, save your merged video.

Check this video below to learn more in how to add an image to a photo with Filmora.
2. Merge Videos and Photos With Windows Movie Maker

Ratings from G2: 4.0 out of 5
Operating Systems: Windows
Pricing:
- Free
Pros
- Freeware
- Transitions
- Effects auto preview
- Audio features include voiceovers
- Sharing capabilities
Cons
- No way to change saturation or contrast
- No adjustments to visual effects
- Installation challenges
Windows Movie Maker is a free video editing software for Windows users. It offers basic video editing capabilities, including merging videos and pictures.
To merge a video and a picture, you can import the media files into the software, then drag and drop them into the timeline. You can place the photo on top of the video, adjust the duration of the photo and video, and add transitions between them. It also allows you to edit the video and picture by adding text, effects, and music. It provides a simple and intuitive interface which makes it easy for anyone to use.
Follow these steps to merge videos and pictures using Windows Movie Maker:
Step1 Download and install the software on your computer.
Step2 Ensure to tick the “Photo Gallery and Movie Maker“ checkbox during installation.

Step3 Once installed, import the video and picture files you want to merge into the software.

Step4 Organize the videos and pictures in the order you want them to appear in the merged video.

Step5 Once you have arranged the videos and pictures, go to “File“ > “Save movie“ > “Recommended for this project“ to save the merged video.

3. How To Add Photos and Videos Together With iMovie

Ratings from G2: 4.3 out of 5
Operating Systems: Mac
Pricing:
- Free
Pros
- User-friendly interface
- Easy sharing
- Easy to learn
Cons
- Requires a high level of HDD space
- Importing MP4 files for editing is complex
iMovie is a free video editing software for Mac users. It offers various features for creating and editing videos, including merging videos and pictures. It also offers a range of customization options, such as adjusting video speed, adding transitions, and overlaying text and graphics.
One of the most notable features of iMovie is its ability to work seamlessly with other Apple devices such as iPhone, iPad, and Apple TV, which makes it a versatile tool for media editing.
To merge videos and pictures using iMovie, follow these steps:
Step1 Launch the software and press the “Create New“ button.

Step2 From the dropdown menu, choose “Movie.”

Step3 Utilize the “Import Media“ button to bring in the videos and photos you want to merge.

Step4 Use drag-and-drop to organize the videos and photos in the order you want them to appear in the merged video.

Step5 Once you have arranged the videos and photos, edit them as per your preference and save the final merged video to your device.

3 Apps to Merge Video and Photos on iPhone/Android
There are several apps available for those looking for a convenient way to merge videos and photos on their iPhone or Android device. In this section, we’ll highlight three popular mobile apps that offer a wide range of features and capabilities for merging videos and photos. Whether you’re looking for an app that’s easy to use, or one that offers more advanced options, these apps are sure to meet your needs.
4. Combine Video and Picture With Filmora for Mobile

Ratings from App Store: 4.7 out of 5
Ratings from Google Play Store: 4.7 out of 5
Operating Systems: Android / iOS
Pricing:
- Free with In-app purchases
Pros
- Excellent editing interface
- Good range of tools
- The storage options are a bonus
- Multi-platform (Android and iOS)
Cons
- Limited additional features
- Cannot edit effects
- The store is a little bare
Filmora for Mobile is a mobile video editing app that allows you to merge videos and photos on your iPhone or Android device. With this app, you can easily import your photos and videos and then drag and drop them into the timeline to create a cohesive video.
Filmora for Mobile has various customization options, such as adjusting video speed, adding transitions, and overlaying text and graphics. The app also has a user-friendly interface that is easy to navigate, making it simple for anyone without a video editing experience. Once you’ve finished editing, you can quickly share your merged video to various social media platforms with just one click.
To merge videos and pictures using Filmora for Mobile:
Step1 Download and open the app, then tap “New Project“ to access your videos.

Step2 Choose the videos and pictures you want to merge and import them to the timeline.

Step3 Use the “plus“ sign on the right-hand side of the timeline to add more videos to the merge.

Step4 Use the editing tools below the timeline to edit your clip

Step5 Once you are satisfied with your creation, export it and share it to your desired platform.

5. BeeCut Video and Picture Combiner

Ratings from App Store: 3.0 out of 5
Ratings from Google Play Store: 2.4 out of 5
Operating Systems: Android / iOS
Pricing:
- Free with In-app purchases
Pros
- Super simple to use
- It supports multiple video and image formats
- An extensive list of editing tools
Cons
- It doesn’t support 4K rendering
- It’s buggy sometimes
BeeCut is an excellent free app for merging videos and pictures. The app is user-friendly, with a straightforward interface, making it suitable for beginner video editors.
With BeeCut, you can edit and merge various video and image formats such as MOV, MP4, JPG, PNG, and more. In addition, the app offers useful editing tools such as cropping, cutting, and adding transitions. Once you’ve finished editing, you can export your video in 1080p, 720p, or 480p resolution before saving it to your desired social media platform.
To merge videos and pictures using BeeCut:
Step1 Install the app on your mobile and tap the “+” sign icon to import your videos and photos.

Step2 Select all the photos and press “Next step“ on the top right corner, then choose the aspect ratio for your video.

Step3 Edit your clip using the available tools. Once you are done, press the “Export“ button in the top right corner.

6. VN Photo and Video Merger

Ratings from App Store: 4.7 out of 5
Ratings from Google Play Store: 4.7 out of 5
Operating Systems: Android / iOS
Pricing:
- Free with In-app purchases
Pros
- Shifting curves
- 9 different transition modes built-in
- 50+ movie-sensitive filters available
Cons
- Bugs like lagging clips & losing soundtrack
VN is a free and user-friendly video editing app that does not leave any watermark on your edited videos. The app’s interface is intuitive, making it easy for anyone to edit videos, even without prior knowledge. It provides all the necessary features for creating professional and high-quality videos, catering to professional and amateur video editors alike.
To merge videos and pictures using VN Video Editor:
Step1 Launch the app and tap on the “+” icon at the bottom.

Step2 Pick the videos and photos from your phone’s gallery and tap “Next.”

Step3 Use the editing tools to add elements to your clip, then save it to your device.

2 Online Photo and Video Mergers
If you’re looking for a flexible and convenient solution to merge your videos and photos online, you’re in luck! In this section, we’ll showcase two popular online tools perfect for beginners and advanced users. These tools are browser-based, meaning you can access them from anywhere and on any device with an internet connection. So, get ready to elevate your media game and create stunning visuals with ease!
7. Merge Pictures and Videos on Medio.io

Ratings from G2: 4.5 out of 5
Pricing:
- Free - $0
- Basic - $47.40 / monthly
- Pro - $79.99 / annually
Pros
- Fast compression speeds
- No file limits
- No watermarks
- Smart output settings
Cons
- Lacks some functionality
Media.io is an online tool that allows you to merge videos and photos, convert audio and video formats, and more. It’s user-friendly, easy to use, and works on all major browsers. Additionally, it provides a wide range of output options, allowing you to export your merged video in the format of your choice. Media.io is a perfect solution for those looking for an online tool that’s easy to use and offers a wide range of features.
To merge videos and pictures using Media.io:
Step1 Go to the Media.io video editor interface, and click the “Upload“ button to import all the videos and photos to the media library.

Step2 Move the photo above the video in the timeline by using drag-and-drop.

Step3 Press the “Export“ button to download the merged video with photos to your device.

8. Use Movie Maker Online To Combine Photos and Videos

Ratings from G2: 3.0 out of 5
Pricing:
- Free
Pros
- Completely free
- Free photos, music, and sound effects
- Built-in help
- Video and slideshow functions
Cons
- Confusing and clunky interface
- Learning curve
- Ads
Movie Maker Online is an online tool that allows you to easily merge videos and photos. With this tool, you can import your media files and drag and drop them into the timeline to create a single, cohesive video. It also offers a range of customization options, such as adjusting video speed, adding transitions, and overlaying text and graphics.
To merge videos and pictures using Movie Maker Online:
Step1 Drag and drop the files you want to merge onto the webpage.

Step2 Arrange the files in the desired order by dragging and dropping them.

Step3 Enable the “Hold position“ feature and place the files at the desired location.

Step4 Once you are satisfied with the merged video, download it.

Conclusion
There are various options for merging videos and photos on desktop, mobile, and online platforms. Whether you’re looking for professional video editings software like Filmora, or a simple mobile app for quick edits, there’s something for everyone. No matter your needs, there’s a tool that can help you create stunning and cohesive videos with your photos and videos.
- Combine Video and Picture With Filmora for Mobile
- BeeCut Video and Picture Combiner
- VN Photo and Video Merger
- 2 Online Photo and Video Mergers
3 Video and Photo Mergers for Windows/Mac
There are several options available for those looking for a robust video and photo merging tool for their Windows or Mac computer. In this section, we’ll highlight three popular choices that offer a wide range of features and capabilities. Whether you’re a professional photographer or videographer or just looking for a fun and easy way to merge your media, these tools will meet your needs.
1. Combine Videos and Pictures Using Wondershare Filmora
Free Download For Win 7 or later(64-bit)
Free Download For macOS 10.14 or later
Ratings from G2: 4.4 out of 5
Operating Systems: Windows / Mac
Pricing:
- $49.99 - Annual Plan
- $79.99 - Perpetual Plan
Pros
- Easy to use
- Number of transitions and video results
- Beautiful effects
- Can enhance the quality of video
- Can export/import files easily
- Perfect for beginners
Cons
- Watermarking
- Proxy set up
- Compatibility of video importing
- A bit pricey
Wondershare Filmora is a popular video editing software for Windows and Mac. It offers a wide range of features, including merging videos and pictures. With Filmora, you can easily import your photos and videos and then drag and drop them into the timeline to create a cohesive video.
Filmora offers a range of customization options, such as adjusting video speed, adding transitions, and overlaying text and graphics. Additionally, it provides a user-friendly interface which makes it easy for anyone to use and navigate.
To merge video and picture using Wondershare Filmora Video Editor, follow these steps:
Step1 Open the software and select “New Project,” then go to “File“ > “Import Media“ > “Import Media Files“ to add the video and picture files you want to merge.
Step2 Drag the video clip to the timeline, then place the photo on a track above it.
Step3 Press the “Play“ button to preview your video.
Step4 Edit the photo to your liking.
Step5 Once you are satisfied with the result, save your merged video.
Check this video below to learn more in how to add an image to a photo with Filmora.
2. Merge Videos and Photos With Windows Movie Maker
Ratings from G2: 4.0 out of 5
Operating Systems: Windows
Pricing:
- Free
Pros
- Freeware
- Transitions
- Effects auto preview
- Audio features include voiceovers
- Sharing capabilities
Cons
- No way to change saturation or contrast
- No adjustments to visual effects
- Installation challenges
Windows Movie Maker is a free video editing software for Windows users. It offers basic video editing capabilities, including merging videos and pictures.
To merge a video and a picture, you can import the media files into the software, then drag and drop them into the timeline. You can place the photo on top of the video, adjust the duration of the photo and video, and add transitions between them. It also allows you to edit the video and picture by adding text, effects, and music. It provides a simple and intuitive interface which makes it easy for anyone to use.
Follow these steps to merge videos and pictures using Windows Movie Maker:
Step1 Download and install the software on your computer.
Step2 Ensure to tick the “Photo Gallery and Movie Maker“ checkbox during installation.
Step3 Once installed, import the video and picture files you want to merge into the software.
Step4 Organize the videos and pictures in the order you want them to appear in the merged video.
Step5 Once you have arranged the videos and pictures, go to “File“ > “Save movie“ > “Recommended for this project“ to save the merged video.
3. How To Add Photos and Videos Together With iMovie
Ratings from G2: 4.3 out of 5
Operating Systems: Mac
Pricing:
- Free
Pros
- User-friendly interface
- Easy sharing
- Easy to learn
Cons
- Requires a high level of HDD space
- Importing MP4 files for editing is complex
iMovie is a free video editing software for Mac users. It offers various features for creating and editing videos, including merging videos and pictures. It also offers a range of customization options, such as adjusting video speed, adding transitions, and overlaying text and graphics.
One of the most notable features of iMovie is its ability to work seamlessly with other Apple devices such as iPhone, iPad, and Apple TV, which makes it a versatile tool for media editing.
To merge videos and pictures using iMovie, follow these steps:
Step1 Launch the software and press the “Create New“ button.
Step2 From the dropdown menu, choose “Movie.”
Step3 Utilize the “Import Media“ button to bring in the videos and photos you want to merge.
Step4 Use drag-and-drop to organize the videos and photos in the order you want them to appear in the merged video.
Step5 Once you have arranged the videos and photos, edit them as per your preference and save the final merged video to your device.
3 Apps to Merge Video and Photos on iPhone/Android
There are several apps available for those looking for a convenient way to merge videos and photos on their iPhone or Android device. In this section, we’ll highlight three popular mobile apps that offer a wide range of features and capabilities for merging videos and photos. Whether you’re looking for an app that’s easy to use, or one that offers more advanced options, these apps are sure to meet your needs.
4. Combine Video and Picture With Filmora for Mobile
Ratings from App Store: 4.7 out of 5
Ratings from Google Play Store: 4.7 out of 5
Operating Systems: Android / iOS
Pricing:
- Free with In-app purchases
Pros
- Excellent editing interface
- Good range of tools
- The storage options are a bonus
- Multi-platform (Android and iOS)
Cons
- Limited additional features
- Cannot edit effects
- The store is a little bare
Filmora for Mobile is a mobile video editing app that allows you to merge videos and photos on your iPhone or Android device. With this app, you can easily import your photos and videos and then drag and drop them into the timeline to create a cohesive video.
Filmora for Mobile has various customization options, such as adjusting video speed, adding transitions, and overlaying text and graphics. The app also has a user-friendly interface that is easy to navigate, making it simple for anyone without a video editing experience. Once you’ve finished editing, you can quickly share your merged video to various social media platforms with just one click.
To merge videos and pictures using Filmora for Mobile:
Step1 Download and open the app, then tap “New Project“ to access your videos.
Step2 Choose the videos and pictures you want to merge and import them to the timeline.
Step3 Use the “plus“ sign on the right-hand side of the timeline to add more videos to the merge.
Step4 Use the editing tools below the timeline to edit your clip
Step5 Once you are satisfied with your creation, export it and share it to your desired platform.
5. BeeCut Video and Picture Combiner
Ratings from App Store: 3.0 out of 5
Ratings from Google Play Store: 2.4 out of 5
Operating Systems: Android / iOS
Pricing:
- Free with In-app purchases
Pros
- Super simple to use
- It supports multiple video and image formats
- An extensive list of editing tools
Cons
- It doesn’t support 4K rendering
- It’s buggy sometimes
BeeCut is an excellent free app for merging videos and pictures. The app is user-friendly, with a straightforward interface, making it suitable for beginner video editors.
With BeeCut, you can edit and merge various video and image formats such as MOV, MP4, JPG, PNG, and more. In addition, the app offers useful editing tools such as cropping, cutting, and adding transitions. Once you’ve finished editing, you can export your video in 1080p, 720p, or 480p resolution before saving it to your desired social media platform.
To merge videos and pictures using BeeCut:
Step1 Install the app on your mobile and tap the “+” sign icon to import your videos and photos.
Step2 Select all the photos and press “Next step“ on the top right corner, then choose the aspect ratio for your video.
Step3 Edit your clip using the available tools. Once you are done, press the “Export“ button in the top right corner.
6. VN Photo and Video Merger
Ratings from App Store: 4.7 out of 5
Ratings from Google Play Store: 4.7 out of 5
Operating Systems: Android / iOS
Pricing:
- Free with In-app purchases
Pros
- Shifting curves
- 9 different transition modes built-in
- 50+ movie-sensitive filters available
Cons
- Bugs like lagging clips & losing soundtrack
VN is a free and user-friendly video editing app that does not leave any watermark on your edited videos. The app’s interface is intuitive, making it easy for anyone to edit videos, even without prior knowledge. It provides all the necessary features for creating professional and high-quality videos, catering to professional and amateur video editors alike.
To merge videos and pictures using VN Video Editor:
Step1 Launch the app and tap on the “+” icon at the bottom.
Step2 Pick the videos and photos from your phone’s gallery and tap “Next.”
Step3 Use the editing tools to add elements to your clip, then save it to your device.
2 Online Photo and Video Mergers
If you’re looking for a flexible and convenient solution to merge your videos and photos online, you’re in luck! In this section, we’ll showcase two popular online tools perfect for beginners and advanced users. These tools are browser-based, meaning you can access them from anywhere and on any device with an internet connection. So, get ready to elevate your media game and create stunning visuals with ease!
7. Merge Pictures and Videos on Medio.io
Ratings from G2: 4.5 out of 5
Pricing:
- Free - $0
- Basic - $47.40 / monthly
- Pro - $79.99 / annually
Pros
- Fast compression speeds
- No file limits
- No watermarks
- Smart output settings
Cons
- Lacks some functionality
Media.io is an online tool that allows you to merge videos and photos, convert audio and video formats, and more. It’s user-friendly, easy to use, and works on all major browsers. Additionally, it provides a wide range of output options, allowing you to export your merged video in the format of your choice. Media.io is a perfect solution for those looking for an online tool that’s easy to use and offers a wide range of features.
To merge videos and pictures using Media.io:
Step1 Go to the Media.io video editor interface, and click the “Upload“ button to import all the videos and photos to the media library.
Step2 Move the photo above the video in the timeline by using drag-and-drop.
Step3 Press the “Export“ button to download the merged video with photos to your device.
8. Use Movie Maker Online To Combine Photos and Videos
Ratings from G2: 3.0 out of 5
Pricing:
- Free
Pros
- Completely free
- Free photos, music, and sound effects
- Built-in help
- Video and slideshow functions
Cons
- Confusing and clunky interface
- Learning curve
- Ads
Movie Maker Online is an online tool that allows you to easily merge videos and photos. With this tool, you can import your media files and drag and drop them into the timeline to create a single, cohesive video. It also offers a range of customization options, such as adjusting video speed, adding transitions, and overlaying text and graphics.
To merge videos and pictures using Movie Maker Online:
Step1 Drag and drop the files you want to merge onto the webpage.
Step2 Arrange the files in the desired order by dragging and dropping them.
Step3 Enable the “Hold position“ feature and place the files at the desired location.
Step4 Once you are satisfied with the merged video, download it.
Conclusion
There are various options for merging videos and photos on desktop, mobile, and online platforms. Whether you’re looking for professional video editings software like Filmora, or a simple mobile app for quick edits, there’s something for everyone. No matter your needs, there’s a tool that can help you create stunning and cohesive videos with your photos and videos.
If You Are a Teacher or People Who Want to Share Their Ideas via Vides, You Can Always Make It on Your Own. This Article Will Share You 7 Tips to Create an Educational Video Easily
For many teachers, online classes begin with a live recording of their lectures or lessons. Sending the recorded lectures to the students allows them to pause the video and rewatch it multiple times.
Recording lectures before class can assist lecturers in filling gaps that may arise due to your absence. You don’t have to worry about missing lessons if you’re going on vacation or to be sick for an extended time.

You can keep the class continuing even if you are absent by using pre-recorded lectures and sending the file to the class, so they know the lesson. With the help of an online lecture software or tool available on the internet, you can download it free.
These are the steps in creating an instructional video in your classes:
Know Your Target Audience
Before you record the video to present in your classes, you need to know your target audience. We all know that some teachers handle grade school, and some handle high school level. We need to discover what kind of knowledge or skills your students hope to gain in your class learning the topic you presented. Try to use your book, or maybe add some research and then use that information to help you discuss with your students.

Things you need to remember before you proceed to the next step:
- Who is your audience? We, educators, already know our audience. It depends on the school and what level we are going to handle. It’s either grade school level or high school level.
- What is your topic/s? There are a lot of topics and subjects in the field of teaching but try to pick only one topic or subject to present to your class. For example, Computer Subject because I’m a computer teacher. I will be using this subject or topic about computers to create my instructional video for the class.
- What is the learning objective or learning outcome of your video? The learning objective of your video is the outcome that captures precisely what knowledge, skills, and attitudes the students should be able to exhibit following the instructions.
- How will your video benefit your audience? The students will learn and understand the lesson you are discussing, helping them gain knowledge of that subject to answer all the assignments, quizzes, or maybe an activity you will give them.
Write a Script
Once you know your audience and have the topic you need, it’s time to write a script. Think about your plan for presenting your video in your classes.

- Here are a few more writing script tips to help you in your classes:
Go to the mirror and practice. This tip may help some teachers instead of calling their loved ones and getting feedback about the script they write.
- Explain what you’re doing and why you’re doing it. You are not only presenting the topic and explaining it but also showing the class what the topic is all about, which will be suitable for your students. Present some examples, pictures, or videos for them to know better what your discussion is all about.
- Knowing your script 100% is important. Make sure that you already know your script before you record. If you forget something or make a mistake, go back to the beginning and repeat it correctly. Remember as a teacher that we are not allowed to make mistakes in the eyes of the students. So, double-check everything before you record it and show it to the class.
Record the Narration
After writing your script, let’s try to record the narration. You don’t need any application software where you can record the narration. Simply using your mobile phone and having a good background is enough.

Using a microphone to record the narration is necessary. Getting those headphones with one connected microphone is good. Some of that has noise cancellation, providing a much better sound quality while recording and ensuring that your videos don’t contain background noise. Then, find a quiet place to record. Explain to your family members that no one will ever talk loud or shout while you are recording the narration.
Once you are ready to hit that record button, speak clearly. Nobody is perfect, so it’s ok if you make a mistake. You don’t need to start over, just pause and start again. You can remove the error or mistake by editing your finished product. Make sure your narration will be the same on the screen while recording your video.
Record and Edit your Video
The first thing you need to do in recording your video is to clean up your computer screen and close all the unnecessary applications. You need to turn off also the notifications that will pop up on your computer before you start recording. You can also add your recorded narration to your video.
Here are a few simple tips for editing your video:
- Add some interactive elements like motions to highlight key points of your video.
- Adding music to your video is optional but may elevate a decent video to the next level. Pick something cheery. You want your audience to feel good while learning.
The Video Duration
I’d say it’s one of the first things students look at before they click the ‘play’ button of the video. It will benefit both teacher and the students if the video is brief and direct to the point. Some students are more likely to want a short video, or maybe let’s focus on the time between 20 - 30 minutes video, where they can watch and learn on any platform, anytime. After that, you can add time by adding other pieces of information and giving activities and assignments.
Be Yourself
Be yourself, and don’t be afraid to make mistakes sometimes. Make sure that your personality shines throughout the video. Try to research how some teachers or maybe some speakers speak naturally and have a conversational manner with an enthusiastic tone.
When you are recording yourself talking, look right at the camera so students can feel eye contact with you, even if it is online. Sometimes we forget the words we need to say to the class, so try to prepare a note next to your webcam. The messages you prepare will help you don’t look away from the camera all the time. Don’t pretend to the class that you’re reading something, just talk naturally as you would in real classrooms.
Sharing your Video
Instead of sharing your recorded video with your students, you can also share it directly to online video platforms like YouTube, Facebook, and Vimeo or save the video as a local file to upload on a social media platform. They can go there and watch the video. You can also upload your file to the school learning management system like Google Classroom. Please take note of this; before sending the recorded video to your students, share it with first to a few people to get some video feedback about what you created. This might help you ensure that your message is clear and that your video accomplishes your goals for your students.
There’s a chance that your recorded video doesn’t meet your requirements or you are not satisfied with that for the first time. Don’t worry; try it again, even if you recorded it once or several times. You need to trust yourself by doing it because we are teachers; we are doing our best for the students to learn something from us.
Free Download For Win 7 or later(64-bit)
Free Download For macOS 10.14 or later
Free Download For macOS 10.14 or later
Add Text Animation to A Video Online
Do you want to make a creative video? Do you want your presentation or video to be easy to follow and entertaining? You can take the video to another level with the help of text animation. This article will discuss how to add text animation to online videos. You can use a good video editor from where you can select fresh styles and make the best video from there. One of the simplest ways to elevate your movie from good to excellent is with understandable text animation.
Text animation and short captions can broaden the audience for your content as more consumers view videos without sound these days. It matters what fonts you use in the videos, and they establish the mood and facilitate interaction with most viewers who rely on video captions. Add text, alter the font, add transitions, and use text effects to draw the user’s attention as they scroll. Please continue reading to discover how simple it is to make interactive video titles, words, and supers.
1. Use Kapwing animation text editor
(https://www.kapwing.com/animated-text-video-maker )
You can use the potent online editor Kapwing to add animated text to videos online, utilizing music, videos, GIFs, and images. There are no downloads required because everything is already present inside the browser. Kapwing is a capable tool for content production that is simple enough for everyone to use. The majority of video formats, GIF and image, including avi, png, jpg, gif, MOV, mp4, and more, are supported by Kapwing.
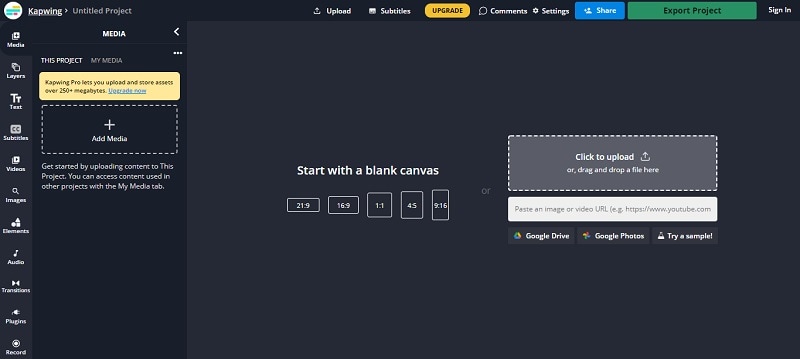
Step1 Upload the Video to Kapwing
You can open Kapwing with the device and tap on “Start Editing” to open up Kapwimg studio. After that, one can use the drag and drop option to upload the video in the studio. You can click on upload or use the link to upload.
If you have a more than 250 MB video, then you will require the Pro version.
Step2 Add the Text
When the video gets uploaded, now you can add your text. You must click the “Text” option on the left and type the text. After that, you can pick your favorite color, background, and color to add style.
You will always want that your text to get animated, but it doesn’t mean that you will have to use explosive fonts or funky or bright, which are very funky. The animation will make your text look attractive, and you can experiment with the colors and fonts to find the best combination.
Step3 Animate the Text
Now the fun part starts; choose the text box present on the right side and click on the “Animate” tab. It will allow the user to select animations like fade, flicker, hue rotates, and many more. Choose the speed according to your requirement, and if you want to change the background and color, you can do it too.
Use “Apply To” for applying this animation in the outro, intro, or both. It will help you to make the text fade out, fade in, or transition out and in with animation. Now the animation library has nine options:
- Drop: It appears on top of the text box
- Flicker: This one is like a candle’s flicker, and text flashes disappear and appear before staying.
- Fade: Opacity can be changed from 0% to 100%.
- Pop:- This grows the text more extensive than the text box and shrinks back to the place.
- Reveal:- Rolls from the left side to the right side
- Wipe:- Rolls from the left side to the right side with a colored background.
- Vibrate: The text box shakes in every direction.
- Hue rotates:- Colour of text cycles through the hue values..
You can use a timeline to adjust the animation’s termination when you set text animation. You can even drag that layer after the start time or use it on end/start time sliders to decrease or increase the time of your video. Text animation can get started when the cursor reaches the start time.
Step4 Export
The video with animated text is now ready to boom. You can click on “Export Video” present at the top and wait for the process. After that, you can download that video and use the links to share it on your social media platform.
2. Use veed.io text video editor
(https://www.veed.io/create/text-video-maker )
Veed is one of the best video editor text effects online, which allows you to add text to online videos. You can easily add style, color, text, and font in a few clicks. You can upload the video and tap the text to get started. Add title and text or select handwriting font. One can select it from templates. Change transparency, alignment, and font size of the text.
This online software is perfect for creating attractive videos on social media. This is free, which omits the usage of expensive software. It is much easier to avoid many complex video editor apps. With the help of VEED, you can create an excellent video without any experience and do it with a few clicks. Let’s see how to add animated text to photos online.
Step1 Upload the video
Tap on “Choose Video” and choose the file you want to upload on VEED. One can even use the drag and drop option from the folder to the editor.
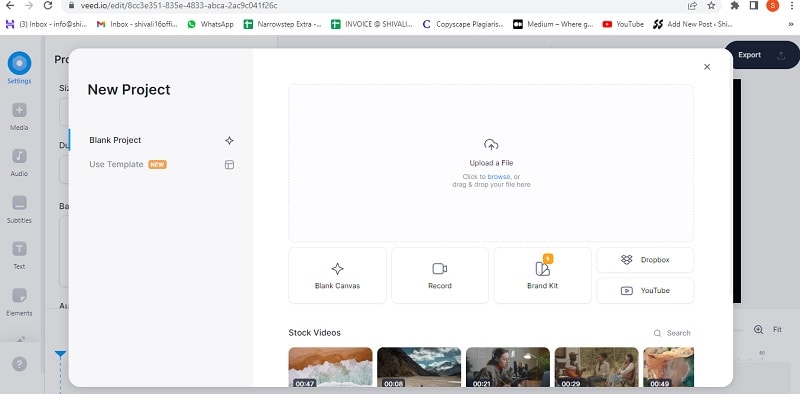
Step2 Add text
After that, you can add the text by tapping on the “Text” option on the left menu. You can select the text style and start typing.
Step3 Export
Save the video with the text you placed by tapping on “Export.” The video gets saved in an MP4 file.
3. Use Animaker text maker
(https://www.animaker.com/text-animation-maker )
The Animaker is one of the best-animated video makers. This app offers the best collection of charts, BGs, and animated characters. With the help of Animaker, you can make the text disappear or appear off-screen in the best way. After you finish your video, you can download the format in MP4.
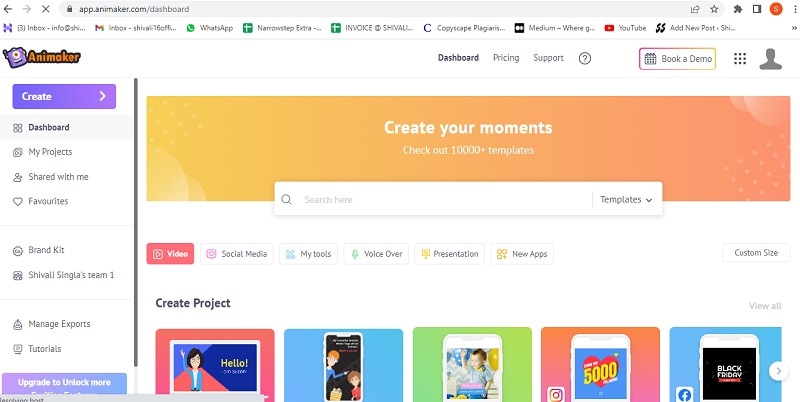
Step1 Upload the video clip
First, you can upload your video clip present on top that you wish to add text animation.
- Tap on the “Upload section” on the bottom left. You can upload your video where you wish to add the animated text.
- The video will get uploaded to “My Files.”
- Click on the uploaded video in the library to load it on the workspace.
Step2 Add text to the video
- You can add text in their text section
- In the next section, one can find two different text types. At the top, you will discover plain text options, and at the bottom, you can find pre-designed boxes seasoned at Animaker.
Let’s see how you can use pre-built text boxes.
- Tap on pre-built designs for your text animation. One can see the text appearing in the center of the workspace, and you can click it and type new text if you want to customize it.
- You can notice widespread options appearing with your text. It is known as the item menu. It will allow the user to modify their text. One can change font size, color, style, etc. Your text will come with pre-defined effects, which will help you to animate text instantly.
- You must have noticed that the purple color bar appears on the timeline, representing the duration of the text visible in the video. For example, if you want that text to get visible between 4rth to 8th seconds, then you will have to drag the edges of that purple bar to the same duration.
To see the scene, you must click on the play button on top of the timeline.
Let’s check the other ways of adding animated text to the video. In the previous one, you have seen how you can add text animation using pre-built boxes. Now you will get to know about doing it by using blank boxes.
- Start tapping the “text section”. Select the bank textbox.
- Click on them and then opt to add new text.
- Opt for clicking the cog icon that is there in the item menu.
- You will notice the settings tab that is on the screen’s right side.
- You can easily opt for the customization of the text in the way you wish. You can start by modifying the style of the font. One can change the size and color of the font as well.
- Use these options and opt for the application of enter and/or exit effects to text. Now, opt to click on the effect option to get more than 50 options. You can select the effect from there.
- Once the animation effect is applied to your timeline, you can notice the pink part in the bar i.e. purple. This completes creating text animation by using Animaker.
Step3 Download the Video
- You can visit the publish option in the right window to download the video.
- Tap on the “download video” option for downloading.
Conclusion
Now, you are aware of how to add text animation to video online and the three best video editors that will help you add animated text to your videos. At this point, you can choose the best one according to your needs and usage. These steps will help you create a unique and good video that will be easy to understand and entertaining.
Free Download For Win 7 or later(64-bit)
Free Download For macOS 10.14 or later
Free Download For macOS 10.14 or later
Also read:
- Updated Detailed Guide to the Best Convertors for Turning GIF Into PDF Files. Know Their Features, Pros, Cons, and More
- Updated Top-Rated Android Apps For Slowing Down Motion
- 2024 Approved Are You Curious About the Functionality of LUTs in LumaFusion? This Article Will Satisfy Your Queries with Ease
- Updated Add Neon Effects to Your Dance Videos with the Help of Wondershare Filmora After Reading This Article. It Will Give a More Thrilling and Exciting Appearance
- Updated AI Features of Wondershare Filmora - Silence Detection in Videos for 2024
- Updated 2024 Approved Replacing the Sky in Adobe After Effects An Extensive Guide
- New An Overview of the Best Free LUTs to Use
- Top 12 Best Freeze Frame Video Editing Examples
- In 2024, Are You Aware that AV1 Has the Potential to Change the Way We Watch Videos Online? Read on to Learn More About AV1 and How It Could Impact Your Life
- New Guiding Principles of Track Matte and Tracking in Adobe After Effects for 2024
- New Top Free LUTs To Use in Shotcut An Overview for 2024
- 2024 Approved Do You Want to Rotate Your TikTok Video to Stylize It More? This Article Will Provide Simple Methods of Rotating TikTok Videos to Improve the Audience Viewing Experience
- 2024 Approved Slow Down Videos on Instagram With Perfection A Guide
- How to Choose A Nice GoPro for Vlogging for 2024
- Updated Video in Text Cinematic Intro【Filmora Tutorial】
- Updated How To Quickly Create A Screen Print Effect In Photoshop Detailed Guide
- Want to Add the Radial Blur Image Effect to Your Photos to Make Them Stand Out? Read on to Find the 11 Best Tools for Creating Stunning Image Editing Projects for 2024
- New In 2024, Zoom In and Zoom Out on YouTube
- In 2024, Wish to Rock on YouTube, but Lacking Tricks? Here, We Will Tell You Everything About How the YouTube Algorithm AI Works and How You Can Perform Well According to AI
- Here, You Will Get the Basic Steps to Use the Speed Ramping Effect in Your Videos by Wondershare Filmora Software. In This Article, You Get a Guide to Adding the BCC Glitch Effect to Give Your Sports Montages a More Professional Look
- Updated Video Maker with Song
- Updated Have You Recently Experienced Motion Blur in Games? Do You Wish to Learn More About It? This Article Provides an Overview and the Need for Motion Blur Gaming
- Updated 2024 Approved Effective 10 Ways to Convert YouTube to MOV at Ease PC & Online
- New Bandicut Video Editor Review for 2024
- New In 2024, Some Effective Slow Motion Video Editors You Can Try
- New The Complete Guide to Slideshow Maker with Music
- Updated In 2024, Demystifying the Vectorscope A Comprehensive Guide for Premiere Pro Color Correction
- Updated How to Brighten a Video in Windows 10 | Step-By-Step Guide
- In 2024, Useful Guide to Speed Up/Down Videos in VLC
- Updated In 2024, How to Make a Smooth Speed Ramping in Premiere Pro?
- In 2024, Best Audio Waveform Generator
- Fixing Foneazy MockGo Not Working On OnePlus Nord 3 5G | Dr.fone
- What is Geo-Blocking and How to Bypass it On Honor X8b? | Dr.fone
- In 2024, 5 Quick Methods to Bypass Samsung Galaxy XCover 6 Pro Tactical Edition FRP
- 9 Best Phone Monitoring Apps for Huawei P60 | Dr.fone
- How to Use Life360 on Windows PC For Xiaomi Redmi 13C 5G? | Dr.fone
- In 2024, Easy Guide to Vivo Y100i FRP Bypass With Best Methods
- Reasons for Xiaomi 14 Stuck on Boot Screen and Ways To Fix Them | Dr.fone
- How to Fix My Samsung Galaxy S21 FE 5G (2023) Location Is Wrong | Dr.fone
- Nokia 105 Classic Not Connecting to Wi-Fi? 12 Quick Ways to Fix | Dr.fone
- In 2024, How To Bypass iCloud Activation Lock on Mac For iPhone 14 Pro Max?
- In 2024, How To Unlock a Vivo S17 Pro Easily?
- How To Unlock Stolen Apple iPhone XS In Different Conditionsin | Dr.fone
- Possible ways to recover deleted files from C210
- In 2024, How To Unlock iPhone 6s Without Swiping Up? 6 Ways
- How to retrieve erased music from Google Pixel Fold
- 2024 Approved The Only Guide to Make 2D Rigging Clear to You
- How to Unlock Vivo V27 Pro Phone without Any Data Loss
- The Ever-Changing Era of AI Video Translation A Reality to Be Fulfilled for 2024
- Does Nubia Red Magic 8S Pro Have Find My Friends? | Dr.fone
- Life360 Learn How Everything Works On Infinix Hot 30 5G | Dr.fone
- A Step-by-Step Guide on Using ADB and Fastboot to Remove FRP Lock on your Nokia C300
- Unlock Your iPhone 15 Plus in Minutes with ICCID Code Everything You Need to Know
- How to use Snapchat Location Spoofer to Protect Your Privacy On Apple iPhone 6s Plus? | Dr.fone
- In 2024, What Is AI Pixel Art Generator?
- How to play an MP4 on Galaxy F34 5G?
- In 2024, How to Change/Fake Your Samsung Galaxy F54 5G Location on Viber | Dr.fone
- 9 Best Free Android Monitoring Apps to Monitor Phone Remotely For your Oppo A1x 5G | Dr.fone
- How To Install the Latest iOS Beta Version on Apple iPhone 11? | Dr.fone
- How and Where to Find a Shiny Stone Pokémon For Oppo A18? | Dr.fone
- Title: Updated 2024 Approved Add Stylish Text to Videos
- Author: Chloe
- Created at : 2024-04-24 07:08:29
- Updated at : 2024-04-25 07:08:29
- Link: https://ai-editing-video.techidaily.com/updated-2024-approved-add-stylish-text-to-videos/
- License: This work is licensed under CC BY-NC-SA 4.0.
