
:max_bytes(150000):strip_icc():format(webp)/ps5controller-0d702b25f7fa47b482999811cfc7af39.jpg)
Updated 2024 Approved Adding Text to Your Collage Not only Makes It Look Sophisticated but Also Versatile. So, if You Too Are Looking for Ways to Create a Collage Text, Check Out Our Article
Adding Text to Your Collage Not only Makes It Look Sophisticated but Also Versatile. So, if You Too Are Looking for Ways to Create a Collage Text, Check Out Our Article
The Ultimate Guide to Make a Text Collage
An easy yet powerful editor
Numerous effects to choose from
Detailed tutorials provided by the official channel
Collages are everywhere, be it online sites, social media platforms, magazines, birthday wishes, newspapers, and much tools, more. Organizing your images in some random or specific shapes to offer a visually enhanced experience is the major purpose of the collage. Besides adding images, there are several other elements and factors that combine to make up an eye-catchy collage and a key one is the “text”.

So, if you too are considering to create a photo collage with text, just stick to us and keep reading.
In this article
01 [Why Create a Text Collage?](#Part 1)
02 [When to Use Text Collage?](#Part 2)
03 [Factors to Be Considered While Creating a Text Collage](#Part 3)
04 [Top 5 Tools to Create a Text Collage](#Part 4)
05 [Use Stock Images to Pep Up Your Text Collage](#Part 5)
Part 1 Why Create a Text Collage?
Adding a text to your collage is beneficial in ways more than one. The text brings versatility to your collage, and also helps in conveying the message along with the theme. Moreover, a little interesting text line along with animations added to your collage enhances its overall visual communication and looks.
Part 2 When to Use Text Collage?
Though text can be added to all types of collages there are some specific occasions when the purpose of adding the text becomes more meaningful. For instance, adding text while creating a birthday collage, mood board collage, anniversary collage, scrapbook collage, holiday collage, or other similar ones helps in expressing the feelings, theme, and emotions in a better manner.
Part 3 Factors to Be Considered While Creating a Text Collage
There are several text-adding ways and methods by which you can make your collage look interesting. Considering a few important ones will let you create an impressive collage in no time. Check out some useful tips and tricks to use text within the photo collage.
● Identify if you wish to add the text as the focal point or not. If you are using the text as the first striking thing in the collage then ensure that it is eye-catchy and interesting.
● Keep a good balance between the text and the images so that it does not look weird.
● The color and the font of the text are among the most important factors to be considered. Make sure that both the text color as well as the font match and blend well with the theme and the images in the collage.
● Keeping the background of the text simple, less detailed, and also clutter-free is important so that the text content comes out nicely.
● Make sure only to add a few words or lines in your collage to make it look sophisticated. It’s majorly a photo collage with a dash of the text so keep it that way only and not vice-versa.
Part 4 Top 5 Tools to Create a Text Collage
There are several desktop, online, and app based text collage maker tools available. Some of the popular ones are enlisted below.
01Adobe Creative Cloud Express
Adobe is known for its advanced image editing options and its online version called creative cloud is no less. Using this browser-based tool you can create some amazing collage and also add text easily. The site offers an array of templates to choose the design as per your theme and the interface is also user-friendly. You need to free sign-up to use the program.

02Befunky
This is another interesting online tool that can be used to add text to your collages, photo projects, and designs. Free to use, the tool has multiple options for text customization like selecting the body text, headline, outline, shadow drop options, and more. Pre-set designs for adding the text to your collages are also available here.

03Fotor
When it comes to creating collages and customizing them, Fotor is one of the most widely used tools. This free online program will let you add text to your created collages for enhancing their overall looks. Several text-based templates are also available to choose from and you can even customize the text parameters like font, size, spacing, highlight color, shadow, and more.

04Canva
Canva is a popular image editing online tool that supports several other functions as well including collage creation. Using this versatile program, you can add texts to your photos as well as collages easily. Several templates in an array of categories for collage creation are available and you can even personalize the text by changing its font, color, background, and other parameters.

05PhotoCollage
This is a simple to use online collage maker with text tool that helps you create a decent collage with a text in no time. You can either use the blank space to add images and set them in the desired format for a collage or choose from the pre-set templates. Using the tool you can change the position of the text, flip it, rotate it, select the font, color, size, shadow, stroke and customize it in several other ways.

Part 5 Use stock images to pep up your text collage
The text is the additional elements of the collage to make them look more interesting while the images and photos remain as the main content. So, no matter how interesting your text and its design are, if the images in the collages are not interesting, the collage will be of no good.
So, if you do not have interesting pictures matching your theme in high quality, no need to worry as there are several tools that can help you use their stock images for creating a collage or other purposes. One such superb tool we suggest here is Wondershare Filmora Video Editor which is a complete video editing tool that also has an impressive collection of pictures and other stick media in high quality.
Search for the pictures from several categories matching your theme at Filmora and use them without any worries. Moreover, you can even create a video collage using the software’s split-screen feature.
For Win 7 or later (64-bit)
For macOS 10.12 or later
● Ending Thoughts →
● Text collage are the ones where text is added to the photo collage to convey a message or make it look more interesting.
● While creating a text collage there are several factors to be considered like the text color, font, background, and more.
● A number of text collage maker online, desktop, and app-based tools available.
● To get stock images in high quality for your collages, Wondershare Filmora is an excellent tool.
Collages are everywhere, be it online sites, social media platforms, magazines, birthday wishes, newspapers, and much tools, more. Organizing your images in some random or specific shapes to offer a visually enhanced experience is the major purpose of the collage. Besides adding images, there are several other elements and factors that combine to make up an eye-catchy collage and a key one is the “text”.
So, if you too are considering to create a photo collage with text, just stick to us and keep reading.
In this article
01 [Why Create a Text Collage?](#Part 1)
02 [When to Use Text Collage?](#Part 2)
03 [Factors to Be Considered While Creating a Text Collage](#Part 3)
04 [Top 5 Tools to Create a Text Collage](#Part 4)
05 [Use Stock Images to Pep Up Your Text Collage](#Part 5)
Part 1 Why Create a Text Collage?
Adding a text to your collage is beneficial in ways more than one. The text brings versatility to your collage, and also helps in conveying the message along with the theme. Moreover, a little interesting text line along with animations added to your collage enhances its overall visual communication and looks.
Part 2 When to Use Text Collage?
Though text can be added to all types of collages there are some specific occasions when the purpose of adding the text becomes more meaningful. For instance, adding text while creating a birthday collage, mood board collage, anniversary collage, scrapbook collage, holiday collage, or other similar ones helps in expressing the feelings, theme, and emotions in a better manner.
Part 3 Factors to Be Considered While Creating a Text Collage
There are several text-adding ways and methods by which you can make your collage look interesting. Considering a few important ones will let you create an impressive collage in no time. Check out some useful tips and tricks to use text within the photo collage.
● Identify if you wish to add the text as the focal point or not. If you are using the text as the first striking thing in the collage then ensure that it is eye-catchy and interesting.
● Keep a good balance between the text and the images so that it does not look weird.
● The color and the font of the text are among the most important factors to be considered. Make sure that both the text color as well as the font match and blend well with the theme and the images in the collage.
● Keeping the background of the text simple, less detailed, and also clutter-free is important so that the text content comes out nicely.
● Make sure only to add a few words or lines in your collage to make it look sophisticated. It’s majorly a photo collage with a dash of the text so keep it that way only and not vice-versa.
Part 4 Top 5 Tools to Create a Text Collage
There are several desktop, online, and app based text collage maker tools available. Some of the popular ones are enlisted below.
01Adobe Creative Cloud Express
Adobe is known for its advanced image editing options and its online version called creative cloud is no less. Using this browser-based tool you can create some amazing collage and also add text easily. The site offers an array of templates to choose the design as per your theme and the interface is also user-friendly. You need to free sign-up to use the program.
02Befunky
This is another interesting online tool that can be used to add text to your collages, photo projects, and designs. Free to use, the tool has multiple options for text customization like selecting the body text, headline, outline, shadow drop options, and more. Pre-set designs for adding the text to your collages are also available here.
03Fotor
When it comes to creating collages and customizing them, Fotor is one of the most widely used tools. This free online program will let you add text to your created collages for enhancing their overall looks. Several text-based templates are also available to choose from and you can even customize the text parameters like font, size, spacing, highlight color, shadow, and more.
04Canva
Canva is a popular image editing online tool that supports several other functions as well including collage creation. Using this versatile program, you can add texts to your photos as well as collages easily. Several templates in an array of categories for collage creation are available and you can even personalize the text by changing its font, color, background, and other parameters.
05PhotoCollage
This is a simple to use online collage maker with text tool that helps you create a decent collage with a text in no time. You can either use the blank space to add images and set them in the desired format for a collage or choose from the pre-set templates. Using the tool you can change the position of the text, flip it, rotate it, select the font, color, size, shadow, stroke and customize it in several other ways.
Part 5 Use stock images to pep up your text collage
The text is the additional elements of the collage to make them look more interesting while the images and photos remain as the main content. So, no matter how interesting your text and its design are, if the images in the collages are not interesting, the collage will be of no good.
So, if you do not have interesting pictures matching your theme in high quality, no need to worry as there are several tools that can help you use their stock images for creating a collage or other purposes. One such superb tool we suggest here is Wondershare Filmora Video Editor which is a complete video editing tool that also has an impressive collection of pictures and other stick media in high quality.
Search for the pictures from several categories matching your theme at Filmora and use them without any worries. Moreover, you can even create a video collage using the software’s split-screen feature.
For Win 7 or later (64-bit)
For macOS 10.12 or later
● Ending Thoughts →
● Text collage are the ones where text is added to the photo collage to convey a message or make it look more interesting.
● While creating a text collage there are several factors to be considered like the text color, font, background, and more.
● A number of text collage maker online, desktop, and app-based tools available.
● To get stock images in high quality for your collages, Wondershare Filmora is an excellent tool.
Create Glitch Text Effect
Glitch text effect is a trending video effect whereby the texts get distorted for a few seconds. The effect is comparable to the glitch you face when your screen starts to malfunction, and the screen appears to be wavy and disoriented. A glitch text effect is better than a regular animated text effect as it helps to get the attention of the viewers immediately and get the message across clearly.
The glitch effect can be applied to the entire video as well as the text as per your preference. There are several video editors available where the glitch text effect comes pre-loaded. All you need to do is to apply it to the text and get it done in a few steps. We will illustrate how to add glitch text effect Premiere Pro. But we recommend Filmora for the best glitter text effect that you can add to your video instantly.
Part 1. Create Glitch Text in Video with Filmora
We have already stated that Wondershare Filmora is the best video editor for the best glitch text effect download and apply to your video in simple steps. Filmora is a premium video editor that is widely used by amateur and professional video editors. You can get all glitch text effect After Effects and add them to your video conveniently in comparison to After Effects.
As a matter of fact, there are literally unlimited video and text effects available, and you can find different types of glitch text effects to apply to your titles and texts. Filmora is available for both Windows and mac users. Here are the steps to create glitch text in video with Filmora.
Free Download For Win 7 or later(64-bit)
Free Download For macOS 10.14 or later
Step1 Download and install Filmora on your computer. Go to File> New Project from the menu bar to start video editing project.

Step2 Go to File> Import Media > Import Media Files to import the video clips where you want to add glitch text effect. Drop the clip into the Timeline to get started.

Step3 Go to Titles tab located at the top. From the left panel, click on Titles option. Search “glitch” in the search field and you will see all the glitch text effects that you can apply to the text in your video.
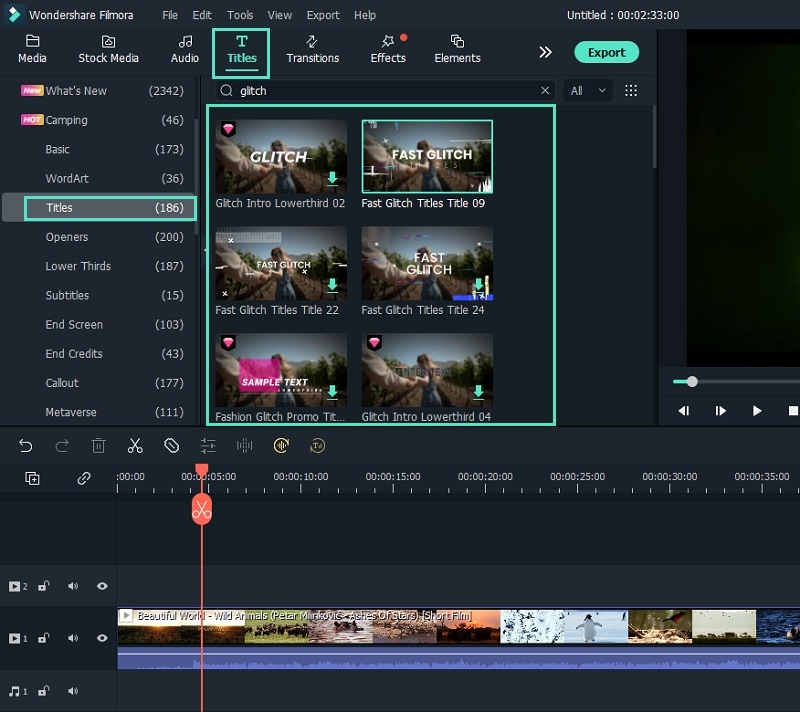
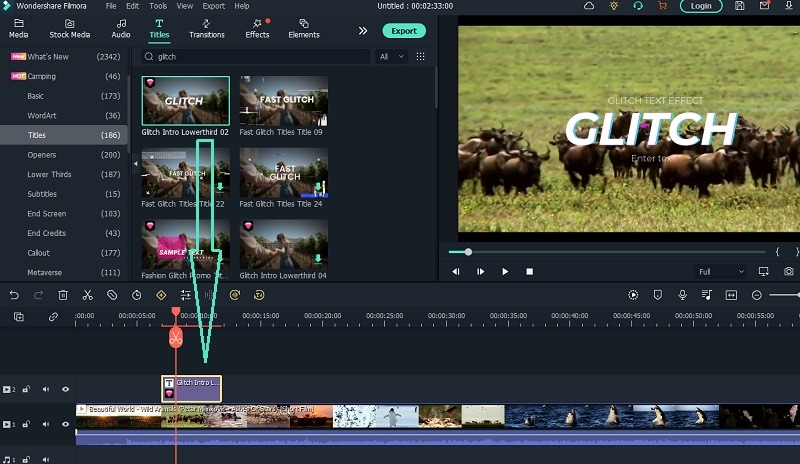
Step4 Select any glitch text effect and drop it into the Timeline above the video clip exactly where you want the text and the effect to appear.
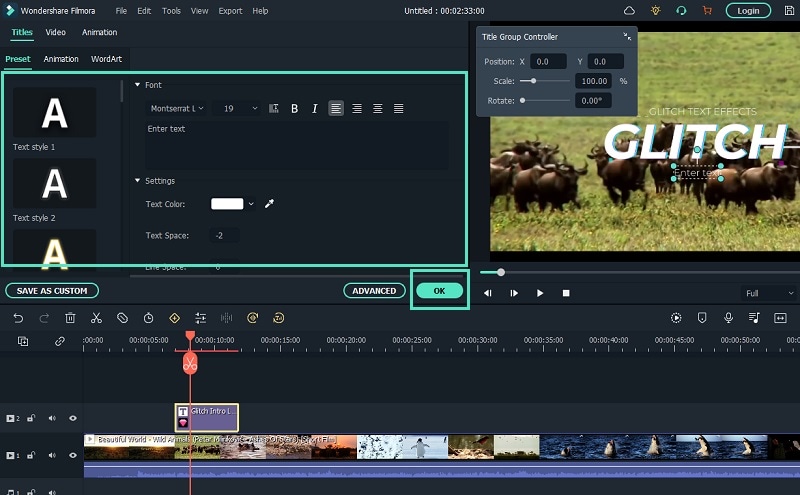
Step5 Double-click on the glitch text effect located on Timeline and edit the text, style, and other parameters as per your preference. Click on Ok and play the video to see your edited video with the glitch text effect.
Part 2. How to Make Glitch Text Effect with Premiere Pro
Adobe Premiere Pro is another renowned video editor where you can add glitch text effect to your video. Premiere Pro is strictly for professional video editors as the user interface is not as intuitive as Filmora . The learning curve is steep, and therefore, you need to go through the steps to add glitch text effect Premiere Pro. There are several glitch text effect presets available that you can apply to any text on your video to make them engaging. Here are the steps to make glitch text effect with Premiere Pro.
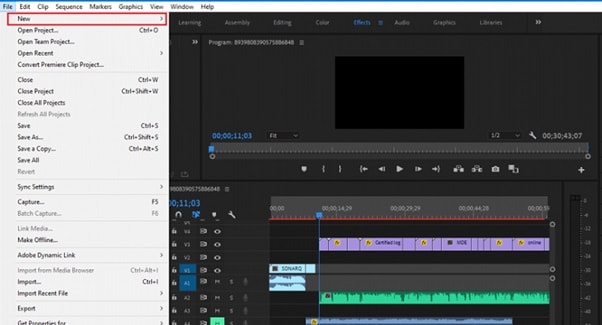
Step1 Launch Adobe Premiere Pro and go to New> Project to get started. Import your video and drop it into Timeline.
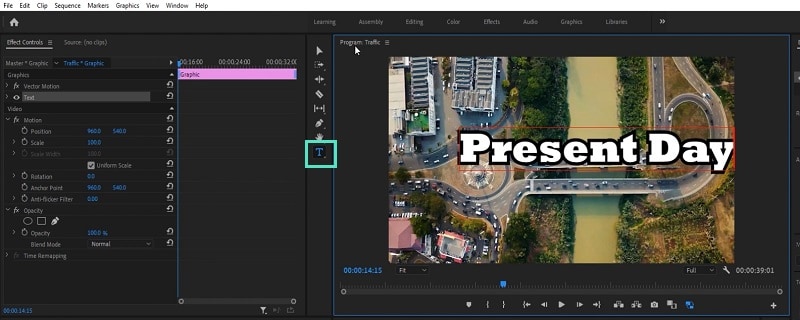
Step2 Use the Type tool to write any text on your video to add glitch text effect. You should have a text layer on Timeline.
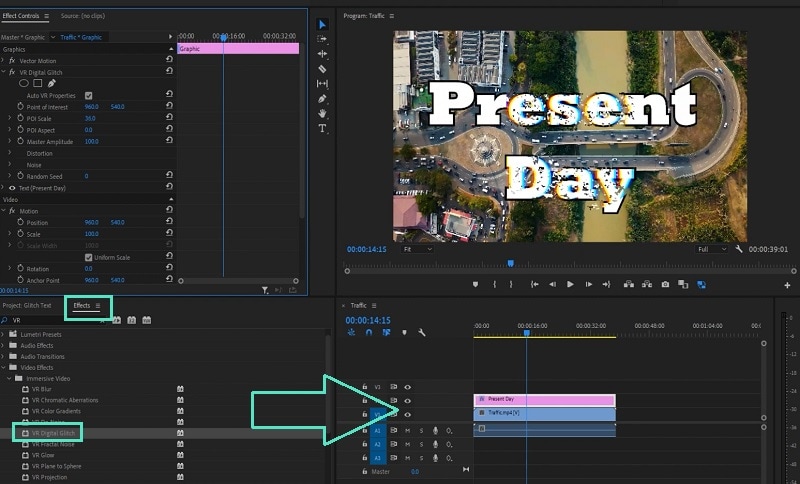
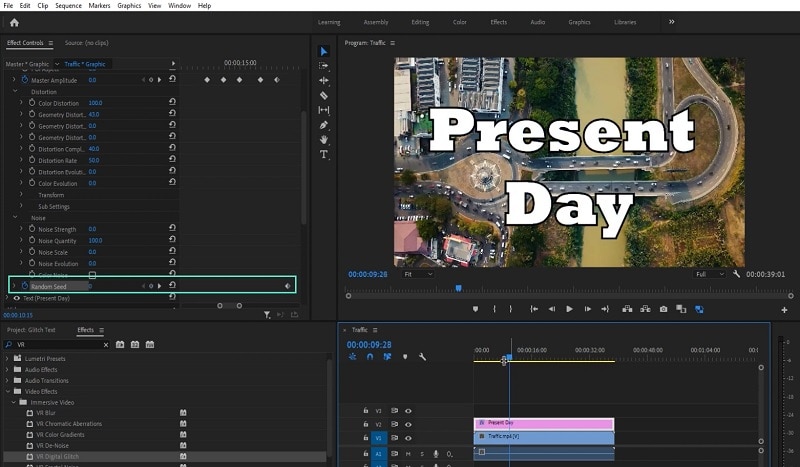
Step3 Go to Effects> Immersive Video> VR Digital Glitch option. Drag and drop the effect to text layer.
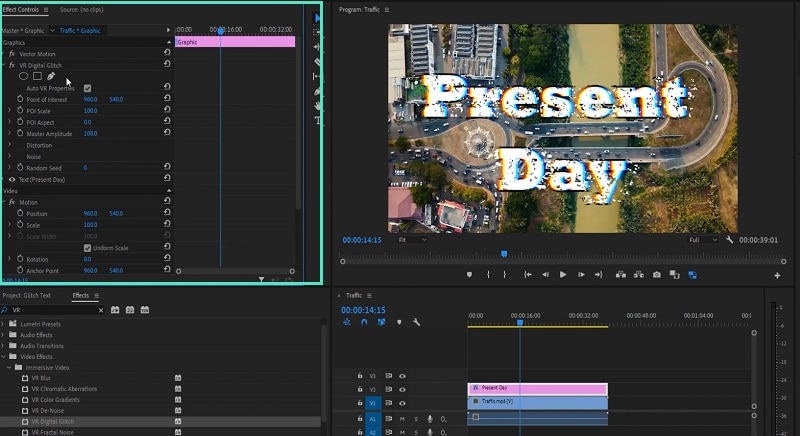
Step4 Under Effect Controls tab, you will find all the different parameters that you can adjust to get the glitch text effect perfectly.
Step5 Turn on Master Amplitude and add multiple keyframes as different points in the Timeline and change the distortion value to make the effect prominent.
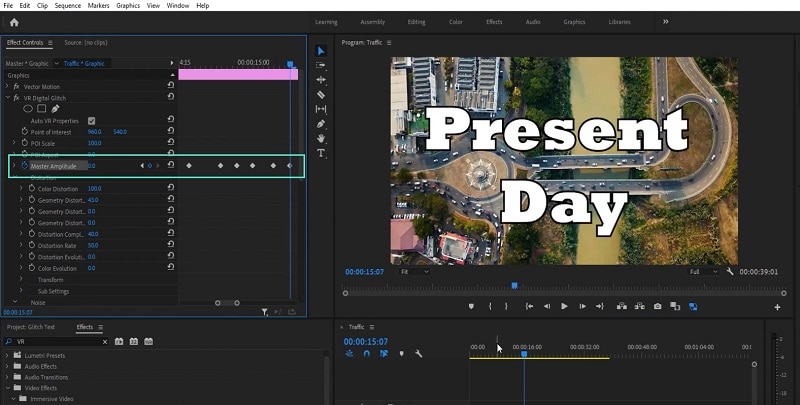
Step6 Go to the first keyframe and turn on Random Seed effect. Go to the last keyframe and turn on Random Seed effect and change the value to 75. Play the video to check the entire video with glitch text effect.
Part 3. Use VSDC Video Editor to Create Glitch Text
If you do not have any premium video editor on your computer and you do not want to purchase any premium video editor, you can still get glitter text effect free. You need to download and install VSDC free video editor on your computer. But the steps to create glitch text on VSDC video editor are slightly complicated as the user interface is not as intuitive as Filmora . Here are the steps to add free glitch text effect on your video.
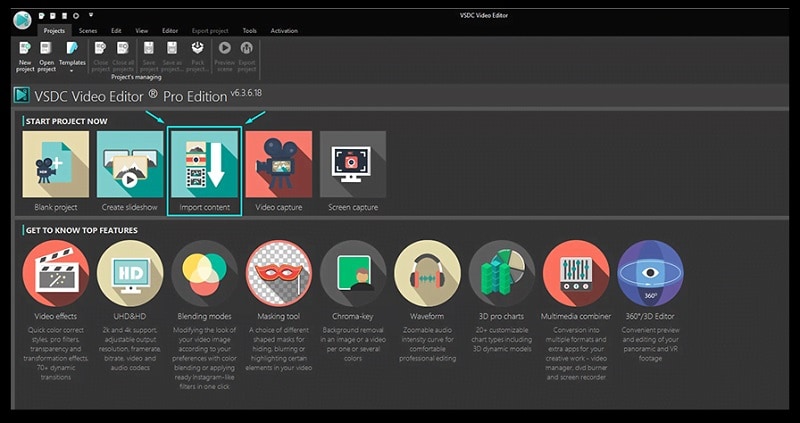
Step1 Download and install VSDC video editor. Launch the editor and click on New Project to get started. Import your video to your project where you want to add glitch text effect.
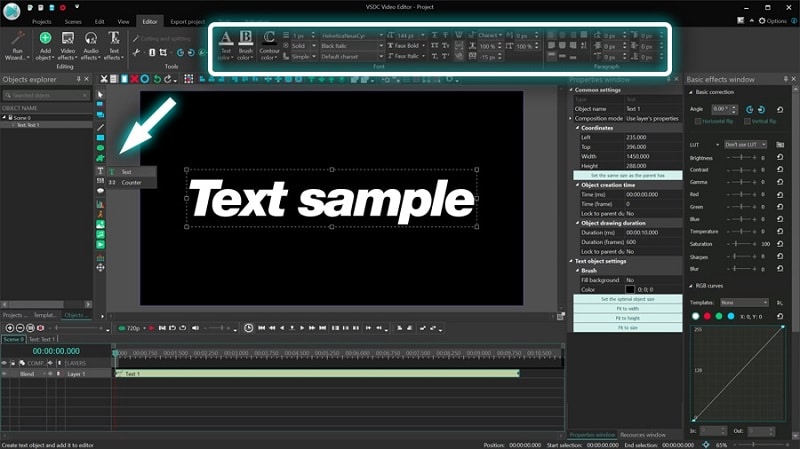
Step2 Use Type tool to write a text on the video. You can press Shift+T shortcut as well. After typing the text, adjust the text style as per your preference.
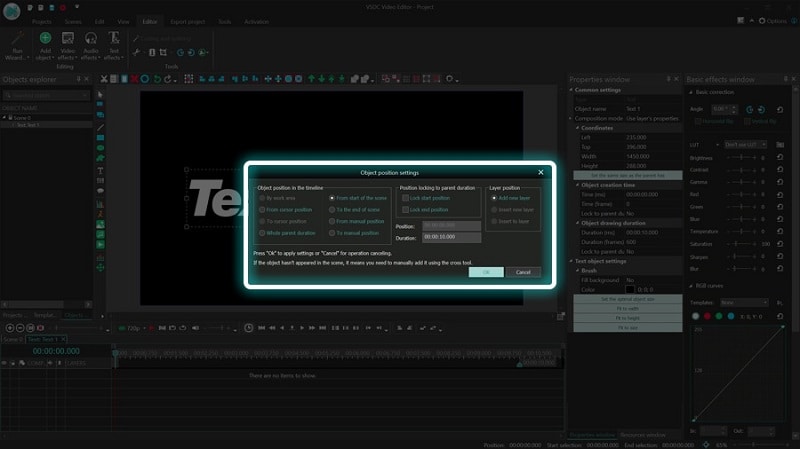
Step3 Double-click on the text layer on Timeline and go to Video Effects> Special FX and click on Glitch option.
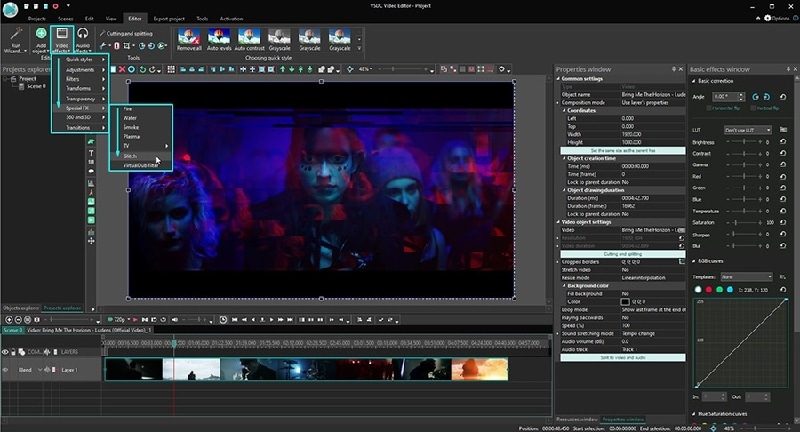
Step4 A window will appear where you can set the starting point, duration, and different parameters. Click on Ok button.
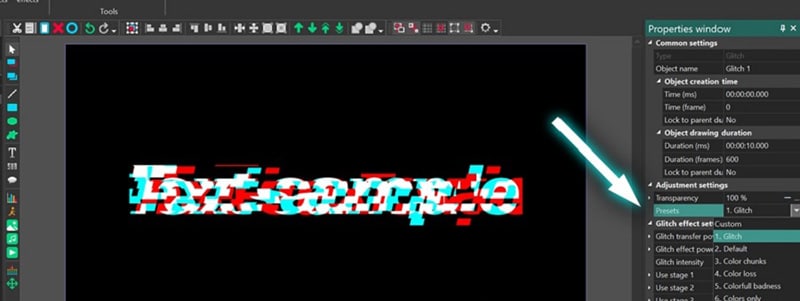
Step5 Go to Properties Windows and click on Presets to select different types of glitch text effects. You can also adjust the intensity of the text effects and other parameters as you feel.
Part 4. Related FAQs about Glitch Text
1. How do you animate glitch text?
If you want to animate glitch text for free, VSDC video editor is ideal as you can customize the effect on any text in simple steps. If you want to use a premium video editor, we recommend Filmora as there are various glitch text effects available to apply to any text on your video instantly.
2. How do you glitch text on video?
First, you have to import your video in your video editor. Type the desired text and set the style. Thereafter, go to glitch text effect presets available on the video editor and apply it to the text instantly. You can customize the glitch text effect as per your preference to make the animation more prominent.
3. How do you glitch text on Android?
You should first install Glitch Video Effect: Glitch FX app from Play Store. Edit your video on the app to add any text, and thereafter, add glitch text effect instantly. In fact, the glitch text effect is available in almost all popular video editor apps on Android due to the effect being trendy and viral.
Free Download For macOS 10.14 or later
Step1 Download and install Filmora on your computer. Go to File> New Project from the menu bar to start video editing project.
Step2 Go to File> Import Media > Import Media Files to import the video clips where you want to add glitch text effect. Drop the clip into the Timeline to get started.
Step3 Go to Titles tab located at the top. From the left panel, click on Titles option. Search “glitch” in the search field and you will see all the glitch text effects that you can apply to the text in your video.
Step4 Select any glitch text effect and drop it into the Timeline above the video clip exactly where you want the text and the effect to appear.
Step5 Double-click on the glitch text effect located on Timeline and edit the text, style, and other parameters as per your preference. Click on Ok and play the video to see your edited video with the glitch text effect.
Part 2. How to Make Glitch Text Effect with Premiere Pro
Adobe Premiere Pro is another renowned video editor where you can add glitch text effect to your video. Premiere Pro is strictly for professional video editors as the user interface is not as intuitive as Filmora . The learning curve is steep, and therefore, you need to go through the steps to add glitch text effect Premiere Pro. There are several glitch text effect presets available that you can apply to any text on your video to make them engaging. Here are the steps to make glitch text effect with Premiere Pro.
Step1 Launch Adobe Premiere Pro and go to New> Project to get started. Import your video and drop it into Timeline.
Step2 Use the Type tool to write any text on your video to add glitch text effect. You should have a text layer on Timeline.
Step3 Go to Effects> Immersive Video> VR Digital Glitch option. Drag and drop the effect to text layer.
Step4 Under Effect Controls tab, you will find all the different parameters that you can adjust to get the glitch text effect perfectly.
Step5 Turn on Master Amplitude and add multiple keyframes as different points in the Timeline and change the distortion value to make the effect prominent.
Step6 Go to the first keyframe and turn on Random Seed effect. Go to the last keyframe and turn on Random Seed effect and change the value to 75. Play the video to check the entire video with glitch text effect.
Part 3. Use VSDC Video Editor to Create Glitch Text
If you do not have any premium video editor on your computer and you do not want to purchase any premium video editor, you can still get glitter text effect free. You need to download and install VSDC free video editor on your computer. But the steps to create glitch text on VSDC video editor are slightly complicated as the user interface is not as intuitive as Filmora . Here are the steps to add free glitch text effect on your video.
Step1 Download and install VSDC video editor. Launch the editor and click on New Project to get started. Import your video to your project where you want to add glitch text effect.
Step2 Use Type tool to write a text on the video. You can press Shift+T shortcut as well. After typing the text, adjust the text style as per your preference.
Step3 Double-click on the text layer on Timeline and go to Video Effects> Special FX and click on Glitch option.
Step4 A window will appear where you can set the starting point, duration, and different parameters. Click on Ok button.
Step5 Go to Properties Windows and click on Presets to select different types of glitch text effects. You can also adjust the intensity of the text effects and other parameters as you feel.
Part 4. Related FAQs about Glitch Text
1. How do you animate glitch text?
If you want to animate glitch text for free, VSDC video editor is ideal as you can customize the effect on any text in simple steps. If you want to use a premium video editor, we recommend Filmora as there are various glitch text effects available to apply to any text on your video instantly.
2. How do you glitch text on video?
First, you have to import your video in your video editor. Type the desired text and set the style. Thereafter, go to glitch text effect presets available on the video editor and apply it to the text instantly. You can customize the glitch text effect as per your preference to make the animation more prominent.
3. How do you glitch text on Android?
You should first install Glitch Video Effect: Glitch FX app from Play Store. Edit your video on the app to add any text, and thereafter, add glitch text effect instantly. In fact, the glitch text effect is available in almost all popular video editor apps on Android due to the effect being trendy and viral.
Some Facts About GIF Background You Didn’t Know
Some Facts About GIF Background You Didn’t Know
An easy yet powerful editor
Numerous effects to choose from
Detailed tutorials provided by the official channel
Once you start using GIFs in your everyday conversations, there’s no going back. GIFs make the conversation more immersive and enjoyable and add a sense of emotion that is not possible with ordinary text. You probably loved some gifs more than others, or there were moments when you wanted to turn them into gifs and wished you could use them as a gif background on your device or presentation but couldn’t figure out how to do it. But, now you don’t have to bury your wish any longer. During this article, you will learn everything there is to know about all the different ways you can use gifs as your background and many more. In addition, you will learn how to use them as your background and how to create them.
In this article
01 [How to Use a GIF as Your Desktop Background on Windows](#Part 1)
02 [How to Make GIF Background on Windows/Mac/Android/iPhone](#Part 2)
03 [How to Make GIF Powerpoint Background](#Part 3)
04 [How to Make GIF Without Background - Free & Efficiently?](#Part 4)
Part 1 How to Use a GIF as Your Desktop Background on Windows?
Although Windows doesn’t have native support to keep animated gif backgrounds, you can use third-party services to keep gifs as background images.
Using Plastuer or BioniX wallpaper changer as a 3rd party software is the best way to use animated gifs for your desktop.
As a starting point, we’ll cover plastuer, which uses WebGL and chromium-browser to make gifs as your background.

The software includes selecting different screens where you want the wallpaper to appear, making it possible to apply it to different screens at once.
To select the gif you want:
● You can paste the URL of the gif you want to use.
● You can also use the “create playlist” field to add multiple gifs as your background.
● You can select a file from your device using the “select file” option.
● Or you can choose from hundreds of gifs present in the plastuer library.
● You can disable the wallpaper whenever you wish by clicking on the “disable wallpaper” option.

How to use the bioniX wallpaper changer?
BioniX comes with several options that one may need to apply to their Windows device’s background, and animated gif backgrounds are one of them.

You will need to download the software and once it is installed, launch it on your PC to apply cool gif backgrounds. To choose files from the device itself, you will have to use the shortcut command “CTRL+F”, or you can also choose to insert the URL of the gif you want to use as your background.
Once your image gets uploaded into the software, double click on it to set it as your windows wallpaper. You can also choose a launch of gifs, create a playlist, and select the timer to change wallpaper regularly.
Part 2 How to Make GIF Background on Windows/Mac/Android/iPhone?
So, how can you create moving background gifs on your different devices like Windows/Mac/Android/iPhone?
In case you thought that was hard, you were entirely mistaken. Now, you can easily create or customize cool background gifs for your computer, tablet, phone, or other devices that you own. The best part is that you don’t need any technical skills to use different tools.
You can create gifs with the help of many tools such as Giphy and share them with your family, friends, and coworkers.
01Giphy
Giphy is a one-stop destination for all of your gifs needs. You can create or choose from thousands of gifs present in their library. Furthermore, one can make personalized gifs with all the tools they provide and add custom stickers, texts or different filters. There is also a live wallpaper section present in giphy, from where you can download hundreds of cool gif backgrounds and make your old machine look fabulous again.

02Pinterest
It’s no secret that Pinterest has a lot of great images, but did you know you can also find gif backgrounds here in various genres that you like and then download them?
It’s straightforward to use, and you can also find anime gif backgrounds on Pinterest if you are an anime fan.

03Tenor
This site offers online gif backgrounds. One may choose from a wide selection of wallpapers and backgrounds available on this site. Online Library is filled up with all sorts of aesthetic gif backgrounds and other types of background that people like.
A few more tools fit the need, but most of them are not reliable, and the tools mentioned above are currently the best ones available for you to use.

Part 3 How to Make a GIF Powerpoint Background?
If you make PowerPoint presentations, you can use various tools to modify your presentation. But did you know that you can also include an aesthetic gif background as part of your presentation?
The steps to creating a gif PowerPoint background are very simple, and below you will find all the steps you need to follow:
● You’ll need to choose the PPTx file that you want to use the GIF background on to get started. Then you can choose the specific slide.
● Navigate to the “design” tab, then to the “background” section. You will see a “background styles” option where you will have to select “format background” to complete the process.
● Select “fill” in the left-hand side panel of the appeared window. Now, select “picture or texture fill” and choose the “file” button, which will lead to another window.
● In the “look in” menu, find the folder or file where the required gif is present. Go on to select the “ok” option. You can either select “close” to apply the gif to a particular slide or “apply to all” to use the gif background in the whole presentation.
Part 4 How to Make GIF Without Background - Free & Efficiently?
One may also look for transparent gif maker websites that will help them make gifs without background and use them on different devices they own.
Here are a few websites that are best for this job; they won’t only help you make transparent gifs but also edit various features like delay time, animation speed etc.
01Using EzGif
Using EzGif is probably one of the best options available in the market at the moment. You can go to their website and create a transparent gif background of high resolution.
Doing that is easy; you need to upload PNG type images that don’t have a background or combine transparent background to form a gif. You can choose up to 2000 images with a maximum file size of 100 MB for all images combined.
To create a gif, go on their site, then to the “gif maker” section to upload the images, and click on “make a gif” to make a transparent gif from the selected images. Once the gif is created, you can use it as a moving gif background and share it with friends or family.
02Use animizer.net to create a gif without background
It is effortless to use software to create transparent gifs by uploading multiple transparent PNG images and combining them to form a gif.
You can use unlimited images for your gif and animated gif background. It also lets you adjust various settings for your transparent gifs like loops, animation speed and much more.
03Use filmora for making gifs without background easily
Wondershare Filmora Video Editor is an all in one tool that will help you create all sorts of gifs, including transparent gifs. You can take advantage of their easy to use tools that are fir for people who have no technical skills at all.
You can easily upload the images and remove their background in the software itself and later use it in the gif you are willing to create.

Wondershare Filmora - Best Video Editor for Mac/Windows
5,481,435 people have downloaded it.
Build unique custom animations without breaking a sweat.
Focus on creating epic stories and leave the details to Filmora’s auto features.
Start a creative adventure with drag & drop effects and endless possibilities.
Filmora simplifies advanced features to save you time and effort.
Filmora cuts out repetition so you can move on to your next creative breakthrough.
This is probably one of the best options if you are looking for an all in one tool for all your needs.
● Ending Thoughts →
● The techniques that we have talked about in this guide may help you discover things about gif backgrounds you have not known before.
● They are incredible and can help you utilize gifs in ways you hadn’t even considered.
● Create a moving gif background and apply it to any device easily.
● Of course, a simple background won’t provide the same type of effect as a moving gif. With this guide, you’ll learn about every tool that you may use and how to apply or create a cool gif background on your own.
Once you start using GIFs in your everyday conversations, there’s no going back. GIFs make the conversation more immersive and enjoyable and add a sense of emotion that is not possible with ordinary text. You probably loved some gifs more than others, or there were moments when you wanted to turn them into gifs and wished you could use them as a gif background on your device or presentation but couldn’t figure out how to do it. But, now you don’t have to bury your wish any longer. During this article, you will learn everything there is to know about all the different ways you can use gifs as your background and many more. In addition, you will learn how to use them as your background and how to create them.
In this article
01 [How to Use a GIF as Your Desktop Background on Windows](#Part 1)
02 [How to Make GIF Background on Windows/Mac/Android/iPhone](#Part 2)
03 [How to Make GIF Powerpoint Background](#Part 3)
04 [How to Make GIF Without Background - Free & Efficiently?](#Part 4)
Part 1 How to Use a GIF as Your Desktop Background on Windows?
Although Windows doesn’t have native support to keep animated gif backgrounds, you can use third-party services to keep gifs as background images.
Using Plastuer or BioniX wallpaper changer as a 3rd party software is the best way to use animated gifs for your desktop.
As a starting point, we’ll cover plastuer, which uses WebGL and chromium-browser to make gifs as your background.
The software includes selecting different screens where you want the wallpaper to appear, making it possible to apply it to different screens at once.
To select the gif you want:
● You can paste the URL of the gif you want to use.
● You can also use the “create playlist” field to add multiple gifs as your background.
● You can select a file from your device using the “select file” option.
● Or you can choose from hundreds of gifs present in the plastuer library.
● You can disable the wallpaper whenever you wish by clicking on the “disable wallpaper” option.
How to use the bioniX wallpaper changer?
BioniX comes with several options that one may need to apply to their Windows device’s background, and animated gif backgrounds are one of them.
You will need to download the software and once it is installed, launch it on your PC to apply cool gif backgrounds. To choose files from the device itself, you will have to use the shortcut command “CTRL+F”, or you can also choose to insert the URL of the gif you want to use as your background.
Once your image gets uploaded into the software, double click on it to set it as your windows wallpaper. You can also choose a launch of gifs, create a playlist, and select the timer to change wallpaper regularly.
Part 2 How to Make GIF Background on Windows/Mac/Android/iPhone?
So, how can you create moving background gifs on your different devices like Windows/Mac/Android/iPhone?
In case you thought that was hard, you were entirely mistaken. Now, you can easily create or customize cool background gifs for your computer, tablet, phone, or other devices that you own. The best part is that you don’t need any technical skills to use different tools.
You can create gifs with the help of many tools such as Giphy and share them with your family, friends, and coworkers.
01Giphy
Giphy is a one-stop destination for all of your gifs needs. You can create or choose from thousands of gifs present in their library. Furthermore, one can make personalized gifs with all the tools they provide and add custom stickers, texts or different filters. There is also a live wallpaper section present in giphy, from where you can download hundreds of cool gif backgrounds and make your old machine look fabulous again.
02Pinterest
It’s no secret that Pinterest has a lot of great images, but did you know you can also find gif backgrounds here in various genres that you like and then download them?
It’s straightforward to use, and you can also find anime gif backgrounds on Pinterest if you are an anime fan.
03Tenor
This site offers online gif backgrounds. One may choose from a wide selection of wallpapers and backgrounds available on this site. Online Library is filled up with all sorts of aesthetic gif backgrounds and other types of background that people like.
A few more tools fit the need, but most of them are not reliable, and the tools mentioned above are currently the best ones available for you to use.
Part 3 How to Make a GIF Powerpoint Background?
If you make PowerPoint presentations, you can use various tools to modify your presentation. But did you know that you can also include an aesthetic gif background as part of your presentation?
The steps to creating a gif PowerPoint background are very simple, and below you will find all the steps you need to follow:
● You’ll need to choose the PPTx file that you want to use the GIF background on to get started. Then you can choose the specific slide.
● Navigate to the “design” tab, then to the “background” section. You will see a “background styles” option where you will have to select “format background” to complete the process.
● Select “fill” in the left-hand side panel of the appeared window. Now, select “picture or texture fill” and choose the “file” button, which will lead to another window.
● In the “look in” menu, find the folder or file where the required gif is present. Go on to select the “ok” option. You can either select “close” to apply the gif to a particular slide or “apply to all” to use the gif background in the whole presentation.
Part 4 How to Make GIF Without Background - Free & Efficiently?
One may also look for transparent gif maker websites that will help them make gifs without background and use them on different devices they own.
Here are a few websites that are best for this job; they won’t only help you make transparent gifs but also edit various features like delay time, animation speed etc.
01Using EzGif
Using EzGif is probably one of the best options available in the market at the moment. You can go to their website and create a transparent gif background of high resolution.
Doing that is easy; you need to upload PNG type images that don’t have a background or combine transparent background to form a gif. You can choose up to 2000 images with a maximum file size of 100 MB for all images combined.
To create a gif, go on their site, then to the “gif maker” section to upload the images, and click on “make a gif” to make a transparent gif from the selected images. Once the gif is created, you can use it as a moving gif background and share it with friends or family.
02Use animizer.net to create a gif without background
It is effortless to use software to create transparent gifs by uploading multiple transparent PNG images and combining them to form a gif.
You can use unlimited images for your gif and animated gif background. It also lets you adjust various settings for your transparent gifs like loops, animation speed and much more.
03Use filmora for making gifs without background easily
Wondershare Filmora Video Editor is an all in one tool that will help you create all sorts of gifs, including transparent gifs. You can take advantage of their easy to use tools that are fir for people who have no technical skills at all.
You can easily upload the images and remove their background in the software itself and later use it in the gif you are willing to create.
Wondershare Filmora - Best Video Editor for Mac/Windows
5,481,435 people have downloaded it.
Build unique custom animations without breaking a sweat.
Focus on creating epic stories and leave the details to Filmora’s auto features.
Start a creative adventure with drag & drop effects and endless possibilities.
Filmora simplifies advanced features to save you time and effort.
Filmora cuts out repetition so you can move on to your next creative breakthrough.
This is probably one of the best options if you are looking for an all in one tool for all your needs.
● Ending Thoughts →
● The techniques that we have talked about in this guide may help you discover things about gif backgrounds you have not known before.
● They are incredible and can help you utilize gifs in ways you hadn’t even considered.
● Create a moving gif background and apply it to any device easily.
● Of course, a simple background won’t provide the same type of effect as a moving gif. With this guide, you’ll learn about every tool that you may use and how to apply or create a cool gif background on your own.
3 Effective Methods to Correct Color Distortion in Videos
Create High-Quality Video - Wondershare Filmora
An easy and powerful YouTube video editor
Numerous video and audio effects to choose from
Detailed tutorials are provided by the official channel
Nothing is more satisfying than seeing the final cut of a video and realizing that everything we filmed is crystal clear, with vibrant colors and balanced light. Unfortunately, whether you are editing on your own or collaborating with a team, this can be difficult to achieve because color problems often occur. Unlike photo editors, where one photo can easily be fixed without affecting the rest of an album, video editing requires adjusting to fix one problem. We’ll look at three different methods to correct color distortion in videos.
In this article
02 How will Color Distortion Affect Your Videos?
03 Different Methods to Correct Color Distortion in Videos
What Is Color Distortion
Color distortion, also called chromatic aberration (CA), happens when the camera’s lens cannot resolve the wavelengths of light that it is recording. It occurs due to dispersion, which is when the lens elements’ refractive index varies with the light wavelength.
The refractive index of transparent materials often reduces with increasing wavelength. Because a lens’ focal length depends on the index of refraction, this variation in refraction index affects focusing.
There are two types of CA: transverse (lateral) and axial (longitudinal). Axial aberration happens when different wavelengths of light focus at different distances from a lens (focus shift). Essentially, longitudinal aberration is often at long focal lengths.
On the other hand, transverse aberration happens when different wavelengths focus at different places in the focal plane due to the magnification or distortion of the lens varying with wavelength. Ideally, transverse aberration is often at short focal lengths.
The two types of CA have different characteristics, and they may occur together. Axial chromatic aberration occurs throughout an image, and you can reduce it by stopping down, hence increasing the depth of the field so that although the different wavelengths are focusing at different distances, they’re still in acceptable focus.
When it comes to transverse chromatic aberration, it doesn’t occur in the middle of the image, and it increases towards the edge. What’s more? Stopping down does not affect it.
How will Color Distortion Affect Your Videos?
Colour distortion displays itself as “fringes” of color on the boundaries separating bright and dark parts of the image in a video. Color distortion can also occur when adding effects to a video, such as the use of a green screen. By using the green screen to replace the real thing, the colors in the video can appear a little off.
Different Methods to Correct Color Distortion in Videos
There are several methods to correct color distortion in your video. They include.
Method 1: Correct Color Distortion in Videos Using Filmora
Filmora is user-friendly software with powerful tools that allow users to tweak the color settings and correct color distortion. Follow the steps below to learn how to correct color distortion in videos using Filmora.
Step 1. Download and Install Filmora
Head to https://filmora.wondershare.net/ and download Filmora. Once you have finished downloading the software, install Filmora on your device and launch it.
Step 2. Import Your videos to Filmora
Select the New Project option to create a new project file. Click on the Import Media Files Here to find and load your videos to the Filmora’s media library. Alternatively, you can drag and drop your video file to the media library, and then put it on the timeline.

Step 3. Correct Color Distortions with Your Preferences
Navigate to the timeline and double-click your video. You’ll see the video editing window. Select the Color panel; you’ll see several parameters that you can tweak.
- Contrast allows you to control the difference in brightness and color in different areas of your video image. The Brightness setting lets you customize the overall darkness or lightness of the video image.
- With the Saturation setting, you can make the colors in your video image appear more inconspicuous or saturated.
- If the color in your video image is set too high, it will look oversaturated. The colors will be washed out and muted if it’s set to low. The Tint control in Filmora allows you to adjust the balance between these two chroma channels.
- Additionally, you can employ Hollywood film-looking color sets for videos from Sparta 300, Walking Dead, Game of Thrones, Star Wars, and much more.
- Preview and Save Your Edited Video

Once you have finished correcting the color distortion in your video, you can hit the Play symbol to view the changes in the previewing window. Click the Export button if you are content with the results. You can click on Settings to change the settings if you want.
Filmora allows you to save your videos in different formats. To do this, navigate to the Format tab. The software has the option of uploading videos directly to Vimeo or YouTube. Alternatively, you can burn it to DVD or export it to a portable device.

For Win 7 or later (64-bit)
For macOS 10.12 or later
Method 2: Correct Color Distortion in Videos Using Premiere Pro
Premiere Pro provides color correction tools that allow users to edit footage directly on their timeline. To learn how to correct color distortion in video using Premiere Pro, follow these steps:
Step 1. Import Your Video Files
Use the Import command to bring video files on your device into your project; this will make the video files available to the Premiere Pro project. This timeline-based video editing software application allows you to import an entire folder, multiple files, or a single file. You can import video files using the Import command or the Media Browser.
Step 2. Head to Color Correction Effect
Once you have imported your video, place it on the timeline. Apply color correction effects to the video you placed in the Timeline. You can also select your video and drag and drop the effect you want to the Video Effects selection under the Effects Control Panel. Here are some of the color correction effects you can apply:
Brightness and Contrast Effect: With this effect, you can adjust the contrast and brightness of your video. Using this effect allows you to make adjustments to all pixel values in your video image at once — mid-tones, shadows, and highlights.
Color Balance Effect: This effect changes the amount of blue, green, and red in the shadow, highlights of an image, and mid-tones. Preserve Luminosity preserves the average brightness of your video image and changes the color. It maintains the tonal balance in your video image.

Method 3: Correct Color Distortion in Videos Using Final Cut Pro
Developed by Macromedia and later Apple, Final Cut Pro is a non-linear video editing software that allows you to log and transfer videos onto a hard drive, where you can edit them, process them, and output the videos to various formats.
The software provides non-destructive and non-linear editing of QuickTime-compatible video formats. These include 8K, 5K, 4K, 2K, XDCAM (via plug-in), P2 MXF (DVCProHD), HDV, and DV film formats. Final Cut Pro can also import projects from iMovie for iPadOS and iOS. It also comes with multiple color correction tools, such as color wheels, video scopes, and sliders and curves.
With that in mind, let’s look at how to correct color distortion in videos using Final Cut Pro.
Step 1. Open Your Video in Final Cut Pro
Click on the ‘Window’ tab at the top of your screen and select the video you’d like to edit from the drop-down menu.
Step 2. Switch to Color Effects Work Space

Go to the Window panel and select the Workspaces option. Then, choose the Color & Effects option. Here, you can adjust a range of scopes, including the Luma Waveform, Vectorscope, and RGB Overlay.

Step 3. Correct the Color
Head to the color panel and click the drop-down menu next to No Corrections. Select Color Wheels, where you’ll be able to control various parts of your video clips individually.

The Shadows wheel allows you to control the darker shades of your footage, Highlights controls the bright shades of your footage, and the Midtones wheel allows you to adjust the Luma channels in the middle of your video clip. The Master wheel allows you to adjust hue, saturation, and Luma channel (exposure).

In addition to the color wheels, you’ll find more controls below that help you adjust the white balance.
Step 4. Save Your New Video File
After you’ve made these adjustments to your video, it’s time to save and export the file. Click on the ‘File’ tab at the top of your screen and choose ‘Export. Once you click ‘Export,’ you’ll be saving the file to your hard drive. Once it’s done, click ‘Save.’ The file will automatically be saved on your desktop.
Conclusion
● If you are experiencing color distortion, you can use any of the three methods above to correct it. Filmora is one of the most popular video edit tools that people use to correct color distortion videos.
Nothing is more satisfying than seeing the final cut of a video and realizing that everything we filmed is crystal clear, with vibrant colors and balanced light. Unfortunately, whether you are editing on your own or collaborating with a team, this can be difficult to achieve because color problems often occur. Unlike photo editors, where one photo can easily be fixed without affecting the rest of an album, video editing requires adjusting to fix one problem. We’ll look at three different methods to correct color distortion in videos.
In this article
02 How will Color Distortion Affect Your Videos?
03 Different Methods to Correct Color Distortion in Videos
What Is Color Distortion
Color distortion, also called chromatic aberration (CA), happens when the camera’s lens cannot resolve the wavelengths of light that it is recording. It occurs due to dispersion, which is when the lens elements’ refractive index varies with the light wavelength.
The refractive index of transparent materials often reduces with increasing wavelength. Because a lens’ focal length depends on the index of refraction, this variation in refraction index affects focusing.
There are two types of CA: transverse (lateral) and axial (longitudinal). Axial aberration happens when different wavelengths of light focus at different distances from a lens (focus shift). Essentially, longitudinal aberration is often at long focal lengths.
On the other hand, transverse aberration happens when different wavelengths focus at different places in the focal plane due to the magnification or distortion of the lens varying with wavelength. Ideally, transverse aberration is often at short focal lengths.
The two types of CA have different characteristics, and they may occur together. Axial chromatic aberration occurs throughout an image, and you can reduce it by stopping down, hence increasing the depth of the field so that although the different wavelengths are focusing at different distances, they’re still in acceptable focus.
When it comes to transverse chromatic aberration, it doesn’t occur in the middle of the image, and it increases towards the edge. What’s more? Stopping down does not affect it.
How will Color Distortion Affect Your Videos?
Colour distortion displays itself as “fringes” of color on the boundaries separating bright and dark parts of the image in a video. Color distortion can also occur when adding effects to a video, such as the use of a green screen. By using the green screen to replace the real thing, the colors in the video can appear a little off.
Different Methods to Correct Color Distortion in Videos
There are several methods to correct color distortion in your video. They include.
Method 1: Correct Color Distortion in Videos Using Filmora
Filmora is user-friendly software with powerful tools that allow users to tweak the color settings and correct color distortion. Follow the steps below to learn how to correct color distortion in videos using Filmora.
Step 1. Download and Install Filmora
Head to https://filmora.wondershare.net/ and download Filmora. Once you have finished downloading the software, install Filmora on your device and launch it.
Step 2. Import Your videos to Filmora
Select the New Project option to create a new project file. Click on the Import Media Files Here to find and load your videos to the Filmora’s media library. Alternatively, you can drag and drop your video file to the media library, and then put it on the timeline.
Step 3. Correct Color Distortions with Your Preferences
Navigate to the timeline and double-click your video. You’ll see the video editing window. Select the Color panel; you’ll see several parameters that you can tweak.
- Contrast allows you to control the difference in brightness and color in different areas of your video image. The Brightness setting lets you customize the overall darkness or lightness of the video image.
- With the Saturation setting, you can make the colors in your video image appear more inconspicuous or saturated.
- If the color in your video image is set too high, it will look oversaturated. The colors will be washed out and muted if it’s set to low. The Tint control in Filmora allows you to adjust the balance between these two chroma channels.
- Additionally, you can employ Hollywood film-looking color sets for videos from Sparta 300, Walking Dead, Game of Thrones, Star Wars, and much more.
- Preview and Save Your Edited Video
Once you have finished correcting the color distortion in your video, you can hit the Play symbol to view the changes in the previewing window. Click the Export button if you are content with the results. You can click on Settings to change the settings if you want.
Filmora allows you to save your videos in different formats. To do this, navigate to the Format tab. The software has the option of uploading videos directly to Vimeo or YouTube. Alternatively, you can burn it to DVD or export it to a portable device.
For Win 7 or later (64-bit)
For macOS 10.12 or later
Method 2: Correct Color Distortion in Videos Using Premiere Pro
Premiere Pro provides color correction tools that allow users to edit footage directly on their timeline. To learn how to correct color distortion in video using Premiere Pro, follow these steps:
Step 1. Import Your Video Files
Use the Import command to bring video files on your device into your project; this will make the video files available to the Premiere Pro project. This timeline-based video editing software application allows you to import an entire folder, multiple files, or a single file. You can import video files using the Import command or the Media Browser.
Step 2. Head to Color Correction Effect
Once you have imported your video, place it on the timeline. Apply color correction effects to the video you placed in the Timeline. You can also select your video and drag and drop the effect you want to the Video Effects selection under the Effects Control Panel. Here are some of the color correction effects you can apply:
Brightness and Contrast Effect: With this effect, you can adjust the contrast and brightness of your video. Using this effect allows you to make adjustments to all pixel values in your video image at once — mid-tones, shadows, and highlights.
Color Balance Effect: This effect changes the amount of blue, green, and red in the shadow, highlights of an image, and mid-tones. Preserve Luminosity preserves the average brightness of your video image and changes the color. It maintains the tonal balance in your video image.
Method 3: Correct Color Distortion in Videos Using Final Cut Pro
Developed by Macromedia and later Apple, Final Cut Pro is a non-linear video editing software that allows you to log and transfer videos onto a hard drive, where you can edit them, process them, and output the videos to various formats.
The software provides non-destructive and non-linear editing of QuickTime-compatible video formats. These include 8K, 5K, 4K, 2K, XDCAM (via plug-in), P2 MXF (DVCProHD), HDV, and DV film formats. Final Cut Pro can also import projects from iMovie for iPadOS and iOS. It also comes with multiple color correction tools, such as color wheels, video scopes, and sliders and curves.
With that in mind, let’s look at how to correct color distortion in videos using Final Cut Pro.
Step 1. Open Your Video in Final Cut Pro
Click on the ‘Window’ tab at the top of your screen and select the video you’d like to edit from the drop-down menu.
Step 2. Switch to Color Effects Work Space
Go to the Window panel and select the Workspaces option. Then, choose the Color & Effects option. Here, you can adjust a range of scopes, including the Luma Waveform, Vectorscope, and RGB Overlay.
Step 3. Correct the Color
Head to the color panel and click the drop-down menu next to No Corrections. Select Color Wheels, where you’ll be able to control various parts of your video clips individually.
The Shadows wheel allows you to control the darker shades of your footage, Highlights controls the bright shades of your footage, and the Midtones wheel allows you to adjust the Luma channels in the middle of your video clip. The Master wheel allows you to adjust hue, saturation, and Luma channel (exposure).
In addition to the color wheels, you’ll find more controls below that help you adjust the white balance.
Step 4. Save Your New Video File
After you’ve made these adjustments to your video, it’s time to save and export the file. Click on the ‘File’ tab at the top of your screen and choose ‘Export. Once you click ‘Export,’ you’ll be saving the file to your hard drive. Once it’s done, click ‘Save.’ The file will automatically be saved on your desktop.
Conclusion
● If you are experiencing color distortion, you can use any of the three methods above to correct it. Filmora is one of the most popular video edit tools that people use to correct color distortion videos.
Also read:
- Updated Adding Slow Motion in DaVinci Resolve A Comprehensive Overview for 2024
- Updated Doable Ways to Create Transparent Background in Procreate
- 2024 Approved How To Change Font In Premiere Pro
- Updated 2024 Approved How to Create a Glitch Text Effect?
- New Updated 8 Ways to Merge SRT with MP4 for 2024
- In 2024, The Best Wedding LUTs for Premiere Pro
- In 2024, Facts About GIF Background You Didnt Know
- If You Are Looking for an Open-Source, Cross-Platform Video Editor, Shotcut Is a Great Choice for 2024 But Is It Truly the Best Video Editor or Is There a Better Alternative Available?
- New How to Get VHS Filter and Glitch Filter to Your Images or Videos?
- New This Article Introduces How Sheila Become a Youtuber and How She Started Video Editing
- New for 2024
- Best Tools To Create Blend Image Collage for 2024
- How to Start a Video Editing Career for 2024
- Updated Are You Looking to Enhance Your Video or Photo Colors Using Premiere LUTs? Get to Know About the Best Free LUT Effects to Get Started
- Step by Step to Rotate Videos in Davinci Resolve
- Updated In 2024, How to Create The Best Video Collages ?
- New If You Dont Know How to Blur a Part of a Video, Youre in the Right Place. We Have Provided All the Details You Need to Help You Blur a Still or Moving Portion of Your Video
- New Step by Step to Rotate Videos in Windows Media Player
- Do You Have a Loved Ones Birthday Fast Approaching, and Youre Wondering What to Do? A Birthday Photo Slideshow Is One Good Way to Celebrate the Person and Make Them Feel that They Are Loved
- 2024 Approved Are You Tired of Spending Too Much Time on Video Editing? Learn the Most Effective Ways to Manage Your Timeline and Streamline Your Video Editing Process
- Minecraft Pixel Art Is a Trending Subject, and They Simply Consist of In-Game Pixel Artworks, Besides the Minecraft Houses, Farms, or Cities. Lets Explore the Fantastic World of Minecraft Pixel Art
- Updated The Frames per Second Can Enhance or Hamper Your Ability to Enjoy Watching a Video on YouTube. This Article Will Define Frame Rates and Help You Choose the Best FPS
- In 2024, How to Slow Down Time-Lapse Videos on iPhone
- 2024 Approved Do You Want to Know Where You Can Find Online Video Editing Courses? In This Article, We Have Provided 15 Options for Your Various Demand. We Also Recommend a Great Video Editor to Help You Start Your Video Editing Journey with Ease
- New In 2024, Working Through the Details of iMovie Slow Motion Video Making 100 Effective
- New 2024 Approved Turn Your Text Into a Podcast Made Possible (+ EASY Editing Tips)
- New 2024 Approved Learning How to Create LUTs with LUTs Generator
- Updated 2024 Approved How to Make After Effects Gifs
- New Do You Want Your Music Videos to Look Like Professional Music Videos? You Can Always Choose From Music Videos LUTs to Give Your Videos a Cinematic Touch
- Possible solutions to restore deleted call logs from Itel S23+
- In 2024, How to Bypass Google FRP Lock on Samsung Galaxy A34 5G Devices
- How to Unlock iPhone X Passcode without iTunes without Knowing Passcode?
- In 2024, 3 Methods to Mirror Honor 90 GT to Roku | Dr.fone
- 4 Ways to Transfer Music from Sony Xperia 5 V to iPhone | Dr.fone
- Unlock Your Vivo S17 Phone with Ease The 3 Best Lock Screen Removal Tools
- In 2024, How To Unlock Realme V30T Phone Without Password?
- The way to convert MTS for Samsung Galaxy Z Flip 5
- In 2024, How to Cast Apple iPhone 15 to Chromecast? | Dr.fone
- How to Change/Fake Your Vivo S17e Location on Viber | Dr.fone
- How Can We Unlock Our Xiaomi Redmi A2+ Phone Screen?
- Best OnePlus 12 Pattern Lock Removal Tools Remove Android Pattern Lock Without Losing Data
- 2024 Approved Reaching a Wider Audience Using Video Translation in Tamil
- In 2024, How Do You Get Sun Stone Evolutions in Pokémon For Apple iPhone 11? | Dr.fone
- How to Retrieve deleted photos on Samsung
- How to Detect and Remove Spyware on OnePlus 11R? | Dr.fone
- Reasons for Samsung Galaxy A15 4G Stuck on Startup Screen and Ways To Fix Them | Dr.fone
- A Quick Guide to Honor X50i FRP Bypass Instantly
- How to Change Netflix Location to Get More Country Version On Infinix Note 30 VIP | Dr.fone
- In 2024, How to Migrate Android Data From Honor X50 to New Android Phone? | Dr.fone
- Full Guide to Bypass Vivo Y78t FRP
- Remove Device Supervision From your Apple iPhone 14
- Tecno Spark 20 Pro+ ADB Format Tool for PC vs. Other Unlocking Tools Which One is the Best?
- Play Store Not Working On Xiaomi Mix Fold 3? 8 Solutions Inside | Dr.fone
- How to Mirror Your Honor V Purse Screen to PC with Chromecast | Dr.fone
- Title: Updated 2024 Approved Adding Text to Your Collage Not only Makes It Look Sophisticated but Also Versatile. So, if You Too Are Looking for Ways to Create a Collage Text, Check Out Our Article
- Author: Chloe
- Created at : 2024-04-24 07:08:30
- Updated at : 2024-04-25 07:08:30
- Link: https://ai-editing-video.techidaily.com/updated-2024-approved-adding-text-to-your-collage-not-only-makes-it-look-sophisticated-but-also-versatile-so-if-you-too-are-looking-for-ways-to-create-a-col/
- License: This work is licensed under CC BY-NC-SA 4.0.
