
:max_bytes(150000):strip_icc():format(webp)/GettyImages-165567842-58e5bd253df78c51625e84ab.jpg)
Updated 2024 Approved An Ultimate Guide to Flexclip Online Trimmer
An Ultimate Guide to Flexclip Online Trimmer
Flexclip video trimmer is a robust and easy-to-use online tool that lets you cut the unwanted section of any of your videos to get the desired result.
Pros
- Online trimming - no need for software.
- No ads during the editing process.
- Real-time preview of what is happening.
- Additional robust video editing features.
- Simple and intuitive UI.
Cons
- The free version lacks advanced features.
- Video export duration is limited to 1 minute in the free version.
- Signup is required for exporting videos.
Part 1. What is Flexclip Video Trimmer?
Do you want to trim your videos quickly without downloading and installing any complicated software? Well, Flexclip Trimmer might be your answer.
Flexclip is a free-to-use online video editing tool that makes it effortless for you to trim, crop, and edit your videos. The editor has an intuitive and user-friendly interface, making it easy to use even for beginners.
Besides video trimming, Flexclip has numerous other features video trimming, including support for a wide range of video formats, slideshow making, screen and voice recording, royalty-free music, pictures and video libraries, and other advanced tools.
Price: You can use the Flexclip trimmer for free. However, export duration is limited to 1 minute, and a watermark will be added to it.
Besides the free version, Flexclip comes with three pricing tiers:
- Basic: $5.99/month or $71.88/year.
- Plus: $ 9.99 /month or $119.88/ year.
- Business: $ 19.99 /month or $239.88/year.
Part 2. Key Features Of Flexclip Video Trimmer
As a powerful and easy-to-use online video trimmer, Flexclip has helped numerous users make great videos without too much hassle.
Therefore, if you’re looking for a video trimmer with all the bells and whistles, this editor must be at the top of your list. Here are some of the key features that make Flexclip Free Video Trimmer stand out from the rest:
Online Video Cutter: Flexclip Video Trimmer eliminates the need to download complex software to cut videos. Head to the website, upload your video, and let the trimmer do its magic.
Safe and Secure to Use: Flexclip editor provides guaranteed security from any malware or data breach.
Easy to Use: Flexclip trimmer is designed with simplicity in mind. Even if you’ve never edited/trimmed a video before, you’ll be able to figure out how to use this tool in no time. Upload your footage, and with a few clicks/adjustments, you will get it trimmed.
Completely Free: Flexclip offers the trimming tool completely free, and no annoying ads will be displayed during the editing process.
Real-Time Preview: Not only is the Flexclip video trimmer convenient to use, but it also provides a real-time preview of the project, so you can see exactly how your edits will look before you save them.
Multiple Video Formats Support: Flexclip Video Trimmer is a versatile and powerful tool that supports a vast range of video formats, including MOV, WEBM, M4V, and MP4.
Part 3. How To Use Flexclip Trimmer To Trim Videos?
Videos are an excellent way to share memories, tell stories, or just have some fun. But sometimes, you might want to trim a clip to make it shorter, edit out certain parts, or just give it a different look. Flexclip’s video trimmer is a splendid way to do this in just a few steps:
Step1 First, ensure you have a stable internet connection. Now, launch a browser of your choice on your PC and visit theFlexclip Video Trimmer website.
Step2 Now, drag and drop your video clip or click the “Browse Video” option to find and upload the video from your computer in the supported MP4, M4V, MOV, or WEBM video formats.

Step3 Next, wait for a few seconds to complete the video uploading process. You will be taken to the editing interface, and the trimming window will pop up. If not, click the Scissor icon below the video.
Step4 Use the handles on either side of the video timeline to select the part of the video you want to keep. Next, click the “Trim Video” button to apply your changes.

Step5 You can also use the trimming tool to split the video into multiple clips. Once you’re done, click “Export” to save your project.
You’ll be asked to sign in to export the video. Create a new account or use the existing one and click “Export” again.
Step6 Finally, select the video resolution but bear in mind that the free version only allows 480p resolution for exporting a clip. Click the Export option and wait for the process to complete. You can also share your video to Youtube, Dropbox, or Google Drive.

Bonus Tips: Best Flexclip Video Trimmer Alternative On Desktop
A desktop video editor has a number of advantages over an online editor, such as:
- More control over the editing process.
- Can Fine tune your edits with more precision.
- Support for a wider range of video and audio formats.
- More flexibility.
- A more comprehensive set of features than online editors.
Filmora is an excellent desktop alternative to the Flexclip video trimmer and includes more advanced features with a user-friendly interface. The software also supports a bit more video formats and higher video output resolution.
Here’s how you can use Filmora to trim your video:
Step1 Download and install the Filmora software from the official website. Click the “New Project” option and select your video to upload. Next, drag and drop the clip to the timeline.

Step2 Hover your mouse near the starting or ending edges and drag the trim icon to cut your video into the desired length. You can also use the Split option to remove the unwanted part in the middle of your clip.

Step3 Once you are done with your video trimming, click the Export option. Select the format from the left-hand side menu and click Export again.
You can also export your videos with YouTube, Vimeo, DVD, or your device.
Conclusion
In this article, we’ve explored the Flexclip video trimmer online tool, its key features, and how to use it to trim videos with simple instructions. We also discussed the best Flexclip video trimmer alternative on desktop - Filmora and provided a step-by-step guide to help you cut an unwanted section from your clip.
Hopefully, you found this comprehensive guide useful and that you now know everything you need to know about trimming videos with Flexclip.
Free Download For Win 7 or later(64-bit)
Free Download For macOS 10.14 or later
Part 1. What is Flexclip Video Trimmer?
Do you want to trim your videos quickly without downloading and installing any complicated software? Well, Flexclip Trimmer might be your answer.
Flexclip is a free-to-use online video editing tool that makes it effortless for you to trim, crop, and edit your videos. The editor has an intuitive and user-friendly interface, making it easy to use even for beginners.
Besides video trimming, Flexclip has numerous other features video trimming, including support for a wide range of video formats, slideshow making, screen and voice recording, royalty-free music, pictures and video libraries, and other advanced tools.
Price: You can use the Flexclip trimmer for free. However, export duration is limited to 1 minute, and a watermark will be added to it.
Besides the free version, Flexclip comes with three pricing tiers:
- Basic: $5.99/month or $71.88/year.
- Plus: $ 9.99 /month or $119.88/ year.
- Business: $ 19.99 /month or $239.88/year.
Part 2. Key Features Of Flexclip Video Trimmer
As a powerful and easy-to-use online video trimmer, Flexclip has helped numerous users make great videos without too much hassle.
Therefore, if you’re looking for a video trimmer with all the bells and whistles, this editor must be at the top of your list. Here are some of the key features that make Flexclip Free Video Trimmer stand out from the rest:
Online Video Cutter: Flexclip Video Trimmer eliminates the need to download complex software to cut videos. Head to the website, upload your video, and let the trimmer do its magic.
Safe and Secure to Use: Flexclip editor provides guaranteed security from any malware or data breach.
Easy to Use: Flexclip trimmer is designed with simplicity in mind. Even if you’ve never edited/trimmed a video before, you’ll be able to figure out how to use this tool in no time. Upload your footage, and with a few clicks/adjustments, you will get it trimmed.
Completely Free: Flexclip offers the trimming tool completely free, and no annoying ads will be displayed during the editing process.
Real-Time Preview: Not only is the Flexclip video trimmer convenient to use, but it also provides a real-time preview of the project, so you can see exactly how your edits will look before you save them.
Multiple Video Formats Support: Flexclip Video Trimmer is a versatile and powerful tool that supports a vast range of video formats, including MOV, WEBM, M4V, and MP4.
Part 3. How To Use Flexclip Trimmer To Trim Videos?
Videos are an excellent way to share memories, tell stories, or just have some fun. But sometimes, you might want to trim a clip to make it shorter, edit out certain parts, or just give it a different look. Flexclip’s video trimmer is a splendid way to do this in just a few steps:
Step1 First, ensure you have a stable internet connection. Now, launch a browser of your choice on your PC and visit theFlexclip Video Trimmer website.
Step2 Now, drag and drop your video clip or click the “Browse Video” option to find and upload the video from your computer in the supported MP4, M4V, MOV, or WEBM video formats.
Step3 Next, wait for a few seconds to complete the video uploading process. You will be taken to the editing interface, and the trimming window will pop up. If not, click the Scissor icon below the video.
Step4 Use the handles on either side of the video timeline to select the part of the video you want to keep. Next, click the “Trim Video” button to apply your changes.
Step5 You can also use the trimming tool to split the video into multiple clips. Once you’re done, click “Export” to save your project.
You’ll be asked to sign in to export the video. Create a new account or use the existing one and click “Export” again.
Step6 Finally, select the video resolution but bear in mind that the free version only allows 480p resolution for exporting a clip. Click the Export option and wait for the process to complete. You can also share your video to Youtube, Dropbox, or Google Drive.
Bonus Tips: Best Flexclip Video Trimmer Alternative On Desktop
A desktop video editor has a number of advantages over an online editor, such as:
- More control over the editing process.
- Can Fine tune your edits with more precision.
- Support for a wider range of video and audio formats.
- More flexibility.
- A more comprehensive set of features than online editors.
Filmora is an excellent desktop alternative to the Flexclip video trimmer and includes more advanced features with a user-friendly interface. The software also supports a bit more video formats and higher video output resolution.
Here’s how you can use Filmora to trim your video:
Step1 Download and install the Filmora software from the official website. Click the “New Project” option and select your video to upload. Next, drag and drop the clip to the timeline.
Step2 Hover your mouse near the starting or ending edges and drag the trim icon to cut your video into the desired length. You can also use the Split option to remove the unwanted part in the middle of your clip.
Step3 Once you are done with your video trimming, click the Export option. Select the format from the left-hand side menu and click Export again.
You can also export your videos with YouTube, Vimeo, DVD, or your device.
Conclusion
In this article, we’ve explored the Flexclip video trimmer online tool, its key features, and how to use it to trim videos with simple instructions. We also discussed the best Flexclip video trimmer alternative on desktop - Filmora and provided a step-by-step guide to help you cut an unwanted section from your clip.
Hopefully, you found this comprehensive guide useful and that you now know everything you need to know about trimming videos with Flexclip.
Free Download For Win 7 or later(64-bit)
Free Download For macOS 10.14 or later
How to Export Video From iMovie
We live in a digital technology world where various applications do everything, and it has made our lives simpler and hassle-free to a certain extent. One of the path-breaking digital technologies is sharing your ideas and thoughts in a video format. You can now create your videos in any format and export them to your friends, colleagues, and family members. Moreover, you can also export your videos to any secondary device so that your hard drive does not get congested with heavy files.
So, if you want to know how to export iMovie, we will give you a step-by-step guideline to satisfy your requirements. One of the most significant aspects of iMovie is that you can edit your videos at your convenience. You can create professional videos, enhance your creativity, and showcase your talent to the world. You can add videos and photos and edit them according to your story.
Part 1. How to Export iMovie Video from iPhone?
Once you design the shape of your story, it is time you make the world know about your creativity. Since iMovie has loads of exciting tools and features, you can create videos with a professional touch. With the help of your iPhone, you can easily export iMovie videos in various ways. Following are the ways how to export iMovie:
1. Send video via email or text message
You can easily send video via email or text message from your iPhone. Following are the steps:
- Tap on the movie that you want to send.
- It would be best if you tap on the share option, which will redirect you to your email page.
- Complete the steps of the email by filling in the required details.
- Once your file is attached, tap on the send button.
2. Export video to another device
With the help of the iPhone, you can easily export iMovie videos to other devices. It saves the hard disk space of your iPhone and, simultaneously, gives you the advantage of restoring your videos if your video gets deleted from your iPhone. Following are the steps to export your iMovie videos from iPhone to other devices. One of the best options is to export your videos to other devices using the AirDrop option.
- Tap the video you want to export from the Project browser of your iPhone.
- Tap the share button after selecting the video that you want to export.
- Choose the resolution of the video that you want to share.
- Tap on the frame rate
- Turn on the HDR output for the particular video.
- Tap on Done
- Select the AirDrop option and tap on the device you want to transfer.

- You must ensure that the AirDrop option is turned on for both devices.
3. Export video to the web
Since iMovie is versatile video editing software, you can quickly transfer them anywhere, including any social networking site. It is an excellent way of showcasing your masterpiece to the world. However, if you plan to upload your video to any social networking site, you must ensure that you have an account with it. The following steps will help you export your iMovie videos to the web.
- Select any of your favorite social networking sites.
- Click on create and select Upload Video.
- Select the video that you want to upload.
- Click on Next to upload your iMovie video.
Part 2. How to Export iMovie Video from Mac?
1. Send video via email
Mac offers you the comfort to send your videos to your friends, colleagues, and loved ones via email. You can create professional videos and send them instantly. However, you must make sure that the videos do not have a high resolution, otherwise it will take some time to transfer the files.
Following are the steps for exporting the iMovie video via email.
- Download the Google Drive app to your iPhone
- Choose the video that you want to transfer to Google drive.
- Tap on the arrow following the name of the video.
- Slide the bar from offline to online
- Tap on the Export icon.
- Tap on Share
- You need to type the email address of the recipient you want to share your iMovie video.
- Tap on the Add option.
- The recipient will get your video instantly.
2. Add the movie to your Photos library
You can add your creative iMovie videos to the Photos library on your Mac, giving you the freedom to store your videos for later use. Following are the steps to add iMovie videos to your Photos library.
- From the Project Browser, select the iMovie video that you want to add to your Photos Library.
- Click on the ‘More’ option and choose the Share Project.
- Click on File.
- Choose a Resolution from the Resolution pop-up menu to define the size of your video. If you select a resolution video, the file size will be less and load onto your photos library fast. However, you need to choose a higher resolution video for excellent viewing.
- Choose a location to save your iMovie video.
- Drag the file that you want to transfer to the photos library.
3. Share video to web
iMovie allows you to share your videos on the web using any social networking platform. Following are the steps to share your videos on the web.
- Click on the iMovie video that you want to export.
- Click on the share button.
- Open your choice of any social networking site.

- Choose a location to save your file by clicking on ‘save’
- Upload the file that you want to share on the social networking site.
Part 3. iMovie Alternative to Edit Videos on Mac
If you find that iMovie export video is not your cup of tea, one of the best alternatives to edit your videos is to use Filmora . The advantage of using Filmora is that you can easily edit your videos. Moreover, you do not have to have previous experience in video editing as the application is easy to use. You can easily download Windows Filmora from the net and use it like a professional. It has some of the most exciting tools that will help you to make videos according to your convenience.
Free Download For Win 7 or later(64-bit)
Free Download For macOS 10.14 or later

With the help of Filmora, you can easily create and transfer your videos in any format. You can even edit any particular area of the videos and add subtitles and music to give it a professional look. One of the most exciting features of Filmora is that the application has one of the best special effects that will enhance the pro touch of your video. You can even make tutorials and other educational videos for your students. It is because you can add your audio and use it best for educational purposes. It is the best application for professionals as well as beginners.
Moreover, you can export the videos in any of the formats of your choice for better viewing, as it works on any given platform. Filmora is great at creating and editing Youtube videos, professional videos, and other videos on social networks. It is one of the best applications for editing your videos.
Conclusion
Apple’s iMovie is one of the most exciting video editing applications that will enhance your creativity. It offers a wide range of tools to create and edit videos according to your choice. Therefore, with the help of iMovie export, you can explore your creativity and showcase the world of your talent. Moreover, it allows you to export files in any video format so you can play them on any device.
Therefore, it is time to empower your imagination and give it a professional look with Apple’s iMovie application. Overall, iMovie is excellent software that is apt for any business or educational institution to enhance its growth. It is the best way to share your ideas and thoughts visually.
Free Download For Win 7 or later(64-bit)
Free Download For macOS 10.14 or later
Free Download For macOS 10.14 or later
With the help of Filmora, you can easily create and transfer your videos in any format. You can even edit any particular area of the videos and add subtitles and music to give it a professional look. One of the most exciting features of Filmora is that the application has one of the best special effects that will enhance the pro touch of your video. You can even make tutorials and other educational videos for your students. It is because you can add your audio and use it best for educational purposes. It is the best application for professionals as well as beginners.
Moreover, you can export the videos in any of the formats of your choice for better viewing, as it works on any given platform. Filmora is great at creating and editing Youtube videos, professional videos, and other videos on social networks. It is one of the best applications for editing your videos.
Conclusion
Apple’s iMovie is one of the most exciting video editing applications that will enhance your creativity. It offers a wide range of tools to create and edit videos according to your choice. Therefore, with the help of iMovie export, you can explore your creativity and showcase the world of your talent. Moreover, it allows you to export files in any video format so you can play them on any device.
Therefore, it is time to empower your imagination and give it a professional look with Apple’s iMovie application. Overall, iMovie is excellent software that is apt for any business or educational institution to enhance its growth. It is the best way to share your ideas and thoughts visually.
Free Download For Win 7 or later(64-bit)
Free Download For macOS 10.14 or later
Windows Movie Maker Review
Are you considering creating impressive movies from your video clips? Then you need to install this famous Windows movie maker tool to fulfill your job. This is expert video editing Microsoft software that you may use for free. This video editing tool by Windows has received massive recognition due to its simplicity. Also, it makes every task easy and quick, like combining video clips to form digital movies, including various effects, background music, transitions, and titles.
So, Windows Movie Maker is undoubtedly the ideal software for this job. Moreover, video editors using this app experience several attributes in their organization to finally emerge with the perfect videos, like audio options, animations, transitions overlays, and timeline narration. It has user-friendly features, which you’ll enjoy experimenting with. This software also has XML code allowing its end users to modify live effects and transitions or even prepare very new ones.
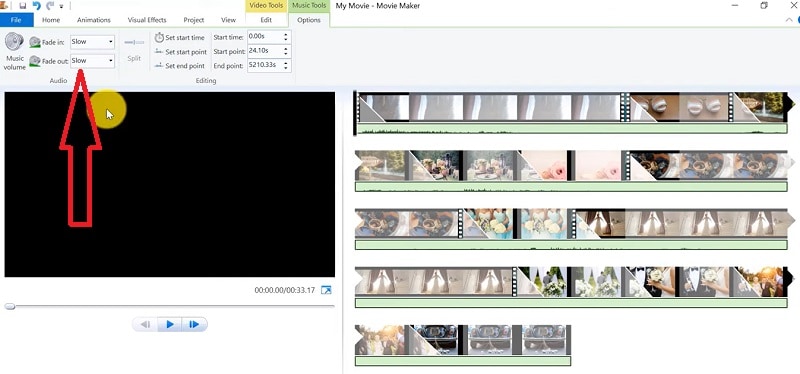
This brilliant tool can even do primary track editing, including fade-out and fade-in effects in your final audio tracks. Windows movie maker even allows you to post your final project effortlessly on various video sites and social media platforms. Here’s a complete guide:
1. Download and Install Windows Movie Maker
Windows movie maker was previously recognized in Windows 7 as Windows Live Movie Maker. So to experience the features of this software, first, you need to download and install this app which is available free of charge. The steps are as follows.
- Firstly, download the setup file of Windows Live Essentials.
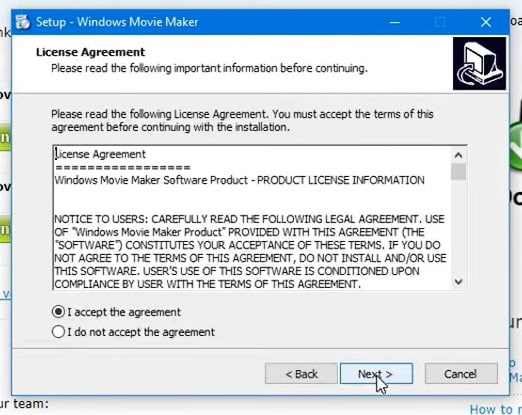
- You’ve to double-click on this setup file called windows-movie-maker.exe. Then tap on ‘Yes’ to permit the setup package to function.
- You’ll now be redirected to the installation window of Windows Essential. Next, you’ll see two options towards the web page’s top, and you’ll have to select the option ‘Install all of Windows Essentials (recommended)’ to continue with the installation process.
Windows Essentials comprise Microsoft OneDrive, Outlook Connector Pack, Movie Maker, Writer, Mail, Photo Gallery, and Messenger.
- Locate ‘View Details’ towards the left end of the page and tap on it. A progress and percentage bar will pop out along with the details regarding the program you’re installing.
- You need to wait a while to install Windows Movie Maker Software. Pause until the program completes its installation. After you find that the program title changes to another program such as Mail, you may proceed again.
- Now click on the Windows icon and then the ‘Start’ menu on the bottom left of your computer screen.
- Type and Search for ‘Windows Movie Maker, and you’ll find the newly downloaded app on the screen.
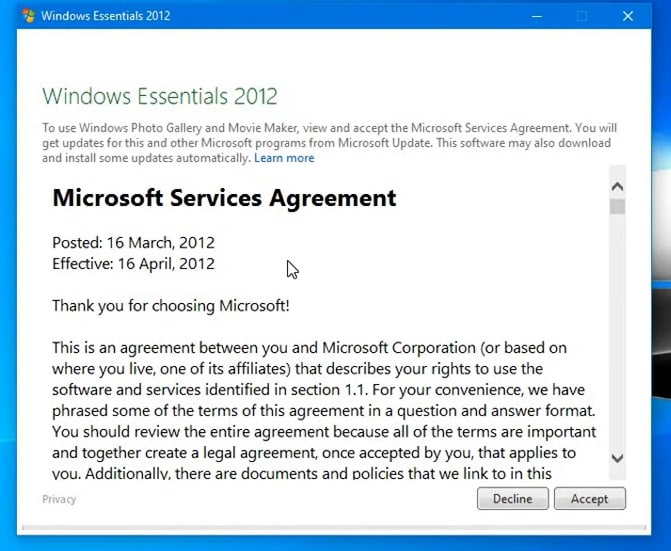
- Click on the icon with film reel, which is the Movie Maker app, and you’ll locate it above the Start menu. Next, you’ll be redirected to the terms of use of Windows Essentials for this Window to begin.
- Find the ‘Accept ‘ button towards the screen’s right-end corner and tap on it. Windows Movie Maker will now open.
- Next, tap on ‘Close’ when prompted with an error message from the installation windows.
You may now Enjoy Windows Movie Maker Live and begin making movies and videos using this software.
2. Interface
The user interface of Winona Movie Maker has three essential areas: the timeline and the storyboard, the panes and the toolbar, and the menu bar. This area covers…
- Timeline and storyboard: It offers a timeline and storyboard usage details for working with the current project clips.
- Panes: It offers details regarding Collections pane usage for viewing all your collections. Furthermore, it offers information regarding the Movie Task pane for all general tasks during movie making or project editing.
- Toolbar and Menubar: Here, you’ll get details regarding toolbar and menu commands usage for different tasks in this software.
3. Basic Editing
Adding clips to your timeline is the most straightforward method for creating digital movies using Movie Maker. Thereby, picking any one AutoMovie Themes out of those seven choices from default, sepia, black and white, pan and zoom, fade, cinematic, and contemporary.
You can enjoy the following choices for editing all your video clips:
- Creating clips: You may create new clips from different video clips after you’re done with capturing and importing in the Windows Movie Maker. You may create clips in the software anytime, according to your convenience.
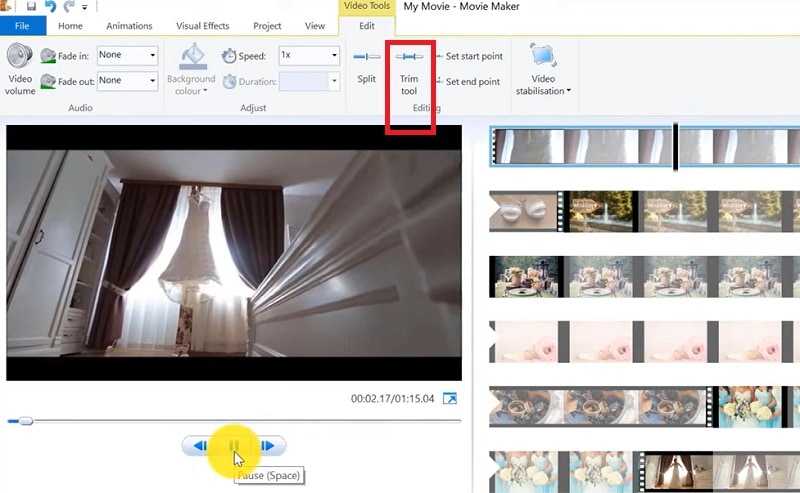
- Trimming any clip: You may hide any clip part you don’t wish to keep in the project. For instance, you may trim the clip’s end or beginning. Also, trimming doesn’t erase the details provided in their source material.
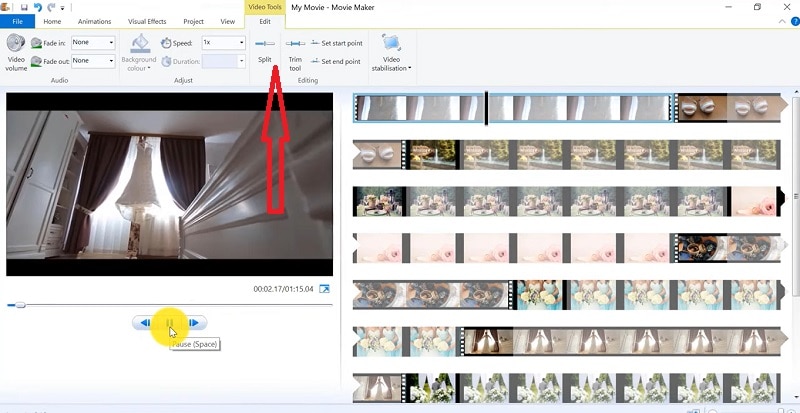
- Splitting Clips: Movie Maker allows you to split any video into two parts which can be helpful when you wish to add a video transition picture between the clips.
- Combining clips: Movie Maker allows you to merge two or multiple contiguous clips. Contiguous indicates that you need to record these clips together so that the beginning and end times are the same as the following video clip.
4. Add Video Effects
Video effects’ ascertain how any title, picture, or video clip displays in the final movie or project. Video effects permit you to include various effects in the movie and are added for the total time that the title, picture, or video clip displays.
Furthermore, you may add various other effects, which you’ll find in the folder of video effects in their Collections pane. You may maintain video effects when moving, copying, cutting, or splitting a picture or video clip.
5. Audio Editing
Windows Movie Maker permits you to operate various audios in several ways. A few specific audio-related jobs you may execute in Windows Movie Live Maker comprise the following:
- Audio levels adjustment: You can adjust your audio level so that you can easily control the audio playback and balance after you have the audio that comes up on Music/ Audio and Audio tracks in your timeline.
- Timeline narration: You may include a voice narration for the picture or video clips, which will appear on the timeline’s video track. There’ll be an automated synchronization of the audio narration with your video, where the narration shall elaborate on the movie event or action when you play it.
- Audio Clips Volume adjustment: You may adjust the audio volume for the video clip’s audio portion or the clips containing only audio. This permits you to control the audio clip’s volume such that you can hear it based on the sound level you’ve set for your audio clip.
- Adding audio effects: You may add various audio effects like mute, fade out and fade in.
6. Share Files
Are you done with video project editing, and now you wish to share it? Windows Movie Maker offers you various choices for sharing straight away from their app, comprising:
- YouTube
- Vimeo
So with this power, you may guarantee to share the video’s correct aspect ratio and size version to any planned platform. Nevertheless, you don’t require signing in to your Microsoft account for sharing to the preferred platform, which may act as a hurdle for all its users who do not have Microsoft Office accounts.
7. Pros and Cons
The software’s advantages are its automated preview, simple controls, and user-friendliness. Additionally, the following are some clear advantages and disadvantages of using Windows Movie Maker:
Pros
- This app is perfect for all novices and is an ideal introduction as it utilizes several pro editing systems’ general workflow components like assembling timelines and importing. Its interface has easy navigation and is exceptionally intuitive for most new beginners as well.
- Windows Live MovieMaker is a video editing Microsoft application that arrives standard with all Windows computers. It is amongst the most favorite editing apps obtainable and exact, as other programs are user-friendly and fun. This software comes free with Vista, XP, and Windows Me and has effortless usage. Moreover, you may download additional video plugins, plus it won’t give you any chance to complain regarding its free software.
- This app is straightforward to learn, and you won’t require any experience in film editing for using Windows Media Player. You’ll explore more than 130 effects with accessible Fantastic credits, titles, and transitions. Next to this, you may drag and then drop the clip at any place in the timeline.
- Windows Movie Maker is an ideal app for image slide shows and was developed to create photo and home movie slide shows. It presents excellent fun transitions and themes; you may add music easily. This app provides excellent variety, being a free editing application. Furthermore, it offers transitions and striking effects to function with.
- Windows Live Movie Maker is free of cost for all Microsoft Windows users and is basically for clients having zero to minimum experience editing audio and videos. Moreover, it has many special effects you may use while creating videos. Also, you may frag and then place any picture or video anywhere you wish to see it.
- You can choose from several themes, enhancing your film with tools like contemporary themes, fade effects, and sepia toning choices. You have to click once, and then the users can choose and apply from the multiple effects collection.
Cons
- Windows Movie Maker contains unlimited audio and video tracks, yet it provides just one accessible one at a time. Hence, if you wish to include some other audio or music track, you may prepare the video, thereby sending it to the ultimate file.
- It isn’t uninstallable using any remove or add control panel. Also, it is impossible to do video overlaying.
- This app requires much patience because it is prone to crashes. Moreover, you’ll require enough time and effort to do video reversing. It often becomes frustrating for all advanced editors to cut clips into small parts and then add them back. Hence, Windows Movie maker isn’t good for professional video editors.
- Windows Live MovieMaker can crash and freeze and is known to suffer frequent crashes. Hence, ensure saving often and avoid creating complex videos. Also, you cannot perform complex editing and can now prepare single audio and video track.
8. Windows Movie Maker Alternative Software
Wondershare Filmora Video Editor is the best alternative for Windows Movie Live Maker and is a highly favored and most effective software program. You can download it for free, and it is adaptable with Windows 7 OS or above. This app is user-friendly but powerful and allows you to split, merge, crop, and trip various video clips with essential built-in video editing attributes.
Free Download For Win 7 or later(64-bit)
Free Download For macOS 10.14 or later
Additionally, you may get a few advanced properties like video stabilization, color correction, and green screen in Filmora effortlessly. You may even explore several fashionable and modern video effects such as music, text, and intros for topics like games, Education, Travel, Vlogger, Beauty, etc. Here is the comparison between the two software:
Filmora and Windows Movie Maker comparison
| Basis | Windows Movie Maker | Wondershare Filmora |
|---|---|---|
| Pricing | Free/ inexpensive | Quote basedAnnual SubscriptionOne-time paymentMonthly Payment |
| Interface | Pleasing interface | Auto movie options |
| Effects | Several overlays and effects | Special effects choices and transition overlays |
| Integration | YouTubeFacebookVimeoEmail | TwitterInstagramFacebookVimeoYouTube |
Conclusion
You may use Windows Movie Maker Live for capturing videos and audio to the computer using various video sources, including Web Cameras and Video Cameras, thereby using the recorded data in your new movies. You may import still pictures, video, and audio into this application to use in the movies you’re making. Moreover, after you’ve finished with video and audio content editing in this app, which may involve adding effects, video transitions, and titles, you may finally save the ultimate movie and then share and watch it with your family and friends.
How to Livestream Zoom on Facebook?
Abundant Video Effects - Wondershare Filmora
Provide abundant video effects - A creative video editor
Powerful color correction and grading
Detailed tutorials provided by the official channel
There are numerous ways to connect with viewers across the globe through online platforms. One such platform is Facebook live stream videos through which a single person can connect with the whole world and can talk to the people live. Through live stream videos on Facebook, people can show cooking or makeup tutorials that millions of people can join to watch easily.
Also, through such videos, many teachers prefer to demonstrate a particular concept so that students can respond instantly. However, if you want a clearer vision for better understanding, you can zoom on Facebook live stream videos by reading instructions from this article.
In this article
Part 1: Zoom in Facebook Livestream from Browser
Part 2: How to Zoom in Facebook Livestream on Android
Part 3: How to Zoom in Facebook Livestream on iPhone
Part 1: Zoom in Facebook Livestream from Browser
The easiest way to zoom in on Facebook Livestream videos is via browser. In this part, we will describe two methods for zooming in on Facebook Livestream videos that are manual and through a browser extension.
Method 1: Manual Method
In this first method, you can zoom on Facebook videos through your desktop manually. Read the following steps to perform this method:
Step 1: Open your Facebook account by entering your username and password. Now play the livestream video on which you want to zoom in.
Step 2: For Windows users, press the “CTRL” and “+” buttons simultaneously to zoom on the Facebook video. Whereas, for Mac users, press the “COMMAND” and “+” buttons at the same time to zoom in. A small pop-up window will display at the top right corner from where you can control the zoom value.

Method 2: Browser Extension
In this particular method, we will use a browser extension called “Zoom,” through which you can quickly enjoy the zoom experience on the Facebook live stream videos. This special browser extension is a lightweight extension that can assist you in browsing the web pages by zooming in and out conveniently. By using this extension, you can change the zoom value through its slider up to 400 easily.
Step 1: First, you need to install the browser extension of Zoom on your PC. Click on the “Add to Chrome” option to download and install this extension on your Chrome browser.

Step 2: Open your Facebook account and play your live stream video. On the top right corner, you can see the “Extension” icon where all your added extensions are pinned. Select Zoom extension, and through its displayed slider, you can increase the zoom value easily. You can also press the “+” button from your keyboard to zoom in on the Facebook video through this extension.

Part 2: How to Zoom in Facebook Livestream on Android
If you are watching live stream videos of Facebook on an Android device, you can also zoom in by modifying your phone’s settings. To do so, here are basic steps:
Step 1: From your Android phone, reach out to the “Settings” to open its menu. From this menu, find the option of “Accessibility” from “Additional Settings” and click on it.

Step 2: On the accessibility screen, tap on the option of “Vision” and then locate the section called “Display.”

Step 3: Now, find the option of “Magnification” and tap on it. Afterward, select the “Magnification Shortcut” and turn on the toggle of magnification.

Step 4: Now, go back to your Facebook account to use your accessibility feature. You have to first tap on the icon of the small person at the bottom right corner of your screen. Now you can tap anywhere on your screen to zoom in.

Step 5: To zoom in on a live stream video of Facebook, expand your two fingers by placing them on the screen. Thus you can easily zoom in on any specific part of the Facebook video easily. For zooming out, move your fingers in an inward direction to pinch the screen. Also, to zoom back into a default mode, click on the accessibility feature.

Part 3: How to Zoom in Facebook Livestream on iPhone
As Android devices give options to zoom in and out easily, iPhone users can also change their settings to use the accessibility feature quickly. To use the accessibility button on iPhone devices, use the following steps:
Step 1: On your iPhone, go to the “Settings” and scroll down its menu. Here you can find the option of “Accessibility,” so tap on it to open its menu.

Step 2: From the accessibility menu, locate the option of “Zoom” and click on it. Now tap on its toggle to turn it on.

Step 3: Afterward, click on “Zoom Region” and then tap the option of “Full Screen Zoom.” Now leave your settings and go back to your Facebook account.

Step 4: To zoom on Facebook portal, double-tap from your three fingers on any specific part of your screen that will activate the accessibility feature.
Step 5: To change the zoom value, you have to triple-tap the screen with your three fingers. Options will pop up from where you can use the magnifying slider to change the zoom level by either moving it to the right or left.

Step 6: If you want to navigate to any part of the screen while zoomed in, use your three fingers and move them around. Also, to return to the default value of the zoom, double-tap on any part of your screen using three fingers.
Conclusion
Facebook is the most popular app across the globe that offers a single and enhanced platform for sharing and posting various kinds of information. Through Facebook live stream videos, users can get details and related information instantly through a live video.
However, if you are struggling to catch a clear vision in live stream videos, you can zoom on Facebook app by using our provided guidelines in this article. Thus, you can have a clear and focused vision by zooming in on live stream videos on Facebook.
There are numerous ways to connect with viewers across the globe through online platforms. One such platform is Facebook live stream videos through which a single person can connect with the whole world and can talk to the people live. Through live stream videos on Facebook, people can show cooking or makeup tutorials that millions of people can join to watch easily.
Also, through such videos, many teachers prefer to demonstrate a particular concept so that students can respond instantly. However, if you want a clearer vision for better understanding, you can zoom on Facebook live stream videos by reading instructions from this article.
In this article
Part 1: Zoom in Facebook Livestream from Browser
Part 2: How to Zoom in Facebook Livestream on Android
Part 3: How to Zoom in Facebook Livestream on iPhone
Part 1: Zoom in Facebook Livestream from Browser
The easiest way to zoom in on Facebook Livestream videos is via browser. In this part, we will describe two methods for zooming in on Facebook Livestream videos that are manual and through a browser extension.
Method 1: Manual Method
In this first method, you can zoom on Facebook videos through your desktop manually. Read the following steps to perform this method:
Step 1: Open your Facebook account by entering your username and password. Now play the livestream video on which you want to zoom in.
Step 2: For Windows users, press the “CTRL” and “+” buttons simultaneously to zoom on the Facebook video. Whereas, for Mac users, press the “COMMAND” and “+” buttons at the same time to zoom in. A small pop-up window will display at the top right corner from where you can control the zoom value.
Method 2: Browser Extension
In this particular method, we will use a browser extension called “Zoom,” through which you can quickly enjoy the zoom experience on the Facebook live stream videos. This special browser extension is a lightweight extension that can assist you in browsing the web pages by zooming in and out conveniently. By using this extension, you can change the zoom value through its slider up to 400 easily.
Step 1: First, you need to install the browser extension of Zoom on your PC. Click on the “Add to Chrome” option to download and install this extension on your Chrome browser.
Step 2: Open your Facebook account and play your live stream video. On the top right corner, you can see the “Extension” icon where all your added extensions are pinned. Select Zoom extension, and through its displayed slider, you can increase the zoom value easily. You can also press the “+” button from your keyboard to zoom in on the Facebook video through this extension.
Part 2: How to Zoom in Facebook Livestream on Android
If you are watching live stream videos of Facebook on an Android device, you can also zoom in by modifying your phone’s settings. To do so, here are basic steps:
Step 1: From your Android phone, reach out to the “Settings” to open its menu. From this menu, find the option of “Accessibility” from “Additional Settings” and click on it.
Step 2: On the accessibility screen, tap on the option of “Vision” and then locate the section called “Display.”
Step 3: Now, find the option of “Magnification” and tap on it. Afterward, select the “Magnification Shortcut” and turn on the toggle of magnification.
Step 4: Now, go back to your Facebook account to use your accessibility feature. You have to first tap on the icon of the small person at the bottom right corner of your screen. Now you can tap anywhere on your screen to zoom in.
Step 5: To zoom in on a live stream video of Facebook, expand your two fingers by placing them on the screen. Thus you can easily zoom in on any specific part of the Facebook video easily. For zooming out, move your fingers in an inward direction to pinch the screen. Also, to zoom back into a default mode, click on the accessibility feature.
Part 3: How to Zoom in Facebook Livestream on iPhone
As Android devices give options to zoom in and out easily, iPhone users can also change their settings to use the accessibility feature quickly. To use the accessibility button on iPhone devices, use the following steps:
Step 1: On your iPhone, go to the “Settings” and scroll down its menu. Here you can find the option of “Accessibility,” so tap on it to open its menu.
Step 2: From the accessibility menu, locate the option of “Zoom” and click on it. Now tap on its toggle to turn it on.
Step 3: Afterward, click on “Zoom Region” and then tap the option of “Full Screen Zoom.” Now leave your settings and go back to your Facebook account.
Step 4: To zoom on Facebook portal, double-tap from your three fingers on any specific part of your screen that will activate the accessibility feature.
Step 5: To change the zoom value, you have to triple-tap the screen with your three fingers. Options will pop up from where you can use the magnifying slider to change the zoom level by either moving it to the right or left.
Step 6: If you want to navigate to any part of the screen while zoomed in, use your three fingers and move them around. Also, to return to the default value of the zoom, double-tap on any part of your screen using three fingers.
Conclusion
Facebook is the most popular app across the globe that offers a single and enhanced platform for sharing and posting various kinds of information. Through Facebook live stream videos, users can get details and related information instantly through a live video.
However, if you are struggling to catch a clear vision in live stream videos, you can zoom on Facebook app by using our provided guidelines in this article. Thus, you can have a clear and focused vision by zooming in on live stream videos on Facebook.
Also read:
- Updated How to Resize FLV Videos EfficientlyWindows, Mac, Android, iPhone & Online for 2024
- How to Create Cooking Video Intro and Outro for YouTube Channel?
- 2024 Approved The Way to Make Dynamic Video Collages?
- Updated How to Edit A Time Lapse Video on iPhone?
- Updated 2024 Approved Free Drone LUTs For Perfect Drone Footage
- New In 2024, Getting Into The Details A Review of Kodak LUTs
- How to Become a Youtuber, In 2024
- Updated How to Make Dynamic Video Collages?
- Best 8 Educational Video Websites for Teachers for 2024
- In 2024, 6 Instant Mp4 to GIF Online Tools
- In 2024, How to Create Text Animation for Videos
- Updated 2024 Approved Creative Ways to Add Green Screen Effects In Photoshop
- A Complete Guide to the Best Brand Story Videos for 2024
- New In 2024, Easy Way to Combine Several Xvid Files Into One Windows, Mac,Android
- Updated Customize PowerPoint Slideshow Icon in Simple Ways for 2024
- Updated 5 Tried-And-True Methods to GIF Making
- Updated 15 Best Travel Vloggers That You Should Follow for 2024
- 2024 Approved How to Delete White Background in Photoshop. How to Create a Transparent Background in Photoshop? Steps to Get Rid of White Background in Photoshop
- Updated How To Create Transparent Background On Picsart
- How to Soft Reset Honor X9b phone? | Dr.fone
- How does the stardust trade cost In pokemon go On Samsung Galaxy M34? | Dr.fone
- In 2024, 10 Free Location Spoofers to Fake GPS Location on your Honor Play 7T | Dr.fone
- Device unlock Galaxy S24+
- Fix Cant Take Screenshot Due to Security Policy on Nokia C12 Plus | Dr.fone
- In 2024, 3 Ways to Erase Apple iPhone XS When Its Locked Within Seconds | Dr.fone
- List of Pokémon Go Joysticks On Samsung Galaxy S21 FE 5G (2023) | Dr.fone
- In 2024, Latest way to get Shiny Meltan Box in Pokémon Go Mystery Box On Apple iPhone XS | Dr.fone
- In 2024, How To Access and Watch Nonstop NBA Live Stream Free Online
- How To Upgrade or Downgrade iPhone 13 Pro Without Data Loss? | Dr.fone
- In 2024, Unlock Apple iPhone 15 Pro Max With Forgotten Passcode Different Methods You Can Try | Dr.fone
- Title: Updated 2024 Approved An Ultimate Guide to Flexclip Online Trimmer
- Author: Chloe
- Created at : 2024-04-24 07:08:40
- Updated at : 2024-04-25 07:08:40
- Link: https://ai-editing-video.techidaily.com/updated-2024-approved-an-ultimate-guide-to-flexclip-online-trimmer/
- License: This work is licensed under CC BY-NC-SA 4.0.
