
Updated 2024 Approved Detailed Steps to Resize Video in Davinci Resolve

Detailed Steps to Resize Video in Davinci Resolve
While editing videos, you may change the aspect ratio of the video to change the size of the video to upload on different platforms like YouTube, Facebook, Pinterest, and Instagram. Videos come in different sizes and shapes. Some videos are portraits while the others are landscapes. Similarly, videos are captured in different places with different devices. So, we need to set a certain size of the video.
Definitely, a very large video can make delays in the work, similarly, a small size video can result in low resolution and bad quality. Resizing a video saves a lot of time and money whether you have a business, a YouTube channel, a short film, or a feature film. Today, we shall discuss how to resize the videos?
The two free ways to resize the video…
Here are a number of tools used in the market to resize the videos. We are going to teach How to resize the video in Davinci resolve and Fimora wondershare. Once you have mastered How to resize a video, it would be as simple as the ‘click’.
Now the good news is, you can dramatically export the videos in the same resolution in a very short time.
Let’s dive in !
Part 1. How to resize video in Davinci Resolve
Davinci Resolve is a very powerful tool to edit videos. Let’s suppose, you have some videos shots and all the videos have different sizes, some of the videos fit in the timeline and some are out of the timeline. No matter, you are going to make a video on the same scale with the same size.
Resize the video can be done in three ways:
- Zoom in zoom out
- Cropping
- Retime and scaling
1. Zoom in and Zoom out
First of all, select the videos in your timeline. You should stay in the middle of the frame to set it because it’s too wide. The timeline moves forward and backward. Let your video be 4k, go to the bottom-right corner and click on timeline format. Select timeline resolution, select ultra HD, or whatever you want from the drop-down list.
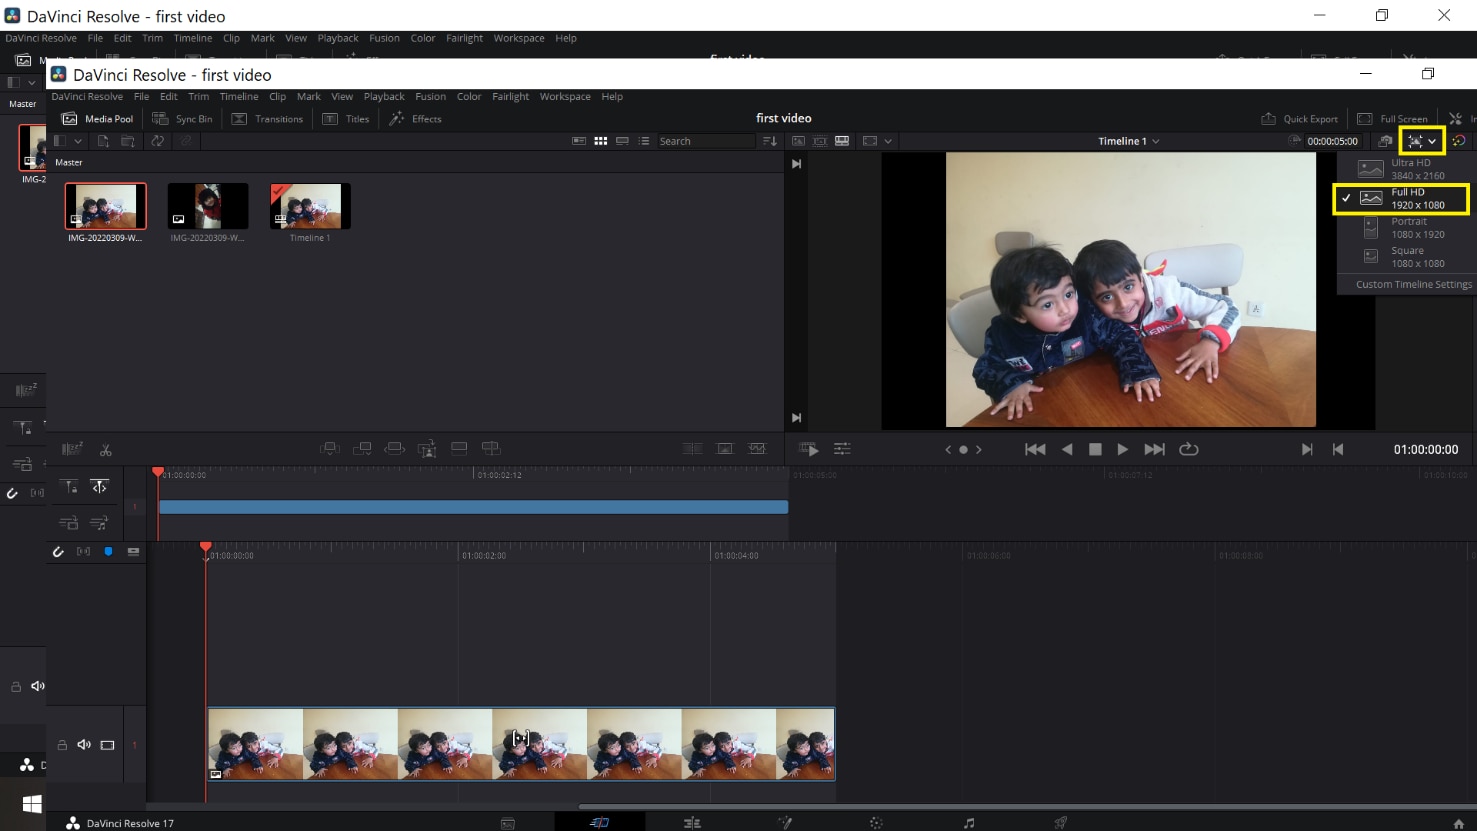
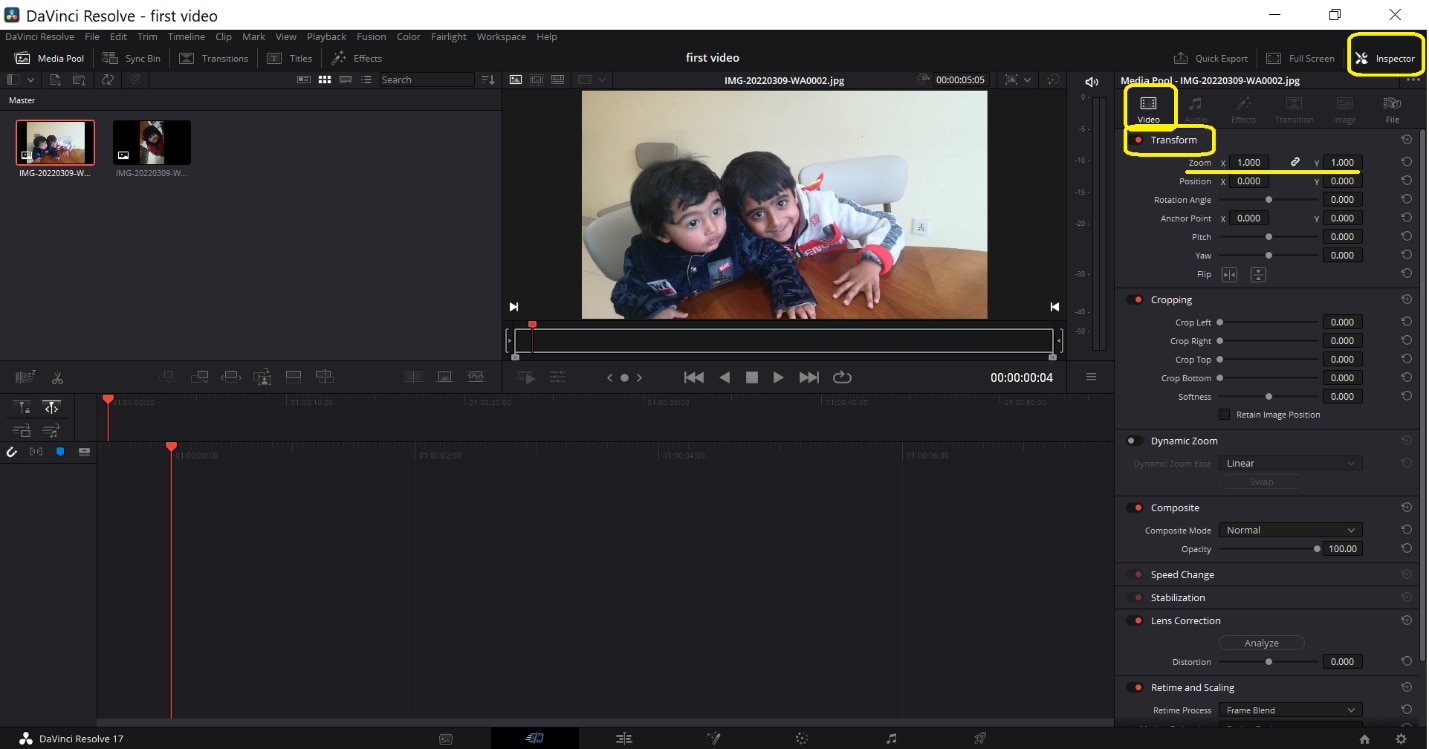
Go to the inspector from the up-right corner and select Transform under the video section. Here you can resize your image. Place the mouse over zoom x (Horizontal) and zoom y (vertical) values to drag left or right for zoom in or zoom out. The video can be resized accordingly.
Here you can also change its rotation.
2. Cropping
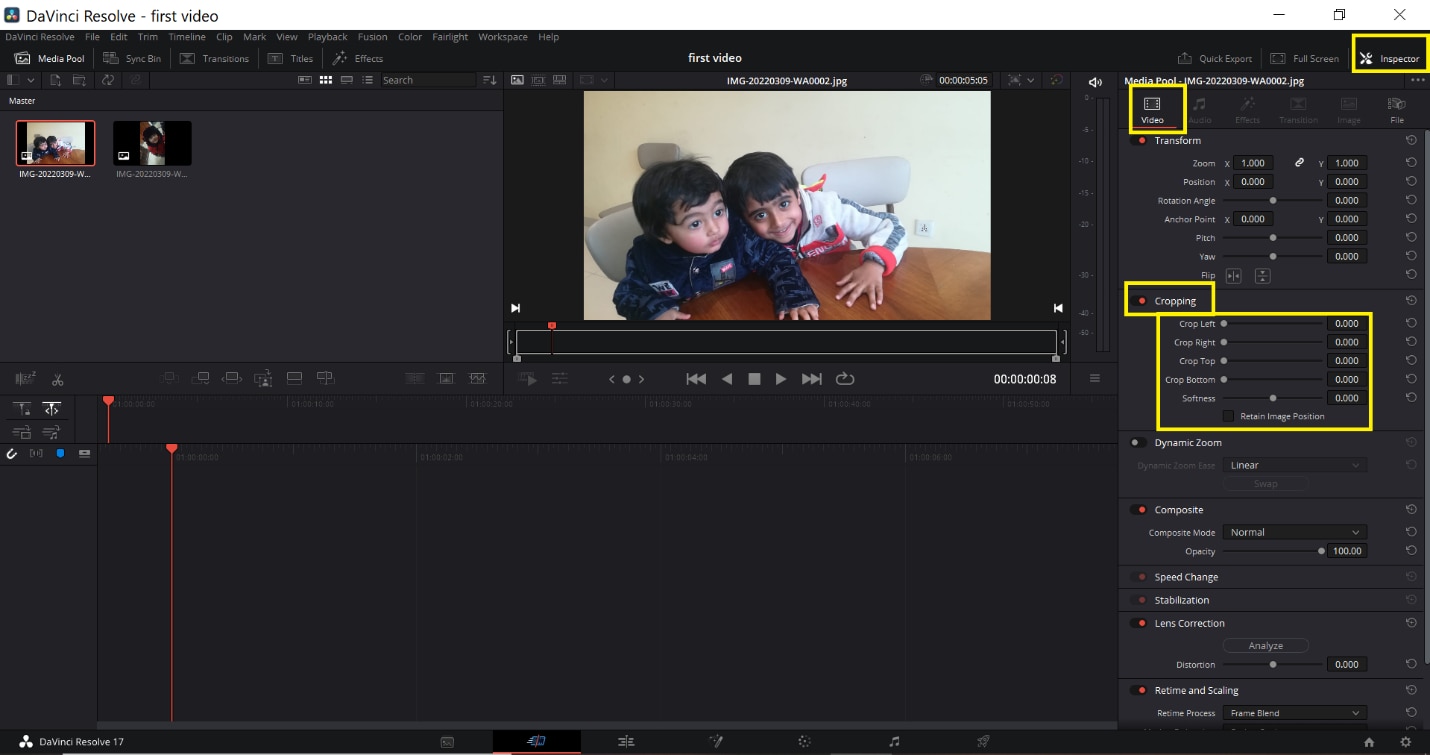
Go to the inspector from the up-right corner and select Transform. Now choose Cropping. Here are four options Crop left, crop right, crop Bottom, and crop Top. You can drag the scale from left to right to adjust the crop settings according to the desired result.
3. Retime and scaling
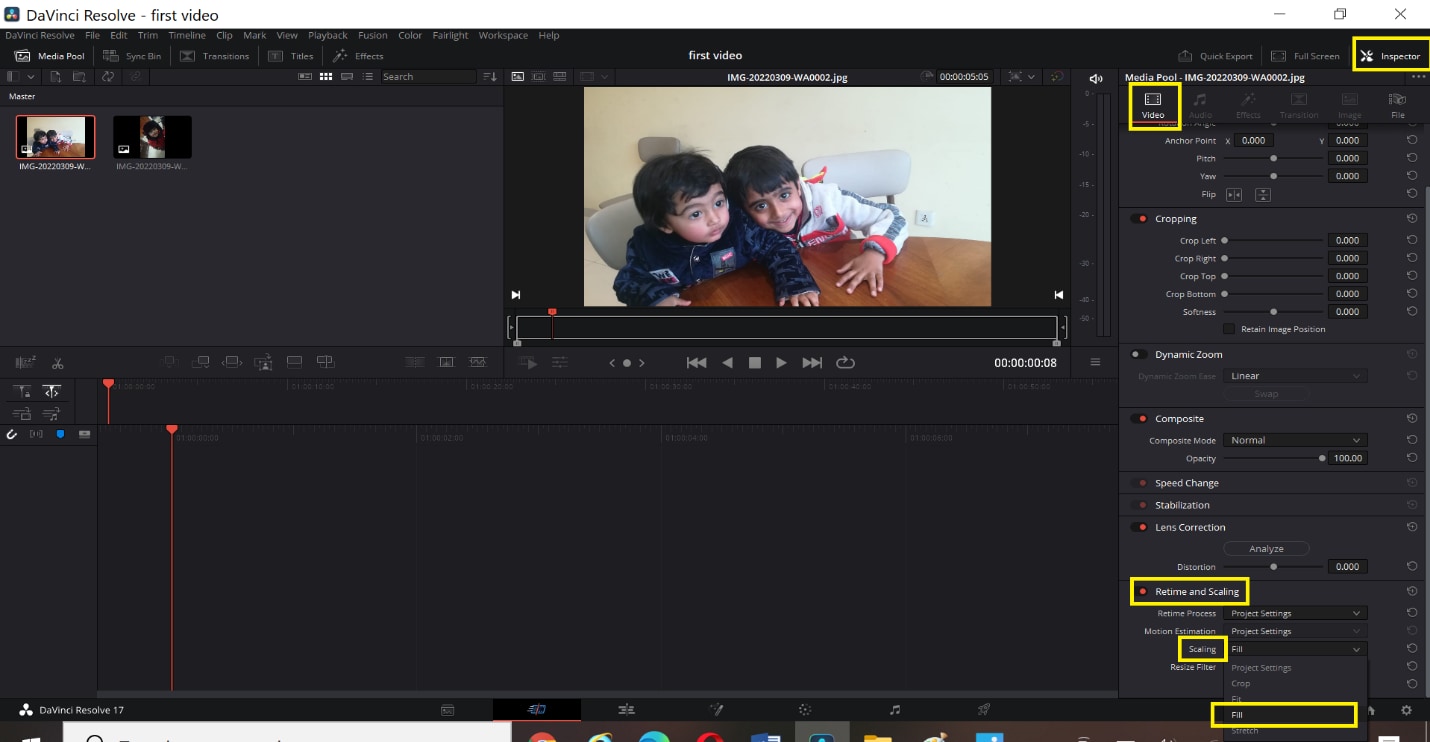
Go to the inspector from the up-right corner and select retime and scaling. You can choose stretch, Fit, Fill, or crop for cropping the video from the drop-down list.
- The Crop function is used to remove the unnecessary or uneven part of the video.
- The Fit function is to have the video auto-center and the selected clips are formatted according to the screen dimensions.
- Stretch Function allows changing the length of the certain clip at a certain duration.
After transforming, cropping, and resizing the videos, you can copy the same settings without repeating the above steps for each video.
Part 2. An alternative way to resize videos with Wondershare
Filmora Video Editor is another great video editing software. It is very easy to use. It offers many different features to resize the videos. Moreover, it allows zooming in the video to highlight the best part of your video. It allows the edited video to export on other devices or YouTube channels.
For Win 7 or later (64-bit)
For macOS 10.14 or later
You can resize your video in three ways:
- Resize video by cropping
- Scale in Scale-out
- Resize by changing Aspect Ratio
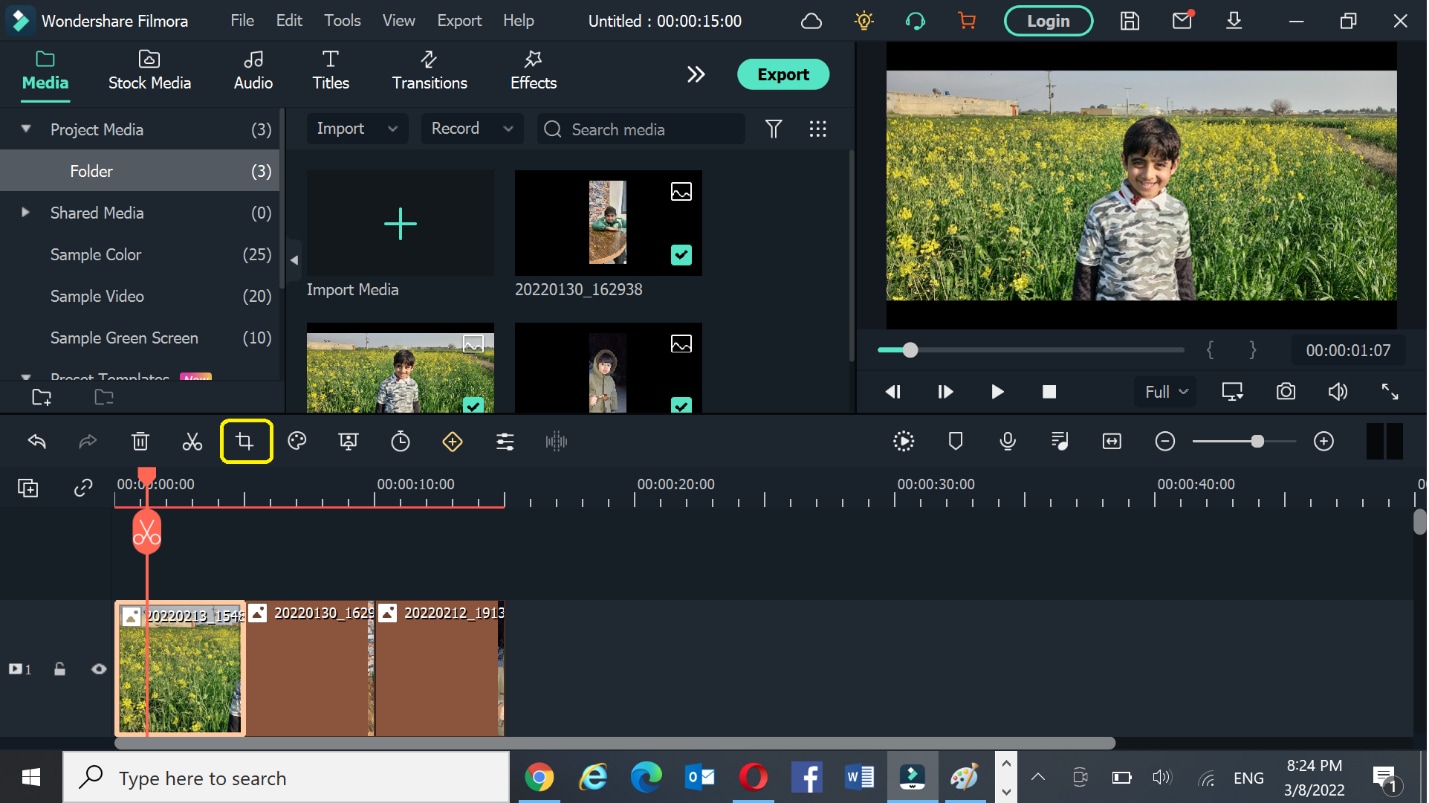
1. Resize video by cropping
- Import the videos from your storage by using the import button.
- Drag the videos in the timeline.
- Right-click on the desired video, crop and zoom option will appear in the menu.
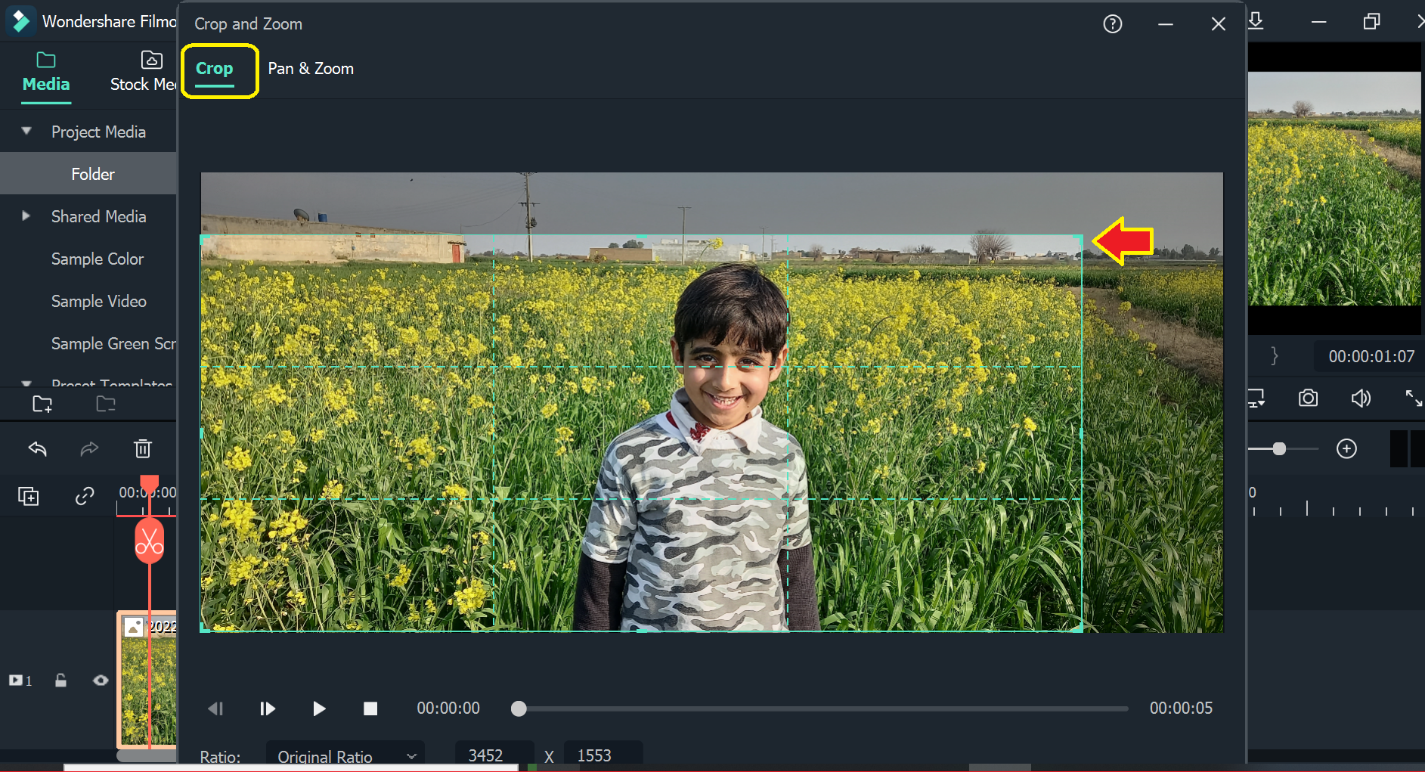
- Select crop tab.
- Grab the corner of the crop inwards, and move to adjust as desired.
- Press the OK tab and your video is cropped.
2. Scale-in and scale-out
- Select the video in the timeline.
- Select the settings
- Click on the Transform tab under image section**.**
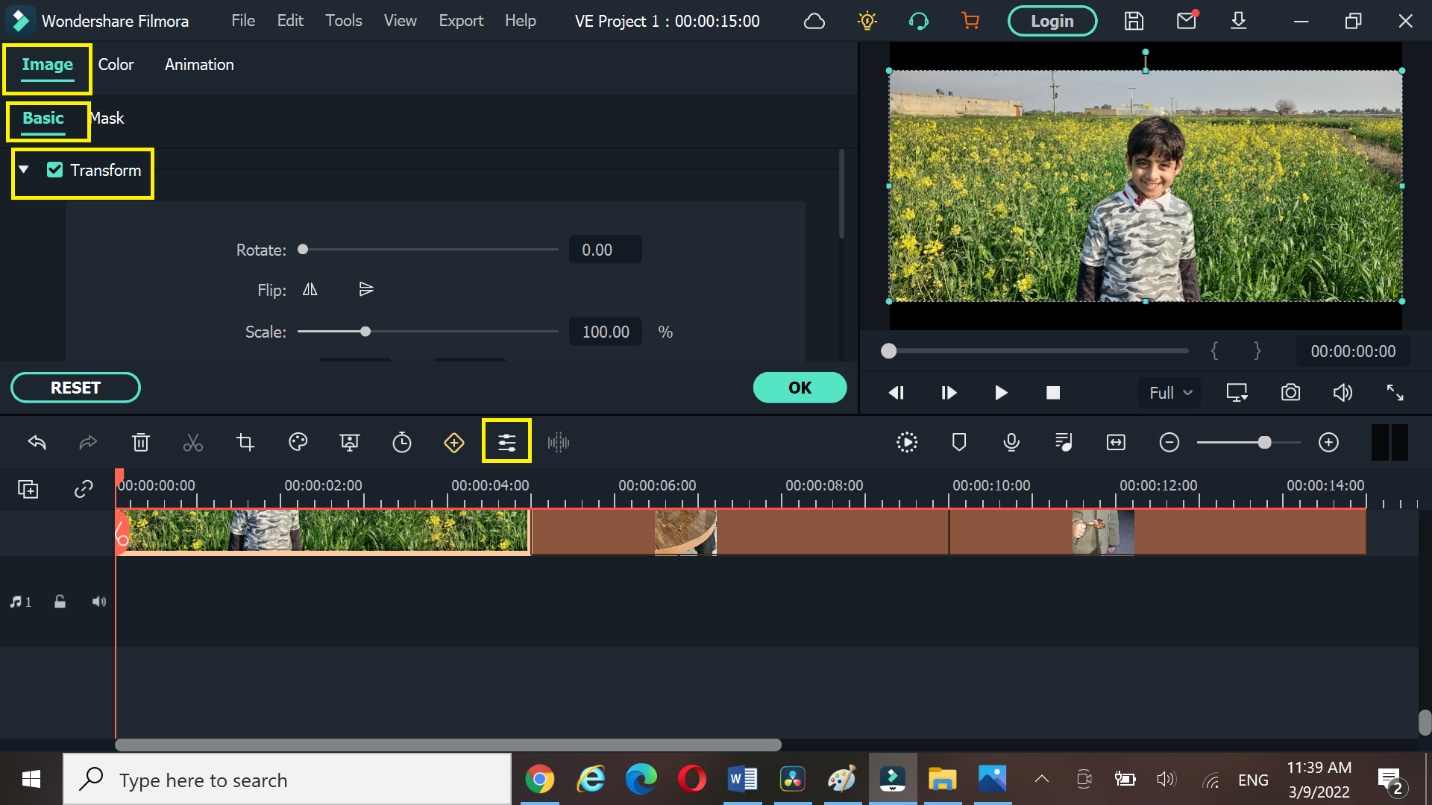
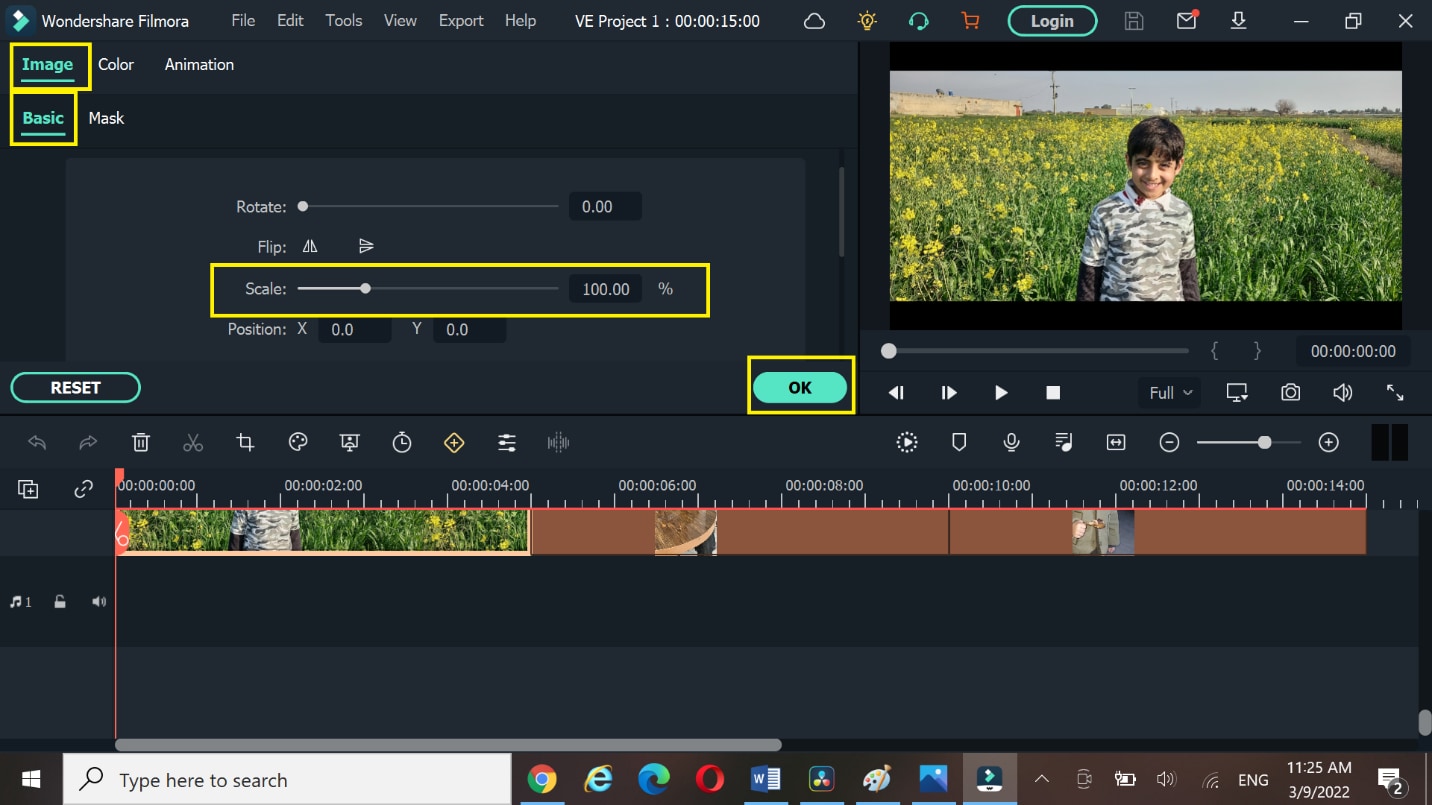
- Move the pointer from left to right on the Scale to zoom in and zoom out the video. You can remove the unwanted portion of the video.
- Press OK tab.
3. Resize video by changing aspect ratio
Some videos are 4k, 6k, and 8k but exporting them in the same resolution and waiting for a long time is really difficult. You need to resize the video to change its width and height. As different social media platforms require a different sizes for videos. We can say, resizing the video in terms of Giga bites and mega bites. You can do it by changing the Project Aspect Ratio. It is a very powerful technique to resize the videos in the timeline.
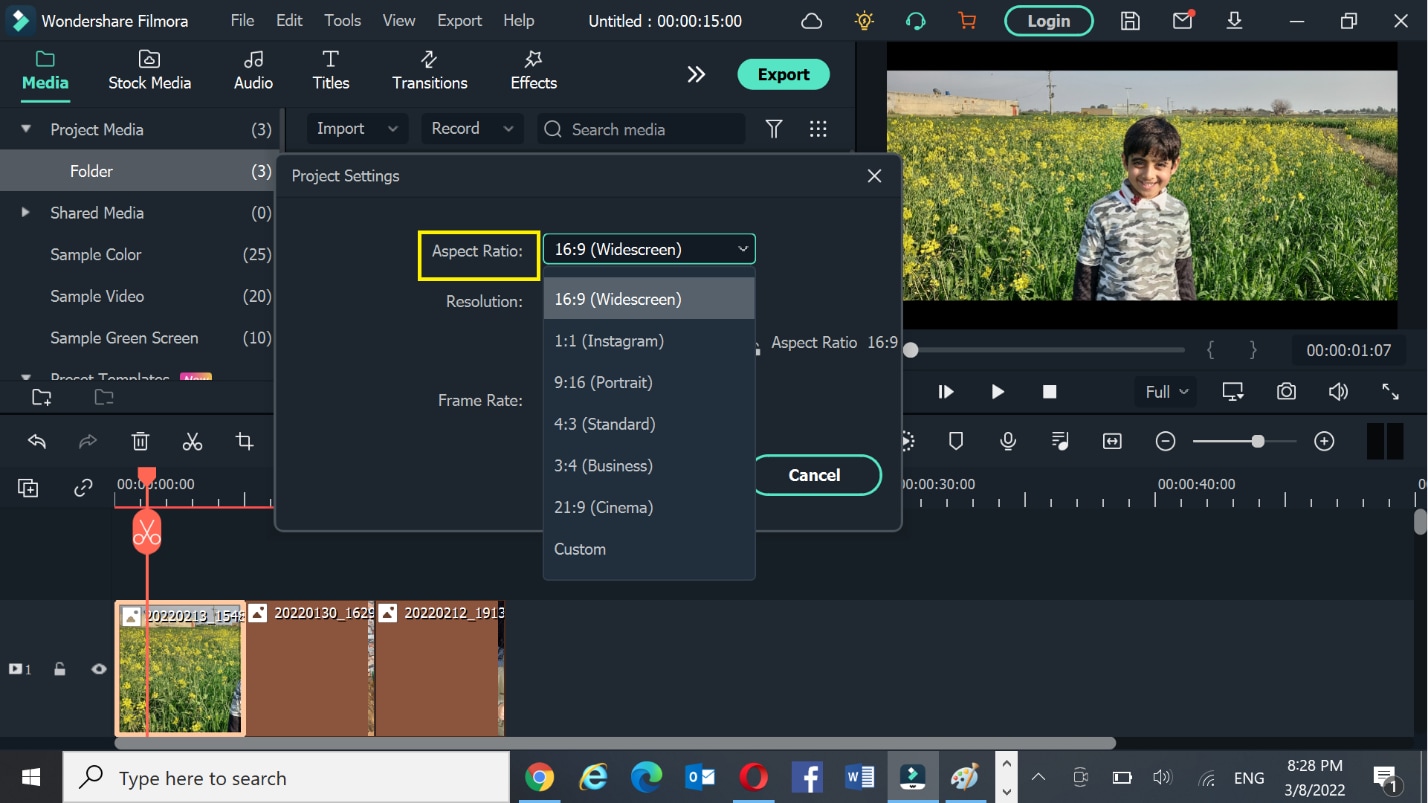
You can change the Project Aspect ratio like 16:9(wide-screen), 1:1(Instagram), 9:16(Portrait), 4:3(standard), 21:9(Cinema), or custom.
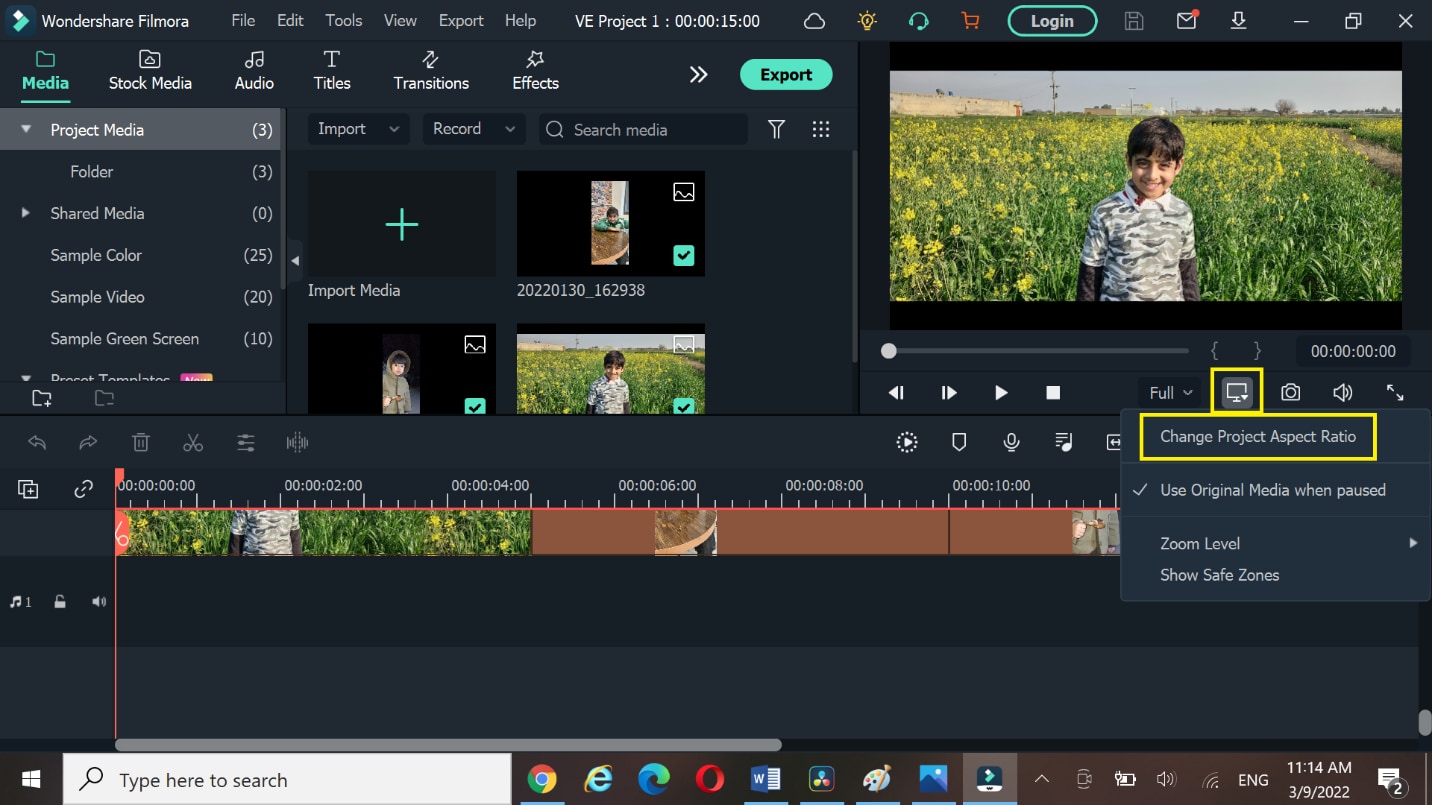
- Select the Aspect Ratio
- Change the ratio 16:9, 1:1, 9:16, 4:3, 21:9, or custom as desired.
- Select OK.
Conclusion
At this time, every business is using marketing to boost the economy, but video marketing is at its climax. Therefore, it is essential to take advantage of video editing tools to increase productivity and efficiency of work.
The Davinci Resolve and Filmora Wonder Share are the best video editing tools to resize the videos. You can easily use these tools on your laptop, tablets, or smartphones in a very short time. Along with this, you can share your compressed videos on different social media platforms like Facebook, Twitter, YouTube, Instagram, and LinkedIn. Moreover, you can enjoy the magical effects of these free tools at the ease of your smartphone. It is beneficial at both small and large businesses for the following
- Time saver
- Economical
- Good video quality
- Presentable
- Increase engagement
Hope the content would be useful for you. If you like the article please leave a comment.
Go to the inspector from the up-right corner and select Transform under the video section. Here you can resize your image. Place the mouse over zoom x (Horizontal) and zoom y (vertical) values to drag left or right for zoom in or zoom out. The video can be resized accordingly.
Here you can also change its rotation.

2. Cropping
Go to the inspector from the up-right corner and select Transform. Now choose Cropping. Here are four options Crop left, crop right, crop Bottom, and crop Top. You can drag the scale from left to right to adjust the crop settings according to the desired result.

3. Retime and scaling
Go to the inspector from the up-right corner and select retime and scaling. You can choose stretch, Fit, Fill, or crop for cropping the video from the drop-down list.
- The Crop function is used to remove the unnecessary or uneven part of the video.
- The Fit function is to have the video auto-center and the selected clips are formatted according to the screen dimensions.
- Stretch Function allows changing the length of the certain clip at a certain duration.

After transforming, cropping, and resizing the videos, you can copy the same settings without repeating the above steps for each video.
Part 2. An alternative way to resize videos with Wondershare
Filmora Video Editor is another great video editing software. It is very easy to use. It offers many different features to resize the videos. Moreover, it allows zooming in the video to highlight the best part of your video. It allows the edited video to export on other devices or YouTube channels.
For Win 7 or later (64-bit)
For macOS 10.14 or later
You can resize your video in three ways:
- Resize video by cropping
- Scale in Scale-out
- Resize by changing Aspect Ratio
1. Resize video by cropping
- Import the videos from your storage by using the import button.
- Drag the videos in the timeline.
- Right-click on the desired video, crop and zoom option will appear in the menu.
- Select crop tab.

- Grab the corner of the crop inwards, and move to adjust as desired.
- Press the OK tab and your video is cropped.

2. Scale-in and scale-out
- Select the video in the timeline.
- Select the settings
- Click on the Transform tab under image section**.**

- Move the pointer from left to right on the Scale to zoom in and zoom out the video. You can remove the unwanted portion of the video.
- Press OK tab.

3. Resize video by changing aspect ratio
Some videos are 4k, 6k, and 8k but exporting them in the same resolution and waiting for a long time is really difficult. You need to resize the video to change its width and height. As different social media platforms require a different sizes for videos. We can say, resizing the video in terms of Giga bites and mega bites. You can do it by changing the Project Aspect Ratio. It is a very powerful technique to resize the videos in the timeline.
You can change the Project Aspect ratio like 16:9(wide-screen), 1:1(Instagram), 9:16(Portrait), 4:3(standard), 21:9(Cinema), or custom.

- Select the Aspect Ratio
- Change the ratio 16:9, 1:1, 9:16, 4:3, 21:9, or custom as desired.
- Select OK.

Conclusion
At this time, every business is using marketing to boost the economy, but video marketing is at its climax. Therefore, it is essential to take advantage of video editing tools to increase productivity and efficiency of work.
The Davinci Resolve and Filmora Wonder Share are the best video editing tools to resize the videos. You can easily use these tools on your laptop, tablets, or smartphones in a very short time. Along with this, you can share your compressed videos on different social media platforms like Facebook, Twitter, YouTube, Instagram, and LinkedIn. Moreover, you can enjoy the magical effects of these free tools at the ease of your smartphone. It is beneficial at both small and large businesses for the following
- Time saver
- Economical
- Good video quality
- Presentable
- Increase engagement
Hope the content would be useful for you. If you like the article please leave a comment.
Go to the inspector from the up-right corner and select Transform under the video section. Here you can resize your image. Place the mouse over zoom x (Horizontal) and zoom y (vertical) values to drag left or right for zoom in or zoom out. The video can be resized accordingly.
Here you can also change its rotation.

2. Cropping
Go to the inspector from the up-right corner and select Transform. Now choose Cropping. Here are four options Crop left, crop right, crop Bottom, and crop Top. You can drag the scale from left to right to adjust the crop settings according to the desired result.

3. Retime and scaling
Go to the inspector from the up-right corner and select retime and scaling. You can choose stretch, Fit, Fill, or crop for cropping the video from the drop-down list.
- The Crop function is used to remove the unnecessary or uneven part of the video.
- The Fit function is to have the video auto-center and the selected clips are formatted according to the screen dimensions.
- Stretch Function allows changing the length of the certain clip at a certain duration.

After transforming, cropping, and resizing the videos, you can copy the same settings without repeating the above steps for each video.
Part 2. An alternative way to resize videos with Wondershare
Filmora Video Editor is another great video editing software. It is very easy to use. It offers many different features to resize the videos. Moreover, it allows zooming in the video to highlight the best part of your video. It allows the edited video to export on other devices or YouTube channels.
For Win 7 or later (64-bit)
For macOS 10.14 or later
You can resize your video in three ways:
- Resize video by cropping
- Scale in Scale-out
- Resize by changing Aspect Ratio
1. Resize video by cropping
- Import the videos from your storage by using the import button.
- Drag the videos in the timeline.
- Right-click on the desired video, crop and zoom option will appear in the menu.
- Select crop tab.

- Grab the corner of the crop inwards, and move to adjust as desired.
- Press the OK tab and your video is cropped.

2. Scale-in and scale-out
- Select the video in the timeline.
- Select the settings
- Click on the Transform tab under image section**.**

- Move the pointer from left to right on the Scale to zoom in and zoom out the video. You can remove the unwanted portion of the video.
- Press OK tab.

3. Resize video by changing aspect ratio
Some videos are 4k, 6k, and 8k but exporting them in the same resolution and waiting for a long time is really difficult. You need to resize the video to change its width and height. As different social media platforms require a different sizes for videos. We can say, resizing the video in terms of Giga bites and mega bites. You can do it by changing the Project Aspect Ratio. It is a very powerful technique to resize the videos in the timeline.
You can change the Project Aspect ratio like 16:9(wide-screen), 1:1(Instagram), 9:16(Portrait), 4:3(standard), 21:9(Cinema), or custom.

- Select the Aspect Ratio
- Change the ratio 16:9, 1:1, 9:16, 4:3, 21:9, or custom as desired.
- Select OK.

Conclusion
At this time, every business is using marketing to boost the economy, but video marketing is at its climax. Therefore, it is essential to take advantage of video editing tools to increase productivity and efficiency of work.
The Davinci Resolve and Filmora Wonder Share are the best video editing tools to resize the videos. You can easily use these tools on your laptop, tablets, or smartphones in a very short time. Along with this, you can share your compressed videos on different social media platforms like Facebook, Twitter, YouTube, Instagram, and LinkedIn. Moreover, you can enjoy the magical effects of these free tools at the ease of your smartphone. It is beneficial at both small and large businesses for the following
- Time saver
- Economical
- Good video quality
- Presentable
- Increase engagement
Hope the content would be useful for you. If you like the article please leave a comment.
Go to the inspector from the up-right corner and select Transform under the video section. Here you can resize your image. Place the mouse over zoom x (Horizontal) and zoom y (vertical) values to drag left or right for zoom in or zoom out. The video can be resized accordingly.
Here you can also change its rotation.

2. Cropping
Go to the inspector from the up-right corner and select Transform. Now choose Cropping. Here are four options Crop left, crop right, crop Bottom, and crop Top. You can drag the scale from left to right to adjust the crop settings according to the desired result.

3. Retime and scaling
Go to the inspector from the up-right corner and select retime and scaling. You can choose stretch, Fit, Fill, or crop for cropping the video from the drop-down list.
- The Crop function is used to remove the unnecessary or uneven part of the video.
- The Fit function is to have the video auto-center and the selected clips are formatted according to the screen dimensions.
- Stretch Function allows changing the length of the certain clip at a certain duration.

After transforming, cropping, and resizing the videos, you can copy the same settings without repeating the above steps for each video.
Part 2. An alternative way to resize videos with Wondershare
Filmora Video Editor is another great video editing software. It is very easy to use. It offers many different features to resize the videos. Moreover, it allows zooming in the video to highlight the best part of your video. It allows the edited video to export on other devices or YouTube channels.
For Win 7 or later (64-bit)
For macOS 10.14 or later
You can resize your video in three ways:
- Resize video by cropping
- Scale in Scale-out
- Resize by changing Aspect Ratio
1. Resize video by cropping
- Import the videos from your storage by using the import button.
- Drag the videos in the timeline.
- Right-click on the desired video, crop and zoom option will appear in the menu.
- Select crop tab.

- Grab the corner of the crop inwards, and move to adjust as desired.
- Press the OK tab and your video is cropped.

2. Scale-in and scale-out
- Select the video in the timeline.
- Select the settings
- Click on the Transform tab under image section**.**

- Move the pointer from left to right on the Scale to zoom in and zoom out the video. You can remove the unwanted portion of the video.
- Press OK tab.

3. Resize video by changing aspect ratio
Some videos are 4k, 6k, and 8k but exporting them in the same resolution and waiting for a long time is really difficult. You need to resize the video to change its width and height. As different social media platforms require a different sizes for videos. We can say, resizing the video in terms of Giga bites and mega bites. You can do it by changing the Project Aspect Ratio. It is a very powerful technique to resize the videos in the timeline.
You can change the Project Aspect ratio like 16:9(wide-screen), 1:1(Instagram), 9:16(Portrait), 4:3(standard), 21:9(Cinema), or custom.

- Select the Aspect Ratio
- Change the ratio 16:9, 1:1, 9:16, 4:3, 21:9, or custom as desired.
- Select OK.

Conclusion
At this time, every business is using marketing to boost the economy, but video marketing is at its climax. Therefore, it is essential to take advantage of video editing tools to increase productivity and efficiency of work.
The Davinci Resolve and Filmora Wonder Share are the best video editing tools to resize the videos. You can easily use these tools on your laptop, tablets, or smartphones in a very short time. Along with this, you can share your compressed videos on different social media platforms like Facebook, Twitter, YouTube, Instagram, and LinkedIn. Moreover, you can enjoy the magical effects of these free tools at the ease of your smartphone. It is beneficial at both small and large businesses for the following
- Time saver
- Economical
- Good video quality
- Presentable
- Increase engagement
Hope the content would be useful for you. If you like the article please leave a comment.
Is Augmented Reality Conferencing the Future of Workplace Collaboratio
Is Augmented Reality Conferencing the Future of Workplace Collaboration?
An easy yet powerful editor
Numerous effects to choose from
Detailed tutorials provided by the official channel
AR or Augmented Reality and VR or Virtual Reality are quite a common discussion in the world of technology. Similarly, the technology-driven workspaces demand a seamless workspace collaboration post-pandemic. People are used to working from home and the workspace culture is changing rapidly due to such habits. 59% of the US workers want to continue WFH according to a study by TalentLyft. To cut the cost of daily travel and dedicate more quality time to work, employees are prioritizing online offices. On the other hand, employers are willing to save office space and other expenses with such a professional routine. That’s where the idea of augmented reality video conferencing is hitting to keep the collaboration between workers alive for a synchronized workflow.
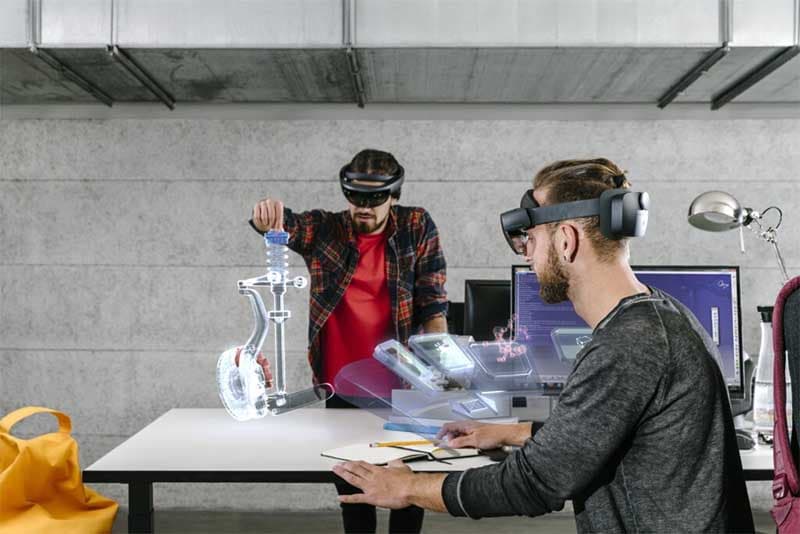
How AR and VR can assist professional collaboration and lift the operations to a better place is the current question. Also, what would be the system through which employees can be habituated to the use? All of the answers are explained in this article.
In this article
01 [What is Augmented Reality Conferencing and What’s VR Video Streaming Workflow](#Part 1)
02 [Pros and Cons of AR and VR Conferencing](#Part 2)
03 [How does Filmora assists AR video conference?](#Part 3)
Part 1 What is Augmented Reality Conferencing and What’s VR Video Streaming Workflow
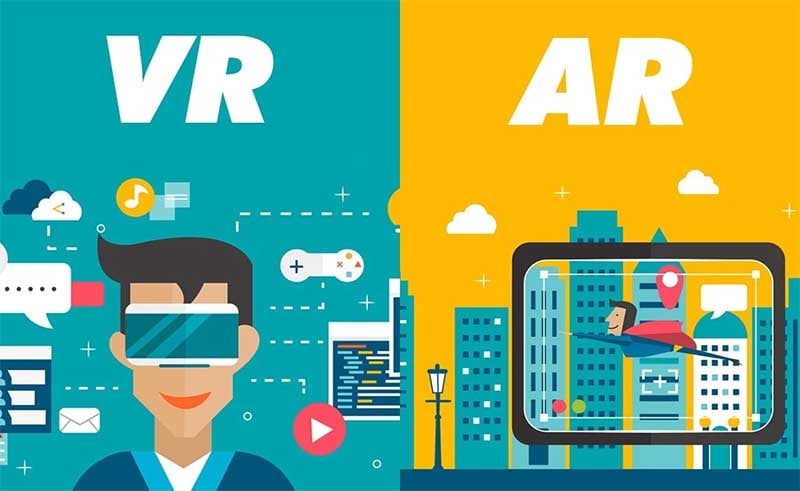
Before jumping to the application of AR and VR, it’s important to clarify the concept of the two different technologies. While AR is an enhanced version of the real world, VR is totally virtual. As a basic concept, note that, augmented reality is an arrangement of the user’s real-world view whereas virtual reality is totally an illusion based on a video. AR can be accessed from a phone to set the camera with a view and a virtual arrangement would be present within it. For example, if there’s a room in the real world, with an AR video conference, people can be adjusted virtually.

Virtual reality, as the name suggests, is totally in control of the system. With goggles or headsets, one can view computer-generated video with 360 degrees of technical effects to be seemed as real. This technology is mainly applicable for a video currently and there’re more scopes to experiment further.

Here comes the question, how these technologies can be merged with a permanent business structure that can be as effective as the older system, and there’s scope for even better results? Well, according to a study by FinancesOnline, 72% of the US customers find AR for better collaboration and 69% think it increases the efficiency in the workspace. Also, 49% of the IT experts believe that AR can access real-time information sooner.
The key idea behind augmented reality conferencing is to omit the parameters like distance, time, and space expenses and motivate positive collaboration in business workflow. There are multiple advantages of this technology for both employees and employers. As people are getting accustomed to the virtual setting in any professional or personal work from home, the plan to shift to a semi-virtual or virtual office structure is not vague now. In fact, this adaptation might take place sooner than expected as a long-term effect of the pandemic.
How augmented reality conferencing and virtual reality video streaming will be working?
AR and VR can be implemented through different technologies and hardware devices. As a result, employees can attend a meeting from home, just with a mobile application that enables the office structure in the room. Or, 2-3 members can be present physically in a meeting room while others are joining from remote places through VR. A 3D video streaming would overshadow the physical absence of the teammates. At the same time, the resources can be shared in no time for reference and transparent communication.
So, how exactly a business can be affected by augmented reality video conferencing on a large scale? Here’s a keen observation from both perspectives.
Part 2 Pros and Cons of AR and VR Conferencing
01Pros of AR and VR Conferencing
● This technology has an initial purpose to save time and energy for the workers including daily travel and balancing personal and professional commitments.
● Employers can hire people from remote places based on their skills and without worrying about the distance and timezone gap.
● Additional resources like bigger office space, electricity, and water can be saved if augmented reality video conferencing is in a complete performance.
● Positive collaboration can be expected while the employees have more energy and a comfortable environment to work in. As a result, productivity might take a boost as well.
● AR video conference serves a better experience than normal video conference in Zoom or Google meeting.
02Cons of AR and VR Conferencing
● The whole process is still under experiment and there’s no confirmed news about its beginning. So, there’s no practical feedback on the process of installation, usage, and maintenance.
● It would be expensive and time-consuming to set up a virtual reality conference system in a big office with n number of people.
● Technical fault from the office or from employees’ home can cost serious penalties in the business workflow.
● Hardware limitations like limited battery life, expensive headsets, and wireless connection are required and these things can cause problems while implementation.
● It can be uncomfortable to wear headsets for a long time during augmented reality conferencing andpeople can experience motion sickness due to this.
Part 3 How does ** Wondershare Filmora Video Editor
To use AR and VR professionally at a larger scale, the videos need to be seamless and follow some standard parameters. With Filmora, it would be easier to manage all the videos during an augmented reality video conferencing. There are multiple effects like “Motion Tracking”, “Keyframing”, “Audio ducking”, “Speed Control”, and “Color matching” that are required while managing a virtual conference with multiple people. It’s important to match the environment thoroughly so there’s no lack of concentration and inferiority in the system.
For Win 7 or later (64-bit)
For macOS 10.12 or later
From a business perspective, a video editor has many roles to play. Similarly, for a modern integration like AR and VR video conferencing, the required tools cannot be compromised. With facilities like “Green screen”, “Audio equalizer”, “Split screen”, “3D Lut”, etc. augmented reality would be presented smartly. To match the whole office environment as effectively as the real (present) one and to boost collaboration in the workspace, new generation video editing tools like Filmora is a must. With minimal effort, virtual meetings can be arranged and presented with the key goal to work at a global level and minimize the distance barrier.
● Ending Thoughts →
● Augmented reality conferencing is at an experiment level now and it is expected to be integrated with the real-life workflow sooner.
● As discussed, there’re both advantages and disadvantages of this technology right now. To enhance the facilities and diminish the cons, a smart video editor can be the gamechanger. In this article, you can find all the current news about AR adaptation for workspace collaboration in detail.
AR or Augmented Reality and VR or Virtual Reality are quite a common discussion in the world of technology. Similarly, the technology-driven workspaces demand a seamless workspace collaboration post-pandemic. People are used to working from home and the workspace culture is changing rapidly due to such habits. 59% of the US workers want to continue WFH according to a study by TalentLyft. To cut the cost of daily travel and dedicate more quality time to work, employees are prioritizing online offices. On the other hand, employers are willing to save office space and other expenses with such a professional routine. That’s where the idea of augmented reality video conferencing is hitting to keep the collaboration between workers alive for a synchronized workflow.

How AR and VR can assist professional collaboration and lift the operations to a better place is the current question. Also, what would be the system through which employees can be habituated to the use? All of the answers are explained in this article.
In this article
01 [What is Augmented Reality Conferencing and What’s VR Video Streaming Workflow](#Part 1)
02 [Pros and Cons of AR and VR Conferencing](#Part 2)
03 [How does Filmora assists AR video conference?](#Part 3)
Part 1 What is Augmented Reality Conferencing and What’s VR Video Streaming Workflow
Before jumping to the application of AR and VR, it’s important to clarify the concept of the two different technologies. While AR is an enhanced version of the real world, VR is totally virtual. As a basic concept, note that, augmented reality is an arrangement of the user’s real-world view whereas virtual reality is totally an illusion based on a video. AR can be accessed from a phone to set the camera with a view and a virtual arrangement would be present within it. For example, if there’s a room in the real world, with an AR video conference, people can be adjusted virtually.

Virtual reality, as the name suggests, is totally in control of the system. With goggles or headsets, one can view computer-generated video with 360 degrees of technical effects to be seemed as real. This technology is mainly applicable for a video currently and there’re more scopes to experiment further.

Here comes the question, how these technologies can be merged with a permanent business structure that can be as effective as the older system, and there’s scope for even better results? Well, according to a study by FinancesOnline, 72% of the US customers find AR for better collaboration and 69% think it increases the efficiency in the workspace. Also, 49% of the IT experts believe that AR can access real-time information sooner.
The key idea behind augmented reality conferencing is to omit the parameters like distance, time, and space expenses and motivate positive collaboration in business workflow. There are multiple advantages of this technology for both employees and employers. As people are getting accustomed to the virtual setting in any professional or personal work from home, the plan to shift to a semi-virtual or virtual office structure is not vague now. In fact, this adaptation might take place sooner than expected as a long-term effect of the pandemic.
How augmented reality conferencing and virtual reality video streaming will be working?
AR and VR can be implemented through different technologies and hardware devices. As a result, employees can attend a meeting from home, just with a mobile application that enables the office structure in the room. Or, 2-3 members can be present physically in a meeting room while others are joining from remote places through VR. A 3D video streaming would overshadow the physical absence of the teammates. At the same time, the resources can be shared in no time for reference and transparent communication.
So, how exactly a business can be affected by augmented reality video conferencing on a large scale? Here’s a keen observation from both perspectives.
Part 2 Pros and Cons of AR and VR Conferencing

01Pros of AR and VR Conferencing
● This technology has an initial purpose to save time and energy for the workers including daily travel and balancing personal and professional commitments.
● Employers can hire people from remote places based on their skills and without worrying about the distance and timezone gap.
● Additional resources like bigger office space, electricity, and water can be saved if augmented reality video conferencing is in a complete performance.
● Positive collaboration can be expected while the employees have more energy and a comfortable environment to work in. As a result, productivity might take a boost as well.
● AR video conference serves a better experience than normal video conference in Zoom or Google meeting.
02Cons of AR and VR Conferencing
● The whole process is still under experiment and there’s no confirmed news about its beginning. So, there’s no practical feedback on the process of installation, usage, and maintenance.
● It would be expensive and time-consuming to set up a virtual reality conference system in a big office with n number of people.
● Technical fault from the office or from employees’ home can cost serious penalties in the business workflow.
● Hardware limitations like limited battery life, expensive headsets, and wireless connection are required and these things can cause problems while implementation.
● It can be uncomfortable to wear headsets for a long time during augmented reality conferencing andpeople can experience motion sickness due to this.
Part 3 How does ** Wondershare Filmora Video Editor
To use AR and VR professionally at a larger scale, the videos need to be seamless and follow some standard parameters. With Filmora, it would be easier to manage all the videos during an augmented reality video conferencing. There are multiple effects like “Motion Tracking”, “Keyframing”, “Audio ducking”, “Speed Control”, and “Color matching” that are required while managing a virtual conference with multiple people. It’s important to match the environment thoroughly so there’s no lack of concentration and inferiority in the system.
For Win 7 or later (64-bit)
For macOS 10.12 or later
From a business perspective, a video editor has many roles to play. Similarly, for a modern integration like AR and VR video conferencing, the required tools cannot be compromised. With facilities like “Green screen”, “Audio equalizer”, “Split screen”, “3D Lut”, etc. augmented reality would be presented smartly. To match the whole office environment as effectively as the real (present) one and to boost collaboration in the workspace, new generation video editing tools like Filmora is a must. With minimal effort, virtual meetings can be arranged and presented with the key goal to work at a global level and minimize the distance barrier.
● Ending Thoughts →
● Augmented reality conferencing is at an experiment level now and it is expected to be integrated with the real-life workflow sooner.
● As discussed, there’re both advantages and disadvantages of this technology right now. To enhance the facilities and diminish the cons, a smart video editor can be the gamechanger. In this article, you can find all the current news about AR adaptation for workspace collaboration in detail.
AR or Augmented Reality and VR or Virtual Reality are quite a common discussion in the world of technology. Similarly, the technology-driven workspaces demand a seamless workspace collaboration post-pandemic. People are used to working from home and the workspace culture is changing rapidly due to such habits. 59% of the US workers want to continue WFH according to a study by TalentLyft. To cut the cost of daily travel and dedicate more quality time to work, employees are prioritizing online offices. On the other hand, employers are willing to save office space and other expenses with such a professional routine. That’s where the idea of augmented reality video conferencing is hitting to keep the collaboration between workers alive for a synchronized workflow.

How AR and VR can assist professional collaboration and lift the operations to a better place is the current question. Also, what would be the system through which employees can be habituated to the use? All of the answers are explained in this article.
In this article
01 [What is Augmented Reality Conferencing and What’s VR Video Streaming Workflow](#Part 1)
02 [Pros and Cons of AR and VR Conferencing](#Part 2)
03 [How does Filmora assists AR video conference?](#Part 3)
Part 1 What is Augmented Reality Conferencing and What’s VR Video Streaming Workflow
Before jumping to the application of AR and VR, it’s important to clarify the concept of the two different technologies. While AR is an enhanced version of the real world, VR is totally virtual. As a basic concept, note that, augmented reality is an arrangement of the user’s real-world view whereas virtual reality is totally an illusion based on a video. AR can be accessed from a phone to set the camera with a view and a virtual arrangement would be present within it. For example, if there’s a room in the real world, with an AR video conference, people can be adjusted virtually.

Virtual reality, as the name suggests, is totally in control of the system. With goggles or headsets, one can view computer-generated video with 360 degrees of technical effects to be seemed as real. This technology is mainly applicable for a video currently and there’re more scopes to experiment further.

Here comes the question, how these technologies can be merged with a permanent business structure that can be as effective as the older system, and there’s scope for even better results? Well, according to a study by FinancesOnline, 72% of the US customers find AR for better collaboration and 69% think it increases the efficiency in the workspace. Also, 49% of the IT experts believe that AR can access real-time information sooner.
The key idea behind augmented reality conferencing is to omit the parameters like distance, time, and space expenses and motivate positive collaboration in business workflow. There are multiple advantages of this technology for both employees and employers. As people are getting accustomed to the virtual setting in any professional or personal work from home, the plan to shift to a semi-virtual or virtual office structure is not vague now. In fact, this adaptation might take place sooner than expected as a long-term effect of the pandemic.
How augmented reality conferencing and virtual reality video streaming will be working?
AR and VR can be implemented through different technologies and hardware devices. As a result, employees can attend a meeting from home, just with a mobile application that enables the office structure in the room. Or, 2-3 members can be present physically in a meeting room while others are joining from remote places through VR. A 3D video streaming would overshadow the physical absence of the teammates. At the same time, the resources can be shared in no time for reference and transparent communication.
So, how exactly a business can be affected by augmented reality video conferencing on a large scale? Here’s a keen observation from both perspectives.
Part 2 Pros and Cons of AR and VR Conferencing

01Pros of AR and VR Conferencing
● This technology has an initial purpose to save time and energy for the workers including daily travel and balancing personal and professional commitments.
● Employers can hire people from remote places based on their skills and without worrying about the distance and timezone gap.
● Additional resources like bigger office space, electricity, and water can be saved if augmented reality video conferencing is in a complete performance.
● Positive collaboration can be expected while the employees have more energy and a comfortable environment to work in. As a result, productivity might take a boost as well.
● AR video conference serves a better experience than normal video conference in Zoom or Google meeting.
02Cons of AR and VR Conferencing
● The whole process is still under experiment and there’s no confirmed news about its beginning. So, there’s no practical feedback on the process of installation, usage, and maintenance.
● It would be expensive and time-consuming to set up a virtual reality conference system in a big office with n number of people.
● Technical fault from the office or from employees’ home can cost serious penalties in the business workflow.
● Hardware limitations like limited battery life, expensive headsets, and wireless connection are required and these things can cause problems while implementation.
● It can be uncomfortable to wear headsets for a long time during augmented reality conferencing andpeople can experience motion sickness due to this.
Part 3 How does ** Wondershare Filmora Video Editor
To use AR and VR professionally at a larger scale, the videos need to be seamless and follow some standard parameters. With Filmora, it would be easier to manage all the videos during an augmented reality video conferencing. There are multiple effects like “Motion Tracking”, “Keyframing”, “Audio ducking”, “Speed Control”, and “Color matching” that are required while managing a virtual conference with multiple people. It’s important to match the environment thoroughly so there’s no lack of concentration and inferiority in the system.
For Win 7 or later (64-bit)
For macOS 10.12 or later
From a business perspective, a video editor has many roles to play. Similarly, for a modern integration like AR and VR video conferencing, the required tools cannot be compromised. With facilities like “Green screen”, “Audio equalizer”, “Split screen”, “3D Lut”, etc. augmented reality would be presented smartly. To match the whole office environment as effectively as the real (present) one and to boost collaboration in the workspace, new generation video editing tools like Filmora is a must. With minimal effort, virtual meetings can be arranged and presented with the key goal to work at a global level and minimize the distance barrier.
● Ending Thoughts →
● Augmented reality conferencing is at an experiment level now and it is expected to be integrated with the real-life workflow sooner.
● As discussed, there’re both advantages and disadvantages of this technology right now. To enhance the facilities and diminish the cons, a smart video editor can be the gamechanger. In this article, you can find all the current news about AR adaptation for workspace collaboration in detail.
AR or Augmented Reality and VR or Virtual Reality are quite a common discussion in the world of technology. Similarly, the technology-driven workspaces demand a seamless workspace collaboration post-pandemic. People are used to working from home and the workspace culture is changing rapidly due to such habits. 59% of the US workers want to continue WFH according to a study by TalentLyft. To cut the cost of daily travel and dedicate more quality time to work, employees are prioritizing online offices. On the other hand, employers are willing to save office space and other expenses with such a professional routine. That’s where the idea of augmented reality video conferencing is hitting to keep the collaboration between workers alive for a synchronized workflow.

How AR and VR can assist professional collaboration and lift the operations to a better place is the current question. Also, what would be the system through which employees can be habituated to the use? All of the answers are explained in this article.
In this article
01 [What is Augmented Reality Conferencing and What’s VR Video Streaming Workflow](#Part 1)
02 [Pros and Cons of AR and VR Conferencing](#Part 2)
03 [How does Filmora assists AR video conference?](#Part 3)
Part 1 What is Augmented Reality Conferencing and What’s VR Video Streaming Workflow
Before jumping to the application of AR and VR, it’s important to clarify the concept of the two different technologies. While AR is an enhanced version of the real world, VR is totally virtual. As a basic concept, note that, augmented reality is an arrangement of the user’s real-world view whereas virtual reality is totally an illusion based on a video. AR can be accessed from a phone to set the camera with a view and a virtual arrangement would be present within it. For example, if there’s a room in the real world, with an AR video conference, people can be adjusted virtually.

Virtual reality, as the name suggests, is totally in control of the system. With goggles or headsets, one can view computer-generated video with 360 degrees of technical effects to be seemed as real. This technology is mainly applicable for a video currently and there’re more scopes to experiment further.

Here comes the question, how these technologies can be merged with a permanent business structure that can be as effective as the older system, and there’s scope for even better results? Well, according to a study by FinancesOnline, 72% of the US customers find AR for better collaboration and 69% think it increases the efficiency in the workspace. Also, 49% of the IT experts believe that AR can access real-time information sooner.
The key idea behind augmented reality conferencing is to omit the parameters like distance, time, and space expenses and motivate positive collaboration in business workflow. There are multiple advantages of this technology for both employees and employers. As people are getting accustomed to the virtual setting in any professional or personal work from home, the plan to shift to a semi-virtual or virtual office structure is not vague now. In fact, this adaptation might take place sooner than expected as a long-term effect of the pandemic.
How augmented reality conferencing and virtual reality video streaming will be working?
AR and VR can be implemented through different technologies and hardware devices. As a result, employees can attend a meeting from home, just with a mobile application that enables the office structure in the room. Or, 2-3 members can be present physically in a meeting room while others are joining from remote places through VR. A 3D video streaming would overshadow the physical absence of the teammates. At the same time, the resources can be shared in no time for reference and transparent communication.
So, how exactly a business can be affected by augmented reality video conferencing on a large scale? Here’s a keen observation from both perspectives.
Part 2 Pros and Cons of AR and VR Conferencing

01Pros of AR and VR Conferencing
● This technology has an initial purpose to save time and energy for the workers including daily travel and balancing personal and professional commitments.
● Employers can hire people from remote places based on their skills and without worrying about the distance and timezone gap.
● Additional resources like bigger office space, electricity, and water can be saved if augmented reality video conferencing is in a complete performance.
● Positive collaboration can be expected while the employees have more energy and a comfortable environment to work in. As a result, productivity might take a boost as well.
● AR video conference serves a better experience than normal video conference in Zoom or Google meeting.
02Cons of AR and VR Conferencing
● The whole process is still under experiment and there’s no confirmed news about its beginning. So, there’s no practical feedback on the process of installation, usage, and maintenance.
● It would be expensive and time-consuming to set up a virtual reality conference system in a big office with n number of people.
● Technical fault from the office or from employees’ home can cost serious penalties in the business workflow.
● Hardware limitations like limited battery life, expensive headsets, and wireless connection are required and these things can cause problems while implementation.
● It can be uncomfortable to wear headsets for a long time during augmented reality conferencing andpeople can experience motion sickness due to this.
Part 3 How does ** Wondershare Filmora Video Editor
To use AR and VR professionally at a larger scale, the videos need to be seamless and follow some standard parameters. With Filmora, it would be easier to manage all the videos during an augmented reality video conferencing. There are multiple effects like “Motion Tracking”, “Keyframing”, “Audio ducking”, “Speed Control”, and “Color matching” that are required while managing a virtual conference with multiple people. It’s important to match the environment thoroughly so there’s no lack of concentration and inferiority in the system.
For Win 7 or later (64-bit)
For macOS 10.12 or later
From a business perspective, a video editor has many roles to play. Similarly, for a modern integration like AR and VR video conferencing, the required tools cannot be compromised. With facilities like “Green screen”, “Audio equalizer”, “Split screen”, “3D Lut”, etc. augmented reality would be presented smartly. To match the whole office environment as effectively as the real (present) one and to boost collaboration in the workspace, new generation video editing tools like Filmora is a must. With minimal effort, virtual meetings can be arranged and presented with the key goal to work at a global level and minimize the distance barrier.
● Ending Thoughts →
● Augmented reality conferencing is at an experiment level now and it is expected to be integrated with the real-life workflow sooner.
● As discussed, there’re both advantages and disadvantages of this technology right now. To enhance the facilities and diminish the cons, a smart video editor can be the gamechanger. In this article, you can find all the current news about AR adaptation for workspace collaboration in detail.
What Is MKV Format and How To Play MKV Video?
MKV file format is a popularly adopted format. The format is easily accessible digital, and self-documented. The only problem people face with different formats is their compatibility. If you are trying to play an MKV video but facing problems, read the article below.
We will discuss the MKV video format, how it works, the way to play it, and other things you need to know. Stay with us; we are about to begin.
In this article
03 How to Play MKV Video Files on VLC Media Player?
04 How Can You Edit Video Files with Filmora Video Editor?
05 Which One Is Better? MKV or MOV?
Part 1: What is MKV format?
The MKV format, known as Matroska, was developed in 2002. This is an open standard video format. Different media files have different encoding, yet MKV stores various multimedia files as it is a container. Do you know what the format is widely used for? Well, the MKV file format is popularly used for online video streaming and also HD videos.

Typically, the format is used to store video clips, movies, and also TV shows. Among the list of audio and video codecs that MKV support, a few are VobSub subtitles, .SRT, .SSA, and .USF. The MKV container file format is famous in the anime fansubbing world. Many users create subtitles with this as the MKV video format supports various audio and subtitle tracks in one same file.
Part 2. How Does A MKV Video Work?
What do you know about the working of the MKV file? If you don’t have much knowledge, let’s share everything you need to know. The MKV format supports 3D objects and also subtitles. The file format is capable of running on both Windows and Mac. Interestingly, the MKV format supports all video and audio coding formats.
Let us clarify something, MKV file format is not an audio-video compression codec; it is a container format used to store subtitles, audio, video in a single file. Surprisingly, the MKV video format is also great for storing complete movies or CDs.
Do you know one amazing thing about MKV? It’s error-resilient; this means if your file is corrupted, it can recover the playback. The open-source format is great for describing technical information and commercial groups.
Part 3. How to Play MKV Video Files on VLC Media Player?
Different platforms support different formats like this MKV file format supported by Microsoft Movies & TV, VLC Media Player, and MPlayer. We will share how you can play MKV video files on VLC Media Player for the current article. If you don’t know, VLC is a cross-platform media player that supports most of the file formats, streaming protocols, DVDs, VCDs, Audio CDs, etc.
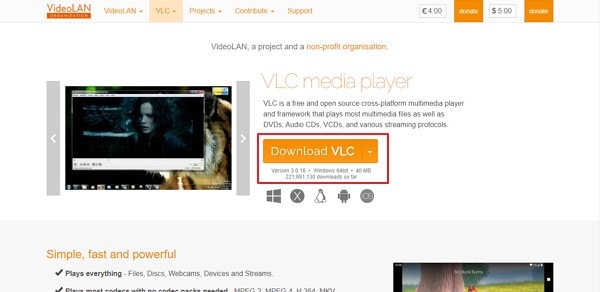
Interestingly, the media players work on all platforms like Windows, Mac, Linux, iOS, Android, etc. Do you know that the media playing software is free? Well, it is. It has no spyware and no user tracking. If you are interested in learning about how to play MKV video format on VLC, follow the steps below:
Step 1: Start by installing VLC Media Player on your respective device. It is possible you might have already installed VLC; what to do now? If this is the case, then open VLC and head over to the ‘Help’ option. There select the ‘Check for Updates’ option to update your VLC to the latest version for better performance.
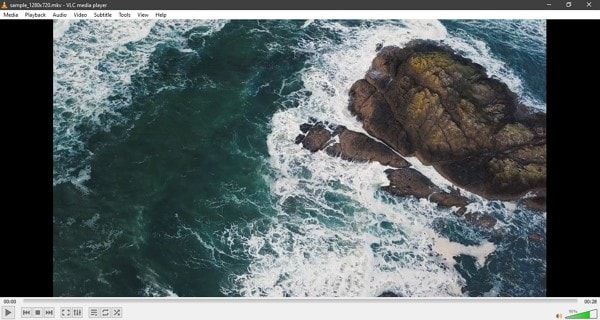
Step 2: After you have either installed or updated VLC Media Player, launch it and move to the ‘Media’ option from the top bar. Next, select the ‘Open File’ option from the menu list and look for the MKV format video in your device to add to the media player. You can also add files to VLC by directly dragging them to the media player.

Step 3: Have you successfully imported the MKV file? If yes, then your video will start playing, and you can enjoy watching your videos with VLC.
Part 4. How Can You Edit Video Files with Filmora Video Editor?
You must have heard about Wondershare Filmora , as a great video editor. The software is used everywhere, by professionals, beginners, everyone. Do you not know much about it? Let us tell you! Whenever you plan to edit your MKV video format files, make sure you try Filmora. The video editor comes with uncountable features and offers limitless editing capabilities.
For Win 7 or later (64-bit)
For macOS 10.12 or later
While editing with Filmora, you never have to worry about video effects, transitions, titles, or anything. Do you know why? This is because Filmora provides every editing element. Let’s talk more about its features:
Audio Section
From the top menu bar on Filmora, you get an Audio section. This section can do wonders for your MVK format video. If you are looking for suitable audio to add to your video, try the audio collection from the audio section. You get sound effects of various types like Jazz, Rock, Happy, etc. You also get a wide variety of musical sounds, human sounds, etc.
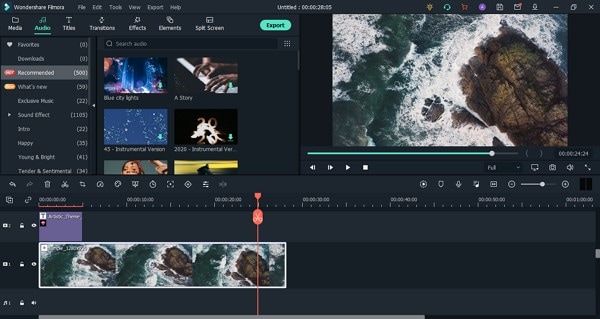
Audio Editing Capacity
We must have mentioned above that apart from video editing; you get options for Audio Editing. Do you know what you can do? Start by accessing the Audio Editor by double-clicking on the audio file now, and you can do whatever you like.
For instance, the software offers features like Detach Audio from video, Mute video. Or even the advanced features offer Silence Detection, which automatically detects silence and crops the part.

Add Transitions and Titles
Like we said earlier, you don’t have to worry about transitions and titles with Filmora; this is because an independent section has been given to both the categories that are loaded with wide crazy options. Like if you head to the Transitions tab, you will get options like Speed Blur, Basic, Ripple & Dissolve, and others.
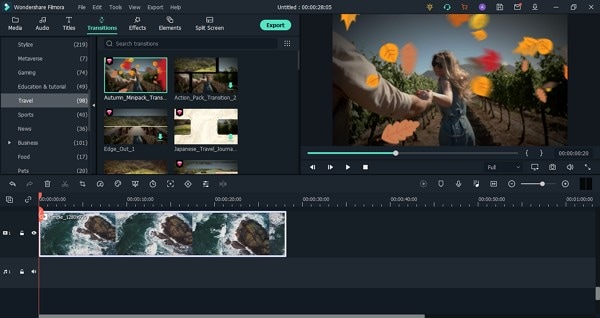
Whereas, if you open the Titles section, you will get various templates. The software offers Lower Thirds, Subtitles, Openers, etc. With Filmora, you get Titles and Transitions according to recent events and occasions.
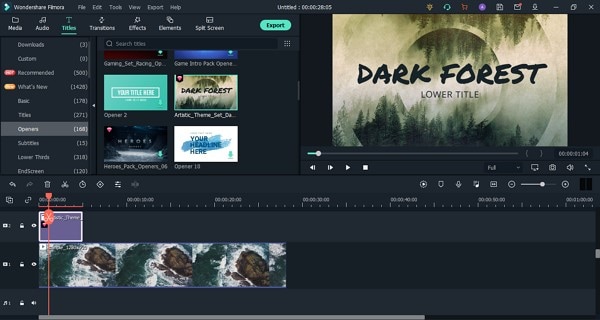
Cool Elements
For video editing, effects and transitions are not everything. Although they play a vital role in setting and making a good video but do, you know what else matters? Let’s guide you. To make creative and eye-catching content, you need to add elements.
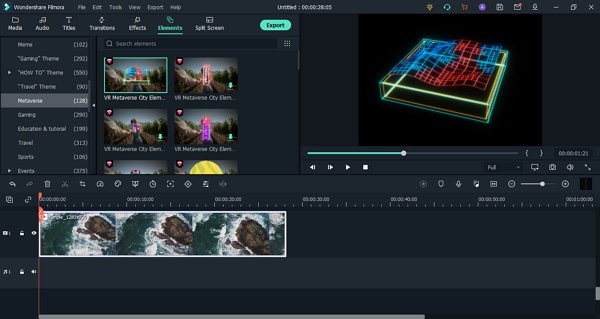
With Filmora, you get tons of great elements that can sustain your viewer’s interest. You can select between the various options like Subscribe Chanel, Share, Count Down, Metaverse, and much more than this. You can also get your hands-on Background Elements, Social Media Elements, etc.
Part 5. Which One Is Better? MKV or MOV?
MKV file format is not as commonly used as MOV because of its poor compatibility when it comes to mobile devices. If we talk about the file size, MKV tends to have a larger file size as compared to other used formats. MOV is a container file format that can store multiple media files of different tracks. Whereas MKV is an envelope format, even supporting to store complete movies with subtitles.
MKV format was developed by Matroska, whereas Apple developed the MOV file format. MKV format is good for storing HD videos, and MOV format is great for saving movies.
Last Words
MKV format is a container format that can store different files with different encodings. The article above has discussed the file format in detail. We talked about how you can use the format, play MKV video format, and also how to edit MKV videos. We will conclude the article by suggesting a great video editor, Wondershare Filmora.
Features like Keyframing, Motion Tracking are offered by the software. Along with this, some advanced-level features are also provided, like Advanced Color Tuning, Green Screen, Video Snapshot, and many others. So, for creating a nice video with great editing elements, Wondershare Filmora is a must.
For Win 7 or later (64-bit)
For macOS 10.12 or later
03 How to Play MKV Video Files on VLC Media Player?
04 How Can You Edit Video Files with Filmora Video Editor?
05 Which One Is Better? MKV or MOV?
Part 1: What is MKV format?
The MKV format, known as Matroska, was developed in 2002. This is an open standard video format. Different media files have different encoding, yet MKV stores various multimedia files as it is a container. Do you know what the format is widely used for? Well, the MKV file format is popularly used for online video streaming and also HD videos.

Typically, the format is used to store video clips, movies, and also TV shows. Among the list of audio and video codecs that MKV support, a few are VobSub subtitles, .SRT, .SSA, and .USF. The MKV container file format is famous in the anime fansubbing world. Many users create subtitles with this as the MKV video format supports various audio and subtitle tracks in one same file.
Part 2. How Does A MKV Video Work?
What do you know about the working of the MKV file? If you don’t have much knowledge, let’s share everything you need to know. The MKV format supports 3D objects and also subtitles. The file format is capable of running on both Windows and Mac. Interestingly, the MKV format supports all video and audio coding formats.
Let us clarify something, MKV file format is not an audio-video compression codec; it is a container format used to store subtitles, audio, video in a single file. Surprisingly, the MKV video format is also great for storing complete movies or CDs.
Do you know one amazing thing about MKV? It’s error-resilient; this means if your file is corrupted, it can recover the playback. The open-source format is great for describing technical information and commercial groups.
Part 3. How to Play MKV Video Files on VLC Media Player?
Different platforms support different formats like this MKV file format supported by Microsoft Movies & TV, VLC Media Player, and MPlayer. We will share how you can play MKV video files on VLC Media Player for the current article. If you don’t know, VLC is a cross-platform media player that supports most of the file formats, streaming protocols, DVDs, VCDs, Audio CDs, etc.
Interestingly, the media players work on all platforms like Windows, Mac, Linux, iOS, Android, etc. Do you know that the media playing software is free? Well, it is. It has no spyware and no user tracking. If you are interested in learning about how to play MKV video format on VLC, follow the steps below:
Step 1: Start by installing VLC Media Player on your respective device. It is possible you might have already installed VLC; what to do now? If this is the case, then open VLC and head over to the ‘Help’ option. There select the ‘Check for Updates’ option to update your VLC to the latest version for better performance.

Step 2: After you have either installed or updated VLC Media Player, launch it and move to the ‘Media’ option from the top bar. Next, select the ‘Open File’ option from the menu list and look for the MKV format video in your device to add to the media player. You can also add files to VLC by directly dragging them to the media player.

Step 3: Have you successfully imported the MKV file? If yes, then your video will start playing, and you can enjoy watching your videos with VLC.

Part 4. How Can You Edit Video Files with Filmora Video Editor?
You must have heard about Wondershare Filmora , as a great video editor. The software is used everywhere, by professionals, beginners, everyone. Do you not know much about it? Let us tell you! Whenever you plan to edit your MKV video format files, make sure you try Filmora. The video editor comes with uncountable features and offers limitless editing capabilities.
For Win 7 or later (64-bit)
For macOS 10.12 or later
While editing with Filmora, you never have to worry about video effects, transitions, titles, or anything. Do you know why? This is because Filmora provides every editing element. Let’s talk more about its features:
Audio Section
From the top menu bar on Filmora, you get an Audio section. This section can do wonders for your MVK format video. If you are looking for suitable audio to add to your video, try the audio collection from the audio section. You get sound effects of various types like Jazz, Rock, Happy, etc. You also get a wide variety of musical sounds, human sounds, etc.

Audio Editing Capacity
We must have mentioned above that apart from video editing; you get options for Audio Editing. Do you know what you can do? Start by accessing the Audio Editor by double-clicking on the audio file now, and you can do whatever you like.
For instance, the software offers features like Detach Audio from video, Mute video. Or even the advanced features offer Silence Detection, which automatically detects silence and crops the part.

Add Transitions and Titles
Like we said earlier, you don’t have to worry about transitions and titles with Filmora; this is because an independent section has been given to both the categories that are loaded with wide crazy options. Like if you head to the Transitions tab, you will get options like Speed Blur, Basic, Ripple & Dissolve, and others.

Whereas, if you open the Titles section, you will get various templates. The software offers Lower Thirds, Subtitles, Openers, etc. With Filmora, you get Titles and Transitions according to recent events and occasions.

Cool Elements
For video editing, effects and transitions are not everything. Although they play a vital role in setting and making a good video but do, you know what else matters? Let’s guide you. To make creative and eye-catching content, you need to add elements.

With Filmora, you get tons of great elements that can sustain your viewer’s interest. You can select between the various options like Subscribe Chanel, Share, Count Down, Metaverse, and much more than this. You can also get your hands-on Background Elements, Social Media Elements, etc.
Part 5. Which One Is Better? MKV or MOV?
MKV file format is not as commonly used as MOV because of its poor compatibility when it comes to mobile devices. If we talk about the file size, MKV tends to have a larger file size as compared to other used formats. MOV is a container file format that can store multiple media files of different tracks. Whereas MKV is an envelope format, even supporting to store complete movies with subtitles.
MKV format was developed by Matroska, whereas Apple developed the MOV file format. MKV format is good for storing HD videos, and MOV format is great for saving movies.
Last Words
MKV format is a container format that can store different files with different encodings. The article above has discussed the file format in detail. We talked about how you can use the format, play MKV video format, and also how to edit MKV videos. We will conclude the article by suggesting a great video editor, Wondershare Filmora.
Features like Keyframing, Motion Tracking are offered by the software. Along with this, some advanced-level features are also provided, like Advanced Color Tuning, Green Screen, Video Snapshot, and many others. So, for creating a nice video with great editing elements, Wondershare Filmora is a must.
For Win 7 or later (64-bit)
For macOS 10.12 or later
03 How to Play MKV Video Files on VLC Media Player?
04 How Can You Edit Video Files with Filmora Video Editor?
05 Which One Is Better? MKV or MOV?
Part 1: What is MKV format?
The MKV format, known as Matroska, was developed in 2002. This is an open standard video format. Different media files have different encoding, yet MKV stores various multimedia files as it is a container. Do you know what the format is widely used for? Well, the MKV file format is popularly used for online video streaming and also HD videos.

Typically, the format is used to store video clips, movies, and also TV shows. Among the list of audio and video codecs that MKV support, a few are VobSub subtitles, .SRT, .SSA, and .USF. The MKV container file format is famous in the anime fansubbing world. Many users create subtitles with this as the MKV video format supports various audio and subtitle tracks in one same file.
Part 2. How Does A MKV Video Work?
What do you know about the working of the MKV file? If you don’t have much knowledge, let’s share everything you need to know. The MKV format supports 3D objects and also subtitles. The file format is capable of running on both Windows and Mac. Interestingly, the MKV format supports all video and audio coding formats.
Let us clarify something, MKV file format is not an audio-video compression codec; it is a container format used to store subtitles, audio, video in a single file. Surprisingly, the MKV video format is also great for storing complete movies or CDs.
Do you know one amazing thing about MKV? It’s error-resilient; this means if your file is corrupted, it can recover the playback. The open-source format is great for describing technical information and commercial groups.
Part 3. How to Play MKV Video Files on VLC Media Player?
Different platforms support different formats like this MKV file format supported by Microsoft Movies & TV, VLC Media Player, and MPlayer. We will share how you can play MKV video files on VLC Media Player for the current article. If you don’t know, VLC is a cross-platform media player that supports most of the file formats, streaming protocols, DVDs, VCDs, Audio CDs, etc.
Interestingly, the media players work on all platforms like Windows, Mac, Linux, iOS, Android, etc. Do you know that the media playing software is free? Well, it is. It has no spyware and no user tracking. If you are interested in learning about how to play MKV video format on VLC, follow the steps below:
Step 1: Start by installing VLC Media Player on your respective device. It is possible you might have already installed VLC; what to do now? If this is the case, then open VLC and head over to the ‘Help’ option. There select the ‘Check for Updates’ option to update your VLC to the latest version for better performance.

Step 2: After you have either installed or updated VLC Media Player, launch it and move to the ‘Media’ option from the top bar. Next, select the ‘Open File’ option from the menu list and look for the MKV format video in your device to add to the media player. You can also add files to VLC by directly dragging them to the media player.

Step 3: Have you successfully imported the MKV file? If yes, then your video will start playing, and you can enjoy watching your videos with VLC.

Part 4. How Can You Edit Video Files with Filmora Video Editor?
You must have heard about Wondershare Filmora , as a great video editor. The software is used everywhere, by professionals, beginners, everyone. Do you not know much about it? Let us tell you! Whenever you plan to edit your MKV video format files, make sure you try Filmora. The video editor comes with uncountable features and offers limitless editing capabilities.
For Win 7 or later (64-bit)
For macOS 10.12 or later
While editing with Filmora, you never have to worry about video effects, transitions, titles, or anything. Do you know why? This is because Filmora provides every editing element. Let’s talk more about its features:
Audio Section
From the top menu bar on Filmora, you get an Audio section. This section can do wonders for your MVK format video. If you are looking for suitable audio to add to your video, try the audio collection from the audio section. You get sound effects of various types like Jazz, Rock, Happy, etc. You also get a wide variety of musical sounds, human sounds, etc.

Audio Editing Capacity
We must have mentioned above that apart from video editing; you get options for Audio Editing. Do you know what you can do? Start by accessing the Audio Editor by double-clicking on the audio file now, and you can do whatever you like.
For instance, the software offers features like Detach Audio from video, Mute video. Or even the advanced features offer Silence Detection, which automatically detects silence and crops the part.

Add Transitions and Titles
Like we said earlier, you don’t have to worry about transitions and titles with Filmora; this is because an independent section has been given to both the categories that are loaded with wide crazy options. Like if you head to the Transitions tab, you will get options like Speed Blur, Basic, Ripple & Dissolve, and others.

Whereas, if you open the Titles section, you will get various templates. The software offers Lower Thirds, Subtitles, Openers, etc. With Filmora, you get Titles and Transitions according to recent events and occasions.

Cool Elements
For video editing, effects and transitions are not everything. Although they play a vital role in setting and making a good video but do, you know what else matters? Let’s guide you. To make creative and eye-catching content, you need to add elements.

With Filmora, you get tons of great elements that can sustain your viewer’s interest. You can select between the various options like Subscribe Chanel, Share, Count Down, Metaverse, and much more than this. You can also get your hands-on Background Elements, Social Media Elements, etc.
Part 5. Which One Is Better? MKV or MOV?
MKV file format is not as commonly used as MOV because of its poor compatibility when it comes to mobile devices. If we talk about the file size, MKV tends to have a larger file size as compared to other used formats. MOV is a container file format that can store multiple media files of different tracks. Whereas MKV is an envelope format, even supporting to store complete movies with subtitles.
MKV format was developed by Matroska, whereas Apple developed the MOV file format. MKV format is good for storing HD videos, and MOV format is great for saving movies.
Last Words
MKV format is a container format that can store different files with different encodings. The article above has discussed the file format in detail. We talked about how you can use the format, play MKV video format, and also how to edit MKV videos. We will conclude the article by suggesting a great video editor, Wondershare Filmora.
Features like Keyframing, Motion Tracking are offered by the software. Along with this, some advanced-level features are also provided, like Advanced Color Tuning, Green Screen, Video Snapshot, and many others. So, for creating a nice video with great editing elements, Wondershare Filmora is a must.
For Win 7 or later (64-bit)
For macOS 10.12 or later
03 How to Play MKV Video Files on VLC Media Player?
04 How Can You Edit Video Files with Filmora Video Editor?
05 Which One Is Better? MKV or MOV?
Part 1: What is MKV format?
The MKV format, known as Matroska, was developed in 2002. This is an open standard video format. Different media files have different encoding, yet MKV stores various multimedia files as it is a container. Do you know what the format is widely used for? Well, the MKV file format is popularly used for online video streaming and also HD videos.

Typically, the format is used to store video clips, movies, and also TV shows. Among the list of audio and video codecs that MKV support, a few are VobSub subtitles, .SRT, .SSA, and .USF. The MKV container file format is famous in the anime fansubbing world. Many users create subtitles with this as the MKV video format supports various audio and subtitle tracks in one same file.
Part 2. How Does A MKV Video Work?
What do you know about the working of the MKV file? If you don’t have much knowledge, let’s share everything you need to know. The MKV format supports 3D objects and also subtitles. The file format is capable of running on both Windows and Mac. Interestingly, the MKV format supports all video and audio coding formats.
Let us clarify something, MKV file format is not an audio-video compression codec; it is a container format used to store subtitles, audio, video in a single file. Surprisingly, the MKV video format is also great for storing complete movies or CDs.
Do you know one amazing thing about MKV? It’s error-resilient; this means if your file is corrupted, it can recover the playback. The open-source format is great for describing technical information and commercial groups.
Part 3. How to Play MKV Video Files on VLC Media Player?
Different platforms support different formats like this MKV file format supported by Microsoft Movies & TV, VLC Media Player, and MPlayer. We will share how you can play MKV video files on VLC Media Player for the current article. If you don’t know, VLC is a cross-platform media player that supports most of the file formats, streaming protocols, DVDs, VCDs, Audio CDs, etc.
Interestingly, the media players work on all platforms like Windows, Mac, Linux, iOS, Android, etc. Do you know that the media playing software is free? Well, it is. It has no spyware and no user tracking. If you are interested in learning about how to play MKV video format on VLC, follow the steps below:
Step 1: Start by installing VLC Media Player on your respective device. It is possible you might have already installed VLC; what to do now? If this is the case, then open VLC and head over to the ‘Help’ option. There select the ‘Check for Updates’ option to update your VLC to the latest version for better performance.

Step 2: After you have either installed or updated VLC Media Player, launch it and move to the ‘Media’ option from the top bar. Next, select the ‘Open File’ option from the menu list and look for the MKV format video in your device to add to the media player. You can also add files to VLC by directly dragging them to the media player.

Step 3: Have you successfully imported the MKV file? If yes, then your video will start playing, and you can enjoy watching your videos with VLC.

Part 4. How Can You Edit Video Files with Filmora Video Editor?
You must have heard about Wondershare Filmora , as a great video editor. The software is used everywhere, by professionals, beginners, everyone. Do you not know much about it? Let us tell you! Whenever you plan to edit your MKV video format files, make sure you try Filmora. The video editor comes with uncountable features and offers limitless editing capabilities.
For Win 7 or later (64-bit)
For macOS 10.12 or later
While editing with Filmora, you never have to worry about video effects, transitions, titles, or anything. Do you know why? This is because Filmora provides every editing element. Let’s talk more about its features:
Audio Section
From the top menu bar on Filmora, you get an Audio section. This section can do wonders for your MVK format video. If you are looking for suitable audio to add to your video, try the audio collection from the audio section. You get sound effects of various types like Jazz, Rock, Happy, etc. You also get a wide variety of musical sounds, human sounds, etc.

Audio Editing Capacity
We must have mentioned above that apart from video editing; you get options for Audio Editing. Do you know what you can do? Start by accessing the Audio Editor by double-clicking on the audio file now, and you can do whatever you like.
For instance, the software offers features like Detach Audio from video, Mute video. Or even the advanced features offer Silence Detection, which automatically detects silence and crops the part.

Add Transitions and Titles
Like we said earlier, you don’t have to worry about transitions and titles with Filmora; this is because an independent section has been given to both the categories that are loaded with wide crazy options. Like if you head to the Transitions tab, you will get options like Speed Blur, Basic, Ripple & Dissolve, and others.

Whereas, if you open the Titles section, you will get various templates. The software offers Lower Thirds, Subtitles, Openers, etc. With Filmora, you get Titles and Transitions according to recent events and occasions.

Cool Elements
For video editing, effects and transitions are not everything. Although they play a vital role in setting and making a good video but do, you know what else matters? Let’s guide you. To make creative and eye-catching content, you need to add elements.

With Filmora, you get tons of great elements that can sustain your viewer’s interest. You can select between the various options like Subscribe Chanel, Share, Count Down, Metaverse, and much more than this. You can also get your hands-on Background Elements, Social Media Elements, etc.
Part 5. Which One Is Better? MKV or MOV?
MKV file format is not as commonly used as MOV because of its poor compatibility when it comes to mobile devices. If we talk about the file size, MKV tends to have a larger file size as compared to other used formats. MOV is a container file format that can store multiple media files of different tracks. Whereas MKV is an envelope format, even supporting to store complete movies with subtitles.
MKV format was developed by Matroska, whereas Apple developed the MOV file format. MKV format is good for storing HD videos, and MOV format is great for saving movies.
Last Words
MKV format is a container format that can store different files with different encodings. The article above has discussed the file format in detail. We talked about how you can use the format, play MKV video format, and also how to edit MKV videos. We will conclude the article by suggesting a great video editor, Wondershare Filmora.
Features like Keyframing, Motion Tracking are offered by the software. Along with this, some advanced-level features are also provided, like Advanced Color Tuning, Green Screen, Video Snapshot, and many others. So, for creating a nice video with great editing elements, Wondershare Filmora is a must.
For Win 7 or later (64-bit)
For macOS 10.12 or later
Learn to Create Custom Sequence Presets in Premiere Pro for Efficient Video Editing. Ensure Consistency and Speed up Your Workflow with Personalized Settings
You’ve probably heard of Adobe Premiere Pro – it’s a top-tier video editing software that’s widely recognized in the market. But have you delved into the nitty-gritty of sequence presets? A custom sequence preset is your best friend for maintaining consistency across projects.
It allows users to save specific settings for sequence attributes like frame rate, resolution, and audio settings. Instead of reconfiguring these settings for each new project, a custom sequence preset lets you jump right into editing. Now, how do you create one? Keep reading!
Part 1: How to Create a Custom Sequence in Premiere Pro
Creating a custom sequence is like tailoring a shirt to fit you perfectly. Here’s a step-by-step guide to help you do just that:
Step 1: Displays the New Sequence Window
Begin by launching Adobe Premiere Pro. Once opened, navigate to the top menu and select File > New > Sequence. This will open up the New Sequence window, where all the magic happens!
Step 2: Change the Editing Mode to Custom in the Settings Panel
You’ll see several tabs in the New Sequence window, but we will focus on the “Settings” tab for our purposes. Click on it.
Here, you’ll find the ‘Editing Mode’ dropdown menu. By default, it’s set to a specific format like ‘DSLR’ or ‘AVCHD.’ Change this to ‘Custom.’ This will unlock a plethora of options for you to play with.
Deep Dive into Settings:
- Frame Size: Define your video’s width and height. Remember, 1920x1080 is Full HD, and 3840x2160 is 4K. Choose based on your project needs.
- Frame Rate: 24fps is the cinematic standard, but if you’re creating content for TV or web, 30fps or 60fps might be more suitable.
- Pixel Aspect Ratio: Stick with ‘Square Pixels’ unless you have a specific reason to do otherwise.
- Fields: Choose ‘No Fields’ for progressive footage. If you’re unsure, this is a safe bet.
- Audio Settings: Here, you can configure the sample rate, among other things. 48000Hz is standard for video.
Step 3: Give the New Preset a Name and Save It
Once you’ve customized the settings to your satisfaction, it’s time to save this configuration for future use. At the bottom of the New Sequence window, you’ll see a ‘Save Preset’ button. Click on it.
A pop-up window will show up, requesting you to provide a name for your new preset. Choose something descriptive so you can easily recognize it later. Once named, click ‘OK’.
Your custom sequence preset is now saved and will appear under the ‘Custom’ folder in the ‘Sequence Presets’ tab.
Part 2: Why Custom Sequence Presets are Essential for Efficient Editing
As you delve deeper into video editing, you’ll begin to appreciate the little things that shave off minutes from your workflow, allowing you to dedicate more time to the creative process. This is precisely where the utility of custom sequence presets in Premiere Pro comes into play. But why are these presets so crucial?
- Consistency Across Projects: If you’re managing multiple projects or a series of videos, having a standard format ensures that all your content has a uniform look and feel. Consistency is a hallmark of professional-grade content. It’s not just about the visuals – maintaining a uniform audio quality and format is equally significant. With a preset, you no longer need to remember the minutiae of each setting, ensuring consistency effortlessly.
- Speed Up Your Workflow: Every minute you spend adjusting the sequence settings is a minute less you have for cutting, color correcting, audio mixing, or adding those special effects that make your videos pop. Over time, those minutes can add up to hours. By using a custom sequence preset, you can jump straight into the creative part of editing without the preliminary setup.
- Avoid Common Mistakes: Have you ever rendered an entire project only to find that the frame rate was off or the audio was set to the wrong sample rate? These kinds of errors can occur when setting up a new sequence from scratch each time. By relying on a preset, you mitigate the risks of such oversights.
- Personalized Templates for Different Platforms: Different platforms may have varying preferred settings. For instance, the ideal video format for YouTube might differ from that of Instagram or TikTok. Instead of Googling these settings each time, you can have a custom sequence preset ready for each platform, ensuring your content is optimized wherever it’s destined.
- Ease of Collaboration: If you’re working as part of a team, having standard sequence presets ensures everyone is on the same page. This is particularly handy when multiple editors are working on different segments of the same project. With custom presets, you’re not just aligning sequences but also visions.
Incorporating this practice into your editing routine might initially seem trivial, but its benefits compound with time.
Part 3: Summary
Creating a custom sequence preset in Adobe Premiere Pro isn’t just about streamlining your workflow – it’s about ensuring consistency across your projects.
By saving your most-used settings, you’re creating a base template that can be pulled up any time, granting you more time for the creative process.
Adobe Premiere Pro’s interface is designed to make tasks like these intuitive, so even if you’re a beginner, with a bit of practice, you’ll be creating custom sequence presets like a pro.
Also read:
- 2024 Approved How to Use Rule of Thirds in Video
- 2024 Approved Within the Realm of Graphic Editing, People Also Ask How to Add Emoji to Photo. Stay Tuned to Walk Through the Best Possible Solutions in the IT Market
- Do You Seek to Blur Out Your Video and Photo to Display some Motion Blur? This Article Provides a List of the Best Motion Blur Apps for Videos and Photos for 2024
- Land Into the Thrill of Creating Stunning GIFs with Ezgif for 2024
- 2024 Approved Guide To Selecting and Using the Best Braw Luts
- 2024 Approved Top LUTs for Sony HLG to Download
- 2024 Approved How To Record Video in Slow Motion Comprehending Important Points
- Updated Add Some Shake to Videos with Alight Motion for 2024
- In 2024, How To Use Virtual Green Screen to Shoot Video
- Have You Ever Used an Adjustment Layer in Photoshop? Read This Article to Find Out How to Add, Resize, Change, and Use an Adjustment Layer in Photoshop Efficiently
- Updated Finding LUTs Made by Danny Gevirtz
- Updated | Best WMV to GIF Converters
- New Some Facts About GIF Background You Didnt Know
- Updated Want Make a Slide Show Video? Heres How for 2024
- Updated Step by Step to Cut Video in Adobe Premiere Pro
- New How To Polish Your Music Video Edits Using Filmora
- New 2024 Approved How to Remove Audio From Videos with FFmpeg?
- New How to Blur Faces in Your Video on iPhone for 2024
- Top 20 Slideshow Makers for Win/Mac/Online Review
- New In 2024, Guide to Create Intro Video with KineMaster
- Updated 2024 Approved Top 10 Fun Discord Bots You Need
- New In 2024, 10 Best Free Text to Speech Software Windows, Mac,Android, iPhone & Online
- 2024 Approved Want to Create an Impressive Video Collage but Clueless About the Best Tools? No Worries as We Are Here and Will Help You to Learn About the Best Video Collage Maker PC Tools
- New 7 Best MP4 Editors on Mac Edit MP4 in Mac for 2024
- How to Make A Jaw-Dropping Time Lapse Video for 2024
- New 2024 Approved | Zoom In and Zoom Out on YouTube
- New Create Perfect Slow Motion Videos With The Best CapCut Templates for 2024
- New 2024 Approved 3 Different Methods to Correct Color Distortion in Videos
- Updated 6 Instant Ways to Make Windows 10 Slideshow
- Learn About Open Broadcaster Software and How to Perform Obs Color Correction. Also, Explore the Various Aspects of Color Correction Like Contrast, Brightness, Saturation, Among Others
- New Best Free LUTs to Use
- New Top 5 Apps To Add Song To Video
- The Necessity of the Creation of Video Content for Social Media Has Urged Many Editing Software to Come Out on the Market. We Have Reviewed some, Free of Them in This Article for You for 2024
- New 2024 Approved Create Intro Video with Flixpress
- EasyHDR Review Is This a Good Choice to Create HDR
- Updated Converting Files Is Easy with the Right Tools, and Likewise, GIF to JPG Conversion Is. Choose the Best Tool and Get the Expected Results Within the Blink of an Eye
- New Beginners Guide About WMV Format and Best WMV Video Editor for 2024
- Updated 6 Best Methods to Make a Video Longer for 2024
- New 2024 Approved How to Resize FLV Videos Efficiently Windows, Mac,Android, iPhone & Online
- 2024 Approved Are You Facing Trouble in Playing a TS File? We Got You! Read the Article Below to Learn the Most About TS Format, Pros and Cons, and More
- How to Create Your Own LUTs for Your Video with Filmora
- 2024 Approved 10 Best Text to Robot Voice Generators Windows, Mac, Android, iPhone & Online
- iPogo will be the new iSpoofer On Apple iPhone 7 Plus? | Dr.fone
- New The Best AI Translator to Translate Videos Online
- In 2024, 5 Ways to Track Xiaomi Redmi Note 12T Pro without App | Dr.fone
- How to Reset Apple iPhone 15 Pro to Factory Settings? | Dr.fone
- Updated 2024 Approved Must-Read Top 10 AI Realistic Avatar Generators
- How to Transfer Data After Switching From Realme 12+ 5G to Latest Samsung | Dr.fone
- How to Unlock iPhone 14 Plus When We Dont Have Apple ID or Password?
- In 2024, How To Pause Life360 Location Sharing For Realme GT Neo 5 SE | Dr.fone
- How to unlock iPhone XS Max without passcode
- How to Reset a Xiaomi Redmi 12 5G Phone that is Locked?
- Simple and Effective Ways to Change Your Country on YouTube App Of your Apple iPhone 8 Plus | Dr.fone
- Troubleshooting Error Connecting to the Apple ID Server From Apple iPhone 8
- Full Guide How To Fix Connection Is Not Private on Honor X9b | Dr.fone
- How To Remove Passcode From Apple iPhone XS Max? Complete Guide | Dr.fone
- Getting the Pokemon Go GPS Signal Not Found 11 Error in Vivo Y56 5G | Dr.fone
- Fix Unfortunately Settings Has Stopped on Vivo Y27s Quickly | Dr.fone
- In 2024, Apple iPhone 12 Pro Backup Password Never Set But Still Asking? Heres the Fix | Dr.fone
- 11 Ways to Fix it When My Vivo Y02T Wont Charge | Dr.fone
- Easy steps to recover deleted data from Asus ROG Phone 7
- How to Rescue Lost Pictures from Samsung Galaxy M34 5G?
- In 2024, Hassle-Free Ways to Remove FRP Lock on Tecno Pop 8 Phones with/without a PC
- How to play HEVC H.265 video on Edge 40?
- Title: Updated 2024 Approved Detailed Steps to Resize Video in Davinci Resolve
- Author: Chloe
- Created at : 2024-06-18 14:30:59
- Updated at : 2024-06-19 14:30:59
- Link: https://ai-editing-video.techidaily.com/updated-2024-approved-detailed-steps-to-resize-video-in-davinci-resolve/
- License: This work is licensed under CC BY-NC-SA 4.0.

