
:max_bytes(150000):strip_icc():format(webp)/homeweatherstation-34f9e9a9aaf64446a8f21ff05991c079.jpg)
Updated 2024 Approved Easy Way to Create a DIY Green Screen Video Effect
Easy Way to Create a DIY Green Screen Video Effect
No matter how big the budget of a Hollywood movie is, at the end of the day, it has to rely on the humble green screens for special video effects. The stunning studios from where your favorite YouTubers and gamers stream their videos are graphical video effects created through green screens. Even the studios that you see on TV channels are a graphical creation of green screens. You must be wondering how they could achieve such awesome graphics with a simple green screen.
All you need is a good-quality green fabric, a professional video editing software, and a camera. You may not believe it, but that is all you need for creating DIY green screen video effect. You do not have to be a professional video editor to edit the green screen on your videos and add any special video effect. In this article, you will learn how to create your own DIY green backdrop.
What Is Green Screen Technique?
A green screen is nothing but a green fabric. In a video, a green screen is placed in the background behind the subject. In the editing phase of the video, the green screen is replaced with any background image or video effect that stays intact in the video as long as possible. In short, the green screen technique involves superimposing photos and videos on the green screen in a video.
Starting from the video game industry, movie industry to video streaming and TV channels, the green screen technique is used everywhere. The stunning graphical component of these industries is totally dependent on the green screen technique. In fact, DIY green screen for zoom meetings and video conferencing is widely used. Along with that, YouTubers and Twitch streamers use DIY green screen for streaming live.
Technically speaking, instead of a green screen, you can use any other color of screen. However, green screens are widely used, and it has become a norm. The main point to remember when using a green screen is that nothing else should have green color such as the dresses the subject is wearing. Therefore, in technical terms, the green screen is referred to as Chroma Key, and you will find Chroma Key option instead of green screen in most video editors.
Why Use Green Screen Technique?
The main reason why the green screen technique is used in movie and video making is that the video editor can replace the entire background at once instead of replacing the background frame by frame. Once you replace a green screen with an image or video effect, it stays the same throughout the video as long as required.
Therefore, the video editor can save a lot of time in editing and the editing stays uniform throughout which gives a realistic effect. If the green screen technique is not used and editing is done frame by frame of a video, there could be a manual error, inconsistent, and graphical glitches.
You can replace green screens with anything you want. It could be a still image of a beautiful studio with 3D effect like you see in case of YouTubers and gamers. It could be a moving, real-life landscape on any place in the world instead of a beautiful background picture. Similarly, it could be replaced by video effects such as explosions, stadiums full of people, battlefields, and likewise. At times, it could be live animations as you see on TV channels.
How To Create DIY Green Screen Stand Setup and Add Green Screen Effect?
If you want to have a green screen setup for your video, you need to have the following things ready.
- A green cloth that is large enough to cover the entire background.
- A video editing software to replace green screen in your video with anything.
- External light for more video clarity and a good camera with mic.
Step 1: Setup DIY Green Backdrop
Your green fabric should be soft and bright. If you are going to be the subject of the video, make sure you are not wearing anything green. Moreover, do not keep any object within the video frame that is green in color. If there are too many green objects, you can use a blue screen.
When it comes to hanging the green cloth in the background, people find it very difficult. If your video frame is going to be a close-up to the subject, you can use a green screen panel to hang green cloth. A green screen panel generally has a collapsible structure for easy storage and transportation.
Otherwise, you need to install hooks in the wall if you are planning to replace the green screen with a studio-like scene so that the entire background of the video frame stays covered with green screen. You should opt for multiple green screens and stitch them together to cover the background completely.
Step 2: Setup Camera and Light
Whether you are shooting with a DSLR camera or smartphone camera or webcam, make sure you are shooting at least HD video quality so that the editing could be great. Lights are important when you are using green screen though they are not a necessity. The video quality and brightness get enhanced with lights. Diffused lights work the best and the background should be well-lit.
Most importantly, you have to place the lights in such a way that your body arms should not be casting any shadow on the green screen. You can either stand very close to the green screen or away from the green screen so that your shadow does not go till the green screen. Instead of starting to shoot the video from the very beginning, you should capture for a few seconds and make sure everything is perfect including the camera angle.
Step 3: Get The Best Video Editor For Green Screen Effect
There are various video editors available, but not all of them are suitable for green screen effect. We recommend Wondershare Filmora as the best video editor to apply green screen effects on your video while editing. The reason behind the recommendation is that the steps to replace the green screen with any image or video are super simple and anyone can do it. There is no need to be a professional video editor.
Wondershare Filmora also lets you capture video through webcam and you can also capture your screen. It is perfect for recording gameplay as well as your reaction and commentary. Similarly, you can record demonstrations, tutorial videos, as well as video conferences. You can apply green screen effects to your recorded video instantly and publish on different platforms. In fact, you can adjust all the parameters such as color scheme, audio ducking, keyframing, motion tracking and much more to enhance the video output quality.
Conclusion
Making videos with DIY green screen stand is no more an esoteric concept. You can set it up anywhere and start shooting video. The magic begins in the post-production stage where you can use Wondershare Filmora to replace the green screen with video effects that will blow the mind of your viewers and followers. Filmora has intuitive options and controls through which you can apply green screen effect in simple steps.
Step-by-Step Guide to Speed Up and Slow Down a Video
Speeding and slowing down the speed of a video is a marvel in the video editing world. In the older days, this feat was accomplished only by the big-budget filming industry.
This article will dive into how you can access the modern-day features available in video editing software. From these features, you can alter the speed of your video easily. However, before we get into the step-by-step guide, let’s understand what fast and slow-mo videos are.
Part 1. What Are Fast and Slow Motion Videos?
As the name suggests, fast-motion videos are the ones that have been sped up from their average speed.

Similarly, slow-motion videos are the ones that have been slowed down from their average speed. The slow-motion effect, also known as the slow-mo effect, is widespread in modern cinema.

Now that we know what Fast and slow-motion videos are. Let’s understand their applications. Or how you can use them in your videos. Scroll below to learn more!
Part 2. Why Should You Change the Speed of Your Videos?
The answer to this question would be that it’s a personal creative decision that will allow you to make your videos more engaging.
Fast Motion Videos
Fast-motion videos are used in many areas of filming. For example, you can speed up your videos to create a funny video or shorten its length.
The fast-motion effect has many applications, such as cooking tutorial videos. For example, the step-by-step process of a cooking tutorial can be too long to fit into a single video. Or it could also help you in cases where you want to keep the length of the video short.
The fast motion of the steps will allow the viewer to quickly grasp the whole process without watching the entire video.
Slow Motion Videos
You can also slow down your videos to give the viewers a more detailed perspective of a scene. Or you can also create a slow-mo video that offers a general surreal vibe.
A famous example is in action films. The producers of the first Matrix film used the Slow-mo effect in the famous bullet dodging scene.

You may wonder how the film producers made the slow-mo effect. The technology at that time was less developed than the recent day. So, even you can create a slow-mo effect.
Before we get into the editing process, let’s first understand what you will need to change the speed of your videos!
Part 3. What Will You Need to Change the Speed of Your Videos?
You will need the following essentials to change the speed of a video:
1. Wondershare Filmora
Free Download For Win 7 or later(64-bit)
Free Download For macOS 10.14 or later
To begin, you will need a good video editor. Wondershare Filmora is the best video editing software available. It has a very engaging system UI that allows inexperienced users to learn how to use it quickly. It also has a diverse collection of stock media. And not only that! It allows you to access reliable features to change the speed of a video.
You can change the speed of the video on Filmora by the speed adjustment panel or by the duration panel present above the timeline. It will adjust in just seconds with a few clicks. This feature makes Filmora more prior with editing tools.

2. Video Clips
Well, it is evident that to change the speed of your videos, you will need video clips. But there are a few things you can keep in mind before adjusting the speed of a video.
![]()
Note: Slowing down a video requires a shot at a higher frame rate. The greater the frame rate, the better will be the slow-mo quality. On the other hand, speeding up videos does not have a strict frame rate requirement.
Part 4. How Can You Change the Speed of Your Videos?
Here you will learn two ways in which you can change the speed of your videos. The two methods to change the speed of your video are mentioned:
- The speed adjustment panel.
- Duration panel settings.
Let’s get started with the editing process. The first method we will look into is the Speed Adjustment panel.
1. Change Speed With the Speed Adjustment Panel
The Speed Adjustment panel is the speed adjuster in the Wondershare Filmora software. This feature will give you a drag bar to adjust the speed of your video.
You can move the bar to the right to increase the speed of your video. Similarly, you can move it to the left to decrease the rate.
But before we use this feature, we will need to download the Filmora video editing software. So please scroll below to learn how to download it!
Step1 Download Filmora
First and foremost, you must have access to Filmora. For this, download Wondershare Filmora. Then, activate this app or software on your PC.
Step2 Import The Video Files
The next step after downloading Filmora is to import your video clips. To accomplish this, follow the steps outlined below:
- Locate and select the Import icon on the top left side of the Filmora Home Interface.
- It takes you to your computer’s library.
- Select the videos to be edited and then click OK.

You can also import the files by another method. After you have opened Filmora, you can restore the Filmora Window size and import by dragging and dropping the clips:
- Drag the cursor to select the video clips you want.
- Then, drop them in the Filmora import window.

Filmora supports various formats for your video clips. They include the Mp4, AVI, MOV, GIFs, and more.
After you have imported your video clips, add them to the timeline as shown below!
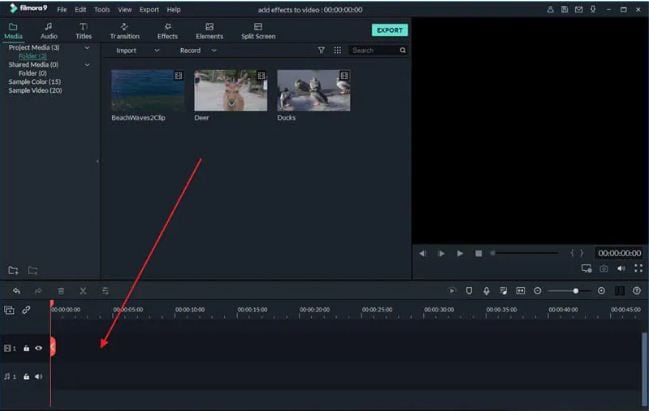
Step3 Add The Video Clips to The Timeline
After you’ve imported clips in the Import window, drag them onto the timeline. Follow the steps outlined below to accomplish this:
- Drag the clips into the import window and select them.
- Then, insert them into the timeline.

Now that we have our video clips in the timeline, we can start adjusting the speed.
Step4 Open the Speed Adjustment Panel
The speed adjustment panel, or the Uniform Speed, is the feature of Filmora that allows you to change the speed of your video. For example, to open the Unifrom Speed panel, do as follows:
- Double-click on the video clip.
- In the pop-up column, scroll down till you see the Unifrom Speed option and click on it.
- The speed controls will be shown in the import window.

In the speed control panel, you can see the speed adjuster slider. A number will usually mark this at the end. This number tells you the current speed your video is calibrated in and how fast or slow the motion effects will be.
1.00 is always the average speed. 0.5 being half and 2.00 being double the average speed. To control the speed through the slider, you will need to do the following:
- To increase the speed: Type in the number you want your rate to be. Or, drag the slider to the right as you wish.
- To decrease the speed: Type in a number less than the standard 1.00, or you can drag the slider to the left as you wish.
The number of your speed can be an inconvenience if you have no prior experience. Instead, render the video and play it from the beginning with the changes that you made. It gives you a better idea of the speed of your video.

Step5 Detach The Audio
The corresponding audio also gets affected when you slow down or speed up a video. In this scenario, you can also choose to detach the audio beforehand. It allows you to maintain the original playback speed. To detach the audio, follow the steps as mentioned:
- Right-click on the video clip.
- In the pop-up column, scroll down to the Detach Audio option and click on it.

It will create an audio file in a separate audio tab in the timeline. You can adjust this audio according to your liking. You can edit the detached audio by:
- Double-click on the audio file.
- A settings menu will open in the import window.
- Adjust the Fade options for your Audio.
- Drag the Fade out slider to the right to Fade out your Audio.
- To Fade in your Audio, drag the Fade in slider to the right.

You can also remove the background noise and the pitch of the audio if you want. You can also replace the video’s original audio with a new one. Click on the audio file and press Del on the keyboard to delete it. To add new audio, do as mentioned ahead:
- Click on The Audio icon above the import window.
- Browse The Audio that matches the vibe of your video.
- Drag and drop it below your video clip.

Doing so would have created alternate audio for your video. Play the video from the start and confirm your changes.
Step6 Save Your Project
Saving a project on Filmora is straightforward. First, you need a few steps to proceed with it. Then, when you are done making changes to the video, simply follow as guided ahead, and you’ll be good to go.
- On the Filmora home interface, Go to > File > Save Project.

- Select the Library/Folder where you want your project to be stored.
- Type in the text box to change the name of your project.

- Click on Save.
That’s about it! You have now saved your project. Now let’s move on to export our video.
Step7 Export Your Video
After we are done with saving our project, we will now move on to export our video.
![]()
Note: Before we export our video, ensure everything is according to your wish. Play the final video again and confirm your changes.
You can export your video to many of the available video formats. And not only that, but you can also export your video to local files and a specific device. You can also export your video directly to YouTube, Vimeo, and DVD format.

To export your video, all you have to do is the following steps:
- Click on Export.
- Type in the Video name.
- Select the Directory you want your file to be stored in.
- Select the Video Format.
- Select the Resolution of your Video.
![]()
Note: If you want to export your video directly to Youtube or Vimeo, ensure you are logged in.
- Click on Export.

Wait till Wondershare Filmora finishes exporting your video. Then, another window will pop up for a reminder when the shipping is done.
These were the methods by which you can change the speed of your video using the Speed Adjustment panel. Now let’s move on to the following method to adjust the speed via the Duration panel.
2. Change Speed via the Duration Panel
The duration panel is one the most valuable features of Wondershare Filmora as it allows you to change the video speed by duration adjustment.
This feature is typically helpful when you have a space between video clips and want to fill it. By measuring the time between the two clips, you can adjust the duration of your video.
It will ultimately hasten the speed of your video. The hastening in rate will depend upon the gap. The smaller the gap, the faster the video will be. Similarly, the greater the gap is, the longer the video will be.
Apart from the Speed Adjustment Panel, the Duration Panel has the advantage of editing the speed of your video by simply typing in the text.
Step1 Import Video Clips to Timeline
After downloading Filmora, the next step is importing your video clips. To do so, follow the steps outlined below:
- Locate and click the Import icon in the upper left corner of the Filmora Home Interface.
- Choose the videos to be edited, then click OK.
Now that you have imported files into Filmora, you can add them to the Timeline. Notice the steps mentioned ahead:
- Drag the clips into the import window and select them.
- Then, insert them into the timeline.
You can begin the editing process now that the clips are in the timeline.
Step2 Open The Duration Panel
The Duration Panel comes attached to the Unifrom Speed Panel. To access the Duration Panel, follow the steps ahead:
- Right-click on the video clip.
- In the pop column, scroll below to Unifrom Speed.
It will open the uniform speed panel in the import window. Below the speed of the controls, you can notice The Duration Panel.
Step3 Change The Speed of The Video
In The Duration Panel, you can see the average speed of your video clip. Now, if you want to reduce the speed of your video, you have to increase the duration of your video. Similarly, if you’re going to increase the speed of your video, you would have to decrease the duration.
Slow Down The Video
To slow down the video clip, follow the steps mentioned below:
- In The Duration Panel, Increase the time of the video.
- Type in a number bigger than the normal value
![]()
Note: If the average speed of the video is 00:01:00:00, increasing the value of the duration to 00:02:00:00 will reduce the speed of your video by half.

Speed Up The Video
To increase the speed of your video, follow as guided ahead:
- In The Duration Panel, decrease the time of the video.
- Type in a number smaller than the normal value
![]()
Note: If the normal video speed is 00:01:00:00, decreasing the value of the duration to 00:00:30:00 will increase the speed of your video by double.

Congratulations! You have successfully learned how to change the speed of your video by Filmora. Now, you can use both the Speed Adjustment Panel and The Duration Panel to adjust the speed of your video.
Conclusion
Changing the speed of your video can be helpful in many filming scenarios. Adjusting the speed in the older days was a marvel in the video editing industry. But the technology in the present day has allowed the typical user to edit the speed of a video.
By following the steps mentioned in this article, you can now change the speed of your video by Wondershare Filmora.
Free Download For macOS 10.14 or later
To begin, you will need a good video editor. Wondershare Filmora is the best video editing software available. It has a very engaging system UI that allows inexperienced users to learn how to use it quickly. It also has a diverse collection of stock media. And not only that! It allows you to access reliable features to change the speed of a video.
You can change the speed of the video on Filmora by the speed adjustment panel or by the duration panel present above the timeline. It will adjust in just seconds with a few clicks. This feature makes Filmora more prior with editing tools.
2. Video Clips
Well, it is evident that to change the speed of your videos, you will need video clips. But there are a few things you can keep in mind before adjusting the speed of a video.
![]()
Note: Slowing down a video requires a shot at a higher frame rate. The greater the frame rate, the better will be the slow-mo quality. On the other hand, speeding up videos does not have a strict frame rate requirement.
Part 4. How Can You Change the Speed of Your Videos?
Here you will learn two ways in which you can change the speed of your videos. The two methods to change the speed of your video are mentioned:
- The speed adjustment panel.
- Duration panel settings.
Let’s get started with the editing process. The first method we will look into is the Speed Adjustment panel.
1. Change Speed With the Speed Adjustment Panel
The Speed Adjustment panel is the speed adjuster in the Wondershare Filmora software. This feature will give you a drag bar to adjust the speed of your video.
You can move the bar to the right to increase the speed of your video. Similarly, you can move it to the left to decrease the rate.
But before we use this feature, we will need to download the Filmora video editing software. So please scroll below to learn how to download it!
Step1 Download Filmora
First and foremost, you must have access to Filmora. For this, download Wondershare Filmora. Then, activate this app or software on your PC.
Step2 Import The Video Files
The next step after downloading Filmora is to import your video clips. To accomplish this, follow the steps outlined below:
- Locate and select the Import icon on the top left side of the Filmora Home Interface.
- It takes you to your computer’s library.
- Select the videos to be edited and then click OK.
You can also import the files by another method. After you have opened Filmora, you can restore the Filmora Window size and import by dragging and dropping the clips:
- Drag the cursor to select the video clips you want.
- Then, drop them in the Filmora import window.
Filmora supports various formats for your video clips. They include the Mp4, AVI, MOV, GIFs, and more.
After you have imported your video clips, add them to the timeline as shown below!
Step3 Add The Video Clips to The Timeline
After you’ve imported clips in the Import window, drag them onto the timeline. Follow the steps outlined below to accomplish this:
- Drag the clips into the import window and select them.
- Then, insert them into the timeline.
Now that we have our video clips in the timeline, we can start adjusting the speed.
Step4 Open the Speed Adjustment Panel
The speed adjustment panel, or the Uniform Speed, is the feature of Filmora that allows you to change the speed of your video. For example, to open the Unifrom Speed panel, do as follows:
- Double-click on the video clip.
- In the pop-up column, scroll down till you see the Unifrom Speed option and click on it.
- The speed controls will be shown in the import window.
In the speed control panel, you can see the speed adjuster slider. A number will usually mark this at the end. This number tells you the current speed your video is calibrated in and how fast or slow the motion effects will be.
1.00 is always the average speed. 0.5 being half and 2.00 being double the average speed. To control the speed through the slider, you will need to do the following:
- To increase the speed: Type in the number you want your rate to be. Or, drag the slider to the right as you wish.
- To decrease the speed: Type in a number less than the standard 1.00, or you can drag the slider to the left as you wish.
The number of your speed can be an inconvenience if you have no prior experience. Instead, render the video and play it from the beginning with the changes that you made. It gives you a better idea of the speed of your video.
Step5 Detach The Audio
The corresponding audio also gets affected when you slow down or speed up a video. In this scenario, you can also choose to detach the audio beforehand. It allows you to maintain the original playback speed. To detach the audio, follow the steps as mentioned:
- Right-click on the video clip.
- In the pop-up column, scroll down to the Detach Audio option and click on it.
It will create an audio file in a separate audio tab in the timeline. You can adjust this audio according to your liking. You can edit the detached audio by:
- Double-click on the audio file.
- A settings menu will open in the import window.
- Adjust the Fade options for your Audio.
- Drag the Fade out slider to the right to Fade out your Audio.
- To Fade in your Audio, drag the Fade in slider to the right.
You can also remove the background noise and the pitch of the audio if you want. You can also replace the video’s original audio with a new one. Click on the audio file and press Del on the keyboard to delete it. To add new audio, do as mentioned ahead:
- Click on The Audio icon above the import window.
- Browse The Audio that matches the vibe of your video.
- Drag and drop it below your video clip.
Doing so would have created alternate audio for your video. Play the video from the start and confirm your changes.
Step6 Save Your Project
Saving a project on Filmora is straightforward. First, you need a few steps to proceed with it. Then, when you are done making changes to the video, simply follow as guided ahead, and you’ll be good to go.
- On the Filmora home interface, Go to > File > Save Project.
- Select the Library/Folder where you want your project to be stored.
- Type in the text box to change the name of your project.
- Click on Save.
That’s about it! You have now saved your project. Now let’s move on to export our video.
Step7 Export Your Video
After we are done with saving our project, we will now move on to export our video.
![]()
Note: Before we export our video, ensure everything is according to your wish. Play the final video again and confirm your changes.
You can export your video to many of the available video formats. And not only that, but you can also export your video to local files and a specific device. You can also export your video directly to YouTube, Vimeo, and DVD format.
To export your video, all you have to do is the following steps:
- Click on Export.
- Type in the Video name.
- Select the Directory you want your file to be stored in.
- Select the Video Format.
- Select the Resolution of your Video.
![]()
Note: If you want to export your video directly to Youtube or Vimeo, ensure you are logged in.
- Click on Export.
Wait till Wondershare Filmora finishes exporting your video. Then, another window will pop up for a reminder when the shipping is done.
These were the methods by which you can change the speed of your video using the Speed Adjustment panel. Now let’s move on to the following method to adjust the speed via the Duration panel.
2. Change Speed via the Duration Panel
The duration panel is one the most valuable features of Wondershare Filmora as it allows you to change the video speed by duration adjustment.
This feature is typically helpful when you have a space between video clips and want to fill it. By measuring the time between the two clips, you can adjust the duration of your video.
It will ultimately hasten the speed of your video. The hastening in rate will depend upon the gap. The smaller the gap, the faster the video will be. Similarly, the greater the gap is, the longer the video will be.
Apart from the Speed Adjustment Panel, the Duration Panel has the advantage of editing the speed of your video by simply typing in the text.
Step1 Import Video Clips to Timeline
After downloading Filmora, the next step is importing your video clips. To do so, follow the steps outlined below:
- Locate and click the Import icon in the upper left corner of the Filmora Home Interface.
- Choose the videos to be edited, then click OK.
Now that you have imported files into Filmora, you can add them to the Timeline. Notice the steps mentioned ahead:
- Drag the clips into the import window and select them.
- Then, insert them into the timeline.
You can begin the editing process now that the clips are in the timeline.
Step2 Open The Duration Panel
The Duration Panel comes attached to the Unifrom Speed Panel. To access the Duration Panel, follow the steps ahead:
- Right-click on the video clip.
- In the pop column, scroll below to Unifrom Speed.
It will open the uniform speed panel in the import window. Below the speed of the controls, you can notice The Duration Panel.
Step3 Change The Speed of The Video
In The Duration Panel, you can see the average speed of your video clip. Now, if you want to reduce the speed of your video, you have to increase the duration of your video. Similarly, if you’re going to increase the speed of your video, you would have to decrease the duration.
Slow Down The Video
To slow down the video clip, follow the steps mentioned below:
- In The Duration Panel, Increase the time of the video.
- Type in a number bigger than the normal value
![]()
Note: If the average speed of the video is 00:01:00:00, increasing the value of the duration to 00:02:00:00 will reduce the speed of your video by half.
Speed Up The Video
To increase the speed of your video, follow as guided ahead:
- In The Duration Panel, decrease the time of the video.
- Type in a number smaller than the normal value
![]()
Note: If the normal video speed is 00:01:00:00, decreasing the value of the duration to 00:00:30:00 will increase the speed of your video by double.
Congratulations! You have successfully learned how to change the speed of your video by Filmora. Now, you can use both the Speed Adjustment Panel and The Duration Panel to adjust the speed of your video.
Conclusion
Changing the speed of your video can be helpful in many filming scenarios. Adjusting the speed in the older days was a marvel in the video editing industry. But the technology in the present day has allowed the typical user to edit the speed of a video.
By following the steps mentioned in this article, you can now change the speed of your video by Wondershare Filmora.
Guide on VHS Technology and Its Influence on Video Editing
Videos are a person’s crucial and cherished memory, and no one wants to compromise their quality. People tend to rely on several effects to exceed the quality of the beloved videos. VHS is the most used effect, popular in professional and personal videos. It stands for “Video Home System” and is often integrated with noises, color bleeding, and smooth glitches.
With VHS-style videos, you can not only make videos more high-class but can also intuitively define their worth. If you are new to this field, you should get familiar with the VHS effects in video. This context will provide basic information about VHS tapes and how to add VHS effects to videos.
Part 1: What Is VHS Technology? An Overview of the 70s Sensation
From definition to usability, every piece of information plays an important role in your videography journey. Don’t worry if you don’t have video editing skills or know what VHS means. This section will provide you with reliable information about this:
What Do You Mean by VHS Technology?
VHS, also known as Video Home System, are the auditory artifacts and visual glitches you see in the pictures. It creates a sense of distortion in the video, making the viewer think the camera equipment is malfunctioning. From the 1980s to the 1990s, this effect gained considerable popularity among video creators and viewers.
In recent years, retro lovers have brought this intuitive effect again into a trend to create a perfect flashback scene. The nostalgic and vintage appeal of these effects is insane. VHS is not just one effect because it divides into further categories. You are also free to select the VHS effects according to the theme of your video and the scene you are going to create.
Key Aspects of The VHS Effects
Several key aspects are crucial to making high-quality VHS effects in the videos. You can see some of the key aspects listed and discussed here:
- **Tracking Lines of VHS:**The VHS tapes are integrated with magnetic strips to sort audio and video signals. However, over time, these tapes degraded, leading to glitches in playback with noticeable distortion.
- **Video Color Bleeding:**You must have noticed that color is bleeding in the VHS videos. In this, the colors in the videos are quite smudged and mixed. This together adds the unique yet smoother distortion in the videos.
- **Vintage and Glitching:**Vintage and glitches are essential to videos with VHS effects. This was initially caused by the limitations of playback equipment and signal interference. At this time, people add glitch VHS to the videos in a manual manner to add a sense of interference in the scene.
- **Noise and Jitters:**VHS tapes are known to be susceptible to wrappings and jitters. It causes a slightly unstable effect in the videos in the form of distorted objects. Moreover, the grainy and noisy appearance due to analog recording technology is also a part of this effect.

Add VHS Effect to Video
Simply add video effects on Video with Filmora Video Effect Editor ! Experience the magic of cool yet outstanding video effects, where your videos come to life in beautiful visuals.
Apply VHS Effect Apply VHS Effect Learn More >


Part 2: What are VHS Effects and What Is Its Use?
Now that you have learned what VHS technology is and what are its key aspects, you must be eager to learn about the VHS effects. Moreover, knowing the proper and effective usage of VHS effects is also an important thing. The below-given information will help you regarding this issue:
What are VHS Effects?
Video Home System, which is famous as VHS, is the type of effect that is used in videos to create manual distortion. It was initially developed by the Victor Company in Japan and was introduced in the 1970s. From then to now, VHS tapes gained reliable popularity across the world. The purpose of creating this effect was to give video recording capabilities to consumers.
In addition to this, the video format in which you can apply this effect was also recognized by potential marketers. The aim of creating this effect was to make affordable yet user-friendly videos. With the help of VHS effects, people could watch cinematic quality movies in their living rooms. The popularity of VHS never stops growing, and even now, video editors love to add this intuitive effect to their videos.
What is the Use of the VHS Effect?
You can use the VHS effects in several creative contexts to achieve artistic goals. Some of the uses of the VHS style are listed below for you:
Video Production
You are free to use the glitch VHS effect in filmmaking and video production projects. It is perfect for retro and vintage-themed movies. This effect also has the capability to add the old fashion sense to engage more users.
Motion and Designing Graphics
The VHS effects are also very helpful in graphic and motion designing. You can add eye-catching visual composition elements to every type of video. This may include scan lines, glitches, and, of course, distortion.
Social Media Content Creation
If you plan to share your past life with your followers, don’t forget to add the old life-themed VHS effects in the videos. This makes your video more retro-friendly and adds a sense of consistency to the videos.
Editing and Experimentations
Getting something new without losing the video quality is the dream of every video editor. The VHS effects can help you in making this dream come true. You can use this effect while editing your videos and can also use it as an experiment.

Part 3: Legacy and Influence of VHS in Video Making
The legacy and influence of this preliminary effect will continue to take hold in every age of digitalization. Here are some of the key points which will guide you about this to a further extent:
Democratization of VHS in Videos
You will never fail to see the pivotal role of VHS in democratizing video productions. It helps to make the video more accessible to a wider amount of audience. Before the introduction of VHS, video production was limited to professional studios. However, now every person can use this to make independent files and share their creativity with the world.
Editing Techniques and Influence
VHS has introduced a wide array of editing techniques and manuals to the users to manipulate video content. Moreover, the VHS editing system and techniques also encourage experimentation. You also get a sense of trying the latest editing skills. It is also known to explore and add a sense of storytelling through simple procedures.
Aesthetics and Pop Culture
In recent years, VHS has experienced several revivals of pop culture themes. It can add aesthetics and a sense of nostalgia to every type of video. You will also see VHS integrations on several music, ads, and events videos. You can also use this effect to preserve the digitalized content without extra effort.
Documentation and Accessibility
With the help of the VHS effect, you can formulate several types of documentation in lossless quality. It helps you to add retro appeal to all your formatted documentaries and make them easily accessible. Above all, you can also distribute the video content at an optimized speed without using any non-mainstream server.
Part 4: Wondershare Filmora: A Great Video Editor Influencing the Use of VHS Effects
You cannot apply the VHS effect to the videos without a reliable video editor. The most known and significant video editor that can help you apply the glitch VHS effect in videos is Filmora Video Editor . Using this premium-grade tool, you can create new projects at any time and customize its visual metrics.
Add VHS Effect For Win 7 or later(64-bit)
Add VHS Effect For macOS 10.14 or later
This premium-grade video editor understands the VHS definition and offers you a wide array of VHS effects. This includes VHS Distortion, VHS Static 1, Vintage Viewfinder, and more. You can drag any effect of your choice to the video in the timeline and apply it to the whole video or a personalized part of the video. One of the best things about Filmora is that it integrates versatile built-in templates. Through this, you can make videos without any issues.

Conclusion
To wrap things up, this discussion has guided you about VHS style and technology. Now, you know what VHS technology is, its key aspects, and what scenarios you can use it. Other than this, the legacy and influence of this effect are also mentioned above. For applying the VHS effects, you can use the industry standard video editor named Wondershare Filmora.
This video editor supports multiple VHS effects, and you can also customize its size and opacity. More valuable information about Filmora is listed above for you.
Add VHS Effect For Win 7 or later(64-bit)
Add VHS Effect For macOS 10.14 or later
Apply VHS Effect Apply VHS Effect Learn More >
Part 2: What are VHS Effects and What Is Its Use?
Now that you have learned what VHS technology is and what are its key aspects, you must be eager to learn about the VHS effects. Moreover, knowing the proper and effective usage of VHS effects is also an important thing. The below-given information will help you regarding this issue:
What are VHS Effects?
Video Home System, which is famous as VHS, is the type of effect that is used in videos to create manual distortion. It was initially developed by the Victor Company in Japan and was introduced in the 1970s. From then to now, VHS tapes gained reliable popularity across the world. The purpose of creating this effect was to give video recording capabilities to consumers.
In addition to this, the video format in which you can apply this effect was also recognized by potential marketers. The aim of creating this effect was to make affordable yet user-friendly videos. With the help of VHS effects, people could watch cinematic quality movies in their living rooms. The popularity of VHS never stops growing, and even now, video editors love to add this intuitive effect to their videos.
What is the Use of the VHS Effect?
You can use the VHS effects in several creative contexts to achieve artistic goals. Some of the uses of the VHS style are listed below for you:
Video Production
You are free to use the glitch VHS effect in filmmaking and video production projects. It is perfect for retro and vintage-themed movies. This effect also has the capability to add the old fashion sense to engage more users.
Motion and Designing Graphics
The VHS effects are also very helpful in graphic and motion designing. You can add eye-catching visual composition elements to every type of video. This may include scan lines, glitches, and, of course, distortion.
Social Media Content Creation
If you plan to share your past life with your followers, don’t forget to add the old life-themed VHS effects in the videos. This makes your video more retro-friendly and adds a sense of consistency to the videos.
Editing and Experimentations
Getting something new without losing the video quality is the dream of every video editor. The VHS effects can help you in making this dream come true. You can use this effect while editing your videos and can also use it as an experiment.
Part 3: Legacy and Influence of VHS in Video Making
The legacy and influence of this preliminary effect will continue to take hold in every age of digitalization. Here are some of the key points which will guide you about this to a further extent:
Democratization of VHS in Videos
You will never fail to see the pivotal role of VHS in democratizing video productions. It helps to make the video more accessible to a wider amount of audience. Before the introduction of VHS, video production was limited to professional studios. However, now every person can use this to make independent files and share their creativity with the world.
Editing Techniques and Influence
VHS has introduced a wide array of editing techniques and manuals to the users to manipulate video content. Moreover, the VHS editing system and techniques also encourage experimentation. You also get a sense of trying the latest editing skills. It is also known to explore and add a sense of storytelling through simple procedures.
Aesthetics and Pop Culture
In recent years, VHS has experienced several revivals of pop culture themes. It can add aesthetics and a sense of nostalgia to every type of video. You will also see VHS integrations on several music, ads, and events videos. You can also use this effect to preserve the digitalized content without extra effort.
Documentation and Accessibility
With the help of the VHS effect, you can formulate several types of documentation in lossless quality. It helps you to add retro appeal to all your formatted documentaries and make them easily accessible. Above all, you can also distribute the video content at an optimized speed without using any non-mainstream server.
Part 4: Wondershare Filmora: A Great Video Editor Influencing the Use of VHS Effects
You cannot apply the VHS effect to the videos without a reliable video editor. The most known and significant video editor that can help you apply the glitch VHS effect in videos is Filmora Video Editor . Using this premium-grade tool, you can create new projects at any time and customize its visual metrics.
Add VHS Effect For Win 7 or later(64-bit)
Add VHS Effect For macOS 10.14 or later
This premium-grade video editor understands the VHS definition and offers you a wide array of VHS effects. This includes VHS Distortion, VHS Static 1, Vintage Viewfinder, and more. You can drag any effect of your choice to the video in the timeline and apply it to the whole video or a personalized part of the video. One of the best things about Filmora is that it integrates versatile built-in templates. Through this, you can make videos without any issues.
Conclusion
To wrap things up, this discussion has guided you about VHS style and technology. Now, you know what VHS technology is, its key aspects, and what scenarios you can use it. Other than this, the legacy and influence of this effect are also mentioned above. For applying the VHS effects, you can use the industry standard video editor named Wondershare Filmora.
This video editor supports multiple VHS effects, and you can also customize its size and opacity. More valuable information about Filmora is listed above for you.
Add VHS Effect For Win 7 or later(64-bit)
Add VHS Effect For macOS 10.14 or later
Finding Best GIF Websites Is Easy as Pie — Here’s What You Should Know
Finding Best GIF Websites Is Easy as Pie — Here’s What You Should Know
An easy yet powerful editor
Numerous effects to choose from
Detailed tutorials provided by the official channel
Want a heap of the most exiting GIFs? Here are the best websites to visit.
In this article
01 [10 Sites for Finding the Perfect GIF](#Part 1)
02 [How to Use Animated GIF Makers](#Part 2)
03 [5 Stunning Examples of Gifs in Web Design](#Part 3)
Part 1 Sites for Finding the Perfect GIF
Information was never so expressive until GIFs came up as delivery platform. Looking through the frame of content diversity and effective delivery, there’s possibly nothing that is left untouched by these short, precise and creative snippets. When the talk is about long term user credibility, creativity is one thing, while reach is the other.
No doubt about the creative aspect, but the convenient availability holds equal importance. However captivating a utility nay be, you would certainly not be interested to spend quality time searching the apt content. Let’s take a look at some of the most popular and convenient GIF website that will surely put a full stop on your search spree for a relatable GIF.
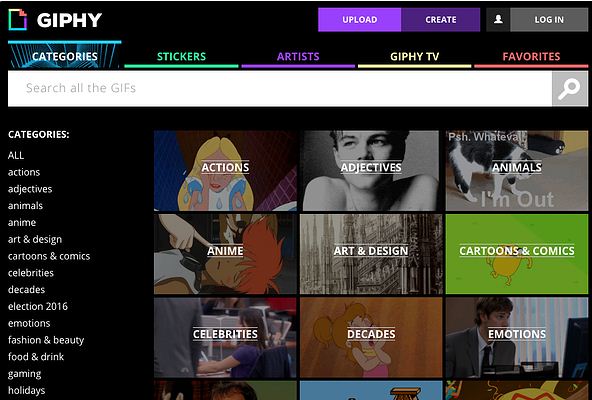
01GIPHY
Initially launched as a GIF search engine, thin is a complete storehouse on almost everything that you can possibly think of. The extensive content library of this site is all set to meet your most specific content requirements in less than a blink’s time. You get an access to quality content in music, science, nature and what not on this free GIF website.
Talking of search flexibility, GIPHY is known to have the most advanced and updated search bar that ensures that top quality and fresh content is always at the hand of its users. You can browse through the vast GIF categories of the site or look for your exact content using a specific search keyword.
02Reddit
You can regard this site as a GIF membership community, where you can find a variety of impressive sub-reddits in the GIF category. The best part is, you will never find recursive content on any two or more sub-reddits as each one is developed and updated keeping different content specifications in mind.

You are given access to even finer content libraries in some particular sub-reddits that follow a sequential guideline to filter their entries according to user preferences. Some popular sub-reddits are listed below:
03Tumblr
Originally a blogging site, Tumblr is simply heaven for creating and sharing GIFs across media platforms. What’s interesting about the site is its content categorization, where bloggers on the site group relatable content under specific categories, which facilitates an easy, quick and hassle free search. Most of the GIF content on the site is either created in Photoshop or taken from across the web.
While the site has exciting GIF content for almost every scenario, the comedy genre is the st5arb attraction of this GIF platform. The huge comic content library of the site has hilarious memes and GIFs that will certainly leave you rolling over the floor. To enjoy your favorite content daily, you just need to search a relatable hashtag and follow some blogs on your searched content.

04Gfycat
This one lands among the most preferred GIF sites and is packed with an enormous inventory of memes and GIFs. Not just this, this one is a free GIF maker website that allows you to convert videos from almost every media platform into GIFs, independent of the video file format via its ‘Video to GIF Converter’ tool.
You can set a daily dose of your favorite, exciting GIF content by using either the search bar or the ‘Selection Menu’ in the left of the site’s Home page. You can even browse through latest GIF categories by navigating to the ‘Trending’ and ‘Explore’ sections.

05Tenor
You can prefer this site to enjoy your favorite GIFs on your PC or iOS device. The site gives you the liberty to share GIFs and memes directly from its library into any of your Instant Messaging chats or community conversations on social media platforms.
All you need to do is navigate to the Tenor search bar, put in a suitable keyword and there you can see loads of GIF content on your screen in less than a second’s time. With periodic updates and a cohesive interface, this site is your storehouse of latest and trendy GIFs, anytime and anywhere.
06Reaction GIFs
This site is known for having an exact content database for almost every thought that crosses your mind. It serves you with a refined search mechanism, having a different pathway for every search, depending on the content you are looking for. This is a perfect aid to get exactly what you want, without having to fuss out with unwanted stuff.
Talking of search methods, you will find a drop-down menu at the right to search GIFs that express ‘Emotions’ or one word answers (preferably a ‘Yes’ or a ‘No’). If you want something related to a more specific category, you can browse through the ‘Galleries’ and ‘Tags’ of the site (categories, like, OMG, LOL, etc).

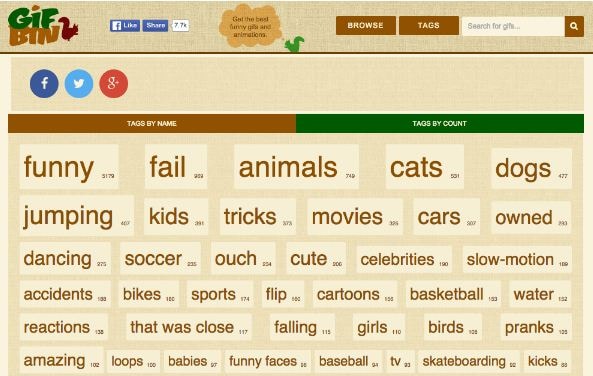
07GIFbin
This is again a trunk of latest, funny and entertaining GIFs tom watch and share. On this site, you get to add search filters, like, ‘Most Viewed’, ‘Latest’, ‘Top Rated’, etc., that refine your search to fetch exactly what you are looking for. You are also free to use ‘Search Tags’ grouped according to name and search count on the site.
The tag names are standard keywords (like, animals, sports, nature, etc.) and the count feature keeps a track of the most frequent searches, thus allowing you to find out your favorite GIFs in a more explicit manner. If you are clueless about anything specific, don’t worry. Hit the ‘Random GIFs’ button to explore a whole new world of fun and excitement.
08Imgur
This site is popular in the meme world as a GIF sub-reddit that has explicitly no text threads. You can take this one as a free, GIF hosting and sharing website. While you can find loads of quality content on the site convenient to almost any genre, it is a leader in comic and funny GIFs. You can use different search tags for hilarious movie snippets, or some other fun element of your liking. This site’s image library is a hub of latest and nostalgic content.

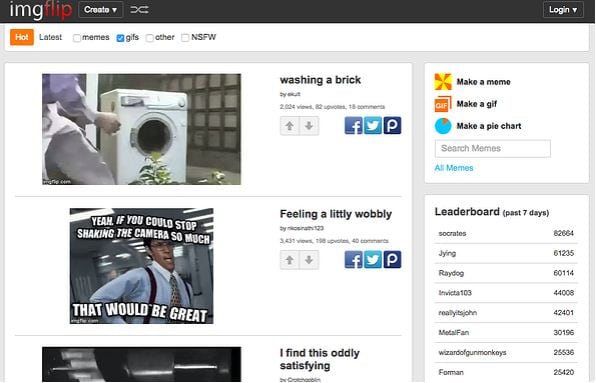
09Imgflip
This is one more hotspot for relatable GIFs and memes. The best thing about the site is that it has separate search pathways to refine your search in cohesion with your content preference. Some common pathways are explained below:
● Browse the site’s homepage for the latest and trending GIF content.
● Simplify your search on specific content pages using the ‘Random’, ‘Next’ or ‘Previous’ navigation options.
● Prefer using ‘Image Hotkeys’ on the content pages.
● Try on ‘Tagging’ specific content pages (sunrise, snowfall, cats, etc.).
If you like competing with fellow visitors on the site, you can experiment with creating GIFs of your own and get ranked on the creator scoreboard. Bag a high vote count to get your GIF trending on the site.
10Gyazo
Last on the list, this is a somewhat different site in terms of features and search constraints. The exclusively unique ’Screen Capture’ feature of this site allows you to take a video of your device screen and use it to create a GIF of your own, making itself a quick and effective ‘Video to GIF Converter’ tool.
You will require creating an account on the site to maintain a library of your searched contents, which you can either tag on the site or downloaded to your device. You can further, export and share your creations across media platforms through this site.

Part 2 How to Use Animated GIF Makers
Landing into the creative and exciting world of GIFs, you can easily get motivated to try hands on making your own GIFs. The online market is a pool of solutions that claim of adhering to this concern in the most effective ways. When looking for the best GIF maker tools and software, you can definitely count upon the following choices:
01**Wondershare Filmora Video Editor **
This one is undoubtedly the best GIF creator software in current times. Using the plethora of audio-visual features, effects and image filters that are offered by this tool, creating animated GIFs is a spic and span process. The software grants you the liberty to play with and explore your editing skills to generate professional quality GIFs within minutes.

Wondershare Filmora - Best Video Editor for Mac/Windows
5,481,435 people have downloaded it.
Build unique custom animations without breaking a sweat.
Focus on creating epic stories and leave the details to Filmora’s auto features.
Start a creative adventure with drag & drop effects and endless possibilities.
Filmora simplifies advanced features to save you time and effort.
Filmora cuts out repetition so you can move on to your next creative breakthrough.
Here’s how you can use this software to become a pro at creating GIFs:
● Step 1: Import Required Media Files
To begin with, select any desired set of images or a particular video file to the Filmora timeline. You don’t need to be format specific; the software is compatible with over 150 different file formats.
● Step 2: Drag Files to Edit
Once you are done with selecting the files, you need to drag the same to the Filmora Editor Timeline, where you can transform the file contents with your editing skills.
● Step 3: Let’s Get Editing.
In the editor window, you are free tom choose from a range of effects, tools and filters suitable to your GIF content to give your artwork a new and engaging look. You can experiment with the cutting, cropping and trimming tools or play with effects, like, overlays, rotation and speed adjustments and even add texts to deliver messages that intensify your GIF.
● Step 4: Time to Save and Share.
Now is the time to save your work locally to your device using the .gif extension with your created file, as well as share it among your peers on social communities.

03Deal With It
This one is an online GIF maker tool that allows you to make top quality animated GIFs within a few seconds and you don’t even need to take up any third party software installation. Creating GIFs with this user friendly, clean interface and quick GIF generator utility is an absolute fun, to say the least.
Once you are done creating, the tools gives you the liberty to experiment with effects like, texts and glasses that would further intensify your GIF to the next level, and the best part is, all of this is available to you without having to spend a penny out of your pocket.
Explained below is the step wise user guide to use this tool for creating GIFs:
● Step 1:
Navigate to official website of the GIF creator tool.
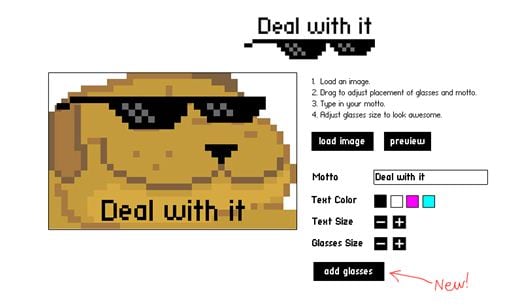
● Step 2:
Choose a desired locally saved image from your device and upload it in the tool’s editor window. To do this, click on the ‘Load Image’ button.
● Step 3:
You can now modify the uploaded image with text and glasses. This is it. Your GIF is ready to save and export.

03LunaPic
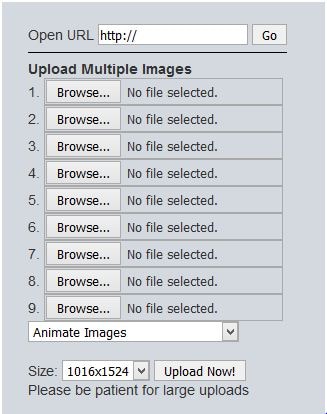
This one lands among the most preferred GIF maker tools available across the web. It comes with a clean interface, is free to use and does not require any third party software installation. You can create catchy and interesting GIF banners, or make captivating, animated GIF files with a series of still images using this tool. However, this GIF maker does not give you the liberty to take up editing and speed or accuracy modifications on your creation.
You need to follow the steps explained below to create your own GIF with LunaPic:
● Step 1:
Open the official site of LunaPic in your web browser.
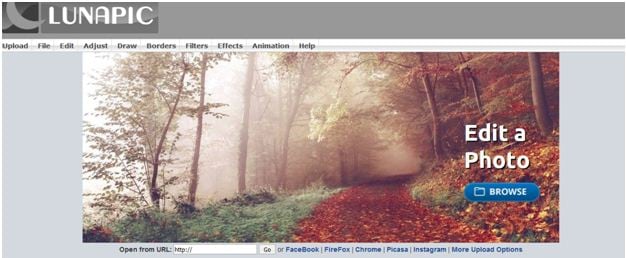
● Step 2:
Upload a desired one or a set of images you wish to use for making your GIF on the site. To do this, select a group of images from your device and tap ‘Upload’
.

● Step 3:
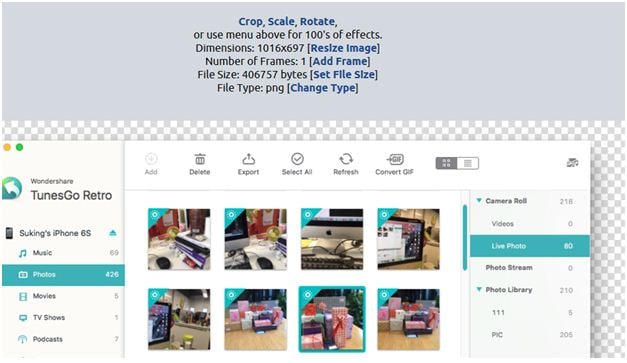
Once uploaded, you can use your creativity to play with the effects library of the site and edit your images in its editing interface.
● Step 4:
When satisfied, choose the file type as GIF and hit the ‘Save’ option at the bottom. This will save your creation locally in your device, once the file conversion gets completed.
Image Name: Finding-best-gif-websites-is-easy-as-pie—here’s-what-you-should-know-22
04Wondershare TunesGo
This one is another efficient animated GIF creator utility on the internet. Available to you as free online software, this tool promises you an amazing and hassle free GIF making experience. You can either create stunning GIFs of your own, or convert video files and even live photos into the same using this software. It allows you to set time slots for file conversions and make speed and flow adjustments for GIF frames, along with offering a plethora of editing effects to play with.
Here’s the know-how of using this software to create top quality animated GIFs:
● Step 1: Download and Launch the Software
Pay a visit to the official TunesGo website to download the software. Begin with installing and launching the same on your preferred device. When you finish, click on the ‘Toolbox’ tab at the top in the welcome screen.
● Step 2: Upload Media Files
In the software’s opening interface, choose the GIF Maker tool. In the following window that pops-up, click on ‘Add’ to upload the desired media files saved in your device, you want to create a GIF with.
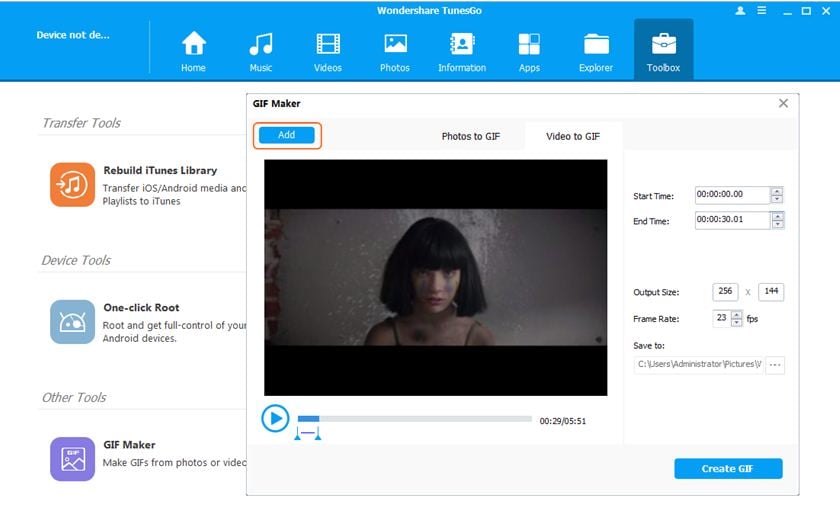
● Step 3: Convert to GIF
Set the media file to GIF conversion time and tap the ‘Create GIF’ button in the bottom-right to initiate the conversion process.

05Wave.video
This one is among the latest GIF maker tools that allow you to create animated GIFs from videos. What’s quite interesting about this Gif creation platform is, you can trim videos to the exact part depending on your content preference before beginning with the conversion process. You can also save your creation as a group of trimmed clips. It is a user friendly, free access online tool that does not ask you to install any third party software, and GIF creation with its mess-free interface is absolute fun.

Take the steps listed below to make GIFs with this online tool:
● Step 1: Choose a Project
To start working with this tool, you need to create an account on its official site. Having done that, just log into your account and upload a desired video you would like to use for creating a GIF. You have a choice to select a locally saved video, choose one from the templates available on the site or create something of your own.
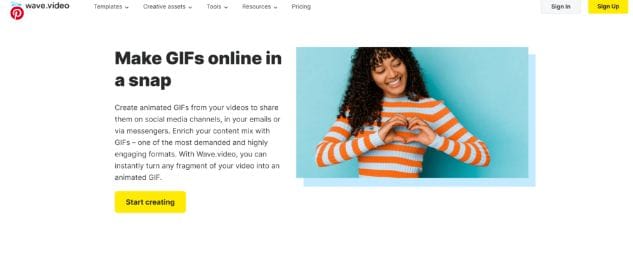
● Step 2: Customization and Publishing
It is now time to try hands on editing your video with stunning effects like, overlays glasses, etc., or add impactful elements, such as, texts, stickers, etc., to make your artwork more impressive. When you are happy, navigate to the top-right and tap ‘Publish’. From the menu that drops down, select ‘GIF’.
● Step 3: Download Your Creation
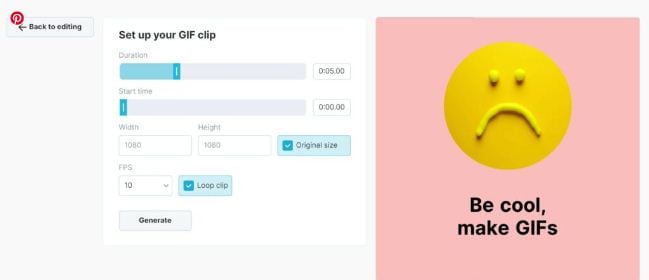
Select the section of your video you wish to convert into a GIF and proceed to fix the GIF start time and play duration. Check for any frame resize requirements, set an adequate frame rate and lastly, click on the ‘Loop Clip’ checkbox. This will produce an infinite loop GIF. When everything seems perfect, tap on ‘Generate’ followed by ‘Download’ to save your creation and share it on social media.
Part 3 5 Stunning Examples of Gifs in Web Design
The credibility of GIFs in market oriented content sharing and information publishing evidently does not require an introduction. These attractive snippets are expert means of business growth and customer appealing strategy planning to address attract a massive target audience within seconds.
Now that you are quite accustomed with the market reliability of GIFs, you may visibly feel motivated to use them to improvise your product websites for a next level market approach. However, before you plunge into using GIFs for your brand promotion, consider sparing a few minutes to browse through some top class product based GIFs to enhance your GIF creation and implementation aptitude.
Described below are some eye-catching examples of GIF for website background, you should certainly look forward to using in your business campaigns:
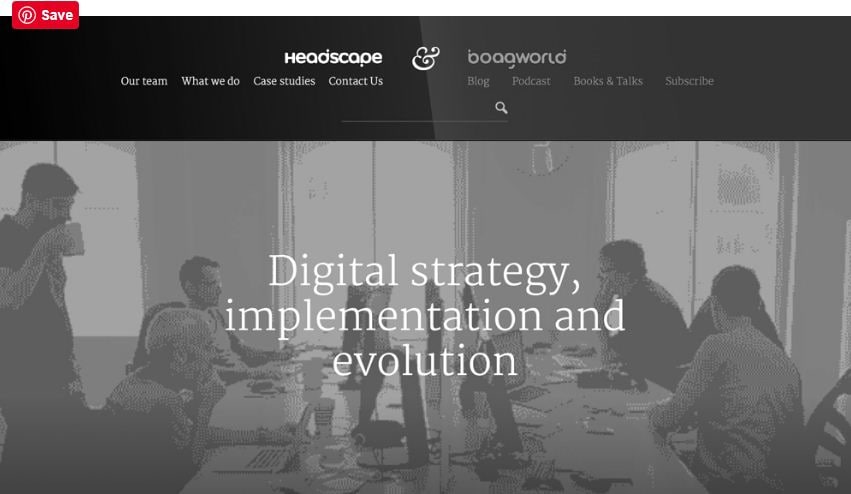
01Headscape
Having its roots in the United Kingdom, this is a top rated, digital media design corporation that excels in providing web design solutions to a diverse global clientele. Their unique idea of using GIFs in grayscale to depict conducive business settings is just perfect.
The monochromatic color balance with parallax scrolls makes this GIF all the more impactful. You can find impressive ways of using GIFs with a professional instinct on the company website and begin to add appeal to your market buildup strategies.
02Invision
This is another high ranked application marketing site that uses GIF for website background to improvise its product promotion. Equipped with a preset world class page makeover, the site’s look and appeal simply gets a boost with floating-text animated GIFs on an otherwise normal webpage.
As you move further on the Invision homepage, you will get to see a demonstration of the site’s prototype tool through GIFs that explain its working functionalities in the most interesting and convenient manner, thus putting forward and outrageously professional and effective marketing strategy.
03Macaw
This one is an excellent design utility that is equally suited to both web designers as well as site developers. On visiting the tool’s homepage, you are welcomed with a streamlined text setting on a black and white theme. Move a bit downwards, and there you see a cluster of animated GIFs in action to get you familiar with the interface and usage pattern of the Macaw design utility with utmost ease. It is convenient enough to make you feel as if you are actually using the tool.

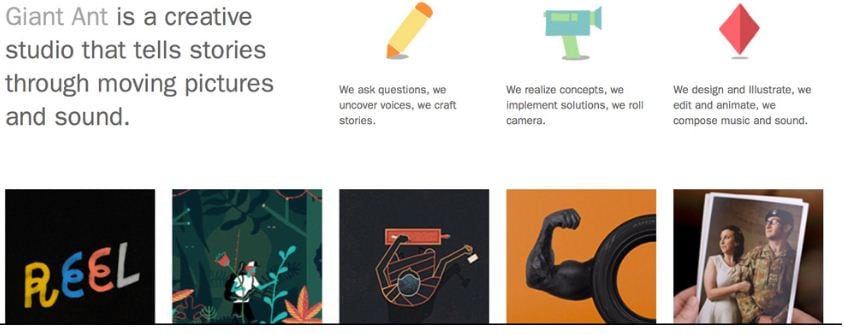
04Giant Ant
Established as a creative firm, this one is known for its appealing website design. As you navigate through the site, you will find a still image complemented by cohesive text overlays. Beneath that, there are caricature forms of everyday objects, but the real magic happens when you click on a particular object and woosh. It instantly turns into an animated GIF. This explicit style of infusing dynamism to your website is simply awesome, to say the least.
05Tinke
This is intuitively a fitness tracker that keeps a record of your system vitals in the most effective manner. But that’s not all. The tracker website is equally amazing, setting the perfect example of using GIFs to improve market buildup. The site majorly utilizes the parallax scroll effect with animated GIFs to facilitate a live demonstration of the tracker functionality, coupled with an iPhone user guide and ways of sharing relatable content with fellow users.
● Key Takeaways from This Episode →
● Surfing the internet, you will land across some of the best GIF creator and downloader sites that are flooded with brilliant GIF content suited for almost every purpose.
● You can create your own animated GIFs on any GIF maker website or enjoy pre-made stuff to your heart’s content, where using Filmora is certainly the best choice. To explore something more exciting, try hands on using GIFs for product marketing and brand promotions on your business sites.
Want a heap of the most exiting GIFs? Here are the best websites to visit.
In this article
01 [10 Sites for Finding the Perfect GIF](#Part 1)
02 [How to Use Animated GIF Makers](#Part 2)
03 [5 Stunning Examples of Gifs in Web Design](#Part 3)
Part 1 Sites for Finding the Perfect GIF
Information was never so expressive until GIFs came up as delivery platform. Looking through the frame of content diversity and effective delivery, there’s possibly nothing that is left untouched by these short, precise and creative snippets. When the talk is about long term user credibility, creativity is one thing, while reach is the other.
No doubt about the creative aspect, but the convenient availability holds equal importance. However captivating a utility nay be, you would certainly not be interested to spend quality time searching the apt content. Let’s take a look at some of the most popular and convenient GIF website that will surely put a full stop on your search spree for a relatable GIF.
01GIPHY
Initially launched as a GIF search engine, thin is a complete storehouse on almost everything that you can possibly think of. The extensive content library of this site is all set to meet your most specific content requirements in less than a blink’s time. You get an access to quality content in music, science, nature and what not on this free GIF website.
Talking of search flexibility, GIPHY is known to have the most advanced and updated search bar that ensures that top quality and fresh content is always at the hand of its users. You can browse through the vast GIF categories of the site or look for your exact content using a specific search keyword.
02Reddit
You can regard this site as a GIF membership community, where you can find a variety of impressive sub-reddits in the GIF category. The best part is, you will never find recursive content on any two or more sub-reddits as each one is developed and updated keeping different content specifications in mind.
You are given access to even finer content libraries in some particular sub-reddits that follow a sequential guideline to filter their entries according to user preferences. Some popular sub-reddits are listed below:
03Tumblr
Originally a blogging site, Tumblr is simply heaven for creating and sharing GIFs across media platforms. What’s interesting about the site is its content categorization, where bloggers on the site group relatable content under specific categories, which facilitates an easy, quick and hassle free search. Most of the GIF content on the site is either created in Photoshop or taken from across the web.
While the site has exciting GIF content for almost every scenario, the comedy genre is the st5arb attraction of this GIF platform. The huge comic content library of the site has hilarious memes and GIFs that will certainly leave you rolling over the floor. To enjoy your favorite content daily, you just need to search a relatable hashtag and follow some blogs on your searched content.
04Gfycat
This one lands among the most preferred GIF sites and is packed with an enormous inventory of memes and GIFs. Not just this, this one is a free GIF maker website that allows you to convert videos from almost every media platform into GIFs, independent of the video file format via its ‘Video to GIF Converter’ tool.
You can set a daily dose of your favorite, exciting GIF content by using either the search bar or the ‘Selection Menu’ in the left of the site’s Home page. You can even browse through latest GIF categories by navigating to the ‘Trending’ and ‘Explore’ sections.
05Tenor
You can prefer this site to enjoy your favorite GIFs on your PC or iOS device. The site gives you the liberty to share GIFs and memes directly from its library into any of your Instant Messaging chats or community conversations on social media platforms.
All you need to do is navigate to the Tenor search bar, put in a suitable keyword and there you can see loads of GIF content on your screen in less than a second’s time. With periodic updates and a cohesive interface, this site is your storehouse of latest and trendy GIFs, anytime and anywhere.
06Reaction GIFs
This site is known for having an exact content database for almost every thought that crosses your mind. It serves you with a refined search mechanism, having a different pathway for every search, depending on the content you are looking for. This is a perfect aid to get exactly what you want, without having to fuss out with unwanted stuff.
Talking of search methods, you will find a drop-down menu at the right to search GIFs that express ‘Emotions’ or one word answers (preferably a ‘Yes’ or a ‘No’). If you want something related to a more specific category, you can browse through the ‘Galleries’ and ‘Tags’ of the site (categories, like, OMG, LOL, etc).
07GIFbin
This is again a trunk of latest, funny and entertaining GIFs tom watch and share. On this site, you get to add search filters, like, ‘Most Viewed’, ‘Latest’, ‘Top Rated’, etc., that refine your search to fetch exactly what you are looking for. You are also free to use ‘Search Tags’ grouped according to name and search count on the site.
The tag names are standard keywords (like, animals, sports, nature, etc.) and the count feature keeps a track of the most frequent searches, thus allowing you to find out your favorite GIFs in a more explicit manner. If you are clueless about anything specific, don’t worry. Hit the ‘Random GIFs’ button to explore a whole new world of fun and excitement.
08Imgur
This site is popular in the meme world as a GIF sub-reddit that has explicitly no text threads. You can take this one as a free, GIF hosting and sharing website. While you can find loads of quality content on the site convenient to almost any genre, it is a leader in comic and funny GIFs. You can use different search tags for hilarious movie snippets, or some other fun element of your liking. This site’s image library is a hub of latest and nostalgic content.
09Imgflip
This is one more hotspot for relatable GIFs and memes. The best thing about the site is that it has separate search pathways to refine your search in cohesion with your content preference. Some common pathways are explained below:
● Browse the site’s homepage for the latest and trending GIF content.
● Simplify your search on specific content pages using the ‘Random’, ‘Next’ or ‘Previous’ navigation options.
● Prefer using ‘Image Hotkeys’ on the content pages.
● Try on ‘Tagging’ specific content pages (sunrise, snowfall, cats, etc.).
If you like competing with fellow visitors on the site, you can experiment with creating GIFs of your own and get ranked on the creator scoreboard. Bag a high vote count to get your GIF trending on the site.
10Gyazo
Last on the list, this is a somewhat different site in terms of features and search constraints. The exclusively unique ’Screen Capture’ feature of this site allows you to take a video of your device screen and use it to create a GIF of your own, making itself a quick and effective ‘Video to GIF Converter’ tool.
You will require creating an account on the site to maintain a library of your searched contents, which you can either tag on the site or downloaded to your device. You can further, export and share your creations across media platforms through this site.
Part 2 How to Use Animated GIF Makers
Landing into the creative and exciting world of GIFs, you can easily get motivated to try hands on making your own GIFs. The online market is a pool of solutions that claim of adhering to this concern in the most effective ways. When looking for the best GIF maker tools and software, you can definitely count upon the following choices:
01**Wondershare Filmora Video Editor **
This one is undoubtedly the best GIF creator software in current times. Using the plethora of audio-visual features, effects and image filters that are offered by this tool, creating animated GIFs is a spic and span process. The software grants you the liberty to play with and explore your editing skills to generate professional quality GIFs within minutes.
Wondershare Filmora - Best Video Editor for Mac/Windows
5,481,435 people have downloaded it.
Build unique custom animations without breaking a sweat.
Focus on creating epic stories and leave the details to Filmora’s auto features.
Start a creative adventure with drag & drop effects and endless possibilities.
Filmora simplifies advanced features to save you time and effort.
Filmora cuts out repetition so you can move on to your next creative breakthrough.
Here’s how you can use this software to become a pro at creating GIFs:
● Step 1: Import Required Media Files
To begin with, select any desired set of images or a particular video file to the Filmora timeline. You don’t need to be format specific; the software is compatible with over 150 different file formats.
● Step 2: Drag Files to Edit
Once you are done with selecting the files, you need to drag the same to the Filmora Editor Timeline, where you can transform the file contents with your editing skills.
● Step 3: Let’s Get Editing.
In the editor window, you are free tom choose from a range of effects, tools and filters suitable to your GIF content to give your artwork a new and engaging look. You can experiment with the cutting, cropping and trimming tools or play with effects, like, overlays, rotation and speed adjustments and even add texts to deliver messages that intensify your GIF.
● Step 4: Time to Save and Share.
Now is the time to save your work locally to your device using the .gif extension with your created file, as well as share it among your peers on social communities.
03Deal With It
This one is an online GIF maker tool that allows you to make top quality animated GIFs within a few seconds and you don’t even need to take up any third party software installation. Creating GIFs with this user friendly, clean interface and quick GIF generator utility is an absolute fun, to say the least.
Once you are done creating, the tools gives you the liberty to experiment with effects like, texts and glasses that would further intensify your GIF to the next level, and the best part is, all of this is available to you without having to spend a penny out of your pocket.
Explained below is the step wise user guide to use this tool for creating GIFs:
● Step 1:
Navigate to official website of the GIF creator tool.
● Step 2:
Choose a desired locally saved image from your device and upload it in the tool’s editor window. To do this, click on the ‘Load Image’ button.
● Step 3:
You can now modify the uploaded image with text and glasses. This is it. Your GIF is ready to save and export.
03LunaPic
This one lands among the most preferred GIF maker tools available across the web. It comes with a clean interface, is free to use and does not require any third party software installation. You can create catchy and interesting GIF banners, or make captivating, animated GIF files with a series of still images using this tool. However, this GIF maker does not give you the liberty to take up editing and speed or accuracy modifications on your creation.
You need to follow the steps explained below to create your own GIF with LunaPic:
● Step 1:
Open the official site of LunaPic in your web browser.
● Step 2:
Upload a desired one or a set of images you wish to use for making your GIF on the site. To do this, select a group of images from your device and tap ‘Upload’
.
● Step 3:
Once uploaded, you can use your creativity to play with the effects library of the site and edit your images in its editing interface.
● Step 4:
When satisfied, choose the file type as GIF and hit the ‘Save’ option at the bottom. This will save your creation locally in your device, once the file conversion gets completed.
Image Name: Finding-best-gif-websites-is-easy-as-pie—here’s-what-you-should-know-22
04Wondershare TunesGo
This one is another efficient animated GIF creator utility on the internet. Available to you as free online software, this tool promises you an amazing and hassle free GIF making experience. You can either create stunning GIFs of your own, or convert video files and even live photos into the same using this software. It allows you to set time slots for file conversions and make speed and flow adjustments for GIF frames, along with offering a plethora of editing effects to play with.
Here’s the know-how of using this software to create top quality animated GIFs:
● Step 1: Download and Launch the Software
Pay a visit to the official TunesGo website to download the software. Begin with installing and launching the same on your preferred device. When you finish, click on the ‘Toolbox’ tab at the top in the welcome screen.
● Step 2: Upload Media Files
In the software’s opening interface, choose the GIF Maker tool. In the following window that pops-up, click on ‘Add’ to upload the desired media files saved in your device, you want to create a GIF with.
● Step 3: Convert to GIF
Set the media file to GIF conversion time and tap the ‘Create GIF’ button in the bottom-right to initiate the conversion process.
05Wave.video
This one is among the latest GIF maker tools that allow you to create animated GIFs from videos. What’s quite interesting about this Gif creation platform is, you can trim videos to the exact part depending on your content preference before beginning with the conversion process. You can also save your creation as a group of trimmed clips. It is a user friendly, free access online tool that does not ask you to install any third party software, and GIF creation with its mess-free interface is absolute fun.
Take the steps listed below to make GIFs with this online tool:
● Step 1: Choose a Project
To start working with this tool, you need to create an account on its official site. Having done that, just log into your account and upload a desired video you would like to use for creating a GIF. You have a choice to select a locally saved video, choose one from the templates available on the site or create something of your own.
● Step 2: Customization and Publishing
It is now time to try hands on editing your video with stunning effects like, overlays glasses, etc., or add impactful elements, such as, texts, stickers, etc., to make your artwork more impressive. When you are happy, navigate to the top-right and tap ‘Publish’. From the menu that drops down, select ‘GIF’.
● Step 3: Download Your Creation
Select the section of your video you wish to convert into a GIF and proceed to fix the GIF start time and play duration. Check for any frame resize requirements, set an adequate frame rate and lastly, click on the ‘Loop Clip’ checkbox. This will produce an infinite loop GIF. When everything seems perfect, tap on ‘Generate’ followed by ‘Download’ to save your creation and share it on social media.
Part 3 5 Stunning Examples of Gifs in Web Design
The credibility of GIFs in market oriented content sharing and information publishing evidently does not require an introduction. These attractive snippets are expert means of business growth and customer appealing strategy planning to address attract a massive target audience within seconds.
Now that you are quite accustomed with the market reliability of GIFs, you may visibly feel motivated to use them to improvise your product websites for a next level market approach. However, before you plunge into using GIFs for your brand promotion, consider sparing a few minutes to browse through some top class product based GIFs to enhance your GIF creation and implementation aptitude.
Described below are some eye-catching examples of GIF for website background, you should certainly look forward to using in your business campaigns:
01Headscape
Having its roots in the United Kingdom, this is a top rated, digital media design corporation that excels in providing web design solutions to a diverse global clientele. Their unique idea of using GIFs in grayscale to depict conducive business settings is just perfect.
The monochromatic color balance with parallax scrolls makes this GIF all the more impactful. You can find impressive ways of using GIFs with a professional instinct on the company website and begin to add appeal to your market buildup strategies.
02Invision
This is another high ranked application marketing site that uses GIF for website background to improvise its product promotion. Equipped with a preset world class page makeover, the site’s look and appeal simply gets a boost with floating-text animated GIFs on an otherwise normal webpage.
As you move further on the Invision homepage, you will get to see a demonstration of the site’s prototype tool through GIFs that explain its working functionalities in the most interesting and convenient manner, thus putting forward and outrageously professional and effective marketing strategy.
03Macaw
This one is an excellent design utility that is equally suited to both web designers as well as site developers. On visiting the tool’s homepage, you are welcomed with a streamlined text setting on a black and white theme. Move a bit downwards, and there you see a cluster of animated GIFs in action to get you familiar with the interface and usage pattern of the Macaw design utility with utmost ease. It is convenient enough to make you feel as if you are actually using the tool.
04Giant Ant
Established as a creative firm, this one is known for its appealing website design. As you navigate through the site, you will find a still image complemented by cohesive text overlays. Beneath that, there are caricature forms of everyday objects, but the real magic happens when you click on a particular object and woosh. It instantly turns into an animated GIF. This explicit style of infusing dynamism to your website is simply awesome, to say the least.
05Tinke
This is intuitively a fitness tracker that keeps a record of your system vitals in the most effective manner. But that’s not all. The tracker website is equally amazing, setting the perfect example of using GIFs to improve market buildup. The site majorly utilizes the parallax scroll effect with animated GIFs to facilitate a live demonstration of the tracker functionality, coupled with an iPhone user guide and ways of sharing relatable content with fellow users.
● Key Takeaways from This Episode →
● Surfing the internet, you will land across some of the best GIF creator and downloader sites that are flooded with brilliant GIF content suited for almost every purpose.
● You can create your own animated GIFs on any GIF maker website or enjoy pre-made stuff to your heart’s content, where using Filmora is certainly the best choice. To explore something more exciting, try hands on using GIFs for product marketing and brand promotions on your business sites.
Also read:
- Updated Despite the Aforementioned Restrictions, Cartoon Video Makers Still Offer a Sea of Possibilities to Their Users, so Lets Dive Into the Magical World of Animated Videos
- New In This Article We Will Be Covering the Most Important Topics You Have to Remember when Becoming a Successful YouTube-Star
- Updated Top 10 Movie Trailer Voice Generators Windows, Mac, Android, iPhone
- In 2024, Best Tools To Create Blend Image Collage
- 2024 Approved Wondering How to Make a Perfect Love Video to Express Your Love for Your Special One and Share with the World? Here Are the Best Love Video Makers with Music
- New Deleting White Background in Photoshop Is Hard? No
- New Art of Time Manipulation A Guide to After Effects Slow Motion Mastery for 2024
- New All Things About Adding Effects In Kinemaster for 2024
- In 2024, Kdenlive Is a Free, Open-Source Video Editing Software Application. Kdenlive Is a Powerful Video Editor that Can Be Used to Create Professional-Quality Videos
- Updated OBS Green Screen Guide
- New How to Find Free Online Slideshow Maker with No Watermark for 2024
- In 2024, Easy Way to Inset Text in Video
- In This Article, Youll Find Four Solutions for Rotating Your Go-Pro Videos. The Following Tools Will Be Used for This Purpose for 2024
- Updated In 2024, Create A Freeze Frame Sequence In Your Videos
- New Best GIF to AVI Converters for 2024
- New How to Zoom Video in VLC Media Player for 2024
- How to Add Filters on iMovie for 2024
- Updated MP3 Cutter Download
- Updated How to Speed up a Video on Splice
- In 2024, Change Background Color in After Effects
- In 2024, VLC Media Player How to Merge Audio and Video Like a Pro
- New Best 12 Best Freeze Frame Video Editing Examples for 2024
- Detailed Tutorial to Merge Videos in VLC Media Player for 2024
- New 2024 Approved MP3 Cutter Download
- 2024 Approved Top Tips for Camtasia Freeze-Frame
- In 2024, How to Bypass Android Lock Screen Using Emergency Call On Samsung Galaxy A05s?
- Best 10 Mock Location Apps Worth Trying On Vivo Y100 5G | Dr.fone
- Guide to Mirror Your Asus ROG Phone 8 Pro to Other Android devices | Dr.fone
- How to Easily Hard reset my Vivo X100 | Dr.fone
- Complete guide for recovering video files on Vivo S18
- Solutions to Spy on Motorola Moto G84 5G with and without jailbreak | Dr.fone
- Hard Resetting an Tecno Pop 7 Pro Device Made Easy | Dr.fone
- Quickly Remove Google FRP Lock on Galaxy A54 5G
- 3 Ways to Erase Apple iPhone 8 When Its Locked Within Seconds | Dr.fone
- Three Solutions to Hard Reset Gionee F3 Pro? | Dr.fone
- How to Change GPS Location on Tecno Spark 20C Easily & Safely | Dr.fone
- Apple ID Unlock From iPhone 15 Pro Max? How to Fix it?
- How to Screen Mirroring Tecno Spark 20 to PC? | Dr.fone
- Hassle-Free Ways to Remove FRP Lock on Oppo F23 5Gwith/without a PC
- How To Teleport Your GPS Location On Vivo Y100A? | Dr.fone
- How to Bypass Google FRP Lock from Tecno Devices
- In 2024, iCloud Separation How To Disconnect iPhone 8 Plus and iPad
- How To Stream Anything From Oppo Reno 9A to Apple TV | Dr.fone
- How to Unlock Apple ID From your iPhone 15 Plus without Security Questions?
- In 2024, Ways To Find Unlocking Codes For Nokia G310 Phones
- How to share/fake gps on Uber for Apple iPhone 13 | Dr.fone
- Title: Updated 2024 Approved Easy Way to Create a DIY Green Screen Video Effect
- Author: Chloe
- Created at : 2024-04-24 07:08:42
- Updated at : 2024-04-25 07:08:42
- Link: https://ai-editing-video.techidaily.com/updated-2024-approved-easy-way-to-create-a-diy-green-screen-video-effect/
- License: This work is licensed under CC BY-NC-SA 4.0.
