
:max_bytes(150000):strip_icc():format(webp)/GettyImages-1365158534-d6952b03afff43f7a1c5f0405f31dc92.jpg)
Updated 2024 Approved How to Add Motion Titles
How to Add Motion Titles
Do you want to make your videos eye-catching instantly? Looking for some cool title animations to make your texts stand out? You should definitely opt for motion title templates that are widely available in popular video editors. Motion title templates come preloaded with animated texts, engaging graphic elements, and even background effects.
You can add them directly to your video and customize them as per you requirements so that your video looks exactly the way you desire. Different video editors have different motion titles, and therefore, you should check them out one by one to find out the templates you are looking for. We will illustrate title motion graphics in all the leading video editors.
Part 1. Add Motion Title with Filmora
The easiest way to add motion title to your video on your computer is through Wondershare Filmora . Filmora is a professional video editor that is available for Windows and Mac users. Filmora has the best collection of motion title templates, and the user interface is super intuitive and anyone can use without any prior experience. Here are the steps to add motion title with Filmora.
Step1Install and launch Wondershare Filmora on your computer. Click on New Project option on the welcome screen or go to File menu and click on New Project option.

Step2Go to File menu and Import Media option to import your video file. Otherwise, you can simply drop the video file into Project Media folder.
Step3Drag the video file from Project Media folder and drop it into the Timeline.

Step4Go to Titles at the top and go to the left panel. You can different categories of motion title templates. Select any desired text effect and drop into the Timeline above the video layer wherever you want.
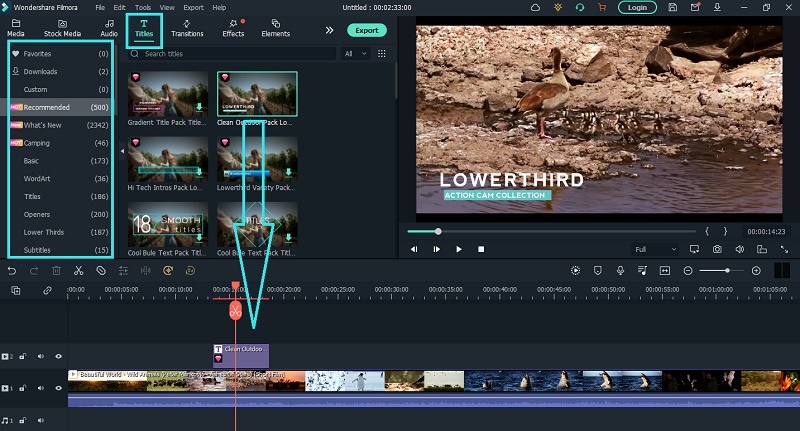
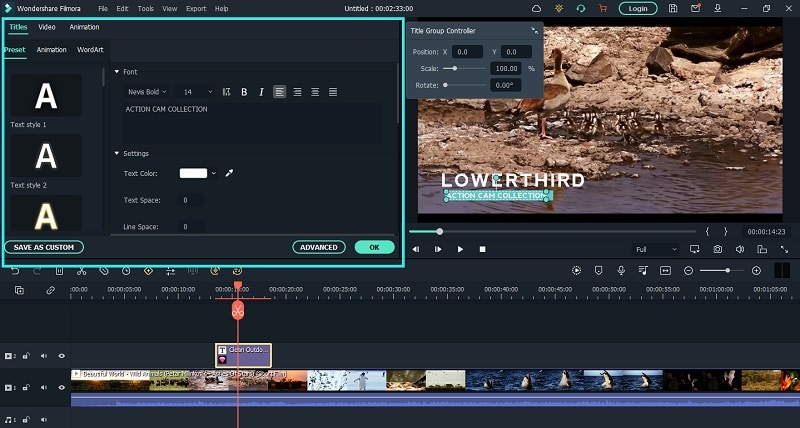
Step5Double clicking on the text layer on Timeline to edit the text and change the styles. Under Preset tab, you can change font, size, and color. Finally, click on OK button to save the edits done.
Part 2. Add Motion Title with Premiere Pro
Adobe Premiere Pro is a renowned video editor that is mostly used by professionals to edit videos and add effects and animations. Even though Premiere Pro has a steep learning curve, you can create motion title in simple steps. You can write any text on the video and select from different effects and animations to create motion title graphics. Here are the steps to add title motion graphics Premiere Pro free.
Step1Launch Premiere Pro and go to New> Project option. Import the video file and drop it into Timeline.
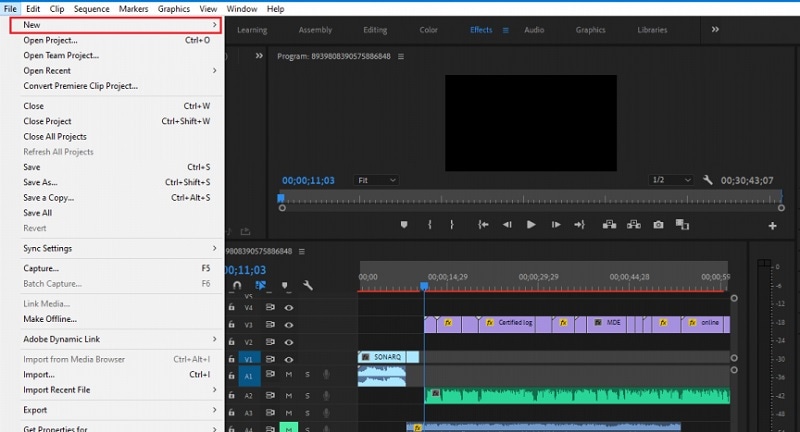
Step2Go to Title> New Title> Default Still option and follow the on-screen instructions.

Step3You will see different types of title styles and designs to choose from as you feel.

Step4Click on Type Tool option and click on the area on the video where you want the text to appear. You can customize them from the right panel from Title Styles, Title Properties, Tools and Title Actions.
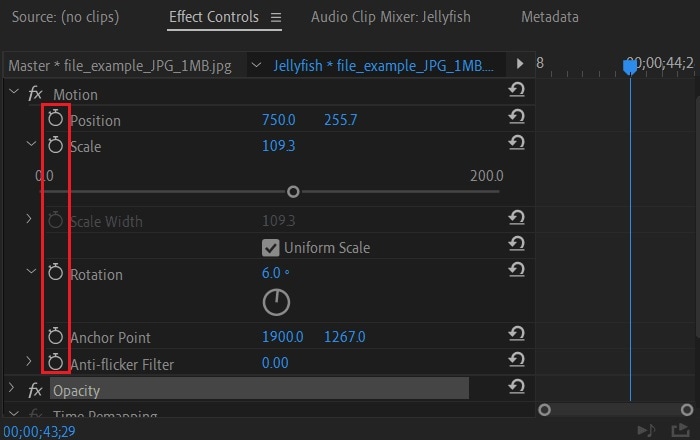
Step5To add motion to the title, click on Effects Control window. Click on any desired animation and turn to Stopwatch icon to apply the effect to the text. There is a dedicated Motion option available.
Part 3. Make motion title with Studio
Studio is a popular video editing software where you can not only apply motion title presets but also create motion title presets from scratch. The reason why video editors choose Studio is because it allows users to customize everything and create different templates and animations for personalization. Here are the steps to create title motion graphics in Studio as per your requirements.
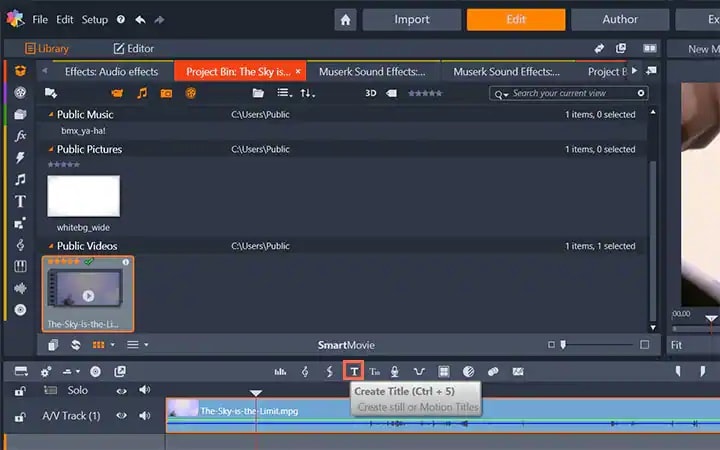
Step1Launch Studio. Import your video file, and you can import single frames such as images from a live video for stop motion titles. Once you have imported, go to the header bar above the Timeline. Click on Create Title option to open Title Editor to create title motion.
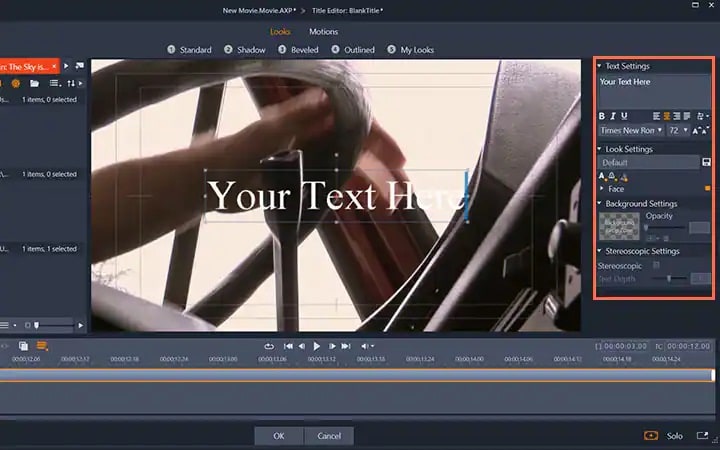
Step2Add your preferred text under Title Editor and adjust font, size, and style as you feel. Go to the right side to make changes to Look, Background, and Stereoscopic Settings to get the perfect text style from the wide range of choices available.
Step3Click on Motion option at the top to add motion to the text. Choose from the different motion title templates as per your preference.
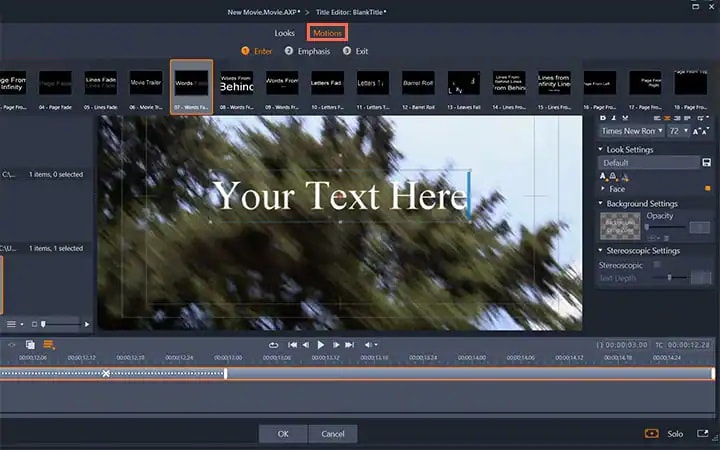
Step4You can adjust the duration of the motion effect from the right panel and click on Ok button.

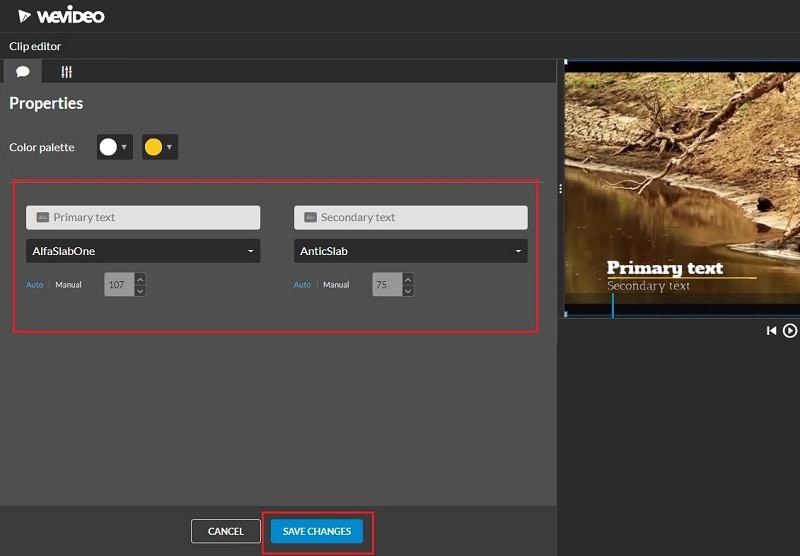
Part 4. Add Motion Title with WeVideo
WeVideo is a popular online video editor that you can use to add title motion graphics Premiere Pro free. You can find many motion titles on WeVideo for free like you get in Premiere Pro and there are many exclusive motion text templates available. You need to create a free account with WeVideo to get started. You can create your video from scratch by selecting from the available video templates. You can even import your recorded video and add motion texts and animations as per your preference. Here are the steps to add motion title with WeVideo.
Step1Open your web browser and visit “wevideo.com”. Click on Try For Free button. Sign up for free and go to WeVideo video editor.
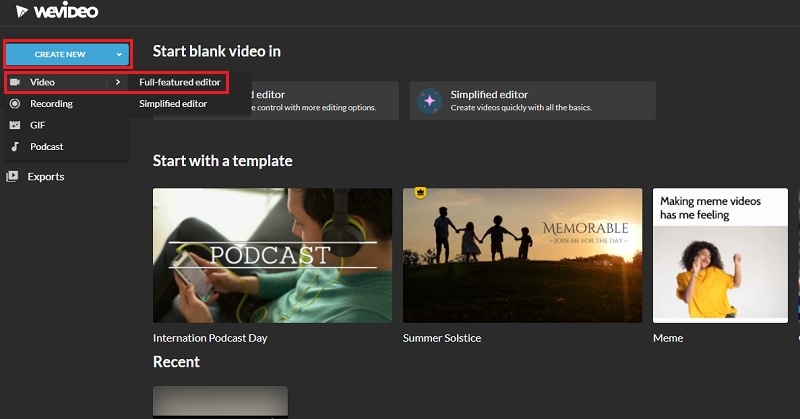
Step2Click on Create New button and select Video option. Click on Full-featured editor option.
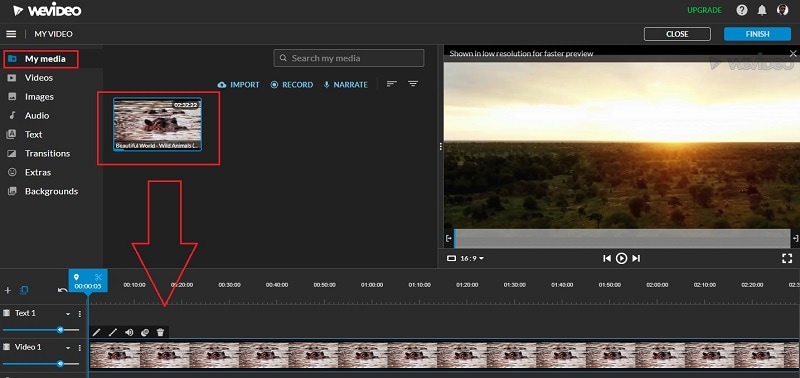
Step3Drag and drop your video file into My Media folder and bring it to Timeline.
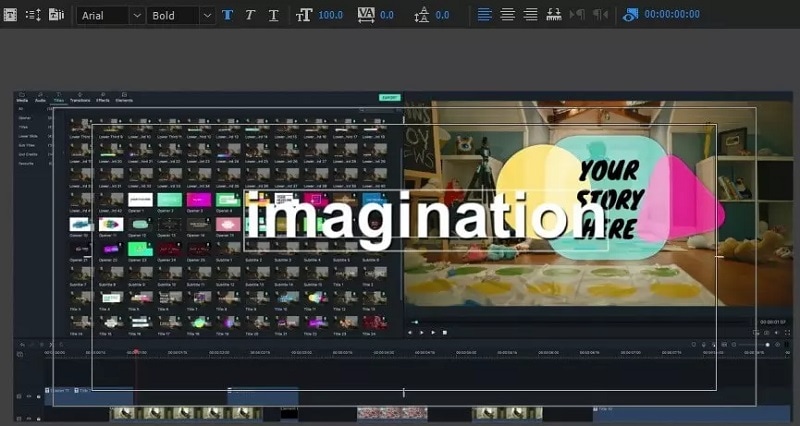
Step4Go to Text tab and you will see all the motion animated titles under Titles section. Click on them to check out their previews in Viewer. If you have selected anyone, drag and drop it into Timeline.
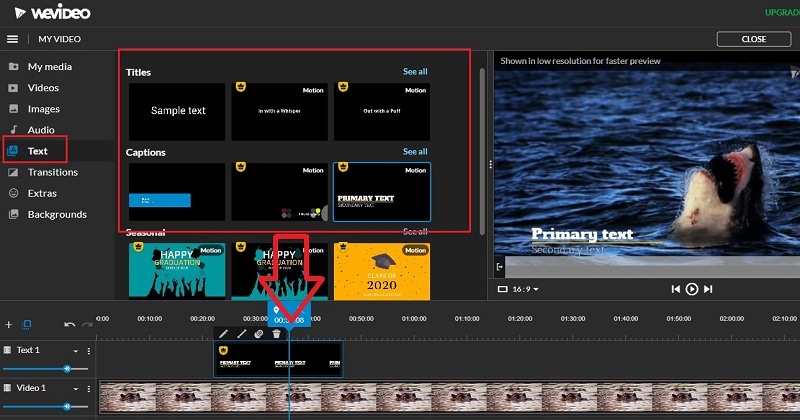
Step5Adjust the position where you want the title to appear on the video and stretch the duration as required. Double-click on the title to edit and customize it as per your preference. Finally, click on Save Changes button.
The Bottom Line
Motion titles are extremely important for any video because they bring in a variety to your video. They make the video eye-catching and help in getting the message across by grabbing the attention of the viewers. We have illustrated how to add motion titles Premiere Pro and Studio. You can also use WeVideo online video editor. We recommend Wondershare Filmora for its extensive collection of motion title templates to choose from and apply to your text.
Free Download For Win 7 or later(64-bit)
Free Download For macOS 10.14 or later
Guaranteed 10 Storyboard Creators To Make Animation Easier
Guaranteed 10 Storyboard Creators To Make Animation Easier For You
An easy yet powerful editor
Numerous effects to choose from
Detailed tutorials provided by the official channel
In this article
01 [5 Facts You Need to Know About Storyboard](#Part 1)
02 [Best 10 Storyboard Creators to Make Your Animation Stand out](#Part 2)
03 [Storyboard Maker Q&A](#Part 3)
Part 1 5 Facts You Need to Know About Storyboard
By using a Storyboard you can represent your story visually. You can make commercials, animated movies etc. Here are some questions from which you will get to know everything you need to know:
01What is an Online Storyboard?
Online Storyboard allows you to create animation videos or films on a web based platform, which is credible in the sense that you do not need to be device specific to use the tool. A web based storyboard works in all your preferred devices and smart phones. The tool does not require a download or installation; however the tool requires a sign up for working on the platform.
02What are the components of a storyboard?
Every shot of the storyboard captures different components. Here are some main components:
● Learning purpose
● A detailed description of communication
● Informatory Strategies to teach the learners
● Format should be perfect according to the topic
● Proper information of audio with file names
● Feedback for the assessment
03Why do you need a Storyboard?
A Storyboard is a process of pre- production. It lets you know how your story is going to flow. You will get to know the mistakes in the early stages if you make a storyboard and this will help you to save your money and time. Here are some essentials because of which you need to have a storyboard.
● Is this concept is going to work? - A storyboard lets you know whether the concept is going to work out or not. A storyboard helps the client to confirm whether the concept will work or not.
● Arranging Shots - A Storyboard lets you to tell you story in a limited time frame in the best way. In commercials we don’t have much time. It is like you have 60 seconds, 30 seconds, or sometimes it is just 15 seconds. So, it is the best way to make every shot count.
● Saving Money - Before making the final product, it is better to have an accepted storyboard from your client. In complex animations, it takes a lot of time and money so it is better to have an approved storyboard. This will let you know how the final product would look like. This will let the client know what is on your mind.
● Recognizing the mistakes - On a storyboarding phase, you can recognize the mistakes related to the media, narration or any other details. This will save your energy, time and money and then you will be ready for the production phase.
● Agreement with punch lines and dialogues - When you are creating a storyboard you can check whether the dialogues and punch lines work together as you have planned before. It is very important to check that the dialogues and punches are delivered in the exact way that you have imagined.
04How to Label Storyboards?
If you are using numerous storyboards for the same shot, keeping the shots labeled is important so that everything is arranged in an order and your team can stay focused and organized. If you will use any software it will name the panel numbers automatically. In case you are not using any software and your client wants to delete, add or move a panel then you can’t name that panel.
For example: Panel_7_New_New_New. It will be very difficult to figure out and also time consuming. The correct way to do is this: Project name_ Script#_Scene_Frame_01.JPG
05Do Storyboards have Dialogues?
Storyboards have dialogues and you can include dialogues which will flow underneath the panels for each and every scene. If you want, you can save it on your drawing. You can name the angles and just specify them “OTS 1” and “OTS 2” with the corresponding dialogues.
Part 2 Best 10 Storyboards Creators To Make Your Animation Stand Out
01Milanote
Price: Free for limited number of file uploads and paid version for $9.99 per month for unlimited file uploads.
Platform: Web, Android, iPhone and IPad.
Description
If you want to create your storyboard from scratch, Milanote is the best choice. It will make it very easy to arrange your ideas and plans you have thought for your storyboard. It is exquisite software for collecting, organizing and generating ideas. Users can create private boards and share them with their team members to get the feedback and can ensure the service quality.
Key Features of Milanote:
● Task management
● Real time editing
● File sharing
● Project management
● Status tracking
Advantages:
● It allows you real time collaboration.
● Helps you to organize your whiteboard workspace.
● Users are allowed to place a variety of images and notes.
Disadvantages:
● It does not have an offline mode
● It creates problem in shaping and moving arrows.
● Requires a seamless internet connection for smooth running.

02StoryboardThat
Price: Storyboard That’s monthly business plan will cost you $14.99 per month.
Platform: Web based
Description:
StoryboardThat is a platform from which users can make a storyboard using their desired graphics from a huge collection of graphics. StoryboardThat has everything you need like character, background or any other graphic. If you are still learning how to create a storyboard then StoryboardThat is a great choice for you. StoryboardThat gives a platform to the writers and publishers so that they can create comics and graphic novels. It can also be used by the teachers to enhance the engagement and design classroom posters.
Key Features of StoryboardThat:
● Custom templates
● Screen capturing
● Feedback management
● Drag and Drop interface
Advantages:
● It has drag and drop interface which makes it easy to use.
● It is good for sharing ideas and thought.
● It delivers exactly what it has promised.
Disadvantages:
● The images are not incredible - looking.
● It is desktop based.
● Quite difficult to use.

03Wave.video
Price: $20 per month.
Platform: Web Based
Wave.video allows you to bring your storyboard to life. It is an online video production platform. You don’t have to start it from the scratch because it comes with infinite number of templates. If you want to add text, music, or to trim video or want to edit the video’s audio then you can use Wave.video.

Key Features of Wave.video
● It has Audio tools
● Text Overlay
● It has a Media library.
● Social Sharing; you can share it to anywhere.
● You can merge the video.
Advantages:
● Intuitive interface
● It has a huge library
● It is easy to use.
Disadvantages:
● Quite slow while rendering project.
● Text animation features are limited.
● Price is bit high.
04Frame Forge
Price: $498.95 is for one time or $12.99 per month
Platform: Windows, Mac and Android.
Frame Forge is an award winning filmmaking creator that helps in visualizing the scenes via storyboards. It helps the users to import scripts and will build replicate sets. Frame Forge is not an online platform you have to download it. It is the most advanced software for storyboarding. It has a lot of impressive features. It is used even in large production houses like Netflix BBC etc. It is a good option if you want to create lengthy videos for entertainment purpose.
Key Features of Frame Forge:
● It allows you to place cameras in a virtual set.
● Easy to use
● Drag and drop control
● Scripts can be imported to the shots.
Advantages:
● It is quite easy to use.
● Text which is provided by the software is easy to use.
● It is a good teaching tool.
Disadvantages:
● Dissatisfied with customer service.
● Data loss
● Numerous crashes

05MakeStoryboard
Price: $12 per month
Platform: Windows and Mac
MakeStoryboard has a simple user friendly interface by which you can quickly upload the camera shots. If you want to add any informational details you can add custom text fields. The pencils, marker and pen tools will respond to any drawing tablet. It offers the free subscription tier; if your team is working on a small budget then it is a great option. When you are done, then you can export it in a PDF. Stakeholders can directly review it through the private link which means there is no need to have an account.
Key Feature of MakeStoryboard:
● Pre-built Templates
● Animations and transitions
● Drag and Drop
● Content library
Advantages:
● Easy to use and user friendly interface.
● You can control who can edit or comment your storyboard.
● You can work in real time collaboration.
Disadvantages:
● Quite expensive for educational organizations.
● Slow while downloading PDF.
● Expensive and not fit for freelancers.

06Canva
Price: Canva is free but has limited graphics and images and its single user plan is $12.99 per month.
Platform: Works on all major operating systems.
Creating a storyboard using Canva is very easy with the help of library of templates and one million stock of images to choose from. You can customize colors, select font size, and can also include headers and sub- headers. If you want a simple and easy tool for your projects, it is the best option. If you are working on a script or design with someone else you can allow access for collaboration, and when you are done with it you can share it with your team via email or in a PDF form.
Key Features of Canva:
● It has a font library.
● Drag and drop editor.
● Photo’s effect to enhance the photo
● Access to icons shapes.
Advantages:
● You can customize the items according to you.
● It is user friendly and easy to navigate.
● It has a huge library.
Disadvantages:
● It is not the best photo editor.
● Its templates appear general.
● You cannot create unique elements.

07Boords Storyboard Creator
Platform: Windows, Linux and Mac
Price: $12- $24 per month.
Boords is a user friendly web app which allows you to collaborate with your team. You can add images to every storyboard and can also create the notes for each step of your video. You can add sounds, action, camera details even if you don’t have much technical knowledge. You can simply access it and can start using it directly. It provides you an especial animatic tool and when you are ready to share you can share it online for the feedback. You can even share it with your clients to let them give their feedback within the platform.
Key Features of Boords Storyboard Creator:
● Frame editor allows you to draw directly on frame.
● You can use the overlay interface.
● Animatic features will help you make animatic with single click.
Advantages:
● Easy to use interface.
● You can create an animatic storyboard with ease.
● Share it easily.
Disadvantages:
● Security and privacy risk
● Migration Risk
● The application cannot be integrated with other platform of same functionality.

08Storyboarder by Wonder Unit
Price: Free
Platform: Windows, Mac and Linux
If you are working with a small budget then Storyboarder is a great option and also it is an open source platform that is free of cost. It has a simple interface which makes it easy to work. You can write and place the dialogues, shot type and also enter timing information. If has simple and smooth drawing tools which makes it easy to draw shapes and characters in it. Even if you know how to draw; still using this will be a great choice as it is a time saver.
Storyboarder works in collaboration with Photoshop so that if you want to edit your storyboard you can edit and it will automatically be updated in Storyboarder. In this you can export your file in various formats like Animated GIF, PDF, Final Cut and Premiere etc.
Key Feature of Storyboarder:
● It has simple interface.
● Simple and smooth drawing.
● Track changes.
● Collaborate with Github.
● Exports to various formats.
Advantages:
● It has a sleek interface which makes it easy to use.
● It auto saves you work which means no data loss.
● It collaborates with the Photoshop so that you can make changes from outside and it will be updated in your board.
Disadvantages:
● Shot description menu text is small.
● Its color scheme is not good.
● Its tools have not a good follow through which makes it difficult to draw specific shots.

09Plot
Price: $10 per month
Platform: Windows, Linux and Mac
Plot Storyboard helps you to make your work quick and easy as possible. You can outline your videos in seconds. Just paste your script and break it into pieces so that there is no need to copy, paste and repeat and now you can focus on your story.
A font library and other flexible options will make your image creation easy. You can upload the pictures or you can copy them from your favorite websites. There is no need to draw. You can share your work with your clients within the software. It is an online program for which you need good internet connection.
Key Feature of Plot:
● Powerful and easy to use interface.
● Customizable Drawing tools.
● You can export a PDF in one click.
● Collaborate on your storyboard from anywhere.
Advantages:
● User friendly interface.
● PDF export format
● Fast Operation.
Disadvantages:
● No way to upload GIF.
● You have to work online, offline mode is absent.
● If you want to use you have to buy the paid version.

10**Wondershare Filmora Video Editor **
Price: $69.99 one time fees.
Platform: Windows and Mac
Filmora is an award winning video editor platform which will help you in creating professional videos for your brand or for your business. By using Filmora, you can create amazing storyboard as it is packed with amazing features like Keyframe animation, motion tracking, color matching and audio editing features. You can also add titles, transitions and split dual screen. You can also access to other feature like green screen.
Key Features of Filmora:
● You can export your videos in multiple formats.
● It has drag and drop functionality making it easy to import the videos.
● It has key framing features as well.
● It also has the feature of audio ducking and video transitions.
Advantages:
● Simple user interface.
● It has advanced audio editing capabilities
● It has drag and drop effect.
Disadvantages:
● Free versions contains watermark.
● You have to download the software.
● If you wanted to use all features you have to buy the paid version.
For Win 7 or later (64-bit)
For macOS 10.12 or later
Part 3 – Storyboard Maker Q&A
What things should be there in a storyboard?
Storyboards have many squares with illustrations which represent each shot of your video, notes stating what is happening in the scenes. It creates a visual outline for your film which means you should include only those moments which are important.
Why storyboard is used and who uses it?
Storyboard is used to work out the story ideas, plans in shot set-up and sequence flow. It is used by most of the Hollywood studios and also in production houses worldwide. It is used by the Writers, Directors, Independent Filmmakers and Producers to create visual outline for their Netflix series, Cable serialized dramas and feature films etc.
How can you store your own artwork?
You can save your artwork by dragging and dropping the artwork directly in the frame from the folders which are full with the artwork. Storyboard allows you to create your own library of the artwork which can be accessed and operated immediately.
What are the best storyboard creators?
There are lots of storyboard creators from which you can choose. Some of them are:
● Canva
● Frame Forge
● Filmora
● Storyboarder
● Studiobinder
● StoryboardThat
What is the aim of creating a Storyboard?
A Storyboard is important to create before the final product because it will save your time, energy and money. It is used to illustrate a story and is created so that you can correct your mistakes if there is any available, before spending money on creating a final product.
● Ending Thoughts →
● Storyboards are important as they let you know your mistakes in an early stage and also let you know how story going to flow.
● Storyboard helps you to save your time, energy and also tells you how much each element will cost which prevents you from spending excess money.
● There are a lot of storyboard creators but Filmora will be the best option to work with as it provides you a wide variety of features to make your storyboard amazing.
In this article
01 [5 Facts You Need to Know About Storyboard](#Part 1)
02 [Best 10 Storyboard Creators to Make Your Animation Stand out](#Part 2)
03 [Storyboard Maker Q&A](#Part 3)
Part 1 5 Facts You Need to Know About Storyboard
By using a Storyboard you can represent your story visually. You can make commercials, animated movies etc. Here are some questions from which you will get to know everything you need to know:
01What is an Online Storyboard?
Online Storyboard allows you to create animation videos or films on a web based platform, which is credible in the sense that you do not need to be device specific to use the tool. A web based storyboard works in all your preferred devices and smart phones. The tool does not require a download or installation; however the tool requires a sign up for working on the platform.
02What are the components of a storyboard?
Every shot of the storyboard captures different components. Here are some main components:
● Learning purpose
● A detailed description of communication
● Informatory Strategies to teach the learners
● Format should be perfect according to the topic
● Proper information of audio with file names
● Feedback for the assessment
03Why do you need a Storyboard?
A Storyboard is a process of pre- production. It lets you know how your story is going to flow. You will get to know the mistakes in the early stages if you make a storyboard and this will help you to save your money and time. Here are some essentials because of which you need to have a storyboard.
● Is this concept is going to work? - A storyboard lets you know whether the concept is going to work out or not. A storyboard helps the client to confirm whether the concept will work or not.
● Arranging Shots - A Storyboard lets you to tell you story in a limited time frame in the best way. In commercials we don’t have much time. It is like you have 60 seconds, 30 seconds, or sometimes it is just 15 seconds. So, it is the best way to make every shot count.
● Saving Money - Before making the final product, it is better to have an accepted storyboard from your client. In complex animations, it takes a lot of time and money so it is better to have an approved storyboard. This will let you know how the final product would look like. This will let the client know what is on your mind.
● Recognizing the mistakes - On a storyboarding phase, you can recognize the mistakes related to the media, narration or any other details. This will save your energy, time and money and then you will be ready for the production phase.
● Agreement with punch lines and dialogues - When you are creating a storyboard you can check whether the dialogues and punch lines work together as you have planned before. It is very important to check that the dialogues and punches are delivered in the exact way that you have imagined.
04How to Label Storyboards?
If you are using numerous storyboards for the same shot, keeping the shots labeled is important so that everything is arranged in an order and your team can stay focused and organized. If you will use any software it will name the panel numbers automatically. In case you are not using any software and your client wants to delete, add or move a panel then you can’t name that panel.
For example: Panel_7_New_New_New. It will be very difficult to figure out and also time consuming. The correct way to do is this: Project name_ Script#_Scene_Frame_01.JPG
05Do Storyboards have Dialogues?
Storyboards have dialogues and you can include dialogues which will flow underneath the panels for each and every scene. If you want, you can save it on your drawing. You can name the angles and just specify them “OTS 1” and “OTS 2” with the corresponding dialogues.
Part 2 Best 10 Storyboards Creators To Make Your Animation Stand Out
01Milanote
Price: Free for limited number of file uploads and paid version for $9.99 per month for unlimited file uploads.
Platform: Web, Android, iPhone and IPad.
Description
If you want to create your storyboard from scratch, Milanote is the best choice. It will make it very easy to arrange your ideas and plans you have thought for your storyboard. It is exquisite software for collecting, organizing and generating ideas. Users can create private boards and share them with their team members to get the feedback and can ensure the service quality.
Key Features of Milanote:
● Task management
● Real time editing
● File sharing
● Project management
● Status tracking
Advantages:
● It allows you real time collaboration.
● Helps you to organize your whiteboard workspace.
● Users are allowed to place a variety of images and notes.
Disadvantages:
● It does not have an offline mode
● It creates problem in shaping and moving arrows.
● Requires a seamless internet connection for smooth running.
02StoryboardThat
Price: Storyboard That’s monthly business plan will cost you $14.99 per month.
Platform: Web based
Description:
StoryboardThat is a platform from which users can make a storyboard using their desired graphics from a huge collection of graphics. StoryboardThat has everything you need like character, background or any other graphic. If you are still learning how to create a storyboard then StoryboardThat is a great choice for you. StoryboardThat gives a platform to the writers and publishers so that they can create comics and graphic novels. It can also be used by the teachers to enhance the engagement and design classroom posters.
Key Features of StoryboardThat:
● Custom templates
● Screen capturing
● Feedback management
● Drag and Drop interface
Advantages:
● It has drag and drop interface which makes it easy to use.
● It is good for sharing ideas and thought.
● It delivers exactly what it has promised.
Disadvantages:
● The images are not incredible - looking.
● It is desktop based.
● Quite difficult to use.
03Wave.video
Price: $20 per month.
Platform: Web Based
Wave.video allows you to bring your storyboard to life. It is an online video production platform. You don’t have to start it from the scratch because it comes with infinite number of templates. If you want to add text, music, or to trim video or want to edit the video’s audio then you can use Wave.video.
Key Features of Wave.video
● It has Audio tools
● Text Overlay
● It has a Media library.
● Social Sharing; you can share it to anywhere.
● You can merge the video.
Advantages:
● Intuitive interface
● It has a huge library
● It is easy to use.
Disadvantages:
● Quite slow while rendering project.
● Text animation features are limited.
● Price is bit high.
04Frame Forge
Price: $498.95 is for one time or $12.99 per month
Platform: Windows, Mac and Android.
Frame Forge is an award winning filmmaking creator that helps in visualizing the scenes via storyboards. It helps the users to import scripts and will build replicate sets. Frame Forge is not an online platform you have to download it. It is the most advanced software for storyboarding. It has a lot of impressive features. It is used even in large production houses like Netflix BBC etc. It is a good option if you want to create lengthy videos for entertainment purpose.
Key Features of Frame Forge:
● It allows you to place cameras in a virtual set.
● Easy to use
● Drag and drop control
● Scripts can be imported to the shots.
Advantages:
● It is quite easy to use.
● Text which is provided by the software is easy to use.
● It is a good teaching tool.
Disadvantages:
● Dissatisfied with customer service.
● Data loss
● Numerous crashes
05MakeStoryboard
Price: $12 per month
Platform: Windows and Mac
MakeStoryboard has a simple user friendly interface by which you can quickly upload the camera shots. If you want to add any informational details you can add custom text fields. The pencils, marker and pen tools will respond to any drawing tablet. It offers the free subscription tier; if your team is working on a small budget then it is a great option. When you are done, then you can export it in a PDF. Stakeholders can directly review it through the private link which means there is no need to have an account.
Key Feature of MakeStoryboard:
● Pre-built Templates
● Animations and transitions
● Drag and Drop
● Content library
Advantages:
● Easy to use and user friendly interface.
● You can control who can edit or comment your storyboard.
● You can work in real time collaboration.
Disadvantages:
● Quite expensive for educational organizations.
● Slow while downloading PDF.
● Expensive and not fit for freelancers.
06Canva
Price: Canva is free but has limited graphics and images and its single user plan is $12.99 per month.
Platform: Works on all major operating systems.
Creating a storyboard using Canva is very easy with the help of library of templates and one million stock of images to choose from. You can customize colors, select font size, and can also include headers and sub- headers. If you want a simple and easy tool for your projects, it is the best option. If you are working on a script or design with someone else you can allow access for collaboration, and when you are done with it you can share it with your team via email or in a PDF form.
Key Features of Canva:
● It has a font library.
● Drag and drop editor.
● Photo’s effect to enhance the photo
● Access to icons shapes.
Advantages:
● You can customize the items according to you.
● It is user friendly and easy to navigate.
● It has a huge library.
Disadvantages:
● It is not the best photo editor.
● Its templates appear general.
● You cannot create unique elements.
07Boords Storyboard Creator
Platform: Windows, Linux and Mac
Price: $12- $24 per month.
Boords is a user friendly web app which allows you to collaborate with your team. You can add images to every storyboard and can also create the notes for each step of your video. You can add sounds, action, camera details even if you don’t have much technical knowledge. You can simply access it and can start using it directly. It provides you an especial animatic tool and when you are ready to share you can share it online for the feedback. You can even share it with your clients to let them give their feedback within the platform.
Key Features of Boords Storyboard Creator:
● Frame editor allows you to draw directly on frame.
● You can use the overlay interface.
● Animatic features will help you make animatic with single click.
Advantages:
● Easy to use interface.
● You can create an animatic storyboard with ease.
● Share it easily.
Disadvantages:
● Security and privacy risk
● Migration Risk
● The application cannot be integrated with other platform of same functionality.
08Storyboarder by Wonder Unit
Price: Free
Platform: Windows, Mac and Linux
If you are working with a small budget then Storyboarder is a great option and also it is an open source platform that is free of cost. It has a simple interface which makes it easy to work. You can write and place the dialogues, shot type and also enter timing information. If has simple and smooth drawing tools which makes it easy to draw shapes and characters in it. Even if you know how to draw; still using this will be a great choice as it is a time saver.
Storyboarder works in collaboration with Photoshop so that if you want to edit your storyboard you can edit and it will automatically be updated in Storyboarder. In this you can export your file in various formats like Animated GIF, PDF, Final Cut and Premiere etc.
Key Feature of Storyboarder:
● It has simple interface.
● Simple and smooth drawing.
● Track changes.
● Collaborate with Github.
● Exports to various formats.
Advantages:
● It has a sleek interface which makes it easy to use.
● It auto saves you work which means no data loss.
● It collaborates with the Photoshop so that you can make changes from outside and it will be updated in your board.
Disadvantages:
● Shot description menu text is small.
● Its color scheme is not good.
● Its tools have not a good follow through which makes it difficult to draw specific shots.
09Plot
Price: $10 per month
Platform: Windows, Linux and Mac
Plot Storyboard helps you to make your work quick and easy as possible. You can outline your videos in seconds. Just paste your script and break it into pieces so that there is no need to copy, paste and repeat and now you can focus on your story.
A font library and other flexible options will make your image creation easy. You can upload the pictures or you can copy them from your favorite websites. There is no need to draw. You can share your work with your clients within the software. It is an online program for which you need good internet connection.
Key Feature of Plot:
● Powerful and easy to use interface.
● Customizable Drawing tools.
● You can export a PDF in one click.
● Collaborate on your storyboard from anywhere.
Advantages:
● User friendly interface.
● PDF export format
● Fast Operation.
Disadvantages:
● No way to upload GIF.
● You have to work online, offline mode is absent.
● If you want to use you have to buy the paid version.
10**Wondershare Filmora Video Editor **
Price: $69.99 one time fees.
Platform: Windows and Mac
Filmora is an award winning video editor platform which will help you in creating professional videos for your brand or for your business. By using Filmora, you can create amazing storyboard as it is packed with amazing features like Keyframe animation, motion tracking, color matching and audio editing features. You can also add titles, transitions and split dual screen. You can also access to other feature like green screen.
Key Features of Filmora:
● You can export your videos in multiple formats.
● It has drag and drop functionality making it easy to import the videos.
● It has key framing features as well.
● It also has the feature of audio ducking and video transitions.
Advantages:
● Simple user interface.
● It has advanced audio editing capabilities
● It has drag and drop effect.
Disadvantages:
● Free versions contains watermark.
● You have to download the software.
● If you wanted to use all features you have to buy the paid version.
For Win 7 or later (64-bit)
For macOS 10.12 or later
Part 3 – Storyboard Maker Q&A
What things should be there in a storyboard?
Storyboards have many squares with illustrations which represent each shot of your video, notes stating what is happening in the scenes. It creates a visual outline for your film which means you should include only those moments which are important.
Why storyboard is used and who uses it?
Storyboard is used to work out the story ideas, plans in shot set-up and sequence flow. It is used by most of the Hollywood studios and also in production houses worldwide. It is used by the Writers, Directors, Independent Filmmakers and Producers to create visual outline for their Netflix series, Cable serialized dramas and feature films etc.
How can you store your own artwork?
You can save your artwork by dragging and dropping the artwork directly in the frame from the folders which are full with the artwork. Storyboard allows you to create your own library of the artwork which can be accessed and operated immediately.
What are the best storyboard creators?
There are lots of storyboard creators from which you can choose. Some of them are:
● Canva
● Frame Forge
● Filmora
● Storyboarder
● Studiobinder
● StoryboardThat
What is the aim of creating a Storyboard?
A Storyboard is important to create before the final product because it will save your time, energy and money. It is used to illustrate a story and is created so that you can correct your mistakes if there is any available, before spending money on creating a final product.
● Ending Thoughts →
● Storyboards are important as they let you know your mistakes in an early stage and also let you know how story going to flow.
● Storyboard helps you to save your time, energy and also tells you how much each element will cost which prevents you from spending excess money.
● There are a lot of storyboard creators but Filmora will be the best option to work with as it provides you a wide variety of features to make your storyboard amazing.
Best Video Editors to Add Text to a Video
While it can be very easy to add text to an image, the same cannot be said when it comes to adding even the simplest text to a video. You will need video editing software that is designed with the necessary features to help you add text to your video.
There are very many programs in the market that can technically be used to add text to a video. But the ones we will look at are video editors that make the process easy, but also give you a wide range of options to customize your text in numerous ways.
Filmora
Filmora by Wondershare is one of the best video editors in the market. Its user interface is so easy to use that adding text to the video is a simple 3-step process. Aside from adding text to the video, Filmora also allows you to edit other aspects of the video including adding transitions, overlays, and animations to any section of the video.

Key Features:
- You can use Filmora to add text to any section of the video
- It gives you the freedom to move the text to any section of the video
- Customizing the text, you add to the video can be done in numerous ways including changing the color, and font and adding animations to the text.
- It offers numerous templates to choose from and different font styles that you can use
- It has a simple user interface that makes the video editing process very easy
- It has numerous other video editing capabilities that allow you to create and edit videos in different ways including splitting videos, trimming videos, and even merging videos clips into one
- You can upload the videos directly to YouTube after editing.
After Effects
Adobe After Effects is a motion picture editing program that you can also use to add text and other animations to your video. While you can use it to add simple text to the video, it is an ideal solution when your goal is to add advanced text animations. It is however by no means a simple solution, especially for beginners who may find it hard to get going with After Effects.

Key Features:
- You can add simple lines of text to any section of the video
- Text is easily customizable by changing the color, font, and size of the text
- You can also choose to change the entire text layer and add advanced animations and effects
- There are a lot of text, animations, and effects templates to choose from
- You can easily copy text from other Adobe applications to use in After Effects
Movavi Editor
Movavi video editor is another great video editor that you can use to add and edit text on a video. Like most similar tools it is designed to simplify the process, allowing you to add text to any section of the document, move the text to any location on the video and even add text effects to customize the text. It has a very simple user interface that allows you to do that quickly and easily.

Key Features:
- You can add text to any section of the video
- Customizing the text by changing the font, color and size is also very easy
- The user interface is very easy to use, allowing you to add even blocks of text very quickly
- You also have additional options to edit the video including splitting and merging the video or adjusting the brightness, saturation, and color.
iMovie
This is a built-in video editor that you will find on macOS and iOS devices. Even though it is free, iMovie has a lot of features that come in handy when you want to add and edit text on a video. The fact that it can be used on iOS devices is an added advantage when you want to edit videos on the go.

Key Features:
- It allows users to add transitions and effects to the text you add to the video
- It comes with a lot of title templates to choose from
- Adding animated text is also very simple including Sideways Drift, Lens Flare, and more
- You can customize the text in very many ways including adding fonts, drop shadows, changing the color, and even resizing or repositioning the text.
Camtasia
TechSmith Camtasia is one of the most popular tools to create and edit videos. Of the numerous features that you get when you choose to use Camtasia is adding and editing text to the video. It has numerous templates that can be used to customize the text you add in various ways.

Key Features:
- It gives you numerous options to add text to the images including text boxes, templates, and effects
- It has a speech-to-text feature that is perfect for adding captions and subtitles to the video
- You can easily customize the text by adding transitions and effects or even by simply changing the font, color, and size of the text
- The text can be moved to any section of the video
Typito
Typito is an online video editor with simple tools that can help you make changes to any video. designed to help YouTube content creators and video editors, Typito can be used to add all kinds of text and text effects to any video. It is accessible on all browsers and it is also very easy to use.
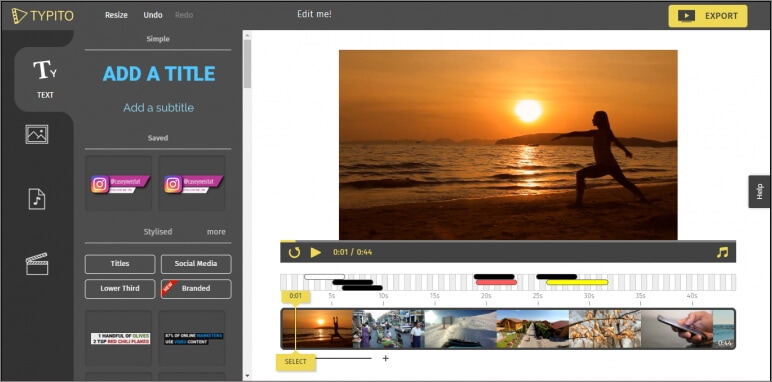
Key Features:
- It is very easy to use, allowing you to add text to any video in a few simple steps
- It has numerous templates to choose from
- Changing the font size, color, and style of the text is very easy
- You can publish videos directly to numerous video-sharing sites after editing
- It allows users to add animations, transitions, and effects to the text
Splice
Splice is an iOS app designed to help you add text to videos on iOS devices. Adding text to any video using Splice can be easily done using the overlay feature. It also has numerous other video editing features including allowing you to easily synchronize your videos and music, adding filters and transitions, and more.

Key Features:
- it has a simple user interface that makes adding text very easy
- You can customize the text in various ways including changing the font size, color and style or even adding various text effects
- Videos can be saved on the device or shared directly on social media apps like Facebook, Instagram, and YouTube
- It has numerous other video editing features including filters and animations
Clipomatic
If the text you want to add to the video is in the form of captions or subtitles, then Clipomatic is perhaps the best choice. It supports various languages including German, French, Portuguese, and even Chinese. You can also use it to add regular text to any video, reposition the text on any section of the video and customize the text in various ways.

Key Features:
- It is available for both Android and iOS
- Adding text to the video is very easy
- You can easily customize the text by changing the font color, and size and adding transitions and text effects
- It supports various languages, making it ideal for captions and subtitles
MySubtitle
MySubtitle is a simple but highly effective app that you can use to add text to your video. As the name suggests, this tool is ideal for adding subtitles and you can do that very easily by simply typing in the text and syncing the text to the video’s content.

Key Features:
- It is available for both iOS and Android devices
- You can type in your subtitles directly on the video
- Subtitles can then be paced to suit the video’s playback speed
- It is completely free to use
- You can share the videos you edit directly on various social media platforms
Free Download For Win 7 or later(64-bit)
Free Download For macOS 10.14 or later
Free Download For macOS 10.14 or later
What Is TS Format and How To Play TS Files? [Basic Tips]
Have you been downloading videos and looking at the files having the ‘.ts’ extension at the end? We guess you have seen them. The question is, do you know what the TS file format is? Many compressed video files have TS format. Do you want to learn more about the file format?
Take our help. Allow us to tell you what this extension means, along with what work they do. We will also tell you its difference with other formats. So, to learn in detail about TS video format, continue reading.
In this article
02 Pros and Coins about TS Video Format
03 How to Play TS Video Files with VLC Media Player?
04 How to Edit TS Video Files with Filmora Video Editor?
05 TS VS. MP4: What’s the Difference?
Part 1. What Is TS Video Format?
A TS format file is a Video Transport Stream file. The TS file extension is used to store video data, mostly on DVDs. The video files are standardly compressed with .MPEG video compression. If you are looking for a file extension to save streamed or broadcast videos, TS video format is ideal for this. Are you worried about how to play a TS file?

Well, a video file with this format can easily be played on a certain media player or video editing program . Various video playback apps, video development tools, and also DVD creation programs support the TS format. The .ts file extension can also contain any data, and TS files don’t always need to store media or documents.
Part 2. Pros and Coins about TS Video Format
Everything has its beneficial factors and disadvantages, so does TS video format has. Are you ready to know more about the TS file format? After learning about the format, it’s time to share its advantages and drawbacks with you. Let’s get started!
Advantages of TS File Format
A great thing about TS format is that, after each keyframe, the file information is added automatically. The format is impressive when it comes to maintaining transmission integrity. This is because of all the elementary streams, synchronization patterns, and error corrections; everything is encapsulated in a container format.
Do you know what else benefits TS format has? It is widely used for broadcasting because broadcasting doesn’t need the complete stream for playing it. You can easily share large files over the communication media in real-time as tiny chunks of the audio or video file are sent. Along with this, the error is easily detected as extra information is shared with every chunk, helping in error detection.
Drawbacks of TS File Format
Moving on to its disadvantages, let’s start with the device compatibility. The biggest drawback of using the TS file format is that it is not compatible with many devices. For instance, a built-in media player like Windows Media Player does not support the format; eventually, users must change the file format.
Do you know another significant disadvantage? You cannot share TS files online. Different platforms like Facebook, YouTube, etc., support other famous formats, so hence, sharing TS video files requires a format converter. Do you know how much space does a TS file occupies? Well, it acquires a significant storage space, more than other file formats.
Part 3. How to Play TS Video Files with VLC Media Player?
As mentioned, only specific programs support and play TS video format, so VLC Media Player is one of those. The software is famous among its competitors because it supports a wide range of file formats.
VLC is an open-source, free cross-platform media player that lets you play various multimedia files and DVDs, VCDs, Audio CDs, and other streaming protocols. VLC also plays most codecs like MPEG-2, MPEG-4, MKV, MP3, etc. The media player runs on Windows, macOS, Linux, Unix, iOS, and Android.
Do you know a great thing about VLC? Surprisingly, the software has no spyware, no user tracking, and no ads. VLC is a simple yet super-fast and powerful media player of all time. Learn how to play TS files on VLC by following the steps below:
Step 1: Install or Update VLC
To play TS file format, first of all, download and install the VLC media player on your respective device. If you have already installed the media player, update it to the latest version. With this, all the codecs will be working properly. Move to the ‘Help’ section from the top menu and hit ‘Check for Updates.’

Step 2: Open the TS File
Now, launch the VLC media player and head over to the ‘Media’ option. From the menu list, select the ‘Open File’ option, locate the TS file from your device and add it to the media player. You can also directly drag the TS video file to VLC to play it.

Step 3: Enjoy Watching TS File
After your file has been successfully imported to the VLC media player, you can now enjoy watching the TS Video format without any trouble.

Part 4. How to Edit TS Video Files with Filmora Video Editor?
Now that you know how to play TS video format with a VLC media player let’s also share how you can edit your TS videos. With Wondershare Filmora , you can edit a stunning video. The video editor offers more features than you can imagine. The software comes with features like Record PC Screen, Color Match, Silence Detection, Scene Detection, etc.
For Win 7 or later (64-bit)
For macOS 10.12 or later
Some more advanced editing tools are offered, like Power Tool, Stabilize Video, Auto Reframe, Auto Highlight, and whatnot. If you are interested in editing your TS file format videos with Filmora, take help from the steps shared below.
Step 1: Import TS File
After you have launched Wondershare Filmora on your device, import the media file so that you can start the editing; for that, head to the ‘File’ tab and hover on the ‘Import Media’ option. By doing this, a sub-menu will appear, select the ‘Import Media Files’ option and locate the TS video.

Step 2: TS Audio Edit
After importing the media file, drag it to the timeline to start the editing. With Filmora, add cool sound effects to your videos from the ‘Audio’ section. You get various effects like Happy, Jazz, Young & Bright, and other options.

Step 3: Use Transitions and Effects
What is a video without Effects and Transitions? Filmora comes with a wide range of options to add unique effects and transitions to your videos.

Step 4: Add Elements
Head to the ‘Elements’ section to add amazing little fun things to your video and make it interesting. You get elements like Laser Eye, various Emoji options, and a lot more.

Step 5: Export TS Video
Once all the editing is complete and satisfied with the final result, export the video. Hit the ‘Export’ button and select TS file format from the ‘Locals’ tab as the output format.

Part 5. TS VS. MP4: What’s the Difference?
What is the difference between the TS file format and MP4? Allow us to tell you some. You might have read about both formats, but a few differences are discussed as follows:
TS
TS format is used in DVD and Blu-ray discs that you have on your respective device. It does the same work as MP4, but the TS file breaks the data into tiny chinks. TS format comprises a few elements, making it a faster transporter for MPEG-2 format compressed video data. It is used widely in broadcasting and streaming.
MP4
MP4 is considered more compatible as compared to TS format, as not all the software allows the ‘.ts’ extension. If the file is not transmitted properly or is not closed properly, it can lose the data it has. MP4 is divided into two parts, one has the media data, and the other has metadata. Due to compression differences in both formats, it has a smaller size than the TS format.
Bottom Line
The article has shared great details about the TS format. We talked about how you can play TS files on VLC and also shed light on its pros and cons. Moreover, we also shared a video editor to edit your TS file format videos. Now, let’s talk about Wondershare Filmora.
Wondershare Filmora is a great video editor and is perfect for creating brilliant videos. The comprehensive list of features that you get from Filmora makes it unique and unforgettable. AI Portrait, Auto Normalization, Video Snapshot, Animation Keyframing, and many others are among its various features. For creating good videos, Filmora is an ideal option.
Wondershare Filmora
Get started easily with Filmora’s powerful performance, intuitive interface, and countless effects!
Try It Free Try It Free Try It Free Learn More >

02 Pros and Coins about TS Video Format
03 How to Play TS Video Files with VLC Media Player?
04 How to Edit TS Video Files with Filmora Video Editor?
05 TS VS. MP4: What’s the Difference?
Part 1. What Is TS Video Format?
A TS format file is a Video Transport Stream file. The TS file extension is used to store video data, mostly on DVDs. The video files are standardly compressed with .MPEG video compression. If you are looking for a file extension to save streamed or broadcast videos, TS video format is ideal for this. Are you worried about how to play a TS file?
Well, a video file with this format can easily be played on a certain media player or video editing program . Various video playback apps, video development tools, and also DVD creation programs support the TS format. The .ts file extension can also contain any data, and TS files don’t always need to store media or documents.
Part 2. Pros and Coins about TS Video Format
Everything has its beneficial factors and disadvantages, so does TS video format has. Are you ready to know more about the TS file format? After learning about the format, it’s time to share its advantages and drawbacks with you. Let’s get started!
Advantages of TS File Format
A great thing about TS format is that, after each keyframe, the file information is added automatically. The format is impressive when it comes to maintaining transmission integrity. This is because of all the elementary streams, synchronization patterns, and error corrections; everything is encapsulated in a container format.
Do you know what else benefits TS format has? It is widely used for broadcasting because broadcasting doesn’t need the complete stream for playing it. You can easily share large files over the communication media in real-time as tiny chunks of the audio or video file are sent. Along with this, the error is easily detected as extra information is shared with every chunk, helping in error detection.
Drawbacks of TS File Format
Moving on to its disadvantages, let’s start with the device compatibility. The biggest drawback of using the TS file format is that it is not compatible with many devices. For instance, a built-in media player like Windows Media Player does not support the format; eventually, users must change the file format.
Do you know another significant disadvantage? You cannot share TS files online. Different platforms like Facebook, YouTube, etc., support other famous formats, so hence, sharing TS video files requires a format converter. Do you know how much space does a TS file occupies? Well, it acquires a significant storage space, more than other file formats.
Part 3. How to Play TS Video Files with VLC Media Player?
As mentioned, only specific programs support and play TS video format, so VLC Media Player is one of those. The software is famous among its competitors because it supports a wide range of file formats.
VLC is an open-source, free cross-platform media player that lets you play various multimedia files and DVDs, VCDs, Audio CDs, and other streaming protocols. VLC also plays most codecs like MPEG-2, MPEG-4, MKV, MP3, etc. The media player runs on Windows, macOS, Linux, Unix, iOS, and Android.
Do you know a great thing about VLC? Surprisingly, the software has no spyware, no user tracking, and no ads. VLC is a simple yet super-fast and powerful media player of all time. Learn how to play TS files on VLC by following the steps below:
Step 1: Install or Update VLC
To play TS file format, first of all, download and install the VLC media player on your respective device. If you have already installed the media player, update it to the latest version. With this, all the codecs will be working properly. Move to the ‘Help’ section from the top menu and hit ‘Check for Updates.’
Step 2: Open the TS File
Now, launch the VLC media player and head over to the ‘Media’ option. From the menu list, select the ‘Open File’ option, locate the TS file from your device and add it to the media player. You can also directly drag the TS video file to VLC to play it.
Step 3: Enjoy Watching TS File
After your file has been successfully imported to the VLC media player, you can now enjoy watching the TS Video format without any trouble.
Part 4. How to Edit TS Video Files with Filmora Video Editor?
Now that you know how to play TS video format with a VLC media player let’s also share how you can edit your TS videos. With Wondershare Filmora , you can edit a stunning video. The video editor offers more features than you can imagine. The software comes with features like Record PC Screen, Color Match, Silence Detection, Scene Detection, etc.
For Win 7 or later (64-bit)
For macOS 10.12 or later
Some more advanced editing tools are offered, like Power Tool, Stabilize Video, Auto Reframe, Auto Highlight, and whatnot. If you are interested in editing your TS file format videos with Filmora, take help from the steps shared below.
Step 1: Import TS File
After you have launched Wondershare Filmora on your device, import the media file so that you can start the editing; for that, head to the ‘File’ tab and hover on the ‘Import Media’ option. By doing this, a sub-menu will appear, select the ‘Import Media Files’ option and locate the TS video.
Step 2: TS Audio Edit
After importing the media file, drag it to the timeline to start the editing. With Filmora, add cool sound effects to your videos from the ‘Audio’ section. You get various effects like Happy, Jazz, Young & Bright, and other options.
Step 3: Use Transitions and Effects
What is a video without Effects and Transitions? Filmora comes with a wide range of options to add unique effects and transitions to your videos.
Step 4: Add Elements
Head to the ‘Elements’ section to add amazing little fun things to your video and make it interesting. You get elements like Laser Eye, various Emoji options, and a lot more.
Step 5: Export TS Video
Once all the editing is complete and satisfied with the final result, export the video. Hit the ‘Export’ button and select TS file format from the ‘Locals’ tab as the output format.
Part 5. TS VS. MP4: What’s the Difference?
What is the difference between the TS file format and MP4? Allow us to tell you some. You might have read about both formats, but a few differences are discussed as follows:
TS
TS format is used in DVD and Blu-ray discs that you have on your respective device. It does the same work as MP4, but the TS file breaks the data into tiny chinks. TS format comprises a few elements, making it a faster transporter for MPEG-2 format compressed video data. It is used widely in broadcasting and streaming.
MP4
MP4 is considered more compatible as compared to TS format, as not all the software allows the ‘.ts’ extension. If the file is not transmitted properly or is not closed properly, it can lose the data it has. MP4 is divided into two parts, one has the media data, and the other has metadata. Due to compression differences in both formats, it has a smaller size than the TS format.
Bottom Line
The article has shared great details about the TS format. We talked about how you can play TS files on VLC and also shed light on its pros and cons. Moreover, we also shared a video editor to edit your TS file format videos. Now, let’s talk about Wondershare Filmora.
Wondershare Filmora is a great video editor and is perfect for creating brilliant videos. The comprehensive list of features that you get from Filmora makes it unique and unforgettable. AI Portrait, Auto Normalization, Video Snapshot, Animation Keyframing, and many others are among its various features. For creating good videos, Filmora is an ideal option.
Wondershare Filmora
Get started easily with Filmora’s powerful performance, intuitive interface, and countless effects!
Try It Free Try It Free Try It Free Learn More >
Also read:
- New Bored of Extraneous Software Downloads and Program Installations to Edit Your Videos? The Best Video Editing Online Utilities Are Here at Your Rescue
- New In 2024, Best 9 Amv Makers for Computer
- 2024 Approved Complete Tutorial to Make an Impressive Countdown Timer Video
- Updated How to Create Your Own LOL Montage Video for 2024
- How to Create an URL for Your Video, In 2024
- Top 18 Video Editors for PC and Mac for 2024
- New In 2024, Zoom In and Zoom Out on YouTube
- New Top 18 Video Editors for PC and Mac for 2024
- Updated Explore the Advanced Tools to Help You Reshape the Art of Sky Replacement in Digital Imagery. Discover Methods to Enhance Your Visual Narratives Through AI
- New REVIEW Whats Best 10 Software to Make AI Upscaling Video for 2024
- Updated How To Make Transparent Background On Picsart for 2024
- In 2024, Best 5 GIF to Video Converters You Cant-Miss
- In 2024, 100 Working Methods to Learn How to Rotate TikTok Video
- Know How to Create OBS Slideshow. Creating OBS Slideshow in Simple Steps; Application for Creating OBS Slideshow. Make OBS Slideshow Online for 2024
- In 2024, Explore the List of the Top Six Online Video Speed Controllers for Chrome, Safari, and Firefox
- Updated In 2024, Create a Brand Video to Make Your Business Shine
- New In 2024, An Ultimate Guide to Edit a Music Video Aspect Ratio and First Cut
- Updated 2024 Approved Top 11 Best Video Editing Apps for iPhone
- New 2024 Approved 10 Best Free Video Player for Windows 11
- 2024 Approved Do You Want to Create a Motion Blur Effect in Your Videos? Read This Well-Described Guide to Learn How to Add Motion Blur on CapCut on iPhone and Android Devices
- Updated 11 Ways To Speed Up A Video On iPhone for 2024
- In 2024, Here We Are Going to Show You the Best Effects to Appear on Camera Made with Filmora
- How To Record Video in Slow Motion Comprehending Important Points
- Updated How to Create Cooking Video Intro and End Screen for YouTube Channel, In 2024
- New 2024 Approved How to Create a Slideshow with Movavi Slideshow Maker
- 2024 Approved How to Remove Background Noise From Video Sony Vegas
- Updated How Can Filmora Create an Audio Visualizer Project for a Song? All Steps, From Launching the App to Editing the Text, Are Detailed Here
- Updated How to Record Super Slow Motion Videos on Your Phone?
- New Create A Freeze Frame Sequence In Your Videos
- New Are You Looking to Find Out How to Loop YouTube Videos on iPhone? Learn How to Loop Your Favorite YouTube Video on Your iPhone, so You Can Play that Part over and Over
- Updated 2024 Approved How to Add Selective Color Effect to Your Videos
- 2024 Approved How to Add Miniature Effect in Video with Filmora
- Updated In 2024, How to Change Aspect Ratio of Video?
- Updated Whats The Best Laptops For Video Editing
- 2024 Approved Why Your Transparent GIF Is Hard to Remove and How to Do With It
- Updated Best 5 AI Music Video Examples and Makers to Make Them for 2024
- Fixes | What If YouTube Zoom to Fill Not Working?
- How to Transfer Text Messages from Sony Xperia 10 V to New Phone | Dr.fone
- How to use Pokemon Go Joystick on Apple iPhone SE (2022)? | Dr.fone
- Can You Unlock Apple iPhone 6s Plus After Forgetting the Passcode?
- New Top List Best 5 Tools for Creating Talking Avatars for 2024
- How to restore wiped call history on Xiaomi Redmi Note 13 5G?
- In 2024, How to Change Netflix Location to Get More Country Version On OnePlus Ace 2 Pro | Dr.fone
- Top 7 Phone Number Locators To Track Xiaomi Redmi 13C Location | Dr.fone
- In 2024, Full Tutorial to Bypass Your Realme Narzo N55 Face Lock?
- Recover your contacts after Vivo S18 Pro has been deleted.
- Google Play Services Wont Update? 12 Fixes are Here on Vivo G2 | Dr.fone
- How To Bypass Vivo S18e FRP In 3 Different Ways
- Looking For A Location Changer On Honor Magic 6? Look No Further | Dr.fone
- In 2024, The Most Useful Tips for Pokemon Go Ultra League On Tecno Pova 5 Pro | Dr.fone
- Full Guide to Hard Reset Your Vivo Y77t | Dr.fone
- In 2024, How to Track WhatsApp Messages on Oppo Reno 11F 5G Without Them Knowing? | Dr.fone
- In 2024, AddROM Bypass An Android Tool to Unlock FRP Lock Screen For your Nokia C12
- Recover your pictures after Lava Blaze 2 5G has been deleted.
- Easy steps to recover deleted videos from Infinix Hot 30i
- Hard Reset Samsung Galaxy S23+ in 3 Efficient Ways | Dr.fone
- Is GSM Flasher ADB Legit? Full Review To Bypass Your Motorola Moto G23FRP Lock
- Updated 2024 Approved DP Animation Maker Tutorial for Finding The Best Animated Profile Picture Maker
- Quick Fixes for Why Is My Realme GT 5 Pro Black and White | Dr.fone
- Ultimate Guide to Catch the Regional-Located Pokemon For Itel P55 | Dr.fone
- AVCHD on Galaxy S24 Ultra-convert MTS for Galaxy S24 Ultra
- Play Store Not Working On Motorola G24 Power? 8 Solutions Inside | Dr.fone
- Lava Agni 2 5G Not Connecting to Wi-Fi? 12 Quick Ways to Fix | Dr.fone
- Title: Updated 2024 Approved How to Add Motion Titles
- Author: Chloe
- Created at : 2024-04-24 07:08:29
- Updated at : 2024-04-25 07:08:29
- Link: https://ai-editing-video.techidaily.com/updated-2024-approved-how-to-add-motion-titles/
- License: This work is licensed under CC BY-NC-SA 4.0.
