

Updated 2024 Approved How to Add Selective Color Effect to Your Videos
How to Add Selective Color Effect to Your Videos
Selective color is an effect that lets you desaturate all the colors in a photo or video while preserving one or more colors of your choice. It is done by isolating a specific color of your choice in the frame while all other colors turn into black and white, just like this.

By using this effect, we can draw viewers’ attention to a specific point in the clip. If you want your video do the same, Filmora can be a good helper. Alright, we’ll be creating selective color effects in two examples. Let’s get started.
Tutorial 1 on making color isolation by selective color effect
In this first example, we are going to use stock footage showing a subject on a bike.
To add a selective color effect, download Wondershare Filmora on your PC or Mac. Now follow the steps as explained below to add this effect and isolate the color of your choice.
Free Download For Win 7 or later(64-bit)
Free Download For macOS 10.14 or later
Step1 Launch Wondershare Filmora and drag and drop your clip to the timeline.

Step2 Go to effects and then click “NewBlue FX” option and select Newblue filters.

Step3 Find the Selective Color Effect and drag it onto the clip. The effect will be instantly applied.

Step4 Next, double-click on the clip and check out the effects menu at the top of the screen.

Step5 Open the preset drop-down menu. There will be a lot of presets with different colors. Select the preset you want to use. In this scenario, let us select Just Blue.

Step6 If you see a blue tint at a place or object which you want to be white and black, click on the first color.

Step7 Now adjust the range slider to decrease the number of unwanted tints.

Step8 To blur the edges of the effects, turn up the softened slider and remove any unwanted tint previously remaining.

In this way, you can add a selective color effect to your video clips and isolate the color of your choice.
Tutorial 2 on make color isolation using eyedropper tool
You might ask how do we use the eyedropper tool here. It can sample colors from anywhere in a video or an image and add them to your swatch panel. The steps to use the eyedropper tool to add a selective color to your video are below.
Step1 As same as the first one, launching Wondershare Filmora is the first priority. And drag your clip to the timeline.

Step2 Go to effects at the top, and find Newblue effects, and click on the Newblue filters.

Step3 Find the selective color effect and drag it to the clip.

Step4 Double-click on the clip and visit the effects menu at the top of the screen.

Step5 Click on the ‘first color’ and select the eye dropper tool. This will allow us to select the red flower in the preview window. You can also click different parts of the image to get the color that we want.

Step6 Next, try selecting a second color to isolate within our shot. In this example, we are going to make the stems on the flowers stand out as well. Select second color and go to the tint section. And find a color that is close to the second color, which will be green in this case.

Step7 Pick the eyedropper tool and click it on the green part of the clip. Then adjust the range slider as needed.

Alright, let’s watch back the video to see how both colors are now isolated.

Follow all the steps in the correct order. This is how you can use NewBlue effects for color isolation using Wondershare Filmora. The color isolation using the selective color effect defines the point of interest in the clip for the viewers.
Free Download For macOS 10.14 or later
Step1 Launch Wondershare Filmora and drag and drop your clip to the timeline.
Step2 Go to effects and then click “NewBlue FX” option and select Newblue filters.
Step3 Find the Selective Color Effect and drag it onto the clip. The effect will be instantly applied.
Step4 Next, double-click on the clip and check out the effects menu at the top of the screen.
Step5 Open the preset drop-down menu. There will be a lot of presets with different colors. Select the preset you want to use. In this scenario, let us select Just Blue.
Step6 If you see a blue tint at a place or object which you want to be white and black, click on the first color.
Step7 Now adjust the range slider to decrease the number of unwanted tints.
Step8 To blur the edges of the effects, turn up the softened slider and remove any unwanted tint previously remaining.
In this way, you can add a selective color effect to your video clips and isolate the color of your choice.
Tutorial 2 on make color isolation using eyedropper tool
You might ask how do we use the eyedropper tool here. It can sample colors from anywhere in a video or an image and add them to your swatch panel. The steps to use the eyedropper tool to add a selective color to your video are below.
Step1 As same as the first one, launching Wondershare Filmora is the first priority. And drag your clip to the timeline.
Step2 Go to effects at the top, and find Newblue effects, and click on the Newblue filters.
Step3 Find the selective color effect and drag it to the clip.
Step4 Double-click on the clip and visit the effects menu at the top of the screen.
Step5 Click on the ‘first color’ and select the eye dropper tool. This will allow us to select the red flower in the preview window. You can also click different parts of the image to get the color that we want.
Step6 Next, try selecting a second color to isolate within our shot. In this example, we are going to make the stems on the flowers stand out as well. Select second color and go to the tint section. And find a color that is close to the second color, which will be green in this case.
Step7 Pick the eyedropper tool and click it on the green part of the clip. Then adjust the range slider as needed.
Alright, let’s watch back the video to see how both colors are now isolated.
Follow all the steps in the correct order. This is how you can use NewBlue effects for color isolation using Wondershare Filmora. The color isolation using the selective color effect defines the point of interest in the clip for the viewers.
Top 5 Solutions on How to Add Emojis to iPhone
Top 5 Solutions on How to Add Emojis to iPhone
An easy yet powerful editor
Numerous effects to choose from
Detailed tutorials provided by the official channel
Have you been looking for interesting solutions on how to add emojis to iPhone? Stop you search and take a breath, you have landed at the correct spot!
In this article
01 [Want an Emoji on Your iPhone? Here’s How to Do It](#Part 1)
02 [Add Emojis to iPhone Q&A](#Part 2)
Part 1 Want an Emoji on Your iPhone? Here’s How to Do It
Emojis are known to live up to their name and introduce an emotional connect to the otherwise plain text within your social media posts and conversations. Speaking in the light of the latest and currently existing communication trends, these miniature graphic elements have managed to earn a significant amount of popularity across a diverse range of communication and information sharing platforms.
Moving ahead, the credibility of emojis to uplift the fun and emotional element in personal conversations across the popular chat service programs does not need an explanation. While the most common means of such conversations are smartphones, having a convenient access to these graphic chat elements on your mobile devices becomes quite important.
Recognizing the need to have emojis at your fingertips the next time you initiate a conversation with your friends on social media or across chat applications, let us proceed with learning about some interesting ways of sorting the concern of how to add custom emojis to iPhone in what follows next:
Solutions for Adding Emojis to Your iPhone
01Using the Emoji Keyboard of a Chat Application
The IT market has launched a variety of high end chat service programs that come with a default emoji keyboard to uplift the customary text messages. You can choose to work with any of the available iPhone compatible chat service program, while conveniently accessing their emoji keyboards on your device.
Step 1: Launch the Application
To begin with addressing the concern of how to put emojis on pictures iPhone; start with browsing through the Launchpad of your iPhone and opening a preferred chat application that supports the emoji keyboard. You can start with using the ‘Messages’ or ‘Mail’ applications.
Step 2: Access the Emoji Keyboard
Tap within the text field of the chat application, followed by clicking on either of the ‘Globe’ or ‘Emoji’ icons. The ‘Emoji Keyboard’ will now pop up on the application screen of your iPhone.
Step 3: Select an Emoji
Proceed to choose a desired emoji to add within your conversation by navigating through the diverse range of available emoji themes. You can this by tapping the ‘Gray’ emoji symbols in the bottom toolbar, or making a left-right swipe to access the available choices.
To browse through the collection of emojis that you have used most frequently, tap the ‘Clock’ icon. If you are not finding the exact emoji to depict a particular expression, navigate to the ‘Search Emoji’ box under the text field and type a relevant keyword to open a customized list of emoji options.
Step 4: Play With Different Skin Tones
If you want to alter the default skin tone of a selected emoji, you can do this by tapping on and holding the same to see a display of different skin tones appear above your selection. Click on the one you like, to apply it to the selected emoji.
Step 5: Include the Emoji
When the aforesaid customizations make you happy; click on the emoji once again to include the latter within the text field of the chat service program you are working with.

02Enabling the Emoji Keyboard of Your iPhone
If you are keen towards sorting the issue of how to add emojis to photos iPhone while working with an emoji keyboard explicitly on your iPhone, you can proceed to enable the same on your device. The process is quick and easy, with no rocket science, and allows you to add emoji to picture iPhone. Here’s what you need to do:
Step 1: Launch the Settings Application
To start with settling the query of how to add emoji keyboard to iPhone, navigate to and click on the ‘Settings’ application on the welcome screen of your iPhone, followed by hitting the ‘General’ tab from the list of categories that appears next. Entering into the ‘General Settings’ interface, pick the ‘Keyboard’ option.
Step 2: Add a New Keyboard
Within the ‘Keyboard’ category of your iPhone settings, you are required to tap on the ‘Keyboards’ subcategory, followed by hitting the ‘Add New Keyboard’ option from the window that pops up next.
As you click on the aforesaid option, a series of keyboard types gets displayed on the screen. Scroll through the list to locate the ‘Emoji’ option, followed by clicking on the same to add emoji keyboard iPhone. That’s it! You can now proceed to use the keyboard to communicate across different conversation platforms.

03Adding Emojis to the Status Bar of Your iPhone
This one is a recently included feature in iOS compatible devices to sort out the issue of working with emojis on iPhones and allied device categories to answer the question of , how to add emoji to iPhone photo. As is obvious, availing the utility requires you to launch an update of your iPhone to iOS 15 or more recent versions. Make sure you adhere to the same before proceeding with the emoji inclusion process.
Without further ado, here’s how you can add the emoji elements to the status bar of your iPhone in just a few quick and simple steps:
Step 1: Launch the Settings Application
Start with heading to and clicking on the ‘Settings’ icon frame on the Launchpad of your iPhone to be greeted by the app’s welcome interface. In the list of available categories, click on the ‘Focus’ tab.

Step 2: Navigating Through the Focus Feature
As you hit the ‘Focus’ tab in the previous step, the latter’s interface pops up with a series of utility options. Instead of entering into the options, you however need to just tap the ‘Add’ button depicted by a ‘+’ icon at the top right corner of the ‘Focus’ window.

Step 3: Select an Emoji Category
Clicking on the ‘Add’ button directs you to the ‘Emoji Selection’ interface. All you need to do here is, click on the ‘Custom’ option to open the available emoji categories within the ‘Focus’ feature. Talking of the diversity of emoji options, the feature allows you to add up to 25 emoji categories to the iPhone status bar.
Ahead of the customary variations in smiley faces, you can experiment with adding more specific icons, like; paw prints, stethoscope, fork and knife, light bulb, etc. You can work with these varieties to walk through the subject of how to add emojis to photos iPhone.

Step 4: Name Your Emoji
When you are done with adding the preferred emoji icons, proceed to assign them a specific name. The added names will however, not show up on the status bar of your iPhone, but can be seen on other conversation platform and chat service applications.
If you choose to add the emoji in a specific color to your iPhone’s status bar, you can avail the feature. The color however, won’t reflect on the device’s status bar, but can be seen on the latter’s lock screen.
04Adding Emojis to iPhone Though the Google Messages Application
When aiming to set aside the concern of how to add emoji to iPhone photo, you can seek the help of third party applications. All you need to do is install and run the app on your iPhone and start your editing spree. Browsing through the IT market, you can easily land across a never ending series of third party alternatives to work with emojis on your iPhone.
Picking one from the same, here’s a detailed explanation of using the Google Messages app to include emojis on your iPhone:
Step 1: Download and Install the Application
Start with visiting the Apple App Store to download the Google Messages application in your iPhone. In case the utility already exists in your device, proceed to update the same to the most recent version.
Step 2: Set as Default
Once you are done with the download and installation formalities, proceed to launch the app in your device, followed by setting the latter as your preferred chat application.
Step 3: And…It’s Ready!
The completion of Step 2 will guide you to the Google Messages welcome screen, where you can start conversing with your friends and peers.
Step 4: Select a Contact
To begin chatting with a contact, click on the ‘Start Chat’ option, followed by selecting the contact number or name of a desired person.
Step 5: Type a Message
As you finish Step 4, the app’s chat interface appears where you can type a message within then text field and proceed to complement the same with emojis, stickers and other graphic elements. The app comes with an extensive range of emojis to select and add from. Moving ahead of the basic smileys, you can pick emojis from categories like, Food and Beverages, Travel, Nature, and many more.
Step 6: Send!
Tap the ‘Send’ button when you are done with composing the message, to let it reach the recipient. You can also forward the message to multiple contacts at the same time.
05Adding Emojis to iPhone Through the SwiftKey Keyboard
This one is another entry in list of answers regarding the query of how to add emojis to a picture on iPhone. Essentially a third party keyboard, SwiftKey works to supplement your messages with the latest and most expressive graphic elements, including emojis. The utility comes with a smart feature that predicts the type and style of emojis you will use in future conversations, in line with your current usage pattern.
The following user guide explains the step by step process to work with the SwiftKey keyboard for adding emojis to your iPhone:
Step 1: Download, Install and Launch SwiftKey
Navigate to the Apple App Store in your iPhone and proceed to download and install the SwiftKey application to the device. When you are done, launch the app and click on ‘Get Started’.

Step 2: Sign In to SwiftKey
As you launch the SwiftKey keyboard, the latter’s ‘Sign In to SwiftKey’ window pops up, requiring you to select an account for initiating the sign process of the application by clicking on either of the ‘Continue With Google’ or ‘Continue With Facebook’ options. To move ahead, follow the instructions that appear on your device screen.

Step 3: Enable the SwiftKey Keyboard
When you have chosen the sign in account, the ‘To Enable SwiftKey’ window appears to explain to you, the process of enabling the SwiftKey keyboard.

Step 4: Accessing SwiftKey Keyboard in iPhone Settings
Launch the iPhone’s ‘Settings’ application, followed by hitting the ‘General’ tab from the list of options within the latter’s opening interface.

As the ‘General’ window pops up, proceed to choose the ‘Keyboard’ option by tapping on the same.

Within the ‘Keyboard’ setting window, navigate to and click on the ‘Keyboards’ option.

Step 5: Make SwiftKey an Additional Keyboard
To work with the SwiftKey keyboard on your iPhone, you will need to add the same to your device’s list of preset keyboards. To do this, click on the ‘Add New Keyboard’ option within the list of keyboards that pops up as you complete Step 4.

A series of third party keyboards shows up in the window that appears next. Proceed to select ‘SwiftKey’ from the available keyboard choices. In case you don’t find the aforesaid keyboard among the options, double tap the ‘Home’ button on your device to exit the ‘Settings’ application.
Re-launch the ‘Settings’ app after a few moments and follow Steps 4 and 5 to make the ‘SwiftKey’ option appear within the list.

Step 6: Grant Full Access to SwiftKey
To work with the complete feature bank of the ‘SwiftKey’ application, you will have to allow the latter to fully access your iPhone. To proceed with the process, navigate to the ‘Keyboards’ window of your iPhone settings, where you can see the ‘SwiftKey’ keyboard present in the list of active keyboards of your device. Open the application’s ‘Access’ window by clocking on the keyboard name in the list.

Within the ‘SwiftKey Access’ window that appears, toggle the slider to the right side to enable the ‘Allow Full Access’ option.

As you enable the ‘Allow Full Access’ option, the ‘App Permissions’ dialog box pops up on your iPhone screen. Click on ‘Allow’ within the same to grant the required app permissions.

Step 7: Switch to the SwiftKey Keyboard
You will now be directed to the ‘Select SwiftKey’ window to change your default keyboard. Here you need to click on the ‘Globe’ icon, followed by choosing ‘SwiftKey’ from the menu that appears next.

Step 8: SwiftKey Is Ready!
As you finish Step 7, a confirmation window pops up on the iPhone screen, displaying the ‘Installation Successful’ message. If you wish to get regular updates and tips from the SwiftKey application, click on the ‘Save’ button, otherwise, navigate to the bottom right corner of the screen and click on the ‘Not Now’ option.

You can now work towards adding emojis in your chats and conversations on the iPhone, simply by typing a message in the text field of the preferred chat service program, followed by picking a suitable emoji from the diverse range of available options within the SwiftKey keyboard. Talking of additional merits, the utility allows you to introduce customizations to the keyboard in terms of supported languages, theme centered design, access compatibility and settings.
Part 2 Add Emojis to iPhone Q&A
01Why does the emoji utility not show up on an iPhone?
In case you find difficulty in accessing emojis on your iPhone, or the latter does not appear within your communication centered utilities of the device, consider checking the settings of the iPhone to make sure that the feature has been added as well as enabled. If not so, proceed to enable the same in the ‘Settings’ interface itself.
02What is the procedure to download an additional set of emojis to an iPhone?
If you want to spark up your iPhone’s emoji library with an extra set of the latest emojis, the only method that would cater to the concern of how to add more emoji to iPhone is taking the help of third party applications. As an affordable pick, you can rely on the Messages App Store in your iPhone to avail a decent rage of third party emoji packages, both free and paid.
03How can the hidden emoji keyboard be accessed?
In your iPhone settings, open the ‘General’ category, followed by selecting the ‘ Keyboard’ option. Entering in, choose the ‘Keyboards’ subcategory and tap on ‘Add New Keyboard’. From the list of options that drops down, select ‘Japanese’, followed by ‘Kana’. As you proceed to type a message the next time, click on the ‘Globe’ icon at the bottom-left corner of the app screen to toggle between keyboard options.
04How can the hidden emojis on an iPhone be unlocked?
To unlock a hidden emoji, navigate to the ‘Apple Messages’ app in your iPhone and launch the iMessage application. Next, open a conversation thread and enter any emoji in the chat’s text field. Now, press and hold the ‘Send’ button to open a hidden emoji page that lets you choose and add these elements to your text message.
05What is the best software to look for free emojis?
If you are willing to sort out the concern of accessing the best inventory of latest emojis, you can traverse the editor library of the Wondershare Filmora Video Editor graphic designer program. Divided into a hoard of specific categories, the software is known to house the most elaborative variety of emoji elements that undergo a periodic update that can help you to sort the query of how to add emojis to pictures on iPhone.
For Win 7 or later (64-bit)
For macOS 10.12 or later
● Ending Thoughts →
● Including emojis in your social media and chat service conversations works to add an emotional connect to your otherwise normal text messages.
● When looking forward to work towards the constraint of how to add new emojis to iPhone, there are a variety of methods to move ahead with the process.
● If you are on a search of the latest collection of emojis to add to your iPhone, you can take suggestions from the editor library of the Wondershare Filmora graphic designer program.
Have you been looking for interesting solutions on how to add emojis to iPhone? Stop you search and take a breath, you have landed at the correct spot!
In this article
01 [Want an Emoji on Your iPhone? Here’s How to Do It](#Part 1)
02 [Add Emojis to iPhone Q&A](#Part 2)
Part 1 Want an Emoji on Your iPhone? Here’s How to Do It
Emojis are known to live up to their name and introduce an emotional connect to the otherwise plain text within your social media posts and conversations. Speaking in the light of the latest and currently existing communication trends, these miniature graphic elements have managed to earn a significant amount of popularity across a diverse range of communication and information sharing platforms.
Moving ahead, the credibility of emojis to uplift the fun and emotional element in personal conversations across the popular chat service programs does not need an explanation. While the most common means of such conversations are smartphones, having a convenient access to these graphic chat elements on your mobile devices becomes quite important.
Recognizing the need to have emojis at your fingertips the next time you initiate a conversation with your friends on social media or across chat applications, let us proceed with learning about some interesting ways of sorting the concern of how to add custom emojis to iPhone in what follows next:
Solutions for Adding Emojis to Your iPhone
01Using the Emoji Keyboard of a Chat Application
The IT market has launched a variety of high end chat service programs that come with a default emoji keyboard to uplift the customary text messages. You can choose to work with any of the available iPhone compatible chat service program, while conveniently accessing their emoji keyboards on your device.
Step 1: Launch the Application
To begin with addressing the concern of how to put emojis on pictures iPhone; start with browsing through the Launchpad of your iPhone and opening a preferred chat application that supports the emoji keyboard. You can start with using the ‘Messages’ or ‘Mail’ applications.
Step 2: Access the Emoji Keyboard
Tap within the text field of the chat application, followed by clicking on either of the ‘Globe’ or ‘Emoji’ icons. The ‘Emoji Keyboard’ will now pop up on the application screen of your iPhone.
Step 3: Select an Emoji
Proceed to choose a desired emoji to add within your conversation by navigating through the diverse range of available emoji themes. You can this by tapping the ‘Gray’ emoji symbols in the bottom toolbar, or making a left-right swipe to access the available choices.
To browse through the collection of emojis that you have used most frequently, tap the ‘Clock’ icon. If you are not finding the exact emoji to depict a particular expression, navigate to the ‘Search Emoji’ box under the text field and type a relevant keyword to open a customized list of emoji options.
Step 4: Play With Different Skin Tones
If you want to alter the default skin tone of a selected emoji, you can do this by tapping on and holding the same to see a display of different skin tones appear above your selection. Click on the one you like, to apply it to the selected emoji.
Step 5: Include the Emoji
When the aforesaid customizations make you happy; click on the emoji once again to include the latter within the text field of the chat service program you are working with.
02Enabling the Emoji Keyboard of Your iPhone
If you are keen towards sorting the issue of how to add emojis to photos iPhone while working with an emoji keyboard explicitly on your iPhone, you can proceed to enable the same on your device. The process is quick and easy, with no rocket science, and allows you to add emoji to picture iPhone. Here’s what you need to do:
Step 1: Launch the Settings Application
To start with settling the query of how to add emoji keyboard to iPhone, navigate to and click on the ‘Settings’ application on the welcome screen of your iPhone, followed by hitting the ‘General’ tab from the list of categories that appears next. Entering into the ‘General Settings’ interface, pick the ‘Keyboard’ option.
Step 2: Add a New Keyboard
Within the ‘Keyboard’ category of your iPhone settings, you are required to tap on the ‘Keyboards’ subcategory, followed by hitting the ‘Add New Keyboard’ option from the window that pops up next.
As you click on the aforesaid option, a series of keyboard types gets displayed on the screen. Scroll through the list to locate the ‘Emoji’ option, followed by clicking on the same to add emoji keyboard iPhone. That’s it! You can now proceed to use the keyboard to communicate across different conversation platforms.
03Adding Emojis to the Status Bar of Your iPhone
This one is a recently included feature in iOS compatible devices to sort out the issue of working with emojis on iPhones and allied device categories to answer the question of , how to add emoji to iPhone photo. As is obvious, availing the utility requires you to launch an update of your iPhone to iOS 15 or more recent versions. Make sure you adhere to the same before proceeding with the emoji inclusion process.
Without further ado, here’s how you can add the emoji elements to the status bar of your iPhone in just a few quick and simple steps:
Step 1: Launch the Settings Application
Start with heading to and clicking on the ‘Settings’ icon frame on the Launchpad of your iPhone to be greeted by the app’s welcome interface. In the list of available categories, click on the ‘Focus’ tab.
Step 2: Navigating Through the Focus Feature
As you hit the ‘Focus’ tab in the previous step, the latter’s interface pops up with a series of utility options. Instead of entering into the options, you however need to just tap the ‘Add’ button depicted by a ‘+’ icon at the top right corner of the ‘Focus’ window.
Step 3: Select an Emoji Category
Clicking on the ‘Add’ button directs you to the ‘Emoji Selection’ interface. All you need to do here is, click on the ‘Custom’ option to open the available emoji categories within the ‘Focus’ feature. Talking of the diversity of emoji options, the feature allows you to add up to 25 emoji categories to the iPhone status bar.
Ahead of the customary variations in smiley faces, you can experiment with adding more specific icons, like; paw prints, stethoscope, fork and knife, light bulb, etc. You can work with these varieties to walk through the subject of how to add emojis to photos iPhone.
Step 4: Name Your Emoji
When you are done with adding the preferred emoji icons, proceed to assign them a specific name. The added names will however, not show up on the status bar of your iPhone, but can be seen on other conversation platform and chat service applications.
If you choose to add the emoji in a specific color to your iPhone’s status bar, you can avail the feature. The color however, won’t reflect on the device’s status bar, but can be seen on the latter’s lock screen.
04Adding Emojis to iPhone Though the Google Messages Application
When aiming to set aside the concern of how to add emoji to iPhone photo, you can seek the help of third party applications. All you need to do is install and run the app on your iPhone and start your editing spree. Browsing through the IT market, you can easily land across a never ending series of third party alternatives to work with emojis on your iPhone.
Picking one from the same, here’s a detailed explanation of using the Google Messages app to include emojis on your iPhone:
Step 1: Download and Install the Application
Start with visiting the Apple App Store to download the Google Messages application in your iPhone. In case the utility already exists in your device, proceed to update the same to the most recent version.
Step 2: Set as Default
Once you are done with the download and installation formalities, proceed to launch the app in your device, followed by setting the latter as your preferred chat application.
Step 3: And…It’s Ready!
The completion of Step 2 will guide you to the Google Messages welcome screen, where you can start conversing with your friends and peers.
Step 4: Select a Contact
To begin chatting with a contact, click on the ‘Start Chat’ option, followed by selecting the contact number or name of a desired person.
Step 5: Type a Message
As you finish Step 4, the app’s chat interface appears where you can type a message within then text field and proceed to complement the same with emojis, stickers and other graphic elements. The app comes with an extensive range of emojis to select and add from. Moving ahead of the basic smileys, you can pick emojis from categories like, Food and Beverages, Travel, Nature, and many more.
Step 6: Send!
Tap the ‘Send’ button when you are done with composing the message, to let it reach the recipient. You can also forward the message to multiple contacts at the same time.
05Adding Emojis to iPhone Through the SwiftKey Keyboard
This one is another entry in list of answers regarding the query of how to add emojis to a picture on iPhone. Essentially a third party keyboard, SwiftKey works to supplement your messages with the latest and most expressive graphic elements, including emojis. The utility comes with a smart feature that predicts the type and style of emojis you will use in future conversations, in line with your current usage pattern.
The following user guide explains the step by step process to work with the SwiftKey keyboard for adding emojis to your iPhone:
Step 1: Download, Install and Launch SwiftKey
Navigate to the Apple App Store in your iPhone and proceed to download and install the SwiftKey application to the device. When you are done, launch the app and click on ‘Get Started’.
Step 2: Sign In to SwiftKey
As you launch the SwiftKey keyboard, the latter’s ‘Sign In to SwiftKey’ window pops up, requiring you to select an account for initiating the sign process of the application by clicking on either of the ‘Continue With Google’ or ‘Continue With Facebook’ options. To move ahead, follow the instructions that appear on your device screen.
Step 3: Enable the SwiftKey Keyboard
When you have chosen the sign in account, the ‘To Enable SwiftKey’ window appears to explain to you, the process of enabling the SwiftKey keyboard.
Step 4: Accessing SwiftKey Keyboard in iPhone Settings
Launch the iPhone’s ‘Settings’ application, followed by hitting the ‘General’ tab from the list of options within the latter’s opening interface.
As the ‘General’ window pops up, proceed to choose the ‘Keyboard’ option by tapping on the same.
Within the ‘Keyboard’ setting window, navigate to and click on the ‘Keyboards’ option.
Step 5: Make SwiftKey an Additional Keyboard
To work with the SwiftKey keyboard on your iPhone, you will need to add the same to your device’s list of preset keyboards. To do this, click on the ‘Add New Keyboard’ option within the list of keyboards that pops up as you complete Step 4.
A series of third party keyboards shows up in the window that appears next. Proceed to select ‘SwiftKey’ from the available keyboard choices. In case you don’t find the aforesaid keyboard among the options, double tap the ‘Home’ button on your device to exit the ‘Settings’ application.
Re-launch the ‘Settings’ app after a few moments and follow Steps 4 and 5 to make the ‘SwiftKey’ option appear within the list.
Step 6: Grant Full Access to SwiftKey
To work with the complete feature bank of the ‘SwiftKey’ application, you will have to allow the latter to fully access your iPhone. To proceed with the process, navigate to the ‘Keyboards’ window of your iPhone settings, where you can see the ‘SwiftKey’ keyboard present in the list of active keyboards of your device. Open the application’s ‘Access’ window by clocking on the keyboard name in the list.
Within the ‘SwiftKey Access’ window that appears, toggle the slider to the right side to enable the ‘Allow Full Access’ option.
As you enable the ‘Allow Full Access’ option, the ‘App Permissions’ dialog box pops up on your iPhone screen. Click on ‘Allow’ within the same to grant the required app permissions.
Step 7: Switch to the SwiftKey Keyboard
You will now be directed to the ‘Select SwiftKey’ window to change your default keyboard. Here you need to click on the ‘Globe’ icon, followed by choosing ‘SwiftKey’ from the menu that appears next.
Step 8: SwiftKey Is Ready!
As you finish Step 7, a confirmation window pops up on the iPhone screen, displaying the ‘Installation Successful’ message. If you wish to get regular updates and tips from the SwiftKey application, click on the ‘Save’ button, otherwise, navigate to the bottom right corner of the screen and click on the ‘Not Now’ option.
You can now work towards adding emojis in your chats and conversations on the iPhone, simply by typing a message in the text field of the preferred chat service program, followed by picking a suitable emoji from the diverse range of available options within the SwiftKey keyboard. Talking of additional merits, the utility allows you to introduce customizations to the keyboard in terms of supported languages, theme centered design, access compatibility and settings.
Part 2 Add Emojis to iPhone Q&A
01Why does the emoji utility not show up on an iPhone?
In case you find difficulty in accessing emojis on your iPhone, or the latter does not appear within your communication centered utilities of the device, consider checking the settings of the iPhone to make sure that the feature has been added as well as enabled. If not so, proceed to enable the same in the ‘Settings’ interface itself.
02What is the procedure to download an additional set of emojis to an iPhone?
If you want to spark up your iPhone’s emoji library with an extra set of the latest emojis, the only method that would cater to the concern of how to add more emoji to iPhone is taking the help of third party applications. As an affordable pick, you can rely on the Messages App Store in your iPhone to avail a decent rage of third party emoji packages, both free and paid.
03How can the hidden emoji keyboard be accessed?
In your iPhone settings, open the ‘General’ category, followed by selecting the ‘ Keyboard’ option. Entering in, choose the ‘Keyboards’ subcategory and tap on ‘Add New Keyboard’. From the list of options that drops down, select ‘Japanese’, followed by ‘Kana’. As you proceed to type a message the next time, click on the ‘Globe’ icon at the bottom-left corner of the app screen to toggle between keyboard options.
04How can the hidden emojis on an iPhone be unlocked?
To unlock a hidden emoji, navigate to the ‘Apple Messages’ app in your iPhone and launch the iMessage application. Next, open a conversation thread and enter any emoji in the chat’s text field. Now, press and hold the ‘Send’ button to open a hidden emoji page that lets you choose and add these elements to your text message.
05What is the best software to look for free emojis?
If you are willing to sort out the concern of accessing the best inventory of latest emojis, you can traverse the editor library of the Wondershare Filmora Video Editor graphic designer program. Divided into a hoard of specific categories, the software is known to house the most elaborative variety of emoji elements that undergo a periodic update that can help you to sort the query of how to add emojis to pictures on iPhone.
For Win 7 or later (64-bit)
For macOS 10.12 or later
● Ending Thoughts →
● Including emojis in your social media and chat service conversations works to add an emotional connect to your otherwise normal text messages.
● When looking forward to work towards the constraint of how to add new emojis to iPhone, there are a variety of methods to move ahead with the process.
● If you are on a search of the latest collection of emojis to add to your iPhone, you can take suggestions from the editor library of the Wondershare Filmora graphic designer program.
Steps To Fade Audio In Premier Pro
Audio is a very big part of any video project and it can make or break the video project. This is why it is very important to not just choose a video editor that also offers audio editing, but one that is easy to use and offers a lot of editing options. This way, you can edit the audio in your project to suit your video’s production and end up with a great professional final product.
One of the video editing tools that offer features that can accomplish all that is Adobe Premier Pro. In this article, we will look at how you can use Premier Pro to fade audio in or out.
Steps to Fade Audio in Premier Pro
Premier Pro gives you two different options to fade audio in or out. Let’s look at both options and then you can choose the one that suits you best;
Fade Audio using Crossfade Audio Transition
Step1To begin, open Premier Pro on your computer and then open the audio that you want to edit.
Step2Once it is open, select the audio clip in the timeline and then click on “Sequence” at the top menu and select “Apply Audio Transition.”
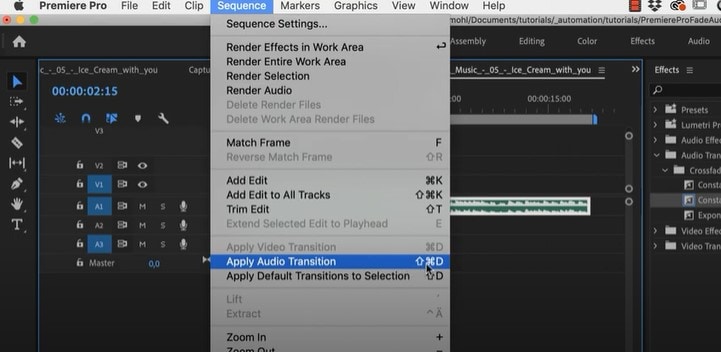
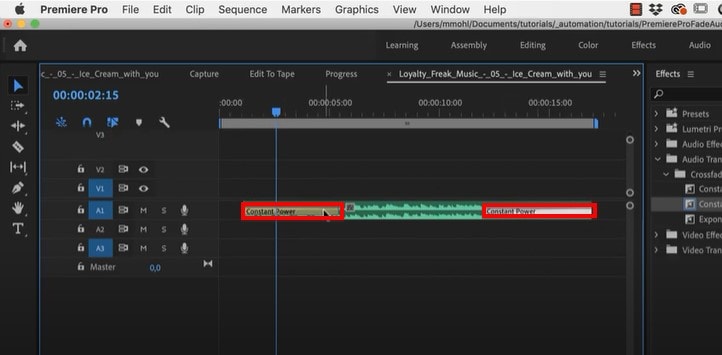
You can also use the keyboard shortcut Shift + Command + D (macOS) or Shift+ Ctrl + D (PC). This will add the “Constant Power Cross Fade” effect at the beginning and the end of the clip.
Step3You can then just change the duration of the effect by simply dragging the end of the transition.
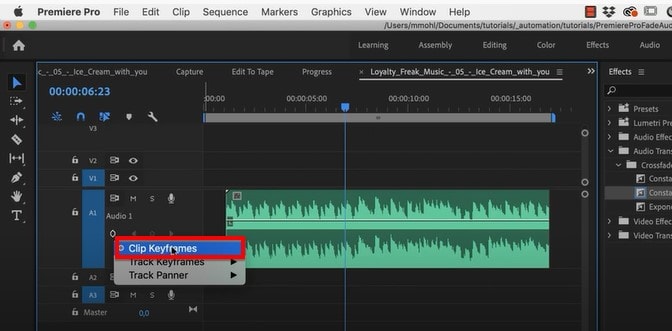
Fade Audio using Clip Keyframes
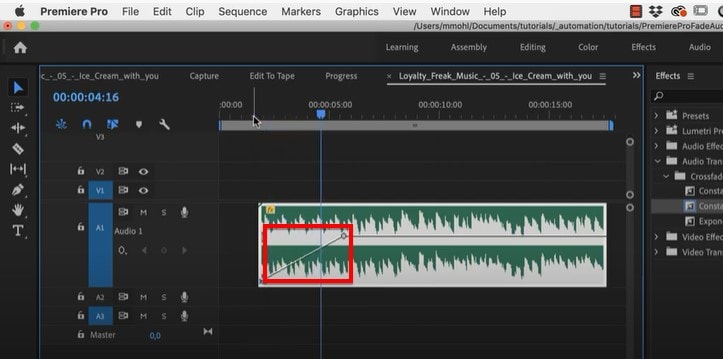
Step1Adobe Premier Pro has two volume keyframes; Track and Clip. Make the audio larger so you can see the volume line and then under the audio name, click on the volume keyframes option to make sure “Clip Keyframes” is enabled.
Step2You can then press down on the Command Key (macOS) or the Control Key (PC) and drag the volume line down to add a fade-in or fade-out effect.
Adobe Premiere Alternative Way to Fade Audio
If you are like most people and you find Adobe Premier Pro to be very difficult you use, we have a tool that is just as effective but also simplifies the process. This is the very simple to use Wondershare Filmora .
Just like Premier Pro, Filmora gives you two options to fade audio in and out. Let’s look at both options;
Adding Fade in and Out in Audio Pane
Step1Download and install Wondershare Filmora onto your computer, open the program and then import the audio clip that you want to edit.
Step2Once the video has been added to the timeline, double-click on it to access the “Audio” editing panel.
Step3Here, you can very simply add the fade-in and fade-out effects by simply dragging the sliders to the desired duration or by manually entering the duration in seconds.

Using the Audio Waveform
You can also use the fade icons on the left and right edges of the audio waveform to quickly add a fade in and out.
To add a fade-in effect, drag the fade-in maker to the right. Then go to the end of the clip to drag the fade-out maker to the left to add a fade-out effect.

Related FAQs about Audio Fade
1. How Do I Fade to Black in Adobe Premiere Pro?
You can easily add the Fade to Black transition in Adobe Premiere Pro using the “Effects” tab. Just open the two clips in Premiere Pro and go to “Effects.” Type in “dip to black” in the search box and when you find the effect, drag it between the two clips in the timeline. The effect will appear on the right side of the project.
You also have several customization options that you can apply to the effect to get it just right. To see these options, go to Effect Controls and you should be able to change the alignment of the effect to “Center at Cut” so that the first video fades out to black before the second video appears.
2. Premiere Pro Audio Fade Not Working?
Sometimes you can complete all the editing steps we have described above but you are unable to tell if the fade-in and fade-out effects are working because you can’t play the audio in Premiere. This is a very common problem that can easily be fixed using the following troubleshooting steps;
Check the master volume on your computer to see if this is the problem
Then check the volume in Premiere to see if the audio meter is moving as you play the clip. It is the green bar usually in the lower right corner.
If your volume is fine but you still can’t hear the audio, you may need to adjust several settings. Go to Edit > Preferences (on PC) or Preferences menu under the main Premiere Pro CC menu (macOS) and select “Audio Hardware” in the options that appear. You can then change the “Default Output” device to something else.
3. How Do You do Audio Transitions in Premiere Pro
Adding audio transitions in Premiere Pro is very easy; just open the audio that you want to edit and then Right-click (PC) or Control- Click (macOS) on either the “Constant Gain” or “Constant Power” effect from the Effects panel. Then choose “Set Selected as Default Transition” from the options in the menu.
To add a duration for the audio transitions, go to Edit > Preferences > Timeline (PC) or Premiere Pro Menu > Preferences (macOS) and enter the duration value under “Audio Transition Default Duration.”
Free Download For Win 7 or later(64-bit)
Free Download For macOS 10.14 or later
How to Got Free After Effects Templates Slideshow with Simple Trick
How I Got Free After Effects Templates Slideshow with Simple Trick
An easy yet powerful editor
Numerous effects to choose from
Detailed tutorials provided by the official channel
Making slide shows is an eminent task for a majority of us. Whether you are a student at a school or University, working at a corporate office or trying to present yourself in a meeting, you will require making slideshows. And the more engaging your slideshow is, the better your presentation is.
One of the many ways for improving your slideshows is by adding after effects templates. And the best part is, you can readily opt for using after effects slideshow template for free. But, how can you get the aftereffect slideshows for free? Or, where can you get free after effect templates?
We have put forth the following discussion where we discuss the different free after effects templates for slides, where can you get them and the solutions to the frequent questions related to it. Lastly, we will also introduce you to the best video editing tool, with which you can use the free after effects template and make amazing sideshow videos.
In this article
01 [10 Best Free After Effects Templates Slideshow](#Part 1)
02 [Where to Get Free After Effects Templates](#Part 2)
03 [FAQ of After Effects Slideshow Template](#Part 3)
Part 1 Best Free After Effects Templates Slideshow
We will begin our discussion by presenting photo slideshows after effects template free download, which means, with the following templates, you can make a slideshow f as many a hundred images and that too, for free.
01Wall Slideshow
Wall Slideshow is free after effects template ideal for making slideshows in which you want to integrate modern essence. It is best suited for creating slideshows of family photographs for occasions, with a touch go modernity. The design of this template is classy but simple at the same time.
One can readily customise the entire template according to their preference, skills and imagination. Also, one can have ultimate control over the colour of the template.
02Old Slideshow
The Old Slideshow is the after effects slideshow template free to download. It is best suitable if you want your slideshow to have a retro style or a retro vibe. Giving such an aura to the slideshow is a recent trend and makes your slideshow look more exciting and updated with the times. One has complete control over the template’s colour and can easily customise every aspect of the template if needed.
03Clean Slideshow
The Clean Slideshow template, as its name suggests, gives you a clean and sophisticated looking slideshow design. It is best for corporate office presentations, school presentations or university slideshows, and it is ideal for any formal or professional purposes. It includes simple texts, a stylish put look, smooth transitional effects and animations. You can customise the template accordingly and make the necessary edits and changes.
04Modern Zoom Telescopic Template Creative Slideshow
Suppose you want your slideshows to look exceptionally incredible. In that case, the Modern Zoom Telescopic Template is the best option among all the other available after effects photo slideshow templates for free. It has an incredible zooming effect that occurs through a transition involving a telescope. So, the entire concept is unique, thereby making your presentation inimitably engaging. It includes numerous light leaks with sleek camera motion.
05Free Elegant Slideshow Template
The Free Elegant Slideshow Template is yet another template ideal for professional use. It is best for making a slideshow for your corporate workplace and office. The elements of this template are elegant and classy. And thus, it is highly suitable for professional purposes. One can readily edit and customise the other features and factors of this template. You can also integrate colours that you prefer to put in your slideshows.

06Travel Slideshow
To portray anything chaotic, dynamic and flowing, the Travel Slideshow is the best template option available for free. Here, the after-effects slide is ideal for making cinematic style slideshow videos that would include an upbeat aura. You can readily update and make the necessary edits in this template and customise it the way you prefer.
07Stylish Spinning Columns Slideshow
For any high-end project requiring slideshow videos, the Stylish Spinning Columns template is the best option. It includes stylish spinning columns, transitional effects and multiple light leaks. You can easily customise the different elements of this template and make the changes according to your preference in this slideshow template.
08Free Dynamic Colourful Slideshow
The Free Dynamic Colourful template has a stylish and modern style of design, and it includes minimalistic typography and the use of vibrant colours. So, to portray anything joyful and ecstatic or to engage the audience more, this template is the best option top pick. These slideshow after-effects are free and thus, make it a more accessible option to use to make the best and the most vibrant slideshows.
This template can serve many purposes and is ideal for professional and informal purposes. You can edit and customise the different elements of this template to make it look the way you want.
09Modern Tile Slideshow
The Modern Tile template is an after effects photo slideshow template that is best suitable for professional and formal use. It is the best option for making sophisticated and formal slideshow videos and presenting them in a corporate office environment.
The design of this template is based on tiles, which its name suggests. The design is unique and includes a 3D tile drop effect as well. You can readily custom and edit the parts and elements of the template to bring about the necessary changes.
10Free Parallax Scrolling Slideshow
Parallax is one of the most commonly used and famous after effect-slide transitions in the present. And you can readily integrate it into your slideshow videos with the Free Parallax Scrolling slideshow template. You can customise the parts where you find changes are necessary. The transitions, video quality and the effects in this template are among the most engaging ones.
If you want to make any slideshow video for your social media platforms, this is the best suitable template.

Part 2 Where to Get Free After Effects Templates
To include the after effects slideshow template, you must know the sources where they are available for free. The after-effects templates are available for free in almost all the video editing and slideshow-making tools, apps, and platforms. However, to name the best among the rest available, Motion Elements is known to have the best collection of free after effects templates for slideshows.
The variety of effects template found in MotionElements is incomparable. You will get the opportunity of choosing among more than 100 after effects templates for your slideshows. There are many other sources, including Adobe, Motion Array, and Rocket Stock.
Part 3 FAQ of After Effects Slideshow Template
There are some questions about After Effects slideshow templates that are commonly asked. So, we will now discuss and present solutions to these FAQs about the slideshow after effects templates.
01How can I make slideshows in the After Effects template?
You will have to open a new project in the app or tool you use to make slideshows. Then, open compositions and import images. The next step is to rinse and then repeat this step to make a slideshow in after effects template.
02Are after effects templates available in Filmora?
Wondershare Filmora Video Editor consists of an innumerable variety of templates and among which there are numerous after effects templates as well. Most importantly, they are available for free so that anyone can use them to make the Ost fantastic slideshow videos.
For Win 7 or later (64-bit)
For macOS 10.12 or later
03Are the after-effects templates arable for free?
One can get the after-effects photo slideshow template free of charge from specific sources, such as Adobe, Motion Array, MotionElements and Filmora.
Filmora is one of the best sources for free after effects slideshow templates. And not just that, it is the best tool for all video editing purposes. If you are a beginner at editing and making slideshow, Filmora can help you develop and nurture your editing skills. Also, if you are a professional, Filmora has the most advanced features that can help you enhance, practise, and put your proficient editing skills into work.
A free version of this tool is available that you can readily use for making slideshow videos. But, if you want to upgrade and opt for better and even more advanced features for editing, you can readily do so with the paid version of Filmora. You get to enjoy the features like using more than 800 templates and filters, having ultimate control over the motion of your videos, compatibility with every device, and the list keeps being unending.
● Ending Thoughts →
● So, in the above discussion, we have covered the following discussion points.
● We examined the ten bests after effects photo slideshow available for free
● We stated the sources where one can get the after-effects templates for slideshows for free.
● We solved the different common questions relating to the after-effects template, and then we introduced the best video editing tool, Filmora.
Making slide shows is an eminent task for a majority of us. Whether you are a student at a school or University, working at a corporate office or trying to present yourself in a meeting, you will require making slideshows. And the more engaging your slideshow is, the better your presentation is.
One of the many ways for improving your slideshows is by adding after effects templates. And the best part is, you can readily opt for using after effects slideshow template for free. But, how can you get the aftereffect slideshows for free? Or, where can you get free after effect templates?
We have put forth the following discussion where we discuss the different free after effects templates for slides, where can you get them and the solutions to the frequent questions related to it. Lastly, we will also introduce you to the best video editing tool, with which you can use the free after effects template and make amazing sideshow videos.
In this article
01 [10 Best Free After Effects Templates Slideshow](#Part 1)
02 [Where to Get Free After Effects Templates](#Part 2)
03 [FAQ of After Effects Slideshow Template](#Part 3)
Part 1 Best Free After Effects Templates Slideshow
We will begin our discussion by presenting photo slideshows after effects template free download, which means, with the following templates, you can make a slideshow f as many a hundred images and that too, for free.
01Wall Slideshow
Wall Slideshow is free after effects template ideal for making slideshows in which you want to integrate modern essence. It is best suited for creating slideshows of family photographs for occasions, with a touch go modernity. The design of this template is classy but simple at the same time.
One can readily customise the entire template according to their preference, skills and imagination. Also, one can have ultimate control over the colour of the template.
02Old Slideshow
The Old Slideshow is the after effects slideshow template free to download. It is best suitable if you want your slideshow to have a retro style or a retro vibe. Giving such an aura to the slideshow is a recent trend and makes your slideshow look more exciting and updated with the times. One has complete control over the template’s colour and can easily customise every aspect of the template if needed.
03Clean Slideshow
The Clean Slideshow template, as its name suggests, gives you a clean and sophisticated looking slideshow design. It is best for corporate office presentations, school presentations or university slideshows, and it is ideal for any formal or professional purposes. It includes simple texts, a stylish put look, smooth transitional effects and animations. You can customise the template accordingly and make the necessary edits and changes.
04Modern Zoom Telescopic Template Creative Slideshow
Suppose you want your slideshows to look exceptionally incredible. In that case, the Modern Zoom Telescopic Template is the best option among all the other available after effects photo slideshow templates for free. It has an incredible zooming effect that occurs through a transition involving a telescope. So, the entire concept is unique, thereby making your presentation inimitably engaging. It includes numerous light leaks with sleek camera motion.
05Free Elegant Slideshow Template
The Free Elegant Slideshow Template is yet another template ideal for professional use. It is best for making a slideshow for your corporate workplace and office. The elements of this template are elegant and classy. And thus, it is highly suitable for professional purposes. One can readily edit and customise the other features and factors of this template. You can also integrate colours that you prefer to put in your slideshows.
06Travel Slideshow
To portray anything chaotic, dynamic and flowing, the Travel Slideshow is the best template option available for free. Here, the after-effects slide is ideal for making cinematic style slideshow videos that would include an upbeat aura. You can readily update and make the necessary edits in this template and customise it the way you prefer.
07Stylish Spinning Columns Slideshow
For any high-end project requiring slideshow videos, the Stylish Spinning Columns template is the best option. It includes stylish spinning columns, transitional effects and multiple light leaks. You can easily customise the different elements of this template and make the changes according to your preference in this slideshow template.
08Free Dynamic Colourful Slideshow
The Free Dynamic Colourful template has a stylish and modern style of design, and it includes minimalistic typography and the use of vibrant colours. So, to portray anything joyful and ecstatic or to engage the audience more, this template is the best option top pick. These slideshow after-effects are free and thus, make it a more accessible option to use to make the best and the most vibrant slideshows.
This template can serve many purposes and is ideal for professional and informal purposes. You can edit and customise the different elements of this template to make it look the way you want.
09Modern Tile Slideshow
The Modern Tile template is an after effects photo slideshow template that is best suitable for professional and formal use. It is the best option for making sophisticated and formal slideshow videos and presenting them in a corporate office environment.
The design of this template is based on tiles, which its name suggests. The design is unique and includes a 3D tile drop effect as well. You can readily custom and edit the parts and elements of the template to bring about the necessary changes.
10Free Parallax Scrolling Slideshow
Parallax is one of the most commonly used and famous after effect-slide transitions in the present. And you can readily integrate it into your slideshow videos with the Free Parallax Scrolling slideshow template. You can customise the parts where you find changes are necessary. The transitions, video quality and the effects in this template are among the most engaging ones.
If you want to make any slideshow video for your social media platforms, this is the best suitable template.
Part 2 Where to Get Free After Effects Templates
To include the after effects slideshow template, you must know the sources where they are available for free. The after-effects templates are available for free in almost all the video editing and slideshow-making tools, apps, and platforms. However, to name the best among the rest available, Motion Elements is known to have the best collection of free after effects templates for slideshows.
The variety of effects template found in MotionElements is incomparable. You will get the opportunity of choosing among more than 100 after effects templates for your slideshows. There are many other sources, including Adobe, Motion Array, and Rocket Stock.
Part 3 FAQ of After Effects Slideshow Template
There are some questions about After Effects slideshow templates that are commonly asked. So, we will now discuss and present solutions to these FAQs about the slideshow after effects templates.
01How can I make slideshows in the After Effects template?
You will have to open a new project in the app or tool you use to make slideshows. Then, open compositions and import images. The next step is to rinse and then repeat this step to make a slideshow in after effects template.
02Are after effects templates available in Filmora?
Wondershare Filmora Video Editor consists of an innumerable variety of templates and among which there are numerous after effects templates as well. Most importantly, they are available for free so that anyone can use them to make the Ost fantastic slideshow videos.
For Win 7 or later (64-bit)
For macOS 10.12 or later
03Are the after-effects templates arable for free?
One can get the after-effects photo slideshow template free of charge from specific sources, such as Adobe, Motion Array, MotionElements and Filmora.
Filmora is one of the best sources for free after effects slideshow templates. And not just that, it is the best tool for all video editing purposes. If you are a beginner at editing and making slideshow, Filmora can help you develop and nurture your editing skills. Also, if you are a professional, Filmora has the most advanced features that can help you enhance, practise, and put your proficient editing skills into work.
A free version of this tool is available that you can readily use for making slideshow videos. But, if you want to upgrade and opt for better and even more advanced features for editing, you can readily do so with the paid version of Filmora. You get to enjoy the features like using more than 800 templates and filters, having ultimate control over the motion of your videos, compatibility with every device, and the list keeps being unending.
● Ending Thoughts →
● So, in the above discussion, we have covered the following discussion points.
● We examined the ten bests after effects photo slideshow available for free
● We stated the sources where one can get the after-effects templates for slideshows for free.
● We solved the different common questions relating to the after-effects template, and then we introduced the best video editing tool, Filmora.
Also read:
- Updated In 2024, 8 Best Free Title Maker You Must Try and Put to Use
- Updated How to Add Camera Shake to Video in Adobe After Effects
- Updated 2024 Approved 10 Best Free Spanish Text To Speech Converter Websites
- 2024 Approved Best Practical Tips to Improve Your Lighting in the Sun
- New 2024 Approved 6 Best Text to Speech Generators for YouTube Videos Windows, Mac, Android, iPhone & Online
- Updated 2024 Approved Deleting White Background in Photoshop Is Hard?
- New Add Emoji to Linkedin Post – 5 Tips You Need to Know
- Updated Elevate Your Designs with Feather Shapes in After Effects
- New Funny Content Ideas for YouTube Videos
- Updated Final Cut Pro - How to Download and Install It, In 2024
- Top 10 Voice Over Generators Windows, Mac, Android, iPhone, and Onli
- In 2024, The Ultimate Guide to GIF for Discord Profile
- New In 2024, Blender Green Screen Effects
- 2024 Approved Easy Ways to Remove Motion Blur In Photoshop
- Splice App for Android - How to Download & Use
- Top 5 Solutions on How to Add Emojis to iPhone
- New How to Add Photos to Tik Tok Video for 2024
- 2024 Approved Create Slow Motion Videos Using Final Cut Pro with Ease
- 6 Ways to Mimic Professional Filming Gears for 2024
- Updated Find Out What Keyframe Interval Is, Why It Is Important, and to Change Its Value on OBS Studio with Simple and Easy-to-Follow Instructions
- FLV Editor for Windows 11/10/8.1/8/7 Easily Edit FLV Videos on PC
- New 2024 Approved How to Change the Speed of Video in DaVinci Resolve?
- Updated How to Add Subtitles in VLC Media Play for 2024
- Updated In 2024, How to Create a PowerPoint Looping Slideshow
- Updated How to Create and Use Adjustment Layers in After Effects for 2024
- Updated 2 Solutions to Cut Video in VLC on Windows
- Updated 2024 Approved Finding Best GIF Websites Is Easy as Pie
- Updated 2024 Approved Guide To Scaling and Setting Videos in Filmora | Tutorial
- New 2024 Approved Best Free Video Editing Software for Reddit
- Updated In 2024, 6 Instant Ways to Make Windows 10 Slideshow
- With the Datamoshing Effect, the User Can Damage the Video Clips to Offer a Glitch Effect. The Article Introduces Datamosh After Effects Its Workability in the Industry for 2024
- In 2024, Transparent Logo and Images Look Cool when You Are Planning to Create a Brand Identity. An Image with Unique Features Catches the Attention of Viewers and Leaves Impression
- In 2024, How to Change Location on TikTok to See More Content On your Infinix Note 30 Pro | Dr.fone
- How To Fake GPS On Vivo Y27s For Mobile Legends? | Dr.fone
- In 2024, Process of Screen Sharing Xiaomi Civi 3 Disney 100th Anniversary Edition to PC- Detailed Steps | Dr.fone
- Issues playing MKV video on Xiaomi Redmi 12
- Restore Missing App Icon on Honor 100 Pro Step-by-Step Solutions | Dr.fone
- How To Fix OEM Unlock Missing on Oppo A18?
- Can you play MP4 on Galaxy S23+?
- How to Change Poco C55 Location on Skout | Dr.fone
- In 2024, How to Mirror PC Screen to Samsung Galaxy S24 Phones? | Dr.fone
- Prank Your Friends! Easy Ways to Fake and Share Google Maps Location On Apple iPhone 13 | Dr.fone
- In 2024, Top 11 Free Apps to Check IMEI on Motorola Moto G Stylus (2023) Phones
- Getting the Pokemon Go GPS Signal Not Found 11 Error in Xiaomi Redmi Note 13 Pro 5G | Dr.fone
- How To Unlock a Realme V30 Easily?
- The 10 Best Tools to Bypass iCloud Activation Lock From Apple iPhone 12 Pro You Should Try Out
- Unlock Your Boost Mobile iPhone 12 Pro Before the Plan Expires
- The Easy Way to Remove an Apple ID from Your MacBook For your iPhone SE (2020)
- How To Unlink Apple ID From iPhone 12 Pro
- In 2024, How To Unlock Realme Phone Without Password?
- 2024 Approved Boost Sales with Live Shopping Learn Winning Strategies From Top Brands
- Repair Video Tool - Repair all your damaged video files of Apple iPhone 15 Pro Max on Windows
- In 2024, 4 Ways to Unlock iPhone 15 Pro Max to Use USB Accessories Without Passcode | Dr.fone
- In 2024, Can I use iTools gpx file to catch the rare Pokemon On Apple iPhone 6 | Dr.fone
- In 2024, Bypassing Google Account With vnROM Bypass For Poco C65
- Title: Updated 2024 Approved How to Add Selective Color Effect to Your Videos
- Author: Chloe
- Created at : 2024-06-26 06:24:09
- Updated at : 2024-06-27 06:24:09
- Link: https://ai-editing-video.techidaily.com/updated-2024-approved-how-to-add-selective-color-effect-to-your-videos/
- License: This work is licensed under CC BY-NC-SA 4.0.
