
:max_bytes(150000):strip_icc():format(webp)/GettyImages-850120538-4d2af54c23a641c8a5f2e00ef7a9aa37.jpg)
Updated 2024 Approved How to Be a YouTube Vlogger
How to Be a YouTube Vlogger
Being a vlogger is a lot of fun specially making videos but is not also very easy, there are times you feel giving up specially when no one in the family supports you, there are also times when you get tired because you think no one is interested in your videos, but very fulfilling at the same time being able to do what you love. As you all know making video on YouTube is making also money that is through google AdSense, but if you are into money without the passion of being a vlogger, you will definitely get tired immediately, because being a vlogger requires more effort, patience, love of work, creativity and most specially passion.
![]()
Note: You don’t need to study a career to become a vlogger, but it’s not easy as simply pressing the publishing button. You’ll need a purpose, a message, a platform, an audience and more.
In this article I will share to you my tips and experiences on How to become a YouTube Vlogger and things you need to consider being a Vlogger.
1. What is Vlog?
A Vlog is a piece of video that document a person’s life or expertise, with an average length of around five minutes. The word vlog is “video” and “blog”. Vlog are created to connect with an audience through shared ideas and experiences in the form of video.
2. Tips on How to Become a YouTube Vlogger
- Create a Channel
- Content
- Equipment
- Skills
- Collaborate
3. Create a YouTube Channel
Your channel name is the official name for your channel on YouTube. Your channel name is a big part of how people will define and understand what your channel is about. So, it’s important that your name accurately represents your brand. It’s important that your name stands out from another channel on YouTube or should be unique.
![]()
Note: So before deciding on a name, pop your potential name into YouTube and see what comes up, if you can’t find any similar sounding channels, you’re good to go.
For example, my channel name is Mayang Dyosa, Mayang is what my family and friend called me and Dyosa means Goddess. I find it unique and cute because that’s my dream to be a Goddess.
❶ Content
One of the challenging parts being a YouTuber is finding a right content for your channel.
You can use YouTube’s trending page this is the easiest way to find trending topic for you to have an idea of what topic or content you like. You can always use or share experiences to be your topic content whether it is beauty, make-up tutorial, DIY’s, Skin care ideas, etc. As long as you can share honestly and correctly.
Do whatever you love, do something that you like, expertise, make a relatable videos or timely videos and searchable videos. Create a content that people need or are often searched for online, content that can provide information to people. I suggest you go with “how to” videos, because people always searched for this kind of content.

Vlog Content
❷ Equipment
Gear is essential for making a YouTube video obviously a camera is the most important piece of equipment, you can use anything that can record at least 1080p resolution of video. You can use your mobile phone or a digital camera. Whatever your equipment you have now, you can start your first vlog as long as you can record a video at you have a clear audio you are good to go.
Many of the successful YouTube creators started with very simple equipment so don’t let equipment get in your way. Start your vlog now!

Vlog Equipment
❸ Skills

Vlog Editing Skills
Speaking with confident in the front of camera is always a skill of being a vlogger, you must be talkative in order for you to share more information to you viewers but make sure that your ideas are related to your chosen content.
You should be entertaining in front of the camera so that the viewers don’t get bored, because sometimes it’s not just the information that excite them to watch a vlogger, but also on how you entertain the viewers.

Entertain in Front of the Camera
❹ Editing Skils
In Editing skills, there are two ways you can edit your vlog, first on your phones, second on your pc or laptops.
You don’t have to be good at editing but this is one of the things you need to study to make your videos better.

Entertain in Front of the Camera2
Wondershare Filmora Video Editor is one of my personally used editing software, this is considered to be the best option for YouTubers because there is how-to video guide that allows anyone to quickly pick up the pace and start producing or creating an eye-catching video.
Wondershare Filmora 11 The Best video editor that makes your editing experience efficient and playful.
Try It Free Try It Free Learn More

I am using this software for almost 5 years and always satisfied by its performance. It is easy to use software with a lot of tools needed to edit a video in a fast way and it even has animation/affects you can add to your video to look more creative and catchier.
Filmora allows you to export your videos in multiple video formats with lot of customization settings.

Wondershare Filmora
It also allows you to export your videos directly to your social media platforms like YouTube, Facebook, Vimeo. The speed of exporting videos is also quite fast so not time consuming.
❺ Collaborate
It really helps your channel to grow if you collaborate with someone that is same passion as you, you can share ideas of content and help one another channel grow. Also, this will help others to know that you also have a YouTube channel and this is another way to promote your channel by the help of other content creator. In this way you can gain a friend and someone that you can seek for advice as you are starting for your career.

Wondershare Filmora
Wrap Up
- You must also remember when starting to be a vlogger you should be emotionally and mentally ready because this is not easy as you expected.
- You can earn money by doing a vlog but don’t make the money to be your motivation to be a Vlogger, ask yourself first if this is really you like or is this really your passion? because being a Vlogger comes with great responsibility and it comes with great effort.
- If you are ready to become a vlogger because of the tips I gave, you can start now but you should not expect more subscriber and views immediately because you still need a lot effort and a lot of work to get people get to know your channel. So just keep working and work hard on the content, one day you will be famous and recognized by many.
In this article I will share to you my tips and experiences on How to become a YouTube Vlogger and things you need to consider being a Vlogger.
1. What is Vlog?
A Vlog is a piece of video that document a person’s life or expertise, with an average length of around five minutes. The word vlog is “video” and “blog”. Vlog are created to connect with an audience through shared ideas and experiences in the form of video.
2. Tips on How to Become a YouTube Vlogger
- Create a Channel
- Content
- Equipment
- Skills
- Collaborate
3. Create a YouTube Channel
Your channel name is the official name for your channel on YouTube. Your channel name is a big part of how people will define and understand what your channel is about. So, it’s important that your name accurately represents your brand. It’s important that your name stands out from another channel on YouTube or should be unique.
![]()
Note: So before deciding on a name, pop your potential name into YouTube and see what comes up, if you can’t find any similar sounding channels, you’re good to go.
For example, my channel name is Mayang Dyosa, Mayang is what my family and friend called me and Dyosa means Goddess. I find it unique and cute because that’s my dream to be a Goddess.
❶ Content
One of the challenging parts being a YouTuber is finding a right content for your channel.
You can use YouTube’s trending page this is the easiest way to find trending topic for you to have an idea of what topic or content you like. You can always use or share experiences to be your topic content whether it is beauty, make-up tutorial, DIY’s, Skin care ideas, etc. As long as you can share honestly and correctly.
Do whatever you love, do something that you like, expertise, make a relatable videos or timely videos and searchable videos. Create a content that people need or are often searched for online, content that can provide information to people. I suggest you go with “how to” videos, because people always searched for this kind of content.
Vlog Content
❷ Equipment
Gear is essential for making a YouTube video obviously a camera is the most important piece of equipment, you can use anything that can record at least 1080p resolution of video. You can use your mobile phone or a digital camera. Whatever your equipment you have now, you can start your first vlog as long as you can record a video at you have a clear audio you are good to go.
Many of the successful YouTube creators started with very simple equipment so don’t let equipment get in your way. Start your vlog now!
Vlog Equipment
❸ Skills
Vlog Editing Skills
Speaking with confident in the front of camera is always a skill of being a vlogger, you must be talkative in order for you to share more information to you viewers but make sure that your ideas are related to your chosen content.
You should be entertaining in front of the camera so that the viewers don’t get bored, because sometimes it’s not just the information that excite them to watch a vlogger, but also on how you entertain the viewers.
Entertain in Front of the Camera
❹ Editing Skils
In Editing skills, there are two ways you can edit your vlog, first on your phones, second on your pc or laptops.
You don’t have to be good at editing but this is one of the things you need to study to make your videos better.
Entertain in Front of the Camera2
Wondershare Filmora Video Editor is one of my personally used editing software, this is considered to be the best option for YouTubers because there is how-to video guide that allows anyone to quickly pick up the pace and start producing or creating an eye-catching video.
Wondershare Filmora 11 The Best video editor that makes your editing experience efficient and playful.
Try It Free Try It Free Learn More
I am using this software for almost 5 years and always satisfied by its performance. It is easy to use software with a lot of tools needed to edit a video in a fast way and it even has animation/affects you can add to your video to look more creative and catchier.
Filmora allows you to export your videos in multiple video formats with lot of customization settings.
Wondershare Filmora
It also allows you to export your videos directly to your social media platforms like YouTube, Facebook, Vimeo. The speed of exporting videos is also quite fast so not time consuming.
❺ Collaborate
It really helps your channel to grow if you collaborate with someone that is same passion as you, you can share ideas of content and help one another channel grow. Also, this will help others to know that you also have a YouTube channel and this is another way to promote your channel by the help of other content creator. In this way you can gain a friend and someone that you can seek for advice as you are starting for your career.
Wondershare Filmora
Wrap Up
- You must also remember when starting to be a vlogger you should be emotionally and mentally ready because this is not easy as you expected.
- You can earn money by doing a vlog but don’t make the money to be your motivation to be a Vlogger, ask yourself first if this is really you like or is this really your passion? because being a Vlogger comes with great responsibility and it comes with great effort.
- If you are ready to become a vlogger because of the tips I gave, you can start now but you should not expect more subscriber and views immediately because you still need a lot effort and a lot of work to get people get to know your channel. So just keep working and work hard on the content, one day you will be famous and recognized by many.
How Can You Create Outstanding Educational Teaching Videos?
Pandemic bought the toughest time for everyone. Some unpredictable decisions were made. Among those decisions, one was online education. Teachers used to record lectures and share them. It was hard for the teachers to record lectures. It was equally hard for the students to study in this way. Teachers record boring lectures, which make it difficult to study and concentrate.
Teachers can add educational background music to their lectures to maintain students’ interest. School videos are not the only educational videos. There are various tutorials on the internet teaching you something. Explainer videos and instructional videos are also kinds of educational videos. This article will share tips to improve your educational teaching videos. Stay with us and learn to make better videos.
In this article
01 Ideas for Making an Outstanding Educational Teaching Video
02 How to Edit A Teacher Introduction Video?
03 3 Recommended Sites to Download Educational Background Music for Studying
Part 1. Ideas for Making an Outstanding Educational Teaching Video
Creating an educational video is not enough. There are a few elements that should be kept in mind. Your content should be good enough. Another thing that needs attention is your viewers’ interest. Your educational video is of no use if it cannot sustain the audience’s interest.
What could be done to improve your videos? How can someone create outstanding educational teaching videos? All your questions will be answered in this section of the article. We are going to share ideas for good educational videos.
· Digital Storytelling
How can digital storytelling help in educational videos? Well, it’s simple. You need to attract and motivate students to study. For this purpose, digital storytelling is the best choice. You can merge different images and videos.
Add cute images from your institute. Insert videos of students working together. All these will attract the student to study.
· Get Dressed
Do you think someone will listen to you with interest if you don’t have a personality? What we wear, how we present ourselves show our personality. If you want to create stunning educational videos, then work a little on yourself first.
Before you start recording, make sure you are well dressed. The more formally you present yourself, the more your students will be attracted.
· Plan Everything
A pro tip for creating outstanding educational videos is your planning. Before properly planning everything, you should never start making a video. You need to gather everything you might need during the video. You should properly compose yourself before you start speaking and teaching.
You should make a mind map of how you will explain things. A storyboard for the sequence of actions should be specified well before. It helps stay on top of things.
· Busy World
What if the video you want to watch is too long and you don’t have that much time? We are very busy in different aspects. For this purpose, it is essential to keep in mind that the educational video should be concise. The video must deliver the actual concept but in a short span of time.
· Audience Hunt
You should have clear knowledge regarding your audience. You must know what content they are looking for. What platform is the most suitable for sharing your content? If you are putting effort into creating amazing educational videos, then a proper audience hunt is also necessary.
Part 2. How to Edit A Teacher Introduction Video?
Have you been searching for the best video editing tool? Let us do the honors and introduce Wondershare Filmora to you. This is the perfect blend between an editing tool and a media library. Filmora has a massive media library. You can get a variety of transitions, effects, titles, etc., from there.
If we talk about the Filmora editing tool, this is amazing for all video creators. The tool is very useful for beginners, experts everyone. With Filmora, edit classy videos. You can edit without limits. Add effects like motion tracing, keyframing from Filmora. It can also be used to edit educational videos. Let us share a step-by-step guideline for making Teachers Introduction in Filmora, shall we?
For Win 7 or later (64-bit)
For macOS 10.12 or later
Step 1: To start making teachers intro in Filmora, firstly, import the background music for work that you want to add to your video. After that, simply drag and drop the music to the timeline.

Step 2: Next, it’s time to add a title to your intro. For that, you need to head over to the ‘Titles’ tab. There search for ‘Back to School’ titles. Select your favorite template from all the available templates and drag it to the timeline. You can edit and customize the template if you want to.

Step 3: Now comes the fun part. Add something to introduce yourself. This will build up the viewers’ interest. You can also add school clips to make an attractive video. Drag the desired media to timeline and trim them accordingly.

Step 4: After adding all the clips, it’s time to do some classy edits. With Filmora, you can easily add Lower Thirds. They can be located in the ‘Titles’ Tab. Lower Thirds can also be customized and edited.

Step 5: With the stunning Filmora editor, you can do wonders. You can perform color correction on your images and clips. With Filmora, add ‘Motion Tracking’ in your video and whatnot.

Step 6: You can conclude your introduction video in very cute ways. For that, head over to the ‘Titles’ tab and select another template. Edit and customize the template according to the video end and drag it on the timeline.

Part 3. 3 Recommended Sites to Download Educational Background Music for Studying
Some people study songs because it helps to concentrate. In the same way, music in educational videos also helps to retain the viewers’ interest. There is appropriate background music for studying available on the internet.
The question here is how can someone find the perfect educational background music? Let us answer your question. The following section of this article will share 3 sites to download work-appropriate background music.
1. Chosic
The first site to be discussed is Chosic. It allows you to download free background music for work. You can find royalty-free MP3 music here. With Chosic, find the perfect work music according to your mood. It offers various genres. The search process is also very convenient. You can search for music by using the tags.

2. Storyblocks
Another site that offers royalty-free music is Storyblocks. It has a lot to offer. You can download your favorite educational background music with Storyblocks. It also lets you create a folder and save your music there. The best thing about Storyblocks is that you can edit the music with its ‘Maker’ feature. Search the music according to your desired genre, instrument choice, moods, etc.

3. TakeTones
With TakeTones, you can find amazing instrumental background music for studying. If you don’t know, TakeTones has royalty-free music. You can not only listen to music but can also download it. The site displays complete details about the music—the music track, its duration, tags, etc. You can either download the music or else add it to your favorites to enjoy it later.

Bottom Line
After taking notes from this article, you will surely create interesting educational teaching videos. The article has shared every bit of information that is needed to create outstanding educational videos. We also introduced the best editor, Filmora. You can take help from Wondershare Filmora to edit mind-blowing videos. In addition to that, we also shed light on sites to download background music for work.
Wondershare Filmora
Get started easily with Filmora’s powerful performance, intuitive interface, and countless effects!
Try It Free Try It Free Try It Free Learn More >

02 How to Edit A Teacher Introduction Video?
03 3 Recommended Sites to Download Educational Background Music for Studying
Part 1. Ideas for Making an Outstanding Educational Teaching Video
Creating an educational video is not enough. There are a few elements that should be kept in mind. Your content should be good enough. Another thing that needs attention is your viewers’ interest. Your educational video is of no use if it cannot sustain the audience’s interest.
What could be done to improve your videos? How can someone create outstanding educational teaching videos? All your questions will be answered in this section of the article. We are going to share ideas for good educational videos.
· Digital Storytelling
How can digital storytelling help in educational videos? Well, it’s simple. You need to attract and motivate students to study. For this purpose, digital storytelling is the best choice. You can merge different images and videos.
Add cute images from your institute. Insert videos of students working together. All these will attract the student to study.
· Get Dressed
Do you think someone will listen to you with interest if you don’t have a personality? What we wear, how we present ourselves show our personality. If you want to create stunning educational videos, then work a little on yourself first.
Before you start recording, make sure you are well dressed. The more formally you present yourself, the more your students will be attracted.
· Plan Everything
A pro tip for creating outstanding educational videos is your planning. Before properly planning everything, you should never start making a video. You need to gather everything you might need during the video. You should properly compose yourself before you start speaking and teaching.
You should make a mind map of how you will explain things. A storyboard for the sequence of actions should be specified well before. It helps stay on top of things.
· Busy World
What if the video you want to watch is too long and you don’t have that much time? We are very busy in different aspects. For this purpose, it is essential to keep in mind that the educational video should be concise. The video must deliver the actual concept but in a short span of time.
· Audience Hunt
You should have clear knowledge regarding your audience. You must know what content they are looking for. What platform is the most suitable for sharing your content? If you are putting effort into creating amazing educational videos, then a proper audience hunt is also necessary.
Part 2. How to Edit A Teacher Introduction Video?
Have you been searching for the best video editing tool? Let us do the honors and introduce Wondershare Filmora to you. This is the perfect blend between an editing tool and a media library. Filmora has a massive media library. You can get a variety of transitions, effects, titles, etc., from there.
If we talk about the Filmora editing tool, this is amazing for all video creators. The tool is very useful for beginners, experts everyone. With Filmora, edit classy videos. You can edit without limits. Add effects like motion tracing, keyframing from Filmora. It can also be used to edit educational videos. Let us share a step-by-step guideline for making Teachers Introduction in Filmora, shall we?
For Win 7 or later (64-bit)
For macOS 10.12 or later
Step 1: To start making teachers intro in Filmora, firstly, import the background music for work that you want to add to your video. After that, simply drag and drop the music to the timeline.
Step 2: Next, it’s time to add a title to your intro. For that, you need to head over to the ‘Titles’ tab. There search for ‘Back to School’ titles. Select your favorite template from all the available templates and drag it to the timeline. You can edit and customize the template if you want to.
Step 3: Now comes the fun part. Add something to introduce yourself. This will build up the viewers’ interest. You can also add school clips to make an attractive video. Drag the desired media to timeline and trim them accordingly.
Step 4: After adding all the clips, it’s time to do some classy edits. With Filmora, you can easily add Lower Thirds. They can be located in the ‘Titles’ Tab. Lower Thirds can also be customized and edited.
Step 5: With the stunning Filmora editor, you can do wonders. You can perform color correction on your images and clips. With Filmora, add ‘Motion Tracking’ in your video and whatnot.
Step 6: You can conclude your introduction video in very cute ways. For that, head over to the ‘Titles’ tab and select another template. Edit and customize the template according to the video end and drag it on the timeline.
Part 3. 3 Recommended Sites to Download Educational Background Music for Studying
Some people study songs because it helps to concentrate. In the same way, music in educational videos also helps to retain the viewers’ interest. There is appropriate background music for studying available on the internet.
The question here is how can someone find the perfect educational background music? Let us answer your question. The following section of this article will share 3 sites to download work-appropriate background music.
1. Chosic
The first site to be discussed is Chosic. It allows you to download free background music for work. You can find royalty-free MP3 music here. With Chosic, find the perfect work music according to your mood. It offers various genres. The search process is also very convenient. You can search for music by using the tags.
2. Storyblocks
Another site that offers royalty-free music is Storyblocks. It has a lot to offer. You can download your favorite educational background music with Storyblocks. It also lets you create a folder and save your music there. The best thing about Storyblocks is that you can edit the music with its ‘Maker’ feature. Search the music according to your desired genre, instrument choice, moods, etc.
3. TakeTones
With TakeTones, you can find amazing instrumental background music for studying. If you don’t know, TakeTones has royalty-free music. You can not only listen to music but can also download it. The site displays complete details about the music—the music track, its duration, tags, etc. You can either download the music or else add it to your favorites to enjoy it later.
Bottom Line
After taking notes from this article, you will surely create interesting educational teaching videos. The article has shared every bit of information that is needed to create outstanding educational videos. We also introduced the best editor, Filmora. You can take help from Wondershare Filmora to edit mind-blowing videos. In addition to that, we also shed light on sites to download background music for work.
Wondershare Filmora
Get started easily with Filmora’s powerful performance, intuitive interface, and countless effects!
Try It Free Try It Free Try It Free Learn More >
Steps to Add Subtitles in Canva
Have you ever used Canva before? It is a famous online tool that is also available on Windows, Mac, Android, and iOS platforms. It contains various basic editing features that you can use to crop, trim, resize, and rotate your video clips and images. Apart from these basic tools, you can also navigate to the built-in library of Canva to explore its vibrant templates.
As more than 100 million individuals use Canva every month, it’s a well-trusted tool. If you are a frequent user of Canva, this article can help you how to add subtitles in Canva. Keep reading this article to find out the quickest way to add subtitles to videos using Canva.

Part 1: What is Canva?
To create and edit videos flawlessly, Canva offers great options. It contains pre-sized video formats for YouTube, Facebook, and other social media platforms. If you are a beginner and struggling with ideas, Canva offers various templates of different categories, such as fitness, education, fashion, and real estate. Apart from using the built-in media library, you have complete freedom to upload your media files to add further modifications.

Furthermore, using Canva, you can also add exciting animations and transitions to your videos to generate a smooth look. You can also add multiple overlays to add more dimensions to your video clips. Also, you can use the Canvas captions feature to generate customized subtitles for your video files. To learn more about Canva, let’s shed light on its key features, advantages, and pricing plans:
Key Features of Canva
- Multiple Export Options: Canva offers various export formats such as MP3, PNG, GIF, MP4, PPTX, etc. You can also check the video quality before exporting it to your device.
- Add Audio Tracks: To make your videos more engaging, you can add audio tracks and sound effects using this professional tool.
- Background Remover: To remove a dull background from your video without a green screen or professional software, you can use the background remover of Canva. Through this advanced feature, you can remove the background from your videos with a single click.
- Magic Resize: It offers a Magic Resize option that enables you to resize videos in different formats for multiple platforms.
- Brand Tools: Canva’s branding tools allow users to create and save branded templates, colors, and fonts. This makes it easy to maintain consistency across all design materials and ensures that all designs align with the brand’s visual identity.
- Collaboration Features: Canva’s collaboration features make it easy for teams to work together on a design project. Users can share designs with team members and assign roles and permissions, allowing for seamless collaboration and feedback.
Advantages of Using Canva
- If you want to share your videos on social media platforms instantly, Canva is the best option. Using this software, you can share your videos on Instagram or other social media platforms with a single tap.
- Canva can also add voice-overs and narrations to your videos in high audio quality.
- This tool provides various elements such as lines, shapes, stickers, and frames that you can add to your videos.
Pricing Plans
If you want to learn more about Canva’s detailed plan, you can visit its official website .
| Plan Name | Price |
|---|---|
| Canva Pro | $54.99/Year for 1 Person |
| Canva for Teams | $84.90/Year for 5 Person |
Part 2: How to Add Captions to Videos in Canva?
Do you want to know how to add subtitles in Canva? Adding subtitles in Canva is extremely simple and quick. In this section, we have jotted down accurate and simple instructions to add subtitles using the Canva tool:
Step1 Begin by visiting the video editor tool page of Canva through any web browser. After accessing the tool page, click on “Edit a Video.” This will open a new window on your screen.

Step2 Now, hit the “Upload Files” button from the left panel and import the video file on this tool. Once done, navigate to the “Text” tab and tap “Add a little bit of body text.” Now adjust the position of the text box according to your desire. You can write your Canva captions by choosing your preferred font, color, size, and style.

Step3 You can also add effects and animation to your added subtitles for more enhancements. Once done with customizations, click on the “Share” button. Here select MP4 as the video file format and save the video on your system.

Part 3: Is There a Good Alternative to Add Subtitles to Videos?
Canva provides a very basic user interface to create subtitles. If you want to enhance your added subtitles with more possibilities, Wondershare Filmora is the best alternative. You can add subtitles through this tool in multiple ways. You can either add subtitles manually or use its “Speech-to-Text” feature. Through this feature, you can transcribe your voice to generate subtitles automatically.
Free Download For Win 7 or later(64-bit)
Free Download For macOS 10.14 or later
Filmora also offers great styles and font options to customize the subtitles. You can easily check the results from the preview window of this efficient video editor. Hence, Filmora acts as a complete and well-trusted platform to generate subtitles in different ways.
Instructions to Create Subtitles Using Filmora
Are you tired of writing subtitles manually in Canva? Read the precise instructions guided below to create the subtitles automatically in more than 16 languages:
Step1 Upload the Video File
Download and launch Filmora on your desktop to initiate the process. On its main interface, tap “Create New Project,” which will open a new window. Afterward, upload your desired video on the Project Media to proceed.

Step2 Select Speech-to-Text Feature
Once done with uploading the file, drag the video file to the timeline. Click on the “Speech-to-Text” icon displayed on the timeline and hit the “OK” button after selecting the required language and file. After some seconds, subtitles would be automatically added to the timeline.

Step3 Add Modifications to Subtitles
On your timeline, double-click on the auto-generated subtitles to open the edit settings. By going to the Presets section, you can select the subtitle styles. To add more modifications, you can head to the Custom tab as displayed on your screen. From here, you can change the font, style, color, and size of the subtitles. To confirm the subtitles edits, press the “OK” button.

Step4 Export the Video File
Once you are done with all the subtitle edits, click on the “Export” button. Filmora provides you with various export resolution options and file formats that you can choose. Moreover, you can also share the video file to your desired social media platform, such as YouTube, Vimeo, or TikTok.

Conclusion
Being a non-technical individual, adding subtitles may sound tricky. To provide you with complete assistance, this article has shed light on how to add subtitles in Canva. But, Canva has some limitations in generating subtitles. Hence, we recommend you try and explore Wondershare Filmora to craft subtitles. This tool comprises a Speech-to-Text feature through which you can produce subtitles automatically without hassle.
Part 2: How to Add Captions to Videos in Canva?
Do you want to know how to add subtitles in Canva? Adding subtitles in Canva is extremely simple and quick. In this section, we have jotted down accurate and simple instructions to add subtitles using the Canva tool:
Step1 Begin by visiting the video editor tool page of Canva through any web browser. After accessing the tool page, click on “Edit a Video.” This will open a new window on your screen.
Step2 Now, hit the “Upload Files” button from the left panel and import the video file on this tool. Once done, navigate to the “Text” tab and tap “Add a little bit of body text.” Now adjust the position of the text box according to your desire. You can write your Canva captions by choosing your preferred font, color, size, and style.
Step3 You can also add effects and animation to your added subtitles for more enhancements. Once done with customizations, click on the “Share” button. Here select MP4 as the video file format and save the video on your system.
Part 3: Is There a Good Alternative to Add Subtitles to Videos?
Canva provides a very basic user interface to create subtitles. If you want to enhance your added subtitles with more possibilities, Wondershare Filmora is the best alternative. You can add subtitles through this tool in multiple ways. You can either add subtitles manually or use its “Speech-to-Text” feature. Through this feature, you can transcribe your voice to generate subtitles automatically.
Free Download For Win 7 or later(64-bit)
Free Download For macOS 10.14 or later
Filmora also offers great styles and font options to customize the subtitles. You can easily check the results from the preview window of this efficient video editor. Hence, Filmora acts as a complete and well-trusted platform to generate subtitles in different ways.
Instructions to Create Subtitles Using Filmora
Are you tired of writing subtitles manually in Canva? Read the precise instructions guided below to create the subtitles automatically in more than 16 languages:
Step1 Upload the Video File
Download and launch Filmora on your desktop to initiate the process. On its main interface, tap “Create New Project,” which will open a new window. Afterward, upload your desired video on the Project Media to proceed.
Step2 Select Speech-to-Text Feature
Once done with uploading the file, drag the video file to the timeline. Click on the “Speech-to-Text” icon displayed on the timeline and hit the “OK” button after selecting the required language and file. After some seconds, subtitles would be automatically added to the timeline.
Step3 Add Modifications to Subtitles
On your timeline, double-click on the auto-generated subtitles to open the edit settings. By going to the Presets section, you can select the subtitle styles. To add more modifications, you can head to the Custom tab as displayed on your screen. From here, you can change the font, style, color, and size of the subtitles. To confirm the subtitles edits, press the “OK” button.
Step4 Export the Video File
Once you are done with all the subtitle edits, click on the “Export” button. Filmora provides you with various export resolution options and file formats that you can choose. Moreover, you can also share the video file to your desired social media platform, such as YouTube, Vimeo, or TikTok.
Conclusion
Being a non-technical individual, adding subtitles may sound tricky. To provide you with complete assistance, this article has shed light on how to add subtitles in Canva. But, Canva has some limitations in generating subtitles. Hence, we recommend you try and explore Wondershare Filmora to craft subtitles. This tool comprises a Speech-to-Text feature through which you can produce subtitles automatically without hassle.
How To Fade Audio With Movavi Editor
Movavi Video Editor Plus is the best option if you want to use its user-friendly Movavi fade audio feature set with plenty of functionality. There are versions of the app on Mac and Windows. For all intents and purposes, Movavi fade out music functionality is an excellent piece of this video editing software. The Movavi Video Editor Plus package comes with standard advanced features and functionality. You may also store your work and share your Movavi fade out audio exports across devices that have the software installed.
Looking for how to fade out music in Movavi? We’ve got you solutions to it. The ability to quickly and simply check that the beginning and conclusion of any audio is one of the best Movavi fade audio features. Prior to the audio, there must be a distinct period of quiet. Finding the program, like Movavi Audio fade out, that best suits your requirements is essential whether you want to fade-in, fad-out, trim, crop, clip, or combine audio files or segments of a music. Find out the details in the upcoming sections.
Part 1. How to Fade Audio with Movavi Editor
When the song’s ending is not featured in the video, fade-out is used to provide an added level of professionalism. Even if you’ve never altered a video before, using Movavi Video Editor Plus is simple. A step-by-step tutorial that walks you through all the tools you’ll need is shown to you when the software initially launches. Additionally, you may always search the Movavi official website for advice.
Steps to use Movavi Fade Audio:
Step1The first step is to import the audio and video files you want to utilize. Drag and drop the files into the software or choose “Add Files” from the Media Bin area to do this. Drag and drop the clip into the timeline after that.
Step2Select the disconnect audio option from the edit menu. Additionally, you can see that the audio and video will no longer be connected by a little connection. Your titles’ location, color, and font may all be changed.
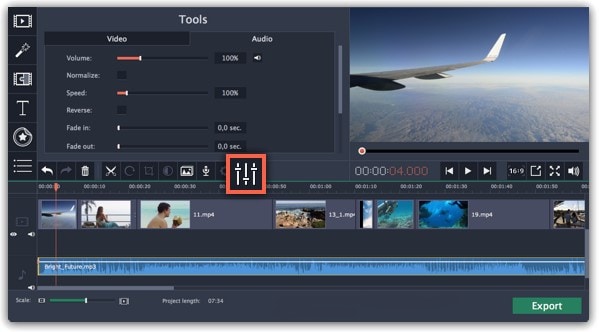
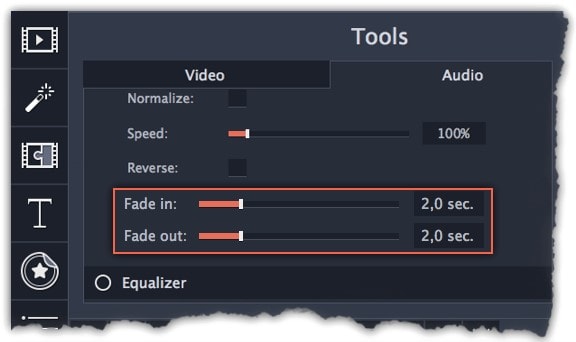
Step3Use the sliders on the Audio tab to set the fade duration by referring to the Audio Properties. Additional options may be used to increase the audio’s loudness, eliminate ambient noise, or even create an echo effect.
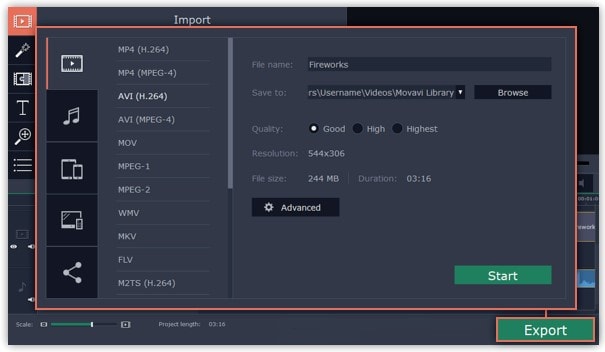
Step4Click on the export option to save this audio as an MP3. Select Audio Export. The MP3 choice is used by default. Select the Save Audio File tab after clicking the Export button. Choose the preferred format and press Start.
Part 2. Movavi Alternative to Fade Audio
Look no further than Filmora by Wondershare if you’re seeking for an effective and user-friendly Movavi audio fade out substitute. This program has all the tools you need to edit, apply special effects, and make titles for videos of a professional caliber. In contrast to Movavi, Filmora gives you the ability to create fade out music without requiring you to install a separate extension. In order to help you understand how to use this function using the Filmora video editing interface, we have enlisted the step-by-step guide for you as well.
Although there are several video editors on the market, Filmora has successfully carved out a position for itself with a variety of intriguing features. The application is appropriate for both new and more experienced users and was designed with novice users in mind. Its user interface (UI), which is rather simple when compared to professional applications. Among all the free video editing programs for beginners, Filmora also offers a far larger selection of effects, customizability, and correction tools, and its screen-splitting capability is much handier than Movavi fade audio feature.
Steps to Fade Out Audio in Filmora:
Step1Install Wondershare Filmora
The straightforward platform to start editing your audio and music files is Filmora, which is available for free. You must first download and install this application on your windows computer in order to utilize it without difficulty. Download the most current edition of this application first. It’s now time to install it on your computer when you’ve completed that. Simply install this program on your computer by following the standard setup instructions if you want to do it fast.
Step2Open Filmora Editor and Import Audio Files
In the step that follows, we’ll show you how to use this platform to fade in and out audio. Filmora may be immediately launched from your desktop or the search bar, then opened as seen below to begin going. By choosing the Video Editor option from the software’s home screen, you may now investigate the basic principles of editing. This will bring up the main interface for Filmora. To import your music and video files, just choose the Import button from the software’s main screen, as seen below:

Step3Load Built-in Audio Editor
You must drag the media files into the program’s timeline after importing them into Filmora. You may modify your media files using every tool in the timeline. To utilize the audio editor in Filmora, just right-click on the specific audio file and choose “Edit Audio” from the list, as seen below.

Step4Use Audio Fade-in/Fade-out
The initial step is to learn how to use Filmora to start fading in and, afterwards, fading out your audio recordings. The best aspect of Filmora is how simple it is to employ these techniques from the timeline. To achieve this, focus on the audio file that you want to change in the timeline; after you’ve picked it, the two icons will show up above the audio file. Drag the first one to the desired duration for the audio fade-in option, as demonstrated:

Step5Edit and Share Video/Sound
In addition to an audio editor, Filmora has a built-in toolset for video editing. You may utilize basic to sophisticated editing techniques inside the program. To choose the basic editor, just click on the video file within the timeline as seen below. There is support for all widely used video and audio formats, including MP3. Click “Export” and choose “File Format” to do this.
By pressing the Format button, choose the required configuration from the list. On a computer, the particular document will be saved to the designated directory.
The Bottom Line
Have you learned how to fade out music in Movavi? If so, then you would also find out that the Movavi fade audio alternative, Filmora , provides a selection of audio editing options in addition to video editing features. The Movavi editor is capable of spicing up your videos and audios, however; Filmora’s workflow is a little more established and well-defined than Movavi’s, which is what propels it to the top of the audio editing field. As a result, Filmora would be the better option if you intend to work as a video editor for a long time.
Free Download For Win 7 or later(64-bit)
Free Download For macOS 10.14 or later
Also read:
- Updated 2024 Approved Explore the List of the Top Six Online Video Speed Controllers for Chrome, Safari, and Firefox
- Updated 2024 Approved How to Create a DIY Green Screen Video Effect?
- New 2024 Approved Detailed Steps to Cut a Video in QuickTime
- Updated In 2024, How to Create Your Own LUTs for Your Video with Filmora
- 2024 Approved This Article Talks in Detail About How to Convert Time-Lapse to Normal Video Using Certain Methods on iPhone, Online Tools, and so On. It Further Discusses Converting Time-Lapse Video to Normal on the Computer. Check Out
- New Camtasia Video Editor Review for 2024
- Updated Transparent Logo and Images Look Cool when You Are Planning to Create a Brand Identity. An Image with Unique Features Catches the Attention of Viewers and Leaves Impression
- New Best Tips for Better Event Videography for 2024
- New Experience Time Differently with The Top Slow-Motion Applications for 2024
- Updated In 2024, How to Blur Faces in Your Video on iPhone
- New 7 Best MP4 Editors on Mac Edit MP4 in Mac
- Know How to Create OBS Slideshow. Creating OBS Slideshow in Simple Steps; Application for Creating OBS Slideshow. Make OBS Slideshow Online
- In 2024, Making a Countdown Timer Video Like a Pro Isnt a Problem Anymore. Follow the Steps Mentioned in This Guide and Create an Impressive Countdown Timer for Your Videos
- Efficient Ways to Manage Your Timeline
- Updated With the Datamoshing Effect, the User Can Damage the Video Clips to Offer a Glitch Effect. The Article Introduces Datamosh After Effects Its Workability in the Industry
- 2024 Approved Do You Seek a Guide to Add Motion in Blender? This Article Explains the Blender Motion Blur Effect in Detail and Helps You Master It
- 2024 Approved How to Make Your CSGO Montage Impressive
- In 2024, Make Super Easy Coin Magic With Filmora
- New 2024 Approved 7 Solutions to Cut Video on Mac without Using FFmpeg?
- Turn Your Text Into a Podcast Made Possible for 2024
- New 2024 Approved How Does the YouTube AI Algorithm Work
- Updated 2024 Approved How to Add Text Effects in Adobe Premiere Pro?
- Updated In 2024, Slow Down or Speed Up Videos Easily on PC, Online, and Phone
- 2024 Approved Do You Know About some Efficient Slow-Motion Video Editors? Read This Article to Find Out the Best Slow-Motion Video Editing Tools that You Can Try
- In 2024, How to Make a Slow Motion Video Complete Guide
- New Bored of Extraneous Software Downloads and Program Installations to Edit Your Videos? The Best Video Editing Online Utilities Are Here at Your Rescue
- In 2024, How To Import and Adjust the Video Clips on Wondershare Filmora?
- Google Play Services Wont Update? 12 Fixes are Here on Tecno Spark 20 Pro+ | Dr.fone
- In 2024, The Updated Method to Bypass Infinix GT 10 Pro FRP
- In 2024, Recommended Best Applications for Mirroring Your Nokia C02 Screen | Dr.fone
- In 2024, FRP Hijacker by Hagard Download and Bypass your Honor X50i FRP Locks
- How to fix Pivot Table Field Name is not Valid error in Excel? | Stellar
- 8 Best Apps for Screen Mirroring Xiaomi 14 PC | Dr.fone
- Three methods to recover lost data on Honor X50i+
- In 2024, Best 3 Software to Transfer Files to/from Your Motorola Edge 2023 via a USB Cable | Dr.fone
- Failed to play HEVC files on Sony Xperia 10 V
- How to Cast Nubia Z50 Ultra to Computer for iPhone and Android? | Dr.fone
- In 2024, What is the best Pokemon for pokemon pvp ranking On Vivo V30 Pro? | Dr.fone
- List of Pokémon Go Joysticks On Apple iPhone 12 Pro Max | Dr.fone
- Title: Updated 2024 Approved How to Be a YouTube Vlogger
- Author: Chloe
- Created at : 2024-04-24 07:08:43
- Updated at : 2024-04-25 07:08:43
- Link: https://ai-editing-video.techidaily.com/updated-2024-approved-how-to-be-a-youtube-vlogger/
- License: This work is licensed under CC BY-NC-SA 4.0.
