
:max_bytes(150000):strip_icc():format(webp)/linksys-default-password-list-2619153-5fccecc7c0b04133b2202a1fa9e8d37a.png)
Updated 2024 Approved How to Color Correct in OBS
How to Color Correct in OBS
Create High-Quality Video - Wondershare Filmora
An easy and powerful YouTube video editor
Numerous video and audio effects to choose from
Detailed tutorials are provided by the official channel
Color Correction is an outstanding functionality that allows editing photos and videos by altering their consistency to match a particular standard. Besides, color correction is available in the premium tool and free applications. And one of the established free software tools with color correction is the OBS.
Even though the Open Broadcaster Software is mainly known for live streaming and offline video recording, it also offers color correction functionality from its open canvas. Read this article to completion and get to the bottom line of how to do color correction in OBS.
More about OBS
In this article
01 What is OBS?
What is OBS?
Open Broadcaster Software (OBS) is free and open-source software that allows users to record videos and live stream events right at their comfort. The software functions effectively on Mac, Windows, and Linux computers.
Open Broadcaster Software (OBS) is free and open-source software that allows users to record videos and live stream events right at their comfort. The software functions effectively on Mac, Windows, and Linux computers.
Since its initial launch in 2012, OBS has made tremendous moves – This is not only from the constant release of its new versions but also the relentless increase in the functionality features. Besides, OBS is equipped with a robust API that enables plugins and scripts which provide extensive customization to precisely suit one’s needs.
However, OBS being a free application can function to date due to enough support from sponsors and backers.
How to Apply Color Correction in OBS
When you carry out basic edits to your videos or images with OBS and realize that your project has poor shade, color, or tone, you don’t have to export it to another software to correct it. Instead, you can use filters for color correction in OBS.
Apart from using OBS filters to color correct video clips and images, you can correct games, browser sources, and video capture devices.
There are various aspects of color correction in OBS. It includes:
1. Gamma
Gamma is a fundamental aspect in OBS that functions by balancing the brightness of an image through contrast. To be precise, Gamma works almost similarly to change in brightness while simultaneously increasing or decreasing the contrast.
In editing, Gamma is applicable mainly for removing shiny foreheads and webcam footage in gaming and browsing.
High Gamma is represented by “L,” whereas low Gamm is represented by “R.”
2. Contrast
Contrast is the difference in the degree of colors and tones in an image. Usually, the low contrast image has a narrow color range, whereas the high contrast images have dark shadows and bright highlights.
“L” represents high contrast in OBS contrast, whereas “R” represents low contrast.
3. Brightness
Brightness is the degree to how light or dark a picture is. To be able to understand an image clearly, it is best to correct its brightness. A change in brightness of a picture has a simultaneous change in pixels of that image.
High brightness in OBS is denounced by the letter “L,” whereas Low brightness is denounced by “R.”
4. Saturation
Saturation is the intensity of colors in a video or an image. High saturated images are bright, strong, and are rich, whereas the low saturated photos appear washed out. Black and white (grayscale) photos have no color saturation. In OBS, high saturation and low saturation are represented as “L” and “R.”
5. Hue Shift
Hue shift is the change in an image’s saturation, lightness, and hue colors. Hue shifting occurs when highlighting or shading images. In OBS, you can use the hue shift functionality to reimage your image with a completely different color palette.
With the hue shift functionality in OBS, you can place the image on top of another and have an 80% opacity. It means that you will still see the first image when you place the second one on top of it.
The “L” sign in the OBS hue shift represents 50% opacity, while the “R” represents 100% Opacity.
Color Grade in OBS
Color grading is the process of enhancing the appearance of an image through attributes such as contrast, saturation, and color, making them enchanting for presentations. Color grading is not only done for still images but also for motion pictures and images.
Color grading functionality in OBS is encompassed with several tools – This includes:
1. Lift tool
As the name suggests, lift tools are used in lifting or removing specific colors from an image. It does so without necessarily affecting other colors in an image.
With this tool, you can selectively remove unwanted colors from your image or video, replace them with your desired ones, and create astonishing results.
2. Offset
Offset is another outstanding tool in OBS color grading that controls the blacks/Shadows of an image. It functions by altering the brightness levels and leaving the highlights and the mid-tones unaffected.
3. Gain
A gain is a tool in OBS color correction that functions by only adjusting the white levels in an image. With the gain tool, brighter colors become brighter or darker.
Many people, especially beginner editors, experience difficulty differentiating between the Gamma and Offset tools. Yes, there is a closer similarity between the two, and for you to be on the safe side, you need to know that Gamma goes with the mid-tones (middle gray levels) whereas the Gain goes with highlights/whites.
How to Apply LUTs in OBS
Look up tables (LUTs) is a functionality feature that allows editors, colorists, and filmmakers to save certain colors as their templates. Therefore, when working on a particular project, they don’t have to create new working color grades; instead, you pick it from your LUT.
Using LUTs OBS is not rocket science. With LUTs, you can create unique projects with a vibrant feel. Here are the simple steps of using LUTs in OBS.
Step 1. Prepare your LUT
First, check and establish whether you have your LUT ready. If you don’t have it, you can download one from the internet. Make sure you download it as a folder. Even though OBS has LUT, It has limited color grades; therefore, it is best to download one. You can extract it to an OBS folder if you downloaded it in a zip file.
Step 2. Add your project to the OBS timeline
Open your OBS software and add your project file. Drag and drop your file to the OBS timeline.

Step 3. Add LUTs to your project
Right-click on the area in your project that you wish to apply LUTs, then click on “Filters.” Select “Apply LUT” from the drop-down menu,” which is usually at the top of the list.

Step 4. Apply your LUT as a filter
On the LUTs section, click on the browser, then open your downloaded LUT folder. Usually, the LUT is in the form of a .cube file. You can adjust your LUT by simply clicking on the “Adjust” option.
Bonus! How to Apply Color Correction for Webcam and Camera
People who primarily use their computers for recording sessions often find it difficult to capture quality videos. It is because most computer cameras are not straightforward. To do away with purchasing a new camera due to poor quality video capture, they can freely use OBS LUTs. For their camera and webcam. LUTs for webcam play a vital role in correcting the quality of photos and videos by using filters.
Here are the simple steps on how to use LUTs for color correction in webcam and camera
Step 1. Check whether your camera has additional software
Most webcams and cameras are controlled by external software, so you first need to check whether yours is also controlled. A thing with these cameras are controlled by their software is that the software determines the color settings and the specific image.
Double click on camera source and select “Configure video.” Computers with external software cameras will have a pop-up window that displays various customizable settings. Here, you can adjust the different settings based on your preference.

Step 2. Download your LUTs
Download online the LUTs you want to use. Download them as folders and extract the files you downloaded as zip files. Save them in the OBS folder.
Step 3. Apply your LUTs
Still, in your OBS software, open your camera and then right-click on it. From the displayed menu, click on “Filters.”
On the bottom left corner of your interface, hit the “+” sign, then select “Apply LUTs” > “Browse.”
Open your already downloaded OBS files. Usually, there is an “Adjust” that allows you to regulate the intensity of the LUT by sliding it.

Step 4. Start recording with LUTs on
After turning on your LUT, you can start recording videos and taking photos. There is an eye icon on the left-hand side of your screen. You can use it to turn on or off LUT.
Conclusion
● And that is how to do color correction in OBS. Besides, you do not have to go to the extremes of getting a new camera because of your webcam faultiness. With OBS, you can correct your camera and webcam and get outstanding results.
● Download LUTs from the internet and use them as a template in OBS. Besides, you don’t have to pay for the LUTs, but you can use the free ones.
Color Correction is an outstanding functionality that allows editing photos and videos by altering their consistency to match a particular standard. Besides, color correction is available in the premium tool and free applications. And one of the established free software tools with color correction is the OBS.
Even though the Open Broadcaster Software is mainly known for live streaming and offline video recording, it also offers color correction functionality from its open canvas. Read this article to completion and get to the bottom line of how to do color correction in OBS.
More about OBS
In this article
01 What is OBS?
What is OBS?
Open Broadcaster Software (OBS) is free and open-source software that allows users to record videos and live stream events right at their comfort. The software functions effectively on Mac, Windows, and Linux computers.
Open Broadcaster Software (OBS) is free and open-source software that allows users to record videos and live stream events right at their comfort. The software functions effectively on Mac, Windows, and Linux computers.
Since its initial launch in 2012, OBS has made tremendous moves – This is not only from the constant release of its new versions but also the relentless increase in the functionality features. Besides, OBS is equipped with a robust API that enables plugins and scripts which provide extensive customization to precisely suit one’s needs.
However, OBS being a free application can function to date due to enough support from sponsors and backers.
How to Apply Color Correction in OBS
When you carry out basic edits to your videos or images with OBS and realize that your project has poor shade, color, or tone, you don’t have to export it to another software to correct it. Instead, you can use filters for color correction in OBS.
Apart from using OBS filters to color correct video clips and images, you can correct games, browser sources, and video capture devices.
There are various aspects of color correction in OBS. It includes:
1. Gamma
Gamma is a fundamental aspect in OBS that functions by balancing the brightness of an image through contrast. To be precise, Gamma works almost similarly to change in brightness while simultaneously increasing or decreasing the contrast.
In editing, Gamma is applicable mainly for removing shiny foreheads and webcam footage in gaming and browsing.
High Gamma is represented by “L,” whereas low Gamm is represented by “R.”
2. Contrast
Contrast is the difference in the degree of colors and tones in an image. Usually, the low contrast image has a narrow color range, whereas the high contrast images have dark shadows and bright highlights.
“L” represents high contrast in OBS contrast, whereas “R” represents low contrast.
3. Brightness
Brightness is the degree to how light or dark a picture is. To be able to understand an image clearly, it is best to correct its brightness. A change in brightness of a picture has a simultaneous change in pixels of that image.
High brightness in OBS is denounced by the letter “L,” whereas Low brightness is denounced by “R.”
4. Saturation
Saturation is the intensity of colors in a video or an image. High saturated images are bright, strong, and are rich, whereas the low saturated photos appear washed out. Black and white (grayscale) photos have no color saturation. In OBS, high saturation and low saturation are represented as “L” and “R.”
5. Hue Shift
Hue shift is the change in an image’s saturation, lightness, and hue colors. Hue shifting occurs when highlighting or shading images. In OBS, you can use the hue shift functionality to reimage your image with a completely different color palette.
With the hue shift functionality in OBS, you can place the image on top of another and have an 80% opacity. It means that you will still see the first image when you place the second one on top of it.
The “L” sign in the OBS hue shift represents 50% opacity, while the “R” represents 100% Opacity.
Color Grade in OBS
Color grading is the process of enhancing the appearance of an image through attributes such as contrast, saturation, and color, making them enchanting for presentations. Color grading is not only done for still images but also for motion pictures and images.
Color grading functionality in OBS is encompassed with several tools – This includes:
1. Lift tool
As the name suggests, lift tools are used in lifting or removing specific colors from an image. It does so without necessarily affecting other colors in an image.
With this tool, you can selectively remove unwanted colors from your image or video, replace them with your desired ones, and create astonishing results.
2. Offset
Offset is another outstanding tool in OBS color grading that controls the blacks/Shadows of an image. It functions by altering the brightness levels and leaving the highlights and the mid-tones unaffected.
3. Gain
A gain is a tool in OBS color correction that functions by only adjusting the white levels in an image. With the gain tool, brighter colors become brighter or darker.
Many people, especially beginner editors, experience difficulty differentiating between the Gamma and Offset tools. Yes, there is a closer similarity between the two, and for you to be on the safe side, you need to know that Gamma goes with the mid-tones (middle gray levels) whereas the Gain goes with highlights/whites.
How to Apply LUTs in OBS
Look up tables (LUTs) is a functionality feature that allows editors, colorists, and filmmakers to save certain colors as their templates. Therefore, when working on a particular project, they don’t have to create new working color grades; instead, you pick it from your LUT.
Using LUTs OBS is not rocket science. With LUTs, you can create unique projects with a vibrant feel. Here are the simple steps of using LUTs in OBS.
Step 1. Prepare your LUT
First, check and establish whether you have your LUT ready. If you don’t have it, you can download one from the internet. Make sure you download it as a folder. Even though OBS has LUT, It has limited color grades; therefore, it is best to download one. You can extract it to an OBS folder if you downloaded it in a zip file.
Step 2. Add your project to the OBS timeline
Open your OBS software and add your project file. Drag and drop your file to the OBS timeline.
Step 3. Add LUTs to your project
Right-click on the area in your project that you wish to apply LUTs, then click on “Filters.” Select “Apply LUT” from the drop-down menu,” which is usually at the top of the list.
Step 4. Apply your LUT as a filter
On the LUTs section, click on the browser, then open your downloaded LUT folder. Usually, the LUT is in the form of a .cube file. You can adjust your LUT by simply clicking on the “Adjust” option.
Bonus! How to Apply Color Correction for Webcam and Camera
People who primarily use their computers for recording sessions often find it difficult to capture quality videos. It is because most computer cameras are not straightforward. To do away with purchasing a new camera due to poor quality video capture, they can freely use OBS LUTs. For their camera and webcam. LUTs for webcam play a vital role in correcting the quality of photos and videos by using filters.
Here are the simple steps on how to use LUTs for color correction in webcam and camera
Step 1. Check whether your camera has additional software
Most webcams and cameras are controlled by external software, so you first need to check whether yours is also controlled. A thing with these cameras are controlled by their software is that the software determines the color settings and the specific image.
Double click on camera source and select “Configure video.” Computers with external software cameras will have a pop-up window that displays various customizable settings. Here, you can adjust the different settings based on your preference.
Step 2. Download your LUTs
Download online the LUTs you want to use. Download them as folders and extract the files you downloaded as zip files. Save them in the OBS folder.
Step 3. Apply your LUTs
Still, in your OBS software, open your camera and then right-click on it. From the displayed menu, click on “Filters.”
On the bottom left corner of your interface, hit the “+” sign, then select “Apply LUTs” > “Browse.”
Open your already downloaded OBS files. Usually, there is an “Adjust” that allows you to regulate the intensity of the LUT by sliding it.
Step 4. Start recording with LUTs on
After turning on your LUT, you can start recording videos and taking photos. There is an eye icon on the left-hand side of your screen. You can use it to turn on or off LUT.
Conclusion
● And that is how to do color correction in OBS. Besides, you do not have to go to the extremes of getting a new camera because of your webcam faultiness. With OBS, you can correct your camera and webcam and get outstanding results.
● Download LUTs from the internet and use them as a template in OBS. Besides, you don’t have to pay for the LUTs, but you can use the free ones.
Every Compositor Should Know The Trick of Color Match in After Effects
Every Compositor Should Know The Trick of Color Match in After Effects
An easy yet powerful editor
Numerous effects to choose from
Detailed tutorials provided by the official channel
After Effects is one of the most exciting applications put forward by Adobe. You can readily use this application for film-making; that is, you can edit videos with After Effects. The features of this application are highly proficient, effective and intuitive. And one of the most exciting and incredible features of After Effects is the “Colour Match” feature.
The “Color Match” of After Effects has numerous advantages, and there are some steps that you need to follow to use this feature. So, in the following discussion, we have discussed how you can match colours in After Effects its advantages. Lastly, we have introduced a video editing tool that can ideally be an alternative to the “Color Match” of After Effects.
In this article
01 [What Are the Obvious Advantages of the Color Match of After Effects?](#Part 1)
02 [Quick Tip - Matching Colors in After Effects](#Part 2)
03 [Alternative to After Effects Color Match](#Part 3)
Part 1 What Are the Obvious Advantages of the Color Match of After Effects?
As we have mentioned earlier, the colour matcher plugin of After Effects has numerous advantages, we will now be discussing what they are. So, the following list states the different benefits of using the “Color Match” of After Effects.
● You can add shadows and highlights.
Sometimes, our photos are underexposed, while sometimes, they are overexposed. Either way, they do not look quite pleasing. But you efficiently use “Colour Match” of After Effects to correct the exposure. And it will be possible when you adjust the highlights and shadows of the picture or the video through this feature. You can access this advantage in the “Shadows and Highlights” option of After Effects.

● Adjuting Vibrance
Another benefit you get from this feature of After Effects is that you can quickly fix the appropriate saturation of the picture or the video you want to edit. You can adjust the saturation, thus, making the picture or the video more vibrant and natural-looking. The option to adjust the saturation or the vibrance of any image or video is present in the “Vibrance” option. Click on the option and set the saturation of the colours of the images perfectly.

● Access to incredible filters
After Effects’ “Colour Match” feature filters make your photos and videos look all-natural. You can readily adjust the settings of the filters and set them according to the essence you want to have in your picture. The filters make your picture and videos look like they have been shot naturally on high-quality camera lenses. So, your videos and pictures look more natural and of the highest quality.
● Choose and match any colour for your images and videos
You might want to change or alter the colours of a particular video clip or an image with the colour of some other image. The “Colour Match” feature of Adobe After Effect makes it readily possible for you to carry this function.
● Intuitive but proficient feature
The “Colour Match” feature of Adobe After Effect helps you edit your videos and images most profoundly. But at the same time, apart from being a professional feature, it is not difficult to use. You can easily understand how to use the feature and make your videos and images match the colours you want.
Part 2 Quick Tip - Matching Colors in After Effects
Here are the steps by which you can avail of the incredible “Colour Match” feature of after-effects to match the colour between clips.
Step 1The first step requires you to access the “Composition Settings” and make the required changes accordingly. You can find the options in the “Composition Settings” and readily make the needed changes.

Step 2Choose the background color according to your choice.

Step 3Now, import the image you want to edit. First, right-click and then you will find an “Import” option. Click on it to import the image you want.

Step 4As you select the “Import” option, you will see a dialogue box. Select the folder in which the image has been saved and then select the image from the folder.

Step 5After importing the image, you need to select After Effects’ “Effects & Presets” option. And there, you will find the “Colour Correction” option. Click on that option.

Step 6You will see an “Auto-colour” option. Double-click on that option. It will automatically make your image look more realistic ad natural. Adobe After Effects will choose the most suitable colour correction shade for your photo and apply it. As a result, you will see a vibrant change in the image.

Many other features under this tool will help you make your images look as vibrant and incredible as possible. And now, we will be discussing the various features and tips that you can use in “After Effects” to make your images look more fabulous than ever.
● Change the contrast of the image to make it look more vibrant
You can change the settings of the image if you want. Also, you can use the “Blend” feature of After Effects to bring out better changes and edits in your picture. Another feature that can help you edit the colours of your image in After Effects is the “Auto Contrast” feature of After Effects.
In this feature, the tool automatically adjusts the exposure of the image’s colours, lights, and shadows, thereby making it look more realistic and natural. The image quality is also enhanced through this feature. It is because the colour contrast gets automatically adjusted to the perfect settings by the feature.
You will get the “Auto Contrast” feature exactly below the “Auto Colour” option, in the “Colour Contrast” drop-down panel.
● Change the level of your image to make it look more natural
You can readily make your images look more natural and realistic than ever. And that is possible through the “Colour Correction” feature of After Effects. Opt for the “Auto Levels” option present in the “Colour Correction” drop-down box.
Then right below the “Auto Contrast” option, you will find the “Auto-Levels” option. After you click on the option, your image will automatically get its colour adjusted by the tool, correctly adjusting all its required settings to make your image look as realistic and natural as possible.
● Bring a black-and-white effect on your image through the option in After effects
The Black-and-White effect on the images has been one of the most popular trends and styles one chooses to edit. And in order to make your efforts minimal and the quality of with the finest, the After Effects has a “Black & white” option as well.
So, if you want to edit your pictures in the black and white filter, you can readily do so in the highest quality and with the least effort. Open the “Colour Contrast” feature in After Effects and click on its drop-down box. The fourth option is the one that is below the “Auto Levels” option, and you will find the “Black & White” option present.
Click on that option, and you will find your image edited in the black-white hues, in the most impeccable shade, light, shadow and effect.
● Change the tint and the brightness or contrast
Under the “Black & White” option in the “Colour Correction” option of After effects, you can avail of the further edit option that is available under the “Black & White” option. There, the last option will be “Tint”. When you opt for the option of “Tint”. You can select the colour you want to be entirely dominant in your image.
And below the “Black & White” option, you will find the “Brightness & Contrast” option. Click on it to adjust and set the brightness and contrast of the image. It will make the image’s colour and shades look more vibrant because you can change its contrast according to your wish.
Part 3 Alternative to After Effects Color Match
And now, we will be introducing you to another video and image editing tool that will help you match the colours of your videos and images as proficiently as the colour matcher after effects plugin. And the tool is Wondershare Filmora Video Editor . Its incredible feature of “Colour Match” allows you to match the colours of your videos and images, making them more vibrancy, sometimes even monochromatic.
You can choose a particular theme or shade for the entire image or video and the “Colour Match” will help you bring your imagination into reality. If you want to edit or match colours in a particular clip or option of the video, you are all set to do so with Filmora 11.
For Win 7 or later (64-bit)
For macOS 10.12 or later
● Key Takeaways from This Episode →
● The advantages that you receive from “Colour Match” of After effects
● The quick steps of how to use “Colour Match” of “After Effects”
● The “Colour Match” feature of Filmora can readily make your videos alter colors and become more vibrant and incredible.
After Effects is one of the most exciting applications put forward by Adobe. You can readily use this application for film-making; that is, you can edit videos with After Effects. The features of this application are highly proficient, effective and intuitive. And one of the most exciting and incredible features of After Effects is the “Colour Match” feature.
The “Color Match” of After Effects has numerous advantages, and there are some steps that you need to follow to use this feature. So, in the following discussion, we have discussed how you can match colours in After Effects its advantages. Lastly, we have introduced a video editing tool that can ideally be an alternative to the “Color Match” of After Effects.
In this article
01 [What Are the Obvious Advantages of the Color Match of After Effects?](#Part 1)
02 [Quick Tip - Matching Colors in After Effects](#Part 2)
03 [Alternative to After Effects Color Match](#Part 3)
Part 1 What Are the Obvious Advantages of the Color Match of After Effects?
As we have mentioned earlier, the colour matcher plugin of After Effects has numerous advantages, we will now be discussing what they are. So, the following list states the different benefits of using the “Color Match” of After Effects.
● You can add shadows and highlights.
Sometimes, our photos are underexposed, while sometimes, they are overexposed. Either way, they do not look quite pleasing. But you efficiently use “Colour Match” of After Effects to correct the exposure. And it will be possible when you adjust the highlights and shadows of the picture or the video through this feature. You can access this advantage in the “Shadows and Highlights” option of After Effects.
● Adjuting Vibrance
Another benefit you get from this feature of After Effects is that you can quickly fix the appropriate saturation of the picture or the video you want to edit. You can adjust the saturation, thus, making the picture or the video more vibrant and natural-looking. The option to adjust the saturation or the vibrance of any image or video is present in the “Vibrance” option. Click on the option and set the saturation of the colours of the images perfectly.
● Access to incredible filters
After Effects’ “Colour Match” feature filters make your photos and videos look all-natural. You can readily adjust the settings of the filters and set them according to the essence you want to have in your picture. The filters make your picture and videos look like they have been shot naturally on high-quality camera lenses. So, your videos and pictures look more natural and of the highest quality.
● Choose and match any colour for your images and videos
You might want to change or alter the colours of a particular video clip or an image with the colour of some other image. The “Colour Match” feature of Adobe After Effect makes it readily possible for you to carry this function.
● Intuitive but proficient feature
The “Colour Match” feature of Adobe After Effect helps you edit your videos and images most profoundly. But at the same time, apart from being a professional feature, it is not difficult to use. You can easily understand how to use the feature and make your videos and images match the colours you want.
Part 2 Quick Tip - Matching Colors in After Effects
Here are the steps by which you can avail of the incredible “Colour Match” feature of after-effects to match the colour between clips.
Step 1The first step requires you to access the “Composition Settings” and make the required changes accordingly. You can find the options in the “Composition Settings” and readily make the needed changes.
Step 2Choose the background color according to your choice.
Step 3Now, import the image you want to edit. First, right-click and then you will find an “Import” option. Click on it to import the image you want.
Step 4As you select the “Import” option, you will see a dialogue box. Select the folder in which the image has been saved and then select the image from the folder.
Step 5After importing the image, you need to select After Effects’ “Effects & Presets” option. And there, you will find the “Colour Correction” option. Click on that option.
Step 6You will see an “Auto-colour” option. Double-click on that option. It will automatically make your image look more realistic ad natural. Adobe After Effects will choose the most suitable colour correction shade for your photo and apply it. As a result, you will see a vibrant change in the image.
Many other features under this tool will help you make your images look as vibrant and incredible as possible. And now, we will be discussing the various features and tips that you can use in “After Effects” to make your images look more fabulous than ever.
● Change the contrast of the image to make it look more vibrant
You can change the settings of the image if you want. Also, you can use the “Blend” feature of After Effects to bring out better changes and edits in your picture. Another feature that can help you edit the colours of your image in After Effects is the “Auto Contrast” feature of After Effects.
In this feature, the tool automatically adjusts the exposure of the image’s colours, lights, and shadows, thereby making it look more realistic and natural. The image quality is also enhanced through this feature. It is because the colour contrast gets automatically adjusted to the perfect settings by the feature.
You will get the “Auto Contrast” feature exactly below the “Auto Colour” option, in the “Colour Contrast” drop-down panel.
● Change the level of your image to make it look more natural
You can readily make your images look more natural and realistic than ever. And that is possible through the “Colour Correction” feature of After Effects. Opt for the “Auto Levels” option present in the “Colour Correction” drop-down box.
Then right below the “Auto Contrast” option, you will find the “Auto-Levels” option. After you click on the option, your image will automatically get its colour adjusted by the tool, correctly adjusting all its required settings to make your image look as realistic and natural as possible.
● Bring a black-and-white effect on your image through the option in After effects
The Black-and-White effect on the images has been one of the most popular trends and styles one chooses to edit. And in order to make your efforts minimal and the quality of with the finest, the After Effects has a “Black & white” option as well.
So, if you want to edit your pictures in the black and white filter, you can readily do so in the highest quality and with the least effort. Open the “Colour Contrast” feature in After Effects and click on its drop-down box. The fourth option is the one that is below the “Auto Levels” option, and you will find the “Black & White” option present.
Click on that option, and you will find your image edited in the black-white hues, in the most impeccable shade, light, shadow and effect.
● Change the tint and the brightness or contrast
Under the “Black & White” option in the “Colour Correction” option of After effects, you can avail of the further edit option that is available under the “Black & White” option. There, the last option will be “Tint”. When you opt for the option of “Tint”. You can select the colour you want to be entirely dominant in your image.
And below the “Black & White” option, you will find the “Brightness & Contrast” option. Click on it to adjust and set the brightness and contrast of the image. It will make the image’s colour and shades look more vibrant because you can change its contrast according to your wish.
Part 3 Alternative to After Effects Color Match
And now, we will be introducing you to another video and image editing tool that will help you match the colours of your videos and images as proficiently as the colour matcher after effects plugin. And the tool is Wondershare Filmora Video Editor . Its incredible feature of “Colour Match” allows you to match the colours of your videos and images, making them more vibrancy, sometimes even monochromatic.
You can choose a particular theme or shade for the entire image or video and the “Colour Match” will help you bring your imagination into reality. If you want to edit or match colours in a particular clip or option of the video, you are all set to do so with Filmora 11.
For Win 7 or later (64-bit)
For macOS 10.12 or later
● Key Takeaways from This Episode →
● The advantages that you receive from “Colour Match” of After effects
● The quick steps of how to use “Colour Match” of “After Effects”
● The “Colour Match” feature of Filmora can readily make your videos alter colors and become more vibrant and incredible.
How to Get Zoom on TV [Easy Solutions]
The modern workforce needs adaptable alternatives to the conventional room-to-room conferencing. The latest integrated online collaboration platform is called Zoom. What’s more, now you can get Zoom on TV. Being one of the most well-known conferencing programs, it offers reliable and efficient hosting of online meetings. In a same vein, you may set up conference rooms, do video seminars, and use instant messaging to receive real-time communications. Moreover, can you get zoom on your tv? Then the answer is Yes! The ideal technique to expand a small conference is to mirror it on TV using Zoom meetings. Additionally, sharing across all platforms and devices is possible. Sharing HD video, audio, and material from your desktop and mobile devices to conference rooms and phone systems is simple, dependable, and safe with Zoom Meetings.
Zoom is one of the top videos calling applications available, however, in terms of functionality, dependability, and stability. Special features include screen sharing for multi-user annotation and local and cloud recording with transcription. With just a single click, you may share any file with supported and encrypted settings for increased security and communicate across all platforms. Zoom has now come to represent meetings for those who do their business remotely. For almost all platforms, including Android, iOS, macOS, Windows, Smart TVs, etc., the Zoom app is officially accessible. For the query how to get zoom on portal tv? you may activate Zoom screen casting whether you’re using a Windows 10 or a Mac laptop with the Chrome browser. This section will be useful to you if you want to benefit from Zoom on a TV. You may thus do so. Continue reading the article to learn more about how to get zoom on tv.
Part 1: Get Zoom on TV with HDMI Cable
Although Zoom provides companies and bigger organizations with a professional solution like Zoom Rooms, if you’re at home, you don’t need to put anything on your TV to use Zoom. You may start using Zoom right away by simply connecting your Zoom device to your TV. Connect your TV to your laptop’s HDMI port if it has one. Simple as that, however if the laptop doesn’t figure it out on its own you may need to explain what is going on with the second display. Although more reliable, connecting via cable means your source device is linked to the TV and you can’t go for a stroll. It also means you don’t have to worry about the wireless connection fading.
Steps to Get Zoom on TV with HDMI
Step1Connect the HDMI End to the TV and the Other End to Your Device
You may use this in its place if you don’t have an HDMI but do have a USB-C port. To connect to the HDMI cable coming into your TV, you’ll need a dongle, but you’ll need to make sure it’s compatible.
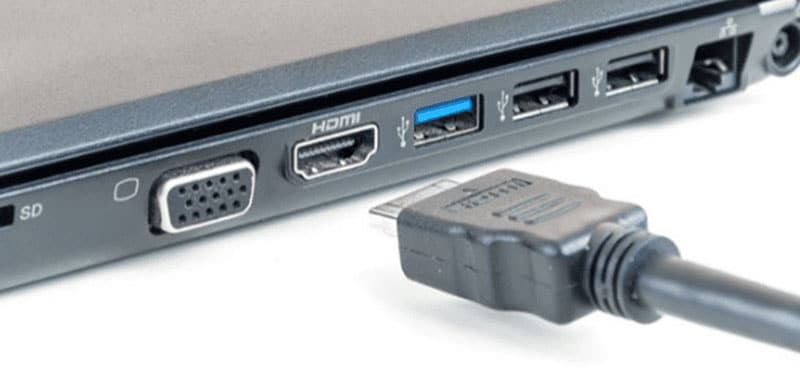
Step2Turn On your TV
Turn on your TV, then switch the video source to the HDMI port you just connected in your device to using the TV remote.
Step3Launch Zoom Meeting
Start or join a meeting by using the Zoom app on your smartphone (available for Android, iOS, Windows, and macOS).
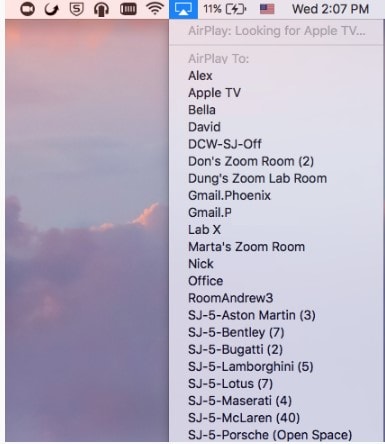
Part 2: Use AirPlay to Connect Zoom to TV
Using AirPlay mirroring, MacOS or iOS devices may share content with Zoom rooms. On MacOS and iOS, Airplay is used to communicate between the Zoom client and the Zoom room. There may be a great potential for your own business requirements if you can figure out how to utilize Airplay to Zoom mirror your screen to your Apple TV. By default, AirPlay sends audio to the Apple TV. Depending on how loud your speakers are set to play and where your input device’s microphone is located, this may cause echoing and ever-louder feedback loops. Without further ado, let’s look at some of the important strategies you may use to maximize live screen streaming on your Apple TV device.
Steps to Use AirPlay to Connect Zoom to TV
Step1Navigate to the Airplay Display in the Apple menu’s top right corner. Choose your Apple TV from the list of AirPlay Display options in the Displays preference pane. The “Show mirroring option in the menu bar when available” checkbox makes it easier to reach the AirPlay menu.

Step2Select Room Management > Zoom Rooms after logging into the Zoom online interface to manage your current Zoom Rooms. Then, modify the account settings and turn on Apple screen mirroring using the location hierarchy system.
Step3Turn on Apple Screen Mirroring by going to the Meetings tab. If this happens, you may need to activate it from the verification dialog box; otherwise, screen mirroring ought to start immediately on your device and let you see Zoom on your Apple TV. A shared password will be required of you.
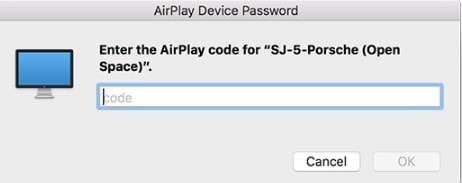
Step4Enter the passcode that is shown on the Zoom room’s screen. You may start using Airplay on your smartphone after enabling Apple screen mirroring.

Step5After that, turn off AirPlay Display by using the option in the preference pane or the system menu bar. To stop sharing, click Disconnect Airplay.
Part 3: Mirror Screen with Chromecast
The Chromecast gadgets from Google are well constructed. They should be able to cast more than just standard streaming services to your TV, logically speaking. Using a Chromecast device is one of the simplest methods to cast a Zoom conference to your TV. They are affordable, and any Google browser and the Google Home app for your Android or iOS smartphone both contain the cast capability. Between a device, such as your phone or computer, and the television, Chromecast offers the perfect connection. Chromecast makes it easy to cast Zoom meetings, particularly conferences with many of participants, since it can virtually reflect everything on your phone, tablet, or computer screen to your TV. For meetings with bigger attendance, it is advantageous to be able to cast Zoom meetings to almost any device, even a smart TV, using Chromecast.
Steps to Mirror Screen with Chromecast
Step1Install the Chromecast
Connect your Google Chromecast to the same internet source as your casting device by plugging it in.
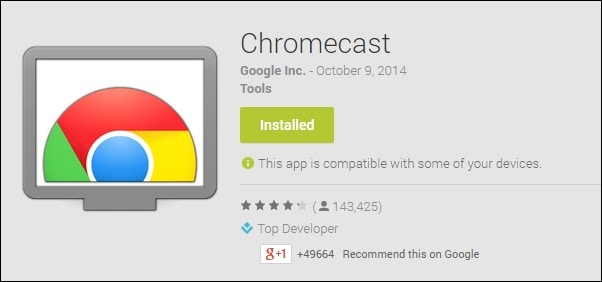
Step2Manage Cast Settings
Locate the casting option on your device and search for recipients. Get the Zoom Cloud Meetings app for iOS or Android. You’ll also need to download the third-party software if you use an iPad or iPhone. After that, sign up for a Zoom account and log in to get started.
Step3Start Mirroring Zoom
The screen of your phone will show up on your TV when you tap your Chromecast. The best view is obtained by turning your phone into landscape after opening Zoom as usual. Once you place a call from here, the video will cast to your TV. Go to the next screen and click Start Broadcasting. You may now start casting to your Chromecast device by opening the Zoom Cloud Meeting app.

You must download the third-party app if you use an iPhone or iPad. The Chromecast Streamer software will let you cast a Zoom meeting on your Chromecast device as Zoom doesn’t provide a casting option.
Conclusion
Zoom’s popularity has skyrocketed as a result of the Pandemic. Zoom has emerged as the preferred video conferencing solution as the bulk of the global workforce shifts to a “work from home” environment. Now that more individuals than ever before work from home, video conferencing has emerged as a vital tool for marketing and corporate communication. Mirroring Zoom meetings to TV has never been this simple. In light of this, we hope that this guide has helped you come up with some of the greatest ideas and approaches for your personal zoom sharing needs. We really hope that this information has been helpful to you if you’ve been interested in learning more about screen sharing your Zoom to TV. Thanks to these methods, you can now mirror any device platform on TV.
The modern workforce needs adaptable alternatives to the conventional room-to-room conferencing. The latest integrated online collaboration platform is called Zoom. What’s more, now you can get Zoom on TV. Being one of the most well-known conferencing programs, it offers reliable and efficient hosting of online meetings. In a same vein, you may set up conference rooms, do video seminars, and use instant messaging to receive real-time communications. Moreover, can you get zoom on your tv? Then the answer is Yes! The ideal technique to expand a small conference is to mirror it on TV using Zoom meetings. Additionally, sharing across all platforms and devices is possible. Sharing HD video, audio, and material from your desktop and mobile devices to conference rooms and phone systems is simple, dependable, and safe with Zoom Meetings.
Zoom is one of the top videos calling applications available, however, in terms of functionality, dependability, and stability. Special features include screen sharing for multi-user annotation and local and cloud recording with transcription. With just a single click, you may share any file with supported and encrypted settings for increased security and communicate across all platforms. Zoom has now come to represent meetings for those who do their business remotely. For almost all platforms, including Android, iOS, macOS, Windows, Smart TVs, etc., the Zoom app is officially accessible. For the query how to get zoom on portal tv? you may activate Zoom screen casting whether you’re using a Windows 10 or a Mac laptop with the Chrome browser. This section will be useful to you if you want to benefit from Zoom on a TV. You may thus do so. Continue reading the article to learn more about how to get zoom on tv.
Part 1: Get Zoom on TV with HDMI Cable
Although Zoom provides companies and bigger organizations with a professional solution like Zoom Rooms, if you’re at home, you don’t need to put anything on your TV to use Zoom. You may start using Zoom right away by simply connecting your Zoom device to your TV. Connect your TV to your laptop’s HDMI port if it has one. Simple as that, however if the laptop doesn’t figure it out on its own you may need to explain what is going on with the second display. Although more reliable, connecting via cable means your source device is linked to the TV and you can’t go for a stroll. It also means you don’t have to worry about the wireless connection fading.
Steps to Get Zoom on TV with HDMI
Step1Connect the HDMI End to the TV and the Other End to Your Device
You may use this in its place if you don’t have an HDMI but do have a USB-C port. To connect to the HDMI cable coming into your TV, you’ll need a dongle, but you’ll need to make sure it’s compatible.
Step2Turn On your TV
Turn on your TV, then switch the video source to the HDMI port you just connected in your device to using the TV remote.
Step3Launch Zoom Meeting
Start or join a meeting by using the Zoom app on your smartphone (available for Android, iOS, Windows, and macOS).
Part 2: Use AirPlay to Connect Zoom to TV
Using AirPlay mirroring, MacOS or iOS devices may share content with Zoom rooms. On MacOS and iOS, Airplay is used to communicate between the Zoom client and the Zoom room. There may be a great potential for your own business requirements if you can figure out how to utilize Airplay to Zoom mirror your screen to your Apple TV. By default, AirPlay sends audio to the Apple TV. Depending on how loud your speakers are set to play and where your input device’s microphone is located, this may cause echoing and ever-louder feedback loops. Without further ado, let’s look at some of the important strategies you may use to maximize live screen streaming on your Apple TV device.
Steps to Use AirPlay to Connect Zoom to TV
Step1Navigate to the Airplay Display in the Apple menu’s top right corner. Choose your Apple TV from the list of AirPlay Display options in the Displays preference pane. The “Show mirroring option in the menu bar when available” checkbox makes it easier to reach the AirPlay menu.
Step2Select Room Management > Zoom Rooms after logging into the Zoom online interface to manage your current Zoom Rooms. Then, modify the account settings and turn on Apple screen mirroring using the location hierarchy system.
Step3Turn on Apple Screen Mirroring by going to the Meetings tab. If this happens, you may need to activate it from the verification dialog box; otherwise, screen mirroring ought to start immediately on your device and let you see Zoom on your Apple TV. A shared password will be required of you.
Step4Enter the passcode that is shown on the Zoom room’s screen. You may start using Airplay on your smartphone after enabling Apple screen mirroring.
Step5After that, turn off AirPlay Display by using the option in the preference pane or the system menu bar. To stop sharing, click Disconnect Airplay.
Part 3: Mirror Screen with Chromecast
The Chromecast gadgets from Google are well constructed. They should be able to cast more than just standard streaming services to your TV, logically speaking. Using a Chromecast device is one of the simplest methods to cast a Zoom conference to your TV. They are affordable, and any Google browser and the Google Home app for your Android or iOS smartphone both contain the cast capability. Between a device, such as your phone or computer, and the television, Chromecast offers the perfect connection. Chromecast makes it easy to cast Zoom meetings, particularly conferences with many of participants, since it can virtually reflect everything on your phone, tablet, or computer screen to your TV. For meetings with bigger attendance, it is advantageous to be able to cast Zoom meetings to almost any device, even a smart TV, using Chromecast.
Steps to Mirror Screen with Chromecast
Step1Install the Chromecast
Connect your Google Chromecast to the same internet source as your casting device by plugging it in.
Step2Manage Cast Settings
Locate the casting option on your device and search for recipients. Get the Zoom Cloud Meetings app for iOS or Android. You’ll also need to download the third-party software if you use an iPad or iPhone. After that, sign up for a Zoom account and log in to get started.
Step3Start Mirroring Zoom
The screen of your phone will show up on your TV when you tap your Chromecast. The best view is obtained by turning your phone into landscape after opening Zoom as usual. Once you place a call from here, the video will cast to your TV. Go to the next screen and click Start Broadcasting. You may now start casting to your Chromecast device by opening the Zoom Cloud Meeting app.
You must download the third-party app if you use an iPhone or iPad. The Chromecast Streamer software will let you cast a Zoom meeting on your Chromecast device as Zoom doesn’t provide a casting option.
Conclusion
Zoom’s popularity has skyrocketed as a result of the Pandemic. Zoom has emerged as the preferred video conferencing solution as the bulk of the global workforce shifts to a “work from home” environment. Now that more individuals than ever before work from home, video conferencing has emerged as a vital tool for marketing and corporate communication. Mirroring Zoom meetings to TV has never been this simple. In light of this, we hope that this guide has helped you come up with some of the greatest ideas and approaches for your personal zoom sharing needs. We really hope that this information has been helpful to you if you’ve been interested in learning more about screen sharing your Zoom to TV. Thanks to these methods, you can now mirror any device platform on TV.
Also read:
- New In 2024, Step by Step to Crop Videos with CyberLink PowerDirector
- New 2024 Approved Learn to Use Montage with These Movies
- New 2024 Approved How to Add Miniature Effect in Video with Filmora
- New How to Create Chroma Key Written Text Effects in Filmora for 2024
- New 2024 Approved Color Correction Basics (S-LOG Footage)
- 2024 Approved Why Vimeo Slideshow Maker Become Popular
- 2024 Approved Add Motion Blur in After Effects
- New In 2024, Why Vimeo Slideshow Maker Become Popular
- In 2024, Learn to Use Montage with These Movies
- Updated An Intro Video Describing You and Your Content Is the First and the Foremost Thing Which a Viewer Sees. Thinking of How to Make an Interesting Intro Video, This Blog Is Surely a Supportive Guide for You. Learn More Here
- Updated Learn How to Create Inspiring Motivational Videos Using AI. Explore Tools Like Midjourney, Runway Gen2, Chat-GPT, and Filmora AI for Seamless Content Creation. Start Your Journey
- 2024 Approved How to Remove Background Noise From Video Sony Vegas
- 2024 Approved This Article Will Help You Make Cinematic Shots with Simple DIY Hacks Using Stuff From Your Nearest Dollar Store. You Can Edit Your Video to Get Pro Results by Wondershare Filmora
- New In 2024, How to Create Vintage Film Effect 1990S
- Updated 2024 Approved How to Make Sony Vegas Freeze Frame
- 2024 Approved How to Create Vintage Film Effect 1990S
- Updated 8 Best Free Photo Collage with Music Video Maker
- Updated Mastering the Art of Video Framing
- How to Denoise in Final Cut Pro – Reduce Video and Audio Noise
- New How to Add Transitions in Adobe Premiere Pro for 2024
- How to Make Video Slow Motion, In 2024
- Updated 2024 Approved How To Achieve LumaFusion Color Grading Through LUTs
- Updated Are You Also Facing a Problem with the Snapchat Camera Zoomed In? Find Out the Easiest Methods to Fix This Error without Installing a Third-Party Tool
- 2024 Approved Best Method to Split Video Into Parts Online
- 2024 Approved 4 Ways to Merge MP4 and MP3
- In 2024, Why Your Transparent GIF Is Hard to Remove and How to Do With It
- 2024 Approved If You Want to Know What to Prepare and How to Make the Wedding Video Perfect for Videographers, Check Out This Menu Here
- 2024 Approved If Youre Looking to Create a Brand Video that Makes Your Business Pop Out, We Have Put Together some Video Editing Tips and Tricks that Work
- New 100 Workable How to Mask Track with Adobe Premiere Pro
- In 2024, Do You Want to Get Green Screen Effects on Your Video without Green Screen Setup in Your Background? Learn How to Get Virtual Green Screen Background and Shoot Videos Like a Pro
- 2024 Approved Mask Tracking Is Believed to Be a Helpful Procedure for Marking Proper Areas in Videos. Learn How to Perform Premiere Pro Mask Tracking in This Guide
- How To Factory Unlock Your Telstra Apple iPhone 12 Pro Max
- In 2024, How To Use Special Features - Virtual Location On Oppo A79 5G? | Dr.fone
- In 2024, How Can You Transfer Files From Motorola Edge 2023 To iPhone 15/14/13? | Dr.fone
- How to Factory Reset Honor Play 8T If I Forgot Security Code or Password? | Dr.fone
- Possible ways to recover deleted files from Poco F5 Pro 5G
- In 2024, Pokemon Go No GPS Signal? Heres Every Possible Solution On Asus ROG Phone 8 | Dr.fone
- Hard Reset Infinix GT 10 Pro in 3 Efficient Ways | Dr.fone
- The Top 5 Android Apps That Use Fingerprint Sensor to Lock Your Apps On Vivo V30
- Trouble with Apple iPhone 14 Swipe-Up? Try These 11 Solutions | Dr.fone
- Can I Bypass a Forgotten Phone Password Of Nokia XR21?
- CatchEmAll Celebrate National Pokémon Day with Virtual Location On Apple iPhone 13 mini | Dr.fone
- Change Location on Yik Yak For your Xiaomi Civi 3 Disney 100th Anniversary Edition to Enjoy More Fun | Dr.fone
- How to Change/Add Location Filters on Snapchat For your Oppo K11 5G | Dr.fone
- Best Oppo Find X6 Pattern Lock Removal Tools Remove Android Pattern Lock Without Losing Data
- 8 Solutions to Fix Find My Friends Location Not Available On Oppo A2 | Dr.fone
- 11 Proven Solutions to Fix Google Play Store Not Working Issue on Realme Narzo N53 | Dr.fone
- In 2024, Simple and Effective Ways to Change Your Country on YouTube App Of your Vivo T2 Pro 5G | Dr.fone
- In 2024, Preparation to Beat Giovani in Pokemon Go For Oppo Find N3 Flip | Dr.fone
- 4 Ways to Transfer Music from Honor X7b to iPhone | Dr.fone
- What Does Enter PUK Code Mean And Why Did The Sim Get PUK Blocked On Samsung Galaxy M14 4G Device
- In 2024, 9 Mind-Blowing Tricks to Hatch Eggs in Pokemon Go Without Walking On Vivo Y55s 5G (2023) | Dr.fone
- New What Is AI Pixel Art Generator for 2024
- 5 Ways to Reset Poco F5 5G Without Volume Buttons | Dr.fone
- In 2024, Unlock Your Boost Mobile Apple iPhone 14 Pro Before the Plan Expires
- How To Restore Missing Call Logs from ZTE Nubia Z60 Ultra
- Title: Updated 2024 Approved How to Color Correct in OBS
- Author: Chloe
- Created at : 2024-04-24 07:08:43
- Updated at : 2024-04-25 07:08:43
- Link: https://ai-editing-video.techidaily.com/updated-2024-approved-how-to-color-correct-in-obs/
- License: This work is licensed under CC BY-NC-SA 4.0.
