
:max_bytes(150000):strip_icc():format(webp)/GettyImages-1250476440-2ff779100e984029aa752236f9791b11.jpg)
Updated 2024 Approved How to Create a PowerPoint Looping Slideshow
How to Create a PowerPoint Looping Slideshow
How to make a PowerPoint looping slideshow
An easy yet powerful editor
Numerous effects to choose from
Detailed tutorials provided by the official channel
A PowerPoint Looping slideshow automatically starts over from the beginning after displaying the last slide. A particular slide is displayed for a certain amount of time interval. Once the time has elapsed, the slide automatically moves to the next one. It is sometimes used in seminars to keep the audience busy before the main presentation commences. In most tradeshows, the videos or information you notice repeatedly playing on its own are in a loop. The transition and slide sets get tweaked to work that way. In Nigeria, most banks use looped slides to display their welcome message. Looping slides make display work more accessible and give time to face other activities while your slide runs automatically.
In this article
01 [Advantages of PowerPoint looping slide](#Part 1)
02 [How to loop a PowerPoint in simple steps.](#Part 2)
Part 1 Advantages of PowerPoint Looping Slide.
PowerPoint slideshows aid and develop visual resources. Looping a PowerPoint slideshowmakes a presentation more accessible and more attractive. Studies show that humans tend to remember more of what they see than what they hear. You should use a PowerPoint-loop slideshow if you want to make a lasting impression while holding that conference, pitch to your boss at work, or even bid for that project**.** Here are some other reasons you should consider looping in your nextPowerPoint slide show.
A looping PowerPoint slideshow runs automatically. A typical PowerPoint presentation moves to the next slide when the presenter clicks the mouse, but a looping slideshow does not need human participation. It displays the next slide automatically after the time interval has elapsed.
It can be helpful to welcome guests to a meeting or Newcomers to an office reception area.
It ensures that latecomers do not miss any significant part of the presentation because a PowerPoint automatic slideshow loop starts all over again after displaying the last slide.
Setting up a looping slideshow is easy and does not require much equipment. You’re all set to go if you have a computer and projector.
It gives the speaker more time to focus on the audience and interact with them rather than concentrating on getting the next slide correctly.
With or without the presence of an operator, the PowerPoint presentation can display the slides configured to display.
It saves you the stress of arranging and rearranging slides during a meeting or an event.
It makes presentation easy and allows the large audience to flow with the speaker as they do not have to read from documents while trying to keep up with the speaker.
A PowerPoint configured to loop continuously can be used to pass general information.
Not everyone likes speaking in public or making a presentation in front of a large crowd. Someone like me immediately starts sweating profusely and has heart palpitations when many eyes are on me. In this kind of situation, a looped PowerPoint slideshow helps take the tension off a nervous speaker as the audience will most likely be concentrating on the slideshows instead of you.
Part 2 How to Loop a PowerPoint in Simple Steps.
Have you been wondering how to make PowerPoint looping slideshows? It seems like a challenging feat, but I’ll show you how to go about it. A looping PowerPoint presentation can create Visual presentations at various events like trade shows, kiosks, conferences, seminars, and many more gatherings. It can display automatically without the intervention of the presenter. With the correct procedure, you’ll be able to create a looping PowerPoint slideshow that will run without hitches. Setting up a looping PowerPoint presentation is relatively easy and doesn’t require rocket science as most people think. Below are simple steps on how to loop a slideshow on PowerPoint;
An easy way to set up looping slideshows is to apply automatic transitions and then set up your desired slideshow settings.
Step 1: Open your PowerPoint presentation
First, open and select the particular PowerPoint presentation you would like to loop.

Step 2: Set up the slideshow
Once your desired presentation is open, go to the “Set Up” group on the “Slide Show” tab and then click on the “Set Up Slide Show” button. Once your desired presentation is open, go to the “Set Up” group on the “Slide Show” tab and then click on the “Set Up Slide Show” button.

Step 3: Choose your mode of control over the slides.
Adialogue box will come up. In the” show options, “select if you want it to get presented by a speaker, which is the default setting of PowerPoint. This option gives the speaker or presenter control over when to advance the slide. The second option, which an individual browses, restricts the control of the speaker over the advancement of the slide, likewise the third option. Checkbox next to “Loop continuously until ‘Esc.’ Then click [OK]. The slide keeps looping automatically until the speaker or presenter presses ok.

Step 4: Select the number of slides you want to be displayed.
From the “Slides” preview side panel, tap your first slide, press and hold [Shift] and click your last slide or input the number of slides you want to display. This option will select all of the slides you want to display.

Step 5: Set up Transitions mode
Click the [Transitions] tab. The transition appears between slides when a slideshow is displayed. In the Transitions tab in PowerPoint, you can choose the type of transition (such as Fade). From the “Timing” group, uncheck the box next to “On Mouse Click” and check “After .”This setting enables the transition to occur after your preferred time and not when you click the mouse.

Step 6: Adjust the time interval
To adjust the duration you would like each slide to display, click the up and down arrows in the “After:” field within the “Timing” group. When your slideshow reaches the last slide, it will automatically loop back to the beginning.

****Wondershare Filmora Video Editor Software**
There are many video editing software, but one that stands out amongst them is filmora because of its unique video editing features. The Filmora software is undoubtedly one of the best beginner and professional-level video editing tools.
For Win 7 or later (64-bit)
For macOS 10.12 or later
Making loop videos is relatively easy with its timeline features. Video loops are short clips that replay for a particular duration or unlimited times without the user having to click the play button repeatedly. This kind of video is quite trendy on social media platforms. Filmora software also creates photo and video slideshows and can add music, texts, filters, different transition effects, and even animation to your slideshow. Many tools can help you create these kinds of videos, and Filmora is one of them.
● Ending Thoughts →
● I’m sure that post reading this guide, you will be able to create a PowerPoint looping slideshow and know what software to use in creating loop videos.
● Learning how to loop a PowerPoint slideshow is a game-changer for organizations and meetings that require a large audience or attendees. The major shortcoming of using a PowerPoint presentation slideshow is that a display cannot hold without a laptop and projector.
A PowerPoint Looping slideshow automatically starts over from the beginning after displaying the last slide. A particular slide is displayed for a certain amount of time interval. Once the time has elapsed, the slide automatically moves to the next one. It is sometimes used in seminars to keep the audience busy before the main presentation commences. In most tradeshows, the videos or information you notice repeatedly playing on its own are in a loop. The transition and slide sets get tweaked to work that way. In Nigeria, most banks use looped slides to display their welcome message. Looping slides make display work more accessible and give time to face other activities while your slide runs automatically.
In this article
01 [Advantages of PowerPoint looping slide](#Part 1)
02 [How to loop a PowerPoint in simple steps.](#Part 2)
Part 1 Advantages of PowerPoint Looping Slide.
PowerPoint slideshows aid and develop visual resources. Looping a PowerPoint slideshowmakes a presentation more accessible and more attractive. Studies show that humans tend to remember more of what they see than what they hear. You should use a PowerPoint-loop slideshow if you want to make a lasting impression while holding that conference, pitch to your boss at work, or even bid for that project**.** Here are some other reasons you should consider looping in your nextPowerPoint slide show.
A looping PowerPoint slideshow runs automatically. A typical PowerPoint presentation moves to the next slide when the presenter clicks the mouse, but a looping slideshow does not need human participation. It displays the next slide automatically after the time interval has elapsed.
It can be helpful to welcome guests to a meeting or Newcomers to an office reception area.
It ensures that latecomers do not miss any significant part of the presentation because a PowerPoint automatic slideshow loop starts all over again after displaying the last slide.
Setting up a looping slideshow is easy and does not require much equipment. You’re all set to go if you have a computer and projector.
It gives the speaker more time to focus on the audience and interact with them rather than concentrating on getting the next slide correctly.
With or without the presence of an operator, the PowerPoint presentation can display the slides configured to display.
It saves you the stress of arranging and rearranging slides during a meeting or an event.
It makes presentation easy and allows the large audience to flow with the speaker as they do not have to read from documents while trying to keep up with the speaker.
A PowerPoint configured to loop continuously can be used to pass general information.
Not everyone likes speaking in public or making a presentation in front of a large crowd. Someone like me immediately starts sweating profusely and has heart palpitations when many eyes are on me. In this kind of situation, a looped PowerPoint slideshow helps take the tension off a nervous speaker as the audience will most likely be concentrating on the slideshows instead of you.
Part 2 How to Loop a PowerPoint in Simple Steps.
Have you been wondering how to make PowerPoint looping slideshows? It seems like a challenging feat, but I’ll show you how to go about it. A looping PowerPoint presentation can create Visual presentations at various events like trade shows, kiosks, conferences, seminars, and many more gatherings. It can display automatically without the intervention of the presenter. With the correct procedure, you’ll be able to create a looping PowerPoint slideshow that will run without hitches. Setting up a looping PowerPoint presentation is relatively easy and doesn’t require rocket science as most people think. Below are simple steps on how to loop a slideshow on PowerPoint;
An easy way to set up looping slideshows is to apply automatic transitions and then set up your desired slideshow settings.
Step 1: Open your PowerPoint presentation
First, open and select the particular PowerPoint presentation you would like to loop.
Step 2: Set up the slideshow
Once your desired presentation is open, go to the “Set Up” group on the “Slide Show” tab and then click on the “Set Up Slide Show” button. Once your desired presentation is open, go to the “Set Up” group on the “Slide Show” tab and then click on the “Set Up Slide Show” button.
Step 3: Choose your mode of control over the slides.
Adialogue box will come up. In the” show options, “select if you want it to get presented by a speaker, which is the default setting of PowerPoint. This option gives the speaker or presenter control over when to advance the slide. The second option, which an individual browses, restricts the control of the speaker over the advancement of the slide, likewise the third option. Checkbox next to “Loop continuously until ‘Esc.’ Then click [OK]. The slide keeps looping automatically until the speaker or presenter presses ok.
Step 4: Select the number of slides you want to be displayed.
From the “Slides” preview side panel, tap your first slide, press and hold [Shift] and click your last slide or input the number of slides you want to display. This option will select all of the slides you want to display.
Step 5: Set up Transitions mode
Click the [Transitions] tab. The transition appears between slides when a slideshow is displayed. In the Transitions tab in PowerPoint, you can choose the type of transition (such as Fade). From the “Timing” group, uncheck the box next to “On Mouse Click” and check “After .”This setting enables the transition to occur after your preferred time and not when you click the mouse.
Step 6: Adjust the time interval
To adjust the duration you would like each slide to display, click the up and down arrows in the “After:” field within the “Timing” group. When your slideshow reaches the last slide, it will automatically loop back to the beginning.
****Wondershare Filmora Video Editor Software**
There are many video editing software, but one that stands out amongst them is filmora because of its unique video editing features. The Filmora software is undoubtedly one of the best beginner and professional-level video editing tools.
For Win 7 or later (64-bit)
For macOS 10.12 or later
Making loop videos is relatively easy with its timeline features. Video loops are short clips that replay for a particular duration or unlimited times without the user having to click the play button repeatedly. This kind of video is quite trendy on social media platforms. Filmora software also creates photo and video slideshows and can add music, texts, filters, different transition effects, and even animation to your slideshow. Many tools can help you create these kinds of videos, and Filmora is one of them.
● Ending Thoughts →
● I’m sure that post reading this guide, you will be able to create a PowerPoint looping slideshow and know what software to use in creating loop videos.
● Learning how to loop a PowerPoint slideshow is a game-changer for organizations and meetings that require a large audience or attendees. The major shortcoming of using a PowerPoint presentation slideshow is that a display cannot hold without a laptop and projector.
The Right Ways to Slow Down a Video on iPhone
Slow-motion videos are widely used for various purposes in videography or filmmaking. They not only underline the significance of a shot but also elevate creativity. The frame rate is remarkably higher in slow-motion videos than in normal videos. There are two methods included in the process of how to slow down a video on an iPhone.
The first method involves increasing the frame rate; meanwhile, the other is playback speed adjustment. This article will enfold apps to teach how to slow a video down on iPhone. All these applications will be available in the iPhone’s official App Store. However, check the compatibility of these apps with the iOS version you’re using. Ultimately, we’ll share a desktop alternative on how to slow down a video iPhone.
Slow Motion Video Maker Slow your video’s speed with better control of your keyframes to create unique cinematic effects!
Make A Slow Motion Video Make A Slow Motion Video More Features

Part 1: Pre-Recorded A Video? Adjust Slow Motion Parameters Right Away
One of the major reasons Gen Z and Gen Alpha opt for iPhones is their high-quality camera. It is ideal for capturing and editing videos in high resolution is ideal. In 2013, iPhones were integrated with the Slow-mo feature for creative purposes. Where first users needed third-party applications, they could use the built-in feature. Here is how do you slow down a video on iPhone officially:
Step 1
Locate the “Photos” application on your iPhone and launch it by simply clicking. Upon accessing the app, go to the bottom and click on “Albums.” Afterward, click the “Slo-mo” option from the expanding menu. Formerly, select a video from your device media library import.

Step 2
Once the video has been selected, navigate to the top right corner and select “Edit.”

Step 3
When the editing panel appears, navigate towards the bottom of the timeline bar. Drag the slider’s position to adjust the speed to create a slow motion. As the slow-motion effect has been created, click the “Done” button. Commencing this action will finalize your slow-motion video.

Part 2: Some Top-Notch Solutions to Slow Down Any Video on iPhone
The iPhone does offer a built-in feature to help you curate a perfect slow-mo. Nonetheless, a third-party application can offer additional and upgraded features. They offer specialized effects and filters, multiplatform support, and more. This section discusses 4 applications and how to make video slow motion iPhone using them. Find the brief introduction, capabilities, and guides of these apps below:
- SpeedPro Slow Speed Video Edit
- Slow Fast Slow – Control the Speed of Your Videos
- Slo Mo – Speed Up Video Editor
- Video Speed Editor Slow & Fast
1. SpeedPro Slow Speed Video Edit
This is an exclusive application to answer your question about how to put a video in slow motion on an iPhone. This application offers a -2x to -6x playback speed option for a slow-mo. Its intuitive feature enables speed alteration from a specific video section. This option is ideal for creatively editing your Instagram reels. Along with slowing down the speed, you can also enhance it for fast motion generation.

Key Features
- The application offers a timeline editing interface that enhances precision and accuracy.
- It possesses the ability to incorporate music in your videos using its Music feature.
- The application collaborates with social platforms like Instagram and Facebook for
Steps to Add Slow Motion in Video Using SpeedPro Slow Speed Video Edit
When you embark on a new experience, using something for the first time can be tricky. The unfamiliarity makes it harder, and one doubts its abilities. Hence, consider us your partner in guiding you on how to edit slow motion on your iPhone. We have curated a step-by-step guide to help you in creating a slow-mo:
Step 1: After downloading and accessing the application’s main menu, click the “Speed Pro” option. Then, select a video clip from your device that you desire to apply this effect to.

Step 2: Once the video clip has been selected, click the “Done” button to import.

Step 3: Afterward, you’ll be redirected to its editing interface for speed change. Navigate toward the speed slider at the bottom of the video display. Drag the slider towards the left to select a suitable playback speed option. You can also apply the slow-mo to a specific area by dragging the timeline slider.

2. Slow Fast Slow - Control the Speed of Your Videos
Use this application to record a slow-motion video or add the effect in post-production editing. This application offers a high frame rate of 240 fps for a high-grade slow-mo effect. This means you can now slow a video up to 1/16th of its original speed. It wins at creating slow motion with the iPhone’s built-in speed manipulation feature.

Key Features
- Provides audio pitch maintenance feature during speed alteration.
- Gives the option to adjust the screen ratio before editing, like square or more.
- The application is compatible with all your iOS 10.0 devices and higher versions.
Steps to Add Slow Motion in Video Using Slow Fast Slow
The encounter with an advanced tool or application is often stressful as you are unfamiliar with it. You do not want to mess up the video, so you must master an app. Following is how to slow down a video on an iPhone using the Slow Fast Slow app:
Step 1: After launching the application, give it access to your files for editing. Then, click on the “Other Videos” option to select a video from a device for slow-mo.

Step 2: Once the video has been imported, you will reach the editing interface. You’ll notice a slider with different points. These points indicate the time frames of your video. The slider is positioned downward to add a slow-mo effect at specific durations.

Step 3: Once you are done with the editing, click the play button to preview. Next, navigate towards the right-side bottom of the preview screen and hit “Export.” Select any particular resolution to save the slowed-down video on your device.

3. Slo Mo – Speed Up Video Editor
Are you looking for a versatile application about how to make a normal video slow-motion iPhone 13? Fashioned to modify a video’s speed, this app can help you. It allows users to adjust the video speed up to 12x for slow and fast motion. In addition, you can alter the video frame rate up to 240 fps at precise frames.

Key Feature
- With an additional freeze frame feature, infuse an innovative touch to videos.
- Experience a more productive workflow with its quick processing feature.
- Keeping up an accessible to all approach, the user interface is straightforward and minimal.
Steps to Add Slow Motion in Video Using Slo Mo – Speed Up Video Editor
Those initial stages of operating a new app and getting your hands on its UI are difficult. However, this article prioritizes your ease more than anything. Find our guide on how to make a video in slow motion on iPhone here:
Step 1: Upon launching the application, it will ask you for storage access. After that, you’ll have to import a video to add slow motion. Just select any normal video on your device and click on the “Next” option.

Step 2: Navigate toward the bar at the bottom of the timeline panel and select “Adjust.”

Step 3: This will feature the speed control options on your screen; go to “Advance.” Further, change the speed change slider towards the left to manipulate it. Afterward, preview the video and click on the “tick” icon.

Step 4: Further, select the “Export” icon appearing in the expanded menu.

4. Video Speed Editor Slow & Fast
How do you slow down a video on an iPhone after recording in a minimalistic way? This iPhone application is designed for such contexts to create slow-motion videos. Users can slow down a clip’s playback speed up to 8x at specific durations. Simply trim the video parts to apply the speed setting at specific sections and merge them later.

Key Features
- After slow motion, you have the option to keep the original sound or insert music offered by it.
- The timeline editing method helps you to trim the video at the right time.
- The application is compatible with iOS 12.0, iPadOS 12.0, macOS 11.0, and newer versions.
Steps to Add Slow Motion in Video Using Video Speed Editor Slow & Fast
This application has an innovative user interface with a simple operational menu. To add a slow-motion effect to a video, buy its Pro subscription first. To assist you further, here is how to slow down an iPhone video in it:
Step 1: Create a new project after launching the application and giving access to storage. Do this by clicking on the screen saying, “Tap to create a new project.”

Step 2: From the Videos section of your media, select a video and hit “Choose.”

Step 3: In the editing interface, simply select a speed option from -2x to -8x for slowing. Once the video is slowed down according to your preferences, export it.

Part 3: Failed to Slow Down Video Properly? Try Wondershare Filmora as a Remedy
Have you tried all the given solutions on how to slow-mo a video on an iPhone and are still clueless? Not getting the desired results can be frustrating, but we have brought the best answer. Wondershare Filmora helps you achieve slow motion on a computer or laptop. The software is compatible with all Windows and macOS devices. You can just connect your iPhone with the source using a cable and import media.
Being a versatile software, Filmora introduces you to two advanced methods. Uniform speed emerges as a simple method of creating a slow-motion effect. On the other hand, Speed Ramping allows you to edit speed for professional purposes. Amongst speed alteration, users can also use the frame interpolation technique. It increases video frames to ensure a smooth playback during slow-mo.
Step-by-Step Guide to Creating Slow-Motion in Filmora
If you are using Filmora for the first time, the user interface might initially seem confusing. However, in comparison to other post-production software, it possesses a minimal interface. In this section, learn about how to slo-mo a video iPhone using Filmora:
Free Download For Win 7 or later(64-bit)
Free Download For macOS 10.14 or later
Step 1Connect iPhone and Import Clip
Once you have created a new project on Filmora, import media. First, to import media from your iPhone, connect it to your computer or related device. Then, go to “Import” > “Import from a Camera or Phone” option. Further, select the device name and import data.

Step 2Access Speed Ramping Option
Use your cursor to bring the edited media to the timeline and select it. From the appearing settings panel, access the “Speed” > “Speed Ramping” tabs. Here, either choose any of the predesigned templates or customize one.

Step 3Enable Optical Flow for Additional Touch
If the slow motion seems rough or abrupt, Filmora has a solution to that as well. Go to the “AI Frame Interpolation” section and expand it. From the expanding menu, click the “Optical Flow” option for a high-quality slow-mo.

Step 4Rendering for Final Preview
To observe the overall results, navigate towards the top toolbar. Select the “File” tab and “Render Preview” from the dropdown menu. After reviewing the final video, use your cursor to click the “Export” button.

Key Features of Wondershare Filmora
Wondershare Filmora provides a wide range of features for a full-fledged editing experience. Some of these features are for video, some are for audio, and others are for visuals. Here is a list of some of Filmora’s key features that you must give a try to:
1. Instant Mode
Once you have recorded a video, the post-production process cannot be neglected. However, when you start editing a video, the process might be confusing at first. With Filmora’s Instant Mode, use AI’s assistance to edit any video without effort. There are 115 built-in templates to integrate according to context and highlights it.
2. Green Screen
Integrate attractive backgrounds in your videos, like mountains, beaches, or more. With Filmora’s Green Screen feature, remove the video backgrounds with accuracy. After removing the background, you can insert multiple backgrounds, like solid colors. If there are backgrounds that you have previously saved, import them to the timeline. They will automatically show in the video, and you can customize them further.
3. Color Correction
Filmora offers an extensive range of color correction elements to enhance visibility. There are 40+ free presets in Filmora that you can download and apply within the app. In addition, you can do custom color settings and save them as custom presets. You can also use the 3D LUT feature to set preferences for specific factors.
4. Text-to-Speech
Another important feature that helps with interactive video creation is text-to-speech. It allows users to transform text into speech with voice selection options. The software has been trained on NLP and integrates realistic voices in videos. Being closer to the human voice helps with better audience interaction and understanding.
Conclusion
The main theme of this article was how to slow down a video on iPhone and the tools to do it. We mentioned 4 applications that are compatible with higher versions of the iPhone. In addition, the article provided detailed guides on all these applications.
Among them, Wondershare Filmora has been integrated with an advanced slow-mo feature. It allows a seamless and professional user interface to import, edit, and customize. The AI Optical Flow in it adds a remarkable fine touch to your slow-mo video.
Make A Slow Motion Video Make A Slow Motion Video More Features
Part 1: Pre-Recorded A Video? Adjust Slow Motion Parameters Right Away
One of the major reasons Gen Z and Gen Alpha opt for iPhones is their high-quality camera. It is ideal for capturing and editing videos in high resolution is ideal. In 2013, iPhones were integrated with the Slow-mo feature for creative purposes. Where first users needed third-party applications, they could use the built-in feature. Here is how do you slow down a video on iPhone officially:
Step 1
Locate the “Photos” application on your iPhone and launch it by simply clicking. Upon accessing the app, go to the bottom and click on “Albums.” Afterward, click the “Slo-mo” option from the expanding menu. Formerly, select a video from your device media library import.
Step 2
Once the video has been selected, navigate to the top right corner and select “Edit.”
Step 3
When the editing panel appears, navigate towards the bottom of the timeline bar. Drag the slider’s position to adjust the speed to create a slow motion. As the slow-motion effect has been created, click the “Done” button. Commencing this action will finalize your slow-motion video.
Part 2: Some Top-Notch Solutions to Slow Down Any Video on iPhone
The iPhone does offer a built-in feature to help you curate a perfect slow-mo. Nonetheless, a third-party application can offer additional and upgraded features. They offer specialized effects and filters, multiplatform support, and more. This section discusses 4 applications and how to make video slow motion iPhone using them. Find the brief introduction, capabilities, and guides of these apps below:
- SpeedPro Slow Speed Video Edit
- Slow Fast Slow – Control the Speed of Your Videos
- Slo Mo – Speed Up Video Editor
- Video Speed Editor Slow & Fast
1. SpeedPro Slow Speed Video Edit
This is an exclusive application to answer your question about how to put a video in slow motion on an iPhone. This application offers a -2x to -6x playback speed option for a slow-mo. Its intuitive feature enables speed alteration from a specific video section. This option is ideal for creatively editing your Instagram reels. Along with slowing down the speed, you can also enhance it for fast motion generation.
Key Features
- The application offers a timeline editing interface that enhances precision and accuracy.
- It possesses the ability to incorporate music in your videos using its Music feature.
- The application collaborates with social platforms like Instagram and Facebook for
Steps to Add Slow Motion in Video Using SpeedPro Slow Speed Video Edit
When you embark on a new experience, using something for the first time can be tricky. The unfamiliarity makes it harder, and one doubts its abilities. Hence, consider us your partner in guiding you on how to edit slow motion on your iPhone. We have curated a step-by-step guide to help you in creating a slow-mo:
Step 1: After downloading and accessing the application’s main menu, click the “Speed Pro” option. Then, select a video clip from your device that you desire to apply this effect to.
Step 2: Once the video clip has been selected, click the “Done” button to import.
Step 3: Afterward, you’ll be redirected to its editing interface for speed change. Navigate toward the speed slider at the bottom of the video display. Drag the slider towards the left to select a suitable playback speed option. You can also apply the slow-mo to a specific area by dragging the timeline slider.
2. Slow Fast Slow - Control the Speed of Your Videos
Use this application to record a slow-motion video or add the effect in post-production editing. This application offers a high frame rate of 240 fps for a high-grade slow-mo effect. This means you can now slow a video up to 1/16th of its original speed. It wins at creating slow motion with the iPhone’s built-in speed manipulation feature.
Key Features
- Provides audio pitch maintenance feature during speed alteration.
- Gives the option to adjust the screen ratio before editing, like square or more.
- The application is compatible with all your iOS 10.0 devices and higher versions.
Steps to Add Slow Motion in Video Using Slow Fast Slow
The encounter with an advanced tool or application is often stressful as you are unfamiliar with it. You do not want to mess up the video, so you must master an app. Following is how to slow down a video on an iPhone using the Slow Fast Slow app:
Step 1: After launching the application, give it access to your files for editing. Then, click on the “Other Videos” option to select a video from a device for slow-mo.
Step 2: Once the video has been imported, you will reach the editing interface. You’ll notice a slider with different points. These points indicate the time frames of your video. The slider is positioned downward to add a slow-mo effect at specific durations.
Step 3: Once you are done with the editing, click the play button to preview. Next, navigate towards the right-side bottom of the preview screen and hit “Export.” Select any particular resolution to save the slowed-down video on your device.
3. Slo Mo – Speed Up Video Editor
Are you looking for a versatile application about how to make a normal video slow-motion iPhone 13? Fashioned to modify a video’s speed, this app can help you. It allows users to adjust the video speed up to 12x for slow and fast motion. In addition, you can alter the video frame rate up to 240 fps at precise frames.
Key Feature
- With an additional freeze frame feature, infuse an innovative touch to videos.
- Experience a more productive workflow with its quick processing feature.
- Keeping up an accessible to all approach, the user interface is straightforward and minimal.
Steps to Add Slow Motion in Video Using Slo Mo – Speed Up Video Editor
Those initial stages of operating a new app and getting your hands on its UI are difficult. However, this article prioritizes your ease more than anything. Find our guide on how to make a video in slow motion on iPhone here:
Step 1: Upon launching the application, it will ask you for storage access. After that, you’ll have to import a video to add slow motion. Just select any normal video on your device and click on the “Next” option.
Step 2: Navigate toward the bar at the bottom of the timeline panel and select “Adjust.”
Step 3: This will feature the speed control options on your screen; go to “Advance.” Further, change the speed change slider towards the left to manipulate it. Afterward, preview the video and click on the “tick” icon.
Step 4: Further, select the “Export” icon appearing in the expanded menu.
4. Video Speed Editor Slow & Fast
How do you slow down a video on an iPhone after recording in a minimalistic way? This iPhone application is designed for such contexts to create slow-motion videos. Users can slow down a clip’s playback speed up to 8x at specific durations. Simply trim the video parts to apply the speed setting at specific sections and merge them later.
Key Features
- After slow motion, you have the option to keep the original sound or insert music offered by it.
- The timeline editing method helps you to trim the video at the right time.
- The application is compatible with iOS 12.0, iPadOS 12.0, macOS 11.0, and newer versions.
Steps to Add Slow Motion in Video Using Video Speed Editor Slow & Fast
This application has an innovative user interface with a simple operational menu. To add a slow-motion effect to a video, buy its Pro subscription first. To assist you further, here is how to slow down an iPhone video in it:
Step 1: Create a new project after launching the application and giving access to storage. Do this by clicking on the screen saying, “Tap to create a new project.”
Step 2: From the Videos section of your media, select a video and hit “Choose.”
Step 3: In the editing interface, simply select a speed option from -2x to -8x for slowing. Once the video is slowed down according to your preferences, export it.
Part 3: Failed to Slow Down Video Properly? Try Wondershare Filmora as a Remedy
Have you tried all the given solutions on how to slow-mo a video on an iPhone and are still clueless? Not getting the desired results can be frustrating, but we have brought the best answer. Wondershare Filmora helps you achieve slow motion on a computer or laptop. The software is compatible with all Windows and macOS devices. You can just connect your iPhone with the source using a cable and import media.
Being a versatile software, Filmora introduces you to two advanced methods. Uniform speed emerges as a simple method of creating a slow-motion effect. On the other hand, Speed Ramping allows you to edit speed for professional purposes. Amongst speed alteration, users can also use the frame interpolation technique. It increases video frames to ensure a smooth playback during slow-mo.
Step-by-Step Guide to Creating Slow-Motion in Filmora
If you are using Filmora for the first time, the user interface might initially seem confusing. However, in comparison to other post-production software, it possesses a minimal interface. In this section, learn about how to slo-mo a video iPhone using Filmora:
Free Download For Win 7 or later(64-bit)
Free Download For macOS 10.14 or later
Step 1Connect iPhone and Import Clip
Once you have created a new project on Filmora, import media. First, to import media from your iPhone, connect it to your computer or related device. Then, go to “Import” > “Import from a Camera or Phone” option. Further, select the device name and import data.
Step 2Access Speed Ramping Option
Use your cursor to bring the edited media to the timeline and select it. From the appearing settings panel, access the “Speed” > “Speed Ramping” tabs. Here, either choose any of the predesigned templates or customize one.
Step 3Enable Optical Flow for Additional Touch
If the slow motion seems rough or abrupt, Filmora has a solution to that as well. Go to the “AI Frame Interpolation” section and expand it. From the expanding menu, click the “Optical Flow” option for a high-quality slow-mo.
Step 4Rendering for Final Preview
To observe the overall results, navigate towards the top toolbar. Select the “File” tab and “Render Preview” from the dropdown menu. After reviewing the final video, use your cursor to click the “Export” button.
Key Features of Wondershare Filmora
Wondershare Filmora provides a wide range of features for a full-fledged editing experience. Some of these features are for video, some are for audio, and others are for visuals. Here is a list of some of Filmora’s key features that you must give a try to:
1. Instant Mode
Once you have recorded a video, the post-production process cannot be neglected. However, when you start editing a video, the process might be confusing at first. With Filmora’s Instant Mode, use AI’s assistance to edit any video without effort. There are 115 built-in templates to integrate according to context and highlights it.
2. Green Screen
Integrate attractive backgrounds in your videos, like mountains, beaches, or more. With Filmora’s Green Screen feature, remove the video backgrounds with accuracy. After removing the background, you can insert multiple backgrounds, like solid colors. If there are backgrounds that you have previously saved, import them to the timeline. They will automatically show in the video, and you can customize them further.
3. Color Correction
Filmora offers an extensive range of color correction elements to enhance visibility. There are 40+ free presets in Filmora that you can download and apply within the app. In addition, you can do custom color settings and save them as custom presets. You can also use the 3D LUT feature to set preferences for specific factors.
4. Text-to-Speech
Another important feature that helps with interactive video creation is text-to-speech. It allows users to transform text into speech with voice selection options. The software has been trained on NLP and integrates realistic voices in videos. Being closer to the human voice helps with better audience interaction and understanding.
Conclusion
The main theme of this article was how to slow down a video on iPhone and the tools to do it. We mentioned 4 applications that are compatible with higher versions of the iPhone. In addition, the article provided detailed guides on all these applications.
Among them, Wondershare Filmora has been integrated with an advanced slow-mo feature. It allows a seamless and professional user interface to import, edit, and customize. The AI Optical Flow in it adds a remarkable fine touch to your slow-mo video.
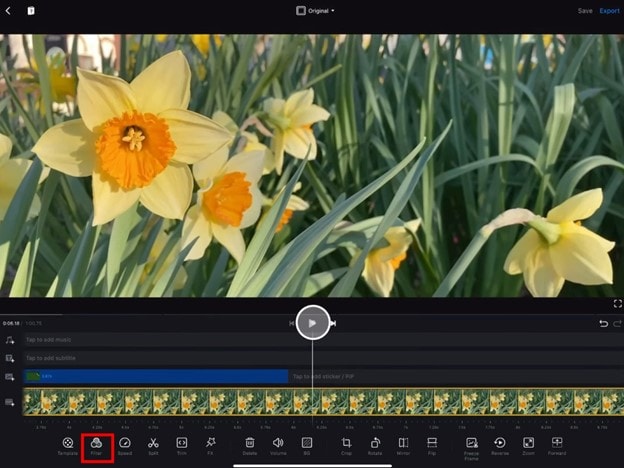
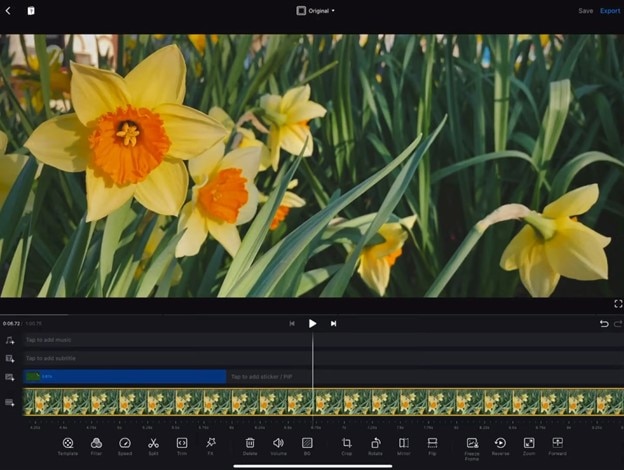
How to Use LUTs in VN Editor – Complete Guide and Best LUTs Download
Hello and welcome to another article full of information and excitement. The topic of this article is LUT for the VN editor. So it will be exciting for those who want to use LUTs in their video to make them look nice and well. As we will discuss today that what is VN editor and how you can add LUTs to your videos using it on the devices it is compatible for. Moreover, where you can download some fantastic LUTs like moody LUTs, which help your videos to look nice, and which software you should use for this purpose if you are running a device on which the VN editor is not compatible. So let’s begin!
Part 1. What is VN editor?
VN editor is one of the best choices for video editing on mobiles and Mac. Fast editing, transitions, effects, filters, colors, subtitles, music, and many other features make the VN video editing app a great tool for producing and editing videos. It aims to make editing shorter and more feature-rich, empowering everyone to take control of their own lives. You cannot only produce great videos but good films as well. In the following, we will discuss how you can add LUTs to your videos using it.

Part 2. How to use LUTs in VN editor?
First, we must know that it is compatible with which platforms. So, it is now available for Android, iOS, and Mac OS only. However, you can also use it on Windows with some Android or iOS emulators, but it is not a very continent way in our suggestions. Even after doing this, it does not work well on your Windows. Maybe you will face some glitches or malfunctioning problems. So it is better to use it on only those platforms for which it is primarily available. Please read the instructions below since we will go through how to use LUTs in it later on.
On Mac:
First of all, we will learn how you can do it on Mac:
- Download the VN Editor for Mac and open it.
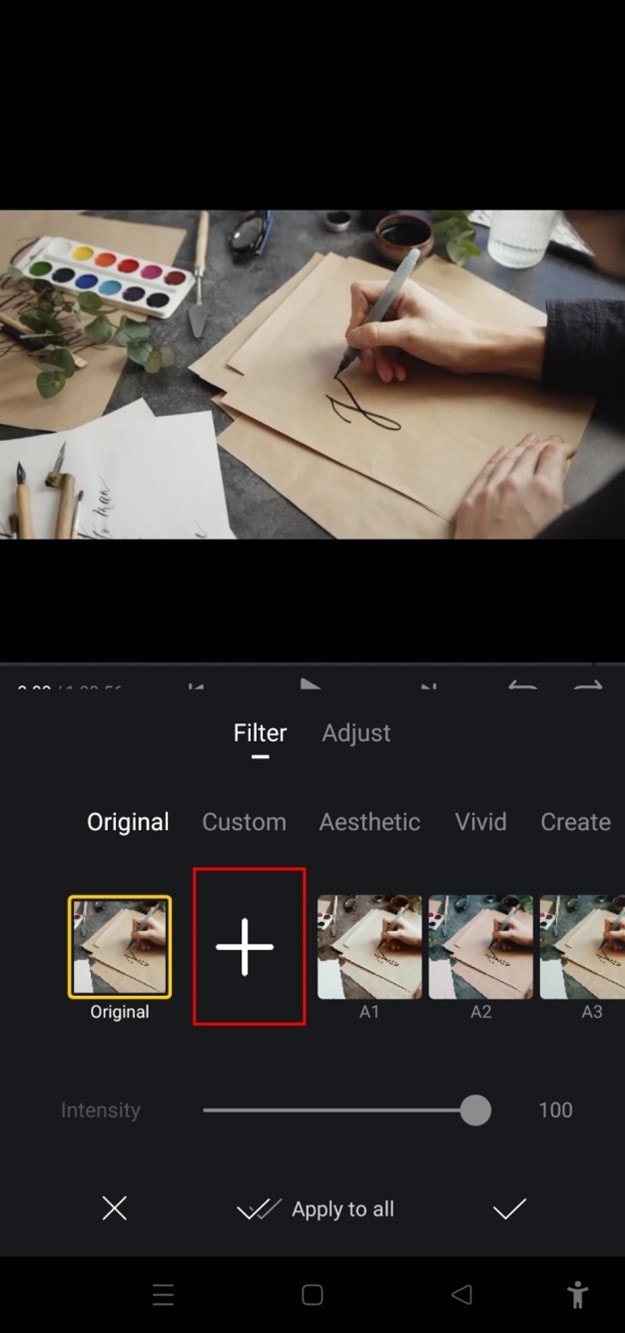
- Add your video and then tap the filters option.
- Now choose custom filters and then select the LUTs pack.

- Select the desired LUT and apply.
On Mobile:
Secondly, we will discuss how we can do this on our mobiles (Android or iOS). The procedure on both devices (Android or iOS) is almost comparable. Therefore, we will discuss the steps from the perspective of both of these here:
- First, download the VN editor from your mobile app store (Android or iOS) and the LUTs pack you want to use in your video.
- After downloading them on your mobile, open the VN editor application.
- Create a new project and add your video to it.

- Then click on the Filters option and select add external or custom filters option next to the existing filters.
- It will take you to the File manager of your mobile, from which you have to find the folder in which you have stored your LUTs.
- After finding them, you can select those LUTs you want to use in your video and then click on the done or select button.
- Your downloaded LUTs start showing in the VN editor, and you can use them in your videos as you want.
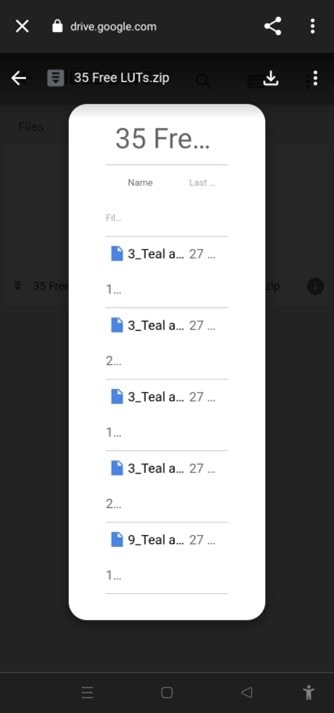
Part 3. Best LUTs resource for VN video editor
1. Presets Store
Presets Store is an online platform that helps you with various Filters, LUTs, and other presets. So you can download LUTs for your videos for the VN editor using it. However, it’s not a free service. You have to pay for the LUTs you want to download from here. You can visit their YouTube channel to follow the latest LUTs, Filters and other presets on this platform.
2. Apna Editz
Apna Editz is another online platform you can use for this purpose. It also provides you with a fantastic variety of Presets like LUTs, Filters, and many other similar effects, which you can use in your video using the VN editor. The main Pros of this recommendation are that it’s a free website. So you can download LUTs for your videos from it for free. Keep an eye on their YouTube channel to be updated about the latest LUTs.
3. Lut Preset
Lut Preset is another alternative to all the above ones. You can get almost all your favorite LUTs for VN editor for free here and then use them in your videos as you want. They also share the latest LUTs on their YouTube Channel.
4. Pencil Hub
Pencil Hub is also a good option in this concern. However, it does not have too much variety of VN LUTs, but you can still use it to download some of the best LUTs for VN editors. To get informed of their every new effect and LUTs, their YouTube channel is the primary source.
5. YRP EDITZ
YRP ETIDZ is another good option if you are still looking for some fantastic VN LUTs. They, too not have a large variety of presets and LUTs. However, if you want some most commonly used LUTs for VN Editor, then they are a good option. You’ll notify of their most website updates by checking their YouTube channel.
Part 4. How to add LUTs to the best alternative to the VN editor?
VN Editor is undoubtedly an excellent choice to add LUTs to your videos. However, the VN editor is best suitable for mobile devices. To enhance your LUTs and effects, it would be great if you used some desktop software. Wondershare Filmora offers a great variety of built-in LUTs to choose from. Let’s look at how we can use Filmora to add LUTs:
- Add your video and tap the tools, then click the Color option.
- Now select the Color Correction option and then choose 3D LUT.
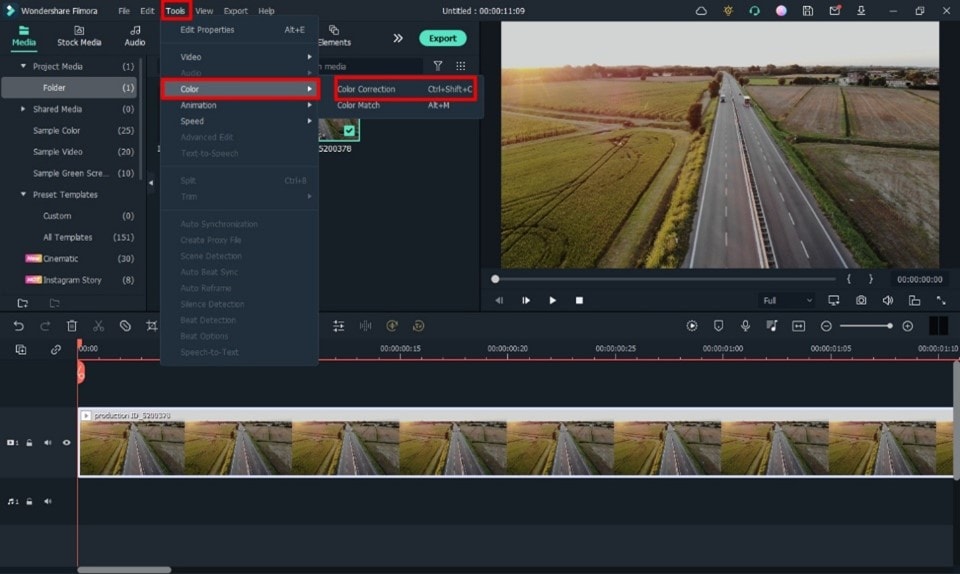
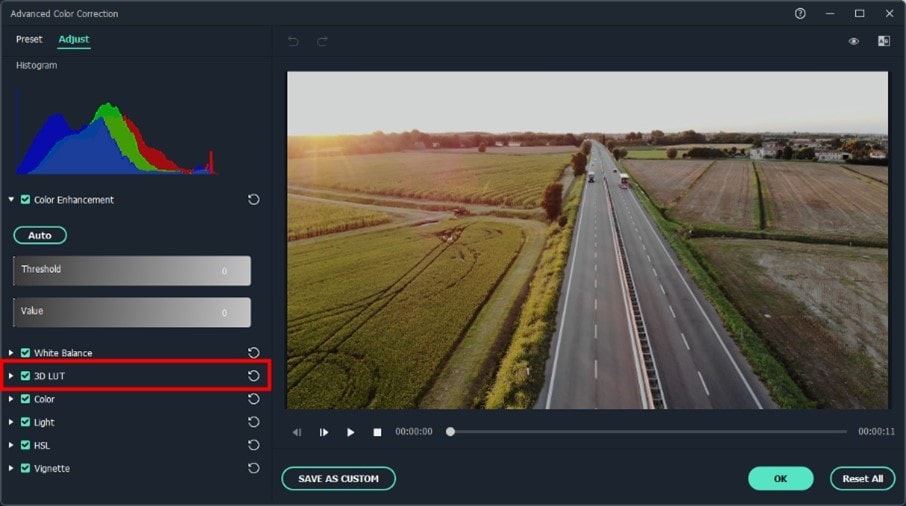
- Click the drop-down menu and select the Load new LUT option. Here you can import other downloaded preset LUTs to use
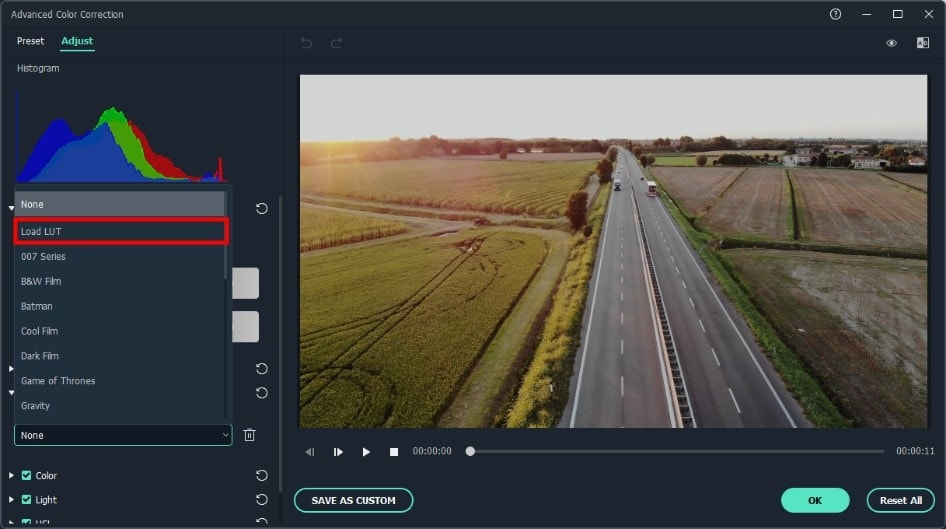
- Choose the LUT and click OK. Your new fantastic video is ready now.

Closing Thoughts
This post recommends several lut resources and demonstrates how to import them if you are a devoted user of VN editor and want to learn how to utilize it for video color grading. The more potent desktop editor Wondershare Filmora, which offers a range of built-in LUT sources and supports color grading settings, is of course recommended if you want to take your videos to the next level. Thanks for reading.
Free Download For Win 7 or later(64-bit)
Free Download For macOS 10.14 or later
2. Apna Editz
Apna Editz is another online platform you can use for this purpose. It also provides you with a fantastic variety of Presets like LUTs, Filters, and many other similar effects, which you can use in your video using the VN editor. The main Pros of this recommendation are that it’s a free website. So you can download LUTs for your videos from it for free. Keep an eye on their YouTube channel to be updated about the latest LUTs.
3. Lut Preset
Lut Preset is another alternative to all the above ones. You can get almost all your favorite LUTs for VN editor for free here and then use them in your videos as you want. They also share the latest LUTs on their YouTube Channel.
4. Pencil Hub
Pencil Hub is also a good option in this concern. However, it does not have too much variety of VN LUTs, but you can still use it to download some of the best LUTs for VN editors. To get informed of their every new effect and LUTs, their YouTube channel is the primary source.
5. YRP EDITZ
YRP ETIDZ is another good option if you are still looking for some fantastic VN LUTs. They, too not have a large variety of presets and LUTs. However, if you want some most commonly used LUTs for VN Editor, then they are a good option. You’ll notify of their most website updates by checking their YouTube channel.
Part 4. How to add LUTs to the best alternative to the VN editor?
VN Editor is undoubtedly an excellent choice to add LUTs to your videos. However, the VN editor is best suitable for mobile devices. To enhance your LUTs and effects, it would be great if you used some desktop software. Wondershare Filmora offers a great variety of built-in LUTs to choose from. Let’s look at how we can use Filmora to add LUTs:
- Add your video and tap the tools, then click the Color option.
- Now select the Color Correction option and then choose 3D LUT.
- Click the drop-down menu and select the Load new LUT option. Here you can import other downloaded preset LUTs to use
- Choose the LUT and click OK. Your new fantastic video is ready now.
Closing Thoughts
This post recommends several lut resources and demonstrates how to import them if you are a devoted user of VN editor and want to learn how to utilize it for video color grading. The more potent desktop editor Wondershare Filmora, which offers a range of built-in LUT sources and supports color grading settings, is of course recommended if you want to take your videos to the next level. Thanks for reading.
Free Download For Win 7 or later(64-bit)
Free Download For macOS 10.14 or later
Also read:
- In 2024, Tutorial | How to Make a Smooth Speed Ramping in Premiere Pro?
- New How to Create Glowing Edge Effect in TikTok Dancing Video
- New 2024 Approved Perfect Moody LUTs for VN Editor An Overview
- New 2024 Approved Slow Down or Speed Up Videos Easily on PC, Online, and Phone
- Updated Do You Know How Boring a Video Can Be with Silent Moments? Some Tools with Silent Detection Features Help You Delete Those Moments
- 6 Instant Mp4 to GIF Online Tools
- Looking Into How Slow Mo Guys Have Changed the Dynamics of Slow-Motion
- Updated Best iOS Slow Motion Apps To Work With for 2024
- Updated 2024 Approved A Comprehensive Review of LUTs Finding LUTs Made by Danny Gevirtz
- Updated 5 Tried-And-True Ways to GIF Making
- New In 2024, Transforming a Slow-Motion Video to Normal Mastering the Skill
- This Article Aims to Show You How to Improve Your Lighting in the Sun
- New Learn Color Correction in After Effects with These YouTube Videos
- Updated In 2024, How to Do Motion Graphics in Filmora
- New How to Add Motion Blur in After Effects for 2024
- How to Make Cool COD Warzone Thumbnail
- Updated In 2024, How Can I Control Speed of a Video
- Updated In 2024, Phone Aspect Ratio Vertical Definition, Types and Tips
- With Many Available Video Editing Solutions in the Market Today, It Is a Bit Hard to Choose the Best Video Editing Software for Your Unique Needs
- New Step by Step to Rotate Videos in Davinci Resolve for 2024
- 2024 Approved How To Record Video in Slow Motion Comprehending Important Points
- 2024 Approved The Power of Music in Videos
- New How to Combine Videos Into One on Instagram
- Want to Loop a Video to Extend Its Duration? You Can Use iMovie to Loop a Video on Your Mac and iPhone and We Will Illustrate How to Loop a Video in iMovie for 2024
- 6 Instant Mp4 to GIF Online Tools for 2024
- Updated In 2024, Top 9 Sparkle Effects Photo and Video Editors You Should Know
- Learn Eight Simple Steps that Will Allow You to Create a Stunning Text Reveal Animation in Filmora. Simple yet Very Professional for 2024
- You Can Splice Video on the iPhone Using Various Applications. This Article Will Guide You Through the Steps Necessary to Splice Your Videos for 2024
- In 2024, GIF Splitting Into Frames Is an Interesting Activity to Do with the Right Tools. Convert GIFs Into Frames Easily with Tools and Use Them as Needed
- Updated This Article Presents a Guide to Using the Keyframe Feature for Creating Competent Films with Detailed Instructions and Filmoras Grow and Win Program Contest
- Want to Play a Video in the Loop on Your Mac? Here Is How You Can Make a Video Loop in QuickTime in Simple Steps for 2024
- 2024 Approved Motion Tracking Is the Process of Tracking the Movements of a Project in a Video. This Article Will Show You How to Apply Motion Tracking Effect Into Videos
- New In 2024, Best Guide of 8 Photo Collage Apps for PC
- New Color Lut in Video - Color Grade Your Video for 2024
- Something About Skin Care Vlog Ideas
- New In 2024, Top List Best VHS Sound Effect That You Can Use in Video Making
- Updated Detailed Steps to Cut a Video in QuickTime
- 2024 Approved How to Rotate Video in iMovie with Alternative
- Updated Here, You Will Learn How to Add a Realistic Fire Effect Using Wondershare Filmora. That Will Help to Boost Your Channel and Decorate Your YouTube Channel with Creative and Unique Effects
- Updated 2024 Approved Best 8 Educational Video Websites for Teachers
- New Add Motion Blur in After Effects
- Want to Know the Full Process of Adding the Falling Text Effect as a Video Introduction? Detailed Guidelines on All the Steps Are Mentioned Here for Filmora Users for 2024
- Updated In 2024, 6 Best MP4 Mergers to Join Videos Easily
- Updated Create Dynamic Text Animation in Filmora
- Updated Top Things People Know About Wedding Slideshow
- New 2024 Approved 6 Websites to Free Download Motivational Video Footage
- Learn the Step-by-Step Process of Slowing Down Time-Lapse Videos on Your iPhone
- Updated In 2024, Dollar-Store DIY Hacks to Use for Filmmaking
- Updated Best 7 Color Match Paint Apps for 2024
- Easy Guide to Oppo Reno 11F 5G FRP Bypass With Best Methods
- Different Methods for Resetting Xiaomi Redmi 13C Phones with Screen Locked and Not | Dr.fone
- In 2024, Mastering Lock Screen Settings How to Enable and Disable on Samsung Galaxy F54 5G
- In 2024, How to Transfer Contacts from Vivo Y100t to Outlook | Dr.fone
- In 2024, Best 3 Oppo A59 5G Emulator for Mac to Run Your Wanted Android Apps | Dr.fone
- How to Transfer Data After Switching From Infinix Note 30 to Latest Samsung | Dr.fone
- Network Locked SIM Card Inserted On Your Lava Yuva 2 Pro Phone? Unlock It Now
- Updated Create AI Avatar Videos | Wondershare Virbo Online
- In 2024, How to Unlock iPhone X Passcode without iTunes without Knowing Passcode? | Dr.fone
- How to Fix Android App Not Installed Error on Vivo T2 5G Quickly? | Dr.fone
- How to Unlock Samsung Galaxy S24 Phone without PIN
- In 2024, 5 Ways to Track Apple iPhone 7 Plus without App | Dr.fone
- In 2024, Remove the Lock Screen Fingerprint Of Your Xiaomi 13 Ultra
- Hassle-Free Ways to Remove FRP Lock on Vivo Y36iwith/without a PC
- Remove Vivo Lock Screen without Password(Vivo )
- In 2024, How to Turn Off Google Location to Stop Tracking You on Oppo Find X7 Ultra | Dr.fone
- In 2024, AddROM Bypass An Android Tool to Unlock FRP Lock Screen For your Itel A70
- New What Is AI Marketing? | Wondershare Virbo Glossary for 2024
- In 2024, Here Are Some Reliable Ways to Get Pokemon Go Friend Codes For Apple iPhone 14 Pro | Dr.fone
- 5 Best Route Generator Apps You Should Try On Meizu 21 Pro | Dr.fone
- Thinking About Changing Your Netflix Region Without a VPN On Samsung Galaxy S21 FE 5G (2023)? | Dr.fone
- How to Change/Fake Your Vivo S17 Pro Location on Viber | Dr.fone
- How to Use Life360 on Windows PC For Meizu 21 Pro? | Dr.fone
- In 2024, A Complete Guide To OEM Unlocking on Motorola Moto G24
- In 2024, How to Mirror PC Screen to Samsung Galaxy A24 Phones? | Dr.fone
- Data Disappears in Excel 2010 - How to get it back
- In 2024, 3 Ways for Android Pokemon Go Spoofing On Samsung Galaxy A25 5G | Dr.fone
- How to Change Spotify Location After Moving to Another Country On Vivo Y27s | Dr.fone
- 2024 Approved Top 10 Robotic Voice Generators (with Comparison Table)
- How to Remove an AirTag from Your Apple ID Account From iPhone 6s?
- In 2024, Sim Unlock Asus ROG Phone 7 Phones without Code 2 Ways to Remove Android Sim Lock
- All Must-Knows to Use Fake GPS GO Location Spoofer On Xiaomi Redmi 13C 5G | Dr.fone
- Hassle-Free Ways to Remove FRP Lock from ZTE Phones with/without a PC
- How to Change Netflix Location to Get More Country Version On Apple iPhone 13 Pro | Dr.fone
- How To Track IMEI Number Of Realme C55 Through Google Earth?
- Vivo S17 ADB Format Tool for PC vs. Other Unlocking Tools Which One is the Best?
- 4 Easy Ways for Your Motorola Moto G14 Hard Reset | Dr.fone
- A Detailed VPNa Fake GPS Location Free Review On Vivo X Fold 2 | Dr.fone
- Title: Updated 2024 Approved How to Create a PowerPoint Looping Slideshow
- Author: Chloe
- Created at : 2024-04-24 07:08:43
- Updated at : 2024-04-25 07:08:43
- Link: https://ai-editing-video.techidaily.com/updated-2024-approved-how-to-create-a-powerpoint-looping-slideshow/
- License: This work is licensed under CC BY-NC-SA 4.0.
