
:max_bytes(150000):strip_icc():format(webp)/GettyImages-81522363-5683a5573df78ccc15cabf56.jpg)
Updated 2024 Approved How to Crop Videos in Windows Media Player
How to Crop Videos in Windows Media Player
In this generation, we are so much engaged in social media forms. We loved to upload and post some pictures and videos. To show the happiness that we had. But sometimes, we are not satisfied with our videos and photos. That is why we gave time to edit, put some effects , transitions and other forms of editing. It is such a big help, especially if you are running some online business. To get and gain the interest and attention of your viewers and costumers, your videos and pictures must be catchy and have some good edits. By doing some basic editing skills can help you boost your social media platform. And also by taking away some unwanted things in your videos and pictures can improved the focus of your video.
One of the basic way of editing is cropping.
Need to modify the point of interest of your video clipped? you don’t need to re-shoot your footage. The crop device can help!
Cropping is the manner of shifting or adjusting the rims of a photograph or video clip.Often used for image modifying, it’s also useful whilst modifying video. With cropping, you may take away pointless or distracting quantities of a video clip or alternate its dimensions to in shape inside a positive area.Whether you’re running with pictures from a digital digicam or display video, you’ll in all likelihood run into instances whilst you want to crop those clips.
In this article you will learn how to crop a video through windows media player and with Filmora Wondershare. Here are ways to crop your video clip.
How to crop a video in Windows Media Player
Actually, Windows Media Player can not crop a video directly. However plug-ins including the SolveigMM WMP Trimmer may be set up and used to cut or edit videos in Windows Media Player for free. Detailed steps are furnished right here to train you a way to deployation and use this unique plug-in.
As said earlier, the Windows Media Player isn’t always a video editor and can not be used immediately to trim or crop your films until with the assist of plug-ins. However, the stages underneath offer info on how to use Windows Media Player to make the edit. Please follow carefully with the steps below and use the SolveigMM WMP Trimmer to your device/Windows Media Player to make an easy edits in your video file.
Step 1: Download and install the SolveigMM WMP Trimmer plug-in. To download the plugin, click this link: https://www.solveigmm.com/en/products/wmp-trimmer-plugin/
Step 3: On Windows Media Player, click on the principle menu object and navigate to Tools Plug-ins SolveigMM WMP Trimmer Plugin.

Your plug-in will be enabled after selecting it from the menu.
Step 4: While playingthe document you need to edit, flow the blue slider to the segment of the film you need to trim/reduce and click “Start”. Manually type the time of the video you need to begin deciding on into the Start box in case you discover the usage of the slider difficult. Click the “End” button on the factor you need the trimming to end.

Step 5: Find and press the “In” button to trim the chosen component; The “Out” button to reduce the chosen component out of the authentic media document.
Note that SolveigMM WMP Trimmer Plugin supports to edit videos including cutting or trimming, however, it doesn’t offer an option to crop video.
An alternative way to crop video on Windows by Wondershare Filmora
Wondershare Filmora Video Editor is one of the great video enhancing software program with cool functions that compares to different competing video enhancing Softwares program. Many video enhancing applications claimed to provide expert results; Filmora is one in every of some consumer-stage equipment that definitely delivers.
For Win 7 or later (64-bit)
For macOS 10.14 or later
Here in Filmora, it is not just trimming but this tool can help you to adjust the focus of your video clip. Here are steps on how to crop a video using wondershare filmora.
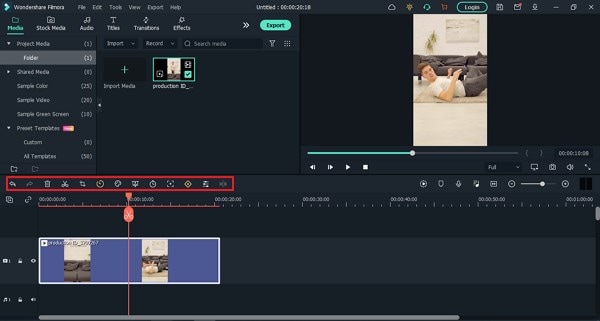
1. Install and launch your Filmora Wondershare app.

2. Find the import media. Click it and choose your preferred video fromyour files that you want to edit. Wait a second until the video is finished importing.

3. Drag the video to the lower left side. After dragging ,right-click yourmouse and choose video and then click “crop and zoom.”


4. Now, you can adjust the focus of your video.

5. After cropping, if you are satisfied with your edit you can now save your project by clicking the save project icon.

Conclusion
In this guide, you have acquired some knowledge about using crop on a video clip. Though this process or step could be very difficult but using Filmora Wondershare you can easily follow the steps provided above.
Therefore, cropping video is necessary. It is one of the basic editing skill that you need to know. It is functional to your online business, work projects, school projects and other related stuffs. Cropping will help you to emphasize more about your subject.
It is easier for you to do the edit if you used some software programs. You can used Filmora Wondershare or any of the best editing software programs. While you are giving the best videos and photos of your costumer and viewers you are also improving and enhancing your editing skills.
However, you also need to be careful in doing some edits. Before you save your project you need to make sure that you are cropping the right portion of your video.
Your plug-in will be enabled after selecting it from the menu.
Step 4: While playingthe document you need to edit, flow the blue slider to the segment of the film you need to trim/reduce and click “Start”. Manually type the time of the video you need to begin deciding on into the Start box in case you discover the usage of the slider difficult. Click the “End” button on the factor you need the trimming to end.
Step 5: Find and press the “In” button to trim the chosen component; The “Out” button to reduce the chosen component out of the authentic media document.
Note that SolveigMM WMP Trimmer Plugin supports to edit videos including cutting or trimming, however, it doesn’t offer an option to crop video.
An alternative way to crop video on Windows by Wondershare Filmora
Wondershare Filmora Video Editor is one of the great video enhancing software program with cool functions that compares to different competing video enhancing Softwares program. Many video enhancing applications claimed to provide expert results; Filmora is one in every of some consumer-stage equipment that definitely delivers.
For Win 7 or later (64-bit)
For macOS 10.14 or later
Here in Filmora, it is not just trimming but this tool can help you to adjust the focus of your video clip. Here are steps on how to crop a video using wondershare filmora.
1. Install and launch your Filmora Wondershare app.
2. Find the import media. Click it and choose your preferred video fromyour files that you want to edit. Wait a second until the video is finished importing.
3. Drag the video to the lower left side. After dragging ,right-click yourmouse and choose video and then click “crop and zoom.”
4. Now, you can adjust the focus of your video.
5. After cropping, if you are satisfied with your edit you can now save your project by clicking the save project icon.
Conclusion
In this guide, you have acquired some knowledge about using crop on a video clip. Though this process or step could be very difficult but using Filmora Wondershare you can easily follow the steps provided above.
Therefore, cropping video is necessary. It is one of the basic editing skill that you need to know. It is functional to your online business, work projects, school projects and other related stuffs. Cropping will help you to emphasize more about your subject.
It is easier for you to do the edit if you used some software programs. You can used Filmora Wondershare or any of the best editing software programs. While you are giving the best videos and photos of your costumer and viewers you are also improving and enhancing your editing skills.
However, you also need to be careful in doing some edits. Before you save your project you need to make sure that you are cropping the right portion of your video.
How to Make A Funny Vlog for TikTok?
TikTok has been among the few social media platforms that have gained an exponential following in a truly short time. Regardless of this stunted digital environment, the platform made its statement of becoming part of the all-time greats.
TikTok became known as a short-video platform that influenced the making of funny vlogs. If you are interested in making a funny vlog, you are at the right place.
In this article
01 Ideas for Creating A Funny Vlog for TikTok
02 5 Popular Funny Vloggers on TikTok
Part 1: Ideas for Creating A Funny Vlog for TikTok
When creating a funny vlog across TikTok, there are numerous ideas that one can think of. However, since TikTok videos are of small lengths, achieving diversity is difficult yet possible. You’ll surely get your break if you understand the following ideas for creating a funny vlog.

React to Other Videos
While it may seem the most mainstream style of creating funny content across TikTok, it is also the most effective way of making people laugh while watching your video. This will also bring recurring viewers across your channel.
Display Failure Videos
It is always great to see people trying and doing something funny across the video. Failure videos are believed to be the other way of creating content for a funny vlog on your TikTok, which shall make people laugh hard.
Use Goofy and Peculiar Voices
Unrealistic and weird voices can make your short video seem funny. If you consider talking about something in a silly voice, it will make people burst out of laughter.
Trolling Family Members
One of the best ways to make something good out of TikTok is creating candid moments. This can always be done if you troll or prank your family members out of nowhere. Just keep reminding that you have to ensure no one gets injured due to it.
Impersonations
Making impersonated videos of major celebrities is another way of showing funny content to the viewers on TikTok. If you consider some funny examples for this, it will surely bring you effective results.
Make Puns and Funny Statements
Another great way to create a funny vlog for your TikTok is to be good at making puns. This is purely hilarious content and needs someone to be highly great in it.
Physical Challenges
This can be a bit risky, but it can become quite fun to make and show to the world if executed with care. However, this can be conducted individually or in a group of people, as you find it appropriate.
Use Effects of TikTok
TikTok makes sure to provide something funny in effects to its users. The use of effects for TikTok is an excellent technique to make funny vlogs; however, it can get funny if the elements used across it have a dubious meaning.
Run Everything in Reverse
One of the most straightforward techniques to make a funny vlog is to run everything in reverse order. The simplest thing of a video becomes the funniest to watch.
Part 2: 5 Popular Funny Vloggers on TikTok
This part will provide some popular examples of TikTokers who have made a considerate performance in providing funny content to people across the platform.
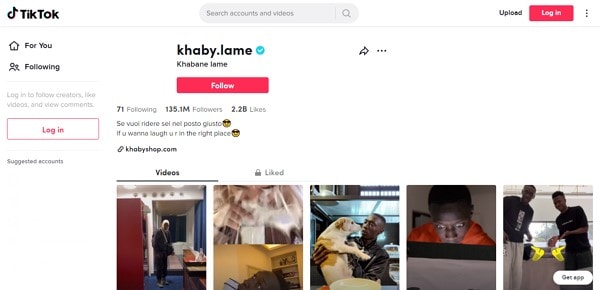
Khaby Lame
This is, without a doubt, the first-choice in TikTok accounts that would always come while relating to funny content. Khaby started his journey as a TikToker with a remarkably simple motive of pointing out the simplicity in different tasks, which were displayed to be difficult. Although it sounds pretty basic, the technique taken by Khaby has been so considerate it brought him millions of followers for creating funny content.
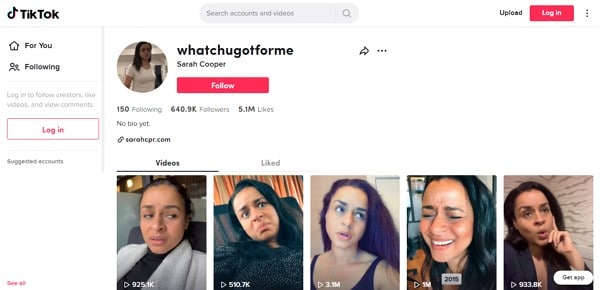
Sarah Cooper
Want to see a great impersonation of Donald Trump? It is undoubtedly great to see every time. With Sarah Cooper, it just becomes an entirely different story. Her impersonation has been so perfect that she has been referred to as one of the best funny vloggers on TikTok. Her likes across the platform may not be that great, but she has shown some stature in presenting funny content in a great way.
Dobre Twins
This twin duo is known across many social media platforms for its funny content. As the twins started using TikTok, they started creating good funny vlogs, which gained quite the traction for them. Their unique ideas to present different things have presented the following worth 23 million likes across TikTok, which is quite commendable. However, Lucas and Marcus are only known to operate this TikTok account.

Image alt: dobre twins funny tiktoker
Brittany Broski
Quite a few TikTokers actually make funny videos with impressive comedy. Brittany Broski is a celebrity in this genre, where she has taken great use of her comedy skills to present great vlogs with different and unique topics. Her take on comedy is entirely different, which makes her funny vlog unique and better than others.

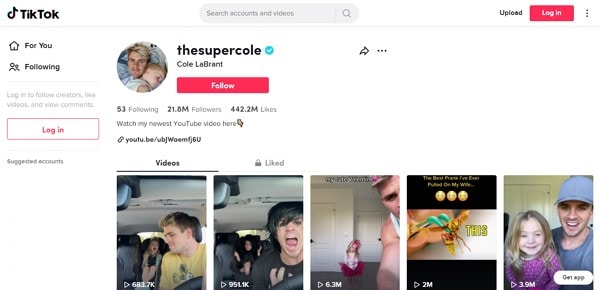
Cole LeBrant
This TikToker makes a good collection of funny vlogs across his account with his family. The variety and variability in his videos make him a different version of fun compared to other TikTokers. He has built a great reach across the account, which makes him an impressive choice.
Part 3: How to Make a Funny Vlog?
Funny vlogs are a fabulous way to interact with people of different tastes. It can be something that cherishes the moods of the viewers, regardless of their current emotions. To make this happen, you need a good platform that helps you create a video for your viewers to watch. Wondershare Filmora fulfills the needs of a video editor by providing you with the perfect options while editing the video for TikTok.
For Win 7 or later (64-bit)
For macOS 10.12 or later
If you are looking forward to understanding how to create a funny vlog for your TikTok using Filmora, you need to follow a set of simple steps. These are shown as follows:
Step 1: Launch and Import Video
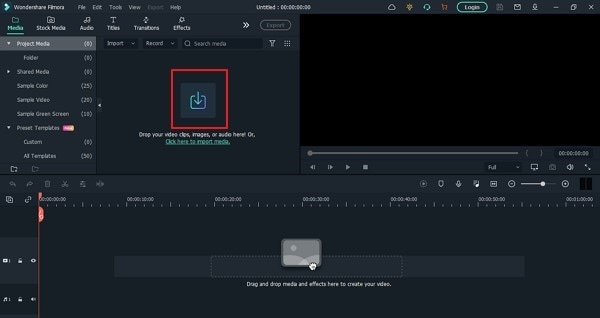
To start, you need to have Wondershare Filmora installed across your device. Launch the tool and click on “New Project” to start from scratch. Once the screen opens up, you need to click on the “Arrow Head” icon across the ‘Media’ Tab to import the audio you wish to amend for TikTok.
Step 2: Perform Basic Editing
Wondershare Filmora provides users with multiple options for editing their files. At first, drag the file onto the timeline. Following this, you can merge different videos or enhance the video by trimming it. Along with that, you can also consider splitting the image or changing its playback speed for different results.
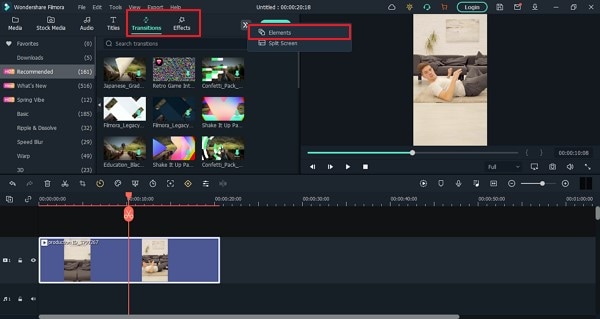
Step 3: Add Effects and Transitions
After you are done with some basic editing, you can add different effects from the “Effects” section. To make the video look exclusive, you can also include “Transitions” across it. Use the “Elements” tab to include stickers and emojis to enhance your TikTok video.
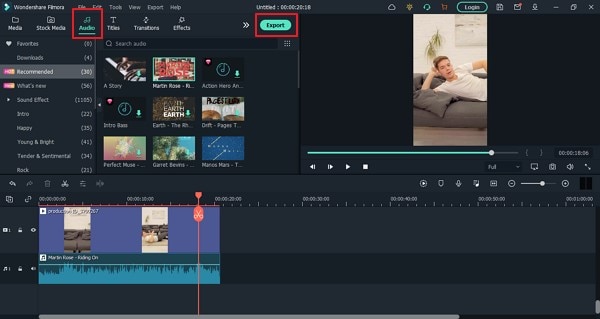
Step 4: Manage the Audio
For managing the audio of your video, you can make several changes across it. You can detach audio and change the audio with another soundtrack. Filmora also allows you to add audio from the “Audio” section, which contains royalty-free music to add. Once you are done, click on the “Export” button to set the settings of the video before exporting it back onto the device.
Closing Words
This article has presented some of the finest tips that can be utilized for creating funny vlogs on your TikTok. If you coherently use these tips, you can get significant results across your account in the name of the followers. Along with that, you can also use Filmora for making the best funny vlog with different editing tools.
Wondershare Filmora
Get started easily with Filmora’s powerful performance, intuitive interface, and countless effects!
Try It Free Try It Free Try It Free Learn More >

02 5 Popular Funny Vloggers on TikTok
Part 1: Ideas for Creating A Funny Vlog for TikTok
When creating a funny vlog across TikTok, there are numerous ideas that one can think of. However, since TikTok videos are of small lengths, achieving diversity is difficult yet possible. You’ll surely get your break if you understand the following ideas for creating a funny vlog.
React to Other Videos
While it may seem the most mainstream style of creating funny content across TikTok, it is also the most effective way of making people laugh while watching your video. This will also bring recurring viewers across your channel.
Display Failure Videos
It is always great to see people trying and doing something funny across the video. Failure videos are believed to be the other way of creating content for a funny vlog on your TikTok, which shall make people laugh hard.
Use Goofy and Peculiar Voices
Unrealistic and weird voices can make your short video seem funny. If you consider talking about something in a silly voice, it will make people burst out of laughter.
Trolling Family Members
One of the best ways to make something good out of TikTok is creating candid moments. This can always be done if you troll or prank your family members out of nowhere. Just keep reminding that you have to ensure no one gets injured due to it.
Impersonations
Making impersonated videos of major celebrities is another way of showing funny content to the viewers on TikTok. If you consider some funny examples for this, it will surely bring you effective results.
Make Puns and Funny Statements
Another great way to create a funny vlog for your TikTok is to be good at making puns. This is purely hilarious content and needs someone to be highly great in it.
Physical Challenges
This can be a bit risky, but it can become quite fun to make and show to the world if executed with care. However, this can be conducted individually or in a group of people, as you find it appropriate.
Use Effects of TikTok
TikTok makes sure to provide something funny in effects to its users. The use of effects for TikTok is an excellent technique to make funny vlogs; however, it can get funny if the elements used across it have a dubious meaning.
Run Everything in Reverse
One of the most straightforward techniques to make a funny vlog is to run everything in reverse order. The simplest thing of a video becomes the funniest to watch.
Part 2: 5 Popular Funny Vloggers on TikTok
This part will provide some popular examples of TikTokers who have made a considerate performance in providing funny content to people across the platform.
Khaby Lame
This is, without a doubt, the first-choice in TikTok accounts that would always come while relating to funny content. Khaby started his journey as a TikToker with a remarkably simple motive of pointing out the simplicity in different tasks, which were displayed to be difficult. Although it sounds pretty basic, the technique taken by Khaby has been so considerate it brought him millions of followers for creating funny content.
Sarah Cooper
Want to see a great impersonation of Donald Trump? It is undoubtedly great to see every time. With Sarah Cooper, it just becomes an entirely different story. Her impersonation has been so perfect that she has been referred to as one of the best funny vloggers on TikTok. Her likes across the platform may not be that great, but she has shown some stature in presenting funny content in a great way.
Dobre Twins
This twin duo is known across many social media platforms for its funny content. As the twins started using TikTok, they started creating good funny vlogs, which gained quite the traction for them. Their unique ideas to present different things have presented the following worth 23 million likes across TikTok, which is quite commendable. However, Lucas and Marcus are only known to operate this TikTok account.
Image alt: dobre twins funny tiktoker
Brittany Broski
Quite a few TikTokers actually make funny videos with impressive comedy. Brittany Broski is a celebrity in this genre, where she has taken great use of her comedy skills to present great vlogs with different and unique topics. Her take on comedy is entirely different, which makes her funny vlog unique and better than others.
Cole LeBrant
This TikToker makes a good collection of funny vlogs across his account with his family. The variety and variability in his videos make him a different version of fun compared to other TikTokers. He has built a great reach across the account, which makes him an impressive choice.
Part 3: How to Make a Funny Vlog?
Funny vlogs are a fabulous way to interact with people of different tastes. It can be something that cherishes the moods of the viewers, regardless of their current emotions. To make this happen, you need a good platform that helps you create a video for your viewers to watch. Wondershare Filmora fulfills the needs of a video editor by providing you with the perfect options while editing the video for TikTok.
For Win 7 or later (64-bit)
For macOS 10.12 or later
If you are looking forward to understanding how to create a funny vlog for your TikTok using Filmora, you need to follow a set of simple steps. These are shown as follows:
Step 1: Launch and Import Video
To start, you need to have Wondershare Filmora installed across your device. Launch the tool and click on “New Project” to start from scratch. Once the screen opens up, you need to click on the “Arrow Head” icon across the ‘Media’ Tab to import the audio you wish to amend for TikTok.
Step 2: Perform Basic Editing
Wondershare Filmora provides users with multiple options for editing their files. At first, drag the file onto the timeline. Following this, you can merge different videos or enhance the video by trimming it. Along with that, you can also consider splitting the image or changing its playback speed for different results.
Step 3: Add Effects and Transitions
After you are done with some basic editing, you can add different effects from the “Effects” section. To make the video look exclusive, you can also include “Transitions” across it. Use the “Elements” tab to include stickers and emojis to enhance your TikTok video.
Step 4: Manage the Audio
For managing the audio of your video, you can make several changes across it. You can detach audio and change the audio with another soundtrack. Filmora also allows you to add audio from the “Audio” section, which contains royalty-free music to add. Once you are done, click on the “Export” button to set the settings of the video before exporting it back onto the device.
Closing Words
This article has presented some of the finest tips that can be utilized for creating funny vlogs on your TikTok. If you coherently use these tips, you can get significant results across your account in the name of the followers. Along with that, you can also use Filmora for making the best funny vlog with different editing tools.
Wondershare Filmora
Get started easily with Filmora’s powerful performance, intuitive interface, and countless effects!
Try It Free Try It Free Try It Free Learn More >
5 Methods to Make a Fake Facetime Call Video
Creating fake video call clips for entertainment has been a new norm on social media platforms. If you are looking for a software to create a fake Facetime call video, then let’s get started:
5 ways to make a fake facetime call video
1. Filmora
Compatibility: Windows/Mac
Wondershare Filmora is the greatest video editor on the market, without a doubt, and it deserves to be at the top of our list.
You’ll discover some professional tools to help you improve video quality and over 300 creative filters and effects to give your movie a new, fresh look without putting in a lot of effort with the Filmora video editor. This tool is one of the most dependable, aside from the features that allow you to modify video rotation easily.
Steps
Step 1: Import the photo or video files
Import all your media files, including video, photos, and music. You have two options for importing your videos: drag and drop directly into our software or click import to select the media files you wish to upload.

Step 2: Edit the video
Wondershare Filmora’s video templates can be added. You can apply music, text, filters and overlays, and motion effects by right-clicking on them and selecting apply. After adding video resources such as text and elements, you may customize the texts by changing the size, placement, etc.
Also, you can add overlay video clips using templates of a video call to make it look like a real call.

Step 3: Export and Save
Quickly export your project to a new video. After you’ve applied the video resources to your videos and clicked Export, you’ll have a whole new video that you can share at birthday parties, weddings, or for marketing purposes, just like any other video you’ve created.

2. Kapwing
Compatibility: Online
Kapwing is a powerful online video editor with a non-linear editing methodology. Upload photos, audio, and video files, then edit them all in one spot.
Creators may view and alter their content from any device or location because Kapwing is entirely online. Work is automatically saved in the cloud, eliminating the need to transfer data locally. When you’re ready to export, sit back and relax because everything is handled in the cloud.
This template allows you to blend two videos into one like an iPhone Facetime call. First, put two videos in a photo and arrange them in a picture arrangement. Then, as a video overlay in the upper corner, layer one on top of the other.
Steps
Step 1: Open Kapwing Fake Video Call Template

Step 2: Import video files
Click on ‘Add Media’ to add video clips.


Step 3: Save and Export Video
Once you are done editing the template with the images you want, click on ‘Export Project’ to Export and save the video.

3. VITA App
Compatibility: Android/Mac

VITA is a program that allows you to make visually appealing videos by combining several filters and other features. The program comes with a large template library, so making films will be a breeze. The best part is that no prior experience is required.
All of VITA’s templates are divided into categories is one of its most noticeable features. This makes it simple to locate the desired impact. It’s critical to stress that you must have all the audiovisual materials you intend to use in your smartphone’s gallery. VITA also allows you to include text in your designs, making them fascinating.
Steps
Step 1: Import the file
Download the application from Google Play Store or Apple Store. Then, launch the application and import the video files.

Step 2: Edit the video
Download PNG images that will help you add all the call elements. Choose a picture-in-picture template. Add Subtitles.

Step 3: Export the video
Once you are done with editing, you can export the file by selecting the ‘Export’ option on the top right corner of the screen.

4. Clipchamp
Compatibility: Windows/Mac
Clipchamp is a free online video editor that makes movie creation simple for anyone, even if they have no prior editing knowledge. It lets you blend films, photos, and audio files and add text and effects before saving the finished product to your computer.
Steps
Step 1: To get started, log into your Clipchamp account or create a free account.

Step 2: Click the ‘Create a video’ button on the left sidebar. There are five different forms from which to pick. First, choose the video aspect ratio that works best for your project. For example, if you wish to upload to YouTube, we recommend shooting in widescreen 16:9.

Step 3: Click ‘Add media’ and drag and drop your films, audio, and photographs into the media box if you already have filmed footage you’d like to utilize in your project. You may also add media by clicking ‘Browse my files.’ If you wish to use free stock footage, go to ‘Stock’ and upload your films to the project by clicking the ‘+’ button. All your films will be saved in your library.

Step 4: You can now find your videos in your media library. Drag and drop the picture-in-picture videos you want to alter to the editing timeline. As shown in the sample below, arrange the two videos one over the other. Make sure both clips are precisely underneath one another.

Step 5: Now that your movies are aligned, select the one you want to shrink. The video you’re reducing must be at the top of the screen. To move it from the bottom to the top, drag and drop it. A small box will appear on the timeline in the bottom left corner of the clip. The clip will shrink when you click the box once. When you click the box once again, modifying choices will appear. You can move the smaller video around and increase or decrease its size.

Step 6: Export your project once you’ve completed editing your video. Save to your preferred place or folder. You can share the video straight on social media or embed it in a document.

5. Movavi
Compatibility: Windows/Mac
Movavi Video Editor is a video editing tool for Windows that is powerful and simple to use. Apply stunning video effects and filters, add music and titles, and more! Yet, despite its enormous features, Movavi’s video editing program is quite simple to use: add a sprinkle of fantasy and some spare time, and you’ll have a Hollywood-style video with far less effort.
Steps
Step 1: Download the software.
Download the installation file and run it. Follow the on-screen directions. Following the setup, the PiP editor will launch.
Step 2: Import files
Select two files: the one you want to use as a background and the one you want to display over it by clicking Add Files.

Step 3: Create a video track
Make an extra video track before you begin video editing. To do so, go to the Plus menu and select Add Video Track. Then, drag one of the videos to the secondary track and the other to the primary track.
From the menu, select the Picture in Picture option. To change the size of the video, drag the boundaries. Then, drag it to the desired location on the background video by clicking and holding.

Step 4: Export and Save
Save your PiP video once you’ve finished editing it. First, select the video format, quality, and folder where the file will be saved by clicking Export and adjusting the parameters in the display popup. Then press the Start button. The picture-in-picture video editor will open the folder holding the file after the Export is complete.

FAQs
1. How do you make a facetime video call?
Tap New FaceTime towards the top of the screen in FaceTime.
Tap to make a video call or an audio call after typing the name or number you wish to call in the top field (not available in all countries or regions). You can also tap instead.
2. How do you add a virtual background on Facetime?
To change the background, use a filter: s
- Tap your tile, then tap during a FaceTime video call (supported models).
- Open the filters by tapping.
- Select your look by tapping a filter at the bottom of the screen (swipe left or right to preview them).
4. Does Facetime have virtual backgrounds?
No. Facetime does have virtual backgrounds, but it allows the users to blur the background.
5. Can you get fake facetime calls?
There is less probability of getting fake facetime calls, but you might spam FaceTime calls from random numbers.
6. Can you Facetime a random number?
FaceTime isn’t any different. A caller could try their luck by FaceTime a random phone number or email address, and if they belong to an iPhone user or an Apple ID, the FaceTime call will be accepted.
7. Can you Facetime from an unknown number?
Switching to your email address for FaceTime audio and video chats is the way to go if you always want to keep your phone number private. You may even go a step further and only receive FaceTime calls via email, with your phone number serving as your FaceTime caller ID.
8. How do I call someone on Facetime?
Launch FaceTime. In the search field, type the names, phone numbers, or email addresses of the persons you wish to contact. Then, click the video or audio icon, depending on the type of call you wish to make. To begin the call, press the video or audio button in the screen’s bottom-left corner.
9. Can you create a background on Facetime?
No. However, FaceTime allows you to apply camera effects on video calls.
Step 2: Edit the video
Wondershare Filmora’s video templates can be added. You can apply music, text, filters and overlays, and motion effects by right-clicking on them and selecting apply. After adding video resources such as text and elements, you may customize the texts by changing the size, placement, etc.
Also, you can add overlay video clips using templates of a video call to make it look like a real call.
Step 3: Export and Save
Quickly export your project to a new video. After you’ve applied the video resources to your videos and clicked Export, you’ll have a whole new video that you can share at birthday parties, weddings, or for marketing purposes, just like any other video you’ve created.
2. Kapwing
Compatibility: Online
Kapwing is a powerful online video editor with a non-linear editing methodology. Upload photos, audio, and video files, then edit them all in one spot.
Creators may view and alter their content from any device or location because Kapwing is entirely online. Work is automatically saved in the cloud, eliminating the need to transfer data locally. When you’re ready to export, sit back and relax because everything is handled in the cloud.
This template allows you to blend two videos into one like an iPhone Facetime call. First, put two videos in a photo and arrange them in a picture arrangement. Then, as a video overlay in the upper corner, layer one on top of the other.
Steps
Step 1: Open Kapwing Fake Video Call Template
Step 2: Import video files
Click on ‘Add Media’ to add video clips.
Step 3: Save and Export Video
Once you are done editing the template with the images you want, click on ‘Export Project’ to Export and save the video.
3. VITA App
Compatibility: Android/Mac
VITA is a program that allows you to make visually appealing videos by combining several filters and other features. The program comes with a large template library, so making films will be a breeze. The best part is that no prior experience is required.
All of VITA’s templates are divided into categories is one of its most noticeable features. This makes it simple to locate the desired impact. It’s critical to stress that you must have all the audiovisual materials you intend to use in your smartphone’s gallery. VITA also allows you to include text in your designs, making them fascinating.
Steps
Step 1: Import the file
Download the application from Google Play Store or Apple Store. Then, launch the application and import the video files.
Step 2: Edit the video
Download PNG images that will help you add all the call elements. Choose a picture-in-picture template. Add Subtitles.
Step 3: Export the video
Once you are done with editing, you can export the file by selecting the ‘Export’ option on the top right corner of the screen.
4. Clipchamp
Compatibility: Windows/Mac
Clipchamp is a free online video editor that makes movie creation simple for anyone, even if they have no prior editing knowledge. It lets you blend films, photos, and audio files and add text and effects before saving the finished product to your computer.
Steps
Step 1: To get started, log into your Clipchamp account or create a free account.
Step 2: Click the ‘Create a video’ button on the left sidebar. There are five different forms from which to pick. First, choose the video aspect ratio that works best for your project. For example, if you wish to upload to YouTube, we recommend shooting in widescreen 16:9.
Step 3: Click ‘Add media’ and drag and drop your films, audio, and photographs into the media box if you already have filmed footage you’d like to utilize in your project. You may also add media by clicking ‘Browse my files.’ If you wish to use free stock footage, go to ‘Stock’ and upload your films to the project by clicking the ‘+’ button. All your films will be saved in your library.
Step 4: You can now find your videos in your media library. Drag and drop the picture-in-picture videos you want to alter to the editing timeline. As shown in the sample below, arrange the two videos one over the other. Make sure both clips are precisely underneath one another.
Step 5: Now that your movies are aligned, select the one you want to shrink. The video you’re reducing must be at the top of the screen. To move it from the bottom to the top, drag and drop it. A small box will appear on the timeline in the bottom left corner of the clip. The clip will shrink when you click the box once. When you click the box once again, modifying choices will appear. You can move the smaller video around and increase or decrease its size.
Step 6: Export your project once you’ve completed editing your video. Save to your preferred place or folder. You can share the video straight on social media or embed it in a document.
5. Movavi
Compatibility: Windows/Mac
Movavi Video Editor is a video editing tool for Windows that is powerful and simple to use. Apply stunning video effects and filters, add music and titles, and more! Yet, despite its enormous features, Movavi’s video editing program is quite simple to use: add a sprinkle of fantasy and some spare time, and you’ll have a Hollywood-style video with far less effort.
Steps
Step 1: Download the software.
Download the installation file and run it. Follow the on-screen directions. Following the setup, the PiP editor will launch.
Step 2: Import files
Select two files: the one you want to use as a background and the one you want to display over it by clicking Add Files.
Step 3: Create a video track
Make an extra video track before you begin video editing. To do so, go to the Plus menu and select Add Video Track. Then, drag one of the videos to the secondary track and the other to the primary track.
From the menu, select the Picture in Picture option. To change the size of the video, drag the boundaries. Then, drag it to the desired location on the background video by clicking and holding.
Step 4: Export and Save
Save your PiP video once you’ve finished editing it. First, select the video format, quality, and folder where the file will be saved by clicking Export and adjusting the parameters in the display popup. Then press the Start button. The picture-in-picture video editor will open the folder holding the file after the Export is complete.
FAQs
1. How do you make a facetime video call?
Tap New FaceTime towards the top of the screen in FaceTime.
Tap to make a video call or an audio call after typing the name or number you wish to call in the top field (not available in all countries or regions). You can also tap instead.
2. How do you add a virtual background on Facetime?
To change the background, use a filter: s
- Tap your tile, then tap during a FaceTime video call (supported models).
- Open the filters by tapping.
- Select your look by tapping a filter at the bottom of the screen (swipe left or right to preview them).
4. Does Facetime have virtual backgrounds?
No. Facetime does have virtual backgrounds, but it allows the users to blur the background.
5. Can you get fake facetime calls?
There is less probability of getting fake facetime calls, but you might spam FaceTime calls from random numbers.
6. Can you Facetime a random number?
FaceTime isn’t any different. A caller could try their luck by FaceTime a random phone number or email address, and if they belong to an iPhone user or an Apple ID, the FaceTime call will be accepted.
7. Can you Facetime from an unknown number?
Switching to your email address for FaceTime audio and video chats is the way to go if you always want to keep your phone number private. You may even go a step further and only receive FaceTime calls via email, with your phone number serving as your FaceTime caller ID.
8. How do I call someone on Facetime?
Launch FaceTime. In the search field, type the names, phone numbers, or email addresses of the persons you wish to contact. Then, click the video or audio icon, depending on the type of call you wish to make. To begin the call, press the video or audio button in the screen’s bottom-left corner.
9. Can you create a background on Facetime?
No. However, FaceTime allows you to apply camera effects on video calls.
Tactics to Make Transparent Image in Minimal Steps
Tactics to Make Transparent Image in Minimal Steps
An easy yet powerful editor
Numerous effects to choose from
Detailed tutorials provided by the official channel
We always want to have the images that give us the power to do customizations as needed. Until and unless an image with appropriate adjustments is not there, we cannot think of editing them as wanted. But how can we forget sometimes the images are already occupied that we cannot make the changes. This sometimes makes us feel annoyed too. But don’t worry about it as now different tools to make pictures transparent are available. After making the image transparent, you can add on the effects as needed.
If you are having confusion how to use these tools or anything else, then keep reading till the last. In this read, we are discussing some transparent image makers that will help you to do it seamlessly. Let’s get started!
In this article
01 [Similarities and Differences Between PNG Vs. JPG Vs. GIF](#Part 1)
02 [Minimal Steps to Make Background Transparent](#Part 2)
03 [How to Insert Transparent Image in Video](#Part 3)
Part 1 Similarities and Differences Between PNG Vs. JPG Vs. GIF
As we all know, there are so many formats in which these images are available. But sometimes it happens we are not aware of the similarities and differences corresponding to them. This confusion sometimes let us chooses the wrong format. But not anymore, and in this section, we are discussing the similarities and differences between PNG Vs. JPG Vs. GIF.
● PNG
PNG is a lossless compression format which means that it can be compressed without losing any data. It also supports transparency. The compression ratio is usually higher than JPG and GIF.
● JPG
JPG is a lossy compression format which means that it can be compressed without losing any data, but the image quality will suffer because of the loss of information. It supports transparency but is not as good as PNG.
● GIF
GIF is a lossless or lossy compression format which means that it can be compressed without losing any data or quality respectively. It does not support transparency and has a limited color range compared to PNG or JPG.
Part 2 Minimal Steps to Make Background Transparent
In this section, we are discussing the steps that you need to follow with transparent image-makers. Here we discuss some of the best tools available so that you can feel a bit confident in utilizing them for editing. This list includes:-
● Canva
Canva is a graphic design tool that helps users creates professional-quality designs. It has easy to use templates and fonts that are free to use. Users can also customize their own templates and fonts, add images and videos, make collages, infographics, and other designs.
Steps to Make in Canva
Step 1: Get “Canva” available on your system and open it.

Step 2: Mode to “Edit Image” and “upload the image” in which you wish to make the background transparent.

Step 3: Choose the “Effect tab” and select the “background remover” option.


Step 4: If you wish to add on any other effect, do it.
Step 5: Click on the “Download icon” and save it for future use.
● Photoshop
Photoshop can be used to edit video footage and create special effects. You can cut video clips together and shape them into a movie sequence by adding transitions and overlays to visualize the actions between shots. You can also use it to add graphics or other visual elements, like animations or even text. But don’t forget this tool also gives you the option to make the backgrounds transparent.
Steps to Make in Photoshop
Step 1: Get Photoshop o your system and import the image you wish to edit.
Step 2: Press Ctrl+J in order to create duplicate layers. (This is important in order to keep an eye on the section you are doing for making the editing.)

Step 3: Move to “Windows” and click on “Properties”

Step 4: From the list of options, hit on “Remove Background”

Step 5: Click on the “Eye icon” to view the transparent image.

Step 6: Save the image for future use.
● Picsart
Picsart is a robust photo editing app which has features such as filters, stickers, and overlays. It also has the ability to create collages and videos. The app also has a feature called “edit & share” which allows the user to edit the photo right in the app, then share it with their friends on social media. Picsart doesn’t require any special knowledge or expertise in photography; so anyone can pick up the basics of using it in no time.
Steps to use Picsart
Step 1: Get the Picsart app in your device or visit the online portal.
Step 2: Upload the image you wish to edit.

Step 3: Click on “Start Editing” button and then choose either of the option from “Behind Person” or “Behind Object” as per your situation.


Step 4: The tool will automatically remove the background and make it transparent. Download the image now.

Part 3 How to Insert Transparent Image in Video
After creating outstanding video content, there is a possibility that you might be looking forward to integrating any transparent image into it. Well, in this case, it is important that you have access to the best tool. Until and unless the best software or tool is not here, you cannot think of getting the task done. Don’t worry because for catering to this need, Filmora is one of the best options to choose.
Wondershare Filmora Video Editor is all-in-one video editing software to help people edit their videos and make them look professional. The best thing about this software is that it doesn’t require any expertise or knowledge of video editing before using it. The user can create a video from scratch just by importing the photos and videos from their camera roll, which are automatically combined into a single video with transitions and music in just a few steps.
For Win 7 or later (64-bit)
For macOS 10.12 or later
Also, this software is both intuitive and easy to use. It also provides many features that you can customize depending on what outcome you want. In addition, this tool also includes tutorials and support services via phone, email or chat line, so all your questions are answered quickly and efficiently.
Furthermore, this allows you to make your videos better by inserting transparent images or graphics in them. You can achieve amazing effects and superimpose without having to spend hours editing your video. With Filmora, it’s simple to create professional-quality videos without using any other software and spending too much time on the editing process.
● Steps to use Filmora
Step 1: After browsing all these features, you might be curious to try out the features integrated into it. The steps you need to follow are:-
Step 2: Get Filmora available on your system. It is compatible with Windows and Mac both.
Step 3: Open Filmora and select “Import-Import Media Files”.

Step 4: Add the imported images. You can do this by doing the right-click and selecting the insert image option. Alternatively you can do it u drag and drop option too.

Step 5: The inserted images will appear in the timeline, and double click on them. The settings menu appear to select the “Chroma key” and enable it.

Step 6: The image will get transparent in no time. If you wish to add on any extra colour or effect to the image, choose it from the editing menu available. The “Color Picker” option is also there that will be helpful in adding the colors.
Step 7: Click on “Ok” to make the changes saved.

Step 7: After getting the expected transparent image, you can simply overlay it into the video.
● Ending Thoughts →
● Transparent images give you the chance to make the editing as required. This simply means there will be no need for you to occupy the image with unnecessary stuff because after making the image transparent only the required content will have a pace on it.
● Filmora is the best tool to insert transparent images in the video. This tool have innovative interface and let users have the best options to make the editing in the video they are creating. Along with making the background transparent, this tool has other editing features too.
● Making transparent images is just a matter of a few steps. One just needs to be sure of the right tools. If they are not having the right tool gett9ing the expected outcome will not be their thing.
We always want to have the images that give us the power to do customizations as needed. Until and unless an image with appropriate adjustments is not there, we cannot think of editing them as wanted. But how can we forget sometimes the images are already occupied that we cannot make the changes. This sometimes makes us feel annoyed too. But don’t worry about it as now different tools to make pictures transparent are available. After making the image transparent, you can add on the effects as needed.
If you are having confusion how to use these tools or anything else, then keep reading till the last. In this read, we are discussing some transparent image makers that will help you to do it seamlessly. Let’s get started!
In this article
01 [Similarities and Differences Between PNG Vs. JPG Vs. GIF](#Part 1)
02 [Minimal Steps to Make Background Transparent](#Part 2)
03 [How to Insert Transparent Image in Video](#Part 3)
Part 1 Similarities and Differences Between PNG Vs. JPG Vs. GIF
As we all know, there are so many formats in which these images are available. But sometimes it happens we are not aware of the similarities and differences corresponding to them. This confusion sometimes let us chooses the wrong format. But not anymore, and in this section, we are discussing the similarities and differences between PNG Vs. JPG Vs. GIF.
● PNG
PNG is a lossless compression format which means that it can be compressed without losing any data. It also supports transparency. The compression ratio is usually higher than JPG and GIF.
● JPG
JPG is a lossy compression format which means that it can be compressed without losing any data, but the image quality will suffer because of the loss of information. It supports transparency but is not as good as PNG.
● GIF
GIF is a lossless or lossy compression format which means that it can be compressed without losing any data or quality respectively. It does not support transparency and has a limited color range compared to PNG or JPG.
Part 2 Minimal Steps to Make Background Transparent
In this section, we are discussing the steps that you need to follow with transparent image-makers. Here we discuss some of the best tools available so that you can feel a bit confident in utilizing them for editing. This list includes:-
● Canva
Canva is a graphic design tool that helps users creates professional-quality designs. It has easy to use templates and fonts that are free to use. Users can also customize their own templates and fonts, add images and videos, make collages, infographics, and other designs.
Steps to Make in Canva
Step 1: Get “Canva” available on your system and open it.
Step 2: Mode to “Edit Image” and “upload the image” in which you wish to make the background transparent.
Step 3: Choose the “Effect tab” and select the “background remover” option.
Step 4: If you wish to add on any other effect, do it.
Step 5: Click on the “Download icon” and save it for future use.
● Photoshop
Photoshop can be used to edit video footage and create special effects. You can cut video clips together and shape them into a movie sequence by adding transitions and overlays to visualize the actions between shots. You can also use it to add graphics or other visual elements, like animations or even text. But don’t forget this tool also gives you the option to make the backgrounds transparent.
Steps to Make in Photoshop
Step 1: Get Photoshop o your system and import the image you wish to edit.
Step 2: Press Ctrl+J in order to create duplicate layers. (This is important in order to keep an eye on the section you are doing for making the editing.)
Step 3: Move to “Windows” and click on “Properties”
Step 4: From the list of options, hit on “Remove Background”
Step 5: Click on the “Eye icon” to view the transparent image.
Step 6: Save the image for future use.
● Picsart
Picsart is a robust photo editing app which has features such as filters, stickers, and overlays. It also has the ability to create collages and videos. The app also has a feature called “edit & share” which allows the user to edit the photo right in the app, then share it with their friends on social media. Picsart doesn’t require any special knowledge or expertise in photography; so anyone can pick up the basics of using it in no time.
Steps to use Picsart
Step 1: Get the Picsart app in your device or visit the online portal.
Step 2: Upload the image you wish to edit.
Step 3: Click on “Start Editing” button and then choose either of the option from “Behind Person” or “Behind Object” as per your situation.
Step 4: The tool will automatically remove the background and make it transparent. Download the image now.
Part 3 How to Insert Transparent Image in Video
After creating outstanding video content, there is a possibility that you might be looking forward to integrating any transparent image into it. Well, in this case, it is important that you have access to the best tool. Until and unless the best software or tool is not here, you cannot think of getting the task done. Don’t worry because for catering to this need, Filmora is one of the best options to choose.
Wondershare Filmora Video Editor is all-in-one video editing software to help people edit their videos and make them look professional. The best thing about this software is that it doesn’t require any expertise or knowledge of video editing before using it. The user can create a video from scratch just by importing the photos and videos from their camera roll, which are automatically combined into a single video with transitions and music in just a few steps.
For Win 7 or later (64-bit)
For macOS 10.12 or later
Also, this software is both intuitive and easy to use. It also provides many features that you can customize depending on what outcome you want. In addition, this tool also includes tutorials and support services via phone, email or chat line, so all your questions are answered quickly and efficiently.
Furthermore, this allows you to make your videos better by inserting transparent images or graphics in them. You can achieve amazing effects and superimpose without having to spend hours editing your video. With Filmora, it’s simple to create professional-quality videos without using any other software and spending too much time on the editing process.
● Steps to use Filmora
Step 1: After browsing all these features, you might be curious to try out the features integrated into it. The steps you need to follow are:-
Step 2: Get Filmora available on your system. It is compatible with Windows and Mac both.
Step 3: Open Filmora and select “Import-Import Media Files”.
Step 4: Add the imported images. You can do this by doing the right-click and selecting the insert image option. Alternatively you can do it u drag and drop option too.
Step 5: The inserted images will appear in the timeline, and double click on them. The settings menu appear to select the “Chroma key” and enable it.
Step 6: The image will get transparent in no time. If you wish to add on any extra colour or effect to the image, choose it from the editing menu available. The “Color Picker” option is also there that will be helpful in adding the colors.
Step 7: Click on “Ok” to make the changes saved.
Step 7: After getting the expected transparent image, you can simply overlay it into the video.
● Ending Thoughts →
● Transparent images give you the chance to make the editing as required. This simply means there will be no need for you to occupy the image with unnecessary stuff because after making the image transparent only the required content will have a pace on it.
● Filmora is the best tool to insert transparent images in the video. This tool have innovative interface and let users have the best options to make the editing in the video they are creating. Along with making the background transparent, this tool has other editing features too.
● Making transparent images is just a matter of a few steps. One just needs to be sure of the right tools. If they are not having the right tool gett9ing the expected outcome will not be their thing.
Also read:
- In 2024, Are You Working on Editing a Video and Youd Like to Add Text to It? Learn the Various Ways that You Can Add Text to a Video
- Special Animated Transition Tutorial【SUPER EASY】
- New 2024 Approved 8 Ways To Live Stream Pre-Recorded Video
- Convert MP4 to 60 FPS GIF A Step-by-Step Guide
- 2024 Approved Change Video Speed with FFmpeg
- Updated Best 5 AI Music Video Examples and Makers to Make Them for 2024
- Updated Add Green Screen Effects in Final Cut Pro for 2024
- In 2024, The Necessity of the Creation of Video Content for Social Media Has Urged Many Editing Software to Come Out on the Market. We Have Reviewed some, Free of Them in This Article for You
- Updated Top 5 Online Video Converter for Instagram
- Record Slow Motion Videos With Phantom Slow-Mo Camera for 2024
- Updated Change Video Speed with FFmpeg for 2024
- In 2024, How to Zoom Video in VLC Media Player
- Top Ways to Make Fast Motion Video on iPhone Solved for 2024
- Deleting White Background in Photoshop Is Hard? No for 2024
- In 2024, Merging Videos Like a Pro A Step-by-Step Guide to Use FFmpeg
- Would You Like to Know How to Change the Ratio of the Video or Which Is the Correct Aspect Ratio for Uploading to the Online Platform? Then, Go Through the Article to Get Complete Details About the Video Aspect Ratio
- Updated Splice Video Editor Online - Get Your Videos Splice Easily
- Updated In 2024, 12 Best Marketing Slideshow Templates
- How to Use a Stabilization Tool in Filmora
- Is pgsharp legal when you are playing pokemon On Realme Narzo N53? | Dr.fone
- Can Life360 Track You When Your Nokia 130 Music is off? | Dr.fone
- Everything You Need to Know about Lock Screen Settings on your Tecno Spark 10 5G
- In 2024, Forgot Pattern Lock? Heres How You Can Unlock Itel P40 Pattern Lock Screen
- How to Change Your Location on Apple iPhone XR | Dr.fone
- In 2024, How Can You Cast Your Apple iPhone SE to Windows PC With Ease? | Dr.fone
- Solved Warning Camera Failed on Samsung Galaxy A25 5G | Dr.fone
- How To Unlock Any Xiaomi 14 Phone Password Using Emergency Call
- In 2024, 4 Most-Known Ways to Find Someone on Tinder For Nokia C12 Plus by Name | Dr.fone
- Dose Life360 Notify Me When Someone Checks My Location On Samsung Galaxy S23 Tactical Edition? | Dr.fone
- Title: Updated 2024 Approved How to Crop Videos in Windows Media Player
- Author: Chloe
- Created at : 2024-04-24 07:08:44
- Updated at : 2024-04-25 07:08:44
- Link: https://ai-editing-video.techidaily.com/updated-2024-approved-how-to-crop-videos-in-windows-media-player/
- License: This work is licensed under CC BY-NC-SA 4.0.
