
:max_bytes(150000):strip_icc():format(webp)/GettyImages-944229088-5bd1f61e46e0fb0026fdf2f0.jpg)
Updated 2024 Approved How to Merge Videos in HandBrake? Expectation Vs. Reality
How to Merge Videos in HandBrake? Expectation Vs. Reality
So you have captured some mind-blowing clips and want to join them together to make an excellent movie? But, sadly, you are still stuck because you are not sure what video editors would be suitable to complete this task fast.
If such miseries are haunting you, take a deep breath because many like you are searching for the right video merging tools. However, some people recommend using HandBrake for merging clips. So let’s dig some ground to know if the software can really combine clips. And if there’s a “Yes”? Then how to merge videos in HandBrake?
In this article
02 Using HandBrake to Merge Videos – Possible or Not?
03 Combining Videos with Filmora Wondershare
Part 1: What is HandBrake?
Before you gear up for HandBrake to merge videos, it would be wise to know a few essential details about this software.
HandBrake is a free tool for Windows, Linux, and MAC operating systems. The basic purpose of this software is to convert videos from any format in MKV, WebM, and MP4. It is an open-source program that allows users to convert their videos to play them on multiple devices, such as TV media players, computers, tablets, mobile phones, etc.
Moreover, this platform gives you the power to turn your low-quality videos into high-quality screen time. That is why most professional videographers use this tool to polish videos captured with old cameras.
A few more interesting features of HandBrake are:
- Combing artifacts removal due to interlacing
- Convert videos without negatively affecting the audio quality
- Volume and range adjustment
- Addition, removal, and preservation of soft subtitles
However, one vital thing to understand is that although HandBrake takes a tiny little space of your hard drive, the interface is complicated for beginners.

Part 2: Using HandBrake to Merge Videos – Possible or Not?
There is a great misconception about HandBrake among the newbies that HandBrake is primarily a video merger software. But, in reality, that is not true at all. Or, at least, the latest HandBrake version 1.5.1 lacks such features.
Even the official website states that HandBrake cannot combine two or more clips to make them whole.
So feel yourself lucky to read this article if you haven’t downloaded HandBrake yet. Congratulations! You are saved from another heartbreak.
But wait! If the software is not meant to merge clips, it doesn’t mean that you can’t use it to prepare your videos for the real deal. HandBrake can still be a helpful tool, permitting you to convert videos in a similar format before you start merging them on any other video editor.
For example, suppose you have two video clips in different formats. In that case, you can use HandBrake to convert all of them in a similar format so that they can be easily be merged when imported on any video merger tool.
But, again, the question is, if not HandBrake, then what?
Frankly, you will find hundreds of video editing tools with a combining clips feature, but not all of them deserve your attention and time. While software like DaVinci Resolve includes characteristics to merge two or more clips in a single shot, beginners and mid-level users may still find them a bit difficult at the start.
That is why professionals and experts prefer Filmora by Wondershare to merge videos without banging their heads on the screen.
So, how to merge videos in Filmora with simple clicks? Focus on the next part of the article to learn the step-by-step method within a few minutes.
Part 3: Combining Videos with Filmora Wondershare
Filmora Video Editor is a remarkable video editing tool for all types of users. The software works on all major operating systems (MAC and Windows) and includes a gigantic library of effects, presets, overlays, and so much more than you can imagine.
You can download Filmora for free if watermarks don’t annoy you. On the other hand, you can purchase a suitable plan to get rid of watermarks, so your videos look 100% professional.
For Win 7 or later (64-bit)
For macOS 10.14 or later
Now, without any more delay, let’s start learning how to combine videos in Filmora through the following steps.
Step 1: Install Filmora on Your Computer
Just visit Filmora’s website to download the latest version of the software for your Windows or MAC.

After downloading the software on your computer, install it. Once the software is ready, double-click the “Wondershare Filmora” icon (it should be on your desktop screen) to open the program.
As you can see, the interface is simple with user-friendly options.

Step 2: Import Multiple Videos in Filmora
Click on the blue icon with a “+” sign to import videos.

Or, click on the “File” button on the top menu to import files and drag and drop both clips to the same timeline.
As you can see, there are two clips on the timeline. The first clip is called “Cherry Blossom,” and the second clip’s name is “Plating Food.”

Step 3: Keep Video Clips on the Same Timeline
There shouldn’t be any gap or spaces between the two clips.

It is because gaps will create a dark blank space between the clips when you export the clips, like this:

Therefore, slide the second video right next to the first video without leaving any gaps with your mouse.

And guess what? You have already merged the two clips.
Step 4: Save Video on Your PC
Now, hit the “Export” button and save the merged video on your computer.

HandBrake is an outstanding tool for video conversion, but there’s no benefit of learning how to merge videos in HandBrake, as the software does not include such features. Nevertheless, when it is about combining multiple videos in high quality, you can rely on Filmora to merge clips in no time.
FAQs
Q1. Can you increase the video quality in HandBrake?
Yes. You can use HandBrake to convert videos and adjust the video quality settings as per your requirements before starting the conversion process.
Q2. Can you crop and resize the video in HandBrake?
HandBrake makes it easy to crop and resize all types of videos without disturbing the audio quality.
Q3. Can you use HandBrake clips on other video editors for video mergers?
After converting videos in HandBrake, you can use the clips in video editors, like Filmora, to merge clips.
02 Using HandBrake to Merge Videos – Possible or Not?
03 Combining Videos with Filmora Wondershare
Part 1: What is HandBrake?
Before you gear up for HandBrake to merge videos, it would be wise to know a few essential details about this software.
HandBrake is a free tool for Windows, Linux, and MAC operating systems. The basic purpose of this software is to convert videos from any format in MKV, WebM, and MP4. It is an open-source program that allows users to convert their videos to play them on multiple devices, such as TV media players, computers, tablets, mobile phones, etc.
Moreover, this platform gives you the power to turn your low-quality videos into high-quality screen time. That is why most professional videographers use this tool to polish videos captured with old cameras.
A few more interesting features of HandBrake are:
- Combing artifacts removal due to interlacing
- Convert videos without negatively affecting the audio quality
- Volume and range adjustment
- Addition, removal, and preservation of soft subtitles
However, one vital thing to understand is that although HandBrake takes a tiny little space of your hard drive, the interface is complicated for beginners.
Part 2: Using HandBrake to Merge Videos – Possible or Not?
There is a great misconception about HandBrake among the newbies that HandBrake is primarily a video merger software. But, in reality, that is not true at all. Or, at least, the latest HandBrake version 1.5.1 lacks such features.
Even the official website states that HandBrake cannot combine two or more clips to make them whole.
So feel yourself lucky to read this article if you haven’t downloaded HandBrake yet. Congratulations! You are saved from another heartbreak.
But wait! If the software is not meant to merge clips, it doesn’t mean that you can’t use it to prepare your videos for the real deal. HandBrake can still be a helpful tool, permitting you to convert videos in a similar format before you start merging them on any other video editor.
For example, suppose you have two video clips in different formats. In that case, you can use HandBrake to convert all of them in a similar format so that they can be easily be merged when imported on any video merger tool.
But, again, the question is, if not HandBrake, then what?
Frankly, you will find hundreds of video editing tools with a combining clips feature, but not all of them deserve your attention and time. While software like DaVinci Resolve includes characteristics to merge two or more clips in a single shot, beginners and mid-level users may still find them a bit difficult at the start.
That is why professionals and experts prefer Filmora by Wondershare to merge videos without banging their heads on the screen.
So, how to merge videos in Filmora with simple clicks? Focus on the next part of the article to learn the step-by-step method within a few minutes.
Part 3: Combining Videos with Filmora Wondershare
Filmora Video Editor is a remarkable video editing tool for all types of users. The software works on all major operating systems (MAC and Windows) and includes a gigantic library of effects, presets, overlays, and so much more than you can imagine.
You can download Filmora for free if watermarks don’t annoy you. On the other hand, you can purchase a suitable plan to get rid of watermarks, so your videos look 100% professional.
For Win 7 or later (64-bit)
For macOS 10.14 or later
Now, without any more delay, let’s start learning how to combine videos in Filmora through the following steps.
Step 1: Install Filmora on Your Computer
Just visit Filmora’s website to download the latest version of the software for your Windows or MAC.
After downloading the software on your computer, install it. Once the software is ready, double-click the “Wondershare Filmora” icon (it should be on your desktop screen) to open the program.
As you can see, the interface is simple with user-friendly options.
Step 2: Import Multiple Videos in Filmora
Click on the blue icon with a “+” sign to import videos.
Or, click on the “File” button on the top menu to import files and drag and drop both clips to the same timeline.
As you can see, there are two clips on the timeline. The first clip is called “Cherry Blossom,” and the second clip’s name is “Plating Food.”
Step 3: Keep Video Clips on the Same Timeline
There shouldn’t be any gap or spaces between the two clips.
It is because gaps will create a dark blank space between the clips when you export the clips, like this:
Therefore, slide the second video right next to the first video without leaving any gaps with your mouse.
And guess what? You have already merged the two clips.
Step 4: Save Video on Your PC
Now, hit the “Export” button and save the merged video on your computer.
HandBrake is an outstanding tool for video conversion, but there’s no benefit of learning how to merge videos in HandBrake, as the software does not include such features. Nevertheless, when it is about combining multiple videos in high quality, you can rely on Filmora to merge clips in no time.
FAQs
Q1. Can you increase the video quality in HandBrake?
Yes. You can use HandBrake to convert videos and adjust the video quality settings as per your requirements before starting the conversion process.
Q2. Can you crop and resize the video in HandBrake?
HandBrake makes it easy to crop and resize all types of videos without disturbing the audio quality.
Q3. Can you use HandBrake clips on other video editors for video mergers?
After converting videos in HandBrake, you can use the clips in video editors, like Filmora, to merge clips.
Ways to Learn Discord Game Bots – Even if You’re Just Starting Out
Ways to Learn Discord Game Bots – Even if You’re Just Starting out
An easy yet powerful editor
Numerous effects to choose from
Detailed tutorials provided by the official channel
Discord is free social communication service used by tens of millions of individuals aged 13 and above to socialize with their communities and friends. People use discord regularly to discuss various topics, from art projects and family vacations to homework and mental health help. It serves as a home for communities of different sizes but has become quite popular as discord bot games due to the rise in the gaming community.
The great majority of servers are private, invite-only locations where friends and communities may communicate and spend time together. More significant, more open groups based on specific themes like popular video games like PUBG and Genshin Impact. Because all discussions are opt-in, users have complete choice over who they connect with and how they use discord.
In this article
01 [What Are Discord Game Bots?](#Part 1)
02 [How Do You Add Bot Games to Discord?](#Part 2)
03 [Top 10 Picks of Discord Gaming Bots](#Part 3)
04 [Discord Game Bots FAQs](#Part 4)
Part 1 What Are Discord Game Bots?
Discord game bots are artificial intelligence (AI)-powered applications that automate processes and add music, games, welcome messages, memes, and other fun stuff to your server. These bots make it simple to interact with your audience, grow your community, and manage your server.
There is a plethora of game bots for discord to pick from, each with its purpose. Some may automatically welcome new users, while others utilize webhooks to interface with other apps—and it may be tough for novice users to figure out which ones will provide the most remarkable results for their requirements.
Part 2 How Do You Add Bot Games to Discord?
Follow the steps below to add game bots for discord successfully:
Step 1: To add a bot to your Discord server, go to the bot’s source page. We’ll be using ProBot for this lesson.
Step 2: Depending on the bot you’re adding, click Add to Discord or Invite Now.
Step 3: To grant the bot access, a pop-up window will appear asking you to check in to your Discord account.
Step 4: After you log in, you’ll see a box asking for account authorization. Locate and choose the Add to Server drop-down menu.
Step 5: This will bring up a list of discord servers where you can add a bot game discord. Continue after selecting your server.
Step 6: Examine the server permissions that the bot asks for. Select and deselect according to your requirements. When you’re ready, click Authorize.
For those who like to share their discord game bots experience through screen recordings and whatnot, a potent and convenient video editing tool to make your sessions look even more incredible is Filmora.
Wondershare Filmora Video Editor is a famous video editing program for those who wish to focus on editing and producing high-quality videos. The program supports 4K video editing. It’s a reasonably priced tool featuring effects for both video and audio. When it comes to designing, adding effects, and modifying movies, it provides users with many possibilities. You can use the tool to add overlays, create animations and objects, add music, and input text. Imagine sharing your experience in 4k!
For Win 7 or later (64-bit)
For macOS 10.12 or later
Part 3 Top 10 Picks of Discord Gaming Bots
01Karuta
Karuta is a discord game bot where you gather anime characters. In Karuta, though, you collect characters using trading cards. Your cards and other objects may be customized, upgraded, and traded with other players. Better still, you maintain the same cards between servers, allowing you to play Karuta with the same deck on any server where the game discord bot is!
02Dragon Bot Z
Dragon Bot Z is the discord bot game that adds discord Ball Z, a multiplayer text-based RPG, to your server. Players in Discord Ball Z summon characters from the iconic Dragon Ball Z franchise, train them, fight foes, buy equipment, and trade with other players. This Discord game is ideal for Dragon Ball fans or anybody who likes text-based roleplaying games.

03Mudae
Mudae is a bot discord game with character-collecting. For example, you can claim popular anime and videogame characters as your “waifus” or “husbandos,” develop your harem, and compete for your favorite characters with other users. You can also trade the characters with other members.

04Rock Puppy
Rock Puppy is a basic yet entertaining game bots discord bot that incorporates several classic games. You can enjoy Discord games like ConnectFour, Truth or Dare, Trivia, Tic-Tac-Toe, Russian Roulette, and Would You Rather with Rock Puppy. You may also use magic 8-ball, dice, or tarot cards, play classic board and party games on your server with Rock Puppy.
05GarticBOT
GarticBot is a bot game in discord that allows you to play the drawing game Gartic. GarticBot begins the Discord game by painting an image on your server. Members then compete against one another to predict the image the quickest. Others can guess your drawings if you submit them. Type the command g.draw, and Gartic will provide you with a URL to submit your artwork. GarticBot creates a fun Pictionary-style game for everyone on your server to play.

06TriviaBot
TriviaBot is the most popular trivia game discord bot. It has over 90,000 questions, and you can even submit your own for inclusion in the bot. Members can form and join teams to compete in competitions. You may also create a public leaderboard to display who performs the best on the server.

07GamesRob
The finest Uno discord game bot is GamesROB. ConnectFour, Trivia, Battleship, 2048, Tic-Tac-Toe, Minesweeper, and Hangman are the other traditional party games added to discord. You may also play “Detective,” a Discord game in which you try to figure out who is the “assassin” on your server, memory games, and Town, Country, River, a game in which you try to come up with as many phrases as possible within a theme.
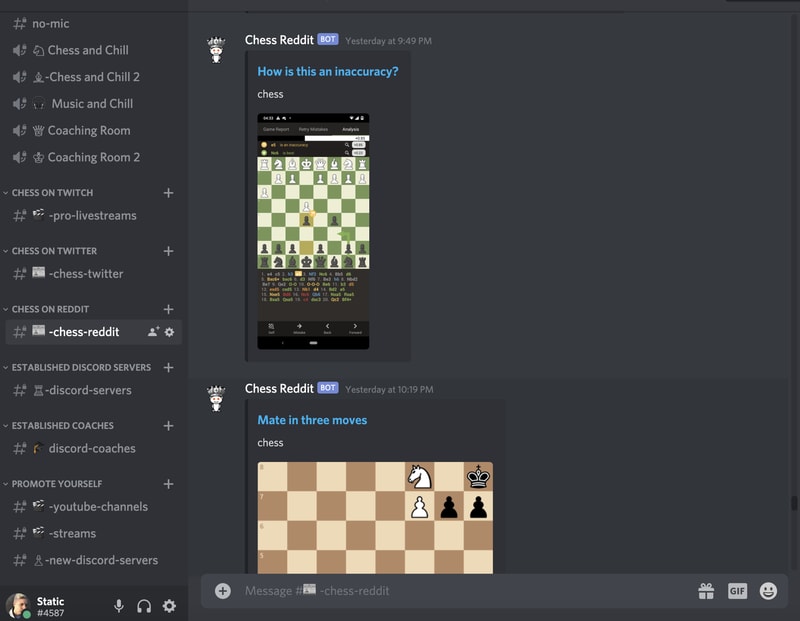
08Chess Reddit
Chess is a simple game that allows you to play chess on discord. You may play a chess game with other server members directly on the server. Instruct the bot on which pieces to move and where they should go. After each move, the Discord game bot creates a fresh graphic of the board so you can plot your next move. And, because the game hosts on your server, other users may watch and debate it!
09PokeMeow
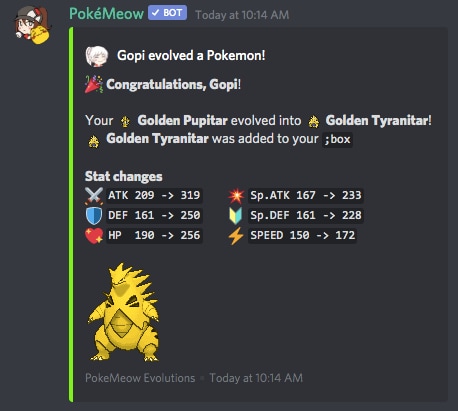
PokeMeow is by far the most popular Pokemon game discord bot. With this Pokemon bot, you may capture Pokemon on your server, trade, battle with other players, and accomplish tasks for in-game currency and stuff. As you keep building up your Pokedex, the Pokemon bot also allows to compete with other users on the worldwide leaderboard! PokeMeow is the ideal Pokemon Discord bot for fans of the Pokemon series.
10IdleRPG
IdleRPG is a discord game where you may play a text-based roleplaying game. You may make your character complete with ethnicity and social status. Then, you can go on quests and combat beasts, purchase, and exchange mythic objects, join guilds, engage with gods, and even marry other players. Play through your character’s adventure while engaging with and creating stories with other players. IdleRPG is likely to provide your server with hundreds of hours of roleplaying pleasure.

Part 4 Discord Game Bots FAQs
Now, let us go through some FAQs about discord game bots:
Q. Is it possible to play games with discord bots?
A. You could indeed play discord games in-server with bots, challenge other members, and win prizes! A game bot is a terrific method to keep players engaged on your server, especially if it’s a gaming Discord channel.
Q. Do game bots spy on you?
A. No, game discord bots do not have inbuilt spyware.
Q. How many bots should a server have?
A. It’s best not to have more than 20 bots game on discord on a server at any moment. More bots than this may cause users to become confused and the service to seem suspicious.
Q. Are discord bots free?
A. All these discord game bots are free to use. However, some have premium upgrades.
Q. Which bot is the most popular game bot in discord?
A. Worddle
Q. Which bot is the best bot for gaming on discord?
A. Gawesome is an excellent alternative for adding a multifunctional bot to your discord server.
● Ending Thoughts →
● Discord is accessible communication and socializing service for individuals aged 13 and above.
● The platform extends to various servers, each with its users, rules, themes, and channels, but one underutilized feature is the ability to develop and code custom AI-powered bots.
● Game bots for discord are artificial intelligence (AI)-powered applications that automate processes and add games to your discord server.
● These game discord bots make it simple to interact with your audience, grow your community, and manage your server.
● Lastly, to enhance the discord game bots experience and bring your gaming videos to life, use the Filmora software.
Discord is free social communication service used by tens of millions of individuals aged 13 and above to socialize with their communities and friends. People use discord regularly to discuss various topics, from art projects and family vacations to homework and mental health help. It serves as a home for communities of different sizes but has become quite popular as discord bot games due to the rise in the gaming community.
The great majority of servers are private, invite-only locations where friends and communities may communicate and spend time together. More significant, more open groups based on specific themes like popular video games like PUBG and Genshin Impact. Because all discussions are opt-in, users have complete choice over who they connect with and how they use discord.
In this article
01 [What Are Discord Game Bots?](#Part 1)
02 [How Do You Add Bot Games to Discord?](#Part 2)
03 [Top 10 Picks of Discord Gaming Bots](#Part 3)
04 [Discord Game Bots FAQs](#Part 4)
Part 1 What Are Discord Game Bots?
Discord game bots are artificial intelligence (AI)-powered applications that automate processes and add music, games, welcome messages, memes, and other fun stuff to your server. These bots make it simple to interact with your audience, grow your community, and manage your server.
There is a plethora of game bots for discord to pick from, each with its purpose. Some may automatically welcome new users, while others utilize webhooks to interface with other apps—and it may be tough for novice users to figure out which ones will provide the most remarkable results for their requirements.
Part 2 How Do You Add Bot Games to Discord?
Follow the steps below to add game bots for discord successfully:
Step 1: To add a bot to your Discord server, go to the bot’s source page. We’ll be using ProBot for this lesson.
Step 2: Depending on the bot you’re adding, click Add to Discord or Invite Now.
Step 3: To grant the bot access, a pop-up window will appear asking you to check in to your Discord account.
Step 4: After you log in, you’ll see a box asking for account authorization. Locate and choose the Add to Server drop-down menu.
Step 5: This will bring up a list of discord servers where you can add a bot game discord. Continue after selecting your server.
Step 6: Examine the server permissions that the bot asks for. Select and deselect according to your requirements. When you’re ready, click Authorize.
For those who like to share their discord game bots experience through screen recordings and whatnot, a potent and convenient video editing tool to make your sessions look even more incredible is Filmora.
Wondershare Filmora Video Editor is a famous video editing program for those who wish to focus on editing and producing high-quality videos. The program supports 4K video editing. It’s a reasonably priced tool featuring effects for both video and audio. When it comes to designing, adding effects, and modifying movies, it provides users with many possibilities. You can use the tool to add overlays, create animations and objects, add music, and input text. Imagine sharing your experience in 4k!
For Win 7 or later (64-bit)
For macOS 10.12 or later
Part 3 Top 10 Picks of Discord Gaming Bots
01Karuta
Karuta is a discord game bot where you gather anime characters. In Karuta, though, you collect characters using trading cards. Your cards and other objects may be customized, upgraded, and traded with other players. Better still, you maintain the same cards between servers, allowing you to play Karuta with the same deck on any server where the game discord bot is!
02Dragon Bot Z
Dragon Bot Z is the discord bot game that adds discord Ball Z, a multiplayer text-based RPG, to your server. Players in Discord Ball Z summon characters from the iconic Dragon Ball Z franchise, train them, fight foes, buy equipment, and trade with other players. This Discord game is ideal for Dragon Ball fans or anybody who likes text-based roleplaying games.
03Mudae
Mudae is a bot discord game with character-collecting. For example, you can claim popular anime and videogame characters as your “waifus” or “husbandos,” develop your harem, and compete for your favorite characters with other users. You can also trade the characters with other members.
04Rock Puppy
Rock Puppy is a basic yet entertaining game bots discord bot that incorporates several classic games. You can enjoy Discord games like ConnectFour, Truth or Dare, Trivia, Tic-Tac-Toe, Russian Roulette, and Would You Rather with Rock Puppy. You may also use magic 8-ball, dice, or tarot cards, play classic board and party games on your server with Rock Puppy.
05GarticBOT
GarticBot is a bot game in discord that allows you to play the drawing game Gartic. GarticBot begins the Discord game by painting an image on your server. Members then compete against one another to predict the image the quickest. Others can guess your drawings if you submit them. Type the command g.draw, and Gartic will provide you with a URL to submit your artwork. GarticBot creates a fun Pictionary-style game for everyone on your server to play.
06TriviaBot
TriviaBot is the most popular trivia game discord bot. It has over 90,000 questions, and you can even submit your own for inclusion in the bot. Members can form and join teams to compete in competitions. You may also create a public leaderboard to display who performs the best on the server.
07GamesRob
The finest Uno discord game bot is GamesROB. ConnectFour, Trivia, Battleship, 2048, Tic-Tac-Toe, Minesweeper, and Hangman are the other traditional party games added to discord. You may also play “Detective,” a Discord game in which you try to figure out who is the “assassin” on your server, memory games, and Town, Country, River, a game in which you try to come up with as many phrases as possible within a theme.
08Chess Reddit
Chess is a simple game that allows you to play chess on discord. You may play a chess game with other server members directly on the server. Instruct the bot on which pieces to move and where they should go. After each move, the Discord game bot creates a fresh graphic of the board so you can plot your next move. And, because the game hosts on your server, other users may watch and debate it!
09PokeMeow
PokeMeow is by far the most popular Pokemon game discord bot. With this Pokemon bot, you may capture Pokemon on your server, trade, battle with other players, and accomplish tasks for in-game currency and stuff. As you keep building up your Pokedex, the Pokemon bot also allows to compete with other users on the worldwide leaderboard! PokeMeow is the ideal Pokemon Discord bot for fans of the Pokemon series.
10IdleRPG
IdleRPG is a discord game where you may play a text-based roleplaying game. You may make your character complete with ethnicity and social status. Then, you can go on quests and combat beasts, purchase, and exchange mythic objects, join guilds, engage with gods, and even marry other players. Play through your character’s adventure while engaging with and creating stories with other players. IdleRPG is likely to provide your server with hundreds of hours of roleplaying pleasure.
Part 4 Discord Game Bots FAQs
Now, let us go through some FAQs about discord game bots:
Q. Is it possible to play games with discord bots?
A. You could indeed play discord games in-server with bots, challenge other members, and win prizes! A game bot is a terrific method to keep players engaged on your server, especially if it’s a gaming Discord channel.
Q. Do game bots spy on you?
A. No, game discord bots do not have inbuilt spyware.
Q. How many bots should a server have?
A. It’s best not to have more than 20 bots game on discord on a server at any moment. More bots than this may cause users to become confused and the service to seem suspicious.
Q. Are discord bots free?
A. All these discord game bots are free to use. However, some have premium upgrades.
Q. Which bot is the most popular game bot in discord?
A. Worddle
Q. Which bot is the best bot for gaming on discord?
A. Gawesome is an excellent alternative for adding a multifunctional bot to your discord server.
● Ending Thoughts →
● Discord is accessible communication and socializing service for individuals aged 13 and above.
● The platform extends to various servers, each with its users, rules, themes, and channels, but one underutilized feature is the ability to develop and code custom AI-powered bots.
● Game bots for discord are artificial intelligence (AI)-powered applications that automate processes and add games to your discord server.
● These game discord bots make it simple to interact with your audience, grow your community, and manage your server.
● Lastly, to enhance the discord game bots experience and bring your gaming videos to life, use the Filmora software.
How to Add a Custom Transition to OBS
OBS Studio is an open-source video editor that is widely popular for live streaming on online platforms. Even though OBS is a completely free application, its features are comparable to any premium video editor. We always look for available transition effects in a video editor and OBS takes it to the next level by allowing users to add custom transitions.
Among custom transitions, Stinger transitions have gained a lot of traction from the users. Stinger transitions are made popular by sports channels who use Stinger frequently whenever there is a change in the scene. We will illustrate how to add custom transitions in OBS and apply Stinger transitions in your video.
Part 1. What is Stinger in OBS
Stinger is a special type of customized animated video transition effect that is available in the latest version of OBS Studio. It is a combination of a transparent video animation and a cut transition. Stinger begins with the transparent video animation that grows into full-screen overlay, and it is followed by the cut transition. After the cut transition, you place the next scene or video clip. You will notice Stinger transition whenever sports channels show an instant replay during a live match.
The transparent video animation starts on top of the current video you are editing. When the animation expands and covers up the entire screen, you place the cut transition, and thereafter, you place the next video clip or scene as per your requirement. Some customized stinger effect also includes audio effects along with video effect.
Part 2. How to add stinger transitions to OBS
The Stinger transition is available on OBS Studio and Streamlabs, and both of them are open-source and free applications. Before you add stinger transition, you should have a video animation ready that you will play on top of the current video followed by the cut transition effect. You can download several stinger video animations from the internet and include any of them in OBS while adding stinger transition. Here are the steps on how to add a custom transition to OBS.
Step1 Go to Scene Transitions section and click on Effects option to open the drop-down menu.
Step2 From the drop-down menu, click on “Add: Stinger” option.

Step3 Give a name to the Stinger transition and click Ok button.

Step4 You will see Properties window now. Click on Browser button against Video file and select the transparent video animation file that you want to play on top of the current video before applying the cut transition effect.

Step5 For Transition Point Type, select Time(milliseconds) option. In the Transition Point field, add the duration of the transparent video animation so that the transition to the next scene takes place immediately after the video animation gets completed.

Step6 If your video animation has audio, go to Audio Monitoring and select Monitor and Output option from the dropdown. For Audio Fade Style, you can select Crossfade option for better output.

Step7 Scroll down and click on Preview Transition button to check if the stinger transition is taking place as expected. You can adjust the transition point and other parameters to get it perfect.

Step8 Finally, click on Ok button and play the video to check out the stinger transition on the big screen.
The steps on how to add a custom transition to Streamlabs OBS are almost similar, and therefore, you can add stinger transition using Streamlabs comfortably.
Part 3. OBS Alternative to Add Transitions
There is no denying the fact that OBS Studio has a complicated user interface. That is why most amateur video editors find OBS Studio difficult to learn quickly even though there is no dearth of features. Apart from add custom transition OBS, there are very limited effects available on OBS Studio. That is why many users look for an OBS alternative to add transitions to their videos.
We recommend Wondershare Filmora as the best alternative to OBS Studio when it comes to adding transition effects. That is because Filmora is a professional video editor with a wide range of effects. Most importantly, Filmora is widely loved by amateurs and professionals for its intuitive user interface. Here are the steps on how to add transitions to your video in Filmora.
Free Download For Win 7 or later(64-bit)
Free Download For macOS 10.14 or later
Step1 Download and install Filmora as per your operating system. Open Filmora and click on New Project option.

Step2 Import or drop your video clips under Project Media folder. Then drag and drop them on Timeline and place them sequentially as appropriate.

Step3 Go to Transitions tab located at the top of the application screen. You will see different categories of transitions on the left side.

Step4 Check them out and once you have selected one to apply, drag and drop it in between the video clips.

Step5 Play the video and click on Export button to save the video.
Part 4: Related FAQs about OBS Transitions
How do I add a transition overlay in OBS?
You need to go to Scene Transition tab and select any transition overlay effect that is available. Thereafter, you can change the settings and parameters to customize the transition effect as per your requirements. Apart from the built-in transitions, you can download and add plugins for more transitions.
Can you have different scene transitions in OBS?
Yes, you can have different scene transitions in OBS Studio. You can add them directly from Scene Transition tab one by one as per your requirements. You can add them in between scenes so that the transition effects play when you switch between scenes.
How do I download transitions in OBS?
Go to the OBS Forums from where you get to download transitions for OBS Studio. Click on Download button and download plugin installer as per your operating system. Double-click the installer file to install it on your computer. Go to OBS Studio and go to Scene Transition to use the installed transition.
Free Download For macOS 10.14 or later
Step1 Download and install Filmora as per your operating system. Open Filmora and click on New Project option.
Step2 Import or drop your video clips under Project Media folder. Then drag and drop them on Timeline and place them sequentially as appropriate.
Step3 Go to Transitions tab located at the top of the application screen. You will see different categories of transitions on the left side.
Step4 Check them out and once you have selected one to apply, drag and drop it in between the video clips.
Step5 Play the video and click on Export button to save the video.
Part 4: Related FAQs about OBS Transitions
How do I add a transition overlay in OBS?
You need to go to Scene Transition tab and select any transition overlay effect that is available. Thereafter, you can change the settings and parameters to customize the transition effect as per your requirements. Apart from the built-in transitions, you can download and add plugins for more transitions.
Can you have different scene transitions in OBS?
Yes, you can have different scene transitions in OBS Studio. You can add them directly from Scene Transition tab one by one as per your requirements. You can add them in between scenes so that the transition effects play when you switch between scenes.
How do I download transitions in OBS?
Go to the OBS Forums from where you get to download transitions for OBS Studio. Click on Download button and download plugin installer as per your operating system. Double-click the installer file to install it on your computer. Go to OBS Studio and go to Scene Transition to use the installed transition.
A Complete Guideline To Better Use QuickTime Player
While designing the iOS and macOS for its dedicated devices, Apple created multiple supporting software that competes for the best in the market. An example is the QuickTime Player, a state-of-the-art, built-in video player available across Mac. This article shall introduce a detailed analysis and overview of QuickTime Player along with major QuickTime formats and features.
Come along as we explore more about QuickTime Player! You surely will get to know much about the tool before using it.
In this article
01 Key Features of QuickTime Player
02 List of QuickTime File Format
03 How to Play Videos with QuickTime
04 How to Do Screen Recording with QuickTime?
05 How to Convert Video File to MOV Format in QuickTime?
06 Top Recommended Video Editor in 2022 – Filmora Video Editor
Part 1: Key Features of QuickTime Player
Multiple highlighting features can be discovered across QuickTime Player. While a basic built-in video player, the tool outshines other video players for the following features, making it a special choice for users working across Mac. Let us look into these features to know more about QuickTime.
Record Across the Player
QuickTime Player offers users a variety of options in recording across the tool. With the basic screen recording where the user potentially sets up the area for recording and other settings, users can also record audio and movies across QuickTime. Doesn’t it sound awesome?
Editing with QuickTime
This video player is much more than a simple video player. Users can effectively use this tool for editing their videos in numerous ways. From trimming video or audio to splitting videos across the player, there are multiple options available that can be accessed easily. The user can also merge and rotate their clips according to their convenience. Sounds convenient, doesn’t it?
Change Resolution of Video
Want to change the resolution of a video? QuickTime Player allows you to potentially change the resolution of the video according to your requirement. If you have a 4K video of huge size, QuickTime Player can easily change its resolution to 1080p, 720p, or 480p, as per the requirement of the user.
Sharing Videos Directly
One of the most impressive options available across QuickTime Player is to share the video directly across different platforms. Users can share their video through Mail, Messages, AirDrop, Vimeo, Facebook, Flickr, YouTube, and several other options supported by QuickTime. Get it shared anywhere!
Part 2: List of QuickTime File Format
QuickTime offers a tangible list of file formats that can be operated across the video player. The following list shows all the QuickTime file format that can run across it:
Video File Formats
- QuickTime Movie (.mov)
- MPEG-4 (.mp4, .m4v)
- MPEG-1
- 3GPP
- 3GPP2
- AVI
- DV
Audio File Formats
- iTunes Audio (.m4a, .m4b, .m4p)
- MP3
- Core Audio (.caf)
- AIFF
- AU
- SD2
- WAV
- SND
- AMR
Part 3: How to Play Videos with QuickTime
Once you know how QuickTime Player makes it easy for Mac users to play their video, it is time to understand the steps associated with the procedure. Two basic techniques can be implemented to play videos with QuickTime. The first method to play videos with QuickTime are featured as follows:
Step 1: You need to open QuickTime Player across your Mac. For that, proceed across Launchpad to access the application.

Step 2: Once the player is launched, you can simply select any video across the window that opens up. Once selected, tap “Open” to play it across QuickTime.

Sounds easy, right? However, if you have multiple videos to open or have other video players installed in your Mac, you should consider following this second approach. If QuickTime Player is not your default video player, it is important to follow the steps below for opening any video across QuickTime.
Step 1: Open Finder on your device and proceed to locate the video that you wish to open across QuickTime. On finding the video, click on the video while holding the “Control” button on the keyboard. This opens a drop-down menu.

Step 2: In the “Open With” section across the menu, you will find the option of QuickTime Player. Tap on the option to open the video across QuickTime.

Part 4: How to Do Screen Recording with QuickTime?
Several functions can be performed across QuickTime. While the QuickTime video format allows you to play different videos across the platform, it also helps users record screens of their choice. To understand the step-by-step procedure, you need to follow the steps displayed below. Come along and learn more about it.
Step 1: Open QuickTime Player on your device and tap on the “File” tab on the top of the screen. Select the option of “New Screen Recording” from the available options to initiate screen recording.

Step 2: The next window opens up, which involves managing the screen recording settings. You need to set up the screen area recorded in the process initially.

Step 3: After setting the screen area, tap on “Options” to specify the microphone settings, the location where the recording will be saved, the timer, and other significant options that are important for screen recording. Click on the “Record” button to start.

Step 4: Once you have recorded the appropriate screen, click on the “Stop” sign appearing on the top of the window to conclude recording and save it across the decided location.

Part 5: How to Convert Video File to MOV Format in QuickTime?
QuickTime Player is not quite extensive when it comes to converting video files. Although there are several QuickTime format files that you may come across and play across the platform, it only converts any video file into MOV format, which is the dedicated file format potentially designed by Apple. To understand the method to convert any QuickTime video format to MOV format, follow the steps shown below:
Step 1: You need to open the appropriate video across QuickTime to convert it accordingly. Once opened, tap on the “File” tab, and select “Export as” across the available options.

Step 2: You need to select an appropriate resolution from the available options according to the video quality that you want the video to be saved in on the preceding menu. QuickTime player will show low-quality resolutions for the high-quality video but not vice versa.

Step 3: A new window opens that requires you to set up the name and location for the video. Add the file extension “.mov” at the end of the name of the video to convert it into MOV format.

Extra Tips: Top Recommended Video Editor in 2022 – Filmora Video Editor
Video players are important for running videos across your devices. However, the significance of a video editor is as primary as a video player in the market. When selecting the best video editor for making changes in your video before posting and viewing it across devices, there are multiple factors that a user looks into.
Wondershare Filmora offers unique and extensive features to its users at a price that is unmatched by the other players in the market. When it comes to basic video editing, the platform features the simplest set of tools that helps users enhance their video to perfection. Along with that, Filmora even allows you to add in music, effects, and transitions as desired. Isn’t it the dream?

For Win 7 or later (64-bit)
For macOS 10.12 or later
With such tools available, Filmora is recognized for its ability to make editing simple for users. There is no need for the user to be a professional in editing for making changes across Filmora. Any individual who is new to video editing can efficiently use the platform for their needs. Along with that, Filmora even allows users to make changes across the audios, both within the videos and separately. It surely is perfect!
Closing Words
Got to know much about QuickTime Player? This effective video player is the best available in the market for Mac users. While supporting different QuickTime file format, users can make significant changes across their videos with the tool. QuickTime allows them to make edits, convert, and record screens easily. This is what makes it a special choice in the market.
02 List of QuickTime File Format
03 How to Play Videos with QuickTime
04 How to Do Screen Recording with QuickTime?
05 How to Convert Video File to MOV Format in QuickTime?
06 Top Recommended Video Editor in 2022 – Filmora Video Editor
Part 1: Key Features of QuickTime Player
Multiple highlighting features can be discovered across QuickTime Player. While a basic built-in video player, the tool outshines other video players for the following features, making it a special choice for users working across Mac. Let us look into these features to know more about QuickTime.
Record Across the Player
QuickTime Player offers users a variety of options in recording across the tool. With the basic screen recording where the user potentially sets up the area for recording and other settings, users can also record audio and movies across QuickTime. Doesn’t it sound awesome?
Editing with QuickTime
This video player is much more than a simple video player. Users can effectively use this tool for editing their videos in numerous ways. From trimming video or audio to splitting videos across the player, there are multiple options available that can be accessed easily. The user can also merge and rotate their clips according to their convenience. Sounds convenient, doesn’t it?
Change Resolution of Video
Want to change the resolution of a video? QuickTime Player allows you to potentially change the resolution of the video according to your requirement. If you have a 4K video of huge size, QuickTime Player can easily change its resolution to 1080p, 720p, or 480p, as per the requirement of the user.
Sharing Videos Directly
One of the most impressive options available across QuickTime Player is to share the video directly across different platforms. Users can share their video through Mail, Messages, AirDrop, Vimeo, Facebook, Flickr, YouTube, and several other options supported by QuickTime. Get it shared anywhere!
Part 2: List of QuickTime File Format
QuickTime offers a tangible list of file formats that can be operated across the video player. The following list shows all the QuickTime file format that can run across it:
Video File Formats
- QuickTime Movie (.mov)
- MPEG-4 (.mp4, .m4v)
- MPEG-1
- 3GPP
- 3GPP2
- AVI
- DV
Audio File Formats
- iTunes Audio (.m4a, .m4b, .m4p)
- MP3
- Core Audio (.caf)
- AIFF
- AU
- SD2
- WAV
- SND
- AMR
Part 3: How to Play Videos with QuickTime
Once you know how QuickTime Player makes it easy for Mac users to play their video, it is time to understand the steps associated with the procedure. Two basic techniques can be implemented to play videos with QuickTime. The first method to play videos with QuickTime are featured as follows:
Step 1: You need to open QuickTime Player across your Mac. For that, proceed across Launchpad to access the application.
Step 2: Once the player is launched, you can simply select any video across the window that opens up. Once selected, tap “Open” to play it across QuickTime.
Sounds easy, right? However, if you have multiple videos to open or have other video players installed in your Mac, you should consider following this second approach. If QuickTime Player is not your default video player, it is important to follow the steps below for opening any video across QuickTime.
Step 1: Open Finder on your device and proceed to locate the video that you wish to open across QuickTime. On finding the video, click on the video while holding the “Control” button on the keyboard. This opens a drop-down menu.
Step 2: In the “Open With” section across the menu, you will find the option of QuickTime Player. Tap on the option to open the video across QuickTime.
Part 4: How to Do Screen Recording with QuickTime?
Several functions can be performed across QuickTime. While the QuickTime video format allows you to play different videos across the platform, it also helps users record screens of their choice. To understand the step-by-step procedure, you need to follow the steps displayed below. Come along and learn more about it.
Step 1: Open QuickTime Player on your device and tap on the “File” tab on the top of the screen. Select the option of “New Screen Recording” from the available options to initiate screen recording.
Step 2: The next window opens up, which involves managing the screen recording settings. You need to set up the screen area recorded in the process initially.
Step 3: After setting the screen area, tap on “Options” to specify the microphone settings, the location where the recording will be saved, the timer, and other significant options that are important for screen recording. Click on the “Record” button to start.
Step 4: Once you have recorded the appropriate screen, click on the “Stop” sign appearing on the top of the window to conclude recording and save it across the decided location.
Part 5: How to Convert Video File to MOV Format in QuickTime?
QuickTime Player is not quite extensive when it comes to converting video files. Although there are several QuickTime format files that you may come across and play across the platform, it only converts any video file into MOV format, which is the dedicated file format potentially designed by Apple. To understand the method to convert any QuickTime video format to MOV format, follow the steps shown below:
Step 1: You need to open the appropriate video across QuickTime to convert it accordingly. Once opened, tap on the “File” tab, and select “Export as” across the available options.
Step 2: You need to select an appropriate resolution from the available options according to the video quality that you want the video to be saved in on the preceding menu. QuickTime player will show low-quality resolutions for the high-quality video but not vice versa.
Step 3: A new window opens that requires you to set up the name and location for the video. Add the file extension “.mov” at the end of the name of the video to convert it into MOV format.
Extra Tips: Top Recommended Video Editor in 2022 – Filmora Video Editor
Video players are important for running videos across your devices. However, the significance of a video editor is as primary as a video player in the market. When selecting the best video editor for making changes in your video before posting and viewing it across devices, there are multiple factors that a user looks into.
Wondershare Filmora offers unique and extensive features to its users at a price that is unmatched by the other players in the market. When it comes to basic video editing, the platform features the simplest set of tools that helps users enhance their video to perfection. Along with that, Filmora even allows you to add in music, effects, and transitions as desired. Isn’t it the dream?
For Win 7 or later (64-bit)
For macOS 10.12 or later
With such tools available, Filmora is recognized for its ability to make editing simple for users. There is no need for the user to be a professional in editing for making changes across Filmora. Any individual who is new to video editing can efficiently use the platform for their needs. Along with that, Filmora even allows users to make changes across the audios, both within the videos and separately. It surely is perfect!
Closing Words
Got to know much about QuickTime Player? This effective video player is the best available in the market for Mac users. While supporting different QuickTime file format, users can make significant changes across their videos with the tool. QuickTime allows them to make edits, convert, and record screens easily. This is what makes it a special choice in the market.
Also read:
- In 2024, If You Want to Know How to Live Stream Pre-Recorded Video, You Are in the Right Place. We Will Give You a Complete Guide on 8 Ways You Can Live Stream Pre-Recorded Videos Successfully
- New 2024 Approved 2 Ways to Add Custom Subtitles to Netflix
- In 2024, Do You Wish to Convert GIF to Animated PNG? Then, You Need to Know About Using a GIF to APNG Converter to Help You Carry This Process Out in No Time. Read On
- New In 2024, How to Create Sports Intro and Outro for YouTube Video?
- 2024 Approved Looking for a Way to Learn How to Merge Videos in HandBrake? Theres a Better Solution Waiting for You Inside
- New Wondering About How to Easily Create a Slideshow on Your iPhone? Well, Take Note of some of the Finest Apps to Turn Your Vision Into Reality
- Updated 3 Effective Methods to Correct Color Distortion in Videos for 2024
- New Best Jump Cut Editing Tricks for 2024
- Updated In 2024, Finding LUTs Made by Danny Gevirtz
- Doable Ways to Make Transparent Background in Procreate for 2024
- New Easy Steps to Slow Down a Video on iPhone and Android
- New 2024 Approved Detailed Tutorial to Rotate Videos in Cyberlink PowerDirector
- How Have Game Recording Software Improved Their Stature in the Market? An Overview
- New Easily Sync Audio With Video With Filmora
- Do You Want to Record Videos with a Phantom High-Speed Camera? In This Guide, You Can Get a Detailed Note on the Phantom Camera for 2024
- Some Facts About GIF Background You Didnt Know for 2024
- In 2024, How to Add Video Effects with Movavi Slideshow Maker
- Detailed Tutorial to Crop a Video Using Openshot, In 2024
- New Secret Tips & Tricks to Use in Filmora
- 2024 Approved Ever Wondered About the Similarity You Bear with an Anime Character? If You Have Not yet Looked Into This Exciting Aspect of Motion Graphic Design, You Can Very Well Break the Ice Here
- How to Make Double Exposure Effect in Filmora
- Updated How To Use Virtual Green Screen to Shoot Video
- New In 2024, How to Make a Neon Dance Effect With Filmora
- New 15 Must-Use Gifs Editors for 2024
- Updated Do You Want to Add Voiceovers to Your Video Project? Wondershare Filmora Is an Amazing Tool that Lets You Add Audio Files, Including Voiceovers
- Updated How to Create The Best Video Collages for 2024
- In 2024, Are You Looking to Turn on the Motion Blur Effect in Minecraft? Learn How You Can Turn the Effect on or Off with the Help of the Best Methods
- Rules of Three or Thirds Is a Classic Trick in Photography, and the Result of Video and Photo Is Really Great. This Article Will Show You How to Use Rule of Thirds to Make a Better Video for 2024
- Updated In 2024, How to Edit Recorded Video
- 2024 Approved How Can You Get VHS Filter and Glitch Filter to Your Images or Videos?
- New In 2024, 12 Top Marketing Slideshow Templates
- Best GIF to AVI Converters for 2024
- New 2024 Approved Camtasia Video Editor Review
- Updated 2024 Approved How to Make Loop Video in PowerPoint
- 2024 Approved Video Editors Use the Loading Text Effect to Create Impressive and Descriptive Videos. Let Us Understand the Detailed Steps to Customize the Loading Text Effect in Wondershare Filmora
- In 2024, Tips and Tricks for Setting Up your Realme Narzo 60x 5G Phone Pattern Lock
- In 2024, Preparation to Beat Giovani in Pokemon Go For Samsung Galaxy F34 5G | Dr.fone
- In 2024, Planning to Use a Pokemon Go Joystick on Apple iPhone 6? | Dr.fone
- 15 Best Strongest Pokémon To Use in Pokémon GO PvP Leagues For Motorola Razr 40 Ultra | Dr.fone
- Best 10 Mock Location Apps Worth Trying On Samsung Galaxy A15 4G | Dr.fone
- In 2024, 9 Best Free Android Monitoring Apps to Monitor Phone Remotely For your Nokia C22 | Dr.fone
- 9 Best Phone Monitoring Apps for Oppo A59 5G | Dr.fone
- 3 Easy Ways to Factory Reset a Locked Apple iPhone 6s Plus Without iTunes
- In 2024, Top 4 Ways to Trace Apple iPhone 15 Pro Max Location | Dr.fone
- How to Fake GPS on Android without Mock Location For your Xiaomi Redmi K70E | Dr.fone
- How to restore wiped music on Oppo
- How to Fix Videos Not Playing on Motorola G54 5G?
- In 2024, Latest way to get Shiny Meltan Box in Pokémon Go Mystery Box On Apple iPhone 8 Plus | Dr.fone
- Android Unlock Code Sim Unlock Your Huawei Nova Y91 Phone and Remove Locked Screen
- In 2024, All You Need To Know About Mega Greninja For Huawei Nova Y91 | Dr.fone
- In 2024, Remove the Lock Screen Fingerprint Of Your Oppo A2
- Title: Updated 2024 Approved How to Merge Videos in HandBrake? Expectation Vs. Reality
- Author: Chloe
- Created at : 2024-04-24 07:08:36
- Updated at : 2024-04-25 07:08:36
- Link: https://ai-editing-video.techidaily.com/updated-2024-approved-how-to-merge-videos-in-handbrake-expectation-vs-reality/
- License: This work is licensed under CC BY-NC-SA 4.0.
