
Updated 2024 Approved Shotcut Video Editor Review

Shotcut Video Editor Review
If you are looking for a free video editor, you should definitely opt for an open-source video editor. They come free of cost without locking any feature and they are compatible with all desktop operating systems. The user interface of Shotcut looks powerful still easy to operate. There are dockable panels and flexible layouts to customize the interface.
Coming to the features, there are plenty of video effects and filters to enhance video content. You can do all the standard video editing works comfortably. There are certain advanced features available such as keyframe, audio mixing and much more. However, can we consider Shotcut video editor the best for editing professional-quality videos? Find out the complete Shotcut reviews.
Part 1. How to Download and Install Shotcut
Shotcut is completely compatible with Windows, Mac and Linux. The company has discontinued Shotcut 32 bit version and the current version only supports 64 bit computer. Shotcut is safe to download and the installer is free of spyware and malware. Here are the steps to download and install Shotcut.

Step 1: From your web browser, visit “shotcut.org/download”. It automatically detects your operating system and provides you the installer to download Shotcut that could be compatible with your system.
Step 2: You can download the installer from Site 1(FossHub) or Site 2(GitHub). Besides, you can download the .exe file from Windows installer link or .zip file from Windows portable zip file.
Step 3: After downloading the installer file, install Shotcut from it by following the on-screen instructions.
Step 4: After installation, launch Shotcut and import all video and audio clips from Open File option. Bring them down to Timeline for basic editing.
Part 2. Key Features of Shotcut
Shotcut has all the standard features for basic video editing. Before downloading Shotcut, you should be aware of the features so that you can decide whether the video editor is suitable for your video editing purpose. Here are all the key features of Shotcut that stand out.
Video Capture – You can capture your screen as well as webcam video. Shotcut supports audio capture from the system as well as from the external mic. In fact, the software supports 4K resolution which is great being an open-source video editor.
Standard Editing – You can trim video clips and perform cut-copy-paste on clips. You can also append clips, insert clips in between, and extract audio from the videos. There are keyframes for video filters, presents, and markers. You can drag and drop files and keep notes. Besides, Shotcut uses proxy editing for handling high-resolution video files.
Audio Features – Shotcut comes with several audio filters that you can apply on your audio clips to enhance them. There are options for volume control, audio mixing, tone generator, and pitch adjustment. The popular fade in and fade out effects are also available along with audio scopes.
Video Effects – There is no dearth of effects and filters on Shotcut. In fact, you can compare Shotcut with premium video editors when it comes to video filters. Besides, there are blending modes and track compositing. Moreover, there are several transitions and deinterlacing. You can opt for 360-degree filters and reverse video clips as well as use video scopes.
Wide Support – Shotcut supports almost all the different video and audio formats. In fact, you get to select different photo file formats. The multi-format timeline supports mixing video and audio of different parameters perfectly. The software also supports network streaming and alpha channel videos.
Part 3. How to Edit Videos with Shotcut
Shotcut is good as a free video editor for standard editing options. You can add texts and titles, crop and trim video clips, as well as split and join clips. Besides, you can control the speed of the video clips as well as add transitions. Thereafter, you can export the video and publish online. Here are the steps about Shotcut editing videos.
Step 1: Launch Shotcut and go to File> New. Select Projects Folder and Video Mode and enter Project Name. Finally, click on Start button to get started.
Step 2: Go to View> Layout> Timeline Project for the best editing layer.
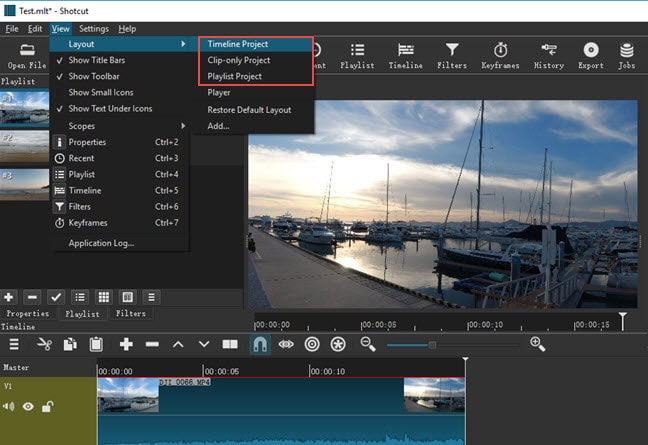
Step 3: To import media files, go to File> Open File> and select media files.
Step 4: To add texts, go to Filters> “+” icon> Video tab> select “Text:Simple”. Thereafter, type anything and choose a font and select any color.

Step 5: To crop any video, go to Filters> Video> and Crop option. You can select various geometry shapes as you think appropriate.
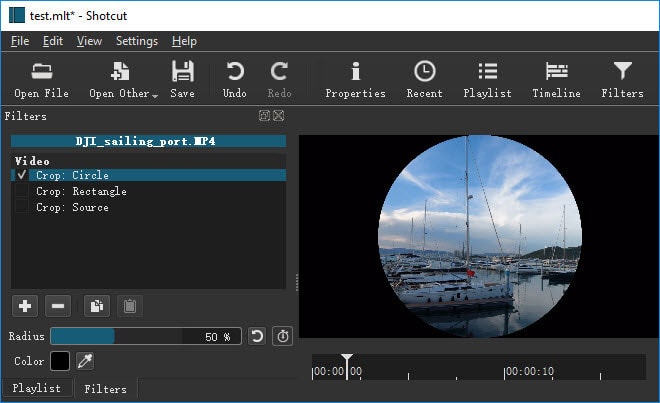
Step 6: To add transitions, keep two clips on the same track and get them overlapped. Choose a transition from Properties and apply to your video.
Step 7: Finally, go to File> Export Video option. You can choose from different option and select frame rate, video resolution, and others from Advanced option.

Part 4. Shotcut Alternative to Edit Videos
There are many reasons why you could be looking for a better alternative to Shotcut. First of all, there is a big lack of advanced video editing features. That is why editing professional-quality videos with Shotcut is not highly feasible. The user interface is not as robust as the standard user interface of video. The editing cannot be as fluent as any premium and professional video editor. That is why we recommend Wondershare Filmora as the best alternative to Shotcut.
Wondershare Filmora is a premium video editor where there is a perfect balance of standard and advanced features. You can also capture screen and webcam video. There are tons of transitions, effects, filters, elements, and much more. There is also a stock media library available. Filmora has wider support for different file formats. Here are the steps on how to edit videos with Filmora.
For Win 7 or later (64-bit)
For macOS 10.12 or later
Step 1: Download and install Filmora as per your operating system. Launch Filmora and click on New Project option on the welcome screen. Drag and drop media files into Project Media folder.
Step 2: Drag and drop video clips and audio clips on the timeline in proper sequence. Thereafter, you can do basic editing such as trimming, cropping, splitting, and much more.

Step 3: Go to Transitions option and add your desired transitions in between clips. You can also opt for Titles for texts, Effects for animations, and Elements for objects.

Step 4: Once you are satisfied with the editing, click on Export button to save your video to your hard drive.

Part 5. FAQs about Shotcut
**Is Shotcut totally free?
Yes, Shotcut is a completely free video editor as it belongs to the open-source software category. It is available for free for Windows, Mac, and Linux users. All the features are completely unlocked, and there is no premium version available.
**Is Openshot better than Shotcut?
Openshot is equally good as Shotcut in terms of features. But in terms of user experience and editing 4K videos, Shotcut scores better than Openshot. Shotcut is a more lightweight video editor, and hence, the chances of crashes are relatively low.
**Is Shotcut good for YouTube?
Shotcut is particularly good for YouTube if you need only basic editing on your videos. You can export the edited video file from Shotcut to YouTube after basic editing. You can get eh frame rate, video resolution, and aspect ratio as per your requirements.
For macOS 10.12 or later
Step 1: Download and install Filmora as per your operating system. Launch Filmora and click on New Project option on the welcome screen. Drag and drop media files into Project Media folder.
Step 2: Drag and drop video clips and audio clips on the timeline in proper sequence. Thereafter, you can do basic editing such as trimming, cropping, splitting, and much more.

Step 3: Go to Transitions option and add your desired transitions in between clips. You can also opt for Titles for texts, Effects for animations, and Elements for objects.

Step 4: Once you are satisfied with the editing, click on Export button to save your video to your hard drive.

Part 5. FAQs about Shotcut
**Is Shotcut totally free?
Yes, Shotcut is a completely free video editor as it belongs to the open-source software category. It is available for free for Windows, Mac, and Linux users. All the features are completely unlocked, and there is no premium version available.
**Is Openshot better than Shotcut?
Openshot is equally good as Shotcut in terms of features. But in terms of user experience and editing 4K videos, Shotcut scores better than Openshot. Shotcut is a more lightweight video editor, and hence, the chances of crashes are relatively low.
**Is Shotcut good for YouTube?
Shotcut is particularly good for YouTube if you need only basic editing on your videos. You can export the edited video file from Shotcut to YouTube after basic editing. You can get eh frame rate, video resolution, and aspect ratio as per your requirements.
For macOS 10.12 or later
Step 1: Download and install Filmora as per your operating system. Launch Filmora and click on New Project option on the welcome screen. Drag and drop media files into Project Media folder.
Step 2: Drag and drop video clips and audio clips on the timeline in proper sequence. Thereafter, you can do basic editing such as trimming, cropping, splitting, and much more.

Step 3: Go to Transitions option and add your desired transitions in between clips. You can also opt for Titles for texts, Effects for animations, and Elements for objects.

Step 4: Once you are satisfied with the editing, click on Export button to save your video to your hard drive.

Part 5. FAQs about Shotcut
**Is Shotcut totally free?
Yes, Shotcut is a completely free video editor as it belongs to the open-source software category. It is available for free for Windows, Mac, and Linux users. All the features are completely unlocked, and there is no premium version available.
**Is Openshot better than Shotcut?
Openshot is equally good as Shotcut in terms of features. But in terms of user experience and editing 4K videos, Shotcut scores better than Openshot. Shotcut is a more lightweight video editor, and hence, the chances of crashes are relatively low.
**Is Shotcut good for YouTube?
Shotcut is particularly good for YouTube if you need only basic editing on your videos. You can export the edited video file from Shotcut to YouTube after basic editing. You can get eh frame rate, video resolution, and aspect ratio as per your requirements.
For macOS 10.12 or later
Step 1: Download and install Filmora as per your operating system. Launch Filmora and click on New Project option on the welcome screen. Drag and drop media files into Project Media folder.
Step 2: Drag and drop video clips and audio clips on the timeline in proper sequence. Thereafter, you can do basic editing such as trimming, cropping, splitting, and much more.

Step 3: Go to Transitions option and add your desired transitions in between clips. You can also opt for Titles for texts, Effects for animations, and Elements for objects.

Step 4: Once you are satisfied with the editing, click on Export button to save your video to your hard drive.

Part 5. FAQs about Shotcut
**Is Shotcut totally free?
Yes, Shotcut is a completely free video editor as it belongs to the open-source software category. It is available for free for Windows, Mac, and Linux users. All the features are completely unlocked, and there is no premium version available.
**Is Openshot better than Shotcut?
Openshot is equally good as Shotcut in terms of features. But in terms of user experience and editing 4K videos, Shotcut scores better than Openshot. Shotcut is a more lightweight video editor, and hence, the chances of crashes are relatively low.
**Is Shotcut good for YouTube?
Shotcut is particularly good for YouTube if you need only basic editing on your videos. You can export the edited video file from Shotcut to YouTube after basic editing. You can get eh frame rate, video resolution, and aspect ratio as per your requirements.
How to Create Sports Intro and YouTube Endscreen?
Are you deep into sports? Have you created a sports channel on YouTube but are still clueless? You do not need to panic. The article has got you covered.
There is an extensive range of sports channels on YouTube struggling and surviving. It includes gaming, exercise, athletics, basketball, hockey, and tennis sports. A promising sports background music in the intro and outro makes it appealing for the audience. Hence, the article will focus on three platforms for exercise downloading impeccable background music.
The step-by-step guide to creating an outstanding sports intro will also be sketched out. So, what are we waiting for? Time to commence this!
In this article
01 How to Create an Epic Sports Intro?
02 How to Edit a Sport Style YouTube Outro or End Screen?
03 3 Recommended Sites to Download Background Music for Exercise Videos
Part 1: How to Create an Epic Sports Intro?
Do you own a sports channel? Continue exploring the section to know more!
A sports channel needs a promising intro to keep the audience interested in the content. An exceptional intro to a sports channel with great music enables you to gain subscribers. The sub-section would cover an extensive procedure to make a startling sports intro with yoga background music or other sport. So, let us start? Shall we?
For Win 7 or later (64-bit)
For macOS 10.12 or later
Step 1: Open Wondershare Filmora from your computer. Now, head to the “Audio” panel to drop a powerful track to the timeline. Use the “Media” panel to import the sports video clips for your intro.
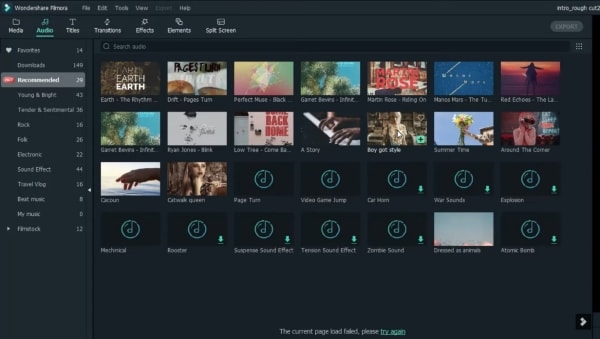
Step 2: Keep the highlights and trim the clips to be in sync with the music. After the editing is concluded, shift your focus to the “Titles.” Move to the Titles panel and use title animations for the “Energy Sports” pack.
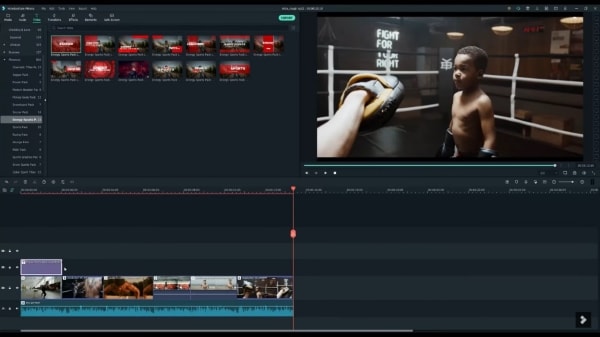
Step 3: Drag and drop the titles on the top of the footage. It would be best to match the duration of the video clips with the titles. Now, double-click the title to rename it according to your need.
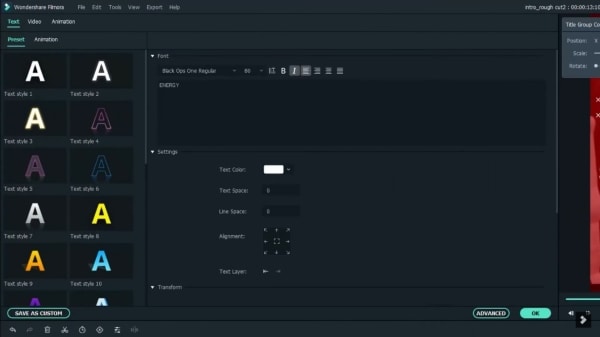
Step 4: To make the ending more powerful, right-click on the last video clip and click on “Speed and Duration.” Enhance the speed to make it engaging. Moving on, navigate to the “Effects” panel.
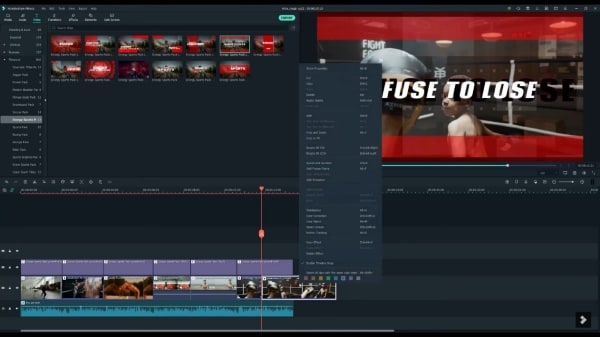
Step 5: From there, pick the “Shake” filter and drag and drop the “Chaos 1” to the last clip. Similarly, click on the “Distortion” filter to drop the “Chromatic Aberration” effect onto the last clip.
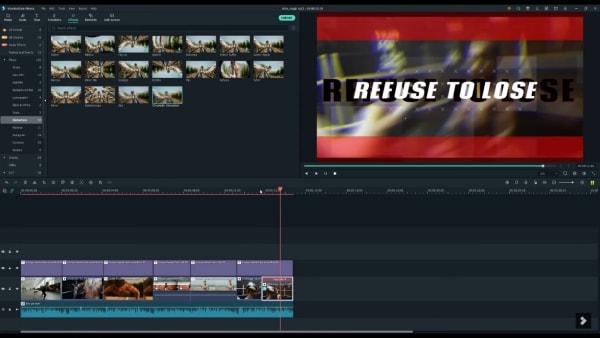
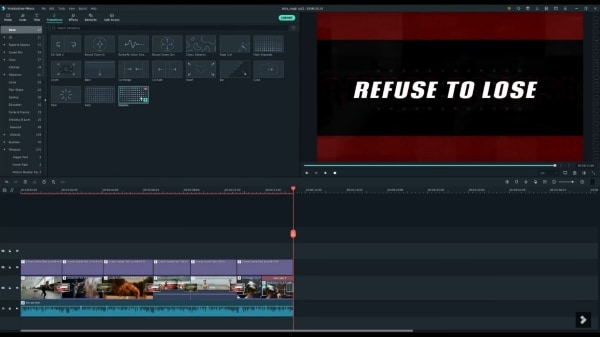
Step 6: Now, it is time to add transitions to create a smooth connection between the clips. Click on “Transitions” and then “Energy Sports” pack. Drag and drop both transitions in between the clips. A creative and captivating sports intro has been created with solid sports background music.
Part 2: How to Edit a Sport Style YouTube Outro or End Screen?
Communicating with the users about a channel doesn’t have to be with words. The background music for exercise expresses the aims of a channel more perfectly. The same goes for a profound sport-style outro which tells the audience that we are ending on a high note.
The sub-section takes the opportunity to offer a step-by-step to edit a sport-style YouTube end screen. So, come with us as we explore it together! Let us go
For Win 7 or later (64-bit)
For macOS 10.12 or later
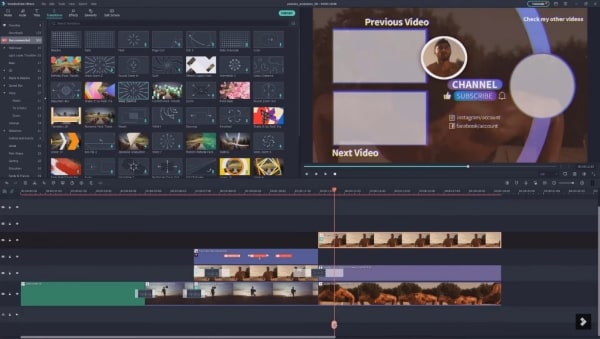
Step 1: To begin, launch Wondershare. Import the targeted video clips that you need as an engaging YouTube outro. After that, click on “Split Screen.” Please choose your favorite split-screen design and drag it to the timeline.
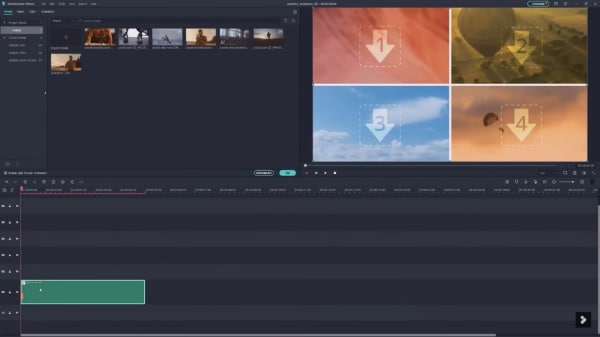
Step 2: Use the imported videos to drag them on the preview window in the split-screen design as selected. You can adjust the scale and position through the mouse click. Now, drag and drop the video onto the timeline and trim it as needed.
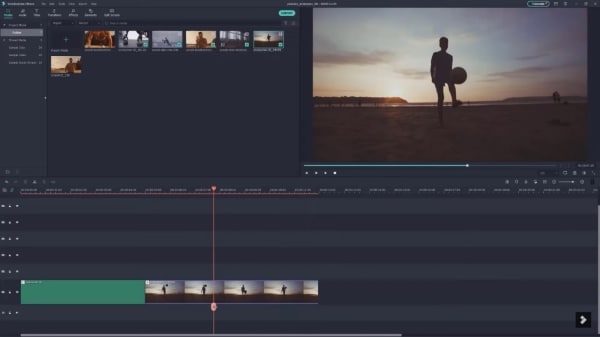
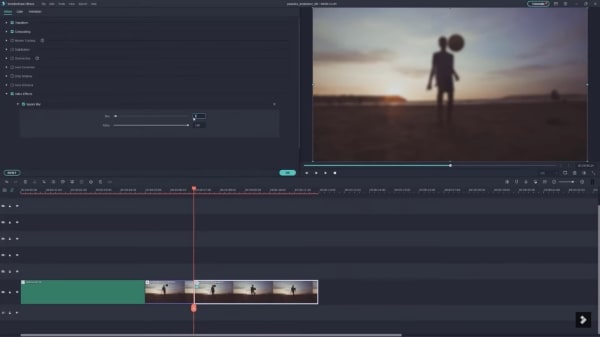
Step 3: Head to the “Effects” tab and search for blur in the space bar. Drag and drop the square blur to the second part of the video. Adjust the blur intensity as required. Import another video and add it to the timeline.
Step 4: Insert dissolved transitions between the first two cuts to smooth the process. Now, it is time to add an avatar image. Import the profile picture to the timeline above the second track. Head to the utility category under the “Effects” tab and drag the “Image Mask” to the image on the timeline.
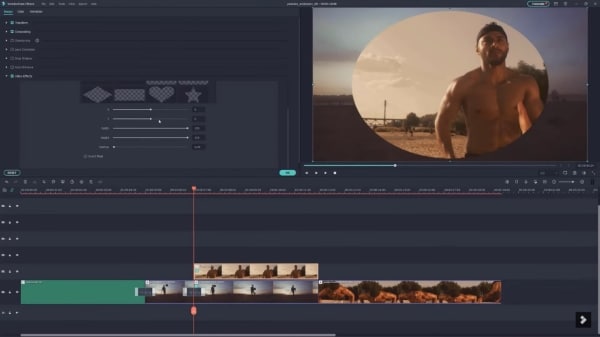
Step 5: Double click on it to alter the masking width so that the circle mask can fit on the image. Scale down the picture and set it to the center of the frame. Navigate to the “Elements” panel and pick the YouTube subscribe button. Drag it to the third track afterward.
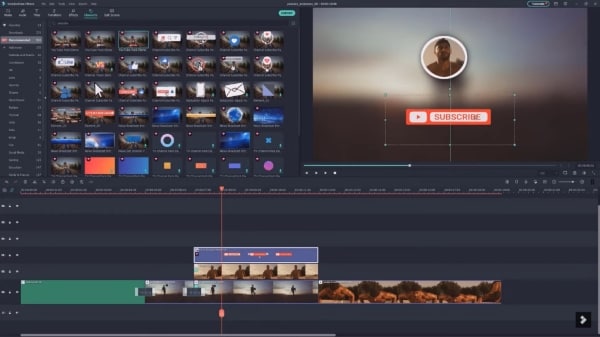
Step 6: Place the location on the preview window as you need. Now, move to the social media category in the “Titles” to choose the perfect one and add it to the timeline above the last clip. The user is instructed to add a transition at the beginning of the clip. Rename the social media names of your sports channel, and you are done with the process.
Part 3: 3 Recommended Sites to Download Background Music for Exercise Videos
Sports background music is one of the significant ways to keep the audience motivated for sports and exercise. It helps enhance the subscribers’ multifold. Therefore, the importance of promising yoga background music cannot be neglected.
Mixkit
Mixkit is a renowned place to access royalty-free marketplaces, bringing revolution to the market and content creators. It is extremely workable to download background music for exercise in seconds. Based on genre, mood, and tag, you can search for a suitable music track.
The trap sport workout, motivating mornings, positive energy, super strong, and the greatest comeback is one of the most exemplary tracks from Mixkit. The audio can be listened to before making the decision. The genre offers ambient, cinematic, funk, hip-hop, acoustic, classical, and electronica.

TunePocket
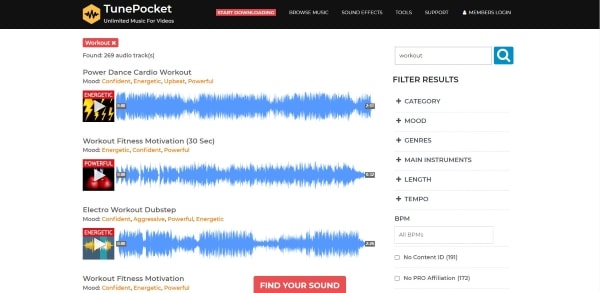
Changing the narrative of music platforms, TunePocket pretty much takes the lead. The filter results make the process flawless. You can tailor the search results by playing with category, mood, genres, instruments, length, and tempo.
The duration of each sports background music is also mentioned to give the content creators an idea. Power dance workout, workout fitness motivation, summer western dance, young gamers, and sports power electro, and techno blast are some examples of outstanding music tracks.
Envato Elements
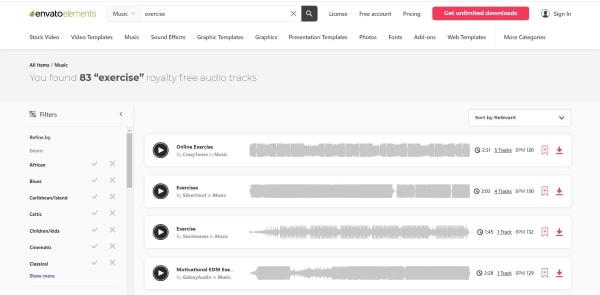
The next on the list is Envato Elements making wonders in the business. The search filters are refined as the user deems necessary. Online exercise, motivational EDM, fitness, workout, corporate meditation, and exercise are some amazing examples of royalty-free music. The search results can be tailored according to relevancy and popularity.
Concluding Remarks
There is an awful load of sports channels on YouTube. The content creators are trying their best to beat the competitors. It is crucial to access energetic background music for exercise to make intro and outro engaging.
The article recommended three apps to download sports background music. The step-by-step guide to creating an inspiring sports intro and editing sports style YouTube outro via Filmora.
Wondershare Filmora
Get started easily with Filmora’s powerful performance, intuitive interface, and countless effects

02 How to Edit a Sport Style YouTube Outro or End Screen?
03 3 Recommended Sites to Download Background Music for Exercise Videos
Part 1: How to Create an Epic Sports Intro?
Do you own a sports channel? Continue exploring the section to know more!
A sports channel needs a promising intro to keep the audience interested in the content. An exceptional intro to a sports channel with great music enables you to gain subscribers. The sub-section would cover an extensive procedure to make a startling sports intro with yoga background music or other sport. So, let us start? Shall we?
For Win 7 or later (64-bit)
For macOS 10.12 or later
Step 1: Open Wondershare Filmora from your computer. Now, head to the “Audio” panel to drop a powerful track to the timeline. Use the “Media” panel to import the sports video clips for your intro.

Step 2: Keep the highlights and trim the clips to be in sync with the music. After the editing is concluded, shift your focus to the “Titles.” Move to the Titles panel and use title animations for the “Energy Sports” pack.

Step 3: Drag and drop the titles on the top of the footage. It would be best to match the duration of the video clips with the titles. Now, double-click the title to rename it according to your need.

Step 4: To make the ending more powerful, right-click on the last video clip and click on “Speed and Duration.” Enhance the speed to make it engaging. Moving on, navigate to the “Effects” panel.

Step 5: From there, pick the “Shake” filter and drag and drop the “Chaos 1” to the last clip. Similarly, click on the “Distortion” filter to drop the “Chromatic Aberration” effect onto the last clip.

Step 6: Now, it is time to add transitions to create a smooth connection between the clips. Click on “Transitions” and then “Energy Sports” pack. Drag and drop both transitions in between the clips. A creative and captivating sports intro has been created with solid sports background music.

Part 2: How to Edit a Sport Style YouTube Outro or End Screen?
Communicating with the users about a channel doesn’t have to be with words. The background music for exercise expresses the aims of a channel more perfectly. The same goes for a profound sport-style outro which tells the audience that we are ending on a high note.
The sub-section takes the opportunity to offer a step-by-step to edit a sport-style YouTube end screen. So, come with us as we explore it together! Let us go
For Win 7 or later (64-bit)
For macOS 10.12 or later
Step 1: To begin, launch Wondershare. Import the targeted video clips that you need as an engaging YouTube outro. After that, click on “Split Screen.” Please choose your favorite split-screen design and drag it to the timeline.

Step 2: Use the imported videos to drag them on the preview window in the split-screen design as selected. You can adjust the scale and position through the mouse click. Now, drag and drop the video onto the timeline and trim it as needed.

Step 3: Head to the “Effects” tab and search for blur in the space bar. Drag and drop the square blur to the second part of the video. Adjust the blur intensity as required. Import another video and add it to the timeline.

Step 4: Insert dissolved transitions between the first two cuts to smooth the process. Now, it is time to add an avatar image. Import the profile picture to the timeline above the second track. Head to the utility category under the “Effects” tab and drag the “Image Mask” to the image on the timeline.

Step 5: Double click on it to alter the masking width so that the circle mask can fit on the image. Scale down the picture and set it to the center of the frame. Navigate to the “Elements” panel and pick the YouTube subscribe button. Drag it to the third track afterward.

Step 6: Place the location on the preview window as you need. Now, move to the social media category in the “Titles” to choose the perfect one and add it to the timeline above the last clip. The user is instructed to add a transition at the beginning of the clip. Rename the social media names of your sports channel, and you are done with the process.

Part 3: 3 Recommended Sites to Download Background Music for Exercise Videos
Sports background music is one of the significant ways to keep the audience motivated for sports and exercise. It helps enhance the subscribers’ multifold. Therefore, the importance of promising yoga background music cannot be neglected.
Mixkit
Mixkit is a renowned place to access royalty-free marketplaces, bringing revolution to the market and content creators. It is extremely workable to download background music for exercise in seconds. Based on genre, mood, and tag, you can search for a suitable music track.
The trap sport workout, motivating mornings, positive energy, super strong, and the greatest comeback is one of the most exemplary tracks from Mixkit. The audio can be listened to before making the decision. The genre offers ambient, cinematic, funk, hip-hop, acoustic, classical, and electronica.

TunePocket
Changing the narrative of music platforms, TunePocket pretty much takes the lead. The filter results make the process flawless. You can tailor the search results by playing with category, mood, genres, instruments, length, and tempo.
The duration of each sports background music is also mentioned to give the content creators an idea. Power dance workout, workout fitness motivation, summer western dance, young gamers, and sports power electro, and techno blast are some examples of outstanding music tracks.

Envato Elements
The next on the list is Envato Elements making wonders in the business. The search filters are refined as the user deems necessary. Online exercise, motivational EDM, fitness, workout, corporate meditation, and exercise are some amazing examples of royalty-free music. The search results can be tailored according to relevancy and popularity.

Concluding Remarks
There is an awful load of sports channels on YouTube. The content creators are trying their best to beat the competitors. It is crucial to access energetic background music for exercise to make intro and outro engaging.
The article recommended three apps to download sports background music. The step-by-step guide to creating an inspiring sports intro and editing sports style YouTube outro via Filmora.
Wondershare Filmora
Get started easily with Filmora’s powerful performance, intuitive interface, and countless effects

02 How to Edit a Sport Style YouTube Outro or End Screen?
03 3 Recommended Sites to Download Background Music for Exercise Videos
Part 1: How to Create an Epic Sports Intro?
Do you own a sports channel? Continue exploring the section to know more!
A sports channel needs a promising intro to keep the audience interested in the content. An exceptional intro to a sports channel with great music enables you to gain subscribers. The sub-section would cover an extensive procedure to make a startling sports intro with yoga background music or other sport. So, let us start? Shall we?
For Win 7 or later (64-bit)
For macOS 10.12 or later
Step 1: Open Wondershare Filmora from your computer. Now, head to the “Audio” panel to drop a powerful track to the timeline. Use the “Media” panel to import the sports video clips for your intro.

Step 2: Keep the highlights and trim the clips to be in sync with the music. After the editing is concluded, shift your focus to the “Titles.” Move to the Titles panel and use title animations for the “Energy Sports” pack.

Step 3: Drag and drop the titles on the top of the footage. It would be best to match the duration of the video clips with the titles. Now, double-click the title to rename it according to your need.

Step 4: To make the ending more powerful, right-click on the last video clip and click on “Speed and Duration.” Enhance the speed to make it engaging. Moving on, navigate to the “Effects” panel.

Step 5: From there, pick the “Shake” filter and drag and drop the “Chaos 1” to the last clip. Similarly, click on the “Distortion” filter to drop the “Chromatic Aberration” effect onto the last clip.

Step 6: Now, it is time to add transitions to create a smooth connection between the clips. Click on “Transitions” and then “Energy Sports” pack. Drag and drop both transitions in between the clips. A creative and captivating sports intro has been created with solid sports background music.

Part 2: How to Edit a Sport Style YouTube Outro or End Screen?
Communicating with the users about a channel doesn’t have to be with words. The background music for exercise expresses the aims of a channel more perfectly. The same goes for a profound sport-style outro which tells the audience that we are ending on a high note.
The sub-section takes the opportunity to offer a step-by-step to edit a sport-style YouTube end screen. So, come with us as we explore it together! Let us go
For Win 7 or later (64-bit)
For macOS 10.12 or later
Step 1: To begin, launch Wondershare. Import the targeted video clips that you need as an engaging YouTube outro. After that, click on “Split Screen.” Please choose your favorite split-screen design and drag it to the timeline.

Step 2: Use the imported videos to drag them on the preview window in the split-screen design as selected. You can adjust the scale and position through the mouse click. Now, drag and drop the video onto the timeline and trim it as needed.

Step 3: Head to the “Effects” tab and search for blur in the space bar. Drag and drop the square blur to the second part of the video. Adjust the blur intensity as required. Import another video and add it to the timeline.

Step 4: Insert dissolved transitions between the first two cuts to smooth the process. Now, it is time to add an avatar image. Import the profile picture to the timeline above the second track. Head to the utility category under the “Effects” tab and drag the “Image Mask” to the image on the timeline.

Step 5: Double click on it to alter the masking width so that the circle mask can fit on the image. Scale down the picture and set it to the center of the frame. Navigate to the “Elements” panel and pick the YouTube subscribe button. Drag it to the third track afterward.

Step 6: Place the location on the preview window as you need. Now, move to the social media category in the “Titles” to choose the perfect one and add it to the timeline above the last clip. The user is instructed to add a transition at the beginning of the clip. Rename the social media names of your sports channel, and you are done with the process.

Part 3: 3 Recommended Sites to Download Background Music for Exercise Videos
Sports background music is one of the significant ways to keep the audience motivated for sports and exercise. It helps enhance the subscribers’ multifold. Therefore, the importance of promising yoga background music cannot be neglected.
Mixkit
Mixkit is a renowned place to access royalty-free marketplaces, bringing revolution to the market and content creators. It is extremely workable to download background music for exercise in seconds. Based on genre, mood, and tag, you can search for a suitable music track.
The trap sport workout, motivating mornings, positive energy, super strong, and the greatest comeback is one of the most exemplary tracks from Mixkit. The audio can be listened to before making the decision. The genre offers ambient, cinematic, funk, hip-hop, acoustic, classical, and electronica.

TunePocket
Changing the narrative of music platforms, TunePocket pretty much takes the lead. The filter results make the process flawless. You can tailor the search results by playing with category, mood, genres, instruments, length, and tempo.
The duration of each sports background music is also mentioned to give the content creators an idea. Power dance workout, workout fitness motivation, summer western dance, young gamers, and sports power electro, and techno blast are some examples of outstanding music tracks.

Envato Elements
The next on the list is Envato Elements making wonders in the business. The search filters are refined as the user deems necessary. Online exercise, motivational EDM, fitness, workout, corporate meditation, and exercise are some amazing examples of royalty-free music. The search results can be tailored according to relevancy and popularity.

Concluding Remarks
There is an awful load of sports channels on YouTube. The content creators are trying their best to beat the competitors. It is crucial to access energetic background music for exercise to make intro and outro engaging.
The article recommended three apps to download sports background music. The step-by-step guide to creating an inspiring sports intro and editing sports style YouTube outro via Filmora.
Wondershare Filmora
Get started easily with Filmora’s powerful performance, intuitive interface, and countless effects

02 How to Edit a Sport Style YouTube Outro or End Screen?
03 3 Recommended Sites to Download Background Music for Exercise Videos
Part 1: How to Create an Epic Sports Intro?
Do you own a sports channel? Continue exploring the section to know more!
A sports channel needs a promising intro to keep the audience interested in the content. An exceptional intro to a sports channel with great music enables you to gain subscribers. The sub-section would cover an extensive procedure to make a startling sports intro with yoga background music or other sport. So, let us start? Shall we?
For Win 7 or later (64-bit)
For macOS 10.12 or later
Step 1: Open Wondershare Filmora from your computer. Now, head to the “Audio” panel to drop a powerful track to the timeline. Use the “Media” panel to import the sports video clips for your intro.

Step 2: Keep the highlights and trim the clips to be in sync with the music. After the editing is concluded, shift your focus to the “Titles.” Move to the Titles panel and use title animations for the “Energy Sports” pack.

Step 3: Drag and drop the titles on the top of the footage. It would be best to match the duration of the video clips with the titles. Now, double-click the title to rename it according to your need.

Step 4: To make the ending more powerful, right-click on the last video clip and click on “Speed and Duration.” Enhance the speed to make it engaging. Moving on, navigate to the “Effects” panel.

Step 5: From there, pick the “Shake” filter and drag and drop the “Chaos 1” to the last clip. Similarly, click on the “Distortion” filter to drop the “Chromatic Aberration” effect onto the last clip.

Step 6: Now, it is time to add transitions to create a smooth connection between the clips. Click on “Transitions” and then “Energy Sports” pack. Drag and drop both transitions in between the clips. A creative and captivating sports intro has been created with solid sports background music.

Part 2: How to Edit a Sport Style YouTube Outro or End Screen?
Communicating with the users about a channel doesn’t have to be with words. The background music for exercise expresses the aims of a channel more perfectly. The same goes for a profound sport-style outro which tells the audience that we are ending on a high note.
The sub-section takes the opportunity to offer a step-by-step to edit a sport-style YouTube end screen. So, come with us as we explore it together! Let us go
For Win 7 or later (64-bit)
For macOS 10.12 or later
Step 1: To begin, launch Wondershare. Import the targeted video clips that you need as an engaging YouTube outro. After that, click on “Split Screen.” Please choose your favorite split-screen design and drag it to the timeline.

Step 2: Use the imported videos to drag them on the preview window in the split-screen design as selected. You can adjust the scale and position through the mouse click. Now, drag and drop the video onto the timeline and trim it as needed.

Step 3: Head to the “Effects” tab and search for blur in the space bar. Drag and drop the square blur to the second part of the video. Adjust the blur intensity as required. Import another video and add it to the timeline.

Step 4: Insert dissolved transitions between the first two cuts to smooth the process. Now, it is time to add an avatar image. Import the profile picture to the timeline above the second track. Head to the utility category under the “Effects” tab and drag the “Image Mask” to the image on the timeline.

Step 5: Double click on it to alter the masking width so that the circle mask can fit on the image. Scale down the picture and set it to the center of the frame. Navigate to the “Elements” panel and pick the YouTube subscribe button. Drag it to the third track afterward.

Step 6: Place the location on the preview window as you need. Now, move to the social media category in the “Titles” to choose the perfect one and add it to the timeline above the last clip. The user is instructed to add a transition at the beginning of the clip. Rename the social media names of your sports channel, and you are done with the process.

Part 3: 3 Recommended Sites to Download Background Music for Exercise Videos
Sports background music is one of the significant ways to keep the audience motivated for sports and exercise. It helps enhance the subscribers’ multifold. Therefore, the importance of promising yoga background music cannot be neglected.
Mixkit
Mixkit is a renowned place to access royalty-free marketplaces, bringing revolution to the market and content creators. It is extremely workable to download background music for exercise in seconds. Based on genre, mood, and tag, you can search for a suitable music track.
The trap sport workout, motivating mornings, positive energy, super strong, and the greatest comeback is one of the most exemplary tracks from Mixkit. The audio can be listened to before making the decision. The genre offers ambient, cinematic, funk, hip-hop, acoustic, classical, and electronica.

TunePocket
Changing the narrative of music platforms, TunePocket pretty much takes the lead. The filter results make the process flawless. You can tailor the search results by playing with category, mood, genres, instruments, length, and tempo.
The duration of each sports background music is also mentioned to give the content creators an idea. Power dance workout, workout fitness motivation, summer western dance, young gamers, and sports power electro, and techno blast are some examples of outstanding music tracks.

Envato Elements
The next on the list is Envato Elements making wonders in the business. The search filters are refined as the user deems necessary. Online exercise, motivational EDM, fitness, workout, corporate meditation, and exercise are some amazing examples of royalty-free music. The search results can be tailored according to relevancy and popularity.

Concluding Remarks
There is an awful load of sports channels on YouTube. The content creators are trying their best to beat the competitors. It is crucial to access energetic background music for exercise to make intro and outro engaging.
The article recommended three apps to download sports background music. The step-by-step guide to creating an inspiring sports intro and editing sports style YouTube outro via Filmora.
Wondershare Filmora
Get started easily with Filmora’s powerful performance, intuitive interface, and countless effects

Camera Shake Effects in Videos Helps to Showcase Aesthetics and Vibes. Do You Wish to Add a Camera Shake in Videos? Consider Using the Video Editor Discussed Here for This
Camera shake effects in videos showcase the instability effect. Capturing real-time camera shake videos is not an easy thing. Even professional photographers need to give more input to get beneficial output. However, you can easily find ready-made camera shake effects in this content to drive the world.
Don’t panic if you don’t know the tools to accomplish this task because Wondershare Filmora got you covered in this scenario. By the end of this article, you will learn how to add camera shake effects in videos with Filmora and another impressive editor named Premiere Pro.
Part 1: Why Should You Involve Effects in Your Videos During Video Creation?
Do you know that you can create more engaging and appealing video content by adding effects to it? Here are some benefits of using effects in your video content which you should know:
1. Quality Visuals
Your content’s visual quality can be increased using different appealing effects. These effects can make your content more eye-catching and engaging. You can use many effects in your visual content. This includes transitions and remarkable filters that can grab the viewer’s attention.
2. Innovative Presentation
If you want to express creativity in your content, using effects is a good option. This is because effects allow you to add uniqueness to your content. You can reflect your style and creativity with the help of these effects. Experimenting with different effects can help you to create unique content.
3. Emotional Resonance
With the help of different effects, you can grab the attention of your viewers. This way, you can easily convey your story or message to them effectively. Effects help you to create an atmosphere that helps to convey emotions beautifully.
4. Showcase of Professionalism
Effects give your videos a very professional look that can engage your audience. Using effects in the right way can help you showcase your production value. This can leave a very positive impact on your audience’s mind. So you can establish a good connection with them as a content creator.
5. Audience Retention
Well-placed effects can help you keep your audience interested in your visual content. They can make your video look more enjoyable and maintain good engagement with your viewers. Eventually, this will also improve your audience retention.
Part 2: Wondershare Filmora: An Epitome of Perfection in Video Editing
Do you wish to make professional-level edits in videos and want to add the smoothest camera shake effects? Nothing to be worried about because you can accomplish this goal with Wondershare Filmora . This video editor helps you make captivating edits and reinforce executive effects.
Camera Shake Effect Editor Add camera shake effects in videos with Wondershare Filmora and Premiere Pro to make cool and unique videos.
Free Download Free Download Learn More

Camera shake videos are not easy to make, and you must invest maximum time and effort to finish the work. Yet, this can be easy if you intend to utilize the feature-rich tool named Wondershare Filmora. This video editor offers timeline-based editing along with a non-destructive procedure.
You also get the fullest control over the video metrics, such as format, dimension, and length. Other than this, you can also select multiple stock media assets. As it has integrations with Giphy, Unsplash, Pexels, and other third-party media libraries, you will not face any issues.
Key Features of Wondershare Filmora
01of 04
Filmora supports integrations with ChatGPT which enhance the usage of the AI Copywriting feature . Through this, you can get inspiring AI-generated content to express better in a limited time.
02of 04
Unrequired silenced intervals in videos impact the video quality in a bad way. To cater to this, Filmora offers you to use its Silence Detection feature to get rid of silenced intervals from videos.
03of 04
You can break the monotony and correct all the colors in the color-disruptive videos. Over 40+ color presets are present in Filmora, which can make videos more outclass.
04of 04
There are more than 70 AI portraits and sticker effects added in Filmora. By this, you can remove the background from videos without affecting humans in videos.
Part 3: Create a Camera Shake Effect Using Premiere Pro
Premiere Pro stands in the top video editing platform in today’s digital market. The video editing intuition helps users develop professional videos that are of the highest quality. It integrates some of the finest functions, making it easy for users to create camera shake effect videos. To know how it is created through Premiere Pro, follow the camera shake effect Premiere Pro steps:
Step 1
In the “Effects” section on the bottom-left of the screen, look for the “Transform” effect and drag it onto the imported video.
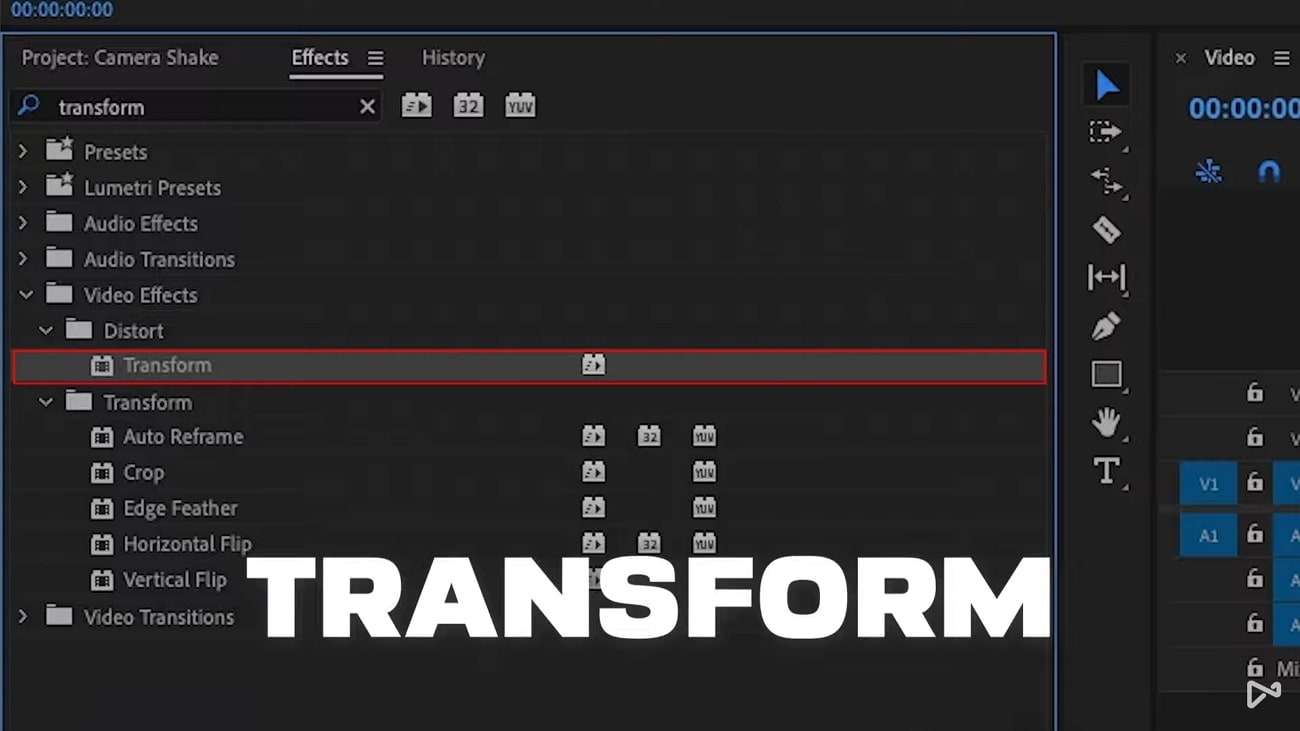
Step 2
Continue to the effects settings that open on the top-left section of the Premiere Pro screen. Change the “Scale” and set the “Position” keyframes on the left and right side of the video frames. Do this for the frames throughout the video in Premiere Pro.
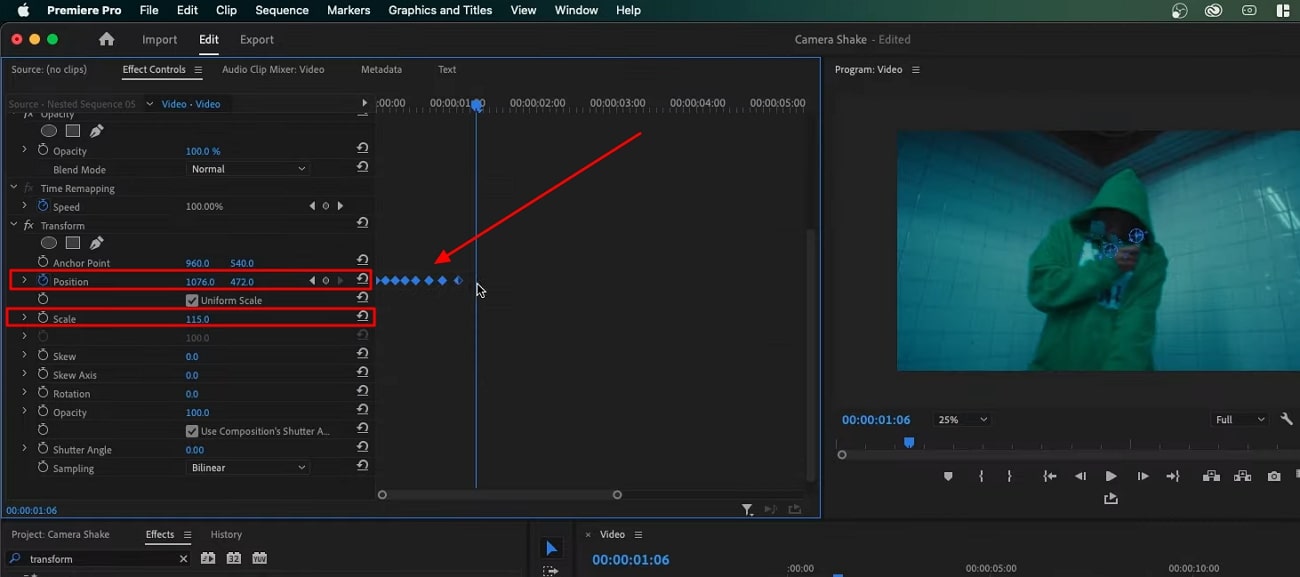
Step 3
For adding motion blur in your camera shake effect video, uncheck the “Use Composition’s Shutter Angle” and set it to “360” degrees. This completes the camera shake, which can be easily exported to the computer.
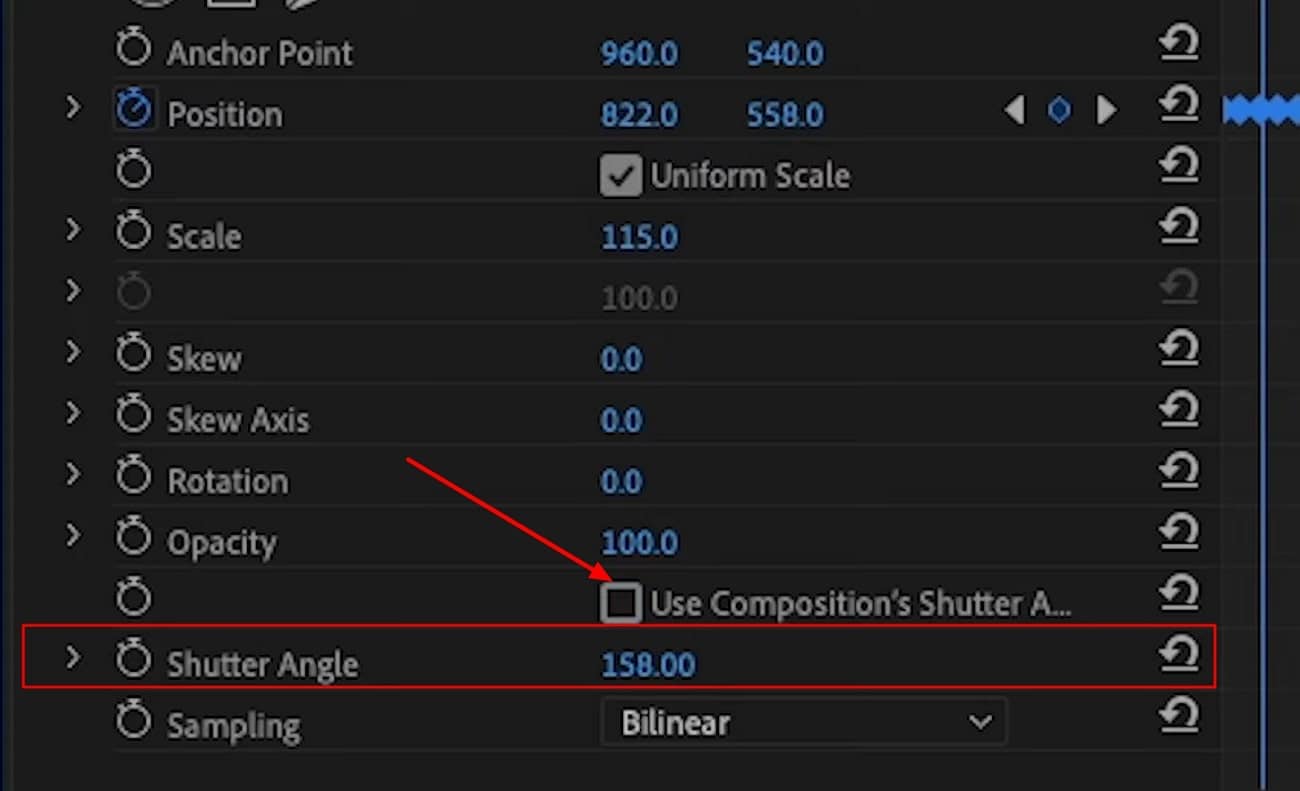
Part 4: A Step-by-Step Understanding of How To Create a Camera Shake Effect with Filmora
Now that you know the outclass capabilities of Filmora, you must be wondering about the procedure of adding a camera shake effect in videos . The instructions to make the camera shake video with Filmora are discussed here for you:
Filmora Tutorial - How to Add CAMERA SHAKE Effects to Your Videos
Free Download For Win 7 or later(64-bit)
Free Download For macOS 10.14 or later
Step 1Add Video File in Filmora
To make the camera shake video with Filmora, install and open Wondershare Filmora on your device and hit the “New Project” option. Next, tap the “Click here to import media” button and then locate the video in which you want to add the camera shake effect. After importing the video, drag it to the “Timeline” to enable editing.
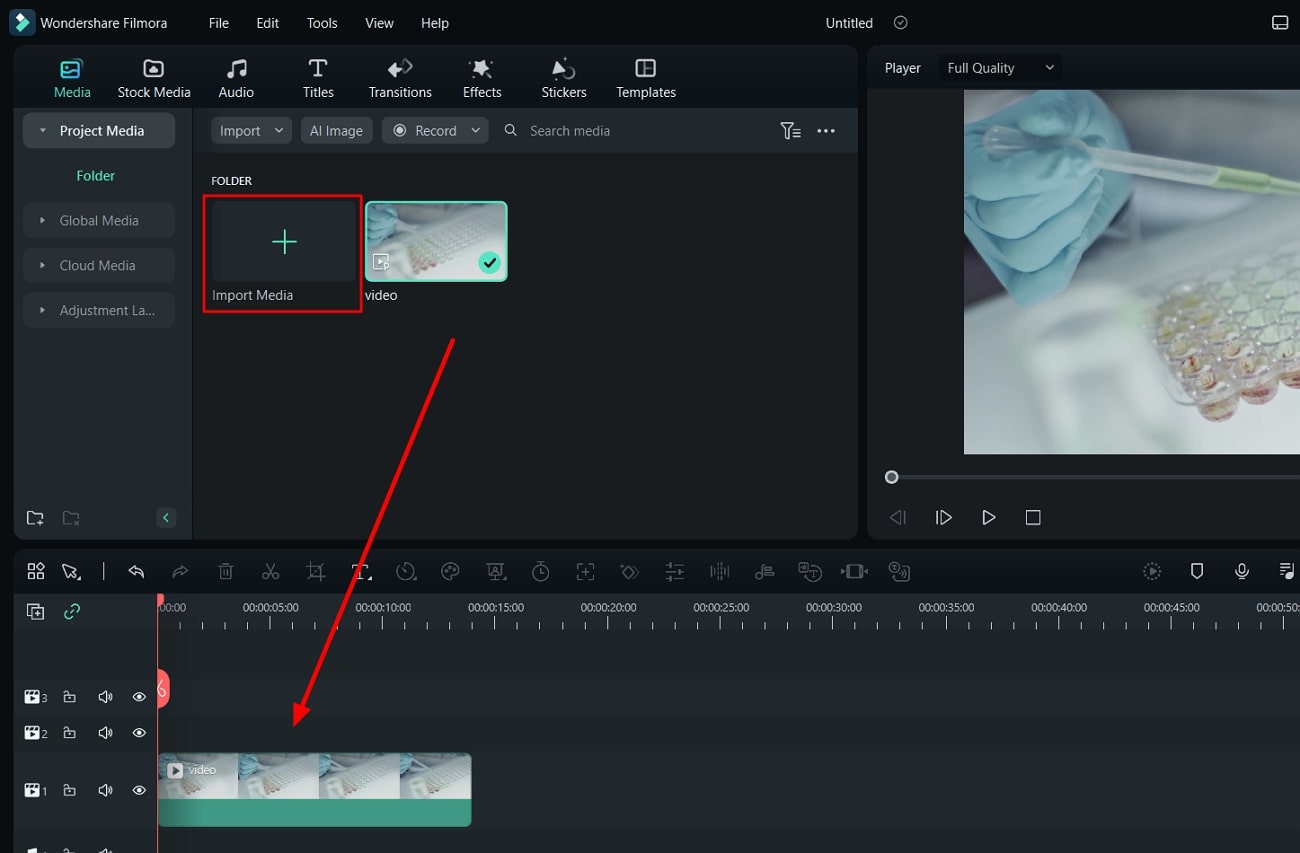
Step 2Add Camera Shake Effect
To add a camera shake effect, go to the “Effects” tab and click “Search Bar.” Next, search for an appropriate camera shake effect and hit the “Download” icon on the effect of your choice. Once the effect is downloaded, drag it on the video in the timeline and customize it as needed.
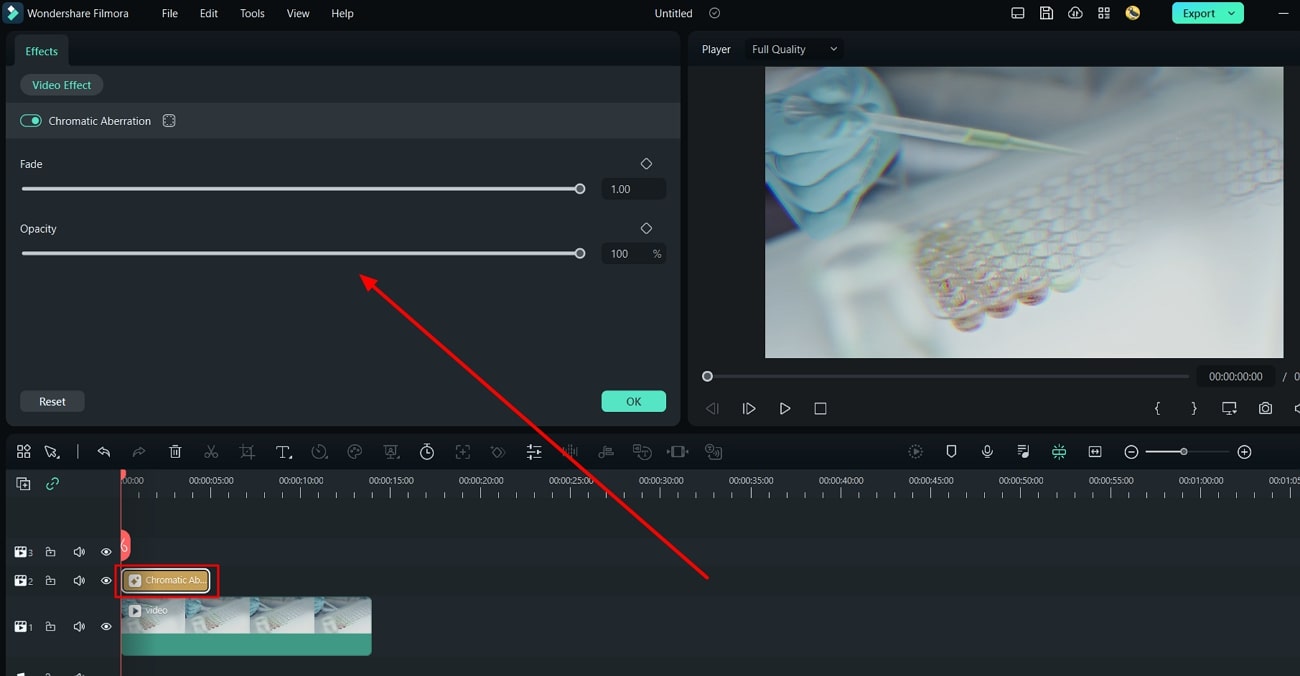
Step 3Export Camera Shake Video
Finally, go to “Export” and manage “Format,” “Preset,” “Frame Rate,” and other parameters of the video. Next, hit the “Export” button to save the video on your computer.
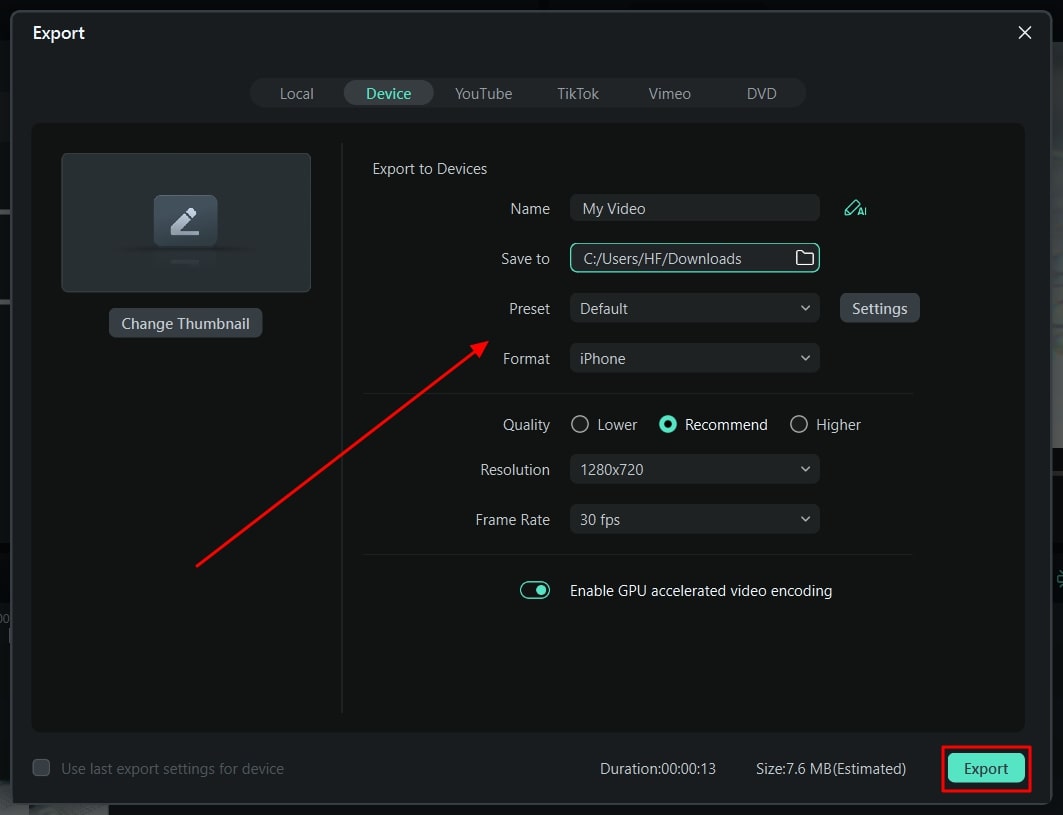
Conclusion
As discussed in this article, you can add a camera shake effect in videos to make them cinematic standards. Several reasons tell us why adding effects in videos is essential, and you can find some of the most relatable reasons above.
Moreover, Filmora can add exquisite level camera shake effects in videos, and you can also find the procedure for accomplishing this task from the above discussion. You have also worked on a method showing how to make a camera shake effect in Premiere Pro.
Free Download Free Download Learn More

Camera shake videos are not easy to make, and you must invest maximum time and effort to finish the work. Yet, this can be easy if you intend to utilize the feature-rich tool named Wondershare Filmora. This video editor offers timeline-based editing along with a non-destructive procedure.
You also get the fullest control over the video metrics, such as format, dimension, and length. Other than this, you can also select multiple stock media assets. As it has integrations with Giphy, Unsplash, Pexels, and other third-party media libraries, you will not face any issues.
Key Features of Wondershare Filmora
01of 04
Filmora supports integrations with ChatGPT which enhance the usage of the AI Copywriting feature . Through this, you can get inspiring AI-generated content to express better in a limited time.
02of 04
Unrequired silenced intervals in videos impact the video quality in a bad way. To cater to this, Filmora offers you to use its Silence Detection feature to get rid of silenced intervals from videos.
03of 04
You can break the monotony and correct all the colors in the color-disruptive videos. Over 40+ color presets are present in Filmora, which can make videos more outclass.
04of 04
There are more than 70 AI portraits and sticker effects added in Filmora. By this, you can remove the background from videos without affecting humans in videos.
Part 3: Create a Camera Shake Effect Using Premiere Pro
Premiere Pro stands in the top video editing platform in today’s digital market. The video editing intuition helps users develop professional videos that are of the highest quality. It integrates some of the finest functions, making it easy for users to create camera shake effect videos. To know how it is created through Premiere Pro, follow the camera shake effect Premiere Pro steps:
Step 1
In the “Effects” section on the bottom-left of the screen, look for the “Transform” effect and drag it onto the imported video.

Step 2
Continue to the effects settings that open on the top-left section of the Premiere Pro screen. Change the “Scale” and set the “Position” keyframes on the left and right side of the video frames. Do this for the frames throughout the video in Premiere Pro.

Step 3
For adding motion blur in your camera shake effect video, uncheck the “Use Composition’s Shutter Angle” and set it to “360” degrees. This completes the camera shake, which can be easily exported to the computer.

Part 4: A Step-by-Step Understanding of How To Create a Camera Shake Effect with Filmora
Now that you know the outclass capabilities of Filmora, you must be wondering about the procedure of adding a camera shake effect in videos . The instructions to make the camera shake video with Filmora are discussed here for you:
Filmora Tutorial - How to Add CAMERA SHAKE Effects to Your Videos
Free Download For Win 7 or later(64-bit)
Free Download For macOS 10.14 or later
Step 1Add Video File in Filmora
To make the camera shake video with Filmora, install and open Wondershare Filmora on your device and hit the “New Project” option. Next, tap the “Click here to import media” button and then locate the video in which you want to add the camera shake effect. After importing the video, drag it to the “Timeline” to enable editing.

Step 2Add Camera Shake Effect
To add a camera shake effect, go to the “Effects” tab and click “Search Bar.” Next, search for an appropriate camera shake effect and hit the “Download” icon on the effect of your choice. Once the effect is downloaded, drag it on the video in the timeline and customize it as needed.

Step 3Export Camera Shake Video
Finally, go to “Export” and manage “Format,” “Preset,” “Frame Rate,” and other parameters of the video. Next, hit the “Export” button to save the video on your computer.

Conclusion
As discussed in this article, you can add a camera shake effect in videos to make them cinematic standards. Several reasons tell us why adding effects in videos is essential, and you can find some of the most relatable reasons above.
Moreover, Filmora can add exquisite level camera shake effects in videos, and you can also find the procedure for accomplishing this task from the above discussion. You have also worked on a method showing how to make a camera shake effect in Premiere Pro.
TikTok Velocity Dance Tutorial| Filmora
Preparation
What you need to prepare:
- A computer (Windows or macOS)
- Your video materials.
- Filmora video editor
Step 1
First, download the Filmora Video Editor . Run it and click on “New Project”.
Step 2
Import the video and audio you want to use for your edit.

Step 3
Drag the Audio into the Timeline. Then, Drag your Video clip to Track 1 on the Timeline.
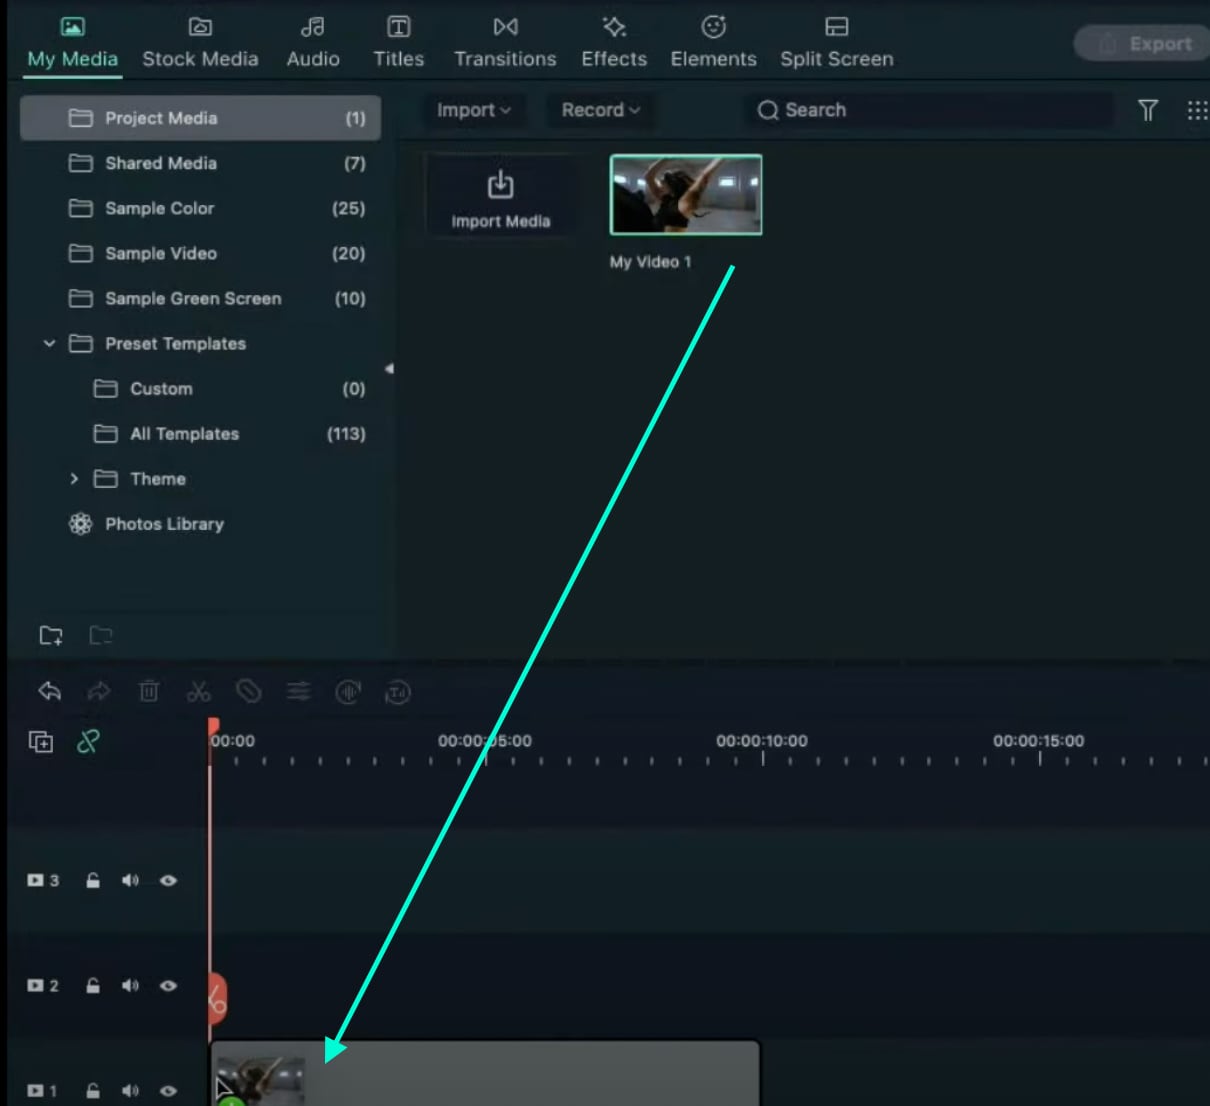
Step 4
Double-click on the Video clip, go to the Speed tab, and change the Speed value to “0.50”. Click on OK.
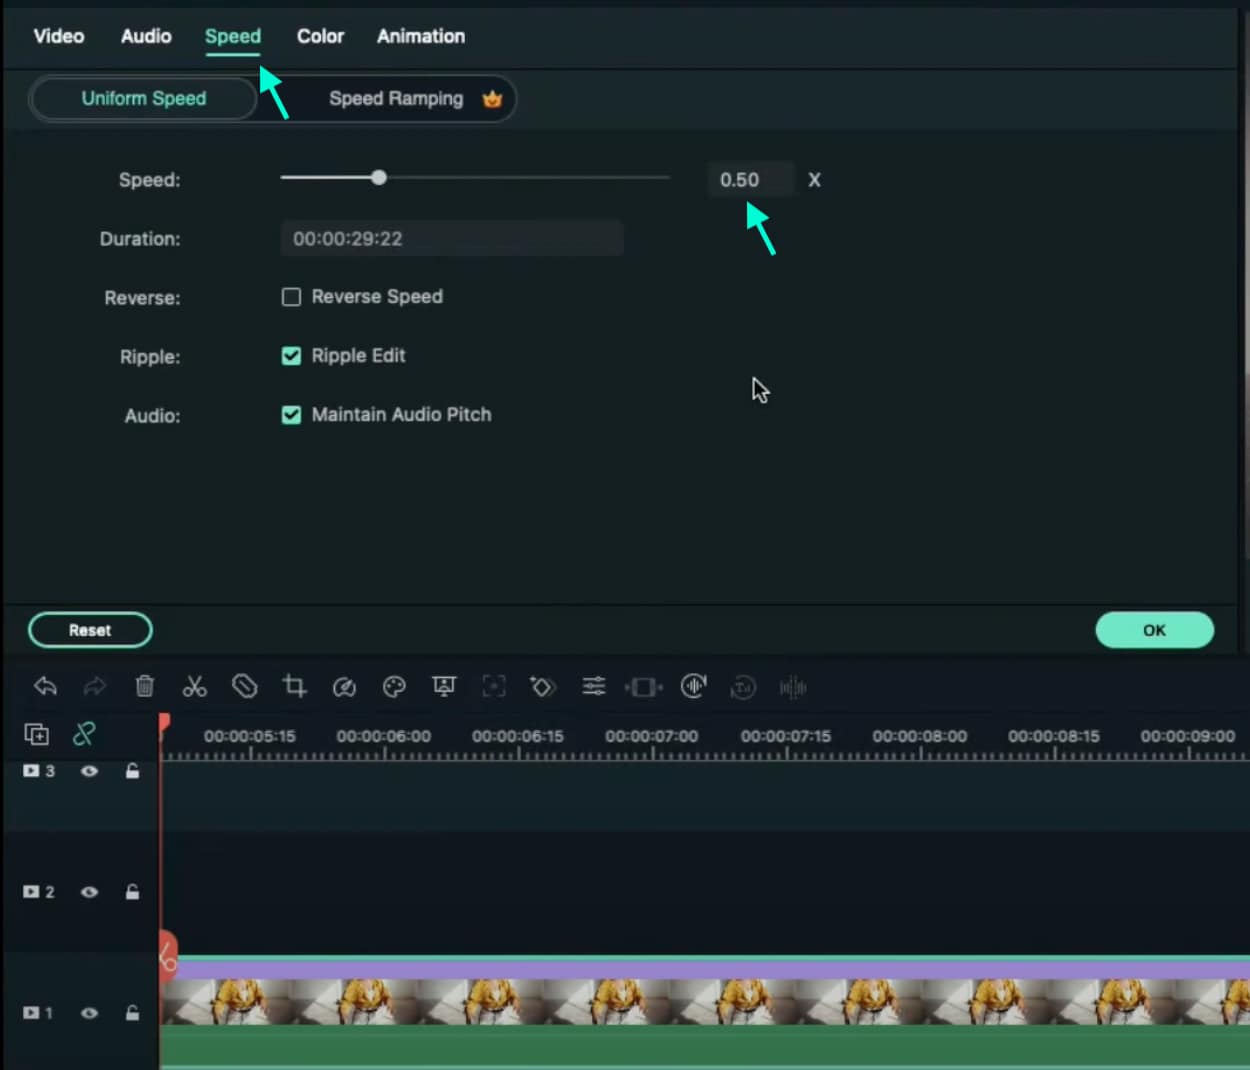
Step 5
Next, place the Playhead one frame before the first spike (beat) on the Audio clip. Here, split the Video clip. Click on the Video from the right, go to Speed and change it to “8”.

Step 6
Move the Playhead three frames forward → Split the video → click on the clip from the right → go to Speed → change it back to “0.50”. Do this same process as in Steps 5 and 6 to every Audio spike (beat) you see on the audio clip.
Step 7
That’s it! Render the video and you can watch the final preview. Congratulations on creating a TikTok velocity dance effect in Filmora.

Summary
What you’ve learned:
- How to create a unique velocity dance effect in Filmora
- How to edit video based on unique audio clips
- Edit the speed settings of a video clip in Filmora
What you need to prepare:
- A computer (Windows or macOS)
- Your video materials.
- Filmora video editor
Step 1
First, download the Filmora Video Editor . Run it and click on “New Project”.
Step 2
Import the video and audio you want to use for your edit.

Step 3
Drag the Audio into the Timeline. Then, Drag your Video clip to Track 1 on the Timeline.

Step 4
Double-click on the Video clip, go to the Speed tab, and change the Speed value to “0.50”. Click on OK.

Step 5
Next, place the Playhead one frame before the first spike (beat) on the Audio clip. Here, split the Video clip. Click on the Video from the right, go to Speed and change it to “8”.

Step 6
Move the Playhead three frames forward → Split the video → click on the clip from the right → go to Speed → change it back to “0.50”. Do this same process as in Steps 5 and 6 to every Audio spike (beat) you see on the audio clip.
Step 7
That’s it! Render the video and you can watch the final preview. Congratulations on creating a TikTok velocity dance effect in Filmora.

Summary
What you’ve learned:
- How to create a unique velocity dance effect in Filmora
- How to edit video based on unique audio clips
- Edit the speed settings of a video clip in Filmora
What you need to prepare:
- A computer (Windows or macOS)
- Your video materials.
- Filmora video editor
Step 1
First, download the Filmora Video Editor . Run it and click on “New Project”.
Step 2
Import the video and audio you want to use for your edit.

Step 3
Drag the Audio into the Timeline. Then, Drag your Video clip to Track 1 on the Timeline.

Step 4
Double-click on the Video clip, go to the Speed tab, and change the Speed value to “0.50”. Click on OK.

Step 5
Next, place the Playhead one frame before the first spike (beat) on the Audio clip. Here, split the Video clip. Click on the Video from the right, go to Speed and change it to “8”.

Step 6
Move the Playhead three frames forward → Split the video → click on the clip from the right → go to Speed → change it back to “0.50”. Do this same process as in Steps 5 and 6 to every Audio spike (beat) you see on the audio clip.
Step 7
That’s it! Render the video and you can watch the final preview. Congratulations on creating a TikTok velocity dance effect in Filmora.

Summary
What you’ve learned:
- How to create a unique velocity dance effect in Filmora
- How to edit video based on unique audio clips
- Edit the speed settings of a video clip in Filmora
What you need to prepare:
- A computer (Windows or macOS)
- Your video materials.
- Filmora video editor
Step 1
First, download the Filmora Video Editor . Run it and click on “New Project”.
Step 2
Import the video and audio you want to use for your edit.

Step 3
Drag the Audio into the Timeline. Then, Drag your Video clip to Track 1 on the Timeline.

Step 4
Double-click on the Video clip, go to the Speed tab, and change the Speed value to “0.50”. Click on OK.

Step 5
Next, place the Playhead one frame before the first spike (beat) on the Audio clip. Here, split the Video clip. Click on the Video from the right, go to Speed and change it to “8”.

Step 6
Move the Playhead three frames forward → Split the video → click on the clip from the right → go to Speed → change it back to “0.50”. Do this same process as in Steps 5 and 6 to every Audio spike (beat) you see on the audio clip.
Step 7
That’s it! Render the video and you can watch the final preview. Congratulations on creating a TikTok velocity dance effect in Filmora.

Summary
What you’ve learned:
- How to create a unique velocity dance effect in Filmora
- How to edit video based on unique audio clips
- Edit the speed settings of a video clip in Filmora
Also read:
- In 2024, 8 Tips to Apply Cinematic Color Grading to Your Videos
- Updated In 2024, 10 Best Free Spanish Text To Speech Converter Software Windows, Mac, Android, iPhone, & Online
- In 2024, This Post Will Make You Learn Anything and Everything About Animated GIFs, the Ways to Use Cool Gifs in My Marketing, and How to Create Unique Custom Animated Gifs
- Updated 10 Best Free Spanish Text To Speech Converter Software Windows, Mac, Android, iPhone, & Online for 2024
- Updated Top 11 Best Video Editing Apps for iPhone
- Updated In 2024, Best Way To Color Grading & Color Correction in Filmora
- Updated Which Is the Best Video Slideshow Maker Available Online? Methods to Prepare Custom Slideshows for Google Presentation. How to Make a Slide Show Video?
- In 2024, Ideas That Help You Out in Making Transparent Image
- In 2024, Everything You Need to Know About Color Grading in Photography
- Updated How to Film Better in Public - 2024 Guide
- New How to Create OBS Slideshow for 2024
- New 4K Videos Are the in Thing because of Their Flexibility and High Resolution. Stick Around to Learn How to Choose the Best Frame Rate for 4K Videos
- Updated In 2024, Top Online Video Background Changers Transform Your Videos with Ease
- New Learn How to Create Animated Titles and Text in the Filmora Video Editor. This Is a Simple Step-by-Step Tutorial for Any Skill Level
- Updated Do You Want to Be Aware of VHSs Meaning? There Is Nothing to Be Worried About because We Will Guide You in This Article
- In 2024, The Best 10 AI Video Analytics Companies at a Glance
- How to Remove Audio From Video Without Watermark?
- New What Slideshow Templates Teach You About Aesthetic
- Learn to Create Custom Sequence Presets in Premiere Pro for Efficient Video Editing. Ensure Consistency and Speed up Your Workflow with Personalized Settings
- Updated In 2024, 10 Best Meme Text to Speech Tools Windows, Mac, Android, iPhone&Online
- In 2024, Best Video Grabbers for Chrome
- New In 2024, Complete Guide to Change Video Resolution in Filmora
- In 2024, How Can You Deny These Top 10 Free Speech to Text Software
- 2024 Approved Explore the Advanced Tools to Help You Reshape the Art of Sky Replacement in Digital Imagery. Discover Methods to Enhance Your Visual Narratives Through AI
- Updated In 2024, Detailed Guide to Crop Video in Sony Vegas Pro
- Kdenlive Review – Is It The Best Video Editor?
- New Guide Adding Audio in Wondershare Filmora
- In 2024, Intro Videos Have the Potential to Make a First Impression on Viewers, and You Know How They Say that the First Impression Is the Last Impression
- Updated 4 Ways to Merge MP4 and MP3
- New Do You Wish to Create High-Quality Videos and Experience Effective Videos with Editing? No Problem at All because the Keyboard Shortcuts Listed Here Will Assist You
- SRT Not Displaying How to Open and Use SRT File in VLC for 2024
- Updated 2024 Approved How To Make Ninja Jump Effect
- This Is a Recommendation About Bandicut. If You Are Confused, Please Check It Out for 2024
- Adobe Premiere Pro Rec 709 LUTs Finding The Best Options
- In 2024, How to Add Subtitles in QuickTime Player?
- Updated List of Supported Whatsapp Video Format You May Want to Know for 2024
- Updated In 2024, Basic Knowledge About WMV Format and Best WMV Video Editor
- In 2024, The Definite Guide to Craig Bot Discord
- New What Is Animated GIF
- Updated In 2024, Create A Freeze Frame Sequence In Your Videos
- 7 Best MP4 Editors on Mac Edit MP4 in Mac
- Updated Enhance Your Video Color Accuracy with Video Scopes for 2024
- In 2024, Which Pokémon can Evolve with a Moon Stone For Oppo Find X6? | Dr.fone
- 6 Fixes to Unfortunately WhatsApp has stopped Error Popups On Honor Magic 6 Lite | Dr.fone
- How To Unlock The Apple iPhone 12 Pro SIM Lock 4 Easy Methods
- 11 Ways to Fix it When My Oppo Find X7 Ultra Wont Charge | Dr.fone
- How to Unlock HTC U23 Phone Forgot Password
- In 2024, How Can You Transfer Files From Vivo Y100 To iPhone 15/14/13? | Dr.fone
- Mastering Lock Screen Settings How to Enable and Disable on Poco M6 Pro 4G
- Wireless Methods to MirrorApple iPhone 11 & iPad to Fire Stick With Ease | Dr.fone
- PassFab Apple iPhone 15 Plus Backup Unlocker Top 4 Alternatives
- Updated Whats Music Video GIF & How to Add Music to Your GIF Files
- In 2024, How to Change Oppo A78 5G Location on Skout | Dr.fone
- How to Screen Mirror on Apple iPhone 6 Plus? | Dr.fone
- How to Bypass Activation Lock from Apple iPhone 14 Plus or iPad?
- Fix Unfortunately Settings Has Stopped on Oppo K11x Quickly | Dr.fone
- How to play MP4 files on Motorola ?
- 8 Solutions to Fix Find My Friends Location Not Available On Xiaomi Redmi 13C | Dr.fone
- Vivo Data Recovery – recover lost data from Vivo V27
- Does Motorola support MKV video files?
- How to Unlock ZTE Nubia Z60 Ultra Pattern Lock if Forgotten? 6 Ways
- In 2024, How to Change Netflix Location to Get More Country Version On Oppo Find X7 Ultra | Dr.fone
- In 2024, How to Spy on Text Messages from Computer & Realme 12 Pro 5G | Dr.fone
- 3 Ways to Change Location on Facebook Marketplace for Xiaomi Redmi 12 | Dr.fone
- How To Transfer WhatsApp From Apple iPhone 11 Pro Max to other iPhone? | Dr.fone
- Infinix Smart 8 Plus ADB Format Tool for PC vs. Other Unlocking Tools Which One is the Best?
- In 2024, All You Need To Know About Mega Greninja For Samsung Galaxy S23 Tactical Edition | Dr.fone
- Forgot your C51 lock screen pattern, PIN or password? Here’s what to do
- How to Spy on Text Messages from Computer & Xiaomi Redmi 12 5G | Dr.fone
- Updated Secret Source to Make a Stop Motion Puppet for 2024
- In 2024, How to Change Realme GT Neo 5 Location on Skout | Dr.fone
- The way to get back lost data from OnePlus Open
- In 2024, The Best Android SIM Unlock Code Generators Unlock Your Samsung Galaxy A25 5G Phone Hassle-Free
- In 2024, Planning to Use a Pokemon Go Joystick on Oppo A79 5G? | Dr.fone
- 4 Most-Known Ways to Find Someone on Tinder For Infinix Zero 5G 2023 Turbo by Name | Dr.fone
- In 2024, How to Unlock iCloud Activation Lock and iCloud Account On Apple iPhone 8?
- In 2024, Unlock Your Vivo S17t Phone with Ease The 3 Best Lock Screen Removal Tools
- Title: Updated 2024 Approved Shotcut Video Editor Review
- Author: Chloe
- Created at : 2024-06-18 14:31:00
- Updated at : 2024-06-19 14:31:00
- Link: https://ai-editing-video.techidaily.com/updated-2024-approved-shotcut-video-editor-review/
- License: This work is licensed under CC BY-NC-SA 4.0.

