

Updated 2024 Approved Split Audio From Video in Adobe Premiere Pro Step by Step
Split Audio From Video in Adobe Premiere Pro [Step by Step]
Adobe Premiere Pro is mainly designed and helpful for all video editors looking for options to enhance their tasks. It is beneficial for transforming any random video into an awesome video. There are different tools so you can experience your creative skills on Premiere Pro. It enables the fine-tuning of the audio, adjustments of the colourings, and supports various formats.
There is an integration of this software with other products of Adobe. So, it is pretty easy for you to transfer the task from one adobe software to another. This helps in editing and using the complete outcome according to the needs. This article is regarding the guidance about the split of the audio from the video in Premiere Pro. And also, the discussion of the Wondershare Fllmora as the replacement and how to perform a similar task in it.
How is it possible to split the audio from the video in Adobe Premiere Pro?
The Adobe Premiere Pro is quite popular for its tools and works smoothly. The whole interface also helps increase the entire work’s productivity, efficiency, and effectiveness. It is very easy to open several projects at the exact timings. It is very simple and easy to add the clips and even extract the audio from the video clips. Please take a step by step below to extract the audio from your video files, whether it is on Windows or Mac operating system.
Step 1: The first step is the creation of the project. Go to the File tab on the toolbar and select the New option.

Step 2: Import the video that you want to be mute. File à Import.

Step 3: From the project panel, drag and drop the project in the timeline panel.

Step 4: Now is the time to select the video clip from the timeline. Click on the video layer for the selection.

Step 5: Right-click on the video presentation on the timeline and select the option of “unlink” from the drop-down menu.

Step 6: Now delete the audio from the video you want to separate. For deleting the audio, either select the layer and press the “delete” key. Or you can choose the layer from audio from which you are unlinking from the video and choose the option of “Clear” from the menu.
You have received success in separating the audio from the video clip with the help of Adobe Premiere Pro. It is easy to edit the track as your own choice. Export options are also available, so you can share them wherever you want.

One easier way to separate the audio from the video clips
It is a fact that Premiere Pro is an extraordinary software, but unluckily, its features depend on the subscription monthly or yearly. It requires high storage memory from your system. While working on this software, it increases the complexity.
That’s the reason the graphic designers and video editor are always in search of feasible and straight forward editing software. Filmora Video Editor is the right solution of all the issues.
It is light to the systems and all the features are freely available without any subscription. No matter which operating system you are using Wondershare Filmora is easily available to run on it. Whether it is separating the audio or removing the background, each and everything is simple for handling.
For Win 7 or later (64-bit)
For macOS 10.14 or later
Features:
- Preview of using the tools before applying the changes
- Numerous tools are available for customizing the videos and images
- Splitting of the clips and screens as well
- Involving of the graphics and animation
- Simply drag and drop the videos in the timeline
- Mixing of the audio
- Removing the noise
Under this heading are the steps for guiding you regarding the extraction or separation of the audio from your videos.
Step :1
Simply launch the Wondershare Filmora after it installs your system. If it is already installed, then start creating the new project.
Step:2
Import the file in the timeline you want to remove or separate the audio. Go to the File menuàimport the media file or press the keys of CTRL+I on the keyboard.

Step :3
Drag and drop the video clip in the timeline to proceed with editing.

Step:4
Right-click on your video and choose the option of “Detach Audio”. Then the new track of the audio appears in the timeline.

Step:5
Select the audio you have just received above and select the option of “Delete”.

Step:6
Click on the button “Export” for exporting the video.

Step:7
Please choose the format of your choice, name the file and choose the folder where you want to save it. Even setting the resolution, decoding the video and frame rate is also possible. These options are under the settings button. Click on “Export” to begin the exporting of the video. Wondershare Filmora supports a number of video formats, as you can see in the picture below. So, it is also possible to save the video in the format of your choice. It supports 4K quality.

Every website, blog or social media page doesn’t look appealing without the videos. So, the video plays an essential role in showing your presence on the web, and for this purpose, you need the most straightforward editing software. Wondershare Filmora is the proper selection as it has all the tools no matter you are familiar with it or not.
It can completely transform your videos with amazing tools and features that bring a WOW factor to your images and videos. There is a whole library for effects; whether for transition or animation; everything is available. Start using Wondershare Filmora today and have fun.
Step 2: Import the video that you want to be mute. File à Import.
Step 3: From the project panel, drag and drop the project in the timeline panel.
Step 4: Now is the time to select the video clip from the timeline. Click on the video layer for the selection.
Step 5: Right-click on the video presentation on the timeline and select the option of “unlink” from the drop-down menu.
Step 6: Now delete the audio from the video you want to separate. For deleting the audio, either select the layer and press the “delete” key. Or you can choose the layer from audio from which you are unlinking from the video and choose the option of “Clear” from the menu.
You have received success in separating the audio from the video clip with the help of Adobe Premiere Pro. It is easy to edit the track as your own choice. Export options are also available, so you can share them wherever you want.
One easier way to separate the audio from the video clips
It is a fact that Premiere Pro is an extraordinary software, but unluckily, its features depend on the subscription monthly or yearly. It requires high storage memory from your system. While working on this software, it increases the complexity.
That’s the reason the graphic designers and video editor are always in search of feasible and straight forward editing software. Filmora Video Editor is the right solution of all the issues.
It is light to the systems and all the features are freely available without any subscription. No matter which operating system you are using Wondershare Filmora is easily available to run on it. Whether it is separating the audio or removing the background, each and everything is simple for handling.
For Win 7 or later (64-bit)
For macOS 10.14 or later
Features:
- Preview of using the tools before applying the changes
- Numerous tools are available for customizing the videos and images
- Splitting of the clips and screens as well
- Involving of the graphics and animation
- Simply drag and drop the videos in the timeline
- Mixing of the audio
- Removing the noise
Under this heading are the steps for guiding you regarding the extraction or separation of the audio from your videos.
Step :1
Simply launch the Wondershare Filmora after it installs your system. If it is already installed, then start creating the new project.
Step:2
Import the file in the timeline you want to remove or separate the audio. Go to the File menuàimport the media file or press the keys of CTRL+I on the keyboard.
Step :3
Drag and drop the video clip in the timeline to proceed with editing.
Step:4
Right-click on your video and choose the option of “Detach Audio”. Then the new track of the audio appears in the timeline.
Step:5
Select the audio you have just received above and select the option of “Delete”.
Step:6
Click on the button “Export” for exporting the video.
Step:7
Please choose the format of your choice, name the file and choose the folder where you want to save it. Even setting the resolution, decoding the video and frame rate is also possible. These options are under the settings button. Click on “Export” to begin the exporting of the video. Wondershare Filmora supports a number of video formats, as you can see in the picture below. So, it is also possible to save the video in the format of your choice. It supports 4K quality.
Every website, blog or social media page doesn’t look appealing without the videos. So, the video plays an essential role in showing your presence on the web, and for this purpose, you need the most straightforward editing software. Wondershare Filmora is the proper selection as it has all the tools no matter you are familiar with it or not.
It can completely transform your videos with amazing tools and features that bring a WOW factor to your images and videos. There is a whole library for effects; whether for transition or animation; everything is available. Start using Wondershare Filmora today and have fun.
Video Maker with Song
Versatile Video Editor - Wondershare Filmora
An easy yet powerful editor
Numerous effects to choose from
Detailed tutorials provided by the official channel
>
Had you ever thought about creating a video along with the music tracks? Is it exciting to make a video using the captured images and favorite soundtracks? Create engaging videos using the video maker with a song to post them on social media. Play them on special occasions like birthday and anniversary parties to entertain the crowd wisely. There are numerous options to use the videos precisely to have fun with your family and friends. In this article, you will learn about the reliable video maker that assists you to create the best videos for your needs. It has a wide range of customization options to make the content realistic. Connect with this article and explore the functionalities of the video maker tool and edit your videos professionally to acquire desired effects.

In this article
01 [Video Maker with Song – Filmora Video Editor](#Part 1)
02 [Tip: Additional video edits using the Filmora video editor](#Part 2)
Part 1 Video Maker with Song – Filmora Video Editor
Here is an impressive video maker with a song that helps your video content to sound energetical and entertain the viewers to a greater extent. The Filmora video editor offers the users to create videos from the scratch or use the in-built templates to make your video creation work complete at a faster rate. Another capturing feature of the Filmora app is that you can insert any in-built options merely by drag and drop action or right-click on the relevant items and select the Apply message from the pop-up. This application has a simple interface and creates wonders for your video content. If you are a newbie user, no worries, the Filmora video editor will be your perfect partner to create inspiring videos with music for your needs.

Wondershare Filmora - Best Video Editor for Mac/Windows
5,481,435 people have downloaded it.
Build unique custom animations without breaking a sweat.
Focus on creating epic stories and leave the details to Filmora’s auto features.
Start a creative adventure with drag & drop effects and endless possibilities.
Filmora simplifies advanced features to save you time and effort.
Filmora cuts out repetition so you can move on to your next creative breakthrough.
The Filmora video editor, there is a large source of music files are available for quick access. You can also import it from external files to enhance the video content. There are impressive options to make your video realistic and it entertains the viewers optimally. Choose the perfect feature and edit it according to your needs in no time. The controls are highly visible and you can reach for them quickly. It is enough of you to tap the perfect controls to implement the desired changes on the imported media files. The in-built library contains templates, sound effects, filters, and special effects to customize the video content precisely. In the below content you will learn how to use Filmora the video maker with song efficiently to edit the uploaded media file. It is enough if you drag and drop the desired effects on the timeline to apply the changes to it.
The stunning features of Filmora Video Editor
● The simple interface helps the newbie users to use this program efficiently without any special skills.
● Insert the desired filter effects and transitions to enhance the interaction of the video content.
● Add your favorite sound effects and merge them with your video file effortlessly.
● Easily import and export the media files to any storage space without any data loss.
● There are options to adjust the audio settings like audio ducking, detach audio, fade- and fade-out options to customize the videos efficiently.
The above features help you to make the best out of your video content. You can post them on any social media platform and store them on any storage space for quick access. After performing all the edits, you can have a preview of it before exporting it to the storage space. During the export process, there are options to modify the file format, and resolution settings to improve the video clarity.
The stepwise guide to editing the media file using the Video Maker with a song like the Filmora application.
Step1 Download the Filmora Video Editor
Go to the official webpage of Filmora and download the appropriate version of this program based on your system OS. You can either choose Windows or Mac and download according to your needs. Then, install the app by following the instruction wizard. Launch the program and insert the media file into the working space by tapping the Import Media files option. You must drag and drop the uploaded media file into the timeline to make further edits.

Step2 Add song to the uploaded video
Now, click the Audio in the Menu option and choose Sound effects from the left panel of the screen. From the displayed items at the right panel, choose the desired ones and make a right-click on them. Then, select Apply option from the pop-up screen. You can also drag and drop it to the timeline to merge this audio track with the video file.

Step3 Preview and export
After adding the desired audio tracks with the uploaded video content, preview the video by playing them on this video editor screen. When you are convinced with the edit operations, then export it by tapping the Export button. In the Export screen, you can change the display settings like resolution, and file format to overcome the file compatibility issues. You can store it on any external or internal storage space based on your needs.

Use the above instructions to edit the media files using the Filmora app the video maker with song and enhance the quality of the video content professionally.
Tip: Additional video edits using the Filmora video editor
Wondershare Filmora
Get started easily with Filmora’s powerful performance, intuitive interface, and countless effects Try It Free Try It Free Learn More about Filmora>
In the Filmora app, you can find audio adjustment options to customize the audio signal manually by fading them in and out precisely. You can enable the audio ducking option to increase the audio quality by personalizing the specific segment of the audio file. This feature helps to make the audio file sound better. Based on your needs, you can detach the audio tracks from the video file and insert the voice-over sounds by recoding them using this program. This option helps the editors to convert the video file to interactive and fun-filled.

Apart from working on the audio tracks, you can also make changes in the video settings. Add the filters and transitions to enhance the video quality and you can also split the screens to narrate a better story using the video content. Another interesting factor with the Filmora application is that you can upload any file format files to make necessary edits because it supports all formats without compromising on any factors.
In Filmora, you can edit the audios with loads of in-built settings like Audio Equalizer and Audio speed options. In the Equalizer screen, you can make variations by manually adjusting the fade-in/fade-out options, volume adjustment and pitch to improvise the audio quality. You can also make changes with the audio speed by making it fast forward, slow motion effect and reverse the speed as per your requirements. On the Audio edit window, you can set the Denoise option to remove the background noise. Check in the Remove Background Noise option and scroll on the settings liner to assign the value between weak, mid, and strong.

These are the available audio settings with the Filmora video editor. Make the right settings to enhance the overall audio attributes with utmost quality factors.
Conclusion
This article had taught you how to create an efficient video using the video maker with a song like Filmora video editor. It is an incredible app that assists you to perform a wide range of video edit options. This app is compatible with professionals as well as newbie users. You can work on this program and build a creative video for your needs. Connect with this article to get some valuable insights on the best video edits using an efficient video editor. Choose Filmora to unleash your imaginations and make desired edits limitlessly. Stay tuned to make wise edits on your videos and create stunning content to entertain the audience precisely.
Had you ever thought about creating a video along with the music tracks? Is it exciting to make a video using the captured images and favorite soundtracks? Create engaging videos using the video maker with a song to post them on social media. Play them on special occasions like birthday and anniversary parties to entertain the crowd wisely. There are numerous options to use the videos precisely to have fun with your family and friends. In this article, you will learn about the reliable video maker that assists you to create the best videos for your needs. It has a wide range of customization options to make the content realistic. Connect with this article and explore the functionalities of the video maker tool and edit your videos professionally to acquire desired effects.
In this article
01 [Video Maker with Song – Filmora Video Editor](#Part 1)
02 [Tip: Additional video edits using the Filmora video editor](#Part 2)
Part 1 Video Maker with Song – Filmora Video Editor
Here is an impressive video maker with a song that helps your video content to sound energetical and entertain the viewers to a greater extent. The Filmora video editor offers the users to create videos from the scratch or use the in-built templates to make your video creation work complete at a faster rate. Another capturing feature of the Filmora app is that you can insert any in-built options merely by drag and drop action or right-click on the relevant items and select the Apply message from the pop-up. This application has a simple interface and creates wonders for your video content. If you are a newbie user, no worries, the Filmora video editor will be your perfect partner to create inspiring videos with music for your needs.
Wondershare Filmora - Best Video Editor for Mac/Windows
5,481,435 people have downloaded it.
Build unique custom animations without breaking a sweat.
Focus on creating epic stories and leave the details to Filmora’s auto features.
Start a creative adventure with drag & drop effects and endless possibilities.
Filmora simplifies advanced features to save you time and effort.
Filmora cuts out repetition so you can move on to your next creative breakthrough.
The Filmora video editor, there is a large source of music files are available for quick access. You can also import it from external files to enhance the video content. There are impressive options to make your video realistic and it entertains the viewers optimally. Choose the perfect feature and edit it according to your needs in no time. The controls are highly visible and you can reach for them quickly. It is enough of you to tap the perfect controls to implement the desired changes on the imported media files. The in-built library contains templates, sound effects, filters, and special effects to customize the video content precisely. In the below content you will learn how to use Filmora the video maker with song efficiently to edit the uploaded media file. It is enough if you drag and drop the desired effects on the timeline to apply the changes to it.
The stunning features of Filmora Video Editor
● The simple interface helps the newbie users to use this program efficiently without any special skills.
● Insert the desired filter effects and transitions to enhance the interaction of the video content.
● Add your favorite sound effects and merge them with your video file effortlessly.
● Easily import and export the media files to any storage space without any data loss.
● There are options to adjust the audio settings like audio ducking, detach audio, fade- and fade-out options to customize the videos efficiently.
The above features help you to make the best out of your video content. You can post them on any social media platform and store them on any storage space for quick access. After performing all the edits, you can have a preview of it before exporting it to the storage space. During the export process, there are options to modify the file format, and resolution settings to improve the video clarity.
The stepwise guide to editing the media file using the Video Maker with a song like the Filmora application.
Step1 Download the Filmora Video Editor
Go to the official webpage of Filmora and download the appropriate version of this program based on your system OS. You can either choose Windows or Mac and download according to your needs. Then, install the app by following the instruction wizard. Launch the program and insert the media file into the working space by tapping the Import Media files option. You must drag and drop the uploaded media file into the timeline to make further edits.
Step2 Add song to the uploaded video
Now, click the Audio in the Menu option and choose Sound effects from the left panel of the screen. From the displayed items at the right panel, choose the desired ones and make a right-click on them. Then, select Apply option from the pop-up screen. You can also drag and drop it to the timeline to merge this audio track with the video file.
Step3 Preview and export
After adding the desired audio tracks with the uploaded video content, preview the video by playing them on this video editor screen. When you are convinced with the edit operations, then export it by tapping the Export button. In the Export screen, you can change the display settings like resolution, and file format to overcome the file compatibility issues. You can store it on any external or internal storage space based on your needs.
Use the above instructions to edit the media files using the Filmora app the video maker with song and enhance the quality of the video content professionally.
Tip: Additional video edits using the Filmora video editor
Wondershare Filmora
Get started easily with Filmora’s powerful performance, intuitive interface, and countless effects Try It Free Try It Free Learn More about Filmora>
In the Filmora app, you can find audio adjustment options to customize the audio signal manually by fading them in and out precisely. You can enable the audio ducking option to increase the audio quality by personalizing the specific segment of the audio file. This feature helps to make the audio file sound better. Based on your needs, you can detach the audio tracks from the video file and insert the voice-over sounds by recoding them using this program. This option helps the editors to convert the video file to interactive and fun-filled.
Apart from working on the audio tracks, you can also make changes in the video settings. Add the filters and transitions to enhance the video quality and you can also split the screens to narrate a better story using the video content. Another interesting factor with the Filmora application is that you can upload any file format files to make necessary edits because it supports all formats without compromising on any factors.
In Filmora, you can edit the audios with loads of in-built settings like Audio Equalizer and Audio speed options. In the Equalizer screen, you can make variations by manually adjusting the fade-in/fade-out options, volume adjustment and pitch to improvise the audio quality. You can also make changes with the audio speed by making it fast forward, slow motion effect and reverse the speed as per your requirements. On the Audio edit window, you can set the Denoise option to remove the background noise. Check in the Remove Background Noise option and scroll on the settings liner to assign the value between weak, mid, and strong.
These are the available audio settings with the Filmora video editor. Make the right settings to enhance the overall audio attributes with utmost quality factors.
Conclusion
This article had taught you how to create an efficient video using the video maker with a song like Filmora video editor. It is an incredible app that assists you to perform a wide range of video edit options. This app is compatible with professionals as well as newbie users. You can work on this program and build a creative video for your needs. Connect with this article to get some valuable insights on the best video edits using an efficient video editor. Choose Filmora to unleash your imaginations and make desired edits limitlessly. Stay tuned to make wise edits on your videos and create stunning content to entertain the audience precisely.
A Detailed Guid to Remove Background From a Video in Premier Pro
Adobe Premiere Pro is one of the leading video editing software. You can use to create or remove a video’s background. Advanced Chroma Key features such as Color Key and Ultra Key make it possible to produce background-free content quickly.
Although both Keys work similarly, many users prefer to use the Ultra key for a better result in the video. This article will explain how to remove video background in Premiere Pro if you are a newbie.
Let’s get right to it and start the tutorial!
How to Use Premiere Pro to Remove Video Background?
Adobe Premiere Pro can remove video backgrounds quickly using the Ultra Key feature with the following steps:
Step1 In the first step, launch a browser, and download the appropriate Adobe Premiere Pro version for your Windows PC or Mac . Next, install the software on your system and launch it from your Desktop or Dock.
Step2 Now, use the Media Browser panel in the software to browse the video clips you want to import into the software. Next, right-click on your selected video file in which you want to remove the background and choose the “Import” option.

Step3 Click the “Effects” tab in the software panel and select Video Effects. Here, you will see the “Keying” option; select the Ultra Key, press and hold it to grab the key, and place it on your video clip.

![]()
Note: You can also search for the Ultra Key in the Adobe Premiere Pro search bar. Drag it to the video clip containing a background you want to remove.
Step4 As soon as you drop the Ultra Key to your footage, an Effects Control panel will pop up. Next, use the eyedropper tool in the Effects Control panel. Finally, select the background color on your video that you want to remove.

Step5 In the next step, click the drop-down menu next to the “Output” option, and select “Alpha Channel” from the list. This will reveal the details of your video and the edits. Also, click the “Setting” drop-down menu and select the Relaxed, Aggressive, or Custom option for the video effect.

Step6 Select the “Matte Generation“ below Key Color. Try different levels for Highlight, Shadow, Tolerance, Transparency, Pedestal, and other settings to further clean the matte for a premium effect.

Step7 In this step,choose the “Matte Cleanup” option to expand its settings and clean up the edges of your clip. You will see various options here, but the most important one is “Choke.” It will shrink the object’s borders and “Soften” to add fuzz.

If you see a background color spill on your video after playing with the above settings, click “Spill Suppression” beneath Matte Cleanup to expand its options and choose the desired settings to resolve this issue.
That’s about it! You have successfully removed the video background in Premiere Pro.
Step8 In the last step, you need to save, render, and export your video with the removed background. To do this, click the “File” option on the Premiere Pro Media Browser, and choose “Export” to explore the “Media” menu.
Choose the format in the Export Settings, as it is compatible with most devices. Next, choose a valid Preset and resolution, and click “Export” to begin the rendering process. Finally, save your edited background video again, and export the video to the desired destination.
Is There Any Best Alternative to Remove Video’s Background?
Although Adobe Premiere Pro is an excellent choice, the software can be a little overzealous for beginners. But don’t fret; there is an alternative for newbie to remove the video background.
Many video content creators recommended Wondershare Filmora as a user-friendly video editing software. This software loads with customization options and compact feature, including the Human Segmentation effect. With it, you can isolate objects from the background of a video without a green screen.

Let’s take a quick look at Filmora video editing marvel features:
- Comes with a free trial and is priced to meet most video designers’ production needs.
- Remove the video background with four quick steps.
- View the foreground of your video in real-time after background removal.
- Numerous customization options to add a different background or an image to the original content.
- Add the removed background as an overlay on top of another clip.
- Drag and drop a video clip to another track in the timeline for cutting, trimming, and elimination purposes.
- Using the “Human Segregation effect” in the AI Portrait on any imported video is simple.
- See objects isolated from the background in the Preview mode, which allows you to adjust the edges, feathers, and thickness accordingly.
- Easy export options supporting various compatible formats.
Additionally, we have provided you with a video tutorial about How to Remove and Change Video Background Without Green Screen with Filmora:
Free Download For Win 7 or later(64-bit)
Free Download For macOS 10.14 or later
Conclusion
This comprehensive guide explains how to remove the video background in Premier Pro using the Ultra key instead of the Color Key.
We have also discussed an excellent alternative to Premier Pro that can eliminate any background in your video content within minutes.
This article helped solve your queries. As a result, you can now create quality video content for your audience without paying thousands of dollars to professional video editors to do the background removal for you.
Step4 As soon as you drop the Ultra Key to your footage, an Effects Control panel will pop up. Next, use the eyedropper tool in the Effects Control panel. Finally, select the background color on your video that you want to remove.
Step5 In the next step, click the drop-down menu next to the “Output” option, and select “Alpha Channel” from the list. This will reveal the details of your video and the edits. Also, click the “Setting” drop-down menu and select the Relaxed, Aggressive, or Custom option for the video effect.
Step6 Select the “Matte Generation“ below Key Color. Try different levels for Highlight, Shadow, Tolerance, Transparency, Pedestal, and other settings to further clean the matte for a premium effect.
Step7 In this step,choose the “Matte Cleanup” option to expand its settings and clean up the edges of your clip. You will see various options here, but the most important one is “Choke.” It will shrink the object’s borders and “Soften” to add fuzz.
If you see a background color spill on your video after playing with the above settings, click “Spill Suppression” beneath Matte Cleanup to expand its options and choose the desired settings to resolve this issue.
That’s about it! You have successfully removed the video background in Premiere Pro.
Step8 In the last step, you need to save, render, and export your video with the removed background. To do this, click the “File” option on the Premiere Pro Media Browser, and choose “Export” to explore the “Media” menu.
Choose the format in the Export Settings, as it is compatible with most devices. Next, choose a valid Preset and resolution, and click “Export” to begin the rendering process. Finally, save your edited background video again, and export the video to the desired destination.
Is There Any Best Alternative to Remove Video’s Background?
Although Adobe Premiere Pro is an excellent choice, the software can be a little overzealous for beginners. But don’t fret; there is an alternative for newbie to remove the video background.
Many video content creators recommended Wondershare Filmora as a user-friendly video editing software. This software loads with customization options and compact feature, including the Human Segmentation effect. With it, you can isolate objects from the background of a video without a green screen.
Let’s take a quick look at Filmora video editing marvel features:
- Comes with a free trial and is priced to meet most video designers’ production needs.
- Remove the video background with four quick steps.
- View the foreground of your video in real-time after background removal.
- Numerous customization options to add a different background or an image to the original content.
- Add the removed background as an overlay on top of another clip.
- Drag and drop a video clip to another track in the timeline for cutting, trimming, and elimination purposes.
- Using the “Human Segregation effect” in the AI Portrait on any imported video is simple.
- See objects isolated from the background in the Preview mode, which allows you to adjust the edges, feathers, and thickness accordingly.
- Easy export options supporting various compatible formats.
Additionally, we have provided you with a video tutorial about How to Remove and Change Video Background Without Green Screen with Filmora:
Free Download For Win 7 or later(64-bit)
Free Download For macOS 10.14 or later
Conclusion
This comprehensive guide explains how to remove the video background in Premier Pro using the Ultra key instead of the Color Key.
We have also discussed an excellent alternative to Premier Pro that can eliminate any background in your video content within minutes.
This article helped solve your queries. As a result, you can now create quality video content for your audience without paying thousands of dollars to professional video editors to do the background removal for you.
How To Split Screen On Tiktok
TikTok is probably the most popular video-sharing app in the world right now. Many TikTokers have become famous for making videos that have a significant impact and encourage creativity and new ideas. One of the most popular TikTok trends is the split-screen effect. You’ve probably seen a lot of TikTok split-screen videos with cool effects that made you wonder how the user split their screen. Becoming skilled in using TikTok effects is not as difficult as it might look. It only requires a significant amount of practice. Read on as we show you how to make a TikTok split-screen video.
Using CapCut To Split Screen
CapCut is the official free TikTok Video Maker and Video Editor with Music for TikTok that is multifunctional. Its interface is quite similar and easy to use.
CapCut includes free advanced capabilities such as keyframe animation, stabilization, and Picture-in-Picture (PIP). These are in addition to its fundamental functions, such as video editing, adding stickers, text, and music.
Steps to Split Screen Video with CapCut On Android and IOS Devices
- To use the app, you need to install it first. iPhone and Android users can download CapCut. Navigate to the appropriate app store of your choice and download CapCut.
- After installation, launch the app.
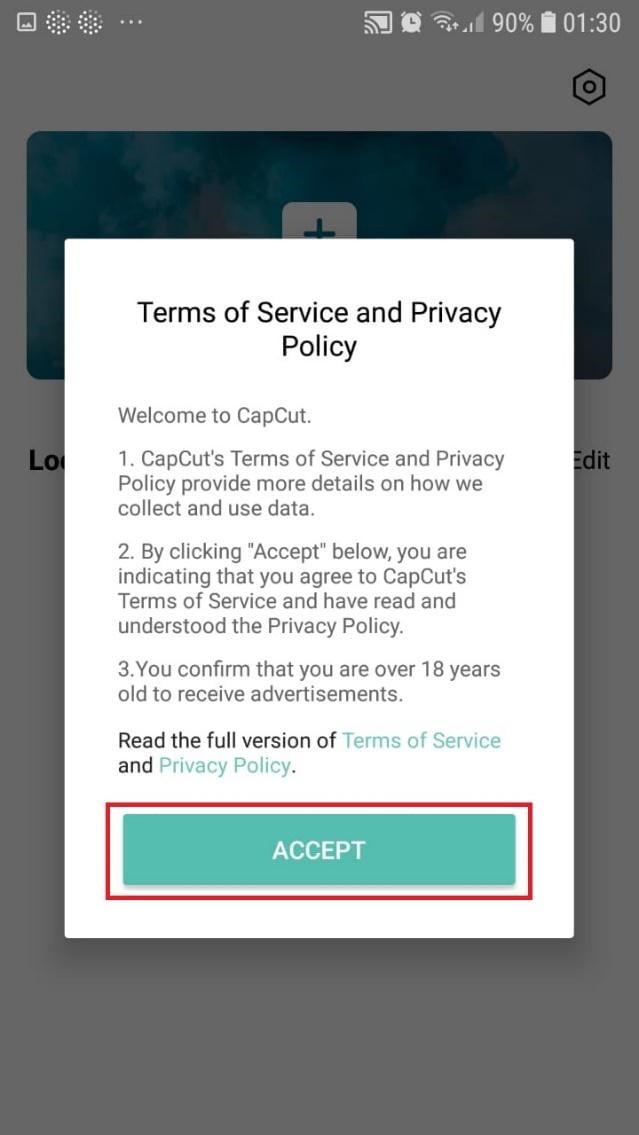
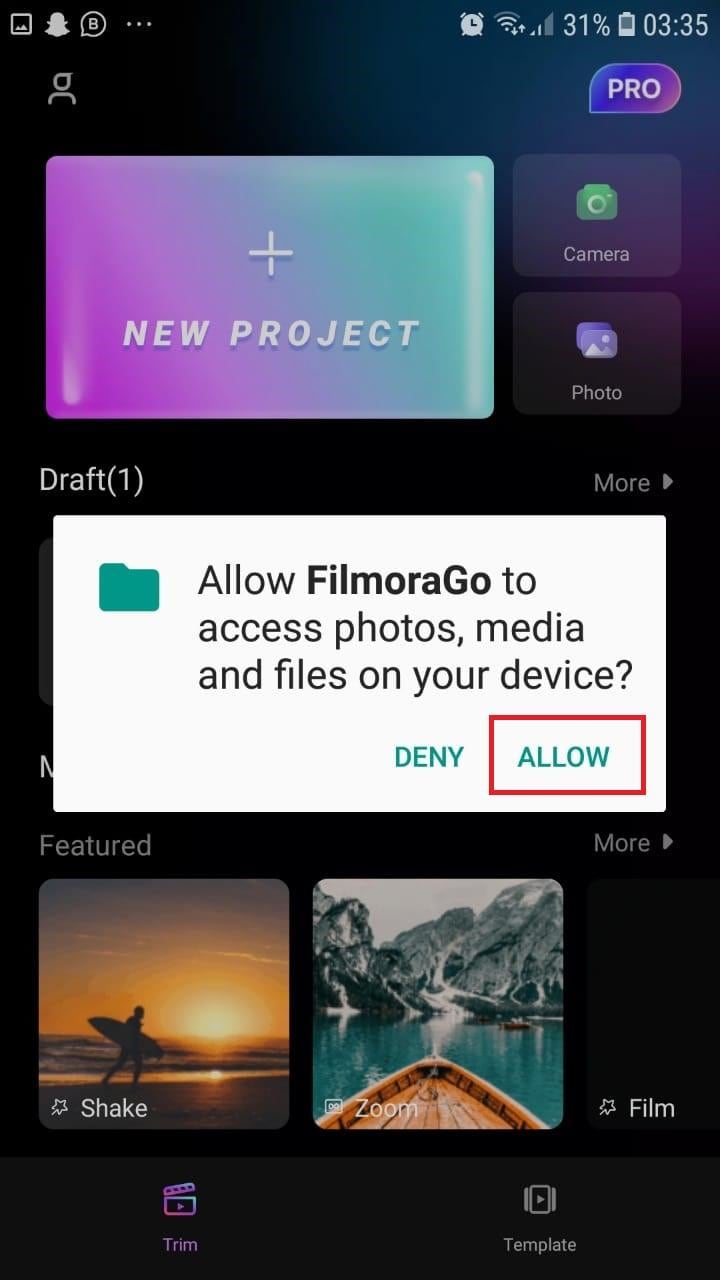
- Then go ahead and grant CapCut permission to view your camera roll. Incorporating video clips into your project has never been easier. Go to the app’s main screen and select “New Project“ from the drop-down menu.
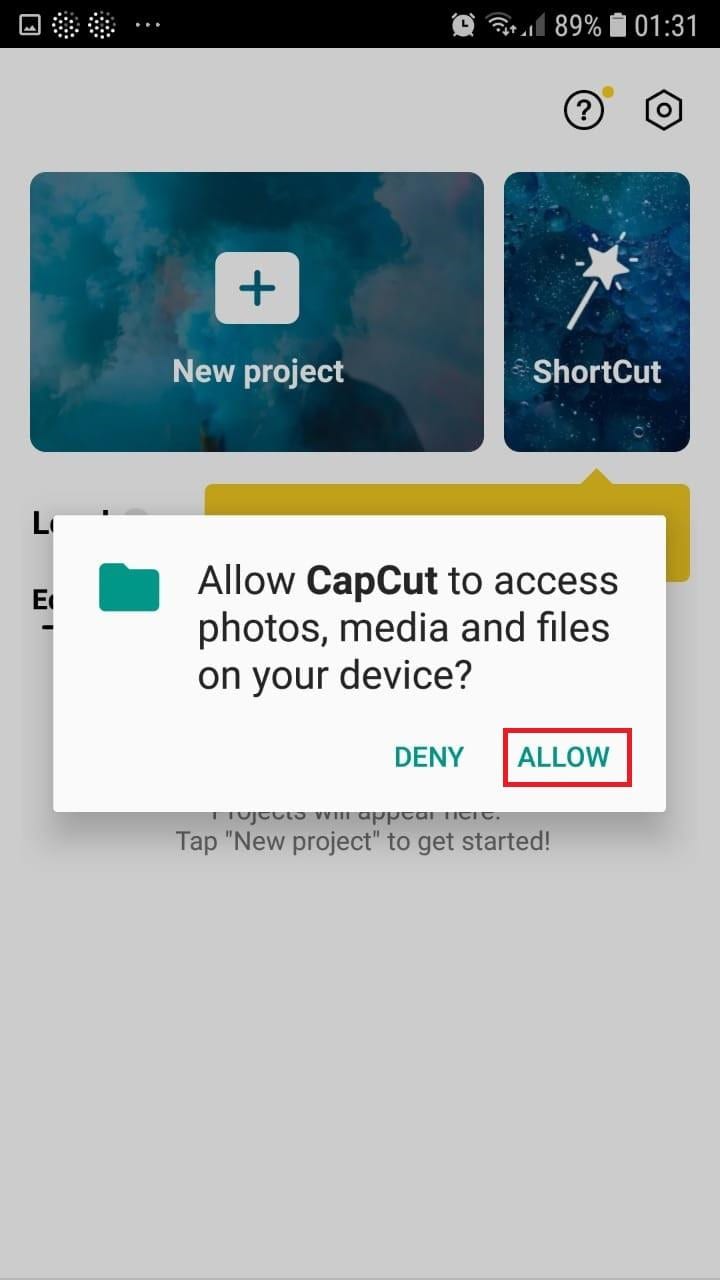
- To confirm your selection, click the green Accept This confirms that CapCut requires access to your photographs to function correctly. Tap on the button on the following pop-up window to gain access to all the photos. This is a one-time process that must be carried out the first time you launch the application.
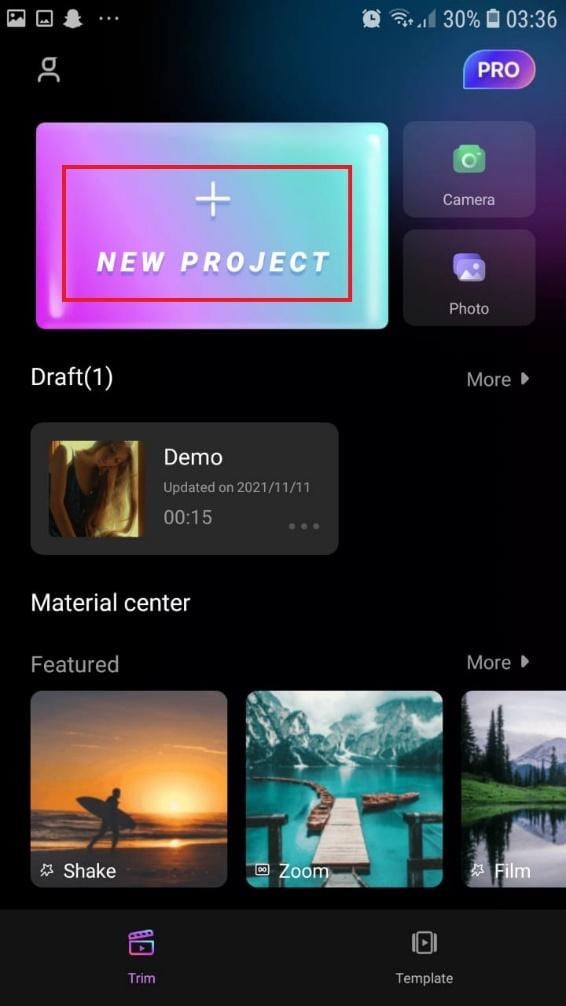
- Begin a New Project. After opening the app, press the “New Project“ icon to bring up a new screen showing your device’s videos.

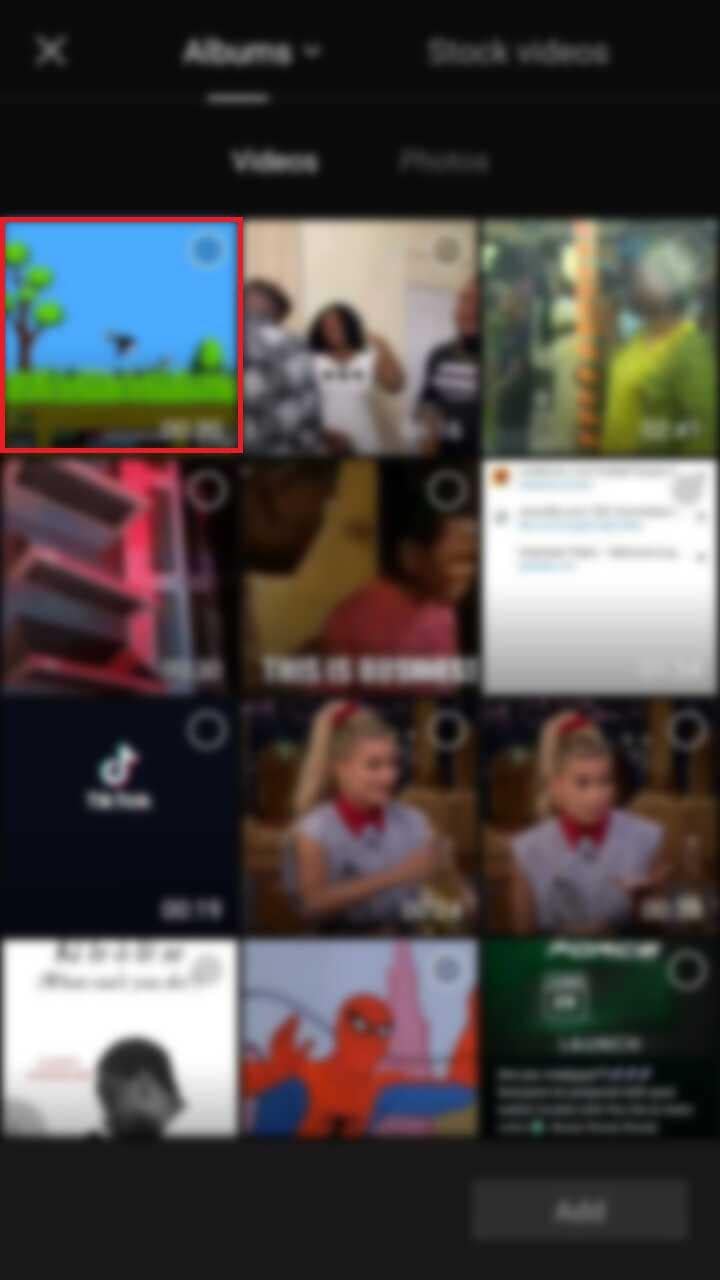
- Choose a video clip. Locate the desired video clip for your project by scrolling through the pages displaying your camera roll. Tap the video’s thumbnail and then tap the “Add“ icon in the screen’s lower part.
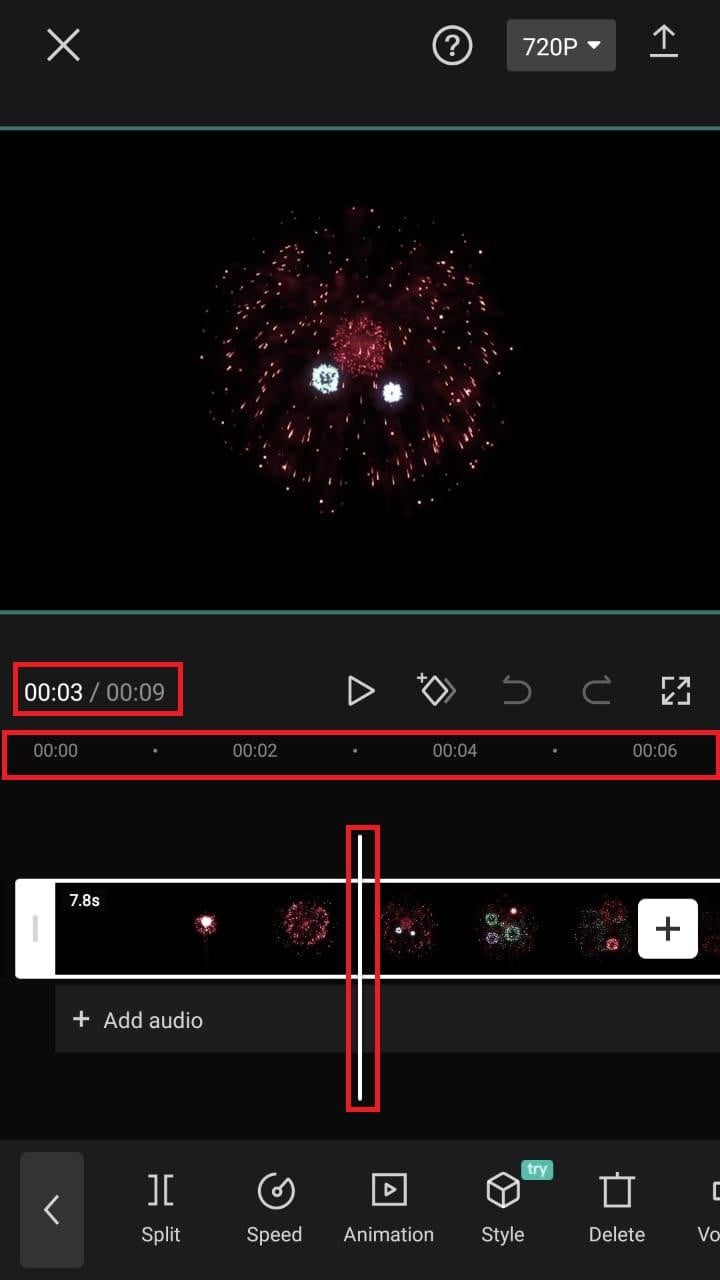
- Get familiar with your workspace. Upon uploading your first clip, CapCut leads you to the primary workspace. This is where you will spend most of your time within the app. The preview panel, the timeline, and the toolbar are in order from top to bottom.
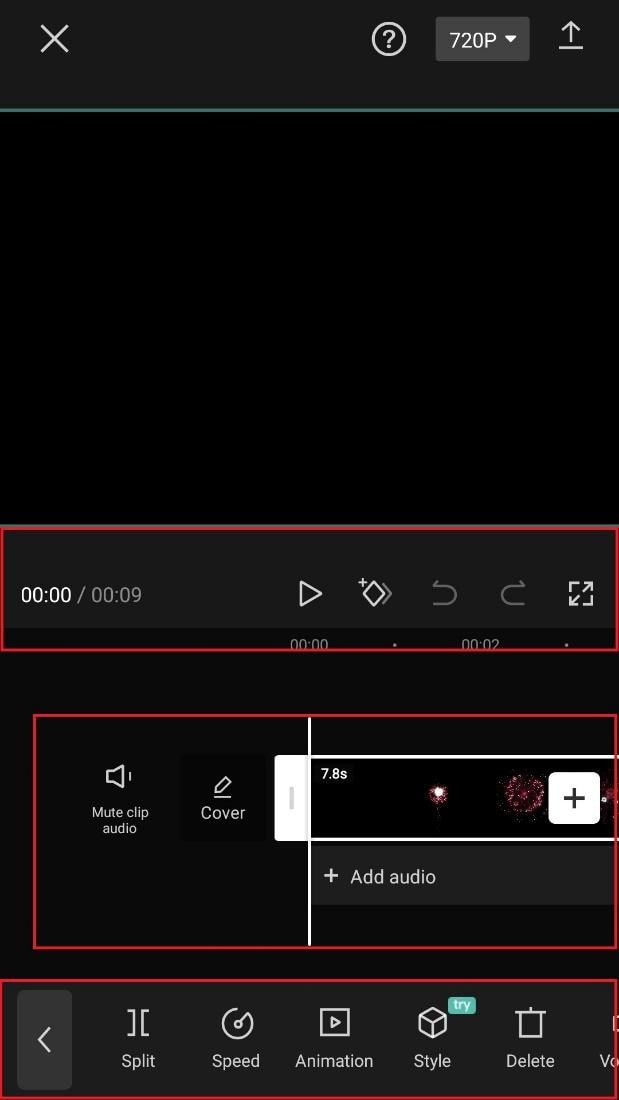
- View the toolbar and timeline. They represent your screen’s bottom half. The timeline, located below the preview panel, is where you’ll make all your adjustments. You can access all your video editing tools, including split, text, audio, effects, stickers, and more, on the toolbar at the bottom of your screen.
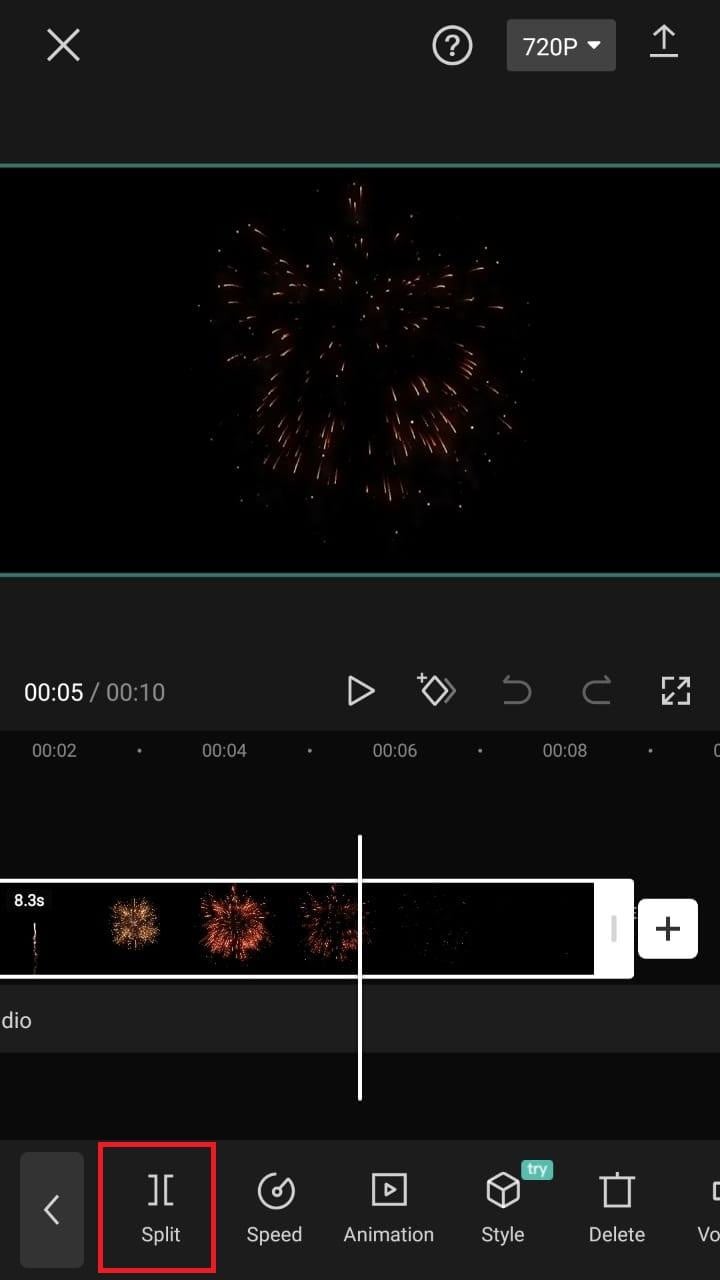
- Split video clips. To split a video clip in half, move the play head to the desired location on the timeline. Tap on your clip, then press the “Split“ toolbar icon. Your result now shows two different clips, not just one.
A Better Split-Screen Effect Video Editor
Filmora is one of the best free HD video makers and video editors with several functionalities, including text, backgrounds, filters, special effects, emoji, audio, and special effects.
Filmora is a feature-packed video editor which has a variety of tools to work with. With this video editor, producing memes, videos with images, pictures, music, stickers, and sound effects and editing videos for YouTube, Twitter, WhatsApp, Facebook, TikTok, and Instagram is simple and entertaining.
Free Download For Win 7 or later(64-bit)
Free Download For macOS 10.14 or later
Steps to Split Screen Video with Filmora
- Download Filmora from the App store
- After installation, launch it.
- Click on “Continue” to continue to use the app.

- Click on Allow to grant Filmora access to your photos and videos.
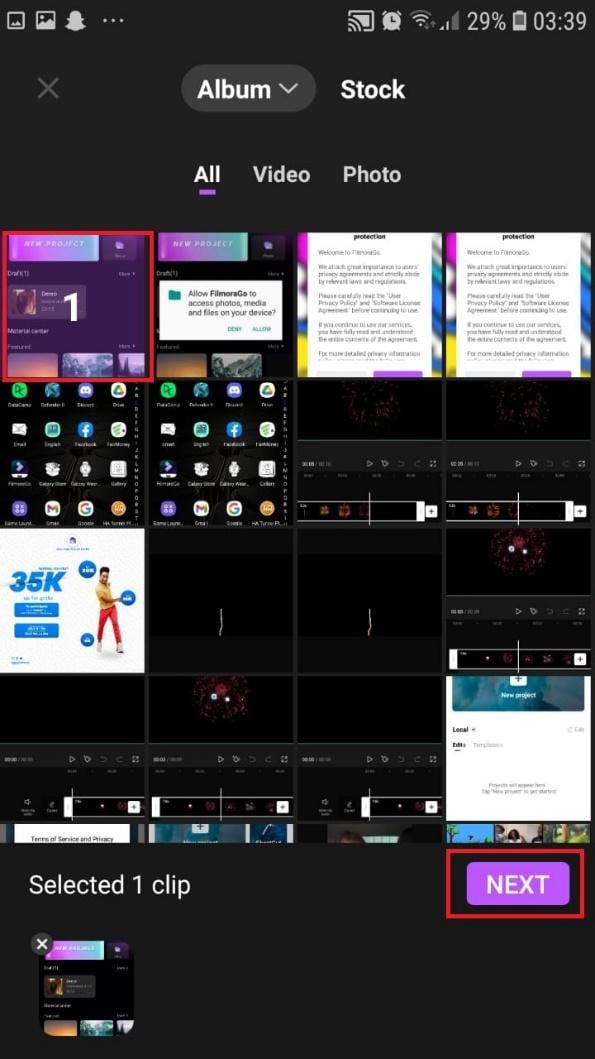
- You can now tap on “New Project” with the + Symbol.
- Select your desired video and tap on “Next” at the bottom right of your screen
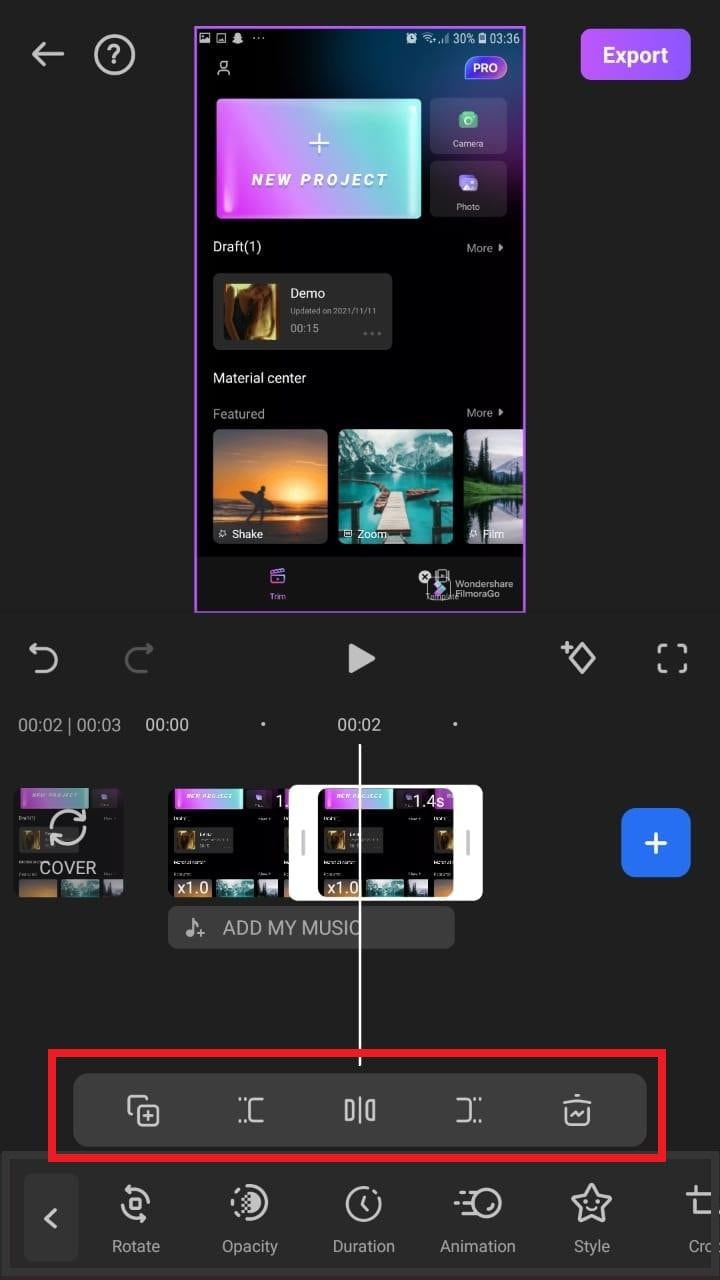
- You can select various options from the bottom of your screen to edit the selected video the way you like.

- Click on trim, and then you will see the different split-screen and collage feature options. Pick any that appeals to you.
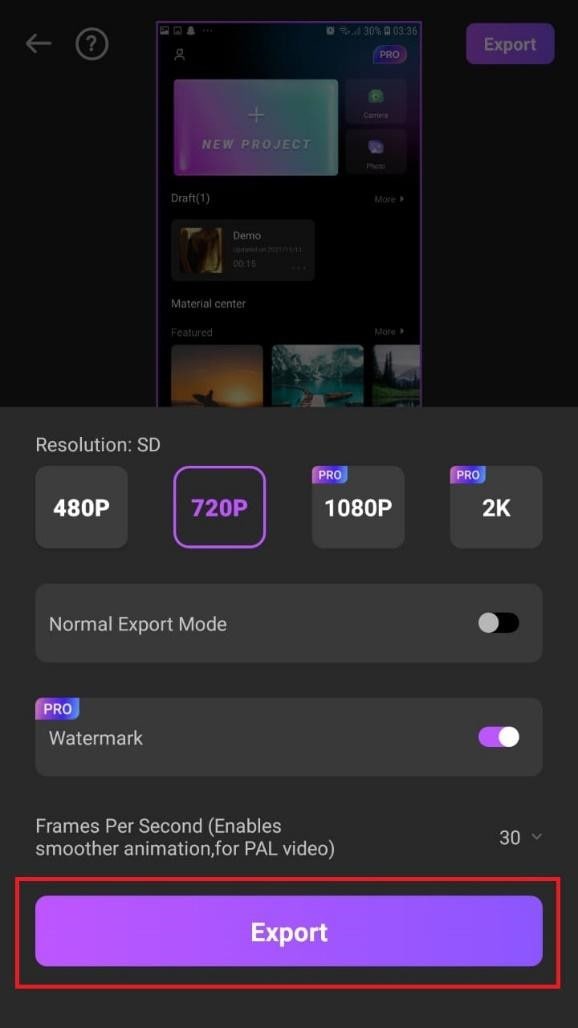
- When you are done with the editing, tap on “Export” at the top right of your screen.

- Go ahead and tap on “Export” on the next screen. Your video will be successfully exported and saved to your camera roll.
Using Filmora is very efficient in splitting your videos and making collage features for TikTok. It is a very simplified app available on both the Google Play Store and Apple Appstore.
Conclusion
TikTok is a platform that users use worldwide to create and share content. It could be pictures, videos, reels, or any other media type. Some people create videos for their audience on TikTok to educate them, while others do it to entertain them.
In any case, the goal is to build a more significant following on TikTok and garner greater attention from its users. You could even make money off the app.
One of the methods to impress your fans and explore multiple possibilities to build unique reels is to use the TikTok split-screen and collage feature effect available on TikTok. Although there are a few different ways to create a Split Screen on TikTok, the steps highlighted in this article are the most straightforward.
Free Download For macOS 10.14 or later
Steps to Split Screen Video with Filmora
- Download Filmora from the App store
- After installation, launch it.
- Click on “Continue” to continue to use the app.
- Click on Allow to grant Filmora access to your photos and videos.
- You can now tap on “New Project” with the + Symbol.
- Select your desired video and tap on “Next” at the bottom right of your screen
- You can select various options from the bottom of your screen to edit the selected video the way you like.
- Click on trim, and then you will see the different split-screen and collage feature options. Pick any that appeals to you.
- When you are done with the editing, tap on “Export” at the top right of your screen.
- Go ahead and tap on “Export” on the next screen. Your video will be successfully exported and saved to your camera roll.
Using Filmora is very efficient in splitting your videos and making collage features for TikTok. It is a very simplified app available on both the Google Play Store and Apple Appstore.
Conclusion
TikTok is a platform that users use worldwide to create and share content. It could be pictures, videos, reels, or any other media type. Some people create videos for their audience on TikTok to educate them, while others do it to entertain them.
In any case, the goal is to build a more significant following on TikTok and garner greater attention from its users. You could even make money off the app.
One of the methods to impress your fans and explore multiple possibilities to build unique reels is to use the TikTok split-screen and collage feature effect available on TikTok. Although there are a few different ways to create a Split Screen on TikTok, the steps highlighted in this article are the most straightforward.
Also read:
- 2024 Approved Add Motion Blur in After Effects
- In 2024, Do You Want to Know About Phone Aspect Ratio Vertical? Trying to Learn About iPhone Vertical Video Dimensions? Read This Article to Get All Your Answers on Vertical Phone Aspect Ratio Definition, Types and Tips
- New In 2024, 4 Solutions to Add White Borders on Mobile and Desktop
- How to Create Your Own LUTs for Your Video with Filmora
- New Create an Awesome Logo Reveal with Logo Intro Templates
- Updated In 2024, Adobe Premiere Pro Download and Use Guide In Depth
- Updated Learn How to Blur Faces in Your Video on iPhone
- New 2024 Approved Guide on VHS Technology and Its Influence on Video Editing
- Updated DaVinci Resolve Scopes Have Undergone Significant Improvements. Find Out How to Use These Scopes and Improve Your Video Editing Skills
- In 2024, Are You Looking for an Ideal Halloween Countdown Video Clip for Your Video? This Article Will Walk You Through the Best Ones You Can Use to Get the Job Done Perfectly
- In 2024, With This Article, We Will Be Looking at Steps to Rotate a Video in Cyberlink PowerDirector to Help You when Required. We Have Also Mentioned the Steps You Will Need to Follow in Wondershare Filmora
- Updated Shoot Video with Virtual Green Screen
- Best Options to Replace Sky of Any Photo Online + Offline for 2024
- Updated Are You Seeking Free Lumetri Presets to Enhance Your Videos? Find Out All About Lumetri Color Presets and How to Use Them in Presenting Proper Color Grading
- Updated Blender Green Screen Effects for 2024
- Updated In 2024, Video Editing Tips to Know Before Editing First Draft
- New In 2024, How to Create a Video Slideshow in iMovie
- Updated The Premiere Pro Video Templates Help Make Original Content of Broadcast Quality. The Article Introduces 10 Free Premiere Pro Templates that Are Sure to Make Your Life Easy
- 2024 Approved Easy Steps to Slow Down a Video on iPhone and Android
- How to Add Text Animation Online
- 2024 Approved Easy Way to Apply Green Screen to YouTube Videos
- Are You Stuck with How to Use Discord GIF Ideally? Check that Out in This Article, as We Will Guide You on All You Need to Know About GIFs for Discord for 2024
- Updated In 2024, Best 6 WMV to GIF Converters
- The Complete Guide to Converting GIF to SVG With Ease
- New Do You Also Use Android to Create and Edit Videos? Read About the Efectum Video Effects Editor, Which Is Available in Your App Stores for Seamless Editing
- Updated 2024 Approved How to Create Realistic Fire Effects
- Updated 3 Actionable Ways to Create Countdown Animation for Videos for 2024
- New This Article Presents the Guide to Using Magic Effects for Creating Competent Films with Step-by-Step Instructions and Filmoras Grow and Win Program Contest
- Learn How to Blur Faces in Your Video on iPhone for 2024
- In 2024, Best Slow Motion Camera Apps for Best Content Creation
- Updated 2024 Approved Splice Video Editor Online - Get Your Videos Splice Easily
- In 2024, How to Convert Videos to Slow Motion? Complete Guide
- In 2024, Synchronizing Videos Can Be Hectic, but Do You Wish to Know a Good Tool for This Purpose? This Article Will Discuss Wondershare Filmora, Which Is Perfect for This
- Updated 2024 Approved Beginners Guide About WMV Format and Best WMV Video Editor
- Overview of FPS for YouTube Videos for 2024
- A Guide to Create Your Own LOL Montage Video
- In 2024, TikTok Slow Zoom | Create Your Slow Zoom TikTok in Minutes
- Learn How to Extract Sound From Video Using the Different Online and Software Tools. Details About Their Features, Pros/Cons, and More Are Given for 2024
- New In 2024, Best PDF to GIF Converters
- In 2024, Are You Interested in the Best LUTs ? Do You Want to Enhance Your Photos and Images with High-End Quality? Then, Quickly Step Into This Article for Mind-Blowing Facts on It
- In 2024, Best Ai Generated Memes
- Updated 2024 Approved Add Fade in Windows Video Editor
- Updated In 2024, Best 10 Anime Movies for All Time
- In 2024, How to Make Glitch Effect with Filmora
- 2024 Approved Beginners Guide to Green Screen Keying
- In 2024, Fixing Foneazy MockGo Not Working On OnePlus Ace 2 Pro | Dr.fone
- In 2024, How to Reset your Poco F5 5G Lock Screen Password
- In 2024, How to Transfer Contacts from Samsung Galaxy M54 5G To Phone | Dr.fone
- How to Factory Reset Vivo S17 If I Forgot Security Code or Password? | Dr.fone
- In 2024, Your Account Has Been Disabled in the App Store and iTunes From Apple iPhone 13 Pro Max?
- Will iSpoofer update On Lava Blaze 2 Pro | Dr.fone
- How To Bypass the Required Apple Store Verification For iPhone XS Max
- How to Unlock Apple ID Activation Lock On Apple iPhone XR?
- In 2024, How to Unlock Vivo S17 Pro Phone Pattern Lock without Factory Reset
- In 2024, Set Your Preferred Job Location on LinkedIn App of your Gionee F3 Pro | Dr.fone
- In 2024, Apple ID is Greyed Out On Apple iPhone XS Max How to Bypass?
- The way to get back lost call history from Oppo K11x
- In 2024, How to Use Google Assistant on Your Lock Screen Of Realme GT 5 Phone
- Fixing Persistent Pandora Crashes on Honor 80 Pro Straight Screen Edition | Dr.fone
- Fake the Location to Get Around the MLB Blackouts on Oppo Reno 11F 5G | Dr.fone
- Title: Updated 2024 Approved Split Audio From Video in Adobe Premiere Pro Step by Step
- Author: Chloe
- Created at : 2024-06-18 14:30:49
- Updated at : 2024-06-19 14:30:49
- Link: https://ai-editing-video.techidaily.com/updated-2024-approved-split-audio-from-video-in-adobe-premiere-pro-step-by-step/
- License: This work is licensed under CC BY-NC-SA 4.0.
