
:max_bytes(150000):strip_icc():format(webp)/Robothandholdinganapple-fbe6ff482ed641e188dd6650b9ac132e.jpg)
Updated 2024 Approved Tips to Make Cinematic Color Grading
Tips to Make Cinematic Color Grading
New modern color grading software allows you to do point-and-click color grading right in your browser. Color changes are as easy and intuitive as painting or sketching.
You can choose from many different look presets and movie emulations based on Hollywood movies plus real-time previews of your favorite LUTs with this software.
Part 1. What is Cinematic Color Grading?
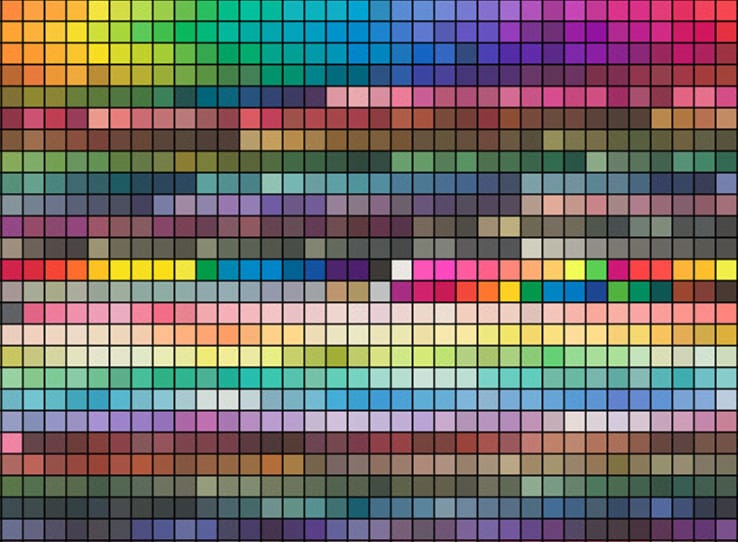
The cinematic look is all the rage these days and aims to mimic images captured on real film rather than digitally created. To achieve this effect, film directors use various means from lighting to cinematic color gradation. The latter is a powerful tool for bringing a cool or warm tone to a video and providing smooth color transitions to fall on an image that doesn’t look too real but feels emotional.
This kind of post-production processing, which produces beautiful results when used by color magicians, requires a deep understanding of colors and their effect on our psyche and even physiology. It’s not enough to watch a color grading video and use a LUT to get where you want. You should at the very least have an understanding of:
- Color wheel
- Color quality
- Color harmony and discord
- Warm and cool colors
- Color context
Part 2. Tips to make cinematic color grading
Here are three helpful tips to create cinematic-looking images in DaVinci Resolve.
In my 10-year career as a colorist, I’ve worked on every type of content imaginable: short, long, commercial, educational, episodic—you name it. And while each of these formats requires its approach, the one constant that spans them all is the client’s desire for a cinematic look.
Virtually all of us aspire to more cinematic color, but we often come up short—in part because the term itself has become too broad to effectively target. To focus on the goal, I like to think of “cinematic” as “an image whose key visual properties are consistent with those of printed film.”
The print film was the primary medium through which we consumed cinematic images for the first century of filmmaking and is therefore at the very heart of cinematic aesthetics. In this video, I’ll show you my top three secrets to achieving this aesthetic quickly and consistently in Davinci Resolve.
Tips1: Create Color Density
The first secret to film color is to create color density. Another key aesthetic property of film images is that colors can be either highly saturated or highly luminescent but cannot be both.
We can mimic this visual characteristic by identifying strongly saturated colors in our image and using the Hue vs. Lum to reduce their brightness. This simple technique is especially effective on pure primary colors (red, green, and blue).
Tips2: Separation Beats Saturation
The second secret to film color is prioritizing separation over saturation. When you feel like an image lacks overall color or pop, it’s all too easy to reach for the saturation knob, but that’s not a very cinematic solution.
Instead, try using split toning—pushing cool colors into shadows and warm colors into highlights—to increase tonal separation and add depth to an image. This characteristic is present in virtually every film print and is deeply evocative when applied correctly.
Tips3: Strong Contrast is Your Friend
The third secret of film colors is a strong contrast. This is not always easy, as a higher contrast look inherently requires more precision with exposure placement. Too often we pump up some contrast, end up with an image that looks blown out or too crisp, and then immediately back away from editing.
However, if you stick with high contrast long enough to improve your exposure, you’ll get a very different result and be well on your way to a more cinematic image.
Part 3. How to add color cinematic grading by using Filmora?
New modern color grading software allows you to do point-and-click color grading right in your browser. Color changes are as easy and intuitive as painting or sketching.
You can choose from many different look presets and movie emulations based on Hollywood movies plus real-time previews of your favorite LUTs with this software.
Wondershare Filmora is an option if you want to easily change the colors of your projects. You may just double-click the media after dragging it onto the editing timeline to change the contrast, saturation, brightness, and hue.
Despite its speed, it also allows you to merge, edit audio, divide, rotate, and apply as many cool video effects as you like.
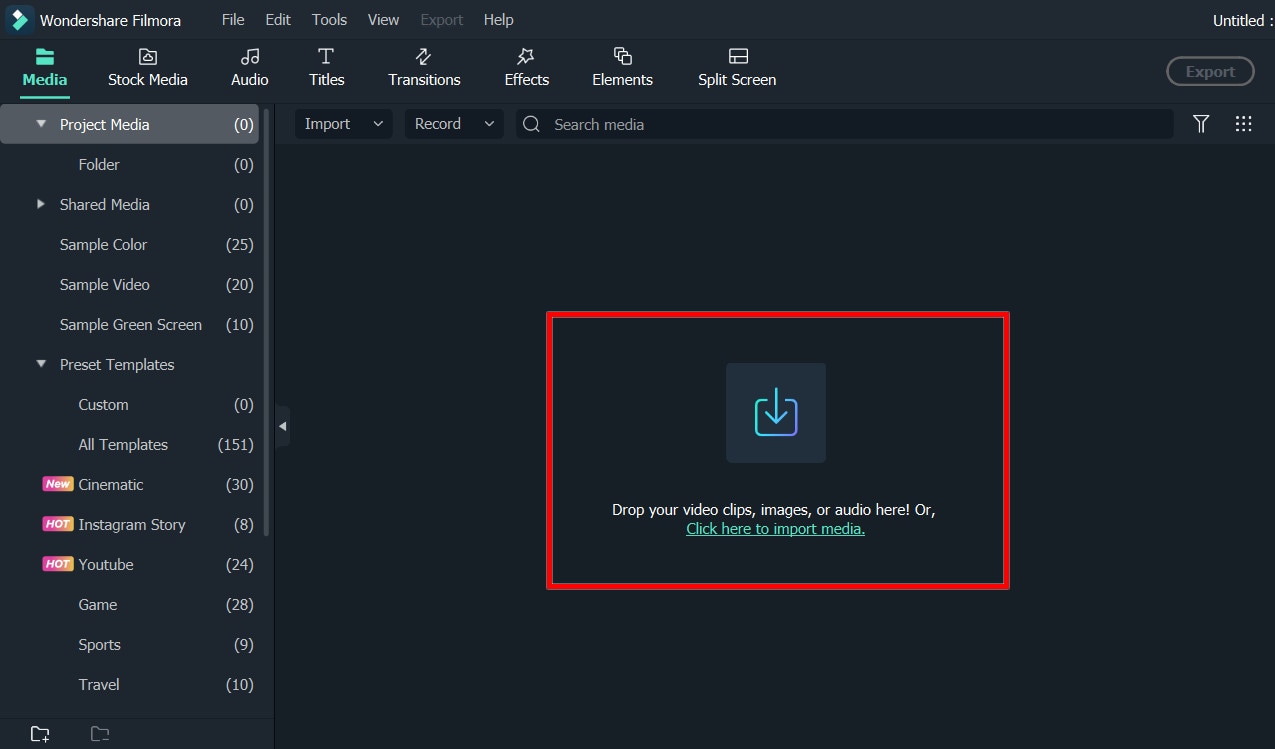
Step1Add the media
After installing Wondershare Filmora, click the New Project and Import button to easily find and load your videos.
Step2Correct the color [Basic and Advanced]
In the timeline, double-click the video editing window. Select the “Color” panel and make adjustments.
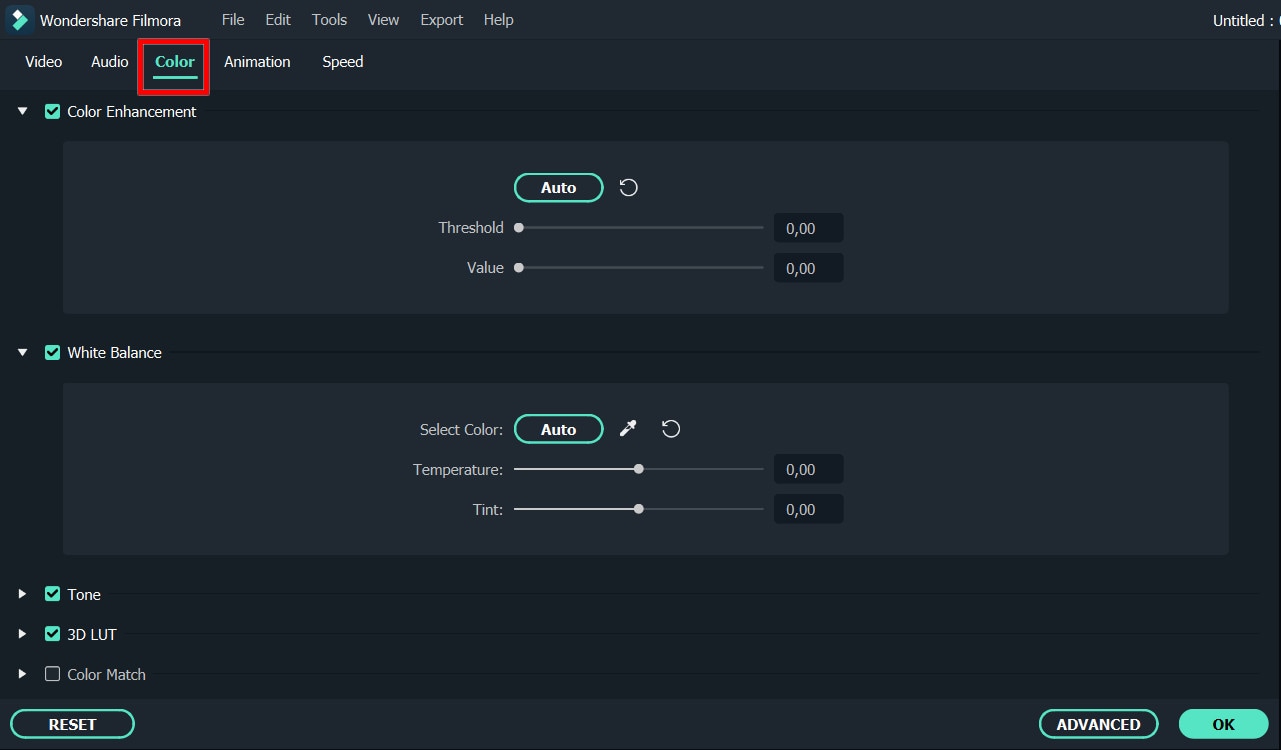
- Contrast: By adjusting this setting, you can control the brightness and color in different parts of the image.
- Saturation: This setting highlights the gray part of the video to a shade. You can adjust it to make the colors of the entire video image appear more saturated or more subdued.
- Brightness: You can change this setting to adjust the overall darkness and lightness of your project.
- Hue: Hue is generally the lightness of a color. Let’s say that when red is saturated with white, it creates a shade of pink.
- 3D LUT: 3D lookup tables provide your media with Hollywood movie color sets like the 007 series, Batman, Harry Porter, etc.
Hover over the indicator to adjust the color correction settings. Then left click on it and move the slider. The corresponding value stabilizes after releasing the mouse button.
With Filmora, you also have access to advanced color correction. Click the Advanced Color Tuning icon to enter the appropriate window where you can fine-tune the color or use preset templates.
The Preferences tab has a variety of templates, including Movie, Normal, 3D LUT, and Vignette. In the Edit tab, you can adjust color temperature, white balance, hue, 3D LUT, color, HSL, light, vignette, etc.
Step3Preview and save the new video
When you are satisfied with your creation, click “Export”. Then click the Settings button and save the new videos in different formats in the Format tab. You can also export the video directly to Vimeo or YouTube or burn it to DVD for better preservation.
Filmora’s color correction tools will make your videos look natural, more attractive, more vibrant, consistent, and professional.
Color Correction Presets
Color correction presets help your video achieve an enhanced cinematic look. Adjust gives you control over fine-tuning the colors in your shots. You can make various adjustments such as color temperature and exposure.
In the “Effects > LUT” tab, you’ll see an extensive selection of preset color settings. These include Vignettes, Movie Looks Like Old Movies, and Cinematic 3D LUT effects such as Harry Potter, Game of Thrones, House of Cards, and Mission Impossible.
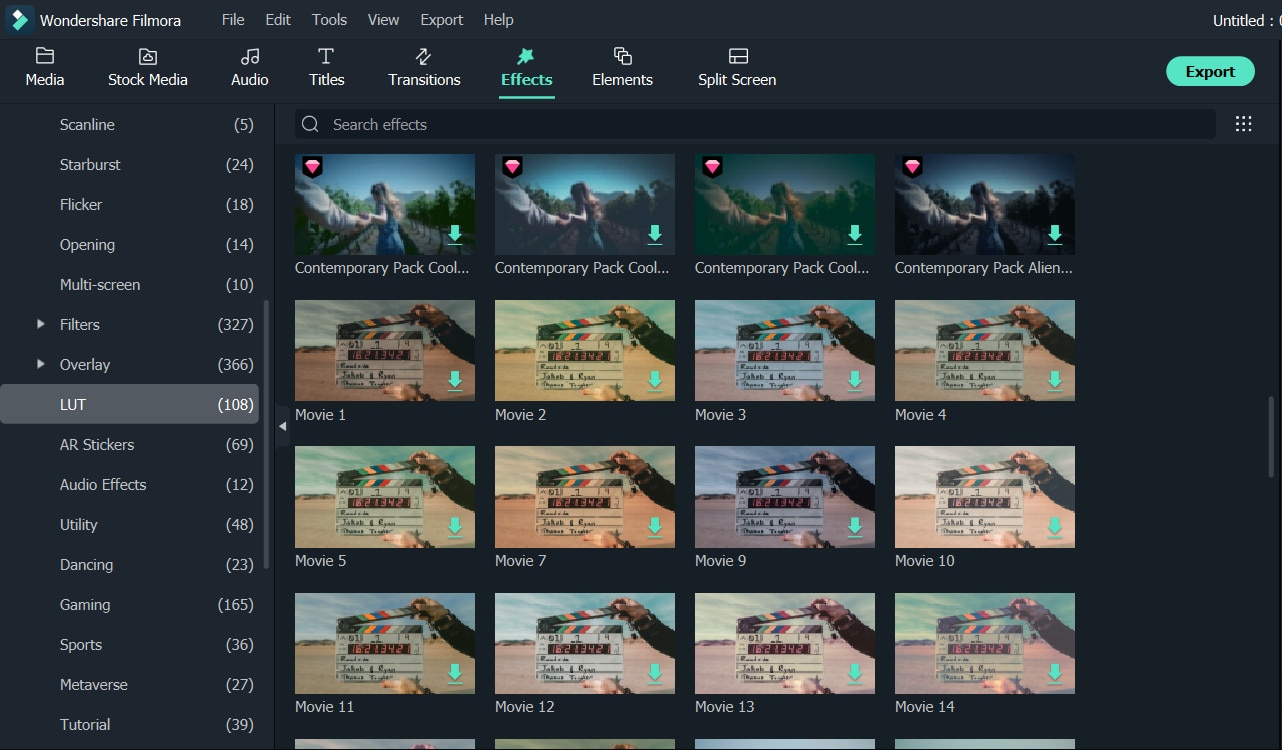
Filmora’s Color Correction Advanced Tool also categorizes your presets. Click on All Presents to see six categories: Favorites, Custom, 3D Lut, Common, Film, and Vignette.
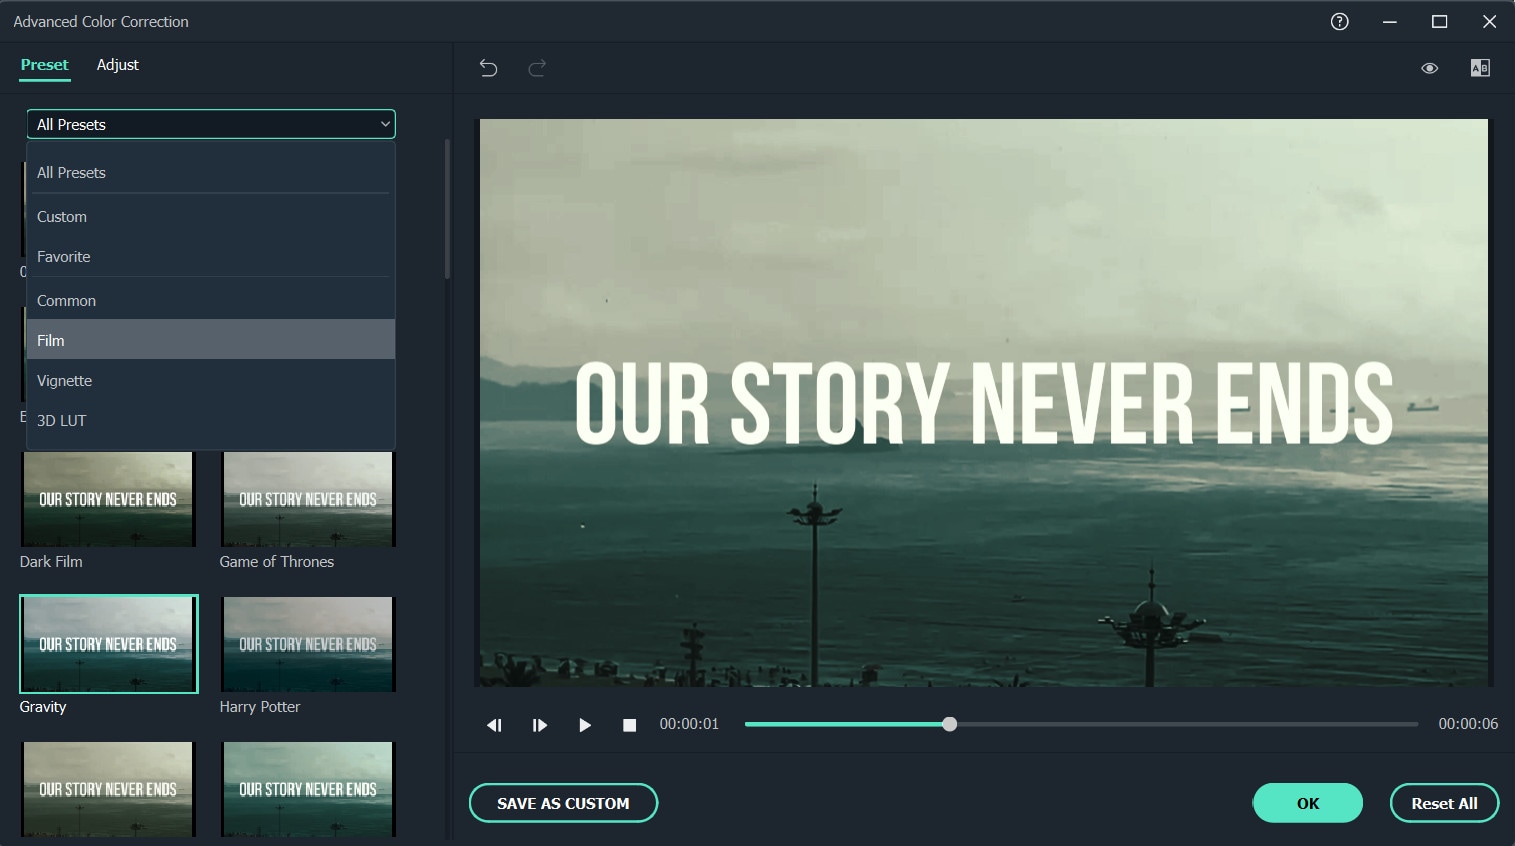
Double-click a preset to apply it to your video. You can see how it looks in the Advanced Color Correction preview window. If you are satisfied with the results, click OK.
Conclusion
Above are the steps to give your video a cinematic look using Wondershare Filmora, hope this helps if you are wondering how to do it. As we can see above, using Filmora video editor will make you more creative in making videos with a suitable emotional tone.
Free Download For Win 7 or later(64-bit)
Free Download For macOS 10.14 or later
Minecraft Pixel Art Is a Trending Subject, and They Simply Consist of In-Game Pixel Artworks, Besides the Minecraft Houses, Farms, or Cities. Let’s Explore the Fantastic World of Minecraft Pixel Art
Versatile Video Editor - Wondershare Filmora
An easy yet powerful editor
Numerous effects to choose from
Detailed tutorials provided by the official channel
Minecraft pixel art is a trending subject, and they simply consist of in-game pixel artworks, besides the Minecraft houses, farms or cities.
In this article
01 What is Pixel Art Minecraft?
02 5 Most Popular Minecraft Pixel Art for Minecraft Die-Hard Fans
03 Best Tools to Make Minecraft Pixel Art
04 How to Make Pixel Art Minecraft In-game?
05 Tips for Creating a Wonderful Minecraft Pixel Art
Part 1: What is Pixel Art Minecraft?
This art can range from drawings to 3D models and even statues. Anything the players would like is just up to their imagination.
Like any Minecraft thing you do in-game, you just stack piles of blocks over blocks to do it, except what the player is doing is creating pixelated art, in general in large proportions. In terms of in-game, pixel art really doesn’t do much, but it is to be appreciated like any art.
Many players state that Minecraft pixel art is rewarding and realistic in terms of the game.
Part 2: 5 Most Popular Minecraft Pixel Art for Minecraft Die-Hard Fans
1. The Sandshrew
In this Minecraft pixel art, we see a mural of a Sandshrew; a pokemon depicted sitting down and with a palette color ranging from yellow to light brown and dark brown.
![]()
2. The Obama
In this Minecraft Pixel art, we can see the former president of the USA, Barack Obama portrait, in reference to a famous picture of him in real life. The color palette ranges from white to blue and red.
![]()
3. The Goomba
In this pixel art Minecraft, we have Goomba, a character from Super Mario. The colors are very simple and range from black to white and brown.
![]()
4. Spongebob
In this Minecraft pixel art, we have depicted SpongeBob Square pants in the game. Its color goes from yellow to green, blue, white and black to be faithful to the original cartoon.
![]()
5. The Joker
In this Minecraft pixel art, we have Joker from the Batman universe. A famous villain in that universe. Its color pattern ranges from several tones of green, red, purple, white, and blue.
![]()
Part 3: Best Tools to Make Minecraft Pixel Art
There are a few apps that you can use to create Minecraft pixel art, for example:
1. Scriptolab.com
In this small web application, you are able to transform your image or any photo of your choice into Minecraft pixel art and blocks.
It’s very easy to use. All you have to do is go to the website and pic your image. Resize the image or picture to the desired size to correspond to the number of blocks in the game.
It also has an easy-to-contact platform to communicate with the website owner that can guide you through the steps if you are ever in doubt.
2. Filmora
This is an application that you can download onto your PC or Mac for free. It is a powerful tool that does more than pixel art, but we will use it for such.
With Filmora, you can use a range of tools to create your Minecraft pixel art, like posterize effect to add a different gradient to the pixel art. The tool CC Black Load can help you perfect the square pixels to make it look more defined. You also have tools such as tint and grid to give a retro look to your art. Or even an animation effect for your wallpapers.
Also, in Filmora, you can add many effects to your pixel art like the 8-bit style or 16-bit style. You can also share your creations and export them and send them to your friends.
![]()
Wondershare Filmora
Get started easily with Filmora’s powerful performance, intuitive interface, and countless effects!
Try It Free Try It Free Try It Free Learn More >

3. Pixel Art Builder
In this mobile app, you can create Minecraft pixel art from the palm of your hand.
You can draw on grids rather than in real pixels to help you be more precise with your art. It has a very easy-to-use interface, and it is completely free.
Many of its key features are, for example, exporting images, dynamic size adjustment of the ability to save in several different formats. Its tools range from the regular pencil to eraser, paint bucket, line and circle drawer, move/zoom function, color wheel, and eyedropper.
Part 4: How to Make Pixel Art Minecraft In-game?
It is very easy to create pixel art Minecraft in-game. Of course, each artist’s ability differs, and so does art as well, but to start out, you do not need much. You need, though, careful planning and knowing the exact scale of your art.
You can break the creation of pixel art in Minecraft into four different steps:
1. Choose an image that you like
It is important that you reference the original work and can easily access it, as you might need to peek often while building your own art. The best thing to do is when you are starting to copy an image and work on it, rather than start it from scratch, as it takes an enormous amount of time and you need to be an expert to do it.
2. Break the image down into single-color sections
This is the part where “careful planning” comes in. You need to be looking at your original piece constantly to know if you are going in the right direction. Also, take all the colors and try to group them. Deconstructing the original image into colored shapes is a process that will help you outline the shape and color of the original design.
3. Obtain the necessary resources
You can start this step by opening Minecraft and start collecting blocks that you think will be useful for your pixel art. It does not matter if you play in Survival, Hardcore, or Adventure mode. The process is the same. It is ideal, though, that you work on creative mode when making pixel art, as the game gives you unlimited resources. You are also able to fly in this mode, making it easier to pick up blocks, and there is no risk of your art being destroyed.
4. Start building
Now you can start building your masterpiece. Start with the foundation and build from there; although you can virtually start anywhere, these blocks can float, unlike art or buildings outside the game. The time the process takes depends on the amount of work that needs to be done and the piece’s complexity.
Part 5: Tips for Creating a Wonderful Minecraft Pixel Art
There are many ways to draw Minecraft pixel art, but here are some tips to help you out.
- Have a clear idea of what kind of art you want to do. And start with something pre-made if you are only starting out. It is extremely hard to start something from scratch.
- Plan the pixel art you are going to do. Gather around all the block materials and colors that you’ll need to make your pixel art.
- Use creative mode. Because with the creative mode, you are not limited to the number of blocks you can find, and also, no one can come and destroy your art.
- If it is easier, you can first draft your pixel art on another app to help you map out your own project.
Conclusion
Minecraft pixel art is a growing trend in the video games world. It can range from easy and accessible to beginners to extremely complicated pieces of art. Players are becoming more engaged with this type of art in-game, and the future only predicts a bigger expansion. There are several tools that you can use to start out in your pixel art, as well as many tutorials.
Minecraft pixel art is a trending subject, and they simply consist of in-game pixel artworks, besides the Minecraft houses, farms or cities.
In this article
01 What is Pixel Art Minecraft?
02 5 Most Popular Minecraft Pixel Art for Minecraft Die-Hard Fans
03 Best Tools to Make Minecraft Pixel Art
04 How to Make Pixel Art Minecraft In-game?
05 Tips for Creating a Wonderful Minecraft Pixel Art
Part 1: What is Pixel Art Minecraft?
This art can range from drawings to 3D models and even statues. Anything the players would like is just up to their imagination.
Like any Minecraft thing you do in-game, you just stack piles of blocks over blocks to do it, except what the player is doing is creating pixelated art, in general in large proportions. In terms of in-game, pixel art really doesn’t do much, but it is to be appreciated like any art.
Many players state that Minecraft pixel art is rewarding and realistic in terms of the game.
Part 2: 5 Most Popular Minecraft Pixel Art for Minecraft Die-Hard Fans
1. The Sandshrew
In this Minecraft pixel art, we see a mural of a Sandshrew; a pokemon depicted sitting down and with a palette color ranging from yellow to light brown and dark brown.
![]()
2. The Obama
In this Minecraft Pixel art, we can see the former president of the USA, Barack Obama portrait, in reference to a famous picture of him in real life. The color palette ranges from white to blue and red.
![]()
3. The Goomba
In this pixel art Minecraft, we have Goomba, a character from Super Mario. The colors are very simple and range from black to white and brown.
![]()
4. Spongebob
In this Minecraft pixel art, we have depicted SpongeBob Square pants in the game. Its color goes from yellow to green, blue, white and black to be faithful to the original cartoon.
![]()
5. The Joker
In this Minecraft pixel art, we have Joker from the Batman universe. A famous villain in that universe. Its color pattern ranges from several tones of green, red, purple, white, and blue.
![]()
Part 3: Best Tools to Make Minecraft Pixel Art
There are a few apps that you can use to create Minecraft pixel art, for example:
1. Scriptolab.com
In this small web application, you are able to transform your image or any photo of your choice into Minecraft pixel art and blocks.
It’s very easy to use. All you have to do is go to the website and pic your image. Resize the image or picture to the desired size to correspond to the number of blocks in the game.
It also has an easy-to-contact platform to communicate with the website owner that can guide you through the steps if you are ever in doubt.
2. Filmora
This is an application that you can download onto your PC or Mac for free. It is a powerful tool that does more than pixel art, but we will use it for such.
With Filmora, you can use a range of tools to create your Minecraft pixel art, like posterize effect to add a different gradient to the pixel art. The tool CC Black Load can help you perfect the square pixels to make it look more defined. You also have tools such as tint and grid to give a retro look to your art. Or even an animation effect for your wallpapers.
Also, in Filmora, you can add many effects to your pixel art like the 8-bit style or 16-bit style. You can also share your creations and export them and send them to your friends.
![]()
Wondershare Filmora
Get started easily with Filmora’s powerful performance, intuitive interface, and countless effects!
Try It Free Try It Free Try It Free Learn More >
3. Pixel Art Builder
In this mobile app, you can create Minecraft pixel art from the palm of your hand.
You can draw on grids rather than in real pixels to help you be more precise with your art. It has a very easy-to-use interface, and it is completely free.
Many of its key features are, for example, exporting images, dynamic size adjustment of the ability to save in several different formats. Its tools range from the regular pencil to eraser, paint bucket, line and circle drawer, move/zoom function, color wheel, and eyedropper.
Part 4: How to Make Pixel Art Minecraft In-game?
It is very easy to create pixel art Minecraft in-game. Of course, each artist’s ability differs, and so does art as well, but to start out, you do not need much. You need, though, careful planning and knowing the exact scale of your art.
You can break the creation of pixel art in Minecraft into four different steps:
1. Choose an image that you like
It is important that you reference the original work and can easily access it, as you might need to peek often while building your own art. The best thing to do is when you are starting to copy an image and work on it, rather than start it from scratch, as it takes an enormous amount of time and you need to be an expert to do it.
2. Break the image down into single-color sections
This is the part where “careful planning” comes in. You need to be looking at your original piece constantly to know if you are going in the right direction. Also, take all the colors and try to group them. Deconstructing the original image into colored shapes is a process that will help you outline the shape and color of the original design.
3. Obtain the necessary resources
You can start this step by opening Minecraft and start collecting blocks that you think will be useful for your pixel art. It does not matter if you play in Survival, Hardcore, or Adventure mode. The process is the same. It is ideal, though, that you work on creative mode when making pixel art, as the game gives you unlimited resources. You are also able to fly in this mode, making it easier to pick up blocks, and there is no risk of your art being destroyed.
4. Start building
Now you can start building your masterpiece. Start with the foundation and build from there; although you can virtually start anywhere, these blocks can float, unlike art or buildings outside the game. The time the process takes depends on the amount of work that needs to be done and the piece’s complexity.
Part 5: Tips for Creating a Wonderful Minecraft Pixel Art
There are many ways to draw Minecraft pixel art, but here are some tips to help you out.
- Have a clear idea of what kind of art you want to do. And start with something pre-made if you are only starting out. It is extremely hard to start something from scratch.
- Plan the pixel art you are going to do. Gather around all the block materials and colors that you’ll need to make your pixel art.
- Use creative mode. Because with the creative mode, you are not limited to the number of blocks you can find, and also, no one can come and destroy your art.
- If it is easier, you can first draft your pixel art on another app to help you map out your own project.
Conclusion
Minecraft pixel art is a growing trend in the video games world. It can range from easy and accessible to beginners to extremely complicated pieces of art. Players are becoming more engaged with this type of art in-game, and the future only predicts a bigger expansion. There are several tools that you can use to start out in your pixel art, as well as many tutorials.
Easy Guide to Apply Slow Zoom Effects to Videos
A raw video without any effect will fall flat on its face when it comes to engagement and watch time. Nobody likes watching videos without effects as there is no entertainment value, and the video is not soothing and pleasing to the eyes. That is why effects in videos are extremely important especially when it is a video you are posting on social media to get everyone’s attention. You should definitely consider adding slow zoom effect in your video to make it stand out.
The slow zoom effect is one of the most common but widely loved video effects that work for any video. Human eyes love when there is slow motion effect of panning and zooming into the central or specific portion of a video. The slow zoom in effect is extremely popular among TikTok videos. We will illustrate how to apply slow zoom effect to your video on your smartphone as well as on your computer.
Part 1. How to create slow zoom-in effect in Filmora
If you want to add slow zoom to any recorded video on your computer, you will need a dedicated video editor. There are many popular video editors available where slow zoom effect is not available. We recommend Wondershare Filmora which is a professional video editor that is available for Windows and Mac users. You will need to combine slow motion and keyframe to achieve the desired slow zoom effect. Here are the steps on how to create slow zoom in effect for your videos.
Free Download For Win 7 or later(64-bit)
Free Download For macOS 10.14 or later
Step1 Download and install Wondershare Filmora . Launch the application and click on New Project option from the welcome screen.

Step2 Drag and drop your video in Project Media folder. Thereafter, drag and drop the video into the Timeline.

Step3 Put the red header on the beginning part of the clip that you want to cut off and click on Cut(Scissor) icon. Then put the red header on the end part of the clip and click on Cut icon again. You should now have the separated clip for applying slow zoom effect.

Step4 Select the separated clip and click on Speed icon. Go to Slow option and select the speed according to the slowness of zooming you want.

Step5 Now you have to add multiple keyframes so that the slow zoom effect is smooth and soothing. Right-click on the clip, go to Animation and click on Add Animation. Go to Animation tab and then to Customization section.

Move the red header to the point where you want a keyframe and click on Add option. Similarly, move the red header slightly farther and add another keyframe. Keep adding like that till you reach the end point.

Step6 Double-click on the clip and go to Video> Basic> Transform. Select keyframes and slowly increase the scale slider for each keyframe to apply the zoom effect. Therefore, for every keyframe, zooming will increase gradually and you have already applied slow speed for complete slow zoom effect.

Part 2. How to do the slow zoom in effect on TikTok?
TikTok is one of the most popular short-video sharing platforms among teenagers and young adults. The slow zoom effect has been popularized by TikTokers as they use the effect quite regularly. Naturally, adding slow zoom in effect on your video on TikTok is the easiest. Here are the steps to follow one by one.
Step1 Launch TikTok app and you can shoot your video directly from TikTok. If you have already recorded the video, tap on “+” icon located at the bottom of the app screen and select the video.
Step2 After adding the video, go to Effects> Time. Under Time section, tap on “Slo-Mo” option to add slow-motion effect on your video.

Step3 Go to Visuals and you will find Zoom option. Place the header on the part of the video where you want to place the slow zoom effect. Thereafter, tap and hold Zoom effect so that the effect applies on the video clip. Release the effect where the desired section is covered.

Step4 Tap on Save option and play the video to see slow zoom effect. Tap on Next button and you can share the video on social media platforms as well.

There is another way you can apply slow zoom effect on TikTok. Here are the steps to find and apply slow zoom effect.
Step1 Launch TikTok app and tap on Discover option located at the bottom.

Step2 On the next screen, type “Slow Zoom” on the search bar and tap on Search option.

Step3 Now you will see the videos where different TikTok users have already applied slow zoom effect. Tap on Effects Slow Motion to apply the same effect to your video.

Step4 On the next screen, tap on Try This Effect button. You can select the duration of the zooming of the video you are about to shoot as well the zooming magnification.

Step5 Finally, tap on Record button to capture your video and apply slow zoom effect on the video automatically.

Conclusion
The slow zoom effect is one of the most viral and trending video effects on social media platforms. If you want to add slow zoom effect to your video for a certain portion, you can do the same from your smartphone as well as computer. For Windows and Mac users, we recommend you use Wondershare Filmora .
Free Download For macOS 10.14 or later
Step1 Download and install Wondershare Filmora . Launch the application and click on New Project option from the welcome screen.
Step2 Drag and drop your video in Project Media folder. Thereafter, drag and drop the video into the Timeline.
Step3 Put the red header on the beginning part of the clip that you want to cut off and click on Cut(Scissor) icon. Then put the red header on the end part of the clip and click on Cut icon again. You should now have the separated clip for applying slow zoom effect.
Step4 Select the separated clip and click on Speed icon. Go to Slow option and select the speed according to the slowness of zooming you want.
Step5 Now you have to add multiple keyframes so that the slow zoom effect is smooth and soothing. Right-click on the clip, go to Animation and click on Add Animation. Go to Animation tab and then to Customization section.
Move the red header to the point where you want a keyframe and click on Add option. Similarly, move the red header slightly farther and add another keyframe. Keep adding like that till you reach the end point.
Step6 Double-click on the clip and go to Video> Basic> Transform. Select keyframes and slowly increase the scale slider for each keyframe to apply the zoom effect. Therefore, for every keyframe, zooming will increase gradually and you have already applied slow speed for complete slow zoom effect.
Part 2. How to do the slow zoom in effect on TikTok?
TikTok is one of the most popular short-video sharing platforms among teenagers and young adults. The slow zoom effect has been popularized by TikTokers as they use the effect quite regularly. Naturally, adding slow zoom in effect on your video on TikTok is the easiest. Here are the steps to follow one by one.
Step1 Launch TikTok app and you can shoot your video directly from TikTok. If you have already recorded the video, tap on “+” icon located at the bottom of the app screen and select the video.
Step2 After adding the video, go to Effects> Time. Under Time section, tap on “Slo-Mo” option to add slow-motion effect on your video.
Step3 Go to Visuals and you will find Zoom option. Place the header on the part of the video where you want to place the slow zoom effect. Thereafter, tap and hold Zoom effect so that the effect applies on the video clip. Release the effect where the desired section is covered.
Step4 Tap on Save option and play the video to see slow zoom effect. Tap on Next button and you can share the video on social media platforms as well.
There is another way you can apply slow zoom effect on TikTok. Here are the steps to find and apply slow zoom effect.
Step1 Launch TikTok app and tap on Discover option located at the bottom.
Step2 On the next screen, type “Slow Zoom” on the search bar and tap on Search option.
Step3 Now you will see the videos where different TikTok users have already applied slow zoom effect. Tap on Effects Slow Motion to apply the same effect to your video.
Step4 On the next screen, tap on Try This Effect button. You can select the duration of the zooming of the video you are about to shoot as well the zooming magnification.
Step5 Finally, tap on Record button to capture your video and apply slow zoom effect on the video automatically.
Conclusion
The slow zoom effect is one of the most viral and trending video effects on social media platforms. If you want to add slow zoom effect to your video for a certain portion, you can do the same from your smartphone as well as computer. For Windows and Mac users, we recommend you use Wondershare Filmora .
A Full Guide to Funcall Voice Changer and Its Alternatives
Do you want to prank your friends? Everyone can agree that receiving a prank call is one of the world’s most annoying experiences. Still, you must admit that coming up with a great prank is a flex. If you want to make the next big prank film for TikTok or are just looking for something to do during a sleepover with your friends, you’ll need to have a plan before you pick up the phone. In this article, we will tell you how you can make prank calls easily with Funcall apps:
Try AI Voice Changer For Win 7 or later(64-bit)
Try AI Voice Changer For macOS 10.14 or later
Part 1: What’s Funcall App, and how to use it?
Making successful prank calls is very challenging. The Funcall - Voice Changer makes it incredibly easy to change your voice on a call and prank your family members and friends. You can call them and get their funny reactions.
You must input the target’s phone number and select whether you want the voice to be feminine, helium balloon, frightening, male, or regular sound. Funcall app also allows you to make international calls in over 150 countries on cell phones and landlines.

After installing the app, you will only have 30 seconds to play the prank. You can install other applications, view advertisements, or buy time directly through the app to get additional time. You are free to phone whatever number you like and speak in an artificial voice as long as you have the time. Additionally, you can include humorous sound effects like barking, farts, or gunfire. This voice-changing app is compatible with both Android and iPhone devices.
Follow these easy steps to use the Funcall app:
Step1Download
Go to the official website of Funcall apps and download it on your mobile device. To start the Funcall app, tap on the icon.
Step2Dial the Number
Dial the number of your friend or relative you want to prank and select the country.
Step3Select a Voice
At this point, pick the voice-altering sound you want to use. You can also add a background effect.
Step4Change Voice in Real Time
The call’s recipient will hear your customized voice rather than the original. To make the call more thrilling, you can add sound effects in addition to your altered voice.

Part 2: How to use the app for free?
Funcall is a premium software, and to use it, you must purchase one of its membership plans, which are reasonably priced. The first call on this app is free. You can earn more free minutes for prank calls by completing activities like watching advertising and downloading software.
Another option is to use Funcall MOD APK. It can be your best option if you’re seeking its free version, which allows you to enjoy an infinite number of minutes and an ad-free experience. You can use its hacked version to have free access to all of its paid features.
Part 3: Best alternatives to Funcall Voice Changer
Prank Dial
If you are looking for the best alternative to the Funcall app, you can use Prank Dial. With the help of the Prank Dial app, users can have fun while spending their free time making up to three random prank calls to friends and coworkers each day. You can press a call scenario to hear it and tap the heart to put it in your favourites so you can use it later.

The array of situations is sorted by category in the Prank Dial app, including “celebrities,” “angry,” “love,” “family prank calls,” etc. The history area displays all recent calls, including call date, caller id, scenario name, etc.
Fake Caller ID
If you want to make prank calls, make false caller ID, and have a good time, download this Fake Caller ID software. It has a very straightforward user interface that is free of any complications. You can easily prank or make fun of your friends by changing your voice pitch and caller ID.

This app gives two free calls each day and allows you to adjust your caller ID before you make the call, alter your voice while on the call, and record calls to listen to them later for fun.
MagicCall
For both Android and iOS, MagicCall is a fantastic tool to use as a voice-changing app when on the phone. It is an excellent app for making prank calls to pals and applying various effects. With multiple voice modifications and appended background effects, Magic Call is straightforward to use.

You can choose between Male, Robot, Female, Elderly Male, and Kid voices in the Voices area.
Prank Caller
With the help of the features in the Prank Caller app, you can access a massive library of prank call scripts directly from your smartphone’s screen and entertain your loved ones by using a different voice.

To try a new prank daily, you can browse the top prank call scripts and a list of all the available prank situations ranked by popularity.
FAQs
Can I use the Funcall app to make international calls?
You can use the Funcall app to make international calls in over 150 countries, including Asian, European, African, Middle Eastern regions, etc.
Can I use the Funcalls app while playing games?
No, you can’t use the Funcalls app while playing games. You can only use this app to change your voice during calls.
Can I change my voice during a call?
Yes, you can change your voice during calls. You can use Funcall apps or any alternatives to change your voice. However, we recommend you use the Funcall app because it is compatible with Android and iPhone.
What are the available voices on the Funcall app?
You can use a feminine, male, scary, helium, or a regular voice. This app also allows you to use various background sounds and effects.
Free Download For Win 7 or later(64-bit)
Free Download For macOS 10.14 or later
Try AI Voice Changer For Win 7 or later(64-bit)
Try AI Voice Changer For macOS 10.14 or later
Part 1: What’s Funcall App, and how to use it?
Making successful prank calls is very challenging. The Funcall - Voice Changer makes it incredibly easy to change your voice on a call and prank your family members and friends. You can call them and get their funny reactions.
You must input the target’s phone number and select whether you want the voice to be feminine, helium balloon, frightening, male, or regular sound. Funcall app also allows you to make international calls in over 150 countries on cell phones and landlines.
After installing the app, you will only have 30 seconds to play the prank. You can install other applications, view advertisements, or buy time directly through the app to get additional time. You are free to phone whatever number you like and speak in an artificial voice as long as you have the time. Additionally, you can include humorous sound effects like barking, farts, or gunfire. This voice-changing app is compatible with both Android and iPhone devices.
Follow these easy steps to use the Funcall app:
Step1Download
Go to the official website of Funcall apps and download it on your mobile device. To start the Funcall app, tap on the icon.
Step2Dial the Number
Dial the number of your friend or relative you want to prank and select the country.
Step3Select a Voice
At this point, pick the voice-altering sound you want to use. You can also add a background effect.
Step4Change Voice in Real Time
The call’s recipient will hear your customized voice rather than the original. To make the call more thrilling, you can add sound effects in addition to your altered voice.
Part 2: How to use the app for free?
Funcall is a premium software, and to use it, you must purchase one of its membership plans, which are reasonably priced. The first call on this app is free. You can earn more free minutes for prank calls by completing activities like watching advertising and downloading software.
Another option is to use Funcall MOD APK. It can be your best option if you’re seeking its free version, which allows you to enjoy an infinite number of minutes and an ad-free experience. You can use its hacked version to have free access to all of its paid features.
Part 3: Best alternatives to Funcall Voice Changer
Prank Dial
If you are looking for the best alternative to the Funcall app, you can use Prank Dial. With the help of the Prank Dial app, users can have fun while spending their free time making up to three random prank calls to friends and coworkers each day. You can press a call scenario to hear it and tap the heart to put it in your favourites so you can use it later.
The array of situations is sorted by category in the Prank Dial app, including “celebrities,” “angry,” “love,” “family prank calls,” etc. The history area displays all recent calls, including call date, caller id, scenario name, etc.
Fake Caller ID
If you want to make prank calls, make false caller ID, and have a good time, download this Fake Caller ID software. It has a very straightforward user interface that is free of any complications. You can easily prank or make fun of your friends by changing your voice pitch and caller ID.
This app gives two free calls each day and allows you to adjust your caller ID before you make the call, alter your voice while on the call, and record calls to listen to them later for fun.
MagicCall
For both Android and iOS, MagicCall is a fantastic tool to use as a voice-changing app when on the phone. It is an excellent app for making prank calls to pals and applying various effects. With multiple voice modifications and appended background effects, Magic Call is straightforward to use.
You can choose between Male, Robot, Female, Elderly Male, and Kid voices in the Voices area.
Prank Caller
With the help of the features in the Prank Caller app, you can access a massive library of prank call scripts directly from your smartphone’s screen and entertain your loved ones by using a different voice.
To try a new prank daily, you can browse the top prank call scripts and a list of all the available prank situations ranked by popularity.
FAQs
Can I use the Funcall app to make international calls?
You can use the Funcall app to make international calls in over 150 countries, including Asian, European, African, Middle Eastern regions, etc.
Can I use the Funcalls app while playing games?
No, you can’t use the Funcalls app while playing games. You can only use this app to change your voice during calls.
Can I change my voice during a call?
Yes, you can change your voice during calls. You can use Funcall apps or any alternatives to change your voice. However, we recommend you use the Funcall app because it is compatible with Android and iPhone.
What are the available voices on the Funcall app?
You can use a feminine, male, scary, helium, or a regular voice. This app also allows you to use various background sounds and effects.
Free Download For Win 7 or later(64-bit)
Free Download For macOS 10.14 or later
Also read:
- New How to Create Cooking Video Intro and End Screen for YouTube Channel, In 2024
- New Want to Make a Slide Show Video? Heres How
- In 2024, Top LUTs for Sony HLG to Download
- 2024 Approved Guide to Create an Intro Video with Filmora
- The Complete Guide to GIF for Discord Profile
- Updated 2024 Approved How to Change Video Thumbnail in Google Drive
- 2024 Approved The Ultimate Guide to Using AR Emoji Stickers in Your Videos
- Here Is a Complete Overview of VSCO Video Editor; the Best Photo-Editing App that Helps You Adjust Your Pictures Right After You Capture Them for 2024
- New 8 Best Sites to Get Glitch Transition for Premiere Pro for 2024
- New Top 15 Slow Motion CapCut Templates to Work With
- New How to Apply Gaussian Blur Effect to Videos In Premiere Pro, In 2024
- New In 2024, 2 Effective Ways to Add Text Behind Objects
- Zoom In and Out on Discord
- 2024 Approved Do You Seek to Blur Out Your Video and Photo to Display some Motion Blur? This Article Provides a List of the Best Motion Blur Apps for Videos and Photos
- AVI Editors for Windows 11/10/8.1/8/7 Easily Edit AVI Files on PC
- How to Create Cooking Video Intro and End Screen for YouTube Channel?
- Updated Free LUTs for OBS How to Use Them?
- In 2024, Best Video Title Generators
- Updated In 2024, Best MOV to GIF Converters
- How to Make Strobe Light Text Effect, In 2024
- In 2024, How Long Does It Take To Edit A Video
- Updated In 2024, Everything You Need to Know About Color Grading in Photography
- What Is the Selective Color Effect, and How Can You Add This Effect to Your Videos Using Wondershare Filmora? A Complete Guide for Beginners
- In 2024, Do You Have Images in GIF Format, and Do You Find Converting Them to AVI Pretty Tricky? Please Stay on This Article as Well Guide You with Tools Thatll Help You Convert Your GIF to AVI Quickly and with Ease
- In 2024, Learn How To Lock Stolen Your Apple iPhone 12 Pro Max Properly | Dr.fone
- Learn How To Lock Stolen Your Apple iPhone 15 Properly
- Android Unlock Code Sim Unlock Your Xiaomi 13T Pro Phone and Remove Locked Screen
- How to Unlock a Network Locked Vivo V30 Lite 5G Phone?
- In 2024, iPhone 11 Pro Asking for Passcode after iOS 17/14 Update, What to Do?
- Here Are Some Reliable Ways to Get Pokemon Go Friend Codes For Samsung Galaxy S23 | Dr.fone
- How to Change your Apple iPhone 13 Pro Max Location on Twitter | Dr.fone
- 15 Best Strongest Pokémon To Use in Pokémon GO PvP Leagues For Realme V30T | Dr.fone
- In 2024, 5 Ways to Track Nokia G42 5G without App | Dr.fone
- New In 2024, A Comprehensive List of The Top SpongeBob Voice Generators
- How To Get Out of DFU Mode on Apple iPhone 14 Pro Max? | Dr.fone
- Solutions to Spy on Vivo S17 Pro with and without jailbreak | Dr.fone
- Fix Motorola Moto G34 5G Android System Webview Crash 2024 Issue | Dr.fone
- Recommended Best Applications for Mirroring Your Tecno Phantom V Fold Screen | Dr.fone
- Title: Updated 2024 Approved Tips to Make Cinematic Color Grading
- Author: Chloe
- Created at : 2024-04-24 07:08:38
- Updated at : 2024-04-25 07:08:38
- Link: https://ai-editing-video.techidaily.com/updated-2024-approved-tips-to-make-cinematic-color-grading/
- License: This work is licensed under CC BY-NC-SA 4.0.
