
:max_bytes(150000):strip_icc():format(webp)/GettyImages-527847020-5b9edc17c9e77c0050ff9045.jpg)
Updated 7 Ways Add Subtitles to MKV Videos on All Platforms for 2024
[7 Ways] Add Subtitles to MKV Videos on All Platforms
Many people use MKV files as it’s an open-source format and does not require licenses. This file format functions as a multimedia file container that can help you in storing audio and video tracks. However, there are some key disadvantages of using MKV files, as this format is not supported by various platforms or devices. So, the most suitable video file formats that you can use are FLV and MP4. These two formats offer high-quality results and are supported by multiple platforms.
If you still want to use MKV files and want to add subtitles, this article can assist you. By reading this article, you can learn how to add subtitles to MKV with different methods.
Part 1: How to Add Subtitles to MKV on Windows?
Are you a Windows user and want to add subtitles to MKV? Read this section to find out compatible tools that can add subtitles to your MKV videos efficiently.
1. Wondershare Filmora
Free Download For Win 7 or later(64-bit)
Free Download For macOS 10.14 or later
Wondershare Filmora is a popular tool that provides you with multiple options to edit video files. If you are interested in adding subtitles to your MKV files, you can navigate to its “Speech-to-Text” feature. This feature automatically transcribes the voice used in the video into subtitles. It supports 16 different languages for creating subtitles through this feature.
This feature can also enhance your editing efficiency as you don’t have to write the subtitles on your own. Moreover, the STT feature utilizes advanced algorithms that help the tool create subtitles with high precision. Furthermore, you can also manually add the subtitles to your MKV file using this MKV subtitle editor.
Key Features
- Filmora offers various effects, such as a green screen that can help you to change your background dramatically.
- If you want to resize your videos efficiently, this tool provides the Auto Reframe feature.
- Filmora also offers various preset templates that can help you to craft captivating videos easily.
Step-by-Step Guide to Add Subtitles Using Filmora
Step1 Create a New Filmora Project
Download and install Filmora on your PC and click “Create Project.” Afterward, import the MKV video from your PC to this tool by clicking on the “Arrow” icon.

Step2 Go to Titles Tab
After importing the video, drag it to the timeline. Once done, click on the “Titles” section given on top. Afterward, click on “Subtitles” from the left section. Now you will be able to see different types of subtitles on your screen. Select your favorite style of subtitles and tap on its “Download” icon.

Step3 Choose the Preferred Subtitle Style
After that, tap on the “Plus” icon to add your selected subtitle style to the timeline. Double-click on the added subtitles, which will open the settings. You can manually add the subtitles on the “Input Text” box easily. Moreover, you can easily change the text font, color, opacity, and alignment.

Step4 Export and Save Video
Once you have created subtitles for your imported video, click the “Export” button on top. Using this option, you can save the video file to your device or share it on other platforms.

2. Cisdem Video Converter
Cisdem is an efficient tool that can be used by content creators for various purposes. Along with editing the videos, this tool can help you add subtitles to your video files in any format. It supports various formats for adding subtitles, such as MKV, MP4, AVI, etc. This tool also offers a built-in editor to modify the MKV videos flawlessly. Hence, it’s a basic tool that generates quality results instantly.
Key Features
- Cisdem can function as a video converter that supports more than 300 file formats. You can convert to and from MKV files using this platform easily.
- Through this software, you can professionally add watermarks to your MKV files. It provides various options to add a customized watermark to your desired video files.
- It offers a built-in media player that allows you to play and watch MKV files without interruption.
Steps to Add Subtitles to MKV Using Cisdem Video Converter
Step1 Launch the Cisdem tool on your system and navigate to its “Converter”. Afterward, import the MKV file instantly. Now tap on the “Pencil” icon given on top to open the editing window.

Step2 From the editing window, go to “Subtitle and Audio” and click on “No subtitles.” From the drop-down box, click on “Load Subtitles” to upload your SRT or ASS subtitle file from your system.

Step3 Now press the “Save” button to proceed. As the default output format in this tool is MP4, navigate to the “General Video” section to change it. From this option, select “MKV Video” as the output format. Afterward, hit the “Convert” button to embed the added subtitles easily.

3. VLC Media Player
The VLC Media Player is a commonly used platform that offers various functions. It can be easily accessed and shows compatibility with tons of platforms. It has a simple interface that allows you to operate it easily. Through this tool, you can also add subtitles to MKV proficiently. This MKV subtitle editor supports various caption formats such as VobSub, SubRip, SubViewer, etc.
Key Features
- While watching a video on the VLC media player, you can take instant snapshots of your favorite moments in high resolution.
- This tool offers a screen recorder through which you can capture your activities on a desktop. You can also choose the frame rate and output format for your screen recording.
- You can enhance your video files by adding effects from this tool. Along with applying attractive video effects, you can also change the brightness and hue of your video.
Step-by-Step Guide to Add Subtitles Using VLC
Step1 Open your VLC media player and click on the “Media” tab given on top. From there, tap on the “Convert/Save” option.

Step2 A new dialogue box will open regarding “Open Media.” Now you can instantly upload your MKV file on this tool. By staying on the same window, check the box saying, “Use a subtitle file.” Afterward, browse the SRT file from your computer.

Step3 Now tap on the “Convert/Save” arrowhead and choose the “Convert” option from the drop-down menu. A new window will open from where you have to tap on the “Wretch” icon. On the “Encapsulation” section, select “MKV.”

Step4 By going to the “Audio codec” and “Video codec” sections, check the box “keep original video or audio track.” Now go to the “Subtitle” section and enable the option of “Overlay subtitles on the video.” Once done, hit the “Create” button.

Part 2: How to Add Subtitles to MKV on Mac?
Are you looking for MKV subtitle editors that are compatible with Mac? In this section, you can learn how to add subtitles to MKV on your Mac devices easily.
1. HD Video Converter Deluxe
This tool is highly compatible with Mac users and provides tons of advanced features. Besides being a great video editor, this tool can help you add subtitles to your MKV video files. It supports popular subtitle formats such as ASS, SSA, and SRT. If you want to embed hardcode subtitles into your MKV files, this is the most compatible tool.
Key Features
- If you want to decrease the video file size without harming its high quality, you can use this platform. This tool offers a video compressor through which you can reduce file sizes effectively.
- To combine your various video chunks or clips, this software offers a reliable video merger.
- If you are facing audio problems in your video, this tool can permanently adjust the volume according to your preference.
Step-by-Step Guide to Add Subtitles Using HD Video Converter Deluxe
Step1 Start by launching HD Video Converter Deluxe on your MacBook. Afterward, tap on the “+Video” button to import your MKV file.

Step2 On the Output Profile window, choose “MKV” as your output format. Click on the “OK” button to proceed. Now navigate to the “Edit” tab and select “Subtitle.” From there, check “Enable Subtitle.” Also, check “Extra” and then click on the “Add” button. Now you can import the subtitle file to this tool.

Step3 Click the “Done” button and then hit the “RUN” button to embed the subtitles.

2. Wondershare UniConverter
UniConverter is one of the famous tools that many people prefer due to its high reliability. Among its various advanced features, you can use its “Subtitle Editor” to add subtitles to MKV videos. You can create subtitles manually in your preferred font. Moreover, it provides an auto generator to create subtitles by extracting audio from the video file. This feature supports more than 100 languages to offer more diversity.
Key Features
- The MKV subtitle editor of UniConverter is also capable of converting text into subtitle lines through its TXT to SRT feature.
- You can remove backgrounds from your video and add a new one with a few clicks. This can make your video more captivating.
- It offers a vocal remover that can separate instrumental sounds and vocals from an audio or video file easily.
Step-by-Step Guide to Use the Subtitle Editor of UniConverter
Step1 Run UniConverter on your PC and click on “Subtitle Editor” from its homepage. A new window will open in which you have to import the MKV video file.

Step2 You can click on the “Manual Subtitles” button to add your subtitles with respect to the time duration. Or, you can tap on ‘Import Subtitles’ to upload the subtitles file from your MacBook. Other options are also available such as Text to Subtitles and Auto Subtitles.

Step3 You can edit the added subtitles by going to the “Styles” section. Here, you can change the font, color, and style of your subtitles. Once done, click on the “Save” button.

Part 3: How to Add Subtitles to MKV Online?
If you want to use online platforms to merge subtitles with MKV, here are the top two online tools.
1. Veed
Veed is an easy-to-use online tool that allows you to edit your video clips with high accuracy. Through this online tool, you can add subtitles to your MKV files in 3 different ways. You can upload subtitle files in formats like VVT, TXT, SSA, SRT, and ASS. Otherwise, you can enter the subtitles manually by selecting their color, font, size, and time duration. Moreover, you can use its voice recognition software to auto-create subtitles instantly.
Key Features
- To make your video clips funny and engaging, this tool enables you to add various emojis and stickers to your video files.
- You can explain the content in your video by adding annotations such as text boxes using this tool.
- To remove unwanted objects from your video, you can use the crop feature of Veed.
Step-by-Step Guide to Add Subtitles Using Veed
Step1 Access the official website of Veed and click on “Add Subtitles To video” from its tools. Afterward, click the “Choose Files” button and import your MKV file.

Step2 Once done with uploading, click on “Upload Subtitle File.” You can upload any of its supported subtitle files. Also, choose the language from the given box.

Step3 After importing the subtitles, you can modify them by altering their text color, color effect, style, and alignment. Once done, hit the “Export” button.

2. Flixier
Do you want an interesting tool to create subtitles? Flixier is an efficient online tool that can edit your video and audio files. Without making a user account, you can use this tool to add subtitles to MKV video files. You can upload MKV files from different platforms, such as your device, Google Drive, Zoom, Dropbox, etc. This tool also provides different ways to flawlessly create subtitles for your video files.
Key Features
- The subtitle editor of this tool offers more than 1000 fonts. Thus, you can make your subtitles look stylish by choosing a preferred font.
- To edit your videos, this tool allows you to collaborate with your friends in real-time.
- It offers more than 50 transitions that you can apply to your videos easily.
Step-by-Step Guide to Add Subtitles Using Flixier
Step1 Visit the website of Flixier and click on “Add subtitles to your videos” from its tools. Afterward, tap on “Get Started” to proceed. The tool will ask you to upload your video file.

Step2 Once you have uploaded the MKV video, click on “Text” given on the left side. Afterward, tap “Add Subtitle” to create subtitles for your video. You can add text to the given space to create subtitles. You can also tap on the “Import Subtitle” button to upload the subtitle file. To change the properties of your subtitles, you can edit them from the provided options on your screen.

Step3 Once done with creating and adjusting subtitles, click on the “Export” button.

Conclusion
Subtitles are shown at the bottom of a video and help make the video content comprehensive. If you are dealing with MKV files and want to add subtitles in an instant way, this article has provided all the details. By reading this guide, you can learn how to add subtitles to MKV files on different platforms.
To attain the best results and utilize advanced features, we will highly recommend you use Wondershare Filmora. This tool creates a comfortable environment and gives an intuitive interface to create subtitles.
Part 1: How to Add Subtitles to MKV on Windows?
Are you a Windows user and want to add subtitles to MKV? Read this section to find out compatible tools that can add subtitles to your MKV videos efficiently.
1. Wondershare Filmora
Free Download For Win 7 or later(64-bit)
Free Download For macOS 10.14 or later
Wondershare Filmora is a popular tool that provides you with multiple options to edit video files. If you are interested in adding subtitles to your MKV files, you can navigate to its “Speech-to-Text” feature. This feature automatically transcribes the voice used in the video into subtitles. It supports 16 different languages for creating subtitles through this feature.
This feature can also enhance your editing efficiency as you don’t have to write the subtitles on your own. Moreover, the STT feature utilizes advanced algorithms that help the tool create subtitles with high precision. Furthermore, you can also manually add the subtitles to your MKV file using this MKV subtitle editor.
Key Features
- Filmora offers various effects, such as a green screen that can help you to change your background dramatically.
- If you want to resize your videos efficiently, this tool provides the Auto Reframe feature.
- Filmora also offers various preset templates that can help you to craft captivating videos easily.
Step-by-Step Guide to Add Subtitles Using Filmora
Step1 Create a New Filmora Project
Download and install Filmora on your PC and click “Create Project.” Afterward, import the MKV video from your PC to this tool by clicking on the “Arrow” icon.
Step2 Go to Titles Tab
After importing the video, drag it to the timeline. Once done, click on the “Titles” section given on top. Afterward, click on “Subtitles” from the left section. Now you will be able to see different types of subtitles on your screen. Select your favorite style of subtitles and tap on its “Download” icon.
Step3 Choose the Preferred Subtitle Style
After that, tap on the “Plus” icon to add your selected subtitle style to the timeline. Double-click on the added subtitles, which will open the settings. You can manually add the subtitles on the “Input Text” box easily. Moreover, you can easily change the text font, color, opacity, and alignment.
Step4 Export and Save Video
Once you have created subtitles for your imported video, click the “Export” button on top. Using this option, you can save the video file to your device or share it on other platforms.
2. Cisdem Video Converter
Cisdem is an efficient tool that can be used by content creators for various purposes. Along with editing the videos, this tool can help you add subtitles to your video files in any format. It supports various formats for adding subtitles, such as MKV, MP4, AVI, etc. This tool also offers a built-in editor to modify the MKV videos flawlessly. Hence, it’s a basic tool that generates quality results instantly.
Key Features
- Cisdem can function as a video converter that supports more than 300 file formats. You can convert to and from MKV files using this platform easily.
- Through this software, you can professionally add watermarks to your MKV files. It provides various options to add a customized watermark to your desired video files.
- It offers a built-in media player that allows you to play and watch MKV files without interruption.
Steps to Add Subtitles to MKV Using Cisdem Video Converter
Step1 Launch the Cisdem tool on your system and navigate to its “Converter”. Afterward, import the MKV file instantly. Now tap on the “Pencil” icon given on top to open the editing window.
Step2 From the editing window, go to “Subtitle and Audio” and click on “No subtitles.” From the drop-down box, click on “Load Subtitles” to upload your SRT or ASS subtitle file from your system.
Step3 Now press the “Save” button to proceed. As the default output format in this tool is MP4, navigate to the “General Video” section to change it. From this option, select “MKV Video” as the output format. Afterward, hit the “Convert” button to embed the added subtitles easily.
3. VLC Media Player
The VLC Media Player is a commonly used platform that offers various functions. It can be easily accessed and shows compatibility with tons of platforms. It has a simple interface that allows you to operate it easily. Through this tool, you can also add subtitles to MKV proficiently. This MKV subtitle editor supports various caption formats such as VobSub, SubRip, SubViewer, etc.
Key Features
- While watching a video on the VLC media player, you can take instant snapshots of your favorite moments in high resolution.
- This tool offers a screen recorder through which you can capture your activities on a desktop. You can also choose the frame rate and output format for your screen recording.
- You can enhance your video files by adding effects from this tool. Along with applying attractive video effects, you can also change the brightness and hue of your video.
Step-by-Step Guide to Add Subtitles Using VLC
Step1 Open your VLC media player and click on the “Media” tab given on top. From there, tap on the “Convert/Save” option.
Step2 A new dialogue box will open regarding “Open Media.” Now you can instantly upload your MKV file on this tool. By staying on the same window, check the box saying, “Use a subtitle file.” Afterward, browse the SRT file from your computer.
Step3 Now tap on the “Convert/Save” arrowhead and choose the “Convert” option from the drop-down menu. A new window will open from where you have to tap on the “Wretch” icon. On the “Encapsulation” section, select “MKV.”
Step4 By going to the “Audio codec” and “Video codec” sections, check the box “keep original video or audio track.” Now go to the “Subtitle” section and enable the option of “Overlay subtitles on the video.” Once done, hit the “Create” button.
Part 2: How to Add Subtitles to MKV on Mac?
Are you looking for MKV subtitle editors that are compatible with Mac? In this section, you can learn how to add subtitles to MKV on your Mac devices easily.
1. HD Video Converter Deluxe
This tool is highly compatible with Mac users and provides tons of advanced features. Besides being a great video editor, this tool can help you add subtitles to your MKV video files. It supports popular subtitle formats such as ASS, SSA, and SRT. If you want to embed hardcode subtitles into your MKV files, this is the most compatible tool.
Key Features
- If you want to decrease the video file size without harming its high quality, you can use this platform. This tool offers a video compressor through which you can reduce file sizes effectively.
- To combine your various video chunks or clips, this software offers a reliable video merger.
- If you are facing audio problems in your video, this tool can permanently adjust the volume according to your preference.
Step-by-Step Guide to Add Subtitles Using HD Video Converter Deluxe
Step1 Start by launching HD Video Converter Deluxe on your MacBook. Afterward, tap on the “+Video” button to import your MKV file.
Step2 On the Output Profile window, choose “MKV” as your output format. Click on the “OK” button to proceed. Now navigate to the “Edit” tab and select “Subtitle.” From there, check “Enable Subtitle.” Also, check “Extra” and then click on the “Add” button. Now you can import the subtitle file to this tool.
Step3 Click the “Done” button and then hit the “RUN” button to embed the subtitles.
2. Wondershare UniConverter
UniConverter is one of the famous tools that many people prefer due to its high reliability. Among its various advanced features, you can use its “Subtitle Editor” to add subtitles to MKV videos. You can create subtitles manually in your preferred font. Moreover, it provides an auto generator to create subtitles by extracting audio from the video file. This feature supports more than 100 languages to offer more diversity.
Key Features
- The MKV subtitle editor of UniConverter is also capable of converting text into subtitle lines through its TXT to SRT feature.
- You can remove backgrounds from your video and add a new one with a few clicks. This can make your video more captivating.
- It offers a vocal remover that can separate instrumental sounds and vocals from an audio or video file easily.
Step-by-Step Guide to Use the Subtitle Editor of UniConverter
Step1 Run UniConverter on your PC and click on “Subtitle Editor” from its homepage. A new window will open in which you have to import the MKV video file.
Step2 You can click on the “Manual Subtitles” button to add your subtitles with respect to the time duration. Or, you can tap on ‘Import Subtitles’ to upload the subtitles file from your MacBook. Other options are also available such as Text to Subtitles and Auto Subtitles.
Step3 You can edit the added subtitles by going to the “Styles” section. Here, you can change the font, color, and style of your subtitles. Once done, click on the “Save” button.
Part 3: How to Add Subtitles to MKV Online?
If you want to use online platforms to merge subtitles with MKV, here are the top two online tools.
1. Veed
Veed is an easy-to-use online tool that allows you to edit your video clips with high accuracy. Through this online tool, you can add subtitles to your MKV files in 3 different ways. You can upload subtitle files in formats like VVT, TXT, SSA, SRT, and ASS. Otherwise, you can enter the subtitles manually by selecting their color, font, size, and time duration. Moreover, you can use its voice recognition software to auto-create subtitles instantly.
Key Features
- To make your video clips funny and engaging, this tool enables you to add various emojis and stickers to your video files.
- You can explain the content in your video by adding annotations such as text boxes using this tool.
- To remove unwanted objects from your video, you can use the crop feature of Veed.
Step-by-Step Guide to Add Subtitles Using Veed
Step1 Access the official website of Veed and click on “Add Subtitles To video” from its tools. Afterward, click the “Choose Files” button and import your MKV file.
Step2 Once done with uploading, click on “Upload Subtitle File.” You can upload any of its supported subtitle files. Also, choose the language from the given box.
Step3 After importing the subtitles, you can modify them by altering their text color, color effect, style, and alignment. Once done, hit the “Export” button.
2. Flixier
Do you want an interesting tool to create subtitles? Flixier is an efficient online tool that can edit your video and audio files. Without making a user account, you can use this tool to add subtitles to MKV video files. You can upload MKV files from different platforms, such as your device, Google Drive, Zoom, Dropbox, etc. This tool also provides different ways to flawlessly create subtitles for your video files.
Key Features
- The subtitle editor of this tool offers more than 1000 fonts. Thus, you can make your subtitles look stylish by choosing a preferred font.
- To edit your videos, this tool allows you to collaborate with your friends in real-time.
- It offers more than 50 transitions that you can apply to your videos easily.
Step-by-Step Guide to Add Subtitles Using Flixier
Step1 Visit the website of Flixier and click on “Add subtitles to your videos” from its tools. Afterward, tap on “Get Started” to proceed. The tool will ask you to upload your video file.
Step2 Once you have uploaded the MKV video, click on “Text” given on the left side. Afterward, tap “Add Subtitle” to create subtitles for your video. You can add text to the given space to create subtitles. You can also tap on the “Import Subtitle” button to upload the subtitle file. To change the properties of your subtitles, you can edit them from the provided options on your screen.
Step3 Once done with creating and adjusting subtitles, click on the “Export” button.
Conclusion
Subtitles are shown at the bottom of a video and help make the video content comprehensive. If you are dealing with MKV files and want to add subtitles in an instant way, this article has provided all the details. By reading this guide, you can learn how to add subtitles to MKV files on different platforms.
To attain the best results and utilize advanced features, we will highly recommend you use Wondershare Filmora. This tool creates a comfortable environment and gives an intuitive interface to create subtitles.
How to Make Split Screen Videos in Filmora
To show the interactions and exchanges of things between the characters are widely seen in movies. It seems they are close to each other, but they aren’t.
In this article, we will go with the video editor, Wondershare Filmora, to make split-screen videos instantly. Let’s move forward to check what you need to make these videos!
Part 1. Prerequisites To Make Split Screen Video To Interact
There is no need to make complex videos. Because nowadays, only short videos get viral and are more trending. The interaction videos should be as simple as passing props or playing with someone!
Split-screen videos are widely used in movies and films because it is a visual way to describe any story. The actions will be based on real-time interactions between the characters. The essential things you are required to make these videos are described as follows:
1. Storyboard
First of all, you have to create a story with your friends and family, with whomever you want to create a video. For this, follow the below steps:
- Make a script of a story by coordination, such as writing all dialogues and actions so that there will be no difficulty during a performance on screen.
- Practice those actions again and again to get a professional look.
- The storyboard should be based on the split screen templates available on Wondershare Filmora , or you can create your customized too.

Free Download For Win 7 or later(64-bit)
Free Download For macOS 10.14 or later
2. Characters on the screen
The friends with whom you are interacting should be on the screen and have assets to record a video wherever they are. It will be one person on one split screen or two persons on one. It all depends upon your story and script.
3. Prop to interact
A prop will be any particular thing used to show interaction and should be present in the homes of both characters.
![]()
Note: The prop can be any object like a tissue roll, mobile phone, or anything seen as a passing object from one character to another.

4. A helper at home
There will be one person at home during video shooting to pretend a friend’s or family’s hand reaching to the other character from off-camera.
For example, while performing a high-five action, insert the hand of any member with whom you are living in the scene, showing as the character adjacent to you. After setting up everything in a row, it’s time to record scenes for the video.

5. Record different takes
To give a professional look to the video, you have to record different takes for each person from different angles. After recording, everyone has to send footage to only one person to edit on Filmora.
After getting things and recording, it’s time to edit it on Wondershare Filmora. For this, follow the lines below!
Part 2. Steps To Edit Split Screen Video in Filmora
Split-screen video editing is as simple as throwing a prop toward someone. Wondershare Filmora with a premium domain will get your back!
Filmora is a more creative and instant platform to edit any video or to give birth to new ideas. One of the prominent features is having ready-to-use templates for editing split-screen video. Meanwhile, you can also do a manual setup for editing. Follow the steps mentioned below to edit a video by using split-screen effects.
Split Screen Effect With Templates
Step1Import footage to Filmora
After picking up the best footage of every character, download the Wondershare Filmora (if you have not already). Then to import the clips, perform the following steps:
Free Download For Win 7 or later(64-bit)
Free Download For macOS 10.14 or later
- First, click on the “Click here to Import Media” button, as shown below.

- Then, select the clips you want to edit from your PC, and then they’ll be shown in the media section of Filmora.
Step2Add split screen effect to the timeline
Before adding the clips to the timeline, add the split screen effect to the timeline by following the below-mentioned steps:
- Click on the two-headed arrow at the upper tab.
- Then the drop-down list of two options will pop up, as shown below.

- Click on the Split Screen option, and it will show many split screen effects.

- Select the effect, whatever suits you, and download it then.
- After downloading, drag and drop the effect on the timeline section.

Step3Add clips to the effect
After adding the effect to the timeline, it’s time to implement it on the clips or footage. For this, follow the below-mentioned steps:
- Drag and drop the clips based on your storyboard in the required section.
- Then import the takes wherever and however you want, according to the storyboard.

If you don’t want any templates to be used in your video, then you can manually make a screen split layout. To do this, check the below section.
Manual Split Screen Layout
If the storyboard is organized in such a way that you can’t find out any of the templates suitable, then you can easily create a customized one for your video. In a customized split screen, you can set the duration and adjust the frame rate according to your choice.
Step1Import the clips
First, you must create a timeline to edit your split-screen video. To do this, take a look at the below steps!
- Click on the Import icon in the main preview when you open Wondershare Filmora.
- Then, import all the clips or footage you want to edit.

Step2Add all footages to the timeline
After importing all the clips of interaction videos into Filmora, our next step is to add our videos to the timeline.
- Simply click on the imported clips present in the project media section.
- Then drag it to the timeline below and drop it in the required track of videos.
Do the above-mentioned steps with all the clips present in the project media block.

Doing so will create a working timeline you can view and edit as you go along the editing process.
Step3Adjust the frame rate of all clips
It is all set that your storyboard is customized, for this you have to resize all the clips manually. To arrange clips according to the size, follow the below-mentioned steps:
- First, double-click on the clip you want to edit in the timeline.
- The Basic settings of the video will open in which you have a lot of options to edit.
- Click on the Transform option, and its setting will pop up on the top left side.
- Find out the Scale option from the settings and check out its range.

Adjust the scale rate according to your choice by sliding from its section.

![]()
Note: Repeat this process with all other clips present in the timeline to adjust them in such a way so that the hands moving from frame to frame will line up.

Step4Adjust the timing of clips
After adjusting the frame, you now have to adjust the timing of the clips. To perform this action, follow the below steps:
- Arrange and move around the clips on the timeline so that the timing of the scene lines up between each shot.
- Drag the edge of the clip to the right side if you want to increase the timing and duration.
- While dragging the edge of the clip to the left side, if you want to decrease the timing of the clip.
![]()
Note: The most important part is the first time a hand is supposed to move from one frame to another.
What to do if there is any lag in the preview?
If you’re experiencing lag during the preview, click on the “render” button on the top right of the timeline. It will help to render for a smooth preview.

Step5Splitting the clips
If the timing in your scene starts to fall out of sync, then do the following steps:
- First, try splitting all of the clips.
- Ensure to split before they start to fall out of sync.

![]()
Note: Splitting the clip before one person’s dialogue is preferred.
Step6Full-screen moment
After splitting the clips according to adjustments and storyboard, you can now make one of the characters’ videos in full screen. For this, follow the below steps:
- First, make another cut in the clips before the next hand-crossing action.
- Take one of the characters’ videos from clips in-between moment and make them full screen.

![]()
Note: You can quickly do full screen by double-clicking on the clip and unchecking the “transform“ heading in the top left window.

Final Results
You’re now free to re-adjust your clips in the next part back into sync. If you still want to make any adjustments in duration or cutting or sizing, you can do it easily. Because it’s a customizable effect. Give a pat on your Back! You did a great job and accomplish the results!

Free Download For Win 7 or later(64-bit)
Free Download For macOS 10.14 or later
Conclusion
An instant way to make split screen video and edit it is hidden in Wondershare Filmora . You can unwrap it by following the above-mentioned steps and giving a new life to your interaction videos.
Enjoy new and creative ideas with your family and friends and make your video trendy by Filmora. If you are an influencer, you can interact with other bloggers and influencers and make split-screen videos. It will be a great treat for you and your social media followers!
Free Download For macOS 10.14 or later
2. Characters on the screen
The friends with whom you are interacting should be on the screen and have assets to record a video wherever they are. It will be one person on one split screen or two persons on one. It all depends upon your story and script.
3. Prop to interact
A prop will be any particular thing used to show interaction and should be present in the homes of both characters.
![]()
Note: The prop can be any object like a tissue roll, mobile phone, or anything seen as a passing object from one character to another.
4. A helper at home
There will be one person at home during video shooting to pretend a friend’s or family’s hand reaching to the other character from off-camera.
For example, while performing a high-five action, insert the hand of any member with whom you are living in the scene, showing as the character adjacent to you. After setting up everything in a row, it’s time to record scenes for the video.
5. Record different takes
To give a professional look to the video, you have to record different takes for each person from different angles. After recording, everyone has to send footage to only one person to edit on Filmora.
After getting things and recording, it’s time to edit it on Wondershare Filmora. For this, follow the lines below!
Part 2. Steps To Edit Split Screen Video in Filmora
Split-screen video editing is as simple as throwing a prop toward someone. Wondershare Filmora with a premium domain will get your back!
Filmora is a more creative and instant platform to edit any video or to give birth to new ideas. One of the prominent features is having ready-to-use templates for editing split-screen video. Meanwhile, you can also do a manual setup for editing. Follow the steps mentioned below to edit a video by using split-screen effects.
Split Screen Effect With Templates
Step1Import footage to Filmora
After picking up the best footage of every character, download the Wondershare Filmora (if you have not already). Then to import the clips, perform the following steps:
Free Download For Win 7 or later(64-bit)
Free Download For macOS 10.14 or later
- First, click on the “Click here to Import Media” button, as shown below.
- Then, select the clips you want to edit from your PC, and then they’ll be shown in the media section of Filmora.
Step2Add split screen effect to the timeline
Before adding the clips to the timeline, add the split screen effect to the timeline by following the below-mentioned steps:
- Click on the two-headed arrow at the upper tab.
- Then the drop-down list of two options will pop up, as shown below.
- Click on the Split Screen option, and it will show many split screen effects.
- Select the effect, whatever suits you, and download it then.
- After downloading, drag and drop the effect on the timeline section.
Step3Add clips to the effect
After adding the effect to the timeline, it’s time to implement it on the clips or footage. For this, follow the below-mentioned steps:
- Drag and drop the clips based on your storyboard in the required section.
- Then import the takes wherever and however you want, according to the storyboard.
If you don’t want any templates to be used in your video, then you can manually make a screen split layout. To do this, check the below section.
Manual Split Screen Layout
If the storyboard is organized in such a way that you can’t find out any of the templates suitable, then you can easily create a customized one for your video. In a customized split screen, you can set the duration and adjust the frame rate according to your choice.
Step1Import the clips
First, you must create a timeline to edit your split-screen video. To do this, take a look at the below steps!
- Click on the Import icon in the main preview when you open Wondershare Filmora.
- Then, import all the clips or footage you want to edit.
Step2Add all footages to the timeline
After importing all the clips of interaction videos into Filmora, our next step is to add our videos to the timeline.
- Simply click on the imported clips present in the project media section.
- Then drag it to the timeline below and drop it in the required track of videos.
Do the above-mentioned steps with all the clips present in the project media block.
Doing so will create a working timeline you can view and edit as you go along the editing process.
Step3Adjust the frame rate of all clips
It is all set that your storyboard is customized, for this you have to resize all the clips manually. To arrange clips according to the size, follow the below-mentioned steps:
- First, double-click on the clip you want to edit in the timeline.
- The Basic settings of the video will open in which you have a lot of options to edit.
- Click on the Transform option, and its setting will pop up on the top left side.
- Find out the Scale option from the settings and check out its range.
Adjust the scale rate according to your choice by sliding from its section.
![]()
Note: Repeat this process with all other clips present in the timeline to adjust them in such a way so that the hands moving from frame to frame will line up.
Step4Adjust the timing of clips
After adjusting the frame, you now have to adjust the timing of the clips. To perform this action, follow the below steps:
- Arrange and move around the clips on the timeline so that the timing of the scene lines up between each shot.
- Drag the edge of the clip to the right side if you want to increase the timing and duration.
- While dragging the edge of the clip to the left side, if you want to decrease the timing of the clip.
![]()
Note: The most important part is the first time a hand is supposed to move from one frame to another.
What to do if there is any lag in the preview?
If you’re experiencing lag during the preview, click on the “render” button on the top right of the timeline. It will help to render for a smooth preview.
Step5Splitting the clips
If the timing in your scene starts to fall out of sync, then do the following steps:
- First, try splitting all of the clips.
- Ensure to split before they start to fall out of sync.
![]()
Note: Splitting the clip before one person’s dialogue is preferred.
Step6Full-screen moment
After splitting the clips according to adjustments and storyboard, you can now make one of the characters’ videos in full screen. For this, follow the below steps:
- First, make another cut in the clips before the next hand-crossing action.
- Take one of the characters’ videos from clips in-between moment and make them full screen.
![]()
Note: You can quickly do full screen by double-clicking on the clip and unchecking the “transform“ heading in the top left window.
Final Results
You’re now free to re-adjust your clips in the next part back into sync. If you still want to make any adjustments in duration or cutting or sizing, you can do it easily. Because it’s a customizable effect. Give a pat on your Back! You did a great job and accomplish the results!
Free Download For Win 7 or later(64-bit)
Free Download For macOS 10.14 or later
Conclusion
An instant way to make split screen video and edit it is hidden in Wondershare Filmora . You can unwrap it by following the above-mentioned steps and giving a new life to your interaction videos.
Enjoy new and creative ideas with your family and friends and make your video trendy by Filmora. If you are an influencer, you can interact with other bloggers and influencers and make split-screen videos. It will be a great treat for you and your social media followers!
How to Make Dynamic Video Collages?
Videos are a crucial component in everyone’s lives. Even businesses rely on videos to promote their products and services in the most effective and engaging manner. People love to capture their day-to-day life and share it with the world to attract more and more followers. If you also want to get active on social media and share your life with other people, dynamic videos are your chance.
Don’t know what dynamic videos are? No problem, because from definition to editors, this article will help you to make dynamic videos. Jump ahead and find what you need in further discussion.
Part 1: Understanding Video Collages
Getting into video collages without understanding their basic purpose or what they can do for you is not the best thing to do. Before using anything and investing your precious time in it, you should know what benefits it can provide for you or what its applications are.
Don’t panic if you don’t know anything because this part will help you a lot. Here we will guide you through the basics of dynamic videos to upgrade your functionality:
- Definition of Dynamic Video Collages
- Purpose of Dynamic Video Collages
- Benefits of Dynamic Video Collages
- Applications of Dynamic Video Collages
Definition of Dynamic Video Collages
Combining multiple videos, clips, images, or other intuitive visual elements into a cohesive presentation is termed a “video collage.” Several types of video collages are present on the web, and one of them is Dynamic Video Collages.
From layering to the arrangement of the visual metrics, you can customize everything as per your need. It is one of the most engaging factors that can help you attract more users and share multiple multimedia content with the world innovatively.
Purpose of Dynamic Video Collages
Now that you are aware of what Dynamic Video Collages are, you must be wondering what their core purpose is. It is not wrong to say that the purpose of these collages solely depends on the context or interpretation of the intention of the creator. However, some of the core purposes of Dynamic Video Collages are discussed here:
1. Storytelling and Presentation
With the usage of video collages, you can present your stories in a more eye-catching manner. Moreover, these collages can also be used to present the business model in the most understandable way.
2. Mosaics and Highlights
You will notice that video collages are often used to showcase memorable events and highlight important occupations. From sports to entertainment, every person can use video collages to present something such as performance, achievements, etc.
3. Effects and Expressions
These collages can also play a significant role as a platform to present artistic expressions and effects. You can combine diversified visual elements, such as graphics, images, texture, and more. Along with this, it can also help to evoke presentable emotion in the audience.
4. Promotion and Projects
If you wish to provide a visually rich experience for the audience, you can get assistance from video collages. It helps to showcase the projects in visually appealing formats. You also have an opportunity to promote your products and services in an optimized manner with video collages.
Benefits of Dynamic Video Collages
The benefits of visual collages are not limited to some specific areas. It can offer diversified productive benefits for you. A few of them can be seen in the understated points:
1. Engagement and Communication
The video collages help to provide a visually engaging experience with the combination of multiple videos. It also assists in capturing attention and acts as an effective communication medium.
2. Emotional and Expressional Impact
You can get creative freedom with video collages with impactful compositions. Above all, it also integrates the potential to evoke high-level and realistic expressions and emotions.
3. Flexibility and Marketing
Video collages are easier to share on multiple platforms and benefit more than blogs. You can also use this as a medium of omnichannel marketing in multiple domains. Moreover, the flexibility of video collages across multiple domains is also part of this.
4. Easy To Create
You don’t need to master specific skills to create dynamic video collages. These video colleges are easy to create, and you can present them to the world without issues.
Make Dynamic Video Collages
Use simple video editing tips to make cool and wonderful videos with Wondershare Filmora features and effects.
Make Dynamic Video Collages Apply VHS Effect Learn More >


Applications of Dynamic Video Collages
In this content-driven world, you can find diversified applications for dynamic video collages. You can use it to engage with others or share your daily activities without issues. If you are still curious about its applications, the below-given points will satisfy your queries:
1. Digital Marketing
One of the common uses of video colleges is digital marketing. You can showcase products, highlight their features, and convey explicit brand messages.
2. Content for Social Media
Besides digital marketing, you can also use these video collages to create specified content for your social media. It lets you compile multiple photos and videos to share more in a limited time with the world.
3. Personal Use
It is not compulsory to use video collages for business purposes because you can also use them for personal use. From birthdays to weddings, you can create personalized video collages for every occasion.
4. Artistic Projects
Another considerable application of video collages is the creation and composition of artistic content. You can use it for visual storytelling along with boosting of immersive experience.
Part 2: The Purpose of Split Screen
Research is a basic component of creating unmatchable, immersive, engaging content for blogs and sites. If you are a content writer or a multimedia content editor, you may face problems while acquiring the specific content to write or apply. However, as technology and the need for digital content emerge, so do the techniques for this.
One of the basic yet effective techniques mostly used by content creators is Split Screen. When you divide your desktop or laptop’s content in half, it is known as a split screen. Other than the previously discussed content, there are some other purposes of split screen. Some of them are discussed here:
01of 06Effective Comparison
From content writing to video editing, you need to compare the content to ensure creativity. If you are using the split screen, it can be helpful for you because you can compare content on both windows in real time.
02of 06Different Storyline Perspectives
You can get aid from a split screen to depict the actions or happenings in different locations. Moreover, you can also follow multiple storylines simultaneously and experience a broader range of perspectives.
03of 06Clone Visual Effects
Clone visual effects mean applying the effect in one part of the video and creating its modified version. To clone the visual effects in real time, the split screen is the best option.
04of 06Content Preview
Every video editor needs to see how your video will look after editing to analyze its engaging and modified metric. With split screens, you can have optimized content previews without any problem.
05of 06Compression and Constraints
Split screens are genuinely effective in maximizing the productivity of the users. You can also compress the time limits with a split screen and can also utilize this for technical constraints.
06of 06Personal Preference
Some users find it difficult to open the windows every time they wish to search for information. For this reason, they use the split screen because it lets you explore the windows without minimizing the first one. So, it can be said that a split screen’s usability depends upon the users’ perspective.
Part 3: 5 Best Video Collage Makers
Knowing the effectiveness of dynamic video collages without knowing the video collage makers is like getting thirsty but not drinking water. You can create studio-friendly dynamic videos to ensure higher functionality and share more in a limited time.
The most trusted and reliable video collage makers that can help you in creating cinematic dynamic video collages are listed here. From description to features, you can find valuable information about these video collage makers here:
1. Filmora Video Editor
With over 100 million users, Wondershare Filmora never fails to amaze users with its optimized functionality ratio. You can use this premium-grade video collage maker on several platforms such as desktop, tablet, or mobile phone. Filmora also integrates the Split Screen so you can maximize your productivity without losing focus.
It also encompasses uncountable preset templates to fabricate the cinematic level video in a limited time. One of the best things about Wondershare Filmora is that it comprehends the nondestructive and layer base edition and video-creating procedure.

Free Download For Win 7 or later(64-bit)
Free Download For macOS 10.14 or later
Key Features of Wondershare Filmora
- Using its AI Copywriting feature, you can create inspiring and descriptive content in a limited time.
- With the built-in Instant Mode of Filmora, you can create videos by adding media files. No specialized skill is required to make a video with Filmora.
- By using the Title Editing feature, you can create expressive titles for your videos. Moreover, it also allows you to edit multiple videos at once.
Pros of Wondershare Filmora
- It offers free cloud storage through which you can back up and store your needed media resources easily.
- You can also do motion tracking in the video collages without impacting the content in videos.
Con of Wondershare Filmora
- Some of the features of Filmora are limited to the paid version, so you cannot use them unless you are a premium user.
2. Canva
In Canva, you can find a huge array of layouts and grids to create perfect video collages. It also integrates several free templates, which are also used to create high-level videos. If you are a startup, you can also use this tool to create the logo for your brand. Arguably, Canva is one of the most used platforms for creating intuitive video collages.

Key Features of Canva
- In Canva, you can find uncountable elements and illustrations for every type of project. It also integrates royalty-free images.
- Canva also offers several intuitive and engaging filters and effects to make multimedia files more upgraded and cinematic.
- You can remove the unattractive background from photos and videos and can also replace them with the backgrounds of your choice.
Pros of Canva
- It can encompass a modernized editing feature through which you can turn simple videos into engaging videos.
- There is an extensive library of pictures, themes, templates, and other visual elements which can make your work easier than ever.
Con of Canva
- Canva is an online tool, so you cannot use its exclusive features and make high-level video collages if you don’t have a reliable internet connection.
3. Kapwing
Kapwing lets you create premium-grade dynamic video collages, and you can export them in the desired formats without any issue. It helps you in creating and editing videos to generate the best content. While making video collages, you can also use its built-in collage templates from its versatile library. It supports timeline-based editing, which gives you full control over several metrics of your videos.

Key Features of Kapwing
- With Kapwing, you can edit videos in real time with your team members and friends. It saves you from sharing the video every time after editing.
- It also offers you the chance to add expressive and accurate subtitles in the videos and auto-sync them to your videos.
- There are hundreds and thousands of royalty-free stock assets in this. It includes GIFs, photos, videos, audio, and other things.
Pros of Kapwing
- It supports Smart Cut, through which you can remove the unrequired silences from videos to get rid of boring parts.
- There are unlimited overlays in it that give you unlimited possibilities of making your video more cutting-edge in a limited time.
Cons of Kapwing
- Users can face irritable restrictions and limitations while exporting their dynamic video collages on devices.
4. Adobe Express
It is one of the most reliable tools through which you can create intuitive, dynamic video collages on the web, mobiles, and desktop devices. It offers modernized capabilities to leverage your branding videos in no time. You can also access Adobe fonts and assets with this video collage maker. The built-in layouts and grids of this tool are also well-optimized and modernized.

Key Features of Adobe Express
- You can use professionally designed templates to create the most efficient and engaging content without investing extra effort.
- It also offers the integration of designing with AI, so you can also transfer text to images with this tool.
- No matter if you are working alone or with a team, it lets you synchronize your projects with other people so you can work in a collaborative manner.
Pros of Adobe Express
- There are endless customizing possibilities in Adobe Express that help you to make collages without compromising your creativity.
- You can remove the background from images and videos or cam edit it in multiple ways effortlessly.
Con of Adobe Express
- It does not support the SVG format, which can be a major restriction for many users.
5. Veed.io
Do you wish to make dynamic video collages of professional quality? There is nothing to be concerned about because Veed.io got you covered in this domain. It’s a game-changing tool because you can create gorgeous promotional content with this. Moreover, it also supports the auto resizing option, through which you can resize the collages in multiple dimensions.

Key Features of Veed.io
- io helps you to record engaging videos, and you can also edit them directly on Veed.io without any restriction to download them on your device.
- This tool helps you in adding accurate and synchronized subtitles, and you can also transcribe the audio of the video into text.
- As it also comprehends the Video Converter, you can convert your video file of one format into another.
Pros of Veed.io
- In case your video collage has a large size, you can use the built-in video compressor for compressing videos in lossless quality.
- The Video Merger of Veed.io can assist you in merging multiple videos together to create one optimized masterpiece.
Con of Veed.io
- There is no broader range of audiograms in Veed.io. It can be stressful for users that want to add audio to videos.
Part 4: How to Make a Video Collage in Filmora?
The best video collage maker among the tools listed above is Wondershare Filmora. It offers higher functionality along with innovative features. Do you want to make dynamic video collages with Wondershare Filmora? Do you want to know how to create video collages with split screens and overlays? No worries because the instructions listed here can help you a lot:
Free Download For Win 7 or later(64-bit)
Free Download For macOS 10.14 or later
Method 1: Split Screen
Here is the procedure for making dynamic video collages with the help of a split screen:
Step 1Launch Filmora and Add Clips
Initially, install and launch Wondershare Filmora on your device and click the “New Project” option. To continue, go to the “Click here to import media” section and add the videos. Next, drag the video to “Timeline” to enable its editing.

Step 2Select a Collage Layout
Following this. open “Wondershare Filmstock” and search for the “Video Collage Layouts” from the “Search Bar.” Once you find the best layout, click the “Download” button to download it. Next, go to the tab related to the college you have downloaded. This may include “Titles,” “Transitions,” “Effects,” and other metrics.

Step 3Add Clips to Collage Layout
After adding the collage layout, add the clips of your choice in the customized arrangements. You are also free to manage the “Start Time” and “Duration” of the video. Along with that, you can access “Effects,” “Transitions,” or “Stickers” to check the Filmstock package that is downloaded into Filmora.

Step 4Export the Dynamic Video Collages
After making all the modifications, click the “Export” button from the top right of the screen. To proceed, change its “Name,” “Save to” location, “Preset,” “Resolution,” and other metrics. Finally, hit the “Export” button to save the video collage on the device.

Method 2: Overlay
Another significant method to make dynamic video collages with Wondershare Filmora is to use its overlays. Don’t know how to use it? The understated steps will guide you about this:
Step 1Import Video Clips to Filmora
To start, open Wondershare Filmora on your device and hit the “New Project” option. Following this, select the “Click here to import media” option and add the video clips you want to make a collage. Don’t forget to drag the imported video in “Timeline.”

Step 2Select an Overlay
Next, go to “Effects” and search for a specific overlay with the help of the “Search Bar.” Following this, select the effect of your liking and drag it on the video in the timeline.

Step 3Add Clips to Overlays
Next, customize the overlay in your desired size and dimension and add the “Video Clips” to add in collage. You can also manage the arrangement of clips in collages.

Step 4Export the Video Collage into the Device
Afterward, click the “Export” button from the above panel and use the on-screen “Output Settings” to modify and personalize the video collage. Once done, select the “Export” button and save the video collage on your device.

Part 5: Boost Your Video Collage
Several factors play an important role in boosting and improving the quality of your video. Luckily, Wondershare Filmora also supports several factors that can enhance your video’s productivity. These factors include the followings.
Free Download For Win 7 or later(64-bit)
Free Download For macOS 10.14 or later
Transitions
The transitions in videos create a smooth flow and add a sense of consistency. Moreover, It also helps to make the videos more visually appealing and engage users. It acts like the smoothest break in the scenes that attract the users and capture their attention. In addition, you can also give a great storytelling experience to users with transitions.

Video Effects and LUTs
LUTs stand for Look Up Tables, and they are used to maximize video engagement. Moreover, video effects can also make videos more cinematic and studio friendly. It can add versatility and flexibility that ensures the longevity of videos. You can also make corrective adjustments in videos and express your creativity to the world.

Title Effects
Titles Effects are extremely crucial components of videos because they express the theme and purpose of the video. The audience is likely to guess the content of videos from the title because it’s the first thing they will see. You have to keep it informative and attention-grabbing, along with keeping professionalism in mind. It can also help in boosting the retention of videos.

Conclusion
In this article, you have learned about dynamic video collages, their definition, purposes, benefits, and application. It can be said that it is an optimized option to attract more users and boost your video retention. You can use video collages for both personal and professional purposes. It also helps you to share your artistic and creative side with the world.
To enhance your productivity ratio, you can also use Split Screen. To learn more about the split screens, you can look at the above discussion. The best tools that can help you make videos without any issues are also discussed above for your ease. However, the best among them is Wondershare Filmora. It also integrates LUTs, transitions, and effects.
Frequently Asked Questions
To make video collages on your laptop, you can take assistance from the most useful tool named Wondershare Filmora. It is a feature-rich tool, so also modify your video to make them more engaging.
Users think that making collages with pictures and videos is not easy. However, it is not true in the case of the reliable collage maker. Several collage makers claim to be best when creating customized content, yet the most beneficial and effective one is Filmora. You just need to import clips in Filmora, add overlays, customize their settings, arrange clips, and export them in the desired output format.
With video collages, you can experience visual variety and effective storytelling. Moreover, it also helps to generate the best presentation and highlight multiple events. Sharing more content in limited time and effort is also a specialty of Filmora.
If you wish to know the most reliable and feature-rich app through which you can make a video collage, the answer is Wondershare Filmora. It also encompasses tons of reputable and innovative features that can make your videos more upgraded.
One of the highly reputable and significant college makers that offer straightforward procedures is Wondershare Filmora. It also comprehends integrations with Filmstock that help access more content to make cinematic-level collages.
Definition of Dynamic Video Collages
Combining multiple videos, clips, images, or other intuitive visual elements into a cohesive presentation is termed a “video collage.” Several types of video collages are present on the web, and one of them is Dynamic Video Collages.
From layering to the arrangement of the visual metrics, you can customize everything as per your need. It is one of the most engaging factors that can help you attract more users and share multiple multimedia content with the world innovatively.
Purpose of Dynamic Video Collages
Now that you are aware of what Dynamic Video Collages are, you must be wondering what their core purpose is. It is not wrong to say that the purpose of these collages solely depends on the context or interpretation of the intention of the creator. However, some of the core purposes of Dynamic Video Collages are discussed here:
1. Storytelling and Presentation
With the usage of video collages, you can present your stories in a more eye-catching manner. Moreover, these collages can also be used to present the business model in the most understandable way.
2. Mosaics and Highlights
You will notice that video collages are often used to showcase memorable events and highlight important occupations. From sports to entertainment, every person can use video collages to present something such as performance, achievements, etc.
3. Effects and Expressions
These collages can also play a significant role as a platform to present artistic expressions and effects. You can combine diversified visual elements, such as graphics, images, texture, and more. Along with this, it can also help to evoke presentable emotion in the audience.
4. Promotion and Projects
If you wish to provide a visually rich experience for the audience, you can get assistance from video collages. It helps to showcase the projects in visually appealing formats. You also have an opportunity to promote your products and services in an optimized manner with video collages.
Benefits of Dynamic Video Collages
The benefits of visual collages are not limited to some specific areas. It can offer diversified productive benefits for you. A few of them can be seen in the understated points:
1. Engagement and Communication
The video collages help to provide a visually engaging experience with the combination of multiple videos. It also assists in capturing attention and acts as an effective communication medium.
2. Emotional and Expressional Impact
You can get creative freedom with video collages with impactful compositions. Above all, it also integrates the potential to evoke high-level and realistic expressions and emotions.
3. Flexibility and Marketing
Video collages are easier to share on multiple platforms and benefit more than blogs. You can also use this as a medium of omnichannel marketing in multiple domains. Moreover, the flexibility of video collages across multiple domains is also part of this.
4. Easy To Create
You don’t need to master specific skills to create dynamic video collages. These video colleges are easy to create, and you can present them to the world without issues.
Make Dynamic Video Collages
Use simple video editing tips to make cool and wonderful videos with Wondershare Filmora features and effects.
Make Dynamic Video Collages Apply VHS Effect Learn More >
Applications of Dynamic Video Collages
In this content-driven world, you can find diversified applications for dynamic video collages. You can use it to engage with others or share your daily activities without issues. If you are still curious about its applications, the below-given points will satisfy your queries:
1. Digital Marketing
One of the common uses of video colleges is digital marketing. You can showcase products, highlight their features, and convey explicit brand messages.
2. Content for Social Media
Besides digital marketing, you can also use these video collages to create specified content for your social media. It lets you compile multiple photos and videos to share more in a limited time with the world.
3. Personal Use
It is not compulsory to use video collages for business purposes because you can also use them for personal use. From birthdays to weddings, you can create personalized video collages for every occasion.
4. Artistic Projects
Another considerable application of video collages is the creation and composition of artistic content. You can use it for visual storytelling along with boosting of immersive experience.
Part 2: The Purpose of Split Screen
Research is a basic component of creating unmatchable, immersive, engaging content for blogs and sites. If you are a content writer or a multimedia content editor, you may face problems while acquiring the specific content to write or apply. However, as technology and the need for digital content emerge, so do the techniques for this.
One of the basic yet effective techniques mostly used by content creators is Split Screen. When you divide your desktop or laptop’s content in half, it is known as a split screen. Other than the previously discussed content, there are some other purposes of split screen. Some of them are discussed here:
01of 06Effective Comparison
From content writing to video editing, you need to compare the content to ensure creativity. If you are using the split screen, it can be helpful for you because you can compare content on both windows in real time.
02of 06Different Storyline Perspectives
You can get aid from a split screen to depict the actions or happenings in different locations. Moreover, you can also follow multiple storylines simultaneously and experience a broader range of perspectives.
03of 06Clone Visual Effects
Clone visual effects mean applying the effect in one part of the video and creating its modified version. To clone the visual effects in real time, the split screen is the best option.
04of 06Content Preview
Every video editor needs to see how your video will look after editing to analyze its engaging and modified metric. With split screens, you can have optimized content previews without any problem.
05of 06Compression and Constraints
Split screens are genuinely effective in maximizing the productivity of the users. You can also compress the time limits with a split screen and can also utilize this for technical constraints.
06of 06Personal Preference
Some users find it difficult to open the windows every time they wish to search for information. For this reason, they use the split screen because it lets you explore the windows without minimizing the first one. So, it can be said that a split screen’s usability depends upon the users’ perspective.
Part 3: 5 Best Video Collage Makers
Knowing the effectiveness of dynamic video collages without knowing the video collage makers is like getting thirsty but not drinking water. You can create studio-friendly dynamic videos to ensure higher functionality and share more in a limited time.
The most trusted and reliable video collage makers that can help you in creating cinematic dynamic video collages are listed here. From description to features, you can find valuable information about these video collage makers here:
1. Filmora Video Editor
With over 100 million users, Wondershare Filmora never fails to amaze users with its optimized functionality ratio. You can use this premium-grade video collage maker on several platforms such as desktop, tablet, or mobile phone. Filmora also integrates the Split Screen so you can maximize your productivity without losing focus.
It also encompasses uncountable preset templates to fabricate the cinematic level video in a limited time. One of the best things about Wondershare Filmora is that it comprehends the nondestructive and layer base edition and video-creating procedure.
Free Download For Win 7 or later(64-bit)
Free Download For macOS 10.14 or later
Key Features of Wondershare Filmora
- Using its AI Copywriting feature, you can create inspiring and descriptive content in a limited time.
- With the built-in Instant Mode of Filmora, you can create videos by adding media files. No specialized skill is required to make a video with Filmora.
- By using the Title Editing feature, you can create expressive titles for your videos. Moreover, it also allows you to edit multiple videos at once.
Pros of Wondershare Filmora
- It offers free cloud storage through which you can back up and store your needed media resources easily.
- You can also do motion tracking in the video collages without impacting the content in videos.
Con of Wondershare Filmora
- Some of the features of Filmora are limited to the paid version, so you cannot use them unless you are a premium user.
2. Canva
In Canva, you can find a huge array of layouts and grids to create perfect video collages. It also integrates several free templates, which are also used to create high-level videos. If you are a startup, you can also use this tool to create the logo for your brand. Arguably, Canva is one of the most used platforms for creating intuitive video collages.
Key Features of Canva
- In Canva, you can find uncountable elements and illustrations for every type of project. It also integrates royalty-free images.
- Canva also offers several intuitive and engaging filters and effects to make multimedia files more upgraded and cinematic.
- You can remove the unattractive background from photos and videos and can also replace them with the backgrounds of your choice.
Pros of Canva
- It can encompass a modernized editing feature through which you can turn simple videos into engaging videos.
- There is an extensive library of pictures, themes, templates, and other visual elements which can make your work easier than ever.
Con of Canva
- Canva is an online tool, so you cannot use its exclusive features and make high-level video collages if you don’t have a reliable internet connection.
3. Kapwing
Kapwing lets you create premium-grade dynamic video collages, and you can export them in the desired formats without any issue. It helps you in creating and editing videos to generate the best content. While making video collages, you can also use its built-in collage templates from its versatile library. It supports timeline-based editing, which gives you full control over several metrics of your videos.
Key Features of Kapwing
- With Kapwing, you can edit videos in real time with your team members and friends. It saves you from sharing the video every time after editing.
- It also offers you the chance to add expressive and accurate subtitles in the videos and auto-sync them to your videos.
- There are hundreds and thousands of royalty-free stock assets in this. It includes GIFs, photos, videos, audio, and other things.
Pros of Kapwing
- It supports Smart Cut, through which you can remove the unrequired silences from videos to get rid of boring parts.
- There are unlimited overlays in it that give you unlimited possibilities of making your video more cutting-edge in a limited time.
Cons of Kapwing
- Users can face irritable restrictions and limitations while exporting their dynamic video collages on devices.
4. Adobe Express
It is one of the most reliable tools through which you can create intuitive, dynamic video collages on the web, mobiles, and desktop devices. It offers modernized capabilities to leverage your branding videos in no time. You can also access Adobe fonts and assets with this video collage maker. The built-in layouts and grids of this tool are also well-optimized and modernized.
Key Features of Adobe Express
- You can use professionally designed templates to create the most efficient and engaging content without investing extra effort.
- It also offers the integration of designing with AI, so you can also transfer text to images with this tool.
- No matter if you are working alone or with a team, it lets you synchronize your projects with other people so you can work in a collaborative manner.
Pros of Adobe Express
- There are endless customizing possibilities in Adobe Express that help you to make collages without compromising your creativity.
- You can remove the background from images and videos or cam edit it in multiple ways effortlessly.
Con of Adobe Express
- It does not support the SVG format, which can be a major restriction for many users.
5. Veed.io
Do you wish to make dynamic video collages of professional quality? There is nothing to be concerned about because Veed.io got you covered in this domain. It’s a game-changing tool because you can create gorgeous promotional content with this. Moreover, it also supports the auto resizing option, through which you can resize the collages in multiple dimensions.
Key Features of Veed.io
- io helps you to record engaging videos, and you can also edit them directly on Veed.io without any restriction to download them on your device.
- This tool helps you in adding accurate and synchronized subtitles, and you can also transcribe the audio of the video into text.
- As it also comprehends the Video Converter, you can convert your video file of one format into another.
Pros of Veed.io
- In case your video collage has a large size, you can use the built-in video compressor for compressing videos in lossless quality.
- The Video Merger of Veed.io can assist you in merging multiple videos together to create one optimized masterpiece.
Con of Veed.io
- There is no broader range of audiograms in Veed.io. It can be stressful for users that want to add audio to videos.
Part 4: How to Make a Video Collage in Filmora?
The best video collage maker among the tools listed above is Wondershare Filmora. It offers higher functionality along with innovative features. Do you want to make dynamic video collages with Wondershare Filmora? Do you want to know how to create video collages with split screens and overlays? No worries because the instructions listed here can help you a lot:
Free Download For Win 7 or later(64-bit)
Free Download For macOS 10.14 or later
Method 1: Split Screen
Here is the procedure for making dynamic video collages with the help of a split screen:
Step 1Launch Filmora and Add Clips
Initially, install and launch Wondershare Filmora on your device and click the “New Project” option. To continue, go to the “Click here to import media” section and add the videos. Next, drag the video to “Timeline” to enable its editing.
Step 2Select a Collage Layout
Following this. open “Wondershare Filmstock” and search for the “Video Collage Layouts” from the “Search Bar.” Once you find the best layout, click the “Download” button to download it. Next, go to the tab related to the college you have downloaded. This may include “Titles,” “Transitions,” “Effects,” and other metrics.
Step 3Add Clips to Collage Layout
After adding the collage layout, add the clips of your choice in the customized arrangements. You are also free to manage the “Start Time” and “Duration” of the video. Along with that, you can access “Effects,” “Transitions,” or “Stickers” to check the Filmstock package that is downloaded into Filmora.
Step 4Export the Dynamic Video Collages
After making all the modifications, click the “Export” button from the top right of the screen. To proceed, change its “Name,” “Save to” location, “Preset,” “Resolution,” and other metrics. Finally, hit the “Export” button to save the video collage on the device.
Method 2: Overlay
Another significant method to make dynamic video collages with Wondershare Filmora is to use its overlays. Don’t know how to use it? The understated steps will guide you about this:
Step 1Import Video Clips to Filmora
To start, open Wondershare Filmora on your device and hit the “New Project” option. Following this, select the “Click here to import media” option and add the video clips you want to make a collage. Don’t forget to drag the imported video in “Timeline.”
Step 2Select an Overlay
Next, go to “Effects” and search for a specific overlay with the help of the “Search Bar.” Following this, select the effect of your liking and drag it on the video in the timeline.
Step 3Add Clips to Overlays
Next, customize the overlay in your desired size and dimension and add the “Video Clips” to add in collage. You can also manage the arrangement of clips in collages.
Step 4Export the Video Collage into the Device
Afterward, click the “Export” button from the above panel and use the on-screen “Output Settings” to modify and personalize the video collage. Once done, select the “Export” button and save the video collage on your device.
Part 5: Boost Your Video Collage
Several factors play an important role in boosting and improving the quality of your video. Luckily, Wondershare Filmora also supports several factors that can enhance your video’s productivity. These factors include the followings.
Free Download For Win 7 or later(64-bit)
Free Download For macOS 10.14 or later
Transitions
The transitions in videos create a smooth flow and add a sense of consistency. Moreover, It also helps to make the videos more visually appealing and engage users. It acts like the smoothest break in the scenes that attract the users and capture their attention. In addition, you can also give a great storytelling experience to users with transitions.
Video Effects and LUTs
LUTs stand for Look Up Tables, and they are used to maximize video engagement. Moreover, video effects can also make videos more cinematic and studio friendly. It can add versatility and flexibility that ensures the longevity of videos. You can also make corrective adjustments in videos and express your creativity to the world.
Title Effects
Titles Effects are extremely crucial components of videos because they express the theme and purpose of the video. The audience is likely to guess the content of videos from the title because it’s the first thing they will see. You have to keep it informative and attention-grabbing, along with keeping professionalism in mind. It can also help in boosting the retention of videos.
Conclusion
In this article, you have learned about dynamic video collages, their definition, purposes, benefits, and application. It can be said that it is an optimized option to attract more users and boost your video retention. You can use video collages for both personal and professional purposes. It also helps you to share your artistic and creative side with the world.
To enhance your productivity ratio, you can also use Split Screen. To learn more about the split screens, you can look at the above discussion. The best tools that can help you make videos without any issues are also discussed above for your ease. However, the best among them is Wondershare Filmora. It also integrates LUTs, transitions, and effects.
Frequently Asked Questions
To make video collages on your laptop, you can take assistance from the most useful tool named Wondershare Filmora. It is a feature-rich tool, so also modify your video to make them more engaging.
Users think that making collages with pictures and videos is not easy. However, it is not true in the case of the reliable collage maker. Several collage makers claim to be best when creating customized content, yet the most beneficial and effective one is Filmora. You just need to import clips in Filmora, add overlays, customize their settings, arrange clips, and export them in the desired output format.
With video collages, you can experience visual variety and effective storytelling. Moreover, it also helps to generate the best presentation and highlight multiple events. Sharing more content in limited time and effort is also a specialty of Filmora.
If you wish to know the most reliable and feature-rich app through which you can make a video collage, the answer is Wondershare Filmora. It also encompasses tons of reputable and innovative features that can make your videos more upgraded.
One of the highly reputable and significant college makers that offer straightforward procedures is Wondershare Filmora. It also comprehends integrations with Filmstock that help access more content to make cinematic-level collages.
What Are the Best 10 GIF Creator?
What are the 10 Best GIF Creator?
An easy yet powerful editor
Numerous effects to choose from
Detailed tutorials provided by the official channel
Stay tuned to find the most affordable GIF creator solutions.
In this article
01 [Why Gifs Are Essential for Every Marketer?](#Part 1)
02 [How to Make Your Own GIF?](#Part 2)
03 [What Are 10 Best GIF Creator to Find Brilliant Pre-made Gifs?](#Part 3)
Part 1 Why Gifs Are Essential for Every Marketer?
Everyone around you today is accustomed with the fact that GIFs are an interesting and impactful means of content sharing. These 3-5 second snippets are highly preferred and convenient ways to deliver information that is precise, clear and to the point. When it comes to time frames, short and quick GIFs are obvious choices over lengthy videos. Additionally, GIFs are eye-catchy and keep you captivated to see though the entire content within seconds, contradictory to those monotonous and often dull videos that sound more like a long, boring lecture.
These are an effective media tool that is not limited to sharing information that is chiefly entertainment based or fun centered. You can use them to deliver important content that addresses a specific purpose or audience. Owing to this, GIFs have become an essential marketing utility, here’s why:
● Improve Product Branding:
GIFs can serve as impressive branding tools for your products in the market. Markets today are considerably impacted by the ‘What You See is What You Buy’ concept, which puts forward the need to lay added stress on effective branding.
GIFs are ready to sort this out with their exciting range of features. From video editing choices to sound and color customization, GIFs are loaded with everything you need to improvise your product branding. All you have to do is explore your creativity to make the most of the GIF branding choices.
● Explain it Better
On a preference poll, most of us would shift to ‘watch’ over ‘read’ for a comprehensive understanding. An attractive motion visual is an even better treat. GIFs are pivotal in making viewers relate to the concept and message behind your product in a more enhanced manner.
Additionally, these are a continent means to introduce emotional mobility among your target audience with depictive emojis. You can use GIFs to develop effective content approaches to make the audience connect with your product viability, both practically band emotionally.
● Increase Visitor Attraction
Today’s changing times have brought about a rapid outlook towards everything. All of us are bounded by time constraints and when browsing the web, the prime need is to look for quick and accurate solutions to everything concerned.
Short and exact information delivery of GIFs is something that would keep visitors glued to your site because they will be assured of getting exactly what they search for and that too in an interesting and entertaining way.
Part 2 How to Make Your Own GIF?
Now that you are familiar with the creative marketing credibility of GIFs, you might naturally feel motivated towards creating a GIF of your own. In case you are, see through the following section of this article to find out interesting ways of creating interesting and catchy GIFs, either for impressive product marketing or just to make your social media posts leave your community peers in awe!
Looking for the best GIF creator solutions on the web, you can rely on GIPHY, one of the most preferred and convenient databases to create GIFs quickly. This is a smartphone compatible tool and works well with almost any device. Follow the steps given below to make GIFs with this tool:
Step 1:
Download and install the GIPHY app in your device.
Step 2:
Click on ‘Create’ in the app’s welcome screen. This will change (+) icon at the top-right corner to the ‘Camera’ symbol. You can also navigate to the ‘Profile’ at the bottom-right and tap the (+) or ‘Camera’ icon in the app’s account page.
Step 3:
Click on ‘Allow Camera Access’. You will receive two successive prompt messages from the app. Click on ‘Allow’ to grant access permissions to your device media. When you are done, click on ‘I Agree’.
Step 4:
GIFHY uses your device’s front camera for GIF creation. However, if you need to go for a camera switch, click on the ‘Camera’ sign at the bottom-right.
Step 5:
Choose a desired filter and effect for your GIF with a left or right swipe on the live feed toolbar. The app has 11 amazing and realistic effects, including VHS Static, 3D Glasses, etc.
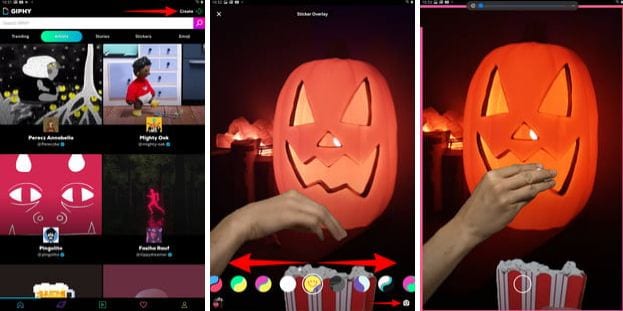
Step 6:
You can take up either of the following:
Press either of the ‘Filter’ or ‘Effect’ buttons to take static shots to create GIF from images, or press and hold the same to create animated GIF. For simply using effects, tap the white button.
In case you choose to create a motion GIF, the app forms a ‘visual timer’ around the editor screen. The motion recording stops once the line is in sync with the screen edges.
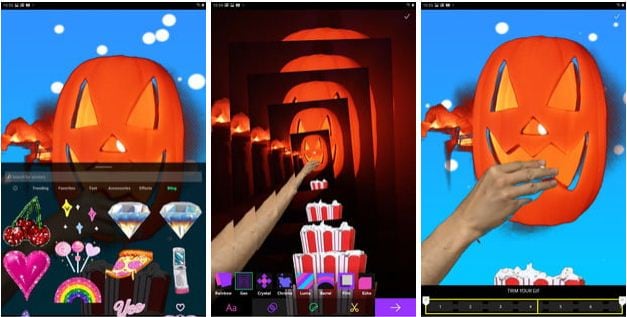
Step 7:
Having captured your perfect shot, you have the liberty to merge it with an image or video. However, do consider the following options to add some more elements to your capture: You can add relatable text in 9 color choices.
● Enhance your graphic presentation with 8 amazing effects like, ‘rainbow overlays’, BW film grains, etc.
● Choose from a never ending list of suitable stickers to add the feel through connect to your GIFs.
● Trim your animated GIFs to the ‘just perfect’ portion by adjusting the editing markers.
Relax; that’s no rocket science. Just tap on the respective buttons and there you go!
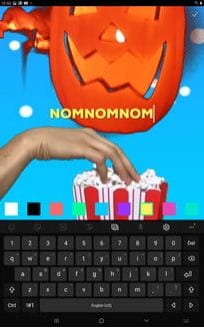
Step 8:
Set your GIF in a desired size frame by choosing the ‘Crop’ tool from the top-right corner of the editing screen. You are given a size flexibility of 1:1, 3:2, 16:9, 4:5 and 9:16.

Step 9:
Once you are satisfied with your creation, tap the ‘Right Arrow’ icon. In the interface that follows, add suitable share tags to the GIF.
Step 10:
Tap ‘Share GIF’ to post your creation on social media platforms or share it through popular IM apps. To save your initially captured clip, click on ‘Save Video’ or tap ‘Save GIF’ to save your creation in your smartphone’s memory.
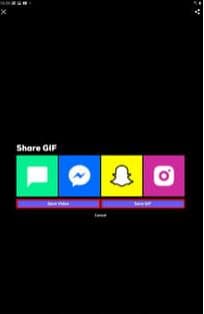
Part 1 What Are 10 Best GIF Creator to Find Brilliant Pre-made Gifs?
Having talked about GIF creation on the go, let’s take a dive into the best GIF creator solutions that are a storehouse of exciting pre-made GIFs. When browsing the web for an affordable GIF maker tool, you land across a pool of choices. Read through the further sections of this article to find out what’s best for you.
Described below are 10 best alternatives to get amazing pre-made GIFs:
● Wondershare Filmora Video Editor
This one is a popular, preferred and top rated application where you get to choose from an exciting range of pre-made GIFs under a variety of specific categories. All you need to do is, visit the app’s official site, browse to your favorite GIF category and select a desired GIF. Follow a few app instructions to save your selection and that’s it! Your selected GIF reaches your device memory within seconds.

Wondershare Filmora - Best Video Editor for Mac/Windows
5,481,435 people have downloaded it.
Build unique custom animations without breaking a sweat.
Focus on creating epic stories and leave the details to Filmora’s auto features.
Start a creative adventure with drag & drop effects and endless possibilities.
Filmora simplifies advanced features to save you time and effort.
Filmora cuts out repetition so you can move on to your next creative breakthrough.
Key Features
● This app is available to you absolutely free of cost.
● Has an intelligent and user cohesive interface.
● Loaded with tons of brilliant GIFs to choose from.
● The app supports GIF customization.
● GIFHY
Launched in 2013, this one is probably the best GIF maker and downloader tool available on the web today. It is a free tool, packed with enormous varieties of GIFs to choose from. What’s more interesting about the app is that you are free to play with your editing creativity to enhance your downloaded GIFs in the GIPHY editor.
Key Features
● It comes with an easy to use, convenient interface.
● You can edit downloaded GIFs with hundreds of effects and filters.
● The app provides you a direct sharing platform, allowing you to post GIFs to various social media platforms and also go for sharing via Instant Messaging applications.
● This is a fast processing tool that allows you to escape the notch of annoying and delayed download processes.
● Tenor
You can conveniently regard this one as the closest competitor to the GIPHY GIF creator and downloader tool. Needless to say, both are quite similar to each other in interface and usage respects. However, focusing on search results for a common keyword, you find diverse variations to your obvious surprise.
Key Features
● This is a free to use, interactive interface tool.
● It introduces a GIF Keyboard that allows you to search the most specific and relatable GIFs.
● It ensures a speedy and high quality GIF download.
● You can explore your editing skills to your heart’s content to improvise the downloaded GIFs with this tool.
● This tool gives you the liberty to directly share GIFs across different platforms.
If you like to spend ample time on choosing what’s perfect for you, refer this online tool for your GIF download solutions. It caters to your love of diversity with the most deep rooted and broad GIF range. However, this one comes with a little messy interface, demanding some patience from you to get to the right thing.
Key Features
● This tool provides you with almost all possible choices for a GIF category.
● It is available to you free of cost
● The tool site is loaded with rich and quality GIF content.
● This one is a direct save and export tool for your downloaded GIFs.
● Gfycat
You can prefer this one as a GIF hosting tool. Developed with a view to launch a common medium for GIF and HTML contents, this app ensures in-time and hassle free downloads and delivery. Though lacking a refined search bar, this tool promises you of excellence in content quality.
Key Features
● This comes to you as one of the most reliable GIF hosting tools.
● It is a free and quick content delivery tool.
● You are allowed to select the most suitable one from a variety of playback choices.
● This tool also gives you the flexibility of direct media sharing.
● GIFbin
If you are hung-over decade old nostalgia and the fever doesn’t seem to go away, you can check this site for some really satisfying retro and other similar content. This would definitely make you take a toll back to the times when MSN and Limewire were unparalleled market leaders in content sharing.
Key Features
● GIFbin is a storehouse of the best animated GIFs, that is on a continuous update to facilitate fresh and quality based content, every time you visit the site.
● It has an advanced, API enabled search mechanism.
● It boasts of having the handiest and convenient user interface.
● If you prefer GIFs of the comic genre, this tool is heaven for you.
● Imgflip
This is another GIF download site, commonly preferred for comedy and fun oriented content. Using this site, you can download and create a variety of GIF based memes that have the potential to flood your social media posts with likes and comments. This one is a complete GIF basket, suited to vast content varieties and user preferences. You will find the site’s official watermark on all its contents.
Key Features
● The site stands among the most preferred GIF-meme creation and sharing platforms.
● The tool is packed with loads of quality content under specific categories
● You can improvise the dimensions of your editing skills to modify downloaded GIFs.
● This site has a default media export feature that you can use to share your GIFs on social media.
● Imgur
Launched in 2009, this is among the most visited GIF sites, originally created for sharing meme based contents on social media. Its extensive search filters are dedicated to fetch the exact GIFs and memes you are looking for. If you are tired of browsing sites for particular content requirements, your search spree will definitely end here.
Key Features
● The site is known for its extensive and diversified content quality.
● It is a free, convenient and dependable GIF download tool.
● Imgur is highly preferred for content export across various media platforms.
● It is equipped with an advanced and updated search filter that assures you of getting fresh and top quality GIFs on almost every possible keyword.
● Tumblr
Claiming a launch date of 13 years back, this is quite a good GIF download option. You can find excellent quality GIF content on the site, particularly in the comic genre. Though not as popular as its online counterparts today, the site definitely enjoyed commendable visitor preferences at the time of its launch. You can certainly visit this site for a filling entertainment dose.
Key Features
● Tumblr is a free download site with a user friendly interface.
● The site is loaded with notable content varieties.
● You can go for direct media sharing through this site.
● Its comic GIFs are quite hilarious.
● Know Your Meme
This site uses the Wiki software to stock an inventory of classic GIFs and memes. Using this database for GIF downloads means that you don’t need to compromise on content and image quality. The site contents are periodically updated to ensure that visitors are not exposed to stale and outdated content.
Key Features
● The site offers fresh content having catchy and latest GIFs.
● This is a complete storehouse of GIFs and memes that can definitely keep you rolling.
● The site comes as a free tool and gas a user cohesive interface
● It hast the most efficient search filters that are regularly improvised to ensure quality content delivery.
● Key Takeaways from This Episode →
● GIFs are an effective and captivating means of quality content sharing and message delivery. Take them as a hilarious entertainment source or use them to enhance your marketing policies, GIFs can do it all.
● Influenced by the user credibility of GIFs, there are loads of GIF creator and download tools available online; among which Filmora by Wondershare is the current market leader. You can use this app to explore your GIF editing skills or download and share latest GIFs across media sharing platforms.
Stay tuned to find the most affordable GIF creator solutions.
In this article
01 [Why Gifs Are Essential for Every Marketer?](#Part 1)
02 [How to Make Your Own GIF?](#Part 2)
03 [What Are 10 Best GIF Creator to Find Brilliant Pre-made Gifs?](#Part 3)
Part 1 Why Gifs Are Essential for Every Marketer?
Everyone around you today is accustomed with the fact that GIFs are an interesting and impactful means of content sharing. These 3-5 second snippets are highly preferred and convenient ways to deliver information that is precise, clear and to the point. When it comes to time frames, short and quick GIFs are obvious choices over lengthy videos. Additionally, GIFs are eye-catchy and keep you captivated to see though the entire content within seconds, contradictory to those monotonous and often dull videos that sound more like a long, boring lecture.
These are an effective media tool that is not limited to sharing information that is chiefly entertainment based or fun centered. You can use them to deliver important content that addresses a specific purpose or audience. Owing to this, GIFs have become an essential marketing utility, here’s why:
● Improve Product Branding:
GIFs can serve as impressive branding tools for your products in the market. Markets today are considerably impacted by the ‘What You See is What You Buy’ concept, which puts forward the need to lay added stress on effective branding.
GIFs are ready to sort this out with their exciting range of features. From video editing choices to sound and color customization, GIFs are loaded with everything you need to improvise your product branding. All you have to do is explore your creativity to make the most of the GIF branding choices.
● Explain it Better
On a preference poll, most of us would shift to ‘watch’ over ‘read’ for a comprehensive understanding. An attractive motion visual is an even better treat. GIFs are pivotal in making viewers relate to the concept and message behind your product in a more enhanced manner.
Additionally, these are a continent means to introduce emotional mobility among your target audience with depictive emojis. You can use GIFs to develop effective content approaches to make the audience connect with your product viability, both practically band emotionally.
● Increase Visitor Attraction
Today’s changing times have brought about a rapid outlook towards everything. All of us are bounded by time constraints and when browsing the web, the prime need is to look for quick and accurate solutions to everything concerned.
Short and exact information delivery of GIFs is something that would keep visitors glued to your site because they will be assured of getting exactly what they search for and that too in an interesting and entertaining way.
Part 2 How to Make Your Own GIF?
Now that you are familiar with the creative marketing credibility of GIFs, you might naturally feel motivated towards creating a GIF of your own. In case you are, see through the following section of this article to find out interesting ways of creating interesting and catchy GIFs, either for impressive product marketing or just to make your social media posts leave your community peers in awe!
Looking for the best GIF creator solutions on the web, you can rely on GIPHY, one of the most preferred and convenient databases to create GIFs quickly. This is a smartphone compatible tool and works well with almost any device. Follow the steps given below to make GIFs with this tool:
Step 1:
Download and install the GIPHY app in your device.
Step 2:
Click on ‘Create’ in the app’s welcome screen. This will change (+) icon at the top-right corner to the ‘Camera’ symbol. You can also navigate to the ‘Profile’ at the bottom-right and tap the (+) or ‘Camera’ icon in the app’s account page.
Step 3:
Click on ‘Allow Camera Access’. You will receive two successive prompt messages from the app. Click on ‘Allow’ to grant access permissions to your device media. When you are done, click on ‘I Agree’.
Step 4:
GIFHY uses your device’s front camera for GIF creation. However, if you need to go for a camera switch, click on the ‘Camera’ sign at the bottom-right.
Step 5:
Choose a desired filter and effect for your GIF with a left or right swipe on the live feed toolbar. The app has 11 amazing and realistic effects, including VHS Static, 3D Glasses, etc.
Step 6:
You can take up either of the following:
Press either of the ‘Filter’ or ‘Effect’ buttons to take static shots to create GIF from images, or press and hold the same to create animated GIF. For simply using effects, tap the white button.
In case you choose to create a motion GIF, the app forms a ‘visual timer’ around the editor screen. The motion recording stops once the line is in sync with the screen edges.
Step 7:
Having captured your perfect shot, you have the liberty to merge it with an image or video. However, do consider the following options to add some more elements to your capture: You can add relatable text in 9 color choices.
● Enhance your graphic presentation with 8 amazing effects like, ‘rainbow overlays’, BW film grains, etc.
● Choose from a never ending list of suitable stickers to add the feel through connect to your GIFs.
● Trim your animated GIFs to the ‘just perfect’ portion by adjusting the editing markers.
Relax; that’s no rocket science. Just tap on the respective buttons and there you go!
Step 8:
Set your GIF in a desired size frame by choosing the ‘Crop’ tool from the top-right corner of the editing screen. You are given a size flexibility of 1:1, 3:2, 16:9, 4:5 and 9:16.
Step 9:
Once you are satisfied with your creation, tap the ‘Right Arrow’ icon. In the interface that follows, add suitable share tags to the GIF.
Step 10:
Tap ‘Share GIF’ to post your creation on social media platforms or share it through popular IM apps. To save your initially captured clip, click on ‘Save Video’ or tap ‘Save GIF’ to save your creation in your smartphone’s memory.
Part 1 What Are 10 Best GIF Creator to Find Brilliant Pre-made Gifs?
Having talked about GIF creation on the go, let’s take a dive into the best GIF creator solutions that are a storehouse of exciting pre-made GIFs. When browsing the web for an affordable GIF maker tool, you land across a pool of choices. Read through the further sections of this article to find out what’s best for you.
Described below are 10 best alternatives to get amazing pre-made GIFs:
● Wondershare Filmora Video Editor
This one is a popular, preferred and top rated application where you get to choose from an exciting range of pre-made GIFs under a variety of specific categories. All you need to do is, visit the app’s official site, browse to your favorite GIF category and select a desired GIF. Follow a few app instructions to save your selection and that’s it! Your selected GIF reaches your device memory within seconds.
Wondershare Filmora - Best Video Editor for Mac/Windows
5,481,435 people have downloaded it.
Build unique custom animations without breaking a sweat.
Focus on creating epic stories and leave the details to Filmora’s auto features.
Start a creative adventure with drag & drop effects and endless possibilities.
Filmora simplifies advanced features to save you time and effort.
Filmora cuts out repetition so you can move on to your next creative breakthrough.
Key Features
● This app is available to you absolutely free of cost.
● Has an intelligent and user cohesive interface.
● Loaded with tons of brilliant GIFs to choose from.
● The app supports GIF customization.
● GIFHY
Launched in 2013, this one is probably the best GIF maker and downloader tool available on the web today. It is a free tool, packed with enormous varieties of GIFs to choose from. What’s more interesting about the app is that you are free to play with your editing creativity to enhance your downloaded GIFs in the GIPHY editor.
Key Features
● It comes with an easy to use, convenient interface.
● You can edit downloaded GIFs with hundreds of effects and filters.
● The app provides you a direct sharing platform, allowing you to post GIFs to various social media platforms and also go for sharing via Instant Messaging applications.
● This is a fast processing tool that allows you to escape the notch of annoying and delayed download processes.
● Tenor
You can conveniently regard this one as the closest competitor to the GIPHY GIF creator and downloader tool. Needless to say, both are quite similar to each other in interface and usage respects. However, focusing on search results for a common keyword, you find diverse variations to your obvious surprise.
Key Features
● This is a free to use, interactive interface tool.
● It introduces a GIF Keyboard that allows you to search the most specific and relatable GIFs.
● It ensures a speedy and high quality GIF download.
● You can explore your editing skills to your heart’s content to improvise the downloaded GIFs with this tool.
● This tool gives you the liberty to directly share GIFs across different platforms.
If you like to spend ample time on choosing what’s perfect for you, refer this online tool for your GIF download solutions. It caters to your love of diversity with the most deep rooted and broad GIF range. However, this one comes with a little messy interface, demanding some patience from you to get to the right thing.
Key Features
● This tool provides you with almost all possible choices for a GIF category.
● It is available to you free of cost
● The tool site is loaded with rich and quality GIF content.
● This one is a direct save and export tool for your downloaded GIFs.
● Gfycat
You can prefer this one as a GIF hosting tool. Developed with a view to launch a common medium for GIF and HTML contents, this app ensures in-time and hassle free downloads and delivery. Though lacking a refined search bar, this tool promises you of excellence in content quality.
Key Features
● This comes to you as one of the most reliable GIF hosting tools.
● It is a free and quick content delivery tool.
● You are allowed to select the most suitable one from a variety of playback choices.
● This tool also gives you the flexibility of direct media sharing.
● GIFbin
If you are hung-over decade old nostalgia and the fever doesn’t seem to go away, you can check this site for some really satisfying retro and other similar content. This would definitely make you take a toll back to the times when MSN and Limewire were unparalleled market leaders in content sharing.
Key Features
● GIFbin is a storehouse of the best animated GIFs, that is on a continuous update to facilitate fresh and quality based content, every time you visit the site.
● It has an advanced, API enabled search mechanism.
● It boasts of having the handiest and convenient user interface.
● If you prefer GIFs of the comic genre, this tool is heaven for you.
● Imgflip
This is another GIF download site, commonly preferred for comedy and fun oriented content. Using this site, you can download and create a variety of GIF based memes that have the potential to flood your social media posts with likes and comments. This one is a complete GIF basket, suited to vast content varieties and user preferences. You will find the site’s official watermark on all its contents.
Key Features
● The site stands among the most preferred GIF-meme creation and sharing platforms.
● The tool is packed with loads of quality content under specific categories
● You can improvise the dimensions of your editing skills to modify downloaded GIFs.
● This site has a default media export feature that you can use to share your GIFs on social media.
● Imgur
Launched in 2009, this is among the most visited GIF sites, originally created for sharing meme based contents on social media. Its extensive search filters are dedicated to fetch the exact GIFs and memes you are looking for. If you are tired of browsing sites for particular content requirements, your search spree will definitely end here.
Key Features
● The site is known for its extensive and diversified content quality.
● It is a free, convenient and dependable GIF download tool.
● Imgur is highly preferred for content export across various media platforms.
● It is equipped with an advanced and updated search filter that assures you of getting fresh and top quality GIFs on almost every possible keyword.
● Tumblr
Claiming a launch date of 13 years back, this is quite a good GIF download option. You can find excellent quality GIF content on the site, particularly in the comic genre. Though not as popular as its online counterparts today, the site definitely enjoyed commendable visitor preferences at the time of its launch. You can certainly visit this site for a filling entertainment dose.
Key Features
● Tumblr is a free download site with a user friendly interface.
● The site is loaded with notable content varieties.
● You can go for direct media sharing through this site.
● Its comic GIFs are quite hilarious.
● Know Your Meme
This site uses the Wiki software to stock an inventory of classic GIFs and memes. Using this database for GIF downloads means that you don’t need to compromise on content and image quality. The site contents are periodically updated to ensure that visitors are not exposed to stale and outdated content.
Key Features
● The site offers fresh content having catchy and latest GIFs.
● This is a complete storehouse of GIFs and memes that can definitely keep you rolling.
● The site comes as a free tool and gas a user cohesive interface
● It hast the most efficient search filters that are regularly improvised to ensure quality content delivery.
● Key Takeaways from This Episode →
● GIFs are an effective and captivating means of quality content sharing and message delivery. Take them as a hilarious entertainment source or use them to enhance your marketing policies, GIFs can do it all.
● Influenced by the user credibility of GIFs, there are loads of GIF creator and download tools available online; among which Filmora by Wondershare is the current market leader. You can use this app to explore your GIF editing skills or download and share latest GIFs across media sharing platforms.
Also read:
- In 2024, Best Cinematic LUTs For Premiere Pro You Can Come Across
- Updated 2024 Approved 3 Ways to Create Motion Text Effects for Your Video
- New 2024 Approved Step by Step to Rotate Videos Using Handbrake
- Explore the List of the Top Six Online Video Speed Controllers for Chrome, Safari, and Firefox for 2024
- How to Find Free Online Slideshow Maker with No Watermark for 2024
- New In 2024, How to Create Your Own LUTs for Your Video
- How to Create a Vacation Slideshow in 5 Minutes
- Updated How to Animate Designs With Canva GIF for 2024
- Updated Do You Want to Blur Faces in Your Videos? Read This Article to Find Out the Easiest Way to Blur the Faces in Videos Using Adobe Premiere Pro
- In 2024, How to Use Lumetri Color in After Effects
- New Looking Into The Top Free Slow Motion Apps (Android & iOS) for 2024
- New How Do You Use the Splice App on Android and Which Useful Video Splice Apps Are Best Suited? This Article Expands More on It
- New The Top Tips for Becoming a Good Podcast Host Are Presented in This Article. How to Start and End the Podcast Show Is All Set Below. You Can Also Learn About the Ways to Call Guests to Your Show
- New 2024 Approved 8 Free Photo Collage with Music Video Maker
- New A Complete Guide to the Best Brand Story Videos |2023| for 2024
- 2024 Approved The Best Way to Remove Audio From Your Videos
- Updated How to Make a TikTok Loop Video
- In 2024, How to Make Strobe Light Text Effect?
- CapCut Lenta Template How It Benefits Slow Motion Video
- 2024 Approved What Can Be Better than Converting Apple Video Format Into Other Formats so that You Can Use the Files Easily. We Have a Few Options that You Can Use for This Purpose
- New 2024 Approved 8 Apps to Custom GIF Stickers
- How To Fix Slow Playback Issues in DaVinci Resolve Finding the Best Solutions for 2024
- In 2024, 11 Ways To Radial Blur To Images (iPhone/Android/Mac/Windows)
- New In 2024, Top iOS Solutions Finding Premium Slow Motion Apps For Video Creation
- Updated To Get Cinematographs of a Music Video, You Need to Understand the Basics of Camera Movement. As Well Framing and Lighting of the Setup Are Illustrated in This Article
- This Article Discusses What Is Hitfilm Express, How to Download, Install and Use It, and Its Key Features. It Further Discusses Its Alternative for Editing Your Videos and More. Check Out Now for 2024
- In 2024, Gifs Can Convey Your Emotions in a Way that Words Cannot, so They Are Becoming a Popular Way to Express Yourself, and You Must Know How to Make a Gif and You Wont Believe that Its Not Difficult to Do
- Best 5 Solutions on How to Add Emojis to iPhone for 2024
- 2024 Approved How to Add Expression in After Effects
- Updated 2024 Approved How to Apply Gaussian Blur Effect to Videos In Premiere Pro?
- Updated Do You Know About some Efficient Slow-Motion Video Editors? Read This Article to Find Out the Best Slow-Motion Video Editing Tools that You Can Try
- In 2024, The Glitch Effect Shows Errors and Flaws in the Image or a Video. The Write-Up Presents the Complete Procedure of Adding Premiere Pros Glitch Effect and Introduces Eight Free Glitch Effects
- Updated 2024 Approved Looking For The Best Slow Motion Effect in Premiere Pro
- In 2024, This Article Provides Helpful Tips for Creating Better Film Footage in Public Places. Learn How to Choose the Right Angle and Re-Record the Audio with Filmora
- Updated In 2024, 4 Ways to Add White Borders on Mobile and Desktop
- Learn to Merge Clips in DaVinci Resolve Simple Steps
- 2024 Approved Overview of Perfect Moody LUTs for VN Editor
- Facts About GIF Background You Didnt Know for 2024
- In 2024, How to Rotate Videos With Media Player Classic
- Top 7 Phone Number Locators To Track Samsung Galaxy A15 5G Location | Dr.fone
- The Best 8 VPN Hardware Devices Reviewed On Honor Play 40C | Dr.fone
- Stuck at Android System Recovery Of Oppo Reno 11F 5G ? Fix It Easily | Dr.fone
- In 2024, How to Unlock Verizon Apple iPhone 13 Pro
- In 2024, 6 Ways To Transfer Contacts From Nubia Red Magic 8S Pro to iPhone | Dr.fone
- How To Restore Missing Music Files from GT 5 Pro
- In 2024, How Do I Stop Someone From Tracking My Oppo A1x 5G? | Dr.fone
- How to Hard Reset Oppo A38 Without Password | Dr.fone
- How to Samsung Galaxy A15 5G Get Deleted Pictures Back with Ease and Safety?
- In 2024, How Can We Bypass OnePlus Ace 2 FRP?
- In 2024, Will Pokémon Go Ban the Account if You Use PGSharp On Tecno Camon 20 | Dr.fone
- In 2024, Here are Some of the Best Pokemon Discord Servers to Join On Apple iPhone 13 Pro | Dr.fone
- The Ultimate Guide to Vivo Y78 5G Pattern Lock Screen Everything You Need to Know
- Complete Tutorial for Oppo A59 5G Hard Reset | Dr.fone
- In 2024, Troubleshooting Error Connecting to the Apple ID Server From Apple iPhone X
- Realme 12 Pro+ 5G Not Connecting to Wi-Fi? 12 Quick Ways to Fix | Dr.fone
- Full Guide to Catch 100 IV Pokémon Using a Map On Realme Narzo 60 Pro 5G | Dr.fone
- Here Are Some Reliable Ways to Get Pokemon Go Friend Codes For Apple iPhone 6s Plus | Dr.fone
- In 2024, Motorola Moto G24 ADB Format Tool for PC vs. Other Unlocking Tools Which One is the Best?
- Use Device Manager to identify malfunctioning drivers with Windows Device Manager in Windows 10 & 7
- How to Reset a Itel P55T Phone that is Locked?
- How to Track Apple iPhone 11 Pro Location by Number | Dr.fone
- Complete Tutorial to Use VPNa to Fake GPS Location On ZTE Nubia Flip 5G | Dr.fone
- How To Bypass Motorola Moto G34 5G FRP In 3 Different Ways
- How to Transfer Photos From Realme Narzo 60 5G to Samsung Galaxy S21 Ultra | Dr.fone
- New 2024 Approved Best 7 Whiteboard Explainer Videos to Inspire You
- new Best 10 Chinese Video to English Translators
- In 2024, How to Change GPS Location on Samsung Galaxy A15 5G Easily & Safely | Dr.fone
- In 2024, How to Watch Hulu Outside US On Oppo Reno 8T 5G | Dr.fone
- updated In 2024, 9 Best French Video Translators Online and Download Options
- In 2024, How to Mirror PC to Apple iPhone 15 Plus? | Dr.fone
- Preparation to Beat Giovani in Pokemon Go For Honor X9b | Dr.fone
- 4 Feasible Ways to Fake Location on Facebook For your Oppo Reno 9A | Dr.fone
- How to Exit Android Factory Mode On Poco X5 Pro? | Dr.fone
- How to Bypass FRP from Motorola G54 5G?
- Title: Updated 7 Ways Add Subtitles to MKV Videos on All Platforms for 2024
- Author: Chloe
- Created at : 2024-04-24 07:08:28
- Updated at : 2024-04-25 07:08:28
- Link: https://ai-editing-video.techidaily.com/updated-7-ways-add-subtitles-to-mkv-videos-on-all-platforms-for-2024/
- License: This work is licensed under CC BY-NC-SA 4.0.
