
:max_bytes(150000):strip_icc():format(webp)/Cleaningrobotonlaptop_HuberandStarke_GettyImages-1448733073_EVANCROP-8ed67f08b9c4430db8e47c51fde78feb.jpg)
Updated 8 Tips to Apply Cinematic Color Grading to Your Video
8 Tips to Apply Cinematic Color Grading to Your Video
Create High-Quality Video - Wondershare Filmora
An easy and powerful YouTube video editor
Numerous video and audio effects to choose from
Detailed tutorials are provided by the official channel
After a successful video shoot, video editing tends to wrap up the video production process. However, a video cannot be enlivened by using simple video editing tools, i.e., cut, crop, and trim, but rather tools such as cinematic color grading. Usually, directors want their video to evoke their intended ambiance and appear more realistic – This can only be achieved through cinematic color grading.
Color grading is the alteration and enhancement of color in a video, motion picture, or still image. Color grading is an essential tool for videographers since it enables them to enhance the mood or tone. Stick to this article and learn about the eight tips to apply cinematic color grading to your video.
In this article
02 8 Tips to Apply Cinematic Color Grading to Your Video
Don’t Make These Mistakes
Even though to err is human, there are some mistakes that colorists and video editors need to avoid at all costs. It is not only because they will make them look amateurish but also undermines the message and impact of the video.
Some people assume color grading is as simple as adding filters to their Instagram photos which they are absolutely wrong. Color grading is a long and frustrating process, and it only requires “persons with a thick skin.”
Some mistakes are not only committed by amateurs alone but also professional colorists who are in a rush to complete their projects on due time. Usually, these mistakes degrade the quality output. Some of the mistakes that one needs not make include:
1. Using a Poorly Calibrated Monitor
Almost every videographer and colorist’s goal is to design footages that distinctively display their primary colors and decipher the intended message. And this can only be achieved using a properly calibrated monitor.
Before working on a project, you ought to crosscheck your monitor calibration. Most people assume that the calibration is accurate since they possess a new, out-of-the-box monitor. It is utterly wrong since retailer shops usually adjust the monitor settings to overblown saturation and contrast to attract customers.
Furthermore, if you opt to edit your videos without adjusting your monitor calibration, you will have a poor footage.
2. Poor Prepping of the Video Footage
One major mistake that videographers often make is not prepping their video correctly. A poorly prepped footage is one that has a bad color space conversion. Usually, the outcome result of poorly prepped footage is an imbalanced image.
Prepping footage is not as easy as an apple pie. Besides, most videographers tend to follow a shortcut by starting messing with the gains and individual nodes, forgetting that a shortcut is often a wrong cut.
The best way of prepping a video is to start by making separate nodes and labeling them differently.
3. Imbalancing the Shadow
Have you ever seen video footage with partially opaque shadows? And when you look keenly, you see tinted greens and reds. Usually, this is a result of an imbalanced shadow.
This mistake is not only carried out by beginner videographers but also professionals who are always in a hurry to complete a project. When you look at your scope, you see the shadows are lifted or down in other scenarios – This is also a result of shadow imbalance.
4. Overusing LUTs
A mistake that beginner editors often make is overusing LUTs. Footages with overly used LUTs often appear to be dull. A thing that videographers need to observe when using LUTs is consistency.
When using LUTs, you need to ensure that your project has similar saturation, colors, and contrast throughout your video project. Moreover, it would be best to choose your LUTs based on the film color palette and your story.
5. Having Limited break
Having enough break enables one’s eyes to recalibrate. As a colorist, your eyes are often considered the main asset. Sitting for long periods in your workstation and staring for long hours at your monitor may cause one to add more saturation and contrast, thus making the video dull. Therefore the best remedy is to take a break from your monitor.
Besides, coming from a break enables one to have another different perspective about the color grading of the project.
8 Tips to Apply Cinematic Color Grading to Your Video
When it comes to creating cinematic looks in video footage, the camera type is usually non-essential. What matters is that you capture quality videos with the right angles then leave the rest to color grading.
For a video clip to look more cinematic, a couple of elements are put together. Here, we will look at those elements and create stunning videos.
1. Use Lumetri Color to adjust brightness, contrast, and saturation
The Lumeri color is an essential color grading functionality in most premiere software, including Wondershare Filmora, Adobe After Effects, and Davinci Resolve 17. With this functionality tool, you can carry out a wide range of customizable settings such as hue, saturation, contrasts, brightness, and tone.
The lumetri panel contains a histogram, vectorscope, parade scope, and waveform monitor. In your lumetri panel, you can measure the brightness and tonal values using a histogram, the light intensity with a waveform monitor, saturation and hue using vectorscope, and color channel using parade scope.
Adjusting the brightness, contrast, hue, saturation, and tone to moderate levels will give your video clip that cinematic look.

2. Use Cosmo functionality to adjust skin tones
Due to the light effect, shots taken during the day will have inconsistent color matches, especially skin tone. In the post-production process, one needs to make uniformity in skin tone and the clip. To rectify this, you need to involve a professional color grading functionality, Cosmo.
With cosmo, you can adjust the skin color, squeeze the skin, and soften the skin. Generally, Cosmo makes people in video clips look their best.

3. Use Highlights and Shadows adjustment
A clip will look more cinematic when the shadows and highlights are brought out as separate entities. The shadows become more vivid when adjusted to either teal, purple or blue. You can go a mile and adjust the highlights to become crystal clear by making the footage become yellow, red, or orange.
When carrying out color grading, you need to know the various video demands, such as the horror clips demand more of the dark shadow.

4. Use Vectorscope to get the accurate adjustment
Naked eyes cannot effectively see all the errors in a video project, which is the essence of having a vectorscope. A vectorscope provides all the quantitative information about a video image – This lessens work for video editors.
Vectorscope provides extensive details, such as how intense a given color is – This will help you make necessary adjustments to your footage.

5. Use the black and white functionality to change the opacity
Even though you can change your footage to black and white using the hue and saturation functionality, the black and white tool gives you more control.
This functionality feature can make your footage blend with the soft light part. Besides, it is best to first lower the contrast of your image or video to black and white to be able to highlight the unclear parts.

6. Use levels to unveil the whites, blacks, and mids of an image
Levels is a functionality feature that displays the blacks, whites, and mids of footage. With this functionality, you can make the highlight parts lighter and the shadows appear darker, which is essential in making cinematic videos.
In the levels histogram, the left slider defines the darkest part, the right defines the brightest part, and the top defines distributions.
In software such as Adobe After Effects, you can set this functionality to automatic or customize it based on your preference.

7. Use Vibrance to control other levels of saturation
The saturation of video footage or a clip can be regulated using vibrance functionality. With vibrance, you can alter the saturation levels of your clip while simultaneously minimizing clippings for the colors to approach complete saturation.
When you want to use this functionality in After Effects, you drag and drop it right on top of your footage – The exact part you want to apply it.

8. Use a Vignette to fade edges
To increase the point of focus, you need to fade your edges. In color grading, you can only fade your edges with a vignette.
This functionality allows you to center images or certain video parts and make the edges unclear. Your emphasis will be more on the central region.

Bottom line
● Color grading is not a piece of cake. Besides, you should not use it as an excuse for making simple mistakes such as the ones highlighted above. You need to pay close attention when color grading your films, and you will have your video project mapping out its intended meaning.
● Moreover, you need not be a pro to carry out cinematic color grading. You need to follow the above eight tips altogether to apply color grading to your video. You will create stunning video files that leave your viewers’ eyes gorged out.
After a successful video shoot, video editing tends to wrap up the video production process. However, a video cannot be enlivened by using simple video editing tools, i.e., cut, crop, and trim, but rather tools such as cinematic color grading. Usually, directors want their video to evoke their intended ambiance and appear more realistic – This can only be achieved through cinematic color grading.
Color grading is the alteration and enhancement of color in a video, motion picture, or still image. Color grading is an essential tool for videographers since it enables them to enhance the mood or tone. Stick to this article and learn about the eight tips to apply cinematic color grading to your video.
In this article
02 8 Tips to Apply Cinematic Color Grading to Your Video
Don’t Make These Mistakes
Even though to err is human, there are some mistakes that colorists and video editors need to avoid at all costs. It is not only because they will make them look amateurish but also undermines the message and impact of the video.
Some people assume color grading is as simple as adding filters to their Instagram photos which they are absolutely wrong. Color grading is a long and frustrating process, and it only requires “persons with a thick skin.”
Some mistakes are not only committed by amateurs alone but also professional colorists who are in a rush to complete their projects on due time. Usually, these mistakes degrade the quality output. Some of the mistakes that one needs not make include:
1. Using a Poorly Calibrated Monitor
Almost every videographer and colorist’s goal is to design footages that distinctively display their primary colors and decipher the intended message. And this can only be achieved using a properly calibrated monitor.
Before working on a project, you ought to crosscheck your monitor calibration. Most people assume that the calibration is accurate since they possess a new, out-of-the-box monitor. It is utterly wrong since retailer shops usually adjust the monitor settings to overblown saturation and contrast to attract customers.
Furthermore, if you opt to edit your videos without adjusting your monitor calibration, you will have a poor footage.
2. Poor Prepping of the Video Footage
One major mistake that videographers often make is not prepping their video correctly. A poorly prepped footage is one that has a bad color space conversion. Usually, the outcome result of poorly prepped footage is an imbalanced image.
Prepping footage is not as easy as an apple pie. Besides, most videographers tend to follow a shortcut by starting messing with the gains and individual nodes, forgetting that a shortcut is often a wrong cut.
The best way of prepping a video is to start by making separate nodes and labeling them differently.
3. Imbalancing the Shadow
Have you ever seen video footage with partially opaque shadows? And when you look keenly, you see tinted greens and reds. Usually, this is a result of an imbalanced shadow.
This mistake is not only carried out by beginner videographers but also professionals who are always in a hurry to complete a project. When you look at your scope, you see the shadows are lifted or down in other scenarios – This is also a result of shadow imbalance.
4. Overusing LUTs
A mistake that beginner editors often make is overusing LUTs. Footages with overly used LUTs often appear to be dull. A thing that videographers need to observe when using LUTs is consistency.
When using LUTs, you need to ensure that your project has similar saturation, colors, and contrast throughout your video project. Moreover, it would be best to choose your LUTs based on the film color palette and your story.
5. Having Limited break
Having enough break enables one’s eyes to recalibrate. As a colorist, your eyes are often considered the main asset. Sitting for long periods in your workstation and staring for long hours at your monitor may cause one to add more saturation and contrast, thus making the video dull. Therefore the best remedy is to take a break from your monitor.
Besides, coming from a break enables one to have another different perspective about the color grading of the project.
8 Tips to Apply Cinematic Color Grading to Your Video
When it comes to creating cinematic looks in video footage, the camera type is usually non-essential. What matters is that you capture quality videos with the right angles then leave the rest to color grading.
For a video clip to look more cinematic, a couple of elements are put together. Here, we will look at those elements and create stunning videos.
1. Use Lumetri Color to adjust brightness, contrast, and saturation
The Lumeri color is an essential color grading functionality in most premiere software, including Wondershare Filmora, Adobe After Effects, and Davinci Resolve 17. With this functionality tool, you can carry out a wide range of customizable settings such as hue, saturation, contrasts, brightness, and tone.
The lumetri panel contains a histogram, vectorscope, parade scope, and waveform monitor. In your lumetri panel, you can measure the brightness and tonal values using a histogram, the light intensity with a waveform monitor, saturation and hue using vectorscope, and color channel using parade scope.
Adjusting the brightness, contrast, hue, saturation, and tone to moderate levels will give your video clip that cinematic look.
2. Use Cosmo functionality to adjust skin tones
Due to the light effect, shots taken during the day will have inconsistent color matches, especially skin tone. In the post-production process, one needs to make uniformity in skin tone and the clip. To rectify this, you need to involve a professional color grading functionality, Cosmo.
With cosmo, you can adjust the skin color, squeeze the skin, and soften the skin. Generally, Cosmo makes people in video clips look their best.
3. Use Highlights and Shadows adjustment
A clip will look more cinematic when the shadows and highlights are brought out as separate entities. The shadows become more vivid when adjusted to either teal, purple or blue. You can go a mile and adjust the highlights to become crystal clear by making the footage become yellow, red, or orange.
When carrying out color grading, you need to know the various video demands, such as the horror clips demand more of the dark shadow.
4. Use Vectorscope to get the accurate adjustment
Naked eyes cannot effectively see all the errors in a video project, which is the essence of having a vectorscope. A vectorscope provides all the quantitative information about a video image – This lessens work for video editors.
Vectorscope provides extensive details, such as how intense a given color is – This will help you make necessary adjustments to your footage.
5. Use the black and white functionality to change the opacity
Even though you can change your footage to black and white using the hue and saturation functionality, the black and white tool gives you more control.
This functionality feature can make your footage blend with the soft light part. Besides, it is best to first lower the contrast of your image or video to black and white to be able to highlight the unclear parts.
6. Use levels to unveil the whites, blacks, and mids of an image
Levels is a functionality feature that displays the blacks, whites, and mids of footage. With this functionality, you can make the highlight parts lighter and the shadows appear darker, which is essential in making cinematic videos.
In the levels histogram, the left slider defines the darkest part, the right defines the brightest part, and the top defines distributions.
In software such as Adobe After Effects, you can set this functionality to automatic or customize it based on your preference.
7. Use Vibrance to control other levels of saturation
The saturation of video footage or a clip can be regulated using vibrance functionality. With vibrance, you can alter the saturation levels of your clip while simultaneously minimizing clippings for the colors to approach complete saturation.
When you want to use this functionality in After Effects, you drag and drop it right on top of your footage – The exact part you want to apply it.
8. Use a Vignette to fade edges
To increase the point of focus, you need to fade your edges. In color grading, you can only fade your edges with a vignette.
This functionality allows you to center images or certain video parts and make the edges unclear. Your emphasis will be more on the central region.
Bottom line
● Color grading is not a piece of cake. Besides, you should not use it as an excuse for making simple mistakes such as the ones highlighted above. You need to pay close attention when color grading your films, and you will have your video project mapping out its intended meaning.
● Moreover, you need not be a pro to carry out cinematic color grading. You need to follow the above eight tips altogether to apply color grading to your video. You will create stunning video files that leave your viewers’ eyes gorged out.
Add Text Animation to A Video Online
Do you want to make a creative video? Do you want your presentation or video to be easy to follow and entertaining? You can take the video to another level with the help of text animation. This article will discuss how to add text animation to online videos. You can use a good video editor from where you can select fresh styles and make the best video from there. One of the simplest ways to elevate your movie from good to excellent is with understandable text animation.
Text animation and short captions can broaden the audience for your content as more consumers view videos without sound these days. It matters what fonts you use in the videos, and they establish the mood and facilitate interaction with most viewers who rely on video captions. Add text, alter the font, add transitions, and use text effects to draw the user’s attention as they scroll. Please continue reading to discover how simple it is to make interactive video titles, words, and supers.
1. Use Kapwing animation text editor
(https://www.kapwing.com/animated-text-video-maker )
You can use the potent online editor Kapwing to add animated text to videos online, utilizing music, videos, GIFs, and images. There are no downloads required because everything is already present inside the browser. Kapwing is a capable tool for content production that is simple enough for everyone to use. The majority of video formats, GIF and image, including avi, png, jpg, gif, MOV, mp4, and more, are supported by Kapwing.
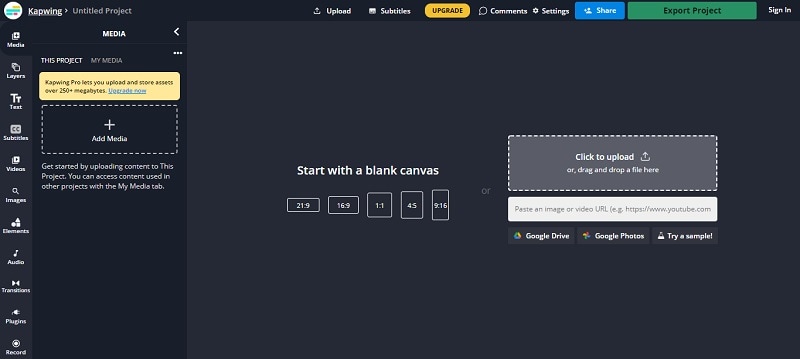
Step1 Upload the Video to Kapwing
You can open Kapwing with the device and tap on “Start Editing” to open up Kapwimg studio. After that, one can use the drag and drop option to upload the video in the studio. You can click on upload or use the link to upload.
If you have a more than 250 MB video, then you will require the Pro version.
Step2 Add the Text
When the video gets uploaded, now you can add your text. You must click the “Text” option on the left and type the text. After that, you can pick your favorite color, background, and color to add style.
You will always want that your text to get animated, but it doesn’t mean that you will have to use explosive fonts or funky or bright, which are very funky. The animation will make your text look attractive, and you can experiment with the colors and fonts to find the best combination.
Step3 Animate the Text
Now the fun part starts; choose the text box present on the right side and click on the “Animate” tab. It will allow the user to select animations like fade, flicker, hue rotates, and many more. Choose the speed according to your requirement, and if you want to change the background and color, you can do it too.
Use “Apply To” for applying this animation in the outro, intro, or both. It will help you to make the text fade out, fade in, or transition out and in with animation. Now the animation library has nine options:
- Drop: It appears on top of the text box
- Flicker: This one is like a candle’s flicker, and text flashes disappear and appear before staying.
- Fade: Opacity can be changed from 0% to 100%.
- Pop:- This grows the text more extensive than the text box and shrinks back to the place.
- Reveal:- Rolls from the left side to the right side
- Wipe:- Rolls from the left side to the right side with a colored background.
- Vibrate: The text box shakes in every direction.
- Hue rotates:- Colour of text cycles through the hue values..
You can use a timeline to adjust the animation’s termination when you set text animation. You can even drag that layer after the start time or use it on end/start time sliders to decrease or increase the time of your video. Text animation can get started when the cursor reaches the start time.
Step4 Export
The video with animated text is now ready to boom. You can click on “Export Video” present at the top and wait for the process. After that, you can download that video and use the links to share it on your social media platform.
2. Use veed.io text video editor
(https://www.veed.io/create/text-video-maker )
Veed is one of the best video editor text effects online, which allows you to add text to online videos. You can easily add style, color, text, and font in a few clicks. You can upload the video and tap the text to get started. Add title and text or select handwriting font. One can select it from templates. Change transparency, alignment, and font size of the text.
This online software is perfect for creating attractive videos on social media. This is free, which omits the usage of expensive software. It is much easier to avoid many complex video editor apps. With the help of VEED, you can create an excellent video without any experience and do it with a few clicks. Let’s see how to add animated text to photos online.
Step1 Upload the video
Tap on “Choose Video” and choose the file you want to upload on VEED. One can even use the drag and drop option from the folder to the editor.
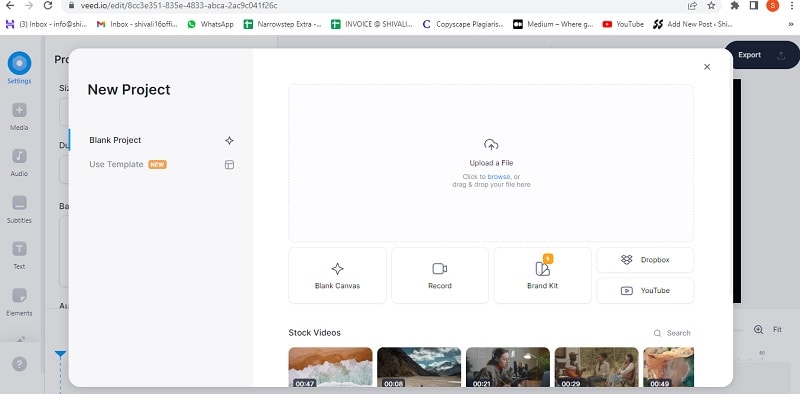
Step2 Add text
After that, you can add the text by tapping on the “Text” option on the left menu. You can select the text style and start typing.
Step3 Export
Save the video with the text you placed by tapping on “Export.” The video gets saved in an MP4 file.
3. Use Animaker text maker
(https://www.animaker.com/text-animation-maker )
The Animaker is one of the best-animated video makers. This app offers the best collection of charts, BGs, and animated characters. With the help of Animaker, you can make the text disappear or appear off-screen in the best way. After you finish your video, you can download the format in MP4.
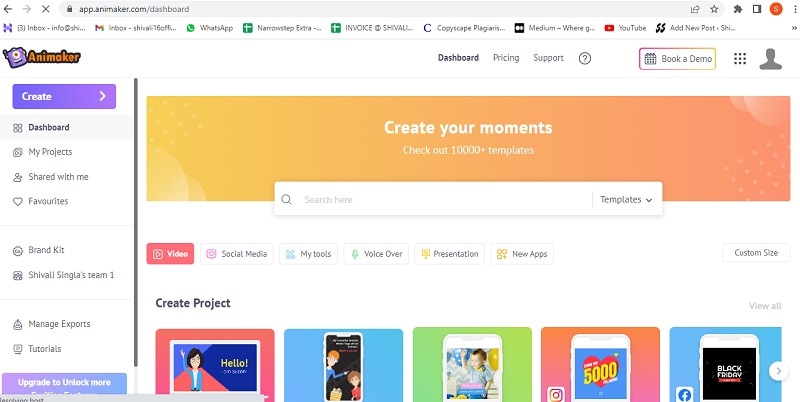
Step1 Upload the video clip
First, you can upload your video clip present on top that you wish to add text animation.
- Tap on the “Upload section” on the bottom left. You can upload your video where you wish to add the animated text.
- The video will get uploaded to “My Files.”
- Click on the uploaded video in the library to load it on the workspace.
Step2 Add text to the video
- You can add text in their text section
- In the next section, one can find two different text types. At the top, you will discover plain text options, and at the bottom, you can find pre-designed boxes seasoned at Animaker.
Let’s see how you can use pre-built text boxes.
- Tap on pre-built designs for your text animation. One can see the text appearing in the center of the workspace, and you can click it and type new text if you want to customize it.
- You can notice widespread options appearing with your text. It is known as the item menu. It will allow the user to modify their text. One can change font size, color, style, etc. Your text will come with pre-defined effects, which will help you to animate text instantly.
- You must have noticed that the purple color bar appears on the timeline, representing the duration of the text visible in the video. For example, if you want that text to get visible between 4rth to 8th seconds, then you will have to drag the edges of that purple bar to the same duration.
To see the scene, you must click on the play button on top of the timeline.
Let’s check the other ways of adding animated text to the video. In the previous one, you have seen how you can add text animation using pre-built boxes. Now you will get to know about doing it by using blank boxes.
- Start tapping the “text section”. Select the bank textbox.
- Click on them and then opt to add new text.
- Opt for clicking the cog icon that is there in the item menu.
- You will notice the settings tab that is on the screen’s right side.
- You can easily opt for the customization of the text in the way you wish. You can start by modifying the style of the font. One can change the size and color of the font as well.
- Use these options and opt for the application of enter and/or exit effects to text. Now, opt to click on the effect option to get more than 50 options. You can select the effect from there.
- Once the animation effect is applied to your timeline, you can notice the pink part in the bar i.e. purple. This completes creating text animation by using Animaker.
Step3 Download the Video
- You can visit the publish option in the right window to download the video.
- Tap on the “download video” option for downloading.
Conclusion
Now, you are aware of how to add text animation to video online and the three best video editors that will help you add animated text to your videos. At this point, you can choose the best one according to your needs and usage. These steps will help you create a unique and good video that will be easy to understand and entertaining.
Free Download For Win 7 or later(64-bit)
Free Download For macOS 10.14 or later
Free Download For macOS 10.14 or later
How to Enable and Use OBS Zoom Camera
The number of online meetings, seminars, and networking events for translators and interpreters has increased dramatically in the last year. The OBS Studio is one of them. A streaming program called OBS Studio aids users in planning and arranging their material. To create enlightening and captivating visual sceneries, you may combine several sources. You’ve undoubtedly acquired a reliable webcam by this point and learned how to adjust your lighting and frame to appear decent on video. You could have even splashed out on a green screen to make your online meetings’ backgrounds seem more branded and professional. Without OBS, you may utilize your webcam directly with Zoom, but the picture quality will be poor. This is due to Zoom’s lack of access to your webcam’s exposure and white balance settings. Additionally, you cannot apply any filters, such as LUTs. This tutorial will show you how to use the OBS Virtual Camera to install OBS as a camera in Zoom.
A video source option called “OBS Virtual Camera” may be found in the settings of video conferencing applications like Zoom, Teams, and Google Meet. You may also be curious about it and how to use the virtual camera. With Zoom, OBS is now easy to set up. Every single scene, overlay, and widget you have access to may be used as a video source for the well-liked conference meetings program. Your ability to utilize OBS Studio with Zoom will help you make your meetings more professional. You may utilize an external media resource, such as a video file, screenshot, app, game, etc., as the camera output for Zoom, Teams, Meet, or other video calls by using the OBS virtual camera. Instead of your face from the camera, your conference partner will see the video source you just selected. We’ll walk you through setting up OBS Studio as a virtual camera in this post so that you may utilize any of your OBS collections in Zoom rather than your webcam. Find out more here:
Do You Know About some Efficient Slow-Motion Video Editors? Read This Article to Find Out the Best Slow-Motion Video Editing Tools that You Can Try
Slow-motion videos help in sports analysis to gain insights into the performance. Slow motion is beneficial for observing precise movements in instructional videos. Moreover, such videos are crucial for product showcasing in advertising and marketing. Due to the various uses of slow-motion videos, you may need to create one with an edit video slow motion online free.
Thus, this article will focus on some top-notch slow-motion video editors online for free. With these tools, you can produce slow-motion videos at the desired pace. Moreover, we will introduce a desktop tool that leaves behind all online video editors slow motion free.
Slow Motion Video Maker Slow your video’s speed with better control of your keyframes to create unique cinematic effects!
Make A Slow Motion Video Make A Slow Motion Video More Features

Part 1: [Top List] Best Slow Motion Video Editors To Work Within 2024
Have you ever worked with slow-motion video editors? In this section, we will shed light on some of the best online video editors that are slow-motion free. By using them, you can produce professional quality slow-motion videos with ease:
1. VEED.io
VEED.io is a prominent tool that you can access through a web browser. Along with its many features, this tool lets you slow down a video with proficiency. It lets you change the video speed to up to 0.5x. Moreover, you can enter the custom speed for more modification. For precision, you can slow down certain parts by splitting the clips. Hence, this tool gives you complete control for making slow-motion videos.

Pros
- This tool shows compatibility with many file formats. For example, you can import videos in MOV, MP3, AVI, and other formats.
- After slowing down a video, this tool lets you perform basic video editing. You can cut, crop, trim, and annotate the slow-motion video.
Cons
- This tool freezes and lacks fast processing speed.
2. Canva
Have you ever edited a video through Canva? This famous edit video slow motion online free tool offers many tools to execute basic and advanced editing. Among them, it contains the feature to add a slow-motion effect to a video. After uploading the video, you can reduce the speed to 0.1x. While adding a slow-motion effect, you can add comments to the video for more modification.

Pros
- This tool provides many options for uploading a video. For instance, you can upload videos from Facebook, Google Drive, Google Photos, or Dropbox.
- It includes a collaboration link to help your teammates access the video. You can also enter groups, people, and tags for collaboration.
Cons
- The options for template designs and export are limited.
3. Typito
Typito is a reliable tool that supports over 20 video file formats. With its video speed modifier, you can speed up or slow down a video file without hassle. Furthermore, it supports many aspect ratios, like a square letterbox, vertical, etc. Moreover, it contains a stock media library containing royalty-free videos and images. Thus, it’s a competent online tool featuring a reliable option to make slow-motion videos.

Pros
- You can display your own brand video with this tool. It allows you to upload your brand colors, designs, and fonts for brand marketing.
- It offers a real-time video preview to analyze the final result. By doing so, you can download satisfactory slow-motion videos.
Cons
- Sometimes, the tool encounters glitches, which can disrupt its overall performance.
4. Media.io
Media.io is a capable online tool famous for its flawless results. After importing the video, you can reduce it to the lowest speed, which is 0.25x. Meanwhile, you can also increase the video speed to 4x efficiently. One of the best things about this tool is that it can edit the motion effect to YouTube URLs directly. Hence, this slow down video online free can benefit you in making slow-motion videos.

Pros
- This tool contains many free additional features. For instance, it contains a video converter, letting you convert the file format into another one.
- To remove unwanted audio from a video, you can mute the video. Thus, with a single click, you can mute the video instantly.
Cons
- You cannot upload large file sizes on this tool. Thus, you can face file size restrictions on Media.io.
5. Flixier
This online video editor slow motion free tool has an easy-to-use interface that you can operate without watching tutorials. It can slow down a video at any frame rate without decreasing its quality. To reduce the video speed, you can drag the slider with great ease. Moreover, you can add powerful effects to enhance the slowed-down video. Hence, it’s an advanced tool for creating slow-motion videos.

Pros
- It contains an AI subtitle generator through which you can transcribe your videos. It supports all common languages for the generation of video subtitles.
- To make your video pleasing in a visual way, you can add many filters. This tool consists of many filters which can improve your facial appearance.
Cons
- Flixier takes extra time to process video files. Thus, making slow-motion videos with this tool is time-consuming.
6. Kapwing
This online tool uses advanced technology to slow down a video without losing quality. Whether your video is 4K or 1080p, the tool maintains the original resolution of the video. You can import the video from your device within a few seconds. It also allows you to paste the URL of the video quickly. Afterward, you can adjust the speed slider to manage the video speed in a preferred way.

Pros
- Kapwing is an all-round video editor offering many features. Using this video editor, users can combine and split video tracks.
- The AI audio enhancer of this tool can improve the sound quality of your audio. You can improve the quality of your voice recording and background music with this feature.
Cons
- To use its premium features, you must buy its subscription plans. However, its subscription plans can be expensive for some users.
7. Clideo
Do you want a basic tool for slowing down videos? Clideo is one of the simple tools that has intuitive controls to modify a video. It has a fast processing speed to offer users instant results. It provides six commonly used speeds for video clips. In addition, you can use the speed slider to adjust the speed in a personalized way. Meanwhile, the tool ensures complete security to protect your valuable video files.

Pros
- This slow down video online free can function as a great video compressor. It decreases the video file size without compromising its resolution.
- It acts as a video maker, allowing you to create videos from images. Moreover, you can produce videos with GIFs of desired quality.
Cons
- It adds a watermark to the videos in its free version.
8. Online Video Cutter
This comprehensive slow motion video online without watermark tool offers a great user experience in making slow-motion videos. Without adding a watermark, it can create slow-mo videos as best as possible. Along with various video speeds, it provides many file formats. Moreover, you can slow down videos without creating an account. Within a few taps, you can make slow-motion videos in high resolution.

Pros
- To describe your video clips, add text to them using this tool. It lets you select the desired text font, style, size, and color.
- It contains a screen recorder to capture the current activities of your desktop. After recording, you can edit and export the video flawlessly.
Cons
- The interface of this tool contains many pop-up ads, which can be annoying.
Part 2: Alternative For Better Results: Wondershare Filmora
After knowing the drawbacks of online tools, you must want an alternative. Wondershare Filmora is a skillful tool comprising good qualities as a video editor. It targets every need of a professional video editor with its robust features. With its friendly user interface, you can perform video editing without hurdles. It lets you apply effects, transitions, animations, and other modifications with ease.
Moreover, it allows users to control the speed of the videos. After dragging the video to the timeline, you can adjust its speed accordingly. It retains the frame rate of the video with high-end rendering. Also, it contains tons of AI options to improvise the video clip. Hence, Filmora is a must-have offline tool catering to all the needs of video editors.
Free Download For Win 7 or later(64-bit)
Free Download For macOS 10.14 or later
Directions to Make Slow-Motion Video
In this section, we will enlist the simple steps to create slow-motion videos. Thus, check the following instructions to generate slow-motion videos in a flawless way.
Step 1Sign Into Filmora
Start by launching Filmora on your PC. Once done, head to the top bar and select “Profile”. From there, sign into the account and select the “New Project” button.

Step 2Add Video on Timeline
Now, on the main interface of Filmora, press “Ctrl + I”. In this manner, you can import the video clips from your computer. Once done, drag and drop the video file to the timeline for editing.

Step 3Go to the Speed Tab
Select the video on the timeline and go to the right panel. Through this panel, click on the “Speed” tab and tap “Uniform Speed”.

Step 4Choose Optical Flow
Expand “AI Frame Interpolation” and tap “Optical Flow”. Now, stay on the timeline and select “Render Preview” from the top toolbar. By doing so, you can export the video in the selected file format.

Key Features Highlighting Filmora
AI Vocal Remover: This AI feature isolates the music from any song. It preserves the high resolution of the video while removing vocals. Also, it extracts other unwanted elements from audio. Hence, it automatically removes vocals from an audio file.
AI Copywriting: This feature is integrated with ChatGPT to produce AI-generated scripts. Content creators can generate YouTube descriptions and titles from this smart feature. To do so, you can enter the question in the given box. After some seconds, the AI tool will answer your queries.
AI Image: By using this feature, you can convert your text to images in an automated way. You can describe the image in the text in the given box. Afterward, the tool will create an AI image in three resolutions.
Part 3: What Are Some Major Drawbacks to Using Online Slow Motion Video Editors Compared to Offline Editors?
There are some disadvantages to using online slow-motion video editors as compared to offline tools. Here are some of the common drawbacks of slow motion video editor online free that you should consider:
Network Dependency
Online slow-motion video editors need credible and fast internet connections. You can’t access their website with a poor internet connection. If there is a poor network connection, the tool will take extra time to upload and process videos.
Limitations of Features
Unlike offline slow-motion video editors, online free tools have limited features. They don’t offer advanced options to make professional enhancements. Moreover, advanced tools need high-end computing sources. This may not be present on web-based slow-motion video editors.
Privacy Concerns
Desktop tools use enhanced encryption methods for data privacy. However, online sites may contain hidden malicious files which can harm your data. Hence, online users may face privacy threats when making slow-motion videos.
User Interface and Subscription Packages
It’s common that online slow-motion video editors lack intuitive controls. The interface of online tools is difficult to operate for beginners. Moreover, the subscription packages can be expensive for some users. In contrast, desktop tools have better user interface experience with affordable plans.
Conclusion
Slow-motion videos are useful for deep analysis. It helps in highlighting the minor details of a product. There are many online video editors slow motion free to create slow-motion effects. However, desktop tools like Filmora are a better alternative to such online tools. This tool uses high-end computing algorithms to make slow-motion videos with precision.
Make A Slow Motion Video Make A Slow Motion Video More Features
Part 1: [Top List] Best Slow Motion Video Editors To Work Within 2024
Have you ever worked with slow-motion video editors? In this section, we will shed light on some of the best online video editors that are slow-motion free. By using them, you can produce professional quality slow-motion videos with ease:
1. VEED.io
VEED.io is a prominent tool that you can access through a web browser. Along with its many features, this tool lets you slow down a video with proficiency. It lets you change the video speed to up to 0.5x. Moreover, you can enter the custom speed for more modification. For precision, you can slow down certain parts by splitting the clips. Hence, this tool gives you complete control for making slow-motion videos.
Pros
- This tool shows compatibility with many file formats. For example, you can import videos in MOV, MP3, AVI, and other formats.
- After slowing down a video, this tool lets you perform basic video editing. You can cut, crop, trim, and annotate the slow-motion video.
Cons
- This tool freezes and lacks fast processing speed.
2. Canva
Have you ever edited a video through Canva? This famous edit video slow motion online free tool offers many tools to execute basic and advanced editing. Among them, it contains the feature to add a slow-motion effect to a video. After uploading the video, you can reduce the speed to 0.1x. While adding a slow-motion effect, you can add comments to the video for more modification.
Pros
- This tool provides many options for uploading a video. For instance, you can upload videos from Facebook, Google Drive, Google Photos, or Dropbox.
- It includes a collaboration link to help your teammates access the video. You can also enter groups, people, and tags for collaboration.
Cons
- The options for template designs and export are limited.
3. Typito
Typito is a reliable tool that supports over 20 video file formats. With its video speed modifier, you can speed up or slow down a video file without hassle. Furthermore, it supports many aspect ratios, like a square letterbox, vertical, etc. Moreover, it contains a stock media library containing royalty-free videos and images. Thus, it’s a competent online tool featuring a reliable option to make slow-motion videos.
Pros
- You can display your own brand video with this tool. It allows you to upload your brand colors, designs, and fonts for brand marketing.
- It offers a real-time video preview to analyze the final result. By doing so, you can download satisfactory slow-motion videos.
Cons
- Sometimes, the tool encounters glitches, which can disrupt its overall performance.
4. Media.io
Media.io is a capable online tool famous for its flawless results. After importing the video, you can reduce it to the lowest speed, which is 0.25x. Meanwhile, you can also increase the video speed to 4x efficiently. One of the best things about this tool is that it can edit the motion effect to YouTube URLs directly. Hence, this slow down video online free can benefit you in making slow-motion videos.
Pros
- This tool contains many free additional features. For instance, it contains a video converter, letting you convert the file format into another one.
- To remove unwanted audio from a video, you can mute the video. Thus, with a single click, you can mute the video instantly.
Cons
- You cannot upload large file sizes on this tool. Thus, you can face file size restrictions on Media.io.
5. Flixier
This online video editor slow motion free tool has an easy-to-use interface that you can operate without watching tutorials. It can slow down a video at any frame rate without decreasing its quality. To reduce the video speed, you can drag the slider with great ease. Moreover, you can add powerful effects to enhance the slowed-down video. Hence, it’s an advanced tool for creating slow-motion videos.
Pros
- It contains an AI subtitle generator through which you can transcribe your videos. It supports all common languages for the generation of video subtitles.
- To make your video pleasing in a visual way, you can add many filters. This tool consists of many filters which can improve your facial appearance.
Cons
- Flixier takes extra time to process video files. Thus, making slow-motion videos with this tool is time-consuming.
6. Kapwing
This online tool uses advanced technology to slow down a video without losing quality. Whether your video is 4K or 1080p, the tool maintains the original resolution of the video. You can import the video from your device within a few seconds. It also allows you to paste the URL of the video quickly. Afterward, you can adjust the speed slider to manage the video speed in a preferred way.
Pros
- Kapwing is an all-round video editor offering many features. Using this video editor, users can combine and split video tracks.
- The AI audio enhancer of this tool can improve the sound quality of your audio. You can improve the quality of your voice recording and background music with this feature.
Cons
- To use its premium features, you must buy its subscription plans. However, its subscription plans can be expensive for some users.
7. Clideo
Do you want a basic tool for slowing down videos? Clideo is one of the simple tools that has intuitive controls to modify a video. It has a fast processing speed to offer users instant results. It provides six commonly used speeds for video clips. In addition, you can use the speed slider to adjust the speed in a personalized way. Meanwhile, the tool ensures complete security to protect your valuable video files.
Pros
- This slow down video online free can function as a great video compressor. It decreases the video file size without compromising its resolution.
- It acts as a video maker, allowing you to create videos from images. Moreover, you can produce videos with GIFs of desired quality.
Cons
- It adds a watermark to the videos in its free version.
8. Online Video Cutter
This comprehensive slow motion video online without watermark tool offers a great user experience in making slow-motion videos. Without adding a watermark, it can create slow-mo videos as best as possible. Along with various video speeds, it provides many file formats. Moreover, you can slow down videos without creating an account. Within a few taps, you can make slow-motion videos in high resolution.
Pros
- To describe your video clips, add text to them using this tool. It lets you select the desired text font, style, size, and color.
- It contains a screen recorder to capture the current activities of your desktop. After recording, you can edit and export the video flawlessly.
Cons
- The interface of this tool contains many pop-up ads, which can be annoying.
Part 2: Alternative For Better Results: Wondershare Filmora
After knowing the drawbacks of online tools, you must want an alternative. Wondershare Filmora is a skillful tool comprising good qualities as a video editor. It targets every need of a professional video editor with its robust features. With its friendly user interface, you can perform video editing without hurdles. It lets you apply effects, transitions, animations, and other modifications with ease.
Moreover, it allows users to control the speed of the videos. After dragging the video to the timeline, you can adjust its speed accordingly. It retains the frame rate of the video with high-end rendering. Also, it contains tons of AI options to improvise the video clip. Hence, Filmora is a must-have offline tool catering to all the needs of video editors.
Free Download For Win 7 or later(64-bit)
Free Download For macOS 10.14 or later
Directions to Make Slow-Motion Video
In this section, we will enlist the simple steps to create slow-motion videos. Thus, check the following instructions to generate slow-motion videos in a flawless way.
Step 1Sign Into Filmora
Start by launching Filmora on your PC. Once done, head to the top bar and select “Profile”. From there, sign into the account and select the “New Project” button.
Step 2Add Video on Timeline
Now, on the main interface of Filmora, press “Ctrl + I”. In this manner, you can import the video clips from your computer. Once done, drag and drop the video file to the timeline for editing.
Step 3Go to the Speed Tab
Select the video on the timeline and go to the right panel. Through this panel, click on the “Speed” tab and tap “Uniform Speed”.
Step 4Choose Optical Flow
Expand “AI Frame Interpolation” and tap “Optical Flow”. Now, stay on the timeline and select “Render Preview” from the top toolbar. By doing so, you can export the video in the selected file format.
Key Features Highlighting Filmora
AI Vocal Remover: This AI feature isolates the music from any song. It preserves the high resolution of the video while removing vocals. Also, it extracts other unwanted elements from audio. Hence, it automatically removes vocals from an audio file.
AI Copywriting: This feature is integrated with ChatGPT to produce AI-generated scripts. Content creators can generate YouTube descriptions and titles from this smart feature. To do so, you can enter the question in the given box. After some seconds, the AI tool will answer your queries.
AI Image: By using this feature, you can convert your text to images in an automated way. You can describe the image in the text in the given box. Afterward, the tool will create an AI image in three resolutions.
Part 3: What Are Some Major Drawbacks to Using Online Slow Motion Video Editors Compared to Offline Editors?
There are some disadvantages to using online slow-motion video editors as compared to offline tools. Here are some of the common drawbacks of slow motion video editor online free that you should consider:
Network Dependency
Online slow-motion video editors need credible and fast internet connections. You can’t access their website with a poor internet connection. If there is a poor network connection, the tool will take extra time to upload and process videos.
Limitations of Features
Unlike offline slow-motion video editors, online free tools have limited features. They don’t offer advanced options to make professional enhancements. Moreover, advanced tools need high-end computing sources. This may not be present on web-based slow-motion video editors.
Privacy Concerns
Desktop tools use enhanced encryption methods for data privacy. However, online sites may contain hidden malicious files which can harm your data. Hence, online users may face privacy threats when making slow-motion videos.
User Interface and Subscription Packages
It’s common that online slow-motion video editors lack intuitive controls. The interface of online tools is difficult to operate for beginners. Moreover, the subscription packages can be expensive for some users. In contrast, desktop tools have better user interface experience with affordable plans.
Conclusion
Slow-motion videos are useful for deep analysis. It helps in highlighting the minor details of a product. There are many online video editors slow motion free to create slow-motion effects. However, desktop tools like Filmora are a better alternative to such online tools. This tool uses high-end computing algorithms to make slow-motion videos with precision.
Also read:
- 2024 Approved Steps to Denoise in Final Cut Pro – Reduce Video and Audio Noise
- Do You Want to Use a Video Editor for Your iOS Device? This Article Introduces LumaFusion, a Perfect Multi-Track Video Editor Designed to Cater to Your Needs for 2024
- New In 2024, Best 15 Subtitle Apps 2023 Windows, Mac, iPhone, Android & Online
- 2024 Approved 10 Matching Color Combination That Works Together
- In 2024, Have You Ever Tried to Remove the Transparent Background of Gif and Failed? This Blog Will Help You with This Issue. Also, We Will Discuss How to Create Animated Gifs and the Best Tools for Them
- Updated In 2024, Designed for You! Best Image (JPG/PNG) to GIF Converters
- Before & After Editing Trick | Wondershare Filmora Tutorial for 2024
- Top 10 Secret Tips & Tricks to Use in Wondershare Filmora
- 2024 Approved Green Screen Is a Widely Used Effect in After Effects. Many Professional Photographers Use It to Make Creative Video Effects. This Guide Will Show You How to Use Green Screen to Videos in After Effects
- Do You Want to Enable the Motion Blur Effect While Playing Dying Light 2? Read This Article to Find Out How to Use Dying Light 2 Motion Blur for a Great Gaming Experience
- New 2024 Approved Best 10 iPad Slideshow Apps to Create a Slideshow
- New In 2024, Finding LUTs Made by Danny Gevirtz
- 2024 Approved End Screen Makers
- New How to Create Motion Text Effects for Your Video, In 2024
- In 2024, Have You Ever Heard Hyperlapse and Tume Lapse Videos? Do You Know the Differences Between Them? This Article Will Introduce the Concepts, Features and Differnces of Them
- 2024 Approved Top GIF to MP4 Converters
- In 2024, 8 Tips to Apply Cinematic Color Grading to Your Videos
- “Create. Edit. Share. Transform Your Videos with KineMaster! Powerful Tools, Easy to Use.” – a Few Words We Read when We Come up with the Official Web-Site of KineMaster, a Mobile Video Editing Application
- In 2024, 5 Photoshop Alternatives to Animate Your Logo
- Fix Realme Narzo 60 Pro 5G Android System Webview Crash 2024 Issue | Dr.fone
- Things You Dont Know About Realme C51 Reset Code | Dr.fone
- 7 Solutions to Fix Chrome Crashes or Wont Open on Vivo S17t | Dr.fone
- How To Transfer WhatsApp From Apple iPhone 14 Pro to other iPhone 15 devices? | Dr.fone
- Here are Some Pro Tips for Pokemon Go PvP Battles On Poco X6 Pro | Dr.fone
- In 2024, How to Change Lock Screen Wallpaper on Xiaomi Civi 3
- Top 15 Apps To Hack WiFi Password On ZTE Axon 40 Lite
- What is Fake GPS Location Pro and Is It Good On Poco M6 Pro 5G? | Dr.fone
- Ways to stop parent tracking your OnePlus Open | Dr.fone
- New The Only Guide to Make 2D Rigging Clear to You for 2024
- Thinking About Changing Your Netflix Region Without a VPN On Apple iPhone 6s Plus? | Dr.fone
- In 2024, A Guide Motorola Moto G13 Wireless and Wired Screen Mirroring | Dr.fone
- How to Bypass FRP from Xiaomi Civi 3?
- Does Honor Magic5 Ultimate Have Find My Friends? | Dr.fone
- In 2024, The Top 5 Android Apps That Use Fingerprint Sensor to Lock Your Apps On Itel A60
- How to retrieve erased videos from A59 5G
- Title: Updated 8 Tips to Apply Cinematic Color Grading to Your Video
- Author: Chloe
- Created at : 2024-05-20 03:37:44
- Updated at : 2024-05-21 03:37:44
- Link: https://ai-editing-video.techidaily.com/updated-8-tips-to-apply-cinematic-color-grading-to-your-video/
- License: This work is licensed under CC BY-NC-SA 4.0.
