
:max_bytes(150000):strip_icc():format(webp)/ps6-concept-trailer-64aac5b7323041ad93d7535eccf7df40.png)
Updated A Complete Guideline To Better Use QuickTime Player for 2024
A Complete Guideline To Better Use QuickTime Player
While designing the iOS and macOS for its dedicated devices, Apple created multiple supporting software that competes for the best in the market. An example is the QuickTime Player, a state-of-the-art, built-in video player available across Mac. This article shall introduce a detailed analysis and overview of QuickTime Player along with major QuickTime formats and features.
Come along as we explore more about QuickTime Player! You surely will get to know much about the tool before using it.
In this article
01 Key Features of QuickTime Player
02 List of QuickTime File Format
03 How to Play Videos with QuickTime
04 How to Do Screen Recording with QuickTime?
05 How to Convert Video File to MOV Format in QuickTime?
06 Top Recommended Video Editor in 2022 – Filmora Video Editor
Part 1: Key Features of QuickTime Player
Multiple highlighting features can be discovered across QuickTime Player. While a basic built-in video player, the tool outshines other video players for the following features, making it a special choice for users working across Mac. Let us look into these features to know more about QuickTime.
Record Across the Player
QuickTime Player offers users a variety of options in recording across the tool. With the basic screen recording where the user potentially sets up the area for recording and other settings, users can also record audio and movies across QuickTime. Doesn’t it sound awesome?
Editing with QuickTime
This video player is much more than a simple video player. Users can effectively use this tool for editing their videos in numerous ways. From trimming video or audio to splitting videos across the player, there are multiple options available that can be accessed easily. The user can also merge and rotate their clips according to their convenience. Sounds convenient, doesn’t it?
Change Resolution of Video
Want to change the resolution of a video? QuickTime Player allows you to potentially change the resolution of the video according to your requirement. If you have a 4K video of huge size, QuickTime Player can easily change its resolution to 1080p, 720p, or 480p, as per the requirement of the user.
Sharing Videos Directly
One of the most impressive options available across QuickTime Player is to share the video directly across different platforms. Users can share their video through Mail, Messages, AirDrop, Vimeo, Facebook, Flickr, YouTube, and several other options supported by QuickTime. Get it shared anywhere!
Part 2: List of QuickTime File Format
QuickTime offers a tangible list of file formats that can be operated across the video player. The following list shows all the QuickTime file format that can run across it:
Video File Formats
- QuickTime Movie (.mov)
- MPEG-4 (.mp4, .m4v)
- MPEG-1
- 3GPP
- 3GPP2
- AVI
- DV
Audio File Formats
- iTunes Audio (.m4a, .m4b, .m4p)
- MP3
- Core Audio (.caf)
- AIFF
- AU
- SD2
- WAV
- SND
- AMR
Part 3: How to Play Videos with QuickTime
Once you know how QuickTime Player makes it easy for Mac users to play their video, it is time to understand the steps associated with the procedure. Two basic techniques can be implemented to play videos with QuickTime. The first method to play videos with QuickTime are featured as follows:
Step 1: You need to open QuickTime Player across your Mac. For that, proceed across Launchpad to access the application.

Step 2: Once the player is launched, you can simply select any video across the window that opens up. Once selected, tap “Open” to play it across QuickTime.

Sounds easy, right? However, if you have multiple videos to open or have other video players installed in your Mac, you should consider following this second approach. If QuickTime Player is not your default video player, it is important to follow the steps below for opening any video across QuickTime.
Step 1: Open Finder on your device and proceed to locate the video that you wish to open across QuickTime. On finding the video, click on the video while holding the “Control” button on the keyboard. This opens a drop-down menu.

Step 2: In the “Open With” section across the menu, you will find the option of QuickTime Player. Tap on the option to open the video across QuickTime.

Part 4: How to Do Screen Recording with QuickTime?
Several functions can be performed across QuickTime. While the QuickTime video format allows you to play different videos across the platform, it also helps users record screens of their choice. To understand the step-by-step procedure, you need to follow the steps displayed below. Come along and learn more about it.
Step 1: Open QuickTime Player on your device and tap on the “File” tab on the top of the screen. Select the option of “New Screen Recording” from the available options to initiate screen recording.

Step 2: The next window opens up, which involves managing the screen recording settings. You need to set up the screen area recorded in the process initially.

Step 3: After setting the screen area, tap on “Options” to specify the microphone settings, the location where the recording will be saved, the timer, and other significant options that are important for screen recording. Click on the “Record” button to start.

Step 4: Once you have recorded the appropriate screen, click on the “Stop” sign appearing on the top of the window to conclude recording and save it across the decided location.

Part 5: How to Convert Video File to MOV Format in QuickTime?
QuickTime Player is not quite extensive when it comes to converting video files. Although there are several QuickTime format files that you may come across and play across the platform, it only converts any video file into MOV format, which is the dedicated file format potentially designed by Apple. To understand the method to convert any QuickTime video format to MOV format, follow the steps shown below:
Step 1: You need to open the appropriate video across QuickTime to convert it accordingly. Once opened, tap on the “File” tab, and select “Export as” across the available options.

Step 2: You need to select an appropriate resolution from the available options according to the video quality that you want the video to be saved in on the preceding menu. QuickTime player will show low-quality resolutions for the high-quality video but not vice versa.

Step 3: A new window opens that requires you to set up the name and location for the video. Add the file extension “.mov” at the end of the name of the video to convert it into MOV format.

Extra Tips: Top Recommended Video Editor in 2022 – Filmora Video Editor
Video players are important for running videos across your devices. However, the significance of a video editor is as primary as a video player in the market. When selecting the best video editor for making changes in your video before posting and viewing it across devices, there are multiple factors that a user looks into.
Wondershare Filmora offers unique and extensive features to its users at a price that is unmatched by the other players in the market. When it comes to basic video editing, the platform features the simplest set of tools that helps users enhance their video to perfection. Along with that, Filmora even allows you to add in music, effects, and transitions as desired. Isn’t it the dream?

For Win 7 or later (64-bit)
For macOS 10.12 or later
With such tools available, Filmora is recognized for its ability to make editing simple for users. There is no need for the user to be a professional in editing for making changes across Filmora. Any individual who is new to video editing can efficiently use the platform for their needs. Along with that, Filmora even allows users to make changes across the audios, both within the videos and separately. It surely is perfect!
Closing Words
Got to know much about QuickTime Player? This effective video player is the best available in the market for Mac users. While supporting different QuickTime file format, users can make significant changes across their videos with the tool. QuickTime allows them to make edits, convert, and record screens easily. This is what makes it a special choice in the market.
02 List of QuickTime File Format
03 How to Play Videos with QuickTime
04 How to Do Screen Recording with QuickTime?
05 How to Convert Video File to MOV Format in QuickTime?
06 Top Recommended Video Editor in 2022 – Filmora Video Editor
Part 1: Key Features of QuickTime Player
Multiple highlighting features can be discovered across QuickTime Player. While a basic built-in video player, the tool outshines other video players for the following features, making it a special choice for users working across Mac. Let us look into these features to know more about QuickTime.
Record Across the Player
QuickTime Player offers users a variety of options in recording across the tool. With the basic screen recording where the user potentially sets up the area for recording and other settings, users can also record audio and movies across QuickTime. Doesn’t it sound awesome?
Editing with QuickTime
This video player is much more than a simple video player. Users can effectively use this tool for editing their videos in numerous ways. From trimming video or audio to splitting videos across the player, there are multiple options available that can be accessed easily. The user can also merge and rotate their clips according to their convenience. Sounds convenient, doesn’t it?
Change Resolution of Video
Want to change the resolution of a video? QuickTime Player allows you to potentially change the resolution of the video according to your requirement. If you have a 4K video of huge size, QuickTime Player can easily change its resolution to 1080p, 720p, or 480p, as per the requirement of the user.
Sharing Videos Directly
One of the most impressive options available across QuickTime Player is to share the video directly across different platforms. Users can share their video through Mail, Messages, AirDrop, Vimeo, Facebook, Flickr, YouTube, and several other options supported by QuickTime. Get it shared anywhere!
Part 2: List of QuickTime File Format
QuickTime offers a tangible list of file formats that can be operated across the video player. The following list shows all the QuickTime file format that can run across it:
Video File Formats
- QuickTime Movie (.mov)
- MPEG-4 (.mp4, .m4v)
- MPEG-1
- 3GPP
- 3GPP2
- AVI
- DV
Audio File Formats
- iTunes Audio (.m4a, .m4b, .m4p)
- MP3
- Core Audio (.caf)
- AIFF
- AU
- SD2
- WAV
- SND
- AMR
Part 3: How to Play Videos with QuickTime
Once you know how QuickTime Player makes it easy for Mac users to play their video, it is time to understand the steps associated with the procedure. Two basic techniques can be implemented to play videos with QuickTime. The first method to play videos with QuickTime are featured as follows:
Step 1: You need to open QuickTime Player across your Mac. For that, proceed across Launchpad to access the application.
Step 2: Once the player is launched, you can simply select any video across the window that opens up. Once selected, tap “Open” to play it across QuickTime.
Sounds easy, right? However, if you have multiple videos to open or have other video players installed in your Mac, you should consider following this second approach. If QuickTime Player is not your default video player, it is important to follow the steps below for opening any video across QuickTime.
Step 1: Open Finder on your device and proceed to locate the video that you wish to open across QuickTime. On finding the video, click on the video while holding the “Control” button on the keyboard. This opens a drop-down menu.
Step 2: In the “Open With” section across the menu, you will find the option of QuickTime Player. Tap on the option to open the video across QuickTime.
Part 4: How to Do Screen Recording with QuickTime?
Several functions can be performed across QuickTime. While the QuickTime video format allows you to play different videos across the platform, it also helps users record screens of their choice. To understand the step-by-step procedure, you need to follow the steps displayed below. Come along and learn more about it.
Step 1: Open QuickTime Player on your device and tap on the “File” tab on the top of the screen. Select the option of “New Screen Recording” from the available options to initiate screen recording.
Step 2: The next window opens up, which involves managing the screen recording settings. You need to set up the screen area recorded in the process initially.
Step 3: After setting the screen area, tap on “Options” to specify the microphone settings, the location where the recording will be saved, the timer, and other significant options that are important for screen recording. Click on the “Record” button to start.
Step 4: Once you have recorded the appropriate screen, click on the “Stop” sign appearing on the top of the window to conclude recording and save it across the decided location.
Part 5: How to Convert Video File to MOV Format in QuickTime?
QuickTime Player is not quite extensive when it comes to converting video files. Although there are several QuickTime format files that you may come across and play across the platform, it only converts any video file into MOV format, which is the dedicated file format potentially designed by Apple. To understand the method to convert any QuickTime video format to MOV format, follow the steps shown below:
Step 1: You need to open the appropriate video across QuickTime to convert it accordingly. Once opened, tap on the “File” tab, and select “Export as” across the available options.
Step 2: You need to select an appropriate resolution from the available options according to the video quality that you want the video to be saved in on the preceding menu. QuickTime player will show low-quality resolutions for the high-quality video but not vice versa.
Step 3: A new window opens that requires you to set up the name and location for the video. Add the file extension “.mov” at the end of the name of the video to convert it into MOV format.
Extra Tips: Top Recommended Video Editor in 2022 – Filmora Video Editor
Video players are important for running videos across your devices. However, the significance of a video editor is as primary as a video player in the market. When selecting the best video editor for making changes in your video before posting and viewing it across devices, there are multiple factors that a user looks into.
Wondershare Filmora offers unique and extensive features to its users at a price that is unmatched by the other players in the market. When it comes to basic video editing, the platform features the simplest set of tools that helps users enhance their video to perfection. Along with that, Filmora even allows you to add in music, effects, and transitions as desired. Isn’t it the dream?
For Win 7 or later (64-bit)
For macOS 10.12 or later
With such tools available, Filmora is recognized for its ability to make editing simple for users. There is no need for the user to be a professional in editing for making changes across Filmora. Any individual who is new to video editing can efficiently use the platform for their needs. Along with that, Filmora even allows users to make changes across the audios, both within the videos and separately. It surely is perfect!
Closing Words
Got to know much about QuickTime Player? This effective video player is the best available in the market for Mac users. While supporting different QuickTime file format, users can make significant changes across their videos with the tool. QuickTime allows them to make edits, convert, and record screens easily. This is what makes it a special choice in the market.
[Top 10] Transparent Image Online Tools That Give You an Advantage
[Top 10] Transparent Image Online Tools That Give You an Advantage
An easy yet powerful editor
Numerous effects to choose from
Detailed tutorials provided by the official channel
If you are a photoholic person and you love to share your images on social media then at some point in time you might have felt the need of removing the background of the image and add something cool to the background. This process of removing the background of the image is called making your image transparent. Professional photo artists make the most use of this feature to create the best of photos. Creating transparent images and changing their background could be used in many ways like designing the logo of the brands, professional photography, or simply fun purpose.
If you have not made use of transparent images yet and you want to learn to create transparent images online and edit transparent images online then this article is for you.
In this article
01 [Best 10 Transparent Image Editors You Deserve to Own](#Part 1)
02 [Can You Find Assets of Transparent Image in the Video Editor?](#Part 2)
Part 1 Best 10 Transparent Image Editors You Deserve to Own
You might be afraid that editing a picture online and making it a transparent image would need technical knowledge in photo editing. Then you are wrong. Making transparent images online and then editing them is very easy. We, here in this article, have come up with the 10 best online transparent image makers using which you can create transparent images in a very fun way, and then you can use them for whatever purpose you want. And don’t worry, we have provided the steps on how to use online transparent image makers to make your work easy.
01Removebg
If you are looking for a free online transparent image maker then Removbg should be the first one you give a try. This online tool is powered by Al technology which enables you to remove the background of your image precisely. Removebg has “Erase” and “Restore” tools which provides for manual adjustment of the details so you can give your image a realistic touch. Apart from these features, the other highlights of this online tool are solid color backgrounds, well-designed templates, and custom templates. Using this online free tool you can also upload your image in batches. Images created by you will have a professional finishing.

02FocoClipping
The next great online transparent image maker on our list is FocoClipping. While most of the image makers and editors have a free version and paid version but all the features in the FocoClipping are free. This image editor enables you to remove background from your photos and make them transparent with only a single click. FocoClipping also uses AI tech to remove the background of your image precisely. The other features of this tool include no limit of download and upload, an easy-to-use interface, casting shadows into images, and many more.

03Image online.co
Image online.co is a trusted name in the field of transparent image makers online. This amazing website is also completely free to use. This website is powered packed by a bundle of image editing tools. To make your transparent image all you need to do is to select the background using the mouse and you are done. No technical photo editing knowledge is required to use this tool. Apart from this Image online.co offers you features like resizing the image, image color picker, merging the images, pencil sketching the photo, adding text to the image, adding a logo to the photo, etc.

04AirMore
If you are the one who needs a simple and easy-to-use tool without much sophistication to make a transparent image, then AirMore could be a good choice for you. All you need is a single click on the background to remove it. This tool provides the “Keep” and “Remove” options so in case you don’t like your editing then you can reverse the whole process. The best thing about using AirMore is that you will not have to compromise with the quality of your image and you can add any cool background to your image like a pro.

05PhotoWorks
If you find photoshop software on your pc too complicated to use then try PhotoWorks. This easy-to-use tool can help you in making transparent images online in a few seconds. PhotoWorks has a very user-friendly interface packed with many manual settings which users can adjust according to their needs. The biggest highlight of this tool is once you access it online you need no further internet connection to edit your images. It is a wonderful transparent background generator with effective results.

06Publisher
This tool comes is created by Microsoft and comes in your laptops and computers with the Microsoft office package. Publisher provides features using which you can generate transparent images in a very quick and easy manner. Other features of this tool include making designs, calendars, posters, greeting cards, and many more. However, this tool is only compatible with computers only and not smartphones. The results generated by Publisher are accurate to a high level and the interface of this software is very user-friendly.

07Online PNG Tools
Another website on our list is Online PNG Tools. This website offers you all the means to create a hassle-free transparent image online in a few seconds and that too at no cost. The algorithm of this website is powered by artificial intelligence which lets you make transparent images without any trouble. All you need to do is open the site and upload your image and click on the background you want to make transparent. The most attractive feature offered by this website is that it does not ask you to download anything. You will get very quick results while using Online PNG Tools.

08Photoshop
After reading the name Photoshop on our list, many readers might be surprised. Many people find Photoshop a bit tough to use but that is not true. This is one of the best online transparent image makers which you can use to remove the background from your images. Photoshop is a one-stop solution for the entire photo editing-related works. Here you can use features like resizing the image, image color picker, merging the images, pencil sketching the photo, adding text to the image, adding a logo to the photo, etc. Photoshop is the most reliable transparent image maker.

09LunaPic
Next on our list of online transparent image makers is LunaPic. This online platform is completely free to use and you don’t even need to sign in to use it. The best feature is can upload your image from your computer, social media, the Cloud, or any other website you want. LunaPic is power-packed with numerous tools for editing the images which will make your online transparent image-making experience a good one. It provides various Borders, Filters, Effects, etc using which you can be master in image editing. Also, you can share your photos directly to social media from the LunaPic.

10Fotor
No discussion of online transparent image maker is complete without Fotor. If you consider yourself a complete beginner, in photo editing, you should try Fotor. Creating transparent images through this tool is very easy. Along with this, you can make use of various Effects, Beauty, Frames, Stickers, etc to make the image picture-perfect. This tool’s photo background remover lets you clear the background in just a few steps. Be it about beautifying life by sharing moments or the purpose is simply the business advertisement, when you have Fotor in hand, the background removal experience is incredible and the process gets easy with its easy interface.

So, now you know the best online transparent image maker. But if you are not a professional and worried about using these online tools then we are here. Here we will guide you on making a transparent picture online, and we have usedFocoClipping for explaining, but you can use any of the above-mentioned tools and the steps are almost similar for all.
Step 1: Go to the browser of your computer and type “FocoClipping” in your search box. Click on the FocoClipping link on your screen.
Step 2: Now select the image you want to make transparent and click on “Upload”. FocoClipping user interface is auto-adjusted to remove the background from your image. As soon as you open the image in FocoClipping the background of your image will be removed.

Step 3: Now if you want to experiment more with your image then you a new background, crop, or resize the transparent image. On the right corner of your screen, you will see options “Background, Crop, and Shadow” select them according to your requirements.

Step 4: If you feel like restoring any part or whole of the real image then select the “Recover” option. Drag the recover brush over the parts you want to recover. You can make use of the “Erase” tool to delete any stuff.
Step 5: After the completion of the whole editing process click on the “Download” button”. FocoClipping will download your image without any sign-in process. The tool will ask you to choose between PNG and JPG format to save your edited image, go for your preferred format. Hit the “Download” option again and your edited image will get saved to your preferred location on your pc.
Part 2 Can You Find Assets of Transparent Image in the Video Editor?
Till now we were keeping our discussion limited to online photo editors that can create transparent images, but what is a video editing platform that provides all such features? If you find all the assets of the transparent image in a video editor then your life is going to be very easy.
Here we are talking about Wondershare Filmora Video Editor . This online video editing platform enables its users to find all the assets of transparent images. All the online video content creators find this feature of Filmora very handy in making their videos awesome and cool.
For Win 7 or later (64-bit)
For macOS 10.12 or later
Apart from this Filmora is power-packed with a big list of features some of these features are mentioned below.
● Editing features like split screen, motion tracker, screen recorder, keyframing, Auto Beat Sync, etc.
● Various kinds of effects like green screen, mask and blend, AI portraits, video effects, etc.
● Audio editing features like audio ducking and silence detection.
● Color match and color combination.
Using Filmora you can create transparent images online and along with it, this platform offers a whole bunch of editing features. If you are new to photo editing then you don’t have to worry, the UI of Filmora has been designed in such a way that anyone without any technical expertise can edit their images and videos like a pro.
● Ending Thoughts →
● So dear readers, with this article we have tried to bring you the best online transparent image maker.
● All the 10 image editors mentioned in his article are top class and you can use them to create and edit all kinds of images including transparent images.
● With the tutorial provided in the article, you can learn to create transparent images. All you need to do is to follow the steps explained in the article and you will master the art of creating transparent images online.
● If you are looking for a video editing platform through which you can access all the assets of transparent images then try Filmora.
● This platform enables you to create and video including transparent images in a very quick and easy manner.
If you are a photoholic person and you love to share your images on social media then at some point in time you might have felt the need of removing the background of the image and add something cool to the background. This process of removing the background of the image is called making your image transparent. Professional photo artists make the most use of this feature to create the best of photos. Creating transparent images and changing their background could be used in many ways like designing the logo of the brands, professional photography, or simply fun purpose.
If you have not made use of transparent images yet and you want to learn to create transparent images online and edit transparent images online then this article is for you.
In this article
01 [Best 10 Transparent Image Editors You Deserve to Own](#Part 1)
02 [Can You Find Assets of Transparent Image in the Video Editor?](#Part 2)
Part 1 Best 10 Transparent Image Editors You Deserve to Own
You might be afraid that editing a picture online and making it a transparent image would need technical knowledge in photo editing. Then you are wrong. Making transparent images online and then editing them is very easy. We, here in this article, have come up with the 10 best online transparent image makers using which you can create transparent images in a very fun way, and then you can use them for whatever purpose you want. And don’t worry, we have provided the steps on how to use online transparent image makers to make your work easy.
01Removebg
If you are looking for a free online transparent image maker then Removbg should be the first one you give a try. This online tool is powered by Al technology which enables you to remove the background of your image precisely. Removebg has “Erase” and “Restore” tools which provides for manual adjustment of the details so you can give your image a realistic touch. Apart from these features, the other highlights of this online tool are solid color backgrounds, well-designed templates, and custom templates. Using this online free tool you can also upload your image in batches. Images created by you will have a professional finishing.
02FocoClipping
The next great online transparent image maker on our list is FocoClipping. While most of the image makers and editors have a free version and paid version but all the features in the FocoClipping are free. This image editor enables you to remove background from your photos and make them transparent with only a single click. FocoClipping also uses AI tech to remove the background of your image precisely. The other features of this tool include no limit of download and upload, an easy-to-use interface, casting shadows into images, and many more.
03Image online.co
Image online.co is a trusted name in the field of transparent image makers online. This amazing website is also completely free to use. This website is powered packed by a bundle of image editing tools. To make your transparent image all you need to do is to select the background using the mouse and you are done. No technical photo editing knowledge is required to use this tool. Apart from this Image online.co offers you features like resizing the image, image color picker, merging the images, pencil sketching the photo, adding text to the image, adding a logo to the photo, etc.
04AirMore
If you are the one who needs a simple and easy-to-use tool without much sophistication to make a transparent image, then AirMore could be a good choice for you. All you need is a single click on the background to remove it. This tool provides the “Keep” and “Remove” options so in case you don’t like your editing then you can reverse the whole process. The best thing about using AirMore is that you will not have to compromise with the quality of your image and you can add any cool background to your image like a pro.
05PhotoWorks
If you find photoshop software on your pc too complicated to use then try PhotoWorks. This easy-to-use tool can help you in making transparent images online in a few seconds. PhotoWorks has a very user-friendly interface packed with many manual settings which users can adjust according to their needs. The biggest highlight of this tool is once you access it online you need no further internet connection to edit your images. It is a wonderful transparent background generator with effective results.
06Publisher
This tool comes is created by Microsoft and comes in your laptops and computers with the Microsoft office package. Publisher provides features using which you can generate transparent images in a very quick and easy manner. Other features of this tool include making designs, calendars, posters, greeting cards, and many more. However, this tool is only compatible with computers only and not smartphones. The results generated by Publisher are accurate to a high level and the interface of this software is very user-friendly.
07Online PNG Tools
Another website on our list is Online PNG Tools. This website offers you all the means to create a hassle-free transparent image online in a few seconds and that too at no cost. The algorithm of this website is powered by artificial intelligence which lets you make transparent images without any trouble. All you need to do is open the site and upload your image and click on the background you want to make transparent. The most attractive feature offered by this website is that it does not ask you to download anything. You will get very quick results while using Online PNG Tools.
08Photoshop
After reading the name Photoshop on our list, many readers might be surprised. Many people find Photoshop a bit tough to use but that is not true. This is one of the best online transparent image makers which you can use to remove the background from your images. Photoshop is a one-stop solution for the entire photo editing-related works. Here you can use features like resizing the image, image color picker, merging the images, pencil sketching the photo, adding text to the image, adding a logo to the photo, etc. Photoshop is the most reliable transparent image maker.
09LunaPic
Next on our list of online transparent image makers is LunaPic. This online platform is completely free to use and you don’t even need to sign in to use it. The best feature is can upload your image from your computer, social media, the Cloud, or any other website you want. LunaPic is power-packed with numerous tools for editing the images which will make your online transparent image-making experience a good one. It provides various Borders, Filters, Effects, etc using which you can be master in image editing. Also, you can share your photos directly to social media from the LunaPic.
10Fotor
No discussion of online transparent image maker is complete without Fotor. If you consider yourself a complete beginner, in photo editing, you should try Fotor. Creating transparent images through this tool is very easy. Along with this, you can make use of various Effects, Beauty, Frames, Stickers, etc to make the image picture-perfect. This tool’s photo background remover lets you clear the background in just a few steps. Be it about beautifying life by sharing moments or the purpose is simply the business advertisement, when you have Fotor in hand, the background removal experience is incredible and the process gets easy with its easy interface.
So, now you know the best online transparent image maker. But if you are not a professional and worried about using these online tools then we are here. Here we will guide you on making a transparent picture online, and we have usedFocoClipping for explaining, but you can use any of the above-mentioned tools and the steps are almost similar for all.
Step 1: Go to the browser of your computer and type “FocoClipping” in your search box. Click on the FocoClipping link on your screen.
Step 2: Now select the image you want to make transparent and click on “Upload”. FocoClipping user interface is auto-adjusted to remove the background from your image. As soon as you open the image in FocoClipping the background of your image will be removed.
Step 3: Now if you want to experiment more with your image then you a new background, crop, or resize the transparent image. On the right corner of your screen, you will see options “Background, Crop, and Shadow” select them according to your requirements.
Step 4: If you feel like restoring any part or whole of the real image then select the “Recover” option. Drag the recover brush over the parts you want to recover. You can make use of the “Erase” tool to delete any stuff.
Step 5: After the completion of the whole editing process click on the “Download” button”. FocoClipping will download your image without any sign-in process. The tool will ask you to choose between PNG and JPG format to save your edited image, go for your preferred format. Hit the “Download” option again and your edited image will get saved to your preferred location on your pc.
Part 2 Can You Find Assets of Transparent Image in the Video Editor?
Till now we were keeping our discussion limited to online photo editors that can create transparent images, but what is a video editing platform that provides all such features? If you find all the assets of the transparent image in a video editor then your life is going to be very easy.
Here we are talking about Wondershare Filmora Video Editor . This online video editing platform enables its users to find all the assets of transparent images. All the online video content creators find this feature of Filmora very handy in making their videos awesome and cool.
For Win 7 or later (64-bit)
For macOS 10.12 or later
Apart from this Filmora is power-packed with a big list of features some of these features are mentioned below.
● Editing features like split screen, motion tracker, screen recorder, keyframing, Auto Beat Sync, etc.
● Various kinds of effects like green screen, mask and blend, AI portraits, video effects, etc.
● Audio editing features like audio ducking and silence detection.
● Color match and color combination.
Using Filmora you can create transparent images online and along with it, this platform offers a whole bunch of editing features. If you are new to photo editing then you don’t have to worry, the UI of Filmora has been designed in such a way that anyone without any technical expertise can edit their images and videos like a pro.
● Ending Thoughts →
● So dear readers, with this article we have tried to bring you the best online transparent image maker.
● All the 10 image editors mentioned in his article are top class and you can use them to create and edit all kinds of images including transparent images.
● With the tutorial provided in the article, you can learn to create transparent images. All you need to do is to follow the steps explained in the article and you will master the art of creating transparent images online.
● If you are looking for a video editing platform through which you can access all the assets of transparent images then try Filmora.
● This platform enables you to create and video including transparent images in a very quick and easy manner.
Video Course and Online Learning Are Very Popular Nowadays. Here We Are Going to Recommend some of the Best Video Websites for Teachers to Use
The examples below are the only few that are possible to find on the internet and offer a thousand free educational videos usable in the classroom or online classroom. It’s up to you if you can use or follow all the websites I provide. Of course, the internet offers unlimited help for teachers to tap into, but it has dangers around quality, inappropriate content, advertisement, and copyrights. Double-check everything before you use in your classes and show it to your students.
Khan Academy (https://www.khanacademy.org/ )
Provides a free personalized learning resource for all ages. Khan Academy also offers different exercises and instructional videos that empower the students to study at their own pace inside the classroom or outside. For the students who want to learn something, these are the following subjects they tackle: Science, Mathematics, History, Economics, Reading & Language, Life Skills, and more.

They are working hard to ensure that Khan Academy gives teachers of all stripes the tools they need to understand better the students’ activities and how to assist them effectively. The Khan Academy teacher dashboard offers an overview of the overall performance of the class as well as comprehensive student profiles. Khan Academy is free, and anyone can learn anything. They are nonprofit because, according to Khan Academy, they believe in free, world-class education anywhere.
Is Khan Academy suitable for learning?
An excellent and convenient resource for academic study is Khan Academy. Anyone who desires to study may benefit from Khan, even though it is specially designed for kids in grade school through the college level stage. The website has several fantastic features, like the ability to enable subtitles for each video and the availability of the whole Khan Academy course in at least 18 other languages.
However, it would be convenient if the text-only material could use the built-in text-to-speech feature. Students may now access all courses using the Khan Academy app, which also enables downloading for offline learning. It’s doubtful that many students will open Khan Academy and be eager to start using it because its organization and interface are both rather formal, and its activities are simple.
SchoolTube (https://www.schooltube.com/ )
- is a secure platform for sharing videos without distraction-causing side video suggestions and advertising. Teachers and students can upload a YouTube video to their SchoolTube playlist. Still, all ancillary material, including advertising that would typically be included on the YouTube website, has been stripped off.

Many choices are available on the SchoolTube website, including the ability to submit movies, screenshot a device’s display, record video inside the application, add attachments to films, and add a video quiz. Further exploration of the application reveals more possibilities for the editor. SchoolTube is suitable for teachers and students since it lets them contribute or make their movies with brand-new features that encourage more interactive learning in a secure digital setting.
Is SchoolTube suitable for learning?
This product is an excellent place to submit student-made movies or to obtain videos related to your classroom topics. The subject or topic they are discussing can be used to filter channels for students and teachers. I think it is a fantastic alternative to using YouTube, a more restricted site in the classroom. When you require students to watch films related to the ideas you are discussing, SchoolTube is a terrific resource to use. It is a safer or more closely supervised website than YouTube.
TeacherTube (https://www.teachertube.com/ )
- is an online community for sharing instructional videos. They seek to offer a safe venue or site for teachers, schools, and students to access educationally focused videos. Currently, they provide an incredible 60 topics or subjects for all ages from Science, Math, History, Social Studies, Language & Arts, and more. They also have educational songs for kids and programming languages for the higher level. TeacherTube also provides anytime, anywhere professional development for teachers. And the site where teachers can post educational videos on their own designed for students to view to learn a concept or skill.

Is TeacherTube suitable for learning?
Despite being helpful in situations with no access to YouTube, this has a restricted search function. For each topic searched, there are just a few relevant search results. Results might range widely in terms of quality. If required, this would be a helpful resource, but it might be even better if it were more thorough.
TED-Ed (https://www.ed.ted.com/ )
- the videos and courses on TED-Ed may be used to supplement practically any topic by adding video learning, knowledge tests, and conversation prompts. Students are likely to get immediately engaged with the content because it is outstanding and comes from some of the top brains in the world. Videos are excellent for group viewing or use in flipped classrooms.

You can use TED-Ed’s videos and lessons to supplement almost any subject with video learning, basic knowledge checks, and discussion questions. Browse by topic or subtopic or search by keyword. You can filter by target age, content type, subtitles, etc. The content is remarkable and comes from some of the world’s best minds, and the students will likely engage with it immediately. Videos can be great to watch as a class or to include as part of a flipped classroom.
Is Ted-Ed suitable for learning?
TED-Ed is a fantastic tool for students and instructors searching for inspiration, knowledge, and perhaps even some fun, thanks to the high-quality videos and the vast library of lesson ideas. The cartoons and films are just as well-made and engaging as some of the most remarkable television programming. The website presents a complicated subject intelligently, while a few students may feel bored or annoyed with videos on more advanced topics.
Crash Course (https://thecrashcourse.com/ )
Can provide a free high-quality educational video on various subjects. Crash Course also alters the traditional textbook model by presenting information in a fast-paced format to enhance students’ learning experience. With the help of the Crash Course team, they created different kinds of videos on 21 subjects for high school and college learners.

Primary and Intermediate or grade school students can also use this site. According to Crash Course, they also have hundreds of millions of views on their YouTube channel. While the show is a beneficial tool for teachers and students, it also has an extensive viewership of casual learners seeking online educational content independently.
Is Crash Course suitable for learning?
The sarcastic tone and rapid speed of Crash Course will undoubtedly keep students intrigued, but the material is often dubious, and the videos offer primarily passive learning. Each Crash Course video’s host is enthusiastic about the subject. The majority of the Crash Course videos are pretty accurate. However, in an attempt to simplify topics, several Crash Course Kids videos fall short.
National Geographic Kids (https://kids.nationalgeographic.com/ )
It offers educational videos, games, and other activities, especially on animals and the natural world. The students will enjoy playing games with simple instructions and a range of difficulties and frequently practice memory, logic, and other skills. They can contribute to the site by leaving some comments, taking quizzes, viewing user photos, and sharing their own.

Is National Geographic Kids suitable for learning?
The National Geographic Kids website is easy to navigate and contains exciting materials for students, while some content isn’t properly structured and may be challenging to find. Clicking on a menu choice at the top of the screen leads you to a related page, but lingering over that same option brings up extra alternatives that you wouldn’t see if you clicked. Keyword searches and links supplied by the teacher will be helpful here. For example, the site has tools such as a Homework Help section that teaches kids how to be an expert fact-checker, write an animal report, and more. Still, it’s not precisely apparent how to get there unless you search for it.
NeoK12 (https://www.neok12.com/ )
Uses educational videos and animations for the students. It is a great way to learn, allowing the students to build a visual model in their minds by watching their videos. The graphical representation of the ideas aids their comprehension, piques their interest, and promotes self-directed learning in each learner. Educational videos in NeoK12 and games are possibly one of the most effective learning tools. Even the higher levels of students will find the platform enriching and entertaining. NeoK12’s website also features tools not only for learners but also for teachers.

Is NeoK12 suitable for learning?
This platform is a rather extensive library of interesting educational tools, and the films and brain games are both free and well worth a look. Kids may augment the movie with other resources, such as interactive diagrams, flowcharts, fun, and puzzles, for a relatively inexpensive monthly charge. The films are simple teaching tools that usually contain supplementary resources that help youngsters to put what they’ve learned into practice. There are various “Universe” films, for example, under the Earth and Space area. Children who watch these films may also access relevant games, diagrams, activities, and photographs to prepare presentations.
Discovery Education (https://www.discoveryeducation.com/ )
Has made a name for itself as the top supplier of digital content, curriculum resources, and professional development for grades K–12. Discovery Education is used by almost 5.6 million students in Canada, all 50 states, and other countries. Why not give it a shot in the Philippines or somewhere else in Asia?

Teachers can use the free resources on Discovery Education to enhance their existing curriculum from the Grade School Level up to High School Level. An example of a tool with this platform is the Puzzlemaker, whose vocabulary makes crosswords and other types of puzzles. They can also be assigned specific videos or interactive activities to introduce new ideas at home.
Is Discovery Education suitable for learning?
Discovery Education is an excellent free resource. The commercial edition has considerably more resources, and after using it, I sincerely wished they would make it accessible for free or at a lower cost. The items aimed at students are straightforward and uninspiring; the website is intended for teachers. I would love to see them unlock more of the stuff that is locked behind the barrier, maybe in a cyclical manner where some films or resources are made available for free for a month at a time.
Free Download For Win 7 or later(64-bit)
Free Download For macOS 10.14 or later
Free Download For macOS 10.14 or later
Tips to Make Cinematic Color Grading
New modern color grading software allows you to do point-and-click color grading right in your browser. Color changes are as easy and intuitive as painting or sketching.
You can choose from many different look presets and movie emulations based on Hollywood movies plus real-time previews of your favorite LUTs with this software.
Part 1. What is Cinematic Color Grading?
The cinematic look is all the rage these days and aims to mimic images captured on real film rather than digitally created. To achieve this effect, film directors use various means from lighting to cinematic color gradation. The latter is a powerful tool for bringing a cool or warm tone to a video and providing smooth color transitions to fall on an image that doesn’t look too real but feels emotional.
This kind of post-production processing, which produces beautiful results when used by color magicians, requires a deep understanding of colors and their effect on our psyche and even physiology. It’s not enough to watch a color grading video and use a LUT to get where you want. You should at the very least have an understanding of:
- Color wheel
- Color quality
- Color harmony and discord
- Warm and cool colors
- Color context
Part 2. Tips to make cinematic color grading
Here are three helpful tips to create cinematic-looking images in DaVinci Resolve.
In my 10-year career as a colorist, I’ve worked on every type of content imaginable: short, long, commercial, educational, episodic—you name it. And while each of these formats requires its approach, the one constant that spans them all is the client’s desire for a cinematic look.
Virtually all of us aspire to more cinematic color, but we often come up short—in part because the term itself has become too broad to effectively target. To focus on the goal, I like to think of “cinematic” as “an image whose key visual properties are consistent with those of printed film.”
The print film was the primary medium through which we consumed cinematic images for the first century of filmmaking and is therefore at the very heart of cinematic aesthetics. In this video, I’ll show you my top three secrets to achieving this aesthetic quickly and consistently in Davinci Resolve.
Tips1: Create Color Density
The first secret to film color is to create color density. Another key aesthetic property of film images is that colors can be either highly saturated or highly luminescent but cannot be both.
We can mimic this visual characteristic by identifying strongly saturated colors in our image and using the Hue vs. Lum to reduce their brightness. This simple technique is especially effective on pure primary colors (red, green, and blue).
Tips2: Separation Beats Saturation
The second secret to film color is prioritizing separation over saturation. When you feel like an image lacks overall color or pop, it’s all too easy to reach for the saturation knob, but that’s not a very cinematic solution.
Instead, try using split toning—pushing cool colors into shadows and warm colors into highlights—to increase tonal separation and add depth to an image. This characteristic is present in virtually every film print and is deeply evocative when applied correctly.
Tips3: Strong Contrast is Your Friend
The third secret of film colors is a strong contrast. This is not always easy, as a higher contrast look inherently requires more precision with exposure placement. Too often we pump up some contrast, end up with an image that looks blown out or too crisp, and then immediately back away from editing.
However, if you stick with high contrast long enough to improve your exposure, you’ll get a very different result and be well on your way to a more cinematic image.
Part 3. How to add color cinematic grading by using Filmora?
New modern color grading software allows you to do point-and-click color grading right in your browser. Color changes are as easy and intuitive as painting or sketching.
You can choose from many different look presets and movie emulations based on Hollywood movies plus real-time previews of your favorite LUTs with this software.
Wondershare Filmora is an option if you want to easily change the colors of your projects. You may just double-click the media after dragging it onto the editing timeline to change the contrast, saturation, brightness, and hue.
Despite its speed, it also allows you to merge, edit audio, divide, rotate, and apply as many cool video effects as you like.
Step1Add the media
After installing Wondershare Filmora, click the New Project and Import button to easily find and load your videos.
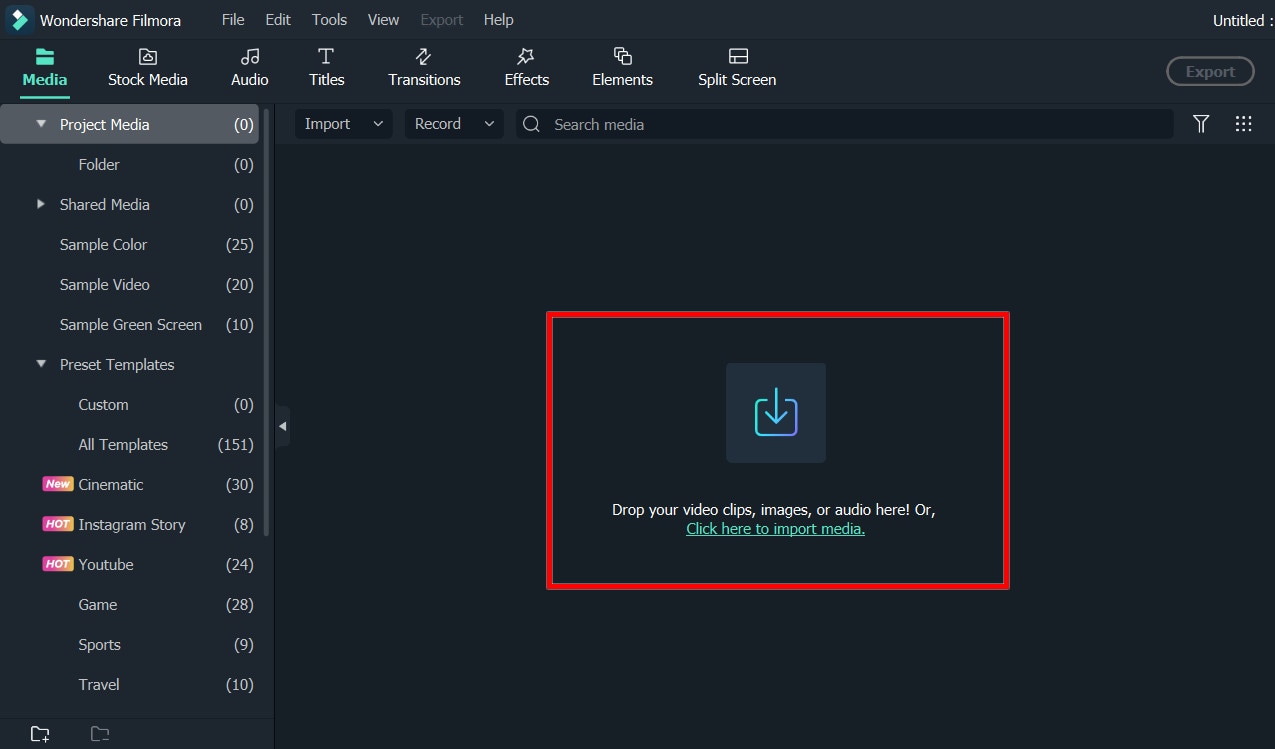
Step2Correct the color [Basic and Advanced]
In the timeline, double-click the video editing window. Select the “Color” panel and make adjustments.
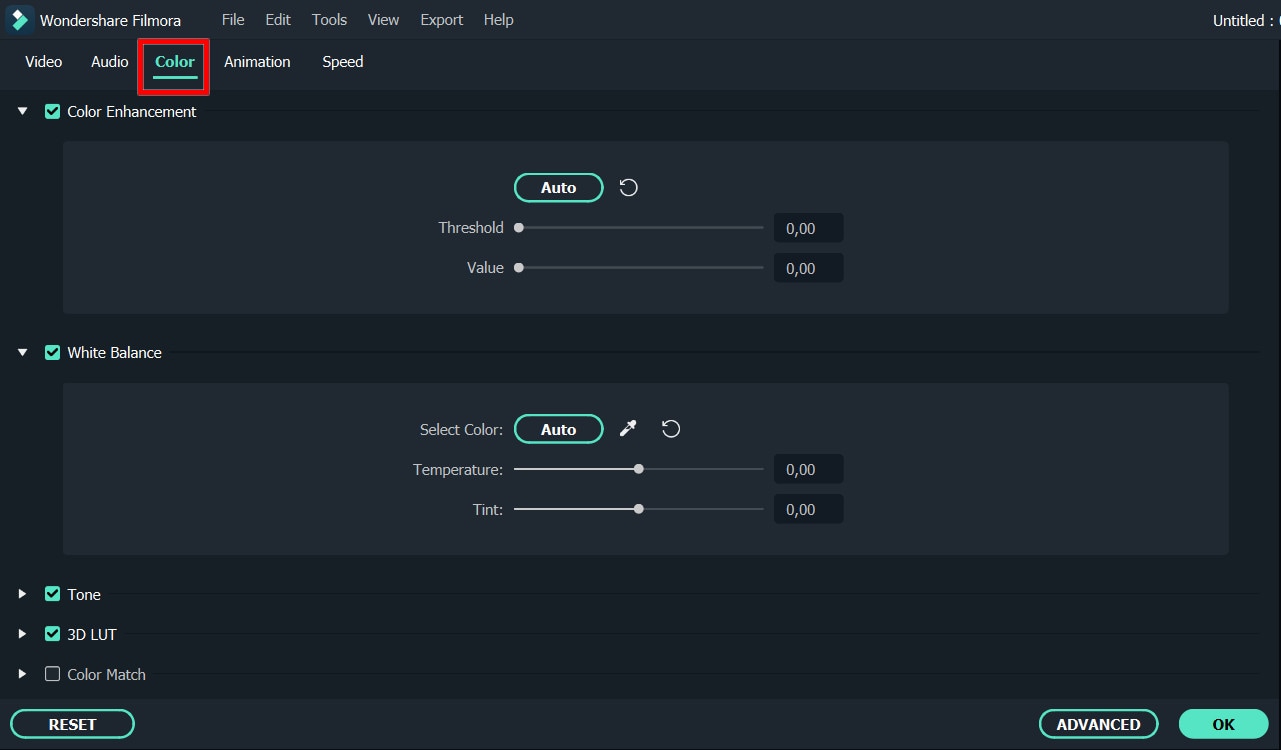
- Contrast: By adjusting this setting, you can control the brightness and color in different parts of the image.
- Saturation: This setting highlights the gray part of the video to a shade. You can adjust it to make the colors of the entire video image appear more saturated or more subdued.
- Brightness: You can change this setting to adjust the overall darkness and lightness of your project.
- Hue: Hue is generally the lightness of a color. Let’s say that when red is saturated with white, it creates a shade of pink.
- 3D LUT: 3D lookup tables provide your media with Hollywood movie color sets like the 007 series, Batman, Harry Porter, etc.
Hover over the indicator to adjust the color correction settings. Then left click on it and move the slider. The corresponding value stabilizes after releasing the mouse button.
With Filmora, you also have access to advanced color correction. Click the Advanced Color Tuning icon to enter the appropriate window where you can fine-tune the color or use preset templates.
The Preferences tab has a variety of templates, including Movie, Normal, 3D LUT, and Vignette. In the Edit tab, you can adjust color temperature, white balance, hue, 3D LUT, color, HSL, light, vignette, etc.
Step3Preview and save the new video
When you are satisfied with your creation, click “Export”. Then click the Settings button and save the new videos in different formats in the Format tab. You can also export the video directly to Vimeo or YouTube or burn it to DVD for better preservation.
Filmora’s color correction tools will make your videos look natural, more attractive, more vibrant, consistent, and professional.
Color Correction Presets
Color correction presets help your video achieve an enhanced cinematic look. Adjust gives you control over fine-tuning the colors in your shots. You can make various adjustments such as color temperature and exposure.
In the “Effects > LUT” tab, you’ll see an extensive selection of preset color settings. These include Vignettes, Movie Looks Like Old Movies, and Cinematic 3D LUT effects such as Harry Potter, Game of Thrones, House of Cards, and Mission Impossible.
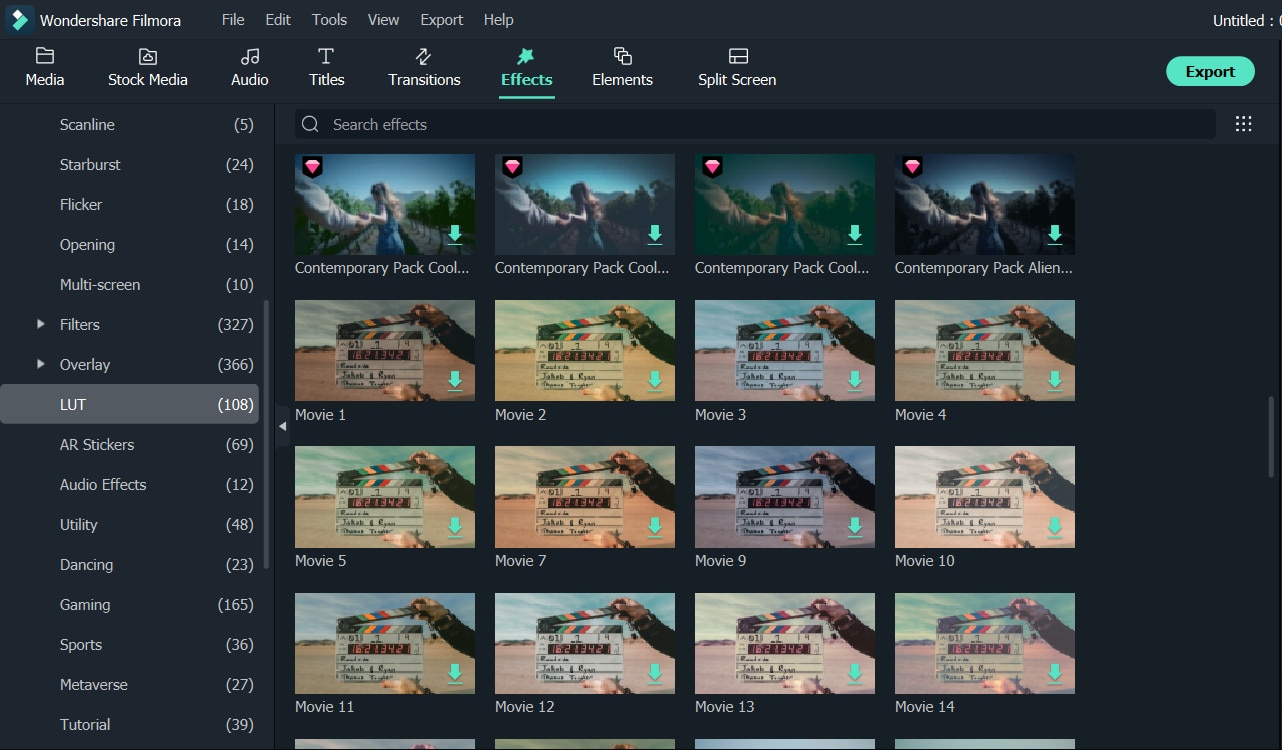
Filmora’s Color Correction Advanced Tool also categorizes your presets. Click on All Presents to see six categories: Favorites, Custom, 3D Lut, Common, Film, and Vignette.
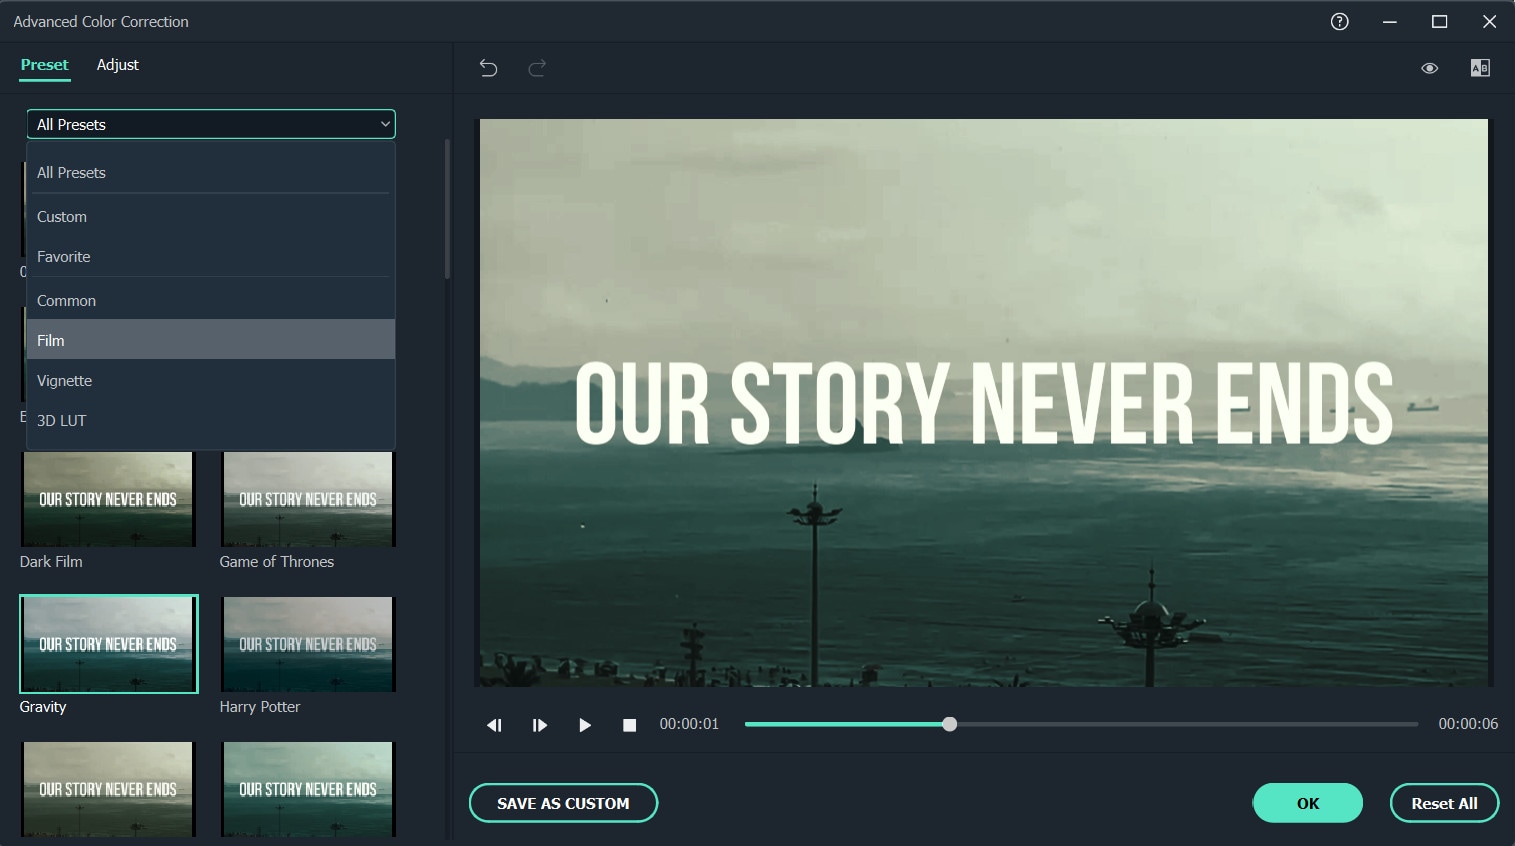
Double-click a preset to apply it to your video. You can see how it looks in the Advanced Color Correction preview window. If you are satisfied with the results, click OK.
Conclusion
Above are the steps to give your video a cinematic look using Wondershare Filmora, hope this helps if you are wondering how to do it. As we can see above, using Filmora video editor will make you more creative in making videos with a suitable emotional tone.
Free Download For Win 7 or later(64-bit)
Free Download For macOS 10.14 or later
Also read:
- New In 2024, How to Apply Video Filters
- Cropping Video in VLC Step by Step
- 2024 Approved Top Silence Detection Tools for Better Film Production
- New Ideas That Help You Out in Converting AVI to GIF
- Updated Have You Been Looking for Online YouTube Video Trimmer? You Will Be Introduced to Different Ways to Trim YouTube Videos as Introduced by YouTube Itself and some Online and Desktop Software to Help You Learn Video Trimming in This Article
- Updated Discover the Art of Masking in After Effects A Comprehensive Guide for 2024
- Splice App for Android - Guide to Download & Use for 2024
- 2024 Approved Renderforest Is a Great Online Editing Platform to Use for Many Video Creators. If You Want to Make an Intro Video for Your Channel or Daily Vlogs, You Can Follow This Article to Know More Details
- 2024 Approved How to Make Strobe Light Text Effect?
- In 2024, Best Video Grabbers for Chrome
- Best Online MPEG to GIF Converters for 2024
- In 2024, Hard to Remove Black Background in After Effects? Heres the Best Way to Deal With It
- Updated How to Animate Your Designs With Canva GIF for 2024
- Updated 2024 Approved Video Inspiration for Birthday Slideshow
- Updated In 2024, How to Make Video Slow Motion?
- How to Make Tutorial Video with Filmora for 2024
- 2024 Approved Want to Add Life to Your Customary Business Presentations and Videos on a MacOs Device with Expressive Emojis? Dive in to Have an Insight Into the Credibility of Using Emojis on a Mac
- New How to Make OBS Slideshow
- 2024 Approved Converting an SRT (SRT/Sorted Reader) Into a DOCX File Is a Process. Here We Will Discuss Converting a Set File to a Docx File and More Details About This
- New 10 Crazy-Cool Examples of AR Video for 2024
- 7 Ways Add Subtitles to MKV Videos on All Platforms for 2024
- How to Add Custom Filters in VN App 2024 Quick Guide
- Updated Unlock Your Video Editing Potential With Wondershare Filmora
- What Are the Top 15 Slideshow Presentation Examples Your Audience Will
- In 2024, Powerpoint Supported Video Format and User Tips
- New Step by Step to Resize Video in Davinci Resolve
- In 2024, Detailed Tutorial to Crop a Video in KineMaster
- New 2024 Approved How To Create The Best AI Thumbnail Using The Right Tools?
- Top-Notch Solutions for Disabled Apple ID On Apple iPhone 14 Making It Possible
- In 2024, Best Pokemons for PVP Matches in Pokemon Go For Vivo S17 Pro | Dr.fone
- In 2024, 3 Solutions to Find Your Vivo Y27 5G Current Location of a Mobile Number | Dr.fone
- In 2024, Edit and Send Fake Location on Telegram For your Lava Storm 5G in 3 Ways | Dr.fone
- In 2024, Samsung Galaxy F34 5G ADB Format Tool for PC vs. Other Unlocking Tools Which One is the Best?
- In 2024, The 10 Best Tools to Bypass iCloud Activation Lock On Apple iPhone 6 Plus You Should Try Out
- In 2024, How to Unlock a Network Locked Xiaomi Redmi A2 Phone?
- 4 solution to get rid of pokemon fail to detect location On Honor X50i | Dr.fone
- In 2024, How to Unlock iPhone 8 Plus With an Apple Watch & What to Do if It Doesnt Work | Dr.fone
- How to Find iSpoofer Pro Activation Key On Samsung Galaxy S24 Ultra? | Dr.fone
- The Complete Guide to Vivo Y36 FRP Bypass Everything You Need to Know
- How to Change your Motorola Moto G73 5G Location on Twitter | Dr.fone
- In 2024, How PGSharp Save You from Ban While Spoofing Pokemon Go On Samsung Galaxy F04? | Dr.fone
- In 2024, Step-by-Step Tutorial How To Bypass Infinix FRP
- How to Transfer Apple iPhone 15 Data to iPhone 12 A Complete Guide | Dr.fone
- How to Make Explainer Videos—Step by Step Guide for 2024
- 3 Best Tools to Hard Reset Xiaomi 13T Pro | Dr.fone
- In 2024, Unlocking Apple iPhone 6s Plus Lock Screen 3 Foolproof Methods that Actually Work
- How to use Device Manager to update drivers in Windows 11/10/7
- How to Factory Reset Infinix GT 10 Pro without Losing Data | Dr.fone
- How can I get more stardust in pokemon go On Tecno Pop 8? | Dr.fone
- Does Realme Narzo N53 Have Find My Friends? | Dr.fone
- In 2024, 3 Ways for Android Pokemon Go Spoofing On Samsung Galaxy S23 Tactical Edition | Dr.fone
- How to Reset Honor V Purse without Losing Data | Dr.fone
- In 2024, Easily Unlock Your Vivo S18e Device SIM
- New Detailed Review & Alternatives of VOCALOID6 Voice Generator
- How to Repair corrupt MP4 and MOV files of Vivo T2 Pro 5G using Video Repair Utility on Windows?
- Why Your WhatsApp Live Location is Not Updating and How to Fix on your Poco X5 | Dr.fone
- Title: Updated A Complete Guideline To Better Use QuickTime Player for 2024
- Author: Chloe
- Created at : 2024-04-24 07:08:28
- Updated at : 2024-04-25 07:08:28
- Link: https://ai-editing-video.techidaily.com/updated-a-complete-guideline-to-better-use-quicktime-player-for-2024/
- License: This work is licensed under CC BY-NC-SA 4.0.
