
Updated Add Camera Shake to Video in Adobe After Effects for 2024
Add Camera Shake to Video in Adobe After Effects
Create High-Quality Video - Wondershare Filmora
An easy and powerful YouTube video editor
Numerous video and audio effects to choose from
Detailed tutorials are provided by the official channel
So you’ve shot your video with good camera technique and shot it on a good camera; how can you make it look like you shot it on an old PXL 2000? Well, the answer is to add a little camera shake to the footage. If you’ve ever been to a theme park, then you’ve likely seen the effect of camera shake. Video camera shake can be a powerful tool for telling a story and creating an impactful scene. It helps to build suspense and make the video more realistic. This article will show you how to add camera shake to your videos using Adobe After Effects.
In this article
01 Why Do We Need To Add A Camera Shake Effect To The Video?
02 How to add camera shake to video in After Effects
03 Bonus! Camera Shake Presets for After Effects
Why Do We Need To Add A Camera Shake Effect To The Video?
Have you ever tried to add a simple camera shake effect to your videos? You know, those cool shake effects that you may have seen on an amateur or professional video on the web? Well, if you have, then you probably thought it was impossible. The camera shake effect is a technique applied to the clips where shaky camera movements cause the image to appear more cinematic and real. Applying a camera shake effect is to hide your flaws when shooting a video.
Camera shake is often mistaken for poor cinematography. It can enhance your video. For instance, if you’re filming something like a car chase or any other scene where there’s lots of movement and action, the inclusion of a camera shake can help make it more realistic.
A camera shake effect can be an excellent way of adding a sense of realism to your videos. Whether you’re making a video that’s meant to be taken as a real scene, such as one depicting a robbery, or one that’s supposed to be shot in a documentary style, such as making a movie, you can use this as an effective tool. You can consider adding camera shakes to your videos due to the following reasons:
- This camera shake effect makes your video more creative. If you want to make, your video different from those other businesses produce, adding this effect will be a good idea.
- Your audience will be able to relate better to your video if they’ve seen similar videos before.
- Adding a camera shake to your video will make it more interesting and engaging for your viewers.
- It’s a great way to mask any mistakes you might have made during the video production. After all, we aren’t perfect humans, so we can’t make perfect videos every time!”
- You can use camera shakes to simulate the feeling of being in an environment that is free from control (such as being on a boat).
- You can use them to create a sense of urgency for the viewer/audience by adding motion blur to the sequence.
How to add camera shake to video in After Effects
When it comes to video editing, knowing how to make a layer shake in After Effects is a very useful skill. Using it correctly can add subtle motion to a static frame, emphasize an important object, and even make a character quiver in fear! In this tutorial, you will learn how to effectively use the wiggle expression to affect a layer throughout the Composition.
Step 1. Select the layer you want to shake from your After Effects file
Suppose you have an image or video of an object and want to apply it to shake effect, then it is quite easy. Just follow the steps described below.

Step 2. Press the alt/option key, then click the stopwatch next to “position.”
You are adding an “expression” to the timeline when the position text turns red, and you begin typing. Using a coding language adapted from javascript, you can apply complex motion to layers.
By pressing the alt/option again on the stopwatch, you can edit your expression anytime-or by clicking the arrow beside “position” and then double-clicking the text in the timeline.

Step 3. Enter “Wiggle (3,8)” and adjust the settings accordingly
In this expression, the first number indicates the frequency of Wiggle – basically, how quickly it appears to tremble. Its amplitude is the second number, which indicates how far it moves. The numbers are adjustable as you wish. Layers will shake dramatically but slowly when they use Wiggle (2,40). The “Wiggle (10,3)” command makes a layer move quickly without too much movement in one direction.
Step 4. Adjust the frame rate of your Composition
In order to make the overall effect more “choppy,” you can reduce the frame rate of the video by going to Composition> Composition settings. After Effects uses a frame rate of 24.5, you can go as low as “8” if you want a choppy feel.

Your entire Composition will become choppier if you reduce the frame rate, so it might not be worth it if you have other moving elements in your Composition. Only adjust the frame rate of the layer containing the wiggling object if you want it to affect that layer.
Bonus! Camera Shake Presets for After Effects
Working with After Effects, you will have to shoot a movie that uses a camera shake. It is important to read the manual completely to take control of the camera. After Effects provides us with ready-made presets that we can quickly and easily. Here is a set of 5 camera shake presets that will help you create motion effects.
Normal Light 1
This preset gives you a light camera shake like a normal lens.
Resolution: 2K (2048x1080) and 4K (4096x2160)
Frame Rate: 29.97fps
Earthquake 1
This preset gives you a feel of camera shake, just like from an earthquake.
Resolution: 2K (2048x1080) and 4K (4096x2160)
Frame Rate: 29.97fps
Normal Heavy 1
This preset provides you with a feel of a heavy camera shake from a normal lens.
Resolution: 2K (2048x1080) and 4K (4096x2160)
Frame Rate: 29.97fps
Telephoto Light 1
This preset gives you an effect of light camera shake from a telephoto lens.
Resolution: 2K (2048x1080) and 4K (4096x2160)
Frame Rate: 29.97fp
Wide Heavy 1
You get a heavy camera shake from a wide lens with this preset.
Resolution: 2K (2048x1080) and 4K (4096x2160)
Frame Rate: 29.97fp
Conclusion
● We hope that this tutorial gave you some new ideas for making your videos more interesting for your audience. It’s easy to add camera shake to your videos in Adobe After Effects. It’s a matter of getting all the right details right—that means it’s a matter of knowing all the right settings and controls, which we detail above. With this information and a little practice, you’ll be able to add that cinematic flair to your video footage in no time.
So you’ve shot your video with good camera technique and shot it on a good camera; how can you make it look like you shot it on an old PXL 2000? Well, the answer is to add a little camera shake to the footage. If you’ve ever been to a theme park, then you’ve likely seen the effect of camera shake. Video camera shake can be a powerful tool for telling a story and creating an impactful scene. It helps to build suspense and make the video more realistic. This article will show you how to add camera shake to your videos using Adobe After Effects.
In this article
01 Why Do We Need To Add A Camera Shake Effect To The Video?
02 How to add camera shake to video in After Effects
03 Bonus! Camera Shake Presets for After Effects
Why Do We Need To Add A Camera Shake Effect To The Video?
Have you ever tried to add a simple camera shake effect to your videos? You know, those cool shake effects that you may have seen on an amateur or professional video on the web? Well, if you have, then you probably thought it was impossible. The camera shake effect is a technique applied to the clips where shaky camera movements cause the image to appear more cinematic and real. Applying a camera shake effect is to hide your flaws when shooting a video.
Camera shake is often mistaken for poor cinematography. It can enhance your video. For instance, if you’re filming something like a car chase or any other scene where there’s lots of movement and action, the inclusion of a camera shake can help make it more realistic.
A camera shake effect can be an excellent way of adding a sense of realism to your videos. Whether you’re making a video that’s meant to be taken as a real scene, such as one depicting a robbery, or one that’s supposed to be shot in a documentary style, such as making a movie, you can use this as an effective tool. You can consider adding camera shakes to your videos due to the following reasons:
- This camera shake effect makes your video more creative. If you want to make, your video different from those other businesses produce, adding this effect will be a good idea.
- Your audience will be able to relate better to your video if they’ve seen similar videos before.
- Adding a camera shake to your video will make it more interesting and engaging for your viewers.
- It’s a great way to mask any mistakes you might have made during the video production. After all, we aren’t perfect humans, so we can’t make perfect videos every time!”
- You can use camera shakes to simulate the feeling of being in an environment that is free from control (such as being on a boat).
- You can use them to create a sense of urgency for the viewer/audience by adding motion blur to the sequence.
How to add camera shake to video in After Effects
When it comes to video editing, knowing how to make a layer shake in After Effects is a very useful skill. Using it correctly can add subtle motion to a static frame, emphasize an important object, and even make a character quiver in fear! In this tutorial, you will learn how to effectively use the wiggle expression to affect a layer throughout the Composition.
Step 1. Select the layer you want to shake from your After Effects file
Suppose you have an image or video of an object and want to apply it to shake effect, then it is quite easy. Just follow the steps described below.
Step 2. Press the alt/option key, then click the stopwatch next to “position.”
You are adding an “expression” to the timeline when the position text turns red, and you begin typing. Using a coding language adapted from javascript, you can apply complex motion to layers.
By pressing the alt/option again on the stopwatch, you can edit your expression anytime-or by clicking the arrow beside “position” and then double-clicking the text in the timeline.
Step 3. Enter “Wiggle (3,8)” and adjust the settings accordingly
In this expression, the first number indicates the frequency of Wiggle – basically, how quickly it appears to tremble. Its amplitude is the second number, which indicates how far it moves. The numbers are adjustable as you wish. Layers will shake dramatically but slowly when they use Wiggle (2,40). The “Wiggle (10,3)” command makes a layer move quickly without too much movement in one direction.
Step 4. Adjust the frame rate of your Composition
In order to make the overall effect more “choppy,” you can reduce the frame rate of the video by going to Composition> Composition settings. After Effects uses a frame rate of 24.5, you can go as low as “8” if you want a choppy feel.
Your entire Composition will become choppier if you reduce the frame rate, so it might not be worth it if you have other moving elements in your Composition. Only adjust the frame rate of the layer containing the wiggling object if you want it to affect that layer.
Bonus! Camera Shake Presets for After Effects
Working with After Effects, you will have to shoot a movie that uses a camera shake. It is important to read the manual completely to take control of the camera. After Effects provides us with ready-made presets that we can quickly and easily. Here is a set of 5 camera shake presets that will help you create motion effects.
Normal Light 1
This preset gives you a light camera shake like a normal lens.
Resolution: 2K (2048x1080) and 4K (4096x2160)
Frame Rate: 29.97fps
Earthquake 1
This preset gives you a feel of camera shake, just like from an earthquake.
Resolution: 2K (2048x1080) and 4K (4096x2160)
Frame Rate: 29.97fps
Normal Heavy 1
This preset provides you with a feel of a heavy camera shake from a normal lens.
Resolution: 2K (2048x1080) and 4K (4096x2160)
Frame Rate: 29.97fps
Telephoto Light 1
This preset gives you an effect of light camera shake from a telephoto lens.
Resolution: 2K (2048x1080) and 4K (4096x2160)
Frame Rate: 29.97fp
Wide Heavy 1
You get a heavy camera shake from a wide lens with this preset.
Resolution: 2K (2048x1080) and 4K (4096x2160)
Frame Rate: 29.97fp
Conclusion
● We hope that this tutorial gave you some new ideas for making your videos more interesting for your audience. It’s easy to add camera shake to your videos in Adobe After Effects. It’s a matter of getting all the right details right—that means it’s a matter of knowing all the right settings and controls, which we detail above. With this information and a little practice, you’ll be able to add that cinematic flair to your video footage in no time.
Top 5 AI Music Video Examples and Makers to Make Them
Best 5 AI Music Video Examples and Makers to Make Them
An easy yet powerful editor
Numerous effects to choose from
Detailed tutorials provided by the official channel
Music videos are an excellent combination of interesting videos and music files and with double entertainment, the efforts to make these videos are also double. Creating and editing these tools manually is not only a tedious but also time-consuming task and to help with this there are an array of music video maker tools and software available. With the advancement in technology these days, a lot of tools, companies, and setups are also creating versatile AI-generated videos which are a treat to eyes as well as ears. To learn more about these AI music video and creation tools, this article will be a great read.

In this article
01 [Some Interesting Examples Of AI Music Videos](#Part 1)
02 [Top 5 Music Video Makers](#Part 2)
Part 1 Some Interesting Examples Of AI Music Videos
The AI generated music video are getting the attention of a lot of users these days and if you too are keen to check out some of these files, check out the list below of YouTube music ai files.
Part 2 Top 5 Music Video Makers
To help you create music videos in a hassle-free manner and like a pro, several music video makers are available. We have shortlisted the list of popular 5 as below.
01**Wondershare Filmora Video Editor **
This is one of the best tools for creating a music video on your Windows and Mac systems. Quick to download, the program comes with several features that can be further customized for creating your desired footage. The drag and drop function further make the task quick and easy. To ensure that along with customized videos, the audio quality is also great, the software support functions like automatic audio sync, audio compression, audio equalizer, and more. For video editing, you can add transitions, filters, effects, and many other elements. By the way, now, you can generate music for commercial use and seamlessly select sound effects with Filmora’s filtering features. The interface is simple and user-friendly which makes the software apt for beginners as well as pros.

02Rotor Videos
This is an online music video-making service that can help you create your desired music videos within your budget. The process of creating the footage is simple where you just need to add and upload your music file, select the video clips that go with the theme of the audio, add the lyrics, and then finally process. The video will be ready and can be downloaded for further use. The tool is capable of analyzing the tempo, beat, and other elements of the music file and if needed you can also pay for accessing the video stock collection.

04VideoFX Music Video Maker
This is an Android-based app developed by FuzeBits Inc that allows the creation of interesting music videos. Using the app, you can also record the lip-sync music and then customize it using over 50 filters like neon, mirror, thermal, and more. Preset shooting modes – fast motion, auto-pause, and stop motion is also sorted. Other editing functions include stickers, text, filters, and more.

05Mixxx
This is an interesting tool for creating professional-looking music videos using its advanced features. With the drag and drop function, using the tool becomes very easy and it supports the function where the places on the track can be marked using the Hot Keys. The tempo of the song can also be changed by controlling the pitch and its complete music mixer will let you create awesome DJ-type tracks.

● Ending Thoughts →
● Music videos are everywhere on digital media platforms and used for entertainment, promotion, and all other tasks.
● The latest technology has taken these videos to another level by creating AI-generated music videos.
● Several music video maker tools, apps, and software are available, and depending on what are your requirements, a selection can be done.
Music videos are an excellent combination of interesting videos and music files and with double entertainment, the efforts to make these videos are also double. Creating and editing these tools manually is not only a tedious but also time-consuming task and to help with this there are an array of music video maker tools and software available. With the advancement in technology these days, a lot of tools, companies, and setups are also creating versatile AI-generated videos which are a treat to eyes as well as ears. To learn more about these AI music video and creation tools, this article will be a great read.
In this article
01 [Some Interesting Examples Of AI Music Videos](#Part 1)
02 [Top 5 Music Video Makers](#Part 2)
Part 1 Some Interesting Examples Of AI Music Videos
The AI generated music video are getting the attention of a lot of users these days and if you too are keen to check out some of these files, check out the list below of YouTube music ai files.
Part 2 Top 5 Music Video Makers
To help you create music videos in a hassle-free manner and like a pro, several music video makers are available. We have shortlisted the list of popular 5 as below.
01**Wondershare Filmora Video Editor **
This is one of the best tools for creating a music video on your Windows and Mac systems. Quick to download, the program comes with several features that can be further customized for creating your desired footage. The drag and drop function further make the task quick and easy. To ensure that along with customized videos, the audio quality is also great, the software support functions like automatic audio sync, audio compression, audio equalizer, and more. For video editing, you can add transitions, filters, effects, and many other elements. By the way, now, you can generate music for commercial use and seamlessly select sound effects with Filmora’s filtering features. The interface is simple and user-friendly which makes the software apt for beginners as well as pros.
02Rotor Videos
This is an online music video-making service that can help you create your desired music videos within your budget. The process of creating the footage is simple where you just need to add and upload your music file, select the video clips that go with the theme of the audio, add the lyrics, and then finally process. The video will be ready and can be downloaded for further use. The tool is capable of analyzing the tempo, beat, and other elements of the music file and if needed you can also pay for accessing the video stock collection.
04VideoFX Music Video Maker
This is an Android-based app developed by FuzeBits Inc that allows the creation of interesting music videos. Using the app, you can also record the lip-sync music and then customize it using over 50 filters like neon, mirror, thermal, and more. Preset shooting modes – fast motion, auto-pause, and stop motion is also sorted. Other editing functions include stickers, text, filters, and more.
05Mixxx
This is an interesting tool for creating professional-looking music videos using its advanced features. With the drag and drop function, using the tool becomes very easy and it supports the function where the places on the track can be marked using the Hot Keys. The tempo of the song can also be changed by controlling the pitch and its complete music mixer will let you create awesome DJ-type tracks.
● Ending Thoughts →
● Music videos are everywhere on digital media platforms and used for entertainment, promotion, and all other tasks.
● The latest technology has taken these videos to another level by creating AI-generated music videos.
● Several music video maker tools, apps, and software are available, and depending on what are your requirements, a selection can be done.
Steps To Fade Audio In Premier Pro
Audio is a very big part of any video project and it can make or break the video project. This is why it is very important to not just choose a video editor that also offers audio editing, but one that is easy to use and offers a lot of editing options. This way, you can edit the audio in your project to suit your video’s production and end up with a great professional final product.
One of the video editing tools that offer features that can accomplish all that is Adobe Premier Pro. In this article, we will look at how you can use Premier Pro to fade audio in or out.
Steps to Fade Audio in Premier Pro
Premier Pro gives you two different options to fade audio in or out. Let’s look at both options and then you can choose the one that suits you best;
Fade Audio using Crossfade Audio Transition
Step1To begin, open Premier Pro on your computer and then open the audio that you want to edit.
Step2Once it is open, select the audio clip in the timeline and then click on “Sequence” at the top menu and select “Apply Audio Transition.”
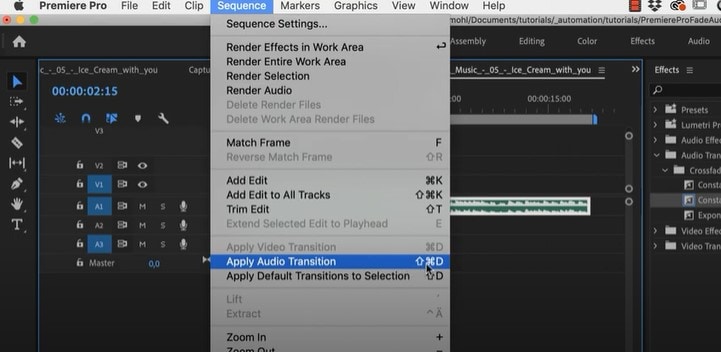
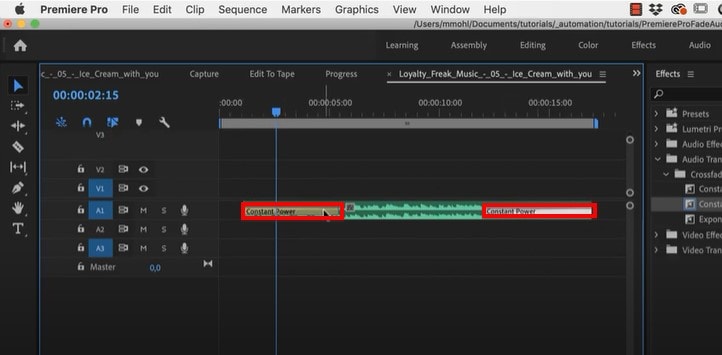
You can also use the keyboard shortcut Shift + Command + D (macOS) or Shift+ Ctrl + D (PC). This will add the “Constant Power Cross Fade” effect at the beginning and the end of the clip.
Step3You can then just change the duration of the effect by simply dragging the end of the transition.
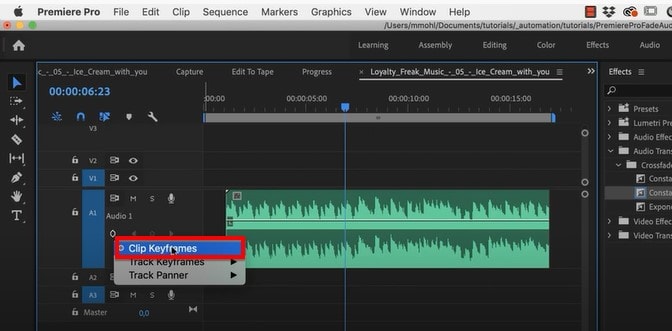
Fade Audio using Clip Keyframes
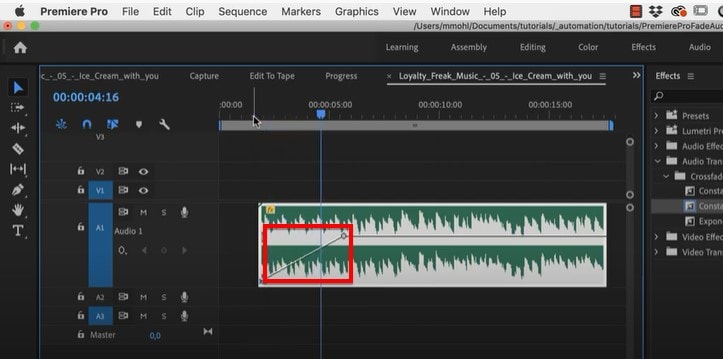
Step1Adobe Premier Pro has two volume keyframes; Track and Clip. Make the audio larger so you can see the volume line and then under the audio name, click on the volume keyframes option to make sure “Clip Keyframes” is enabled.
Step2You can then press down on the Command Key (macOS) or the Control Key (PC) and drag the volume line down to add a fade-in or fade-out effect.
Adobe Premiere Alternative Way to Fade Audio
If you are like most people and you find Adobe Premier Pro to be very difficult you use, we have a tool that is just as effective but also simplifies the process. This is the very simple to use Wondershare Filmora .
Just like Premier Pro, Filmora gives you two options to fade audio in and out. Let’s look at both options;
Adding Fade in and Out in Audio Pane
Step1Download and install Wondershare Filmora onto your computer, open the program and then import the audio clip that you want to edit.
Step2Once the video has been added to the timeline, double-click on it to access the “Audio” editing panel.
Step3Here, you can very simply add the fade-in and fade-out effects by simply dragging the sliders to the desired duration or by manually entering the duration in seconds.

Using the Audio Waveform
You can also use the fade icons on the left and right edges of the audio waveform to quickly add a fade in and out.
To add a fade-in effect, drag the fade-in maker to the right. Then go to the end of the clip to drag the fade-out maker to the left to add a fade-out effect.

Related FAQs about Audio Fade
1. How Do I Fade to Black in Adobe Premiere Pro?
You can easily add the Fade to Black transition in Adobe Premiere Pro using the “Effects” tab. Just open the two clips in Premiere Pro and go to “Effects.” Type in “dip to black” in the search box and when you find the effect, drag it between the two clips in the timeline. The effect will appear on the right side of the project.
You also have several customization options that you can apply to the effect to get it just right. To see these options, go to Effect Controls and you should be able to change the alignment of the effect to “Center at Cut” so that the first video fades out to black before the second video appears.
2. Premiere Pro Audio Fade Not Working?
Sometimes you can complete all the editing steps we have described above but you are unable to tell if the fade-in and fade-out effects are working because you can’t play the audio in Premiere. This is a very common problem that can easily be fixed using the following troubleshooting steps;
Check the master volume on your computer to see if this is the problem
Then check the volume in Premiere to see if the audio meter is moving as you play the clip. It is the green bar usually in the lower right corner.
If your volume is fine but you still can’t hear the audio, you may need to adjust several settings. Go to Edit > Preferences (on PC) or Preferences menu under the main Premiere Pro CC menu (macOS) and select “Audio Hardware” in the options that appear. You can then change the “Default Output” device to something else.
3. How Do You do Audio Transitions in Premiere Pro
Adding audio transitions in Premiere Pro is very easy; just open the audio that you want to edit and then Right-click (PC) or Control- Click (macOS) on either the “Constant Gain” or “Constant Power” effect from the Effects panel. Then choose “Set Selected as Default Transition” from the options in the menu.
To add a duration for the audio transitions, go to Edit > Preferences > Timeline (PC) or Premiere Pro Menu > Preferences (macOS) and enter the duration value under “Audio Transition Default Duration.”
Free Download For Win 7 or later(64-bit)
Free Download For macOS 10.14 or later
Also read:
- [New] Elevating Live TikTok Content via Zoom
- 2024 Approved Easiest Fix Included! Top 5 Ways to Convert HDR to SDR Videos
- 2024 Approved Structuring Stimulating Podcast Trailers
- Apple Reveals Improved Repairability of New iPhone 16 Compared to Earlier Models - Insights From ZDNet
- Expanding Possibilities with Virtual Reality for 2024
- Expert Tips for Intimate Filmmaking Approaches for 2024
- How Can Filmora Create an Audio Visualizer Project for a Song? All Steps, From Launching the App to Editing the Text, Are Detailed Here for 2024
- In 2024, Mastering Lock Screen Settings How to Enable and Disable on Honor Magic 5 Pro
- In 2024, Slow Motion Videos Are Taking over Social Media and Becoming a New Trend. Read This Article if You Want to Learn How to Slow Down Video in After Effects
- Insights Into the Drive Toward Electric Vehicle Adoption
- New Adobe Premiere Pro Rec 709 LUTs Finding The Best Choices
- New In 2024, MP3 Cutter Download for Computer and Mobile
- New Ultimate Guide on How To Plan and Storyboard a Music Video for 2024
- Quick Fixes for Why Is My Vivo X Flip Black and White | Dr.fone
- This Article Will Help You Make Cinematic Shots with Simple DIY Hacks Using Stuff From Your Nearest Dollar Store. You Can Edit Your Video to Get Pro Results by Wondershare Filmora for 2024
- Top 507 Memorable Instagram Caption Ideas
- Unique Japanese Art Collection: Premium Wallpapers, HD Backgrounds, and Stunning Visuals - Discovered by YL Computing
- Updated How To Use Virtual Green Screen to Shoot Video for 2024
- Updated In 2024, Clone Yourself in Videos with Filmora
- Title: Updated Add Camera Shake to Video in Adobe After Effects for 2024
- Author: Chloe
- Created at : 2025-02-27 00:39:45
- Updated at : 2025-03-03 20:38:48
- Link: https://ai-editing-video.techidaily.com/updated-add-camera-shake-to-video-in-adobe-after-effects-for-2024/
- License: This work is licensed under CC BY-NC-SA 4.0.