
:max_bytes(150000):strip_icc():format(webp)/operationcouldnotcomplete-95695abe458d4062a2c2f7e46e656b08.png)
Updated Add Green Screen Video on TikTok
Add Green Screen Video on TikTok
TikTok is the most popular platform for making short videos. You can create creative short videos and upload to TikTok so that they can entertain your followers and make your videos go viral. To add variety to your video content, the use of green screen in short videos is a great idea. You can replace the green screen with any background in your TikTok video. You need to know how to add green screen video on TikTok.
Adding green screen on TikTok videos has become a trend now as there are several green screen TikTok videos that have gone viral. In fact, creative green screen videos are extremely popular on social media platforms. Instead of replacing the green screen in your video with a single photo, you can replace it with multiple pictures on TikTok. We will illustrate how to add multiple pictures on TikTok green screen.
Part 1. How to Add Green Screen on TikTok?
To add green screen on TikTok video, you need to have a background of uniform color. It does not necessarily have to be a green screen. For example, if you are shooting a video of your legs and the floor tiles have uniform color, you can use green screen on TikTok to replace the tiles with any picture. Instead of using one picture on TikTok short video, you can use multiple pictures in the background to create stunning TikTok videos. Here are the steps on how to add multiple pictures to TikTok green screen.
Step1 Open TikTok app on your phone. Tap on Plus icon located at the bottom of the app screen to make a new video.
Step2 Choose the duration of the video as per your preference. Thereafter, tap on Effects option located at the bottom-left corner to see the different effects available on TikTok.
![]()
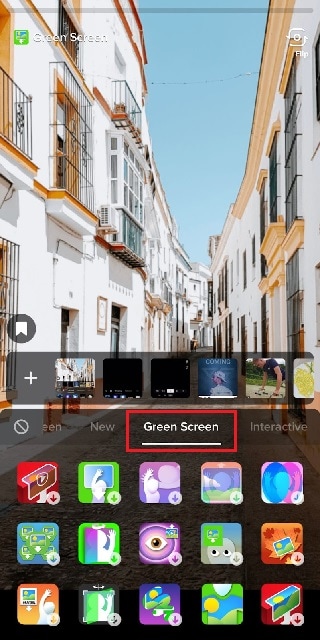
Step3 Go to Trending tab and you will see Green Screen and Green Screen Video icons. If you want your video to have green screen photo, tap on Green Screen icon. If you want your video to have green screen video, tap on Green Screen Video icon.

Step4 You will get a generic background and you can choose any preset background or select photo or video from your phone gallery by tapping on Plus icon. Once you are done, tap on Record button.
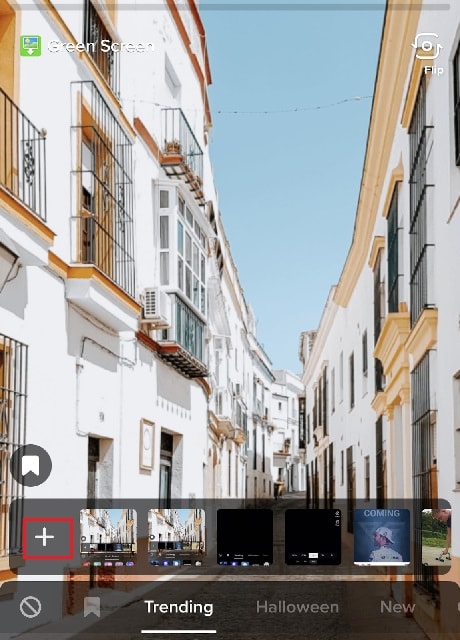
Step5 In order to use multiple pictures, you should stop recording in between and change your green screen image to anything you desire. Then tap on Record button again. TikTok will string your clips and it would appear that you have been changing multiple pictures of your background for your video.
If you want to experiment with green scree effects, you can scroll down after tapping on Green Screen icon under Effects. You will see different types of green screen videos possible on TikTok to choose from.
Part 2. Creative Ideas to Make TikTok Green Screen Video
Now that you know how to add a video on TikTok green screen, you have to make the most out of it. If you are wondering how you can use green screen in your TikTok videos, here are some creative ideas for you.
Walking Out Videos – You can use green screen effect to show that you are walking out of plane, walking vertically on the wall like inception, walking on the roof of a building. In fact, you can show that you are walking out of popular monuments and palaces and trick your viewers into thinking that you were actually there.
Photoshoot Location – Create a TikTok video showing your favorite locations across the world where you dream of doing photoshoot. You can pose differently and place the location in your background through green screen effect.
How-To Video – If your TikTok channel is about tutorial and learning videos, you can explain things better by putting screenshots and multiple relevant pictures in the background so that viewers can get a pictorial representation of what you are speaking to them.
Mystery Story – You can a create short video describing unknowing facts and mysteries around certain places in the world. You can put photos or video clips of those mysterious places in your background to keep your viewers hooked and related to your narration.
Rate Them Video – You can use green screen effect to showcase your old Instagram photos or videos and rate them. This is an extremely popular trend in TikTok where people show their old photos, display work from the past, and rate them today.
Reveal Your Creation – Share your secrets or interesting stories behind some of the photos or videos you took in the past. You can talk about how creatively you took certain photos and put those photos in the background while discussing them.
Part 3. How to Make Green Screen Video on Computer?
If you have a computer and a webcam, you can record a green screen video on your computer. You can place the green screen in the background perfectly and place the webcam so that the background stays within the green screen. You will need a video recorder and a video editor to make green screen video as well as replace the green screen with any photo or video. We recommend Wondershare Filmora where you can record as well as edit green screen video.
Filmora is a professional video editor where you can record your computer screen as well as your webcam video with green screen background in Picture-in-Picture mode. After recording the video, you can replace the green screen with any video clip or photo instantly in a few steps. You can also fine-tune green screen effect for perfection. Therefore, you can save the video in any resolution and file format as per your preference.

Free Download For Win 7 or later(64-bit)
Free Download For macOS 10.14 or later
Conclusion
Adding green screen effect on TikTok videos can make your videos stand out. We have illustrated how to add multiple green screen videos on TikTok and your videos will have a better chance of getting viral. Keep the green screen ideas in mind while making TikTok green screen videos. If you want to make and edit green screen videos on computer, Wondershare Filmora is the best application available for Windows and Mac users.
Top LUTs for Sony HLG
Social media platforms have undoubtedly become a dominant force in our lives. Similarly, color grading our photos and videos are also in high demand due to social media. Furthermore, HLG is a popular high-dynamic range (HDR) standard with significant traction. Many social media platforms like Instagram and YouTube increasingly support HDR content.
Additionally, to achieve consistent and desirable results in color grading, you can use LUTs. Various LUTs are available, each offering distinct color tones and schemes. Similarly, for HLG color grading, Sony HLG LUTs have become widely popular. These LUTs are designed to optimize the color reproduction and dynamic range of Sony cameras shooting in HLG mode.
Part 1: How Are LUTs Used in Cinematography?
In cinematography, LUTs are essential to adjust the color and tone of digital images after filming. They help cinematographers and editors to achieve specific looks and maintain consistency. Here’s how LUTs are typically used in cinematography:
- Correcting Colors: LUTs fix any color imbalances in any video or photo. Moreover, it ensures that the colors look accurate and natural.
- Creating a Style: Cinematographers use LUTs to establish a particular mood and feel for a film. Furthermore, LUTs can completely change your content’s overall color and tone in a unique style.
- Matching Different Cameras: When using multiple cameras, each camera may capture colors differently. However, LUTs can be applied for consistent color grading throughout your video.
- Adjusting Lighting Conditions: LUTs are helpful when shooting scenes under different lighting conditions. In addition, they maintain consistent color and contrast throughout your project.
- Recreating Film Looks: LUTs can imitate the color characteristics of specific film stocks. It helps the filmmakers to achieve a desired look similar to classic films. It is especially useful when shooting digitally but aiming for a film-like appearance.
- Previewing the Final Look: You can see the real-time view of your color grading using LUTs. It helps you make important creative decisions and to maintain visual consistency throughout.
Empower your videos with a new mood using different LUTs. Filmora now offers 800+ top-quality 3D LUTs cover a broad range of scenarios. Transform your videos with Filmora’s powerful 3D LUTs.
Apply LUT on Videos Apply LUT on Videos Learn More


Part 2: 5 Top LUTs Available for Sony HLG to Download
If you feel like searching for good LUTs for your Sony camera’s footage, don’t worry. Here is a list of some of the best Song HLG LUTs, each with a unique tone and feel. You can choose any LUT that matches your style and preference.
1. Cinematic HLG2 LUTs
It is a pack of cinematic-style Sony HLG2 LUTs. This pack is for those seeking a dramatic and moody style. It adds a film noir-inspired touch to your videos. Moreover, this pack offers 5 cinematic LUTs, each with unique color grading. Additionally, it creates a professional look with high contrast and desaturated colors. Furthermore, one of its LUT gives a bluish tone to create a Winter ambiance.

2. HLG Cinematic LUT Pack
The HLG Cinematic LUT Pack is a collection of 19 unique cinematic Look-Up Tables. Each LUT in the pack offers a different color scheme, tone, and style. Additionally, it provides multiple options to give your media the perfect cinematic feel. You can choose from different options and select the LUT which matches your style and mood.

3. HLG3 & HLG2 creative correction LUT
This LUT pack is all about bold and vibrant colors that grab attention. It is one of the best Sony HLG3 to Rec709 LUT packs available. It enhances the saturation and contrast of your videos and images. Furthermore, this pack makes colors appear vivid and eye-catching. Additionally, it adds a punch to your digital media content with more vibrant and bright colors.

4. HLG Normalized LUT Pack
The HLG Normalized LUT Pack offers a refreshing and calming color scheme. It gives your videos cool-toned hues, giving a serene and calm feel. This pack has 80 different styles of LUTs, each with a unique color composition. Furthermore, this pack is ideal for capturing scenic landscapes, beach views, or other relaxing scenes. It gives your visuals a cool and crisp look by highlighting the shades of blue and green.

5. HLG LUT Pack
This pack for Sony HLG offers a dreamy and soft color scheme. It softens the colors and adds a subtle pastel touch to your footage. Moreover, it creates a dreamier and fantasy-like color scheme. This LUT has over 10 different LUTs that you can use for your videos and images. With this LUT pack, you can add a touch of magic to give your videos a soft and dream-like feel.

Part 3: Wondershare Filmora: A Great Option for Applying LUTs
Wondershare Filmora is a versatile tool that offers impressive color grading capabilities. This tool allows you to enhance your content by improving its color composition. With Filmora, you have the ability to import and apply LUTs to your videos. Moreover, this tool goes a step further by offering a vast library of over 800+ LUTs that you can use. These LUTs offer a wide range of color grading options for you.
Add LUTs on Video For Win 7 or later(64-bit)
Add LUTs on Video For macOS 10.14 or later
Additionally, it allows you to customize the strength of your applied LUTs. That being said, you can even import your Sony HLG to Rec709 LUTs. Filmora isn’t just limited to color grading; it is a complete video editing software. You can add captivating texts, filters, effects, transitions, and more to your content. Last but not least, you can even access over 10 billion free media assets for your edits.

Key Features:
- You can make your audio as much professional as your videos. With its AI Denoiser, your audio will be distortion free. It will remove all the background noises and distortion from your audio.
- Moreover, if you want to change the background of your video without a green screen, you can. It has an AI Cutout tool, which selects your subject to change its background.
- Furthermore, make engaging short reels with Filmora. Don’t frustrate your audience with long and boring videos. Trim your videos, remove pauses and silent moments with Silence Detection, and make good reels.
Conclusion
In conclusion, color grading has become increasingly significant in social media. It can capture attention, convey emotions, and enhance the look of our content. Furthermore, HLG, with its HDR capabilities, offers a more immersive viewing experience. LUTs, including the popular Sony HLG LUTs, also provide a practical and efficient way to color grade your media files.
You can also try Filmora video editor to apply luts on videos.
Add LUTs on Video For Win 7 or later(64-bit)
Add LUTs on Video For macOS 10.14 or later
Apply LUT on Videos Apply LUT on Videos Learn More
Part 2: 5 Top LUTs Available for Sony HLG to Download
If you feel like searching for good LUTs for your Sony camera’s footage, don’t worry. Here is a list of some of the best Song HLG LUTs, each with a unique tone and feel. You can choose any LUT that matches your style and preference.
1. Cinematic HLG2 LUTs
It is a pack of cinematic-style Sony HLG2 LUTs. This pack is for those seeking a dramatic and moody style. It adds a film noir-inspired touch to your videos. Moreover, this pack offers 5 cinematic LUTs, each with unique color grading. Additionally, it creates a professional look with high contrast and desaturated colors. Furthermore, one of its LUT gives a bluish tone to create a Winter ambiance.
2. HLG Cinematic LUT Pack
The HLG Cinematic LUT Pack is a collection of 19 unique cinematic Look-Up Tables. Each LUT in the pack offers a different color scheme, tone, and style. Additionally, it provides multiple options to give your media the perfect cinematic feel. You can choose from different options and select the LUT which matches your style and mood.
3. HLG3 & HLG2 creative correction LUT
This LUT pack is all about bold and vibrant colors that grab attention. It is one of the best Sony HLG3 to Rec709 LUT packs available. It enhances the saturation and contrast of your videos and images. Furthermore, this pack makes colors appear vivid and eye-catching. Additionally, it adds a punch to your digital media content with more vibrant and bright colors.
4. HLG Normalized LUT Pack
The HLG Normalized LUT Pack offers a refreshing and calming color scheme. It gives your videos cool-toned hues, giving a serene and calm feel. This pack has 80 different styles of LUTs, each with a unique color composition. Furthermore, this pack is ideal for capturing scenic landscapes, beach views, or other relaxing scenes. It gives your visuals a cool and crisp look by highlighting the shades of blue and green.
5. HLG LUT Pack
This pack for Sony HLG offers a dreamy and soft color scheme. It softens the colors and adds a subtle pastel touch to your footage. Moreover, it creates a dreamier and fantasy-like color scheme. This LUT has over 10 different LUTs that you can use for your videos and images. With this LUT pack, you can add a touch of magic to give your videos a soft and dream-like feel.
Part 3: Wondershare Filmora: A Great Option for Applying LUTs
Wondershare Filmora is a versatile tool that offers impressive color grading capabilities. This tool allows you to enhance your content by improving its color composition. With Filmora, you have the ability to import and apply LUTs to your videos. Moreover, this tool goes a step further by offering a vast library of over 800+ LUTs that you can use. These LUTs offer a wide range of color grading options for you.
Add LUTs on Video For Win 7 or later(64-bit)
Add LUTs on Video For macOS 10.14 or later
Additionally, it allows you to customize the strength of your applied LUTs. That being said, you can even import your Sony HLG to Rec709 LUTs. Filmora isn’t just limited to color grading; it is a complete video editing software. You can add captivating texts, filters, effects, transitions, and more to your content. Last but not least, you can even access over 10 billion free media assets for your edits.
Key Features:
- You can make your audio as much professional as your videos. With its AI Denoiser, your audio will be distortion free. It will remove all the background noises and distortion from your audio.
- Moreover, if you want to change the background of your video without a green screen, you can. It has an AI Cutout tool, which selects your subject to change its background.
- Furthermore, make engaging short reels with Filmora. Don’t frustrate your audience with long and boring videos. Trim your videos, remove pauses and silent moments with Silence Detection, and make good reels.
Conclusion
In conclusion, color grading has become increasingly significant in social media. It can capture attention, convey emotions, and enhance the look of our content. Furthermore, HLG, with its HDR capabilities, offers a more immersive viewing experience. LUTs, including the popular Sony HLG LUTs, also provide a practical and efficient way to color grade your media files.
You can also try Filmora video editor to apply luts on videos.
Add LUTs on Video For Win 7 or later(64-bit)
Add LUTs on Video For macOS 10.14 or later
The Ultimate Guide for the 10 Leading Slow-Motion Cameras
Camera technology is evolving at an increased pace with improved features. Each brand competes in the media industry to release cameras with diverse functionalities. When you keep updated on the latest models, you will get to know different varieties and options. It will also help you stay current with evolving technology for slow-motion videos. Choosing the best slow-motion camera involves considering specific needs like filmmaking or creating slow-motion videos.
In this article, we’ll mention the top 10 best slow mo cameras for filming slow-motion videos. The slow-motion camera is specifically built to capture the moments in perfect frame rates. Furthermore, this article will highlight an innovative way to slow down videos without any camera.
Slow Motion Video Maker Slow your video’s speed with better control of your keyframes to create unique cinematic effects!
Make A Slow Motion Video Make A Slow Motion Video More Features
Part 1: How Do Slow-Motion Cameras Help in Recording Perfect Slow-Mo Videos?
Slow-motion cameras record videos at much faster speeds than regular cameras. This feature helps create slow-motion videos by slowing down the recorded action when played at normal speed. These slow-motion cameras are popular in filmmaking, sports analysis, science, and content creation. That’s because they capture detailed moments and highlight fast-moving things.
- Higher Frame Rate: Regular videos usually record 24, 30, or 60 frames per second (fps). But slow-motion cameras can capture hundreds or thousands of frames per second. More frames mean more details and smoother slow-motion videos when played back.
- Smooth Playback: Slow-motion videos look smooth and purposeful when played at regular speeds. More frames are recorded initially to achieve this effect. Ultimately, it will preserve all details when the video is played in slow motion.
- High-Resolution Sensors: Lots of slow-motion cameras have high-quality sensors. These sensors ensure that even with more frames captured, the picture stays sharp and detailed in slow-motion videos. This helps capture fine details without losing clarity.
- Creative Control: Slow-motion cameras let filmmakers and videographers control how fast or slow some parts of a scene look. This helps tell stories better, focus on details, and make videos more interesting and attractive to watch.
- Reduced Motion Blur: More frames per second make pictures clearer and sharper. This feature works especially for fast-moving things. This is important when you need to see tiny details or when the lighting isn’t great.
- Temporal Resolution: Slow-motion cameras can record lots of details in quick movements. They’re handy in sports, science, and creative videos where catching fast and detailed actions matter a lot.
Part 2: Finding The Top Slow-Motion Cameras to Use in 2024
If you want a good slow-motion camera, start by checking out the ones with higher frame rates. Also, think about what you’ll be recording and where you’ll share your videos. Buying a new camera can be confusing and perplexing. We hope you’ll find the best slow-motion camera in the list below. We have arranged the top slow-motion cameras to use in 2024 below:
- PowerShot G7 X Mark III Black
- Sony ZV-1 Camera
- GoPro HERO11 Black
- GoPro HERO10 Black
- Panasonic Lumix GH6
- Sony α7R IV
- Fujifilm X-S20
- Canon EOS-1D X Mark III DSLR Camera
- Nikon D6 FX-Format Digital SLR Camera
- Canon DSLR Camera [EOS 90D]
1. PowerShot G7 X Mark III Black
The PowerShot G7 X Mark III Black is a small but powerful camera for taking high-quality slow-motion videos. It has a 20.1 Megapixel camera and a DIGIC 8 Image Processor, which means it shows exceptional clarity even in different lighting. The 4.2x Optical Zoom Kens with Optical Image Stabilizer helps get close-up shots without making them blurry. For videos, it can record in 4K (at 30 frames per second) and Full HD (at 120 frames per second) for super smooth slow-motion shots.

2. Sony ZV-1 Camera
The Sony ZV-1 Camera is made specifically for content creators and vloggers. Although it has a compact design, it is packed with powerful features. This slow-motion video camera has a 1-inch sensor and digital and optical image stabilization. This means your pictures and videos will be clear and steady even if things are moving fast.
The camera’s results are sharp and colorful thanks to its 20.1 MP resolution and BIONZ X Image Processor. Also, it has a Fast Hybrid AF System that quickly focuses accurately, perfect for both photos and videos.

3. GoPro HERO11 Black
The GoPro HERO11 Black is an awesome slow-motion camera perfect for all kinds of adventures. It takes clear videos up to 5.3K resolution and sharp 27MP photos. The camera has great stabilization, so your videos always look smooth. You can change how wide your shots are and switch lenses digitally while keeping things clear.
GoPro HERO11 Black has cool effects for nighttime shots, making them look artistic. The camera is tough, waterproof up to 33 feet, and has a long-lasting battery that works well even in cold weather.

4. GoPro HERO10 Black
The GoPro HERO10 Black has a faster processor for smoother use and better touch controls. It can record super clear videos at higher speeds: 5.3K at 60fps and 4K at 120fps. You can also shoot camera slow-motion videos at 240fps in 2.7K resolution. The camera’s sensor is better, too, making photos sharper and allowing you to grab 15.8MP pictures from videos. It keeps footage perfectly steady with its excellent stabilization.

5. Panasonic LUMIX GH6
The LUMIX GH6 is an inspiring innovation in the LUMIX camera series, packed with amazing upgrades. It records high-quality videos internally in ProRes 422 HQ and ProRes 422, making them look great and easier to work with on computers later. This slow-mo video camera is faster due to a new engine, making pictures look better with less noise and better colors.
It’s great for professional video making, offering top-notch recording options. It also has image stabilization, a flexible rear monitor, and slots for different memory cards.

6. Sony α7R IV
The Sony A7R IV is a top-notch mirrorless camera appreciated by videography experts. It takes super clear pictures with its 20MP full-frame sensor. Also, it has a feature that prevents shaky photos and helps videos stay steady. You can control how long the shutter stays open, which helps in different lighting.
This slow-motion video camera lets you choose different ways to measure light for better pictures. Small and adaptable, it is high-tech and has great performance in digital photography.

7. Fujifilm X-S20
The Fujifilm X-S20 is a versatile camera that is equipped with advanced features and is easy to carry. This slow-motion camera has a 26.1MP sensor for really clear pictures. The screen is a vary-angle touchscreen of 3.0 inches and 1.84m-dot. You can connect it to Wi-Fi and Bluetooth to share and control the camera from a distance.
It’s perfect for videos, too, recording in high-quality up to 6.2K resolution. The camera is small and compact at 127.7 x 85.1 x 65.4mm and weighs only 491g.

8. Canon EOS-1D X Mark III DSLR Camera
The Canon EOS-1D X Mark III is a top choice for professionals in photography and videography. It has a powerful 20.1 Megapixel Full-frame CMOS sensor that ensures high-quality images. The DIGIC X Image Processor handles low-light situations exceptionally well. Adding on, it offers a wide ISO range for great performance.
Its advanced autofocus system with deep learning technology tracks subjects accurately. This slow-mo camera supports impressive 4K UHD 2160p video recording.

9. Nikon D6 FX-Format Digital SLR Camera
The Nikon D6 FX-Format Digital SLR Camera Body is made for professionals who promise top-notch performance. It has a powerful 20.8 Megapixel Full-frame CMOS sensor for high-quality photos. Also, it can work as a webcam with a maximum resolution of 16 MP and performs well in different situations.
Using digital image stabilization, the slow-motion video camera helps prevent blur. Moreover, it has a quick shutter speed of 1/8000 seconds for precise control over exposure.

10. Canon DSLR Camera [EOS 90D]
The Canon 90D Body is a slow-mo camera for both filmmakers and videographers. It has a 32.5-megapixel CMOS APS-C sensor for clear and detailed images. Furthermore, it supports recording videos in 4K UHD 30P and Full HD 120P, which helps in delivering excellent video quality. With a 45-Point All Cross-type AF System, the 90D provides precise autofocus across the entire frame.

Part 3: What To Do If You Do Not Have a Camera? Use Filmora for Slow-Mo Video Making
Sometimes, getting an affordable slow-motion camera for shooting videos can be tricky. But don’t worry! You can still create slow-motion videos without having a specific camera. Wondershare Filmora is an excellent solution to make fantastic slow-motion videos, even if you don’t own a special slow-motion camera.
You can adjust the speed of your videos easily to make certain moments slower, making your clips look cool. Filmora isn’t just about changing the speed of your videos. It’s a powerful editing software that lets you do lots of things to make your videos better.
Free Download For Win 7 or later(64-bit)
Free Download For macOS 10.14 or later
Steps Required to Slow Down Video Professionally with Speed Ramping
Filmora Speed Ramping feature allows you to control your clip’s speed. It gives the flexibility to either slow down the entire video or specific segments. Here’s a guide on executing slow-motion in the Filmora video editing interface.
Step 1Set Up Project and Import Footage
Start by launching Wondershare Filmora and creating a new project. Then, import your video by clicking the “+” icon. After that, select “Match to Media” to ensure your project settings align with your clip’s resolution.

Step 2Apply Slow-Motion Effect to Slow Down Video
In the next step, add the imported video to the timeline and access the “Speed” icon. Choose a preset, such as 0.5x from the “Slow” menu, to apply a slow-motion effect to the entire clip. Alternatively, right-click on the video, go to “Speed,” followed by “Uniform Speed,” and adjust the slider leftwards for slow motion.

Step 3Customize Speed for Specific Segments
To create slow-motion effects for specific parts or frames within your video, navigate to the “Speed Ramping” window. Then, choose “Customize” and modify the speed by dragging the points along the line.

Step 4Add Freeze Frame at Required Position
For freezing a frame, position the play head at the desired spot. Select “Add Freeze Frame,” then set the freeze duration in the “Freeze Time Field” and adjust its placement as required. Save changes by clicking “OK.”

Top Features Offered by Filmora
Wondershare Filmora offers its users a variety of advanced features to perform an edit conveniently. It enhances creativity and productivity with the help of AI-equipped in it. Described below are some of these features to know about Filmora:
1. AI Smart Masking
AI Smart Masking simplifies the process of adding high-quality transitions and effects. By contrast, it can be complex with manual editing. By activating this feature, it automatically handles the masking task. Once AI masking is enabled and the desired area is specified, it swiftly completes the process. This allows you to apply transitions and effects to the unmasked area afterward.
2. AI Copywriting
Filmora AI Copywriting is a new tool that incorporates ChatGPT API. It uses AI to create scripts, providing tons of ideas for creators to improve their video storytelling. This tool seamlessly integrates AI-generated text and narration into the editing process. With Filmora AI Copywriting, creators can quickly develop catchy YouTube titles and descriptions.
3. Audio Visualizer
Filmora Audio Visualizer is an innovative tool for music videos on how you experience sound and visuals together. It works by matching the visuals to the sound in your video. The Audio Visualizer analyzes the audio and syncs with the music’s beats and rhythm. This creates an amazing display that makes watching and listening more enjoyable.

4. Speech-To-Text
The Filmora Speech-To-Text (STT) feature is a huge help for video editors who want to work more efficiently. With just one click, this tool changes spoken words in videos into written text. It saves a lot of time by avoiding the manual work of typing subtitles. This feature not only saves time but also ensures that subtitles match what’s being said in the video accurately.
Conclusion
In summary, slow-motion videography is an amazing way to tell stories visually. Mixing technology and your ideas helps create videos that capture people’s attention. For that reason, we have provided 10 slow-motion video cameras to help you capture slow-motion videos. Additionally, we also highlighted the perfect solution if you don’t have a camera: Wondershare Filmora. You can easily generate a slow-motion video using our simple guide with this tool.
Make A Slow Motion Video Make A Slow Motion Video More Features
Part 1: How Do Slow-Motion Cameras Help in Recording Perfect Slow-Mo Videos?
Slow-motion cameras record videos at much faster speeds than regular cameras. This feature helps create slow-motion videos by slowing down the recorded action when played at normal speed. These slow-motion cameras are popular in filmmaking, sports analysis, science, and content creation. That’s because they capture detailed moments and highlight fast-moving things.
- Higher Frame Rate: Regular videos usually record 24, 30, or 60 frames per second (fps). But slow-motion cameras can capture hundreds or thousands of frames per second. More frames mean more details and smoother slow-motion videos when played back.
- Smooth Playback: Slow-motion videos look smooth and purposeful when played at regular speeds. More frames are recorded initially to achieve this effect. Ultimately, it will preserve all details when the video is played in slow motion.
- High-Resolution Sensors: Lots of slow-motion cameras have high-quality sensors. These sensors ensure that even with more frames captured, the picture stays sharp and detailed in slow-motion videos. This helps capture fine details without losing clarity.
- Creative Control: Slow-motion cameras let filmmakers and videographers control how fast or slow some parts of a scene look. This helps tell stories better, focus on details, and make videos more interesting and attractive to watch.
- Reduced Motion Blur: More frames per second make pictures clearer and sharper. This feature works especially for fast-moving things. This is important when you need to see tiny details or when the lighting isn’t great.
- Temporal Resolution: Slow-motion cameras can record lots of details in quick movements. They’re handy in sports, science, and creative videos where catching fast and detailed actions matter a lot.
Part 2: Finding The Top Slow-Motion Cameras to Use in 2024
If you want a good slow-motion camera, start by checking out the ones with higher frame rates. Also, think about what you’ll be recording and where you’ll share your videos. Buying a new camera can be confusing and perplexing. We hope you’ll find the best slow-motion camera in the list below. We have arranged the top slow-motion cameras to use in 2024 below:
- PowerShot G7 X Mark III Black
- Sony ZV-1 Camera
- GoPro HERO11 Black
- GoPro HERO10 Black
- Panasonic Lumix GH6
- Sony α7R IV
- Fujifilm X-S20
- Canon EOS-1D X Mark III DSLR Camera
- Nikon D6 FX-Format Digital SLR Camera
- Canon DSLR Camera [EOS 90D]
1. PowerShot G7 X Mark III Black
The PowerShot G7 X Mark III Black is a small but powerful camera for taking high-quality slow-motion videos. It has a 20.1 Megapixel camera and a DIGIC 8 Image Processor, which means it shows exceptional clarity even in different lighting. The 4.2x Optical Zoom Kens with Optical Image Stabilizer helps get close-up shots without making them blurry. For videos, it can record in 4K (at 30 frames per second) and Full HD (at 120 frames per second) for super smooth slow-motion shots.
2. Sony ZV-1 Camera
The Sony ZV-1 Camera is made specifically for content creators and vloggers. Although it has a compact design, it is packed with powerful features. This slow-motion video camera has a 1-inch sensor and digital and optical image stabilization. This means your pictures and videos will be clear and steady even if things are moving fast.
The camera’s results are sharp and colorful thanks to its 20.1 MP resolution and BIONZ X Image Processor. Also, it has a Fast Hybrid AF System that quickly focuses accurately, perfect for both photos and videos.
3. GoPro HERO11 Black
The GoPro HERO11 Black is an awesome slow-motion camera perfect for all kinds of adventures. It takes clear videos up to 5.3K resolution and sharp 27MP photos. The camera has great stabilization, so your videos always look smooth. You can change how wide your shots are and switch lenses digitally while keeping things clear.
GoPro HERO11 Black has cool effects for nighttime shots, making them look artistic. The camera is tough, waterproof up to 33 feet, and has a long-lasting battery that works well even in cold weather.
4. GoPro HERO10 Black
The GoPro HERO10 Black has a faster processor for smoother use and better touch controls. It can record super clear videos at higher speeds: 5.3K at 60fps and 4K at 120fps. You can also shoot camera slow-motion videos at 240fps in 2.7K resolution. The camera’s sensor is better, too, making photos sharper and allowing you to grab 15.8MP pictures from videos. It keeps footage perfectly steady with its excellent stabilization.
5. Panasonic LUMIX GH6
The LUMIX GH6 is an inspiring innovation in the LUMIX camera series, packed with amazing upgrades. It records high-quality videos internally in ProRes 422 HQ and ProRes 422, making them look great and easier to work with on computers later. This slow-mo video camera is faster due to a new engine, making pictures look better with less noise and better colors.
It’s great for professional video making, offering top-notch recording options. It also has image stabilization, a flexible rear monitor, and slots for different memory cards.
6. Sony α7R IV
The Sony A7R IV is a top-notch mirrorless camera appreciated by videography experts. It takes super clear pictures with its 20MP full-frame sensor. Also, it has a feature that prevents shaky photos and helps videos stay steady. You can control how long the shutter stays open, which helps in different lighting.
This slow-motion video camera lets you choose different ways to measure light for better pictures. Small and adaptable, it is high-tech and has great performance in digital photography.
7. Fujifilm X-S20
The Fujifilm X-S20 is a versatile camera that is equipped with advanced features and is easy to carry. This slow-motion camera has a 26.1MP sensor for really clear pictures. The screen is a vary-angle touchscreen of 3.0 inches and 1.84m-dot. You can connect it to Wi-Fi and Bluetooth to share and control the camera from a distance.
It’s perfect for videos, too, recording in high-quality up to 6.2K resolution. The camera is small and compact at 127.7 x 85.1 x 65.4mm and weighs only 491g.
8. Canon EOS-1D X Mark III DSLR Camera
The Canon EOS-1D X Mark III is a top choice for professionals in photography and videography. It has a powerful 20.1 Megapixel Full-frame CMOS sensor that ensures high-quality images. The DIGIC X Image Processor handles low-light situations exceptionally well. Adding on, it offers a wide ISO range for great performance.
Its advanced autofocus system with deep learning technology tracks subjects accurately. This slow-mo camera supports impressive 4K UHD 2160p video recording.
9. Nikon D6 FX-Format Digital SLR Camera
The Nikon D6 FX-Format Digital SLR Camera Body is made for professionals who promise top-notch performance. It has a powerful 20.8 Megapixel Full-frame CMOS sensor for high-quality photos. Also, it can work as a webcam with a maximum resolution of 16 MP and performs well in different situations.
Using digital image stabilization, the slow-motion video camera helps prevent blur. Moreover, it has a quick shutter speed of 1/8000 seconds for precise control over exposure.
10. Canon DSLR Camera [EOS 90D]
The Canon 90D Body is a slow-mo camera for both filmmakers and videographers. It has a 32.5-megapixel CMOS APS-C sensor for clear and detailed images. Furthermore, it supports recording videos in 4K UHD 30P and Full HD 120P, which helps in delivering excellent video quality. With a 45-Point All Cross-type AF System, the 90D provides precise autofocus across the entire frame.
Part 3: What To Do If You Do Not Have a Camera? Use Filmora for Slow-Mo Video Making
Sometimes, getting an affordable slow-motion camera for shooting videos can be tricky. But don’t worry! You can still create slow-motion videos without having a specific camera. Wondershare Filmora is an excellent solution to make fantastic slow-motion videos, even if you don’t own a special slow-motion camera.
You can adjust the speed of your videos easily to make certain moments slower, making your clips look cool. Filmora isn’t just about changing the speed of your videos. It’s a powerful editing software that lets you do lots of things to make your videos better.
Free Download For Win 7 or later(64-bit)
Free Download For macOS 10.14 or later
Steps Required to Slow Down Video Professionally with Speed Ramping
Filmora Speed Ramping feature allows you to control your clip’s speed. It gives the flexibility to either slow down the entire video or specific segments. Here’s a guide on executing slow-motion in the Filmora video editing interface.
Step 1Set Up Project and Import Footage
Start by launching Wondershare Filmora and creating a new project. Then, import your video by clicking the “+” icon. After that, select “Match to Media” to ensure your project settings align with your clip’s resolution.
Step 2Apply Slow-Motion Effect to Slow Down Video
In the next step, add the imported video to the timeline and access the “Speed” icon. Choose a preset, such as 0.5x from the “Slow” menu, to apply a slow-motion effect to the entire clip. Alternatively, right-click on the video, go to “Speed,” followed by “Uniform Speed,” and adjust the slider leftwards for slow motion.
Step 3Customize Speed for Specific Segments
To create slow-motion effects for specific parts or frames within your video, navigate to the “Speed Ramping” window. Then, choose “Customize” and modify the speed by dragging the points along the line.
Step 4Add Freeze Frame at Required Position
For freezing a frame, position the play head at the desired spot. Select “Add Freeze Frame,” then set the freeze duration in the “Freeze Time Field” and adjust its placement as required. Save changes by clicking “OK.”
Top Features Offered by Filmora
Wondershare Filmora offers its users a variety of advanced features to perform an edit conveniently. It enhances creativity and productivity with the help of AI-equipped in it. Described below are some of these features to know about Filmora:
1. AI Smart Masking
AI Smart Masking simplifies the process of adding high-quality transitions and effects. By contrast, it can be complex with manual editing. By activating this feature, it automatically handles the masking task. Once AI masking is enabled and the desired area is specified, it swiftly completes the process. This allows you to apply transitions and effects to the unmasked area afterward.
2. AI Copywriting
Filmora AI Copywriting is a new tool that incorporates ChatGPT API. It uses AI to create scripts, providing tons of ideas for creators to improve their video storytelling. This tool seamlessly integrates AI-generated text and narration into the editing process. With Filmora AI Copywriting, creators can quickly develop catchy YouTube titles and descriptions.
3. Audio Visualizer
Filmora Audio Visualizer is an innovative tool for music videos on how you experience sound and visuals together. It works by matching the visuals to the sound in your video. The Audio Visualizer analyzes the audio and syncs with the music’s beats and rhythm. This creates an amazing display that makes watching and listening more enjoyable.
4. Speech-To-Text
The Filmora Speech-To-Text (STT) feature is a huge help for video editors who want to work more efficiently. With just one click, this tool changes spoken words in videos into written text. It saves a lot of time by avoiding the manual work of typing subtitles. This feature not only saves time but also ensures that subtitles match what’s being said in the video accurately.
Conclusion
In summary, slow-motion videography is an amazing way to tell stories visually. Mixing technology and your ideas helps create videos that capture people’s attention. For that reason, we have provided 10 slow-motion video cameras to help you capture slow-motion videos. Additionally, we also highlighted the perfect solution if you don’t have a camera: Wondershare Filmora. You can easily generate a slow-motion video using our simple guide with this tool.
Easy Step by Step Tutorial on Creating a Lightroom Collage
Easy Step by Step Tutorial on Creating a Lightroom Collage
An easy yet powerful editor
Numerous effects to choose from
Detailed tutorials provided by the official channel
Do you love photography and taking pictures? The best way to make sure that your photos don’t end up on the hard drive is to hang them up in an artful, stylish photo lightroom collage.
Lightroom Collages are a great way to display a collection of your best photos in one place. They can also be an effective way of putting together a datebook or keeping track as you go through your full-time year.
In this article
01 [What’s Lightroom Used for?](#Part 1)
02 [The Value of a Lightroom Collage](#Part 2)
03 [Core Considerations for a Lightroom Collage](#Part 3)
04 [How to Create a Lightroom Collage](#Part 4)
Part 1 What’s Lightroom Used for?
Adobe Lightroom is one of the favorite non-linear editing tools for photographers. It offers a plenty of features for image manipulation and more. Get all the photography essentials with this software.
You can easily create beautiful photo collages in Lightroom and share them with your friends and loved ones. Moreover, it can be used for the storage and organization of photos after uploading them to the database.
Explore some amazing ways to bring out the best in your photographs, whether you’re perfecting one image or organizing thousands in Lightroom.
Part 2 The Value of a Lightroom Collage
In a single picture, you can only see part of a story, but collage lightroom tells you more about that. It helps by refreshing all the memories of a trip, function, and more in a single frame.
They have gained huge popularity in the last few years as the digital space has grown. You may have already seen social media users posting their photo collages on their timelines. Instagram is far ahead of the competition in this regard. It has played a crucial role in establishing the photo collage as a normal trend.
For the photographer
With a photo collage, a photographer can best showcase his talent. It shows that you can do a lot more than your capabilities, like representing stories by blending colors and elements perfectly. This will help you attract your prospects and convert them into your paying customers.
How do photo collages provide value to the clients?
A photo collage provides visual value to the clients by enhancing the creative process. It can have a profound effect on the way they perceive your art of photography. In fact, your clients will love to see all their memories collected in an attractive photo collage. There are a lot of people that even love to present collages to their loved ones.
Part 3 Core Considerations for a Lightroom Collage
The secret to designing an eye-catching lightroom collage is to know how to blend all the elements together properly. Professional Lightroom users concentrate on a few key graphic design considerations to keep their photo collage looking its best.In other words, every element should be in the right proportion, such as dimension, alignment, proximity, and theme.
Balance
Balance refers to the arrangement of all elements. It includes the division of pictures into equal or different dimensions according to the collage size. Maintaining balance enhances the overall appearance of a photo collage in lightroom. Some lightroom experts prefer symmetrical balance, but you can get better quality collages through asymmetrical balance.
Alignment
Don’t underestimate the importance of alignment in Lightroom collage. How your pictures are aligned can have a drastic effect on their overall look. It provides a definitive structure and delivers a well-finished product to the client.
In graphic design, two kinds of elements exist: edge and centre alignment. These are applied to visual design and text as well.
Proximity
Proximity signifies the relationship between various elements on the basis of the distance between them. It follows two basic principles:
● Realistic pictures should be put together.
● Unrelatable images should be separated.
Moreover, the border width needs to be consistent throughout, irrespective of the number of pictures.
Theme
The theme, also known as tone or style, matters when it comes to collage design. Each image must have a similar style, as this idea can personify all the captured memories. It will completely beautify your artistic perspective, but it’s not as measurable as others.
Part 4 How to Create a Lightroom Collage
Before introducing you to the ways of creating a lightroom collage, let’s meet Wondershare Filmora Video Editor . You can use it as an alternative to Lightroom for creating video collages. Recently, Wondershare has brought the latest update of Filmora to give some retouching to your videos.
Wondershare Filmora
Get started easily with Filmora’s powerful performance, intuitive interface, and countless effects!
Try It Free Try It Free Try It Free Learn More >

Now, you can narrate your story with incredible text and title templates in this full-featured video editor. It now features an animated split-screen effect that converts multiple videos into a single compelling collage. You only have to import the clips that you want in the split-screen preview window to make the video collage. But, for photo collages, the best tool ever is Adobe Lightroom.
You get two options for creating photo collages in Lightroom: using a pre-designed template or creating a new one. It will be a time-consuming process to make an original template, but we will still focus on both. If you want to create a lightroom collage of pictures, follow the steps given below.
Create a Photo Collage with a New Template
For a beginner, designing their own template can be a complex and hectic process. But, it’s worth it in the end because the final collage will be the result of all your hard work. In addition, you can show your own creative style by designing a new layout template. This way, you can also deliver a unique creation to your client. Maybe they will end up paying you more as a reward. If you are up for it, then go read the steps to do so.
Step 1: Import and Edit Photographs
Your first step should be to import the photos into your lightroom before proceeding further. Next, to get a perfect collage, your pictures deserve a final touch, which you can do conveniently with the batch editing feature.

Step 2: Establishing the Workspace
After importing and editing the photos, it’s time to create a workspace. Go to the “Print” panel and then to the “Print Job” menu. At this point, you can adjust the dimension of your collage. Make sure to provide ample space for the photos and borders.
Step 3: Create a Photo Layout
As you have photos in hand and space for distributing them, start forming individual spaces to place them. Try using individual boxes as per the required size or your choice with the “Add to Package” section. You can find it under the Cell of Print menu. Feel free to experiment with the size, placement, and more.
Step 4: Add Photos to the Layout
If you are satisfied with the collage template, now bring all your photos to the layout. It’s pretty easy to do because you just have to click on the photo and drag it to where you want. At the end, rearrange as you want until the final design doesn’t seem pleasing to your eyes.
Create a Photo Collage with a Pre-designed Template
Want to save some time without compromising on the final quality of the collage? Make a collage in Lightroom using a pre-designed template. But remember, you won’t get enough freedom to customize the template. If you are up for creating a collage in Lightroom using a pre-designed template, go through the following points.
Step 1: Import the photos into the program
Here also, you can’t create the collage without adding your photos to Lightroom. Simply click on “File” > “Add Photos” and choose the file location.
Step 2: Download the collage layout
Adobe Lightroom offers free as well as paid templates to make a photo collage in Lightroom. You are free to download any one that appeals to you.
Step 3: Bring in the Template
Click on the “Print” module > “Template Browser” > “Lightroom Templates” menu. Now, import the extracted Lightroom collage template using the “Import” button.

Step 4: Insert Photos
After finishing up the import of the template, start adding the photos to them. You can reposition them in whatever way you want. And now, you are done. Export the collage if you are satisfied with the position, color, and everything else.
● Key Takeaways from This Episode →
●Formatting the pictures is the easy part. The real struggle is in creating the collage. That takes a bit more time, but it’s worth it in the end.
●You can follow any of the above steps to get your desired photo collage. So now, you can reduce your burden with Adobe Lightroom or Wondershare Filmora .
●We hope you followed along with this tutorial and have enjoyed reading it. Thanks for your efforts and time.
Do you love photography and taking pictures? The best way to make sure that your photos don’t end up on the hard drive is to hang them up in an artful, stylish photo lightroom collage.
Lightroom Collages are a great way to display a collection of your best photos in one place. They can also be an effective way of putting together a datebook or keeping track as you go through your full-time year.
In this article
01 [What’s Lightroom Used for?](#Part 1)
02 [The Value of a Lightroom Collage](#Part 2)
03 [Core Considerations for a Lightroom Collage](#Part 3)
04 [How to Create a Lightroom Collage](#Part 4)
Part 1 What’s Lightroom Used for?
Adobe Lightroom is one of the favorite non-linear editing tools for photographers. It offers a plenty of features for image manipulation and more. Get all the photography essentials with this software.
You can easily create beautiful photo collages in Lightroom and share them with your friends and loved ones. Moreover, it can be used for the storage and organization of photos after uploading them to the database.
Explore some amazing ways to bring out the best in your photographs, whether you’re perfecting one image or organizing thousands in Lightroom.
Part 2 The Value of a Lightroom Collage
In a single picture, you can only see part of a story, but collage lightroom tells you more about that. It helps by refreshing all the memories of a trip, function, and more in a single frame.
They have gained huge popularity in the last few years as the digital space has grown. You may have already seen social media users posting their photo collages on their timelines. Instagram is far ahead of the competition in this regard. It has played a crucial role in establishing the photo collage as a normal trend.
For the photographer
With a photo collage, a photographer can best showcase his talent. It shows that you can do a lot more than your capabilities, like representing stories by blending colors and elements perfectly. This will help you attract your prospects and convert them into your paying customers.
How do photo collages provide value to the clients?
A photo collage provides visual value to the clients by enhancing the creative process. It can have a profound effect on the way they perceive your art of photography. In fact, your clients will love to see all their memories collected in an attractive photo collage. There are a lot of people that even love to present collages to their loved ones.
Part 3 Core Considerations for a Lightroom Collage
The secret to designing an eye-catching lightroom collage is to know how to blend all the elements together properly. Professional Lightroom users concentrate on a few key graphic design considerations to keep their photo collage looking its best.In other words, every element should be in the right proportion, such as dimension, alignment, proximity, and theme.
Balance
Balance refers to the arrangement of all elements. It includes the division of pictures into equal or different dimensions according to the collage size. Maintaining balance enhances the overall appearance of a photo collage in lightroom. Some lightroom experts prefer symmetrical balance, but you can get better quality collages through asymmetrical balance.
Alignment
Don’t underestimate the importance of alignment in Lightroom collage. How your pictures are aligned can have a drastic effect on their overall look. It provides a definitive structure and delivers a well-finished product to the client.
In graphic design, two kinds of elements exist: edge and centre alignment. These are applied to visual design and text as well.
Proximity
Proximity signifies the relationship between various elements on the basis of the distance between them. It follows two basic principles:
● Realistic pictures should be put together.
● Unrelatable images should be separated.
Moreover, the border width needs to be consistent throughout, irrespective of the number of pictures.
Theme
The theme, also known as tone or style, matters when it comes to collage design. Each image must have a similar style, as this idea can personify all the captured memories. It will completely beautify your artistic perspective, but it’s not as measurable as others.
Part 4 How to Create a Lightroom Collage
Before introducing you to the ways of creating a lightroom collage, let’s meet Wondershare Filmora Video Editor . You can use it as an alternative to Lightroom for creating video collages. Recently, Wondershare has brought the latest update of Filmora to give some retouching to your videos.
Wondershare Filmora
Get started easily with Filmora’s powerful performance, intuitive interface, and countless effects!
Try It Free Try It Free Try It Free Learn More >
Now, you can narrate your story with incredible text and title templates in this full-featured video editor. It now features an animated split-screen effect that converts multiple videos into a single compelling collage. You only have to import the clips that you want in the split-screen preview window to make the video collage. But, for photo collages, the best tool ever is Adobe Lightroom.
You get two options for creating photo collages in Lightroom: using a pre-designed template or creating a new one. It will be a time-consuming process to make an original template, but we will still focus on both. If you want to create a lightroom collage of pictures, follow the steps given below.
Create a Photo Collage with a New Template
For a beginner, designing their own template can be a complex and hectic process. But, it’s worth it in the end because the final collage will be the result of all your hard work. In addition, you can show your own creative style by designing a new layout template. This way, you can also deliver a unique creation to your client. Maybe they will end up paying you more as a reward. If you are up for it, then go read the steps to do so.
Step 1: Import and Edit Photographs
Your first step should be to import the photos into your lightroom before proceeding further. Next, to get a perfect collage, your pictures deserve a final touch, which you can do conveniently with the batch editing feature.
Step 2: Establishing the Workspace
After importing and editing the photos, it’s time to create a workspace. Go to the “Print” panel and then to the “Print Job” menu. At this point, you can adjust the dimension of your collage. Make sure to provide ample space for the photos and borders.
Step 3: Create a Photo Layout
As you have photos in hand and space for distributing them, start forming individual spaces to place them. Try using individual boxes as per the required size or your choice with the “Add to Package” section. You can find it under the Cell of Print menu. Feel free to experiment with the size, placement, and more.
Step 4: Add Photos to the Layout
If you are satisfied with the collage template, now bring all your photos to the layout. It’s pretty easy to do because you just have to click on the photo and drag it to where you want. At the end, rearrange as you want until the final design doesn’t seem pleasing to your eyes.
Create a Photo Collage with a Pre-designed Template
Want to save some time without compromising on the final quality of the collage? Make a collage in Lightroom using a pre-designed template. But remember, you won’t get enough freedom to customize the template. If you are up for creating a collage in Lightroom using a pre-designed template, go through the following points.
Step 1: Import the photos into the program
Here also, you can’t create the collage without adding your photos to Lightroom. Simply click on “File” > “Add Photos” and choose the file location.
Step 2: Download the collage layout
Adobe Lightroom offers free as well as paid templates to make a photo collage in Lightroom. You are free to download any one that appeals to you.
Step 3: Bring in the Template
Click on the “Print” module > “Template Browser” > “Lightroom Templates” menu. Now, import the extracted Lightroom collage template using the “Import” button.
Step 4: Insert Photos
After finishing up the import of the template, start adding the photos to them. You can reposition them in whatever way you want. And now, you are done. Export the collage if you are satisfied with the position, color, and everything else.
● Key Takeaways from This Episode →
●Formatting the pictures is the easy part. The real struggle is in creating the collage. That takes a bit more time, but it’s worth it in the end.
●You can follow any of the above steps to get your desired photo collage. So now, you can reduce your burden with Adobe Lightroom or Wondershare Filmora .
●We hope you followed along with this tutorial and have enjoyed reading it. Thanks for your efforts and time.
Also read:
- Updated In 2024, How to Make a Movie with Windows Movie Maker?
- Updated How to Make Your CSGO Montage Impressive
- In 2024, How To Make a Video by Mouse in Filmora?
- How to Stabilize Videos for Free with Google Photos App for 2024
- In 2024, Learn About some of the Best Apps for Photo Collage for PC
- 2024 Approved Do You Know You Can Trim and Cut Your Video Into the Desired Portions Using a Reliable Video Splitter? Get an Easy Video Splitter Now to Simplify Your Work. Here Are 33 Carefully Chosen Apps to Help You in This
- New MP3 Cutter Download for 2024
- Updated Fixes | What If YouTube Zoom to Fill Not Working?
- Top 10 Free Text to Speech Software Windows, Mac,Android, iPhone & O for 2024
- Updated In 2024, Finding The Finest Way to Add Subtitles to Videos | Filmora
- In 2024, Steps to Denoise in Final Cut Pro – Reduce Video and Audio Noise
- New Quick Answer Why Did Filmora AI Portrait Attract People for 2024
- Updated Camtasia Vs Captivate - Which to Choose?
- In 2024, Replace Sky Background in Video Figuring Out the Best Options
- New Are You in Search for a Step-by-Step Guide to How to Add Effects in TikTok? Here It Is. To Add some Flavor to Your TikTok Videos. Use These How to Add Effect to TikTok Recommendations
- Fun & Easy Masking Tricks in Filmora
- 2024 Approved 10 Best Music Video Templates to Make Your Video Popular
- New Beginners Guide to Green Screen Keying
- How to Soft Reset Infinix GT 10 Pro phone? | Dr.fone
- Set Your Preferred Job Location on LinkedIn App of your Huawei Nova Y91 | Dr.fone
- In 2024, How to Remove Activation Lock From the iPhone 6 Without Previous Owner?
- What is the best Pokemon for pokemon pvp ranking On Vivo G2? | Dr.fone
- In 2024, How to Unlock Apple iPhone 12 Pro without Passcode or Face ID
- In 2024, Remove Device Supervision From your iPhone 8
- 6 Fixes to Unfortunately WhatsApp has stopped Error Popups On Vivo V27e | Dr.fone
- How Can I Catch the Regional Pokémon without Traveling On Honor Play 40C | Dr.fone
- The Ultimate Guide to Bypassing iCloud Activation Lock from iPhone 11 Pro
- Fixes for Apps Keep Crashing on Lava Storm 5G | Dr.fone
- Best Anti Tracker Software For Honor X8b | Dr.fone
- Stuck at Android System Recovery Of Realme V30 ? Fix It Easily | Dr.fone
- In 2024, All You Need To Know About Mega Greninja For Samsung Galaxy A23 5G | Dr.fone
- In 2024, How to Share/Fake Location on WhatsApp for Samsung Galaxy XCover 6 Pro Tactical Edition | Dr.fone
- Strategies for Apps That Wont Download From Play Store On Infinix Hot 40 Pro | Dr.fone
- How to Transfer Text Messages from Infinix Hot 30i to New Phone | Dr.fone
- The Best 8 VPN Hardware Devices Reviewed On Infinix Smart 7 HD | Dr.fone
- Title: Updated Add Green Screen Video on TikTok
- Author: Chloe
- Created at : 2024-05-20 03:37:47
- Updated at : 2024-05-21 03:37:47
- Link: https://ai-editing-video.techidaily.com/updated-add-green-screen-video-on-tiktok/
- License: This work is licensed under CC BY-NC-SA 4.0.
