
:max_bytes(150000):strip_icc():format(webp)/GettyImages-664800650-4349941504c24712b81975694798236b.jpg)
Updated Add Text Animation to A Video Online for 2024
Add Text Animation to A Video Online
Do you want to make a creative video? Do you want your presentation or video to be easy to follow and entertaining? You can take the video to another level with the help of text animation. This article will discuss how to add text animation to online videos. You can use a good video editor from where you can select fresh styles and make the best video from there. One of the simplest ways to elevate your movie from good to excellent is with understandable text animation.
Text animation and short captions can broaden the audience for your content as more consumers view videos without sound these days. It matters what fonts you use in the videos, and they establish the mood and facilitate interaction with most viewers who rely on video captions. Add text, alter the font, add transitions, and use text effects to draw the user’s attention as they scroll. Please continue reading to discover how simple it is to make interactive video titles, words, and supers.
1. Use Kapwing animation text editor
(https://www.kapwing.com/animated-text-video-maker )
You can use the potent online editor Kapwing to add animated text to videos online, utilizing music, videos, GIFs, and images. There are no downloads required because everything is already present inside the browser. Kapwing is a capable tool for content production that is simple enough for everyone to use. The majority of video formats, GIF and image, including avi, png, jpg, gif, MOV, mp4, and more, are supported by Kapwing.
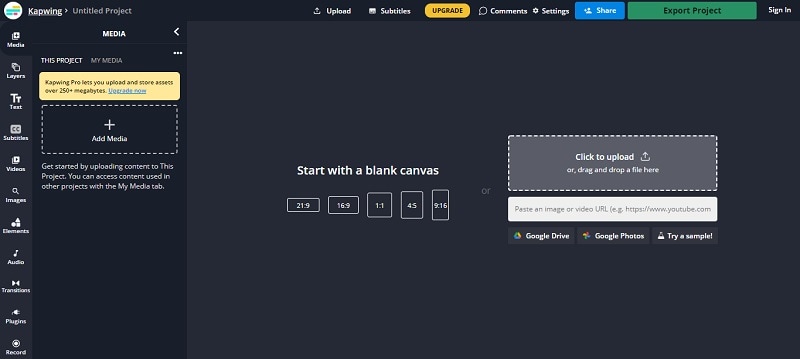
Step1 Upload the Video to Kapwing
You can open Kapwing with the device and tap on “Start Editing” to open up Kapwimg studio. After that, one can use the drag and drop option to upload the video in the studio. You can click on upload or use the link to upload.
If you have a more than 250 MB video, then you will require the Pro version.
Step2 Add the Text
When the video gets uploaded, now you can add your text. You must click the “Text” option on the left and type the text. After that, you can pick your favorite color, background, and color to add style.
You will always want that your text to get animated, but it doesn’t mean that you will have to use explosive fonts or funky or bright, which are very funky. The animation will make your text look attractive, and you can experiment with the colors and fonts to find the best combination.
Step3 Animate the Text
Now the fun part starts; choose the text box present on the right side and click on the “Animate” tab. It will allow the user to select animations like fade, flicker, hue rotates, and many more. Choose the speed according to your requirement, and if you want to change the background and color, you can do it too.
Use “Apply To” for applying this animation in the outro, intro, or both. It will help you to make the text fade out, fade in, or transition out and in with animation. Now the animation library has nine options:
- Drop: It appears on top of the text box
- Flicker: This one is like a candle’s flicker, and text flashes disappear and appear before staying.
- Fade: Opacity can be changed from 0% to 100%.
- Pop:- This grows the text more extensive than the text box and shrinks back to the place.
- Reveal:- Rolls from the left side to the right side
- Wipe:- Rolls from the left side to the right side with a colored background.
- Vibrate: The text box shakes in every direction.
- Hue rotates:- Colour of text cycles through the hue values..
You can use a timeline to adjust the animation’s termination when you set text animation. You can even drag that layer after the start time or use it on end/start time sliders to decrease or increase the time of your video. Text animation can get started when the cursor reaches the start time.
Step4 Export
The video with animated text is now ready to boom. You can click on “Export Video” present at the top and wait for the process. After that, you can download that video and use the links to share it on your social media platform.
2. Use veed.io text video editor
(https://www.veed.io/create/text-video-maker )
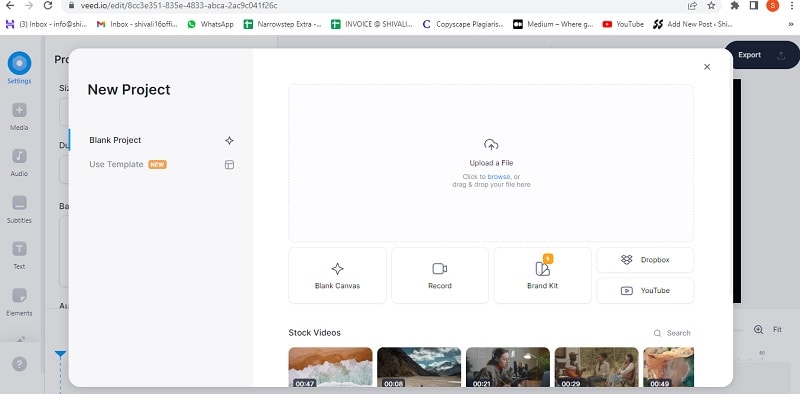
Veed is one of the best video editor text effects online, which allows you to add text to online videos. You can easily add style, color, text, and font in a few clicks. You can upload the video and tap the text to get started. Add title and text or select handwriting font. One can select it from templates. Change transparency, alignment, and font size of the text.
This online software is perfect for creating attractive videos on social media. This is free, which omits the usage of expensive software. It is much easier to avoid many complex video editor apps. With the help of VEED, you can create an excellent video without any experience and do it with a few clicks. Let’s see how to add animated text to photos online.
Step1 Upload the video
Tap on “Choose Video” and choose the file you want to upload on VEED. One can even use the drag and drop option from the folder to the editor.
Step2 Add text
After that, you can add the text by tapping on the “Text” option on the left menu. You can select the text style and start typing.
Step3 Export
Save the video with the text you placed by tapping on “Export.” The video gets saved in an MP4 file.
3. Use Animaker text maker
(https://www.animaker.com/text-animation-maker )
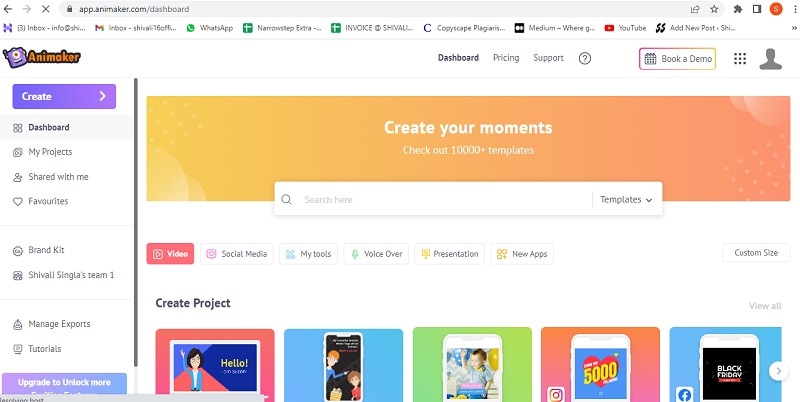
The Animaker is one of the best-animated video makers. This app offers the best collection of charts, BGs, and animated characters. With the help of Animaker, you can make the text disappear or appear off-screen in the best way. After you finish your video, you can download the format in MP4.
Step1 Upload the video clip
First, you can upload your video clip present on top that you wish to add text animation.
- Tap on the “Upload section” on the bottom left. You can upload your video where you wish to add the animated text.
- The video will get uploaded to “My Files.”
- Click on the uploaded video in the library to load it on the workspace.
Step2 Add text to the video
- You can add text in their text section
- In the next section, one can find two different text types. At the top, you will discover plain text options, and at the bottom, you can find pre-designed boxes seasoned at Animaker.
Let’s see how you can use pre-built text boxes.
- Tap on pre-built designs for your text animation. One can see the text appearing in the center of the workspace, and you can click it and type new text if you want to customize it.
- You can notice widespread options appearing with your text. It is known as the item menu. It will allow the user to modify their text. One can change font size, color, style, etc. Your text will come with pre-defined effects, which will help you to animate text instantly.
- You must have noticed that the purple color bar appears on the timeline, representing the duration of the text visible in the video. For example, if you want that text to get visible between 4rth to 8th seconds, then you will have to drag the edges of that purple bar to the same duration.
To see the scene, you must click on the play button on top of the timeline.
Let’s check the other ways of adding animated text to the video. In the previous one, you have seen how you can add text animation using pre-built boxes. Now you will get to know about doing it by using blank boxes.
- Start tapping the “text section”. Select the bank textbox.
- Click on them and then opt to add new text.
- Opt for clicking the cog icon that is there in the item menu.
- You will notice the settings tab that is on the screen’s right side.
- You can easily opt for the customization of the text in the way you wish. You can start by modifying the style of the font. One can change the size and color of the font as well.
- Use these options and opt for the application of enter and/or exit effects to text. Now, opt to click on the effect option to get more than 50 options. You can select the effect from there.
- Once the animation effect is applied to your timeline, you can notice the pink part in the bar i.e. purple. This completes creating text animation by using Animaker.
Step3 Download the Video
- You can visit the publish option in the right window to download the video.
- Tap on the “download video” option for downloading.
Conclusion
Now, you are aware of how to add text animation to video online and the three best video editors that will help you add animated text to your videos. At this point, you can choose the best one according to your needs and usage. These steps will help you create a unique and good video that will be easy to understand and entertaining.
Free Download For Win 7 or later(64-bit)
Free Download For macOS 10.14 or later
Free Download For macOS 10.14 or later
The Frames per Second Can Enhance or Hamper Your Ability to Enjoy Watching a Video on YouTube. This Article Will Define Frame Rates and Help You Choose the Best FPS
YouTube has become one of the to go to social media platforms for internet use because it provides entertainment for people who want to get entertained, learn or catch up with their favorite personalities. This platform has also given content creators a space to showcase their talents, educate the masses or simply have a good time when playing their games.
However, being a content creator on YouTube entails more than just posting a video weekly. You ought to ensure you get the frame rate in the video right. Failure to choose the correct frame rate will affect how your audience enjoys the video, increasing the chances that you lose subscribers.
Without further ado, let’s discuss the best fps for YouTube.

How Does FPS Affect Viewing YouTube Videos?
Before we dive into how FPS affects your viewing experience on YouTube and determine the best frame rate for YouTube, let’s define what it is. FPS is short for frames per second and is the number of still images appearing on display in one second. The more frames per second you have in your video, the clearer your video will become. The vice versa is also true.
To further simplify this definition, we will use the example of a flipbook. An animator usually draws an image on each page of the book. When they flip the pages in rapid succession, the images appear to be in motion. Suppose the animator used fewer pages to make their flipbook.

The animation would not be as smooth and crisp as if they had used more pages, each with a different still image contributing to the final motion.
The human brain can easily differentiate between 12 distinct images. However, when the photos exceed 18 and move rapidly, the brain is tricked into believing that the pictures are in motion. A frame rate lower than 24FPS will make your YouTube video look choppy and unnatural, as if it lags in real time.
Ideally, 24fps is the best fps for YouTube videos featuring mundane activities that we see in daily life. However, if you want to pack more information into your video and make the motion a bit smoother, then 30fps is the best video frame rate for YouTube.
Perhaps you post fast-paced content about gaming and other live-action videos. You are better off choosing 60FPS, which makes high-speed scenes look more fluid and helps you capture double the information.
What Is the Recommended & Highest Frame Rate for YouTube Videos?
Unfortunately, there is no correct answer when it comes to the best video frame rate for YouTube videos. The controversy still continues, and everyone seems to have their own opinion.
According to Thomas Edison , anything less than 46FPS for motion pictures will strain the eyes and give an unpleasant viewing experience. At the time, filmmakers and videographers were adamant about sticking to between 22-26PFS for their videos, provided the audio adaptability remained at 35mm.
Different frame rates are used for various displays, genres, and mediums. For instance, 1-16FPS was common in silent-era movies and stop-motion movies. However, this frame rate is neither universally accepted nor widespread in the world today.

An excellent example of a frame rate that produces larger-than-life videos with exceptional detail is 24fps. However, the NTSC confirms that it is, in fact, 23.97 frames per second when you consider issues to do with color and hue.
Another universally acceptable frame rate is 30fps, which is widespread in television. Videographers also use it to make slow-motion segments in sports videos or other fast-paced content. The sweet 60fps makes any motion look smooth as butter and significantly reduces any blur in your videos. This frame rate is also characterized by super fine details you can easily miss with 24 and 30fps. It is also the highest fps video on YouTube.
120fps is synonymous with grandeur, with its monumental footage suitable for slow-motion scenes. Lastly, anything above 120fps works great with ultra-slow-motion videos. Of course, we are talking 240fps, which is rare but not uncommon. However, you would need a high-speed capture camera, which we believe doesn’t come cheap.
To sum it all up, 24fps is the recommended frame rate for YouTube. You can go higher than the baseline and use 30fps or higher if you make videos with lots of motion, like gaming videos. Most of the time, a higher frame rate is a personal choice rather than a necessity. However, we understand you want to give your viewers a pleasant experience while watching your content.
What Is the Best Frame Rate for YouTube Videos?
If you want to record a video for your YouTube channel, you might wonder what is the best fps for YouTube videos. You are better off sticking between 24fps and 60fps. The platform has only recently added 8K support for videos, which is a plus for many content creators. Below is a list of frame rates for the most popular genres on YouTube.

- Podcasts and talk shows - 30 FPS
- Gaming videos - 60 FPS
- Makeup tutorials - 60 FPS
- Educational videos - 24- 30 FPS
- Health and fitness - 24-30 FPS
- Sports - 40-60 FPS
Remember that the list above is not exhaustive and doesn’t cover all types of content on the platform. We can’t also guarantee that there is a “best” frame rate for your YouTube video. We suggest you heed our suggestion and practice to determine the best frame rate for YouTube videos.
We couldn’t fail to mention that your frame rate should match the content uploading and decoding. Since the interlaced content may experience performance issues on YouTube, it would help if you deinterlaced it.
How To Check FPS on YouTube Video?
Below is a simple guide on how to check fps on YouTube videos.
Step1 Open any video on YouTube and right-click on it. A pop-up window will appear. Select “Stats for nerds.”

Step2 Narrow down on the “Current/Optimal Res” tab. The first set of figures before the forward slash represents the current resolution, while the figures after the forward slash represent the optimal resolution for the video. For instance, the figure in the picture below indicates that the resolution is 1280*720, and the frame rate is 30FPS. The figures repeat themselves, meaning that the video is at the optimal resolution.

How To Adjust FPS When Editing a YouTube Video?
An efficient video editing tool is all you need to adjust the frame rate for a video you want to upload to YouTube. Since there are so many options in the market, it is easy to get swept away by the prospects and wonder which one to choose.
Based on our research, Wondershare Filmora is one of the most efficient editing tools to change the FPS in your video and make it more enjoyable to watch.
Free Download For Win 7 or later(64-bit)
Free Download For macOS 10.14 or later
Wondershare Filmora is highly feature-rich, making it an editor’s dream. We guarantee you don’t need to be a pro to use this platform. The user-friendly interface is the ideal choice for even the most clueless novice.
However, a little knowledge goes a long way in ensuring you don’t get stuck using it. In addition, customer support is impeccable, meaning you will always find someone to help you whenever you encounter a problem using the platform.
The split-screen icon allows you to play and edit different clips simultaneously without clicking out of the app or finishing one task before starting the next. You can also select the number of split screens you want, depending on the videos you want to edit in one go. The newer version, Filomra 12, has everything you need to edit your video and make anyone who watches it glued to the screen because of how crisp it is.

Below are some examples of key features you might find interesting.
- GIF support
- Audio equalizer
- 4K editing
- Advanced text editing
- Noise removal
- Scene detection
- Audio mixer
- Colour tuning
Here is a detailed guide on how to use Wondershare Filmora to adjust the frame rate for YouTube videos.
Step1 Launch the platform on your PC or laptop and click on the “File” tab at the top of the page. A drop-down menu will appear. Select “Project Settings.”

Step2 After a dialogue box appears, click “Frame Rate” and choose the best option.

Step3 Continue customizing your video using the other editing tools in the platform, and click “Export” to save a copy to your device.
Conclusion
Making crisp, polished-looking YouTube videos takes a lot of time and dedication. Fortunately, you knew that by the time you decided to start creating content for the platform. With all the knowledge at your fingertips, you have no reason not to broaden your knowledge base and gather enough information to help you create the best videos.
There are plenty of video editing tools to get your video to the correct resolution, so your content is above par. If you don’t know how to use a specific app or platform, you must search for a tutorial and start practicing. You could also consult other creators in your niche and ask them how they make their videos look so good.
Free Download For macOS 10.14 or later
Wondershare Filmora is highly feature-rich, making it an editor’s dream. We guarantee you don’t need to be a pro to use this platform. The user-friendly interface is the ideal choice for even the most clueless novice.
However, a little knowledge goes a long way in ensuring you don’t get stuck using it. In addition, customer support is impeccable, meaning you will always find someone to help you whenever you encounter a problem using the platform.
The split-screen icon allows you to play and edit different clips simultaneously without clicking out of the app or finishing one task before starting the next. You can also select the number of split screens you want, depending on the videos you want to edit in one go. The newer version, Filomra 12, has everything you need to edit your video and make anyone who watches it glued to the screen because of how crisp it is.
Below are some examples of key features you might find interesting.
- GIF support
- Audio equalizer
- 4K editing
- Advanced text editing
- Noise removal
- Scene detection
- Audio mixer
- Colour tuning
Here is a detailed guide on how to use Wondershare Filmora to adjust the frame rate for YouTube videos.
Step1 Launch the platform on your PC or laptop and click on the “File” tab at the top of the page. A drop-down menu will appear. Select “Project Settings.”
Step2 After a dialogue box appears, click “Frame Rate” and choose the best option.
Step3 Continue customizing your video using the other editing tools in the platform, and click “Export” to save a copy to your device.
Conclusion
Making crisp, polished-looking YouTube videos takes a lot of time and dedication. Fortunately, you knew that by the time you decided to start creating content for the platform. With all the knowledge at your fingertips, you have no reason not to broaden your knowledge base and gather enough information to help you create the best videos.
There are plenty of video editing tools to get your video to the correct resolution, so your content is above par. If you don’t know how to use a specific app or platform, you must search for a tutorial and start practicing. You could also consult other creators in your niche and ask them how they make their videos look so good.
The Glitch Filter Is Similar to an Error or a Distorted Effect in the Video. The Article Enables the Users to Get the VHS Filter in One of Their Travel Videos and Instagram Accounts
A glitch in the video or an image gives the notion of an error in the video recording process, and it was not accepted in the media industry. However, presently, creative professionals are incorporating the VHS filters to give a vintage impression. The visual distortions are used by gamers and streaming creators extensively.
For this very reason, the article discusses the procedure to create a glitch filter in Photoshop, Instagram, TikTok, and in one of your impeccable travel videos. Time to start!
In this article
01 How to Make VHS Filter in Photoshop?
02 How to Get VHS Filter in Instagram?
03 How to Get VHS Filter in TikTok?
04 How to Add VHS Effects to your Travel Video?
Part 1: How to Make VHS Filter in Photoshop?
There are a lot of steps associated with VHS filter Photoshop. The procedure can be tricky for a beginner in the industry. Therefore, we have sketched out a guide to make a VHS image filter in Photoshop. Follow it carefully to have desirable results.
Step 1: Open Photoshop
Open Photoshop from your computer and click on “New.” Use the “Custom” option from the windows that appear. After that, click on “File” and launch the imagery. Drag and drop that picture to the customized workspace.

Step 2: Apply the Transformation
Head to the “Edit” from the top panel and press “Transform” from there. Click on “Scale” from the context menu. The user is recommended to set the scale as required using arrows from the mouse. After that, apply the transformation.

Step 3: Changing the Parameters
Now, right-click on your layer to click on “Brightness and Contrast.” Change it as you need. After that, move on to the “Curves” and play with the graphs of the picture. Change the “Solid Color” as well. Make the color white and change the opacity levels.

Step 4: Adding Noise
Moving on, click on the first layer and navigate to the “Filter” bar on the top of the interface. Hit “Noise” and then “Add Noise.” Make the necessary changes as you like and press “Enter.” Scroll up to the “File” and hit “Open Recent” to launch the VHS texture photo. Drag and drop the texture to the photo layer that we are working on.

Step 5: Inserting VHS Texture
Resize the VHS texture and then apply the transformation. By default, the blend mode is “Normal.” Change it to “Darken” from the right panel. The picture will get dark. Again, change the mode to “Screen.” Moving on, input another VHS Filter texture and drag and drop it to the layer we are working on. Resize it and apply the transformation.

Step 6: Altering the Blend Mode
Alter the blend mode to “Darker” and then to “Screen.” Apply another filter and then drag and drop the layer. Change the blend mode to “Screen.” Pick up the eraser from the left panel of tools and make necessary edits.

Step 7: Duplicating the Layer
Duplicate the photo layer and move it up. Again, click on “Filter” then “Noise” to add the noise as needed. Alter the blend mode to “Soft Light” and set the opacity value. After that, add any solid color and switch the blend mode back to Soft Light.

Step 8: Playing with the Layers
Duplicate the layer again to change the color. After that, double click the layer and deselect “R.” Move to left or right. Perform the same procedure for the rest of the layers. Use the erase tool to offer fine imprinting to the transition. Duplicate the final layer and deselect “R” and “C.” Move left and right.

Step 9: Final Process
Use the eraser tool one last time, and you are done with the VCR filter.
Part 2: How to Get VHS Filter in Instagram?
Now that you know how to add glitch filter Photoshop let us move on to Instagram. The sub-section of this write-up shall focus on VHS filter Instagram. If you are an Instagram user wishing to get a retro VHS filter, follow our lead.
Step 1: Finding the Filters
The first step revolves around clicking on the Instagram app to open it. Navigate to the “Story.” The user will find a number of filters in the top panel along a circle.

Step 2: Picking the Vintage Filter
Swipe right towards those filters until a “Search” option is seen. Type “Vintage DV” and press “Enter,” where several VHS video filters will be displayed. Pick one and save it to your camera roll.

Step 3: Using the VHS Filter
Head back to the “Story” and select the “Effects” option. Select the filter that you saved and initiate the recording process. You have got the VHS filter for videos.

Part 3: How to Get VHS Filter in TikTok?
The following section of the write-up shall highlight finding and getting the 90s VHS filter in TikTok. So, what are we waiting for? Let us start the procedure.
Find the VHS Filter in TikTok
Step 1: Navigate to the App
Use your computer to launch the TikTok application. As soon as the interface appears, click on “Trends” in the bottom left corner.
Step 2: Open the Effects
Type Retro VHS in the search bar and click on the second result that is displayed. Click on the “Effects” that says, “VHS Retro.”
Step 3: Add in Favorites
Add it to the favorites and then tap on the video icon located at the center of the screen.

Use the VHS Filter in TikTok
Step 1: Deactivating the Filter</p
With the camera open, click on “Effects” right next to the camera icon. The filter is activated, but we need to deactivate it by clicking on the stop icon with the effects. Click anywhere on the screen to exit the “Effects” panel.
Step 2: Recording Process
Now, click on the red video sign and begin recording for some seconds without the filter. It is important to record the video by pointing at the targeted person. After the first part of the video is recorded, head back to the “Effects” menu and navigate to the tab that says, “Add to Favorites.”

Step 3: Publishing the Video
Choose the Retro VHS Filter and point the camera at the person that needs the filter. Hit the “Register” button. Make the recording and press the red popcorn. Hit “Next” and “Publish” the video finally.

Part 4: How to Add VHS Effects to your Travel Video?
With vacation season on, bloggers are into adding VHS photo filters to their videos to be uploaded on YouTube channels. The section shall convey the detailed procedure of adding a glitch effect filter to the travel and vacation videos in Wondershare Filmora .
For Win 7 or later (64-bit)
For macOS 10.12 or later
Step 1: Initiating the Process
Begin the process by launching Wondershare Filmora. For starters, let us work on the perfect music for the video. The Audio tab shows an awful collection. Choose the “Young and Bright” category for the music.

Step 2: Picking the Music
Select any music and drag and drop it to the timeline. Now, trim the music into 15 seconds long. Now, input the travel videos to start their editing. Set the order for the video afterward.

Step 3: Choosing the Overlays
Navigate to the “Effects” panel and search for VHS. The software would offer multiple choices to pick from. Choose different overlays and place them onto the video tracks as you like.

Step 4: Adding the Transition
To add the transition, head to the “Transition” tab and find VHS. Drag and drop the transitions among the cuts between the video clips. Adjust their duration as needed. Preview the video, and the mission is accomplished.

Final Thoughts
Grabbing the attention of the audience is not as easy as it sounds. The creative industry uses a vast range of effects to compel the viewers to be on the edge of their seats. The article introduced the VHS filter while covering its procedure. If you are a TikTok, Instagram, or Photoshop user, we have got you. Wondershare Filmora helps perfectly to add the glitch filter to the vacation videos.
Versatile Video Editor - Wondershare Filmora
An easy yet powerful editor
Numerous effects to choose from
Detailed tutorials provided by the official channel
Something That You Should Know About MP4 Video Format
You all must have taken pictures and made videos at various occasions of life, and it might be someone’s wedding, birthday, or any other party. The images and videos are saved in different file formats, and sometimes sharing file across different platforms get difficult because of this.
What if you want to edit your MP4 video but don’t know much about the MP4 file format? The following article will help you learn more about it. From the introduction to the technical descriptions, all are discussed in detail below.
In this article
02 Why MP4 Video Format Is the Most Popular Video File?
03 Best MP4 Video Editor- Filmora Video Editor
04 How to Edit MP4 Video Files?
05 MOV VS. MP4: What’s the Difference?
Part 1. What Is MP4 Video Format?
MP4 file format is mostly used for video files. The original data is not in MP4 format. The format can also contain audio, video, subtitles, or image data in different streams. All the streams can be decoded by different decoders.

MP4 video format is developed by the Moving Picture Expert Group (MPEG). MP4 file format is compatible with a wide range of software and devices. It has relatively high post-compressed video quality thus takes less space than other formats.
Part 2. Why MP4 Video Format Is the Most Popular Video File?
You all must have heard about various file formats, but can you name the most popular format? Well, it’s MP4 format. Now that you know about the MP4 format, let’s tell you why it’s famous among other formats:
· Compatibility
Do you know something about MP4 compatibility? The file format is extremely compatible with online and also mobile internet browsers. Moreover, you can also find its compatibility with various social media like Facebook, Twitter, Instagram.
· Codecs
The MP4 containers can use codecs like MPEG-4, , . MP4 file format is also suitable for images and audio files.
· Size
Do you know another reason why the MP4 video format is famous? It’s because of the size. MP4 format delivers high-quality video but in a relatively smaller size.
Part 3. Best MP4 Video Editor- Filmora Video Editor
When we talk about MP4 video format editing, Wondershare Filmora Video Editor is the best choice you could ever have. The video editor is easy and straightforward for beginners, and you don’t need any technical expertise to use the Filmora video editor. Moreover, the interface is very clean and intuitive. The software offers a precision cutter.

For Win 7 or later (64-bit)
For macOS 10.12 or later
Do you know any video editor that supports 4k? Filmora does support 4K video resolution and also high definition image quality. Additionally, Filmora has a media library; you can get cool and stunning editing elements, titles, effects, transitions, and a lot more things. Wondershare Filmora offers a wide range of features; let’s discuss a few:
Green Screen Effect
Distractions in videos are very annoying, but with Filmora, you can get rid of this. The Green Screen Effect offered by Filmora helps in removing all the distractions from your video like any unwanted person, irritating light, or whatever.
Motion Tracking
It’s tough to find good software that offers features like motion tracking. Luckily, you have Wondershare Filmora to use the feature. Motion Tracking is among the most anticipated and prominent features of the video editor, which help you track movements in the video.
Split Screen
Are you creating a tutorial? Do try the Split Screen feature of Filmora for creating tutorials, commentary, or even interviews. This classical feature is fantastic and makes your video unique. You can switch between 4 to 6 screen panels.
Transitions and Effects
Video Editing is incomplete without effects and transitions. If you are using Filmora Video Editor, you will get a lot of brilliant transitions and effects to add to your video and make it shine. You also get a variety of title and text templates.
Part 4. How to Edit MP4 Video Files?
If you are worried about editing your videos in MP4 file format, let’s share something that will help you. Read the following section of this article to learn more about some tips regarding MP4 editing.
1. Cut the Video
If your video has any rough or extra content, remove it. You can easily cut your MP4 video and remove unwanted parts. Filmora Video Editor offers a ‘Cut’ feature that could be used for this purpose.

2. Join MP4 Videos
Do you know what else you can do? With Filmora, you can join and combine several MP4 videos with great ease. The software lets you create cool joined videos that look like an entire movie. The feature lets you add your desired videos.

3. Edit Audio of MP4 Video
Can you edit audio from Filmora Video Editor? Surprisingly, yes, you can also edit the audio of your MP4 video from this editor. The software lets you adjust the different features of the audio like its Pitch, Speed, Volume, etc.

4. Add Effects, Titles, and Transitions
You can also add stunning effects to your MP4 video while editing it. Moreover, explore Filmora and find the perfect title for your video. Apart from this, you also get tons of cool transitions that you can add for smooth transitioning effects.

Part 5. MOV VS. MP4: What’s the Difference?
There are multiple types of documents that you can have your material saved into. Among them exists MOV and MP4. Do you know the difference between these two? Allow us to help you out by sharing the qualities of MOV and MP4.

MP4
Let us tell you about MP4 first. MP4 is a multimedia storage format mainly used to store videos. It is widely used and can be used is multiple devices. MP4 is the wrapper around the video, not the video itself. If we talk technically, MP4 contains the compressed video data and necessary data files that are required to play the video. MP4 is more compressed than other files types, thus taking less space.
MOV
MOV is a file-saving format that Apple owns. It would not be wrong to say that MOV works best in iOS and macOS devices. MOV files can be converted into MP4 and vices versa if needed. MOV has the best video quality and sound under the same compression level. MOV files are also decoded by MPEG-4 codec, the same as MP4.
Final Words
After reading and learning from the above article, we hope that you have increased your knowledge about the MP4 video format. The article shared various things about MP4, like the factors for its popularity, editing MP4 video, etc. We also introduced a great video editor to edit your MP4 file format videos.
Wondershare Filmora is the best editor for videos when you want to create unique and stunning content. The editor offers a whole new editing world with limitless features. Do you know any good software for Color Match? Its Filmora! The easy-to-use, multi-track, drag, and drop video editor will change your editing game.
If you want to stun your viewers with your videos, then try Wondershare Filmora. You can add brilliant transitions, effects, titles to your video. Apart from this, you also get features like cut, crop, trim, join, split, and many more.
Wondershare Filmora
Get started easily with Filmora’s powerful performance, intuitive interface, and countless effects!
Try It Free Try It Free Try It Free Learn More >

02 Why MP4 Video Format Is the Most Popular Video File?
03 Best MP4 Video Editor- Filmora Video Editor
04 How to Edit MP4 Video Files?
05 MOV VS. MP4: What’s the Difference?
Part 1. What Is MP4 Video Format?
MP4 file format is mostly used for video files. The original data is not in MP4 format. The format can also contain audio, video, subtitles, or image data in different streams. All the streams can be decoded by different decoders.
MP4 video format is developed by the Moving Picture Expert Group (MPEG). MP4 file format is compatible with a wide range of software and devices. It has relatively high post-compressed video quality thus takes less space than other formats.
Part 2. Why MP4 Video Format Is the Most Popular Video File?
You all must have heard about various file formats, but can you name the most popular format? Well, it’s MP4 format. Now that you know about the MP4 format, let’s tell you why it’s famous among other formats:
· Compatibility
Do you know something about MP4 compatibility? The file format is extremely compatible with online and also mobile internet browsers. Moreover, you can also find its compatibility with various social media like Facebook, Twitter, Instagram.
· Codecs
The MP4 containers can use codecs like MPEG-4, , . MP4 file format is also suitable for images and audio files.
· Size
Do you know another reason why the MP4 video format is famous? It’s because of the size. MP4 format delivers high-quality video but in a relatively smaller size.
Part 3. Best MP4 Video Editor- Filmora Video Editor
When we talk about MP4 video format editing, Wondershare Filmora Video Editor is the best choice you could ever have. The video editor is easy and straightforward for beginners, and you don’t need any technical expertise to use the Filmora video editor. Moreover, the interface is very clean and intuitive. The software offers a precision cutter.
For Win 7 or later (64-bit)
For macOS 10.12 or later
Do you know any video editor that supports 4k? Filmora does support 4K video resolution and also high definition image quality. Additionally, Filmora has a media library; you can get cool and stunning editing elements, titles, effects, transitions, and a lot more things. Wondershare Filmora offers a wide range of features; let’s discuss a few:
Green Screen Effect
Distractions in videos are very annoying, but with Filmora, you can get rid of this. The Green Screen Effect offered by Filmora helps in removing all the distractions from your video like any unwanted person, irritating light, or whatever.
Motion Tracking
It’s tough to find good software that offers features like motion tracking. Luckily, you have Wondershare Filmora to use the feature. Motion Tracking is among the most anticipated and prominent features of the video editor, which help you track movements in the video.
Split Screen
Are you creating a tutorial? Do try the Split Screen feature of Filmora for creating tutorials, commentary, or even interviews. This classical feature is fantastic and makes your video unique. You can switch between 4 to 6 screen panels.
Transitions and Effects
Video Editing is incomplete without effects and transitions. If you are using Filmora Video Editor, you will get a lot of brilliant transitions and effects to add to your video and make it shine. You also get a variety of title and text templates.
Part 4. How to Edit MP4 Video Files?
If you are worried about editing your videos in MP4 file format, let’s share something that will help you. Read the following section of this article to learn more about some tips regarding MP4 editing.
1. Cut the Video
If your video has any rough or extra content, remove it. You can easily cut your MP4 video and remove unwanted parts. Filmora Video Editor offers a ‘Cut’ feature that could be used for this purpose.
2. Join MP4 Videos
Do you know what else you can do? With Filmora, you can join and combine several MP4 videos with great ease. The software lets you create cool joined videos that look like an entire movie. The feature lets you add your desired videos.
3. Edit Audio of MP4 Video
Can you edit audio from Filmora Video Editor? Surprisingly, yes, you can also edit the audio of your MP4 video from this editor. The software lets you adjust the different features of the audio like its Pitch, Speed, Volume, etc.
4. Add Effects, Titles, and Transitions
You can also add stunning effects to your MP4 video while editing it. Moreover, explore Filmora and find the perfect title for your video. Apart from this, you also get tons of cool transitions that you can add for smooth transitioning effects.
Part 5. MOV VS. MP4: What’s the Difference?
There are multiple types of documents that you can have your material saved into. Among them exists MOV and MP4. Do you know the difference between these two? Allow us to help you out by sharing the qualities of MOV and MP4.
MP4
Let us tell you about MP4 first. MP4 is a multimedia storage format mainly used to store videos. It is widely used and can be used is multiple devices. MP4 is the wrapper around the video, not the video itself. If we talk technically, MP4 contains the compressed video data and necessary data files that are required to play the video. MP4 is more compressed than other files types, thus taking less space.
MOV
MOV is a file-saving format that Apple owns. It would not be wrong to say that MOV works best in iOS and macOS devices. MOV files can be converted into MP4 and vices versa if needed. MOV has the best video quality and sound under the same compression level. MOV files are also decoded by MPEG-4 codec, the same as MP4.
Final Words
After reading and learning from the above article, we hope that you have increased your knowledge about the MP4 video format. The article shared various things about MP4, like the factors for its popularity, editing MP4 video, etc. We also introduced a great video editor to edit your MP4 file format videos.
Wondershare Filmora is the best editor for videos when you want to create unique and stunning content. The editor offers a whole new editing world with limitless features. Do you know any good software for Color Match? Its Filmora! The easy-to-use, multi-track, drag, and drop video editor will change your editing game.
If you want to stun your viewers with your videos, then try Wondershare Filmora. You can add brilliant transitions, effects, titles to your video. Apart from this, you also get features like cut, crop, trim, join, split, and many more.
Wondershare Filmora
Get started easily with Filmora’s powerful performance, intuitive interface, and countless effects!
Try It Free Try It Free Try It Free Learn More >
Also read:
- 2024 Approved How to Create Photoshop GIF The Easy Way
- Updated In 2024, Best Applications That Can Help Apply The Best VHS Camera Effect
- New Easy Steps to Loop YouTube Videos on iPhone
- OBS Studio Is a Free and Open-Source App for Screen-Casting and Live Streaming
- New How to Apply Video Filters Mobile and Desktop
- Updated How to Create a Text Effect Video with Filmora
- Updated In 2024, Learn Topaz Video Enhance AI Review and Achieve Powerful Video Conversion
- Updated Camtasia Vs Captivate - Which to Choose for 2024
- New 2024 Approved How to Add a Slideshow in PowerPoint
- New Create a Brand Video to Make Your Business Shine
- New In 2024, Text Animation Intro Tutorial in Filmora
- New Quick Answer Why Did Filmora AI Portrait Attract People for 2024
- In 2024, Top 10 Best Free Video Compressors
- 2024 Approved 15 Best Vloggers That You Should Follow for Travel
- New 2024 Approved Making Slow Motion Videos in Final Cut Pro The Best Methods
- Updated In 2024, How to Make a Gaming Montage - Guide & Tips
- 2024 Approved Mix and Match The Ultimate List of 8 Video and Photo Merging Tools
- This Article Aims to Show You How to Improve Your Lighting in the Sun
- New In 2024, Best Free Video Editing Software for Reddit
- New Slow Down the GIF to Emphasize Details Better. To Do so, Read This Guide and Learn to Use the Best Platforms for Slow-Motion GIFs
- New How to Add Green Screen Effects In Phhotoshop
- How to Make Fortnite Thumbnail with Motion Blur?
- 6 Tips for Your First Facebook Ads for 2024
- Updated In 2024, Best Tools To Create Blend Image Collage
- 2024 Approved Repeated Text Animation Tutorial
- Lets Introduce the Top 5 Applications to Add a Song to a Video for Free with some Amazing Sound and Visual Effects for 2024
- Updated 3 Methods to Combine 2 or 3 Videos Into 1
- Updated 2024 Approved Troubleshoot Snapchat Camera Zoomed in Issue
- How To Upgrade or Downgrade iPhone 7 Without iTunes? | Dr.fone
- In 2024, How to Screen Mirroring Samsung Galaxy A54 5G to PC? | Dr.fone
- In 2024, For People Wanting to Mock GPS on OnePlus Open Devices | Dr.fone
- The Best 8 VPN Hardware Devices Reviewed On Honor Play 40C | Dr.fone
- 3 Things You Must Know about Fake Snapchat Location On Samsung Galaxy S23 | Dr.fone
- In 2024, What Legendaries Are In Pokemon Platinum On Realme C51? | Dr.fone
- How to Detect and Stop mSpy from Spying on Your Oppo Find N3 | Dr.fone
- Updated 2024 Approved Top 10 Free and Best Text-to-Speech Generators
- Complete guide for recovering contacts files on OnePlus Open.
- 4 Solutions to Fix Unfortunately Your App Has Stopped Error on Poco X5 | Dr.fone
- In 2024, 10 Easy-to-Use FRP Bypass Tools for Unlocking Google Accounts On Infinix Smart 7 HD
- Title: Updated Add Text Animation to A Video Online for 2024
- Author: Chloe
- Created at : 2024-04-24 07:08:29
- Updated at : 2024-04-25 07:08:29
- Link: https://ai-editing-video.techidaily.com/updated-add-text-animation-to-a-video-online-for-2024/
- License: This work is licensed under CC BY-NC-SA 4.0.
