
:max_bytes(150000):strip_icc():format(webp)/Lifewire_Windows_Update_2624595-9da08302ecc44539b8f0fa484a81227e.jpg)
Updated Adobe After Effects Review
Adobe After Effects Review
Make cinematic films, movies, intros, and transitions. Delete people from clips. Start fires or create a foggy weather. With Adobe After Effects, the industry-standard motion graphics and visual effects software, you are able to take any idea and make it come to life. Animate titles, credits, and lower thirds. Begin editing from scratch or with presets available. Combine photos and video footage to create anything you can think of.
Choose amazing effects from hundreds of options, remove unwanted parts from the frame, people or objects, and make VR videos to push your audience into the action. This software lets professionals configure keyframes, allow them to create compositing operations. Features of Adobe After Effects include a content library, digital asset management, video rendering, data import/export, and much more. In this article we will give you a brief overview of what After Effects is, what it’s used for and by who and the overall experience!
With that said, let’s get started!
1. Speed and Stability
When talking about speed and stability, After Effects has the latest release packed with improvements. All the developers have focused themselves on speed and also performance. The team at Adobe have worked very hard to make this application more responsive and when we go along in this article, that can be seen in many ways
The main improvement which is immediately clear to all users, is the renewed preview playback optimization. What we noticed is that After Effects is creating the ram preview for your projects a lot faster. However, while working with the software for this article, we did find the user interface to be more responsive, the playback is way smoother, so is it a lot more stable overall.
While using shape layers, there was a significant improvement. A few expressions are a lot faster. This alone is worth upgrading to the latest version of After Effects.

2. User Interface
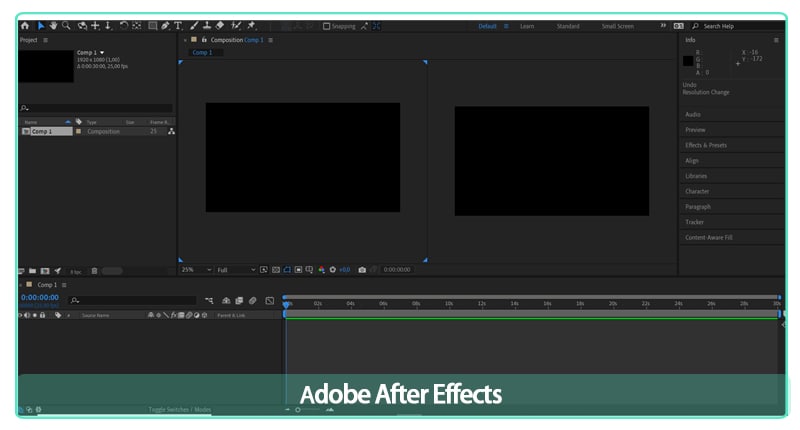
The After Effects interface is constructed up of four main parts. The Timeline panel, the Project panel, the Composition panel and the Effects panel.
The Timeline Panel
In the Timeline panel, you edit all the footage and clips to create your rough cut. You can find the Timeline panel on the bottom of the workspace.
The Project Panel
It’s pretty straightforward that in the Project panel you import your footage and create your project. This is located on the top left of the standard After Effects workspace.
The Composition Panel
The Composition panel is where you will see the final product. This is located in the middle of your workspace.
The Effects Panel
In order to make creative changes to your video, use the preview, audio, effects, and Preset Panels. These panels are located on the upper right area of your workspace, each one also has its dropdown.
3. Learning Curve
The learning curve for After Effects depends on your background, the best way to find out if you like it is starting a free trial. Go through some tutorials online or paid courses. You’ll also want to spend time with the User Guide. The Search Help field in the top right corner provides you an easier search for answers to most questions that you have. Speaking of YouTube and online learning, most of the video tutorials you will find have been created by people that are experienced in After Effects and know their way around it.
4. VFX
There’s a time-period when video editors require strengthening their skills, calling it imperative software for improving editing skills is nowhere near an exaggeration. it really helps prospective professionals improve their learning experience through visual effects, camera tracking, text animation, motion tracking, color grading, etc. All of these methodologies do help in improving the VFX learning process in the long run.
Video editing happens to be a crucial part of film production. Making videos in a fantastic process can indulge in building professional videos via motion graphics animation. This is where Adobe After Effects become an excellent learning tool.
5. Motion Graphics
Motion graphics can sound quite scary. It’s a new term for a specific genre of animation. Motion graphics is the intersection between animation and graphic design. These are purpose-driven visual aspects with the goal of showing information to the viewer through the use of animated graphics or text. Sometimes they include voice-overs narrating what the text or graphics are showing. Where it gets a little complex is that the more popular the term motion graphics becomes, the more people are misaligning animations to it. They need to represent information and illustrate the idea to the viewer clearly, so they do that using animation and motion graphics.
6. Titles and Outros
Adobe released a new combination of features for you. For Adobe Stock: Graphics templates. Those pre-made templates give you a super smooth way to discover new motion graphics within Premiere Pro, without needing to spend time creating titles, overlays, or animations from scratch. The world has digitalized, and videos often need visual aspects such as titles, lower thirds, to present information. The templates not only assist video editors increase the quality of the content by showing certain information, but they also give a strong visual touch to keep the viewer engaged throughout the video. The audience nowadays is a lot more sophisticated, meaning that motion graphics are a necessity in a driven media world.
Motion Graphics templates are valuable for video editors of all levels. For the beginning content creators, the templates offer great quality, ready-made footage to help their creative goal. They can explore and work on their skills. Motion graphics that are pre-made are an excellent way to express the vision and express inspiration to new opportunities.
So now that you are aware of what After Effects templates are, we can move on to the actual workflow, why it is important, and how to use it as efficient as possible.
7. Workflow
Whether you are using Adobe After Effects to create motion graphics, or composite realistic visuals, you usually follow the same workflow, you may repeat the process of adjusting layer properties, editing, and compositing until everything looks good. You can change any property of any element, such as position, opacity and size. Make use of motion tracking to stabilize footage so that it follows the motion from another clip, and so much more!
8. Rendering Speed
When it comes to exporting your project in After Effects, you don’t need to buy an expensive workstation. You can speed up your rendering process from your own laptop without investing too much and by using the following tips we have for you below!
Tip #1: Enable Multiprocessing
What exactly is multiprocessing? That is when After Effects uses multiple cores from your CPU to export multiple frames at once. If your processor has one or more cores, you can enable this feature to reduce your rendering time. We want to mention that you need to check whether or not this option is turned on. Once enabled, you’ll see a great decrease in export time.
To enable Multiprocessing, navigate to Preferences > Memory & Multiprocessing. Then you click the check box next to ‘Render Multiple Frames Simultaneously’ and remember also to adjust the settings that you need.
Tip #2: Optimize Your RAM Usage
The RAM memory inside your workstation can be used to write and read data at a lot higher speeds than regular hard drives and portable drives. Configuring your RAM in a system is one of the easiest upgrades for better performance. Giving you affordable solutions for both desktop and laptop systems, the RAM memory upgrade does not require a lot of knowledge. The more RAM you allow applications to use, the higher the performance you will get out of it.
It also shows a noticeable increase in rendering speed. When the export time in your work is longer than needed, look at your RAM memory and see if you can make the necessary changes or upgrades.
Tip #3: Use the Media Encoder
Let’s talk about the Media Encoder. It’s the software that comes up with Adobe Creative Cloud products such as After Effects and Premiere Pro to simplify the export process. You can easily render your project from After Effects to Adobe Media Encoder and begin the project render process from that point on. The Media Encoder will increase your rendering performance and will significantly decrease rendering time.
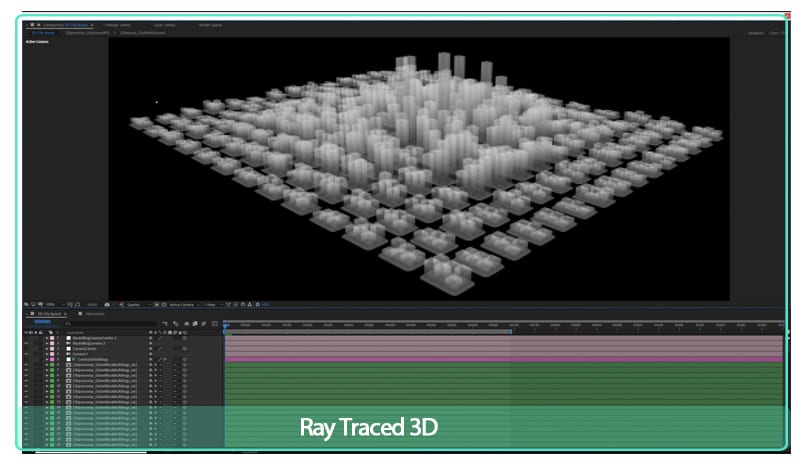
Tip #4: Disable Ray-Traced 3D
The included After Effects Ray-Traced 3D feature enables you to produce 3D models within After Effects without any struggle. Calculating all the motions and visual graphics is such a heavy process for your workstation. When you disable raytracing, you will get a faster export time. By looking that ‘Classic 3D’ is checked instead of ‘Ray-Traced 3D’ from your composition preferences, you can speed your rendering speed up to 50%. Isn’t that incredible?
Tip #5: Activate GPU Exporting with Cuda Acceleration
Exporting your videos with GPU rather than CPU will increase the efficiency of your render process. The export length will decrease a whole lot when you activate Mercury GPU Acceleration, also known as ‘CUDA’ from the ‘Project Settings’.
After Effects doesn’t really require CUDA features from a special kind of Nvidia GPU. Only the GPU accelerated 3D renderer, that is based on the raytracing algorithm, requires that. The other GPU features are running on any GPU that meets the basic minimums, including Intel and AMD GPUs.
9. System Requirements for Windows
These are the minimum specifications needed to use After Effects on PC:
OS: Windows 10 (64-bit) versions 1909 and later, or Windows 11
CPU: Intel or AMD Quad-Core Processor (Intel i5 and i7 will do the job)
RAM: 16 GB
Monitor resolution: 1280 x 1080
An internet connection
Free storage: 15 GB
GPU: Minimum 2 GB of VRAM
10. System Requirements for macOS
OS: macOS 10.13 or later
RAM: 16 GB
CPU: Intel and Apple Silicon (Rosetta2 Supported) Quad-Core Processor
GPU: 2GB of VRAM
Monitor resolution: 1440×900
Free storage: 15 GB
An internet connection
11. Keyboard Shortcuts
You can work visually when you configure your keyboard shortcuts with the visual keyboard shortcut editor within After Effects. You can use the keyboard user interface to show the keys that have been assigned to shortcuts, the available keys for assignment, and edit assigned shortcuts to make your workflow even easier.
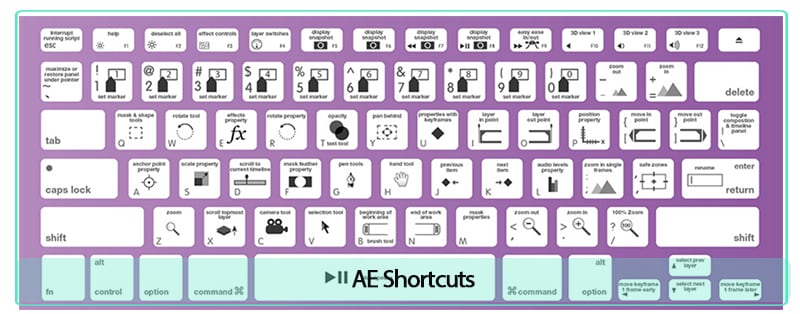
The keyboard layout:
This is a representation of your physical keyboard where you can see which keys have been assigned a shortcut, and which are available.
Command list:
The list displays all the commands that can be assigned shortcuts.
Key modifier list:
This list shows you all the modifier combinations and assigned shortcuts associated with the key you select on your physical keyboard.
After Effects does not allow you to reassign the following keys:
- A
- AA
- E
- EE
- F
- FF
- L
- LL
- M
- MM
- P
- PP
- R
- RR
- S
- SS
- T
- TT
- U
- UU
12. Should You Buy It?
Well first, you cannot buy After Effects, Premiere Pro or other software from Adobe. You have to rent them by paying monthly. After Effects is primarily a compositing and graphics software. Premiere is primarily a video editing program. In the case of After Effects and Premiere Pro, it’s not really an either/or. They’re both software with different purposes. After Effects is a lot more powerful and essentially showcases most of Premiere’s functionality, but according to our experience, the Premiere Pro interface and workflow is way more superior for video editing.
Premiere Pro is essentially built around its timeline, the region where you cut your video clips and drag and place them into your appropriate sequence. Hollywood filmmakers and professional YouTube content creators are using Premiere Pro to edit high-performing content and award-winning films. The software is very intuitive and easy for beginners to start with.
Are going to work with After Effects to create an income? Or are just going to use it for a hobby? It’s crucial to mention that question because Adobe After Effects is not something that is cheaply available. You will be investing much money on the program, and if you are working to use the software, paying a good amount, and earning nothing in return, then you might want to shift to another alternative which would cost you less. For instance, let’s assume you are using the application to earn an income, and have a few low-paying clients. In such a situation, you will have to rethink your options of software and analyze whether what you are paying in comparison to what you are getting is enough for you or not. We all are different individuals and have different preferences. Once we can see what is more important to us, or what is our need at this moment, then we will be able to judge the worth of purchasing Adobe After Effects better.
Are you going to use After Effects to earn an income? Or are just using it as a hobby? It is very important to address this question because Adobe After Effects is not something cheaply accessible. You will be investing a lot of money into this software, if you are using the software while paying a good amount and earning nothing in return yet, then you could shift to a different alternative which will cost you a lot less. Let’s say you are using After Effects to earn an income and have some low-paying work. In that case, you will have to reconsider your options of video editing software and look at whether what you are paying in comparison to what you are getting is possible for you. When we can see what is more important to us, we will be able to see the worth of buying After Effects.
Did you previously use After Effects or are you new to the program? The return that you will get using Adobe After Effects, depends on how good you know how to work with the options, functions and features in the software.
The Bottom Line
So summing it all together, Adobe After Effects takes care of all your assets and creates a final product, considering that After Effects is usually an asset-generation tool. Most video editors complete their projects in After Effects non-stop. It’s excellent for making visual videos come to life.
AE version 22.3 is very impressive. Giving you a wealth of new features created to make VFX editing a lot faster and easier. Offering new features on a regular basis, improving their subscription model making it more attractive. Especially if you’re a professional editor and designer.
Once you get comfortable with Adobe After Effects, you learn how to dynamically combine After Effects compositions to your Premiere projects. You are able to access both assets at the same time if needed!
Free Download For Win 7 or later(64-bit)
Free Download For macOS 10.14 or later
What Is Motion Tracking and How to Use It
Motion tracking makes it easier to follow the movement of objects and provide the sensed data to a program for additional processing. Motion tracking involves recording an object’s movements that match a previously stored motion template. This has a wide range of uses, including in robotics, entertainment, sports, the military, and the entertainment industry. Additionally, it is utilized in the creation of video games and films. While motion tracking is frequently referred to as match movement in the film and video game industries, motion tracking is frequently referred to as motion capture in other contexts.
With that said, let’s begin!
Part 1. Learning to Understand Motion Tracking
We need to ask the really crucial question now that we have a fundamental understanding of what it is. What in the world am I going to do with this? In order to do that, let’s quickly review some excellent applications for motion tracking. You could,
Utilize tracking information to stabilize motion
Add text or solids as additional compositional elements
Add 3D elements to 2D footage
Use effects or color gradation methods
Replace the screens on your computer, mobile device, or television
These are just a few examples of how motion tracking might be useful. You need to be able to track motion in compositions of any complexity.
Part 2. What software do you need?
There are numerous options for motion tracking applications. With advantages and downsides, we’ve compiled a list of the finest motion tracking programs. The following are the best video editors for motion tracking in our opinion:
Filmora
Wondershare created Filmora to enable you to fully express your creativity. FilmoraPro is the best option if you want to make some high-level modifications to your video. In addition to the pre-sets offered, it allows you to tweak the effects for a more expertly edited appearance.
![]()
Motion tracking is currently its best feature. You may track a skater as they race across the ice or follow a boat as it travels. Use the motion tracking feature to add drama to your videos. You won’t have to worry about getting lost because FilmoraPro features an amazingly simple UI. Simply click on the person or object you wish to track and choose Motion Track from the Effects menu.
Free Download For Win 7 or later(64-bit)
Free Download For macOS 10.14 or later
Blender
Open-source and cost-free motion tracking software is called Blender. It’s an excellent 3D creating tool. Modeling, rigging, animation, simulation, rendering, compositing, video editing, 2D animation, and of course motion tracking is all supported.

Kdenlive
A motion tracker was recently added to Kdenlive, an open source and free video editing tool, under its Effects section. This program analyzes an object’s tracking information and automatically generates a map of the object’s motion. Following that, you can align a title, an image, an icon, and any other 2D elements to the moving object using this track. Motion Tracker’s regularly updated algorithms are one of its key characteristics, which leads to a higher tracking success rate and faster tracking speed.

HitFilm Express
The free edition of HitFilm Express is a wonderful place to start if you’re learning the fundamentals of 2D motion tracking. To get superior tracking results, it offers two motion tracking types: Single Point for tracking simply position and Double Points for tracking position, scale, or rotation of an object. You can either steady the video with the tracking data or change the point with a CG object.

Its optical flow tracking technique is outstanding. It successfully tracks a moving item that changes into multiple shapes or is veiled for a few frames by figuring out the brightness flow of the moving object. Beginners can therefore save a great deal of time and effort when designing settings to deal with complex frames.
VEGAS Pro
In VEGAS Pro 18 and later, auto motion tracking is a freshly upgraded function. Despite its late birth, it included the Mocha masking and planar tracking technology, winner of an Academy Award. It enables you to accurately attach images and messages and even adjust for shifting perspective. You can hide faces, license information, and any private objects using this capability.

Adobe Premiere Pro
Because of its superior editing capabilities, Premiere Pro seems to be a requirement for anyone learning video editing. Premiere Pro, however, has a limited number of presets and automatic tools in order to provide consumers the most control.

When masking and blurring a face, motion tracking only works with the auto option. If not, you will need to enter and alter multiple keyframes to add text or resize the video, or you will need to install an extension to convert the mask’s tracks to any transformed parts.
PowerDirector
Due to its simplicity of use, PowerDirector is unquestionably among the greatest motion tracking programs currently available. It accomplishes complex effects without having an advanced learning curve, in contrast to other video editing tools. As demonstrated in the introductory video up top, a simple interface may be used to easily track and manage one or more motion-tracked items.

With this program, creating a simple motion track may be done in only three easy steps. This editor is for you if you want to finish the job swiftly and painlessly and are new to intermediate video editing.
Part 3. Differences between camera tracking and motion tracking?
Making the audience forget that there is a camera in the room is one of the primary goals of filmmaking. To engage the audience, tracking shots like camera tracking and motion tracking are helpful. Tracking shots provide filmmakers the chance to immerse their audience more deeply in the storyline of their characters. I discovered that there is some ambiguity around how motion tracking and camera tracking differ from one another. I’ll explain where the confusion might have originated and give you examples of how to use both strategies.
What distinguishes motion tracking from camera tracking? Their differences are due to how they view the course of action. From a camera’s perspective, motion tracking monitors an object’s movement. The scenario is more immersive thanks to camera tracking, which detects the movement of the camera and presents it as though you are in a virtual or augmented reality environment.
We’ll examine tracking’s development in the movie and its significance to the business. What it is and how it affects the cinematography industry. Along with the many software used for both motion tracking and camera tracking, we’ll also look at some of the popular applications for both.
Motion tracking
Motion tracking is similar to a car pursuit on the highway in an action movie. Let’s use a SimCity environment as another illustration: your Sim’s movement is monitored against the steady scene of your home. The frame is set on your Sim, regardless of what your Sim does.
Camera tracking
When the camera must move and the object being “tracked” must remain stationary, camera tracking might be utilized instead of motion tracking. Information from a recorded live shot taken with a live camera is used for camera tracking. Then, using this data, a parallel virtual camera is projected in a three-dimensional composition frame. fresh 3D pieces are added while scenes are recreated.
On the Internet of Vehicles, motion tracking will be crucial. IoV will project the motion of your vehicle along the 2D path. Then, utilizing the information about your surroundings, you are informed of any potential roadblocks.
The same basic idea underlies motion tracking and stabilization. Both follow a moving target. When stabilizing, you choose the location where you wish to remain concentrated and centered despite movement. You track the object you wish to concentrate on while moving when you use motion tracking.
Sports videos frequently use basketball and football and use motion tracking. wherein the player is surrounded by a circle as he circles the court or the field for basketball.
Conclusion
In video editing, techniques like motion tracking and camera tracking are frequently employed. Even though they are frequently compared, both employ various vantage angles to depict motion. By following the moving object’s movement throughout the frame, motion tracking maintains the moving object in focus. A post-production technique called camera tracking uses data from a pre-shot movie to project a parallel virtual camera that displays a 3D perspective. If motion tracking and camera tracking have anything in common, it’s the way they draw the viewer into the tale and make them feel like a part of it. This gives your audience a sense of immersion in the story and enables your movie to linger in their minds emotionally and visually long after the credits have rolled.
Part 1. Learning to Understand Motion Tracking
We need to ask the really crucial question now that we have a fundamental understanding of what it is. What in the world am I going to do with this? In order to do that, let’s quickly review some excellent applications for motion tracking. You could,
Utilize tracking information to stabilize motion
Add text or solids as additional compositional elements
Add 3D elements to 2D footage
Use effects or color gradation methods
Replace the screens on your computer, mobile device, or television
These are just a few examples of how motion tracking might be useful. You need to be able to track motion in compositions of any complexity.
Part 2. What software do you need?
There are numerous options for motion tracking applications. With advantages and downsides, we’ve compiled a list of the finest motion tracking programs. The following are the best video editors for motion tracking in our opinion:
Filmora
Wondershare created Filmora to enable you to fully express your creativity. FilmoraPro is the best option if you want to make some high-level modifications to your video. In addition to the pre-sets offered, it allows you to tweak the effects for a more expertly edited appearance.
![]()
Motion tracking is currently its best feature. You may track a skater as they race across the ice or follow a boat as it travels. Use the motion tracking feature to add drama to your videos. You won’t have to worry about getting lost because FilmoraPro features an amazingly simple UI. Simply click on the person or object you wish to track and choose Motion Track from the Effects menu.
Free Download For Win 7 or later(64-bit)
Free Download For macOS 10.14 or later
Blender
Open-source and cost-free motion tracking software is called Blender. It’s an excellent 3D creating tool. Modeling, rigging, animation, simulation, rendering, compositing, video editing, 2D animation, and of course motion tracking is all supported.
Kdenlive
A motion tracker was recently added to Kdenlive, an open source and free video editing tool, under its Effects section. This program analyzes an object’s tracking information and automatically generates a map of the object’s motion. Following that, you can align a title, an image, an icon, and any other 2D elements to the moving object using this track. Motion Tracker’s regularly updated algorithms are one of its key characteristics, which leads to a higher tracking success rate and faster tracking speed.
HitFilm Express
The free edition of HitFilm Express is a wonderful place to start if you’re learning the fundamentals of 2D motion tracking. To get superior tracking results, it offers two motion tracking types: Single Point for tracking simply position and Double Points for tracking position, scale, or rotation of an object. You can either steady the video with the tracking data or change the point with a CG object.
Its optical flow tracking technique is outstanding. It successfully tracks a moving item that changes into multiple shapes or is veiled for a few frames by figuring out the brightness flow of the moving object. Beginners can therefore save a great deal of time and effort when designing settings to deal with complex frames.
VEGAS Pro
In VEGAS Pro 18 and later, auto motion tracking is a freshly upgraded function. Despite its late birth, it included the Mocha masking and planar tracking technology, winner of an Academy Award. It enables you to accurately attach images and messages and even adjust for shifting perspective. You can hide faces, license information, and any private objects using this capability.
Adobe Premiere Pro
Because of its superior editing capabilities, Premiere Pro seems to be a requirement for anyone learning video editing. Premiere Pro, however, has a limited number of presets and automatic tools in order to provide consumers the most control.
When masking and blurring a face, motion tracking only works with the auto option. If not, you will need to enter and alter multiple keyframes to add text or resize the video, or you will need to install an extension to convert the mask’s tracks to any transformed parts.
PowerDirector
Due to its simplicity of use, PowerDirector is unquestionably among the greatest motion tracking programs currently available. It accomplishes complex effects without having an advanced learning curve, in contrast to other video editing tools. As demonstrated in the introductory video up top, a simple interface may be used to easily track and manage one or more motion-tracked items.
With this program, creating a simple motion track may be done in only three easy steps. This editor is for you if you want to finish the job swiftly and painlessly and are new to intermediate video editing.
Part 3. Differences between camera tracking and motion tracking?
Making the audience forget that there is a camera in the room is one of the primary goals of filmmaking. To engage the audience, tracking shots like camera tracking and motion tracking are helpful. Tracking shots provide filmmakers the chance to immerse their audience more deeply in the storyline of their characters. I discovered that there is some ambiguity around how motion tracking and camera tracking differ from one another. I’ll explain where the confusion might have originated and give you examples of how to use both strategies.
What distinguishes motion tracking from camera tracking? Their differences are due to how they view the course of action. From a camera’s perspective, motion tracking monitors an object’s movement. The scenario is more immersive thanks to camera tracking, which detects the movement of the camera and presents it as though you are in a virtual or augmented reality environment.
We’ll examine tracking’s development in the movie and its significance to the business. What it is and how it affects the cinematography industry. Along with the many software used for both motion tracking and camera tracking, we’ll also look at some of the popular applications for both.
Motion tracking
Motion tracking is similar to a car pursuit on the highway in an action movie. Let’s use a SimCity environment as another illustration: your Sim’s movement is monitored against the steady scene of your home. The frame is set on your Sim, regardless of what your Sim does.
Camera tracking
When the camera must move and the object being “tracked” must remain stationary, camera tracking might be utilized instead of motion tracking. Information from a recorded live shot taken with a live camera is used for camera tracking. Then, using this data, a parallel virtual camera is projected in a three-dimensional composition frame. fresh 3D pieces are added while scenes are recreated.
On the Internet of Vehicles, motion tracking will be crucial. IoV will project the motion of your vehicle along the 2D path. Then, utilizing the information about your surroundings, you are informed of any potential roadblocks.
The same basic idea underlies motion tracking and stabilization. Both follow a moving target. When stabilizing, you choose the location where you wish to remain concentrated and centered despite movement. You track the object you wish to concentrate on while moving when you use motion tracking.
Sports videos frequently use basketball and football and use motion tracking. wherein the player is surrounded by a circle as he circles the court or the field for basketball.
Conclusion
In video editing, techniques like motion tracking and camera tracking are frequently employed. Even though they are frequently compared, both employ various vantage angles to depict motion. By following the moving object’s movement throughout the frame, motion tracking maintains the moving object in focus. A post-production technique called camera tracking uses data from a pre-shot movie to project a parallel virtual camera that displays a 3D perspective. If motion tracking and camera tracking have anything in common, it’s the way they draw the viewer into the tale and make them feel like a part of it. This gives your audience a sense of immersion in the story and enables your movie to linger in their minds emotionally and visually long after the credits have rolled.
10+ Top Unlimited FCPX Slideshow Templates
10+ Best Unlimited FCPX Slideshow Templates
An easy yet powerful editor
Numerous effects to choose from
Detailed tutorials provided by the official channel
The Final Cut Pro is one of the best and the most well-known tools or software for editing and making slideshows and videos. And making slideshows with fcpx leads to the production of the finest and the most creative slideshow videos!
The best part about using fcpx is that one can use the best of the best fcpx slideshow template for free. The software includes a large variety of templates which makes your slideshows look unique, and you will find templates that will suit every necessary purpose for the slideshow.
In this article
01 [10+ Best Final Cut Pro Slideshow Templates in 2022](#Part 1)
02 [How to Create a Slideshow in Final Cut Pro?](#Part 2)
03 [FAQ of FCPX Slideshow Templates](#Part 3)
Part 1 Best Final Cut Pro Slideshow Templates in 2022
Let us begin our discussion with the best Final Cut Pro slideshow templates in 2022. We will put forth the names of the templates and a short description of them so that you know what they are best suitable for.
So, here are the best Final Cut Pro slideshow templates for 2022.
01Colorful Liquid Slideshow
The Colorful Liquid Slideshow is the template best suited for any slideshow video for promotional purposes on social media. It has a very attractive design and components that quickly draws attention. And it is needed for any promotional videos on social media platforms.
The template is all about vibrant colours and beautiful transitions, making it ideal for fashion and lifestyle videos.

02Freestyle Slideshow
If you want to play with different transitional effects on your slideshow, the Freestyle Slideshow template of FCPX is best suited for your purpose. It has many transition effects that make your slideshow look highly engaging and jaw-dropping.
It is compatible with Apple Motion also and is best for making casual and fun slideshow videos.

03Smooth Colourful Slideshow
To present a modern touch to your slideshow, the Smooth Colourful Slideshow template of FCPX is the best option. It has the integration of vibrant colours, with a sophisticated modern touch to the use and design of the template. This template works the best to draw the necessary attention for any branding purposes.

04Beautiful Slideshow
As its name suggests, the Beautiful Slideshow template emits a sense and aura of soothing and pleasantness through its design. It is best suitable for any travelling slideshow videos, as it has an old-school film theme. It has a vintage vibe, and the best feature is that it is available for free. It consists of 10 placeholders for texts and media.

05Fast Dynamic Slideshow
The Fast Dynamic Slideshow consists of all the quick transitional effects. So, if you want to make a slideshow video that would have some action, this template will be best suitable for the purpose. The template and its transitions are sure to catch the audience’s attention, and the clean and quick transitions make this template one of the best on the list.
06Colorful Slideshow
The Colourful Slideshow template of FCPX is a template that is simple yet elegant. The design has a modern theme to it. So, if you want to create a simple but modern and elegant styled slideshow, this template can help you the best. You can readily make edits in the template, and it includes sufficient place for media and text holder.

07Urban Fashion Promo
As its name suggests, the Urban Fashion Promo slideshow template of FCPX is best suited for making slideshows for stylish themes with an urban touch to it. It is ideal for making any fashion slideshow videos. The template is customizable with different slide layout styles and customizable colours. The template is compatible with Apple Motion which makes it possible for you to customize it on Apple Motion.

08Multi-Screen Slideshow
The inspiration behind this fantastic Multi-Screen Template design of FCPX is the popular ongoing trend. The template has 32 media placeholders and as many as 26 text placeholders. Additionally, one can readily customize and edit the template to make it more attractive and eye-catching. It is best suitable for making any action-oriented slideshow and the ones that require grasping the audience’s attention.

09Dynamic Slideshow Opener
If you want to make trendy slideshow videos and involve the game of colours, the Dynamic Slideshow Opener template is best suitable for it. The creative effects of the template are added with an urban style which can create unique slideshows. It is ideal for videos on social media platforms.

10AI Technology Slideshow
When you are to make a slideshow for any exhibitions, presentations or any other professional purpose, the AI Technology Slideshow is the best option. The the template has a design related to tech backgrounds, so it is also ideal for any slideshows involving the showcasing of technological components or topics.

11Typography Slides
The Typography Slides of FCPX are best for making slideshow videos for professional purposes and business projects. It consists of various layouts that are ideal for showcasing various products, services, brands and the like. The resolution compatible with this template is 4K, and one can use this template on Apple Motion.

12Portfolio Video Slideshow Template
The Portfolio Video Slideshow Template of FCPX is best suited for making the best portfolio videos. It has all the elements that can significantly help you create your portfolio. The template is available in 4K resolution and allows you to integrate different slides together to create the best slideshow.
Part 2 How to Create a Slideshow in Final Cut Pro?
Now, we will discuss the different steps that will help you make a slideshow in Final Cut Pro. The steps are easy to follow. So, the following are the steps for creating an fcpx slideshow.
Step 1: Create a new project in the Final Cut Pro. For that, select “File” and then select “New Project”.
Step 2: The next step is about importing the photos you want to include in your slideshow. for this, use the option “Import” in “File” and import all the images you want for your slideshow.
Step 3: Create the timeline for your slideshow. Drag the images into the order you prefer, and it will make the photos appear in the sequence you want in your slideshow.
Step 4: Add the different transitions, effects, filters and the other elements of editing the slideshow. You can also integrate the various templates that are available at fcpx.
Step 5: It is the last step, which requires you to export the slideshow you just made. For that, go to “File”, sleet “Export”, choose “QuickTime Movie” and the quality you would prefer.
Part 3 FAQ of FCPX Slideshow Templates
Let us now look into some common questions related to FCPX slideshow templates. Some of the common questions about the fcpx slideshow template is as follows.
01Can I create a slideshow using Final Cut Pro?
Yes, one can effortlessly create the best and the most inimitable slideshows with Final Cut Pro. There are only five steps involved, and all the steps are easy to follow, as we have mentioned earlier.
02Are there templates like fcpx available at Filmora?
Filmora has a large variety of equally excellent templates, like fcpx’s. One can create the best and the most incredible slideshows in Wondershare Filmora Video Editor with its endless array of templates.
03What can we understand by fcpx templates?
The fcpx slideshow templates help you integrate different transitions, effects, texts, and other editing components and make your slideshow appear more engaging and extraordinary.
04Can I make slideshows in Wondershare Filmora Video Editor ?
Yes, one can make the most fantastic slideshow videos at Filmora with its incomparable professional yet simple-to-use features with which it is wholly loaded.
For Win 7 or later (64-bit)
For macOS 10.12 or later
Now, let us discuss the best tool with which you can make excellent slideshow videos and edit them. The tool we are talking about is Filmora. And it has the best features for video editing and making slideshow videos, and it is suitable for beginners and also professionals.
The features and elements for editing are simple to use but are the most advanced and proficient ones. The templates at Filmora are innumerable and are equally incredible, and you will find templates that will perfectly fit every purpose. You can readily avail yourself of the free version of Filmora and try out the free trial version of the paid version of the tool, which offers you the most excellent tools for editing.
● Ending Thoughts →
● We have covered the topics in our discussion that are given below.
● The best Final Cut Pro slideshow templates of 2022 and their description.
● The steps with which you can create a sideshow in the Final Cut Pro software.
● We have discussed the solutions to the common questions relating to the FCPX slideshow templates, and we introduced Filmora, the best tool for creating and editing incredible slideshow videos.
The Final Cut Pro is one of the best and the most well-known tools or software for editing and making slideshows and videos. And making slideshows with fcpx leads to the production of the finest and the most creative slideshow videos!
The best part about using fcpx is that one can use the best of the best fcpx slideshow template for free. The software includes a large variety of templates which makes your slideshows look unique, and you will find templates that will suit every necessary purpose for the slideshow.
In this article
01 [10+ Best Final Cut Pro Slideshow Templates in 2022](#Part 1)
02 [How to Create a Slideshow in Final Cut Pro?](#Part 2)
03 [FAQ of FCPX Slideshow Templates](#Part 3)
Part 1 Best Final Cut Pro Slideshow Templates in 2022
Let us begin our discussion with the best Final Cut Pro slideshow templates in 2022. We will put forth the names of the templates and a short description of them so that you know what they are best suitable for.
So, here are the best Final Cut Pro slideshow templates for 2022.
01Colorful Liquid Slideshow
The Colorful Liquid Slideshow is the template best suited for any slideshow video for promotional purposes on social media. It has a very attractive design and components that quickly draws attention. And it is needed for any promotional videos on social media platforms.
The template is all about vibrant colours and beautiful transitions, making it ideal for fashion and lifestyle videos.
02Freestyle Slideshow
If you want to play with different transitional effects on your slideshow, the Freestyle Slideshow template of FCPX is best suited for your purpose. It has many transition effects that make your slideshow look highly engaging and jaw-dropping.
It is compatible with Apple Motion also and is best for making casual and fun slideshow videos.
03Smooth Colourful Slideshow
To present a modern touch to your slideshow, the Smooth Colourful Slideshow template of FCPX is the best option. It has the integration of vibrant colours, with a sophisticated modern touch to the use and design of the template. This template works the best to draw the necessary attention for any branding purposes.
04Beautiful Slideshow
As its name suggests, the Beautiful Slideshow template emits a sense and aura of soothing and pleasantness through its design. It is best suitable for any travelling slideshow videos, as it has an old-school film theme. It has a vintage vibe, and the best feature is that it is available for free. It consists of 10 placeholders for texts and media.
05Fast Dynamic Slideshow
The Fast Dynamic Slideshow consists of all the quick transitional effects. So, if you want to make a slideshow video that would have some action, this template will be best suitable for the purpose. The template and its transitions are sure to catch the audience’s attention, and the clean and quick transitions make this template one of the best on the list.
06Colorful Slideshow
The Colourful Slideshow template of FCPX is a template that is simple yet elegant. The design has a modern theme to it. So, if you want to create a simple but modern and elegant styled slideshow, this template can help you the best. You can readily make edits in the template, and it includes sufficient place for media and text holder.
07Urban Fashion Promo
As its name suggests, the Urban Fashion Promo slideshow template of FCPX is best suited for making slideshows for stylish themes with an urban touch to it. It is ideal for making any fashion slideshow videos. The template is customizable with different slide layout styles and customizable colours. The template is compatible with Apple Motion which makes it possible for you to customize it on Apple Motion.
08Multi-Screen Slideshow
The inspiration behind this fantastic Multi-Screen Template design of FCPX is the popular ongoing trend. The template has 32 media placeholders and as many as 26 text placeholders. Additionally, one can readily customize and edit the template to make it more attractive and eye-catching. It is best suitable for making any action-oriented slideshow and the ones that require grasping the audience’s attention.
09Dynamic Slideshow Opener
If you want to make trendy slideshow videos and involve the game of colours, the Dynamic Slideshow Opener template is best suitable for it. The creative effects of the template are added with an urban style which can create unique slideshows. It is ideal for videos on social media platforms.
10AI Technology Slideshow
When you are to make a slideshow for any exhibitions, presentations or any other professional purpose, the AI Technology Slideshow is the best option. The the template has a design related to tech backgrounds, so it is also ideal for any slideshows involving the showcasing of technological components or topics.
11Typography Slides
The Typography Slides of FCPX are best for making slideshow videos for professional purposes and business projects. It consists of various layouts that are ideal for showcasing various products, services, brands and the like. The resolution compatible with this template is 4K, and one can use this template on Apple Motion.
12Portfolio Video Slideshow Template
The Portfolio Video Slideshow Template of FCPX is best suited for making the best portfolio videos. It has all the elements that can significantly help you create your portfolio. The template is available in 4K resolution and allows you to integrate different slides together to create the best slideshow.
Part 2 How to Create a Slideshow in Final Cut Pro?
Now, we will discuss the different steps that will help you make a slideshow in Final Cut Pro. The steps are easy to follow. So, the following are the steps for creating an fcpx slideshow.
Step 1: Create a new project in the Final Cut Pro. For that, select “File” and then select “New Project”.
Step 2: The next step is about importing the photos you want to include in your slideshow. for this, use the option “Import” in “File” and import all the images you want for your slideshow.
Step 3: Create the timeline for your slideshow. Drag the images into the order you prefer, and it will make the photos appear in the sequence you want in your slideshow.
Step 4: Add the different transitions, effects, filters and the other elements of editing the slideshow. You can also integrate the various templates that are available at fcpx.
Step 5: It is the last step, which requires you to export the slideshow you just made. For that, go to “File”, sleet “Export”, choose “QuickTime Movie” and the quality you would prefer.
Part 3 FAQ of FCPX Slideshow Templates
Let us now look into some common questions related to FCPX slideshow templates. Some of the common questions about the fcpx slideshow template is as follows.
01Can I create a slideshow using Final Cut Pro?
Yes, one can effortlessly create the best and the most inimitable slideshows with Final Cut Pro. There are only five steps involved, and all the steps are easy to follow, as we have mentioned earlier.
02Are there templates like fcpx available at Filmora?
Filmora has a large variety of equally excellent templates, like fcpx’s. One can create the best and the most incredible slideshows in Wondershare Filmora Video Editor with its endless array of templates.
03What can we understand by fcpx templates?
The fcpx slideshow templates help you integrate different transitions, effects, texts, and other editing components and make your slideshow appear more engaging and extraordinary.
04Can I make slideshows in Wondershare Filmora Video Editor ?
Yes, one can make the most fantastic slideshow videos at Filmora with its incomparable professional yet simple-to-use features with which it is wholly loaded.
For Win 7 or later (64-bit)
For macOS 10.12 or later
Now, let us discuss the best tool with which you can make excellent slideshow videos and edit them. The tool we are talking about is Filmora. And it has the best features for video editing and making slideshow videos, and it is suitable for beginners and also professionals.
The features and elements for editing are simple to use but are the most advanced and proficient ones. The templates at Filmora are innumerable and are equally incredible, and you will find templates that will perfectly fit every purpose. You can readily avail yourself of the free version of Filmora and try out the free trial version of the paid version of the tool, which offers you the most excellent tools for editing.
● Ending Thoughts →
● We have covered the topics in our discussion that are given below.
● The best Final Cut Pro slideshow templates of 2022 and their description.
● The steps with which you can create a sideshow in the Final Cut Pro software.
● We have discussed the solutions to the common questions relating to the FCPX slideshow templates, and we introduced Filmora, the best tool for creating and editing incredible slideshow videos.
Quickest Guide | Zoom In and Out on Snapchat
Abundant Video Effects - Wondershare Filmora
Provide abundant video effects - A creative video editor
Powerful color correction and grading
Detailed tutorials are provided by the official channel
People make Snapchat videos for various purposes, such as capturing beautiful natural scenery or a funny video of a friend. To capture the details or to focus on a specific part, the zoom in and out feature is commonly used. By doing so, you can manually focus on a particular area clearly with your fingers.
The following article will focus on how to zoom in on Snapchat by offering detailed and easy steps. Moreover, we will suggest a powerful tool that can help you in zooming in and out on Snapchat flawlessly, along with additional distinct features.
In this article
Part 1: How to Zoom In and Out a Video on Snapchat While Recording?
Part 2: How to Zoom In and Out a Pre-Recorded Video on Snapchat?
Part 3: How to Zoom In and Zoom Out Videos using Wondershare Filmora?
Part 1: How to Zoom In and Out a Video on Snapchat While Recording?
In this section, we will provide you with two methods of how to zoom in and out on Snapchat videos instantly:
Method 1: Without Locking Snapchat Recorder
Step 1: Start by opening your Snapchat from on your mobile device to access the camera screen for recording a video. Now, start capturing the video by holding the center red button from the middle of your screen.

Step 2: While holding the center recording button, use your finger and slide it in the upward direction to zoom in.

Step 3: To zoom out, use the same finger by sliding it to the bottom direction. Once done, leave the recording button by removing your finger to finish the recording. Now you can save the recorded video on Snapchat.

Method 2: By Using the Snapchat Lock Feature
Step 1: Begin with opening your Snapchat account and stay on your camera screen to record the video. Now start the recording by holding the center red button from your displayed screen.

Step 2: To “Lock” the recording, move your finger towards the left side, after which you can see the padlock icon on your screen.

Step 3: After recording the video is locked, use your two fingers simultaneously and move them apart to zoom in on the specific part. Conversely, for zooming out, use your two fingers and move them in an inward direction.

Step 4: To finalize the recording, simply tap on the recording icon, and the recording will stop. You can now edit your snap and send it to your friends or post it on your Snapchat.

Part 2: How to Zoom In and Out a Pre-Recorded Video on Snapchat?
In this section, we will offer detailed steps on how to zoom in and out on Snapchat with pre-recorded videos:
Step 1: Open your Snapchat from your smartphone and then tap on the icon showing on the left side depicting “Two Mobiles Overlapping Each Other.” From this icon, navigate to your “Camera Roll.”

Step 2: From your camera roll, choose the video you want to edit. Then click on the “Pencil” icon by going to the bottom left corner to zoom in and out on your video.

Step 3: On the next screen, you will see various editing options on the right side. Select the second last option, which is for cropping and can be used to zoom in on the videos.

Step 4: By using this selected option, you can zoom in and out on the video according to your preference. Just use your two fingers and place them on the screen. To zoom in, stretch the fingers and move them apart and control the zoom value manually.

Step 5: For zooming out, move the fingers in an inward direction. Once done with all the changes, tap on the “Tick” button. Afterward, click on the “Done” option and save the changes by tapping on “Save Changes.”

Part 3: How to Zoom In and Zoom Out Videos using Wondershare Filmora?
If you are finding it difficult how to zoom in on Snapchat effortlessly, we will recommend Wondershare Filmora as a complete toolbox for editing videos. Through this tool, you can not only flawlessly zoom in on the multiple Snapchat videos but can also perform various editing functions. The user interface is specially designed in a way to assist beginners in executing the editing process.
You can take advantage of tons of advanced features in Filmora like auto reframing, video effects, transitions, and instant mode. The user interface is so simple that within seconds you can zoom in and out on any video perfectly.
Collectively, this tool functions as a complete professional toolbox for video editing and does not require technical experience or additional tools. Steps to Zoom In and Out through Wondershare Filmora:
Step 1: Select New Project
Begin with launching Wondershare Filmora on your computer and click to open its user interface. Afterward, tap on the option “New Project” to continue with the process.

Step 2: Import your Snapchat Video
On the new window, click on the icon of the “Arrowhead” to import the video on this tool. Once done with uploading the video, drag the video to the timeline of this tool.

Step 3: Go to Transitions Tab
From the tabs displayed on the left side, navigate to the “Transitions” tab by clicking on them. On its search box, type “Zoom In Out,” and the tool will automatically fetch transitions related to it.

Step 4: Choose Transitions
From the displayed transitions, select any transition of your choice. Apply the transition to your video by dragging it to the video available on the timeline.

Step 5: Preview the video
If you find the results satisfactory in the preview window, tap on the “Export” button displayed on top and save the video on your computer.

Conclusion
Snapchat videos are highly popular due to their high-quality results and features. However, if you are struggling to focus on certain parts while recording a video through Snapchat, this article has offered a well-structured guide on how to zoom in and out on Snapchat quickly. If you are finding manual methods confusing, you can rely on the top-notch tool called Wondershare Filmora for Snapchat zoomed in.
People make Snapchat videos for various purposes, such as capturing beautiful natural scenery or a funny video of a friend. To capture the details or to focus on a specific part, the zoom in and out feature is commonly used. By doing so, you can manually focus on a particular area clearly with your fingers.
The following article will focus on how to zoom in on Snapchat by offering detailed and easy steps. Moreover, we will suggest a powerful tool that can help you in zooming in and out on Snapchat flawlessly, along with additional distinct features.
In this article
Part 1: How to Zoom In and Out a Video on Snapchat While Recording?
Part 2: How to Zoom In and Out a Pre-Recorded Video on Snapchat?
Part 3: How to Zoom In and Zoom Out Videos using Wondershare Filmora?
Part 1: How to Zoom In and Out a Video on Snapchat While Recording?
In this section, we will provide you with two methods of how to zoom in and out on Snapchat videos instantly:
Method 1: Without Locking Snapchat Recorder
Step 1: Start by opening your Snapchat from on your mobile device to access the camera screen for recording a video. Now, start capturing the video by holding the center red button from the middle of your screen.
Step 2: While holding the center recording button, use your finger and slide it in the upward direction to zoom in.
Step 3: To zoom out, use the same finger by sliding it to the bottom direction. Once done, leave the recording button by removing your finger to finish the recording. Now you can save the recorded video on Snapchat.
Method 2: By Using the Snapchat Lock Feature
Step 1: Begin with opening your Snapchat account and stay on your camera screen to record the video. Now start the recording by holding the center red button from your displayed screen.
Step 2: To “Lock” the recording, move your finger towards the left side, after which you can see the padlock icon on your screen.
Step 3: After recording the video is locked, use your two fingers simultaneously and move them apart to zoom in on the specific part. Conversely, for zooming out, use your two fingers and move them in an inward direction.
Step 4: To finalize the recording, simply tap on the recording icon, and the recording will stop. You can now edit your snap and send it to your friends or post it on your Snapchat.
Part 2: How to Zoom In and Out a Pre-Recorded Video on Snapchat?
In this section, we will offer detailed steps on how to zoom in and out on Snapchat with pre-recorded videos:
Step 1: Open your Snapchat from your smartphone and then tap on the icon showing on the left side depicting “Two Mobiles Overlapping Each Other.” From this icon, navigate to your “Camera Roll.”
Step 2: From your camera roll, choose the video you want to edit. Then click on the “Pencil” icon by going to the bottom left corner to zoom in and out on your video.
Step 3: On the next screen, you will see various editing options on the right side. Select the second last option, which is for cropping and can be used to zoom in on the videos.
Step 4: By using this selected option, you can zoom in and out on the video according to your preference. Just use your two fingers and place them on the screen. To zoom in, stretch the fingers and move them apart and control the zoom value manually.
Step 5: For zooming out, move the fingers in an inward direction. Once done with all the changes, tap on the “Tick” button. Afterward, click on the “Done” option and save the changes by tapping on “Save Changes.”
Part 3: How to Zoom In and Zoom Out Videos using Wondershare Filmora?
If you are finding it difficult how to zoom in on Snapchat effortlessly, we will recommend Wondershare Filmora as a complete toolbox for editing videos. Through this tool, you can not only flawlessly zoom in on the multiple Snapchat videos but can also perform various editing functions. The user interface is specially designed in a way to assist beginners in executing the editing process.
You can take advantage of tons of advanced features in Filmora like auto reframing, video effects, transitions, and instant mode. The user interface is so simple that within seconds you can zoom in and out on any video perfectly.
Collectively, this tool functions as a complete professional toolbox for video editing and does not require technical experience or additional tools. Steps to Zoom In and Out through Wondershare Filmora:
Step 1: Select New Project
Begin with launching Wondershare Filmora on your computer and click to open its user interface. Afterward, tap on the option “New Project” to continue with the process.
Step 2: Import your Snapchat Video
On the new window, click on the icon of the “Arrowhead” to import the video on this tool. Once done with uploading the video, drag the video to the timeline of this tool.
Step 3: Go to Transitions Tab
From the tabs displayed on the left side, navigate to the “Transitions” tab by clicking on them. On its search box, type “Zoom In Out,” and the tool will automatically fetch transitions related to it.
Step 4: Choose Transitions
From the displayed transitions, select any transition of your choice. Apply the transition to your video by dragging it to the video available on the timeline.
Step 5: Preview the video
If you find the results satisfactory in the preview window, tap on the “Export” button displayed on top and save the video on your computer.
Conclusion
Snapchat videos are highly popular due to their high-quality results and features. However, if you are struggling to focus on certain parts while recording a video through Snapchat, this article has offered a well-structured guide on how to zoom in and out on Snapchat quickly. If you are finding manual methods confusing, you can rely on the top-notch tool called Wondershare Filmora for Snapchat zoomed in.
Also read:
- New Want to Know the Full Process of Adding the Falling Text Effect as a Video Introduction? Detailed Guidelines on All the Steps Are Mentioned Here for Filmora Users
- Best 8 AI Video Denoise Software for 2024
- Want to Sync Separate Audio with Video? Check Out This Guide to Do It in the Simplest Way Using the Video Editor - Wondershare Filmora for 2024
- 2024 Approved This Article Talks About Pixel Art Wallpapers. It Gives Examples of Different Pixel Art to Show You How to Customize Your Own Pixel Art Wallpapers, and How to Make a Pixel Art Gif on Filmora
- Updated 4 Ways to Merge MP4 and MP3
- Best Filmic Pro LUTs For Video Editing for 2024
- New In 2024, How to Create a Video Slideshow in iMovie
- New Best 31 Video Trimmers for Computer, Phone and Online
- Updated 2024 Approved How to Vlog? A Ultimate Guide for Beginners
- 2024 Approved Dubbing Videos With Voiceovers | Using Wondershare Filmora
- 2024 Approved Learn How to Add Fun and Personalized AR Emoji Stickers to Your Videos. Discover Tips and Tricks for Using These Stickers Like a Pro and Making Your Videos Stand Out
- Updated 2024 Approved The Best 10 GIF to JPGPNG Converters
- In This Article I Will Share to You My Tips and Experiences on How to Become a YouTube Vlogger and Things You Need to Consider Being a Vlogger for 2024
- The Craziest 10 AI Editors Youve Ever Seen for 2024
- New In 2024, Replacing Sky Background Using Adobe Photoshop A Comprehensive Guide
- In 2024, 7 Solutions to Edit GoPro Video on Mac
- New Overview of FPS for YouTube Videos
- 2024 Approved Do You Want to Make Your Background Disappear and Replace with an Attractive Background? Here Is How to Add a Green Screen to Zoom App and Add Any Virtual Background of Your Choice
- Updated Simple Tricks Make 3D GIF Production of Inspiration Pop up Constantly
- New How to Turn On/Off Motion Blur in Minecraft?
- Updated Movavi Slideshow Maker Is a Powerful Video Editing Tool that Can Be Used to Add Rich Effects to Videos Easily. This Guide Will Introduce the Features and Show You How to Apply Effects to Videos with This Tool
- Complete Tutorial on After Effects Countdown Timer Adding for 2024
- New SRT Not Displaying How to Open and Use SRT File in VLC?
- 2024 Approved Complete Guide to Change Video Resolution in Filmora
- Updated Clone Yourself in Videos with Filmora
- In 2024, Best Youtube Video Meme Maker
- In 2024, How To Speed Up Video With Lightworks Video Editor
- In 2024, Updated 8 Ways to Merge SRT with MP4
- In 2024, Step by Step to Cut Videos in Adobe Premiere Pro
- 2024 Approved Top 10 TEXT TO SPEECH VIDEO MAKERS
- 2024 Approved TOP 10 Types of Video Framing From Novice to Master
- Updated How to Make a Vacation Slideshow in 5 Minutes for 2024
- Updated In 2024, How to DIY VHS Overlay in After Effects?
- New How to Make A Funny Vlog for TikTok?
- New Using AI to Replace Skies Finding the Right Methods
- New How to Use LUTs in VN Editor – Complete Guide and Best LUTs Download
- Learn How to Create Quiz Videos for YouTube that Are Interactive and Can Get Your Audience Engaged with Your Content for 2024
- New How to Make a PowerPoint Looping Slideshow
- In 2024, Do You Want to Know About the Best Filmic Pro LUTs for Video Editing? This Article Provides Details on the Best Recommendations
- New Best 22 Video Editing Tips to Know
- New 2024 Approved Create Slow Motion Videos Using Final Cut Pro with Ease
- 2024 Approved This Article Is a Guide on How to Download and Install Final Cut Pro, Its Key Features, and More. It Also Discusses an Alternative Option to It so the Creators or Editors Can Opt for Editing Videos Accordingly
- Updated 7 Ways to Make GIF From Videos on Mac
- Updated In 2024, How to Animate Your Designs With Canva GIF
- New How to Add the Popular Video Text Effects to Your Video for 2024
- In 2024, Quick Answer What Is a GIF File?
- Updated Free LUTs for OBS How to Use Them for 2024
- How D AI Video Games Act More Human Than Human?
- Updated Perfectly Use the Audio Mixer in Filmora
- New Learn How to Easily Concatenate Videos Using FFmpeg in This Step-by-Step Guide. From Installation to Execution, We Cover It All to Streamline Your Video Editing Process
- Life360 Learn How Everything Works On Vivo Y28 5G | Dr.fone
- In 2024, Preparation to Beat Giovani in Pokemon Go For OnePlus Ace 2 | Dr.fone
- Wondering the Best Alternative to Hola On Xiaomi Redmi Note 12T Pro? Here Is the Answer | Dr.fone
- What Pokémon Evolve with A Dawn Stone For OnePlus 12R? | Dr.fone
- In 2024, How to Unlock Apple ID On your Apple iPhone 12 mini without Security Questions?
- 8 Ultimate Fixes for Google Play Your Itel P55T Isnt Compatible | Dr.fone
- Fix the Error of Unfortunately the Process.com.android.phone Has Stopped on Realme 12 Pro+ 5G | Dr.fone
- In 2024, Unlock Apple iPhone 14 Plus Without Passcode Easily
- Tutorial to Change Samsung Galaxy S24+ IMEI without Root A Comprehensive Guide
- How To Bypass Activation Lock On Apple Watch Or iPhone 6s Plus?
- 3 Ways to Export Contacts from Apple iPhone 13 to Excel CSV & vCard Easily | Dr.fone
- How to Fix Life360 Shows Wrong Location On Xiaomi Redmi Note 13 Pro 5G? | Dr.fone
- How to Unlock Infinix Note 30i Phone Password Without Factory Reset?
- Title: Updated Adobe After Effects Review
- Author: Chloe
- Created at : 2024-05-20 03:37:50
- Updated at : 2024-05-21 03:37:50
- Link: https://ai-editing-video.techidaily.com/updated-adobe-after-effects-review/
- License: This work is licensed under CC BY-NC-SA 4.0.
