:max_bytes(150000):strip_icc():format(webp)/full-frame-shot-of-speakers-1138109687-33289baddc314b44ae87abc2fc8060cd-e7bccad6d81244509ed97ddf557f89e4.jpg)
Updated Adobe Premiere Pro Rec 709 LUTs Finding The Best Choices

Adobe Premiere Pro Rec 709 LUTs: Finding The Best Choices
Different styles of LUTs exist because each style serves a specific purpose in color correction and grading. LUTs are designed to replicate various cinematic styles and to change lighting conditions. By using different styles of LUTs, you can effortlessly achieve the desired color grading for your media. There are many types of LUTs to download, each with unique color composition.
However, Rec 709 LUT is a type of LUT commonly used in video editing software like Premiere Pro. Additionally, this LUT ensures that your video appears accurate and consistent on various HD screens. Moreover, it helps maintain the right balance of colors, contrast, and brightness. Furthermore, Rec 709 LUT Premiere Pro is suitable for broadcast, web streaming, or other HD content platforms.
Part 1: What are the Benefits of Using Premiere Pro Rec 709 LUTs in Video Editing?
Do you know the advantages of using Rec 709 Premiere Pro LUTs? Using Rec 709 LUTs in video editing with software like Adobe Premiere Pro can offer several benefits:
Color Accuracy
Rec 709 is the color space standard used for broadcast and video production. Furthermore, applying Rec 709 LUTs ensures accurate color representation of your media. Additionally, it maintains consistency and accuracy across different devices and platforms. It helps to achieve a standardized color look that conforms to industry standards.
Efficient Color Correction
Rec 709 LUTs streamline your color correction process. They provide a starting point for adjusting your videos’ color balance, contrast, and saturation. Moreover, if you apply this LUT at the start of your project, you can bring your video within the acceptable color range. Eventually, it will save you time and effort in the editing process.
Previewing Final Look
When you apply these LUTs, you can preview how your footage will look after color grading. Similarly, it helps you visualize your content to make changes for further adjustments. In addition, it also allows you to assess the tone and mood of the video in real-time.
Consistency and Compatibility
Such LUTs promote consistency across different cameras, lighting conditions, and sources. When working with multiple sources, you can apply this LUT for a consistent look. Furthermore, these LUTs also ensure compatibility with various display devices and platforms. It makes this tool compatible with different platforms and software.
Creative Control
Furthermore, these LUTs also serve as a starting point for further creative grading. You can layer additional adjustments on top of the LUT. In this way, you can achieve a specific artistic style to create a unique look for your project. Additionally, Rec 709 LUT creates a foundation for you to color-grade your content creatively.
Speeding Up Workflow
By using Rec 709 LUTs as a starting point, you can speed up your editing workflow. Using these LUTs, you don’t need to adjust each clip individually manually. In addition, you can apply a LUT to multiple clips simultaneously to color-correct your media files. Moreover, it saves you time when working on larger video projects.
Empower your videos with a new mood using different LUTs. Filmora now offers 100+ top-quality 3D LUTs cover a broad range of scenarios. Transform your videos with Filmora’s powerful 3D LUTs.
Apply LUT on Videos Apply LUT on Videos Learn More

Part 2: How to Use LUTs in Premiere Pro: A Guide
You can apply your Rec 709 LUT for Premiere Pro without needing any prior experience. All you have to do is to follow these simple steps to apply your favorite LUT.
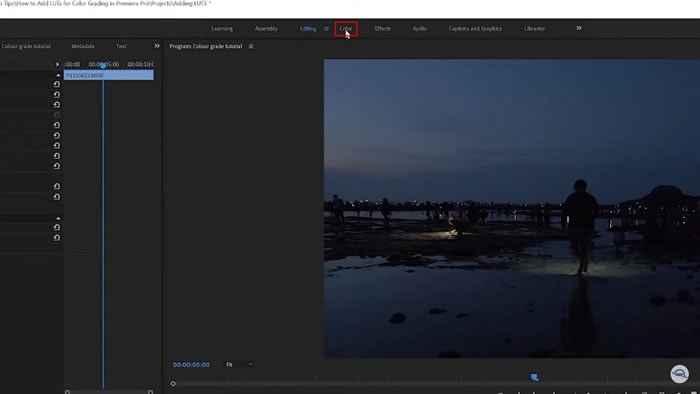
Step 1: To apply a LUT using Adobe Premiere Pro, import your video by clicking the “File” button and selecting the “Import” option. You can also click on “Import media to start” in the Project Tab. Once your file is imported, drag the clip onto the timeline and move into the “Color” workspace.
Step 2: In continuation, click the “Adjustment Layer” button in the Project tab. Select your adjustment layer and drop it on top of your video clip in the timeline. Click on the layer and go to the “Video Effects” in the Effects option in the Project window. Then, navigate to “Color Correction” and select “Lumetri Color.”

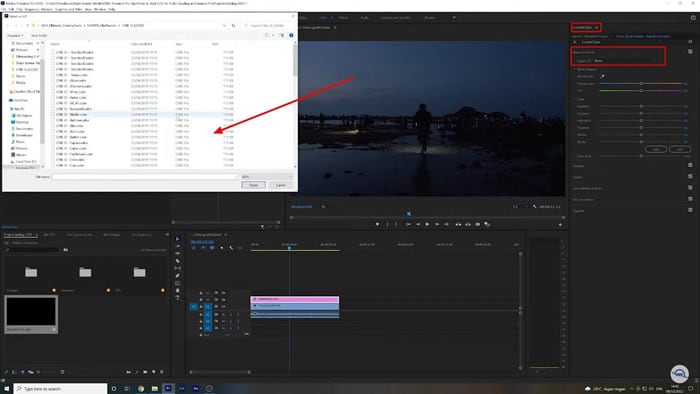
Step 3: In the new window that appears, find the “Input LUT” option under the Basic Correction tab. Browse the LUT you want to apply to your video. Additionally, you can explore more creative LUTs by going to the “Creative” tab in the Lumetri Color window. In the “Look” section, browse for different creative LUTs for your video. You can adjust the intensity of the selected LUT using the slider.
Part 3: The Top Notch Premiere Pro LUTs Rec 709
There are many Premiere Pro Rec 709 LUTs available that you can download and purchase. In the list below are some of the best Rec 709 LUTs you can use.
1. LOOK Creative LUT Pack
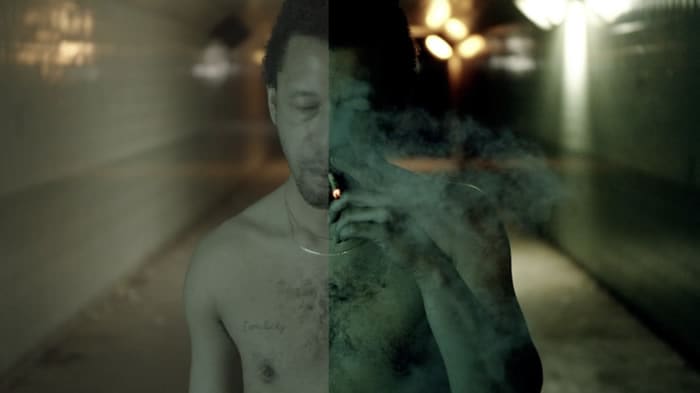
The LOOK Creative LUT Pack is a collection of 10 creative LUTs. It includes a range of LUTs, including some popular ones like teal and orange and old noir. These LUTs provide a quick and easy way to add a specific color tone or mood to your footage. In addition to the basic LUTs, it also offers unique and creative options. For example, you’ll find LUTs like Subtle Sci-Fi, Grunge Green, and others.

2. Cinematic LUTs V2
Cinematic LUTs V2 is a pack of modern cinematic-style LUTs. This incredible LUTs pack is designed to give your videos a cinematic touch. With this pack, you get access to 10 different cinematic LUTs to color grade your videos. Furthermore, you can use these LUTs for your LOG footage as well. Additionally, with these LUTs, you can add richness and depth to your videos.

3. NATURAL Rec709
The NATURAL Rec709 LUT pack offers 17 different styles of LUTs. It includes ones inspired by Tobacco, Crunchy Gold, and Black & White filters. These LUTs can enhance the colors and tones in your videos, providing a natural look. Furthermore, you can customize the intensity of the LUTs. Moreover, each LUT in this pack offers a unique color scheme for your videos.
4. 35 Free LUTs for Color Grading Videos
It is an amazing LUT pack that offers you a variety of 35 different styles of LUTs. With these LUTs, you can achieve a vintage look or a cinematic vibe for your videos. These LUTs can work perfectly with Rec 709 footage with accurate and vibrant colors. Furthermore, this pack is compatible with different software, including Premiere Pro.

5. S-Log 3 to Rec.709 LUT
The S-Log3 to Rec.709 LUT pack is designed to enhance your footage by adding vibrance. Applying this LUT boosts saturation, giving your video a more natural and realistic look. Additionally, you can bring out the full potential of your videos captured in S-Log3 gamma. Moreover, this LUT amplifies the colors and is compatible with the Rec.709 color space.

6. DJI OSMO POCKET Creative LUTs Pack
The DJI Osmo Pocket Creative LUTs Pack offers a collection of various creative LUTs. You can choose from different styles and color overlays for your media files. Moreover, you can use this LUT pack for both pictures and videos. In addition to this, it is also compatible with popular editing software. Furthermore, this tool pack supports both .3dl and .cube formats.
7. Blockbuster HLG And Standard LUTs
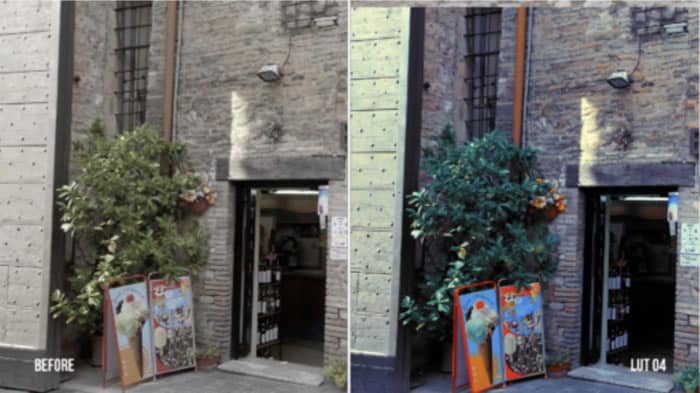
Another amazing pack of LUTs that you can use is Blockbuster HLG and Standard LUTs. This pack includes 21 Rec 709 LUTs with unique color toning and style. Furthermore, applying these LUTs will make your color grading more professional. Additionally, you can get rich and deep tones for your digital medial files. Similarly, you can change the feel of your content in a more professional style.

Conclusion
In conclusion, LUTs are perfect tools to enhance your media by altering its colors and tones. Different styles of LUTs cater to various creative needs. Furthermore, LUTs allow you to achieve specific looks and moods for your digital content. Moreover, the Rec 709 LUT Premiere Pro ensures your video appears accurate and consistent on HD displays. Additionally, you can achieve professional-grade results as well.
To add more LUTs on video, you can try Wondershare Filmora !
Add LUTs on Video For Win 7 or later(64-bit)
Add LUTs on Video For macOS 10.14 or later
Apply LUT on Videos Apply LUT on Videos Learn More

Part 2: How to Use LUTs in Premiere Pro: A Guide
You can apply your Rec 709 LUT for Premiere Pro without needing any prior experience. All you have to do is to follow these simple steps to apply your favorite LUT.
Step 1: To apply a LUT using Adobe Premiere Pro, import your video by clicking the “File” button and selecting the “Import” option. You can also click on “Import media to start” in the Project Tab. Once your file is imported, drag the clip onto the timeline and move into the “Color” workspace.

Step 2: In continuation, click the “Adjustment Layer” button in the Project tab. Select your adjustment layer and drop it on top of your video clip in the timeline. Click on the layer and go to the “Video Effects” in the Effects option in the Project window. Then, navigate to “Color Correction” and select “Lumetri Color.”

Step 3: In the new window that appears, find the “Input LUT” option under the Basic Correction tab. Browse the LUT you want to apply to your video. Additionally, you can explore more creative LUTs by going to the “Creative” tab in the Lumetri Color window. In the “Look” section, browse for different creative LUTs for your video. You can adjust the intensity of the selected LUT using the slider.

Part 3: The Top Notch Premiere Pro LUTs Rec 709
There are many Premiere Pro Rec 709 LUTs available that you can download and purchase. In the list below are some of the best Rec 709 LUTs you can use.
1. LOOK Creative LUT Pack
The LOOK Creative LUT Pack is a collection of 10 creative LUTs. It includes a range of LUTs, including some popular ones like teal and orange and old noir. These LUTs provide a quick and easy way to add a specific color tone or mood to your footage. In addition to the basic LUTs, it also offers unique and creative options. For example, you’ll find LUTs like Subtle Sci-Fi, Grunge Green, and others.

2. Cinematic LUTs V2
Cinematic LUTs V2 is a pack of modern cinematic-style LUTs. This incredible LUTs pack is designed to give your videos a cinematic touch. With this pack, you get access to 10 different cinematic LUTs to color grade your videos. Furthermore, you can use these LUTs for your LOG footage as well. Additionally, with these LUTs, you can add richness and depth to your videos.

3. NATURAL Rec709
The NATURAL Rec709 LUT pack offers 17 different styles of LUTs. It includes ones inspired by Tobacco, Crunchy Gold, and Black & White filters. These LUTs can enhance the colors and tones in your videos, providing a natural look. Furthermore, you can customize the intensity of the LUTs. Moreover, each LUT in this pack offers a unique color scheme for your videos.

4. 35 Free LUTs for Color Grading Videos
It is an amazing LUT pack that offers you a variety of 35 different styles of LUTs. With these LUTs, you can achieve a vintage look or a cinematic vibe for your videos. These LUTs can work perfectly with Rec 709 footage with accurate and vibrant colors. Furthermore, this pack is compatible with different software, including Premiere Pro.

5. S-Log 3 to Rec.709 LUT
The S-Log3 to Rec.709 LUT pack is designed to enhance your footage by adding vibrance. Applying this LUT boosts saturation, giving your video a more natural and realistic look. Additionally, you can bring out the full potential of your videos captured in S-Log3 gamma. Moreover, this LUT amplifies the colors and is compatible with the Rec.709 color space.

6. DJI OSMO POCKET Creative LUTs Pack
The DJI Osmo Pocket Creative LUTs Pack offers a collection of various creative LUTs. You can choose from different styles and color overlays for your media files. Moreover, you can use this LUT pack for both pictures and videos. In addition to this, it is also compatible with popular editing software. Furthermore, this tool pack supports both .3dl and .cube formats.

7. Blockbuster HLG And Standard LUTs
Another amazing pack of LUTs that you can use is Blockbuster HLG and Standard LUTs. This pack includes 21 Rec 709 LUTs with unique color toning and style. Furthermore, applying these LUTs will make your color grading more professional. Additionally, you can get rich and deep tones for your digital medial files. Similarly, you can change the feel of your content in a more professional style.

Conclusion
In conclusion, LUTs are perfect tools to enhance your media by altering its colors and tones. Different styles of LUTs cater to various creative needs. Furthermore, LUTs allow you to achieve specific looks and moods for your digital content. Moreover, the Rec 709 LUT Premiere Pro ensures your video appears accurate and consistent on HD displays. Additionally, you can achieve professional-grade results as well.
To add more LUTs on video, you can try Wondershare Filmora !
Add LUTs on Video For Win 7 or later(64-bit)
Add LUTs on Video For macOS 10.14 or later
Learn How to Use and Download KineMaster Templates Like a Pro. Discover Alternative Video Templates to Elevate Your Video Creation
Creating videos has always been challenging, especially with the advent of mobile video editing apps like KineMaster. This app is for professionals and amateur content creators who want to take their videos to the next level. With KineMaster, you can easily edit, enhance and share your videos in no time. One of the best features that KineMaster offers is the ability to use video templates.
This article will guide you through using and downloading KineMaster templates. We will also share some alternative templates that you can use to elevate your video creation. Whether you’re a beginner or an advanced user, this guide will give you all the information you need to create stunning videos with KineMaster. So, let’s get started!

Overview of KineMaster & Its Video Templates
KineMaster is a powerful video editing app that allows users to create professional-looking videos on their mobile devices. It is available on both Android and iOS platforms.
With a wide range of features like multi-layer video, chroma key, and blending modes, KineMaster empowers users to edit their videos with precision and creativity. It is also one of the first mobile video editing apps that supports multiple video layers and audio keyframes.
KineMaster also provides a variety of video templates for different purposes, such as intro, outro, social media posts, and more. These templates are pre-designed and include different elements such as animation, text, and effects.
KineMaster templates provide an easy way for users to create videos with professional looks and styles. Templates are also customizable, so you can add photos, videos, and text to match your brand or style. This feature of KineMaster saves time for users to create the video from scratch and make the editing process much more seamless.
How To Use & Download KineMaster Video Templates?
KineMaster video templates are a great way to quickly create professional-looking videos without starting from scratch. With a wide range of templates to choose from, you can easily find one that suits your needs.
Whether you’re a beginner or an advanced user, these steps will provide you with all the information you need to get the most out of KineMaster’s video templates.
Step 1. Launch the KineMaster app and go to “Video Templates.“

Step 2. Search for a template category you want to use.
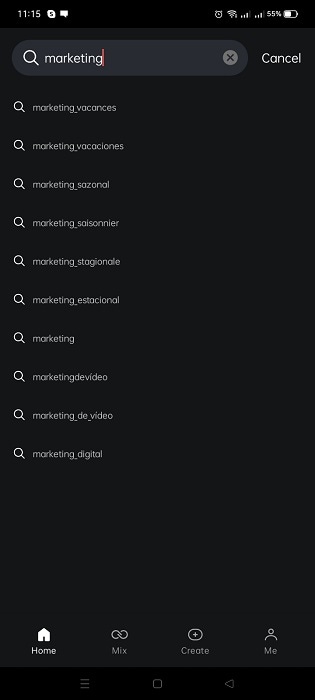
Step 3. Choose your template design.

Step 4. Tap the “Mix“ button to download the template.

Step 5. Edit the template to your preference. You can replace the clips with your video.
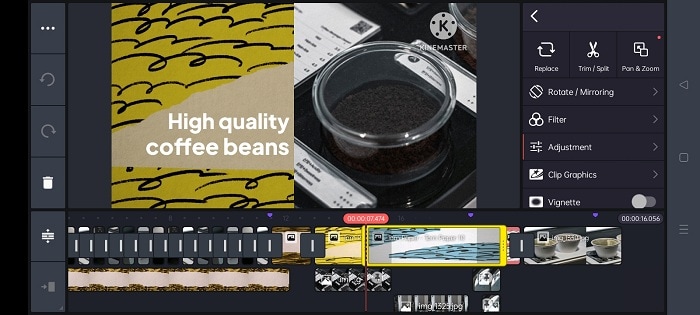
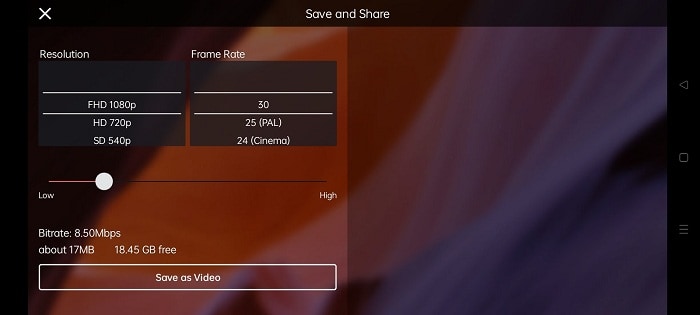
Step 6. Change the resolution of your video and tap the “Save as Video“ button to save your work.
Filmora for Mobile - KineMaster’s Alternative
Filmora for mobile is an alternative video editing app that provides features similar to KineMaster. It is a user-friendly app designed for amateur and professional content creators. The app is available on both Android and iOS platforms. Some of its key features include:
- A wide range of video effects, including filters, overlays, and elements.
- A library of music and sound effects to enhance your videos
- A variety of text and title templates for adding captions and subtitles.
- Multi-layer video editing allows you to add text, stickers, and more to your videos.
- A dedicated social media export feature that allows you to quickly share your videos on different platforms.
- A wide range of resolution and aspect ratio options.
- In-app purchase options for extra features and assets
Video Templates of Filmora - Alternative to KineMaster Template
Just like KineMaster, Filmora also offers a wide range of video templates to help users create professional-looking videos quickly. These templates include different elements such as animations, text, and effects. These templates are pre-designed and customizable, allowing users to add photos, videos, and text to match their brand or style.
Filmora also provides the feature of customizing these templates according to the user’s preference, making them flexible and versatile. The templates are regularly updated with new options and designs to match the latest trends and styles.
How To Use Video Templates of Filmora for Mobile in Video Editing?
This section will show you how to use Filmora’s video templates to enhance your video editing skills. With step-by-step instructions and visual aids, this guide will make it easy for you to use Filmora’s video templates to take your videos to the next level.
Step 1. Install and launch the Filmora app on your device.
Step 2. Tap the “Template“ button on the lower right part of the interface.

Step 3. Choose the template you want to use.
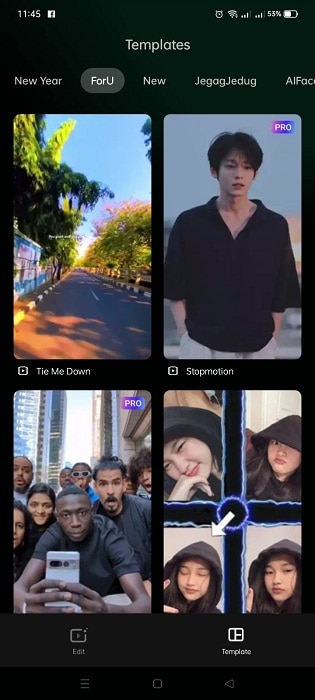
Step 4. Tap the “Make Video“ button to download the template.

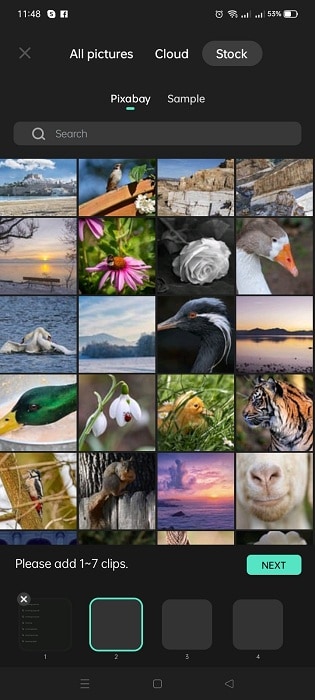
Step 5. Add the required number of clips to edit the template, then tap “Next.”
Step 6. You can preview the video and edit it if necessary.
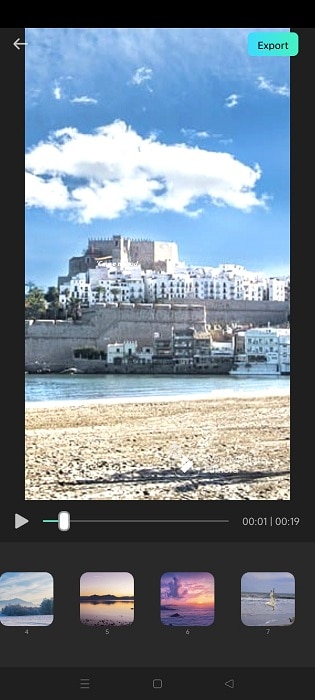
Step 7. Tap the “Export“ button to save your video.

KineMaster vs. Filmora Comparison
KineMaster and Filmora are powerful video editing apps that offer a wide range of features and tools for creating professional-looking videos. In the table below, we will compare the two apps side-by-side, highlighting the similarities and differences between the two. This will help you decide which app best fits your video editing needs.
| KineMaster | Wondershare Filmora | |
|---|---|---|
| Operating System | Android and iOS | Android and iOS |
| App Store Rating | 4.7 out of 5 | 4.7 out of 5 |
| Google Play Store Rating | 4.1 out of 5 | 4.7 out of 5 |
| Pricing | Free and offers In-App PurchasesPremium Subscriptions - $79.99 | Free and offers In-App Purchases |
| Number of Templates | 800+ Templates | 1000+ Templates |
KineMaster is a powerful video editing app available on Android and iOS platforms. It has a rating of 4.7 out of 5 on the App Store and 4.1 out of 5 on the Google Play Store. The app is free to download and use but offers in-app purchases for additional features and assets. Users can also opt for a premium subscription, priced at $79.99 per year.
One of the key features of KineMaster is its templates. These templates are suitable for various purposes, like intros, outros, social media posts, etc. It offers more than 1000 templates, giving the user more options.
KineMaster is an ideal app for amateur and professional content creators who want to take their videos to the next level. This app is great for YouTubers, Social media influencers, and small businesses looking to create engaging video content.
Filmora is another alternative video editing app available on Android and iOS platforms. It has a 4.7 out of 5 on both the App Store and the Google Play Store. Like KineMaster, Filmora is free to download and use, but it also offers in-app purchases for additional features and assets.
Filmora’s key feature is also its templates. It offers a wide range of pre-designed video templates, including animations, text, and effects. Users can customize these templates by adding photos, videos, and text to match their brand or style. It also offers more than 1000 templates, making it a great choice for users looking for various options.
Filmora is an ideal app for both amateur and professional content creators. Its user-friendly interface makes it perfect for beginners new to video editing, while its powerful features make it suitable for advanced users.
People Also Ask
Whether you’re a beginner or an advanced user, this section will provide the answers you need to make an informed decision.
Q1. Does KineMaster Have Watermarks?
KineMaster does have a watermark feature for the free version of the app. When you edit a video using the app’s free version, it will add a KineMaster watermark to the bottom-right corner of your video. However, you can remove this watermark by purchasing the full version of the app or by subscribing to the KineMaster Premium.
Q2. Is KineMaster Copyright Free?
KineMaster is not a copyright-free app, but it allows you to use copyright-free music and other media within the app. KineMaster has a library of royalty-free music and sound effects that you can use in your videos without fearing copyright infringement. However, you are responsible for ensuring that all media you use within the app is not protected by copyright.
Q3. Can KineMaster Videos Be Monetized on YouTube?
Yes, KineMaster videos can be monetized on YouTube. As long as your videos adhere to YouTube’s community guidelines and terms of service, you can monetize them on the platform.
Conclusion
KineMaster and Filmora are both powerful and versatile video editing apps that are great options for anyone looking to create professional-looking videos quickly and easily. Both apps offer a wide range of features, including templates, and are available on Android and iOS platforms.
Ultimately, the best app for you will depend on your specific needs and preferences. Consider factors such as pricing, features, and the number of templates when making your decision. Both apps are great choices, but Filmora may be more suitable for beginners.
How to Make Coin Magic With Filmora
Do you want to become a magician in your videos? Now, everyone can look like a magician with the magic of editing. This article will show you how to do a cool coin trick in Filmora 11 .
Part 1: What is the filmmaking technique “Cutting on action”
Cutting on action is a technique the editors use to cut in the middle of an action to another shot that matches the first shot’s action. Typically, the subject starts an action in one shot and continues the action in another, creating a smooth transition. For example, when you make the coin trick video, you need to cut on the tapping so it can trick the eyes, and the cut won’t be noticeable.
Part 2: Things You Need to Prepare for The Coin Magic Trick
- Glass and two coins

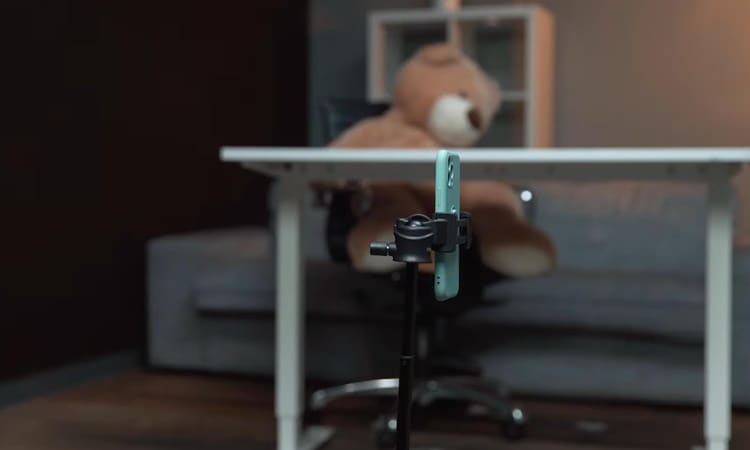
- Set the phone on a tripod. Because utilizing a tripod can significantly improve the recording’s stability.
Part 3: Start Filming
Step1 Firstly, you must show the coin and the bottom of the glass.
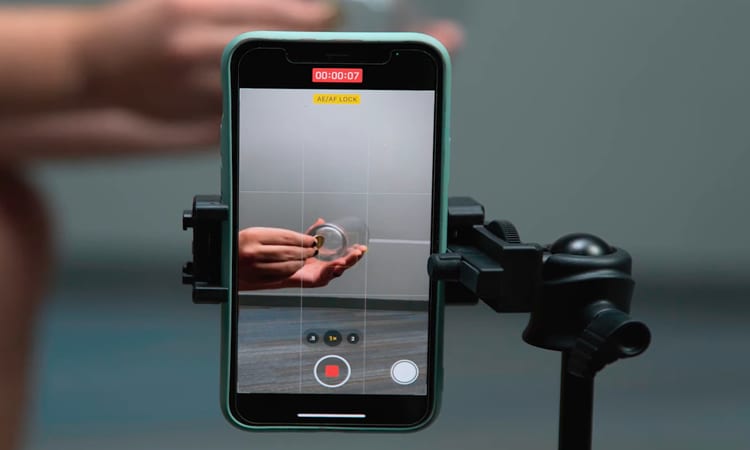
Step2 After that, you need to hold the coin with the fingers part of one hand and tap down on the coin. Make sure it looks like the coin is going through straight to the glass.
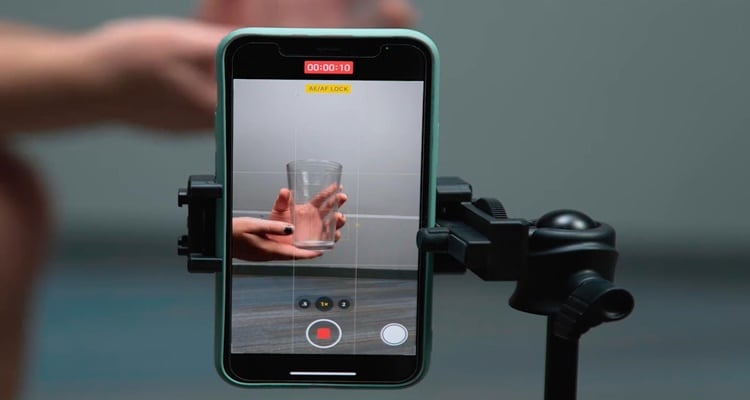
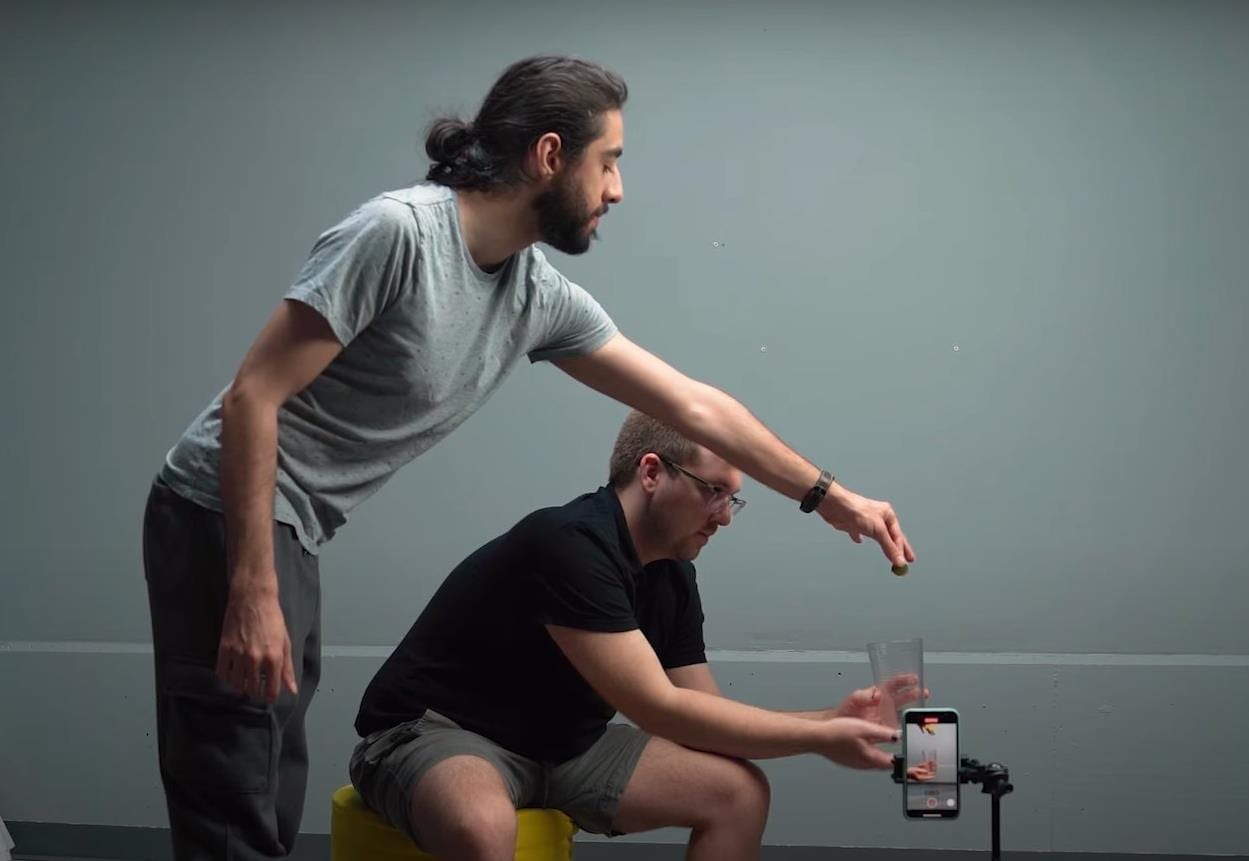
Step3 You need someone else to drop the other coin from the top. Meanwhile, you are pretending to tap a coin on the glass. You don’t need to worry about someone else hand in the frame. Since you can remove it easily with the masking feature in Filmora.
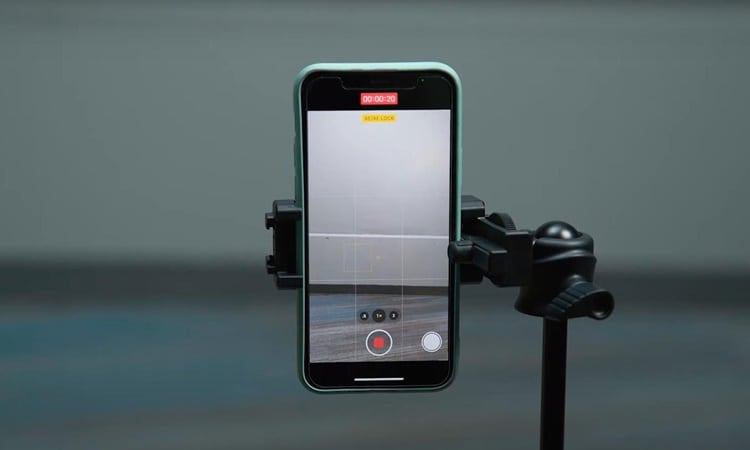
Step4 It would help if you had a second shot for a clean plate of the background. You can record background for 20 seconds.
Part 4: Bring the clips into Filmora 11
Step1 If you have not downloaded Filmora, you can visit filmora.wondershare.com to download Filmora’s new version.
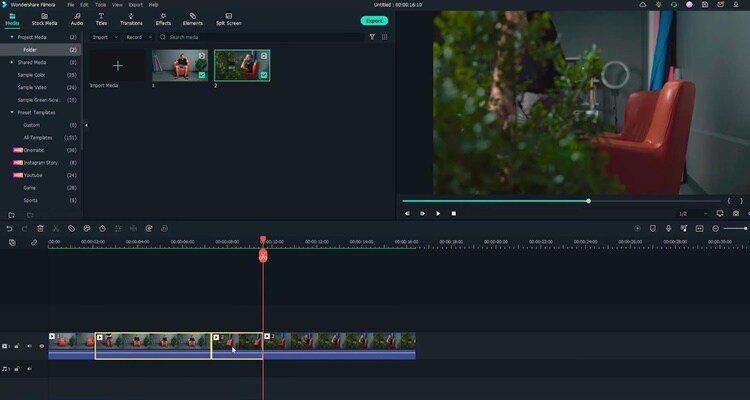
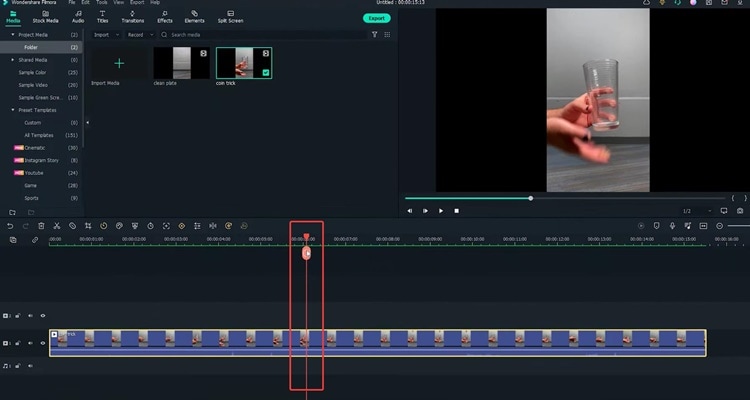
Step2 Drag and drop the clip onto the first track of the timeline.Afterward, move the playhead to the right and find the spot where you tapped the coin last time before your friend drops the other coin. Additionally, make sure it is in the middle of the tapping action and cut.
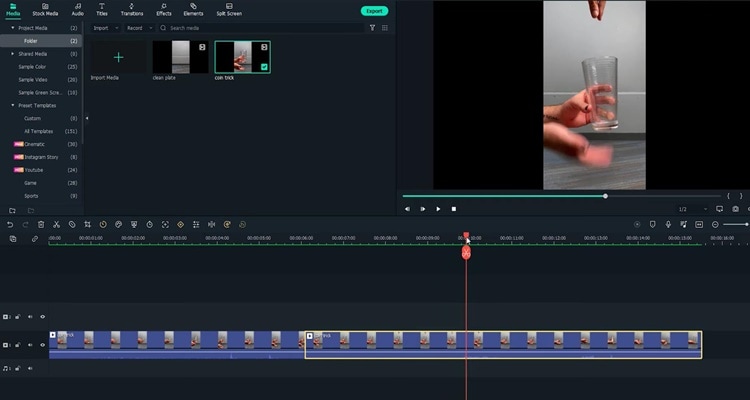
Step3 Then move the playhead to the right and find the spot where your friend drops the coin while you tap without the coin in your hand. Make sure it is in the middle of the tapping action, and the position of your hand roughly matches that in the last cut and make a cut.
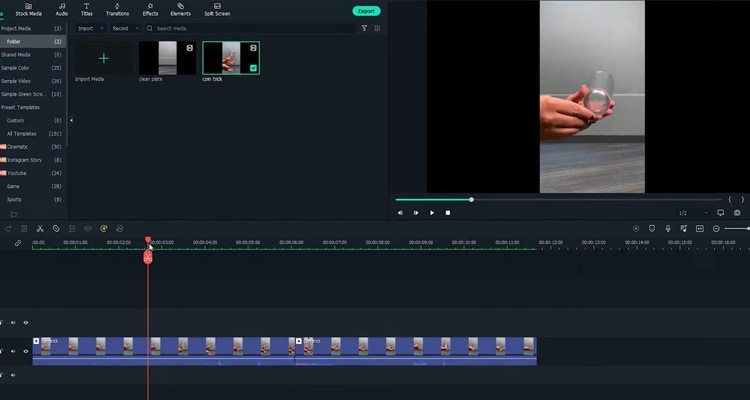
Step4 Now you need to delete the middle part and play it back. Indeed, cutting on action is the key to creating the illusion that the action is continued without editing.
Step5 Next, you must remove your friend’s hand in the frame with the Filmora masking feature. Afterwards. drag and drop the clean plate video onto the second track of the timeline.
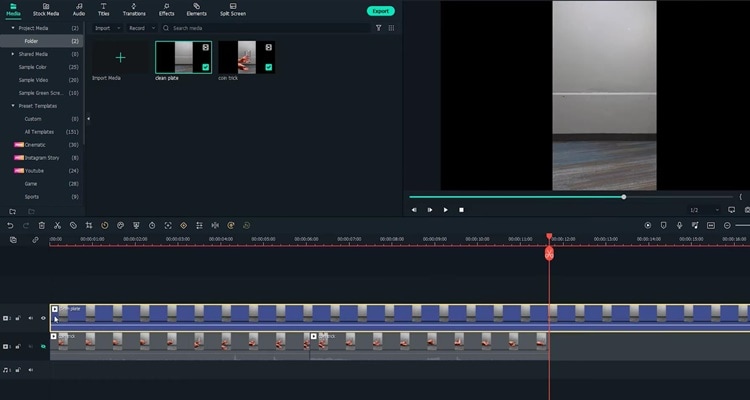
Step6 Next, double-click the clip to open the setting video. Find the Mask Section and select the single line.
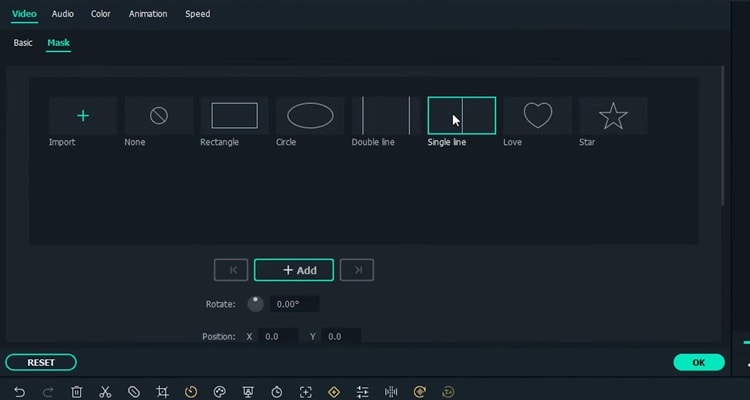
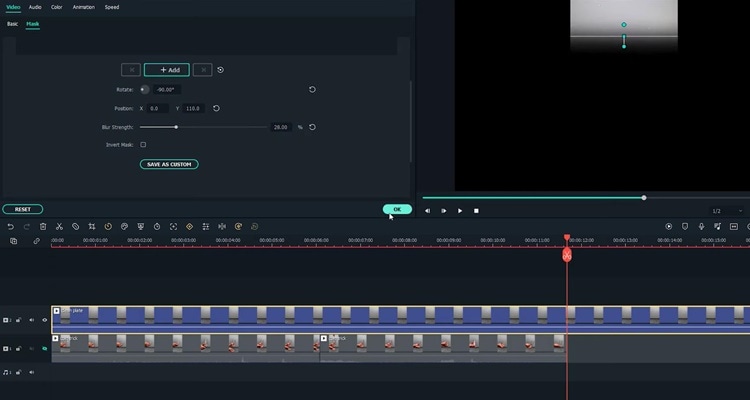
Step7 Here you can see the mask is applied.First, adjust the angle and position of the mask to only show the top part of the frame. Then you have to change the Blur Strength to add more blur to the edge of the mask.
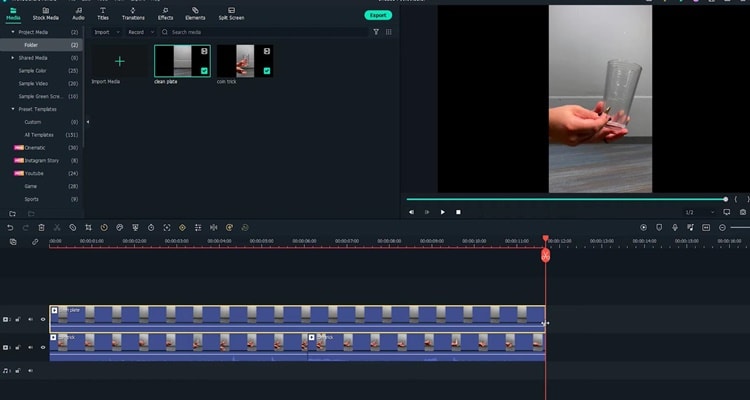
Step8 With the mask finalized, unhide the first video track and adjust the length of the clip on the timeline. Finally, playback the video and see how it looks.
Summary
That’s how to make a coin move through a glass-like MAGIC with the cutting on action editing technique. You can pay close attention to the steps above and follow each step for perfect results.
Free Download For Win 7 or later(64-bit)
Free Download For macOS 10.14 or later
Free Download For macOS 10.14 or later
Discover 8 Top-Rated Video and Photo Merger Tools for Desktop, Mobile, and Online Use. Elevate Your Media Game and Create Stunning Visuals with Ease
When it comes to creating and sharing visual content, it’s important to have a variety of tools at your disposal. Whether you’re a professional photographer or a hobbyist, merging photos and videos can add a whole new dimension to your work. You can create stunning visuals with the right tools that captivate your audience.
This article will look at some of the best video and photo merging tools available for desktop, mobile, and online use. From free and easy-to-use options to more advanced and feature-rich applications, there’s something for everyone on this list. Whether you’re looking to create a short film, a time-lapse video, or a panorama, these tools will help you take your visual storytelling to the next level.
- Combine Videos and Pictures Using Wondershare Filmora
- Merge Videos and Photos With Windows Movie Maker
- How To Add Photos and Videos Together With iMovie
- Combine Video and Picture With Filmora for Mobile
- BeeCut Video and Picture Combiner
- VN Photo and Video Merger
3 Video and Photo Mergers for Windows/Mac
There are several options available for those looking for a robust video and photo merging tool for their Windows or Mac computer. In this section, we’ll highlight three popular choices that offer a wide range of features and capabilities. Whether you’re a professional photographer or videographer or just looking for a fun and easy way to merge your media, these tools will meet your needs.
1. Combine Videos and Pictures Using Wondershare Filmora
Free Download For Win 7 or later(64-bit)
Free Download For macOS 10.14 or later

Ratings from G2: 4.4 out of 5
Operating Systems: Windows / Mac
Pricing:
- $49.99 - Annual Plan
- $79.99 - Perpetual Plan
Pros
- Easy to use
- Number of transitions and video results
- Beautiful effects
- Can enhance the quality of video
- Can export/import files easily
- Perfect for beginners
Cons
- Watermarking
- Proxy set up
- Compatibility of video importing
- A bit pricey
Wondershare Filmora is a popular video editing software for Windows and Mac. It offers a wide range of features, including merging videos and pictures. With Filmora, you can easily import your photos and videos and then drag and drop them into the timeline to create a cohesive video.
Filmora offers a range of customization options, such as adjusting video speed, adding transitions, and overlaying text and graphics. Additionally, it provides a user-friendly interface which makes it easy for anyone to use and navigate.
To merge video and picture using Wondershare Filmora Video Editor, follow these steps:
Step1 Open the software and select “New Project,” then go to “File“ > “Import Media“ > “Import Media Files“ to add the video and picture files you want to merge.

Step2 Drag the video clip to the timeline, then place the photo on a track above it.

Step3 Press the “Play“ button to preview your video.
Step4 Edit the photo to your liking.
Step5 Once you are satisfied with the result, save your merged video.
Check this video below to learn more in how to add an image to a photo with Filmora.
2. Merge Videos and Photos With Windows Movie Maker

Ratings from G2: 4.0 out of 5
Operating Systems: Windows
Pricing:
- Free
Pros
- Freeware
- Transitions
- Effects auto preview
- Audio features include voiceovers
- Sharing capabilities
Cons
- No way to change saturation or contrast
- No adjustments to visual effects
- Installation challenges
Windows Movie Maker is a free video editing software for Windows users. It offers basic video editing capabilities, including merging videos and pictures.
To merge a video and a picture, you can import the media files into the software, then drag and drop them into the timeline. You can place the photo on top of the video, adjust the duration of the photo and video, and add transitions between them. It also allows you to edit the video and picture by adding text, effects, and music. It provides a simple and intuitive interface which makes it easy for anyone to use.
Follow these steps to merge videos and pictures using Windows Movie Maker:
Step1 Download and install the software on your computer.
Step2 Ensure to tick the “Photo Gallery and Movie Maker“ checkbox during installation.

Step3 Once installed, import the video and picture files you want to merge into the software.

Step4 Organize the videos and pictures in the order you want them to appear in the merged video.

Step5 Once you have arranged the videos and pictures, go to “File“ > “Save movie“ > “Recommended for this project“ to save the merged video.

3. How To Add Photos and Videos Together With iMovie

Ratings from G2: 4.3 out of 5
Operating Systems: Mac
Pricing:
- Free
Pros
- User-friendly interface
- Easy sharing
- Easy to learn
Cons
- Requires a high level of HDD space
- Importing MP4 files for editing is complex
iMovie is a free video editing software for Mac users. It offers various features for creating and editing videos, including merging videos and pictures. It also offers a range of customization options, such as adjusting video speed, adding transitions, and overlaying text and graphics.
One of the most notable features of iMovie is its ability to work seamlessly with other Apple devices such as iPhone, iPad, and Apple TV, which makes it a versatile tool for media editing.
To merge videos and pictures using iMovie, follow these steps:
Step1 Launch the software and press the “Create New“ button.

Step2 From the dropdown menu, choose “Movie.”

Step3 Utilize the “Import Media“ button to bring in the videos and photos you want to merge.

Step4 Use drag-and-drop to organize the videos and photos in the order you want them to appear in the merged video.

Step5 Once you have arranged the videos and photos, edit them as per your preference and save the final merged video to your device.

3 Apps to Merge Video and Photos on iPhone/Android
There are several apps available for those looking for a convenient way to merge videos and photos on their iPhone or Android device. In this section, we’ll highlight three popular mobile apps that offer a wide range of features and capabilities for merging videos and photos. Whether you’re looking for an app that’s easy to use, or one that offers more advanced options, these apps are sure to meet your needs.
4. Combine Video and Picture With Filmora for Mobile

Ratings from App Store: 4.7 out of 5
Ratings from Google Play Store: 4.7 out of 5
Operating Systems: Android / iOS
Pricing:
- Free with In-app purchases
Pros
- Excellent editing interface
- Good range of tools
- The storage options are a bonus
- Multi-platform (Android and iOS)
Cons
- Limited additional features
- Cannot edit effects
- The store is a little bare
Filmora for Mobile is a mobile video editing app that allows you to merge videos and photos on your iPhone or Android device. With this app, you can easily import your photos and videos and then drag and drop them into the timeline to create a cohesive video.
Filmora for Mobile has various customization options, such as adjusting video speed, adding transitions, and overlaying text and graphics. The app also has a user-friendly interface that is easy to navigate, making it simple for anyone without a video editing experience. Once you’ve finished editing, you can quickly share your merged video to various social media platforms with just one click.
To merge videos and pictures using Filmora for Mobile:
Step1 Download and open the app, then tap “New Project“ to access your videos.

Step2 Choose the videos and pictures you want to merge and import them to the timeline.

Step3 Use the “plus“ sign on the right-hand side of the timeline to add more videos to the merge.

Step4 Use the editing tools below the timeline to edit your clip

Step5 Once you are satisfied with your creation, export it and share it to your desired platform.

5. BeeCut Video and Picture Combiner

Ratings from App Store: 3.0 out of 5
Ratings from Google Play Store: 2.4 out of 5
Operating Systems: Android / iOS
Pricing:
- Free with In-app purchases
Pros
- Super simple to use
- It supports multiple video and image formats
- An extensive list of editing tools
Cons
- It doesn’t support 4K rendering
- It’s buggy sometimes
BeeCut is an excellent free app for merging videos and pictures. The app is user-friendly, with a straightforward interface, making it suitable for beginner video editors.
With BeeCut, you can edit and merge various video and image formats such as MOV, MP4, JPG, PNG, and more. In addition, the app offers useful editing tools such as cropping, cutting, and adding transitions. Once you’ve finished editing, you can export your video in 1080p, 720p, or 480p resolution before saving it to your desired social media platform.
To merge videos and pictures using BeeCut:
Step1 Install the app on your mobile and tap the “+” sign icon to import your videos and photos.

Step2 Select all the photos and press “Next step“ on the top right corner, then choose the aspect ratio for your video.

Step3 Edit your clip using the available tools. Once you are done, press the “Export“ button in the top right corner.

6. VN Photo and Video Merger

Ratings from App Store: 4.7 out of 5
Ratings from Google Play Store: 4.7 out of 5
Operating Systems: Android / iOS
Pricing:
- Free with In-app purchases
Pros
- Shifting curves
- 9 different transition modes built-in
- 50+ movie-sensitive filters available
Cons
- Bugs like lagging clips & losing soundtrack
VN is a free and user-friendly video editing app that does not leave any watermark on your edited videos. The app’s interface is intuitive, making it easy for anyone to edit videos, even without prior knowledge. It provides all the necessary features for creating professional and high-quality videos, catering to professional and amateur video editors alike.
To merge videos and pictures using VN Video Editor:
Step1 Launch the app and tap on the “+” icon at the bottom.

Step2 Pick the videos and photos from your phone’s gallery and tap “Next.”

Step3 Use the editing tools to add elements to your clip, then save it to your device.

2 Online Photo and Video Mergers
If you’re looking for a flexible and convenient solution to merge your videos and photos online, you’re in luck! In this section, we’ll showcase two popular online tools perfect for beginners and advanced users. These tools are browser-based, meaning you can access them from anywhere and on any device with an internet connection. So, get ready to elevate your media game and create stunning visuals with ease!
7. Merge Pictures and Videos on Medio.io

Ratings from G2: 4.5 out of 5
Pricing:
- Free - $0
- Basic - $47.40 / monthly
- Pro - $79.99 / annually
Pros
- Fast compression speeds
- No file limits
- No watermarks
- Smart output settings
Cons
- Lacks some functionality
Media.io is an online tool that allows you to merge videos and photos, convert audio and video formats, and more. It’s user-friendly, easy to use, and works on all major browsers. Additionally, it provides a wide range of output options, allowing you to export your merged video in the format of your choice. Media.io is a perfect solution for those looking for an online tool that’s easy to use and offers a wide range of features.
To merge videos and pictures using Media.io:
Step1 Go to the Media.io video editor interface, and click the “Upload“ button to import all the videos and photos to the media library.
Step2 Move the photo above the video in the timeline by using drag-and-drop.
Step3 Press the “Export“ button to download the merged video with photos to your device.
8. Use Movie Maker Online To Combine Photos and Videos

Ratings from G2: 3.0 out of 5
Pricing:
- Free
Pros
- Completely free
- Free photos, music, and sound effects
- Built-in help
- Video and slideshow functions
Cons
- Confusing and clunky interface
- Learning curve
- Ads
Movie Maker Online is an online tool that allows you to easily merge videos and photos. With this tool, you can import your media files and drag and drop them into the timeline to create a single, cohesive video. It also offers a range of customization options, such as adjusting video speed, adding transitions, and overlaying text and graphics.
To merge videos and pictures using Movie Maker Online:
Step1 Drag and drop the files you want to merge onto the webpage.

Step2 Arrange the files in the desired order by dragging and dropping them.

Step3 Enable the “Hold position“ feature and place the files at the desired location.

Step4 Once you are satisfied with the merged video, download it.

Conclusion
There are various options for merging videos and photos on desktop, mobile, and online platforms. Whether you’re looking for professional video editings software like Filmora, or a simple mobile app for quick edits, there’s something for everyone. No matter your needs, there’s a tool that can help you create stunning and cohesive videos with your photos and videos.
- Combine Video and Picture With Filmora for Mobile
- BeeCut Video and Picture Combiner
- VN Photo and Video Merger
- 2 Online Photo and Video Mergers
3 Video and Photo Mergers for Windows/Mac
There are several options available for those looking for a robust video and photo merging tool for their Windows or Mac computer. In this section, we’ll highlight three popular choices that offer a wide range of features and capabilities. Whether you’re a professional photographer or videographer or just looking for a fun and easy way to merge your media, these tools will meet your needs.
1. Combine Videos and Pictures Using Wondershare Filmora
Free Download For Win 7 or later(64-bit)
Free Download For macOS 10.14 or later

Ratings from G2: 4.4 out of 5
Operating Systems: Windows / Mac
Pricing:
- $49.99 - Annual Plan
- $79.99 - Perpetual Plan
Pros
- Easy to use
- Number of transitions and video results
- Beautiful effects
- Can enhance the quality of video
- Can export/import files easily
- Perfect for beginners
Cons
- Watermarking
- Proxy set up
- Compatibility of video importing
- A bit pricey
Wondershare Filmora is a popular video editing software for Windows and Mac. It offers a wide range of features, including merging videos and pictures. With Filmora, you can easily import your photos and videos and then drag and drop them into the timeline to create a cohesive video.
Filmora offers a range of customization options, such as adjusting video speed, adding transitions, and overlaying text and graphics. Additionally, it provides a user-friendly interface which makes it easy for anyone to use and navigate.
To merge video and picture using Wondershare Filmora Video Editor, follow these steps:
Step1 Open the software and select “New Project,” then go to “File“ > “Import Media“ > “Import Media Files“ to add the video and picture files you want to merge.

Step2 Drag the video clip to the timeline, then place the photo on a track above it.

Step3 Press the “Play“ button to preview your video.
Step4 Edit the photo to your liking.
Step5 Once you are satisfied with the result, save your merged video.
Check this video below to learn more in how to add an image to a photo with Filmora.
2. Merge Videos and Photos With Windows Movie Maker

Ratings from G2: 4.0 out of 5
Operating Systems: Windows
Pricing:
- Free
Pros
- Freeware
- Transitions
- Effects auto preview
- Audio features include voiceovers
- Sharing capabilities
Cons
- No way to change saturation or contrast
- No adjustments to visual effects
- Installation challenges
Windows Movie Maker is a free video editing software for Windows users. It offers basic video editing capabilities, including merging videos and pictures.
To merge a video and a picture, you can import the media files into the software, then drag and drop them into the timeline. You can place the photo on top of the video, adjust the duration of the photo and video, and add transitions between them. It also allows you to edit the video and picture by adding text, effects, and music. It provides a simple and intuitive interface which makes it easy for anyone to use.
Follow these steps to merge videos and pictures using Windows Movie Maker:
Step1 Download and install the software on your computer.
Step2 Ensure to tick the “Photo Gallery and Movie Maker“ checkbox during installation.

Step3 Once installed, import the video and picture files you want to merge into the software.

Step4 Organize the videos and pictures in the order you want them to appear in the merged video.

Step5 Once you have arranged the videos and pictures, go to “File“ > “Save movie“ > “Recommended for this project“ to save the merged video.

3. How To Add Photos and Videos Together With iMovie

Ratings from G2: 4.3 out of 5
Operating Systems: Mac
Pricing:
- Free
Pros
- User-friendly interface
- Easy sharing
- Easy to learn
Cons
- Requires a high level of HDD space
- Importing MP4 files for editing is complex
iMovie is a free video editing software for Mac users. It offers various features for creating and editing videos, including merging videos and pictures. It also offers a range of customization options, such as adjusting video speed, adding transitions, and overlaying text and graphics.
One of the most notable features of iMovie is its ability to work seamlessly with other Apple devices such as iPhone, iPad, and Apple TV, which makes it a versatile tool for media editing.
To merge videos and pictures using iMovie, follow these steps:
Step1 Launch the software and press the “Create New“ button.

Step2 From the dropdown menu, choose “Movie.”

Step3 Utilize the “Import Media“ button to bring in the videos and photos you want to merge.

Step4 Use drag-and-drop to organize the videos and photos in the order you want them to appear in the merged video.

Step5 Once you have arranged the videos and photos, edit them as per your preference and save the final merged video to your device.

3 Apps to Merge Video and Photos on iPhone/Android
There are several apps available for those looking for a convenient way to merge videos and photos on their iPhone or Android device. In this section, we’ll highlight three popular mobile apps that offer a wide range of features and capabilities for merging videos and photos. Whether you’re looking for an app that’s easy to use, or one that offers more advanced options, these apps are sure to meet your needs.
4. Combine Video and Picture With Filmora for Mobile

Ratings from App Store: 4.7 out of 5
Ratings from Google Play Store: 4.7 out of 5
Operating Systems: Android / iOS
Pricing:
- Free with In-app purchases
Pros
- Excellent editing interface
- Good range of tools
- The storage options are a bonus
- Multi-platform (Android and iOS)
Cons
- Limited additional features
- Cannot edit effects
- The store is a little bare
Filmora for Mobile is a mobile video editing app that allows you to merge videos and photos on your iPhone or Android device. With this app, you can easily import your photos and videos and then drag and drop them into the timeline to create a cohesive video.
Filmora for Mobile has various customization options, such as adjusting video speed, adding transitions, and overlaying text and graphics. The app also has a user-friendly interface that is easy to navigate, making it simple for anyone without a video editing experience. Once you’ve finished editing, you can quickly share your merged video to various social media platforms with just one click.
To merge videos and pictures using Filmora for Mobile:
Step1 Download and open the app, then tap “New Project“ to access your videos.

Step2 Choose the videos and pictures you want to merge and import them to the timeline.

Step3 Use the “plus“ sign on the right-hand side of the timeline to add more videos to the merge.

Step4 Use the editing tools below the timeline to edit your clip

Step5 Once you are satisfied with your creation, export it and share it to your desired platform.

5. BeeCut Video and Picture Combiner

Ratings from App Store: 3.0 out of 5
Ratings from Google Play Store: 2.4 out of 5
Operating Systems: Android / iOS
Pricing:
- Free with In-app purchases
Pros
- Super simple to use
- It supports multiple video and image formats
- An extensive list of editing tools
Cons
- It doesn’t support 4K rendering
- It’s buggy sometimes
BeeCut is an excellent free app for merging videos and pictures. The app is user-friendly, with a straightforward interface, making it suitable for beginner video editors.
With BeeCut, you can edit and merge various video and image formats such as MOV, MP4, JPG, PNG, and more. In addition, the app offers useful editing tools such as cropping, cutting, and adding transitions. Once you’ve finished editing, you can export your video in 1080p, 720p, or 480p resolution before saving it to your desired social media platform.
To merge videos and pictures using BeeCut:
Step1 Install the app on your mobile and tap the “+” sign icon to import your videos and photos.

Step2 Select all the photos and press “Next step“ on the top right corner, then choose the aspect ratio for your video.

Step3 Edit your clip using the available tools. Once you are done, press the “Export“ button in the top right corner.

6. VN Photo and Video Merger

Ratings from App Store: 4.7 out of 5
Ratings from Google Play Store: 4.7 out of 5
Operating Systems: Android / iOS
Pricing:
- Free with In-app purchases
Pros
- Shifting curves
- 9 different transition modes built-in
- 50+ movie-sensitive filters available
Cons
- Bugs like lagging clips & losing soundtrack
VN is a free and user-friendly video editing app that does not leave any watermark on your edited videos. The app’s interface is intuitive, making it easy for anyone to edit videos, even without prior knowledge. It provides all the necessary features for creating professional and high-quality videos, catering to professional and amateur video editors alike.
To merge videos and pictures using VN Video Editor:
Step1 Launch the app and tap on the “+” icon at the bottom.

Step2 Pick the videos and photos from your phone’s gallery and tap “Next.”

Step3 Use the editing tools to add elements to your clip, then save it to your device.

2 Online Photo and Video Mergers
If you’re looking for a flexible and convenient solution to merge your videos and photos online, you’re in luck! In this section, we’ll showcase two popular online tools perfect for beginners and advanced users. These tools are browser-based, meaning you can access them from anywhere and on any device with an internet connection. So, get ready to elevate your media game and create stunning visuals with ease!
7. Merge Pictures and Videos on Medio.io

Ratings from G2: 4.5 out of 5
Pricing:
- Free - $0
- Basic - $47.40 / monthly
- Pro - $79.99 / annually
Pros
- Fast compression speeds
- No file limits
- No watermarks
- Smart output settings
Cons
- Lacks some functionality
Media.io is an online tool that allows you to merge videos and photos, convert audio and video formats, and more. It’s user-friendly, easy to use, and works on all major browsers. Additionally, it provides a wide range of output options, allowing you to export your merged video in the format of your choice. Media.io is a perfect solution for those looking for an online tool that’s easy to use and offers a wide range of features.
To merge videos and pictures using Media.io:
Step1 Go to the Media.io video editor interface, and click the “Upload“ button to import all the videos and photos to the media library.
Step2 Move the photo above the video in the timeline by using drag-and-drop.
Step3 Press the “Export“ button to download the merged video with photos to your device.
8. Use Movie Maker Online To Combine Photos and Videos

Ratings from G2: 3.0 out of 5
Pricing:
- Free
Pros
- Completely free
- Free photos, music, and sound effects
- Built-in help
- Video and slideshow functions
Cons
- Confusing and clunky interface
- Learning curve
- Ads
Movie Maker Online is an online tool that allows you to easily merge videos and photos. With this tool, you can import your media files and drag and drop them into the timeline to create a single, cohesive video. It also offers a range of customization options, such as adjusting video speed, adding transitions, and overlaying text and graphics.
To merge videos and pictures using Movie Maker Online:
Step1 Drag and drop the files you want to merge onto the webpage.

Step2 Arrange the files in the desired order by dragging and dropping them.

Step3 Enable the “Hold position“ feature and place the files at the desired location.

Step4 Once you are satisfied with the merged video, download it.

Conclusion
There are various options for merging videos and photos on desktop, mobile, and online platforms. Whether you’re looking for professional video editings software like Filmora, or a simple mobile app for quick edits, there’s something for everyone. No matter your needs, there’s a tool that can help you create stunning and cohesive videos with your photos and videos.
Also read:
- 2024 Approved Everything You Need to Know About Color Grading in Photography
- Updated In 2024, How to Use LUTs in Adobe Premiere Pro
- 2024 Approved Learn How to Effectively Use Masking in After Effects with This Comprehensive Guide. Includes Step-by-Step Instructions and an Alternative Masking Technique
- New 2024 Approved Is Augmented Reality Conferencing the Future of Workplace Collaboration?
- New What Are The Stages Of Film Production for 2024
- 2024 Approved Making Slow Motion Videos in Premiere Pro A Review on The Best Methods
- Top Free Video Editing Software Enhance Your Content with These Essential Tools
- 2024 Approved Slowing Down GIF With The Best Available Methods
- Updated Step by Step to Rotate Videos in Davinci Resolve
- New How to Add a Spooky Shadow Effect
- New How to Change Quicktime Player Speed on Mac for 2024
- Overview of FPS for YouTube Videos
- In 2024, How to Remove Echo with Premiere Pro? Full Guide Here
- New 2024 Approved Detailed Tutorial to Rotate Videos in Cyberlink PowerDirector
- Updated Top 10 Free Spanish Text To Speech Converter Websites
- 2024 Approved 10 Best Vlogging Cameras for Beginners
- In 2024, Have You Ever Used an Adjustment Layer in Photoshop? Read This Article to Find Out How to Add, Resize, Change, and Use an Adjustment Layer in Photoshop Efficiently
- In 2024, How to Bypass FRP on Xiaomi Mix Fold 3?
- Solutions to restore deleted files from Red Magic 8S Pro
- 2024 Approved 15 Best Video to GIF App on iPhone and Android
- The Ultimate Guide How to Bypass Swipe Screen to Unlock on Nokia G22 Device
- Updated 15 Best Sites to Watch Cartoons Online Free And So Can You for 2024
- How To Recover Lost Data on iPhone SE (2022)? | Dr.fone
- In 2024, 7 Top Ways To Resolve Apple ID Not Active Issue For Apple iPhone 12
- Best Android Data Recovery - Retrieve Lost Contacts from Realme GT Neo 5.
- In 2024, Resolve Your Apple iPhone XS Keeps Asking for Outlook Password
- 5 Solutions For Samsung Galaxy A25 5G Unlock Without Password
- Stuck at Android System Recovery Of Vivo V27e ? Fix It Easily | Dr.fone
- How Vivo Y100i Power 5G Mirror Screen to PC? | Dr.fone
- Fake Android Location without Rooting For Your Nokia C22 | Dr.fone
- In 2024, How To Fix OEM Unlock Missing on ZTE Nubia Flip 5G?
- Spoofing Life360 How to Do it on Realme 10T 5G? | Dr.fone
- Fake Android Location without Rooting For Your Tecno Spark 10C | Dr.fone
- Title: Updated Adobe Premiere Pro Rec 709 LUTs Finding The Best Choices
- Author: Chloe
- Created at : 2024-05-20 03:37:51
- Updated at : 2024-05-21 03:37:51
- Link: https://ai-editing-video.techidaily.com/updated-adobe-premiere-pro-rec-709-luts-finding-the-best-choices/
- License: This work is licensed under CC BY-NC-SA 4.0.


