
:max_bytes(150000):strip_icc():format(webp)/F8conferencelogo-7ec4475dc6624114aea076c2611df199.jpg)
Updated Best 7 Color Match Paint Apps
Top 7 Color Match Paint Apps
Best 7 Color Match Paint Apps
An easy yet powerful editor
Numerous effects to choose from
Detailed tutorials provided by the official channel
In today’s digital world, applications make tax more manageable, efficient, and labor-intensive. In addition, when it comes to the painting of the house or paint match, this application will allow you to do everything digitally by testing out different colors on your own to match a color in your favorite picture.

You can find paint color from photos to make your choice on matching paint color, and also, there are several ways you can match paints to your desired color. There is a famous saying that Color is Life, and the house is the place where you live in your life. So, the proper color matching will bring brightness to your life. Isn’t that? Using the appropriate paint color finder will enable you to make a wise choice to paint your house effectively.
In this article
01 [Steps for Matching a Paint Color](#Part 1)
02 [What’s the Best 7 Color Match Paint Apps](#Part 2)
Part 1 Steps for Matching a Paint Color
Become a paint match Pro by following these steps below to match paint color. Here are five steps. Paying attention to these steps shall make choosing the correct color control system much more accessible and provide a more comprehensive understanding of matching colors:

01Step 1: Identify the desired color/hue
Eyeball the color and choose a match closest to the color you want, but this method is likely to match existing paint in a noticeable area. In addition, it is a perfectly acceptable option when you want to choose a closer color.
02Step 2: Select an Application
Please make use of paint matching applications to make it easier. Oh, they work differently but provide the same solution.
● Just download the application to your smartphone,
● Take a picture of the painted surface you want to match in natural light,
● Upload it to the heart.
The app will get you the closest cousin, and more so you can preview recommended accent color and design from the comfort of your home.
Alternatively, you can take a picture with your phone in natural light without using a caller app and take the photo to your favorite paint store. They will match the color very closely with their installed spectrophotometer. Although there might be variations in color display on phone cameras, we most assuredly get a satisfactory result.
03Step 3: Paint store
When you are out of options or other options to use and need a perfect match for an already painted wall, you need to collect samples and take them to the paint store. Using a sharp utility blade, scrape a small square on a section of the painted drywall
if you want to match a pale yellow, bright blue, or stormy sky grey furniture or wall. All you need is to head to your favorite paint store and gather up a selection of paint chips close to the hue you are trying to match. After that, bring the trip home and hang them on the surface which color you want to duplicate, then observe multiple lights using lamp light and daylight, whichever chip matches most closely.
Part 2 What’s the Best 7 Color Match Paint Apps
One of the essential tips to making a design come alive is choosing the right color combination, and when you want to make your audience feel something, you can achieve this with the use of color. Whether you choose the perfect color combination for your logo or website or choose a color for a flyer, business card, and photograph, everything remains the same. Most times, it isn’t easy to match colors together. Thus, we compiled a list of the best mobile application you can use in matching colors at a go.
Here are seven (7) auto paint matching applications that we recommend when you want to tackle an exterior and interior painting Project:
01Paint My Place

The Paint My Place application is a fantastic virtual reality for Android and iPhone devices. It allows you to experience different colors on your walls without picking up a brush. You need to upload an image of your space, choose your paint brand, and swipe with your fingers.
Cost: Basic Free, advanced $2.99
Pros:
● Access to thousands of color palette
● The app is handy
● Easy to use
Cons:
● Painting around furniture or design details is difficult
● It is sometimes not accurate
● Advanced features need a subscription
02ColorView Finder

ColorView Finder is handy for iPad and iPhone users. It is used for the first house painting stage when looking for an inspirational area of color palettes. Focus your camera on an object that dries the attention, and the app will automatically generate an array of five color combinations.
Cost: Basic (Free), $1.99 (Pro)
Pros:
● Provides you with a continuous selection of color palettes to mature image inspiration
● Lots of customization feature
● It has a creative layout feature
Cons:
● The free version has a watermark
● To access the thousands of features, you will need to upgrade to the pro version
● Auto-generation sometimes avoid selecting color choices
03Paint My Wall

Paint My Wall is an effortless and easy-to-use application available for iOS devices and allows you to use images to explore color options or upload your photo to test. It will enable you to paint with your finger digitally or use the intelligent feel to feel a wall completely.
Cost: free
Pros:
● It is easy to use
● It is quick to test various color option
● The nice erase function gives a chance for modification.
Cons:
● There are a few ads that you must skip to move on
● It has limited customization features
● Edge detection does not working properly
● ColorSnap

ColorSnap is the best color palette creator that allows you to explore all of the paint colors and gives you the ability to create your color palette. Choose the color you like and see coordinating and similar colors to take it to the next level. Accessible to both Android and iOS devices.
Cost: free
Pros:
● It is easy to use
● It is the best color palette creator
● It is a good app for getting started on your painting project
Cons:
● The amount of paint options available in the application is a bit overwhelming
● It has limited customization features
● It does not give a real vision of the color as compared to digitalized look.
04Paint Tester

The Paint Tester app is available on Android and iOS devices and provides a quick way to find my paint color and purchase it right away. Choose your paint color from the two options, test the color on your surface and then select the cut button to be taken to the retailer.
Cost: $2.99
Pros:
● The app is easy to use
● It is quick to use for fast projects and to find a paint color
● Can save color combination to photo album.
Cons:
● It has limited customization features
● Ads showed up in between.
● Contain certain bugs
05Home Harmony

Home Harmony is a perfect all in 1 tool for iOS devices for designing an exterior room. The app is straightforward to use and makes switching between paint brands easier.
Cost: Free
Pros:
● The app is easy to use
● Lots of customization options
● You can try multiple color options.
Cons:
● The app is a bit slow compared to others
● Ads under Free Version.
● Sometimes crash or freeze out.
06ColorPic

ColorPic is a color hub for Amazon lovers and is available on Android and iOS devices. It gives you a view of your new paint and an easy order button straight from Amazon. A building loan calculator tells you the total number of cans you should purchase for your project.
Cost: $2.99
Pros:
● You can explore the entire color from the main menu
● The before and after images shows how pressure paints look
● Color-changing wheels give a quick option to choose from.
Cons:
● The sample images in the harp gallery are not downloadable
● No free version
● Sometimes color changing does not work well
07The New Filmora 11
Note: If you want to have a color match function from your PC, there is one ultimate solution. Yes, we are talking about the latest Wondershare launch, Filmora 11. The new Filmora 11 can do color correction, matching in a batch.
For Win 7 or later (64-bit)
For macOS 10.12 or later
● You can opt for customized color correction
● The color setting, degree adjustment
● Comparison preview function and a lot more.
● Key Takeaways from This Episode →
● The article covers how to get paint color matching
● Steps to match paint color
● Some of the prime application that assists in color matching.
● The color match in Filmora allows you to color correct the clip as a badge instead of editing it individually.
In today’s digital world, applications make tax more manageable, efficient, and labor-intensive. In addition, when it comes to the painting of the house or paint match, this application will allow you to do everything digitally by testing out different colors on your own to match a color in your favorite picture.
You can find paint color from photos to make your choice on matching paint color, and also, there are several ways you can match paints to your desired color. There is a famous saying that Color is Life, and the house is the place where you live in your life. So, the proper color matching will bring brightness to your life. Isn’t that? Using the appropriate paint color finder will enable you to make a wise choice to paint your house effectively.
In this article
01 [Steps for Matching a Paint Color](#Part 1)
02 [What’s the Best 7 Color Match Paint Apps](#Part 2)
Part 1 Steps for Matching a Paint Color
Become a paint match Pro by following these steps below to match paint color. Here are five steps. Paying attention to these steps shall make choosing the correct color control system much more accessible and provide a more comprehensive understanding of matching colors:
01Step 1: Identify the desired color/hue
Eyeball the color and choose a match closest to the color you want, but this method is likely to match existing paint in a noticeable area. In addition, it is a perfectly acceptable option when you want to choose a closer color.
02Step 2: Select an Application
Please make use of paint matching applications to make it easier. Oh, they work differently but provide the same solution.
● Just download the application to your smartphone,
● Take a picture of the painted surface you want to match in natural light,
● Upload it to the heart.
The app will get you the closest cousin, and more so you can preview recommended accent color and design from the comfort of your home.
Alternatively, you can take a picture with your phone in natural light without using a caller app and take the photo to your favorite paint store. They will match the color very closely with their installed spectrophotometer. Although there might be variations in color display on phone cameras, we most assuredly get a satisfactory result.
03Step 3: Paint store
When you are out of options or other options to use and need a perfect match for an already painted wall, you need to collect samples and take them to the paint store. Using a sharp utility blade, scrape a small square on a section of the painted drywall
if you want to match a pale yellow, bright blue, or stormy sky grey furniture or wall. All you need is to head to your favorite paint store and gather up a selection of paint chips close to the hue you are trying to match. After that, bring the trip home and hang them on the surface which color you want to duplicate, then observe multiple lights using lamp light and daylight, whichever chip matches most closely.
Part 2 What’s the Best 7 Color Match Paint Apps
One of the essential tips to making a design come alive is choosing the right color combination, and when you want to make your audience feel something, you can achieve this with the use of color. Whether you choose the perfect color combination for your logo or website or choose a color for a flyer, business card, and photograph, everything remains the same. Most times, it isn’t easy to match colors together. Thus, we compiled a list of the best mobile application you can use in matching colors at a go.
Here are seven (7) auto paint matching applications that we recommend when you want to tackle an exterior and interior painting Project:
01Paint My Place
The Paint My Place application is a fantastic virtual reality for Android and iPhone devices. It allows you to experience different colors on your walls without picking up a brush. You need to upload an image of your space, choose your paint brand, and swipe with your fingers.
Cost: Basic Free, advanced $2.99
Pros:
● Access to thousands of color palette
● The app is handy
● Easy to use
Cons:
● Painting around furniture or design details is difficult
● It is sometimes not accurate
● Advanced features need a subscription
02ColorView Finder
ColorView Finder is handy for iPad and iPhone users. It is used for the first house painting stage when looking for an inspirational area of color palettes. Focus your camera on an object that dries the attention, and the app will automatically generate an array of five color combinations.
Cost: Basic (Free), $1.99 (Pro)
Pros:
● Provides you with a continuous selection of color palettes to mature image inspiration
● Lots of customization feature
● It has a creative layout feature
Cons:
● The free version has a watermark
● To access the thousands of features, you will need to upgrade to the pro version
● Auto-generation sometimes avoid selecting color choices
03Paint My Wall
Paint My Wall is an effortless and easy-to-use application available for iOS devices and allows you to use images to explore color options or upload your photo to test. It will enable you to paint with your finger digitally or use the intelligent feel to feel a wall completely.
Cost: free
Pros:
● It is easy to use
● It is quick to test various color option
● The nice erase function gives a chance for modification.
Cons:
● There are a few ads that you must skip to move on
● It has limited customization features
● Edge detection does not working properly
● ColorSnap
ColorSnap is the best color palette creator that allows you to explore all of the paint colors and gives you the ability to create your color palette. Choose the color you like and see coordinating and similar colors to take it to the next level. Accessible to both Android and iOS devices.
Cost: free
Pros:
● It is easy to use
● It is the best color palette creator
● It is a good app for getting started on your painting project
Cons:
● The amount of paint options available in the application is a bit overwhelming
● It has limited customization features
● It does not give a real vision of the color as compared to digitalized look.
04Paint Tester
The Paint Tester app is available on Android and iOS devices and provides a quick way to find my paint color and purchase it right away. Choose your paint color from the two options, test the color on your surface and then select the cut button to be taken to the retailer.
Cost: $2.99
Pros:
● The app is easy to use
● It is quick to use for fast projects and to find a paint color
● Can save color combination to photo album.
Cons:
● It has limited customization features
● Ads showed up in between.
● Contain certain bugs
05Home Harmony
Home Harmony is a perfect all in 1 tool for iOS devices for designing an exterior room. The app is straightforward to use and makes switching between paint brands easier.
Cost: Free
Pros:
● The app is easy to use
● Lots of customization options
● You can try multiple color options.
Cons:
● The app is a bit slow compared to others
● Ads under Free Version.
● Sometimes crash or freeze out.
06ColorPic
ColorPic is a color hub for Amazon lovers and is available on Android and iOS devices. It gives you a view of your new paint and an easy order button straight from Amazon. A building loan calculator tells you the total number of cans you should purchase for your project.
Cost: $2.99
Pros:
● You can explore the entire color from the main menu
● The before and after images shows how pressure paints look
● Color-changing wheels give a quick option to choose from.
Cons:
● The sample images in the harp gallery are not downloadable
● No free version
● Sometimes color changing does not work well
07The New Filmora 11
Note: If you want to have a color match function from your PC, there is one ultimate solution. Yes, we are talking about the latest Wondershare launch, Filmora 11. The new Filmora 11 can do color correction, matching in a batch.
For Win 7 or later (64-bit)
For macOS 10.12 or later
● You can opt for customized color correction
● The color setting, degree adjustment
● Comparison preview function and a lot more.
● Key Takeaways from This Episode →
● The article covers how to get paint color matching
● Steps to match paint color
● Some of the prime application that assists in color matching.
● The color match in Filmora allows you to color correct the clip as a badge instead of editing it individually.
Mastering DaVinci Resolve Scopes: A Comprehensive Guide
How do you set up DaVinci scopes? The internal color scopes in Resolve are flexible and customizable but can be confusing. The built-in DaVinci Resolve scope used to be limited only a few possibilities. However, the new 9-scope view offers a wider range of choice, making them a powerful tool for video editing. In this article, we will explore how to set up DaVinci scopes to achieve better color results.
Color Correction Editor An easy-to-use video editor helps you make color correction and color grading experience for videos!
Free Download Use Vectorscope in Filmora Try Color Correction

Part 1. Unlocking Color Precision: Exploring the Improved Scopes in DaVinci Resolve
The Blackmagic Design continues to improve the Resolve to make it better with every iteration. The new features improve colorist workflow in less powerful ways. The major improvements include a major facelift to the scope, allowing professions to do more with DaVinci resolve. Let’s have a look at some of these changes:
1. CIE 1931 Color Space
The inclusion of the CIE chromaticity diagram is perhaps the biggest change to DaVinci scopes. It displays the gamut of the project as set in the Color Management preferences. This makes it a useful alternate way of looking at the trace of an image to judge when the values are out of legal range. It also functions as an educational tool for learning about the range of color spaces.

2. Low Pass Filter
The wavefront and parade scopes now have a low pass filter, which reduces noise in the trace. This visually sharpens the display of the scopes, allowing easier detection of elements in the frame.

The image above shows the major improvements. The second set of waveforms has more defined lines. These have the low-pass filter activated, which makes the scopes easier to read.
3. High, Mid, and Low Views in Vectorscope
The vectorscope has been added to the ability to toggle the mid-tones, shadows, and highlights of the image independently. You can set the ranges with greater visualization control.

As seen in the picture above, the vectorscope controls allow you to select the low, mid, or high range of the image. You can also set the low and high ranges as desired.
4. Histograms Over Curves
Another great DaVinci scope is the histogram, which now appears outside of the scope panel. The new improvements have embedded the histogram inside the Curves tab on the bottom Palette. Click on the three dots in the Custom Curves tab. The pulldown menu that appears includes the Input or Output of the histogram. With these settings, you can find the element in the frame that helps you make adjustments quickly.

5. Scope Quality
The GPU-accelerated scopes engine allows the scopes to respond quickly. Users have the option to set the quality to high, medium, or low and the scopes will respond to a range of hardware systems. Depending on whether you are working on a stationary short or looking to see how the scopes react in real-time, you will be able to toggle the modes quickly and easily.

6. YRGB View in Histogram and Parade
The histogram and parade now come with the ability to view luminance together with the red, green, and blue channels. Users also have the option for YCbCr mode in the Parade.

7. Extents
These are weak elements in the signore, which are of lesser importance compared to the stronger elements. However, Danvici now allows them to be revealed for a full illustration of the information that lies in the image. Consequently, extents can be used to determine whether the data is being clipped beyond legal limits.

Part 2. Mastering Scopes in DaVinci Resolve: A Brief Guide
DaVinci scopes help you to analyze images as a basis for color correction. When used properly, scopes help in fixing white balance issues and checking saturation. They also allow you to get the correct exposure and check details like skin tone. To use scopes in DaVinci Resolve, go to the color page in the bottom right corner. You can also click on the small graph icon to view the scope. Here is how to use them:
1. Waveform
The Waveform represents the brightness or luminance of your image. In this video scope, the brightest parts are at the top while the darkest are at the bottom. The pixels are represented from left to right.

The Waveform scope on DaVinci Resolve is helpful when you are checking for clipping. This simply means finding out whether the image is too bright or too dark. The waveform also ensures that the image is properly exposed. The colorize feature of the waveform shows the colors of the image while the extent shows the darkest or lightest parts of the image.
2. Parade (RGB)
The RGB Parade comprises 3 waveforms that represent the luminance of red, green, and blue channels. The approach for reading the parade video scope is similar to that of the waveform. However, you now look at the balance between the colors correct the white balance, and check for a color cast.

The Parade works almost in a similar manner as the waveform. It displays the red, green, and blue channels of the image as separate waveforms. This way, you can easily identify and correct color casts while ensuring the colors in the image are balanced. The video scope provides useful information to decide which parts of the image need to be corrected or tweaked further.
3. Vectorscope
Vectorscope in DaVinci Resolve shows hue and saturation on a circular graph. Hues (the colors) are indicated outside of the color wheel for easier color correction. Saturation is indicated by how far the graph extends from the center.

By displaying the hue and saturation of the image as a vector, this video scope helps check skin tones. The scope specifically checks whether skin tones are shifted toward colors such as yellow, magenta, or green. It allows you to make sure that the colors in your subject skin tones are not too saturated or desaturated.
4. Histogram
Histogram is a video scope in DaVinci Resolve that displays the brightness or luminance of an image from left to right for the RGB channel. The video scope is based on the number of pixels that the colors red, blue, and green have in an image.

Using the histogram video scope on DaVinci Resolve allows you to check for overexposure or underexposure in your image. You can also ensure that the image has a good overall brightness range. The scope provides a graphical representation of tonal distribution in each channel. This way, you can evaluate the tone in detail for more accurate brightness and contrast adjustments.
Part 3: Edit Like a Pro: Mastering Video Scopes in Filmora
When working on video projects, Wondershare Filmora is a great editing software. It comes with unique features to color-correct your videos on the go as you edit it. From AI-powered features to royalty-free music, there is so much more you can do with Filmora.
Free Download For Win 7 or later(64-bit)
Free Download For macOS 10.14 or later
How to Use Video Scopes on Filmora
Using video scopes on Filmora is easy. The software offers four video scope options, allowing you to color-correct and grade your visual images properly. They include parade RGB, waveform, vectorscope, and histogram. When editing videos on Filmora, the video scopes can be accessed by clicking on the video scopes icon. The icon is found on the top right corner of the media player.

Filmora has made it easy for users to manage video scopes, and color-correct videos quickly. Users can change the layout options of the video scopes to match the editing needs of their project. You can also expand the button to show the name of the scope. As you manage the scopes, you can start with the Parade to make the necessary adjustments. Then move on to waveform, vectorscope, and histogram.

The uses of the video scope on Filmora are as follows:
- Parade – Cahnge the color channel from RBG to YRGB or YCbCr
- Vectorscope – Identify skin tone
- Waveform – Adjust color channels in a different way
- Histogram – Display the multiple color adjustments in a graphical way
Conclusion
Scopes are indeed valuable to video editors and colorists. While viewing images on a monitor can be subjective, scopes allow you to analyze and define them objectively. This gives you the power to color grade and correct to ensure that viewers look at the image with a clear representation. When working on or editing your videos, we recommend Wondershare Filmora. The video editing software comes with a wide range of features and video scopes that allow you to do everything on the same platform.
Free Download Use Vectorscope in Filmora Try Color Correction
Part 1. Unlocking Color Precision: Exploring the Improved Scopes in DaVinci Resolve
The Blackmagic Design continues to improve the Resolve to make it better with every iteration. The new features improve colorist workflow in less powerful ways. The major improvements include a major facelift to the scope, allowing professions to do more with DaVinci resolve. Let’s have a look at some of these changes:
1. CIE 1931 Color Space
The inclusion of the CIE chromaticity diagram is perhaps the biggest change to DaVinci scopes. It displays the gamut of the project as set in the Color Management preferences. This makes it a useful alternate way of looking at the trace of an image to judge when the values are out of legal range. It also functions as an educational tool for learning about the range of color spaces.
2. Low Pass Filter
The wavefront and parade scopes now have a low pass filter, which reduces noise in the trace. This visually sharpens the display of the scopes, allowing easier detection of elements in the frame.
The image above shows the major improvements. The second set of waveforms has more defined lines. These have the low-pass filter activated, which makes the scopes easier to read.
3. High, Mid, and Low Views in Vectorscope
The vectorscope has been added to the ability to toggle the mid-tones, shadows, and highlights of the image independently. You can set the ranges with greater visualization control.
As seen in the picture above, the vectorscope controls allow you to select the low, mid, or high range of the image. You can also set the low and high ranges as desired.
4. Histograms Over Curves
Another great DaVinci scope is the histogram, which now appears outside of the scope panel. The new improvements have embedded the histogram inside the Curves tab on the bottom Palette. Click on the three dots in the Custom Curves tab. The pulldown menu that appears includes the Input or Output of the histogram. With these settings, you can find the element in the frame that helps you make adjustments quickly.
5. Scope Quality
The GPU-accelerated scopes engine allows the scopes to respond quickly. Users have the option to set the quality to high, medium, or low and the scopes will respond to a range of hardware systems. Depending on whether you are working on a stationary short or looking to see how the scopes react in real-time, you will be able to toggle the modes quickly and easily.
6. YRGB View in Histogram and Parade
The histogram and parade now come with the ability to view luminance together with the red, green, and blue channels. Users also have the option for YCbCr mode in the Parade.
7. Extents
These are weak elements in the signore, which are of lesser importance compared to the stronger elements. However, Danvici now allows them to be revealed for a full illustration of the information that lies in the image. Consequently, extents can be used to determine whether the data is being clipped beyond legal limits.
Part 2. Mastering Scopes in DaVinci Resolve: A Brief Guide
DaVinci scopes help you to analyze images as a basis for color correction. When used properly, scopes help in fixing white balance issues and checking saturation. They also allow you to get the correct exposure and check details like skin tone. To use scopes in DaVinci Resolve, go to the color page in the bottom right corner. You can also click on the small graph icon to view the scope. Here is how to use them:
1. Waveform
The Waveform represents the brightness or luminance of your image. In this video scope, the brightest parts are at the top while the darkest are at the bottom. The pixels are represented from left to right.
The Waveform scope on DaVinci Resolve is helpful when you are checking for clipping. This simply means finding out whether the image is too bright or too dark. The waveform also ensures that the image is properly exposed. The colorize feature of the waveform shows the colors of the image while the extent shows the darkest or lightest parts of the image.
2. Parade (RGB)
The RGB Parade comprises 3 waveforms that represent the luminance of red, green, and blue channels. The approach for reading the parade video scope is similar to that of the waveform. However, you now look at the balance between the colors correct the white balance, and check for a color cast.
The Parade works almost in a similar manner as the waveform. It displays the red, green, and blue channels of the image as separate waveforms. This way, you can easily identify and correct color casts while ensuring the colors in the image are balanced. The video scope provides useful information to decide which parts of the image need to be corrected or tweaked further.
3. Vectorscope
Vectorscope in DaVinci Resolve shows hue and saturation on a circular graph. Hues (the colors) are indicated outside of the color wheel for easier color correction. Saturation is indicated by how far the graph extends from the center.
By displaying the hue and saturation of the image as a vector, this video scope helps check skin tones. The scope specifically checks whether skin tones are shifted toward colors such as yellow, magenta, or green. It allows you to make sure that the colors in your subject skin tones are not too saturated or desaturated.
4. Histogram
Histogram is a video scope in DaVinci Resolve that displays the brightness or luminance of an image from left to right for the RGB channel. The video scope is based on the number of pixels that the colors red, blue, and green have in an image.
Using the histogram video scope on DaVinci Resolve allows you to check for overexposure or underexposure in your image. You can also ensure that the image has a good overall brightness range. The scope provides a graphical representation of tonal distribution in each channel. This way, you can evaluate the tone in detail for more accurate brightness and contrast adjustments.
Part 3: Edit Like a Pro: Mastering Video Scopes in Filmora
When working on video projects, Wondershare Filmora is a great editing software. It comes with unique features to color-correct your videos on the go as you edit it. From AI-powered features to royalty-free music, there is so much more you can do with Filmora.
Free Download For Win 7 or later(64-bit)
Free Download For macOS 10.14 or later
How to Use Video Scopes on Filmora
Using video scopes on Filmora is easy. The software offers four video scope options, allowing you to color-correct and grade your visual images properly. They include parade RGB, waveform, vectorscope, and histogram. When editing videos on Filmora, the video scopes can be accessed by clicking on the video scopes icon. The icon is found on the top right corner of the media player.
Filmora has made it easy for users to manage video scopes, and color-correct videos quickly. Users can change the layout options of the video scopes to match the editing needs of their project. You can also expand the button to show the name of the scope. As you manage the scopes, you can start with the Parade to make the necessary adjustments. Then move on to waveform, vectorscope, and histogram.
The uses of the video scope on Filmora are as follows:
- Parade – Cahnge the color channel from RBG to YRGB or YCbCr
- Vectorscope – Identify skin tone
- Waveform – Adjust color channels in a different way
- Histogram – Display the multiple color adjustments in a graphical way
Conclusion
Scopes are indeed valuable to video editors and colorists. While viewing images on a monitor can be subjective, scopes allow you to analyze and define them objectively. This gives you the power to color grade and correct to ensure that viewers look at the image with a clear representation. When working on or editing your videos, we recommend Wondershare Filmora. The video editing software comes with a wide range of features and video scopes that allow you to do everything on the same platform.
How to Add Adjustment Layer in Premiere Pro
Are you using Premiere Pro frequently? Adobe Premiere Pro is considered advanced software for editing video clips proficiently. You can find a diverse range of features in Premiere Pro that allows you to transform your videos immensely.
If you want to be a professional video editor, you must know the basic techniques of executing video editing. In Premiere Pro, there are various options and features that can help you in enhancing your productivity. For instance, the use of adjustment layers in video editing can make a huge difference. By reading this article, you can come to know about the Premiere Pro adjustment layer efficiently.

Part 1: What is Adjustment Layer in Premiere Pro?
In Premiere Pro, you can save time efficiently by editing each layer individually. To do so, you can find the feature of the adjustment layer in Premiere Pro that enables you to apply the same effect to multiple clips instantly. This will eventually save you time and manual effort. However, you must ensure that the adjustment layer has been placed on top of the layers stack section.
In an adjustment layer in Premiere Pro, you can add multiple effects to create a captivating illustration in your video clips. Moreover, you can also create multiple adjustment layers in Premiere Pro to handle and apply the effects in your clips proficiently. Also, you can easily move, remove, or cut the Premiere Pro adjustment layer anytime within a few clicks.

Furthermore, you can also remove the adjustment layer from your timeline easily without modifying the composition settings of your video. If you get a basic understanding of creating and managing the adjustment layer in Premiere Pro, you can efficiently enhance the visual appeal of your videos. To learn more about the Premiere Pro adjustment layer, continue reading.
Part 2: How to Add an Adjustment Layer in Premiere Pro?
In this section, we will briefly address how to add an adjustment layer in Premiere Pro in a simpler manner.
Step1 Once you have uploaded your project in Premiere Pro, go to the “File” tab and select the “New” option. Afterward, tap on “Adjustment Layer.”

Step2 You can also go to the bottom of your project’s panel and tap on the “New Item” icon. After clicking on this icon, you can click on the “Adjustment layer” option. Afterward, you can modify the video settings to change the settings of the adjustment layer. Once done, hit the “OK” button.

Step3 Once the adjustment layer has been created, you can drag and drop it into the timeline. To change its name, you can right-click on it.

Part 3: Three Ways to Use Adjustment Layer in Premiere Pro
Do you want to use the Premiere Pro adjustment layer significantly? In this section, we will highlight three ways through which you can use the adjustment layer in Premiere Pro to edit your videos.
1. Color Grading
Color grading in Premiere Pro can help you to adjust the balance and tone of your video. You can use the color grading effects and tools to set the exposure, brightness, saturation, and light according to your preference. It will also let you redefine the colors in your video efficiently. To use the adjustment layer for color grading, you can read the below instructions:
Step1 After uploading the video clip in Premiere Pro, create a new adjustment layer in the timeline. Drag and adjust it according to the duration of your video clip. Once done, go to the “Effects” tab and search for “FilmConvert Nitrate.”

Step2 Apply this effect to the adjustment layer and choose your camera to match the color profile. Afterward, you can adjust the saturation, exposure filmstock, and curves according to your choice. You can also increase the vibrancy and hue saturation curves for more enhancement. You can also navigate to the basic correction section to modify the contrast value accordingly.
2. Transition
To merge multiple video clips smoothly and efficiently, transitional effects can assist you. By adding a suitable transition effect, you can make your whole video look clean and cinematic. Moreover, you can use adjustment layers in Premiere Pro to add transition effects to your effect professionally. To do the transition effect, you can proceed to the following instructions:
Step1 First, drag and drop your video clips into the timeline. Once done, create the adjustment layer and apply it above the layers of video clips. Once done, search the “Offset” effect and apply it to the adjustment layer.
Step2 Now add the keyframe to the position where you want to start and end the transition effect. Afterward, right-click on the first keyframe and select “Temporal Interpolation.” From there, choose “Ease Out.” Repeat the same process with the last keyframe. Once done, add the “Directional blur” effect to the adjustment layer for a smoother look.

3. Mask
By using masks in Premiere Pro, you can efficiently blur, highlight, or add an effect to a specific area of your video clip. With this tool, you can draw different mask shapes, such as ellipses, rectangles, etc. Thus, it’s a great way to edit any particular part of the video clip effortlessly. Here are the simple steps to add masks to the video clips using the adjustment layer:
Step1 Add the adjustment layer to the timeline and head to the “Effects” library to locate the “Crop” effect. Add this effect to the adjustment layer and then head to the Effects control.

Step2 Now enhance the top and bottom properties to 15%. You can also adjust the headspace of the person accordingly. Also, you can animate the black bars to produce a more cinematic look in your video.
Part 4: FAQ about Adjustment Layers in Premiere Pro
If you have some questions or concerns about using the adjustment layer in Premiere Pro, we have discussed the commonly asked question below.
Why is the adjustment layer greyed out in my Premiere Pro?
To fix grayed adjustment layer in Premiere Pro, there are two methods that you can follow:
Method 1: At the bottom of your project panel, click on the “New Item” icon and select “Adjustment Layer.” Once done, adjust the settings and press the “OK” button. Now you can drag and drop the adjustment layer in the timeline.
Method 2: Click on your “Project Panel” and then navigate to the “File” tab. From there, select “New” and then click on “Adjustment Layer.” Once done, you can drag and drop the adjustment layer at the timeline.
Conclusion
Premiere Pro is a famous video editing software that lets you enhance your videos proficiently. In this tool, using adjustment layers can help you in making your editing process quicker and easier. That’s why, in this article, we have focused on how to add an adjustment layer in Premiere Pro. Moreover, we have also shed light on how to use the adjustment layer precisely with various effects to enhance your videos.
Are you using Premiere Pro frequently? Adobe Premiere Pro is considered advanced software for editing video clips proficiently. You can find a diverse range of features in Premiere Pro that allows you to transform your videos immensely.
If you want to be a professional video editor, you must know the basic techniques of executing video editing. In Premiere Pro, there are various options and features that can help you in enhancing your productivity. For instance, the use of adjustment layers in video editing can make a huge difference. By reading this article, you can come to know about the Premiere Pro adjustment layer efficiently.
Part 1: What is Adjustment Layer in Premiere Pro?
In Premiere Pro, you can save time efficiently by editing each layer individually. To do so, you can find the feature of the adjustment layer in Premiere Pro that enables you to apply the same effect to multiple clips instantly. This will eventually save you time and manual effort. However, you must ensure that the adjustment layer has been placed on top of the layers stack section.
In an adjustment layer in Premiere Pro, you can add multiple effects to create a captivating illustration in your video clips. Moreover, you can also create multiple adjustment layers in Premiere Pro to handle and apply the effects in your clips proficiently. Also, you can easily move, remove, or cut the Premiere Pro adjustment layer anytime within a few clicks.
Furthermore, you can also remove the adjustment layer from your timeline easily without modifying the composition settings of your video. If you get a basic understanding of creating and managing the adjustment layer in Premiere Pro, you can efficiently enhance the visual appeal of your videos. To learn more about the Premiere Pro adjustment layer, continue reading.
Part 2: How to Add an Adjustment Layer in Premiere Pro?
In this section, we will briefly address how to add an adjustment layer in Premiere Pro in a simpler manner.
Step1 Once you have uploaded your project in Premiere Pro, go to the “File” tab and select the “New” option. Afterward, tap on “Adjustment Layer.”
Step2 You can also go to the bottom of your project’s panel and tap on the “New Item” icon. After clicking on this icon, you can click on the “Adjustment layer” option. Afterward, you can modify the video settings to change the settings of the adjustment layer. Once done, hit the “OK” button.
Step3 Once the adjustment layer has been created, you can drag and drop it into the timeline. To change its name, you can right-click on it.
Part 3: Three Ways to Use Adjustment Layer in Premiere Pro
Do you want to use the Premiere Pro adjustment layer significantly? In this section, we will highlight three ways through which you can use the adjustment layer in Premiere Pro to edit your videos.
1. Color Grading
Color grading in Premiere Pro can help you to adjust the balance and tone of your video. You can use the color grading effects and tools to set the exposure, brightness, saturation, and light according to your preference. It will also let you redefine the colors in your video efficiently. To use the adjustment layer for color grading, you can read the below instructions:
Step1 After uploading the video clip in Premiere Pro, create a new adjustment layer in the timeline. Drag and adjust it according to the duration of your video clip. Once done, go to the “Effects” tab and search for “FilmConvert Nitrate.”
Step2 Apply this effect to the adjustment layer and choose your camera to match the color profile. Afterward, you can adjust the saturation, exposure filmstock, and curves according to your choice. You can also increase the vibrancy and hue saturation curves for more enhancement. You can also navigate to the basic correction section to modify the contrast value accordingly.
2. Transition
To merge multiple video clips smoothly and efficiently, transitional effects can assist you. By adding a suitable transition effect, you can make your whole video look clean and cinematic. Moreover, you can use adjustment layers in Premiere Pro to add transition effects to your effect professionally. To do the transition effect, you can proceed to the following instructions:
Step1 First, drag and drop your video clips into the timeline. Once done, create the adjustment layer and apply it above the layers of video clips. Once done, search the “Offset” effect and apply it to the adjustment layer.
Step2 Now add the keyframe to the position where you want to start and end the transition effect. Afterward, right-click on the first keyframe and select “Temporal Interpolation.” From there, choose “Ease Out.” Repeat the same process with the last keyframe. Once done, add the “Directional blur” effect to the adjustment layer for a smoother look.
3. Mask
By using masks in Premiere Pro, you can efficiently blur, highlight, or add an effect to a specific area of your video clip. With this tool, you can draw different mask shapes, such as ellipses, rectangles, etc. Thus, it’s a great way to edit any particular part of the video clip effortlessly. Here are the simple steps to add masks to the video clips using the adjustment layer:
Step1 Add the adjustment layer to the timeline and head to the “Effects” library to locate the “Crop” effect. Add this effect to the adjustment layer and then head to the Effects control.
Step2 Now enhance the top and bottom properties to 15%. You can also adjust the headspace of the person accordingly. Also, you can animate the black bars to produce a more cinematic look in your video.
Part 4: FAQ about Adjustment Layers in Premiere Pro
If you have some questions or concerns about using the adjustment layer in Premiere Pro, we have discussed the commonly asked question below.
Why is the adjustment layer greyed out in my Premiere Pro?
To fix grayed adjustment layer in Premiere Pro, there are two methods that you can follow:
Method 1: At the bottom of your project panel, click on the “New Item” icon and select “Adjustment Layer.” Once done, adjust the settings and press the “OK” button. Now you can drag and drop the adjustment layer in the timeline.
Method 2: Click on your “Project Panel” and then navigate to the “File” tab. From there, select “New” and then click on “Adjustment Layer.” Once done, you can drag and drop the adjustment layer at the timeline.
Conclusion
Premiere Pro is a famous video editing software that lets you enhance your videos proficiently. In this tool, using adjustment layers can help you in making your editing process quicker and easier. That’s why, in this article, we have focused on how to add an adjustment layer in Premiere Pro. Moreover, we have also shed light on how to use the adjustment layer precisely with various effects to enhance your videos.
How to Use Visual Effect for Zoom
Zoom, a video calling software, has been quite popular over the last several months and is still one of the most used videos calling applications by millions of people worldwide. The site is a favorite among working professionals, but it is also utilized by individuals to connect with their friends and loved ones. Additionally, despite the app’s abundance of practical built-in tools and functions, it lacks the fun filters and special effects that the majority of users are used to when using a camera. Zoom has ingrained itself in our vocabulary during the last year. It seemed almost inevitable given that everything, from meetings to parties, has moved online.
You don’t need to seek farther than Zoom visual effects to inject a little jazz into the routine Zoom meetings during these hard times. By making adjustments to your Video configuration either before or during a video call, you may add visual effects in Zoom. Zoom meetings may be tedious to conduct over extended periods of time. Additionally, it would be helpful if you recorded the condition of your room before any Zoom meetings. You wouldn’t want to reveal your disorganized space while in a meeting. In these situations, adding visual effects will keep your private area private while also making your Zoom meetings entertaining and exciting. It will also prevent others from seeing your filthy room. This tutorial will walk you through the process of adding visual effects to Zoom step-by-step. In addition, you will get acquainted with the numerous camera functions and visual effects that you may employ during a Zoom video conversation.
- 1. What apps can add visual effect on Zoom?
- 2. How do I add visual effects to Zoom in Mobile?
- 3. How do you download Zoom effects?
Part 1: Popular Visual Effects you can add to Zoom
You may apply one of four main graphic effects to your Zoom meetings. The visual effects that you may use in your next Zoom video chat are briefly summarized below.
1. Visual Backgrounds
Virtual backdrops may transform any plain wall into an artistic setting. Zoom provides you the choice to add photographs to your backdrop in addition to offering you a few pre-made backdrops. Zoom lets you add a movie to your backdrop in addition to simply photographs. With the help of this imaginative feature, gather your pals and enjoy your favorite meme or video. A presentation’s collection of photos, a video, or a single image may all serve as virtual backdrops. A green screen would often be used as your real backdrop and consistent lighting would be required.
To avoid having to reveal your real surroundings while in a conference, you may add any picture or video as a virtual backdrop in Zoom. You have the option of adding own photos and movies or selecting from the pre-existing backdrop films and images. The file type for video backgrounds should be MP4 or MOV, and the resolution should range from 360p to a maximum of 1080p. Ensure that the mirroring of your video is deselected in the Zoom’s Video settings if your backdrop picture has text that may be read. By using virtual backdrops, you may alter the background of your video as it appears to the audience member with whom you are speaking. During the video conference you’re in, the other participants will be able to view your face and body overlaid on the backdrop of your choice.
2. Filters
With these filters, you can have fun in all of your Zoom meetings! Filters are a fun way to spend time with loved ones who are far away, particularly at a period when maintaining social distance is crucial. Filters are the modifications you make to yourself during Zoom meetings (such as a mustache, beard, etc.). They enliven the proceedings and contribute to the fun and memorability of your Zoom meetings.
Your films’ colors may be changed, and video filters can also add new aspects. By selecting a filter appropriate for each event, like team meetings or game nights, you may create the right atmosphere. You may embellish your face in the video with flowers or animal traits by using Zoom’s various filters. Alternately, you might just convert your video’s color to black and white. The video filters from a different program, however, allow you to apply more vibrant filters and place a greater emphasis on special effects.
3. Lighting and Touch-ups
The Lighting function enhances lighting effects and makes adjustments for low light situations to make you seem more professional during a Zoom conference. Similar to this, Touch-up enhances your facial characteristics by making your skin shine, erasing wrinkles, and giving your face a radiant appearance.
On your Zoom videos, changing your lighting and applying touch-ups may improve how you seem. By adjusting your lighting, you can make even dim illumination look bright. By doing touch-ups, you may get a smoother skin texture and get rid of any obvious imperfections.
4. Studio Effects
Zoom has been developing on a new feature called Studio Effects that would give customers the option of using virtual cosmetics in their movies. They are still checking it out before formally releasing it since it is still in beta. However, it is still available to users under the Backgrounds & Filters area. You may adjust the opacity as you like. You have the option to choose a new color or one of the predefined colors. Additionally, you may decide to employ the face effects in all of your next meetings, albeit doing so might be problematic if you use Zoom for business. Don’t worry if you’re running late. Zoom can give your face a natural-looking cosmetic makeover in only one minute!
This function is intended for less formal settings, such as gatherings of friends or family. Anyone who wants to seem more professional during meetings has access to Studio Effects, which offers the choice of various eyebrow colors, beards, and lipsticks. These are a few recently added features. You may add mustaches, beards, and brows in a variety of designs, hues, and intensities. Additionally, you have the option of coloring your lips.
Part 2: How to Add Visual Effects to Zoom
Along with facilitating online meetings, the Zoom program also lets you play with its visual effects. You just need to make a few adjustments to the video settings or utilize another third-party program to be ready to go.
Step1Start a Zoom meeting
You can download Zoom, install it on your computer, and log into your account if you don’t already have it if you don’t already have it.
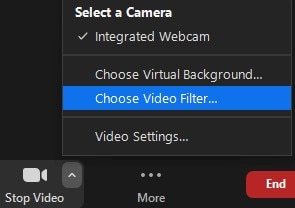
Step2Tap Background and Filters
After logging in to Zoom, use these settings. - Options > Camera > Video

Step3Faucet Filters
Here, you may play with a variety of visual effects and customize them to suit your tastes. Pick one of the numerous filters that are offered. To activate the filter, tap it.
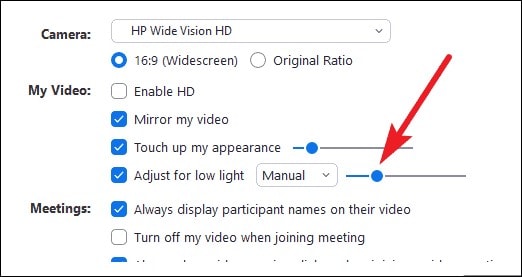
Step4Set Lighting Effects to on
Select “Adjust for low light” in the video options. For your lighting, you may choose between Auto and Manual effects. Zoom will automatically detect and adapt for the lighting in your room if you choose Auto.
Use Zoom’s noise reduction option to keep your conversation focused during your video conference in addition to adding visual elements. To do this, go to “Audio Settings” and choose “High” under “Suppress background noise.” Once you start speaking during the video conference, this essentially cancels out any background noise.
Part 3: Related FAQs
1. What apps can add visual effect on Zoom?
Following is the list of top three apps that you can use to utilize visual effects Zoom application:
Snap Camera is regarded as the most user-friendly. It is a software that you can download for Windows or Mac that works with live broadcasts and video chats. Because it was created by the people who founded Snapchat, it shares a broad variety of filters with that platform.
Link: Snap Camera
The Mac is the only platform on which CamTwist may be used. You may also use it to give your movies additional filters and unique effects. This program lets you pick from a variety of pre-made effects while also allowing you to create your own.
Link: CamTwist
Another desktop application that lets you change and even blur your backdrop is ManyCam. It enables you to apply digital effects, filters, and 3-D masks to your face. Using this tool, you can also build layers and presets.
Link: ManyCam
2. How do I add visual effects to Zoom in Mobile?
Zoom includes a function that might be useful if you don’t want to tidy up or want to add some entertainment to your calls. You may utilize Zoom virtual backdrops to alter your surroundings and take you to a more pleasant location on both the desktop and mobile apps. After joining one on a mobile device, pick Virtual backdrop by tapping the More icon in the bottom right corner. Choose a photo from the list of choices, or click the plus sign (+) to add a photo or video from your gallery.
3. How do you download Zoom effects?
Pressing the Studio Effects button after installing Zoom for the first time will prompt a pop-up asking you to download the Studio Effects package. Several filters, suited for both business meetings and conversations with friends, let you customize the video and audio during your video calls. To start downloading the Effects bundle, click the Download button. The “Studio Effects” window will appear on the right-hand side of the Background & Filter page after the download is finished. All the face components and choices are available in this Studio Effects window.
Conclusion
The most popular video meeting tool worldwide is Zoom. Family, friends, coworkers, and any two people who want to video chat utilize it. Zoom visual effects are the ideal tool for injecting some humor into otherwise dull Zoom sessions and meetings. A few simple steps will get you a striking backdrop, a humorous filter, and some interesting effects. Since the majority of formal work is now completed from home, Zoom has taken over as the standard video conferencing program. Try out as many of the effects as you like, and use this page as a companion and a map to help you along the way.
- 1. What apps can add visual effect on Zoom?
- 2. How do I add visual effects to Zoom in Mobile?
- 3. How do you download Zoom effects?
Part 1: Popular Visual Effects you can add to Zoom
You may apply one of four main graphic effects to your Zoom meetings. The visual effects that you may use in your next Zoom video chat are briefly summarized below.
1. Visual Backgrounds
Virtual backdrops may transform any plain wall into an artistic setting. Zoom provides you the choice to add photographs to your backdrop in addition to offering you a few pre-made backdrops. Zoom lets you add a movie to your backdrop in addition to simply photographs. With the help of this imaginative feature, gather your pals and enjoy your favorite meme or video. A presentation’s collection of photos, a video, or a single image may all serve as virtual backdrops. A green screen would often be used as your real backdrop and consistent lighting would be required.
To avoid having to reveal your real surroundings while in a conference, you may add any picture or video as a virtual backdrop in Zoom. You have the option of adding own photos and movies or selecting from the pre-existing backdrop films and images. The file type for video backgrounds should be MP4 or MOV, and the resolution should range from 360p to a maximum of 1080p. Ensure that the mirroring of your video is deselected in the Zoom’s Video settings if your backdrop picture has text that may be read. By using virtual backdrops, you may alter the background of your video as it appears to the audience member with whom you are speaking. During the video conference you’re in, the other participants will be able to view your face and body overlaid on the backdrop of your choice.
2. Filters
With these filters, you can have fun in all of your Zoom meetings! Filters are a fun way to spend time with loved ones who are far away, particularly at a period when maintaining social distance is crucial. Filters are the modifications you make to yourself during Zoom meetings (such as a mustache, beard, etc.). They enliven the proceedings and contribute to the fun and memorability of your Zoom meetings.
Your films’ colors may be changed, and video filters can also add new aspects. By selecting a filter appropriate for each event, like team meetings or game nights, you may create the right atmosphere. You may embellish your face in the video with flowers or animal traits by using Zoom’s various filters. Alternately, you might just convert your video’s color to black and white. The video filters from a different program, however, allow you to apply more vibrant filters and place a greater emphasis on special effects.
3. Lighting and Touch-ups
The Lighting function enhances lighting effects and makes adjustments for low light situations to make you seem more professional during a Zoom conference. Similar to this, Touch-up enhances your facial characteristics by making your skin shine, erasing wrinkles, and giving your face a radiant appearance.
On your Zoom videos, changing your lighting and applying touch-ups may improve how you seem. By adjusting your lighting, you can make even dim illumination look bright. By doing touch-ups, you may get a smoother skin texture and get rid of any obvious imperfections.
4. Studio Effects
Zoom has been developing on a new feature called Studio Effects that would give customers the option of using virtual cosmetics in their movies. They are still checking it out before formally releasing it since it is still in beta. However, it is still available to users under the Backgrounds & Filters area. You may adjust the opacity as you like. You have the option to choose a new color or one of the predefined colors. Additionally, you may decide to employ the face effects in all of your next meetings, albeit doing so might be problematic if you use Zoom for business. Don’t worry if you’re running late. Zoom can give your face a natural-looking cosmetic makeover in only one minute!
This function is intended for less formal settings, such as gatherings of friends or family. Anyone who wants to seem more professional during meetings has access to Studio Effects, which offers the choice of various eyebrow colors, beards, and lipsticks. These are a few recently added features. You may add mustaches, beards, and brows in a variety of designs, hues, and intensities. Additionally, you have the option of coloring your lips.
Part 2: How to Add Visual Effects to Zoom
Along with facilitating online meetings, the Zoom program also lets you play with its visual effects. You just need to make a few adjustments to the video settings or utilize another third-party program to be ready to go.
Step1Start a Zoom meeting
You can download Zoom, install it on your computer, and log into your account if you don’t already have it if you don’t already have it.
Step2Tap Background and Filters
After logging in to Zoom, use these settings. - Options > Camera > Video
Step3Faucet Filters
Here, you may play with a variety of visual effects and customize them to suit your tastes. Pick one of the numerous filters that are offered. To activate the filter, tap it.
Step4Set Lighting Effects to on
Select “Adjust for low light” in the video options. For your lighting, you may choose between Auto and Manual effects. Zoom will automatically detect and adapt for the lighting in your room if you choose Auto.
Use Zoom’s noise reduction option to keep your conversation focused during your video conference in addition to adding visual elements. To do this, go to “Audio Settings” and choose “High” under “Suppress background noise.” Once you start speaking during the video conference, this essentially cancels out any background noise.
Part 3: Related FAQs
1. What apps can add visual effect on Zoom?
Following is the list of top three apps that you can use to utilize visual effects Zoom application:
Snap Camera is regarded as the most user-friendly. It is a software that you can download for Windows or Mac that works with live broadcasts and video chats. Because it was created by the people who founded Snapchat, it shares a broad variety of filters with that platform.
Link: Snap Camera
The Mac is the only platform on which CamTwist may be used. You may also use it to give your movies additional filters and unique effects. This program lets you pick from a variety of pre-made effects while also allowing you to create your own.
Link: CamTwist
Another desktop application that lets you change and even blur your backdrop is ManyCam. It enables you to apply digital effects, filters, and 3-D masks to your face. Using this tool, you can also build layers and presets.
Link: ManyCam
2. How do I add visual effects to Zoom in Mobile?
Zoom includes a function that might be useful if you don’t want to tidy up or want to add some entertainment to your calls. You may utilize Zoom virtual backdrops to alter your surroundings and take you to a more pleasant location on both the desktop and mobile apps. After joining one on a mobile device, pick Virtual backdrop by tapping the More icon in the bottom right corner. Choose a photo from the list of choices, or click the plus sign (+) to add a photo or video from your gallery.
3. How do you download Zoom effects?
Pressing the Studio Effects button after installing Zoom for the first time will prompt a pop-up asking you to download the Studio Effects package. Several filters, suited for both business meetings and conversations with friends, let you customize the video and audio during your video calls. To start downloading the Effects bundle, click the Download button. The “Studio Effects” window will appear on the right-hand side of the Background & Filter page after the download is finished. All the face components and choices are available in this Studio Effects window.
Conclusion
The most popular video meeting tool worldwide is Zoom. Family, friends, coworkers, and any two people who want to video chat utilize it. Zoom visual effects are the ideal tool for injecting some humor into otherwise dull Zoom sessions and meetings. A few simple steps will get you a striking backdrop, a humorous filter, and some interesting effects. Since the majority of formal work is now completed from home, Zoom has taken over as the standard video conferencing program. Try out as many of the effects as you like, and use this page as a companion and a map to help you along the way.
Also read:
- In 2024, 10 Best Vlogging Cameras for Beginners
- New 2024 Approved What You Should Know About Speech-to-Text Technology
- In 2024, Complete Tutorial to Make an Impressive Countdown Timer Video
- New 10 Best Camera for YouTube Beginners
- Overview of FPS for YouTube Videos for 2024
- Updated How to Choose A Nice GoPro for Vlogging for 2024
- Updated Little Tricks to Make Canva Slideshow No One Is Telling You
- New Want to Find a Good Camera for YouTube? This Article Brings You some of the Best Options of Different Varieties for Your Channel
- A Guide to Understanding Efectum App and Some Top Alternatives
- New 2024 Approved Top 8 Memoji Makers to Make a Memoji on PC, Android & iPhone
- Updated In 2024, Detailed Steps to Rotate Videos Using Kdenlive
- 2024 Approved Easy Guide to Use a Stabilization Tool in Filmora
- New Get The Perfect Drone Footage With Free Drone LUTs for 2024
- In 2024, Do You Want to Apply Professional-Looking Color Grading on Your iPhones Photos and Videos? You Can Use Different iPhone LUTs for Your Pictures and Videos
- Updated Do You Want to Know How to Add a VHS Effect Premiere Look? You Can Easily Apply the VHS Effect to Your Videos Using Adobe Premiere Pro
- Updated In 2024, How to Create Glowing Edge Effect in TikTok Dancing Video
- With This Article, We Will Be Looking at Steps to Rotate a Video in Cyberlink PowerDirector to Help You when Required. We Have Also Mentioned the Steps You Will Need to Follow in Wondershare Filmora for 2024
- Shotcut Review – Is It The Best Free Video Editor for 2024
- New The Best Way to Remove Audio From Your Videos
- Tutorial Guides for Video Maker with Song for 2024
- 2024 Approved Do You Want Your Videos to Look Like Danny Gevirtz? You Can Use some Inspired Presets. There Are Different Danny Gevirtz LUTs that You Can Download and Use
- In 2024, Best Tips on How to Design Travel Slideshow
- Updated Get Creative with These 10 Video Editing App With Templates for 2024
- New In 2024, How to Record Super Slow Motion Videos on Your Phone?
- Updated 2024 Approved A Full Guide to Funcall Voice Changer and Its Alternatives
- 2024 Approved Looking for Exciting Methods to Create Alluring GIFs Worthy of Making a Mass Appeal? Heres All About GIF Design You Will Ever Want to Know and Learn
- 2024 Approved A Countdown Effect Is Widely Used in Gaming and Report Videos. So How to Create Your Own Countdown Video? This Article Will Tell You some Ideas About Contdown Video Editing
- Do You Wish to Convert GIF to Animated PNG? Then, You Need to Know About Using a GIF to APNG Converter to Help You Carry This Process Out in No Time. Read On for 2024
- Do You Also Use Android to Create and Edit Videos? Read About the Efectum Video Effects Editor, Which Is Available in Your App Stores for Seamless Editing
- Wondering How to Edit a Video to Slow Motion on iPhone and Android Devices? Find Out How to Use Wondershare Filmora to Create and Edit Slo Mo Videos in a Few Clicks
- In 2024, Recommended Best Applications for Mirroring Your Oppo Reno 10 5G Screen | Dr.fone
- How to Recover Apple iPhone 8 Plus Data From iOS iTunes Backup? | Dr.fone
- How To Restore Missing Music Files from Itel P40
- In 2024, Does Life360 Notify When You Log Out On Tecno Phantom V Flip? | Dr.fone
- How to share/fake gps on Uber for Itel P55 5G | Dr.fone
- In 2024, About Samsung Galaxy XCover 6 Pro Tactical Edition FRP Bypass
- In 2024, CatchEmAll Celebrate National Pokémon Day with Virtual Location On Nubia Red Magic 9 Pro | Dr.fone
- In 2024, The 10 Best Tools to Bypass iCloud Activation Lock On iPhone XR You Should Try Out
- In 2024, How Can I Catch the Regional Pokémon without Traveling On Vivo Y27 5G | Dr.fone
- Failed to play MOV movies on Redmi K70
- A Working Guide For Pachirisu Pokemon Go Map On Honor 90 Lite | Dr.fone
- Top 5 Oppo K11x Bypass FRP Tools for PC That Actually Work
- In 2024, How to Fix Apple iPhone XS Passcode not Working? | Dr.fone
- Step-by-Step Tutorial How To Bypass Oppo Reno 11F 5G FRP
- Android Unlock Code Sim Unlock Your Vivo T2x 5G Phone and Remove Locked Screen
- Hassle-Free Ways to Remove FRP Lock from Samsung Galaxy M34 Phones with/without a PC
- How To Restore a Bricked Oppo A78 5G Back to Operation | Dr.fone
- Use Device Manager to identify malfunctioning your drivers with Windows Device Manager in Windows 10 & 7
- In 2024, 5 Ways to Transfer Music from Oppo A58 4G to Other Android Devices Easily | Dr.fone
- How To Transfer WhatsApp From iPhone 12 Pro to other iPhone 12 Pro Max devices? | Dr.fone
- Top IMEI Unlokers for Your OnePlus 12R Phone
- In 2024, Delete Gmail Account With/Without Password On Infinix Smart 8 Plus
- In 2024, Hacks to do pokemon go trainer battles For Samsung Galaxy S24 Ultra | Dr.fone
- In 2024, How to Bypass Google FRP Lock from Honor Magic 5 Devices
- How to Transfer Music from ZTE Axon 40 Lite to iPod | Dr.fone
- Title: Updated Best 7 Color Match Paint Apps
- Author: Chloe
- Created at : 2024-05-20 03:37:56
- Updated at : 2024-05-21 03:37:56
- Link: https://ai-editing-video.techidaily.com/updated-best-7-color-match-paint-apps/
- License: This work is licensed under CC BY-NC-SA 4.0.
