
:max_bytes(150000):strip_icc():format(webp)/relaxing-while-getting-his-studies-done-495857099-5a1ed8c5ec2f640037e369f4.jpg)
Updated Best Filmic Pro LUTs For Video Editing for 2024
Best Filmic Pro LUTs For Video Editing
Video editing involves rearranging and upscaling video content for improved quality. Meanwhile, video editing can consume a lot of time and resources. For video editing, you need to have expertise in using the software. The ideal solution is using Filmic Tone LUTs for free download. These LUTs can extend the quality of your videos in a hassle-free environment. This article will discuss important Filmic Pro LUTs.
- Part 2: Discussing Some Practical Uses of LUTs in Video Editing
- Part 3: Best Filmic Pro LUTs To Use
- Part 4: Getting To Know Wondershare Filmora and Its Use in LUTs
Part 1: How Can LUTs Benefit Video Editors?
Video editors are professionals that are tasked to edit and customize videos. Their main objective is to enhance video quality with necessary manual upscaling. Making things more accessible, find how LUTs can benefit these professionals:
- Increased Efficiency: With LUTs, video editors can optimize their workflows with ready-made filters. So they don’t need to spend hours on video editing. By applying filters, video colors are upgraded.
- Consistent Grading: During manual editing, multiple frames are left out during color correction. With LUTs, the colors are applied in a consistent way in all frames. This way, you will experience effective color enhancement.
- Professional Quality: The quality of applied LUTs is amazing. After all, LUTs provide dedicated filter presets to optimize color saturation and brightness. With professional color grading, experience a top-quality video.
- Creative Colors: LUTs are ideal for adding premium yet stylish color schemas into videos. The color gradients are creative as well as sleek and luxurious. You will not regret using creative color presets in LUTs.
Part 2: Discussing Some Practical Uses of LUTs in Video Editing
LUTs, also known as look-up tables, are unique video editing tools. They use mathematical instructions to map input color values into output color values. This way, consistent color gradings are applied across video content. In video editing, LUTs can be used for a variety of practical uses:
1. Special Effects
By using LUTs, you can add special effects to your videos. This includes different effects, including dreamy, moody, or surreal. The videos will look more professional and enchanting with attractive looks. So you don’t need to pursue video editing in a deep way.
2. HDR Display
With LUTs, users can add a dynamic touch of HDR display to the videos. After all, they can convert SDR footage to HDR footage using special filter presets. This allows for different color contrasts within the video.
3. Color Enhancement
Enhancing color schemas is easier and more convenient using LUTs. These editing tools can adjust color contrast, balance, and saturation. Hence, your video is upscaled with an improved color display for vintage or cinematic looks.
4. Match Footages
Different cameras produce videos with diverse quality, which is unsatisfying. Through LUTs, you can match the color of your footage with a consistent appearance. The color schemes and tone contrasts are optimized in a collective way.
Part 3: Best Filmic Pro LUTs To Use
Using LUTs in video editing can save a lot of time. For video editors, LUTs can be revolutionizing because of less effort with amazing output. In general, using Filmic Pro LUTs is in great demand. Let’s discover some of them:
1. Filmic LUT Support
Bring Filmic looks to your videos using this Filmic Pro LUTs download pack. There are up to 7 different LUT preset filters that you can import. With Filmic touch, you can add unique cinematic looks to your visual content. LUT Quick Action Modal (QAM) is also introduced to switch into preview mode or apply LUT to the video.

2. Richard Lackey FREE Filmic Pro LOGv2 LUT for FilmConvert
Add a cinematic touch to your videos with this Filmic Tone LUTs free download pack. This special LUTs pack lets you add attractive film interaction to your video. The provided color schemes are exceptional because they offer unique color presentations. Meanwhile, the LUT equips solutions to correct imbalances and noise.

3. Free LUT Filmic
Make your photo or video more special with this Free LUT Filmic pack. Meanwhile, there are special effects for transforming color schemas within visual content. So, if you have film or photography, the provided LUT filters are amazing. This way, you can spark creativity like a professional editor. The video content will become more appealing.

4. Film Slog3 And Standard LUTs
Enhance your visual creativity by blending premium looks into your videos. After all, this Filmic Pro LUT download pack has fantastic color upscaling solutions. It contains a collection of 20 Film REC 709 LUTs and 20 Film Slog3 LUTs to adapt. This way, you can improve the color gradients of your social media videos and presentations.

5.FILMIC PRO SUPER-BUNDLE LUTS PACK
Enhancing video quality is now easier with this color-grading Filmic Pro pack. This is a specialized LUTs bundle that incorporates 50 cinematic filter presets. The available LUTs can generally optimize color gradients with the right contrasts. So if you have flat or log footage, using this LUT can be ideal. Meanwhile, the LUT is designed explicitly for mobile-captured videos.

6.Filmic Tone LUTs
Upgrade your preset library with this amazing Filmic Tone LUTs pack. While featuring 10 preset filters, this LUTs pack provides an aesthetic dark, moody tone. LUTs are easily applied to your videos with the right color upscaling. You will also receive a VLOG - Rec709 LUT and Sony SLOG2/3 - Rec709 LUT. The supported file format is .cube.

7. 7. Filmic LUTs Vol.2
Working with LUTs has never been this easy. So when you use Filmic LUTs Vol.2, you will get 10 creative LUT preset filters. Integrate these LUTs into your visual content to upscale their quality. Meanwhile, the LUTs can be used on different editing platforms. In most instances, you will get upscaling results within seconds. There is also an option to adjust intensity, contrast, and more.

8. 50 Cinematic Retro Film LUTs Pack
Add a retro touch to your videos with this Filmic Pro LUT download pack. After all, there are 50 retro-styled Filmic LUT presets. When you apply these LUTs to your video, special color grading is applied. Every specific LUT has a unique color schema with a styled theme. In this LUTs pack, you will also receive a PDF guide with step-by-step instructions.

9. Moody Filmic Cityscape LR Presets
Moody Filmic retouches are always special and exciting. When adding them to visual content, you can extend quality in an optimal way. After all, this Filmic Tone LUTs free download pack has 12 filter presets. This way, you can enhance color grading with the right correction standards. You can use these filter presets on both mobile and the web.

10. Movie Cinematic Film LUTs
Transform color grading within your visual content with this cinematic film LUTs pack. To sum up, there are 50 different cinematic LUTs in this pack. So, while using these LUTs, color saturation and brightness will upgrade your visual content. The good thing is the LUTs are compatible with both video and image formats.

Part 4: Getting To Know Wondershare Filmora and Its Use in LUTs
Wondershare Filmora is an industrial-standard video editing software. Meanwhile, this software is ideal for all video editors because it offers various video enhancements. There are 200+ LUTs in this editing tool which includes color grading Filmic Pro. Thus, you can upscale video colors in an optimized way in different styles.
![]()
Note: Filmora has AI tools like AI Smart Cutout, AI Audio Denoise, and Auto Reframe. Moreover, you can also enjoy the perks of AI copywriting for ready-made video scripts. With motion tracking, speed ramping, and keyframing, video editing becomes simpler. In addition, there are several options for effects, transitions, and stickers. This makes it a complete and comprehensive video editing solution for the masses.

Empower your videos with a new mood using different LUTs. Filmora now offers 100+ top-quality 3D LUTs cover a broad range of scenarios. Transform your videos with Filmora’s powerful 3D LUTs.
Apply LUT on Videos Apply LUT on Videos Learn More


Conclusion
LUTs are pre-defined color gradients that work in an instant way. Meanwhile, they make video editing simpler and smarter. This article illustrated 10 top Filmic Pro LUTs free download. By using these LUTs, you can upscale your important videos with improved color schemas. In addition, you discovered a vital editing tool, Wondershare Filmora. Within this software, you can upscale videos with multiple functionalities.
Part 1: How Can LUTs Benefit Video Editors?
Video editors are professionals that are tasked to edit and customize videos. Their main objective is to enhance video quality with necessary manual upscaling. Making things more accessible, find how LUTs can benefit these professionals:
- Increased Efficiency: With LUTs, video editors can optimize their workflows with ready-made filters. So they don’t need to spend hours on video editing. By applying filters, video colors are upgraded.
- Consistent Grading: During manual editing, multiple frames are left out during color correction. With LUTs, the colors are applied in a consistent way in all frames. This way, you will experience effective color enhancement.
- Professional Quality: The quality of applied LUTs is amazing. After all, LUTs provide dedicated filter presets to optimize color saturation and brightness. With professional color grading, experience a top-quality video.
- Creative Colors: LUTs are ideal for adding premium yet stylish color schemas into videos. The color gradients are creative as well as sleek and luxurious. You will not regret using creative color presets in LUTs.
Part 2: Discussing Some Practical Uses of LUTs in Video Editing
LUTs, also known as look-up tables, are unique video editing tools. They use mathematical instructions to map input color values into output color values. This way, consistent color gradings are applied across video content. In video editing, LUTs can be used for a variety of practical uses:
1. Special Effects
By using LUTs, you can add special effects to your videos. This includes different effects, including dreamy, moody, or surreal. The videos will look more professional and enchanting with attractive looks. So you don’t need to pursue video editing in a deep way.
2. HDR Display
With LUTs, users can add a dynamic touch of HDR display to the videos. After all, they can convert SDR footage to HDR footage using special filter presets. This allows for different color contrasts within the video.
3. Color Enhancement
Enhancing color schemas is easier and more convenient using LUTs. These editing tools can adjust color contrast, balance, and saturation. Hence, your video is upscaled with an improved color display for vintage or cinematic looks.
4. Match Footages
Different cameras produce videos with diverse quality, which is unsatisfying. Through LUTs, you can match the color of your footage with a consistent appearance. The color schemes and tone contrasts are optimized in a collective way.
Part 3: Best Filmic Pro LUTs To Use
Using LUTs in video editing can save a lot of time. For video editors, LUTs can be revolutionizing because of less effort with amazing output. In general, using Filmic Pro LUTs is in great demand. Let’s discover some of them:
1. Filmic LUT Support
Bring Filmic looks to your videos using this Filmic Pro LUTs download pack. There are up to 7 different LUT preset filters that you can import. With Filmic touch, you can add unique cinematic looks to your visual content. LUT Quick Action Modal (QAM) is also introduced to switch into preview mode or apply LUT to the video.
2. Richard Lackey FREE Filmic Pro LOGv2 LUT for FilmConvert
Add a cinematic touch to your videos with this Filmic Tone LUTs free download pack. This special LUTs pack lets you add attractive film interaction to your video. The provided color schemes are exceptional because they offer unique color presentations. Meanwhile, the LUT equips solutions to correct imbalances and noise.
3. Free LUT Filmic
Make your photo or video more special with this Free LUT Filmic pack. Meanwhile, there are special effects for transforming color schemas within visual content. So, if you have film or photography, the provided LUT filters are amazing. This way, you can spark creativity like a professional editor. The video content will become more appealing.
4. Film Slog3 And Standard LUTs
Enhance your visual creativity by blending premium looks into your videos. After all, this Filmic Pro LUT download pack has fantastic color upscaling solutions. It contains a collection of 20 Film REC 709 LUTs and 20 Film Slog3 LUTs to adapt. This way, you can improve the color gradients of your social media videos and presentations.
5.FILMIC PRO SUPER-BUNDLE LUTS PACK
Enhancing video quality is now easier with this color-grading Filmic Pro pack. This is a specialized LUTs bundle that incorporates 50 cinematic filter presets. The available LUTs can generally optimize color gradients with the right contrasts. So if you have flat or log footage, using this LUT can be ideal. Meanwhile, the LUT is designed explicitly for mobile-captured videos.
6.Filmic Tone LUTs
Upgrade your preset library with this amazing Filmic Tone LUTs pack. While featuring 10 preset filters, this LUTs pack provides an aesthetic dark, moody tone. LUTs are easily applied to your videos with the right color upscaling. You will also receive a VLOG - Rec709 LUT and Sony SLOG2/3 - Rec709 LUT. The supported file format is .cube.
7. 7. Filmic LUTs Vol.2
Working with LUTs has never been this easy. So when you use Filmic LUTs Vol.2, you will get 10 creative LUT preset filters. Integrate these LUTs into your visual content to upscale their quality. Meanwhile, the LUTs can be used on different editing platforms. In most instances, you will get upscaling results within seconds. There is also an option to adjust intensity, contrast, and more.
8. 50 Cinematic Retro Film LUTs Pack
Add a retro touch to your videos with this Filmic Pro LUT download pack. After all, there are 50 retro-styled Filmic LUT presets. When you apply these LUTs to your video, special color grading is applied. Every specific LUT has a unique color schema with a styled theme. In this LUTs pack, you will also receive a PDF guide with step-by-step instructions.
9. Moody Filmic Cityscape LR Presets
Moody Filmic retouches are always special and exciting. When adding them to visual content, you can extend quality in an optimal way. After all, this Filmic Tone LUTs free download pack has 12 filter presets. This way, you can enhance color grading with the right correction standards. You can use these filter presets on both mobile and the web.
10. Movie Cinematic Film LUTs
Transform color grading within your visual content with this cinematic film LUTs pack. To sum up, there are 50 different cinematic LUTs in this pack. So, while using these LUTs, color saturation and brightness will upgrade your visual content. The good thing is the LUTs are compatible with both video and image formats.
Part 4: Getting To Know Wondershare Filmora and Its Use in LUTs
Wondershare Filmora is an industrial-standard video editing software. Meanwhile, this software is ideal for all video editors because it offers various video enhancements. There are 200+ LUTs in this editing tool which includes color grading Filmic Pro. Thus, you can upscale video colors in an optimized way in different styles.
![]()
Note: Filmora has AI tools like AI Smart Cutout, AI Audio Denoise, and Auto Reframe. Moreover, you can also enjoy the perks of AI copywriting for ready-made video scripts. With motion tracking, speed ramping, and keyframing, video editing becomes simpler. In addition, there are several options for effects, transitions, and stickers. This makes it a complete and comprehensive video editing solution for the masses.
Empower your videos with a new mood using different LUTs. Filmora now offers 100+ top-quality 3D LUTs cover a broad range of scenarios. Transform your videos with Filmora’s powerful 3D LUTs.
Apply LUT on Videos Apply LUT on Videos Learn More
Conclusion
LUTs are pre-defined color gradients that work in an instant way. Meanwhile, they make video editing simpler and smarter. This article illustrated 10 top Filmic Pro LUTs free download. By using these LUTs, you can upscale your important videos with improved color schemas. In addition, you discovered a vital editing tool, Wondershare Filmora. Within this software, you can upscale videos with multiple functionalities.
Powerpoint Supported Video Format and Advanced User Tips
It doesn’t matter if you are a student or a working person; you must have made a PowerPoint presentation in your life. It can be a business presentation, educational presentation, or any work-related presentation if you are an employee. The types of presentation may vary, but the way to make a presentation is almost the same.
We are here to share a few tips and tricks to make your presentations unique like, you can add videos, voice-overs, and much more things. Remember one thing; there are certain video formats that PowerPoint supports. The video formats for PowerPoint presentations are discussed below, read ahead, and you’ll know more about them.
In this article
01 Overview of PowerPoint Supported Video Format
02 How to Insert or Embed Video in PowerPoint?
03 How to Turn Your Presentation into A Video with PowerPoint?
04 How to Match Color and Remove Image Background in PowerPoint?
Part 1. Overview of PowerPoint Supported Video Format
The supported video formats for PowerPoint are different for both Windows and macOS. All the supported formats for both types of the operating system are discussed below individually:

Windows
ASF: Advanced System Format (ASF) is a proprietary video and audio container format. It is an extensible file format design.
AVI: AVI is an Audio Video Interleave file. It is a multimedia container format made by Microsoft. It allows synchronous audio with video playback.
MP4, M4V, MOV: MPEG-4 file format is also known as MP4 or M4V. It is a common video file format. In comparison, MOV is developed by Apple Inc. It is the same as MP4 but is made for Apple devices.
MPEG, MPG: It is a famous file format for movies that are distributed over the internet. They use specific compression that makes downloading and steaming easy and fast.
WMV: WMV was introduced by Microsoft, and it stands for Windows Media Video. It is a compressed file container. The format is based on ASF.
macOS
AVI, VFW: AVI stands for Audio Video Interleave, and VFW stands for Video for Windows. Both are multimedia container files. AVI is encoded into VFW.
MP4, MPEG-4: MP4 is a digital video file format. MPEG-4 uses compression, but it is less common than the MP4 extension. MPEG encodes audio tracks.
M4V: It is a video container format developed by Apple Inc. It is similar to MP4. MV4 is used to encode video files in iTunes.
MPG, MPEG, MPE, M75, M15: MPG, MPEG, MPE, M75, and M15 are all the different types of formats developed by the Moving Pictures Expert Group.
M2V: It contains only video data and no other files. It is encoded by using MPEG-2 compression. It is mostly used by DVD authorized applications.
TS: It is a Video Transport Stream file and is used to store MPEG-2 compressed video data. It is used by digital broadcasting systems.
MOV, QT: QT and MOV both were developed by Apple Inc. Both the formats can hold multiple types of multimedia formats (audio, video, and subtitles).
DIF: DIF stands for Data Interchange Format. It is a text-based file format and is used for tabular and spreadsheet data. It is also used to transfer data between spreadsheets.
Part 2. How to Insert or Embed Video in PowerPoint?
PowerPoint is the simplest way to make a presentation. You might impress your boss with a good presentation. Do you ever consider adding videos from your computer across your slides? Have you ever embedded a video in PowerPoint? Allow us to help you out with this. The process to insert or embed a video in PowerPoint is not difficult; you can do this in a few simple steps.
How to Insert a Video in PowerPoint
The video format for PowerPoint differs for different versions. The steps to insert a video in PowerPoint do not deviate much. You can follow the following instructions and insert the video:
Step 1: First, you need to select the slide in which the video is supposed to be inserted. Select the video from the device you are using by heading to the ‘Insert’ tab. There, look for the ‘Video’ option and click on it to select the ‘This Device’ option.

Step 2: After you have located and selected the video, click on ‘Insert.’ Adjust the video settings from the ‘Format’ and ‘Playback’ toolbar according to your needs. You can resize the video, add effects, play full screen, etc.

Step 3: After all the settings are done, you need to preview the slideshow to check if the video is playing according to your desire or not.

How to Embed a Video in PowerPoint
If you are looking to add an online video across PowerPoint, the platform allows you to either embed its code or use its URL for adding it within your slides. To follow this, look into the steps featured below.
Step 1: Access the online video across your browser that you wish to embed in your PowerPoint slides. You can either copy its embed code or simply copy its URL. However, this video can only be from YouTube, SlideShare, Vimeo, Stream, or Flipgrid, as allowed by PowerPoint.

Step 2: Once copied, open your slides, and navigate to the “Insert” panel. Select “Video” from the available options and proceed to click on “Online Videos.”

Step 3: A new window opens up. Paste the copied code or URL across the provided space and tap “Insert” to add the online video across your slides. You can enhance the video across the “Video Format” and “Playback” sections.

Part 3. How to Turn Your Presentation into A Video with PowerPoint?
Inserting videos in PowerPoint presentations is normal; now, it’s time to discover something new. Have you ever thought of making a PowerPoint presentation a video itself? It is interesting! Your superior authority might get impressed and give you a promotion; who knows.
How to save your presentation as a video in PowerPoint? It can be done in a few simple steps. These steps are concisely discussed in the section below; follow to help yourself.
Step 1: You need to save the presentation that you made at first. After saving the original file, you need to click on ‘Export’ from the main menu.

Step 2: From the ‘Export’ menu, click on the ‘Create Video’ option. Select the video quality as per your needs. You can use pre-recorded narrations with the timings. In case no recorded narrations exist, you can record your own.

Step 3: The recorded narration will play over your video. If you don’t want narrations, you can simply skip these settings and move on.

Step 4: Next step is to select how much time a single slide will be shown. Keep in mind the longest slide; select an appropriate time so that all the material in the slides can be read easily.

Step 5: Now, moving towards the final step, click on ‘Create Video.’ This will generate and save the new PowerPoint video on your respective device.

Part 4. How to Match Color and Remove Image Background in PowerPoint?
There are two different things that you can do to make your presentation better. These are distinctive concerning video format for PowerPoint. Removal of background in PowerPoint is discussed, followed by Color Matching.
Remove Image Background
A simple way to remove background in PowerPoint is discussed in the following steps, read them for further assistance:
Step 1: Start by opening the PowerPoint software. Afterward, move to the ‘Insert’ tab and hit the ‘Pictures’ option to insert the image you plan to work with. As you click the photo, the ‘Picture Format’ tab will appear on the taskbar. Select the ‘Remove Background’ option on the left-most side below the taskbar.

Step 2: When you click ‘Remove Background,’ it will give options. Select the ‘Mark Areas to Keep’ option and draw the section that you want to save. You can also select the option ‘Mark Areas to Remove.’ It depends on the type of photo on which the task is being performed.

Step 3: Once all the necessary editing is done, click on the option ‘Keep Changes.’ You can save the image separately by clicking on ‘Save as Picture.’

Match Color in PowerPoint
Eyedropper helps you to match colors in your presentation. This takes a few clicks, and you have done color matching.
Step 1: For this, you need to open PowerPoint and select the image that you want to match the color of its background with the rest of the slide. Navigate to the “Design” panel and select the “Format Background” option.

Step 2: Click on ‘Drawing tool’ from the ribbon. Select the option of ‘Solid Fill’ from the menu bar at the top of the screen. Now, from ‘Solid Fill,’ move the mouse towards the ‘Eyedropper’ option. Tap on the background color that you wish to match within the background.

Step 3: Select the area that you want to change the background to its desired color. Access the option of “Solid Fill” after selecting the appropriate section of the document and select the color from the preview window present in the recent colors.

Closing Words
After reading the above article, you will be able to make incredible PowerPoint presentations. As videos add great information to your presentation so hence, we discussed in detail various video formats for PowerPoint. Now let’s share something new.
Do you know anything about Wondershare Filmora ? The software is a video editor with tons of great features and functionalities. You can create stunning videos with Filmora and its wide list of features. The video editor lets you trim, join, cut, split, and do much more than this. You get so many different effects, transitions, and elements with Filmora.
For Win 7 or later (64-bit)
For macOS 10.12 or later
02 How to Insert or Embed Video in PowerPoint?
03 How to Turn Your Presentation into A Video with PowerPoint?
04 How to Match Color and Remove Image Background in PowerPoint?
Part 1. Overview of PowerPoint Supported Video Format
The supported video formats for PowerPoint are different for both Windows and macOS. All the supported formats for both types of the operating system are discussed below individually:
Windows
ASF: Advanced System Format (ASF) is a proprietary video and audio container format. It is an extensible file format design.
AVI: AVI is an Audio Video Interleave file. It is a multimedia container format made by Microsoft. It allows synchronous audio with video playback.
MP4, M4V, MOV: MPEG-4 file format is also known as MP4 or M4V. It is a common video file format. In comparison, MOV is developed by Apple Inc. It is the same as MP4 but is made for Apple devices.
MPEG, MPG: It is a famous file format for movies that are distributed over the internet. They use specific compression that makes downloading and steaming easy and fast.
WMV: WMV was introduced by Microsoft, and it stands for Windows Media Video. It is a compressed file container. The format is based on ASF.
macOS
AVI, VFW: AVI stands for Audio Video Interleave, and VFW stands for Video for Windows. Both are multimedia container files. AVI is encoded into VFW.
MP4, MPEG-4: MP4 is a digital video file format. MPEG-4 uses compression, but it is less common than the MP4 extension. MPEG encodes audio tracks.
M4V: It is a video container format developed by Apple Inc. It is similar to MP4. MV4 is used to encode video files in iTunes.
MPG, MPEG, MPE, M75, M15: MPG, MPEG, MPE, M75, and M15 are all the different types of formats developed by the Moving Pictures Expert Group.
M2V: It contains only video data and no other files. It is encoded by using MPEG-2 compression. It is mostly used by DVD authorized applications.
TS: It is a Video Transport Stream file and is used to store MPEG-2 compressed video data. It is used by digital broadcasting systems.
MOV, QT: QT and MOV both were developed by Apple Inc. Both the formats can hold multiple types of multimedia formats (audio, video, and subtitles).
DIF: DIF stands for Data Interchange Format. It is a text-based file format and is used for tabular and spreadsheet data. It is also used to transfer data between spreadsheets.
Part 2. How to Insert or Embed Video in PowerPoint?
PowerPoint is the simplest way to make a presentation. You might impress your boss with a good presentation. Do you ever consider adding videos from your computer across your slides? Have you ever embedded a video in PowerPoint? Allow us to help you out with this. The process to insert or embed a video in PowerPoint is not difficult; you can do this in a few simple steps.
How to Insert a Video in PowerPoint
The video format for PowerPoint differs for different versions. The steps to insert a video in PowerPoint do not deviate much. You can follow the following instructions and insert the video:
Step 1: First, you need to select the slide in which the video is supposed to be inserted. Select the video from the device you are using by heading to the ‘Insert’ tab. There, look for the ‘Video’ option and click on it to select the ‘This Device’ option.
Step 2: After you have located and selected the video, click on ‘Insert.’ Adjust the video settings from the ‘Format’ and ‘Playback’ toolbar according to your needs. You can resize the video, add effects, play full screen, etc.
Step 3: After all the settings are done, you need to preview the slideshow to check if the video is playing according to your desire or not.
How to Embed a Video in PowerPoint
If you are looking to add an online video across PowerPoint, the platform allows you to either embed its code or use its URL for adding it within your slides. To follow this, look into the steps featured below.
Step 1: Access the online video across your browser that you wish to embed in your PowerPoint slides. You can either copy its embed code or simply copy its URL. However, this video can only be from YouTube, SlideShare, Vimeo, Stream, or Flipgrid, as allowed by PowerPoint.
Step 2: Once copied, open your slides, and navigate to the “Insert” panel. Select “Video” from the available options and proceed to click on “Online Videos.”
Step 3: A new window opens up. Paste the copied code or URL across the provided space and tap “Insert” to add the online video across your slides. You can enhance the video across the “Video Format” and “Playback” sections.
Part 3. How to Turn Your Presentation into A Video with PowerPoint?
Inserting videos in PowerPoint presentations is normal; now, it’s time to discover something new. Have you ever thought of making a PowerPoint presentation a video itself? It is interesting! Your superior authority might get impressed and give you a promotion; who knows.
How to save your presentation as a video in PowerPoint? It can be done in a few simple steps. These steps are concisely discussed in the section below; follow to help yourself.
Step 1: You need to save the presentation that you made at first. After saving the original file, you need to click on ‘Export’ from the main menu.
Step 2: From the ‘Export’ menu, click on the ‘Create Video’ option. Select the video quality as per your needs. You can use pre-recorded narrations with the timings. In case no recorded narrations exist, you can record your own.
Step 3: The recorded narration will play over your video. If you don’t want narrations, you can simply skip these settings and move on.
Step 4: Next step is to select how much time a single slide will be shown. Keep in mind the longest slide; select an appropriate time so that all the material in the slides can be read easily.
Step 5: Now, moving towards the final step, click on ‘Create Video.’ This will generate and save the new PowerPoint video on your respective device.
Part 4. How to Match Color and Remove Image Background in PowerPoint?
There are two different things that you can do to make your presentation better. These are distinctive concerning video format for PowerPoint. Removal of background in PowerPoint is discussed, followed by Color Matching.
Remove Image Background
A simple way to remove background in PowerPoint is discussed in the following steps, read them for further assistance:
Step 1: Start by opening the PowerPoint software. Afterward, move to the ‘Insert’ tab and hit the ‘Pictures’ option to insert the image you plan to work with. As you click the photo, the ‘Picture Format’ tab will appear on the taskbar. Select the ‘Remove Background’ option on the left-most side below the taskbar.
Step 2: When you click ‘Remove Background,’ it will give options. Select the ‘Mark Areas to Keep’ option and draw the section that you want to save. You can also select the option ‘Mark Areas to Remove.’ It depends on the type of photo on which the task is being performed.
Step 3: Once all the necessary editing is done, click on the option ‘Keep Changes.’ You can save the image separately by clicking on ‘Save as Picture.’
Match Color in PowerPoint
Eyedropper helps you to match colors in your presentation. This takes a few clicks, and you have done color matching.
Step 1: For this, you need to open PowerPoint and select the image that you want to match the color of its background with the rest of the slide. Navigate to the “Design” panel and select the “Format Background” option.
Step 2: Click on ‘Drawing tool’ from the ribbon. Select the option of ‘Solid Fill’ from the menu bar at the top of the screen. Now, from ‘Solid Fill,’ move the mouse towards the ‘Eyedropper’ option. Tap on the background color that you wish to match within the background.
Step 3: Select the area that you want to change the background to its desired color. Access the option of “Solid Fill” after selecting the appropriate section of the document and select the color from the preview window present in the recent colors.
Closing Words
After reading the above article, you will be able to make incredible PowerPoint presentations. As videos add great information to your presentation so hence, we discussed in detail various video formats for PowerPoint. Now let’s share something new.
Do you know anything about Wondershare Filmora ? The software is a video editor with tons of great features and functionalities. You can create stunning videos with Filmora and its wide list of features. The video editor lets you trim, join, cut, split, and do much more than this. You get so many different effects, transitions, and elements with Filmora.
For Win 7 or later (64-bit)
For macOS 10.12 or later
Add Green Screen Video on TikTok
TikTok is the most popular platform for making short videos. You can create creative short videos and upload to TikTok so that they can entertain your followers and make your videos go viral. To add variety to your video content, the use of green screen in short videos is a great idea. You can replace the green screen with any background in your TikTok video. You need to know how to add green screen video on TikTok.
Adding green screen on TikTok videos has become a trend now as there are several green screen TikTok videos that have gone viral. In fact, creative green screen videos are extremely popular on social media platforms. Instead of replacing the green screen in your video with a single photo, you can replace it with multiple pictures on TikTok. We will illustrate how to add multiple pictures on TikTok green screen.
Part 1. How to Add Green Screen on TikTok?
To add green screen on TikTok video, you need to have a background of uniform color. It does not necessarily have to be a green screen. For example, if you are shooting a video of your legs and the floor tiles have uniform color, you can use green screen on TikTok to replace the tiles with any picture. Instead of using one picture on TikTok short video, you can use multiple pictures in the background to create stunning TikTok videos. Here are the steps on how to add multiple pictures to TikTok green screen.
Step1 Open TikTok app on your phone. Tap on Plus icon located at the bottom of the app screen to make a new video.
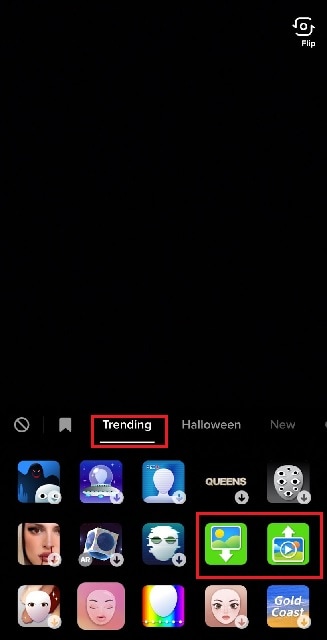
Step2 Choose the duration of the video as per your preference. Thereafter, tap on Effects option located at the bottom-left corner to see the different effects available on TikTok.
![]()
Step3 Go to Trending tab and you will see Green Screen and Green Screen Video icons. If you want your video to have green screen photo, tap on Green Screen icon. If you want your video to have green screen video, tap on Green Screen Video icon.
Step4 You will get a generic background and you can choose any preset background or select photo or video from your phone gallery by tapping on Plus icon. Once you are done, tap on Record button.
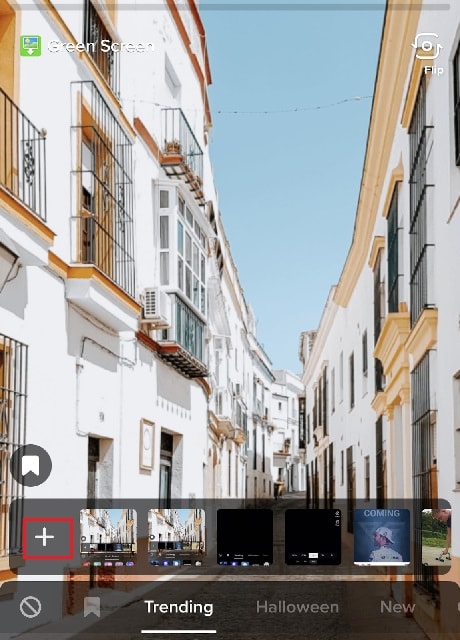
Step5 In order to use multiple pictures, you should stop recording in between and change your green screen image to anything you desire. Then tap on Record button again. TikTok will string your clips and it would appear that you have been changing multiple pictures of your background for your video.
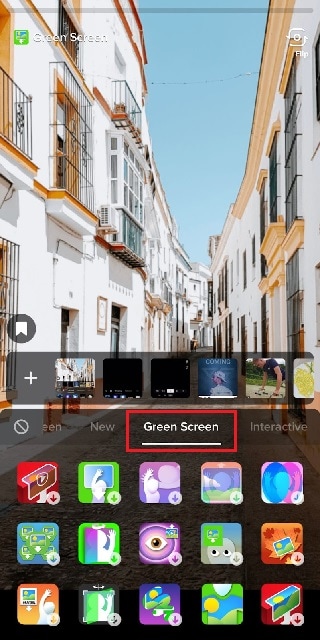
If you want to experiment with green scree effects, you can scroll down after tapping on Green Screen icon under Effects. You will see different types of green screen videos possible on TikTok to choose from.
Part 2. Creative Ideas to Make TikTok Green Screen Video
Now that you know how to add a video on TikTok green screen, you have to make the most out of it. If you are wondering how you can use green screen in your TikTok videos, here are some creative ideas for you.
Walking Out Videos – You can use green screen effect to show that you are walking out of plane, walking vertically on the wall like inception, walking on the roof of a building. In fact, you can show that you are walking out of popular monuments and palaces and trick your viewers into thinking that you were actually there.
Photoshoot Location – Create a TikTok video showing your favorite locations across the world where you dream of doing photoshoot. You can pose differently and place the location in your background through green screen effect.
How-To Video – If your TikTok channel is about tutorial and learning videos, you can explain things better by putting screenshots and multiple relevant pictures in the background so that viewers can get a pictorial representation of what you are speaking to them.
Mystery Story – You can a create short video describing unknowing facts and mysteries around certain places in the world. You can put photos or video clips of those mysterious places in your background to keep your viewers hooked and related to your narration.
Rate Them Video – You can use green screen effect to showcase your old Instagram photos or videos and rate them. This is an extremely popular trend in TikTok where people show their old photos, display work from the past, and rate them today.
Reveal Your Creation – Share your secrets or interesting stories behind some of the photos or videos you took in the past. You can talk about how creatively you took certain photos and put those photos in the background while discussing them.
Part 3. How to Make Green Screen Video on Computer?
If you have a computer and a webcam, you can record a green screen video on your computer. You can place the green screen in the background perfectly and place the webcam so that the background stays within the green screen. You will need a video recorder and a video editor to make green screen video as well as replace the green screen with any photo or video. We recommend Wondershare Filmora where you can record as well as edit green screen video.
Filmora is a professional video editor where you can record your computer screen as well as your webcam video with green screen background in Picture-in-Picture mode. After recording the video, you can replace the green screen with any video clip or photo instantly in a few steps. You can also fine-tune green screen effect for perfection. Therefore, you can save the video in any resolution and file format as per your preference.

Free Download For Win 7 or later(64-bit)
Free Download For macOS 10.14 or later
Conclusion
Adding green screen effect on TikTok videos can make your videos stand out. We have illustrated how to add multiple green screen videos on TikTok and your videos will have a better chance of getting viral. Keep the green screen ideas in mind while making TikTok green screen videos. If you want to make and edit green screen videos on computer, Wondershare Filmora is the best application available for Windows and Mac users.
How to Create a PowerPoint Looping Slideshow
How to make a PowerPoint looping slideshow
An easy yet powerful editor
Numerous effects to choose from
Detailed tutorials provided by the official channel
A PowerPoint Looping slideshow automatically starts over from the beginning after displaying the last slide. A particular slide is displayed for a certain amount of time interval. Once the time has elapsed, the slide automatically moves to the next one. It is sometimes used in seminars to keep the audience busy before the main presentation commences. In most tradeshows, the videos or information you notice repeatedly playing on its own are in a loop. The transition and slide sets get tweaked to work that way. In Nigeria, most banks use looped slides to display their welcome message. Looping slides make display work more accessible and give time to face other activities while your slide runs automatically.
In this article
01 [Advantages of PowerPoint looping slide](#Part 1)
02 [How to loop a PowerPoint in simple steps.](#Part 2)
Part 1 Advantages of PowerPoint Looping Slide.
PowerPoint slideshows aid and develop visual resources. Looping a PowerPoint slideshowmakes a presentation more accessible and more attractive. Studies show that humans tend to remember more of what they see than what they hear. You should use a PowerPoint-loop slideshow if you want to make a lasting impression while holding that conference, pitch to your boss at work, or even bid for that project**.** Here are some other reasons you should consider looping in your nextPowerPoint slide show.
A looping PowerPoint slideshow runs automatically. A typical PowerPoint presentation moves to the next slide when the presenter clicks the mouse, but a looping slideshow does not need human participation. It displays the next slide automatically after the time interval has elapsed.
It can be helpful to welcome guests to a meeting or Newcomers to an office reception area.
It ensures that latecomers do not miss any significant part of the presentation because a PowerPoint automatic slideshow loop starts all over again after displaying the last slide.
Setting up a looping slideshow is easy and does not require much equipment. You’re all set to go if you have a computer and projector.
It gives the speaker more time to focus on the audience and interact with them rather than concentrating on getting the next slide correctly.
With or without the presence of an operator, the PowerPoint presentation can display the slides configured to display.
It saves you the stress of arranging and rearranging slides during a meeting or an event.
It makes presentation easy and allows the large audience to flow with the speaker as they do not have to read from documents while trying to keep up with the speaker.
A PowerPoint configured to loop continuously can be used to pass general information.
Not everyone likes speaking in public or making a presentation in front of a large crowd. Someone like me immediately starts sweating profusely and has heart palpitations when many eyes are on me. In this kind of situation, a looped PowerPoint slideshow helps take the tension off a nervous speaker as the audience will most likely be concentrating on the slideshows instead of you.
Part 2 How to Loop a PowerPoint in Simple Steps.
Have you been wondering how to make PowerPoint looping slideshows? It seems like a challenging feat, but I’ll show you how to go about it. A looping PowerPoint presentation can create Visual presentations at various events like trade shows, kiosks, conferences, seminars, and many more gatherings. It can display automatically without the intervention of the presenter. With the correct procedure, you’ll be able to create a looping PowerPoint slideshow that will run without hitches. Setting up a looping PowerPoint presentation is relatively easy and doesn’t require rocket science as most people think. Below are simple steps on how to loop a slideshow on PowerPoint;
An easy way to set up looping slideshows is to apply automatic transitions and then set up your desired slideshow settings.
Step 1: Open your PowerPoint presentation
First, open and select the particular PowerPoint presentation you would like to loop.

Step 2: Set up the slideshow
Once your desired presentation is open, go to the “Set Up” group on the “Slide Show” tab and then click on the “Set Up Slide Show” button. Once your desired presentation is open, go to the “Set Up” group on the “Slide Show” tab and then click on the “Set Up Slide Show” button.

Step 3: Choose your mode of control over the slides.
Adialogue box will come up. In the” show options, “select if you want it to get presented by a speaker, which is the default setting of PowerPoint. This option gives the speaker or presenter control over when to advance the slide. The second option, which an individual browses, restricts the control of the speaker over the advancement of the slide, likewise the third option. Checkbox next to “Loop continuously until ‘Esc.’ Then click [OK]. The slide keeps looping automatically until the speaker or presenter presses ok.

Step 4: Select the number of slides you want to be displayed.
From the “Slides” preview side panel, tap your first slide, press and hold [Shift] and click your last slide or input the number of slides you want to display. This option will select all of the slides you want to display.

Step 5: Set up Transitions mode
Click the [Transitions] tab. The transition appears between slides when a slideshow is displayed. In the Transitions tab in PowerPoint, you can choose the type of transition (such as Fade). From the “Timing” group, uncheck the box next to “On Mouse Click” and check “After .”This setting enables the transition to occur after your preferred time and not when you click the mouse.

Step 6: Adjust the time interval
To adjust the duration you would like each slide to display, click the up and down arrows in the “After:” field within the “Timing” group. When your slideshow reaches the last slide, it will automatically loop back to the beginning.

****Wondershare Filmora Video Editor Software**
There are many video editing software, but one that stands out amongst them is filmora because of its unique video editing features. The Filmora software is undoubtedly one of the best beginner and professional-level video editing tools.
For Win 7 or later (64-bit)
For macOS 10.12 or later
Making loop videos is relatively easy with its timeline features. Video loops are short clips that replay for a particular duration or unlimited times without the user having to click the play button repeatedly. This kind of video is quite trendy on social media platforms. Filmora software also creates photo and video slideshows and can add music, texts, filters, different transition effects, and even animation to your slideshow. Many tools can help you create these kinds of videos, and Filmora is one of them.
● Ending Thoughts →
● I’m sure that post reading this guide, you will be able to create a PowerPoint looping slideshow and know what software to use in creating loop videos.
● Learning how to loop a PowerPoint slideshow is a game-changer for organizations and meetings that require a large audience or attendees. The major shortcoming of using a PowerPoint presentation slideshow is that a display cannot hold without a laptop and projector.
A PowerPoint Looping slideshow automatically starts over from the beginning after displaying the last slide. A particular slide is displayed for a certain amount of time interval. Once the time has elapsed, the slide automatically moves to the next one. It is sometimes used in seminars to keep the audience busy before the main presentation commences. In most tradeshows, the videos or information you notice repeatedly playing on its own are in a loop. The transition and slide sets get tweaked to work that way. In Nigeria, most banks use looped slides to display their welcome message. Looping slides make display work more accessible and give time to face other activities while your slide runs automatically.
In this article
01 [Advantages of PowerPoint looping slide](#Part 1)
02 [How to loop a PowerPoint in simple steps.](#Part 2)
Part 1 Advantages of PowerPoint Looping Slide.
PowerPoint slideshows aid and develop visual resources. Looping a PowerPoint slideshowmakes a presentation more accessible and more attractive. Studies show that humans tend to remember more of what they see than what they hear. You should use a PowerPoint-loop slideshow if you want to make a lasting impression while holding that conference, pitch to your boss at work, or even bid for that project**.** Here are some other reasons you should consider looping in your nextPowerPoint slide show.
A looping PowerPoint slideshow runs automatically. A typical PowerPoint presentation moves to the next slide when the presenter clicks the mouse, but a looping slideshow does not need human participation. It displays the next slide automatically after the time interval has elapsed.
It can be helpful to welcome guests to a meeting or Newcomers to an office reception area.
It ensures that latecomers do not miss any significant part of the presentation because a PowerPoint automatic slideshow loop starts all over again after displaying the last slide.
Setting up a looping slideshow is easy and does not require much equipment. You’re all set to go if you have a computer and projector.
It gives the speaker more time to focus on the audience and interact with them rather than concentrating on getting the next slide correctly.
With or without the presence of an operator, the PowerPoint presentation can display the slides configured to display.
It saves you the stress of arranging and rearranging slides during a meeting or an event.
It makes presentation easy and allows the large audience to flow with the speaker as they do not have to read from documents while trying to keep up with the speaker.
A PowerPoint configured to loop continuously can be used to pass general information.
Not everyone likes speaking in public or making a presentation in front of a large crowd. Someone like me immediately starts sweating profusely and has heart palpitations when many eyes are on me. In this kind of situation, a looped PowerPoint slideshow helps take the tension off a nervous speaker as the audience will most likely be concentrating on the slideshows instead of you.
Part 2 How to Loop a PowerPoint in Simple Steps.
Have you been wondering how to make PowerPoint looping slideshows? It seems like a challenging feat, but I’ll show you how to go about it. A looping PowerPoint presentation can create Visual presentations at various events like trade shows, kiosks, conferences, seminars, and many more gatherings. It can display automatically without the intervention of the presenter. With the correct procedure, you’ll be able to create a looping PowerPoint slideshow that will run without hitches. Setting up a looping PowerPoint presentation is relatively easy and doesn’t require rocket science as most people think. Below are simple steps on how to loop a slideshow on PowerPoint;
An easy way to set up looping slideshows is to apply automatic transitions and then set up your desired slideshow settings.
Step 1: Open your PowerPoint presentation
First, open and select the particular PowerPoint presentation you would like to loop.
Step 2: Set up the slideshow
Once your desired presentation is open, go to the “Set Up” group on the “Slide Show” tab and then click on the “Set Up Slide Show” button. Once your desired presentation is open, go to the “Set Up” group on the “Slide Show” tab and then click on the “Set Up Slide Show” button.
Step 3: Choose your mode of control over the slides.
Adialogue box will come up. In the” show options, “select if you want it to get presented by a speaker, which is the default setting of PowerPoint. This option gives the speaker or presenter control over when to advance the slide. The second option, which an individual browses, restricts the control of the speaker over the advancement of the slide, likewise the third option. Checkbox next to “Loop continuously until ‘Esc.’ Then click [OK]. The slide keeps looping automatically until the speaker or presenter presses ok.
Step 4: Select the number of slides you want to be displayed.
From the “Slides” preview side panel, tap your first slide, press and hold [Shift] and click your last slide or input the number of slides you want to display. This option will select all of the slides you want to display.
Step 5: Set up Transitions mode
Click the [Transitions] tab. The transition appears between slides when a slideshow is displayed. In the Transitions tab in PowerPoint, you can choose the type of transition (such as Fade). From the “Timing” group, uncheck the box next to “On Mouse Click” and check “After .”This setting enables the transition to occur after your preferred time and not when you click the mouse.
Step 6: Adjust the time interval
To adjust the duration you would like each slide to display, click the up and down arrows in the “After:” field within the “Timing” group. When your slideshow reaches the last slide, it will automatically loop back to the beginning.
****Wondershare Filmora Video Editor Software**
There are many video editing software, but one that stands out amongst them is filmora because of its unique video editing features. The Filmora software is undoubtedly one of the best beginner and professional-level video editing tools.
For Win 7 or later (64-bit)
For macOS 10.12 or later
Making loop videos is relatively easy with its timeline features. Video loops are short clips that replay for a particular duration or unlimited times without the user having to click the play button repeatedly. This kind of video is quite trendy on social media platforms. Filmora software also creates photo and video slideshows and can add music, texts, filters, different transition effects, and even animation to your slideshow. Many tools can help you create these kinds of videos, and Filmora is one of them.
● Ending Thoughts →
● I’m sure that post reading this guide, you will be able to create a PowerPoint looping slideshow and know what software to use in creating loop videos.
● Learning how to loop a PowerPoint slideshow is a game-changer for organizations and meetings that require a large audience or attendees. The major shortcoming of using a PowerPoint presentation slideshow is that a display cannot hold without a laptop and projector.
Also read:
- Updated How to Make Your CSGO Montage Impressive for 2024
- In 2024, Are You a Vlogger Looking for Good Color Correction and Video Grading Presets? Here Youll Find Different Vlog LUTs that You Can Use for Your Videos
- New Change Aspect Ratio of Video
- New How to Create a PowerPoint Looping Slideshow
- New How to Make a Slow Motion Video Complete Guide
- 2024 Approved Here, the Main Discussion Is Regarding the Split of the Audio From the Video in the Sony Vegas Pro. There Are Also some Details About the Substitute, Which Is Wondershare Filmora
- 6 Tips for Your First Facebook Ads
- Updated In 2024, How to Make Your CSGO Montage Impressive
- New 2024 Approved Techniques You Never Heard of for Learning AI Marketing YouTube
- New Add Zoom Blur Effect In Photoshop Step by Step
- New Steps To Fade Audio In Premier Pro
- How to Create a Slideshow with Movavi Slideshow Maker
- How to Make Falling Text Effect in Filmora?
- Updated Looking for Free Tools to Create Radial Blur Images Online? Read Our Full Guide to Learn About the 6 Best Programs to Add This Effect to Your Pictures
- New 2024 Approved Best Online GIF to Image (PNG/JPG) Converter
- Wondering How to Add Custom Transitions in OBS Studio? Here Are the Steps to Add Stinger Transitions to OBS. Get a Better OBS Alternative to Add Transitions
- Updated 2024 Approved Ultimate Guide on Magic Effects Video Making
- How to Make a Smooth Speed Ramping in Premiere Pro?
- New 2024 Approved Best 8 Augmented Reality Video Games
- Updated 100+ Best TikTok Captions Enhance Your Content for 2024
- 2024 Approved Top 10 3D Slideshow Software Review
- Updated 2024 Approved Step by Step to Crop Videos with CyberLink PowerDirector
- New Read This Article to Learn How to Convert Your Slow-Motion Videos Into Normal-Speed Videos in a Few Simple Steps and Methods. So, Stick to the End
- 2024 Approved GIF Splitting Into Frames Is an Interesting Activity to Do with the Right Tools. Convert GIFs Into Frames Easily with Tools and Use Them as Needed
- Updated In 2024, Whatre the Best Alternatives to Pexels?
- Want to Skip the Typing Hustle with a Convenient and Instant Conversion of Your Words Into Text? Stay Here to Learn About some Irresistible Software Solutions to Address the Concern for 2024
- In 2024, How to Add a Slideshow in PowerPoint
- New 15 Best CapCut Templates for Slow Motion Editing for 2024
- Updated Create an Awesome Logo Reveal with Logo Intro Templates for 2024
- Updated There Are Several Video Players that You Can Use to Watch Videos on Your PC. To Have a Better Experience Viewing Videos and Enhancing Them Across a Similar Platform, You Can Try Out VLC Media Player for PC
- In 2024, Final Cut Pro for iPad- Is It Available?
- New How to Use Frame Blending in Adobe Premiere Pro
- Why Vimeo Slideshow Maker Become Popular
- How to Set Up Twitch Green Screen for 2024
- New Do You Know Anything About the Video Format Supported by WhatsApp? If Not, Then This Is the Right Time to Learn About WhatsApp-Supported Video Formats for 2024
- General Knowledge About MP4 Format and Best MP4 Video Editor for 2024
- Updated Best GIF to Video Converters for 2024
- 2024 Approved How to Perfectly Use Canva Color Match?
- Updated 2024 Approved How to Make Video Fade to Black in Movie Maker Easily
- Brightening a Video Doesnt Need to Be Complicated. This Article Will Discuss How to Brighten up Your Videos Easily Using Premiere Pro for 2024
- 2024 Approved Detailed Tutorial to Crop Video in KineMaster
- New 2024 Approved Creative Ways to Add Green Screen Effects In Photoshop
- 2024 Approved The Ultimate Guide to Make a Text Collage
- Updated Frame Rates, Speed, and Wondershare Filmora
- Top 10 Free WhatsApp Video Converter for 2024
- Detailed Steps to Rotate Videos in Lightworks
- Updated In 2024, 10 Best Audio Visualizers Windows, Mac, Android, iPhone & Online
- How to get the dragon scale and evolution-enabled pokemon On Vivo X Fold 2? | Dr.fone
- How to retrieve erased call logs from Motorola G24 Power?
- In 2024, Does Airplane Mode Turn off GPS Location On Honor X50 GT? | Dr.fone
- In 2024, How to Watch Hulu Outside US On Motorola Edge 2023 | Dr.fone
- updated In 2024, The Best Translator to Translate Videos Online
- How to recover deleted photos after deleting from Recently Deleted on iPhone XS | Stellar
- Best 10 Mock Location Apps Worth Trying On Infinix Note 30 VIP Racing Edition | Dr.fone
- In 2024, How and Where to Find a Shiny Stone Pokémon For Oppo A59 5G? | Dr.fone
- What Does Enter PUK Code Mean And Why Did The Sim Get PUK Blocked On Oppo Find N3 Device
- In 2024, How To Animate Graphics in Canva
- Forgot Pattern Lock? Heres How You Can Unlock Oppo Reno 11F 5G Pattern Lock Screen
- How to Cast Vivo S17t to Computer for iPhone and Android? | Dr.fone
- Two Ways to Track My Boyfriends Apple iPhone 13 without Him Knowing | Dr.fone
- In 2024, 5 Ways to Move Contacts From Realme GT Neo 5 to iPhone (13/14/15) | Dr.fone
- Planning to Use a Pokemon Go Joystick on Nokia 105 Classic? | Dr.fone
- How to Transfer from Apple iPhone 13 Pro to iPhone 8/11/11 Pro | Dr.fone
- In 2024, How to Transfer Data After Switching From Oppo A1x 5G to Latest Samsung | Dr.fone
- In 2024, How to Fake Snapchat Location without Jailbreak On Oppo A1 5G | Dr.fone
- How to Bypass FRP from Nokia C02?
- In 2024, Top 9 Lava Blaze Pro 5G Monitoring Apps for Parental Controls | Dr.fone
- In 2024, Fake the Location to Get Around the MLB Blackouts on Tecno Spark 10C | Dr.fone
- How to Cast Apple iPhone X to Chromecast? | Dr.fone
- In 2024, How to Remove Forgotten PIN Of Your Xiaomi 13 Ultra
- In 2024, Why does the pokemon go battle league not available On Asus ROG Phone 8 | Dr.fone
- In 2024, How to use Pokemon Go Joystick on Oppo Reno 11 5G? | Dr.fone
- In 2024, Full Guide to Catch 100 IV Pokémon Using a Map On Apple iPhone 12 Pro | Dr.fone
- 8 Types of Explainer Videos with Best Examples for 2024
- Top 10 Fixes for Phone Keep Disconnecting from Wi-Fi On Samsung Galaxy S23 Ultra | Dr.fone
- How To Unlock Vivo X Fold 2 Phone Without Password?
- How Many Attempts To Unlock iPhone XS Max | Dr.fone
- Fix Unfortunately Settings Has Stopped on Xiaomi 13 Ultra Quickly | Dr.fone
- A Working Guide For Pachirisu Pokemon Go Map On Meizu 21 | Dr.fone
- How to Hard Reset Poco M6 Pro 5G Without Password | Dr.fone
- 6 Ways to Change Spotify Location On Your Vivo V27 Pro | Dr.fone
- Strategies for Apps That Wont Download From Play Store On Vivo Y27 4G | Dr.fone
- In 2024, How to Reset your ZTE Blade A73 5G Lock Screen Password
- In 2024, 3 Things You Must Know about Fake Snapchat Location On Oppo Find X6 | Dr.fone
- In 2024, Is pgsharp legal when you are playing pokemon On Infinix Hot 30i? | Dr.fone
- In 2024, All You Need To Know About Mega Greninja For Apple iPhone 12 mini | Dr.fone
- How to Soft Reset Vivo V30 phone? | Dr.fone
- Title: Updated Best Filmic Pro LUTs For Video Editing for 2024
- Author: Chloe
- Created at : 2024-04-24 07:08:32
- Updated at : 2024-04-25 07:08:32
- Link: https://ai-editing-video.techidaily.com/updated-best-filmic-pro-luts-for-video-editing-for-2024/
- License: This work is licensed under CC BY-NC-SA 4.0.
