
:max_bytes(150000):strip_icc():format(webp)/duet-c82ee94b39e24788bcfd51d1eea24288.jpg)
Updated Create a Movie with Windows Movie Maker for 2024
Create a Movie with Windows Movie Maker
Are you interested in making movies? Well, If your answer is yes, you’re in luck! Windows Movie Maker is a great way to make movies on your computer. You can use it to create family videos, school projects, or even movies for fun. This might seem like too much work, but trust us, it’s not! With this amazing program, anyone can make movies on windows. There are only a few things to keep in mind, and you’ll be on your way to becoming a movie maker in no time.
Video Windows Movie Maker makes it easy to put your movies together. You just have to drag and drop the video clips you want to use into the movie maker. Then, you need to follow certain steps to complete your project. In the section below, we will discuss in detail the steps to make a movie from Windows Movie Maker.
Let’s get started.
How to Make a Video with Windows Movie Maker
Here are the steps you need to take to make movies on windows 10:
Step1 Import Media Into Movie Maker

The first thing you need to do is get all of your video footage and images into Windows Movie Maker.
Media file formats can be imported into this program:
- Audio Files: aif, .aifc, .aiff, .asf, .au, .mp2, .mp3, .mpa, .snd, .wav, and .wma
- Image Files: .bmp, .dib, .emf, .gif, .jfif, .jpe, .jpeg, .jpg, .png, .tif, .tiff, and .wmf
- Movie Files: asf, .avi, dvr-ms, .m1v, .mp2, .mp2v, .mpe, .mpeg, .mpg, .mpv2, .wm, and .wmv
To import media:
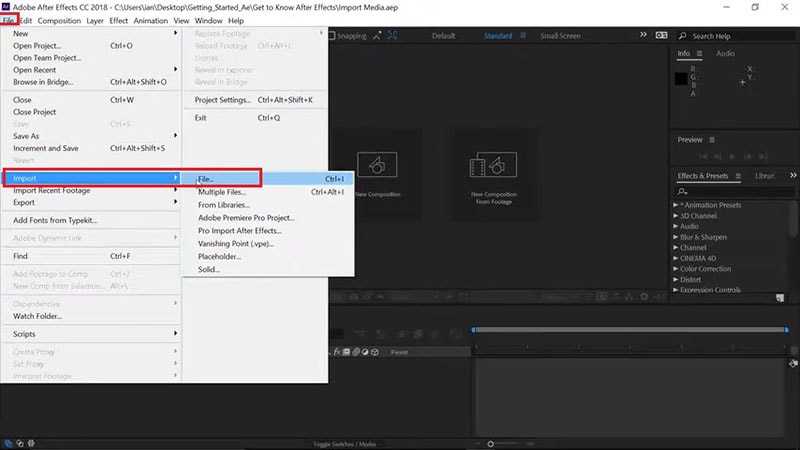
- Click “File” > “Import into collections.”
- Browse to the location of the file you want to import, select it, and then click “Open.”
Your selected file will now appear in the “Collections” pane. You can double-click on the imported file to preview it. If you’re happy with what you see, great! You can now move on to step two. If the files are not good, no worries - you can always delete them and try again. Just right-click on the file and select “Delete,” or press the “Delete” key on your keyboard.
Step2 Basic Editing from Timeline

After you have imported all of your desired clips and images into Windows Movie Maker, it is time to start editing them into your movie. Here are the things that you need to do to edit your clips and images:
- For cutting the image, you need to select the part of the image that you want to cut. To do this, just click on the image and drag it to where you want it to be cut. The cutting process will automatically happen when you release your mouse button.
- To combine the images, you need to select the images that you want to combine. To do this, click on one image and then hold down the “Ctrl” key while clicking on the other images that you want to combine. Once you have selected all the images you want to combine, just right-click on any of the selected images and choose “Combine Clips.”
- To split clips in the timeline, select the clip you want to split by clicking on it. Then, position your mouse cursor to where you want to split the clip and click on the “Split Clip” button. The clip will be automatically split into two separate clips.
By doing these minor things, you can edit your clips and images in the timeline according to your preference. Now, you are one step closer to creating your very own movie!
Step3 Add Video Effects

Video effects are a great way to make your movies look more professional. Windows Movie Maker has various built-in effects that you can use to improve the quality of your videos. These effects can be applied to your movie’s video and audio tracks. Moreover, they can add transitions between clips and even change the way your video looks.
There are hundreds of different effects that you can use in Windows Movie Maker. So experiment with them until you find a style that suits your needs. With a bit of practice, you’ll be making movies that look like they were made by a professional in no time!
To add video effects in the video movie maker windows:
- Select the clip you want to modify, and then click on the “Effects” tab. From there, you can browse through the available effects and preview them before adding them to your project.
- Once you’ve found an effect you like, simply drag and drop it onto the clip.
- You can also add multiple effects to a single clip if you want.
- Just remember that too many effects can make your video look cluttered and difficult to watch. So be sure to use them sparingly.
When you’re happy with your added effects, click on the “Ok” button to save your changes.
Step4 Edit Audio & Titles

Audio and Title are both crucial aspects when you want to make movie windows 10 movie perfectly. You can edit both of these in Windows Movie Maker. Editing is one of the most creative aspects of making a movie. In Windows Movie Maker, you easily edit your audio and titles in the video. Even if you want to do the editing multiple times, you can do so without any problem. All you need to do is have the latest version of Windows Movie Maker installed on your computer.
To Edit the Audio & Tiles:
- Go to the ‘Home’ tab and click on the ‘Add music’ button.
- Find the audio file that you want to add to your movie. You can either use a song from your personal collection or look for one online.
- Once you have found the perfect audio, drag and drop it into the timeline.
- If you want to edit the audio, right-click on it and select ‘Edit’. You can then make changes to the audio, such as volume, duration, etc.
- To add titles, go to the ‘Home’ tab and click on the ‘Add title’ button.
- A new window will open where you can type in the text for your title. You can also change the font, color, and size of the text.
- Once you are happy with your title, click on the ‘OK’ button, and it will be added to your timeline.
- If you want to edit the title, simply double-click on it and make changes as needed.
Step5 Export and Save Video
The last step that you need to follow after completing the video is to export and save it. It is always important to save your work so that you can access it later or make changes if needed.
To export and save the video:
- Click on File
- Click on Save movie
- Choose the quality and file size that you want
- Give the video a name
- Save it to your computer
Movie Maker Alternative to Create Videos
Filmora is a video creating and editing software developed by Wondershare. Although it is not as widely known as some of its competitors, it has many features that make it a great alternative to Windows Movie Maker. Anyone can use this software to create high-quality videos, from beginners to professionals. The software is compatible with both Windows and Mac operating systems.
One of the great things about Filmora is that it is very user-friendly. The interface is straightforward and easy to navigate and comes with top-notch editing features and rich effects. So, if you have never used video editing software before, you can figure out how to use Filmora easily. Another plus is that free trials are available to try out the software before you commit to buying it.
Steps to Edit Video with Filmora
Now that you know a little bit more about this movie maker alternative, let’s go over the steps to edit videos with Filmora.
Free Download For Win 7 or later(64-bit)
Free Download For macOS 10.14 or later
Step1 Import your video into the software. You can do this by clicking on “Import” and selecting the file from your computer.

Step2 Once your video is imported, you can see it in the “Project Library”. You can drag and drop it from here into the “Video Timeline” located at the bottom of the screen.

Step3 Now that your video is in the timeline, you can start editing it. To do this, simply click on the item in the timeline you want to edit and then make your changes in the “Video Inspector” panel on the screen’s right-hand side.

You can make changes, including cropping the video, adjusting the volume, adding filters and effects, and more.
Step4 Once you are happy with your edits, you can preview your video by clicking on the “Play” button in the tight and save it if it seems perfect to you.
If you are satisfied with what you see, then you can go ahead and export your video. To do this, click on “File” located in the top left-hand corner of the screen and then select “Export”. From here, you can choose what format you want to export your video and where you want to save it on your computer.
Conclusion
If you’re looking for an easy way to make movies on your Windows computer, then you should definitely check out Windows Movie Maker. This free from Microsoft makes it simple to create and edit videos, and it’s perfect for beginners. Another alternative for making movies on Windows is to use the Filmora video editor. This program is more robust and has multiple features just like Movie Maker.
Free Download For macOS 10.14 or later
Step1 Import your video into the software. You can do this by clicking on “Import” and selecting the file from your computer.
Step2 Once your video is imported, you can see it in the “Project Library”. You can drag and drop it from here into the “Video Timeline” located at the bottom of the screen.
Step3 Now that your video is in the timeline, you can start editing it. To do this, simply click on the item in the timeline you want to edit and then make your changes in the “Video Inspector” panel on the screen’s right-hand side.
You can make changes, including cropping the video, adjusting the volume, adding filters and effects, and more.
Step4 Once you are happy with your edits, you can preview your video by clicking on the “Play” button in the tight and save it if it seems perfect to you.
If you are satisfied with what you see, then you can go ahead and export your video. To do this, click on “File” located in the top left-hand corner of the screen and then select “Export”. From here, you can choose what format you want to export your video and where you want to save it on your computer.
Conclusion
If you’re looking for an easy way to make movies on your Windows computer, then you should definitely check out Windows Movie Maker. This free from Microsoft makes it simple to create and edit videos, and it’s perfect for beginners. Another alternative for making movies on Windows is to use the Filmora video editor. This program is more robust and has multiple features just like Movie Maker.
Best Cinematic LUTs For Premiere Pro Recommendation
LUTs stand for Look-Up Tables and are compatible with a wide array of editing software. This element in video editing can be used during production or before and after production. Using the LUTs, you can color grade your media content to make it more visually appealing. The LUTs can create consistency in your videos and photos and also leads to accurate results.
This article is designed to provide all the information about cinematic LUTs for Premiere Pro. You will not only find the best LUTs present for Premiere Pro, but we will also discuss the compatibility of LUTs with other editing software. Above all, the bonus tip will also provide a great alternative to Premiere Pro for cinematic LUTs.
Part 1: Which File Formats Are LUTs Available In?
You must be wondering if there are any specific file formats for cinematic LUTs Premiere Pro. Yes, some formats define the availability of LUTs. Some of them are:
- 3DL: 3DL is the 3D lattice of RGB output colors. You can find this in DaVinci Resolve, Adobe After Effects, and Photoshop.
- CUBE: It is one of the most popular file formats for video editing. If you want to work with CUBE, you can access it on Final Cut Pro, Adobe Premiere Pro, and other editing software.
- DAT: If you are an animation maker or work with 3D modeling, this file format is for you. In case you want to use it, go to Autodesk Maya.
- CSP: This stands for Clip Studio Paint. As the name suggests, you can use it for making high-class digital art.
- ICC: The International Color Consortium is a file format specifically used for color calibrations along with color management.
- MGA: Are you irritated by low-quality graphics? No worries because MGA can help you in improving the graphics in versatile gaming software.
- Look: With this file format; you can work with Sony Camera’s postproduction work. It leads to high-quality results, so you can use it without issues.
Empower your videos with a new mood using different LUTs. Filmora now offers 100+ top-quality 3D LUTs cover a broad range of scenarios. Transform your videos with Filmora’s powerful 3D LUTs.
Apply LUT on Videos Apply LUT on Videos Learn More


Part 2: Are LUTs Compatible With All Media Editing Software?
Predominantly, LUTs are compatible with a considerable number of media editing software. Yet, the specificity of the compatibility is somehow dependent on the file formats for the LUTs you want to use. Moreover, some software does not have the ability to import or apply the LUTs to a satisfactory quality. Many video editing software supports 3DL and CUBE as they are the most commonly used software.
In addition, popular platforms such as Final Cut Pro, Adobe Acrobat, DaVinci Resolve, and many other software can provide you with LUTs. However, you need to make sure that you are using their latest version because versions of software can affect the compatibility of LUTs. In case you want to use the less commonly used LUTs formats, you need to find a reliable source to import or apply it.
Part 3: What Are The Best Cinematic LUTs For Premiere Pro?
Now that you know considerable information about LUTs, you must be wondering where to find them. In this section, you will discover the cinematic LUTs for Premiere Pro, one of the most known platforms for providing LUTs. Thus, look below to find the LUTs of Premiere Pro:
1. Fast Film LUTs
With this cinematic LUTs Premiere Pro, you can add aesthetic emulation to your film project. It can even add a filmy touch to simple photographs. This can also save the low light issues in the footage to show clear scenes to your audience. Above all, it also reduces the noise and helps improve your film’s outlook.

2. Emulation LUTs
Using this LUT preset, you can optimize your film’s dynamic range and emulation metrics. It can escalate every little detail of your footage and help engage more viewers. In addition to this, you can apply these LUTs to multiple shots to add consistency to your video. These Premiere Pro cinematic LUTs can also

3. Pro Color Grading LUTs
A video or photo without colors can never attract the target audience. Yet, you can cater to these issues using the intuitive LUT named Pro Color Grading LUTs. It can not only fix the color grading problems of your media but can also add aesthetics to it. Moreover, you can also customize it as per your need.

4. Filmy Tone LUTs
If you wish to evoke a sense of nostalgia in your viewers, there is no better way than the Filmy Tone LUTs. It enhances the visibility of videos and photos and aims to show different periods. This can be the perfect choice for those who want to create films and photos dedicated to the past.

5. City Skyline LUTs
For creating and adding the city-lighted environment to media, you can take assistance from this LUT. It is widely used in travel and commercial videos. Moreover, you can also emphasize the features of the cityscape by using it. This also helps to add vibrant colors and styling, just as in city shots.

6. LUTs Summer Film
Creating summer videos with precise summer lights can be a tricky procedure. However, the LUTs Summer Film can help you with this as it can add summer vibes to any videos and photos. You can even use it to give summer looks to the videos shot in the winter season.

7. Exhale LUTs
To add the soft highlight along with a moody environment, you can use the Exhale LUTs. These cinematic filters Premiere Pro are widely used in music and fashion videos. You can also use it in art videos to create a sense of immersion and connection for the viewers.

8. DELUTS
The Digital Film Emulation Look-Up Tables are useful for creating a classic filmy look for simple videos and photos. It can enhance the texture and depth of everything in the video, making it more studio friendly. You can use this LUT for weddings or corporate videos.

9. Free Reign Sample LUTs
With the help of this LUT, you can experience full control over the color metrics of videos and photos. Even if the video’s color gets compromised during shooting, you can fix them with this. This type of LUTs can be used for experiments, independent or travel videos.

10. Vintage LUTs for Premiere Pro
As the name suggests, you can use these LUTs to add a more vintage look to the photos and videos. This can improve the warmth and clarify the theme of the video. You can make your videos and photos stand out in a crowd with the help of this type of LUTs.

11. Airy Bright LUTs
Many users love to make their videos airier and fuller in brightness. This LUT is perfect for users of these types of liking. You can access these LUTs to add soothing brightness and airer effects in videos and photos. It is widely used for fixing the photos of bad videos captured at night.

12. Canon Cinestyle to Rec.709 LUT
This LUT can help the videographers to add a more cinematic look to the videos captured by Cannon DSLR. You can also create a color space of Rec.709 in your videos with this LUT. No matter if you want to work on wedding shots or short films, this LUT can help you with all.

13. Urban Fashion Premiere Pro LUTs
By applying this LUT, you can convert simple fashion videos into professional ones. It can create VOUGE-standard videos for you; thus, you can also use this for startup brands. Moreover, if you are an Instagram or TikTok model, you should get familiar with it because it can make any footage premiere level in a few taps.

14. Osiris Cinematic LUTs
For making travel or advertisement videos more high quality, you can use this Premiere Pro cinematic presets. It can make all types of videos more visually appealing and can add cinematic looks to it. Moreover, this LUT allows you to upscale all the visuals and characters in the video.

15. Finishing LUTs
To add eye-catching finishing effects to the videos, you can use the Finishing LUTs. This can enhance the end-of-color grading procedure for you. It can also add a more contrast and color-friendly look to the ends. You can use it for TV series, films, music, and other videos.

Bonus Part: Wondershare Filmora – A Great Alternative To Discover Cinematic LUTs
Undoubtedly, you can use the cinematic LUTs for Premiere Pro, yet sometimes it can be a tricky platform. Thus, you need to know the best alternative to Premiere Pro so you can apply LUTs to your videos in an optimized manner. The best tool that can help you with this is Wondershare Filmora . You can experience professional-level video editing with this.
Add LUTs on Video For Win 7 or later(64-bit)
Add LUTs on Video For macOS 10.14 or later
Moreover, you can apply LUTs to the videos and can also adjust their intensity as per your need. Above all, it can help you to apply LUTs to several types of videos, such as landscapers or short videos. It also supports the LUTs hover, which lets you preview the LUTs effects .

Prominent Features of Wondershare Filmora
- With its Color Wheel, you can adjust every color metric of video. It can include mid-tones, shadows, hue, and more.
- Along with color customization, you can also sharpen the blur videos to improve the quality of your video.
- You can also control the speed ramping of your video with Filmora. It can also do motion tracking for you.
- By using the batch edit feature, you can edit multiple videos at once without compromising the quality.
Conclusion
Considering everything, you can use the cinematic LUTs for Premiere Pro to upgrade the functionality of your video. The LUTs are available in several file formats, which are mentioned above. Moreover, several editing software can help you to import and apply LUTs on photos and videos. One of the popular ones is Premiere Pro.
Other than this, the best Premiere Pro cinematic LUTs are also discussed above for your ease. Yet, if you find the Premiere Pro difficult, you can use its best alternative named Wondershare Filmora. To find out more about Filmora, go to the previous part.
Add LUTs on Video For Win 7 or later(64-bit)
Add LUTs on Video For macOS 10.14 or later
Apply LUT on Videos Apply LUT on Videos Learn More
Part 2: Are LUTs Compatible With All Media Editing Software?
Predominantly, LUTs are compatible with a considerable number of media editing software. Yet, the specificity of the compatibility is somehow dependent on the file formats for the LUTs you want to use. Moreover, some software does not have the ability to import or apply the LUTs to a satisfactory quality. Many video editing software supports 3DL and CUBE as they are the most commonly used software.
In addition, popular platforms such as Final Cut Pro, Adobe Acrobat, DaVinci Resolve, and many other software can provide you with LUTs. However, you need to make sure that you are using their latest version because versions of software can affect the compatibility of LUTs. In case you want to use the less commonly used LUTs formats, you need to find a reliable source to import or apply it.
Part 3: What Are The Best Cinematic LUTs For Premiere Pro?
Now that you know considerable information about LUTs, you must be wondering where to find them. In this section, you will discover the cinematic LUTs for Premiere Pro, one of the most known platforms for providing LUTs. Thus, look below to find the LUTs of Premiere Pro:
1. Fast Film LUTs
With this cinematic LUTs Premiere Pro, you can add aesthetic emulation to your film project. It can even add a filmy touch to simple photographs. This can also save the low light issues in the footage to show clear scenes to your audience. Above all, it also reduces the noise and helps improve your film’s outlook.
2. Emulation LUTs
Using this LUT preset, you can optimize your film’s dynamic range and emulation metrics. It can escalate every little detail of your footage and help engage more viewers. In addition to this, you can apply these LUTs to multiple shots to add consistency to your video. These Premiere Pro cinematic LUTs can also
3. Pro Color Grading LUTs
A video or photo without colors can never attract the target audience. Yet, you can cater to these issues using the intuitive LUT named Pro Color Grading LUTs. It can not only fix the color grading problems of your media but can also add aesthetics to it. Moreover, you can also customize it as per your need.
4. Filmy Tone LUTs
If you wish to evoke a sense of nostalgia in your viewers, there is no better way than the Filmy Tone LUTs. It enhances the visibility of videos and photos and aims to show different periods. This can be the perfect choice for those who want to create films and photos dedicated to the past.
5. City Skyline LUTs
For creating and adding the city-lighted environment to media, you can take assistance from this LUT. It is widely used in travel and commercial videos. Moreover, you can also emphasize the features of the cityscape by using it. This also helps to add vibrant colors and styling, just as in city shots.
6. LUTs Summer Film
Creating summer videos with precise summer lights can be a tricky procedure. However, the LUTs Summer Film can help you with this as it can add summer vibes to any videos and photos. You can even use it to give summer looks to the videos shot in the winter season.
7. Exhale LUTs
To add the soft highlight along with a moody environment, you can use the Exhale LUTs. These cinematic filters Premiere Pro are widely used in music and fashion videos. You can also use it in art videos to create a sense of immersion and connection for the viewers.
8. DELUTS
The Digital Film Emulation Look-Up Tables are useful for creating a classic filmy look for simple videos and photos. It can enhance the texture and depth of everything in the video, making it more studio friendly. You can use this LUT for weddings or corporate videos.
9. Free Reign Sample LUTs
With the help of this LUT, you can experience full control over the color metrics of videos and photos. Even if the video’s color gets compromised during shooting, you can fix them with this. This type of LUTs can be used for experiments, independent or travel videos.
10. Vintage LUTs for Premiere Pro
As the name suggests, you can use these LUTs to add a more vintage look to the photos and videos. This can improve the warmth and clarify the theme of the video. You can make your videos and photos stand out in a crowd with the help of this type of LUTs.
11. Airy Bright LUTs
Many users love to make their videos airier and fuller in brightness. This LUT is perfect for users of these types of liking. You can access these LUTs to add soothing brightness and airer effects in videos and photos. It is widely used for fixing the photos of bad videos captured at night.
12. Canon Cinestyle to Rec.709 LUT
This LUT can help the videographers to add a more cinematic look to the videos captured by Cannon DSLR. You can also create a color space of Rec.709 in your videos with this LUT. No matter if you want to work on wedding shots or short films, this LUT can help you with all.
13. Urban Fashion Premiere Pro LUTs
By applying this LUT, you can convert simple fashion videos into professional ones. It can create VOUGE-standard videos for you; thus, you can also use this for startup brands. Moreover, if you are an Instagram or TikTok model, you should get familiar with it because it can make any footage premiere level in a few taps.
14. Osiris Cinematic LUTs
For making travel or advertisement videos more high quality, you can use this Premiere Pro cinematic presets. It can make all types of videos more visually appealing and can add cinematic looks to it. Moreover, this LUT allows you to upscale all the visuals and characters in the video.
15. Finishing LUTs
To add eye-catching finishing effects to the videos, you can use the Finishing LUTs. This can enhance the end-of-color grading procedure for you. It can also add a more contrast and color-friendly look to the ends. You can use it for TV series, films, music, and other videos.
Bonus Part: Wondershare Filmora – A Great Alternative To Discover Cinematic LUTs
Undoubtedly, you can use the cinematic LUTs for Premiere Pro, yet sometimes it can be a tricky platform. Thus, you need to know the best alternative to Premiere Pro so you can apply LUTs to your videos in an optimized manner. The best tool that can help you with this is Wondershare Filmora . You can experience professional-level video editing with this.
Add LUTs on Video For Win 7 or later(64-bit)
Add LUTs on Video For macOS 10.14 or later
Moreover, you can apply LUTs to the videos and can also adjust their intensity as per your need. Above all, it can help you to apply LUTs to several types of videos, such as landscapers or short videos. It also supports the LUTs hover, which lets you preview the LUTs effects .
Prominent Features of Wondershare Filmora
- With its Color Wheel, you can adjust every color metric of video. It can include mid-tones, shadows, hue, and more.
- Along with color customization, you can also sharpen the blur videos to improve the quality of your video.
- You can also control the speed ramping of your video with Filmora. It can also do motion tracking for you.
- By using the batch edit feature, you can edit multiple videos at once without compromising the quality.
Conclusion
Considering everything, you can use the cinematic LUTs for Premiere Pro to upgrade the functionality of your video. The LUTs are available in several file formats, which are mentioned above. Moreover, several editing software can help you to import and apply LUTs on photos and videos. One of the popular ones is Premiere Pro.
Other than this, the best Premiere Pro cinematic LUTs are also discussed above for your ease. Yet, if you find the Premiere Pro difficult, you can use its best alternative named Wondershare Filmora. To find out more about Filmora, go to the previous part.
Add LUTs on Video For Win 7 or later(64-bit)
Add LUTs on Video For macOS 10.14 or later
How to Make Discord Logo GIF
How to Make Discord Logo GIF
An easy yet powerful editor
Numerous effects to choose from
Detailed tutorials provided by the official channel
The craze to get a personalized Discord animated icon is increasing with time. As it can deliver your favorite vibe to you and your friends, it’s exciting. Moreover, there are so many options in logos to choose from.
But what if you want a Discord GIF icon for your account? Maybe you’ve seen your friends using it and it’s stunning, isn’t it? That’s why this article is containing all the latest and easiest tricks to make the desired GIF icons Discord. Get the three best ways to make your own Discord logo. And let your friends ask you for the secret.
In this article
01 [Why Discord GIF Become Popular Recently?](#Part 1)
02 [How to Make an Animated Discord Logo Icon (Free Template)](#Part 2)
03 [How to Get Animated Discord PFP](#Part 3)
04 [How to Make Your Discord PFP a GIF on Wondershare Filmora](#Part 4)
Part 1 Why Discord GIF Become Popular Recently?
Think of one online entertainment that Discord is not serving right now. It’s hard to get one in mind. From chatting with friends to watching a movie together, from listening to music to playing together, all the entertainment is under a roof. And who doesn’t want the best appearance on such an engaging platform?
On the other hand, animated icons Discord is immensely popular as they can replicate your expression and mood as you want. Normal profile pictures are back-dated now as these GIFs can make the profile more interesting. You can pick any character or Discord animated icon as per your wish. Moreover, many of these are for free. While using these GIFs on multiple online chatting platforms, users can express their exact thoughts behind a message or reaction. Similarly, by using Discord icons GIFs, people can make their profile more lively and personalized.
Not sure of using GIFs? Imagine your Discord profile with your favorite anime character or a suitable clip. On some social media platforms, we need to be formal out of the profession. But on Discord, you can chill, so your profile. So, why not give it a try?
If you’re here to know the quick guide to set your Discord logo GIF or if you’re facing any error while setting the logo, this article will help you in no time.
Part 2 How to Make an Animated Discord Logo Icon (Free Template)
If you have already decided what will be the type of GIF icon Discord you want, that’s great. Otherwise, decide whether you need something funny or relaxed or it depends on a brand. This decision would help you to pick the template. Similarly, you can make the best Discord GIF icon with the following steps.


● To make a GIF with your choice, use this tool and click on “Edit this template”. This will let you make a customized GIF from any video from your personal collection or download from the Internet.
![]()
● In the next step, you have to choose the template size from the right-hand side of the window. You can keep to the custom 512x512 size as well.
● Now, on the topmost bar in the window, you can find an option named “Upload”. Click on this option to upload the video from where you want to make your Discord icon GIF.
![]()
● You can upload the video from the gallery or drag-and-drop to the uploader window. You can also get videos from Google Drive.
● Now, as the video gets uploaded, you need to edit within the edit window. You can set the frame, time, and size from the tools highlighted in the image.
![]()
● Now, from the top-right side of the window, get the “Export Video” button. Click on the green arrow beside the button to get a drop-down list. From there click on the “Export as GIF” button to save your Discord icon GIF.
![]()
● You can check the download status from the next window.
![]()
● To save the recent GIF, click on “Download”. It will take some seconds to get saved to your system.
![]()
● Now, open Discord in your system and right-click on your “Server” icon from the left-hand side of the window. As a drop-down menu appears, select “Server Settings” followed by “Overview”.
![]()
● A new window will be opened with the existing profile picture of the server. To add the GIF icon Discord, click on “Upload Image”.
![]()
● From the location where you’ve saved the GIF, select it. Then, click on “Apply” to upload the GIF icon to the server profile.
![]()
● When uploading is completed, click on the green button named “Save Changes” to save the GIF icons Discord. Make sure that your GIF file size is less than 10.24 MB. Otherwise, you cannot save the GIF and have to resize it again.
![]()
Part 3 How to Get Animated Discord PFP
To set an exciting avatar in your Discord profile, you need to go through the following quick steps. Firstly, note that you need to have Discord Nitro to set a Discord logo GIF in your user profile. Without Nitro, GIF cannot be used as a PFP. Get all the answers for how to use Discord Nitro or how to get animated Discord PFP here.
● Open Discord and from the bottom-left side panel, click on the “Gear” icon that is the “User Settings”. It will present beside your user name on the “Home” window itself.
![]()
● As the new window gets opened, go to “Discord Nitro” under “Payment Settings”.
![]()
● If you don’t have activated Nitro, then click on “Subscribe” to get a suitable subscription to initiate animated icons Discord for your profile.
![]()
● Then, you’ll be redirected to the subscription options. Choose “Monthly” or “Yearly” subscription and to confirm it, click “Select”. If you choose the yearly plan, you’ll get an additional 16% off.
![]()
● As Discord Nitro is activated after payment and agreeing to the terms and conditions, you can see a pop-up window. Click on “Sweet” to get started.
![]()
● To set your profile avatar with GIF icon Discord, you need some GIFs downloaded to your system. So, make your GIF according to the last technique we mentioned. Or you can search for GIFs on the Internet like Giphy”, “Tenor”, or “Gfycat”. Save the GIFs as images to the system.
● Go the the “Gear” icon like the 1st step and open “User Settings”. Then, Go to the second option under user settings, “User Profile”. In this window, you can find a blue button named “Change Avatar”. Click on this button to set the Discord icon GIF.
![]()
● Now, you need to find the desired GIF from the “File Explorer” opened. Go to the folder where you saved the GIF file. Then, select it and click on “Open”.
![]()
● You can edit the frame of your Discord animated icons in the “edit image’ pop-up window. Then, click on “Apply” to set it finally. If you don’t want to edit the size, click on “Skip” to save the GIF as your profile picture on Discord.
![]()
● Check your profile picture now and match it with your expectations. Then click on “Save Changes” to save the icon. If you want some changes, click on “Change Avatar” and select any GIF from the saved discord icons GIF from the file explorer.
![]()
Part 4 How to Make Your Discord PFP a GIF on Wondershare Filmora
Wondershare Filmora Video Editor is the latest software where you can create a GIF easily to set as a discord GIF icon. Instead of using the same, existing GIFs, you can make your own now. It will help you to make a unique impression and be satisfied with your personalized account. Moreover, this software is just 4 KB in storage size. So, instan5 download and installation is not a problem at all.

Wondershare Filmora - Best Video Editor for Mac/Windows
5,481,435 people have downloaded it.
Build unique custom animations without breaking a sweat.
Focus on creating epic stories and leave the details to Filmora’s auto features.
Start a creative adventure with drag & drop effects and endless possibilities.
Filmora simplifies advanced features to save you time and effort.
Filmora cuts out repetition so you can move on to your next creative breakthrough.
Let’s go through the steps to understand the procedure to make GIF icons discord on Wondershare Filmora.
● Download and Install Wondershare Filmora in your system. It won’t take more than 10 minutes for the complete installation process. This software is available for both Windows and Mac OS.
![]()
● You can observe the installation status on your screen.
![]()
● As the installation is done, click on “Start Now” to open the software on the computer. A new black window will be opened on the screen.
![]()
● Click on the “Import Media Files Here” section to select an editable video file or a collection of photos to make the GIF.
![]()
● As you select the desired video or images to make a discord animated icon from, you can find plenty of editing tools in the bottom section of the window. You can “crop”, “edit”, change the “duration” or apply “chroma-key” to the selected file. You can observe the respective changes on the right-hand side of the window.
![]()
● When you complete the editing process, move to the right-hand section to play the GIF with the triangular-shaped button. It will give you a preview of your edited GIF for discord.
![]()
● If you want to add text to your GIF to make it more interactive, it’s possible with Wondershare Filmora. Firstly, select the “T” button or “Title” option from the menubar in the window. There’ll be multiple title templates available. Choose any one of them and click on the green “Down arrow” on the template.
![]()
● The template will be loaded and then you can click on the small, green “+” button on the selected template to add it to your GIF. Now, click on the GIF frame to edit the text. Then click on “OK”.
![]()
● Now, save the discord icon GIF with a proper gif extension and then upload it as your profile picture.
![]()
● Ending Thoughts →
● This article includes three different ways to make discord icons GIF easily to make a customized avatar.
● There’s no need to stick to the old profile picture in your discord account.
● With these quick and easy steps, creating and setting a GIF as a profile icon would be very easy.
The craze to get a personalized Discord animated icon is increasing with time. As it can deliver your favorite vibe to you and your friends, it’s exciting. Moreover, there are so many options in logos to choose from.
But what if you want a Discord GIF icon for your account? Maybe you’ve seen your friends using it and it’s stunning, isn’t it? That’s why this article is containing all the latest and easiest tricks to make the desired GIF icons Discord. Get the three best ways to make your own Discord logo. And let your friends ask you for the secret.
In this article
01 [Why Discord GIF Become Popular Recently?](#Part 1)
02 [How to Make an Animated Discord Logo Icon (Free Template)](#Part 2)
03 [How to Get Animated Discord PFP](#Part 3)
04 [How to Make Your Discord PFP a GIF on Wondershare Filmora](#Part 4)
Part 1 Why Discord GIF Become Popular Recently?
Think of one online entertainment that Discord is not serving right now. It’s hard to get one in mind. From chatting with friends to watching a movie together, from listening to music to playing together, all the entertainment is under a roof. And who doesn’t want the best appearance on such an engaging platform?
On the other hand, animated icons Discord is immensely popular as they can replicate your expression and mood as you want. Normal profile pictures are back-dated now as these GIFs can make the profile more interesting. You can pick any character or Discord animated icon as per your wish. Moreover, many of these are for free. While using these GIFs on multiple online chatting platforms, users can express their exact thoughts behind a message or reaction. Similarly, by using Discord icons GIFs, people can make their profile more lively and personalized.
Not sure of using GIFs? Imagine your Discord profile with your favorite anime character or a suitable clip. On some social media platforms, we need to be formal out of the profession. But on Discord, you can chill, so your profile. So, why not give it a try?
If you’re here to know the quick guide to set your Discord logo GIF or if you’re facing any error while setting the logo, this article will help you in no time.
Part 2 How to Make an Animated Discord Logo Icon (Free Template)
If you have already decided what will be the type of GIF icon Discord you want, that’s great. Otherwise, decide whether you need something funny or relaxed or it depends on a brand. This decision would help you to pick the template. Similarly, you can make the best Discord GIF icon with the following steps.
● To make a GIF with your choice, use this tool and click on “Edit this template”. This will let you make a customized GIF from any video from your personal collection or download from the Internet.
![]()
● In the next step, you have to choose the template size from the right-hand side of the window. You can keep to the custom 512x512 size as well.
● Now, on the topmost bar in the window, you can find an option named “Upload”. Click on this option to upload the video from where you want to make your Discord icon GIF.
![]()
● You can upload the video from the gallery or drag-and-drop to the uploader window. You can also get videos from Google Drive.
● Now, as the video gets uploaded, you need to edit within the edit window. You can set the frame, time, and size from the tools highlighted in the image.
![]()
● Now, from the top-right side of the window, get the “Export Video” button. Click on the green arrow beside the button to get a drop-down list. From there click on the “Export as GIF” button to save your Discord icon GIF.
![]()
● You can check the download status from the next window.
![]()
● To save the recent GIF, click on “Download”. It will take some seconds to get saved to your system.
![]()
● Now, open Discord in your system and right-click on your “Server” icon from the left-hand side of the window. As a drop-down menu appears, select “Server Settings” followed by “Overview”.
![]()
● A new window will be opened with the existing profile picture of the server. To add the GIF icon Discord, click on “Upload Image”.
![]()
● From the location where you’ve saved the GIF, select it. Then, click on “Apply” to upload the GIF icon to the server profile.
![]()
● When uploading is completed, click on the green button named “Save Changes” to save the GIF icons Discord. Make sure that your GIF file size is less than 10.24 MB. Otherwise, you cannot save the GIF and have to resize it again.
![]()
Part 3 How to Get Animated Discord PFP
To set an exciting avatar in your Discord profile, you need to go through the following quick steps. Firstly, note that you need to have Discord Nitro to set a Discord logo GIF in your user profile. Without Nitro, GIF cannot be used as a PFP. Get all the answers for how to use Discord Nitro or how to get animated Discord PFP here.
● Open Discord and from the bottom-left side panel, click on the “Gear” icon that is the “User Settings”. It will present beside your user name on the “Home” window itself.
![]()
● As the new window gets opened, go to “Discord Nitro” under “Payment Settings”.
![]()
● If you don’t have activated Nitro, then click on “Subscribe” to get a suitable subscription to initiate animated icons Discord for your profile.
![]()
● Then, you’ll be redirected to the subscription options. Choose “Monthly” or “Yearly” subscription and to confirm it, click “Select”. If you choose the yearly plan, you’ll get an additional 16% off.
![]()
● As Discord Nitro is activated after payment and agreeing to the terms and conditions, you can see a pop-up window. Click on “Sweet” to get started.
![]()
● To set your profile avatar with GIF icon Discord, you need some GIFs downloaded to your system. So, make your GIF according to the last technique we mentioned. Or you can search for GIFs on the Internet like Giphy”, “Tenor”, or “Gfycat”. Save the GIFs as images to the system.
● Go the the “Gear” icon like the 1st step and open “User Settings”. Then, Go to the second option under user settings, “User Profile”. In this window, you can find a blue button named “Change Avatar”. Click on this button to set the Discord icon GIF.
![]()
● Now, you need to find the desired GIF from the “File Explorer” opened. Go to the folder where you saved the GIF file. Then, select it and click on “Open”.
![]()
● You can edit the frame of your Discord animated icons in the “edit image’ pop-up window. Then, click on “Apply” to set it finally. If you don’t want to edit the size, click on “Skip” to save the GIF as your profile picture on Discord.
![]()
● Check your profile picture now and match it with your expectations. Then click on “Save Changes” to save the icon. If you want some changes, click on “Change Avatar” and select any GIF from the saved discord icons GIF from the file explorer.
![]()
Part 4 How to Make Your Discord PFP a GIF on Wondershare Filmora
Wondershare Filmora Video Editor is the latest software where you can create a GIF easily to set as a discord GIF icon. Instead of using the same, existing GIFs, you can make your own now. It will help you to make a unique impression and be satisfied with your personalized account. Moreover, this software is just 4 KB in storage size. So, instan5 download and installation is not a problem at all.
Wondershare Filmora - Best Video Editor for Mac/Windows
5,481,435 people have downloaded it.
Build unique custom animations without breaking a sweat.
Focus on creating epic stories and leave the details to Filmora’s auto features.
Start a creative adventure with drag & drop effects and endless possibilities.
Filmora simplifies advanced features to save you time and effort.
Filmora cuts out repetition so you can move on to your next creative breakthrough.
Let’s go through the steps to understand the procedure to make GIF icons discord on Wondershare Filmora.
● Download and Install Wondershare Filmora in your system. It won’t take more than 10 minutes for the complete installation process. This software is available for both Windows and Mac OS.
![]()
● You can observe the installation status on your screen.
![]()
● As the installation is done, click on “Start Now” to open the software on the computer. A new black window will be opened on the screen.
![]()
● Click on the “Import Media Files Here” section to select an editable video file or a collection of photos to make the GIF.
![]()
● As you select the desired video or images to make a discord animated icon from, you can find plenty of editing tools in the bottom section of the window. You can “crop”, “edit”, change the “duration” or apply “chroma-key” to the selected file. You can observe the respective changes on the right-hand side of the window.
![]()
● When you complete the editing process, move to the right-hand section to play the GIF with the triangular-shaped button. It will give you a preview of your edited GIF for discord.
![]()
● If you want to add text to your GIF to make it more interactive, it’s possible with Wondershare Filmora. Firstly, select the “T” button or “Title” option from the menubar in the window. There’ll be multiple title templates available. Choose any one of them and click on the green “Down arrow” on the template.
![]()
● The template will be loaded and then you can click on the small, green “+” button on the selected template to add it to your GIF. Now, click on the GIF frame to edit the text. Then click on “OK”.
![]()
● Now, save the discord icon GIF with a proper gif extension and then upload it as your profile picture.
![]()
● Ending Thoughts →
● This article includes three different ways to make discord icons GIF easily to make a customized avatar.
● There’s no need to stick to the old profile picture in your discord account.
● With these quick and easy steps, creating and setting a GIF as a profile icon would be very easy.
Change Background Color in After Effects
Adobe After Effects is a powerful video editor. After Effects is particularly popular for its special effects that you can add to your videos and blow the mind of your audience. In any video, the background plays a major role in enhancing the overall frame and scene. If you are planning to change background color After Effects or add special effects, you must shoot your video with a solid color background.
During the post-production phase, you can change the background uniformly to any color scheme or special effect as per the requirement of the scene. Since the learning curve for After Effects is slightly steeper, you should know the exact steps to change After Effects background color. We will explain the process in simple steps and provide you with an alternative way to change background color.
Part 1. How to change video BG color in After Effects?
After Effects is widely used for professionals to add animations and special effects to videos during video editing phase. Starting from editing social media videos and YouTube videos to short films and even movies, After Effects finds its application in every field of video editing. Changing background color in After Effects is super simple even though other video editing techniques could be slightly complex for beginners. Here are the steps on how to change background color in After Effects.
Step1 Open After Effects on your computer. Go to File> Import> File. Select the video file from your hard drive and it will appear under Project tab.
Step2 Drag and drop your video into Timeline. Select the video clip and right-click on Video Composition option located below Project tab.
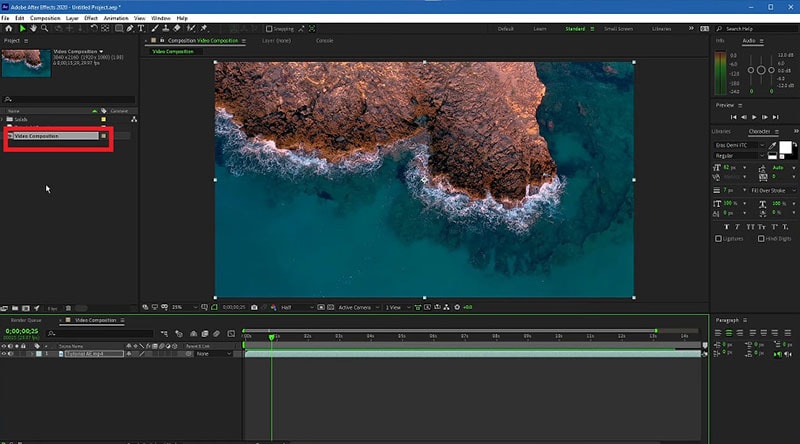
Step3 From the menu, click on Composition Settings option. You can also use Ctrl + K(Windows) or Command + K(Mac) key combination to open Composition Settings directly.

Step4 On Composition Settings window, go to Background Color and set the color as per your preference. You can also use a color picker as well to select any color from the video directly.
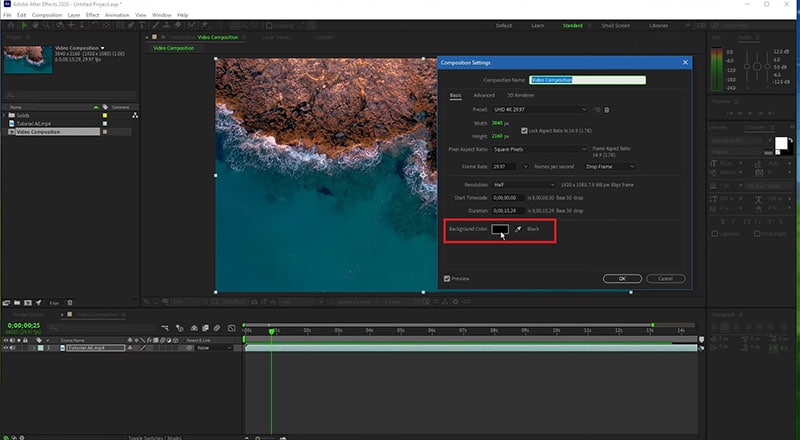
Step5 Click on Ok to set the new background color. Depending on the transparency of your video scene or the transition effect such as fade in and out, the background color will be more prominent.
Part 2. Alternative way to change background color
The best alternative to After Effects is Wondershare Filmora as Filmora has a wide range of special effects and animations. Filmora is a professional video editor where you can perform all basic as well as advanced video editing work. Most importantly, Filmora comes with an intuitive user interface so that even amateurs can use it easily.
There are several ways you can change background color in your video. For example, you can remove background color even when you do not have a solid color. If your video has a solid color, you can change background color to any color or graphical element using Chroma key. Here are the steps to change background color in Filmora .
Free Download For Win 7 or later(64-bit)
Free Download For macOS 10.14 or later
Step1 Download and install Filmora and it is available for Windows and Mac. Launch Filmora and click on New Project.
Step2 Import your video under Project Media folder and drag and drop into Timeline.
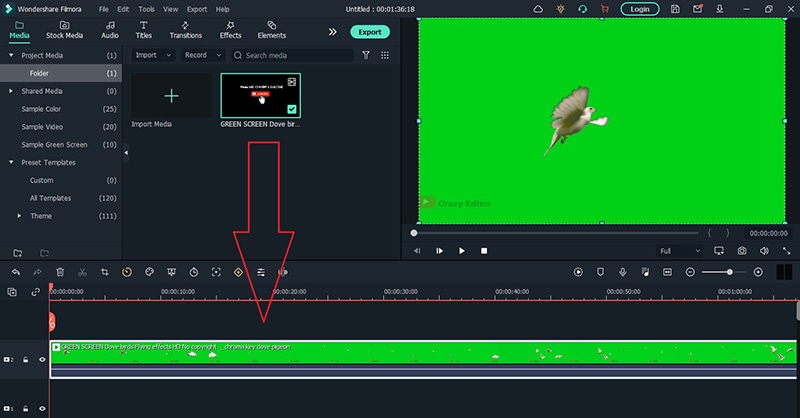
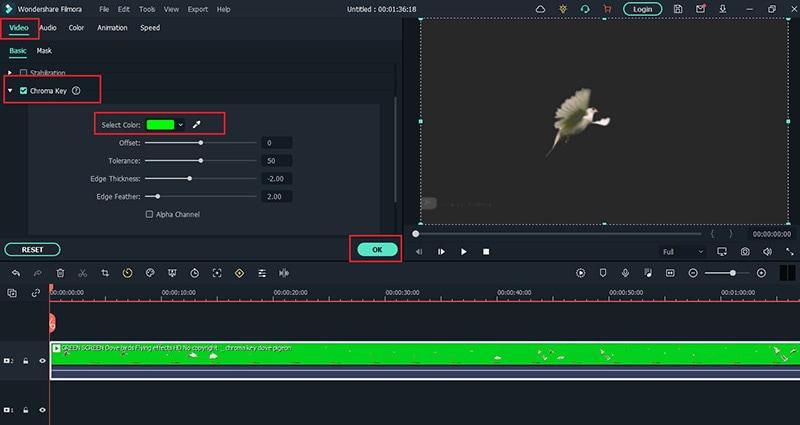
Step3 Double-click on the video clip and go to Video tab and turn on Chroma Key option. Select the solid color present in the background of the video and click on Ok button.
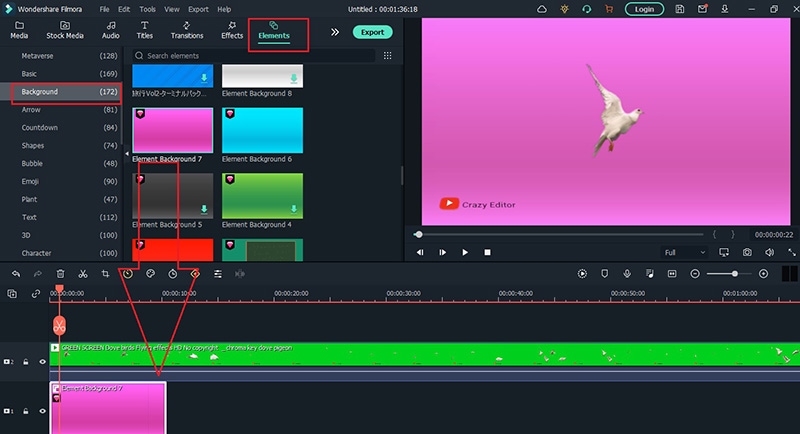
Step4 You will see the background color of the video disappear. Go to Elements> Background and drag and drop any background into Timeline. Make sure it is placed below the video clip and extend the duration of the background color as per your requirements.
Step5 Finally, play the video and click on Export button to save the video.
Part 3. FAQs about Video Background Colors
1. How do I remove background color in After Effects?
Import your video clip with a solid background color and place it on Timeline. Go to Effect menu> Keying> Keylight option. In Effects window and under Keylight, you will see Screen Colour option. Click on the eyedropper icon and select the background color you want to remove.
2. How do I change a solid background in After Effects?
The steps for After Effects how to change background color solid involve removing the background color and adding a layer of solid color to replace the transparency of the video. Go to Layer> New> Solid. Under Solid Settings window, go to Color and select the desired color from Color option and click on OK button. The new color will get reflected in the background of the video.
3. How do you add a white background in After Effects?
Go to Layer> New> Solid and add a white color solid first. However, this white color layer will not be visible unless you turn the background of your video transparent. Go to Effects & Presets and search for Luma Key and drop Luma Key on your video. Set Key type as Brighter and the threshold of the Lema key as per suitability on your video to see the white background appear.
Free Download For macOS 10.14 or later
Step1 Download and install Filmora and it is available for Windows and Mac. Launch Filmora and click on New Project.
Step2 Import your video under Project Media folder and drag and drop into Timeline.
Step3 Double-click on the video clip and go to Video tab and turn on Chroma Key option. Select the solid color present in the background of the video and click on Ok button.
Step4 You will see the background color of the video disappear. Go to Elements> Background and drag and drop any background into Timeline. Make sure it is placed below the video clip and extend the duration of the background color as per your requirements.
Step5 Finally, play the video and click on Export button to save the video.
Part 3. FAQs about Video Background Colors
1. How do I remove background color in After Effects?
Import your video clip with a solid background color and place it on Timeline. Go to Effect menu> Keying> Keylight option. In Effects window and under Keylight, you will see Screen Colour option. Click on the eyedropper icon and select the background color you want to remove.
2. How do I change a solid background in After Effects?
The steps for After Effects how to change background color solid involve removing the background color and adding a layer of solid color to replace the transparency of the video. Go to Layer> New> Solid. Under Solid Settings window, go to Color and select the desired color from Color option and click on OK button. The new color will get reflected in the background of the video.
3. How do you add a white background in After Effects?
Go to Layer> New> Solid and add a white color solid first. However, this white color layer will not be visible unless you turn the background of your video transparent. Go to Effects & Presets and search for Luma Key and drop Luma Key on your video. Set Key type as Brighter and the threshold of the Lema key as per suitability on your video to see the white background appear.
Also read:
- New In 2024, Frame Rates, Speed, and Wondershare Filmora
- Updated How to Use OBS Chroma Key With/Without Green Screen
- Updated Unlink Audio and Video in DaVinci Resolve Detailed Steps
- Updated In 2024, Adobe Lightroom Color Grading Tutorial
- New 2024 Approved Change Video Speed with FFmpeg
- 2024 Approved Do You Need a Royalty-Free 5 Seconds Countdown Video for Your Video but Dont Not Where to Find One? We Will Introduce You to the Best HD and 4K Clips that You Can Always Try Anytime
- New Learn Color Correction in After Effects with These YouTube Videos
- In 2024, Want to Loop a Video to Extend Its Duration? You Can Use iMovie to Loop a Video on Your Mac and iPhone and We Will Illustrate How to Loop a Video in iMovie
- Updated 2024 Approved How to Create a Video Slideshow in iMovie
- Quick Answer Why Did Filmora AI Portrait Attract People?
- New Want to Know the Simplest Way to Match the Colors of Your Photos in Photoshop? The Following Discussion Will Help Match Color in Photoshop, Almost Effortlessly
- Updated Take Your Video Editing to the Next Level with Video Scopes for 2024
- Step by Step to Crop a Video with CyberLink PowerDirector
- Make Your Presentation More Attractive with Best Google Slideshows Templates. How to Make a Google Slideshow in Simple Step for 2024 Do You Know How to Create Google Images Slideshow?
- Updated 2024 Approved An Ultimate Guide to Flexclip Online Trimmer
- Updated In 2024, Detailed Steps to Rotate Videos in Lightworks
- Updated What You Should Know About Speech-to-Text Technology
- In 2024, A Complete Overview of VSCO Video Editor
- 2024 Approved Event Videography Is Popular in Weddings, Graduation, Family Reunion and Other Great Moments. Here Im Going to Share some of the Tips to Make a Better Event Videography
- With Many Available Video Editing Solutions in the Market Today, It Is a Bit Hard to Choose the Best Video Editing Software for Your Unique Needs
- In 2024, How to Make Hand Shake Effect with Final Cut Pro
- Updated Want to Know How to Slow Down a Video on iPhone or Speed It Up? This Guide Provides Step by Step Method to Do so Using Simple Techniques. Find Out More About It
- Updated 5 Simple Tools to Merge Video and Audio Online
- New Adding Slow Motion in DaVinci Resolve A Comprehensive Overview for 2024
- New Top 10 Free WhatsApp Video Converter 2023
- In 2024, If You Want an App to Make Videos with Pictures and Music for Social Media Posts, We Are with the Best Apps to Make Videos with Music and Pictures
- In 2024, How to Mirror Your Realme 11 Pro+ Screen to PC with Chromecast | Dr.fone
- In 2024, Easy Guide How To Bypass Vivo Y100A FRP Android 10/11/12/13
- How To Use Special Features - Virtual Location On Apple iPhone 15? | Dr.fone
- In 2024, How to Bypass Google FRP Lock from Samsung Galaxy XCover 7 Devices
- What are Location Permissions Life360 On Xiaomi 13 Ultra? | Dr.fone
- 2024 Approved How to Translate YouTube Videos to English Subtitles
- How to Stop Life360 from Tracking You On Samsung Galaxy F04? | Dr.fone
- How To Transfer Data From Apple iPhone 6s Plus To Other iPhone 11 Pro Max devices? | Dr.fone
- 11 Ways to Fix it When My Sony Xperia 1 V Wont Charge | Dr.fone
- How To Transfer WhatsApp From iPhone X to other iPhone 13 Pro Max devices? | Dr.fone
- My Videos Arent Playing on Itel P55+ – What Can I Do? | Dr.fone
- The Best 8 VPN Hardware Devices Reviewed On Xiaomi Redmi Note 13 Pro 5G | Dr.fone
- In 2024, Complete Guide For iPhone 12 Pro Max Lock Screen | Dr.fone
- Easy steps to recover deleted videos from Galaxy A15 4G
- How to remove Gionee F3 Pro PIN
- Title: Updated Create a Movie with Windows Movie Maker for 2024
- Author: Chloe
- Created at : 2024-04-24 07:08:42
- Updated at : 2024-04-25 07:08:42
- Link: https://ai-editing-video.techidaily.com/updated-create-a-movie-with-windows-movie-maker-for-2024/
- License: This work is licensed under CC BY-NC-SA 4.0.
