
:max_bytes(150000):strip_icc():format(webp)/GettyImages-541365354-5c8ad42246e0fb00014a9687.jpg)
Updated Denoise Video in Adobe Premiere Pro – Audio and Video Noise Removal for 2024
Denoise Video in Adobe Premiere Pro – Audio and Video Noise Removal
What’s the key to our success? And what’s the process that it takes us? How can we attract audiences and guarantee the viewers’ transition to loyalty? – these are the questions that people in the professions connected to the technology should ask. There is no recipe, but at least, we know what NOT to do – DO NOT create bad content! You will never have a desired amount of listeners for your podcasts if the voice of the actor or noise of the whole track is annoying, you will struggle to have success on Youtube if your shots are unpleasant to watch, and the list goes on – there are just too many things you should not do!
But sometimes bad quality just happens. It happens when you know you have a problem and it happens when you think everything is going well in producing. You might come back from the production and find out that every shot you took had bad lightning, or there was an almost naked guy running on the background, or there is a noise on the background that just makes the whole experience of watching and listening not worthwhile! This might be something that sinks your heart…
But the mistakes we make don’t ensure that there has been a verdict cast for our failure. Nowadays, the will is everything – if you are really willing to make something work, you will just have to find the right tools, and learn a little about them, and, Voila! – Maybe you can turn bad into something good? Unacceptable into something acceptable? Annoying into interesting, and unpleasant into enjoyable?
This is called EDITING. And Editing covers different, almost endless days – too many computer programs, too many tools, too many opportunities to modify almost anything you want to make look and sound better - All of this feels like magic!
Among many instruments and techniques, there is one thing called denoising, with two different meaning. You might find noise in two areas – video and audio. Audio denoising means to remove or reduce the background noise, such as air conditioner hum, someone screaming from far away, birds chirping, the waves, etc. the noise in photo and video terms means that the scene we are looking at is grainy and makes watching the scene a little more difficult, with a less clear picture. And whenever these kind of things appear, mostly out of the blue, – because no one wants to take a bad video or record a bad voice-over, - our magical tools and abilities come to play…
One of those is called Adobe Premiere Pro, using for video editing, viewed as the most sophisticated video editor software. So, in this article, we will learn how to handle bot noise-s – in video as well as audio terms, and how to create a better viewer/listener experience in this very program. Lastly, we’ll touch upon an alternative for background noise removal, so, there’s nothing left but tuning in!
Video denoising in Adobe Premiere Pro
Reducing the noise in the video in this software can be achieved through using effect which is called Median. Before discovering it, without any doubt, we need to add our footage into the Timeline in Premiere Pro. Then, we can proceed to finding the Effects Panel, where our wanted Median can be found – just drag and drop the effect to your clip.

In order to make sure that the Median touches the grainiest parts of the whole clip, we need to use something called masks. In the Effects Control panel, we can select the mask shape for our clip –either choose rectangle, circle, or pen tool. Pen tool is something with which we move the Mask around the screen and resize it to include the desired area and cover it.

Changing Feather setting to 100 will make sure that the effect loses a visible edge and there is some smoothness added to those edges.

There might be the need to repeat this process and create several masks, if that means to have covered all of the grainy area of the scene.
Lastly, tom reduce the noise, adjusting the effect settings is needed.

Technically, what the Median effect does is just blurring the graininess, not exactly “taking it away”. And if we play with the Radius settings there, we can find our desired look!
How to remove background noise in Adobe Premiere Pro
Removing background noise in Adobe Premiere Pro can be a pretty simple process and lead to much better results. First of all, of course, import the desired material into your software so you can see the video and audio in the sequence visually. After having the project set up, you will need to find the Efffects Panel, which might be hidden a little, but it must be on the left and bottom of the program layout; or, you can find it on the top, in the navbar.

After having located the Effects panel, go for the search bar and type: denoise, and you’ll see that DeNoise effect is under Audio Effects.

You hold onto the effect, drag and drop it on the audio track in the timeline itself! Then, you just click on the audio in the sequence and on the top right Effect Controls will appear, which we need to concentrate on. You will scroll down a little there and below Audio notice: fx DeNoise, where you hit on the Edit button. This will open the Clip Fx Editor for the Audio denoising.

Basically, it only has one, Amount scale, and if you drag the slider of it to the right at 100%, it will remove the whole noise, but setting it on 0% will not remove any noise at all. So, you need to choose your preferred percentage! Just listen what is acceptable for you, but the general suggestion here would be that you can choose as high percent as you want, but if the effect starts taking out the voice and actually wanted parts, then you will have to stop and keep it that way. So, that’s actually it!
Bonus tip: how to remove audio noise in video with Wondershare Filmora
What we have promised in the beginning in the video, we like to offer now – the alternative to reduce or remove audio noise in the video is called Wondershare Filmora, which functions in a very simple way. So, we can start using these guides:
Drag and drop your video into the timeline. Right-clicking on the video and hitting Detach Audio will enable us to separate audio and video from one another, getting us a chance to work on them individually.

Double-click on the audio track shows the editing panel, where we see Remove background noise – choosing this option removes the noise!

Though, there is another way to do this too. If you don’t want to detach the audio, then first, double-click on the video clip in the timeline and when the editing panel opens, switch to Audio. If you check the box next to Remove background noise, you will see that there are three levels – weak, mid, and strong, which determine the strength of how toe noise is going to be reduced. Choosing one of them is up to you!
In case you find that the voice sounds a little robotics, you’ll need to make it sound more natural, of course. For it, you will need to click Customize, which will take you into the Customize Equalizer department.

The low tunes are on the left, while the highs are on the right. Background noises are often the low ones, so we better lower them even more, but we would raise the middle ones to achieve a natural sound.

And, that’s it – you are done with audio background noise removal!
So, in this article, we learned how to remove the video noise and grain and audio background noise using the software Adobe Premire Pro, while we also discussed how to do the latter using Wondershare Filmora – hope you can start using your new knowledge and tools very soon and create the content you never thought you could have created!
In order to make sure that the Median touches the grainiest parts of the whole clip, we need to use something called masks. In the Effects Control panel, we can select the mask shape for our clip –either choose rectangle, circle, or pen tool. Pen tool is something with which we move the Mask around the screen and resize it to include the desired area and cover it.
Changing Feather setting to 100 will make sure that the effect loses a visible edge and there is some smoothness added to those edges.
There might be the need to repeat this process and create several masks, if that means to have covered all of the grainy area of the scene.
Lastly, tom reduce the noise, adjusting the effect settings is needed.
Technically, what the Median effect does is just blurring the graininess, not exactly “taking it away”. And if we play with the Radius settings there, we can find our desired look!
How to remove background noise in Adobe Premiere Pro
Removing background noise in Adobe Premiere Pro can be a pretty simple process and lead to much better results. First of all, of course, import the desired material into your software so you can see the video and audio in the sequence visually. After having the project set up, you will need to find the Efffects Panel, which might be hidden a little, but it must be on the left and bottom of the program layout; or, you can find it on the top, in the navbar.
After having located the Effects panel, go for the search bar and type: denoise, and you’ll see that DeNoise effect is under Audio Effects.
You hold onto the effect, drag and drop it on the audio track in the timeline itself! Then, you just click on the audio in the sequence and on the top right Effect Controls will appear, which we need to concentrate on. You will scroll down a little there and below Audio notice: fx DeNoise, where you hit on the Edit button. This will open the Clip Fx Editor for the Audio denoising.
Basically, it only has one, Amount scale, and if you drag the slider of it to the right at 100%, it will remove the whole noise, but setting it on 0% will not remove any noise at all. So, you need to choose your preferred percentage! Just listen what is acceptable for you, but the general suggestion here would be that you can choose as high percent as you want, but if the effect starts taking out the voice and actually wanted parts, then you will have to stop and keep it that way. So, that’s actually it!
Bonus tip: how to remove audio noise in video with Wondershare Filmora
What we have promised in the beginning in the video, we like to offer now – the alternative to reduce or remove audio noise in the video is called Wondershare Filmora, which functions in a very simple way. So, we can start using these guides:
Drag and drop your video into the timeline. Right-clicking on the video and hitting Detach Audio will enable us to separate audio and video from one another, getting us a chance to work on them individually.
Double-click on the audio track shows the editing panel, where we see Remove background noise – choosing this option removes the noise!
Though, there is another way to do this too. If you don’t want to detach the audio, then first, double-click on the video clip in the timeline and when the editing panel opens, switch to Audio. If you check the box next to Remove background noise, you will see that there are three levels – weak, mid, and strong, which determine the strength of how toe noise is going to be reduced. Choosing one of them is up to you!
In case you find that the voice sounds a little robotics, you’ll need to make it sound more natural, of course. For it, you will need to click Customize, which will take you into the Customize Equalizer department.
The low tunes are on the left, while the highs are on the right. Background noises are often the low ones, so we better lower them even more, but we would raise the middle ones to achieve a natural sound.
And, that’s it – you are done with audio background noise removal!
So, in this article, we learned how to remove the video noise and grain and audio background noise using the software Adobe Premire Pro, while we also discussed how to do the latter using Wondershare Filmora – hope you can start using your new knowledge and tools very soon and create the content you never thought you could have created!
Ever Wondered About the Similarity You Bear with an Anime Character? If You Have Not yet Looked Into This Exciting Aspect of Motion Graphic Design, You Can Very Well Break the Ice Here
What Anime Character Are You Look Like
An easy yet powerful editor
Numerous effects to choose from
Detailed tutorials provided by the official channel
In this article
01 [What Anime Character Are You Look Like?](#Part 1)
02 [Which Anime Character Do You Share a Personality With?](#Part 2)
03 [What Anime Character Are You Based on Your Zodiac Sign?](#Part 3)
04 [Superb Sites to Create Free Anime Character Online](#Part 4)
05 [Anime Drawing Q&A](#Part 5)
Part 1 Part1: What Anime Character Are You Look Like?
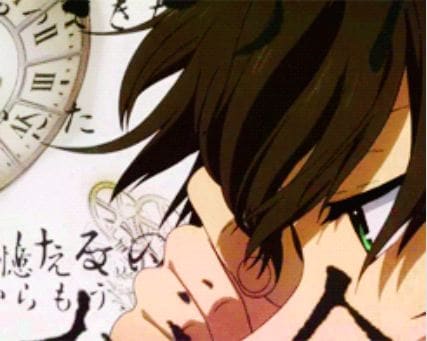
Anime characters are the newest trends of fascination in the realm of motion graphic design and imagery. While you are bound to get an engaging feel regardless of any anime character you pick, the expressive and stunning features and detailing of these graphic images often appear so relatable that you may think of bearing a close resemblance to some specific character.
This may sound fascinating as ever, but the concept has been explored with a digital vision. Graphic creators and design experts have come up with interesting ways and means to help you meet the anime character you resemble the closest to. The most prominent and exact examples of such techniques are anime quizzes. When moving ahead to recognize your look alike in the anime world, you can prefer taking up these quizzes and tests to lead your path in an interesting and amazing manner.
Talking of the functionality of these tests, the latter work on the principle of recognizing the pronounced aspects of your personality, like physical features and body language. Your dressing sense, hair styles and preferences on accessories are matched closely through a digital framework to the anime world creatures to fetch the most accurate results.
Part 2 Which Anime Character Do You Share a Personality With?
Anime characters not only work to bear a close connection with your physical appearances, they are well in concord with your inherent personality traits. However superficial it may seem, such characters are smart enough to mirror your exact personality types and characteristics. If you are interested to find about what anime character are you in more detail, there are respective quizzes and tests to help you out.
As of the credibility of these quizzes, you can be specific on a particular favorite character to look for your resemblance with the same. For example, you can take the ‘Red Flag Anime Character’ quiz to examine the similarity score of your personality with this class of anime characters. Such quizzes further let you know about a variety of additional aspects that connect you with the anime akin, like whether or not you possess the evil traits associated with your favorite anime character.
Knowing your anime personality can cater additional help in some respects. You can have a walk-through of interesting ways to find solutions and alternative reactions to tackle situations like your anime character attempts to address them. To guide you further in the line of understanding the connection of personalities between you and your favorite anime character, here’s a comparison of some specific personality traits with their anime counterparts in what follows next:
Specific Personality Traits: The Pragmatic Ones
The pragmatic personality trait belongs to those who prefer a logical approach over an emotional one while making important decisions. If you have a pragmatic nature, you might stick to the straightforward attitude of looking at things, ahead of inclining towards the empathetic side. Entering into the anime world, you may find a series of characters resembling this specific aspect of your personality. One such character example is Kiritsugu Emiya from the anime series called Fate/Zero.
Talking about the character in some detail, this character has a habit of sacrificing the smaller assets while hoping for bigger and greater opportunities. The habit eventually forces him to take certain painful and unwanted decisions. Mentioning a personal aspect, this one is a relatable character trait to my own personality. Considering the fact that I myself follow the line of logic to find out solutions to challenges and situations, I bear a complete resemblance with the character.
A downside of the pragmatic traits is their double faceted appearance to the viewers in case the latter fail to interpret the character in a correct form. It is a common assumption about these characters is that they wear a pretentious form to hide the actual aspects of personality from the onlookers.
Part 3 What Anime Character Are You Based on Your Zodiac Sign?
Anime characters are known to have a significant potential to relate with peoples’ persona in real-time. Ahead of the physical features and personality, you can even use your zodiac sign to identify your anime mirror. Discussing along the line, let us talk about some of the zodiac deciding constellations and the anime characters that correspond to the same in what follows next:
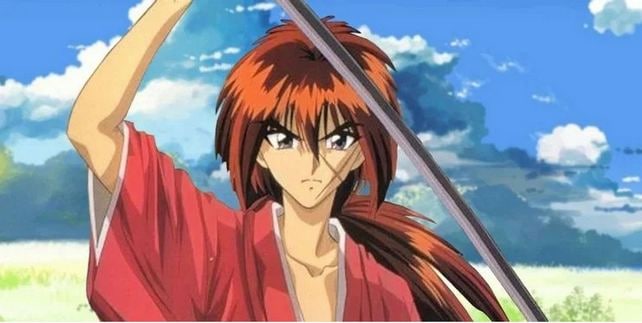
01Taurus: Himsura Kenshin
Belonging to the Taurus constellation, you will have an inherent love for quietness and peace. Satisfying your love for nature, you would be more comfortable with enjoying the small pleasures of life. Talking of a relatable anime character, you bear a close resemblance with Kenshin, the main lead of the anime movie by the name Ruroni Kenshin. The latter went on to trade his murderous past to live a peaceful life in his present.
The major appeals of Kenshin’s character are a gentle and kind personality that caters to understand and care about everyone he comes across. Choosing to kill as the last option, he works to transform his sword into a no blood sucking object. Like most Taurus personalities, the only expectation Kenshin has is of leading a simple, happy and peaceful life around his loved ones.
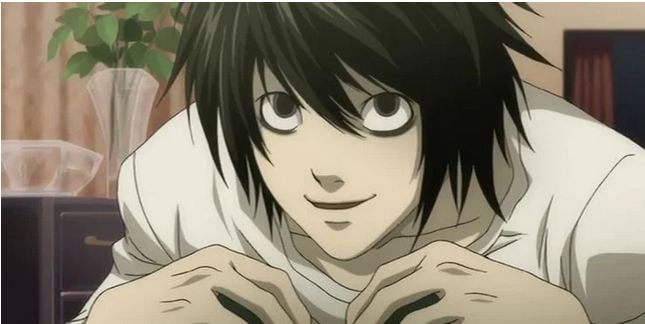
02Gemini: L Lawliet
Being a Gemini, you may well be the master of a conflicting personality, which is commonly victimized of being misinterpreted. Possessing the strongest of thinking abilities, you might be a smart and intelligent philosopher. People belonging to this zodiac sign, however have a quite hidden out perspective of looking at the world. Being a Gemini, you may prefer being a bit antisocial person, who has his own unconventional ways of taking the challenges of life.
In the anime world, the aforesaid zodiac sign traits have the closest connections with Detective L Lawliet from the movie Death Note. The latter possesses a gray shade character, who never reveals his real motives and true colors. He often works out cunning ways and means to get something that suits his needs and wants, in line with a problem he aims to solve.
Nonetheless, Lawliet always attempts to put the well-being of the society ahead of his personal interest in solving cases. While the character is both, complex and fascinating at the same time, a comparison with the latter is an indirect way of addressing yourself as an intelligent and a goal oriented personality. You should however, take care to stop losing your self-confidence amid the process of reaching at your desired goal.
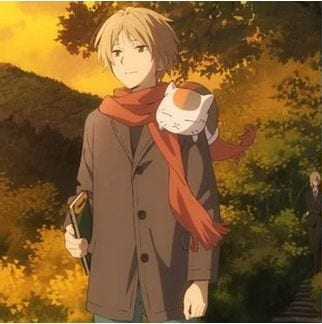
03Cancer: Takeshi Natsume
Talking of the specific characteristics of possessing a Cancarian personality, you will have a sensitive naughtiness and high level of empathy as the common aspects of your behavior. While you may encounter great difficulties to adjust with the world around you, don’t be skeptical about being alone in the race. Natsume, the title character of the anime Natsume’s Book of Friends shares this personality with you.
The striking aspect of this anime character is that its kindness remains untouched by the hardships that life has daunted upon him. The latter additionally obliges with respect towards the kindness he is showered on by other people. The thoughtful aspect of his character is however something that often works against him. The latter becomes oblivious to everything else to care about others’ feelings, making his sensitivity a cursed blessing for himself.
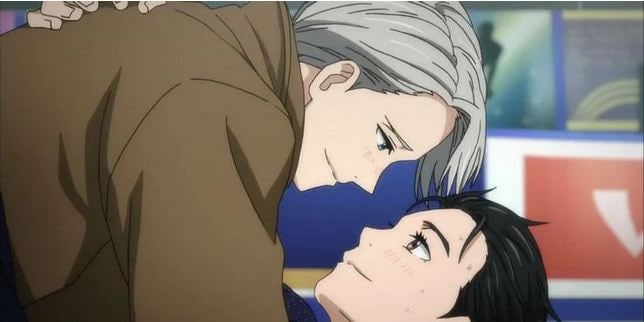
04Leo: Victor Nikiforov
Referred more fondly as the stylish icons among the zodiacs, Leos are the masters of a charismatic personality, who enjoy bring loved and focused on. Blessed with the power to excel on their own terms and conditions, they are habituated to tackle problems and challenges with utmost ease. Being the fiery zodiacs, the Leo personalities are best represented by Victor Nikiforov, the ice skating hero of Yuri on Ice anime.
About the specific personality traits of the character, Victor has ruled the skating world since the time when he was a mere 16 years old. The latter is amazingly talented, possesses a handsome and well groomed physique, along with a stunningly captivating personality. Ahead of all these aspects, what makes him shine so bright is his determination to achieve a place among the stars of his line and expertise.
Being a Leo, he possesses the classically romantic nature and feels not at all guilty in openly expressing his attraction towards Yuri, the female lead of the anime.
05Virgo: Yuugo Hachiken
Talking of the specific aspects of a Virgo personality, masters of this zodiac are diligent and hard workers, love to follow the methodical approach of handling things and solving problems and perform best when adhering to physically straining tasks, such as working in agriculture fields. Searching for an anime resemblance, Yuugo Hachiken from Silver Spoon is affordably the best match you can get.
Hachiken was fortunate enough to have an overly large set of materialistic achievements to his credit. The latter, however, exhausts everything to land in a traditional school, where he meets agriculture, the true love of his life. Though inexperienced in the field, he relies on the ethics and principles of his profession to counter the challenges of his new trade. He is additionally assisted by his imbibing love for nature, which is a Virgo trademark.
Part 4 Superb Sites to Create Free Anime Character Online
For Win 7 or later (64-bit)
For macOS 10.12 or later
By far, you have acquired enough knowledge and understanding of anime characters. While the information is enough to motivate you towards creating your own anime character, it becomes important to pick an affordable motion graphic design utility to begin with the process. Browsing through the IT market, you will land across a hoard of anime character generator software and application programs to choose from.
While the aforesaid alternatives have enough credibility with respect to anime character creation, the impact and performance of web based tools in addressing the concern is no less. Diverting the focus of our discussion along the same line, here’s a brief overview of some of the most popular and preferred online websites to create anime characters for free in what follows next:
01Face Your Manga
Starting the list with the best at the first, this online platform is possibly the best amine character generation tool available across the web. When attempting to create an anime avatar for yourself, landing on the site will entitle you to access the latter’s extensive library of creation features, which literally houses the whole kit and caboodle that you will ever need to craft the best anime personality.
Talking of the character centric features of the site, you are allowed to mask a real-time look on your avatar by adding birth marks, moles, blemishes, scars, third-eye and band-aids. You can additionally craft the eyebrows of your character to be in the perfect shape and setting in line with your specific preferences.
02Potrait Illustration Maker
Moving ahead, there comes the Portrait Illustration Maker website, which is quite a reliable place for working with anime character creation. The site facilitates a quick character design and is best suited for the swift graphic creators, who don’t have a lot of time to spare on crafting an anime character.
If you are more fascinated towards generating a random anime avatar, the ‘Randomizer’ option is there to help you out. All you need to do is, navigate to the respective icon, followed by tapping on the same and that it! The site works to generate an instant anime avatar for you. As of the feature bank offered by the website, you may not have a heap of customization choices at your disposal.
The website however, has an editing facility allows you to manually customize the randomly generated anime character. Additional to creating such characters, the platform grants you the liberty to share your artwork across all popular social media handles and communities.

03Marvel Superhero Avatar
The aforesaid website is a welcome gift for those who have always had a soft corner for the Marvel caricature series. Boasting itself as one among the best anime creator platforms, the latter allows you to craft amazing anime avatars, particularly those from the Marvel Superhero legacy. Packed with almost every customization feature that you will ever need, the site presents you with an expanded canvas to explore your motion graphic design creativity.
The site further lets you cross the boundaries of your imagination, while experimenting with the same to generate an anime superhero of your own. The customization tool of the website further allows you to mix and match the outlooks of the different Marvel superheroes to create a new hybrid character.
As an instance, you can integrate the features of Captain Marvel and Spider-girl, the female Marvel superheroes, into a single character. As of the male counterparts, you can try hands at integrating Spider Man and Iron Man.
Part 5 Anime Drawing Q&A
● What is the difficulty level of creating anime drawings?
However easy it may seem at the first look, crafting anime drawings is no easy thing. Before you proceed to carve out your anime art, you will essentially require a comprehensive knowledge of the various aspects of the character you choose to draw. This includes the character’s anatomy, value, perspective and features, and a series of other details.
● What is the minimum time duration required to create an anime drawing?
Anime drawings are a work of concentration and may take several hours or days to come out with perfection depending upon the complexity level. In most cases, you may finish the drawing in 10-20 hours, with a working time of 1 hour. As you cross different levels of expertise, the aforesaid duration will start appearing too small.
● Why is the accuracy factor so important in anime drawing?
Creating a detailed and accurate drawing helps to bring out the exact vision and perspective you are aiming at. This additionally proves beneficial in catering viable information about the cost constraints before you start with materializing things. This will eventually aid in keeping your construction requirements within the line of your budget, while allowing you to introduce necessary changes if need be.
● What is the cumulative count of the different styles of anime drawings?
The world of anime drawing houses a total of 22 style variants, starting from cubism and technical art, to pop art and realistic creations. There is an additional set of sub-styles in anime drawing that originate from the aforesaid classifications. As of the specific number of sub-styles, these are numerous in count, owing to the fact that the drawing preferences of different artists show significant variations. The diversity in drawing tools further adds to the variations.
● What is the significance of working with exact measurements in anime drawing?
The complete structuration of anime drawing is centered on taking accurate measurements. Being the most essential element of such drawings, a precise measurement can make your creation stand out, while a random one on the other hand, has the potential to put the same into rugs.
● Ending Thoughts →
● Anime characters are found to bear a close connection with different aspects of your personality, such as physical features, inherent traits and zodiac signs.
● There are a hoard of digital and online utilities, like quizzes and personality tests that can help you know about which anime character are you.
● If you are interested in creating your own anime character for free, there is wide range of online tools and software at your disposal.
In this article
01 [What Anime Character Are You Look Like?](#Part 1)
02 [Which Anime Character Do You Share a Personality With?](#Part 2)
03 [What Anime Character Are You Based on Your Zodiac Sign?](#Part 3)
04 [Superb Sites to Create Free Anime Character Online](#Part 4)
05 [Anime Drawing Q&A](#Part 5)
Part 1 Part1: What Anime Character Are You Look Like?
Anime characters are the newest trends of fascination in the realm of motion graphic design and imagery. While you are bound to get an engaging feel regardless of any anime character you pick, the expressive and stunning features and detailing of these graphic images often appear so relatable that you may think of bearing a close resemblance to some specific character.
This may sound fascinating as ever, but the concept has been explored with a digital vision. Graphic creators and design experts have come up with interesting ways and means to help you meet the anime character you resemble the closest to. The most prominent and exact examples of such techniques are anime quizzes. When moving ahead to recognize your look alike in the anime world, you can prefer taking up these quizzes and tests to lead your path in an interesting and amazing manner.
Talking of the functionality of these tests, the latter work on the principle of recognizing the pronounced aspects of your personality, like physical features and body language. Your dressing sense, hair styles and preferences on accessories are matched closely through a digital framework to the anime world creatures to fetch the most accurate results.
Part 2 Which Anime Character Do You Share a Personality With?
Anime characters not only work to bear a close connection with your physical appearances, they are well in concord with your inherent personality traits. However superficial it may seem, such characters are smart enough to mirror your exact personality types and characteristics. If you are interested to find about what anime character are you in more detail, there are respective quizzes and tests to help you out.
As of the credibility of these quizzes, you can be specific on a particular favorite character to look for your resemblance with the same. For example, you can take the ‘Red Flag Anime Character’ quiz to examine the similarity score of your personality with this class of anime characters. Such quizzes further let you know about a variety of additional aspects that connect you with the anime akin, like whether or not you possess the evil traits associated with your favorite anime character.
Knowing your anime personality can cater additional help in some respects. You can have a walk-through of interesting ways to find solutions and alternative reactions to tackle situations like your anime character attempts to address them. To guide you further in the line of understanding the connection of personalities between you and your favorite anime character, here’s a comparison of some specific personality traits with their anime counterparts in what follows next:
Specific Personality Traits: The Pragmatic Ones
The pragmatic personality trait belongs to those who prefer a logical approach over an emotional one while making important decisions. If you have a pragmatic nature, you might stick to the straightforward attitude of looking at things, ahead of inclining towards the empathetic side. Entering into the anime world, you may find a series of characters resembling this specific aspect of your personality. One such character example is Kiritsugu Emiya from the anime series called Fate/Zero.
Talking about the character in some detail, this character has a habit of sacrificing the smaller assets while hoping for bigger and greater opportunities. The habit eventually forces him to take certain painful and unwanted decisions. Mentioning a personal aspect, this one is a relatable character trait to my own personality. Considering the fact that I myself follow the line of logic to find out solutions to challenges and situations, I bear a complete resemblance with the character.
A downside of the pragmatic traits is their double faceted appearance to the viewers in case the latter fail to interpret the character in a correct form. It is a common assumption about these characters is that they wear a pretentious form to hide the actual aspects of personality from the onlookers.
Part 3 What Anime Character Are You Based on Your Zodiac Sign?
Anime characters are known to have a significant potential to relate with peoples’ persona in real-time. Ahead of the physical features and personality, you can even use your zodiac sign to identify your anime mirror. Discussing along the line, let us talk about some of the zodiac deciding constellations and the anime characters that correspond to the same in what follows next:
01Taurus: Himsura Kenshin
Belonging to the Taurus constellation, you will have an inherent love for quietness and peace. Satisfying your love for nature, you would be more comfortable with enjoying the small pleasures of life. Talking of a relatable anime character, you bear a close resemblance with Kenshin, the main lead of the anime movie by the name Ruroni Kenshin. The latter went on to trade his murderous past to live a peaceful life in his present.
The major appeals of Kenshin’s character are a gentle and kind personality that caters to understand and care about everyone he comes across. Choosing to kill as the last option, he works to transform his sword into a no blood sucking object. Like most Taurus personalities, the only expectation Kenshin has is of leading a simple, happy and peaceful life around his loved ones.
02Gemini: L Lawliet
Being a Gemini, you may well be the master of a conflicting personality, which is commonly victimized of being misinterpreted. Possessing the strongest of thinking abilities, you might be a smart and intelligent philosopher. People belonging to this zodiac sign, however have a quite hidden out perspective of looking at the world. Being a Gemini, you may prefer being a bit antisocial person, who has his own unconventional ways of taking the challenges of life.
In the anime world, the aforesaid zodiac sign traits have the closest connections with Detective L Lawliet from the movie Death Note. The latter possesses a gray shade character, who never reveals his real motives and true colors. He often works out cunning ways and means to get something that suits his needs and wants, in line with a problem he aims to solve.
Nonetheless, Lawliet always attempts to put the well-being of the society ahead of his personal interest in solving cases. While the character is both, complex and fascinating at the same time, a comparison with the latter is an indirect way of addressing yourself as an intelligent and a goal oriented personality. You should however, take care to stop losing your self-confidence amid the process of reaching at your desired goal.
03Cancer: Takeshi Natsume
Talking of the specific characteristics of possessing a Cancarian personality, you will have a sensitive naughtiness and high level of empathy as the common aspects of your behavior. While you may encounter great difficulties to adjust with the world around you, don’t be skeptical about being alone in the race. Natsume, the title character of the anime Natsume’s Book of Friends shares this personality with you.
The striking aspect of this anime character is that its kindness remains untouched by the hardships that life has daunted upon him. The latter additionally obliges with respect towards the kindness he is showered on by other people. The thoughtful aspect of his character is however something that often works against him. The latter becomes oblivious to everything else to care about others’ feelings, making his sensitivity a cursed blessing for himself.
04Leo: Victor Nikiforov
Referred more fondly as the stylish icons among the zodiacs, Leos are the masters of a charismatic personality, who enjoy bring loved and focused on. Blessed with the power to excel on their own terms and conditions, they are habituated to tackle problems and challenges with utmost ease. Being the fiery zodiacs, the Leo personalities are best represented by Victor Nikiforov, the ice skating hero of Yuri on Ice anime.
About the specific personality traits of the character, Victor has ruled the skating world since the time when he was a mere 16 years old. The latter is amazingly talented, possesses a handsome and well groomed physique, along with a stunningly captivating personality. Ahead of all these aspects, what makes him shine so bright is his determination to achieve a place among the stars of his line and expertise.
Being a Leo, he possesses the classically romantic nature and feels not at all guilty in openly expressing his attraction towards Yuri, the female lead of the anime.
05Virgo: Yuugo Hachiken
Talking of the specific aspects of a Virgo personality, masters of this zodiac are diligent and hard workers, love to follow the methodical approach of handling things and solving problems and perform best when adhering to physically straining tasks, such as working in agriculture fields. Searching for an anime resemblance, Yuugo Hachiken from Silver Spoon is affordably the best match you can get.
Hachiken was fortunate enough to have an overly large set of materialistic achievements to his credit. The latter, however, exhausts everything to land in a traditional school, where he meets agriculture, the true love of his life. Though inexperienced in the field, he relies on the ethics and principles of his profession to counter the challenges of his new trade. He is additionally assisted by his imbibing love for nature, which is a Virgo trademark.
Part 4 Superb Sites to Create Free Anime Character Online
For Win 7 or later (64-bit)
For macOS 10.12 or later
By far, you have acquired enough knowledge and understanding of anime characters. While the information is enough to motivate you towards creating your own anime character, it becomes important to pick an affordable motion graphic design utility to begin with the process. Browsing through the IT market, you will land across a hoard of anime character generator software and application programs to choose from.
While the aforesaid alternatives have enough credibility with respect to anime character creation, the impact and performance of web based tools in addressing the concern is no less. Diverting the focus of our discussion along the same line, here’s a brief overview of some of the most popular and preferred online websites to create anime characters for free in what follows next:
01Face Your Manga
Starting the list with the best at the first, this online platform is possibly the best amine character generation tool available across the web. When attempting to create an anime avatar for yourself, landing on the site will entitle you to access the latter’s extensive library of creation features, which literally houses the whole kit and caboodle that you will ever need to craft the best anime personality.
Talking of the character centric features of the site, you are allowed to mask a real-time look on your avatar by adding birth marks, moles, blemishes, scars, third-eye and band-aids. You can additionally craft the eyebrows of your character to be in the perfect shape and setting in line with your specific preferences.
02Potrait Illustration Maker
Moving ahead, there comes the Portrait Illustration Maker website, which is quite a reliable place for working with anime character creation. The site facilitates a quick character design and is best suited for the swift graphic creators, who don’t have a lot of time to spare on crafting an anime character.
If you are more fascinated towards generating a random anime avatar, the ‘Randomizer’ option is there to help you out. All you need to do is, navigate to the respective icon, followed by tapping on the same and that it! The site works to generate an instant anime avatar for you. As of the feature bank offered by the website, you may not have a heap of customization choices at your disposal.
The website however, has an editing facility allows you to manually customize the randomly generated anime character. Additional to creating such characters, the platform grants you the liberty to share your artwork across all popular social media handles and communities.
03Marvel Superhero Avatar
The aforesaid website is a welcome gift for those who have always had a soft corner for the Marvel caricature series. Boasting itself as one among the best anime creator platforms, the latter allows you to craft amazing anime avatars, particularly those from the Marvel Superhero legacy. Packed with almost every customization feature that you will ever need, the site presents you with an expanded canvas to explore your motion graphic design creativity.
The site further lets you cross the boundaries of your imagination, while experimenting with the same to generate an anime superhero of your own. The customization tool of the website further allows you to mix and match the outlooks of the different Marvel superheroes to create a new hybrid character.
As an instance, you can integrate the features of Captain Marvel and Spider-girl, the female Marvel superheroes, into a single character. As of the male counterparts, you can try hands at integrating Spider Man and Iron Man.
Part 5 Anime Drawing Q&A
● What is the difficulty level of creating anime drawings?
However easy it may seem at the first look, crafting anime drawings is no easy thing. Before you proceed to carve out your anime art, you will essentially require a comprehensive knowledge of the various aspects of the character you choose to draw. This includes the character’s anatomy, value, perspective and features, and a series of other details.
● What is the minimum time duration required to create an anime drawing?
Anime drawings are a work of concentration and may take several hours or days to come out with perfection depending upon the complexity level. In most cases, you may finish the drawing in 10-20 hours, with a working time of 1 hour. As you cross different levels of expertise, the aforesaid duration will start appearing too small.
● Why is the accuracy factor so important in anime drawing?
Creating a detailed and accurate drawing helps to bring out the exact vision and perspective you are aiming at. This additionally proves beneficial in catering viable information about the cost constraints before you start with materializing things. This will eventually aid in keeping your construction requirements within the line of your budget, while allowing you to introduce necessary changes if need be.
● What is the cumulative count of the different styles of anime drawings?
The world of anime drawing houses a total of 22 style variants, starting from cubism and technical art, to pop art and realistic creations. There is an additional set of sub-styles in anime drawing that originate from the aforesaid classifications. As of the specific number of sub-styles, these are numerous in count, owing to the fact that the drawing preferences of different artists show significant variations. The diversity in drawing tools further adds to the variations.
● What is the significance of working with exact measurements in anime drawing?
The complete structuration of anime drawing is centered on taking accurate measurements. Being the most essential element of such drawings, a precise measurement can make your creation stand out, while a random one on the other hand, has the potential to put the same into rugs.
● Ending Thoughts →
● Anime characters are found to bear a close connection with different aspects of your personality, such as physical features, inherent traits and zodiac signs.
● There are a hoard of digital and online utilities, like quizzes and personality tests that can help you know about which anime character are you.
● If you are interested in creating your own anime character for free, there is wide range of online tools and software at your disposal.
Create Realistic Fire Effects by Filmora
Do you know that many cinema films and big-budget companies use visual effects to create realistic fires? It saves them from potential danger in production and helps them manage the time required to create a project. In this article, you will get pro tips and easy ways to add Fire effects by Wondershare Filmora.
![]()
Note: let’s not count Michael Bay and Christopher Nolan productions because their movies have a higher budget, and creating fake fire is easy.
Part 1. What do you need to create fire effects?
Using simple tools such as Filmora and visual effects, you can create a realistic fire effect with an easy setup. For filming the effect, we will need
- A good camera
- A light source
- Video editing software - Wondershare Filmora
- Basic editing skills
However, the light source is key to the fire effects. It will be beneficial if you have a warmer color light or a light that can change its temperature. You can use tungsten light bulbs or small circular LEDs that are pretty famous with Vloggers and tick-tock users.
Part 2. How to make a realistic effect fire?
After getting prepared, it’s time to do the real things. Follow the steps below to create a realistic fire effect like a pro.
Step1 Record your footage
While recording the video, you can slightly shake your light source, which will give it the flickering effect of the flame. Here, you can do this in two ways.
Shaking the light manually
Just make sure when you are shaking the light, it is not shaken aggressively, or it will lose its realism to a real fire.

Shaking the light using a dimmer
You can also use some skills to create the flickering effect of the fire without literally shaking the LED light. Dimmers come to help. A dimmer is a device that enables you to change the temperature of the LED light. If you have a dimmer, your work will be more accessible.
A regulator on the dimmer will help you switch between low and high tones. It will flicker the light on the object like a flame and make it look like it was placed in front of a real fire.

Step2 Record the object
Our next step will be to record the object on which the effect is taking place. Ensure the camera is placed under a good light source so that the picture is not dim and the object is exposed. Make sure the camera is placed at the level of the eye so that it will help you record your video clearly and accurately.
Also, keep in mind to zoom out the camera lens, which will fix the frame of the video so that the object or the person is entirely on the screen. Another tip for creating a realistic fire effect would be the person acting as the object. The more natural the acting is, the more realistic would be the fire effect.
Step3 Edit the footage
We are being safe and saving time by not using actual fire. The goal of creating a fake fire would be the effect and reaction of the object or the actor.
1. Download a professional video editing software - Wondershare Filmora
Visit Wondershare Filmora official site if you haven’t already downloaded it.
![]()
Note: download the latest version of filmora. It will give you a pro version and help you to create more realistic fire effects.
2. Create a new project and import the recorded clips
Before adding the fire effects to your video, you must ensure that you are familiar with the editing software. Your first step would be to add your clips to the timeline. Drag the footage from the library and enter it into the timeline.

3. create the fire effect more realistic by adding smoke
The next step would be to add smoke to the fire. As it is only fair that the fire makes the smoke so. Adding the smoke will create the fire effect more realistic. Follow the below steps to get your cinematic video!
#Step1 Search for smoke effects
To add the smoke effect, click on the element’s icon on the bar above and search for smokescreen 2.
#Step2 Add a smoke effect
Once you have searched and found the smoke screen 2 effects, then import that effect onto your timeline so that you can begin editing.

Once you’ve added the fire effect, you will notice the change on the screen in the top right corner.
#Step3 Add duration
The next step would be to set the duration of the smokescreen effect so that it matches the length of the video. To do so,
- Click on the edge of the smoke screen effect.
- Drag it to the right if the effect appears smaller than the video clip.
- And drag it to the left if it is larger than the video clip.
- As soon as it matches the length of the video, leave the drag, and it will fit right into place.
#Step4 Make some changes to the smoke effect
Once you have matched the duration of the smoke screen effect to the video clip, our next step would be to make some changes. These changes will make the smokescreen appear more pleasing—double-click on the smokescreen effect, which will open the transform menu.
We would first focus on the transform panel. Here you would have many options, but our focus would be on rotation, scale, and position.
![]()
Note: make sure to rotate the smoke screen effect by simply sliding the slider or dragging the slider right or left to your desire.
- You would have created an angle of the smokescreen to make it more natural.
- Now, we would have to adjust the scale of the smokescreen effect.
- Drag the slider to the right to expand the smoke to spread on the screen. It will help the smoke screen do appear more natural.
- You can adjust how much the smoke screen is visible on the screen by decreasing the opacity.
Adjust the slider to the left so it blends in with the flickering of the light we created. Now playback the video from the big screen to get an idea of the effect you added. And here are our parameters for reference.

Cool, isn’t it? Now we have added smoke to our timeline. Combined with the flickering light effect, we are closer to our goal.
Step4 Add flames or sparks
To mimic a real fire, we also have one more element that is missing, And that will be the sparks and the flames. And if you want to bring the fire effect of your video to the pro level, we would have to use the film stock effects. Flames and sparks are also available in the Wondershare Filmora.
#Step1 Search for Fire Tab

- To do so, click on the bar above the element’s icon.
- Once you have opened the elements tab, look to your left window, where further options are available.
- From these options, click on the fire tab.
- A new window will pop up in the library panel.
#Step2 Add the flame to the timeline
Click on a large scale 14 and drag it into your timeline above the smoke effect and the clip. Doing so would have created two extra layers after the video tab.

#Step3 Adjust the flame effect
Now, we have to do steps similar to the ones above the first job. But first, you have to click on the edges of the effect. Then, match it to the length of your video.
Now, remember if the length of the effect is more than that of the video clip. You can adjust it by clicking on the edge and dragging it to the left. And if it appears to be smaller than the video clip, drag the edge to the right to match the length.
#Step4 Blend the video
When you look at the effect as you play the video from the start, you will notice that the effect is a little more intense than we want. To change it to your desires, you can follow the following steps.
- First of all, double-click and open the transform
- Experiment with the rotation and the scale and position; make your choice.
- Then move on to the compositing panel and focus on the blending mode.
- Here, you will notice a drop-down panel and select the screen option from all the other options.
- Doing so would help you blend the spark effect video much better.
If you focus on the spark effect that appears on the screen, you will notice that it seems to be much more intense than we require. If you want to blend it further, you can use the opacity adjuster and decrease the transparency. Then, adjust the slider till you feel it to be just right.
And the following are ideal parameters of our adjustment just for you to refer to.

Final results
Now can easily create a realistic-looking fire effect by Wondershare Filmora.

Best editing views
See how easy it was to create a fire effect without using real fire. A fire effect you can use:
- To make your car catch on fire.
- You are screaming at the top of your lungs in a yard where your garden is on fire.
- Act like your husband forgot to watch the stove on with the dish in the kitchen.
You can create all these scenarios by using camera tricks and lighting effects. And a few skills in video editing, easily! How cool is that?
If you are a beginner or a frequent user of Wondershare Filmora, following the steps explained above will help you quickly get the hang of how to add fire effects to your videos.
Also, if you have a YouTube channel or a content creator, adding these effects will add unique creativity to your videos and ultimately boost your approach.
Free Download For Win 7 or later(64-bit)
Free Download For macOS 10.14 or later
Part 1. What do you need to create fire effects?
Using simple tools such as Filmora and visual effects, you can create a realistic fire effect with an easy setup. For filming the effect, we will need
- A good camera
- A light source
- Video editing software - Wondershare Filmora
- Basic editing skills
However, the light source is key to the fire effects. It will be beneficial if you have a warmer color light or a light that can change its temperature. You can use tungsten light bulbs or small circular LEDs that are pretty famous with Vloggers and tick-tock users.
Part 2. How to make a realistic effect fire?
After getting prepared, it’s time to do the real things. Follow the steps below to create a realistic fire effect like a pro.
Step1 Record your footage
While recording the video, you can slightly shake your light source, which will give it the flickering effect of the flame. Here, you can do this in two ways.
Shaking the light manually
Just make sure when you are shaking the light, it is not shaken aggressively, or it will lose its realism to a real fire.
Shaking the light using a dimmer
You can also use some skills to create the flickering effect of the fire without literally shaking the LED light. Dimmers come to help. A dimmer is a device that enables you to change the temperature of the LED light. If you have a dimmer, your work will be more accessible.
A regulator on the dimmer will help you switch between low and high tones. It will flicker the light on the object like a flame and make it look like it was placed in front of a real fire.
Step2 Record the object
Our next step will be to record the object on which the effect is taking place. Ensure the camera is placed under a good light source so that the picture is not dim and the object is exposed. Make sure the camera is placed at the level of the eye so that it will help you record your video clearly and accurately.
Also, keep in mind to zoom out the camera lens, which will fix the frame of the video so that the object or the person is entirely on the screen. Another tip for creating a realistic fire effect would be the person acting as the object. The more natural the acting is, the more realistic would be the fire effect.
Step3 Edit the footage
We are being safe and saving time by not using actual fire. The goal of creating a fake fire would be the effect and reaction of the object or the actor.
1. Download a professional video editing software - Wondershare Filmora
Visit Wondershare Filmora official site if you haven’t already downloaded it.
![]()
Note: download the latest version of filmora. It will give you a pro version and help you to create more realistic fire effects.
2. Create a new project and import the recorded clips
Before adding the fire effects to your video, you must ensure that you are familiar with the editing software. Your first step would be to add your clips to the timeline. Drag the footage from the library and enter it into the timeline.
3. create the fire effect more realistic by adding smoke
The next step would be to add smoke to the fire. As it is only fair that the fire makes the smoke so. Adding the smoke will create the fire effect more realistic. Follow the below steps to get your cinematic video!
#Step1 Search for smoke effects
To add the smoke effect, click on the element’s icon on the bar above and search for smokescreen 2.
#Step2 Add a smoke effect
Once you have searched and found the smoke screen 2 effects, then import that effect onto your timeline so that you can begin editing.
Once you’ve added the fire effect, you will notice the change on the screen in the top right corner.
#Step3 Add duration
The next step would be to set the duration of the smokescreen effect so that it matches the length of the video. To do so,
- Click on the edge of the smoke screen effect.
- Drag it to the right if the effect appears smaller than the video clip.
- And drag it to the left if it is larger than the video clip.
- As soon as it matches the length of the video, leave the drag, and it will fit right into place.
#Step4 Make some changes to the smoke effect
Once you have matched the duration of the smoke screen effect to the video clip, our next step would be to make some changes. These changes will make the smokescreen appear more pleasing—double-click on the smokescreen effect, which will open the transform menu.
We would first focus on the transform panel. Here you would have many options, but our focus would be on rotation, scale, and position.
![]()
Note: make sure to rotate the smoke screen effect by simply sliding the slider or dragging the slider right or left to your desire.
- You would have created an angle of the smokescreen to make it more natural.
- Now, we would have to adjust the scale of the smokescreen effect.
- Drag the slider to the right to expand the smoke to spread on the screen. It will help the smoke screen do appear more natural.
- You can adjust how much the smoke screen is visible on the screen by decreasing the opacity.
Adjust the slider to the left so it blends in with the flickering of the light we created. Now playback the video from the big screen to get an idea of the effect you added. And here are our parameters for reference.
Cool, isn’t it? Now we have added smoke to our timeline. Combined with the flickering light effect, we are closer to our goal.
Step4 Add flames or sparks
To mimic a real fire, we also have one more element that is missing, And that will be the sparks and the flames. And if you want to bring the fire effect of your video to the pro level, we would have to use the film stock effects. Flames and sparks are also available in the Wondershare Filmora.
#Step1 Search for Fire Tab
- To do so, click on the bar above the element’s icon.
- Once you have opened the elements tab, look to your left window, where further options are available.
- From these options, click on the fire tab.
- A new window will pop up in the library panel.
#Step2 Add the flame to the timeline
Click on a large scale 14 and drag it into your timeline above the smoke effect and the clip. Doing so would have created two extra layers after the video tab.
#Step3 Adjust the flame effect
Now, we have to do steps similar to the ones above the first job. But first, you have to click on the edges of the effect. Then, match it to the length of your video.
Now, remember if the length of the effect is more than that of the video clip. You can adjust it by clicking on the edge and dragging it to the left. And if it appears to be smaller than the video clip, drag the edge to the right to match the length.
#Step4 Blend the video
When you look at the effect as you play the video from the start, you will notice that the effect is a little more intense than we want. To change it to your desires, you can follow the following steps.
- First of all, double-click and open the transform
- Experiment with the rotation and the scale and position; make your choice.
- Then move on to the compositing panel and focus on the blending mode.
- Here, you will notice a drop-down panel and select the screen option from all the other options.
- Doing so would help you blend the spark effect video much better.
If you focus on the spark effect that appears on the screen, you will notice that it seems to be much more intense than we require. If you want to blend it further, you can use the opacity adjuster and decrease the transparency. Then, adjust the slider till you feel it to be just right.
And the following are ideal parameters of our adjustment just for you to refer to.
Final results
Now can easily create a realistic-looking fire effect by Wondershare Filmora.
Best editing views
See how easy it was to create a fire effect without using real fire. A fire effect you can use:
- To make your car catch on fire.
- You are screaming at the top of your lungs in a yard where your garden is on fire.
- Act like your husband forgot to watch the stove on with the dish in the kitchen.
You can create all these scenarios by using camera tricks and lighting effects. And a few skills in video editing, easily! How cool is that?
If you are a beginner or a frequent user of Wondershare Filmora, following the steps explained above will help you quickly get the hang of how to add fire effects to your videos.
Also, if you have a YouTube channel or a content creator, adding these effects will add unique creativity to your videos and ultimately boost your approach.
Free Download For Win 7 or later(64-bit)
Free Download For macOS 10.14 or later
4 Methods for Rotating Your GoPro Videos Professionally
Video editing has secured a prominent position among other post-production works with innovation in cameras. Now, you do not need to hold the reins of your imagination tight.
With its advanced technology, Go-Pro has grabbed the attention of technology lovers. It offers video stabilization, making it the best gadget for capturing sports activities and other outdoor events.
If you have recorded your video in an odd direction? Also, you don’t want to lose that precious memory? There is no need to worry.
Rotating your video horizontally or vertically can change the entire perspective of your project.
The process of changing the orientation of the video is convenient. There are different tools for rotating your Go-Pro videos simply and easily.
In this article, you’ll find four solutions for rotating your Go-Pro Videos. The following tools will be used for this purpose.
- Wondershare Filmora
- GoPro Quik
- VLC Media Player
- Online Converter (Ezgif)
Filmora Wondershare-A companion to rotate your GoPro Videos
If you want to experience new dimensions of video editing by changing the orientation of your videos, then Filmora Video Editor is there for you. If you have made a video with your Go-pro at the wrong angle, video rotation can solve your problem.
Filmora is there to keep you out of trouble. It comes with the option of changing the direction of your videos. Apart from that, you can crop the unwanted parts or even zoom in on videos.
For Win 7 or later (64-bit)
For macOS 10.14 or later
Here is the step-by-step guide for rotating your go-pro video.
Step 1: Drag and Drop
The interface of Filmora is user-friendly and convenient. The video rotation process starts with importing the video file and then adding the drag and drop feature to the timeline.


Step 2: Video Rotation
- In the timeline, double-click on the video clip.
- The video tab will appear with several options like transformation and lens correction.

Step 3: Exploring the Transform Tab
- Expand the Transform tab.
- You will see the options like rotation, flip, scale, and position.
- You can now rotate your Go-pro video by either rotating the slider or entering a specific value for the degree of rotation.

- You can also use the scale slider to adjust the image size.

Step 4:Exporting the rotated Go-pro Video
- After changing the orientation of your video, now is the time to export your project.
- Click on the Export tab.

The Export tab shows a list of options whether you want to export the rotated video directly to your computer or share it with your friends via social media.

Exploring the Rotation of Video through GoPro Quik
GoPro Quik provides an alternative for changing the direction of videos. It comes with built-in tools specifically meant to deal with GoPro videos. Irrespective of the quality of your videos or format, it can rotate GoPro videos with ease.
You can rotate GoPro Video with GoPro Quik by following these steps
- Download and install the software and launch it afterward.
- You can connect your GoPro device to your computer or choose a folder to add media.

- Upload the media folder into the GoPro Quik program.

- Go to the video you want to rotate and double click on it.

- A new window will open. Select the circle-shaped icon.

- The video is rotated at 90 degrees with each click.

- Apart from that, on the far right side is a three-dotted button. Click on it to enter Create Mode.

- Afterward, select Open.
- Click on the Save button to save all the editing.
Pros:
- User-friendly and convenient
- It connects to the GoPro camera easily.
- Background tracks can be imported to audio libraries.
- Supports importing of background tracks to music libraries.
Cons:
- It is slow when dealing with 4K and files.
Changing the orientation of a Go-pro video using a VLC player
The majority consider VLC as only a media player. But, it also performs the functions of a video editor. The software is user-friendly and supports every existing operating system, including Windows and Linux. The cherry on top is that it supports all audio and video formats. Unlike other tools, there is no need to download add-ons.
- After downloading the VLC media player, launch the software.

- Now, you need to import the video file you want to rotate. This is done by dragging the media file to the timeline or selecting a media source from the left.

- In the VLC menu, go to Tools and then select Effects and Filters.

Tip: You can use the shortcut CTRL+E for the same purpose.
- The effects and filter tab will open a dialogue box with different options. Select the Video Effects tab.

- The video effect tab has many sub-tabs. You need to select the Geometry tab.

- Select the Transform option. A drop-down menu will appear with different options for rotating your video at different angles.

- Tick the checkbox that says Rotate to flip your video at a certain angle. Then, move the angle dialer. This will rotate your video to the angle you have specified.

- Click on the save option to complete the rotation process.

Note: The rotation settings are saved. Thus, you need to uncheck the option if you don’t want to rotate your next video.
Permanent Rotation of Video
The above steps rotated the video for only playing once. If you want to make the orientation of the video permanently to be flipped, then follow these instructions after the above steps.
Go to Media and select Convert/Save on the menu bar or use the shortcut CTRL+R.

A pop-up window will appear. Click on the Add button. Your video will be added.
Afterward, select the option Convert/Save.

A pop-up window will appear in which you have to select the settings logo, located next to Profile

- A pop-up window will appear; click on the Video codec tab.
- Select the Filters tab and click on the Video transformation filter

In the Audio Codec tab, under the encoding parameters, select MP3 in the codec option.
Select the save option.

Note: Make sure to add the destination file in the convert dialogue box.

Click on the start button to begin the transformation.
Using the Online Converter
The Online Converter is a tool that assists you in rotating the direction of your GoPro. It is an online resource and does not require downloading and installing the cumbersome trouble. It is user-friendly and compatible with different video formats like MP4, MKV,3GP, and more.
Pros:
It is free for users. Therefore, there is no need for installation.
Cons:
- If it takes longer to upload a file, you may have to re-submit it. Hence, it can be time-consuming.
- It does not support encrypted files.
Fixing the Orientation of Go-pro video by Ezgif
If you have no time to download different tools for rotating your Go-Pro videos, then the Internet has got a solution to your problem. There are various resources available on the web that facilitate the online rotation of your videos.
The Ezgif online video rotation is a handy tool. With it, you can flip your Go-pro video both horizontally and vertically. Not only that, but it also gives you the option of rotating your video at different angles. It supports various video formats like MP4, MOV, and many others.
You need to follow these simple steps to fix the orientation of your Go-Pro video.
- Upload your desired video file.
- You can also paste an URL.

- Select the rotation options and then click the Rotate video button.

Viola! Your new rotated video is there in no time.
- You will also see several options ranging from cropping the video to changing the speed of the video.

Pros:
- There would be no watermarks in the rotated version.
- The output of the created file is mostly similar to the pre-rotated video.
Cons:
- If you have poor internet connectivity, the conversion process may take a little longer than usual.
Conclusion
With the rising trend in the development of video editing tools, Go-pro Quik is not the only app for editing its videos. Whether you are a beginner or an intermediate, editing multimedia files has added spark to the creativity of the artists. You can add the desired rotation effects to yours.
Changing the rotation of your Go-Pro videos has been made easier due to the availability of user-friendly tools. These are available for all types of operating systems. Their interface is not complicated. Hence, it makes it easy for beginners to polish their video-editing skills.
By changing the orientation of your video, you can turn an ordinary video into a mesmerizing and cherishable lifelong memory. So be it an indoor or outdoor activity, enhance your video editing skills by playing with different orientations of your videos.
For macOS 10.14 or later
Here is the step-by-step guide for rotating your go-pro video.
Step 1: Drag and Drop
The interface of Filmora is user-friendly and convenient. The video rotation process starts with importing the video file and then adding the drag and drop feature to the timeline.
Step 2: Video Rotation
- In the timeline, double-click on the video clip.
- The video tab will appear with several options like transformation and lens correction.
Step 3: Exploring the Transform Tab
- Expand the Transform tab.
- You will see the options like rotation, flip, scale, and position.
- You can now rotate your Go-pro video by either rotating the slider or entering a specific value for the degree of rotation.
- You can also use the scale slider to adjust the image size.
Step 4:Exporting the rotated Go-pro Video
- After changing the orientation of your video, now is the time to export your project.
- Click on the Export tab.
The Export tab shows a list of options whether you want to export the rotated video directly to your computer or share it with your friends via social media.
Exploring the Rotation of Video through GoPro Quik
GoPro Quik provides an alternative for changing the direction of videos. It comes with built-in tools specifically meant to deal with GoPro videos. Irrespective of the quality of your videos or format, it can rotate GoPro videos with ease.
You can rotate GoPro Video with GoPro Quik by following these steps
- Download and install the software and launch it afterward.
- You can connect your GoPro device to your computer or choose a folder to add media.
- Upload the media folder into the GoPro Quik program.
- Go to the video you want to rotate and double click on it.
- A new window will open. Select the circle-shaped icon.
- The video is rotated at 90 degrees with each click.
- Apart from that, on the far right side is a three-dotted button. Click on it to enter Create Mode.
- Afterward, select Open.
- Click on the Save button to save all the editing.
Pros:
- User-friendly and convenient
- It connects to the GoPro camera easily.
- Background tracks can be imported to audio libraries.
- Supports importing of background tracks to music libraries.
Cons:
- It is slow when dealing with 4K and files.
Changing the orientation of a Go-pro video using a VLC player
The majority consider VLC as only a media player. But, it also performs the functions of a video editor. The software is user-friendly and supports every existing operating system, including Windows and Linux. The cherry on top is that it supports all audio and video formats. Unlike other tools, there is no need to download add-ons.
- After downloading the VLC media player, launch the software.
- Now, you need to import the video file you want to rotate. This is done by dragging the media file to the timeline or selecting a media source from the left.
- In the VLC menu, go to Tools and then select Effects and Filters.
Tip: You can use the shortcut CTRL+E for the same purpose.
- The effects and filter tab will open a dialogue box with different options. Select the Video Effects tab.
- The video effect tab has many sub-tabs. You need to select the Geometry tab.
- Select the Transform option. A drop-down menu will appear with different options for rotating your video at different angles.
- Tick the checkbox that says Rotate to flip your video at a certain angle. Then, move the angle dialer. This will rotate your video to the angle you have specified.
- Click on the save option to complete the rotation process.
Note: The rotation settings are saved. Thus, you need to uncheck the option if you don’t want to rotate your next video.
Permanent Rotation of Video
The above steps rotated the video for only playing once. If you want to make the orientation of the video permanently to be flipped, then follow these instructions after the above steps.
Go to Media and select Convert/Save on the menu bar or use the shortcut CTRL+R.
A pop-up window will appear. Click on the Add button. Your video will be added.
Afterward, select the option Convert/Save.
A pop-up window will appear in which you have to select the settings logo, located next to Profile
- A pop-up window will appear; click on the Video codec tab.
- Select the Filters tab and click on the Video transformation filter
In the Audio Codec tab, under the encoding parameters, select MP3 in the codec option.
Select the save option.
Note: Make sure to add the destination file in the convert dialogue box.
Click on the start button to begin the transformation.
Using the Online Converter
The Online Converter is a tool that assists you in rotating the direction of your GoPro. It is an online resource and does not require downloading and installing the cumbersome trouble. It is user-friendly and compatible with different video formats like MP4, MKV,3GP, and more.
Pros:
It is free for users. Therefore, there is no need for installation.
Cons:
- If it takes longer to upload a file, you may have to re-submit it. Hence, it can be time-consuming.
- It does not support encrypted files.
Fixing the Orientation of Go-pro video by Ezgif
If you have no time to download different tools for rotating your Go-Pro videos, then the Internet has got a solution to your problem. There are various resources available on the web that facilitate the online rotation of your videos.
The Ezgif online video rotation is a handy tool. With it, you can flip your Go-pro video both horizontally and vertically. Not only that, but it also gives you the option of rotating your video at different angles. It supports various video formats like MP4, MOV, and many others.
You need to follow these simple steps to fix the orientation of your Go-Pro video.
- Upload your desired video file.
- You can also paste an URL.
- Select the rotation options and then click the Rotate video button.
Viola! Your new rotated video is there in no time.
- You will also see several options ranging from cropping the video to changing the speed of the video.
Pros:
- There would be no watermarks in the rotated version.
- The output of the created file is mostly similar to the pre-rotated video.
Cons:
- If you have poor internet connectivity, the conversion process may take a little longer than usual.
Conclusion
With the rising trend in the development of video editing tools, Go-pro Quik is not the only app for editing its videos. Whether you are a beginner or an intermediate, editing multimedia files has added spark to the creativity of the artists. You can add the desired rotation effects to yours.
Changing the rotation of your Go-Pro videos has been made easier due to the availability of user-friendly tools. These are available for all types of operating systems. Their interface is not complicated. Hence, it makes it easy for beginners to polish their video-editing skills.
By changing the orientation of your video, you can turn an ordinary video into a mesmerizing and cherishable lifelong memory. So be it an indoor or outdoor activity, enhance your video editing skills by playing with different orientations of your videos.
Also read:
- Updated Best Ways to Add Meme Text to Videos
- New In 2024, What Is Animated GIF | GIF Example & Advantages of GIF
- Updated Add Effects to Video Online for 2024
- New Add Effects to Video Online for 2024
- What Is a Transparent Logo and Why Do You Need It for 2024
- New How to Make an Intro Video Easy Solution
- How Do You Use the Splice App on Android and Which Useful Video Splice Apps Are Best Suited? This Article Expands More on It for 2024
- Tips & Tricks To Perfectly Use the Audio Mixer in Filmora for 2024
- New How to Rotate Video in iMovie with Alternative for 2024
- Updated 3 Methods to Combine 2 or 3 Videos Into 1
- New How to Create Cinematic Style Videos? Easy Guide for Beginners for 2024
- In 2024, Discover the Top 5 Online Tools for Merging MP4 Files Easily and Quickly. Streamline Your Video Editing Process and Create Seamless Videos with These User-Friendly Tools
- New In 2024, How to Customize Your Loading Text Effect?
- Updated 2024 Approved Best Video Format Converter for PC and Online
- Updated Create Dynamic Text Animation in Filmora for 2024
- In 2024, Video Maker with Song
- 2024 Approved What Is the Best Frame Rate for 4K Videos?
- In 2024, How to Make Censor Effects with Filmora
- Vintage Film Effect 1920S - How to Make for 2024
- Updated How to Add Subtitles in Canva for 2024
- New Fun & Easy Masking Tricks in Filmora for 2024
- New Everything About Adding Effects In Kinemaster for 2024
- New Have You Ever Heard of the Video Format for PowerPoint? Allow Us to Help You Learn More About PowerPoint. It Will Help You Make an Impression by Making Good Slides
- Updated What Is AI Composite Video App and AI Composite Video Tutorial
- Updated 4 Methods to Crop a Video on Android Easily for 2024
- New Create Slide Masking Effect Intro【Filmora】
- Updated 2024 Approved How to Remove Motion Blur In Photoshop
- Want to Feather Shapes in After Effects? Read This for 2024
- Updated Through Speed Ramping, Create a Smooth Transition in Slow-Motion Videos. Follow This Guide and Learn About Premiere Pro Slow Motion and a Better Alternative
- 2024 Approved How to Use Color Grading in Final Cut Pro
- How to Add Green Screen in OBS
- How to Make Vintage Film Effect 1980S
- New Slideshow Makers Are On-Demand as They Come with Multiple Possibilities for Both Professional and Personal Uses. Gradually, the Best Software to Make Slideshows Is Always Welcomed to Save Time and Effort without Compromising the Quality
- 2024 Approved How to Create Your Own Subscribe Channel Graphics
- New How to Blur a Still or Moving Part of Video
- Updated How To Change Speed of Video in Final Cut Pro?
- In 2024, How to Add Filters on iMovie
- New Why You Should Master Slideshows In Lightroom, Fresh Insight, In 2024
- DVD Slideshow Builder Review and Tutorial for 2024
- Free
- Are You a Video Editor Making Use of iMovie? Do You Wish to Read How to Change Orientation in iMovie? Youre in the Right Place! At the End of This Guide, Youd Have Learned How to Change Video Orientation in iMovie
- In 2024, Easy Ways to Make Procreate GIFs
- In 2024, Ways to Find Free Online Slideshow Maker with No Watermark
- How to Turn Text Into a Podcast
- Create Risograph Effect In Photoshop A Beginners Guide for 2024
- In 2024, The Complete Guide to Converting GIF to SVG With Ease
- Updated Detailed Guide to Crop Videos in Sony Vegas Pro for 2024
- In 2024, How to Obtain and Create Animated GIF Icons Like a Pro?
- All You Need To Know About Mega Greninja For Samsung Galaxy S24 | Dr.fone
- How to Change Spotify Location After Moving to Another Country On Xiaomi Civi 3 Disney 100th Anniversary Edition | Dr.fone
- How to Transfer Videos from ZTE Nubia Z60 Ultra to iPad | Dr.fone
- In 2024, How To Check if Your Huawei P60 Is Unlocked
- In 2024, 6 Proven Ways to Unlock Samsung Phone When You Forget the Password
- How To Remove the Two Factor Authentication On iPhone 13 Pro
- Undelete lost music from Nokia 105 Classic
- How to Simulate GPS Movement in AR games On Xiaomi Redmi Note 13 5G? | Dr.fone
- 2 Ways to Transfer Text Messages from Xiaomi Redmi Note 12 Pro 4G to iPhone 15/14/13/12/11/X/8/ | Dr.fone
- Pokemon Go Error 12 Failed to Detect Location On Oppo Find X6? | Dr.fone
- In 2024, Sim Unlock Samsung Galaxy S24+ Phones without Code 2 Ways to Remove Android Sim Lock
- The way to recover deleted contacts on Galaxy Z Flip 5 without backup.
- Top 12 Prominent Oppo A2 Fingerprint Not Working Solutions
- Guide to Mirror Your Nokia C12 Pro to Other Android devices | Dr.fone
- Can I Bypass a Forgotten Phone Password Of OnePlus Ace 3?
- In 2024, Unlocking the Power of Smart Lock A Beginners Guide for Xiaomi Redmi K70 Pro Users
- In 2024, Full Guide to Fix iToolab AnyGO Not Working On Motorola Moto G 5G (2023) | Dr.fone
- How to use iSpoofer on OnePlus 12? | Dr.fone
- Will iSpoofer update On Vivo Y100 5G | Dr.fone
- How to Track a Lost Vivo V30 Pro for Free? | Dr.fone
- How to Retrieve deleted photos on Vivo Y78t
- Best Anti Tracker Software For Samsung Galaxy A24 | Dr.fone
- 3 Easy Ways to Factory Reset a Locked Apple iPhone 13 Pro Without iTunes
- How to add my signature to .docm file
- Full Guide to Unlock iPhone SE (2020) with iTunes | Dr.fone
- How to recover deleted photos on Gionee
- Itel A60 Screen Unresponsive? Heres How to Fix It | Dr.fone
- Three Ways to Sim Unlock Oppo Reno 10 5G
- In 2024, Unlocking Apple iPhone 14 Pro Max Passcode without a Computer
- A Guide Nubia Red Magic 8S Pro Wireless and Wired Screen Mirroring | Dr.fone
- In 2024, The Ultimate Guide to Realme Note 50 Pattern Lock Screen Everything You Need to Know
- In 2024, How to Unlock Disabled Apple iPhone 14/iPad Without Computer | Dr.fone
- Play Store Stuck on Downloading Of Realme C67 4G? 7 Ways to Resolve | Dr.fone
- Title: Updated Denoise Video in Adobe Premiere Pro – Audio and Video Noise Removal for 2024
- Author: Chloe
- Created at : 2024-04-24 07:08:42
- Updated at : 2024-04-25 07:08:42
- Link: https://ai-editing-video.techidaily.com/updated-denoise-video-in-adobe-premiere-pro-audio-and-video-noise-removal-for-2024/
- License: This work is licensed under CC BY-NC-SA 4.0.
