
:max_bytes(150000):strip_icc():format(webp)/camera-56e0976d3df78c5ba0566b37.jpg)
Updated Discover the Top 5 Free Online Video Filter Editors to Transform Your Videos with Captivating Color Grading and Correction Presets. Elevate Your Digital Storytelling Effortlessly
Discover the Top 5 Free Online Video Filter Editors to Transform Your Videos with Captivating Color Grading and Correction Presets. Elevate Your Digital Storytelling Effortlessly
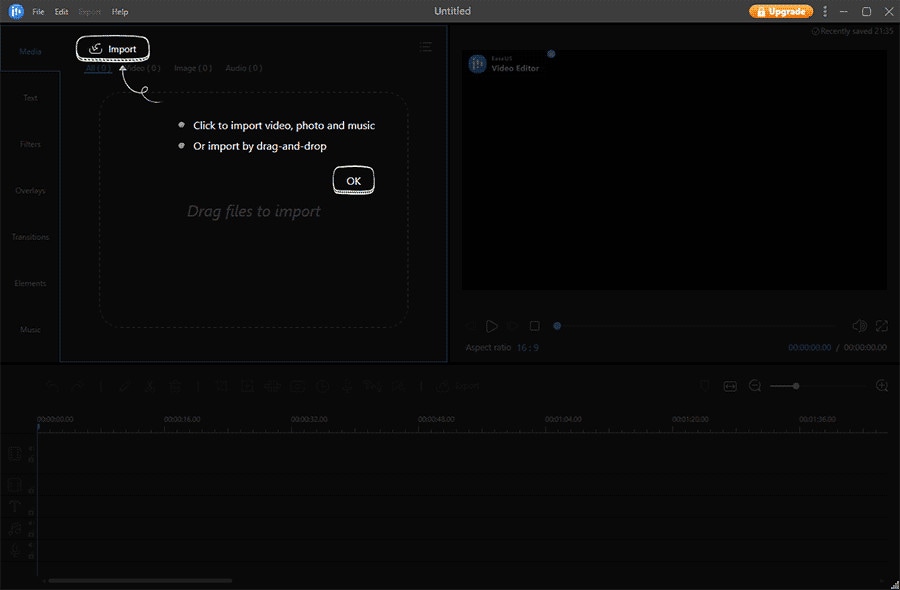
In the era of digital storytelling, everyone desires to make their content stand out. Applying video filters is a surefire way to enhance your videos’ mood, style, and overall appeal.
With many video filter editors available online, choosing the right one can be daunting. Worry not, for we’ve scoured the internet to bring you the top 5 free online video filter editors to jazz up your content. Let’s dive in!
Part 1: Top 5 Free Online Video Filter Editors
Veed.io

Veed.io is more than just an online video editor. This platform is designed with the user in mind, ensuring a hassle-free experience as they navigate its diverse video editing tools. One of the standout features is, undoubtedly, its video filter capabilities.
Is the product free?
Veed.io offers a robust free version, letting creators jump in without any initial investment. However, for those seeking more advanced features and capabilities, Veed.io has premium plans available, starting at a competitive price of $12/month.
Free trial for video filter function?
One of the commendable aspects of Veed.io is its commitment to transparency. Users can fully experience the video filter function without spending a dime, ensuring they know exactly what they’re getting before opting for paid plans.
Advantages: Even those new to video editing can quickly find their way around. The platform’s design is clean and straightforward and prioritizes user experience. Videos are processed promptly, ensuring you get your polished content out quickly.
Disadvantages: The free version watermarks the videos.
Clideo

Clideo is a multifaceted online video editing solution that caters to a broad spectrum of editing needs.
Whether you’re looking to merge clips, resize videos for various platforms, or infuse creativity with video filters, Clideo offers a comprehensive toolkit.
Is the product free?
It has a free version with basic functionalities. Paid plans start at $9/month.
Free trial for video filter function?
Yes, the filter function can be tested without any charges.
Advantages : Simple to use, no software installation required.
Disadvantages : Limited filters in the free version.
Flixier

Flixier emerges as a dynamic online video editing platform, aiming to bridge the gap between advanced editing tools and user accessibility.
Catering to novice editors and seasoned professionals, it offers tools that effortlessly combine efficiency with creativity.
Is the product free?
Flixier provides a free tier. For advanced features, paid plans start at $10/month.
Free trial for video filter function?
The video filter function is available in the free tier.
Advantages: Collaborative editing features quick export times.
Disadvantages: Slightly steeper learning curve for beginners.
Flexclip

Flexclip positions itself as a holistic online video editor designed with both beginners and advanced users in mind.
Whether you’re crafting a short promotional clip, a personal vlog, or an extensive documentary, Flexclip provides the tools and templates to make the process seamless.
Is the product free?
There’s a free version available. Upgraded plans are priced from $4.99/month.
Free trial for video filter function?
Absolutely, users can enjoy filter functions for free.
Advantages: Rich video templates and intuitive design.
Disadvantages: Limited advanced editing options in the free version.
Kapwing

KAPWING has swiftly carved its niche in the world of online video editing, offering a unique blend of simplicity and versatility. Beyond just a video editor, KAPWING is a creative toolkit that empowers users to bring their video visions to life with ease.
Is the product free?
Kapwing provides a basic free version. For premium features, plans start at $20/month.
Free trial for video filter function?
The video filter function is accessible in the free version.
Advantages: No watermarks, user-friendly, wide array of tools.
Disadvantages: Some advanced filters are limited to premium users.
Part 2: Best Alternatives
When it comes to alternative video filter editors, Filmora undoubtedly stands out. Although it’s not exclusively an online tool, Filmora has firmly established its reputation in the digital video editing community, and here’s why:
- Extensive Library of Video Filters : One of Filmora’s shining points is its rich, extensive library of video filters. From adding a touch of nostalgia with sepia tones to creating blockbuster cinematic vibes with dramatic contrasts, Filmora ensures every creative vision can be realized.
Video Filter Editor
Create AI Filter For Win 7 or later(64-bit)
Create AI Filter For macOS 10.14 or later
- User-friendly Interface : While its feature set is extensive, beginners need not be intimidated. Filmora offers an intuitive drag-and-drop interface, making the application of filters a seamless process. This ease of use ensures that even the most novice of editors can achieve professional-looking results in no time.
- Customizable Filters : Filmora allows users to tweak and customize effects to their liking beyond the preset filters. This feature gives creators the flexibility to craft unique visuals that align with their brand or story’s essence.
- Regular Updates : Filmora continuously updates its software, adding new filters and features. This means users can always stay ahead of the curve and incorporate the latest trends into their videos.
- Pricing and Value : While Filmora isn’t free, the value it offers makes the investment worthwhile. The tool offers various pricing plans designed for both individuals and businesses. Given the quality and diversity of its video filters, many content creators view it as a justifiable expense.
- Community and Tutorials : Filmora boasts a vibrant community of users. Their official website and channels regularly release tutorials, guiding users on the various functionalities, ensuring you make the most out of the software.
Part 3: Summary
The digital space is flooded with content, making it crucial for creators to ensure their videos capture attention and engage viewers. Utilizing video filters can significantly boost the visual appeal of your content.
With platforms like Veed.io, Clideo, Flixier, Flexclip, and KAPWING, filtering videos is now more accessible than ever.
And for those willing to invest a little, Filmora stands as a robust alternative. So, explore these platforms, harness the power of video filters, and watch your content shine like never before!
Part 1: Top 5 Free Online Video Filter Editors
Veed.io
Veed.io is more than just an online video editor. This platform is designed with the user in mind, ensuring a hassle-free experience as they navigate its diverse video editing tools. One of the standout features is, undoubtedly, its video filter capabilities.
Is the product free?
Veed.io offers a robust free version, letting creators jump in without any initial investment. However, for those seeking more advanced features and capabilities, Veed.io has premium plans available, starting at a competitive price of $12/month.
Free trial for video filter function?
One of the commendable aspects of Veed.io is its commitment to transparency. Users can fully experience the video filter function without spending a dime, ensuring they know exactly what they’re getting before opting for paid plans.
Advantages: Even those new to video editing can quickly find their way around. The platform’s design is clean and straightforward and prioritizes user experience. Videos are processed promptly, ensuring you get your polished content out quickly.
Disadvantages: The free version watermarks the videos.
Clideo
Clideo is a multifaceted online video editing solution that caters to a broad spectrum of editing needs.
Whether you’re looking to merge clips, resize videos for various platforms, or infuse creativity with video filters, Clideo offers a comprehensive toolkit.
Is the product free?
It has a free version with basic functionalities. Paid plans start at $9/month.
Free trial for video filter function?
Yes, the filter function can be tested without any charges.
Advantages : Simple to use, no software installation required.
Disadvantages : Limited filters in the free version.
Flixier
Flixier emerges as a dynamic online video editing platform, aiming to bridge the gap between advanced editing tools and user accessibility.
Catering to novice editors and seasoned professionals, it offers tools that effortlessly combine efficiency with creativity.
Is the product free?
Flixier provides a free tier. For advanced features, paid plans start at $10/month.
Free trial for video filter function?
The video filter function is available in the free tier.
Advantages: Collaborative editing features quick export times.
Disadvantages: Slightly steeper learning curve for beginners.
Flexclip
Flexclip positions itself as a holistic online video editor designed with both beginners and advanced users in mind.
Whether you’re crafting a short promotional clip, a personal vlog, or an extensive documentary, Flexclip provides the tools and templates to make the process seamless.
Is the product free?
There’s a free version available. Upgraded plans are priced from $4.99/month.
Free trial for video filter function?
Absolutely, users can enjoy filter functions for free.
Advantages: Rich video templates and intuitive design.
Disadvantages: Limited advanced editing options in the free version.
Kapwing
KAPWING has swiftly carved its niche in the world of online video editing, offering a unique blend of simplicity and versatility. Beyond just a video editor, KAPWING is a creative toolkit that empowers users to bring their video visions to life with ease.
Is the product free?
Kapwing provides a basic free version. For premium features, plans start at $20/month.
Free trial for video filter function?
The video filter function is accessible in the free version.
Advantages: No watermarks, user-friendly, wide array of tools.
Disadvantages: Some advanced filters are limited to premium users.
Part 2: Best Alternatives
When it comes to alternative video filter editors, Filmora undoubtedly stands out. Although it’s not exclusively an online tool, Filmora has firmly established its reputation in the digital video editing community, and here’s why:
- Extensive Library of Video Filters : One of Filmora’s shining points is its rich, extensive library of video filters. From adding a touch of nostalgia with sepia tones to creating blockbuster cinematic vibes with dramatic contrasts, Filmora ensures every creative vision can be realized.
Video Filter Editor
Create AI Filter For Win 7 or later(64-bit)
Create AI Filter For macOS 10.14 or later
- User-friendly Interface : While its feature set is extensive, beginners need not be intimidated. Filmora offers an intuitive drag-and-drop interface, making the application of filters a seamless process. This ease of use ensures that even the most novice of editors can achieve professional-looking results in no time.
- Customizable Filters : Filmora allows users to tweak and customize effects to their liking beyond the preset filters. This feature gives creators the flexibility to craft unique visuals that align with their brand or story’s essence.
- Regular Updates : Filmora continuously updates its software, adding new filters and features. This means users can always stay ahead of the curve and incorporate the latest trends into their videos.
- Pricing and Value : While Filmora isn’t free, the value it offers makes the investment worthwhile. The tool offers various pricing plans designed for both individuals and businesses. Given the quality and diversity of its video filters, many content creators view it as a justifiable expense.
- Community and Tutorials : Filmora boasts a vibrant community of users. Their official website and channels regularly release tutorials, guiding users on the various functionalities, ensuring you make the most out of the software.
Part 3: Summary
The digital space is flooded with content, making it crucial for creators to ensure their videos capture attention and engage viewers. Utilizing video filters can significantly boost the visual appeal of your content.
With platforms like Veed.io, Clideo, Flixier, Flexclip, and KAPWING, filtering videos is now more accessible than ever.
And for those willing to invest a little, Filmora stands as a robust alternative. So, explore these platforms, harness the power of video filters, and watch your content shine like never before!
How to DIY VHS Overlay in After Effects?
The 90s generation is familiar with Video Home System video. Today, Moviemakers use VHS static overlay to give their videos an antique and vintage look.
The VHS glitch overlay has become increasingly popular as it changes the video’s theme, tone, and whole look. Let’s see how we can add DIY VHS overlay in after effects-
Part 1:Step by Step DIY VHS Overlay in After Effects?
The retro “VHS Look” has become relatively trendy in recent years. The memories associated with the popular VHS trend has helped the trend make a comeback. Creating this effect in After Effects may seem to be a complicated process if you have not tried it before. But we have made it easier for you to add VHS overlay in Adobe After Effects. Follow the steps to add it in after effects-
Before you begin, download and install VHS preset if you haven’t already. Remember that VHS preset only works with After Effects CC 2018 and up. So, make sure you have the recent version of After Effects or the one not older than the 2018 version.
Step 1: To create a VHS look on your video, drop any video of your choice into the project panel and give it a name, let’s say, “VCR static overlay”. Set the width and height to 1920 and 1080 px, respectively.

Step 2: Right-click on your video and select New Comp from Selection. Drag your video to a new composition and then go to Lumetri Color < Basic Correction. Add some contrast. You can set it to 50 or any other number of your choice. Then bring the white level down to -55.

Then open the Creative tab. Increase the faded film to 40. Set sharpening to -70. Bring vibrance to -30.
Note: Here, I changed the number to get the effect I wanted. You can change the numbers and set the values as per your requirements.
Now, click on the Curves option. Drag down the white curve and then align it with the original curve. Move the green curve up a bit and bring down the blue curve. Then comes the Vignette tab. Open it and set the number to -1.

Step 3: Now, we will give our video a subtle RGB spit appearance. For that, we need to use the Channel Blur effect twice. First, go to Effect < Blur & Sharpen < Channel Blur. Set red blurriness to 20. Turn on the repeat edge pixels. Then change the Blur Dimensions from horizontal and vertical to vertical.

Step 4: Again, go to Effect < Blur & Sharpen < Channel Blur. Set blue blurriness to 30. Repeat the process of checking the repeat edge pixels box. Change the Blue Dimensions from horizontal and vertical to horizontal.
Step 5: Next comes giving the video artificial sharpening look using Unsharp Mask. So, go to Effect < Blur & Sharpen < Unsharp Mask. Under the Unmask Mask menu, set the amount to 100 and the radius to 10.

Step 6: To add a font to your video, simply search VHS font on Google. Look for the one you want to use in your video and download it. To give your video that authentic VHS-style look, we suggest downloading free VCR OSD Mono font and installing the font on your system.
Step 7: Go to Layer < New < Solid and choose any color. We chose white. Now, under Effects & Presets, search for a number. Drag it to the white solid. Choose the font VCR OSD Mono. You can change the number to time or date. You can also add time manually. Select the text tool, go to the source text, hold alt, and click on the stopwatch. Write “timeToCurrentFormat() and time will be displayed on the video. Let us say we want to see the date on the video instead of time. So, change the time to date. Drag the date to the bottom right of the video to give it the look of an old VHS tape.
If you are a beginner and want a simple VHS effect, you can follow these easy steps and create the VHS video that will transport you back to the 90s.
BONUS TIP: How to Add VHS Overlays and Glitch Effects to Make Retro Videos in Filmora Video Editor?
Do you remember the look of the VHS and miss it? You can bring your memories back! With Wondershare Filmora, you can add this effect easily to your videos. Adding a VHS overlay transparent brings drama and creates an atmosphere of distortion. It can significantly change the appearance and feel of your video.
So, if you want to create professional-looking VHS overlay free, the only thing you need is Filmora video editing software . Filmora allows you to add three different overlay VHS effects that you can use along with other overlays to create retro videos.
For Win 7 or later (64-bit)
For macOS 10.12 or later
Do you want to add retro videos on Filmora? It is simple!
To create a VHS overlay video, you should first download the Filmora app for free if you haven’t! Let’s learn how the effect can transform your video. You will have to choose various effects and values to get the final VHS overlay video. These effects can be added to any lyric video, intro, outro, and many others.
Let’s look at the steps:
Open your draft in Filmora software and select sample colors from the Media tab on the top left.

You can drag and drop the photo on a track on the timeline. Then adjust the trim handles to change the duration to match the section of the video to be transformed.
In sequence, add these three overlays by dragging them from the Effects panel at the top to their own individual tracks on the timeline: VHS Distortion Bad (alpha = 25), VHS Distortion (alpha = 35), and VHS Rewind (alpha = 10).
You can also add effects like Strong Glitch, Chromatic Aberration, Glitch Distortion, Distort, etc., to enhance the vintage look of the video.
When finished, click export and choose the format and target folder to save the processed file with the added effects.

The smart generation has access to HD videos and high-tech devices, yet VHS is an exciting concept for them. The videos created with this effect resemble those from the 90s era. You have to customize everything when you add a VHS effect, including the title, background noise, overlay, and credits.
By choosing a video-editing software like Wondershare Filmora, users can make such videos and add retro glitch overlay professionally. You can also access Filmstock to download any video effects, stock media, templates, or sound effects for Filmora.
Conclusion
Video editing is now easy and fun. The trend of VCR overlay is now back as VHR overlay. With Wondershare Filmora, you can easily create classic videos with 90’s effects. Take your video editing to the next big level with Filmora Video Editor. We can help you make the best use of this tool to create glitch effect videos and add a VHS tape overlay.
Versatile Video Editor - Wondershare Filmora
An easy yet powerful editor
Numerous effects to choose from
Detailed tutorials provided by the official channel
For macOS 10.12 or later
Do you want to add retro videos on Filmora? It is simple!
To create a VHS overlay video, you should first download the Filmora app for free if you haven’t! Let’s learn how the effect can transform your video. You will have to choose various effects and values to get the final VHS overlay video. These effects can be added to any lyric video, intro, outro, and many others.
Let’s look at the steps:
Open your draft in Filmora software and select sample colors from the Media tab on the top left.
You can drag and drop the photo on a track on the timeline. Then adjust the trim handles to change the duration to match the section of the video to be transformed.
In sequence, add these three overlays by dragging them from the Effects panel at the top to their own individual tracks on the timeline: VHS Distortion Bad (alpha = 25), VHS Distortion (alpha = 35), and VHS Rewind (alpha = 10).
You can also add effects like Strong Glitch, Chromatic Aberration, Glitch Distortion, Distort, etc., to enhance the vintage look of the video.
When finished, click export and choose the format and target folder to save the processed file with the added effects.
The smart generation has access to HD videos and high-tech devices, yet VHS is an exciting concept for them. The videos created with this effect resemble those from the 90s era. You have to customize everything when you add a VHS effect, including the title, background noise, overlay, and credits.
By choosing a video-editing software like Wondershare Filmora, users can make such videos and add retro glitch overlay professionally. You can also access Filmstock to download any video effects, stock media, templates, or sound effects for Filmora.
Conclusion
Video editing is now easy and fun. The trend of VCR overlay is now back as VHR overlay. With Wondershare Filmora, you can easily create classic videos with 90’s effects. Take your video editing to the next big level with Filmora Video Editor. We can help you make the best use of this tool to create glitch effect videos and add a VHS tape overlay.
Versatile Video Editor - Wondershare Filmora
An easy yet powerful editor
Numerous effects to choose from
Detailed tutorials provided by the official channel
Steps to Remove Background Noise From Video Sony Vegas
The most popular activity you’ll get from video creators is to remove unpleasant noises like rumble or buzz from a final film, whether a promotional video, a short story, a short advertisement, or something else entirely. When mixing and capturing sound effects or even other multimedia design elements, it’s typical to have to remove background noises.
Thankfully, there are some techniques for eliminating these background noises. In this guide, I will illustrate how to eliminate background noise on Windows, Mac, and Online.
How to Remove Background Noise from Video Sony Vegas?
Nothing is more frustrating than watching your film’s current video footage and hearing excessive background noise. Well, if you’re unfamiliar with Vegas Pro, don’t worry; we’ll show you how to reduce noise with these simple steps.
Here’s a quick guide on reducing background noise in Sony Vegas. Follow these techniques to minimize background noise quickly and effectively, leaving you with clear audio:
Method #1: Lower the Volume
Consider lowering the volume of your video. Low-level noise is frequently seen in audio at the lowest volume settings. Simply decrease the general volume levels to fight this, and it may clean any mild, below-the-floor background noise.
Slide down the volume lever in the track to the left to lower the level of all audio occurrences within the track. To equalize the course, press the top of the track and drag the gain level down.

Method #2: Utilize the Noise Gate Feature
Reducing the volume and implementing the first method does not always eliminate background noise, so you must explore further.
There may be circumstances where the background noise is louder than the speaker, and decreasing the total volume makes it incomprehensible.
I suggest that you consider the Noise Gate if the background noise is a constant hiss. Noise Gate effectively suppresses sound below a specific volume, and background noise volume is lesser than the audio you want to include in your edit. As a result, using the Noise Gate is the best option.
To use the Noise Gate, go to the Track FX section of the interface and click the Audio FX button. Now select “Noise Gate.” The choices for this are now visible. Raise the threshold level; this establishes the total volume quality threshold. The Noise Gate will remove all audio below the threshold.

Alternative Ways to Remove Background Noise from Video
The learning curve of Sony Vegas may be a bit too complicated for you; then, there is nothing to worry about because you are in the right place. In this article, I also prepared a few alternative ways that you can use to remove background noises from your video. Let’s skip the talk and start learning:
#1: Wondershare Filmora – Overall Best
It is available on Windows and Mac.
Although there are many applications available for removing background noise, experts recommend Wondershare Filmora Video Editor. Let’s get right to the point.
Aside from the standard audio editing tools, Filmora now includes better wavelengths, volume keyframing, peak detection, and audio fades, resulting in a higher-quality audio editing interface. Here are some of the trump cards of using Filmora to remove background audio noise:
- Waveform audio editing with adjustable track height
- Remove background noise with ONE click using the Denoise function.
- Adjust the Denoise level to Weak, Mid, or Strong for improved noise reduction outcomes.
Here’s a guide on how to use Filmora to improve video footage, including how to eliminate background noise:
- In the Wondershare Filmora timeline panel, upload your clip. Trim and erase the video sections that you don’t wish to keep.
- Hover over the Audio option after right-clicking the clip in the timeline. The four choices available are silence detection, modification audio, removal audio, and mute. Select the “Audio Detach” feature to extract the audio from the video.

- Double-click on the audio file and select “Remove background noise” in the Edit Menu to eliminate the background noise instantly. You may also reach the Editing panel by double-clicking the video in the timeline without removing audio from the video and switching to the Audio page to edit audio and remove noise.

- You may also use the Equalizer tool to fine-tune the audio to make it seem more authentic. Simply tweak the music to fit the visual frame by frame if you want a better assessment. After analyzing the results, click Export to save the noise-reduced clip to your device or share it immediately to YouTube or Vimeo.
#2: Audacity
It is available on Windows, Mac, and Linux.
Audacity is a free, accessible, high-quality audio editing program that runs on Windows, Mac OS X, and Linux. You may use it to record live audio, modify it with capabilities like a cut, copy, and paste, and visualize advanced audio analysis using the Spectrogram view mode.You may also use it to eliminate background noise from your audio or video files for free.
The improved detailed instructions for removing background noise in Audacity in 2022 are listed below:
Step #1: Import Files to Audacity
Move to the File menu and hit Open or Import after running the program to load the audio or video source into Audacity. Before editing, Audacity will prompt you to make a copy of the audio track. This impresses me as extremely thoughtful. If you want to import a video file into Audacity, you’ll have to download and install FFmpeg Library beforehand. Otherwise, you’ll need to separate the audio from the video or transcode the video to a suitable audio format.

Step #2: Detect the Noise Segment
Locate a portion with pure background noise by zooming in on the track or adjusting the Track Size under the View menu.

Choose “Noise Reduction” from the Effect tab, begin with the defaults, and then hit “Get Noise Profile” to have Audacity determine what to filter out based on the specified section.
Step #3: Eliminate Background Noise with Noise Profile
Next, select the entire audio track that requires noise reduction, return to the Noise Reduction panels, select how much noise you want to eliminate, and click OK to eliminate the noise. You may use the default settings. Audacity will automatically minimize the noise, and the outcome will be visible on the audio track right away.
Step #4: Calibrate the Settings
To address the white noise of your audio, go to Effect and Amplify. To see if the noise has been gone, click “Preview.” Click “OK” and then export the denoised clip from Audacity to MP3, WAV, or other codecs.

#4: Remove the Entire Audio from Video Online Free
It is available on Windows, Mac, and Online.
You can use several online audio removers if you don’t want to install apps to eliminate the background noise. For example, I discovered AudioRemover.com, a free online audio extractor. In just two actions, you may eradicate audio from video.
- Choose a video file first, then click the Upload Video button below. Depending on the size of the video, this could take some time.
- Click the download file to save it to your PC after it’s finished.

On the other hand, this online audio remover will eliminate all of your audio, background noise, narration, music, and sound. A video file can only be 500MB in size. It can play MP4, AVI, MOV, and other video formats.
Frequently Asked Questions
What is the best way to remove background noise from a video?
I highly recommend using Wondershare Filmora video editor; all you have to do is activate the Denoise feature in the Audio editing window to eliminate the background noise from the video. Furthermore, it will instantly delete the background noise, such as the breeze.
Is it possible to eliminate background noise from a video online?
You certainly can. Background noise can be removed online using online video editors like Veed.
How do I get rid of the background noise in a YouTube video?
To eliminate background audio noise from YouTube videos, you may first have to download the video, then use the Filmora video editor to eliminate the noise with a single click.
Method #2: Utilize the Noise Gate Feature
Reducing the volume and implementing the first method does not always eliminate background noise, so you must explore further.
There may be circumstances where the background noise is louder than the speaker, and decreasing the total volume makes it incomprehensible.
I suggest that you consider the Noise Gate if the background noise is a constant hiss. Noise Gate effectively suppresses sound below a specific volume, and background noise volume is lesser than the audio you want to include in your edit. As a result, using the Noise Gate is the best option.
To use the Noise Gate, go to the Track FX section of the interface and click the Audio FX button. Now select “Noise Gate.” The choices for this are now visible. Raise the threshold level; this establishes the total volume quality threshold. The Noise Gate will remove all audio below the threshold.
Alternative Ways to Remove Background Noise from Video
The learning curve of Sony Vegas may be a bit too complicated for you; then, there is nothing to worry about because you are in the right place. In this article, I also prepared a few alternative ways that you can use to remove background noises from your video. Let’s skip the talk and start learning:
#1: Wondershare Filmora – Overall Best
It is available on Windows and Mac.
Although there are many applications available for removing background noise, experts recommend Wondershare Filmora Video Editor. Let’s get right to the point.
Aside from the standard audio editing tools, Filmora now includes better wavelengths, volume keyframing, peak detection, and audio fades, resulting in a higher-quality audio editing interface. Here are some of the trump cards of using Filmora to remove background audio noise:
- Waveform audio editing with adjustable track height
- Remove background noise with ONE click using the Denoise function.
- Adjust the Denoise level to Weak, Mid, or Strong for improved noise reduction outcomes.
Here’s a guide on how to use Filmora to improve video footage, including how to eliminate background noise:
- In the Wondershare Filmora timeline panel, upload your clip. Trim and erase the video sections that you don’t wish to keep.
- Hover over the Audio option after right-clicking the clip in the timeline. The four choices available are silence detection, modification audio, removal audio, and mute. Select the “Audio Detach” feature to extract the audio from the video.
- Double-click on the audio file and select “Remove background noise” in the Edit Menu to eliminate the background noise instantly. You may also reach the Editing panel by double-clicking the video in the timeline without removing audio from the video and switching to the Audio page to edit audio and remove noise.
- You may also use the Equalizer tool to fine-tune the audio to make it seem more authentic. Simply tweak the music to fit the visual frame by frame if you want a better assessment. After analyzing the results, click Export to save the noise-reduced clip to your device or share it immediately to YouTube or Vimeo.
#2: Audacity
It is available on Windows, Mac, and Linux.
Audacity is a free, accessible, high-quality audio editing program that runs on Windows, Mac OS X, and Linux. You may use it to record live audio, modify it with capabilities like a cut, copy, and paste, and visualize advanced audio analysis using the Spectrogram view mode.You may also use it to eliminate background noise from your audio or video files for free.
The improved detailed instructions for removing background noise in Audacity in 2022 are listed below:
Step #1: Import Files to Audacity
Move to the File menu and hit Open or Import after running the program to load the audio or video source into Audacity. Before editing, Audacity will prompt you to make a copy of the audio track. This impresses me as extremely thoughtful. If you want to import a video file into Audacity, you’ll have to download and install FFmpeg Library beforehand. Otherwise, you’ll need to separate the audio from the video or transcode the video to a suitable audio format.
Step #2: Detect the Noise Segment
Locate a portion with pure background noise by zooming in on the track or adjusting the Track Size under the View menu.
Choose “Noise Reduction” from the Effect tab, begin with the defaults, and then hit “Get Noise Profile” to have Audacity determine what to filter out based on the specified section.
Step #3: Eliminate Background Noise with Noise Profile
Next, select the entire audio track that requires noise reduction, return to the Noise Reduction panels, select how much noise you want to eliminate, and click OK to eliminate the noise. You may use the default settings. Audacity will automatically minimize the noise, and the outcome will be visible on the audio track right away.
Step #4: Calibrate the Settings
To address the white noise of your audio, go to Effect and Amplify. To see if the noise has been gone, click “Preview.” Click “OK” and then export the denoised clip from Audacity to MP3, WAV, or other codecs.
#4: Remove the Entire Audio from Video Online Free
It is available on Windows, Mac, and Online.
You can use several online audio removers if you don’t want to install apps to eliminate the background noise. For example, I discovered AudioRemover.com, a free online audio extractor. In just two actions, you may eradicate audio from video.
- Choose a video file first, then click the Upload Video button below. Depending on the size of the video, this could take some time.
- Click the download file to save it to your PC after it’s finished.
On the other hand, this online audio remover will eliminate all of your audio, background noise, narration, music, and sound. A video file can only be 500MB in size. It can play MP4, AVI, MOV, and other video formats.
Frequently Asked Questions
What is the best way to remove background noise from a video?
I highly recommend using Wondershare Filmora video editor; all you have to do is activate the Denoise feature in the Audio editing window to eliminate the background noise from the video. Furthermore, it will instantly delete the background noise, such as the breeze.
Is it possible to eliminate background noise from a video online?
You certainly can. Background noise can be removed online using online video editors like Veed.
How do I get rid of the background noise in a YouTube video?
To eliminate background audio noise from YouTube videos, you may first have to download the video, then use the Filmora video editor to eliminate the noise with a single click.
15 Best Free MP4 Video Rotators [Windows,Mac, Android, iPhone & Online
Have you ever encountered a problem where you saved a video in the wrong orientation? So you ask yourself what’s the best tool to rotate. There are tools that help to flip videos recorded so that you don’t get frustrated while you watch them later on your pc or phone. So why don’t you take a look at the best video rotators that are available for Android, iOs, Windows, Mac, and online tools?
Best MP4 Video Rotators to Rotate MP4 Video on Windows and Mac - Filmroa Video Editor
Filmora Video Editor allows you to rotate your video to any angle. You can also zoom in and crop out the parts of the video that you don’t want to see. It also includes predefined aspect ratios such as 16:9, 9:16, 4:5, 1:1, and others to help you quickly discover the ideal aspect ratio for YouTube, Instagram, and other sites. Let’s look at how to modify the orientation of a video in Filmora.
For Win 7 or later (64-bit)
For macOS 10.14 or later
How to change the video orientation in Filmora
Step 1:Import the video file into Filmora, and then drag it to the timeline.
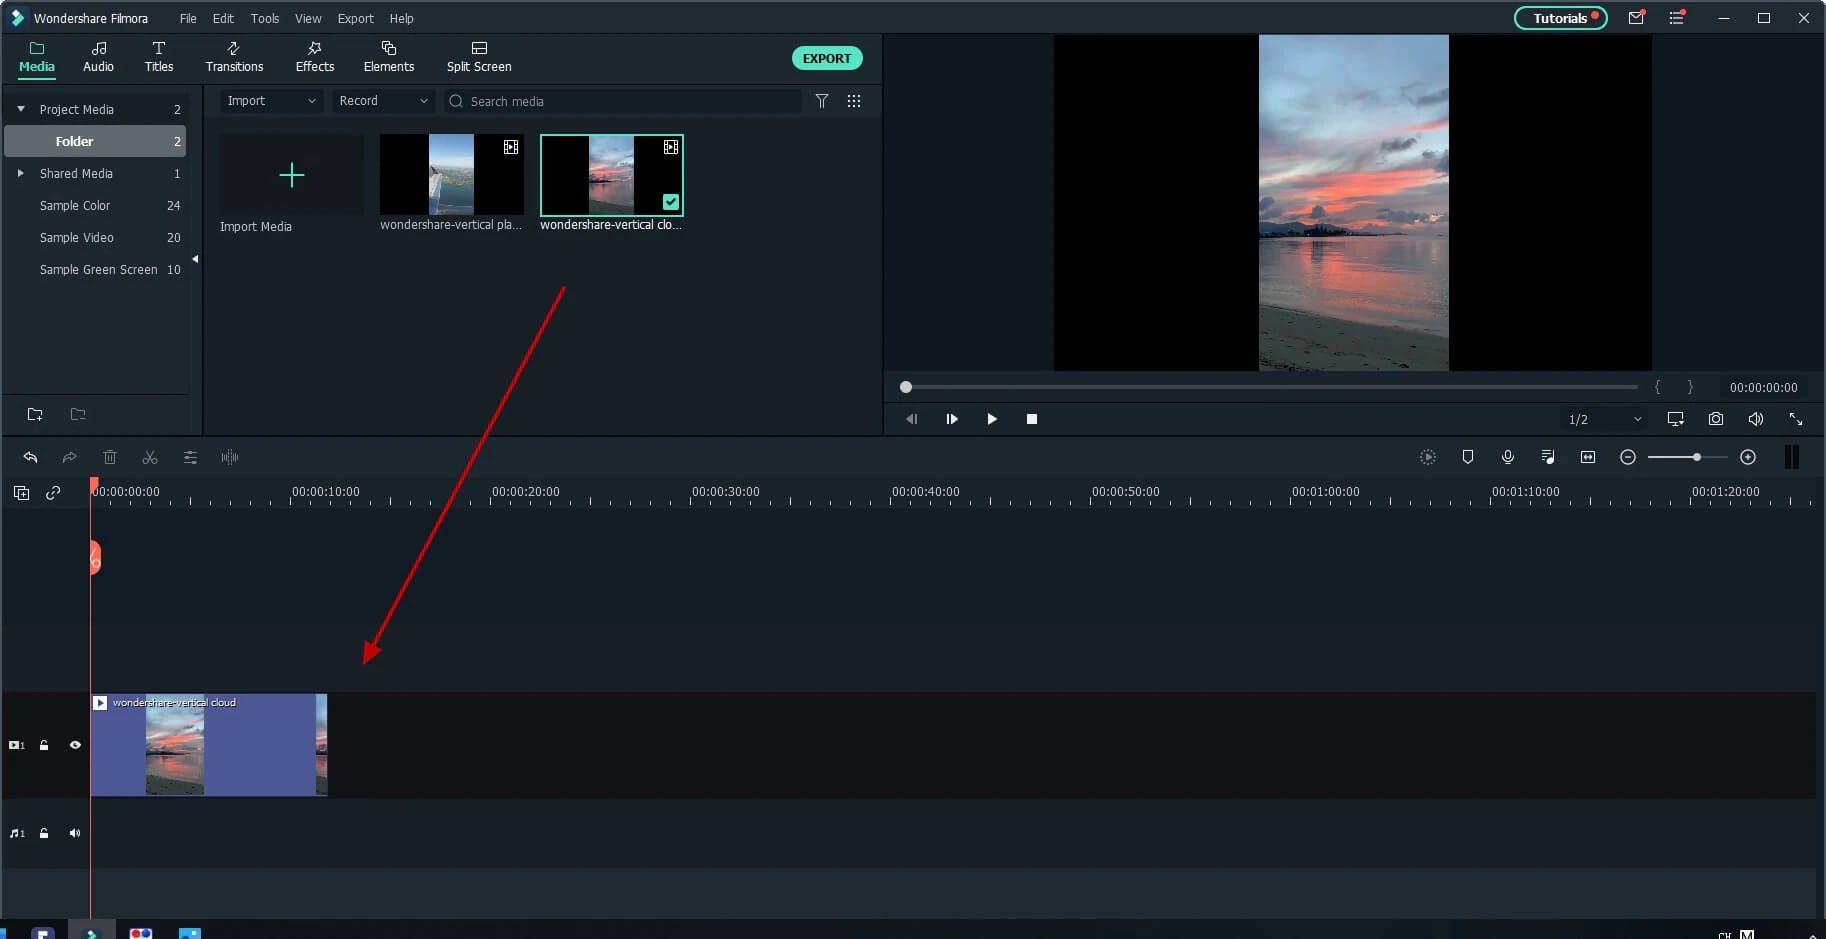
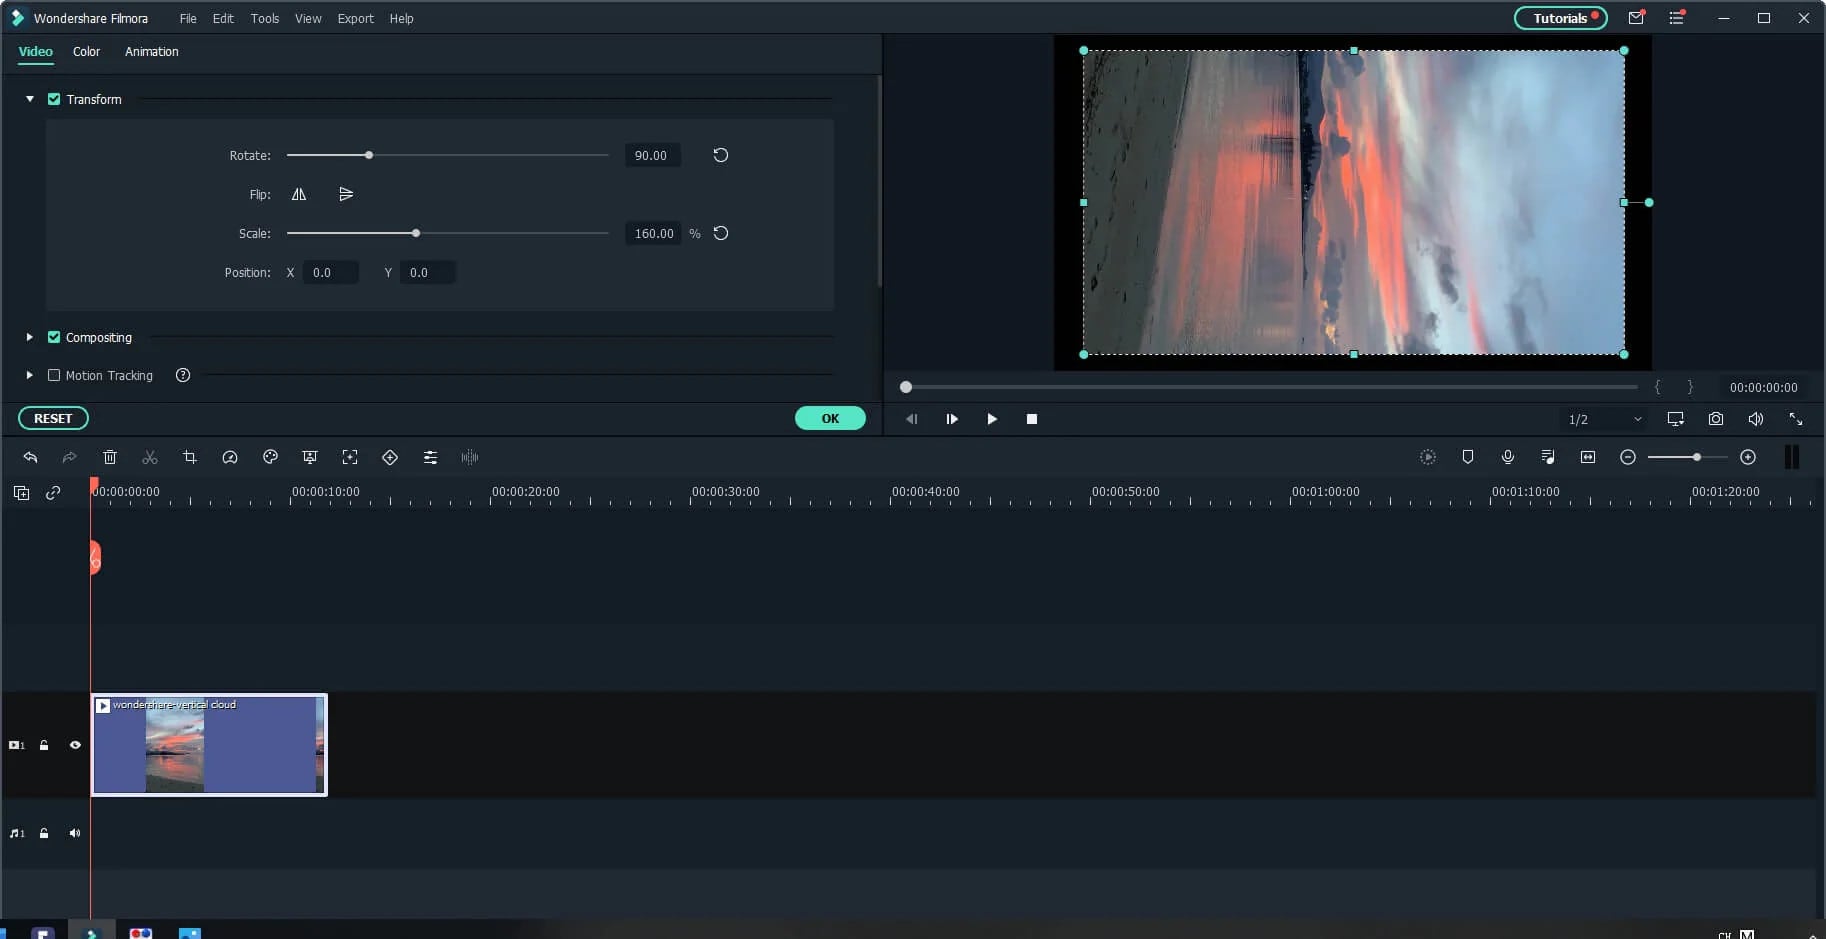
Step 2: To enter the video editing panel, double-click the video clip in the timeline. Locate the “Rotate” option under the “Transform” menu. You can drag the slider or enter a specific number to adjust the rotation value. You can rotate up to 360 degrees. When you enter “90” in the box, the video clip will be rotated 90 degrees.
By dragging the “Scale” slider, you can make the full image screen, or you can directly adjust its position, size, shape, etc., in the Viewer panel.
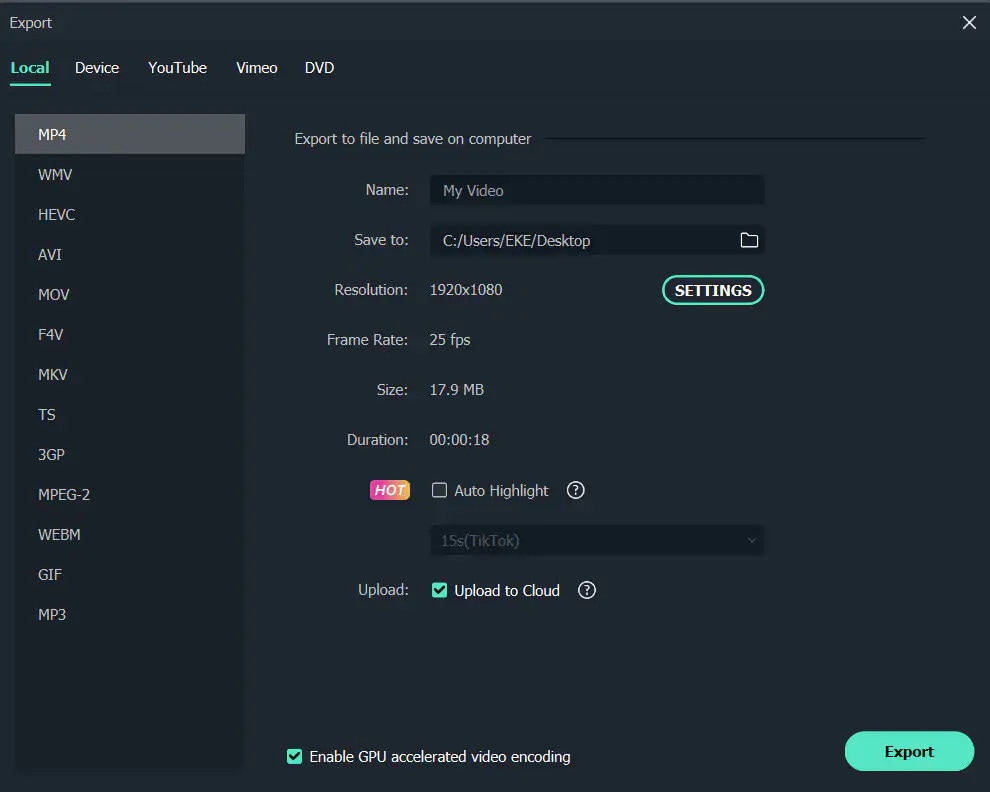
Step 3: After you are satisfied, click the export button. You can change the format here, or you can upload the file to YouTube.
Top 3 Free MP4 Video Rotators on Windows
Looking for the best free video rotator?
If you are looking for a free video rotator for windows, then this article has got you covered. A list of the top 3 free video rotators for windows has been listed.
- VSDC Free Video Editor

It is a highly functional video editing suite with easy controls. It provides anyone who is a beginner to easily access and edit the video easily.
It helps you rotate the videos in increments of 90 degrees, be it clockwise or anticlockwise )
VSDC is a free video editor with non-linear editing capabilities. Users may swiftly convert video and audio files from one format to another with VSDC. A built-in disk burning tool for DVDs is also included in the software. This free program, designed for educational purposes, can be used by businesses or individuals.
VSDC Free Video Editor features
- Built-In DVD Burning Tool
- Colour Blending And Filters
- Specific Multimedia Devices Creation
- Desktop Video Capture
- Export To Social Networking Sites
- Masking
- Non-Linear Video Editing
- Subpixel Accuracy
- Supports Popular Formats
- Video File Converter
Pros
- It’s completely free.
- There is no watermark.
- There are numerous free video editing programs available.
- Support a wide range of file formats
Cons
There isn’t a macOS version available.
Take a severe learning curve into consideration.
There are numerous premium-only features.
The timeline isn’t the same as most NLE editing software.
- Windows Movie Maker
The most well-known video rotator and editor are probably Windows Movie Maker. Most of us who grew up with Microsoft’s various operating systems have had access to it because it comes as a free download with most Microsoft products. It can handle a wide range of files and is generally simple to use. Adding features like sound, music, special effects, or even speeding up the video is simple, and you’ll love the variety of skins available.
For beginners, Windows Video Maker is ideal. It is available for free on Windows PCs and includes basic capabilities and workflow aspects found in professional video editing systems. Its user-friendly interface resembles a simplified version of a video editor timeline and is simple enough for even inexperienced editors to understand.
Features of Windows Movie Maker
- Customization Tool’s title
- Auto Movie Options
- Credit Customization Tool
- Special Effects Options
- Overlays for Transitions
Pros:
- Various video editing functions;
- A variety of output possibilities
Cons:
- Many different versions of the same product;
- No longer included in the Windows operating system.
3.EaseUS Video Editor
EaseUS Video Editor is one of the few most popular video rotators we have today. Its video editing provides tools that can change the video orientation by 90 degrees anticlockwise and clockwise, which can flip vertically and horizontally.
In terms of videos, adding great filters, sound, music, subtitles and other elements to have a great video output can be achieved using the EaseUS. Moreover, it accepts video formats and can convert files to MP4 and other great features.
Features of EaseUS Video Editor
- Can easily trim, cut, split, merge, rotate, and mix video clips.
- Ability to apply stylish video effects
- Can add or remove the watermark and reduce background or wind noise from a video.
Pros:
- User-friendly interface, perfect for beginners
- Easily trim, cut, split, merge, rotate, mix video clips
- A full range of free visual and audio effects
- Change of contrast, exposure, brightness, and other video aspects
- Use the voiceover function to add your comments to the video
Cons:
- The software has no version for macOS
Top 3 Free MP4 Video Rotators on Mac
- iMovie
The iMovie for Mac users is an exceptional video rotator. You can turn any video or movie you may have into an amazing masterpiece with more features due to the special after-effects it has. Simple application to use and navigate easily, although when importing video takes a while at certain times.
Features of the iMovie include
- Full range of options to modify
- Ability to enhance colour settings
- Easily crop and edit video clips ease
- Ability to change the speed of clips.
Pros:
- Nice interface;
- The function is to create fun Movie Trailers.
Cons:
- Supports only a few video formats;
- Pre-processing and import trans-coding can be time-consuming.
- Movavi Video Editor
Movavi has a free version that is easy to use, especially for beginners. It allows you to add titles, filters, transitions, and special effects to your videos and photographs to make attractive movies. You can use the animation to smoothly move things around the screen in your film. On the multi-track timeline, you can add as many tracks as you wish. From the expanded built-in collection, you can get more example video clips, stickers, and audio tracks.
Features of Movavi Video Editor
- You can upload files and photographs in almost any format.
- To make videos automatically, use the Montage Wizard.
- Transition Wizard allows you to quickly put together slideshows.
- Enhance image quality by cutting, cropping, and rotating videos on the timeline.
- Apply artistic filters, and make transitions between portions as smooth as possible.
- Create animated headlines, stickers, callouts, and video overlays:
Pros:
- It’s appropriate for newcomers and casual users alike.
- A number of video formats are supported, including.mov (QuickTime)
- Chroma Key and Slow Motion are examples of special effects.
Cons
- Only the premium version supports the advanced features.
- It uses the basic colour grading tool
- QuickTime Player
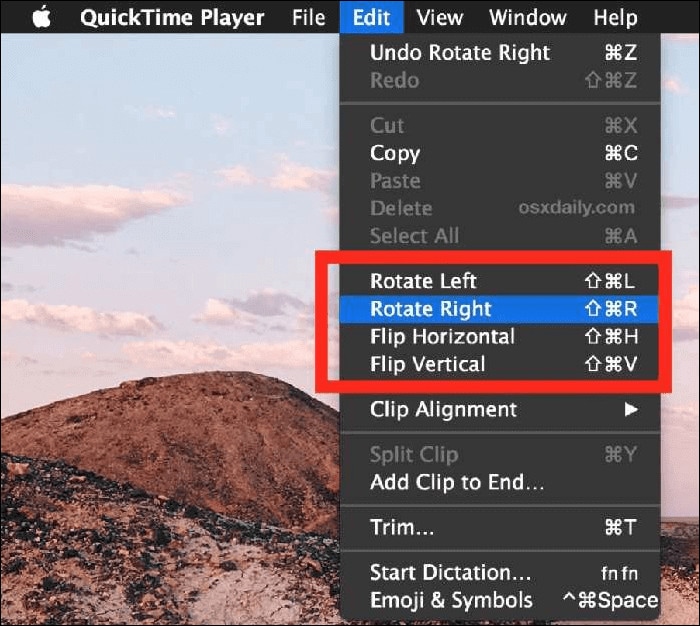
The key advantage of Apple’s QuickTime is that it comes pre-installed on your Mac’s macOS operating system. It’s powerful enough to rotate your clip, yet it’s simple enough for beginners to do. iTunes files can be played and edited with QuickTime. After rotation, it exports a new video file, leaving the old clip on the Mac. The output video will be compressed slightly, resulting in a smaller rotational video file than the original.
Features of QuickTime Player
- Anything can be recorded, including video, audio, and the screen.
- Cropping, audio detachment, combining, and rotation are all simple video editing techniques.
- From 4K to 480p video compression
- Quickly share your video: directly upload videos to YouTube
Pros:
- With macOS, it comes pre-installed.
- Work with iTunes files Streaming video player with no configuration
Cons:
- Only QuickTime Pro 7 unlocks the editing feature.
- There will be no more Windows versions.
- It isn’t compatible with standard subtitle files.
Top 3 Free MP4 Video Rotators on Android
When we use a smartphone to capture a video or download one from a website, we occasionally discover that the video has been inverted. As a result, we’ll require a video rotator app to correct the problem. On the market, there are many different sorts of tools for various platforms. However, you may have discovered that separating the wheat from the chaff can be difficult at times. To save you time, I’ve compiled a list of 3 video rotator applications for Android
- VivaVideo
VivaVideo is one of the top movie producers and free video rotators for Android devices as a media editor. This application allows you to alter the orientation of your videos. Aside from rotating videos, this software also includes cropping, combining, cutting, and other editing features. “The best video editor software is VivaVideo - Video Maker App,” an Android expert previously said. This program is a video producer as well as an editor.
Features of VivaVideo
- It allows you to add music to videos.
- Combine videos clips into one video
- Can apply video effects.
- After you’ve finished editing your videos, you may save and share them on YouTube and TikTok! To rotate video, use this program!
Pros
- It has an In-app camera with live effects previews for capturing videos.
- More than 60 effects to choose from with additional downloadable effects.
- Enhance the videos using themes.
- Ability to Merge videos and create montages with storyboarding features
- Edit frames within a video
Cons
- There is no negative review to say about this app
2.Google Photos
This app may already be installed on your smartphone, but you are unaware of its full potential. This program includes a built-in picture and video editor in addition to backing up your photos. This program includes three essential video editing tools that are extremely basic and easy to use.
The first is to stabilize the video; if your video is unsteady, you can use this option in Google Photos to stabilize it. You may also use the timeline below the video to cut the video. If you mistakenly captured the video in the wrong orientation, there is a tool to rotate it.
Features of Google Photos
- You can modify photographs and videos in Google Photos.
- On Google Photos, make a collage or a movie.
- Recover photos or videos that were recently erased.
- Clear off some space on Google Photos…
- Place photos in the Archive.
Pros
Google Images automatically backs up all of your device’s photos and videos.
Despite its many advantages, the reason I choose Google Photos is that it helps me save space on my smartphone.
The original quality of images stored in Google Photos is really high. Photos and videos are saved in the same resolution as when they were taken.
Over time, Google has improved the Google Photos interface, and it now incorporates AI to provide consumers with even better performance.
Cons
There aren’t many effects, and there aren’t any other editing tools.
The lack of a password-protection option in Google Photos is annoying. Some photos are private, and you may not wish to share them with others.
Users of Google Photos will no longer have limitless storage.
3Adobe Rush
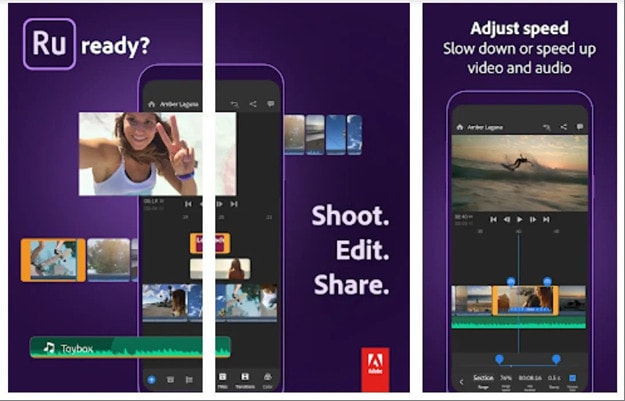
Adobe Rush is a new video editor that Adobe released via a partnership with Samsung’s latest flagship smartphone. This app is a simple yet powerful tool for editing videos on the go, on your smartphone.
This app comes with some powerful tools which you find on some high-end video editing apps. You get a timeline interface to edit your videos perfectly, and you get some music recommendations right into the app.
Features Of Adobe Rush
- In the timeline, you can make changes to your video.
- Audio can be added and refined.
- Change the colour, size, and position of the video.
- Make a title.
- Add transitions, pan and zoom effects, and reframe your clips automatically.
- Change the clip’s attributes.
- Change your video’s aspect ratio.
- Create the illusion of a picture-in-picture effect.
Pros
- It has a user-friendly UI that is responsive and snappy.
- It’s easy to use and provides helpful advice for newcomers.
- It enables Adobe users to quickly and easily produce stunning videos that are customized to their preferences.
- When compared to its competitors, exporting files is a breeze.
- Unlike most of its competitors, it comes with good colour and title tools.
- YouTube, Facebook, Vimeo, Snapchat, Instagram, and Twitter are just a few of the social media channels where the finished files can be simply shared.
- It synchronizes projects between desktop and mobile devices, making them more accessible.
Cons
- When compared to its competitors, it is a little costly.
- It renders projects slowly and only supports three transitions.
- The app does not have storyboard templates and cannot specify the exact structure for output files.
- It only comes with a few video and audio editing capabilities.
- Many standard video effects are missing.
Top 3 Free MP4 Video Rotators on iPhone
1.Splice

Trimming, cropping, effects, titles, speed adjustments, animation, transitions, and music are all available in this well-known video editor, which has a cultish following of dedicated Splicers.
Splice’s music library is one of its strongest assets. It offers a large selection of free music and sound effects to layer over your video, as well as the ability to sync your movie to the beat of your soundtrack.
Features of Splice
Clips should be cropped and trimmed to focus on the highlights.
With an Audio Library and iTunes Integration, you may add music to your videos.
To smooth transitions between clips and images, use transitions.
Enhance videos with effects.
Pros:
- Developed by GoPro, award-winning, highly regarded.
Cons:
- Only available on iOS devices.
2. Clips

It’s easy to miss pre-loaded apps like Apple’s Clips, but this video editing tool has lots of impressive features to enjoy, thanks to the weight of the tech giant’s greatest brains behind it. Take, for example, their live tiles setting. You can use this to generate animated captions and titles that appear as you speak.
To liven things up, you may add animated emojis and backgrounds, and music tracks dynamically sync to the length of your video.
Features of Clips
- Ability to generate animated captions
- Full access to Animated emojis and backgrounds
- Ability to have your music sync to your videos
Pros:
- Simple to use, unique features, and Apple’s support.
Cons:
- It’s only for iOS devices (obviously! ), and it has trouble with a big number of clips.
3. Quik

You may apply transitions and effects to up to 200 photographs and video clips from your photo library or GoPro Plus with this free software. You may not only crop, zoom, and rotate photos and video clips, but you can also customize them with 26 different themes, fonts, effects, and artwork.
You may make HD 1080p or 720p films for social sharing in cinema, square, or portrait formats, and you can store your draft creations for up to seven days.
Features of Quik
- Everything that is available for free.
- There are no limits to the number of mural events.
- Editing is unrestricted.
- There are now a total of 25 more photo and video filters.
Pros:
- Tons of features, including access to 100+ free songs,
- Flashbacks and QuikStories, which make videos based on your most recent footage,
- syncs footage to the beat of your soundtrack, and AI editing help.
Cons:
- Limited control and no trimming option; customers have claimed that it is occasionally glitchy.
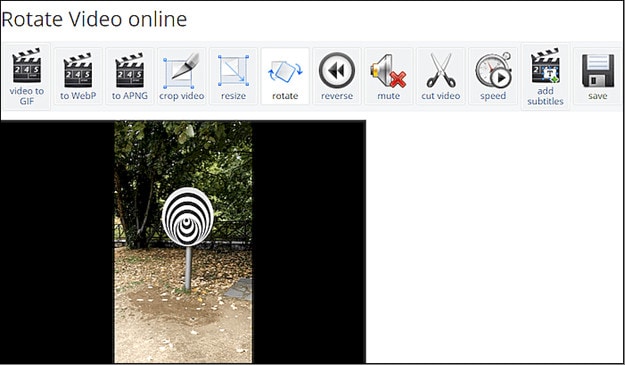
Top 3 Free MP4 Video Rotators Online
1.Online Video Cutter
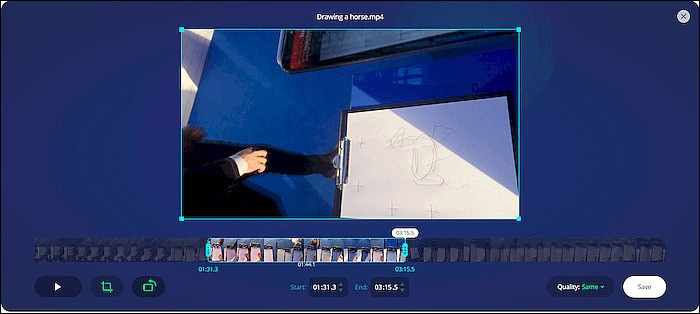
This web tool comes in helpful when you need to rapidly edit a small video file. It is not necessary to install it; you may use it right from your browser. The clip can only be rotated 90, 180, or 270 degrees. It’ll come in handy, especially if you’ve closed the video in portrait mode and want to watch it on a big screen. The service’s provider says that the files will be automatically erased from the servers a few hours after you accomplish your task, resulting in a high level of security.
Features of Online Video cutter.
- It Supports Any Video Format. …
- Completely Online for you to access
- Additional Settings to make more edits to videos
- Easy to use, User-friendly interface.
Pros:
It has a very simple user interface.
You do not need to pay for a license to utilize it.
Almost every video format is supported.
Cons:
Only suitable for little clips
Performing simply the most basic functions, such as rotating and cropping
2.EzGif
This unique internet tool not only creates animated GIFs but can also rotate video. You simply choose the clip from your local folder. However, the file’s maximum size is limited to 100MB. A basic tool for rotating the video through 90, 180, and 270 degrees. You can also vertically and horizontally flip the video before exporting it in a different format and encoding.
Features of EzGif
- A simple user interface to find your way around the website.
- Ability to do resizing and rotating of videos and images.
- Capable of video conversions and editing
Pros:
- Many video formats are supported, including MP4, WebM, AVI, MPEG, FLV, MOV, and 3GP.
- The rotation procedure is quick and simple to utilize.
- After rotating, provide a preview function.
Cons:
- The maximum file size is 100 megabytes.
- There are no filters or transitions, and only basic editing functions are available.
3.Videorotate
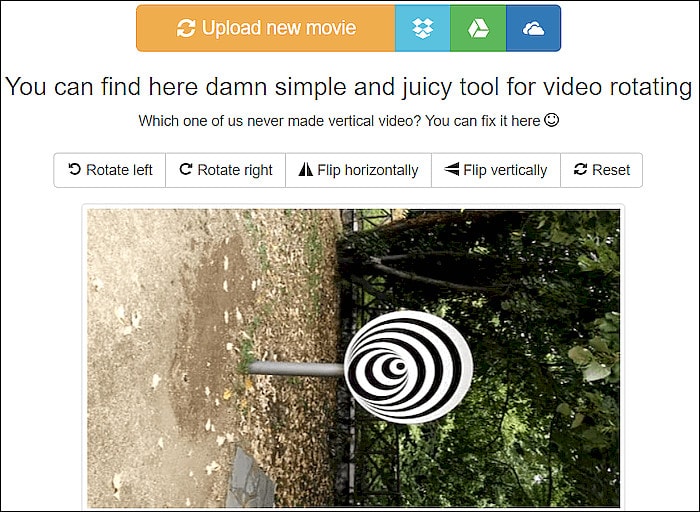
- This is a free online video rotator that is simple and quick to use. You can upload your video from a local folder or import a recorded clip from major cloud services like Dropbox, Google Drive, and One Drive, just like the other online services (there are buttons for each of them). You can flip the clip or rotate it left and right. Other video capabilities available on the site include cropping, stabilizing, and slicing.
Features of Videorotate
- Ability to crop, stabilize and slice videos.
Pros:
- Simple and straightforward to use
- Clips from your Dropbox, Google Drive, and OneDrive accounts can be uploaded.
- A specific “Reset” button is available.
Cons:
- For basic operations, a service for newcomers is available.
- Only a few video file formats are supported.
FAQs about Video Rotator
- What is the best way to rotate a video?
Use an easy-to-use video editing program. It’s easy to rotate a video, even if you’ve never edited one before. You can also use some media players.
- How do I rotate a video permanently?
In this guide, we will show you exactly how to rotate video in Windows with EaseUS Video Editor and save it permanently.
3.How can I rotate a video for free on the internet?
It’s simple to rotate a video online, and there are various services that offer free online video rotators.
- Videorotate
- Ezgif
- Video cutter on the internet
- How do I mirror a video on the internet?
The websites that support video rotation also offer the ability to “flip” the video vertically and horizontally. You’ll have “mirroring” frames in this manner as if you’re filming your pals in the mirror.
For macOS 10.14 or later
How to change the video orientation in Filmora
Step 1:Import the video file into Filmora, and then drag it to the timeline.
Step 2: To enter the video editing panel, double-click the video clip in the timeline. Locate the “Rotate” option under the “Transform” menu. You can drag the slider or enter a specific number to adjust the rotation value. You can rotate up to 360 degrees. When you enter “90” in the box, the video clip will be rotated 90 degrees.
By dragging the “Scale” slider, you can make the full image screen, or you can directly adjust its position, size, shape, etc., in the Viewer panel.
Step 3: After you are satisfied, click the export button. You can change the format here, or you can upload the file to YouTube.
Top 3 Free MP4 Video Rotators on Windows
Looking for the best free video rotator?
If you are looking for a free video rotator for windows, then this article has got you covered. A list of the top 3 free video rotators for windows has been listed.
- VSDC Free Video Editor
It is a highly functional video editing suite with easy controls. It provides anyone who is a beginner to easily access and edit the video easily.
It helps you rotate the videos in increments of 90 degrees, be it clockwise or anticlockwise )
VSDC is a free video editor with non-linear editing capabilities. Users may swiftly convert video and audio files from one format to another with VSDC. A built-in disk burning tool for DVDs is also included in the software. This free program, designed for educational purposes, can be used by businesses or individuals.
VSDC Free Video Editor features
- Built-In DVD Burning Tool
- Colour Blending And Filters
- Specific Multimedia Devices Creation
- Desktop Video Capture
- Export To Social Networking Sites
- Masking
- Non-Linear Video Editing
- Subpixel Accuracy
- Supports Popular Formats
- Video File Converter
Pros
- It’s completely free.
- There is no watermark.
- There are numerous free video editing programs available.
- Support a wide range of file formats
Cons
There isn’t a macOS version available.
Take a severe learning curve into consideration.
There are numerous premium-only features.
The timeline isn’t the same as most NLE editing software.
- Windows Movie Maker
The most well-known video rotator and editor are probably Windows Movie Maker. Most of us who grew up with Microsoft’s various operating systems have had access to it because it comes as a free download with most Microsoft products. It can handle a wide range of files and is generally simple to use. Adding features like sound, music, special effects, or even speeding up the video is simple, and you’ll love the variety of skins available.
For beginners, Windows Video Maker is ideal. It is available for free on Windows PCs and includes basic capabilities and workflow aspects found in professional video editing systems. Its user-friendly interface resembles a simplified version of a video editor timeline and is simple enough for even inexperienced editors to understand.
Features of Windows Movie Maker
- Customization Tool’s title
- Auto Movie Options
- Credit Customization Tool
- Special Effects Options
- Overlays for Transitions
Pros:
- Various video editing functions;
- A variety of output possibilities
Cons:
- Many different versions of the same product;
- No longer included in the Windows operating system.
3.EaseUS Video Editor
EaseUS Video Editor is one of the few most popular video rotators we have today. Its video editing provides tools that can change the video orientation by 90 degrees anticlockwise and clockwise, which can flip vertically and horizontally.
In terms of videos, adding great filters, sound, music, subtitles and other elements to have a great video output can be achieved using the EaseUS. Moreover, it accepts video formats and can convert files to MP4 and other great features.
Features of EaseUS Video Editor
- Can easily trim, cut, split, merge, rotate, and mix video clips.
- Ability to apply stylish video effects
- Can add or remove the watermark and reduce background or wind noise from a video.
Pros:
- User-friendly interface, perfect for beginners
- Easily trim, cut, split, merge, rotate, mix video clips
- A full range of free visual and audio effects
- Change of contrast, exposure, brightness, and other video aspects
- Use the voiceover function to add your comments to the video
Cons:
- The software has no version for macOS
Top 3 Free MP4 Video Rotators on Mac
- iMovie
The iMovie for Mac users is an exceptional video rotator. You can turn any video or movie you may have into an amazing masterpiece with more features due to the special after-effects it has. Simple application to use and navigate easily, although when importing video takes a while at certain times.
Features of the iMovie include
- Full range of options to modify
- Ability to enhance colour settings
- Easily crop and edit video clips ease
- Ability to change the speed of clips.
Pros:
- Nice interface;
- The function is to create fun Movie Trailers.
Cons:
- Supports only a few video formats;
- Pre-processing and import trans-coding can be time-consuming.
- Movavi Video Editor
Movavi has a free version that is easy to use, especially for beginners. It allows you to add titles, filters, transitions, and special effects to your videos and photographs to make attractive movies. You can use the animation to smoothly move things around the screen in your film. On the multi-track timeline, you can add as many tracks as you wish. From the expanded built-in collection, you can get more example video clips, stickers, and audio tracks.
Features of Movavi Video Editor
- You can upload files and photographs in almost any format.
- To make videos automatically, use the Montage Wizard.
- Transition Wizard allows you to quickly put together slideshows.
- Enhance image quality by cutting, cropping, and rotating videos on the timeline.
- Apply artistic filters, and make transitions between portions as smooth as possible.
- Create animated headlines, stickers, callouts, and video overlays:
Pros:
- It’s appropriate for newcomers and casual users alike.
- A number of video formats are supported, including.mov (QuickTime)
- Chroma Key and Slow Motion are examples of special effects.
Cons
- Only the premium version supports the advanced features.
- It uses the basic colour grading tool
- QuickTime Player
The key advantage of Apple’s QuickTime is that it comes pre-installed on your Mac’s macOS operating system. It’s powerful enough to rotate your clip, yet it’s simple enough for beginners to do. iTunes files can be played and edited with QuickTime. After rotation, it exports a new video file, leaving the old clip on the Mac. The output video will be compressed slightly, resulting in a smaller rotational video file than the original.
Features of QuickTime Player
- Anything can be recorded, including video, audio, and the screen.
- Cropping, audio detachment, combining, and rotation are all simple video editing techniques.
- From 4K to 480p video compression
- Quickly share your video: directly upload videos to YouTube
Pros:
- With macOS, it comes pre-installed.
- Work with iTunes files Streaming video player with no configuration
Cons:
- Only QuickTime Pro 7 unlocks the editing feature.
- There will be no more Windows versions.
- It isn’t compatible with standard subtitle files.
Top 3 Free MP4 Video Rotators on Android
When we use a smartphone to capture a video or download one from a website, we occasionally discover that the video has been inverted. As a result, we’ll require a video rotator app to correct the problem. On the market, there are many different sorts of tools for various platforms. However, you may have discovered that separating the wheat from the chaff can be difficult at times. To save you time, I’ve compiled a list of 3 video rotator applications for Android
- VivaVideo
VivaVideo is one of the top movie producers and free video rotators for Android devices as a media editor. This application allows you to alter the orientation of your videos. Aside from rotating videos, this software also includes cropping, combining, cutting, and other editing features. “The best video editor software is VivaVideo - Video Maker App,” an Android expert previously said. This program is a video producer as well as an editor.
Features of VivaVideo
- It allows you to add music to videos.
- Combine videos clips into one video
- Can apply video effects.
- After you’ve finished editing your videos, you may save and share them on YouTube and TikTok! To rotate video, use this program!
Pros
- It has an In-app camera with live effects previews for capturing videos.
- More than 60 effects to choose from with additional downloadable effects.
- Enhance the videos using themes.
- Ability to Merge videos and create montages with storyboarding features
- Edit frames within a video
Cons
- There is no negative review to say about this app
2.Google Photos
This app may already be installed on your smartphone, but you are unaware of its full potential. This program includes a built-in picture and video editor in addition to backing up your photos. This program includes three essential video editing tools that are extremely basic and easy to use.
The first is to stabilize the video; if your video is unsteady, you can use this option in Google Photos to stabilize it. You may also use the timeline below the video to cut the video. If you mistakenly captured the video in the wrong orientation, there is a tool to rotate it.
Features of Google Photos
- You can modify photographs and videos in Google Photos.
- On Google Photos, make a collage or a movie.
- Recover photos or videos that were recently erased.
- Clear off some space on Google Photos…
- Place photos in the Archive.
Pros
Google Images automatically backs up all of your device’s photos and videos.
Despite its many advantages, the reason I choose Google Photos is that it helps me save space on my smartphone.
The original quality of images stored in Google Photos is really high. Photos and videos are saved in the same resolution as when they were taken.
Over time, Google has improved the Google Photos interface, and it now incorporates AI to provide consumers with even better performance.
Cons
There aren’t many effects, and there aren’t any other editing tools.
The lack of a password-protection option in Google Photos is annoying. Some photos are private, and you may not wish to share them with others.
Users of Google Photos will no longer have limitless storage.
3Adobe Rush
Adobe Rush is a new video editor that Adobe released via a partnership with Samsung’s latest flagship smartphone. This app is a simple yet powerful tool for editing videos on the go, on your smartphone.
This app comes with some powerful tools which you find on some high-end video editing apps. You get a timeline interface to edit your videos perfectly, and you get some music recommendations right into the app.
Features Of Adobe Rush
- In the timeline, you can make changes to your video.
- Audio can be added and refined.
- Change the colour, size, and position of the video.
- Make a title.
- Add transitions, pan and zoom effects, and reframe your clips automatically.
- Change the clip’s attributes.
- Change your video’s aspect ratio.
- Create the illusion of a picture-in-picture effect.
Pros
- It has a user-friendly UI that is responsive and snappy.
- It’s easy to use and provides helpful advice for newcomers.
- It enables Adobe users to quickly and easily produce stunning videos that are customized to their preferences.
- When compared to its competitors, exporting files is a breeze.
- Unlike most of its competitors, it comes with good colour and title tools.
- YouTube, Facebook, Vimeo, Snapchat, Instagram, and Twitter are just a few of the social media channels where the finished files can be simply shared.
- It synchronizes projects between desktop and mobile devices, making them more accessible.
Cons
- When compared to its competitors, it is a little costly.
- It renders projects slowly and only supports three transitions.
- The app does not have storyboard templates and cannot specify the exact structure for output files.
- It only comes with a few video and audio editing capabilities.
- Many standard video effects are missing.
Top 3 Free MP4 Video Rotators on iPhone
1.Splice
Trimming, cropping, effects, titles, speed adjustments, animation, transitions, and music are all available in this well-known video editor, which has a cultish following of dedicated Splicers.
Splice’s music library is one of its strongest assets. It offers a large selection of free music and sound effects to layer over your video, as well as the ability to sync your movie to the beat of your soundtrack.
Features of Splice
Clips should be cropped and trimmed to focus on the highlights.
With an Audio Library and iTunes Integration, you may add music to your videos.
To smooth transitions between clips and images, use transitions.
Enhance videos with effects.
Pros:
- Developed by GoPro, award-winning, highly regarded.
Cons:
- Only available on iOS devices.
2. Clips
It’s easy to miss pre-loaded apps like Apple’s Clips, but this video editing tool has lots of impressive features to enjoy, thanks to the weight of the tech giant’s greatest brains behind it. Take, for example, their live tiles setting. You can use this to generate animated captions and titles that appear as you speak.
To liven things up, you may add animated emojis and backgrounds, and music tracks dynamically sync to the length of your video.
Features of Clips
- Ability to generate animated captions
- Full access to Animated emojis and backgrounds
- Ability to have your music sync to your videos
Pros:
- Simple to use, unique features, and Apple’s support.
Cons:
- It’s only for iOS devices (obviously! ), and it has trouble with a big number of clips.
3. Quik
You may apply transitions and effects to up to 200 photographs and video clips from your photo library or GoPro Plus with this free software. You may not only crop, zoom, and rotate photos and video clips, but you can also customize them with 26 different themes, fonts, effects, and artwork.
You may make HD 1080p or 720p films for social sharing in cinema, square, or portrait formats, and you can store your draft creations for up to seven days.
Features of Quik
- Everything that is available for free.
- There are no limits to the number of mural events.
- Editing is unrestricted.
- There are now a total of 25 more photo and video filters.
Pros:
- Tons of features, including access to 100+ free songs,
- Flashbacks and QuikStories, which make videos based on your most recent footage,
- syncs footage to the beat of your soundtrack, and AI editing help.
Cons:
- Limited control and no trimming option; customers have claimed that it is occasionally glitchy.
Top 3 Free MP4 Video Rotators Online
1.Online Video Cutter
This web tool comes in helpful when you need to rapidly edit a small video file. It is not necessary to install it; you may use it right from your browser. The clip can only be rotated 90, 180, or 270 degrees. It’ll come in handy, especially if you’ve closed the video in portrait mode and want to watch it on a big screen. The service’s provider says that the files will be automatically erased from the servers a few hours after you accomplish your task, resulting in a high level of security.
Features of Online Video cutter.
- It Supports Any Video Format. …
- Completely Online for you to access
- Additional Settings to make more edits to videos
- Easy to use, User-friendly interface.
Pros:
It has a very simple user interface.
You do not need to pay for a license to utilize it.
Almost every video format is supported.
Cons:
Only suitable for little clips
Performing simply the most basic functions, such as rotating and cropping
2.EzGif
This unique internet tool not only creates animated GIFs but can also rotate video. You simply choose the clip from your local folder. However, the file’s maximum size is limited to 100MB. A basic tool for rotating the video through 90, 180, and 270 degrees. You can also vertically and horizontally flip the video before exporting it in a different format and encoding.
Features of EzGif
- A simple user interface to find your way around the website.
- Ability to do resizing and rotating of videos and images.
- Capable of video conversions and editing
Pros:
- Many video formats are supported, including MP4, WebM, AVI, MPEG, FLV, MOV, and 3GP.
- The rotation procedure is quick and simple to utilize.
- After rotating, provide a preview function.
Cons:
- The maximum file size is 100 megabytes.
- There are no filters or transitions, and only basic editing functions are available.
3.Videorotate
- This is a free online video rotator that is simple and quick to use. You can upload your video from a local folder or import a recorded clip from major cloud services like Dropbox, Google Drive, and One Drive, just like the other online services (there are buttons for each of them). You can flip the clip or rotate it left and right. Other video capabilities available on the site include cropping, stabilizing, and slicing.
Features of Videorotate
- Ability to crop, stabilize and slice videos.
Pros:
- Simple and straightforward to use
- Clips from your Dropbox, Google Drive, and OneDrive accounts can be uploaded.
- A specific “Reset” button is available.
Cons:
- For basic operations, a service for newcomers is available.
- Only a few video file formats are supported.
FAQs about Video Rotator
- What is the best way to rotate a video?
Use an easy-to-use video editing program. It’s easy to rotate a video, even if you’ve never edited one before. You can also use some media players.
- How do I rotate a video permanently?
In this guide, we will show you exactly how to rotate video in Windows with EaseUS Video Editor and save it permanently.
3.How can I rotate a video for free on the internet?
It’s simple to rotate a video online, and there are various services that offer free online video rotators.
- Videorotate
- Ezgif
- Video cutter on the internet
- How do I mirror a video on the internet?
The websites that support video rotation also offer the ability to “flip” the video vertically and horizontally. You’ll have “mirroring” frames in this manner as if you’re filming your pals in the mirror.
Also read:
- 2024 Approved Video Editing Tips to Know Before Editing First Draft
- New 2024 Approved What Slideshow Templates Can Teach You About Aesthetic
- Updated In 2024, Add Text Animation to A Video Online
- In 2024, Find Out The Best Dark Moody LUTs During Editing
- 2024 Approved Are You Searching for the Best Cinematic LUTs for Premiere Pro? You Are in the Right Place because This Article Is Dedicated to LUTs
- New Advancements in Game Recording Software A Comprehensive Overview
- New Are You Tired of Long Video Edits? Do You Speed up the Video in Canva without a Hassle? Well, Stick with Us as We Guide You Through the Process Step by Step
- New Getting To Know More About the Video Editing Interface of Wondershare Filmora
- Video Maker with Song
- New MP3 Cutter Download
- New Have You Ever Tried to Remove Motion Blur From Photos? This Article Will Address How to Remove the Motion Blur Effect Using Photoshop and Its Alternatives
- In 2024, How to Make A Funny Vlog for TikTok?
- Updated In 2024, How to Customize Your Loading Text Effect?
- Fast and Easy Method to Match Color in Photoshop
- New How To Make a Video by Mouse in Filmora for 2024
- 2024 Approved WebM to GIF Converters (Online and Offline Solutions)
- How to Turn Off Google Location to Stop Tracking You on Asus ROG Phone 8 Pro | Dr.fone
- How to Reset a Vivo S17 Phone That Is Locked | Dr.fone
- In 2024, Best Apple iPhone XR & iPad Screen Mirroring App | Dr.fone
- In 2024, Your Account Has Been Disabled in the App Store and iTunes On Apple iPhone 6s?
- New In 2024, Easy Tutorial How to Record and Send Talking Emoji for iPhone
- In 2024, Best Vivo FRP Bypass Guide
- How to Stop Life360 from Tracking You On Vivo Y78t? | Dr.fone
- How to Come up With the Best Pokemon Team On Honor 90 GT? | Dr.fone
- 2 Ways to Transfer Text Messages from Motorola G54 5G to iPhone 15/14/13/12/11/X/8/ | Dr.fone
- In 2024, Did Your iPhone 11 Pro Passcode Change Itself? Unlock It Now | Dr.fone
- How to Stop My Spouse from Spying on My Nokia C12 Pro | Dr.fone
- Title: Updated Discover the Top 5 Free Online Video Filter Editors to Transform Your Videos with Captivating Color Grading and Correction Presets. Elevate Your Digital Storytelling Effortlessly
- Author: Chloe
- Created at : 2024-04-24 07:08:18
- Updated at : 2024-04-25 07:08:18
- Link: https://ai-editing-video.techidaily.com/updated-discover-the-top-5-free-online-video-filter-editors-to-transform-your-videos-with-captivating-color-grading-and-correction-presets-elevate-your-digi/
- License: This work is licensed under CC BY-NC-SA 4.0.
