
:max_bytes(150000):strip_icc():format(webp)/GettyImages-1302402871-ea3debd2e3c64ec5a78a99e580b6a8d1.jpg)
Updated Do You Want to Know About the DaVinci Resolve Adjustment Layer? Read This Article to Learn How to Use an Adjustment Layer (Clip) in DaVinci Resolve to Edit Videos
Do You Want to Know About the DaVinci Resolve Adjustment Layer? Read This Article to Learn How to Use an Adjustment Layer (Clip) in DaVinci Resolve to Edit Videos
DaVinci Resolve is one of the popular video editors comprising many advanced features. This tool allows you to conduct 3D video editing and adjust color grading properties. You can also access its audio library to find out suitable music clips. Moreover, you can add transitions and animations to your videos for more enhancements.
While executing video editing, many people add an adjustment layer (clip) in DaVinci Resolve for convenience. By reading this article, you can discover the DaVinci Resolve adjustment layer and an easy method to add it during video editing.

Part 1: What is the Adjustment Layer (clip) in DaVinci Resolve?
Do you know the benefits of adding an adjustment layer (clip) in DaVinci Resolve? The adjustment layer (clip) in DaVinci Resolve gives you more control and flexibility during video editing. By adding this particular layer above your other clips, you can apply tons of effects to them.
Due to this ease, you don’t have to apply the same effect to multiple clips. Thus, it saves your time and manual effort on DaVinci Resolve. One of the main advantages of adding an adjustment layer (clip) is that it does not modify the original pixels of the video. You can also rename the adjustment layers (clips) in DaVinci Resolve according to your desire.
Hence, adjustment layers in any video editor like DaVinci Resolve provide a non-destructive way to edit and apply effects to the video.

Part 2: How to Add an Adjustment Layer (clip) in DaVinci Resolve?
Are you keen to know how to add an adjustment layer in DaVinci Resolve? By reading this section, you can find easy instructions to apply the adjustment layer (clip) in DaVinci Resolve without hassle.
Step1 To add an adjustment layer in DaVinci Resolve, head to the “Effects Library.” From there, click on “Toolbox” and select “Effects.”

Step2 From the Effects section, you will have to search for the “Adjustment Clip.” Drag and drop the adjustment clip and apply it above the layers that you want to edit.

Step3 Now extend the adjustment clip according to the layers. Once done, you can apply effects and transitions to the adjustment clip to add modifications.

Part 3: Three Ways to Use Adjustment Layers in DaVinci Resolve
Do you want to know how to use the DaVinci Resolve adjustment layer? Read this part of the article to discover how to use the adjustment layer (clip) in DaVinci Resolve.
1. Zoom in
Do you want to give the zoom-in element in your video to emphasize your subject? The zoom-in effect is created to focus on the subject to engage the viewers. On DaVinci Resolve, you can create the zoom-in effect using the adjustment layer (clip). To do so, you can read and follow the below instructions:
Step1 First, add the adjustment layer to your timeline by heading to Effects Library and then Toolbox. Make sure to apply the adjustment layer above your talking head on the timeline.
Step2 Now click on “Inspector” from the top right corner and enhance the “Zoom” value according to your desire. Once done, you can play the video to check the results.

2. Color Grading
Color grading can change the perspective of your video clip. Do you want to give your video an aesthetic, gloomy, or colorful vibe? Change the color grading properties using the adjustment layer (clip) in DaVinci Resolve. To use an adjustment layer for color grading, we have jotted down the simple steps below:
Step1 Drag and drop your clip above on the timeline. Once you are done, head to the “Color Page” given below.
Step2 On the Color page, go to “Library” from the right side and select the effect called “Color Space Transform” from the Resolve FX Color section. After applying this effect, you can enhance the visual appearance of your video.

3. Shake Transition
The shake transition adds a dramatic feel to your video to hook up the audience. If you have recorded a music video, you can add a shake transition to make it more captivating. To add this particular transition to your video, we will use the adjustment layer in DaVinci Resolve to produce accurate results.
Step1 Add the adjustment layer to your timeline. Trim it according to the specific part of your clip where you want to create the shake transition effect.
Step2 Now, from the left side, select “Open FX” library and search “Camera shake” effect. Apply it to the adjustment layer and navigate to the “Effects” tab from the top right corner. From there, increase the values of motion scale, speed scale, and motion blur. You can also make further changes in the “Shake Levels” section.

Step3 Afterward, scroll to the bottom and change the Border Type to “Reflect.” Now head back to the Open FX library and select the “Flicker Addition” effect. Apply this particular effect to the adjustment layer. From the “Effects” tab on the right side, select “Flicker Gain” as your flicker type. You can also go to the “Video” tab to enhance the zoom and position value.
Step4 You can also select different composite modes. You can also duplicate the adjustment clip and alter the composite mode of the second clip. Once done, decrease the opacity of the second clip. Now copy and place the adjustment clips on your timeline according to your desire.

Bonus Tips: Use Adjustment Layers in the Best Alternative to DaVinci Resolve
If you are not satisfied with the results of the DaVinci Resolve adjustment layer, you can try Wondershare Filmora . This professional software can prove to be the best alternative to DaVinci Resolve due to its numerous key features. You can find this tool on every major platform, such as iOS, Android, Windows, and Mac. This tool has a clean and friendly user interface so that you can enjoy editing and modifying your videos.
Free Download For Win 7 or later(64-bit)
Free Download For macOS 10.14 or later
You can also use adjustment layers to edit with great ease on this compatible video editor. Moreover, you can find multiple trending effects in its library that can help you to enhance your video clips. To add an adjustment layer in Filmora, you can follow the below steps.
Step1 Start with New Project
Once done with launching Filmora, hit the “New Project” button and upload the desired video. Drag and drop the added video to the timeline to proceed further.

Step2 Add the Adjustment Layer
Go to the “Media” tab and locate the option “Adjustment Layer.” Once done, drag and drop the adjustment layer to the timeline and double-click on it to change its settings.

Step3 Manage the Adjustment Layer Settings
From the opened settings, you can alter the blending mode according to your choice. You can also change opacity and position for more adjustments. Also, you can apply various presets to add a cinematic look. Moreover, you can apply different borders across your video clip for a more enhanced look.

Conclusion
DaVinci Resolve is one of the most famous video editors among professionals. If you want to become an expert in using DaVinci Resolve, you must know how to add an adjustment layer (clip) to this tool. For your help, this article has provided complete guidelines on how to add an adjustment layer in DaVinci Resolve.
Moreover, we have also highlighted a better option than DaVinci Resolve, known as Wondershare Filmora. Using this software, you can apply the adjustment layers to your video to generate more precise and accurate results.
Free Download For macOS 10.14 or later
You can also use adjustment layers to edit with great ease on this compatible video editor. Moreover, you can find multiple trending effects in its library that can help you to enhance your video clips. To add an adjustment layer in Filmora, you can follow the below steps.
Step1 Start with New Project
Once done with launching Filmora, hit the “New Project” button and upload the desired video. Drag and drop the added video to the timeline to proceed further.
Step2 Add the Adjustment Layer
Go to the “Media” tab and locate the option “Adjustment Layer.” Once done, drag and drop the adjustment layer to the timeline and double-click on it to change its settings.
Step3 Manage the Adjustment Layer Settings
From the opened settings, you can alter the blending mode according to your choice. You can also change opacity and position for more adjustments. Also, you can apply various presets to add a cinematic look. Moreover, you can apply different borders across your video clip for a more enhanced look.
Conclusion
DaVinci Resolve is one of the most famous video editors among professionals. If you want to become an expert in using DaVinci Resolve, you must know how to add an adjustment layer (clip) to this tool. For your help, this article has provided complete guidelines on how to add an adjustment layer in DaVinci Resolve.
Moreover, we have also highlighted a better option than DaVinci Resolve, known as Wondershare Filmora. Using this software, you can apply the adjustment layers to your video to generate more precise and accurate results.
How to Choose A Nice GoPro for Vlogging?
Vlogging has developed into quite an industry in a short period. We have seen many people building up their image as professional vloggers who have entertained millions of users with their unique content. However, while understanding the dynamics of vlogging, it is particularly important to set up the equipment that would help the user in their vlogging.
This article discusses very proficient equipment, GoPro for YouTubers, which has been considered across various scales for professional vlogging. We shall be providing our readers with an idea of the best GoPro they can be used to cover their vlogs.
In this article
01 What Need to Be Considered Before Choosing a GoPro for Vlogging?
02 8 Best GoPro for Vlogging in 2022
Part 1: What Need to Be Considered Before Choosing a GoPro for Vlogging?
GoPro cameras are known for their versatility. While being simply the best tool for vlogging, they are known for offering several impressive features. This, however, needs to be considered before choosing a GoPro for vlogging. Get ready as we are about to figure them out.

1. Portable and Easy to Carry
Isn’t it great that you are not required to carry heavy equipment everywhere? GoPro cameras offer convenience to their users by providing small sizes and rugged designs. This can prove to be extremely good for vloggers who have rough uses.
2. Multiple Video Features
Are you tired of capturing a simple video? GoPro offers you multiple options while capturing videos, which come in the form of time-lapses. Get creative with the videos that you shoot across your vlogs. Isn’t it great?
3. Affordability
GoPro should never be judged by its size. These tools are considered the most high-end cameras that can be used for vlogging. As they compete for professional cameras, they are considered relatively affordable in their comparison, which makes them a suitable choice in vlogging.
4. Shooting Modes
Have you ever heard about shooting modes? GoPro for vlogging comes up with different modes that can help you manage impressive visuals for your videos. GoPro helps you design content that is visually appealing to the viewers.
5. Quality of Video
Have you ever thought to have video resolutions up to 6K in a small camera? GoPro provides you the opportunity of witnessing history across the cameras with its stunning video resolution features. This is truly exceptional in the video-making industry.
Part 2: 8 Best GoPro for Vlogging in 2022
Once you are aware of what should be kept in mind for selecting a GoPro for vlogging, it is time to come up with some of the best-recommended models according to the use case of the vlogger. Let’s get started on this exceptional journey of finding the best GoPro for yourselves. Come right away!
1. GoPro Hero10 Black
Price: $499.99
The first and foremost model that may come into our mind is the GoPro Hero10 Black, which is, without any discussion, the most advanced model in GoPro cameras. Taking the features to the next level, GoPro Hero10 Black is available with a 5.3K resolution, which is the smoothest resolution in videos you can ask for. It provides faster processors than its predecessors, with features that make it the top-of-the-line choice.
You can find improved stabilization across Hero10; however, the price tag across the camera is as much as a mirrorless camera. Absolutely stunning, it is!

2. GoPro Hero9 Black
Price: $399.99
Another impressive model in the GoPro products is the Hero9 Black model, referred to as the previous iteration of the Hero10. Although it is not as remarkable as the Hero10, it takes up videos with 5K Ultra HD resolution, with a 1080p live streaming facility. Talking about the stabilization of this camera, it isn’t as proficient as the Hero10; however, it still performs better than the previous iterations.
A heavier camera’s multifunctional characteristics are a few major points that need to be considered for Hero9 Black. Do you wish to buy this?

3. GoPro Hero8 Black
Price: $349.98
GoPro cameras are known for their effective sizes and high-performance results. GoPro Hero8 Black is recognized among the most versatile GoPro for YouTubers, accompanied by the small size. Being the first GoPro camera that provides a microphone to its users, GoPro Hero8 changed the dynamics of video making with its effective features. Users can cover 4K Ultra HD video across the device with a 12MP resolution for photos.
The Media Mode offered across the device makes video enhancement possible across GoPro for vlogging, which is commendable.

4. GoPro Hero7 Silver
Price: $299.99
Are you confused about the GoPro that fits your needs? GoPro Hero7 Silver is the most budget-friendly vlogging camera that can be found across the market. GoPro Hero7 Silver can be your perfect companion in tough vlogs with a rugged outlook and waterproofing. It provides voice control, two-mic, slo-mo, time-lapse across a 4K Ultra HD resolution, which broadens the possibility for the users.
This GoPro for YouTubers is still among the people’s favorites, which makes it a consistent choice among newbies. Isn’t it great?

5. GoPro Max
Price: $549.98
Want a camera that captures 360-degree shots? GoPro Max is the camera that you should look for in the market. GoPro Max is a very impressive up-gradation across GoPro cameras, which came to offer more features to it than before. The two 180-degree cameras provide better stabilization, thus crossing cameras like Hero8 quite easily. The details are extremely proficient in this design with improved mic facilities and other characteristics.
If you wish to shift yourselves from a single-camera device, this GoPro for vlogging is the perfect choice you can come by.

6. GoPro Hero7 Black
Price: $319.99
GoPro Hero7 Black, though introduced in 2018, came out to be a quite advanced version of the previous GoPro cameras. This camera allows 4K video resolution shooting under 60fps, stabilizing for smoothing out shakes and vibrations. The video quality from a GoPro is different from the rest, which makes it basic equipment in vlogging.
This GoPro for YouTubers offered excessive controls to its user base, with commands that were able to neutralize and optimize video enhancement. What a great choice!

7. GoPro Fusion
Price: $279.99
This is a hugely different camera across the complete GoPro series. Fusion is known for many things, out of which the size comes out to be the main reason for its popularity. This iteration in GoPro cameras provides 5.2K video resolution quality under a pocket-sized model. Although it is quite durable compared to the other cameras in the market for vlogging, the price tag across this device is usually not much acceptable for users.
It is a bold choice to have Fusion as your GoPro for vlogging, which also allows adding audio across the 360-degree feature. This is sensational.

8. GoPro Hero7 White
Price: $274.49
GoPro Hero7 White is a perfect option to start vlogging. Designed for beginners, it provides Full HD video resolution with a touch screen for better functioning. Although the camera is quite downgraded in terms of the features it offers, it is basically offered for catering to user-friendliness.
It also offers video stabilization for introducing users to a certain environment in video editing. With an affordable price tag, this camera can be the perfect start as your GoPro for vlogging. Do you wish to get started?

Closing Words
Got to know about the best GoPro cameras? Are you ready to select your GoPro for vlogging? We hope that this article has featured the most optimal options. Go through this article to get the perfect start for your vlogging journey. However, if you wish to have a good experience with video editing, you should consider working on Wondershare Filmora .
The tool manages all GoPro videos to perfection. It is truly an exceptional platform to work with. Along with that, Filmora provides a list of impressive video editing functions which can be adopted for making the video look professional. That is why this platform is recommended across multiple stages. Surely the best editor you can use!
Wondershare Filmora
Get started easily with Filmora’s powerful performance, intuitive interface, and countless effects!
Try It Free Try It Free Try It Free Learn More >

02 8 Best GoPro for Vlogging in 2022
Part 1: What Need to Be Considered Before Choosing a GoPro for Vlogging?
GoPro cameras are known for their versatility. While being simply the best tool for vlogging, they are known for offering several impressive features. This, however, needs to be considered before choosing a GoPro for vlogging. Get ready as we are about to figure them out.
1. Portable and Easy to Carry
Isn’t it great that you are not required to carry heavy equipment everywhere? GoPro cameras offer convenience to their users by providing small sizes and rugged designs. This can prove to be extremely good for vloggers who have rough uses.
2. Multiple Video Features
Are you tired of capturing a simple video? GoPro offers you multiple options while capturing videos, which come in the form of time-lapses. Get creative with the videos that you shoot across your vlogs. Isn’t it great?
3. Affordability
GoPro should never be judged by its size. These tools are considered the most high-end cameras that can be used for vlogging. As they compete for professional cameras, they are considered relatively affordable in their comparison, which makes them a suitable choice in vlogging.
4. Shooting Modes
Have you ever heard about shooting modes? GoPro for vlogging comes up with different modes that can help you manage impressive visuals for your videos. GoPro helps you design content that is visually appealing to the viewers.
5. Quality of Video
Have you ever thought to have video resolutions up to 6K in a small camera? GoPro provides you the opportunity of witnessing history across the cameras with its stunning video resolution features. This is truly exceptional in the video-making industry.
Part 2: 8 Best GoPro for Vlogging in 2022
Once you are aware of what should be kept in mind for selecting a GoPro for vlogging, it is time to come up with some of the best-recommended models according to the use case of the vlogger. Let’s get started on this exceptional journey of finding the best GoPro for yourselves. Come right away!
1. GoPro Hero10 Black
Price: $499.99
The first and foremost model that may come into our mind is the GoPro Hero10 Black, which is, without any discussion, the most advanced model in GoPro cameras. Taking the features to the next level, GoPro Hero10 Black is available with a 5.3K resolution, which is the smoothest resolution in videos you can ask for. It provides faster processors than its predecessors, with features that make it the top-of-the-line choice.
You can find improved stabilization across Hero10; however, the price tag across the camera is as much as a mirrorless camera. Absolutely stunning, it is!
2. GoPro Hero9 Black
Price: $399.99
Another impressive model in the GoPro products is the Hero9 Black model, referred to as the previous iteration of the Hero10. Although it is not as remarkable as the Hero10, it takes up videos with 5K Ultra HD resolution, with a 1080p live streaming facility. Talking about the stabilization of this camera, it isn’t as proficient as the Hero10; however, it still performs better than the previous iterations.
A heavier camera’s multifunctional characteristics are a few major points that need to be considered for Hero9 Black. Do you wish to buy this?
3. GoPro Hero8 Black
Price: $349.98
GoPro cameras are known for their effective sizes and high-performance results. GoPro Hero8 Black is recognized among the most versatile GoPro for YouTubers, accompanied by the small size. Being the first GoPro camera that provides a microphone to its users, GoPro Hero8 changed the dynamics of video making with its effective features. Users can cover 4K Ultra HD video across the device with a 12MP resolution for photos.
The Media Mode offered across the device makes video enhancement possible across GoPro for vlogging, which is commendable.
4. GoPro Hero7 Silver
Price: $299.99
Are you confused about the GoPro that fits your needs? GoPro Hero7 Silver is the most budget-friendly vlogging camera that can be found across the market. GoPro Hero7 Silver can be your perfect companion in tough vlogs with a rugged outlook and waterproofing. It provides voice control, two-mic, slo-mo, time-lapse across a 4K Ultra HD resolution, which broadens the possibility for the users.
This GoPro for YouTubers is still among the people’s favorites, which makes it a consistent choice among newbies. Isn’t it great?
5. GoPro Max
Price: $549.98
Want a camera that captures 360-degree shots? GoPro Max is the camera that you should look for in the market. GoPro Max is a very impressive up-gradation across GoPro cameras, which came to offer more features to it than before. The two 180-degree cameras provide better stabilization, thus crossing cameras like Hero8 quite easily. The details are extremely proficient in this design with improved mic facilities and other characteristics.
If you wish to shift yourselves from a single-camera device, this GoPro for vlogging is the perfect choice you can come by.
6. GoPro Hero7 Black
Price: $319.99
GoPro Hero7 Black, though introduced in 2018, came out to be a quite advanced version of the previous GoPro cameras. This camera allows 4K video resolution shooting under 60fps, stabilizing for smoothing out shakes and vibrations. The video quality from a GoPro is different from the rest, which makes it basic equipment in vlogging.
This GoPro for YouTubers offered excessive controls to its user base, with commands that were able to neutralize and optimize video enhancement. What a great choice!
7. GoPro Fusion
Price: $279.99
This is a hugely different camera across the complete GoPro series. Fusion is known for many things, out of which the size comes out to be the main reason for its popularity. This iteration in GoPro cameras provides 5.2K video resolution quality under a pocket-sized model. Although it is quite durable compared to the other cameras in the market for vlogging, the price tag across this device is usually not much acceptable for users.
It is a bold choice to have Fusion as your GoPro for vlogging, which also allows adding audio across the 360-degree feature. This is sensational.
8. GoPro Hero7 White
Price: $274.49
GoPro Hero7 White is a perfect option to start vlogging. Designed for beginners, it provides Full HD video resolution with a touch screen for better functioning. Although the camera is quite downgraded in terms of the features it offers, it is basically offered for catering to user-friendliness.
It also offers video stabilization for introducing users to a certain environment in video editing. With an affordable price tag, this camera can be the perfect start as your GoPro for vlogging. Do you wish to get started?
Closing Words
Got to know about the best GoPro cameras? Are you ready to select your GoPro for vlogging? We hope that this article has featured the most optimal options. Go through this article to get the perfect start for your vlogging journey. However, if you wish to have a good experience with video editing, you should consider working on Wondershare Filmora .
The tool manages all GoPro videos to perfection. It is truly an exceptional platform to work with. Along with that, Filmora provides a list of impressive video editing functions which can be adopted for making the video look professional. That is why this platform is recommended across multiple stages. Surely the best editor you can use!
Wondershare Filmora
Get started easily with Filmora’s powerful performance, intuitive interface, and countless effects!
Try It Free Try It Free Try It Free Learn More >
How to Zoom Webcam on PC
Making certain our digital presence is the best it can be pays dividends as more and more of what we do online; similar is the case with how to zoom out webcam windows 10. The majority of experts advise against using the built-in camera that comes with your laptop or computer and instead advocate getting a webcam or an HD camera. These, however, may be hard to come by and pricy if you locate a nice one. If the built-in camera on your laptop doesn’t perform effectively during Zoom meetings, you may want to consider about investing in a separate, better webcam. Webcams offer automatic settings that are intended to function with the largest variety of lighting situations possible. This suggests that they average out a great number of responses to the content of the frame. Because of this, we have incorporated basic PC webcam zooming settings. These answers may be found in the portions that follow.
It’s vital to know how to zoom in on a webcam before visiting there. The camera wasn’t always as vital as it is today, and only very large corporations could afford to employ it as a convenience. But today, nearly everyone, from huge organizations to little firms, acknowledges its value. Everybody needs a webcam that works properly. The camera control software you are using determines the zoom function. The resolution of your picture window and the capabilities of the application dictate how far you can zoom in on the webcam’s video image. You can zoom in and out on camera photos using tools like YouCam and Windows Live Messenger. The most critical camera capabilities for the ideal video conferencing experience are zoom in and zoom out, which at first look may appear trivial. Here, we’ll walk you through each step, in detail. Continue reading, and we’ll check your understanding of webcam zoom in and zoom out skills!
Way 1: Zoom with Windows Live Messenger
When utilizing a camera for video conferencing, you may zoom in on a user’s face to get rid of the background. Webcam settings are not accessible by default in Microsoft Windows. However, camera zoom settings may be changed in instant chat systems. Through an instant messaging tool, such as Windows Live Messenger, you may simply access these options. This application provides private offline chat, video messaging, image and video sharing, and video chatting.
Step1Start Windows Live Messenger on your PC or laptop first. Enter your login name and password by clicking the “Sign In” button.

Step2On the top menu bar, pick “Tools.” And then select the “Audio and Video Setup”. Drag the slider next to “Speaker” to modify the speaker volume. Drag the slider next to “Microphone” to modify the microphone sensitivity. Press “Next.”

Step3From the drop-down list, pick the webcam. The “Camera Control” option is situated on the top; pick “Webcam Settings” after that.
Step4Now, to alter the zoom settings, drag the “Zoom” slider. To zoom in or out, drag the slider to the left or right. Press “OK.”
Way 2: Use Windows 10 Camera App
Wondering how to zoom your camera in the Windows 10 Camera app? The Camera app enables you to zoom in or out on your webcam in both image and video modes. To accomplish so, click or push the Magnification button, and then use the slider to modify the webcam’s zoom level. To operate the zoom feature manually, pick “Manual Zoom.” In the preview window, a square appears when you pick this option. To zoom in on a specific region of the capture window, drag the square there. To expand the image that was acquired by the webcam, slide the slider bar. In simply, The Camera app enables you zoom in or out of photographs and movies shot with your webcam. To do this, click on the “Zoom” button and drag the slider to the left or right as appropriate on your Windows 10 camera. the following steps:
Step1To open the “Start Menu,” make a right-click on “Start.” Now, to access the Camera app, type “Camera App” into the start menu’s search box.

Step2Tap the Camera Control icon when you start or join a meeting. To zoom and pan the camera to the appropriate spot, utilize the icons on the Camera Control panel.
![]()
Step3To exit the Camera Control window and return to the Meeting Controls, touch outside of it.
Way 3: Zoom with YouCam
Unfortunately, the default cameras or webcams bundled with the majority of Windows laptops and desktops don’t have an automatic zoom option. In fact, the only method to adjust their crop is to switch from “Standard” to “Widescreen,” which does slightly zoom in on you but not in the manner we’d want. This makes it inescapable that the only method to manually alter a webcam’s magnification is to acquire one separately and apply its software settings. , like YouCam. YouCam provides video calling, streaming, and broadcasting. includes an integrated app. To employ Zoom with YouCam, refer to the methods given below:
Step1Launch the YouCam camera program and activate the webcam.

Step2In the camera preview window, pick Settings. Then, select “Enable Video Zoom” from the menu.
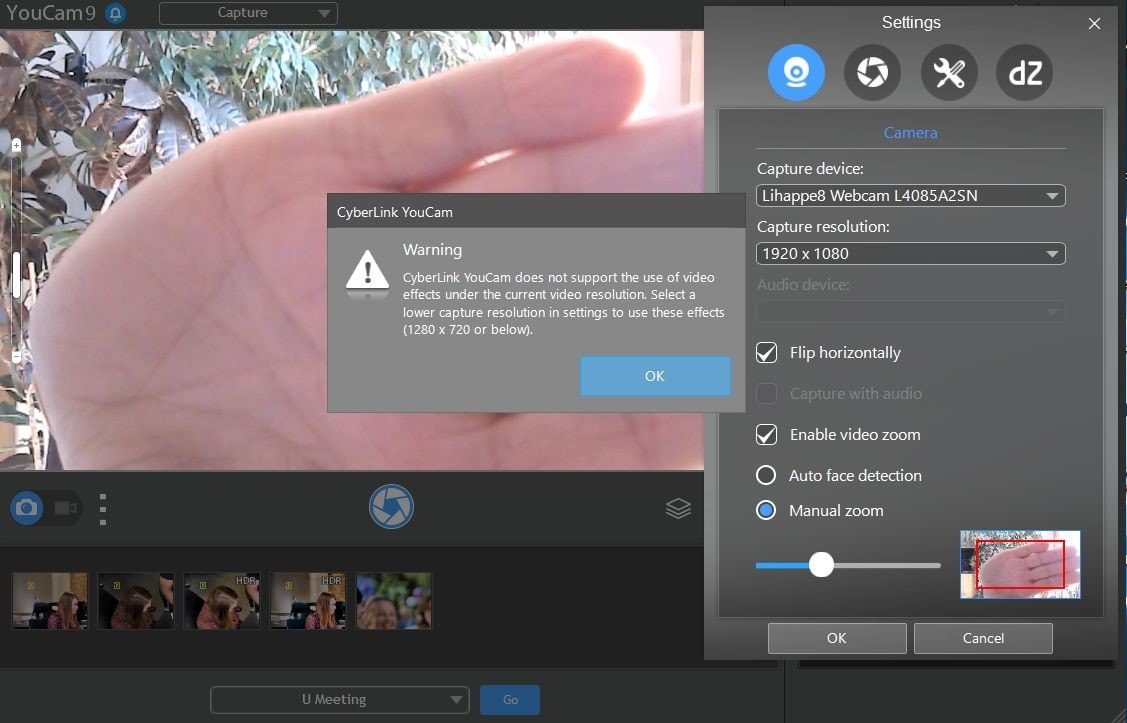
Step3Select “Automatic Face Detection” from the menu. As you wander about in the capture window, the camera watches your face and automatically zooms in on your photo as shown above.
Step4To handle the zoom feature manually, pick “Manual Zoom.” In the preview window, a square appears when you pick this option. To zoom in on a specific region of the capture window, drag the square there. To expand the image that was acquired by the webcam, slide the slider bar.

Way 4: Use iGlasses on Mac
For the perfect webcam look on a MAC, install the Chrome plugin iGlasses for video effects and style tweaks. Your videos will appear better on Zoom as a consequence. You may instantly enhance the appearance of your video interactions by utilizing the digital zoom on your iGlasses. Digital pan, tilt, and zoom are all possible with easy controls. For Macs that support it, an Apple Remote may be used to operate. iGlasses will become an option in Zoom’s video settings when it has been installed. You may improve your camera by altering the settings in iGlasses. You may experiment with a range of amusing effects, like 3-D distortions, using the virtual camera. Let’s learn how to utilize iGlasses on a Mac:
Step1Installing Ecamm’s iGlasses on a MacBook in the first step.
Step2To activate the camera, go to your video settings and pick iGlasses.
Step3Choose the Zoom window and execute the appropriate operations using the Zoom and Flip options. You may now zoom in and out using the camera on your MacBook as you like.

Conclusion
In conclusion, so many people currently take part in online conferences and virtual meetings. You want to create a lasting impression, don’t you? Not or whether you are the host of an online meeting or event, you must now maintain a professional image to prevent turning off attendees. You have discovered how to utilize the tools at your disposal to boost the zoom in and out quality of your camera in this post. However, as will be explained in the sections ahead, you may do it without the third-party plugins. With just one quick plugin, you can significantly transform how you look on a camera. Hence, try out the easy method from the above enlisted ones to get hold on your PC webcam to zoom in or out purposes.
Making certain our digital presence is the best it can be pays dividends as more and more of what we do online; similar is the case with how to zoom out webcam windows 10. The majority of experts advise against using the built-in camera that comes with your laptop or computer and instead advocate getting a webcam or an HD camera. These, however, may be hard to come by and pricy if you locate a nice one. If the built-in camera on your laptop doesn’t perform effectively during Zoom meetings, you may want to consider about investing in a separate, better webcam. Webcams offer automatic settings that are intended to function with the largest variety of lighting situations possible. This suggests that they average out a great number of responses to the content of the frame. Because of this, we have incorporated basic PC webcam zooming settings. These answers may be found in the portions that follow.
It’s vital to know how to zoom in on a webcam before visiting there. The camera wasn’t always as vital as it is today, and only very large corporations could afford to employ it as a convenience. But today, nearly everyone, from huge organizations to little firms, acknowledges its value. Everybody needs a webcam that works properly. The camera control software you are using determines the zoom function. The resolution of your picture window and the capabilities of the application dictate how far you can zoom in on the webcam’s video image. You can zoom in and out on camera photos using tools like YouCam and Windows Live Messenger. The most critical camera capabilities for the ideal video conferencing experience are zoom in and zoom out, which at first look may appear trivial. Here, we’ll walk you through each step, in detail. Continue reading, and we’ll check your understanding of webcam zoom in and zoom out skills!
Way 1: Zoom with Windows Live Messenger
When utilizing a camera for video conferencing, you may zoom in on a user’s face to get rid of the background. Webcam settings are not accessible by default in Microsoft Windows. However, camera zoom settings may be changed in instant chat systems. Through an instant messaging tool, such as Windows Live Messenger, you may simply access these options. This application provides private offline chat, video messaging, image and video sharing, and video chatting.
Step1Start Windows Live Messenger on your PC or laptop first. Enter your login name and password by clicking the “Sign In” button.
Step2On the top menu bar, pick “Tools.” And then select the “Audio and Video Setup”. Drag the slider next to “Speaker” to modify the speaker volume. Drag the slider next to “Microphone” to modify the microphone sensitivity. Press “Next.”
Step3From the drop-down list, pick the webcam. The “Camera Control” option is situated on the top; pick “Webcam Settings” after that.
Step4Now, to alter the zoom settings, drag the “Zoom” slider. To zoom in or out, drag the slider to the left or right. Press “OK.”
Way 2: Use Windows 10 Camera App
Wondering how to zoom your camera in the Windows 10 Camera app? The Camera app enables you to zoom in or out on your webcam in both image and video modes. To accomplish so, click or push the Magnification button, and then use the slider to modify the webcam’s zoom level. To operate the zoom feature manually, pick “Manual Zoom.” In the preview window, a square appears when you pick this option. To zoom in on a specific region of the capture window, drag the square there. To expand the image that was acquired by the webcam, slide the slider bar. In simply, The Camera app enables you zoom in or out of photographs and movies shot with your webcam. To do this, click on the “Zoom” button and drag the slider to the left or right as appropriate on your Windows 10 camera. the following steps:
Step1To open the “Start Menu,” make a right-click on “Start.” Now, to access the Camera app, type “Camera App” into the start menu’s search box.
Step2Tap the Camera Control icon when you start or join a meeting. To zoom and pan the camera to the appropriate spot, utilize the icons on the Camera Control panel.
![]()
Step3To exit the Camera Control window and return to the Meeting Controls, touch outside of it.
Way 3: Zoom with YouCam
Unfortunately, the default cameras or webcams bundled with the majority of Windows laptops and desktops don’t have an automatic zoom option. In fact, the only method to adjust their crop is to switch from “Standard” to “Widescreen,” which does slightly zoom in on you but not in the manner we’d want. This makes it inescapable that the only method to manually alter a webcam’s magnification is to acquire one separately and apply its software settings. , like YouCam. YouCam provides video calling, streaming, and broadcasting. includes an integrated app. To employ Zoom with YouCam, refer to the methods given below:
Step1Launch the YouCam camera program and activate the webcam.
Step2In the camera preview window, pick Settings. Then, select “Enable Video Zoom” from the menu.
Step3Select “Automatic Face Detection” from the menu. As you wander about in the capture window, the camera watches your face and automatically zooms in on your photo as shown above.
Step4To handle the zoom feature manually, pick “Manual Zoom.” In the preview window, a square appears when you pick this option. To zoom in on a specific region of the capture window, drag the square there. To expand the image that was acquired by the webcam, slide the slider bar.
Way 4: Use iGlasses on Mac
For the perfect webcam look on a MAC, install the Chrome plugin iGlasses for video effects and style tweaks. Your videos will appear better on Zoom as a consequence. You may instantly enhance the appearance of your video interactions by utilizing the digital zoom on your iGlasses. Digital pan, tilt, and zoom are all possible with easy controls. For Macs that support it, an Apple Remote may be used to operate. iGlasses will become an option in Zoom’s video settings when it has been installed. You may improve your camera by altering the settings in iGlasses. You may experiment with a range of amusing effects, like 3-D distortions, using the virtual camera. Let’s learn how to utilize iGlasses on a Mac:
Step1Installing Ecamm’s iGlasses on a MacBook in the first step.
Step2To activate the camera, go to your video settings and pick iGlasses.
Step3Choose the Zoom window and execute the appropriate operations using the Zoom and Flip options. You may now zoom in and out using the camera on your MacBook as you like.
Conclusion
In conclusion, so many people currently take part in online conferences and virtual meetings. You want to create a lasting impression, don’t you? Not or whether you are the host of an online meeting or event, you must now maintain a professional image to prevent turning off attendees. You have discovered how to utilize the tools at your disposal to boost the zoom in and out quality of your camera in this post. However, as will be explained in the sections ahead, you may do it without the third-party plugins. With just one quick plugin, you can significantly transform how you look on a camera. Hence, try out the easy method from the above enlisted ones to get hold on your PC webcam to zoom in or out purposes.
Add Subtitles To Videos With Kapwing [Step by Step]
Content creators always prefer to add subtitles to their videos for better comprehension. The reason is that some people cannot understand your language and needs subtitles to understand the content. Moreover, if your viewer is facing an audio problem and won’t be able to hear your voice, subtitles can help there. In this article, we will introduce the Kapwing subtitle maker, through which you can add subtitles in many ways.
There are some drawbacks to using online tools, such as file size restrictions or internet availability. Yet, with the Kapwing tool, you won’t get disappointed. Kapwing is an online tool that offers various options to edit videos. One of the great features of Kapwing is its subtitle maker, which can help you in adding subtitles to your videos easily. To learn how to use the Kapwing subtitles feature, continue reading this article.
Part 1: Upload the Subtitle File to Kapwing
If you have a subtitle file for your video, Kapwing can help you. If you have a subtitle file for your video, Kapwing can help you. Without creating a user account, you can upload the subtitle file on this tool. With this subtitle editor, you can upload video files from your computer or cloud storage platforms. Moreover, it supports the subtitle files of SRT and VVT format. To use Kapwing subtitle maker for uploading a subtitle file, read the below steps:
Step 1 Navigate to the official site of Kapwing and select its “Subtitles” tool. Afterward, click on “Choose a video,” which will open a new window on your screen.

Step 2 Click on the “Upload” button given on top to import your video file on this tool. Once done, click on the “Subtitle” option displayed on the left side. On the subtitles window, click on the “Upload SRT/VVT” button to import your subtitle file.

Step 3 After uploading the file, your subtitles will sync with your video. To edit your subtitles, navigate to the right panel. From that, you can select text position, background color, opacity, font, and alignment.

Step 4 Once done with making the changes on added subtitles, you can click on the “Export Project” button to save or share the file.

Part 2: Automatically Generate your Subtitle on Kapwing
Do you want to generate subtitles for your video instantly? Kapwing subtitle maker offers an Auto-Subtitle Generator that converts your voice into subtitles. This feature supports many languages so that anyone across the world can utilize this tool. Moreover, it also offers a translating feature that can help you in converting your subtitles into another language.
However, to use this feature, you must create your user account. Also, you should upgrade your account to fully use this feature without any restrictions. If you don’t have an upgraded account, you can only auto-generate subtitles for the 7 minutes video. To use the auto-subtitle generator of Kapwing, check the below steps:
Step 1 Begin by accessing the website of the Kapwing tool. Click on “Subtitles” from the “Tools” tab and then tap on the “Choose a video” button. Upload the video file on which you want to add subtitles from your PC.

Step 2 Once done with importing the video, click on “Subtitles” from the left section. From the new window, click on “Auto-generate.” The tool will automatically create subtitles for your video by detecting the language.

Step 3 Once you created the subtitles through this feature, go to the “Translate” tab to translate subtitles into your preferred language. You can also edit the subtitles to change their background, opacity, text font, and size. Once done, click on the “Export Project” button.

Part 3: Manually Add Subtitles to the Video on Kapwing
If you don’t want to use the auto-generator and do not have a subtitle file, you can use the manual option. Kapwing allows you to add subtitles manually in its friendly user interface. After adding Kapwing captions, you can choose your preferred font and style for further enhancement.
Step 1 After accessing the website of Kapwing, select the “Subtitles” tool to proceed. Now select the “Choose a video” button to open the Kapwing editor window.

Step 2 Import your video file by tapping on the “Upload” button. Afterward, go to the “Subtitles” section and click on the “Add Subtitle” button. On the typing space, enter your subtitles. You can also choose the duration for your subtitles from the same window. To add subtitles further, you can click on the “Add Subtitles” button again.

Step 3 After adding the complete subtitles, you can choose their font, style, color, and opacity from the right panel. Once done, hit the “Export Project” button.

Part 4: How to Add Subtitles to Videos with the Best Alternative of Kapwing
If you are not satisfied with the performance of the Kapwing subtitle maker, you can try the Wondershare Filmora tool. As Kapwing is an online tool, it does come with certain restrictions. For example, the time to upload video files on this tool can be time-consuming. Moreover, you would need a strong internet connection throughout. But, with Filmora, you can add subtitles to your video files without facing file size restrictions.
Free Download For Win 7 or later(64-bit)
Free Download For macOS 10.14 or later
Filmora has an easy-to-use interface that offers multiple options to edit and alter video files. This platform is compatible with a mainstream operating system such as Windows. It provides a “Speech to Text” feature that enables you to create subtitles for your video automatically. With a single tap, you can add subtitles to your video without any hassle. To use the Speech to Text feature, check the below steps:
Step 1 Import Video File from the PC
Launch Filmora on your PC and click on the “Create New Project” button to open the Filmora editor on your device. To import your video file from your PC, tap on the “Arrow” icon. After uploading the file, drag it to the timeline.

Step 2 Enable Speech to Text Feature
From the timeline, locate the feature of “Speech to Text.” Now choose the language in which you want to create the subtitles and specify the other settings as well. Afterward, tap on the “OK” button to begin the process.

Step 3 Customize Subtitles and Save the Changes
After the conversion, you can double-click the added subtitles to make modifications. After making the adjustments, hit the “OK” button. Now go to the “Export” button and select the video format in which you want to export the video, or you can also share it on social media platforms.

Conclusion
By adding subtitles to your video, you can enhance your targeted audience and can also engage with them. It also helps in making your video content diverse for people across the globe. There are various online subtitle generators like Kapwing that can help you in adding subtitles, as described in this article. However, there are some drawbacks to using the Kapwing subtitle maker that can disrupt your work. If you want to use a proficient subtitle maker, you can use Wondershare Filmora to get the best results.
Free Download For macOS 10.14 or later
Filmora has an easy-to-use interface that offers multiple options to edit and alter video files. This platform is compatible with a mainstream operating system such as Windows. It provides a “Speech to Text” feature that enables you to create subtitles for your video automatically. With a single tap, you can add subtitles to your video without any hassle. To use the Speech to Text feature, check the below steps:
Step 1 Import Video File from the PC
Launch Filmora on your PC and click on the “Create New Project” button to open the Filmora editor on your device. To import your video file from your PC, tap on the “Arrow” icon. After uploading the file, drag it to the timeline.
Step 2 Enable Speech to Text Feature
From the timeline, locate the feature of “Speech to Text.” Now choose the language in which you want to create the subtitles and specify the other settings as well. Afterward, tap on the “OK” button to begin the process.
Step 3 Customize Subtitles and Save the Changes
After the conversion, you can double-click the added subtitles to make modifications. After making the adjustments, hit the “OK” button. Now go to the “Export” button and select the video format in which you want to export the video, or you can also share it on social media platforms.
Conclusion
By adding subtitles to your video, you can enhance your targeted audience and can also engage with them. It also helps in making your video content diverse for people across the globe. There are various online subtitle generators like Kapwing that can help you in adding subtitles, as described in this article. However, there are some drawbacks to using the Kapwing subtitle maker that can disrupt your work. If you want to use a proficient subtitle maker, you can use Wondershare Filmora to get the best results.
Also read:
- New HDR Photography How to Use HDR Mode on Your Android Devices for 2024
- How to Use Twixtor Effect to Add Slow-Motion Effect to Video, In 2024
- Updated In 2024, KineMaster Templates 101 How to Get the Most Out of Video Templates
- Updated Add Some Shake to Videos with Alight Motion
- In 2024, Cropping Videos in VLC Step by Step
- New How to Add Filter to Video in Premiere Pro, In 2024
- New In 2024, Best Video Editing Courses Online with Certificate
- Updated Top 10 Sound Extractors to Extract Sound From Video 2023
- 2024 Approved Google Meet Green Screen
- New How to Speed up a Video on Splice for 2024
- Updated Introduction to LUTs Their Overview and Benefits
- Updated Guide Cropping and Combining Content in Wondershare Filmora Latest
- Updated Extracting Audio From Videos Is a Key to Better Storytelling. Learn How Filmoras Audio Removal Feature Can Enhance Your Video Stories
- In 2024, Tips for Choosing Location and Scheduling Music Video
- Updated Best Photo Video Maker Apps with Song PC, Mobile, Online for 2024
- New In 2024, Video Inspiration for Birthday Slideshow
- Find a Solution for Effortless Sky Replacement Photoshop in This Comprehensive Guide. Also, Use the Easiest Video Editing Tool to Make Your Media Stunning
- Looking for the Simple Steps to Add a Filter to Your Video in Premiere Pro? Here Are the Complete Steps Along with the List of Free Premiere Filter Presets to Use
- In 2024, In This Article, We Are Going to Learn the Simplest Procedure on How to Cut And/Or Trim Videos Using VLC Media Player. Each Step Is Carefully Explained, with Screenshots Attached
- Looking for Free Tools to Create Radial Blur Images Online? Read Our Full Guide to Learn About the 6 Best Programs to Add This Effect to Your Pictures
- The Article Shall Offer an Overview to Create a Promising Sports Intro and Edit a YouTube Outro for a Sports Channel. There Will Also Be Three Recommended Apps to Download Background Music for Exercise for 2024
- Updated Reversing Time Lapse Videos on iPhone Using Top Applications for 2024
- In 2024, How To Split Videos in Premier Pro
- 2024 Approved How to Choose A Nice GoPro for Vlogging?
- Updated In 2024, Discover How to Change Sky Background with The Best Applications? A Review
- Best Video Grabbers for Chrome
- In 2024, Change Video Speed with FFmpeg
- Updated Some Top Methods to Create AI Slow Motion Videos for 2024
- Updated Top Free Video Editing Software Enhance Your Content with These Essential Tools
- 2024 Approved Does the Customary Speed of Your TikTok Slideshow Appear to Be Slow Enough of Late? If Yes, Drop Your Worries Here with the Know-How of Increasing the TikTok Slideshow Speed
- Updated Do You Want to Know About Phone Aspect Ratio Vertical? Trying to Learn About iPhone Vertical Video Dimensions? Read This Article to Get All Your Answers on Vertical Phone Aspect Ratio Definition, Types and Tips
- How to Comment on YouTube Live Chat for 2024
- New 4K Videos Are the in Thing because of Their Flexibility and High Resolution. Stick Around to Learn How to Choose the Best Frame Rate for 4K Videos for 2024
- New In 2024, How to Make GIFs From Videos on Mac
- 2024 Approved Different Ways To Trim Video In Premiere Pro
- Updated 2024 Approved Wondershare Filmora Tutorial | Using The AI Auto Reframe Feature
- A Complete Guideline To Better Use QuickTime Player for 2024
- New 2024 Approved Create Intro Video with Flixpress
- Motorola Moto G14 won’t play HEVC H.265 media, how to fix?
- In 2024, How to use iSpoofer on Realme C53? | Dr.fone
- How to Change your Apple iPhone 8 Plus Location on Twitter | Dr.fone
- In 2024, 5 Ways to Track Vivo Y100i Power 5G without App | Dr.fone
- Preparation to Beat Giovani in Pokemon Go For Honor Play 8T | Dr.fone
- How To Fix Part of the Touch Screen Not Working on Tecno Pova 5 Pro | Dr.fone
- In 2024, Top 5 Tracking Apps to Track Apple iPhone 6 without Them Knowing | Dr.fone
- Planning to Use a Pokemon Go Joystick on Lava Agni 2 5G? | Dr.fone
- In 2024, Complete Guide For iPhone 8 Lock Screen | Dr.fone
- In 2024, 5 Tutorials on How to Transfer Photos From Apple iPhone 6s Plus to New iPhone | Dr.fone
- 8 Solutions to Solve YouTube App Crashing on Samsung Galaxy M14 4G | Dr.fone
- Best Anti Tracker Software For Motorola Moto G84 5G | Dr.fone
- Getting the Pokemon Go GPS Signal Not Found 11 Error in Samsung Galaxy F15 5G | Dr.fone
- Does Honor Magic 6 Lite Have Find My Friends? | Dr.fone
- Prevent Cross-Site Tracking on Apple iPhone 13 mini and Browser | Dr.fone
- In 2024, How to Remove a Previously Synced Google Account from Your Realme 11 Pro
- How to Downgrade iPhone 15 Pro Max to an Older iOS Version? | Dr.fone
- iSpoofer is not working On Gionee F3 Pro? Fixed | Dr.fone
- Unlock android phone if you forget the Z50S Pro password or pattern lock
- In 2024, Why does the pokemon go battle league not available On Samsung Galaxy A15 5G | Dr.fone
- In 2024, 5 Ways to Move Contacts From Oppo Reno 9A to iPhone (13/14/15) | Dr.fone
- How to Show Wi-Fi Password on Samsung Galaxy S23 Ultra
- CatchEmAll Celebrate National Pokémon Day with Virtual Location On Oppo Reno 10 5G | Dr.fone
- How to Change GPS Location on Vivo S17 Easily & Safely | Dr.fone
- In 2024, Delete Gmail Account With/Without Password On Samsung Galaxy M54 5G
- In 2024, Full Guide to Fix iToolab AnyGO Not Working On Tecno Phantom V Flip | Dr.fone
- In 2024, 11 Best Location Changers for Motorola Moto G24 | Dr.fone
- In 2024, Top 4 Ways to Trace Nokia C12 Pro Location | Dr.fone
- In 2024, Does find my friends work on OnePlus Ace 2 | Dr.fone
- 6 Proven Ways to Unlock Vivo X90S Phone When You Forget the Password
- In 2024, How to Change Location On Facebook Dating for your Realme GT 5 Pro | Dr.fone
- In 2024, Unlocking iPhone 14 Lock Screen 3 Foolproof Methods that Actually Work | Dr.fone
- Android Safe Mode - How to Turn off Safe Mode on Nokia G22? | Dr.fone
- How to Stop Life360 from Tracking You On Apple iPhone 15 Pro? | Dr.fone
- Things You Should Know When Unlocking Total Wireless Of Apple iPhone 12
- Title: Updated Do You Want to Know About the DaVinci Resolve Adjustment Layer? Read This Article to Learn How to Use an Adjustment Layer (Clip) in DaVinci Resolve to Edit Videos
- Author: Chloe
- Created at : 2024-04-24 07:08:18
- Updated at : 2024-04-25 07:08:18
- Link: https://ai-editing-video.techidaily.com/updated-do-you-want-to-know-about-the-davinci-resolve-adjustment-layer-read-this-article-to-learn-how-to-use-an-adjustment-layer-clip-in-davinci-resolve-to-/
- License: This work is licensed under CC BY-NC-SA 4.0.
