
Updated Follow the Trend of Making Slow-Motion Videos with a Camera Lenta CapCut Template. Learn Everything About CapCut and Find Its Alternatives in This Article
Follow the Trend of Making Slow-Motion Videos with a Camera Lenta CapCut Template. Learn Everything About CapCut and Find Its Alternatives in This Article
Slow-motion videos in black and white filters are trending on social media these days. You might be curious how everyone creates such cool videos. It is possible with CapCut, a video editor associated with TikTok. The question arises: is it difficult to achieve perfection in such slow-motion videos? Then, let us tell you there is a camera Lenta CapCut template for this purpose.
Using it, you just have to import the media of your choice and leave the process on CapCut. This article will guide you on making a slow-motion video with customization. Also, you will learn more about Camera Lenta CapCut to explore it quickly. Keep reading to create perfect slow motion by identifying the most powerful alternative.
Slow Motion Video Maker Slow your video’s speed with better control of your keyframes to create unique cinematic effects!
Make A Slow Motion Video Make A Slow Motion Video More Features

Part 1. An Introductory Review of CapCut Video Editor
CapCut is a smart and high-efficiency tool to ease your content creation journey. Beginners and professionals use this platform for captivating social media content. It’s a handy tool to collaborate with teammates on projects within a secure workspace. Unfortunately, it’s a full-featured software but still far from many major video editing software.

Key Features of CapCut
This versatile tool simplifies complex editing tasks with its straightforward interface. It’s a default video editor for TikTok, the most popular video-sharing platform. You can download CapCut on Windows, macOS, and smartphones or use it online. If you want to explore its functionalities before using it, then keep reading.
- Predesigned Templates: CapCut is trending on TikTok due to its templates. It offers predesigned templates in which users do nothing except import videos. Such templates contain pre-existing music, effects, text, and transitions. You can browse desired templates by tapping on categories like For You, Meme, and Beat.
- Editing Functions: Like other editing platforms, CapCut offers common trimming and merging features. You can annotate videos and add customized text with adjustable font sizes and shapes. Besides, users can adjust the speed of video to create slow-mo or fast-forward clips. It allows you to reverse footage to add a fun factor to the content.
- Audio Editing: This video editor makes copyrighted music library accessible to users. You can import audio from your gallery if you fail to find your desired music. Also, it allows you to extract a soundtrack from a video. Users can cut down audio parts to adjust their duration with the video. You will also get the flexibility to improve the audio quality of your added sound.
- Keyframe and Tracking: With AI integration, this tool detects the motion of video objects. Afterward, it changes the background of the video while retaining the main objects. Plus, you can create stunning motion graphics and animated effects with its keyframe option. It can adjust the color, opacity, shape, and position of the added keyframe animations.
Part 2. CapCut Lenta Template: What Is It and How It Benefits Slow Motion Video Creation?
As highlighted above, CapCut is widely famous for its video templates. Among some popular and massively used templates is the Lenta video template. It shows blurry faces and objects at first glance with a black-and-white filter. Moving forward with this, you will see an unblur video revealing with a beat. The Lenta template format is now available in 10 more options added by famous creators.
Camera Lenta CapCut has crossed the usage of over 500 million. The video created with such a template provides a cool look and glorifies your social persona. Anyone without a basic knowledge of video editing can make slow-motion videos by adding clips. This template has enabled you to create a slow-motion video with effects quickly.

Part 3. A Simple Guide to Creating Slow Motion Videos with CapCut
Despite using the Camera Lenta CapCut Template, you can also create slow motion . If the template does not emphasize details in slow-mo, edit it yourself. In this regard, you should follow the steps below to access and use the slow-motion option.
Step 1: Launch the CapCut application in your system and access its main interface. Click on the “New Project” to enter the editing window of this platform. Go to the media panel and tap “Add” to select media for the process. Drag material to the timeline section below and begin the editing.

Step 2: After dropping the video, you will see the editing panel on the right side. Move there and hit the “Speed” option next to the “Split.” Then, choose “Curve” and find speed ramping templates. You can pick one otherwise, tap “Customize” and find a graph below. Adjust the dots on the graph downward to slow down or upward to fast forward the video smoothly.

Step 3: After making the desired slow motion, go to the top right corner to hit the “Export” button. Set parameters from the “Export” screen and press the “Export” again to get the video in the gallery.

Part 4. The Perfect Desktop Alternative in the Form of Wondershare Filmora for Slow Motion Videos
There is a need to manually edit the video for desired changes. Shifting video in slow motion effect by Camera Lenta CapCut is time-consuming and difficult. The best alternative to this slow-motion video app is Wondershare Filmora . It is easily available on the desktop rather than browsing the apps on the internet. Filmora is an AI-powered video editing tool that gives high-quality results.
Users can get screen recording, AI text-to-speech, and many other benefits from this tool. They can apply the slow-motion effect in video with its Uniform Speed feature. Plus, these AI features make the editing process easier than the CapCut video editor.
Free Download For Win 7 or later(64-bit)
Free Download For macOS 10.14 or later
How to Create Slow-Motion Video by Filmora
Filmora makes the slow-motion video process easy due to advanced features. You do not need to be a professional editor to edit the video on Filmora. It has easy-to-follow steps to create a slow-motion video. So, let’s go through the steps to understand the video editing process.
Step 1Install the Filmora to Import Media
Install the Filmora on your desktop and open it to explore it. After that, click on the “New Project” option from the main interface. This option helps to access the editing screen to import the required file by pressing the “Ctrl+I” keys.

Step 2Use the Uniform Speed Feature to Slow Down the Video
After importing the file, drag the file to the timeline panel and hit “Ctrl + R” on the video to access the speed options. From the displayed “Uniform Speed” panel, Slow down the video with the “Speed” slider. Retain the quality of the video by heading to the “AI Frame Interpolation” drop-down list. Click on the “AI Frame Interpolation” downward icon to choose the “Optical Flow” option.

Step 3Finalize the Process and Save it
Make further editing if required or get a final preview to see the applied changes. After finalizing, save the project by selecting the “Export” button in the top right corner.

Key Features of Filmora in Video Editing
The key functionalities of this editing tool have been discussed in this part. You can go through this to understand the workings of this editor and get maximum benefits:
1. AI Image
Users can visualize their words through the AI Image generator feature of Filmora. In this regard, they should add a proper description in the text to generate the image. The description should include the composition, content, and other details for the exact image. It also offers aspect ratio and image style options to generate accurate AI images.
2. AI Thumbnail Creator
Influencers and social media activists post videos regularly. Thumbnails boost viewer engagement, so they add the thumbnail after finalizing the video. Filmora offers the AI Thumbnail feature to generate template-driven thumbnails for video. AI generates the thumbnail automatically by analyzing the best shots from the content.
3. AI Portrait
CapCut is used to change the background of the video. This background-changing process can cause errors in the final video. Filmora has an AI portrait feature to change the background accurately. It also offers versatility by offering 70+ stickers and AR effects. AI integration tracks the main object and facial features to add effects frame-by-frame.
Conclusion
CapCut is famous because it provides ease in editing to non-tech persons. As highlighted, the camera Lenta CapCut template requires clips to generate slow-mo videos. In this regard, users don’t need to put any effort and get appealing content automatically. Besides, this article has shown the steps to slow down video manually.
CapCut proves difficult for beginners to slow down video with speed ramping. So, if you need an easier but more advanced solution, you can benefit from Wondershare Filmora. It can ease your tasks and take your video editing to a professional level.
Make A Slow Motion Video Make A Slow Motion Video More Features
Part 1. An Introductory Review of CapCut Video Editor
CapCut is a smart and high-efficiency tool to ease your content creation journey. Beginners and professionals use this platform for captivating social media content. It’s a handy tool to collaborate with teammates on projects within a secure workspace. Unfortunately, it’s a full-featured software but still far from many major video editing software.
Key Features of CapCut
This versatile tool simplifies complex editing tasks with its straightforward interface. It’s a default video editor for TikTok, the most popular video-sharing platform. You can download CapCut on Windows, macOS, and smartphones or use it online. If you want to explore its functionalities before using it, then keep reading.
- Predesigned Templates: CapCut is trending on TikTok due to its templates. It offers predesigned templates in which users do nothing except import videos. Such templates contain pre-existing music, effects, text, and transitions. You can browse desired templates by tapping on categories like For You, Meme, and Beat.
- Editing Functions: Like other editing platforms, CapCut offers common trimming and merging features. You can annotate videos and add customized text with adjustable font sizes and shapes. Besides, users can adjust the speed of video to create slow-mo or fast-forward clips. It allows you to reverse footage to add a fun factor to the content.
- Audio Editing: This video editor makes copyrighted music library accessible to users. You can import audio from your gallery if you fail to find your desired music. Also, it allows you to extract a soundtrack from a video. Users can cut down audio parts to adjust their duration with the video. You will also get the flexibility to improve the audio quality of your added sound.
- Keyframe and Tracking: With AI integration, this tool detects the motion of video objects. Afterward, it changes the background of the video while retaining the main objects. Plus, you can create stunning motion graphics and animated effects with its keyframe option. It can adjust the color, opacity, shape, and position of the added keyframe animations.
Part 2. CapCut Lenta Template: What Is It and How It Benefits Slow Motion Video Creation?
As highlighted above, CapCut is widely famous for its video templates. Among some popular and massively used templates is the Lenta video template. It shows blurry faces and objects at first glance with a black-and-white filter. Moving forward with this, you will see an unblur video revealing with a beat. The Lenta template format is now available in 10 more options added by famous creators.
Camera Lenta CapCut has crossed the usage of over 500 million. The video created with such a template provides a cool look and glorifies your social persona. Anyone without a basic knowledge of video editing can make slow-motion videos by adding clips. This template has enabled you to create a slow-motion video with effects quickly.
Part 3. A Simple Guide to Creating Slow Motion Videos with CapCut
Despite using the Camera Lenta CapCut Template, you can also create slow motion . If the template does not emphasize details in slow-mo, edit it yourself. In this regard, you should follow the steps below to access and use the slow-motion option.
Step 1: Launch the CapCut application in your system and access its main interface. Click on the “New Project” to enter the editing window of this platform. Go to the media panel and tap “Add” to select media for the process. Drag material to the timeline section below and begin the editing.
Step 2: After dropping the video, you will see the editing panel on the right side. Move there and hit the “Speed” option next to the “Split.” Then, choose “Curve” and find speed ramping templates. You can pick one otherwise, tap “Customize” and find a graph below. Adjust the dots on the graph downward to slow down or upward to fast forward the video smoothly.
Step 3: After making the desired slow motion, go to the top right corner to hit the “Export” button. Set parameters from the “Export” screen and press the “Export” again to get the video in the gallery.
Part 4. The Perfect Desktop Alternative in the Form of Wondershare Filmora for Slow Motion Videos
There is a need to manually edit the video for desired changes. Shifting video in slow motion effect by Camera Lenta CapCut is time-consuming and difficult. The best alternative to this slow-motion video app is Wondershare Filmora . It is easily available on the desktop rather than browsing the apps on the internet. Filmora is an AI-powered video editing tool that gives high-quality results.
Users can get screen recording, AI text-to-speech, and many other benefits from this tool. They can apply the slow-motion effect in video with its Uniform Speed feature. Plus, these AI features make the editing process easier than the CapCut video editor.
Free Download For Win 7 or later(64-bit)
Free Download For macOS 10.14 or later
How to Create Slow-Motion Video by Filmora
Filmora makes the slow-motion video process easy due to advanced features. You do not need to be a professional editor to edit the video on Filmora. It has easy-to-follow steps to create a slow-motion video. So, let’s go through the steps to understand the video editing process.
Step 1Install the Filmora to Import Media
Install the Filmora on your desktop and open it to explore it. After that, click on the “New Project” option from the main interface. This option helps to access the editing screen to import the required file by pressing the “Ctrl+I” keys.
Step 2Use the Uniform Speed Feature to Slow Down the Video
After importing the file, drag the file to the timeline panel and hit “Ctrl + R” on the video to access the speed options. From the displayed “Uniform Speed” panel, Slow down the video with the “Speed” slider. Retain the quality of the video by heading to the “AI Frame Interpolation” drop-down list. Click on the “AI Frame Interpolation” downward icon to choose the “Optical Flow” option.
Step 3Finalize the Process and Save it
Make further editing if required or get a final preview to see the applied changes. After finalizing, save the project by selecting the “Export” button in the top right corner.
Key Features of Filmora in Video Editing
The key functionalities of this editing tool have been discussed in this part. You can go through this to understand the workings of this editor and get maximum benefits:
1. AI Image
Users can visualize their words through the AI Image generator feature of Filmora. In this regard, they should add a proper description in the text to generate the image. The description should include the composition, content, and other details for the exact image. It also offers aspect ratio and image style options to generate accurate AI images.
2. AI Thumbnail Creator
Influencers and social media activists post videos regularly. Thumbnails boost viewer engagement, so they add the thumbnail after finalizing the video. Filmora offers the AI Thumbnail feature to generate template-driven thumbnails for video. AI generates the thumbnail automatically by analyzing the best shots from the content.
3. AI Portrait
CapCut is used to change the background of the video. This background-changing process can cause errors in the final video. Filmora has an AI portrait feature to change the background accurately. It also offers versatility by offering 70+ stickers and AR effects. AI integration tracks the main object and facial features to add effects frame-by-frame.
Conclusion
CapCut is famous because it provides ease in editing to non-tech persons. As highlighted, the camera Lenta CapCut template requires clips to generate slow-mo videos. In this regard, users don’t need to put any effort and get appealing content automatically. Besides, this article has shown the steps to slow down video manually.
CapCut proves difficult for beginners to slow down video with speed ramping. So, if you need an easier but more advanced solution, you can benefit from Wondershare Filmora. It can ease your tasks and take your video editing to a professional level.
Wondering if You Can Make DIY Green Screen Video for Streaming? Learn the Easy Steps to Setup DIY Green Screen, Shoot the Video and Edit It Out to Add Green Screen Effects
No matter how big the budget of a Hollywood movie is, at the end of the day, it has to rely on the humble green screens for special video effects. The stunning studios from where your favorite YouTubers and gamers stream their videos are graphical video effects created through green screens. Even the studios that you see on TV channels are a graphical creation of green screens. You must be wondering how they could achieve such awesome graphics with a simple green screen.
All you need is a good-quality green fabric, a professional video editing software, and a camera. You may not believe it, but that is all you need for creating DIY green screen video effect. You do not have to be a professional video editor to edit the green screen on your videos and add any special video effect. In this article, you will learn how to create your own DIY green backdrop.
What Is Green Screen Technique?
A green screen is nothing but a green fabric. In a video, a green screen is placed in the background behind the subject. In the editing phase of the video, the green screen is replaced with any background image or video effect that stays intact in the video as long as possible. In short, the green screen technique involves superimposing photos and videos on the green screen in a video.
Starting from the video game industry, movie industry to video streaming and TV channels, the green screen technique is used everywhere. The stunning graphical component of these industries is totally dependent on the green screen technique. In fact, DIY green screen for zoom meetings and video conferencing is widely used. Along with that, YouTubers and Twitch streamers use DIY green screen for streaming live.
Technically speaking, instead of a green screen, you can use any other color of screen. However, green screens are widely used, and it has become a norm. The main point to remember when using a green screen is that nothing else should have green color such as the dresses the subject is wearing. Therefore, in technical terms, the green screen is referred to as Chroma Key, and you will find Chroma Key option instead of green screen in most video editors.
Why Use Green Screen Technique?
The main reason why the green screen technique is used in movie and video making is that the video editor can replace the entire background at once instead of replacing the background frame by frame. Once you replace a green screen with an image or video effect, it stays the same throughout the video as long as required.
Therefore, the video editor can save a lot of time in editing and the editing stays uniform throughout which gives a realistic effect. If the green screen technique is not used and editing is done frame by frame of a video, there could be a manual error, inconsistent, and graphical glitches.
You can replace green screens with anything you want. It could be a still image of a beautiful studio with 3D effect like you see in case of YouTubers and gamers. It could be a moving, real-life landscape on any place in the world instead of a beautiful background picture. Similarly, it could be replaced by video effects such as explosions, stadiums full of people, battlefields, and likewise. At times, it could be live animations as you see on TV channels.
How To Create DIY Green Screen Stand Setup and Add Green Screen Effect?
If you want to have a green screen setup for your video, you need to have the following things ready.
- A green cloth that is large enough to cover the entire background.
- A video editing software to replace green screen in your video with anything.
- External light for more video clarity and a good camera with mic.
Step 1: Setup DIY Green Backdrop
Your green fabric should be soft and bright. If you are going to be the subject of the video, make sure you are not wearing anything green. Moreover, do not keep any object within the video frame that is green in color. If there are too many green objects, you can use a blue screen.
When it comes to hanging the green cloth in the background, people find it very difficult. If your video frame is going to be a close-up to the subject, you can use a green screen panel to hang green cloth. A green screen panel generally has a collapsible structure for easy storage and transportation.
Otherwise, you need to install hooks in the wall if you are planning to replace the green screen with a studio-like scene so that the entire background of the video frame stays covered with green screen. You should opt for multiple green screens and stitch them together to cover the background completely.
Step 2: Setup Camera and Light
Whether you are shooting with a DSLR camera or smartphone camera or webcam, make sure you are shooting at least HD video quality so that the editing could be great. Lights are important when you are using green screen though they are not a necessity. The video quality and brightness get enhanced with lights. Diffused lights work the best and the background should be well-lit.
Most importantly, you have to place the lights in such a way that your body arms should not be casting any shadow on the green screen. You can either stand very close to the green screen or away from the green screen so that your shadow does not go till the green screen. Instead of starting to shoot the video from the very beginning, you should capture for a few seconds and make sure everything is perfect including the camera angle.
Step 3: Get The Best Video Editor For Green Screen Effect
There are various video editors available, but not all of them are suitable for green screen effect. We recommend Wondershare Filmora as the best video editor to apply green screen effects on your video while editing. The reason behind the recommendation is that the steps to replace the green screen with any image or video are super simple and anyone can do it. There is no need to be a professional video editor.
Wondershare Filmora also lets you capture video through webcam and you can also capture your screen. It is perfect for recording gameplay as well as your reaction and commentary. Similarly, you can record demonstrations, tutorial videos, as well as video conferences. You can apply green screen effects to your recorded video instantly and publish on different platforms. In fact, you can adjust all the parameters such as color scheme, audio ducking, keyframing, motion tracking and much more to enhance the video output quality.
Conclusion
Making videos with DIY green screen stand is no more an esoteric concept. You can set it up anywhere and start shooting video. The magic begins in the post-production stage where you can use Wondershare Filmora to replace the green screen with video effects that will blow the mind of your viewers and followers. Filmora has intuitive options and controls through which you can apply green screen effect in simple steps.
8 Best Free Title Maker You Must Try and Put to Use
Do you know what’s more important in a blog post? Yes, you guessed it right, headline. It helps your blog grab attention and encourages people to click through. Additionally, the title is a key factor in how search engines categorize and rank posts. A great blog free title maker might be a handy tool for those who want to boost their site’s traffic.
A headline generator may assist you in creating a compelling and efficient title that will make your blog distinguish itself from others by letting you enter a few essential details. Additionally, exploring ideas might be a terrific approach if you’re feeling stuck. A title generator is unquestionably something you should consider including in the toolkit if you’re signed in marketing and blogging.
8 Best Free Title Maker You Must Try and Put to Use
1. SEMrush Title Generator

While writing and publishing something the first thing that grabs a user’s attention is the title of the post. It must be catchy and good enough for them to read the whole thing. What SEMrush ideas generator does is that it suggests you some catchy and interesting title ideas when you type in and search the same keyword.
You can opt to choose the best among the suggested ones and grab people’s attention and make them read your blog/article. Since it’s a free title generator you need not worry about spending money for title ideas and search for as many topics as you need. You may also look for topic ideas by clicking the “get more content ideas” button that is there on the right side at the bottom.
2. Contentrow Title Generator

Another excellent title intro maker online free is Content Row. It provides specific outcomes when a specific keyword is used. You only have to register with the email ID if you want to discover your keyword’s currently trending titles. You can use this free tool to analyze your headline score as well. Once you’ve chosen the blog title or headline, you can assess the topic’s strength. Additionally, it provides some ideas on which you might base your new headline.
Also, this tool displays hot subjects currently being widely or passionately debated online. A case converter or word counter is also an option. Contentrow Title Generator helps you to generate clickable and catchy blog titles to drive traffic to the articles. Discover unique video ideas that will inspire you and interest your audience. Use the clickbait or linkbait ideas for the content with their title generator to capitalize on readers’ curiosity.
3. Hubspot Title Generator

The HubSpot Title Generator has a lot going for it, not the least because it is free to use. This indicates that using the tool is not dependent upon having a HubSpot account. Here are a few additional reasons you should use it, besides being free. HubSpot Title Generator is one of the most accessible content marketing strategies. Type up to five distinct nouns into the area provided and click “Give Me Blog Ideas.”
Afterward, you can navigate through a week’s generated blog post ideas. All it takes is that. It will only take a few seconds to generate title ideas, and once you have entered the nouns into the generator field, you will be given new ideas to create new posts instantly. Users can get a unique title every week based on the nouns they put. Hubspot doesn’t share copied blog titles, producing unique and plagiarism-free titles.
4. Tweak Your Biz

Tweak your Biz Title Maker. Create catchy headlines for your blog posts and articles. A great title can boost visitor traffic, Facebook Likes, and tweets by 50% or more. An online web-only creative title generator called Tweak Your Biz title generator online free is available to experienced and inexperienced bloggers and social media influencers. It is the free headline maker that provides the two-way service, and it serves as the best headline analyzer and generator.
The target word can be searched as a verb or a noun before the output in the Tweak Your Biz headline maker. Input your subject or topic in the box provided on this innovative title generator and press the “Submit” button. It provides headlines for various topics that are grouped under several categories and gives a variety of headlines to fit the tone of your site. Use this free headline generator to create attention-grabbing headlines for your blog or social media sites. It does not require the installation of any programs, just a web browser, to function.
5. The Hoth

A well-known free online title generator and marketing provider called The HOTH offers a variety of solutions for business owners and marketers. They provide a free blog subject headline generator so you can rapidly develop headlines for your posts to help you obtain the maximum traffic to your article. The HOTH’s headline generator is a fantastic choice if you want more control over the suggestions. It still requires little time to operate and is simple, but it requires more input than many other tools.
You must add a keyword, your audience’s intended goal, a frequent key point, the name of your industry, your target audience, and other information into this tool to generate titles. After that, the program generates ten titles simultaneously, each with options specific to the abovementioned factors. The title generator on the HOTH is still a quick and straightforward approach to developing a list of intriguing title concepts. You can specify your preferred term, target market, and other details to make the headline more suited to your needs.
6. Wix Title Generator

Well, this tool called Wix title generator is no different than others as it comes with a plethora of options. All you got to do is open the website using the above link and enter around 2 main keywords to look for a relevant and catchy title for your blog/article. Put the required keywords and then opt for clicking the button that says, “Get your Title.”
You will be given around 7-8 options for the title of the blog and you can choose whatever feels best for the same. You may also load more options by clicking the button that is there at the bottom of the PC’s screen. Once chosen, you can copy the title and use it however you like being it a free tool to be used as many times as you wish.
7. Small Biz Trends

Well, the Small Biz Trends title generator is a bit different when it comes to generating title ideas for your blog than other tools mentioned here. It’s because when you open the website and type in your topic and click the submit button, you will be given a ton of blog title options. Not just that, the options here will be presented to you category-wise. Isn’t this convenient?
Yes, it is, if you feel the other tools are giving you lesser options or ideas. You can just copy whatever title appeals to you the most and use it however you need to. Also, you may use the option given above the submit button “i.e. Small business trends Thesaurus,” of you wish to opt for generating more ideas.
8. fatjoe

With the help of the well-liked headline generator from FatJoe, users may quickly come up with over 100 ideas for blog posts. Have trouble coming to a title for your most recent blog post? There are always options available here. You can enter the focus keyword or selected subject to get the best clickable and SEO-friendly titles.
In addition to providing one of the best headline creation tools for free, Fat Joe is a link-building business. One can create more than 100 titles and even the best headline ideas. You can even create new topics for generating other topics.
Conclusion
Online free title creator can create catchy headlines that increase social media engagement, drive website traffic, and accomplish various other goals. Several automated solutions will handle your labor-intensive tasks, so you don’t have to rely only on your creativity to develop article titles. With the correct tools, you can improve your SEO content and grow your business without going over budget by bringing in more customers and increasing conversions.
Free Download For Win 7 or later(64-bit)
Free Download For macOS 10.14 or later
Free Download For macOS 10.14 or later
Change Background Color in After Effects
Adobe After Effects is a powerful video editor. After Effects is particularly popular for its special effects that you can add to your videos and blow the mind of your audience. In any video, the background plays a major role in enhancing the overall frame and scene. If you are planning to change background color After Effects or add special effects, you must shoot your video with a solid color background.
During the post-production phase, you can change the background uniformly to any color scheme or special effect as per the requirement of the scene. Since the learning curve for After Effects is slightly steeper, you should know the exact steps to change After Effects background color. We will explain the process in simple steps and provide you with an alternative way to change background color.
Part 1. How to change video BG color in After Effects?
After Effects is widely used for professionals to add animations and special effects to videos during video editing phase. Starting from editing social media videos and YouTube videos to short films and even movies, After Effects finds its application in every field of video editing. Changing background color in After Effects is super simple even though other video editing techniques could be slightly complex for beginners. Here are the steps on how to change background color in After Effects.
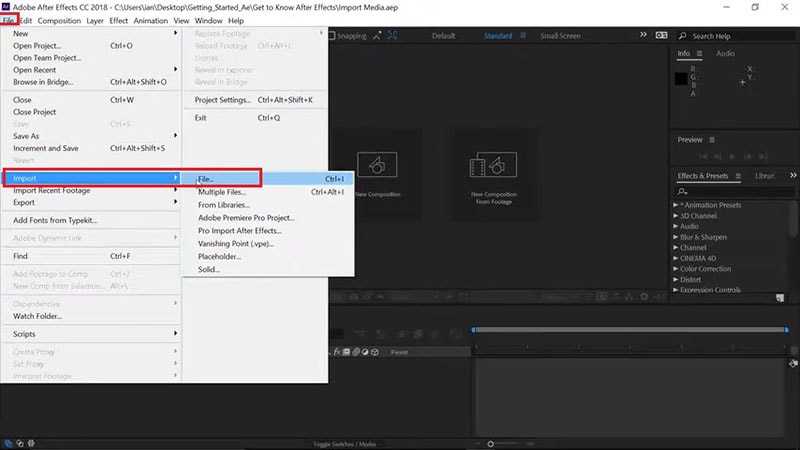
Step1 Open After Effects on your computer. Go to File> Import> File. Select the video file from your hard drive and it will appear under Project tab.
Step2 Drag and drop your video into Timeline. Select the video clip and right-click on Video Composition option located below Project tab.
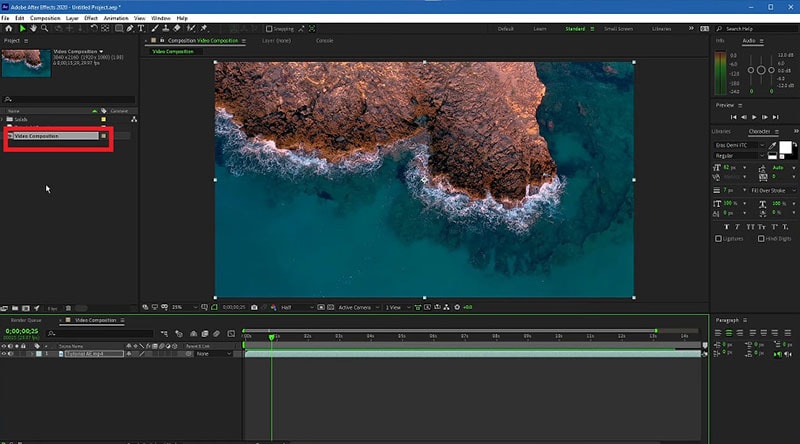
Step3 From the menu, click on Composition Settings option. You can also use Ctrl + K(Windows) or Command + K(Mac) key combination to open Composition Settings directly.

Step4 On Composition Settings window, go to Background Color and set the color as per your preference. You can also use a color picker as well to select any color from the video directly.
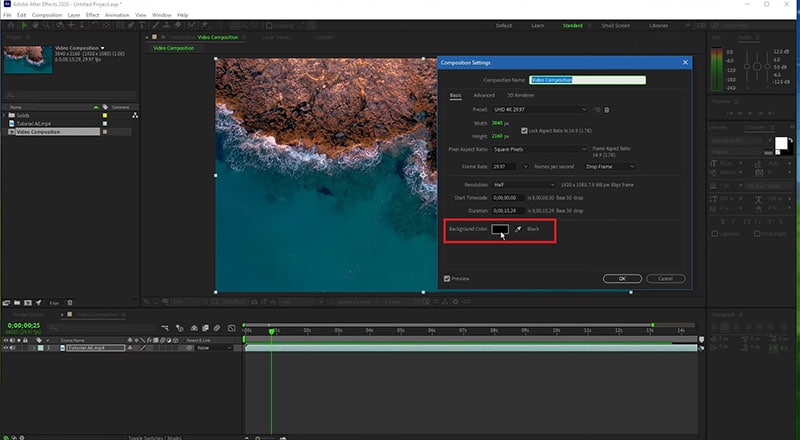
Step5 Click on Ok to set the new background color. Depending on the transparency of your video scene or the transition effect such as fade in and out, the background color will be more prominent.
Part 2. Alternative way to change background color
The best alternative to After Effects is Wondershare Filmora as Filmora has a wide range of special effects and animations. Filmora is a professional video editor where you can perform all basic as well as advanced video editing work. Most importantly, Filmora comes with an intuitive user interface so that even amateurs can use it easily.
There are several ways you can change background color in your video. For example, you can remove background color even when you do not have a solid color. If your video has a solid color, you can change background color to any color or graphical element using Chroma key. Here are the steps to change background color in Filmora .
Free Download For Win 7 or later(64-bit)
Free Download For macOS 10.14 or later
Step1 Download and install Filmora and it is available for Windows and Mac. Launch Filmora and click on New Project.

Step2 Import your video under Project Media folder and drag and drop into Timeline.
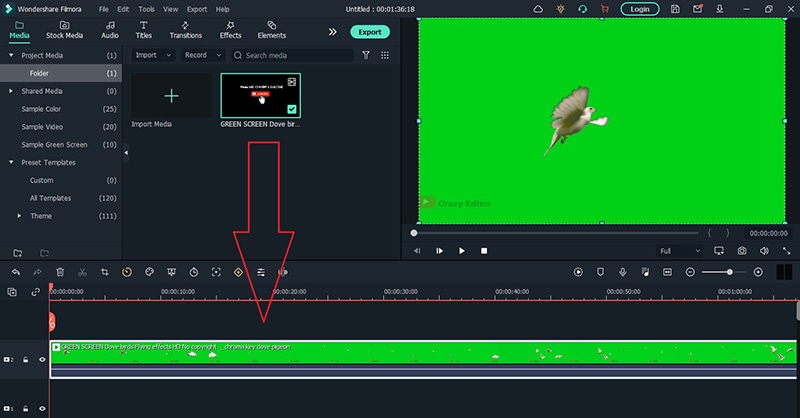
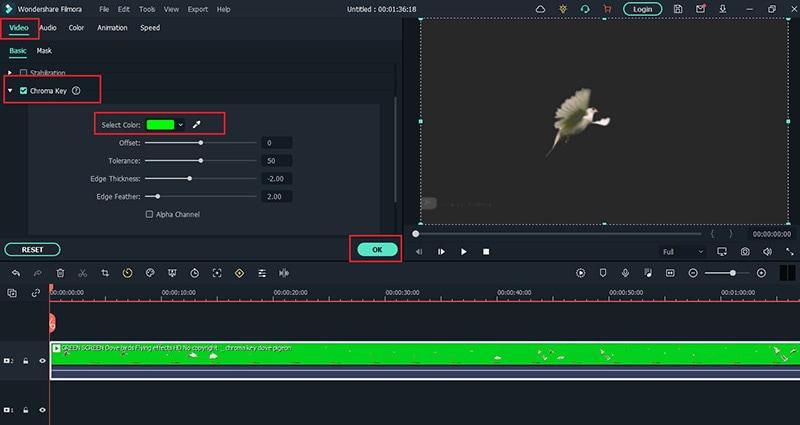
Step3 Double-click on the video clip and go to Video tab and turn on Chroma Key option. Select the solid color present in the background of the video and click on Ok button.
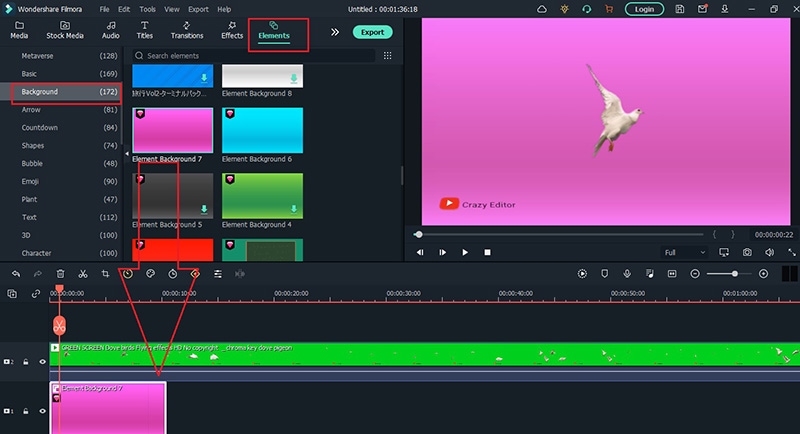
Step4 You will see the background color of the video disappear. Go to Elements> Background and drag and drop any background into Timeline. Make sure it is placed below the video clip and extend the duration of the background color as per your requirements.
Step5 Finally, play the video and click on Export button to save the video.
Part 3. FAQs about Video Background Colors
1. How do I remove background color in After Effects?
Import your video clip with a solid background color and place it on Timeline. Go to Effect menu> Keying> Keylight option. In Effects window and under Keylight, you will see Screen Colour option. Click on the eyedropper icon and select the background color you want to remove.
2. How do I change a solid background in After Effects?
The steps for After Effects how to change background color solid involve removing the background color and adding a layer of solid color to replace the transparency of the video. Go to Layer> New> Solid. Under Solid Settings window, go to Color and select the desired color from Color option and click on OK button. The new color will get reflected in the background of the video.
3. How do you add a white background in After Effects?
Go to Layer> New> Solid and add a white color solid first. However, this white color layer will not be visible unless you turn the background of your video transparent. Go to Effects & Presets and search for Luma Key and drop Luma Key on your video. Set Key type as Brighter and the threshold of the Lema key as per suitability on your video to see the white background appear.
Free Download For macOS 10.14 or later
Step1 Download and install Filmora and it is available for Windows and Mac. Launch Filmora and click on New Project.
Step2 Import your video under Project Media folder and drag and drop into Timeline.
Step3 Double-click on the video clip and go to Video tab and turn on Chroma Key option. Select the solid color present in the background of the video and click on Ok button.
Step4 You will see the background color of the video disappear. Go to Elements> Background and drag and drop any background into Timeline. Make sure it is placed below the video clip and extend the duration of the background color as per your requirements.
Step5 Finally, play the video and click on Export button to save the video.
Part 3. FAQs about Video Background Colors
1. How do I remove background color in After Effects?
Import your video clip with a solid background color and place it on Timeline. Go to Effect menu> Keying> Keylight option. In Effects window and under Keylight, you will see Screen Colour option. Click on the eyedropper icon and select the background color you want to remove.
2. How do I change a solid background in After Effects?
The steps for After Effects how to change background color solid involve removing the background color and adding a layer of solid color to replace the transparency of the video. Go to Layer> New> Solid. Under Solid Settings window, go to Color and select the desired color from Color option and click on OK button. The new color will get reflected in the background of the video.
3. How do you add a white background in After Effects?
Go to Layer> New> Solid and add a white color solid first. However, this white color layer will not be visible unless you turn the background of your video transparent. Go to Effects & Presets and search for Luma Key and drop Luma Key on your video. Set Key type as Brighter and the threshold of the Lema key as per suitability on your video to see the white background appear.
Also read:
- [New] In 2024, Rethinking Content Strategy with Instagram's New Order
- [Updated] How to Write Compelling Podcast Narratives & Examples at No Cost
- 2024 Approved Hyperlapse VS Timelapse Videos
- 2024 Approved Motion Magic Quick Photography Tricks for Samsung Users
- Bypassing and Repairing osetup.dll Error Messages: Tips & Tricks
- Easy Solutions to Read & Edit Apple's Pages Documents on Your Personal Computer
- New 2024 Approved Unleash Your Creativity 10 Public Domain Image Sites
- New A Countdown Effect Is Widely Used in Gaming and Report Videos. So How to Create Your Own Countdown Video? This Article Will Tell You some Ideas About Contdown Video Editing for 2024
- New How to Make a TikTok Loop Video
- New In 2024, Adobe Lightroom Color Grading Tutorial
- Troubleshooting Instagram's Rotating Videos
- Title: Updated Follow the Trend of Making Slow-Motion Videos with a Camera Lenta CapCut Template. Learn Everything About CapCut and Find Its Alternatives in This Article
- Author: Chloe
- Created at : 2025-02-27 18:27:19
- Updated at : 2025-03-04 02:44:01
- Link: https://ai-editing-video.techidaily.com/updated-follow-the-trend-of-making-slow-motion-videos-with-a-camera-lenta-capcut-template-learn-everything-about-capcut-and-find-its-alternatives-in-this-ar/
- License: This work is licensed under CC BY-NC-SA 4.0.