
Updated How to Add Adjustment Layer (Clip) in DaVinci Resolve?

How to Add Adjustment Layer (Clip) in DaVinci Resolve?
DaVinci Resolve is one of the popular video editors comprising many advanced features. This tool allows you to conduct 3D video editing and adjust color grading properties. You can also access its audio library to find out suitable music clips. Moreover, you can add transitions and animations to your videos for more enhancements.
While executing video editing, many people add an adjustment layer (clip) in DaVinci Resolve for convenience. By reading this article, you can discover the DaVinci Resolve adjustment layer and an easy method to add it during video editing.
Part 1: What is the Adjustment Layer (clip) in DaVinci Resolve?
Do you know the benefits of adding an adjustment layer (clip) in DaVinci Resolve? The adjustment layer (clip) in DaVinci Resolve gives you more control and flexibility during video editing. By adding this particular layer above your other clips, you can apply tons of effects to them.
Due to this ease, you don’t have to apply the same effect to multiple clips. Thus, it saves your time and manual effort on DaVinci Resolve. One of the main advantages of adding an adjustment layer (clip) is that it does not modify the original pixels of the video. You can also rename the adjustment layers (clips) in DaVinci Resolve according to your desire.
Hence, adjustment layers in any video editor like DaVinci Resolve provide a non-destructive way to edit and apply effects to the video.
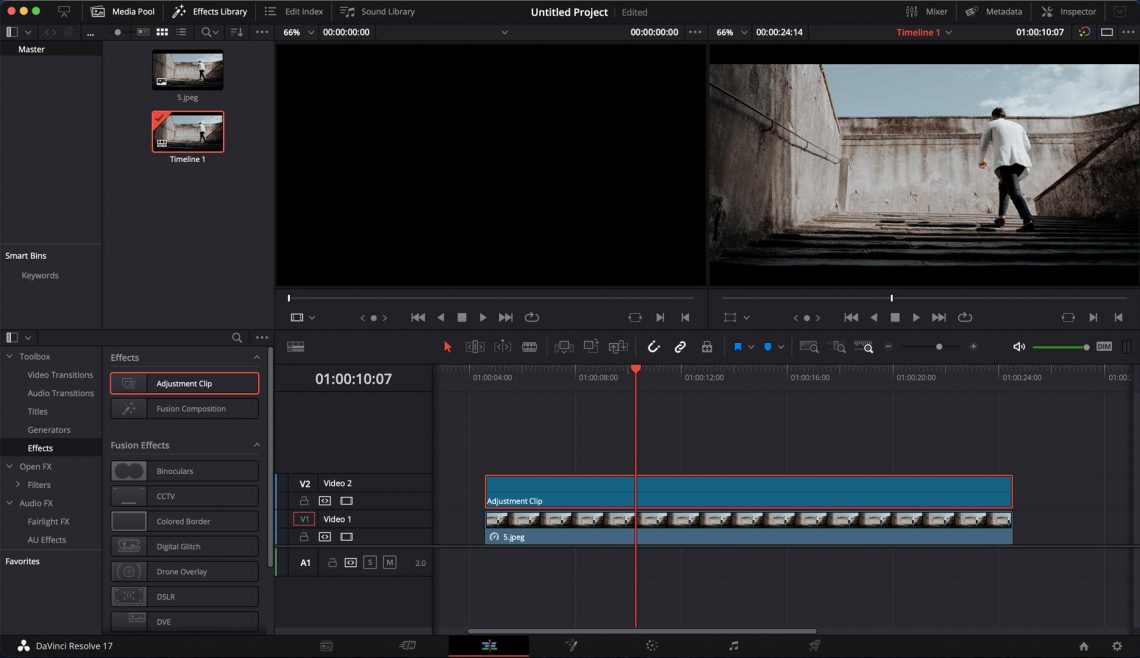
Part 2: How to Add an Adjustment Layer (clip) in DaVinci Resolve?
Are you keen to know how to add an adjustment layer in DaVinci Resolve? By reading this section, you can find easy instructions to apply the adjustment layer (clip) in DaVinci Resolve without hassle.
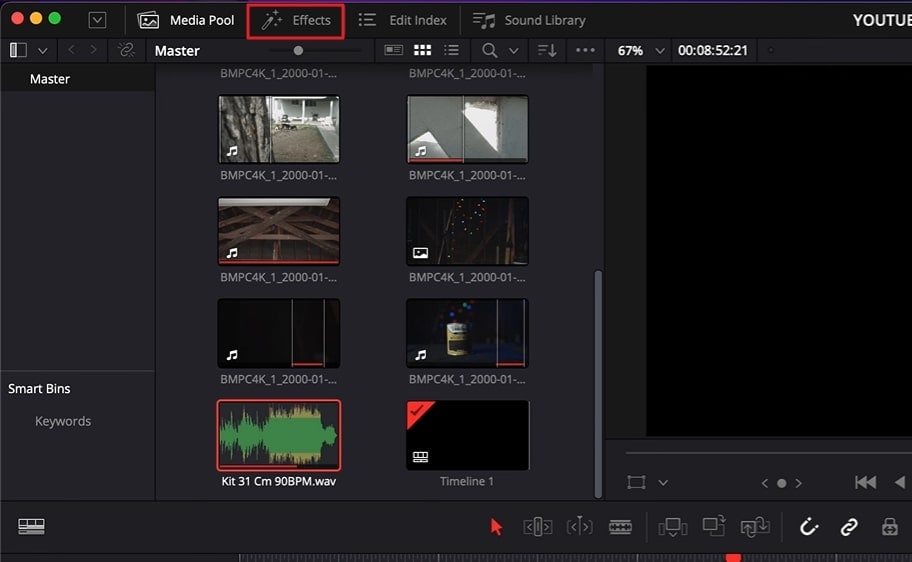
Step1 To add an adjustment layer in DaVinci Resolve, head to the “Effects Library.” From there, click on “Toolbox” and select “Effects.”
Step2 From the Effects section, you will have to search for the “Adjustment Clip.” Drag and drop the adjustment clip and apply it above the layers that you want to edit.
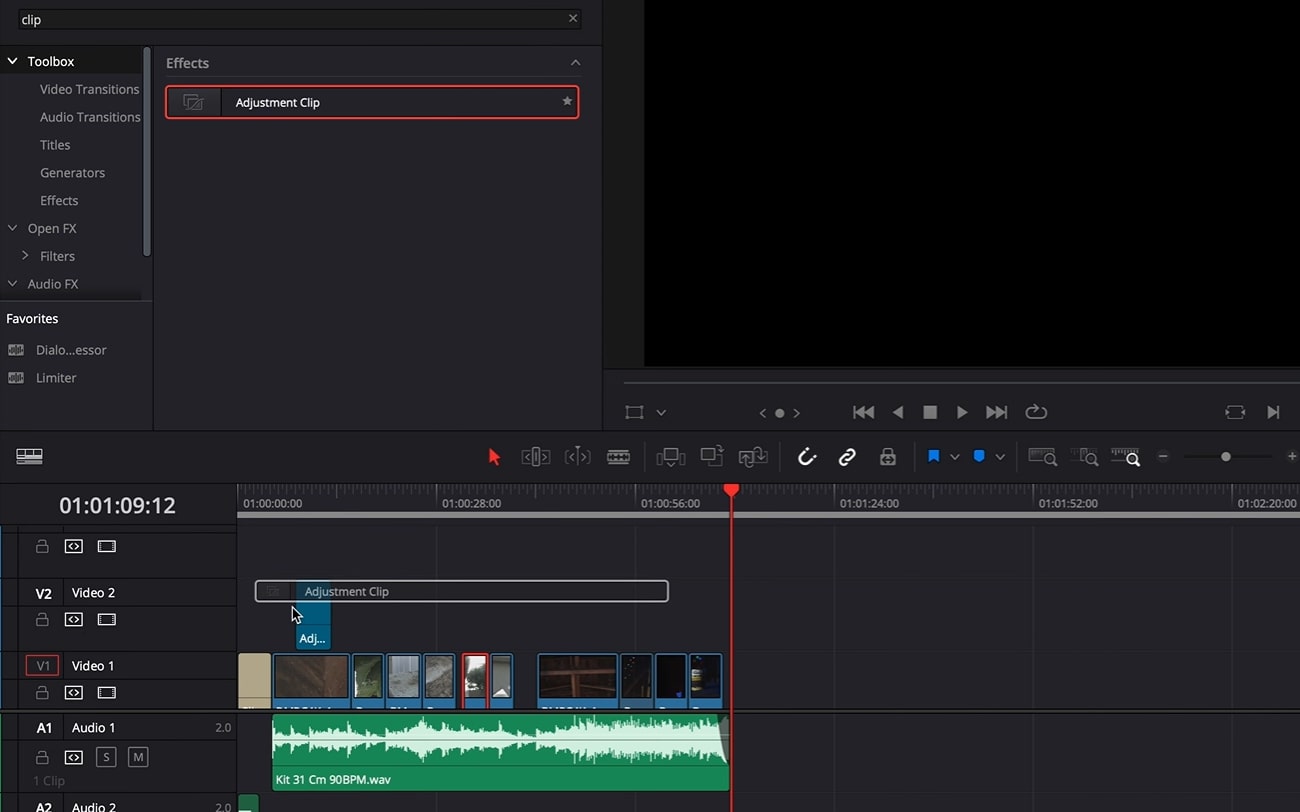
Step3 Now extend the adjustment clip according to the layers. Once done, you can apply effects and transitions to the adjustment clip to add modifications.
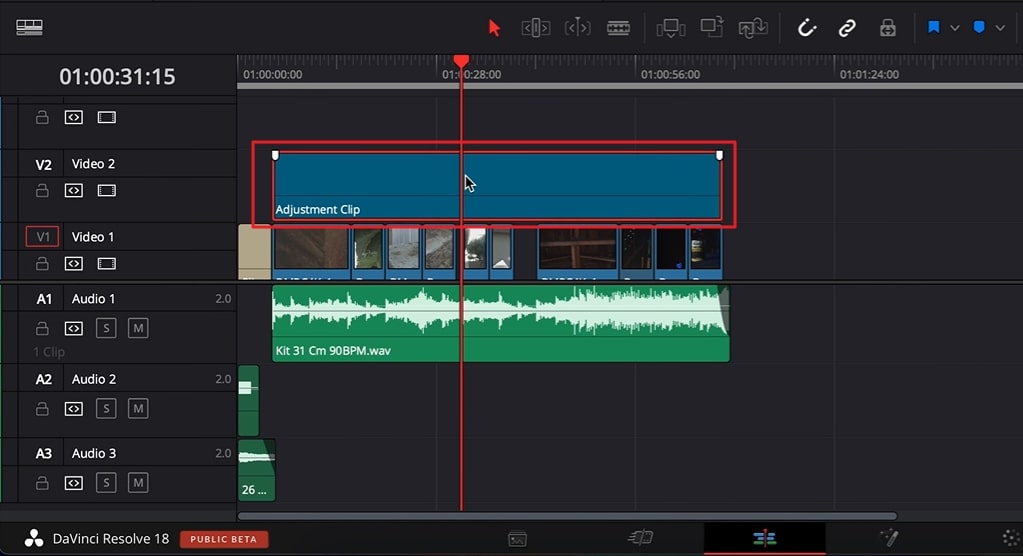
Part 3: Three Ways to Use Adjustment Layers in DaVinci Resolve
Do you want to know how to use the DaVinci Resolve adjustment layer? Read this part of the article to discover how to use the adjustment layer (clip) in DaVinci Resolve.
1. Zoom in
Do you want to give the zoom-in element in your video to emphasize your subject? The zoom-in effect is created to focus on the subject to engage the viewers. On DaVinci Resolve, you can create the zoom-in effect using the adjustment layer (clip). To do so, you can read and follow the below instructions:
Step1 First, add the adjustment layer to your timeline by heading to Effects Library and then Toolbox. Make sure to apply the adjustment layer above your talking head on the timeline.
Step2 Now click on “Inspector” from the top right corner and enhance the “Zoom” value according to your desire. Once done, you can play the video to check the results.
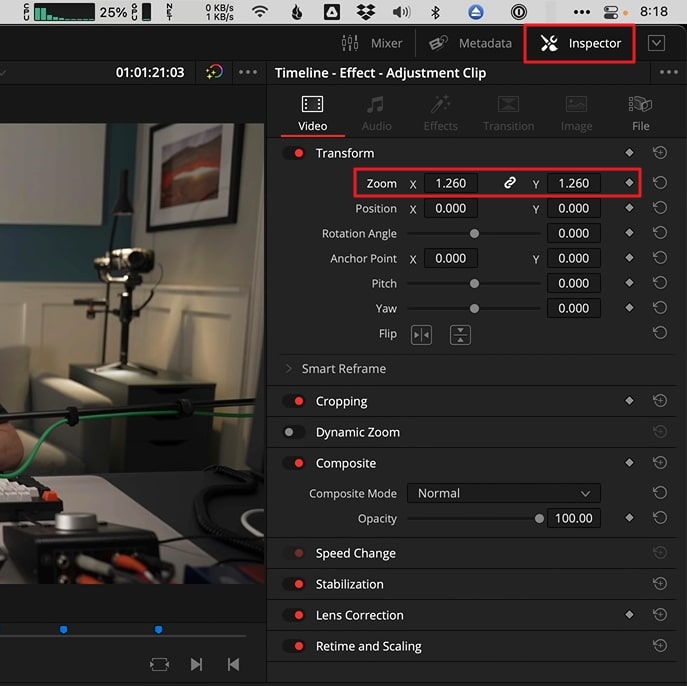
2. Color Grading
Color grading can change the perspective of your video clip. Do you want to give your video an aesthetic, gloomy, or colorful vibe? Change the color grading properties using the adjustment layer (clip) in DaVinci Resolve. To use an adjustment layer for color grading, we have jotted down the simple steps below:
Step1 Drag and drop your clip above on the timeline. Once you are done, head to the “Color Page” given below.
Step2 On the Color page, go to “Library” from the right side and select the effect called “Color Space Transform” from the Resolve FX Color section. After applying this effect, you can enhance the visual appearance of your video.
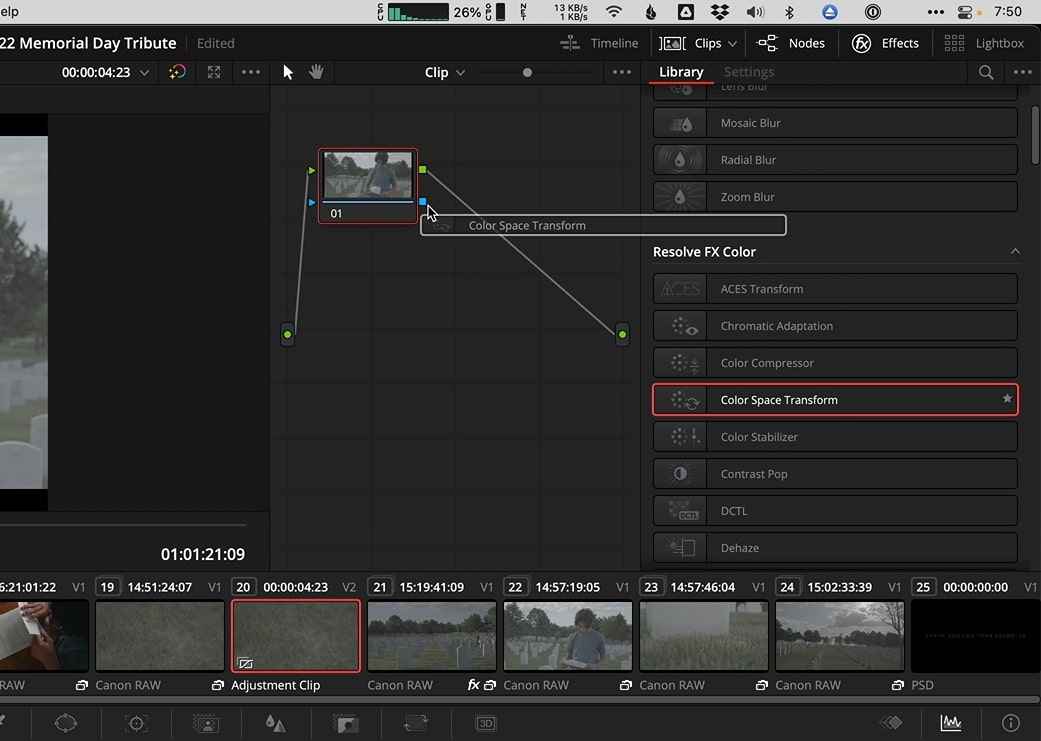
3. Shake Transition
The shake transition adds a dramatic feel to your video to hook up the audience. If you have recorded a music video, you can add a shake transition to make it more captivating. To add this particular transition to your video, we will use the adjustment layer in DaVinci Resolve to produce accurate results.
Step1 Add the adjustment layer to your timeline. Trim it according to the specific part of your clip where you want to create the shake transition effect.
Step2 Now, from the left side, select “Open FX” library and search “Camera shake” effect. Apply it to the adjustment layer and navigate to the “Effects” tab from the top right corner. From there, increase the values of motion scale, speed scale, and motion blur. You can also make further changes in the “Shake Levels” section.
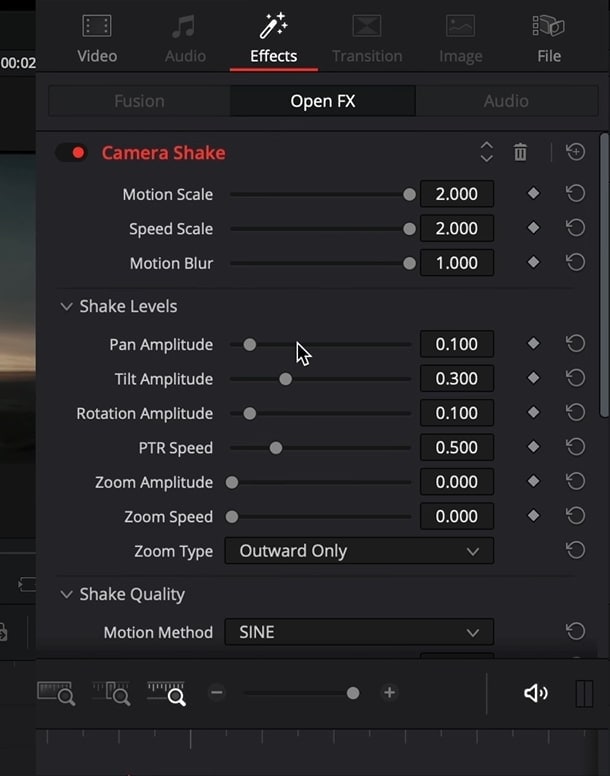
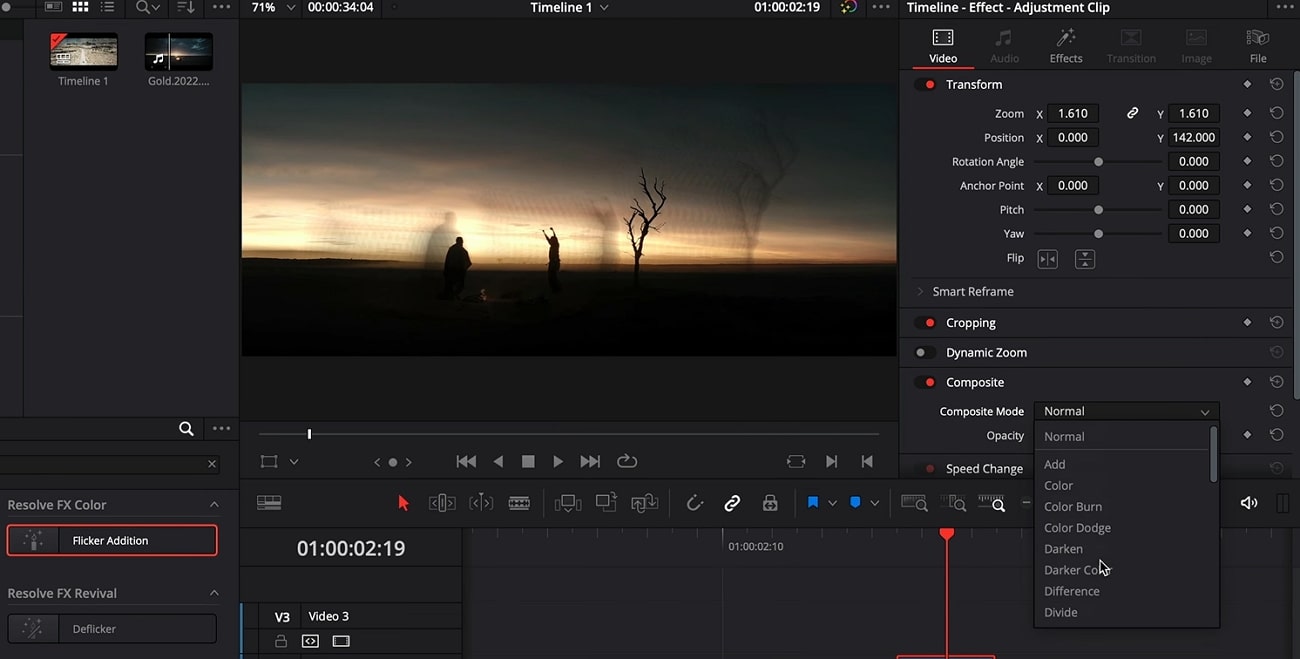
Step3 Afterward, scroll to the bottom and change the Border Type to “Reflect.” Now head back to the Open FX library and select the “Flicker Addition” effect. Apply this particular effect to the adjustment layer. From the “Effects” tab on the right side, select “Flicker Gain” as your flicker type. You can also go to the “Video” tab to enhance the zoom and position value.
Step4 You can also select different composite modes. You can also duplicate the adjustment clip and alter the composite mode of the second clip. Once done, decrease the opacity of the second clip. Now copy and place the adjustment clips on your timeline according to your desire.
Bonus Tips: Use Adjustment Layers in the Best Alternative to DaVinci Resolve
If you are not satisfied with the results of the DaVinci Resolve adjustment layer, you can try Wondershare Filmora . This professional software can prove to be the best alternative to DaVinci Resolve due to its numerous key features. You can find this tool on every major platform, such as iOS, Android, Windows, and Mac. This tool has a clean and friendly user interface so that you can enjoy editing and modifying your videos.
Free Download For Win 7 or later(64-bit)
Free Download For macOS 10.14 or later
You can also use adjustment layers to edit with great ease on this compatible video editor. Moreover, you can find multiple trending effects in its library that can help you to enhance your video clips. To add an adjustment layer in Filmora, you can follow the below steps.
Step1 Start with New Project
Once done with launching Filmora, hit the “New Project” button and upload the desired video. Drag and drop the added video to the timeline to proceed further.

Step2 Add the Adjustment Layer
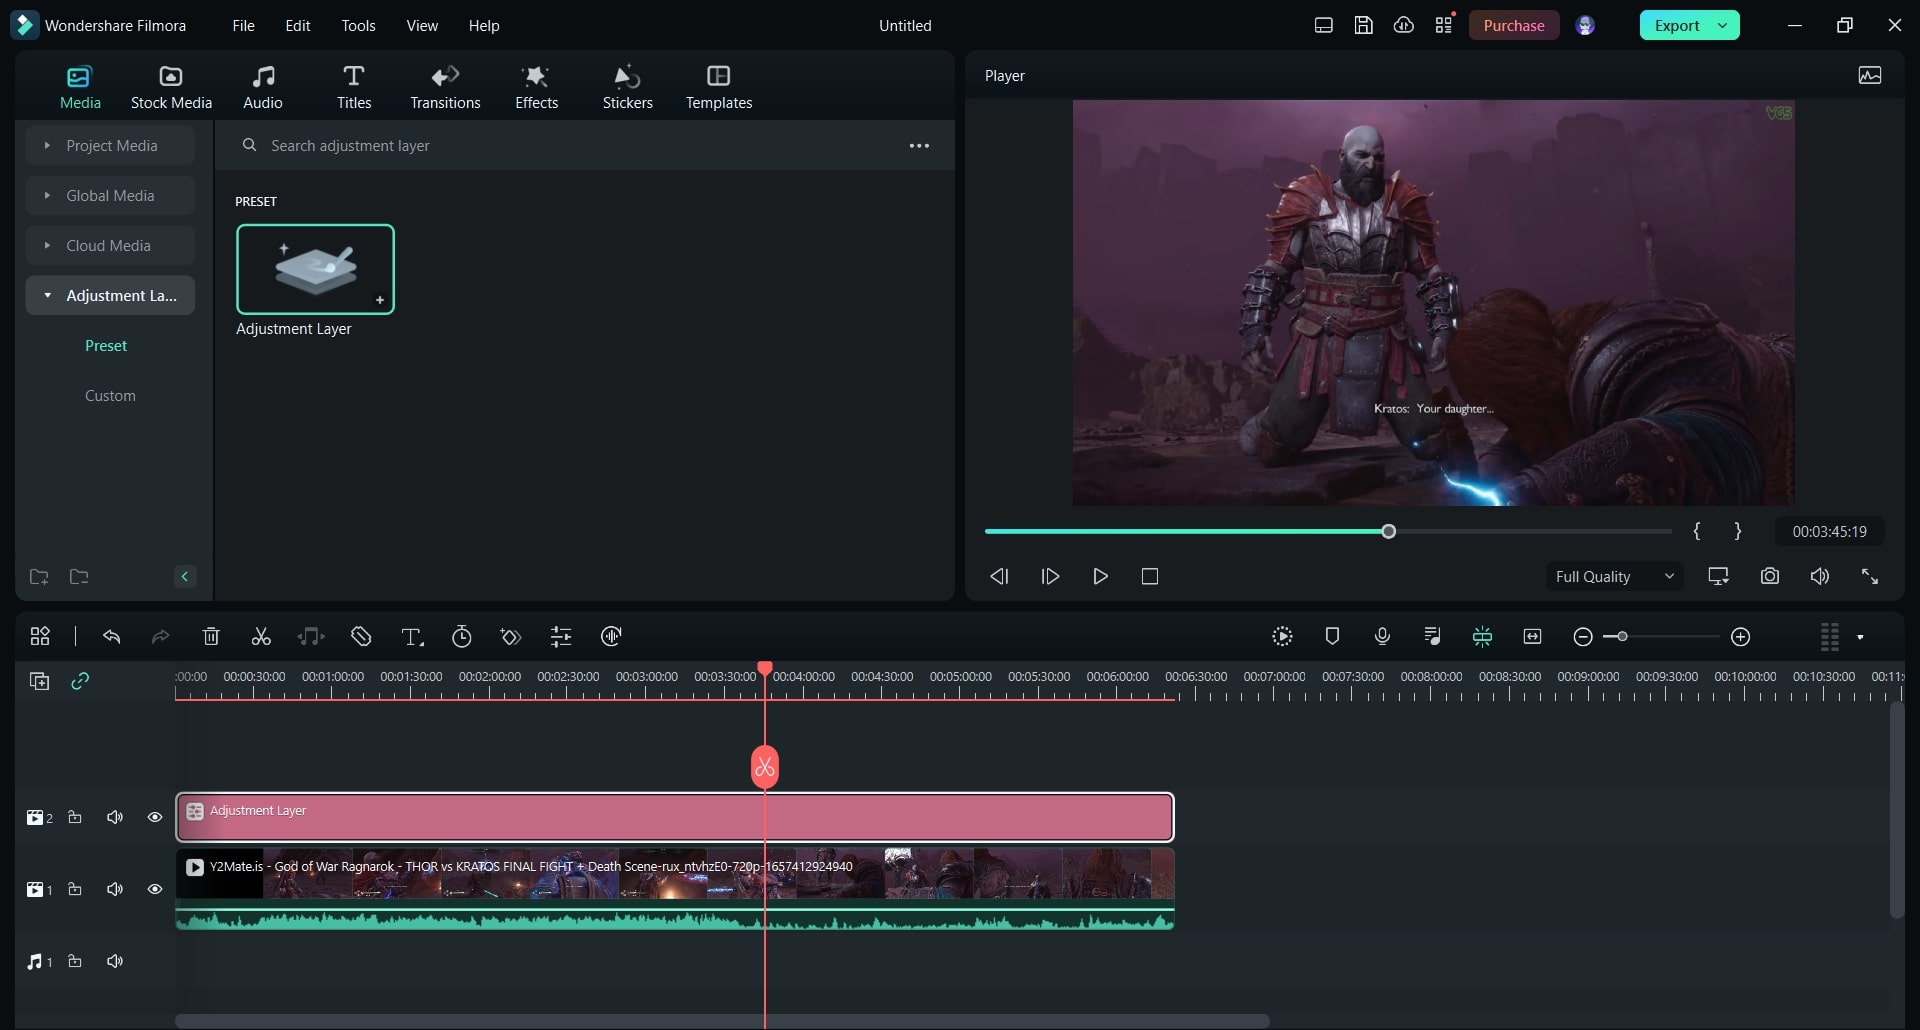
Go to the “Media” tab and locate the option “Adjustment Layer.” Once done, drag and drop the adjustment layer to the timeline and double-click on it to change its settings.
Step3 Manage the Adjustment Layer Settings
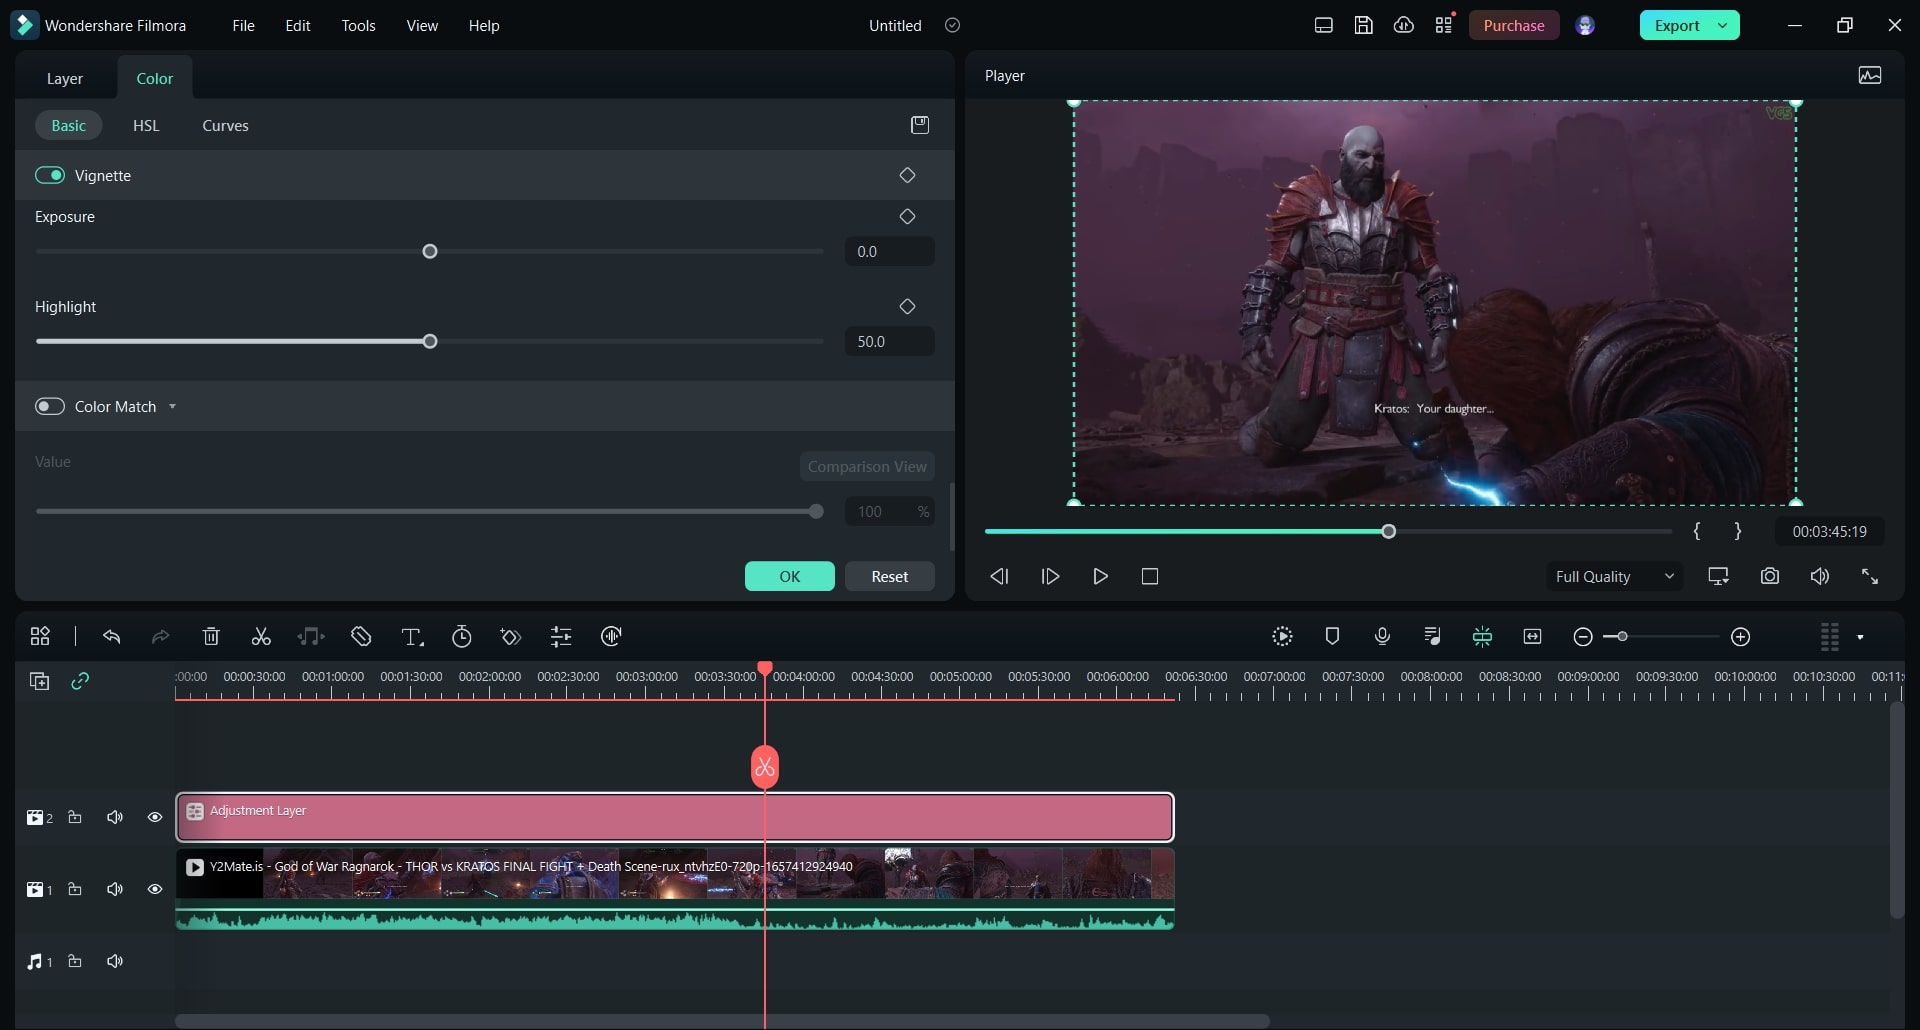
From the opened settings, you can alter the blending mode according to your choice. You can also change opacity and position for more adjustments. Also, you can apply various presets to add a cinematic look. Moreover, you can apply different borders across your video clip for a more enhanced look.
Conclusion
DaVinci Resolve is one of the most famous video editors among professionals. If you want to become an expert in using DaVinci Resolve, you must know how to add an adjustment layer (clip) to this tool. For your help, this article has provided complete guidelines on how to add an adjustment layer in DaVinci Resolve.
Moreover, we have also highlighted a better option than DaVinci Resolve, known as Wondershare Filmora. Using this software, you can apply the adjustment layers to your video to generate more precise and accurate results.
Free Download For macOS 10.14 or later
You can also use adjustment layers to edit with great ease on this compatible video editor. Moreover, you can find multiple trending effects in its library that can help you to enhance your video clips. To add an adjustment layer in Filmora, you can follow the below steps.
Step1 Start with New Project
Once done with launching Filmora, hit the “New Project” button and upload the desired video. Drag and drop the added video to the timeline to proceed further.

Step2 Add the Adjustment Layer
Go to the “Media” tab and locate the option “Adjustment Layer.” Once done, drag and drop the adjustment layer to the timeline and double-click on it to change its settings.

Step3 Manage the Adjustment Layer Settings
From the opened settings, you can alter the blending mode according to your choice. You can also change opacity and position for more adjustments. Also, you can apply various presets to add a cinematic look. Moreover, you can apply different borders across your video clip for a more enhanced look.

Conclusion
DaVinci Resolve is one of the most famous video editors among professionals. If you want to become an expert in using DaVinci Resolve, you must know how to add an adjustment layer (clip) to this tool. For your help, this article has provided complete guidelines on how to add an adjustment layer in DaVinci Resolve.
Moreover, we have also highlighted a better option than DaVinci Resolve, known as Wondershare Filmora. Using this software, you can apply the adjustment layers to your video to generate more precise and accurate results.
Best Animated Text Generator
Text in a video has become an essential part to highlight important points so that the viewers get the message you want to convey through your video. Showing static text may not always get the attention of the viewers immediately. Subconsciously, they may ignore or forget the text you have displayed in your video very quickly. That is where animated text can be impactful.
When you show animated text in your video, it grabs the attention of the viewers instantly and they get intrigued to see the text displayed. Besides, if the animation is eye-catching, it is very likely that they will remember the text shown in the video. In order to create animated text, you will need an animated text generator. Here is the list of the top 10 best animated text makers.
1. Filmora
Wondershare Filmora is an extremely popular text animation software where there are literally unlimited animated text templates available. The templates are categorized so that you can get the appropriate text animated depending on your video category. Most importantly, you will get all the latest and trendy text animations.

The user interface is extremely intuitive and hence, it is equally suitable for amateurs and professionals. The software is available for both Mac and Windows users. You can simply drag and drop the text animations on your video and edit them instantly to get the perfect outcome. Here are some key features of Wondershare Filmora.
- Wide range of text animation templates
- Different categories transitions and effects
- Choose from variety of graphical elements
- Easy to operate with intuitive user interface
- Record your screen and webcam with greenscreen
- Keyframing, motion tracking, and auto reframe
- Extensive audio editing, color matching and correction
- Edit 4K videos, export in any desired file format
2. Adobe Express
Adobe has a wide range of video editors and it is the most reliable brand among professional video editors. Adobe Express is a premium text animation online tool where you can add animated text to your photos instantly and export them as MP4 file. Therefore, the online tool is extremely useful for social media enthusiasts. However, the platform does not support adding animated text to video.

Adobe Express is labelled as the branding tool where you can create trendy images with templates and choose from different animated text presets. You can access the online tool from all devices from your web browser. Most importantly, it is a completely free animated text generator from Adobe and you can add animated text to your images within a few minutes.
- Funky and trendy animated text templates
- Wide range of text styles and effects
- Different color presets for colourful video
- Several text animation styles to choose from.
- Different aspect ratios for different videos
3. Animaker
Animaker is one of the leading animated text makers online. You can make short videos with animated text just by drag and drop technique. The user interface is super easy to operate and it is the reason behind its popularity. There are unlimited templates to choose from and get started with your animated text video. In fact, the platform has the best photo and video asset library that you can use in your video to make it more attractive.
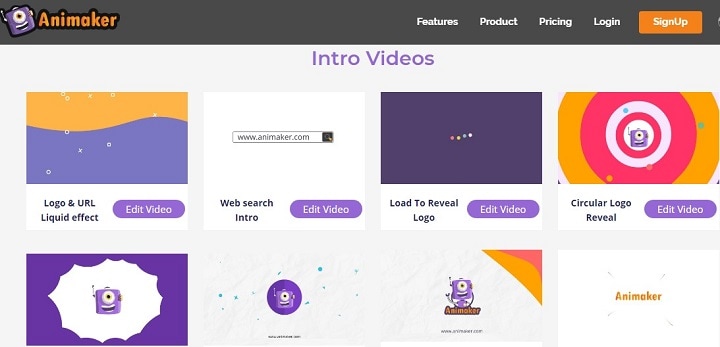
You can publish your video in 4K resolution and resize them for different platforms where you are going to publish them. Unlike Adobe Express, you can add music to your animated text videos. There are also characters that you can use in your text animation for eye-catching video making. Here are the key features of Animaker.
- Drag and drop user interface
- Tons of ready-made templates
- Millions of stock photos and videos
- Access to stock music library
- Simple but powerful character builder
- Edit 4K videos and adjust aspect ratio
4. Textanim
Textanim is a true animated text generator GIF online. All you need to do is type your text and select a text style from the templates available. Thereafter, you can adjust certain text style and format such as background color, animation motion direction, animation duration and likewise. After setting all the parameters, click on Generate button and you will see the animated text generated on your screen. You can simply download the animated text in GIF format or you can get embed code to integrate anywhere including social media platforms. Here are the key features of Textanim.
- Create limited but beautiful text animations
- Tons of fonts and text styles to choose from
- Customize animation and background
- Supports different native language for text
- Export in GIF as well as get embed code

5. MakerMoon
MakerMoon comes with a dedicated animated text generator even though there is a full-featured video editor available online. The platform is suitable for creating animated text for websites that you can use for headers and titles. Choose from the available animated text templates and customize them as per your requirements. You can animate words as well as individual letters. You can save animated text video in GIF as well as get embed code. Here are the key features of MakerMoon.
- Different animation effects to select from
- Customize certain parameters of animation
- Different text shadow styles and formats
- Several fonts, animate letters and words
- Get multiple slides and shuffle animation

6. Loading.io
Loading.io is a dedicated animated text generator GIF online platform. There are demo effects available that you can choose and customize as per your preference. The user interface is as easy as it can get and hence, it is suitable for amateurs as well. Starting from color palette and background color to font style and speed of animation, you can edit everything so that you can personalize the animated text. You can save your animated text in different file formats including GIF. There are several advanced options available to customize the animation on the text. Here are the key features of Loading.io.
- Choose from different templates to get started
- Different types of text animations to pick from
- Customize almost every aspect of the templates
- Advanced options to edit animation and change parameters
- Different output file formats to save your animated text video
- Super intuitive user interface and embed animated text in websites

7. FlexClip Animated Text Generator
FlexClip is a renowned online video editor and it features a free animated text generator. You can create engaging and attractive animated text video conveniently. There are different categories of customizable text animation templates available to get started. In fact, there are different text styles available with animations that you can apply to your video and customize them instantly.
There is a wide array of stock photos and videos along with music that you can use on your video for better content and traction. There are also hundreds of fonts to choose from and you can create promo and storyboard videos instantly. Here are the key features of FlexClip Animated Text Generator.
- Wide array of animation text templates
- Different text styles in different categories
- Dynamic graphical elements to enhance text
- Free stock assets to enhance video content
- You can upload your customized fonts and styles

8. RenderForest Animated Text Generator
RenderForest is a stylish animated text generator that is highly useful for creating brand videos. There are different templates and packs available to pick from to get started. The templates are extremely trendy and eye-catching and there is a high chance that your video will get extremely high traction. You can create engaging promo for social media platforms. You can customize the templates and change font styles as well as add music to enhance the video content. Here are the key features of RenderForest Animated Text Generator.
- Several stunning animated text templates
- Stylish typography which you can personalize
- Add stock music to your video
- Add different scenes to the templates
- Change color presets and palettes
- Download HD videos in different file format

9. TextStudio
TextStudio is a popular 3D text animation generator platform. There are hundreds of text templates and fonts to pick from to get started with your animated text creation. There are not many dedicated and legitimate 3D text animation generators available online. In fact, you can also create 3D logos with the text generator for social media platforms.
There are literally unlimited 3D text animation templates. The user interface is easy to operate and you can customize the texts and animations quickly. The only issue is that the platform has annoying ads across the website. The platform supports many native languages in which you can create text animations. Here are the key features that stand out for TextStudio.
- Unlimited stunning 3D text templates
- Different text styles available to apply
- Choose from different animations
- Supports HD video creation with customized background
- Supports multiple native languages
- Save animated text video in different file formats

10. Kapwing
You can create stunning animated text videos with Kapwing animated text video editor. Kapwing is a full-featured online video editor and you can choose from various templates available. Thereafter, you can customize them as per your requirements. Alternatively, you can upload your video and add different animated text effects to enhance your video content. In fact, you can create animated text videos from scratch for different devices and platforms. Here are the key features of Kapwing animated text video editor.
- Choose from a wide range of animated text templates.
- Select from different text styles and add them to your video.
- Different categories of video elements and animations.
- Add audio effects to animated text for better impact.
- Wide range of graphical elements to enhance text content.

Editor’s Pick: Wondershare Filmora
If you are serious about adding animated text to your video so that your video gets attention and engagement, you have to opt for Filmora. No other animated text generator in the above list has as many animated text templates as Filmora. Most importantly, the templates are trendy and modern to get immediate attention from the viewers. You can customize them to fit seamlessly in your video.
You can create customized animated text with keyframing and motion tracking. Besides, you can add audio effects while showing animated text to make it more impactful. Moreover, there are unlimited effects and elements that will enhance your animated text. You can save you video in any resolution, aspect ratio, and file format. We highly recommend Wondershare Filmora as the text animation software for designing stunning animated text for your video.
The Verdict
Getting animated text for your video is no more a job of experts. You can generate animated texts and create short videos that you can upload on social media platforms. Besides, you can choose from ready-made templates and create professional videos instantly. If you want to add animated text to your video, we recommend Wondershare Filmora for its wide range of animated text effects and super intuitive user interface.
Free Download For Win 7 or later(64-bit)
Free Download For macOS 10.14 or later
Steps to Make a Neon Dance Effect With Filmora
Neon colors in videos are constantly attracting and compelling the scenes. So how it looks if dancing videos have this feature? For sure, it’ll be dreamier and more classy.
After moving toward, the following steps of processing neon effects, you will find different effects to make your video filmier. Wondershare Filmora provides all types of products on one platform. Then try it out and enjoy the rest. Scroll more to learn about the neon effect before editing your video!
Neon Dance Effects in Wondershare Filmora
You often watch viral dance videos or commercials in which a neon highlight of a person dances aside from them in the video. Yes! You can also make that just in a few minutes.
In this case, Wondershare Filmora is considered to be your partner. Filmora is a fantastic tool that you can have at your disposal to edit a range of videos. There are tons of neon effects in Filmora, including neon frames, neon swings, or even multiple neon overlays.
Free Download For Win 7 or later(64-bit)
Free Download For macOS 10.14 or later

Steps to Make a Neon Dance Effect With Filmora
The public is tired now of seeing old video graphics in dancing videos. It’s time to add neon colors to give a fascinating look. Follow the step-by-step guide mentioned below, and let’s get going!
Step1 Import Clips into the Timeline
Before we begin to edit our video, make sure you download Wondershare Filmora. First, you need to create a timeline to edit our dancing clips. For this, take a look at the below steps!
- Click on the Import icon in the main window when you open Wondershare Filmora.
- Then, import the video clips you want to edit.
- Now, drag the Video and drop it in the editing timeline below.

Step2 Add the Same Video again
We aim to create a black background for the original video we imported above. To do so, follow the steps mentioned below.
- Drag and drop the same video on the timeline.
- Make sure to drag and drop it above the original video.

Step3 Go into the Compositing Mode
After adding the same video, now convert BG into a black screen. For this, follow the given steps:
- Double-Click on the video we added later.
- A video editing panel will open up in the Import
- Scroll down till you see the compositing tab.
- Here will have to change the Blending mode.
- Click on the tab ahead that is labeled “Norma“
- A drop-down option will open up.
- In this drop-down option, scroll below to “Difference“.

- As soon as you click on the Difference option, you will notice a change in the main play window; it will all turn to a black screen.
Step4 Add the Pixelated Edges effect
Our target is to outline the individual in the video, so we can move on to create the Neon Highlight effect. To do so, follow these steps!
- First, go into the effects option that you can select from the tab above the import window.
- In the effects panel, search for the Pixelated edges
- You will notice a search bar in the top right corner. Type “Pixelated edges,“ and you will see some effects pop up in the import window.

- Select the Pixelated edges effect. Then, click and drag it below the video that we turned to black using the Difference
- The edges of the individual dancing in the video will be outlined.

Step5 Change the outline color
You may not like the default color with the Pixelated edges effect. But no worries, you can change that to whatever color you desire by following these steps:
- Double-Click on the video in which you added the effect.
- An editing panel will pop up.
- Click on the Effect option below the Video
- Here, you can see the color option.
- Click on the color and select whatever suits you the best.

Step6 Create Multiple Outlines
It would help if you created multiple outlines to achieve the Neon Dance effect. These multiple outlines will be produced by exporting them multiple times with the color you want. Follow the below points to get it instantly!
- When you have selected the color for your outline, export the video by clicking on the Export icon in the top right corner.

- When you have exported the video, move back to the timeline to edit again.
- As we had selected the Blue color for reference, now choose another color you wish.
- After changing the video, export it again.
![]()
Note: Export as many times as you want with the color of your choice. E.g., 5 colors = 5 exports.
Step7 Import the exported videos
- Now you have to import the videos that you exported.
- Before doing that, first, delete the video in track 2. (The video on which we applied the Difference)
- Now select all the exports from your library and import them onto the import window.
- Please select all of them and drag them on the timeline.
![]()
Note: You don’t want all the outlines to play simultaneously. Otherwise, the outlines will not appear to be separate.
- To do so, stack the videos on each other on different tracks.
Tip: The trick here will be to offset the video by a few seconds so that each video plays a little later than the other.

To efficiently blend the outlines with the green screen, you can change the blending mode of each of the exported videos to “Lighten.”
- Double-click on each video.
- In the editing panel, choose compositing.
- From there, select the “Lighten“ option.

Step8 Add the Glow effect
To make the outlines glow like Neon lights, we will need to add another effect from the effects library.
- Go to the effects tab and search for “Glow.”
- Click and drag the glow effect to each of the exported videos.

You can make it more fun by going one step further!
- Double-click on each of the glow effects that you added.
- In effect, the editing panel goes to the video effects.
- Here, you can change the radius of the Glow effect you added.
- Similarly, you can do it in all the other videos.
Step9 Apply the Green screen effect
We will change our green screen for the final part. Follow the last steps, and then enjoy!
- Move the green screen footage below them all to the top track.
- Double-click the video to enter the editing panel.
- Go to the chroma key (Green Screen) in the editing panel**.**
- Click on the arrow aside from the tab.
You will immediately see changes to your video in the main play window. Play the video from the start and notice the changes.

Congratulations! You have successfully created Neon Dance effects by using the user-friendly Wondershare Filmora.
Conclusion
Wondershare Filmora offers a variety of editing features that you can use to create very innovative videos. You can quickly create Neon effects in your dance videos next time by following the above steps! Add more creativity to attract more audience. Have fun and explore more effects to get unique results!
Free Download For macOS 10.14 or later

Steps to Make a Neon Dance Effect With Filmora
The public is tired now of seeing old video graphics in dancing videos. It’s time to add neon colors to give a fascinating look. Follow the step-by-step guide mentioned below, and let’s get going!
Step1 Import Clips into the Timeline
Before we begin to edit our video, make sure you download Wondershare Filmora. First, you need to create a timeline to edit our dancing clips. For this, take a look at the below steps!
- Click on the Import icon in the main window when you open Wondershare Filmora.
- Then, import the video clips you want to edit.
- Now, drag the Video and drop it in the editing timeline below.

Step2 Add the Same Video again
We aim to create a black background for the original video we imported above. To do so, follow the steps mentioned below.
- Drag and drop the same video on the timeline.
- Make sure to drag and drop it above the original video.

Step3 Go into the Compositing Mode
After adding the same video, now convert BG into a black screen. For this, follow the given steps:
- Double-Click on the video we added later.
- A video editing panel will open up in the Import
- Scroll down till you see the compositing tab.
- Here will have to change the Blending mode.
- Click on the tab ahead that is labeled “Norma“
- A drop-down option will open up.
- In this drop-down option, scroll below to “Difference“.

- As soon as you click on the Difference option, you will notice a change in the main play window; it will all turn to a black screen.
Step4 Add the Pixelated Edges effect
Our target is to outline the individual in the video, so we can move on to create the Neon Highlight effect. To do so, follow these steps!
- First, go into the effects option that you can select from the tab above the import window.
- In the effects panel, search for the Pixelated edges
- You will notice a search bar in the top right corner. Type “Pixelated edges,“ and you will see some effects pop up in the import window.

- Select the Pixelated edges effect. Then, click and drag it below the video that we turned to black using the Difference
- The edges of the individual dancing in the video will be outlined.

Step5 Change the outline color
You may not like the default color with the Pixelated edges effect. But no worries, you can change that to whatever color you desire by following these steps:
- Double-Click on the video in which you added the effect.
- An editing panel will pop up.
- Click on the Effect option below the Video
- Here, you can see the color option.
- Click on the color and select whatever suits you the best.

Step6 Create Multiple Outlines
It would help if you created multiple outlines to achieve the Neon Dance effect. These multiple outlines will be produced by exporting them multiple times with the color you want. Follow the below points to get it instantly!
- When you have selected the color for your outline, export the video by clicking on the Export icon in the top right corner.

- When you have exported the video, move back to the timeline to edit again.
- As we had selected the Blue color for reference, now choose another color you wish.
- After changing the video, export it again.
![]()
Note: Export as many times as you want with the color of your choice. E.g., 5 colors = 5 exports.
Step7 Import the exported videos
- Now you have to import the videos that you exported.
- Before doing that, first, delete the video in track 2. (The video on which we applied the Difference)
- Now select all the exports from your library and import them onto the import window.
- Please select all of them and drag them on the timeline.
![]()
Note: You don’t want all the outlines to play simultaneously. Otherwise, the outlines will not appear to be separate.
- To do so, stack the videos on each other on different tracks.
Tip: The trick here will be to offset the video by a few seconds so that each video plays a little later than the other.

To efficiently blend the outlines with the green screen, you can change the blending mode of each of the exported videos to “Lighten.”
- Double-click on each video.
- In the editing panel, choose compositing.
- From there, select the “Lighten“ option.

Step8 Add the Glow effect
To make the outlines glow like Neon lights, we will need to add another effect from the effects library.
- Go to the effects tab and search for “Glow.”
- Click and drag the glow effect to each of the exported videos.

You can make it more fun by going one step further!
- Double-click on each of the glow effects that you added.
- In effect, the editing panel goes to the video effects.
- Here, you can change the radius of the Glow effect you added.
- Similarly, you can do it in all the other videos.
Step9 Apply the Green screen effect
We will change our green screen for the final part. Follow the last steps, and then enjoy!
- Move the green screen footage below them all to the top track.
- Double-click the video to enter the editing panel.
- Go to the chroma key (Green Screen) in the editing panel**.**
- Click on the arrow aside from the tab.
You will immediately see changes to your video in the main play window. Play the video from the start and notice the changes.

Congratulations! You have successfully created Neon Dance effects by using the user-friendly Wondershare Filmora.
Conclusion
Wondershare Filmora offers a variety of editing features that you can use to create very innovative videos. You can quickly create Neon effects in your dance videos next time by following the above steps! Add more creativity to attract more audience. Have fun and explore more effects to get unique results!
How to Record Video Streams With FFmpeg on Windows and Mac?
FFmpeg is an open-source video processing tool with many powerful features. Many of these features are exposed through FFmpeg’s command line interface but can also be accessed from the program’s Python bindings and its Qt GUI frontend, called QFFMpeg.
This article will explain using FFmpeg command line tools to record video streams on Windows and Mac computers with step-by-step examples and screenshots.
Part 1. What is FFmpeg?
FFmpeg stands for “FF Multi-Platform Executable” and was originally developed by Fabrice Bellard in the year 2000 as an extension of the MPlayer project. The sole purpose of the software command-line design is to provide a complete solution for users to record live streams (audio and/or video) from any type of device that supports either the RTSP or HTTP streaming protocols.
FFmpeg is a complete, cross-platform solution to record, convert, mix, and edit audio and video files. The software has over 250 input formats, which allows users to record video streams in any media format. The FFmpeg commands stream the video back after recording, convert it into MP4 or MKV file, and process incoming data on the fly, such as rtmpdump.
Part 2. How to Record a Video Stream With FFmpeg on Windows?
The free FFmpeg command line tool is a great way to record a live internet stream and listen back to it later. If you have a Windows PC and want to record a video stream or screen using FFmpeg, our following step-by-step method will help you go through this process without facing many difficulties.
Step1 First, launch a browser of your choice on your Windows PC and head to the FFmpeg website. Hover over the Windows icon in the middle pane and select either the gyan.dev or BTbn build.
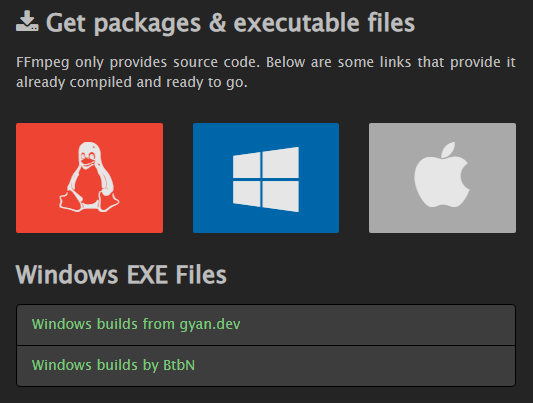
On the next screen, select the latest Windows 64-bit file from the list. Why? You need to use a computer compatible with the Windows 64-bit version. Next, download the ZIP file on your PC and use ZIP file extraction software to open the file contents.
Step2 Locate the ffmpeg.exe file on the extracted file and copy it to a new folder on your computer hard drive (e.g., C:\VideoRecorder).

Step3 In the next step, click the Start icon on your Windows dashboard and type cmd in the search box. Right-click on Command Prompt, select “Run as Administrator,” and launch the program.

Now, write the command to select the FFmpeg directory. For example, cd C:\VideoRecorder, and hit the “Enter” key.
Step4 To start recording the video stream, simply call FFmpeg and use the following command line. In this case, we are taking the example of capturing a YouTube video of “Running up that hill” from the top-rated TV show Stranger Things.
ffmpeg.exe -y -i https://www.youtube.com/watch?v=bV0RAcuG2Ao runningup.mp4
Hit the “Enter” key, and the output of this command will be displayed on the Command Prompt interface.
The command options have the following meanings:
-y allows automatic rewriting of existing files.
-i https://www.youtube.com/watch?v=bV0RAcuG2Ao is the stream URL that FFmpeg will record. You can change it with any video stream URL.
runningup.mp4 is the name of the output file.
Tips: Automatically Recording Video Streams on Windows PC
If you want your computer to record a specific video stream time automatically, use the Windows Task Scheduler to create a Timer to stop the recording after a particular time is passed.
Part 3. How to Record a Video Stream With FFmpeg on Mac?
You can use the Mac Terminal to record video streams via FFmpeg in the following way.
Step1 First, launch a browser on your Mac computer and head to the FFmpeg website. Hover over the Apple icon in the middle pane and select the macOS 64-bit static build option.
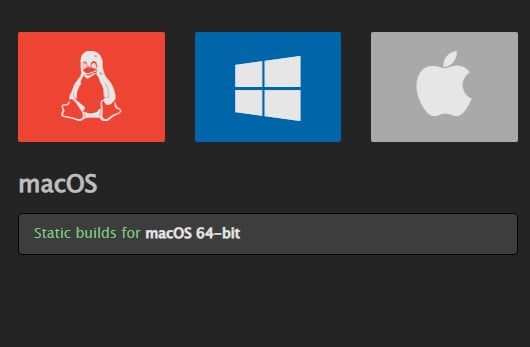
Download the ZIP file on your Mac and use ZIP file extraction software to open the file contents.
Step2 Launch the terminal on your Mac from the Apple menu, type the “ffmpeg -f avfoundation -list_devices true -i” command to let the system know which device to record from, and hit the Enter key.
Step3 Next, designate the path where you want to save your video, e.g., cd Path/to/my/videostream and press Enter.
Step4 Type in the “ffmpeg -f avfoundation -i “1:1”-c:v libx264 -qp 0-preset ultrafast out.mp4” command and hit Enter to start recording the video stream.
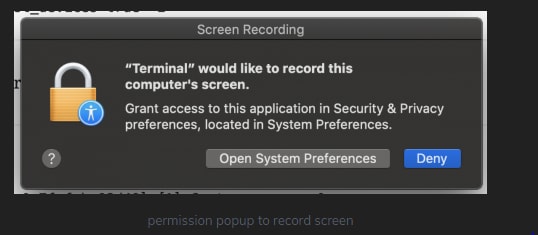
Stop recording the video stream by pressing “q.”
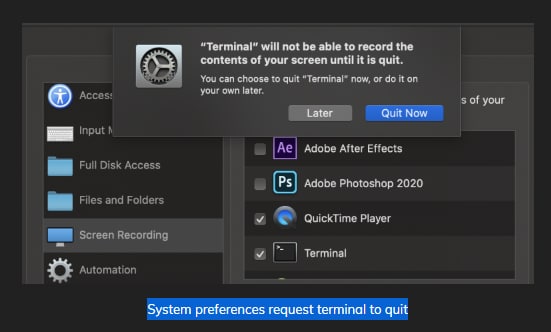
Part 4. How to Record Video Stream More Easily?
Sometimes, using FFmpeg to record a video stream on your Windows or Mac computer is too complicated. So, we recommend using Filmora Screen Recorder to make things a little easier for you.
A few benefits of using the Filmora Screen Recording software are as follows:
- Capture the computer screen and webcam at the same time.
- Select whether to record an entire screen or a part of it.
- Record your Windows or Mac computer audio and microphone voice at the same time.
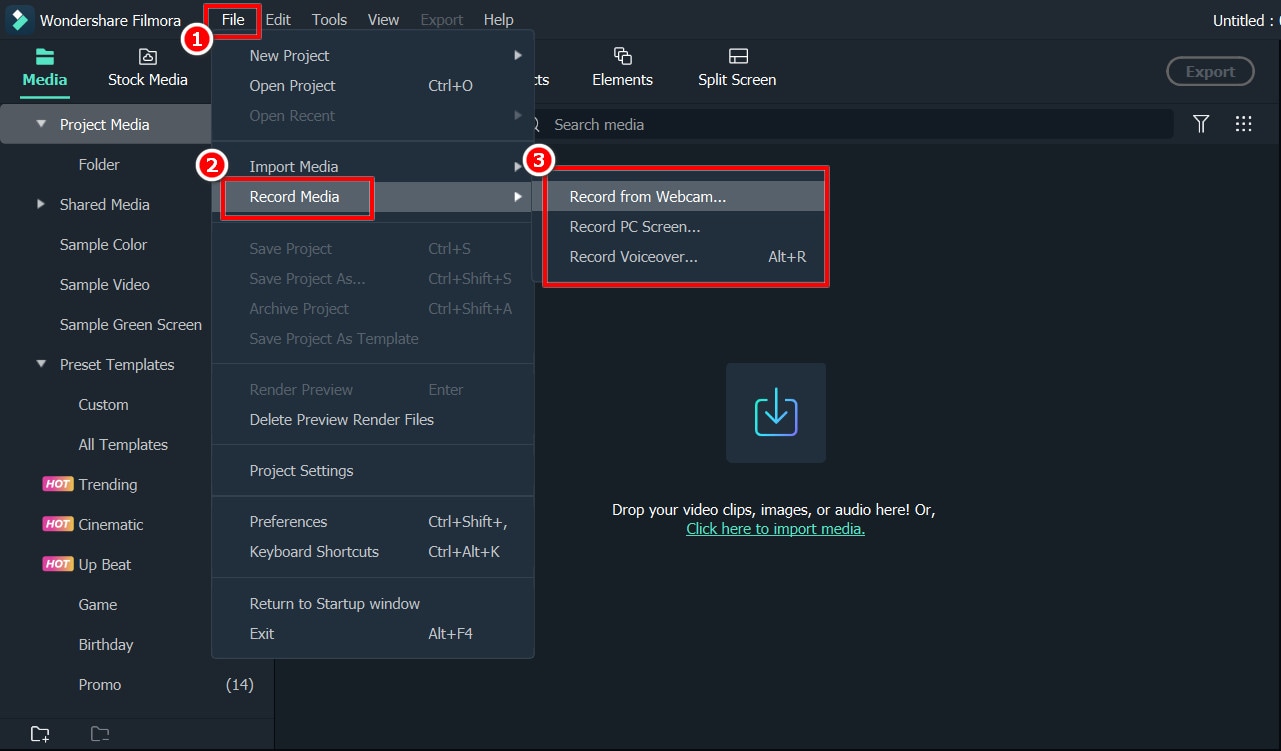
Step1 Launch a browser on your Windows or Mac computer, install the Filmora Screen Recorder software, launch it, and select a New Project from the dashboard. Next, click the File option and select Record PC.
Step2 On the new Scrn pop-up window, customize the recording size by entering your desired dimensions. Also, choose if you want to record audio and which device to record it from.
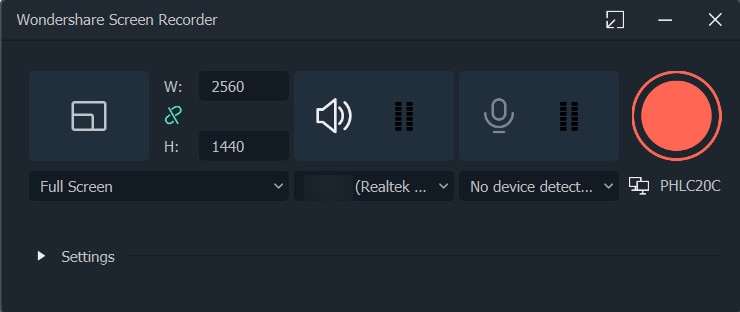
Step3 Click Record to start recording the video stream. Once you are done capturing the video stream on the computer screen, click the F9 button to stop the recording.
Conclusion
In this guide, we have discussed FFmpeg and explored how you can use it to record video streams on your Windows and Mac computer.
We have also discussed Filmora Screen Recorder as an easy alternative to FFmpeg. You can get started immediately with recordings or dive deeper into advanced options as you gain more experience with this software. To help you out, we’ve also shared easy step-by-step instructions to use Filmora Screen Recorder on your computer.
Hopefully, you can now record your video streams and save them in high quality to view or share later.
Free Download For Win 7 or later(64-bit)
Free Download For macOS 10.14 or later
Free Download For macOS 10.14 or later
Also read:
- [New] In 2024, Prime PC Emulators for Gaming on Retro GB Devices
- [Updated] 2024 Approved Find Your Way to YouTube Studio A Comprehensive Overview
- 2024 Approved Easy Steps to Create Intro Video with After Effects
- 2024 Approved Hilarity in a Click (Meme Creation)
- Ace Languages: Premier Examinations and Prep Strategies
- Full Guide to Unlock Your Vivo Y200
- Here We Are Going to Show You the Best Effects to Appear on Camera Made with Filmora for 2024
- How to Upgrade iPhone XS without Losing Anything? | Dr.fone
- Hyperlapse VS Timelapse Videos for 2024
- New How To Create A YouTube Intro for 2024
- New How to Save As MP4 File on Windows Movie Maker?
- Top-Rated Smartwatches : The Ultimate Guide
- Updated 2024 Approved How to Zoom Video in VLC Media Player
- Will the iPogo Get You Banned and How to Solve It On Oppo A59 5G | Dr.fone
- Title: Updated How to Add Adjustment Layer (Clip) in DaVinci Resolve?
- Author: Chloe
- Created at : 2024-12-05 11:14:32
- Updated at : 2024-12-12 06:39:42
- Link: https://ai-editing-video.techidaily.com/updated-how-to-add-adjustment-layer-clip-in-davinci-resolve/
- License: This work is licensed under CC BY-NC-SA 4.0.